

Page 1
p
CTS Series: CT1, CT2, CT1V, & CT2V
Chemical Treatment Systems
INSTALLATION & OPERATING INSTRUCTIONS
OVERVIEW:
The CTS from Fluid Metering Inc. is the solution for
accurate, maintenance-free injection of liquid sodium
hydroxide (Caustic Soda) typically used for pH
adjustment, as well as other chemicals used in water
and wastewater treatment applications.
The CTS system eliminates check valves and/or
peristaltic tubing typically present in traditional
chemical metering systems, which are the primary
sources of routine maintenance and downtime. The
CTS does not lose prime, even against pressure, or air
lock. The CTS is available as a complete system
(CT1V & CT2V) consisting of the CTS Pump Module
and C100A Variable Speed Controller, or can be
supplied alone to be used with a compatible controller.
The CTS Pump Module is a unique valveless pump
design consisting of a rotating and reciprocating
(CeramPump®) ceramic piston, direct coupled to a
variable speed drive motor. The CTS pump injects the
caustic soda directly into the main water stream, at
back pressures up to 125 psi.
Page 1of 9
The C100A Variable Speed Controller from Fluid
Metering, Inc. provides an ideal control interface for
the CTS. The C100A supplies a variable 0-90VDC
power source which can be controlled either manually
using a from panel mounted rotary dial, or
electronically via a 4-20 mA control input.
CTS Pump Module
and C100A Variable S
* Other commercially available controllers may work, however we
recommend contacting FMI for details.
eed Controller
IN-CTS-13
1/4/13 HW
Page 2
pp
SPECIFICATIONS
CTS Chemical Treatment System
Supply Voltage: 0-90 VDC**
CTS Supply: 1/4” FNPT CTS Outlet: 1/4” FNPT
IMPORTANT NOTE: Supply and Outlet fittings contain
Buna-N material which is not compatible with fluids
containing chlorine. Do not use the CTS with hypochlorite,
chloramine, or any fluids which contain chlorine
compounds in ANY concentration.
Output Volume: 6.5 GPH max. - CT1(V)
15 GPH max.- CT2(V)
Output Pressure: 125 psi max.
Environment: Humidity: 100% RH non-condensing
Temp: non-freezing to 104°F
Enclosure: Gasketed Fiberglass w/ vent holes.
Dimensions: 15 1/2” x 13 3/8” x 6 3/4”
Weight: 18.6 lbs. (8.4 kg)
** 0-90 VDC su
lied by C100A
INSTALLATION & SETUP
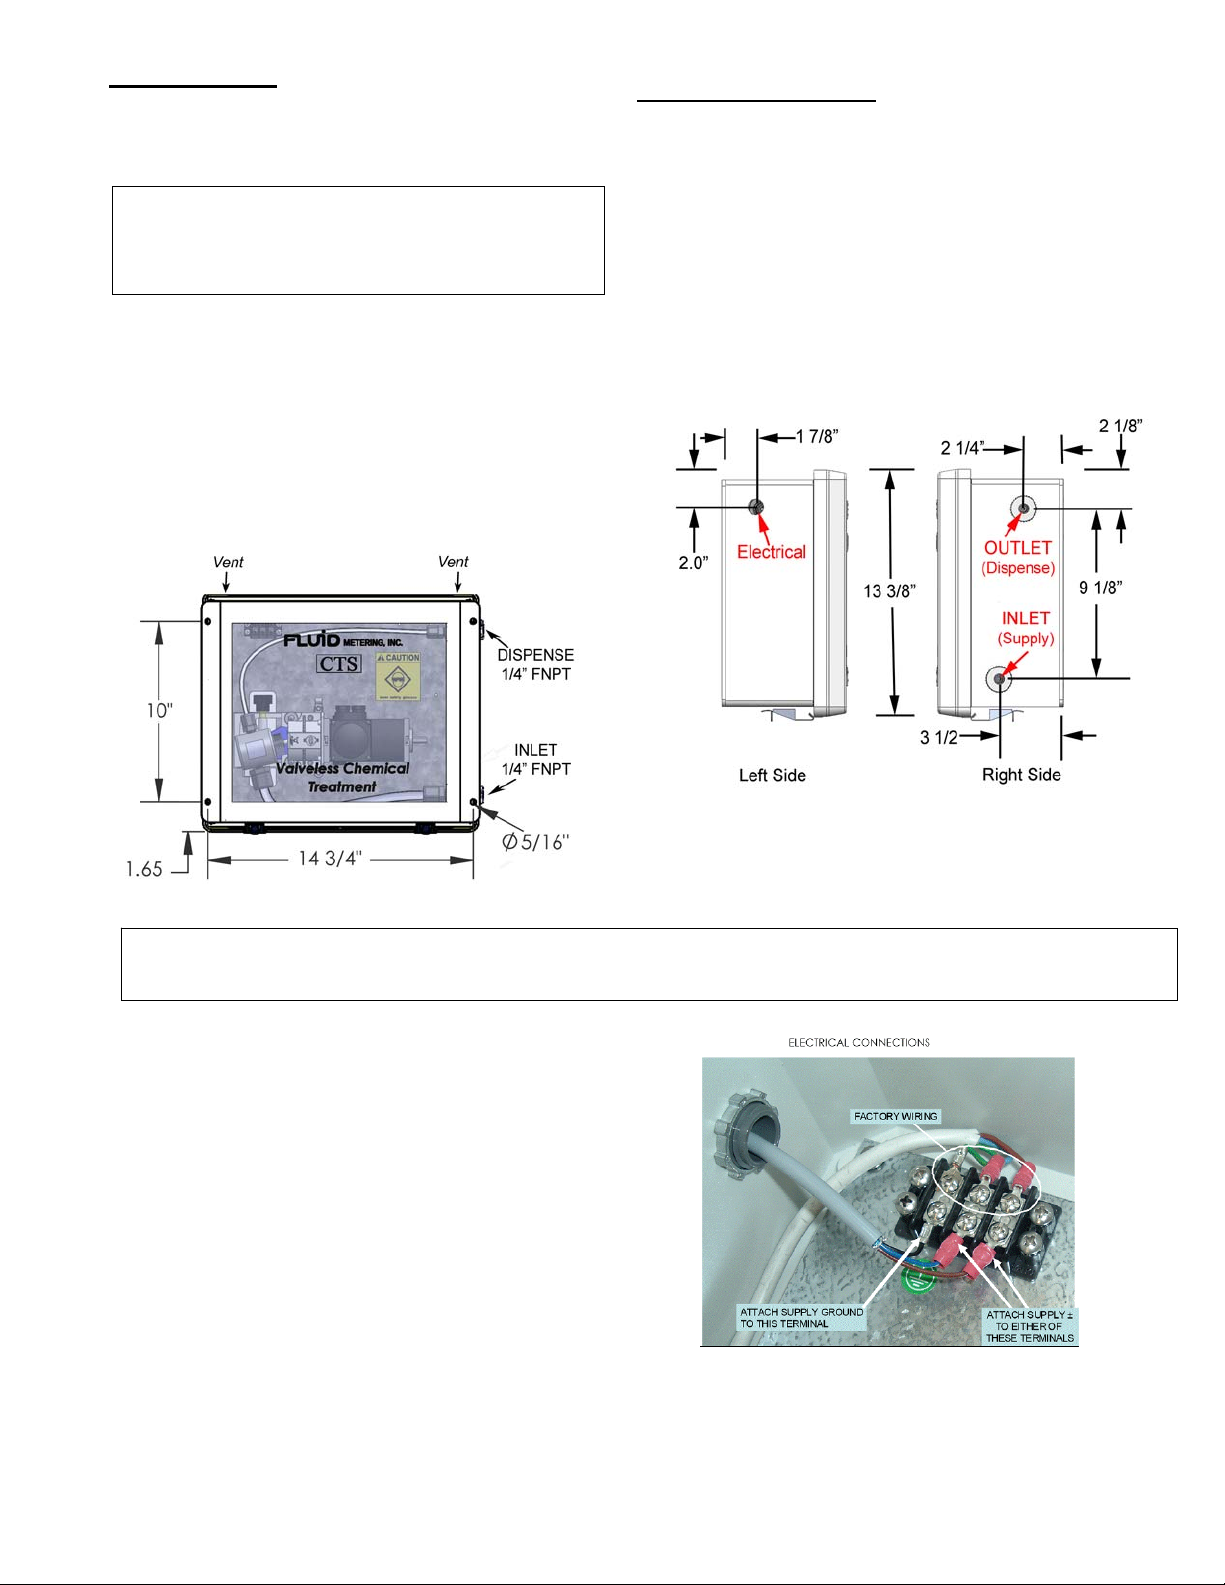
CTS MOUNTING (See diagram page 3)
For optimal performance, mount the CTS as close to
and above the chemical supply reservoir. Securely
fasten the CTS to a wall location with its right side
convenient to the Sodium Hypochlorite supply vessel.
There are 2 mounting holes (5/16” dia) on each side of
the CL enclosure. Utilize all holes for most secure
mounting and mount at least 1 ft. above supply
reservoir.
Diagram 1 (below) shows the mounting hole locations.
Diagram 2
Electrical & Fluid Connections
Diagram 1
Mounting Holes
IMPORTANT NOTE: There are 2 vent holes located at the top front of the enclosure (under the upper lip of the enclosure cover).
Do not close, seal, or obstruct these vent openings. They are designed to prevent hazardous gases from building up in the
ELECTRICAL
On the upper left side of the CTS enclosure is a 7/8”
conduit opening for the electrical supply (0-90 VDC
source from the C100A or customer supplied voltage
controller). Electrical supply wiring should be 3
conductor, minimum 22 AWG. Attach wiring to the
lower 3 spade lugs of the terminal block as shown
below in Diagram 3. Connect the ground wire to the
left most spade lug. Connect the drive wires to the
remaining 2 spade lugs.
It is recommended that electrical connections be
coated with a corrosion protectant such as Aqualube or equivalent.
Note: The CTS is designed so that the motor will
turn in the proper direction, regardless of input
Diagram 3
Terminal Wiring
polarity.
Page 2 of 9
IN-CTS-13
1/4/13 HW
Page 3

FLUIDIC CONNECTIONS
The CTS has two 1/4” FNPT fluid connections.
The INLET (Supply) connection is a 1/4” FNPT fitting
located on the lower right side of the enclosure and
connects the CTS with the chemical supply reservoir
(carboy, tank, etc.) Inlet tubing is customer supplied and
should be semi-rigid and sized adequately t o accommodate
the required flow rate to prevent cavitation. Minimum
recommended inlet tubing diameter is 1/2” I.D.
The OUTLET (Dispense) connection is a 1/4” FNPT fitting
located on the upper right side of the enclosure and
connects the fluid output of the pump to the water source to
be treated, typically a water main. The CTS is designed to
pump against 125 psi backpressure, and therefore all
plumbing on the discharge side of the pump should rated for
250 psi. It is recommended that 1/4” O.D. polyethylene
tubing is used for the output tubing.
Installation Notes:
1) Be careful not to over-tighten fittings to the CTS
box as the bulkheads are made of PVC and may
crack.
2) For optimal performance, mount the CTS as close
to the source as possible and above it.
3) The CHLORITROL
backflow concerns typically associated with
diaphragm and peristaltic pumps. Because the
inlet and outlet fluid path of FMI’s CeramPump®
valveless piston pump are never interconnected, a
backflow check valve is usually not required.
However, local code requires a check valve on the
inlet side of the pump, refer to the “Tips &
Troubleshooting” section of this instruction
manual.
®
was designed to overcome
1 ft. min
Diagram 4
Fluidic System Overview
ADJUSTING FLOW RATE
Mechanical Adjustment: By adjusting the angle of
the high pressure pump head (pump head on right side
of drive) using the adjustment knob, piston
displacement can be increased and decreased, which
in turn will vary flow rate. Diagram 5 shows the
minimum (0%), maximum (100%), and factory set
(50%) pump head positions.
Electronic Adjustment: The C100A Variable Speed
Controller varies pump speed and has both manual and
electronic control modes.
For manual speed adjustment, set the C100A mode on
MANUAL and use the rotary dial to increase or
decrease pump speed.
Page 3 of 9
PUMP HEAD ANGLE
(Displacement Adjustment)
Diagram 5
IN-CTS-13
1/4/13 HW
Page 4

Maintenance
Periodic:
Rinse the piston where it enters the seal using the small squirt bottle provided. Simply use water. This will help
to eliminate any build up of crystals that may damage seals. Perform this procedure once a day, week, or
whenever you are in the pump house.
Check for leaks, drips, .. etc. Wipe clean as necessary.
Scheduled: 4 months or 1000 hrs.
Check for leaks at all fittings and pump head. Change seals and/or fittings if necessary.
Grease piston drive pins using supplied syringe. Apply a small glob of grease to the piston drive pin where it
enters the drive bearing.
Wipe box and components down with a cloth, spraying a light mist of protectant oil, such as Silikroil, on all metal
components to help inhibit corrosion.
Extended Shut Down or Storage:
Always flush your CTS unit with fresh water for 10 minutes prior to any extended shut down to ensure easy startup
later. Pump units that are not flushed prior to extended shut down will probably seize and need to be returned to
FMI for rebuild.
Calibration Reference Charts
Page 4 of 9
IN-CTS-13
1/4/13 HW
Page 5

GENERAL
The FMI C100A Variable Speed DC Controller is designed to
operate with FMI Variable Speed CL and CTS Drives.
The C100A features both manual speed adjustment (“ON”
position) using a front panel mounted rotary control, as well as
electronic speed control (“AUTO” position) via a 4-20mA signal
from an external source (sensor, analyzer, process controller..
etc).
The C100A incorporates transient voltage protection with
adjustable current limit and AC fuse for protection. It features
adjustable minimum and maximum speeds along with
adjustable acceleration and IR compensation.
The electronics are housed in a gasketed NEMA 4/12 enclosure
suitable for wall mounting.
IMPORTANT: The C100A Control Unit is factory calibrated for
optimum performance. Adjusting internal pots may void
C100A Variable Speed DC Controller
MOUNTING PROCEDURE
The C100A has two (2) mounting slots located on flanges
on each side of the chassis as shown in Diagram 7 (right)
suitable for wall or vertical panel mounting. It is
recommended that all four (4) mounting slots be utilized for
maximum stability.
There are two 1/2” NPT female conduit fittings located at
the bottom of the C100A enclosure for connecting electrical
conduit. Allow adequate access to the area surrounding
these fittings for connecting electrical conduit.
C100A CONTROLLER
Supply Voltage: 120 VAC 50/60 Hz, 0.5 Amp
Fuses: The C100A is provided with a fuse in the AC line (P1-11).
This fuse is sized to open in the event of a shorted armature or if
an armature line is shorted to ground.
Speed Control Input via 3 position ON/OFF switch:
1) “ON” position = Manual (Rotary Dial)
2) “AUTO” position = Electronic (4-20 mA) source
Dimensions: 7.0” H x 5.53 W
Enclosure: NEMA 4/12
1/2” NPTF conduit fittings
Diagram 7
Mounting Diagram
Page 5 of 9
IN-CTS-13
1/4/13 HW
Page 6

y
WIRING PROCEDURE
1) Remove the four (4) cover screws to remove the
cover and gain access to the terminal strip.
Note: When removing the cover, take care not to
damage the cover gasket or the wires connecting
the cover controls with the main circuit board.
2) If an external 4-20 mA control source is used,
(typically a sensor, analyzer, or PLC etc.),
connect the 4-20 mA output of this device to the
+1 and -2 terminals as shown below.
3) After all wiring is complete, replace the cover.
Take care to align the gasket and torque down
the four (4) cover screws such that the gasket is
evenly compressed and seals properly.
Important Note: Trimpots are factory tuned for
optimal performance. Adjustments in the field
should only be made with the guidance of FMI
support personnel or performed by an authorized
FMI factory representative. Before performing
an
trimpot adjustments, contact FMI factory.
WIRING NOTES:
1. Size all wires that carry drive motor or line current to
handle currents as specified by national state, and/or
local codes. All other wires may be #18 AWG or
smaller as permitted by local code.
2. Separate control wires from all DC Drive and AC line
wires when routed in conduits or in wire trays. There
are two (2) threaded 1/2” NPT holes in one endplate,
located near the terminal strip, for this purpose.
3. The C100A is provided with a fuse in AC line 1 (P1-11).
This fuse is sized to open in the event of a shorted
drive armature, or if the 0-90 VDC line to the drive
motor is shorted to earth ground. As long as the 120
VAC input is connected properly, there is no additional
fusing required.
IN-CTS-13
Page 6 of 9
1/4/13 HW
Page 7

Page 7of 9
IN-CTS-13
1/4/13 HW
Page 8

Page 8 of 9
IN-CTS-13
1/4/13 HW
Page 9

Tips from the Field
The CTS has been dynamically tested, including the integrity of all intern al fluid connections, prior to shipment. The C100A
control unit is factory adjusted for optimum performance with the CTS, and no additional adjustment of internal trim pots should
be required.
However, if a newly installed CTS with C100A System fails to operate properly, the following is a step by step troubleshooting
guide to determine the cause and corrective action.
When diagnosing problems with the CTS System, it should be first determined if the problem is related to the electronics circuit
which includes C100 A, power supply, input control signal, and wiring. If the electronics appear to be operating properly, the
fluidic circuit, which includes tubing, valving, fittings etc should be examined.
First determine if the problem is Electronic or Fluidic.
If the motor is not rotating, begin with step 1 of ELECTRONICS.
If the motor is rotating but no fluid is being pumped, proceed to step 1 of FLUIDICS.
ELECTRONICS:
1) With the C100A in the OFF position, rotate the rotary speed pot CCW to the “0” speed position.
2) Check all wiring connections between the C100A and the CTS, and (if applic able) between the C100A and the 4-20 mA
control source.
3) With the speed pot still in the “0” position, switch the power of the C100A to the “ON” position, which is the manual speed
adjustment mode.
4) Increase the speed control CW gradually to a setting between 5 and 6 and observe the pump motor to see if it’s rotating. If
“yes”, go to step 1 of FLUIDICS. If “NO”, turn speed pot to “0”, switch C100A to “OFF” position, and disconnect power.
5) Open the CTS enclosure and see of the motor spindle (silver cylinder on right side of motor) rotates freely by hand. If “yes”,
continue to step 6. If “no”, call factory.
6) With enclosure open, turn C100A to “on” position, set speed control to “5”, and using a multi-tester, check the DC voltage at
the terminal block of the CTS. The voltage should be between 30-40 volts. If “yes”, call factory. If “no”, check the power input
to the CTS which should be 115V approximately. If “yes”, check fuse. If “no”, the power source is the problem.
FLUIDICS:
Pump will not prime:
1) Verify proper mounting location relative to supply vessel according to Diagram 5.
2) If motor is rotating and no fluid is being pumped, check the inlet tubing to see if there is fluid in the tubing, and that the inlet
bulkhead fitting (on the inside and outside inlet connections) is tight and not leaking air. If you observe th at fluid level in the inlet
tube rises properly to the bulkhead fitting, turn off power to the motor and watch the fluid level at the inlet tube. It should drop
back momentarily when the motor stops, but should stop falling when observed for approximately 15 seconds. If the fluid
continues to fall, there is a suction air leak, which must be corrected.
3) Make sure all valves on the inlet side (fluid source) are open, and that there is an adequate level of fluid in the supply vessel.
Ensure that inlet tubing has not deformed due to suction (collapsed) whereby creating pump cavitation.
4) Check the mechanical flow setting of the fluid pump head (right side of motor) to make sure that it is set for a minimum of
10% stroke.
5) Make sure the tubing is sized correctly for the desired fluid flow. For flows below 500 ml/min, 1/4” OD tubing is
recommended. For flows above 500 mL/min 3/8” - 1/2” ID tubing is recommended. Tubing sized too small, relative to flow,
may cause cavitation problems, while tubing sized too large may cause vertical lift issues. Consult factory for additio nal
recommendations.
Pump Primes but there is no fluid output:
Check tubing, connections and valving to make sure there are no closed valves or obstruction between the CTS and the output
destination (typically a groundwater well or water main).
IN-CTS-10
Page 9 of 9
IN-CTS-13
1/4/13 HW
 Loading...