

Page 1
ASSEMBLE ONLY WITH ADULT SUPERVISION
• Please read through this instruction booklet to THOROUGHLY familiarize yourself with the assembly
and flight characteristics of this airplane before beginning to assemble this model.
• Please inspect all parts carefully before starting assembly! If any parts are missing, broken or defective, or
if you have any questions about the assembly or flying of this airplane, please call us at (217) 398-8970
and we’ll be glad to help.
WARRANTY
• Hobbico®, Inc. guarantees this kit to be free from defects in both material and workmanship at the date
of purchase. This warranty does not cover any component parts damaged by use or modification. In no
case shall Hobbico’s liability exceed the original cost of the purchased model. Further, Hobbico
reserves the right to change or modify this warranty without notice.
• In that Hobbico has no control over the final assembly, no liability shall be assumed nor accepted for
any damage resulting from the use by the user of the final user-assembled product. By the act of using
the user-assembled product, the user accepts all resulting liability.
• If the buyers are not prepared to accept the liability associated with the use of this product, they are
advised to return this kit immediately in new and unused condition to the place of purchase.
CCOMPLETE R
OMPLETE R
TF
TF
AIRPLANE
AIRPLANE
Requires 6 “C” and 1 “9V”
Alkaline Batteries (Not Included)
Quiet Electric Flight
Entire Contents © Copyright 2004 HCAZ3041 for HCAA1994 V1.0
™
™
Page 2

Your MICRO ULTRIX™is not a toy, but rather a
sophisticated, working model that functions very
much like an actual airplane. Because of its realistic
performance, the model, if not assembled and
operated correctly, could possibly cause injury to
yourself and spectators or damage property.
We highly recommend that you get experienced,
knowledgeable help with assembly and during your
first flights, to make your R/C modeling experience
totally enjoyable. You’ll learn faster and avoid risking
your model before you’re truly ready to solo. Your
local hobby shop has information about flying clubs
in your area whose membership includes qualified
instructors. You can also contact the national
Academy of Model Aeronautics (AMA), which has
more than 2,500 chartered clubs across the country.
Instructor training programs and insured newcomer
training are available through any one of these clubs.
Contact the AMA at the address or toll-free phone
number below.
Academy of Model Aeronautics
5151 East Memorial Drive
Muncie, IN 47302
(800) 435-9262
Fax: (765) 741-0057
or via the internet at: www.modelaircraft.org
1. Assemble the plane according to the instructions.
Do not alter or modify the model. If you make any
modifications, you will void your warranty.
2. Test the operation of the model before each flight
to insure that all equipment is operating properly and
that the model remains structurally sound.
3. Fly only on calm days (with wind speeds less than
3 mph) and in large open areas free of trees, people,
buildings or any other obstacles.
The R/C model hobby becomes more and more
enjoyable as your experience grows. Your chances for
success and graduation to higher levels are very good
if you take your time and follow the assembly and
flying instructions carefully and completely. We hope
you enjoy flying your MICRO ULTRIX.
Electronic Control Unit: This unit controls the
motors. Also, it monitors the battery voltage and turns
off the motors when the voltage gets low. That way
there will be enough battery power to operate the
motors for steering during the landing.
Motors: The motors rotate the props to provide thrust.
NiMH Battery: Rechargeable batteries which are
used to power the airplane.
Transmitter (TX):This is the hand-held unit that sends
the signal to the receiver. As you move the sticks
on the transmitter, the motors in the airplane will
react accordingly.
GLOSSARY
PRECAUTIONS
PROTECT YOUR MODEL, YOURSELF
AND OTHERS.
FOLLOW THIS IMPORTANT
SAFETY PRECAUTION
2
Page 3
Welcome to the world of R/C aero modeling. You will
find your new hobby to be exciting, very interesting and
most of all, a lot of fun. You have purchased, quite
possibly, the best flying,the most reliable and the easiest
flying R/C airplane available today. Be sure to follow the
written instructions and the video instructions
completely and in detail. Doing this will assure you of a
successful first flight and many continued hours of
enjoyment from your new R/C hobby.
Caution: Do not use rechargeable (NiCd) batteries.
❏
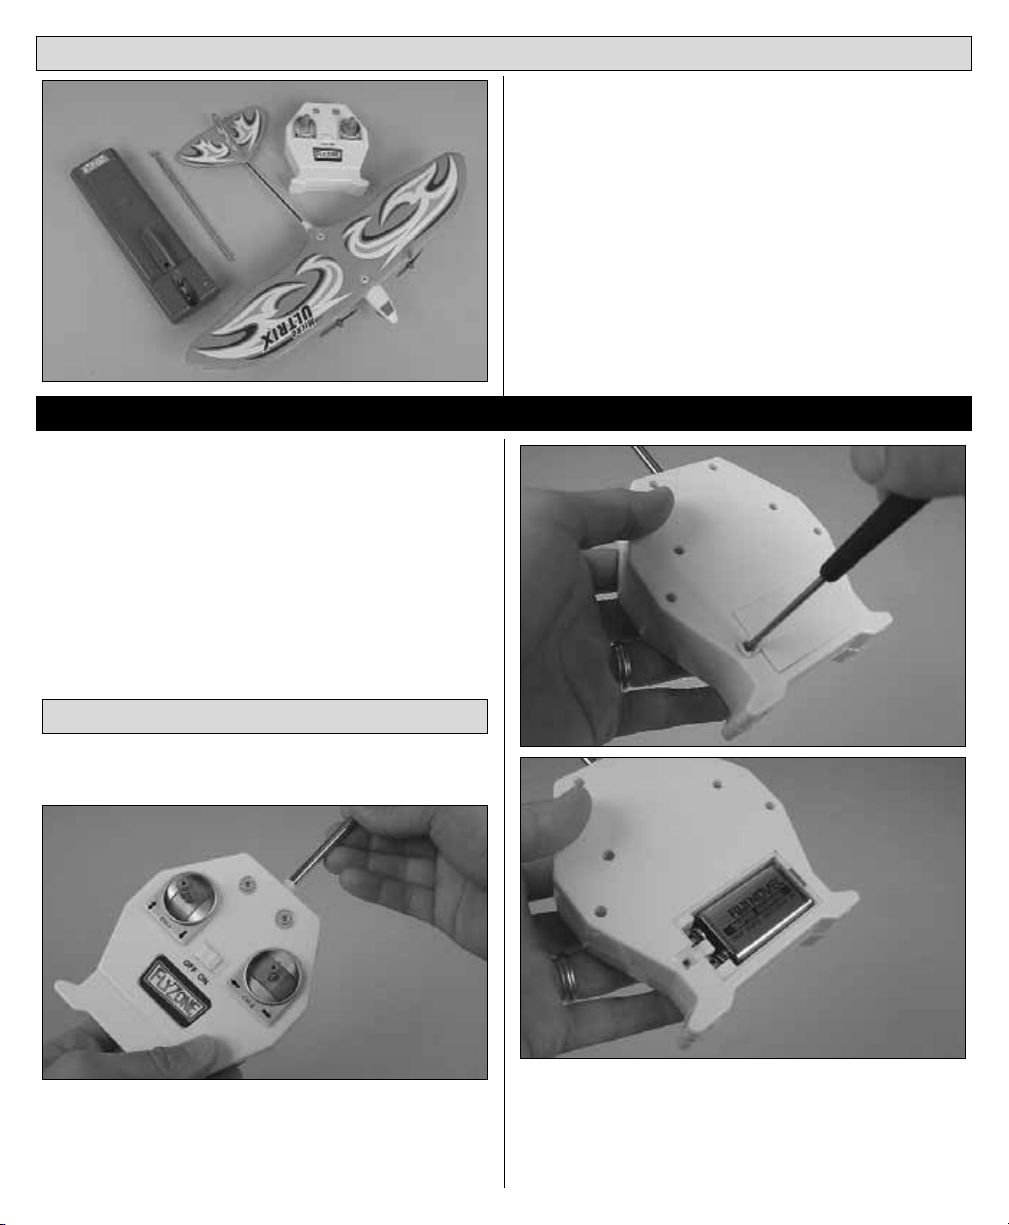
1. Place the transmitter antenna into the top of the
transmitter case as shown above. Tighten it down
“clockwise” until it has a snug fit. Do not overtighten
the antenna.
❏
2. The transmitter that controls your airplane requires
one alkaline “9V” battery. To install the battery, turn
over the transmitter, remove the battery hatch using a
Phillips screwdriver and install the battery following the
diagram inside the battery compartment.
PREPARE THE TRANSMITTER
3
UNPACKING THE BOX
Check the parts against the list below. If any parts are
damaged or missing, give us a call at: (217) 398-8970.
Transmitter Antenna (1) Items not shown:
Transmitter (1) Instruction Manual (1)
Airplane (1) Extra Propellers (2)
Charger (1)
PARTS AND HARDWARE
LET’S GET STARTED
Page 4
❏
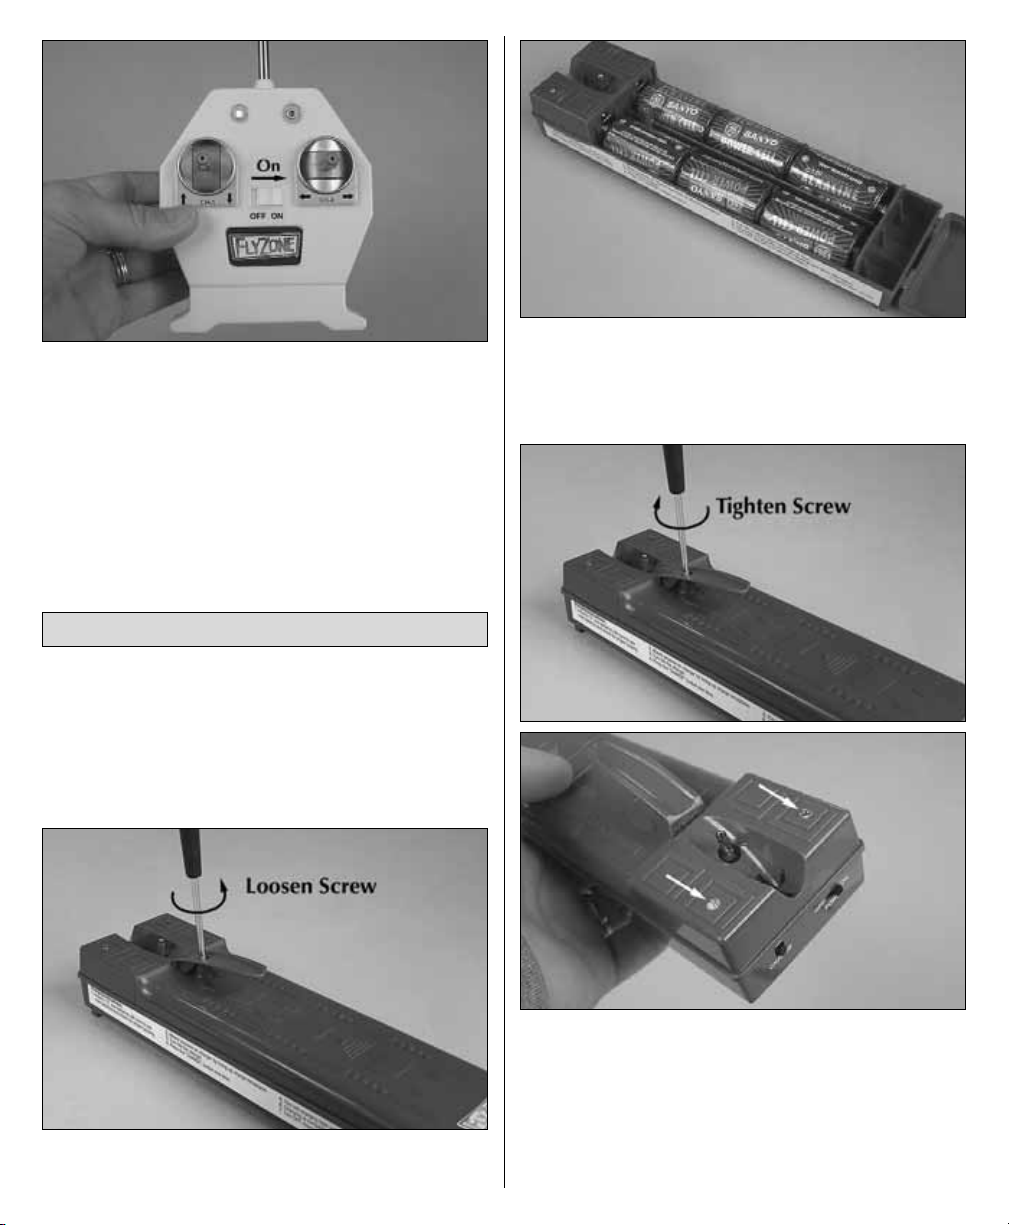
3. Reinstall the battery hatch, switch on the
transmitter and check the LEDs on the front of the
transmitter. If the green light is on, it is safe to fly. If
not, you need to install fresh batteries. Also check to
make sure that the batteries are installed correctly.
CAUTION:
Do not use rechargeable (NiCd) batteries.
Do not mix old and new batteries.
Do not mix alkaline, standard (carbon-zinc) or
rechargeable (NiCd) batteries.
❏
1. Remove the battery hatch from the charger by
removing the latch screw with a Phillips screwdriver.
❏
2. Following the diagram in the charger, install six
“C” size batteries. Make sure the positive (+) and
negative (–) poles match up correctly with the
diagram molded inside the battery compartment.
❏
3. Reinstall the battery hatch by replacing the
screw, switch on the charger and check that both
green LEDs on the top of the charger are lighted. If the
green lights are on, the charger is ready to be used. If
no lights come on check to make sure that the
batteries are installed correctly. If they are, you need
to install fresh batteries.
INSTALL BATTERIES IN THE CHARGER
4
Page 5

❏
1. Before operating your MICRO ULTRIX you will
need to charge the NiMH battery pack in the airplane.
To do so, make sure the airplane is switched off (OFF
is toward the front of the airplane).
❏
2. Turn on the charger and make sure both green lights
are lit. Place the airplane on the charger as shown above
and press it down until the airplane fits snugly against the
charger. The airplane will plug in only one way.
❏
3. Press the “Charge” button. One of the LEDs will
flash and turn red. Leave the airplane on the charger
until the light goes green again. Your airplane battery
is charged.
• Make sure the battery is fully discharged
before charging.
• Never leave a charging battery unattended.
• Never let the battery charge until it feels hot. A hot
battery is an overcharged battery. Only let the battery
get warm to the touch.
• A properly cared for battery pack will last a long
time. If the battery pack is continually overcharged
or charged at too high of a rate, the life of the
battery pack will be shortened.
ATTENTION: The product you have purchased is
powered by a rechargeable battery. At the end of its
useful life, under various state and local laws, it may
be illegal to dispose of this battery into the municipal
waste system. Check with your local solid waste
officials for details in your area for recycling options
or proper disposal.
This product contains a chemical known to the State
of California to cause cancer and birth defects or
other reproductive harm.
BATTERY RECYCLING
SAFETY PRECAUTIONS FOR
CHARGING BATTERIES
NOTE: DO NOT CHARGE THE AIRPLANE’S
BATTERY UNLESS IT HAS BEEN FULLY
DISCHARGED. To discharge the battery, turn on
the airplane and the radio and apply full power
until the propellers stop turning.
CHARGE THE MOTOR BATTERY
5
Page 6
Before attempting to operate or fly your MICRO
ULTRIX, please make sure you fully understand its
operation outlined in this section.
Note: The following is a detailed description of how
you will control your MICRO ULTRIX in flight.
Please study it carefully so you will become familiar
with the operation of the transmitter when you head
for the flying site.
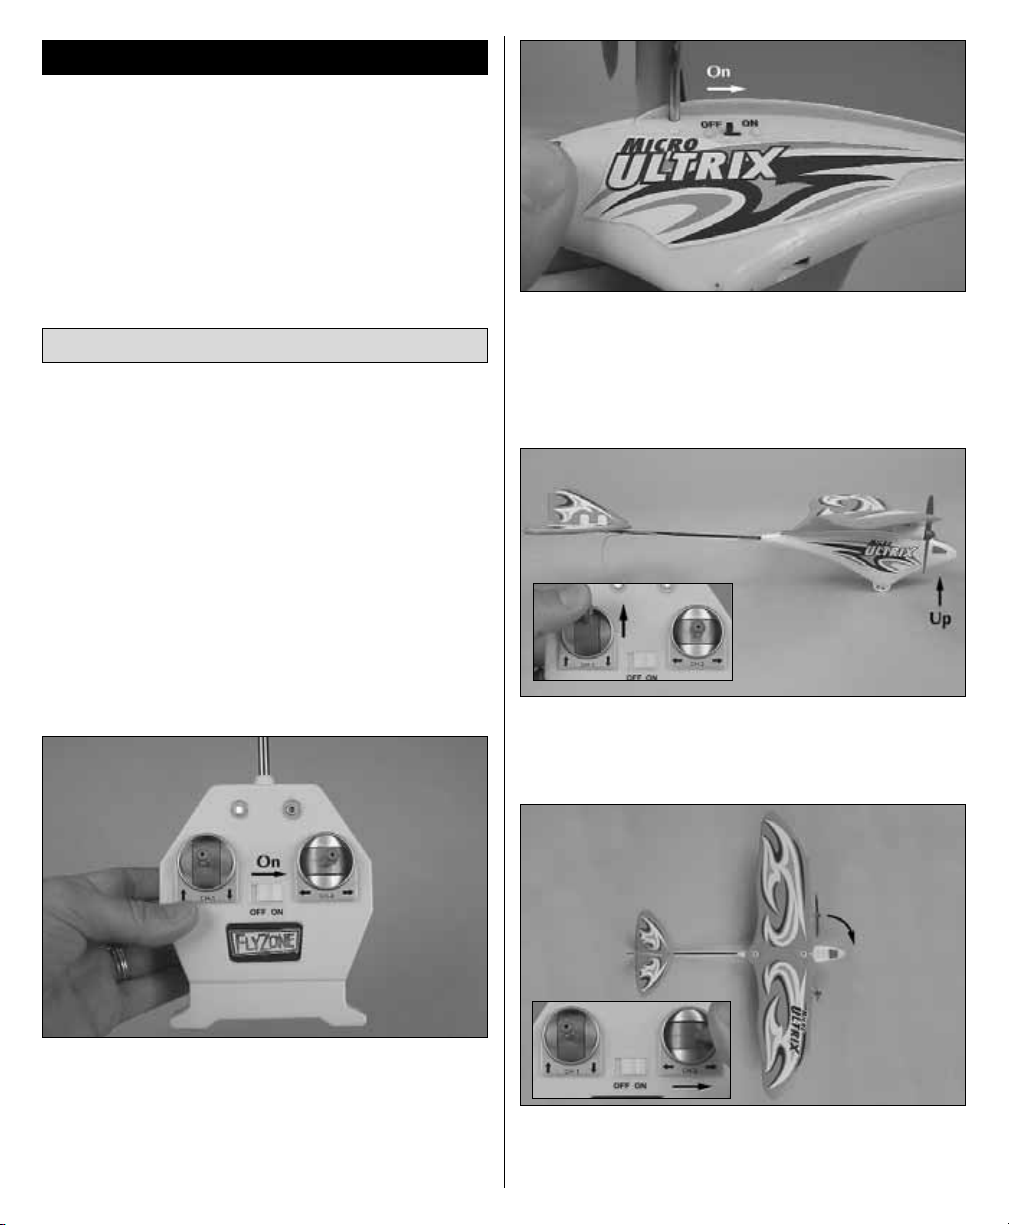
Your transmitter controls the height of the airplane by
operating both motors and the direction of the plane
by slowing down either the left or right motor.
❏
1. First extend the transmitter antenna. Then switch
on the transmitter and make sure the green light is on.
❏
2. Make sure the airplane’s battery is charged.
❏
3. Move the switch located on the left side of the
fuselage forward to the “ON” position.
CAUTION: Stay clear of the propellers once the
airplane’s switch is turned on.
❏
4. Moving the left stick forward will cause both
motors to run at full power. At this setting the plane
should climb at a 15° angle.
❏
5. Moving the right stick to the right will cause the
right motor to slow down. This will cause the plane
to turn to the right.
HOW DOES THE MICRO ULTRIX WORK?
BEFORE GOING TO THE FIELD
6
Page 7

❏
6. Moving the right stick to the left will cause the
left motor to slow down. This will cause the plane to
turn to the left.
❏
7. By releasing the left stick, your airplane will
slowly descend for landing. Fly down wind, pass your
landing spot and turn back into the wind. Release the
left stick and the airplane will glide in for a landing.
It is best to fly on calm days, at least for your first few
flights, when there is little or no wind (3 mph
maximum). Also, find an area clear of trees, power
lines and other structures. Your flying location should
be about the size of a baseball diamond. The best place
to fly your R/C Micro Ultrix is a flying field. Don’t fly
around groups of people, especially children or within
6 miles of where other R/C airplanes are being flown.
Make sure the airplane’s battery pack is fully charged and
that the transmitter has a fresh “9V” battery installed.
If others are flying in the same area, make sure that
they are not using the same frequency as your radio
system. The frequency sticker is located on the back
of your transmitter. This is the frequency you are
using. If someone is on the same frequency, DO NOT
switch on your transmitter until they are done flying.
❏
1. Caution: Always launch the airplane away from
people and obstacles. It is important to adjust or
“trim,” your airplane before each flight. Select an
open area to test your plane.
❏
2. With the motor off, grasp the airplane fuselage
and gently toss the airplane into the wind. It should
glide straight ahead and settle gently to the ground.
See the diagram below. If your plane dives (A) or
stalls (B) follow the steps included below until you
have a correct path (C).
A = Dive.
B = Stall and crash.
C = Correct flight path.
Note: If your airplane flies flat and level the first time
(path C), DO NOT make any further adjustments!
ELEVATOR TRIMMING
PREPARE FOR FIRST FLIGHT
AT THE FIELD
7
Page 8

If you have an airplane that follows either path (A) or (B),
cut the sides the elevator as shown in the photo above.
If your airplane follows path (A), bend the elevator
tab up.
If your airplane follows path (B), bend the elevator
tab down.
❏
3. Repeat step 2 until your airplane follows path C.
D = Airplane turns left.
E = Airplane turns right.
If your airplane turns to the right (E) during glide tests,
bend the rudder to the left.
If your airplane turns to the left (D) during glide tests,
bend the rudder to the right.
RUDDER TRIMMING
8
Page 9

Range check your radio before each flight. Switch on
the transmitter and the airplane. Have a helper hold
the airplane. With the transmitter antenna collapsed,
walk 50 feet away from the airplane. Move both
control sticks, checking that the motors run and turn
off following the control stick movement. If you still
have control over the airplane, it is safe to extend the
antenna and fly the airplane. If you do not have
control of the plane, make sure the batteries in the
transmitter are fresh and the battery in the plane is
charged. Also, make sure the wire antenna is
extending out the back of the plane. Do not cut the
antenna wire on the plane.
If you have never flown an R/C airplane before, we
recommend that you get help from an experienced
R/C pilot. Most R/C clubs have training programs that
will help you learn to fly quickly. If you cannot find
an experienced pilot to help you learn, the following
will help you get your airplane into the air.
1. First, turn your transmitter power switch “ON.”
This immediately puts you in control. Be sure to
extend your antenna completely.
2. Move the airplane’s switch to the “ON” position.
Caution: Stay clear of the propellers.
3. Have an assistant help with the launch. Move the
throttle stick (left) forward so that both motors are
running. Have your assistant launch the plane into
the wind.
4. Allow the airplane to climb at a 15° angle for a few
seconds before turning it. This will allow the plane to
gain altitude and air speed.
5. To turn the MICRO ULTRIX, move the right stick
left or right until the plane has turned. When the
MICRO ULTRIX is moving away from you, moving
the right stick to the left will make your plane turn to
the left. Moving the right stick to the right will make
the plane turn to the right.
6. When the plane is coming toward you, moving the
right stick left still causes the plane to turn left, but it
appears to turn to your right. In short, you have to
reverse the way you control the right stick. A good way
to familiarize yourself with the controls is when the
plane is coming toward you, turn your body so that you
are facing the same direction the plane is going, looking
over your shoulder at the plane. Now when you move
the right stick left the plane will go to your left.
7. Don’t let the airplane get too far away from you.
The farther away it is, the harder it is to see what the
plane is doing.
8. When learning to fly, it is best to keep the plane
high so that if you make a mistake, you have enough
altitude to correct the mistake.
It’s a known fact among fellow R/C pilots that your
airplane will land. It is up to you as to where and
how it lands.
1. The MICRO ULTRIX will get approximately 2 to 3
minutes of flight, at full throttle, on a fully charged
battery before the motors stop. For your first couple of
flights we recommend that you attempt to land before
the motors stop. This will allow enough power to abort
the landing and try again if you miss your landing area.
When the transmitter battery power is getting low, the
green light will go OFF. Once the green light is off, it is
time to land your MICRO ULTRIX.
2. During your first flight, while at a high altitude,
turn the motors off and notice how the MICRO
ULTRIX reacts. This will give you an idea how the
plane will react during landing.
3. To land the MICRO ULTRIX, fly down wind, past the
landing area, a few hundred feet. Gently turn into the
wind and turn the motors off. The plane will start to
come down. If it appears that the MICRO ULTRIX will
LANDING
FLYING THE MICRO ULTRIX
RANGE CHECK
9
Page 10

be short of the landing area, turn the motors back on
for a couple of seconds to lengthen your approach. To
do this push the left stick forward.
4. As the MICRO ULTRIX slowly descends, use the
right stick to control the direction. The MICRO ULTRIX
will just about land itself. All you need to do is control
its direction by moving the right stick from side to side.
Move the switch on the side of the fuselage to the
“OFF” position. Then, switch the transmitter off. Allow
the airplane battery to cool before recharging. Check
the plane over to make sure nothing has come loose.
Even the best R/C pilots in the world damage their
planes every now and then. In the unfortunate event
that you damage your airplane, repairs are fairly
simple to make yourself. If there are any cracks in the
wing or fuselage, apply 6-minute epoxy or white glue
to the broken area and hold together with clear
packaging tape. Let the glue cure, leaving the tape in
place for added strength.
Replacement parts for your MICRO ULTRIX.
To order replacement parts for your MICRO ULTRIX,
use the order numbers in the list below. Replacement
parts are available only as listed. Replacement parts
are not available from Product Support, but can be
purchased from hobby shops or mail order/Internet
order firms. If you need assistance locating a dealer
to purchase parts, contact:
Product Support
Phone: 217-398-8970 Fax: 217-398-7721
E-mail: productsupport@hobbico.com
If any parts are missing or are not of acceptable quality,
or if you need assistance with assembly, contact
Product Support. When reporting defective or missing
parts, use the part names exactly as they are written in
the parts list.
Stock Number Description
HCAA3256 MAIN WING
HCAA3257 TAIL SET COMPLETE
HCAA3258 PROPS (4)
HCAP9916 DC CHARGER
HCAA3264 DECAL SET
❏
1. Check the area to make sure no one is on
your frequency.
❏
2. Charge the airplane battery.
❏
3. Switch on the transmitter and extend the antenna.
Make sure the green light is on.
❏
4. Move the switch on the airplane to the
“ON” position.
❏
5. Move the left stick forward and launch
the airplane.
Cut out or copy and tape to back of transmitter.
❏
1. Switch off the airplane.
❏
2. Switch off the transmitter.
❏
3. Check over the airplane, making sure nothing
came loose.
AFTER LANDING
BEFORE FLIGHT CHECK LIST
PARTS LIST
REPAIRS
AFTER THE FLIGHT
10
Page 11

Enjoy virtually nonstop aerial adventures with Flyzone’s trio of futuristic foam free flights: the 18.6" span Sentinel; 21"
span Revolt; and 16.1" span Regent. Adjustable trim tabs on each model add turning ability to its easy free flight
operation. Each comes fully assembled and painted, with motor and a rechargeable NiCD battery installed. You can
recharge the NiCD pack in just 15-60 seconds with the supplied field charger -- then hand-launch for more air adventure!
Charger requires four ordinary “AA” alkaline batteries.
OTHER ITEMS AVAILABLE FROM HOBBICO
Hobbico®Sea Scout™Micro R/C Sub RTR
The nearly 5" long Sea Scout with working lights takes R/C
“undersea” – so easily that even 8-year-olds can be the
commander. Two motors turn propellers for steering and
forward/reverse thrust. A third motor offers instant diving or
surfacing ability (even straight up and down!). The Sea
Scout’s built-in NiMH battery recharges in just minutes on
the provided DC battery charger. Available on 27MHz
(Black) or 49MHz (Gray) – so two subs can dive and
explore at the same time! Requires one 9V and six “C”
alkaline batteries.
Hobbico®AquaCraft™Reef Racer
™
Even if you don’t have a large body of water to race in, you
can still captain a super-quick vee-hull speedboat with real
R/C quality. The Reef Racer comes completely ready to run,
with an ABS deck and hull that are prejoined and prepainted.
An AquaCraft 2-channel radio by Futaba®is included, with
adjustable steering, fine trims and battery LED - and it’s on
75MHz, not 27. All components are preinstalled, including
the sealed ESC and powerful 380 size motor. At 15" long, the
Reef Racer is perfect for small lakes and ponds, and the selfrighting hull keeps the racing action going.
HCAA0310
HCAA0312
HCAA0311
HCAB12**
HCAB0020
Hobbico
®
Flyzone™Free Flight Electrics
11
Page 12

DuraTrax®Evader™ST Ready-to-Run
Check it out and you’ll agree: nothing can touch the 2WD Evader ST electric
ready-to-run stadium truck for convenience, set-up ease, performance extras or
toughness. It arrives assembled and painted, with a 20-turn Photon Speed
™
motor, Sprint™electronic speed control, and a DuraTrax 2-channel radio system
made by Futaba®. Built-in “extras” include: slipper clutch, ball diff, ball
bearings, steel universal drives, FREE video and still more. Requires only a 6-7
cell NiCd and charger.
Hobbico®Combat Armor™Tank Set
Combat Armor tanks capture the down-to-the-rivets detail of
real King Tiger tanks, in popular 1/35 static display size. But
these machines take realism to the extreme, delivering
exciting combat action through ready-to-run radio control!
Combat Armor sets include two tanks and two controllers, for
full-function R/C operation with synchronized action and
sound. Dual motors power each model - one for each track,
to maneuver just like a real tank. Requires one 9V and 6 “AA”
batteries for each tank.
Hobbico®FlyZone™Sky Screamer™RTF
There’s no gluing or building – you can have the Sky Screamer flight-ready in as little as 5 minutes. A 2-stick, 2-channel
radio, 4.8V NiMH battery pack and 20-minute quick field charger are supplied. Plus, the receiver, auto cut-off circuit and
two motors are included and installed! A free DVD helps you through final assembly - and provides tips on successful
flying. Also included: a spare wing and tail, and two extra props. Spans 27.5" and requires 8 “AA” cells and 6 “D” batteries.
DTXD20**
HCAA2014
HCAC0003
 Loading...