

Page 1
INSTRUCTION MANUAL
Wingspan: 73 in [1855 mm]
2
Wing Area: 526 in
Wing Loading: 7.9− 8.5 oz /ft
[33.9 dm2]
2
[24 − 26 g /dm2]
WARRANTY
Hobbico guarantees this kit to be free from defects in both
material and workmanship at the date of purchase. This warranty
does not cover any component parts damaged by use or
modification. In no case shall Hobbico’s liability exceed the
original cost of the purchased kit. Further, Hobbico reserves
the right to change or modify this warranty without notice.
In that Hobbico has no control over the final assembly or material
used for final assembly, no liability shall be assumed nor
accepted for any damage resulting from the use by the user of
the final user-assembled product. By the act of using the
user-assembled product, the user accepts all resulting liability.
If the buyer is not prepared to accept the liability associated
with the use of this product, the buyer is advised to return
Weight: 29− 31 oz [820 −880 g]
Length: 47 in [1195 mm]
Radio: 4 – 5-channel
SPECIFICATIONS
Motor: 28 u 30 1300 kV outrunner,
18 A ESC,
9 u 5 folding propeller
this kit immediately in new and unused condition to the
place of purchase.
To make a warranty claim send the defective part or item to
Hobby Services at the address below:
Hobby Services
3002 N. Apollo Dr. Suite 1
Champaign IL 61822 USA
Include a letter stating your name, return shipping address, as
much contact information as possible (daytime telephone
number, fax number, e-mail address), a detailed description of
the problem and a photocopy of the purchase receipt. Upon
receipt of the package the problem will be evaluated as quickly
as possible.
READ THROUGH THIS MANUAL BEFORE STARTING CONSTRUCTION. IT CONTAINS IMPORTANT
INSTRUCTIONS AND WARNINGS CONCERNING THE ASSEMBLY AND USE OF THIS MODEL.
Entire Contents © 2012 Hobbico,® Inc. All rights reserved.
™
Champaign, Illinois (217) 398-8970
E-mail: airsupport@hobbico.com
FLZA3000 Mnl
Page 2

TABLE OF CONTENTS
INTRODUCTION . . . . . . . . . . . . . . . . . . . . . . . . . . . . . . . . 2
AMA . . . . . . . . . . . . . . . . . . . . . . . . . . . . . . . . . . . . . . . 2
SAFETY PRECAUTIONS . . . . . . . . . . . . . . . . . . . . . . . . . 2
REQUIRED FOR COMPLETION . . . . . . . . . . . . . . . . . . . . 3
Optional LiPo Battery Charger . . . . . . . . . . . . . . . . . . . 3
KIT INSPECTION. . . . . . . . . . . . . . . . . . . . . . . . . . . . . . . . 3
ORDERING REPLACEMENT PARTS . . . . . . . . . . . . . . . . 3
KIT CONTENTS. . . . . . . . . . . . . . . . . . . . . . . . . . . . . . . . . 4
ASSEMBLY . . . . . . . . . . . . . . . . . . . . . . . . . . . . . . . . . . . . 5
Install the Receiver (Rx-R Only). . . . . . . . . . . . . . . . . . 5
Hook Up the Elevator and Rudder . . . . . . . . . . . . . . . . 5
Optional Flaps . . . . . . . . . . . . . . . . . . . . . . . . . . . . . . . 8
Install the Wings. . . . . . . . . . . . . . . . . . . . . . . . . . . . . 11
INTRODUCTION
Thank you for purchasing the Flyzone Calypso. The Calypso
is one of those models that everyone must have because
it is stable, gentle and durable enough for beginners, yet
maneuverable enough for intermediate and experienced
pilots who might want to temporarily set their more advanced
models aside and enjoy some easy, care-free fl ying. And who
doesn’t embrace the challenge of cruising the sky looking for
thermals? The recommended 1300 mAh battery is enough
“juice” to propel the Calypso to fi ve, approximately one-minute
climbs which can provide up to 30 minutes of air time even in
“dead” air when no lift is present (but we’ve routinely fl own the
Calypso with 1500 mAh – 2100 mAh batteries). Of course, if
you can fi nd lifting air your fl ying time will be virtually unlimited!
We also urge you to consider installing the two additional
servos for the optional fl aps. With the fl aps partially extended
you can just about “park” the Calypso in the sky even when
there is no lift. And with full fl aps and a gentle breeze you
can land the Calypso on the ground as light as a feather. The
fl ap servos are also confi gured to be connected to a single
channel via a Y-harness, eliminating the requirement for a
computer radio.
NOTE: This instruction manual applies to RTF, Rx-R™ and
Tx-R™ versions of the Calypso.
For the latest technical updates or manual corrections to the
Calypso, visit the Hobbico web site at www.hobbico.com. Open
the “Airplanes” link, then select the Calypso ARF. If there is
new technical information or changes to this model a “tech
notice” box will appear in the upper left corner of the page.
AMA
If you are not already a member of the AMA (Academy of
Model Aeronautics), please join! The AMA is the governing
body of model aviation and membership provides liability
insurance coverage, protects modelers’ rights and interests
and is required to fl y at most R/C sites:
FINAL FLIGHT PREPARATION . . . . . . . . . . . . . . . . . . . 13
Balance the Model . . . . . . . . . . . . . . . . . . . . . . . . . . . 13
Check the Control Throws . . . . . . . . . . . . . . . . . . . . . 14
Calibrate the Throttle . . . . . . . . . . . . . . . . . . . . . . . . . 16
Normal Startup Procedure . . . . . . . . . . . . . . . . . . . . . 16
Charge the LiPo Battery. . . . . . . . . . . . . . . . . . . . . . . 17
Range Check . . . . . . . . . . . . . . . . . . . . . . . . . . . . . . . 17
AMA SAFETY CODE. . . . . . . . . . . . . . . . . . . . . . . . . . . . 17
General . . . . . . . . . . . . . . . . . . . . . . . . . . . . . . . . . . . 17
Radio Control . . . . . . . . . . . . . . . . . . . . . . . . . . . . . . . 17
FLYING . . . . . . . . . . . . . . . . . . . . . . . . . . . . . . . . . . . . . . . 17
ESC TROUBLESHOOTING GUIDE. . . . . . . . . . . . . . . . . 19
MAKING REPAIRS . . . . . . . . . . . . . . . . . . . . . . . . . . . . . 19
Academy of Model Aeronautics
5151 East Memorial Drive
Muncie, IN 47302-9252
Tele. (800) 435-9262
Fax (765) 741-0057
Or via the Internet at: http://www.modelaircraft.org
IMPORTANT!!! Two of the most important things you can
do to preserve the radio controlled aircraft hobby are to avoid
fl ying near full-scale aircraft and avoid fl ying near or over
groups of people.
SAFETY PRECAUTIONS
PROTECT YOUR MODEL, YOURSELF
& OTHERS... FOLLOW THESE
IMPORTANT SAFETY PRECAUTIONS
1. Your Calypso should not be considered a toy, but rather a
sophisticated, working model that functions very much like
a full-size airplane. Because of its performance capabilities,
the Calypso, if not assembled and operated correctly, could
possibly cause injury to yourself or spectators and damage
to property.
2. You must assemble the Calypso according to the
instructions. Do not alter or modify the model, as doing so
may result in an unsafe or unfl yable model. In a few cases
the instructions may differ slightly from the photos. In those
instances the written instructions should be considered as
correct.
3. You must use an R/C radio system that is in good condition.
All components must be correctly installed so that the model
operates correctly on the ground and in the air. You must
check the operation of the model and all components before
every fl ight.
4. If you are not an experienced pilot or have not fl own this type
of model before, we recommend that you get the assistance
of an experienced pilot in your R/C club for your fi rst fl ights.
2
Page 3

If you’re not a member of a club, your local hobby shop has
information about clubs in your area whose membership
includes experienced pilots.
5. While this kit has been fl ight tested to exceed normal
use, if the plane will be used for extremely high stress fl ying,
such as racing, or if a motor or battery larger than ones in
the recommended range is used, the modeler is responsible
for taking steps to reinforce the high stress points and/or
substituting hardware more suitable for the increased stress.
We, as the kit manufacturer, provide you with a top quality,
thoroughly tested kit and instructions, but ultimately the
quality and fl yability of your fi nished model depends on how
you build it; therefore, we cannot in any way guarantee the
performance of your completed model, and no representations
are expressed or implied as to the performance or safety of
your completed model.
Remember: Take your time and follow the instructions to
end up with a well-built model that is straight and true.
REQUIRED FOR COMPLETION
Other than a Phillips screw driver nothing extraordinary is
required to assemble your Calypso. Below is a chart with
order numbers indicating the rest of the equipment required
to get your particular version of the Calypso in the air. Boxes
checked with an “✘” indicate that the item is required.
Note: If you plan to fl y your Calypso with the optional fl aps a
minimum 5-channel radio system will be required.
RTF Tx-R Rx-R No. Equipment
TACJ2600
✘
TACJ2000
TACJ2600
✘
HCAA6310
✘
DTXP4235
Optional
Optional Optional Optional
Optional Optional Optional 1800mAh battery
✘
✘
SUPM0070
FLZA1603
FLZA6008
FUTM4130
HCAM2000
HCAA6430
Tactic TX600 6 Ch Tx
–or–
Any 4–5 Ch Tx and
AnyLink 2.4GHz
adapter*
Any 4–5 Ch Tx & Rx
3S (11.1V) 1300mAh
15C battery
with ST connector
LiPo battery charger
Charge lead for
SuperTigre® connector
(2) Flap servos
(1) Flap linkage set
(1) Y-harness
for flap servos
(2) 6" [150mm]
Servo wire extensions
Optional LiPo Battery Charger
The RTF and Tx-R versions of the Calypso include a Great
Planes 3S LiPo balancing Smart Charger. The Smart Charger
is a safe way to charge your LiPo battery, but it’s very basic and
just enough to get you started. The Smart Charger charges at
a rate of .8 Amps, so it will take approximately one-and-a-half
hours or more to charge your battery. Eventually, you’ll want
to get more batteries and an advanced charger to charge
faster and fl y more! If you’ve purchased the Rx-R that doesn’t
come with a charger, or if you would like to replace your
Smart Charger with a more advanced charger, the Duratrax®
Onyx™ 235 AC/DC Advanced Peak Charger (DTXP4235) is
highly recommended and perfect for 3S batteries used with
the Calypso. Same as the Smart Charger the Onyx 235 may
be powered either by an external DC power source (such as
a 12 battery), or a 110V AC outlet, but the Onyx also has an
adjustable charge rate to charge your batteries in as little as a
half-hour or less (depending on the condition of your batteries
and the manufacturer’s specifi ed charge rate). The Onyx can
also be used to charge larger batteries and different kinds of
batteries so it is a charger you can grow into. The 235 also
has an LCD digital display screen, so you can see how much
capacity it took to charge the battery (handy for learning the
condition of your batteries and calculating optimum fl ight time).
Note: For use with the Onyx 235 LiPo batteries that come with
SuperTigre connectors (such as the Flyzone batteries included
or recommended) require a banana plugs-to-SuperTigre charge
lead (SUPM0070) and batteries that come with a Deans® Ultra
Plug® connector require a Charge Lead with banana plugs/
Deans® Ultra Plug® male charge lead (GPMM3148).
KIT INSPECTION
Before assembly, take an inventory of this kit to make sure
it is complete, and inspect the parts to make sure they are
of acceptable quality. If any parts are missing or are not of
acceptable quality, or if you need assistance with assembly,
contact Product Support. When reporting defective or missing
parts, use the part names exactly as they are written in the
Kit Contents list.
Hobbico Product Support Ph: (217) 398-8970 ext. 5
3002 N Apollo Drive Suite 1 Fax: (217) 398-7721
Champaign, IL 61822
E-mail: airsupport@hobbico.com
ORDERING REPLACEMENT PARTS
Replacement parts for the Flyzone Calypso ARF are available
using the order numbers in the Replacement Parts List that
follows. The fastest, most economical service can be provided
by your hobby dealer or mail-order company.
Optional Optional Optional 2100mAh battery
Transmitter must be compatible with AnyLink adapter. Visit tx-ready.com to see
*
AnyLink compatibility chart or contact Product Support at the contact
information on this page.
HCAA6387
To locate a hobby dealer, visit the Hobbico web site at www.
hobbico.com. Choose “Where to Buy” at the bottom of the menu
on the left side of the page. Follow the instructions provided
on the page to locate a U.S., Canadian or International dealer.
3
Page 4
Parts may also be ordered directly from Hobby Services by
calling (217) 398-0007, or via facsimile at (217) 398-7721, but
full retail prices and shipping and handling charges will apply.
Illinois and Nevada residents will also be charged sales tax. If
ordering via fax, include a Visa® or MasterCard® number and
expiration date for payment.
Mail parts orders Hobby Services
and payments by 3002 N Apollo Drive, Suite 1
personal check to: Champaign IL 61822
Be certain to specify the order number exactly as listed in the
Replacement Parts List. Payment by credit card or personal
check only; no C.O.D.
If additional assistance is required for any reason contact
Product Support by e-mail at productsupport@hobbico.com,
or by telephone at (217) 398-8970.
REPLACEMENT PARTS LIST
Order No. Description
FLZA6000
FLZA6001
FLZA6002
FLZA6003
FLZA6004
FLZA6005
FLZA6006
FLZA6007
FLZA6008
FLZA6009
FLZA6010
FLZA6011
FLZA6012
FLZA6013
FLZA6014
TACJ2404
TACL0624
Wing Set
Horizontal Stabilizer
Vertical Stabilizer
Fuselage Set
Canopy
Wing Tube
Spinner, Folding Propeller
9x5 Propeller Blade Set (2)
Flap Linkage Set
Wing Screws
Tail Screw
18A ESC
C28-30 1300kV Brushless Motor
Micro Servo
1300mAh 3S LiPo Battery
Tactic TTX404 4-ch. Tx
Tactic TR624 6-chc Rx
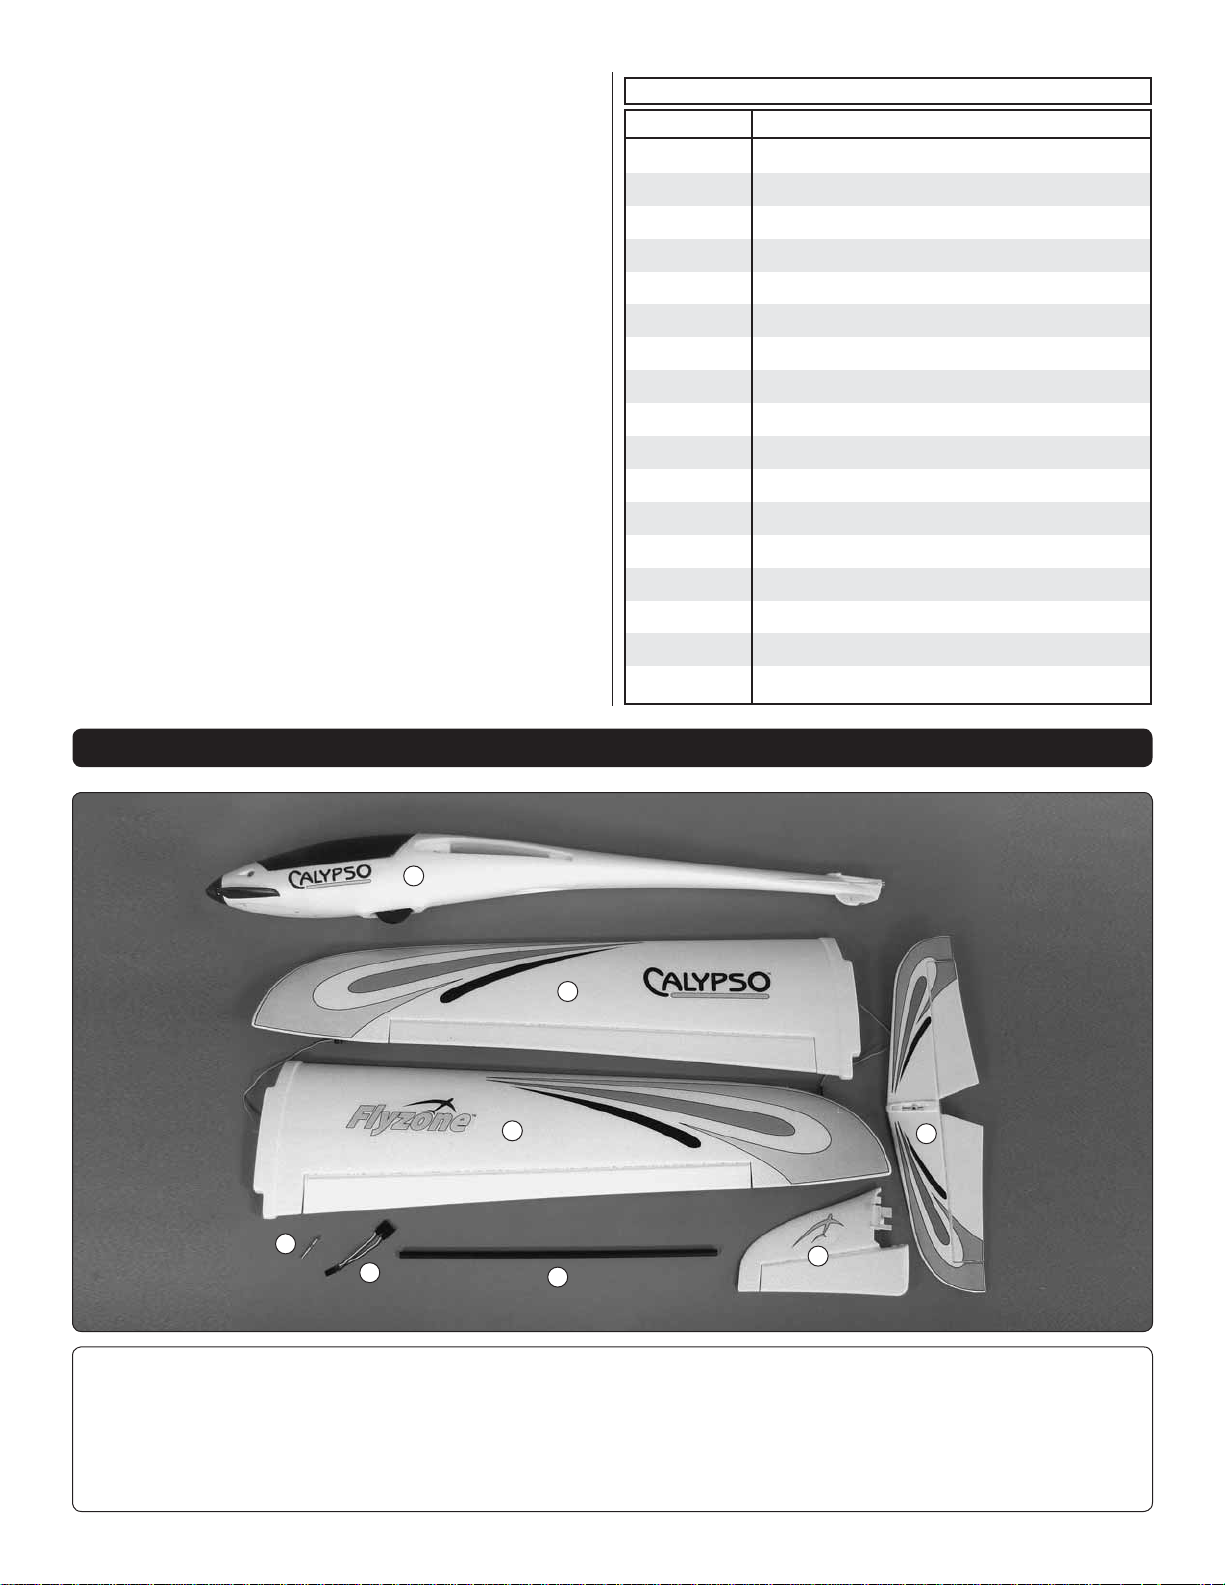
CONTENTS
1
2
2
7
6
5
4
3
Contents
1. Fuselage, Canopy (w/ESC, motor, propeller, servos, spinner)
2. Wings (w/aileron servo)
3. Horizontal Stabilizer (Stab)
4. Vertical Stabilizer (Fin)
4
4
5. Wing Tube
6. Y-Connector (for aileron)
7. Tail Screw
Page 5
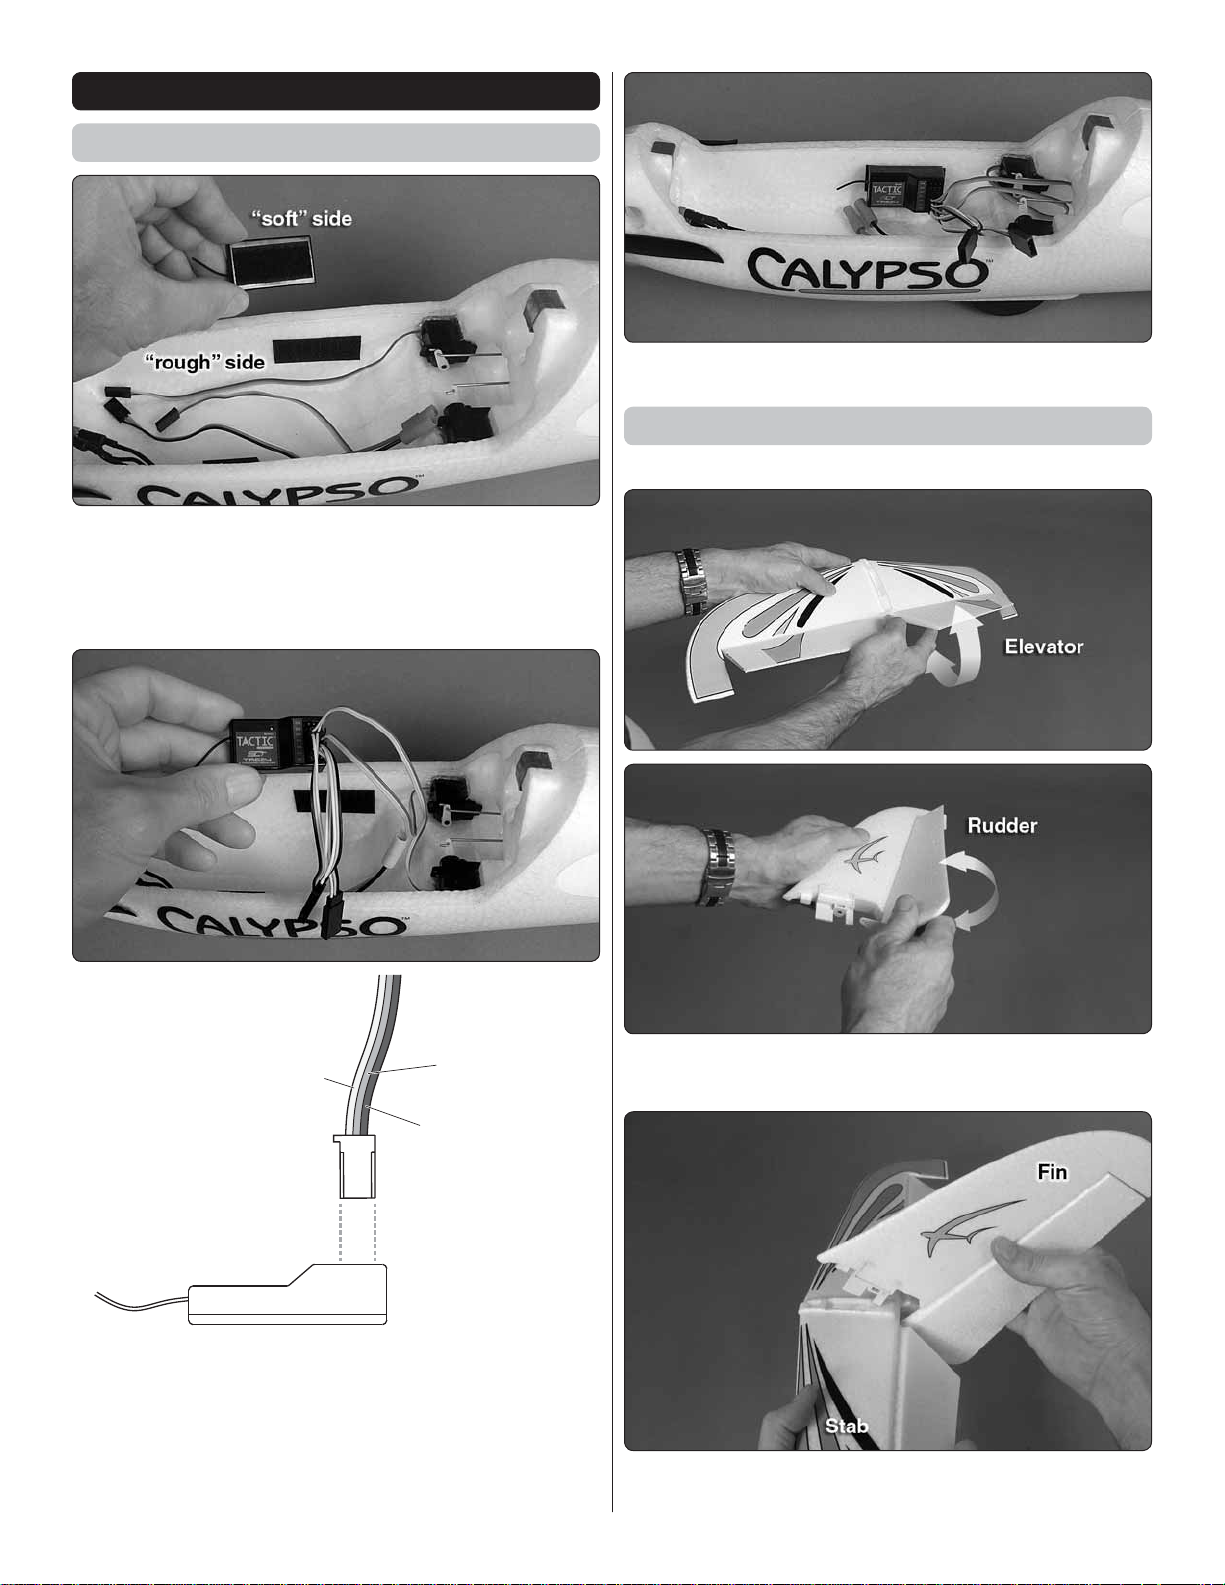
ASSEMBLY
(White/Orange)
Receiver
+ (Red)
− (Black/Brown)
Install the Receiver (Rx-R Only)
1. Cut strips from the included, adhesive-backed hook-
❏
and-loop material. Stick one to the back of your receiver and
the other inside the fuselage as shown—the softer, “loop”
side goes on the receiver and the rougher, “hook” side goes
in the fuselage.
3. Mount the receiver to the Velcro® strip in the fuselage.
❏
Hook Up the Elevator and Rudder
Rx-R, Tx-R, and RTF
2. Connect the servos and the Y-harness to the receiver
❏
as shown.
Channel 1 (aileron) – dual Y-harness
Channel 2 (elevator) – elevator servo
Channel 3 (throttle) – electronic speed control (ESC)
Channel 4 (rudder) – rudder servo
1. Flex the elevator up and down and the rudder back and
❏
forth several times to break them in.
2. Fit the vertical stabilizer (fi n) into the horizontal stabilizer
❏
(stab).
5
Page 6
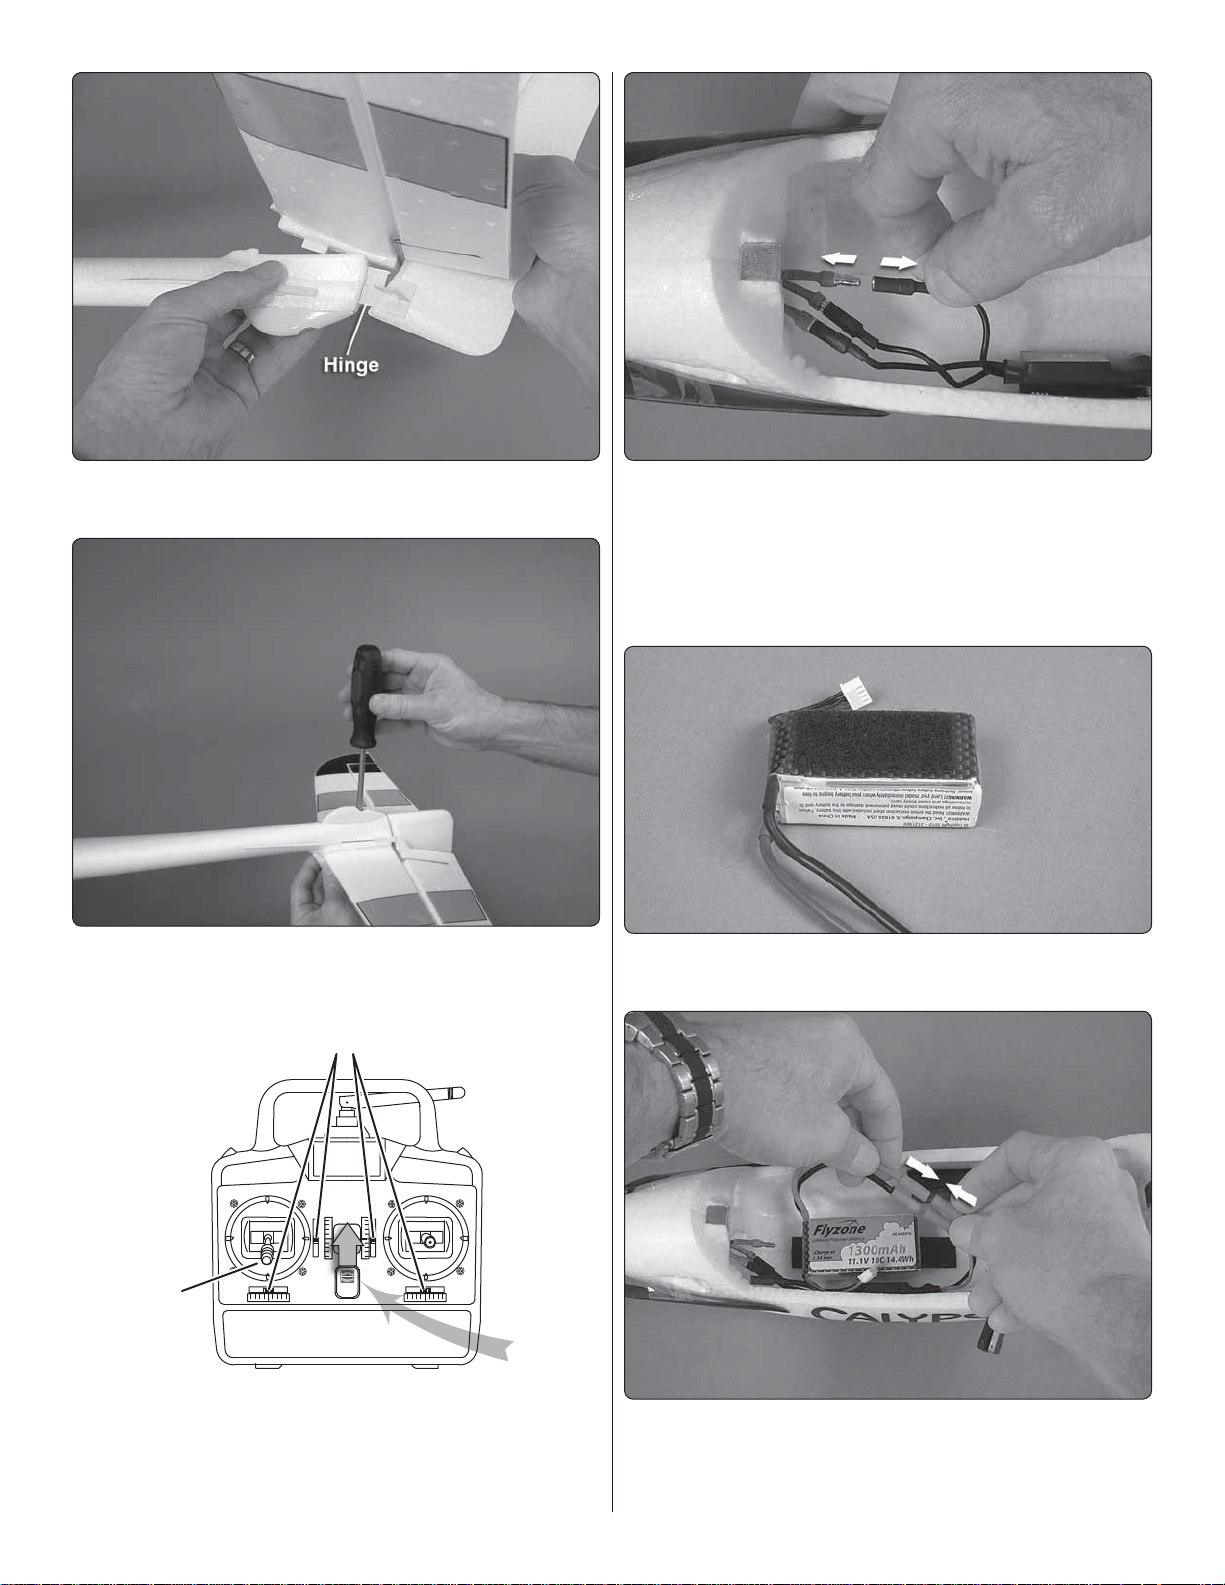
3. Join the stab/fi n assembly to the fuselage, keying the
ON
Centered
Down
❏
rudder into the hinge.
4. Tighten the assembly to the fuselage with the included
❏
bolt and a Phillips screwdriver.
6. Disconnect any one of the three motor wires so the motor
❏
will not turn inadvertently.
7. If your receiver is not already “bound” or linked to the
❏
transmitter, follow the instructions that came with your radio
system to bind the two together so the receiver will receive
signals from the transmitter.
8. Attach the softer, “loop” side of the included hook-and-
❏
loop strip to the battery.
5. If necessary, install batteries in your transmitter. Turn on
❏
the transmitter, center the trims and move the throttle stick
all the way down.
9. Connect the battery to the ESC.
❏
6
Page 7

Clevis
Control
Horn
3rd Hole
4th Hole
Elevator
Rudder
NO
YES
NO
YES
NO
10. With the transmitter and receiver on and the trims
❏
centered, connect the clevises to the hole in the horns shown
in the sketch, so the elevator and rudder will be centered by
screwing the clevises in or out on the pushrods.
11. Make sure the screws in the clevises are not
❏
overtightened.
7
Page 8

Right Rudder
Up Elevator
12. Be certain the elevator and rudder respond in the correct
❏
directions according to the stick movements on the transmitter.
If necessary, use the servo reversing in the transmitter to get
the controls to respond correctly.
13. Disconnect the battery and turn off the transmitter.
❏
Optional Flaps
In addition to the servos, linkages and servo wire extensions
listed under “Items Required for Completion” in the front of
the instruction manual, a minimum 5-channel transmitter is
also required to operate the fl aps.
1. Cut the fl ap from the aileron.
❏
You may do one wing fi rst and then the other, or work on
both wings at the same time.
2. Cut along the molded line to open the servo mount.
❏
8
Page 9

3. Use CA to securely glue the fl ap horn to the fl ap.
❏
4. Tie a small nut or other small weight to the end of a 12"
❏
[300mm] string.
5. Drop the nut on the string down through the servo wire
❏
channel, then cut off the nut and tie the string to the fl ap servo
connector. Pull the string and the servo wire back through
the channel.
9
Page 10

6. Connect a 6" [150mm] servo extension wire to the fl ap
Cut
ON
❏
servo wire.
7. Glue the servo into position as shown in the illustration
❏
at step 13—CA may be used, but will be diffi cult to remove
from the servo if you ever want to remove it for another model
later—something fl exible such as Shoe Goo or canopy glue
is recommended for gluing in servos.
9. Connect the fl ap servo to whichever channel in your
❏
receiver is controlled by the switch or dial on your transmitter
you wish to operate the fl aps—some prefer using a switch, but
most prefer a dial so the fl aps can be moved incrementally. It
is not necessary to join the wing to the fuselage at this time.
8. If necessary, cut the tab from the servo wire extension
❏
so it can be plugged into the Y-harness in the receiver.
10. Same as was done for the elevator and rudder, turn on
❏
the transmitter and connect the battery to the ESC.
10
Page 11

Flap
2nd Hole
4th Hole
11. Connect the fl ap pushrod to the servo arm and fl ap
Right Wing Left Wing
Recommended C.G.Recommended C.G.
Spar
Forward Limit:
3/4" [19 mm] ahead of spar
Recommended C.G.:
1/4" [6.5 mm] ahead of spar
Aft Limit:
1/4" [6.5 mm] behind spar
– 6.5 mm –1/4"
+ 6.5 mm +1/4"
+19 mm + 3/4"
❏
control horn as illustrated.
13. If you weren’t working on both wings at the same time
❏
repeat the process for hooking up the other fl ap the same
way. When fi nished, the fl ap servos should be positioned as
illustrated so they work together.
Install the Wings
12. Position the servo arm on the servo. Adjust the clevis so
❏
the fl ap will be retracted when the fl ap switch on the transmitter
is in one position, and the fl ap will be extended when the fl ap
switch is moved to the other position. Total fl ap travel should
be about 7/8" [22mm]. (More on fl ap throw and measuring
the throws on page 14.)
1. Use a felt-tip pen to mark the C.G. (center of gravity)
❏
locations on the bottom of the both wings. The marks will be
used later for making sure the Calypso balances correctly,
greatly affecting the way it fl ies.
11
Page 12

2. Insert the wing tube and tighten the screw.
❏
3. Guide the servo wires under the wing tube.
❏
5. Plug the wing all the way in.
❏
4. Insert the wing into the fuselage as you guide the servo
❏
wires through.
❏ 6. Join the other wing and tightly press them both together.
12
Page 13

7. Tighten the screw in the other wing.
YES
NO
NO
❏
FINAL FLIGHT PREPARATION
Balance the Model
The C.G. (center of gravity) has a great effect on the way the
model fl ies. If the C.G. is not correct the Calypso could be too
stable (reacting too slowly to control inputs) or too instable
(reacting too quickly to control inputs) possibly causing a crash.
The C.G. must be checked with all of the components
installed including the battery.
1. Install the battery and the canopy.
❏
8. Connect the aileron and fl ap servo wires to the receiver—a
❏
second Y-connector (not included) will be required for the fl aps.
9. Pack the excess fl ap and aileron servo wires back up
❏
through the channel so they don’t interfere with the elevator
and rudder servos.
2. Lift the model with your fi ngertips on the middle lines,
❏
marking the recommended C.G. Shift your fi ngers as necessary
until the model balances. As long as the model balances
suspended by your fi ngers anywhere between the forward and
aft lines, the model is within the acceptable C.G. range and is
ready to fl y. Beginner pilots should strive to get the Calypso
to balance directly on the recommended C.G. or between
the recommended C.G. and the forward C.G., making the
Calypso more stable.
13
Page 14

Right Aileron
Moves Up
Left Aileron
Moves Down
move up and the left aileron should move down. If necessary,
use the servo reversing in your transmitter to set the ailerons
to respond correctly.
3. Position the battery where necessary to get the Calypso
❏
to balance, or use Great Planes stick-on lead weight.
Check the Control Throws
Same as the C.G., the control surface throws have a great
effect on how the model fl ies. Too much throw will make the
model too responsive and diffi cult to control and too little throw
will make the model unresponsive. Measure and correct the
control throws if necessary as instructed below.
2. Measure the elevator throw fi rst; power up the system
❏
(turn on the transmitter and connect the battery) and move the
elevator up and down with the elevator stick on the transmitter.
Measure how far up and how far down from center the elevator
moves. As shown in the chart the elevator should move 3/4"
[19mm] up and 3/4" [19mm] down on high rates and 1/2"
[13mm] up and 1/2" [13mm] down on low rates plus or minus
1/8" [3mm].
1. Power up the system. The rudder and elevator response
❏
was already checked on page 8. Now check the aileron throw.
When moving the stick to the right, the right aileron should
14
Page 15

Aileron Throw Flap Throw
Elevator Throw
Rudder Throw
3. Note that the throw measurements for the elevator, rudder
Less Control Throw
More Control Throw
More
Control
Throw
Less
Control
Throw
❏
and fl aps (if used) are taken at the widest part (front to back)
of each surface, but the aileron throw is measured at the split
between the fl aps and elevator (whether or not you have set
up the optional fl aps and cut the two apart).
4. If necessary, use the programming in your transmitter or
❏
mount the pushrods in different holes in the control horns or in
the servo arms to increase or decrease the elevator throw as
required. Moving the pushrods inward in the servo or outward
on the control surface horn decreases control throw. Moving
the pushrods outward on the servo or inward on the control
surface increases the throw.
5. Measure and adjust if necessary the control throws for
❏
the rudder, ailerons and fl aps the same way.
Recommended Control Surface Throws
LOW RATEHIGH RATE
INCHES
Up
Down
Up
Down
Recommended Control Surface Throws
DEGREES
ELEVATOR
Up
18º
Down
18º
AILERONS
RUDDER (R&L)
FLAP
22º
LOW RATEHIGH RATE
Up
12 º
11º 11º19 º 19 º
14 º 14 º19 º 19º
Down
12 º
ELEVATOR
AILERONS
RUDDER (R&L)
FLAP
Recommended Control Surface Throws
MILLIMETERS
ELEVATOR
AILERONS
RUDDER (R&L)
FLAP
15
3/4"
3/4"
7/8"
Down
19 mmUp19 mm
22mm
1/2"
3/8" 3/8"5/8" 5/8"
3/4" 3/4"1" 1"
1/2"
LOW RATEHIGH RATE
Down
13mmUp13mm
10mm 10 mm16mm 16 mm
19mm 19 mm25mm 25 mm
Page 16

Calibrate the Throttle
ON
UP
DOWN
ON
DOWN
This procedure applies only to Tx-R or Rx-R versions of
the Calypso, or any other time a transmitter different than
the one originally calibrated to the included ESC is used.
At this time one of the motor wires should still be disconnected
from the ESC to prevent accidental starting of the motor.
1. Turn on the transmitter and advance the throttle stick
❏
all the way forward.
4. Now the throttle is calibrated and the battery can be
❏
disconnected and the transmitter turned off.
NOTE: If at any time you encounter problems calibrating
the throttle, or the ESC or motor do not function properly,
refer to the Troubleshooting Guide on page 19 or refer to
complete ESC programming instructions at fl yzoneplanes.
com or contact Product Support for assistance.
While we’re working with the transmitter and the ESC, this
would be a good time to run through the normal startup
procedure…
Normal Startup Procedure
1. Reconnect the disconnected motor wire to the ESC. If
❏
you haven’t yet done so, you may remove the tape from around
the folding propeller holding it to the fuselage.
2. Connect the battery to the ESC. Listen for the three
❏
tones… “ 1 2 3” followed by two short beeps…”beep beep.”
Lower the
throttle stick all
the way down.
3. Listen for the three short beeps…“beep beep beep”
❏
followed by one longer beep…“beeep.”
2. Unless calibrating the throttle or programming the ESC,
❏
always turn on the transmitter with the throttle stick all the
way down. Turn on the transmitter.
3. Connect the battery to the ESC. Listen for the three
❏
tones…“ 1 2 3” followed by three short beeps…“beep beep”
beep” followed by one long beep…“beeep”.
Now the ESC is “armed” and the model is ready to fl y. The
propeller will turn whenever the throttle stick is advanced, so
use caution. When you are done running the motor or fl ying the
plane simply disconnect the battery and turn off the transmitter.
16
Page 17

Charge the LiPo Battery
If you haven’t yet done so, charge your LiPo battery following
the instructions that came with your charger. If uncertain of
the state-of-charge of your battery, you can either reconnect
it to your charger, or use a battery checker (HCAP0275) to
check the condition of the battery. A battery checker is the
best way to check the condition of your batteries at the fl ying
fi eld to make sure you don’t inadvertently fl y your plane with
a partially-discharged battery.
Note: LiPo batteries require special care and handling. Be
certain to follow the instructions that came with your LiPo
battery and charger to charge and handle them correctly. If
using the Smart Charger, refer to Smart Charger instructions
for charging. Note that the Smart Charger has an internal timer
that automatically discontinues the charge after 160 minutes
(2 hours, 40 minutes). Some larger batteries that are deeply
discharged may require longer than 160 minutes to charge,
prompting the Smart Charger to shut off. If this happens,
simply disconnect the battery from the charger, wait for the
GREEN LED to illuminate, then reconnect the battery to the
charger to continue charging.
Range Check
Most radio systems have a procedure for ground-checking
the operational range. This usually involves something such
as the pilot walking a distance away from the model while
operating the controls, with an assistant holding the model
and confi rming that everything is operating correctly. Follow
the manufacturer’s instructions that came with your radio to
perform this check with the motor off and with the motor running
at various speeds. If the radio does not pass the range check
do not fl y! Find and correct the problem fi rst.
AMA SAFETY CODE
Read and abide by the following excerpts from the Academy
of Model Aeronautics Safety Code. For the complete Safety
Code refer to Model Aviation magazine, the AMA web site or
the Code that came with your AMA license.
General
1) I will not fl y my model aircraft in sanctioned events, air shows,
or model fl ying demonstrations until it has been proven to be
airworthy by having been previously, successfully fl ight tested.
2) I will not fl y my model aircraft higher than approximately
400 feet within 3 miles of an airport without notifying the
airport operator. I will give right-of-way and avoid fl ying in the
proximity of full-scale aircraft. Where necessary, an observer
shall be utilized to supervise fl ying to avoid having models fl y
in the proximity of full-scale aircraft.
3) Where established, I will abide by the safety rules for the
fl ying site I use, and I will not willfully and deliberately fl y my
models in a careless, reckless and/or dangerous manner.
5) I will not fl y my model unless it is identifi ed with my name
and address or AMA number, on or in the model. Note: This
does not apply to models while being fl own indoors.
7) I will not operate models with pyrotechnics (any device that
explodes, burns, or propels a projectile of any kind).
Radio Control
1) I will have completed a successful radio equipment ground
check before the fi rst fl ight of a new or repaired model.
2) I will not fl y my model aircraft in the presence of spectators
until I become a qualified flier, unless assisted by an
experienced helper.
3) At all fl ying sites a straight or curved line(s) must be
established in front of which all fl ying takes place with the
other side for spectators. Only personnel involved with fl ying
the aircraft are allowed at or in the front of the fl ight line.
Intentional fl ying behind the fl ight line is prohibited.
4) I will operate my model using only radio control frequencies
currently allowed by the Federal Communications Commission.
5) I will not knowingly operate my model within three miles
of any pre-existing fl ying site except in accordance with
the frequency sharing agreement listed [in the complete
AMA Safety Code].
9) Under no circumstances may a pilot or other person touch
a powered model in fl ight; nor should any part of the model
other than the landing gear, intentionally touch the ground,
except while landing.
FLYING
NOTE: Heat from hot, sunny conditions may blister the foam
beads under the black paint on the canopy. If your Calypso will
be laying in the sun, cover the canopy with a towel or remove
the canopy and place it in the shade.
The Calypso is suitable for beginners because it can fl y
slowly and react predictably and gently, but it is still highly
recommended that those who have no radio control fl ying
experience seek the assistance of an experienced pilot—
especially for the fi rst couple of fl ights.
Beginners should fl y only in calm conditions, but experienced
pilots will embrace the challenge of fl ying the Calypso in winds
up to 20mph!
17
Page 18

Wind
The Calypso is simply hand-launched by advancing the throttle
Wind
and giving it a gentle toss directly into any prevailing wind—it
will basically fl y out of your hand, so a gentle throw is all that
is needed. You’ll probably want to launch it at full-throttle the
fi rst time, but once you get used to the Calypso and get it
trimmed you could launch it at reduced power.
Once airborne the fi rst priority will be to get your Calypso
trimmed for straight-and-level fl ight using the fl ight trims on the
transmitter. The elevator may trim out differently at full power
than it does power off, so trim it for the type of fl ying you will
be doing most—sport-fl ying or thermaling (if thermaling you
will want the Calypso to trim out with the power off).
You can maneuver the Calypso around the sky rather like a
sport model performing gentle aerobatics such as loops, rolls,
Cuban 8s, stall turns and even inverted fl ight, or you can fl y
it like a glider using motor power to climb to altitude, then
shut off the power to search for lifting air. When searching for
thermals you’ll fi nd that the Calypso will appear to just about
“hang” in the air with the fl aps extended.
When ready to land simply bring the Calypso around into the
wind, cut the power and allow it to descend. You can extend
the fl aps to slow the Calypso’s descent, but this may also
extend the glide path so modulate the fl aps as necessary. In
breezy conditions the Calypso may descend almost vertically.
However you fl y you should calculate your fi ght time and
use a timer so you don’t over discharge your battery or end
up having the motor quit unexpectedly causing a dead-stick
landing. Dead-stick landings are usually no problem unless
you are fl ying on a windy day and cannot get your Calypso
back to the landing area.
EXPERT TIP: At full-throttle the Calypso consumes
approximately 210 mAh/minute which should provide at
least 5 minutes of motor run time on a 1300 mAh battery—
usually enough for fi ve one-minute, full-throttle climbs. But
the actual run time you can expect may vary depending
on several factors such as the condition of your batteries,
the average throttle setting and even the wind conditions
(fl ying on windy days you seem to use more power than
when fl ying on calm days).
To fi nd out for yourself how long you can fl y, set your timer to
3 minutes for the fi rst fl ight. Fly until the timer sounds, then
land. Use a charger with a digital display to fi nd out how much
capacity it took to recharge the battery (indicating how much
capacity was used). To ensure against over discharging the
target is to use 80% of your battery’s capacity, so multiply
your battery’s capacity by .8 to fi nd out how much you have
available. Compare the capacity used to 80% of your battery’s
capacity and adjust your fl ight time accordingly.
For example: If using the recommended 1300mAh battery,
your target capacity you want to use for a fl ight is 1040mAh
(1300 mAh x .8 = 1040 mAh). If you fl ew for three minutes
and it took 660 mAh to recharge your battery, you still had
380 mAh to go before you could have landed, so adjust
your timer to increase your fl ight time accordingly until you
reach your 1040mAh target. (You could also divide 660mAh
by three minutes to fi gure a current consumption rate of
220 mAh/minute. Divide 1040mAh by 220 mAh/minute to
conclude that you can fl y for 4.7 minutes [4 min. 40 sec.]—
but round down to 4-1/2 minutes.)
Keeping records over a period of time will allow you to
accurately calculate your target fl ight time.
One fi nal note about fl ying your model. Have a goal or fl ight
plan in mind for every fl ight. This can be learning a new
maneuver(s), improving a maneuver(s) you already know,
or learning how the model behaves in certain conditions
(such as on high or low rates). This is not necessarily to
improve your skills (though it is never a bad idea!), but more
importantly so you do not surprise yourself by impulsively
attempting a maneuver and suddenly fi nding that you’ve run
out of time, altitude or airspeed. Every maneuver should be
deliberate, not impulsive. For example, if you’re going to do a
loop, check your altitude, mind the wind direction (anticipating
rudder corrections that will be required to maintain heading),
remember to throttle back at the top, and make certain you
are on the desired rates (high/low rates). A fl ight plan greatly
reduces the chances of crashing your model just because
of poor planning and impulsive moves. Remember to think.
Have a ball! But always stay in control
and fl y in a safe manner.
GOOD LUCK AND GREAT FLYING!
18
Page 19

ESC TROUBLESHOOTING GUIDE
TROUBLESHOOTING GUIDE
ActionProblem Reason
MAKING REPAIRS
Motor does not
work, no tones or
beeps are coming
from the ESC.
Motor does not
work, Alert Tone
sounds
(“beep-beep,”
“beep-beep,”
“beep-beep,”…).
Motor does not
work, Alert Tone
sounds (long
beeps:
“beeeep-beeeepbeeeep…).
Motor does not
work, Alert Tone
sounds (rapid
beeps: “beepbeep
beepbeepbeep…).
Motor does not
work, five tones are
sounded (“ 1 2 3 4
5”) after the two
beeps.
The motor turns
the wrong
direction.
The ESC is not
receiving power
from the battery.
Battery Voltage is
too high or too low.
The ESC is
receiving power
from the battery,
but is not receiving
a signal from the
receiver.
Throttle stick is not
in the lowest
position, or throttle
needs to be
calibrated.
The direction of the
throttle channel is
reversed and the
ESC has entered
the Programming
Menu.
The three motor
wires are
incorrectly
connected to the
ESC.
Check the battery
or plugs or change
the plugs if the
wires are damaged.
Make sure the
battery is charged
and/or you are
using the correct
battery.
Make sure the
transmitter is
turned on and that
the receiver is
linked to the
transmitter and
receiving a signal.
Lower the throttle
stick all the way, or
recalibrate the
throttle per
calibration
instructions.
Set the throttle
direction the other
way in the
transmitter.
Swap any two of
the motor/ESC wire
connections with
each other.
See the replacement parts list at the front of the manual. Often,
parts can be repaired and you can get your Calypso back into
the air with a little ingenuity.
The Calypso is made from injection-molded EPO (expanded
polyolefi n) foam. It can be glued with just about anything.
Repairs are often made with regular CA—simply apply CA
where necessary, squeeze and hold the parts together, wipe
away excess CA with a cloth, then spray with CA accelerator
and hold for a few seconds until the CA hardens (the fi nal
two steps may require an assistant while you hold the parts).
Repairs can also be made with white glue or Shoe Goo, but
tape will have to be used to hold the parts until the glue
dries—usually overnight.
For complete ESC specifi cations and full programming
instructions visit fl yzoneplanes.com and click on the
Calypso page.
Fiber-reinforced “strapping” tape is also good for reinforcing
structural repairs after the parts have been glued back together.
19
Page 20

Some replacement parts are sold as assemblies (such as
the wing). If the servos in your crashed wing (or fuselage) are
still functioning you can remove them, peel off any excess
glue, then glue them into your new wing or fuselage—CA is
suitable for gluing in servos, but something pliable such as
canopy glue or Shoe Goo is recommended. When gluing the
bottom panel cover into the wing, use care not to get excess
glue in the wing tube channel.
To remove the motor, fi rst remove the spinner screws with a
Phillips screwdriver, then remove the folding propeller bracket
with a 1.5mm hex key wrench. Then disconnect the motor wires
and unscrew the mounting screws from inside the fuselage
and the motor will come out the front.
20
Phone Number
AMA Number
City, State, Zip
Address
This model belongs to:
Name
 Loading...