

Page 1
FW450 Helicopter
Smart Heli
uick Start Guide
V1.00
Page 2

Flight safety notice
Flywing suggests that users enjoy flying in a reasonable safe environment. The knowledge of flight safety is
very important for the safety of yourself, the surrounding people and the environment.
1.Fly in open areas away from buildings, trees, High voltage power cable lines, crowd, water surface, and any near by
obstacle.
2.Please keep the remote control transmitter in hand, even when using the Auto Flight / Auto Landing and Auto
Return Home function, to control the helicopter at any time.
3.Please fly the helicopter within your sight range at all times。
4.To ensure flight safety, please do not fly the helicopter beyond 120 meters above the ground. If there are no
flying height restrictions or if the restriction is lower than 120 meters in your area, please follow the regulations
Please visit http://www.flywingrc.com Watch flight safety
teaching videos and acquire more comprehensive safety
knowledge such as flight restrictions
● PreFlight safety inspection
Please check the helicopter carefully before taking off. Precautions are as follows:
1.Check whether the main blades ,tail blades, helicopter body and landing skids are damaged or distorted,
please replace them with the genuine Fly Wing RC parts.
2.Check whether the flight control linkages and fuselage are fixed firmly, and whether the GPS unit is
correctly fixed on the helicopter tail boom (horizontally placed, straight line behind the main mast )
H1 Unit is fixed firmly on the double sided foam pad either at the front or at the back of the main
mast. Pay attention to the direction of the arrow which has to be pointed towards the direction of
travel
3.Check whether the power of the helicopter and the transmitter are sufficient. After the transmitter is
powered on, turn on the power supply of the helicopter, and check whether the helicopter passes the
self inspection test (the rotor head and swashplate move regularly for several seconds)
● Flight environment requirements
1. Do not fly in bad weather, such as strong wind (10m / s), rain, snow and foggy weather, etc.
2. Choose an open place with no tall buildings around the flight pathway. Any large number of buildings
steel bars will affect the effectiveness of compass function , and they will block GPS signal, resulting in poor
positioning of helicopter and even unable to receive the signals.
3. Please do not fly in any area with high voltage cable line, radio tele-communication station, mobile phone
transmission tower or Wi-Fi, to avoid signal interference of your transmitter and receiver.
4. Please take extra caution when flying above 6000 meters as performance of the battery and the motor power
system of the helicopter will be reduced to cold temperature and thinner air density.
●Flight operation requirements
5.
Fly within your sight of range(VLOS)
6. Keep away from rotating blades and motor.
7. Activating the stop switch during flight will cause the helicopter to fall. Please use this function only in
case of emergency.
8. During the flight, please do not answer or make phone calls, send short messages or use other mobile
devices that may interfere with your helicopter operation.
9. Do not operate the helicopter under the influence of alcohol or drugs.
10. Please return home as soon as possible when low power warning appears from the transmitter.
11. In the process of runaway return, when the radio signal becomes normal again, the helicopter landing
position can be controlled by the transmitter.
12. After landing, the helicopter electronic power should be stopped first and then the transmitter should be
turned off to avoid any loss of transmitter signal.
13. When using the GPS Autopilot flight mode and Return Home functions, you should always be prepared
to control the helicopter manually by turning the transmitter 3D mode switch in case of Emergency .
Please note that the helicopter is still in the Auto GPS flight mode state at this time. If you need to completely
exit the flight mode, please turn the flight stop button on the transmitter.
14. Please keep control of the helicopter all the way. Do not rely on GPS to provide information. In specific flight
mode or flight environment, GPS system can not work normally, such as precise landing or active braking
using
Page 3

and other functions will not be available. Please make a reasonable judgment on the flight condition by
naked eye observation, and set the corresponding flight and return altitude according to the flight
environment.
isclaimer
The remote control model is not a toy. This product is only suitable to adults who have experience in
correct model helicopter assembly, setting, commissioning and operation. he helicopter should only be
flown in legal remote control flying field. This product is not suitable for children or those who do not
have experience in remote control model helicopters. For inexperience or a new beginner, the helicopter
must be operated under the direct supervision of someone with considerable skills or expertise. The
remote control model product of this specification belongs to the operator who has high operational
skills. Improper or unfamiliar use of this product may cause serious harm to yourself and others, or even
death. f the product is disassembled , it can cause loss of parts in various situations. If the product is
defective due to improper use, it will not be possible for us to replace with the new product or to accept
return of the item ,under the warranty conditions. The dealer is unable to correct the abnormal loss of
parts and components, because of the end user improper installation and setting methods, modification
of the goods (including use of the non-original parts), other equipment that does not meet the
specifications, and poor operation. For any damage, accident or injury caused,. Buyers and Operators
assume full responsibility at the time of purchase. Those who can not operate any professional remotecontrolled model helicopters, they shall not operate this product. At the same time, the operator must
operate in the legal remote control model flying site, pay attention to the personal safety of himself and
others and strictly abide by and comply with national and local laws and regulations. The whole machine
hood is a fragile product. Many glass fiber parts are surface painting products. Due to shrinkage,
temperature and transportation process, there may be problem of blasting and cracking on these items.
This is the nature of the product itself. We can not be responsible for any serious problem after
face-to-face courier signed direct delivery of the product to you, Please be aware of terms and
conditions before you buy this sophisticated high tech radio control helicopter
arig
hrough reaig of the etire user aual to failiarize ith the prouct fuctios efore
operatio. f the prouct is ot operate correctly it ay cause serious iury to yourself or others or cause
prouct aage a property loss. his prouct is cople it ees to e failiar ith it for a perio of tie
efore safe usage a you ee to hae soe asic olege efore operatio. f there is o strog
safety aareess iproper operatio ay lea to prouct aage a property loss a ee cause serious
iury to oeself or others. his prouct is ot suitale for chilre. o ot use parts ot
proie or recoee y our copay. You ust strictly follo the copays guielies to istall
a use thees proucts. his guiace ocuet cotais safety operatio a aiteace istructios. e
sure to rea all istructios a arigs i the users aual carefully efore asselig settig up a
usig. You hae rea a uerstoo all the cotets of this ocuet efore usig it.
ai ssible inur an lss it is irtant t bsere te llin ites
1. sers are not allowed to operate this product in any condition of poor physical or mental state
such as drinking, drug taking, drug anesthesia, dizziness and fatigue, nausea, etc.
2. xcept in special circumstances such as the helicopter may hit a crowd, it is forbidden to turn
off the engine during the flight
3. After landing, be sure to turn off the helicopter before turning off the remote control
transmitter.
4. It is forbidden to use this product to throw or launch any dangerous object to buildings,
people or animals.
5. The user shall immediately stop using the helicopter with abnormal flight status in case of
accident such as collision or overturning. The user shall not continue to use the helicopter
until it is repaired by the company or its recommended maintenance center.
he ocuetatio of this prouct is suect to upate ithout prior otice. lease isit the official esite http.flyigrc.co go to the prouct page for
the latest iforatio.
Page 4
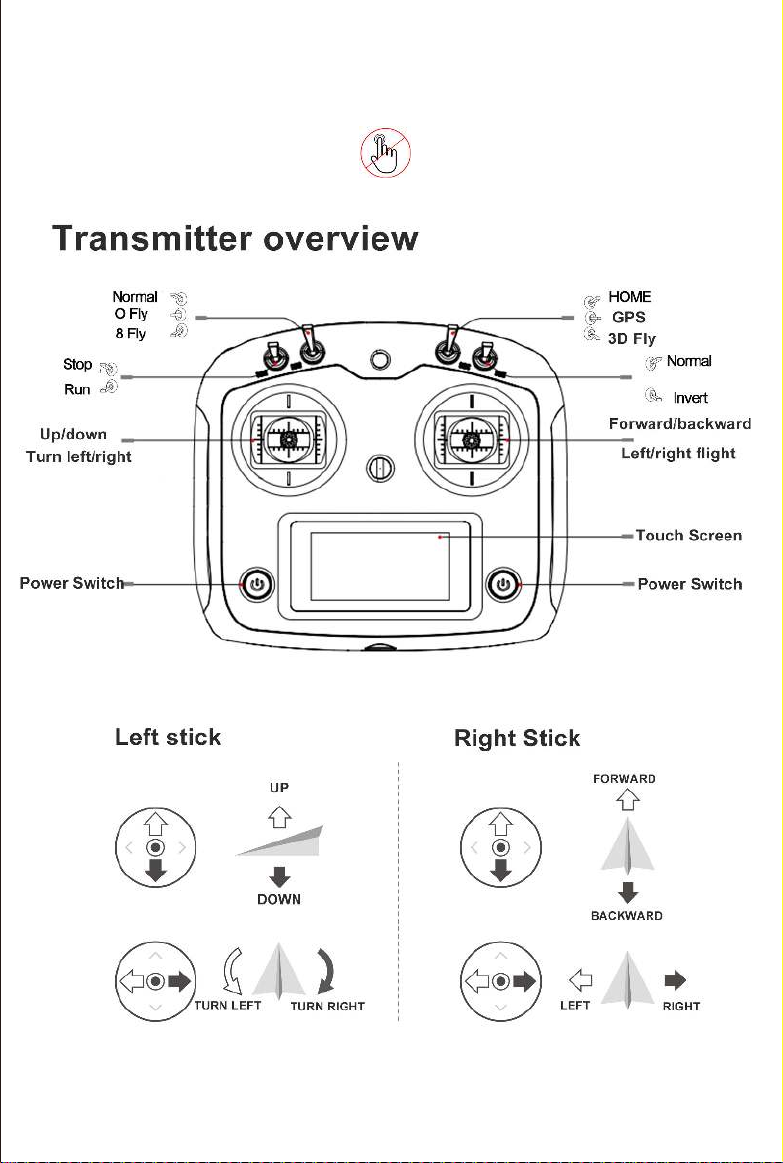
About transmitter
FW450L using FS-i6S transmitter which is 2.4GHz, 1km* control distance。
Please don't touch your transmitter menu
it has been factory set, if the setting is
changed incorrectly, you will not be able
to start the helicopter.
* For the first time, you need to connect a computer to activate this function
* The maximum communication distance is measured in the experimental environment for reference only.
Page 5
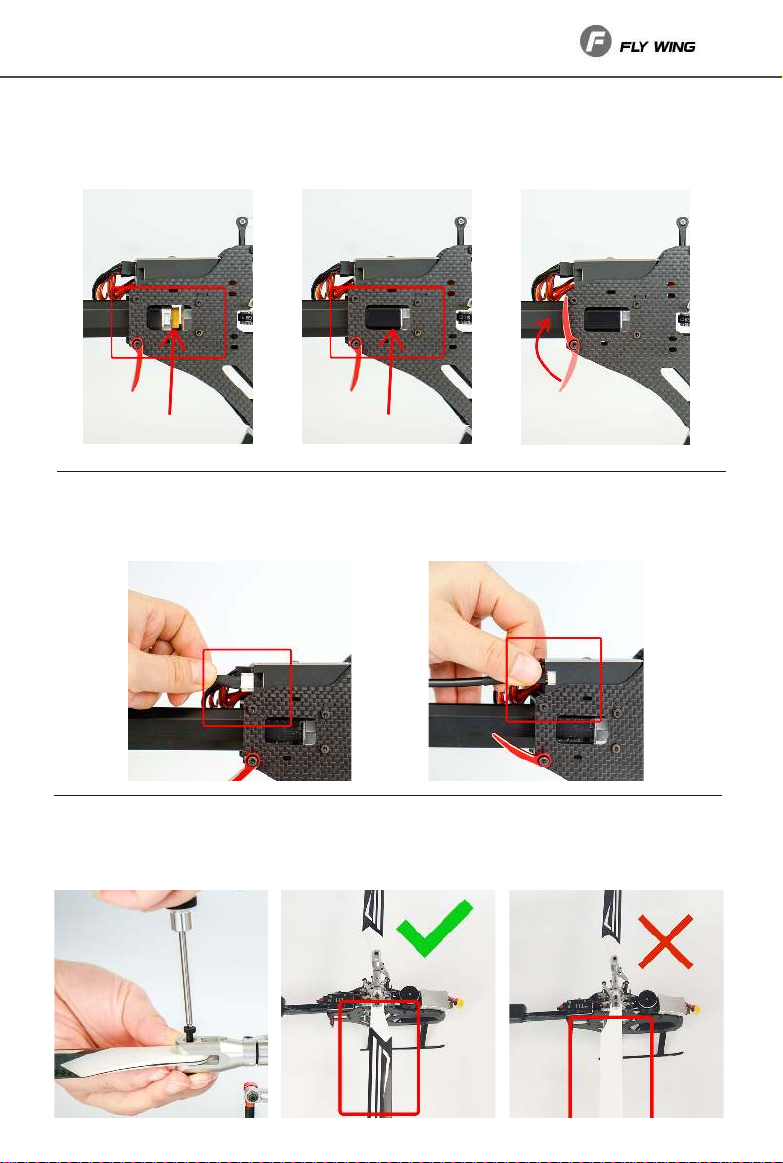
ssemble FW
1. Insert tail tube
Take out the tail tube and insert it into the fixing slot at the rear of the fuselage. After confirming
that it is inserted in place, rotate the fixed wrench until locked.
2.Insert
Insert the GPS wire into the flight control GPS interface correctly, confirm that the self-locking bayonet
is in place, and confirm that the GPS unit is fixed on the tail pipe.
3. Install blae
Install the blade as shown in the figure until there is slight resistance when the blade folds.
Page 6
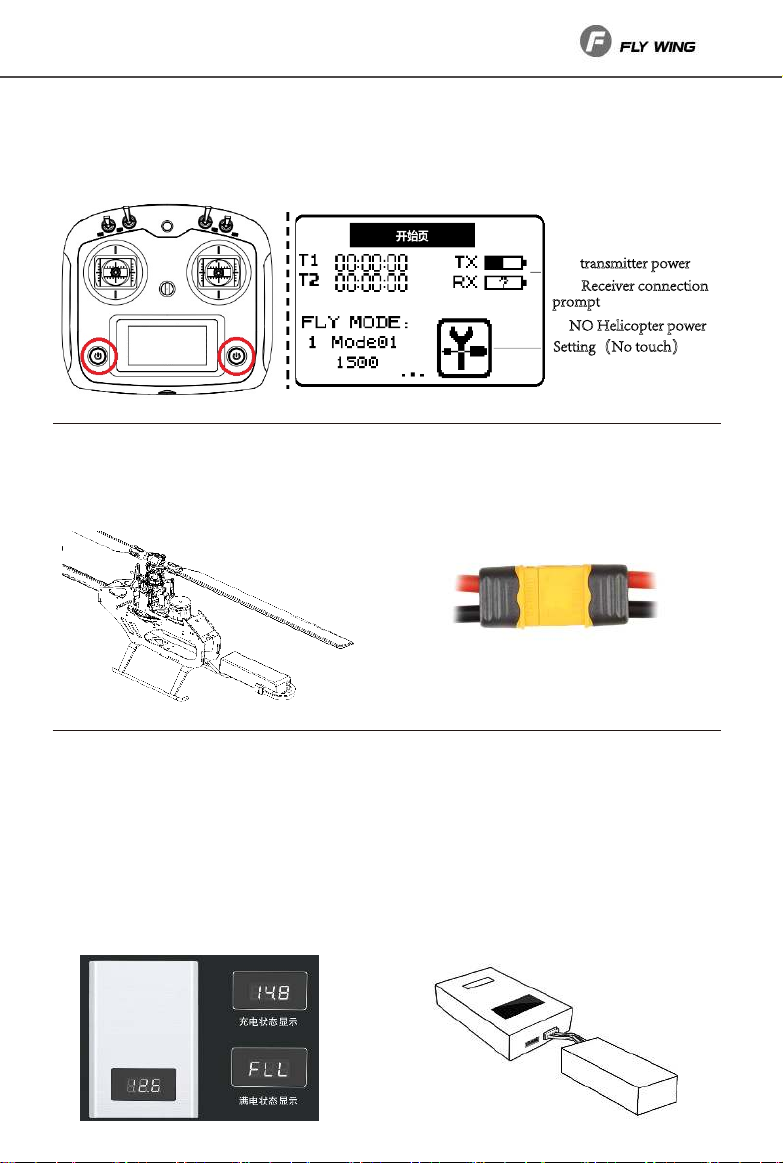
perate Helicopter
1. tar transmitter
Hold the two power buttons at the same time for two seconds to turn on the transmitter. If the
transmitter shows any warning please flip the motor run switch to top positionmotor off
actionthen turn the mode switch to GPS position.
TX-trasitter poer
RX-
eceier coectio
ropt
p
, elicopter poer-
ettig(o touch)
. Helicopter ower
Please insert the battery into the abdomen of the helicopter . e sure that the battery strap is securely
fastened. onnect the yellow plug of the battery to the Helicopter. eep the helicopter stationary. After
the initializing movement of the swash plate and the rotor head is completed, install the canopy
correctly.
The yellow plug of the battery is connected to
the side plug of the helicopter
. harging
onnect the charger to an A power source 100240 , 50/60 Hz use a power adapter if necessary.
●
●
Please use the official charger we provide you to charge. Take out the
flight battery before charging.
● ake sure the battery temperature is normal and connect the battery white jstx balance lead to the
charger. yellow main power plug is not inserted
● When the charger is connected, the charger screen will display the voltage and when full, the symbol
FLL will be displayed.
● o not plug in 3s-4s at the same time. nly one battery can be charged at a time. If the charger
shows the symbol of e.11 , the battery feed is damaged a single cell is less than 3.4.
Page 7
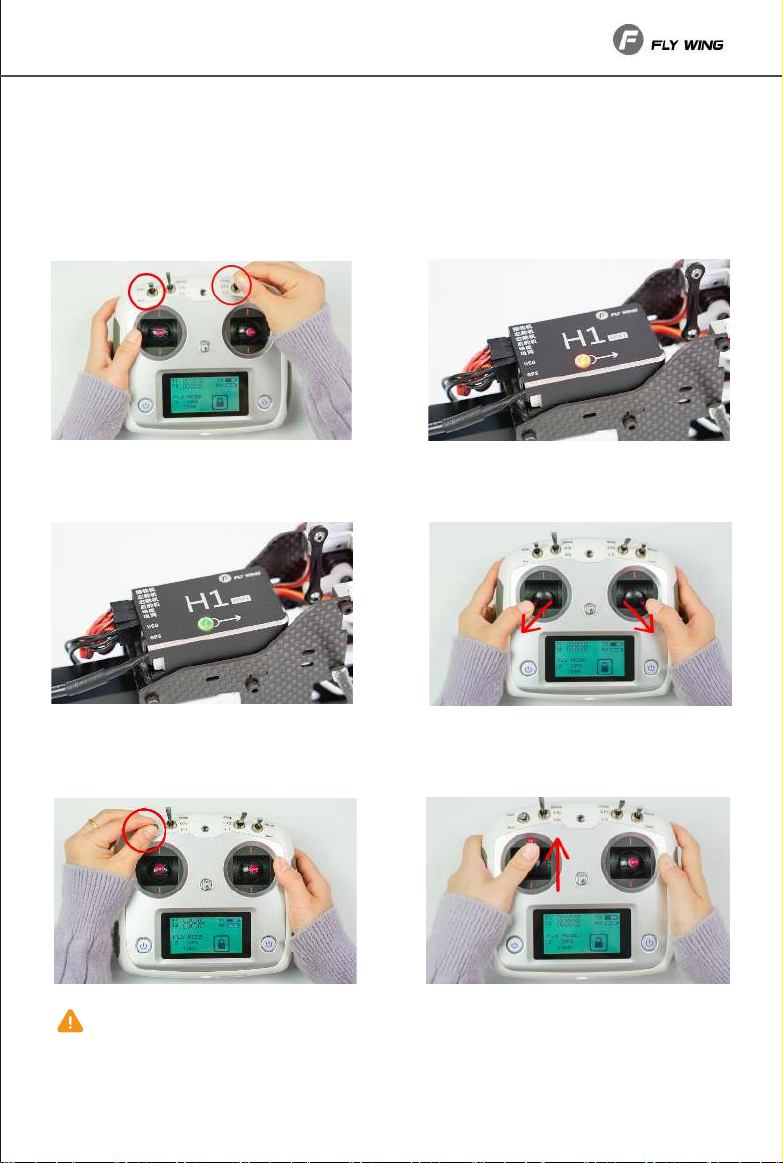
. eady to fly
Please place the helicopter in a flat open outdoor area with user facing the tail.
● GPS mode unlock / take off take mode2 as an example
1Turn the transmitter motor run
switch to stop position, dial
mode switch to GPS , and the H1
light is flashing yellow.
2ove the helicopter to the outdoor open
environment without trees and buildings,
and power on to wait for the GPS satellite
signal search.
3After waiting for a few minutes, the
light changes from flashing yellow to solid
green . The helicopter was positioned
successfully.
5While the green light is flashing, turn
the stop switch to run position , and the
helicopter motor will start the light is
solid green, repeat the unlock procedure
again.
•o not stop the motor during flight, otherwise the helicopter will crash. nless there are special circumstances
e.g. the helicopter may collide with a crowd, it is necessary to stop the motor urgently to minimize the injury.
•The helicopter will not be able to take off in case of serious low power alarm.
•After starting the helicopter motor, the blade will rotate at high speed, which is dangerous. The operator shall
keep a certain distance from the helicopter and keep the helicopter away from the crowd, buildings, trees or
other obstructions to avoid collision.
After landing, please turn off the helicopter power first and then the transmitter.
4nlock as shown in the figure and hold
for about 5 seconds until the H1
flight control unit flashes green light.
6When the helicopter rotor head
speed is stable, push the throttle stick
upwards to take off and raise the
helicopter above ground , then release
the throttle stick and you can hover
appropriately.
Page 8
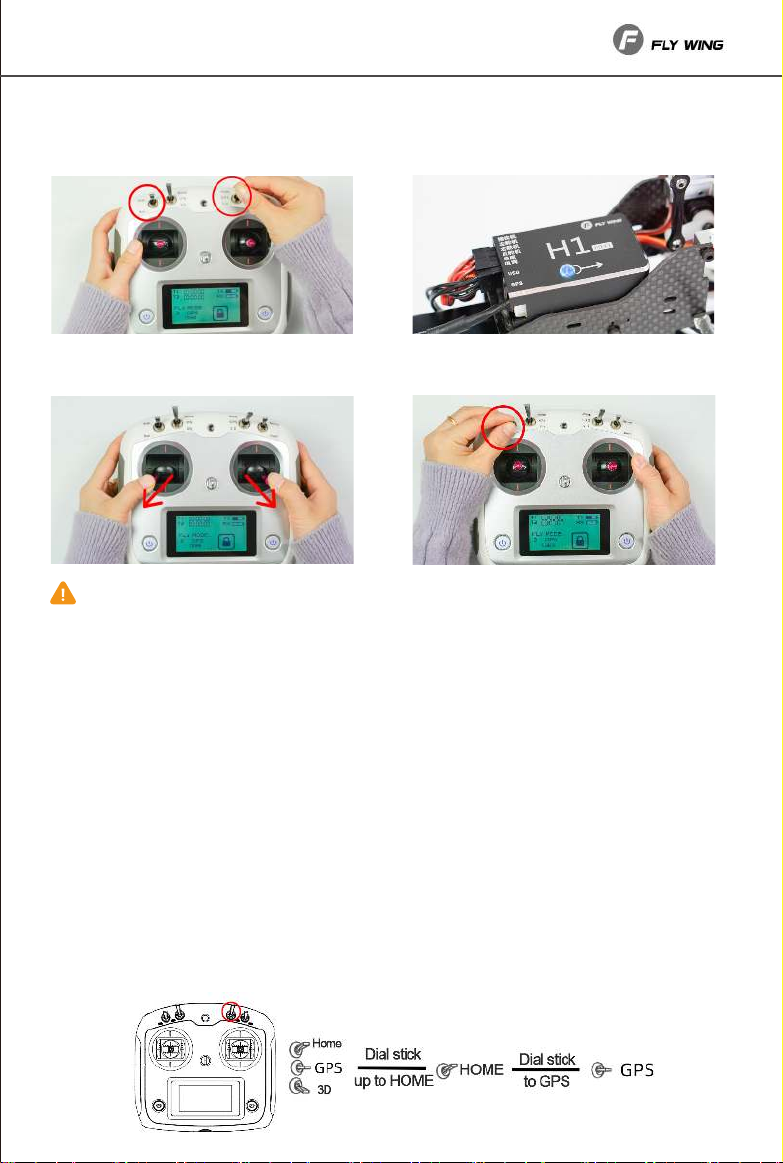
● nlock / take off in 3 mode take mode 2 as an example
1ial the motor run switch to stop position, dial the
mode switch to 3 position,
2ove the helicopter to the outdoor open
environment without trees and buildings.
Power on, and the H1 flight control light is solid
blue.
3nlock as shown in the figure and hold
for about 5 seconds until the flight control
light is flashing blue.
About the use of fully manual 3 mode.
When the helicopter is flying in the air, switch from GPS mode switch to 3 mode, the helicopter will
fall down quickly. If you are a novice, it is very dangerous to operate this function, and the helicopter
will crash. xperienced pilots can quickly and manually increase pitch control after switching to 3
mode.
4uring the blue light is flashing, ial motor
switch stick to run position,and the helicopter
motor will run. Push throttle stick upwards to take
off.
. Home ode
If you need to use the home mode one key to return, low power return, please make sure that the GPS
satellite signal is good before take-off, and there are no buildings or trees around the take-off point that
hinder the return.
● mart return
ial the switch to H,the helicopter return automatically. Then dial to GPS mode to terminate the
return flight.
•
Low power return when the power system judges that the current power is low, it will auto return
and land. Please ensure that the current distance of the helicopter conforms to the range of the
helicopter's remaining power.
•When returning with low power, the helicopter will auto rise up to 15 meters, and then return,
which isn't controlled by the operator. If there are obstacles trees or buildings on the way back,
the auto flight needs to be terminated
● Ways to stop low power
•If you want to stop the low power return, please flick the switch to H, and then flick the switch
to GPS. You can manually control the helicopter after landing and manually turn off the motor.
uring this period, the helicopter will not return with low power until the helicopter is powered off.
Page 9
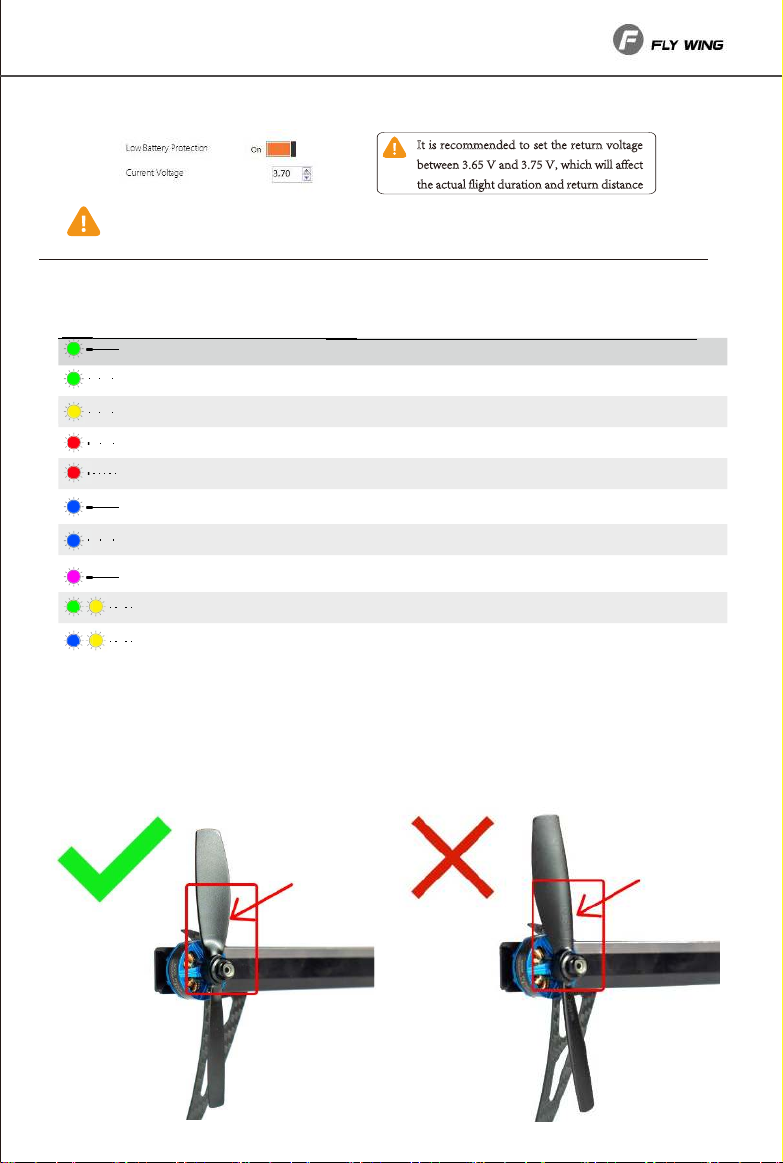
•sers can increase or decrease the return voltage according to the flight demand, or turn off the
low power return function.
t is recoee to set the retur oltage
etee 3.65 a 3.75 hich ill affect
the actual flight uratio a retur istace
When the transmitter signal is normal, the transmitter can be used to control the landing
position during the return landing.
ppendix
Helicopter Status Indicator escription
Green solid
Green flash
Yellow flash
Red flash slowly
Red flash quickly
lue solid
lue flash
Purple solid
Green,yellow flash
lue, yellow flash
GPS status is good, can take off
GPS status has been locked, start switch can start motor
helicopter is getting positioning
ompass calibration required
Receiver has no signal
3 status is good, can take off
3 status has been locked, start switch can start motor
Return mode or automatic flight mode
Low battery power in GPS mode
Low battery power in 3 mode
. aintenance replace the tail blade
If the tail rotor is damaged or has obvious crack, please replace it in time. When replacing, the side with words on
the tail rotor faces the motor, and the side without words faces outward. Pay attention to the installation direction
Page 10
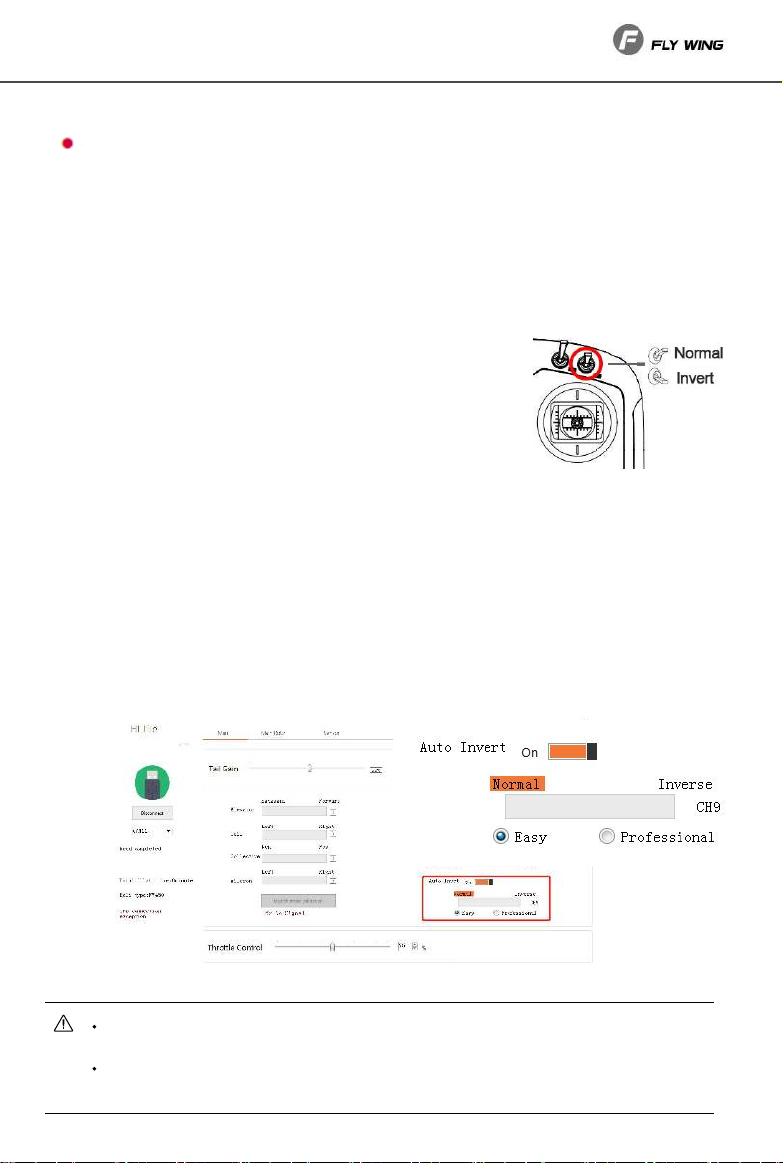
. nekey
ne key to ormal/Invert flight
Flywing has designed one key switch ormal /Invert mode for users. In inverted mode, GPS can still fly at
fixed point and fixed altitude, providing users with a good acrobatic training platform. In 3 mode flight,
this function is invalid, this function only works in GPS self stabilization mode.
•When using this function, the helicopter will switch ormal/ Invert according to the position of the
switch on the upper right corner of the transmitter. While the helicopter is in normal flight, it will switch
to inverted flight, and the helicopter will auto roll over to inverted flight and hover at fixed point by GPS.
•The return function and automatic route Figure of or circle is not available in inverted mode, please
do not switch.
•Please pay attention to the battery power. This function can be switched only when it is more than 10
meters above the ground.
•After one key to invert, you can control the flight action and altitude
of the helicopter
if you want to switch ormal flight mode, you need to climb to more
than 10 m above the ground again, so that the switch is effective. In the inverted state, it is
recommended to use 4S battery and set the constant speed throttle at
more than 5.
•There are two modes simple inverted mode and expert inverted mode.
•simple inverted mode
This mode is suitable for novice , and can quickly experience the fun of reverse flight. It needs to be set
in the parameter adjustment software. When the reverse flight switch is turned on, the helicopter will
automatically roll to inverted flight and hover at fixed point by GPS. At this time, the user's operation
mode is the same as that of forward flight. if the throttle stick is pushed upward, the helicopter will
climb upward. If the elevator stick is pushed forward, the helicopter will move towards the nose.
xpert inverted mode.
•
This mode is suitable for 3 stunt training operation, and can be used for basic hovering operation of
3 stunt assisted by GPS. It needs to be set in the parameter adjustment software. When the reverse
flight switch is turned on, the helicopter will automatically roll to inverted flight and hover at fixed
point by GPS. At this time, the operation mode of the helicopter is the same as that of 3 stunt.
push the throttle stick upward, the helicopter will descend, and if the elevator stick move forward,
and the helicopter will move towards the tail.
This function is a test function. ue to the different performance and power of each helicopter,
the rolling effect will be slightly different. y default in the software ,If the height of the
helicopter is less than 10 meters above the ground, this function cannot be turned on.
If the user opens this function below 10 meters above the ground, the user shall bear the
adverse effects and consequences caused by the use of this function, such as helicopter failure.
Page 11
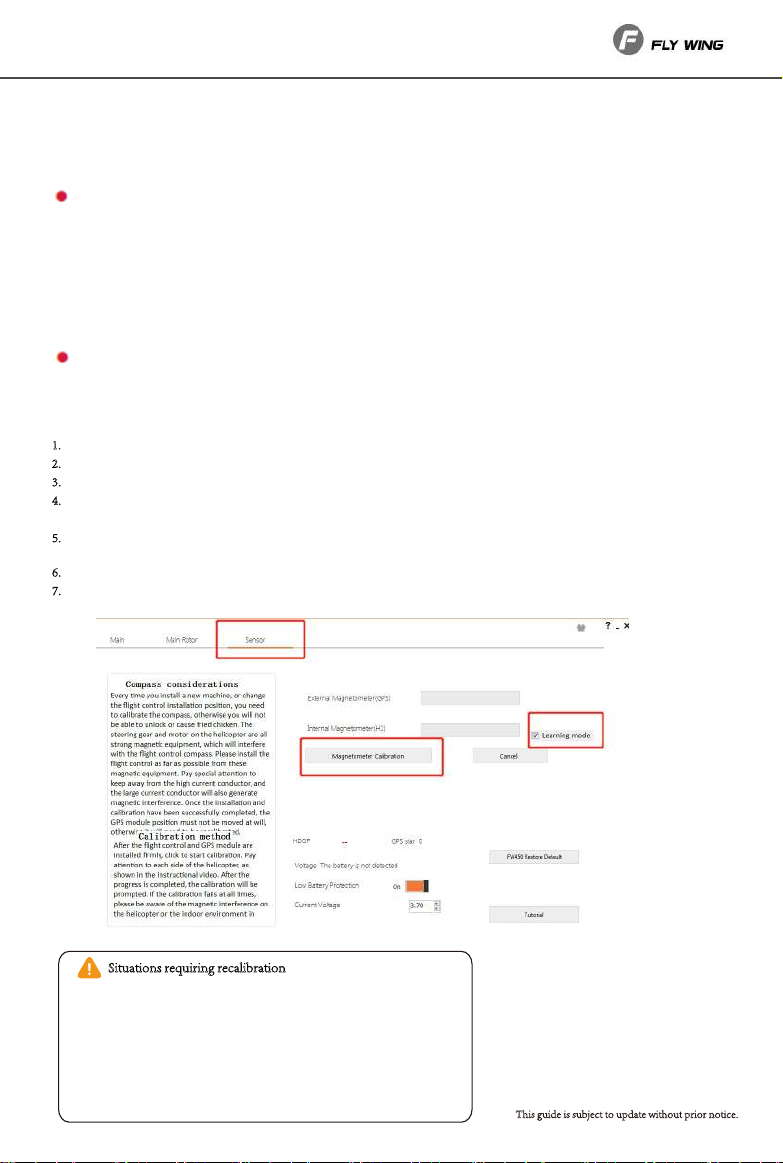
. ompass calibration
ompass is easy to be disturbed by strong electric field, strong magnetic field and strong
electromagnetic field, which will lead to abnormal compass and even cause flight accidents. Regular
calibration can make the compass works at its best.
alibration precautions
1. o not calibrate in the area of strong magnetic field and electric field or near large metal, such as
magnetic ore, parking lot, building area with underground reinforcement, etc.
2.o not carry ferromagnetic materials, such as keys, watches, speakers, etc. when calibrating.
3. If the compass is calibrated indoors, remember to recalibrate when changing to outdoor flight to
prevent compass abnormality during flight due to magnetic field difference between the two places.
4.Please move the helicopter to another location when there may be steel materials affecting the
compass.
alibration procedure
Please select an open space and calibrate the compass according to the steps below. For more
information on compass calibration, please visit https//www.flywingrc.com/video/ Watch relevant
teaching videos. ethods calibration was carried out with parameter adjustment software
.pen https//www.flywingrc.com/software/ ownload a software.
1
2
. onnect flight control and computer with S type- data cable
. Select the corresponding port generally not 1 and click onnect.
3
4
.nter the sensor calibration option of parameter adjustment software, check the learning mode, and
click Start calibration.
. The rotor rotates 360 in upright position of the helicopter and 360 in the inverted upside down
5
position.
6
. Head up vertical rotation 360 degrees, head down vertical rotation 360 degrees.
. If the progress bar does not end, repeat the above operation until the end of the calibration
7
progress bar indicates that the calibration is successful.
ituatios reuirig recaliratio
1. ompass data abnormal, helicopter status light
red flashing
2. The flight site is far away from the last compass
calibration site
3. The structure of helicopter is changed
4. The drift is serious during flight, or it can't fly in a
straight line.
※his guie is suect to upate ithout prior otice.
Page 12
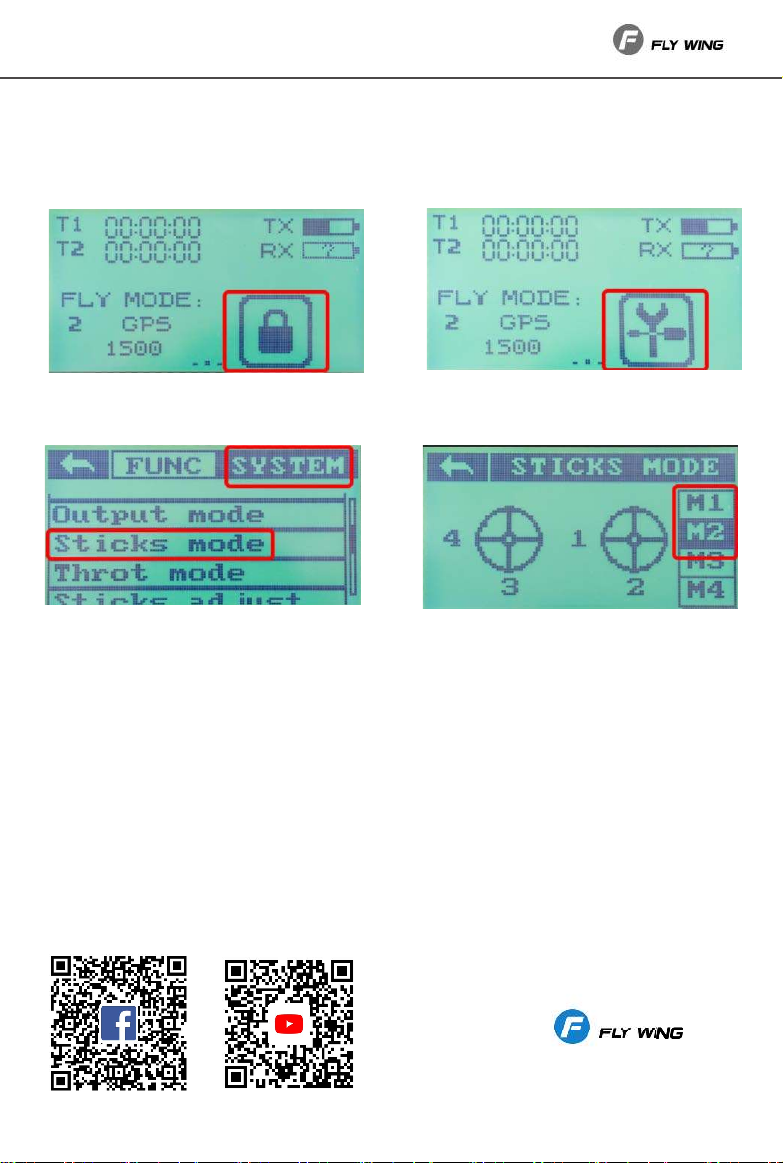
. Model 1/Model 2 change
How to change 1 to
1When the helicopter is powered off, press
and hold the screen lock icon for about 3
seconds to unlock the screen
2Short press the wrench icon to enter the
menu
3nter the SYST menu and click sticks mode
4Select the corresponding mode on the right
side of the screen and press the arrow in the
upper left corner to return
10.
oes the servo arm move in GPS mode
A In GPS mode, the servo arm does not move, and it will move only after unlocking. uring adjusting,
you can switch to 3 mode to view the servo arm movement
After the helicopter motor run is unlocked, the motor rotates autonomously, and the rotor rpm speed is
not controlled by the throttle stick
AThe transmitter controls the flight of the helicopter by adjusting the pitch
I pick up helicopter, do not install blades, unlock and start the helicopter, servo arm irregular movement
H1 recognizes that blades are not on. Servo will not move correctly.
11. Get more information
Welcome to join the Facebook H1 flight control technology exchange group. If you have any doubts, you
can find more teaching contents in this discussion group. Welcome to follow the official YouTube channel
for more teaching videos. Welcome to contact us on the official website
Facebook Youtobe
www.FlywingRC.com
 Loading...