

Page 1

USER
MANUAL
PEAK4
EN
Page 2

ENGLISH
2
PEAK4 User Manual ENGLISH #01 / 11-2018
Änderungen vorbehalten / data subject to change
© FLYSURFER Kiteboarding 2018, www.flysurfer.com
CONTENT
01 Safety Notes ............................................................................................................................................. 3
01.01 Do not fly with kites........................................................................................................................................................3
02 Overview of the kite ................................................................................................................................ 4
03 Handling ................................................................................................................................................... 6
03.01 Setting Up a Single-Skin Kite .......................................................................................................................................6
03.02 Sorting the bridle ............................................................................................................................................................7
03.03 Securing a Single-Skin Kite .......................................................................................................................................... 8
04 Launching ................................................................................................................................................. 8
04.01 Self launching at the edge of the wind window ........................................................................................................ 8
04.02 Edge of the wind window with an assistant ...............................................................................................................9
04.03 Powerzone ........................................................................................................................................................................9
05 Relaunch .................................................................................................................................................10
05.01 Reverse Launch ............................................................................................................................................................. 10
05.02 One Line Relaunch ........................................................................................................................................................ 11
06 Landing ....................................................................................................................................................11
06.01 Landing with an assistant ........................................................................................................................................... 11
06.02 Landing without an assistant at the side of the wind window ............................................................................. 12
06.03 Self-landing using the B-Safe System .....................................................................................................................12
07 Safety System .........................................................................................................................................13
07.01 Reactivating the kite .................................................................................................................................................... 13
08 Emergencies ............................................................................................................................................14
09 Packing Up ..............................................................................................................................................14
10 Kite Care ..................................................................................................................................................15
11 Assembly of B-Safe System ...................................................................................................................16
12 Maintenance ............................................................................................................................................16
12.01 Replacing the Sparepart Lines ................................................................................................................................... 16
12.02 Little Connection Lines ................................................................................................................................................17
12.03 Repairing the Cloth .......................................................................................................................................................17
13 Trimming .................................................................................................................................................18
13.01 Mixer Test ....................................................................................................................................................................... 18
13.02 Optimum trim of the flying lines ................................................................................................................................ 18
14 Repair & Spare Parts ..............................................................................................................................18
Page 3

ENGLISH
3
SAFETY NOTES
01 SAFETY NOTES
Read the entire Gear Guide online thouroughly before using the kite, and strictly confirm to the procedures noted. The following
safety guidelines are only guidelines and do not claim to cover every instance.
01. Powerkiting is a potentially dangerous sport, that holds risks for the athlete or the people surrounding them. Incorrect use of
this product may result in serious injury or even death for the user or third parties. Every user should be qualified by a FLYSURFER
kiteschool or a FLYSURFER dealer.
02. The user carries the sole responsibility for themselves and third parties when using this product. The user must check their equipment for wear, especially wearing parts, before each kite session. Do a test activation of your quick release before every launch. This
will ensure the system is working and reinforces the release instinct of the kiter.
03. The product may only be used with original spare parts, and may not be modified.
04. This product has been designed for riders weighing 40-120kg. We cannot guarantee the proper functioning of the product outside
of this weight range.
05. Never kite in unsuitable conditions such as storm fronts, lightning, or oshore winds. Check the weather and wind conditions carefully and choose the according kite size.
06. Check out the kiting spot beforehand. Make sure you are aware of any risks such as obstacles, shallows, currents and bans. Also
be aware if a rescue craft can get to you in case of an emergency. It is always best to ask people (locals) who know the area well.
07. Keep a safety margin of at least two line-lengths downwind of you, and never kite near people or obstacles. Kiting near powerlines,
roads, airports, clis, etc. is extremely dangerous.
08. Make sure that someone is looking out for you and that help is there if you need it. Never go out alone. Never kite further away from
shore than you can swim back.
09. The incorrect usage of lines creates a high risk of injury for yourself as well as others. Body parts that get caught in the lines of the
kite may suer from severe injury or burns.
10. Only use bars with a safety system that you can open in emergency situations. Use a quick-release kite leash so that you can disconnect your body from the product in case of an unforeseeable emergency.
01.01 Do not fly with kites
A kite is not designed, tested or licensed as an aircraft or flying device. The use of a kite as a flying device is illegal and not covered
by insurance. Flying with this product can lead to death!
Page 4
ENGLISH
4
OVERVIEW OF THE KITE
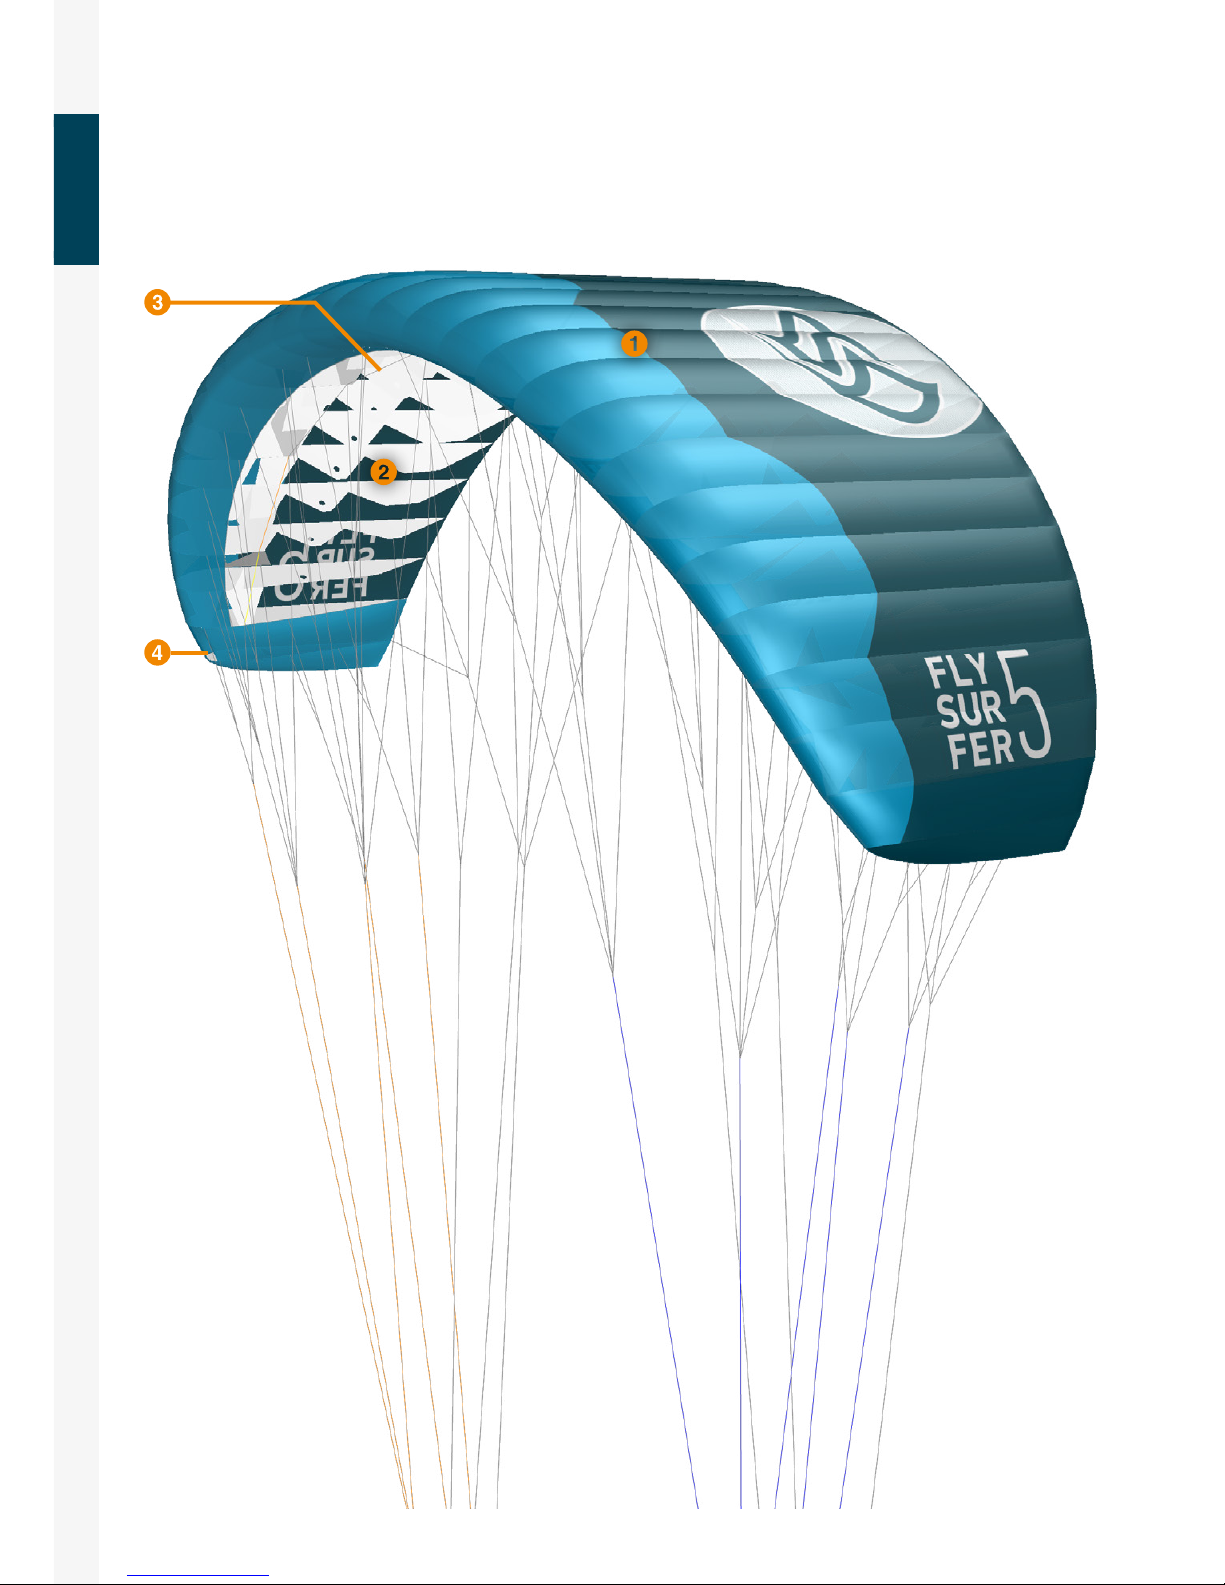
02 OVERVIEW OF THE KITE
Page 5
ENGLISH
5
OVERVIEW OF THE KITE
Optimized Construction
The PEAK4 uses our proven material mix of DLX+ & X-Light cloth,
as well as new reinforcements in areas subject to particularly
high loads such as the leading edge, the wingtip and the trailing
edge of the kite. The single skin concept simply collapses during
hard crashes on the leading edge, and therefore can not burst or
be badly damaged. The new outline of the PEAK4, the reduced
number of cells and bridle layout, in addition to the use of XLight cloth used for large areas of the canopy, result in an incredibly light kite, which has the smallest pack size and is therefore
perfectly suited for kite touring.
Single Skin Foilkite Concept
The Single-Skin foilkite concept has a very ecient depower and
allows for immediate loss of power using the bar throw, oering
the PEAK4 high levels of safety on the mountain. Its performance
and unparalleled traction generate amazing power per square
metre. Increased profile curvature for the PEAK4 maximises lift
and agility. The most obvious benefit of the Single Skin concept
is the reduced mass of the kite, allowing the PEAK4 to be stable whilst flying at the edge of the wind window in the slightest
breeze, without overflying and remaining easy to control in low
to high winds.
B-Safe System
The B-Safe System is guided along the B-Level attachment
points, through polypropylene sliding rings. After activating the
quick release, the bar slides up the 5th line and the kite is reefed
horizontally in the middle. This removes the pressure in the kite
and allows it to come down powerless through the wind window.
The PEAK4 can then be reactivated immediately and can be restarted in the power zone. Independent launching and landing of
the PEAK4 is fully supported by this safety system.
Hybrid Wingtip Technology
Hybrid Wingtip Technology consists of two self-inflating cells on
each wingtip of the kite. The openings are protected with mesh
material to prevent entry of snow or dirt. The more ecient aerodynamics of the wingtip allows for tighter turning with constant pull, as well as increased backstall resistance. Through
that the bar feedback has been improved considerably, and the
flapping of the tip is almost eliminated, giving the PEAK4 a sporty but familiar and confidence inspiring feeling.
X-Light / DLX+ Construction
A high-strength Nylon 6.6, 32g / m2 double-ripstop, UV resistant
+ PU coating on the outside and Lotus coating on the inside. Rigid foils make for a stier, more dynamic canopy. The rigid foils
are sewn in further inwards to minimize abrasion at the leading
edge if the kite is pulled over hard surfaces.
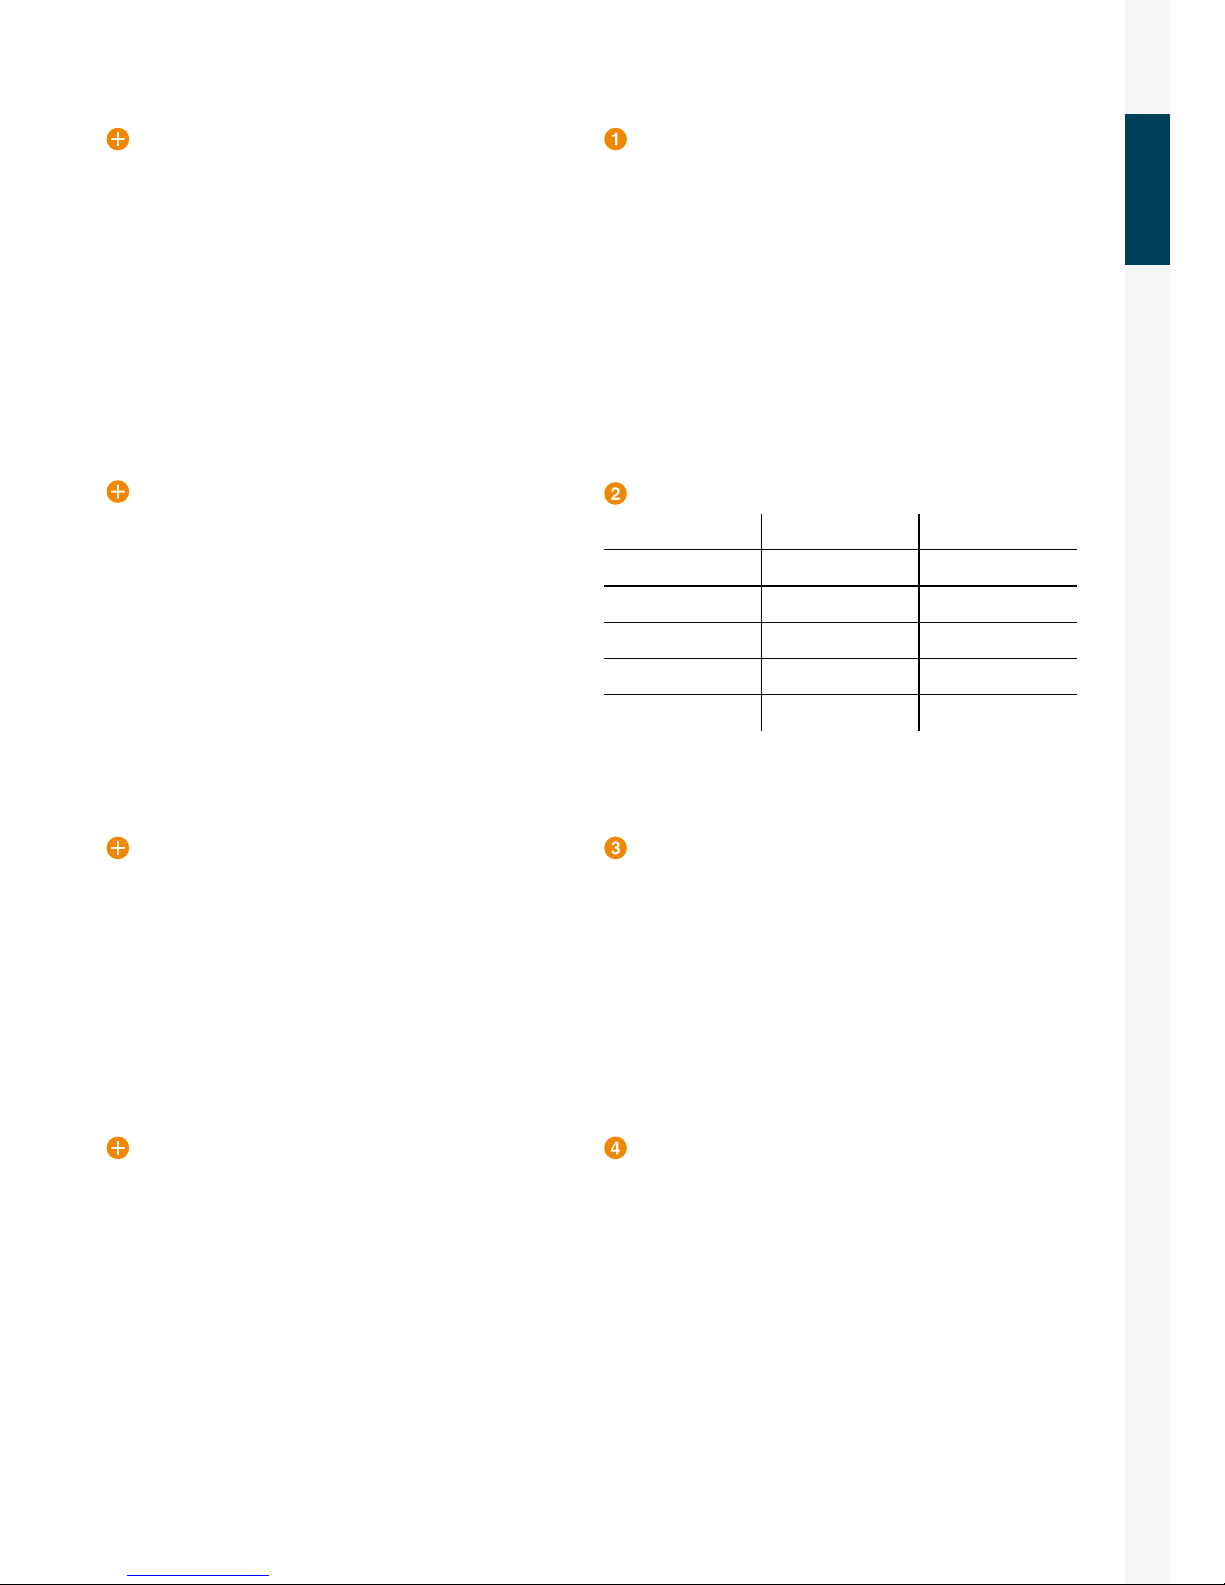
Weight and packing size
PEAK4 Weight (kg) Packing size (HxLxW)
3 0,62 33 x 10 x10
4 0,70 35 x 11 x 11
5 0,88 37 x 12 x 12
8 1,16 41 x 13 x 13
11 1,46 45 x 15 x 15
B-Safe System
The scope of delivery of the PEAK4 bag includes the B-Safe top
lines for mounting the B-Safe system. Detailed instructions can
be found on page 16.
Hybrid Wingtip Technology
Hybrid Wingtip technology has an opening integrated in the
wingtip to divert any incoming snow or dirt again.
Page 6
ENGLISH
6
HANDLING
03 HANDLING
A kite needs to be secured properly even if
the wind is light. A runaway kite can be a serious danger to people or animals downwind.
To ensure a long lifespan of your kite, we recommend that you do not leave the kite flapping in the wind and sun for long periods.
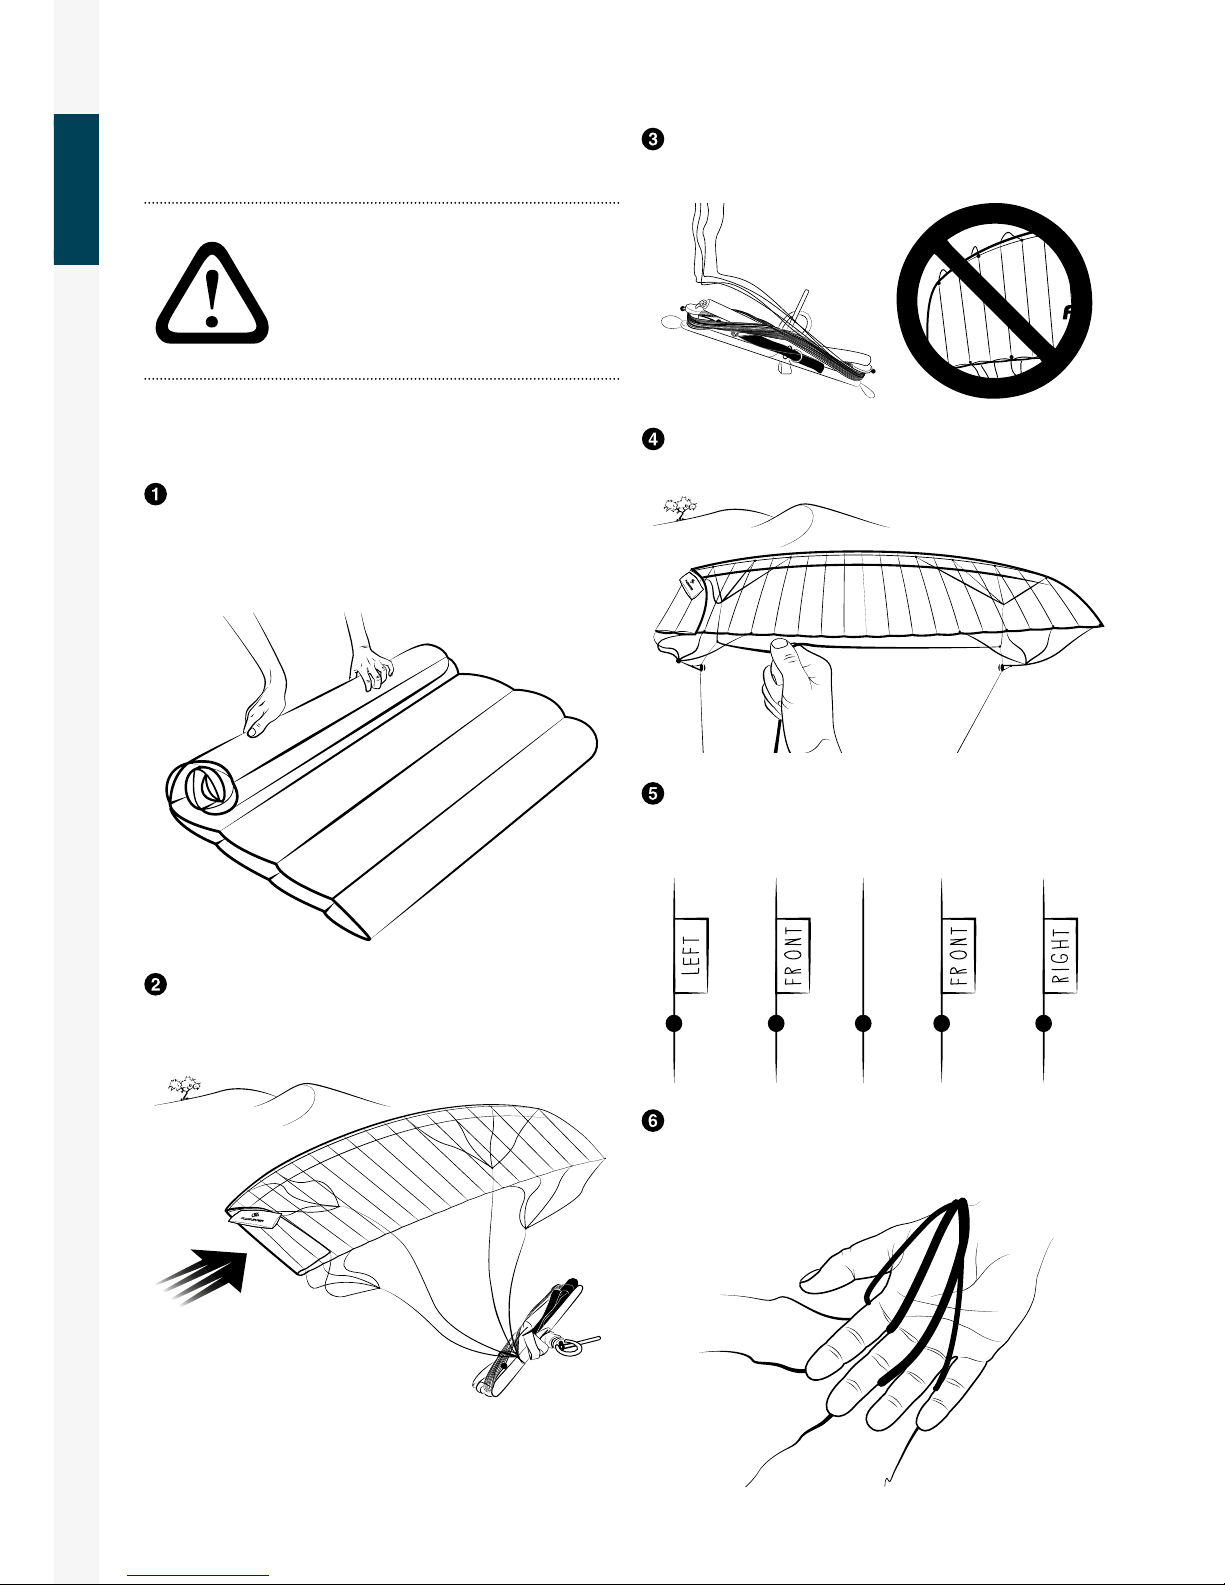
03.01 Setting Up a Single-Skin Kite
Lay the kite out on a surface free of hard or sharp objects.
Unroll your kite upside down into the wind and secure it with
something that has no sharp edges and is heavy enough to hold
down the kite for the given wind.
Place the bar far enough away from all bridle lines on the
trailing edge side of the kite. Make sure that the bar cannot fall
or be pulled into the bridles.
Check your bridle for tangles. Make sure that none of the
lines are caught around the back of the kite.
Start at the leading edge holding up the front lines to visu-
ally check the bridle step by step.
When the bridle is sorted out, lay the front lines to the inside
and the steering lines to the outside. If not, follow the tips on the
“Sorting out the bridle“ chapter.
Ensure your flying lines are connected correctly and clear of
any potential hazards. Check for any damage or knots.
Page 7
ENGLISH
7
HANDLING
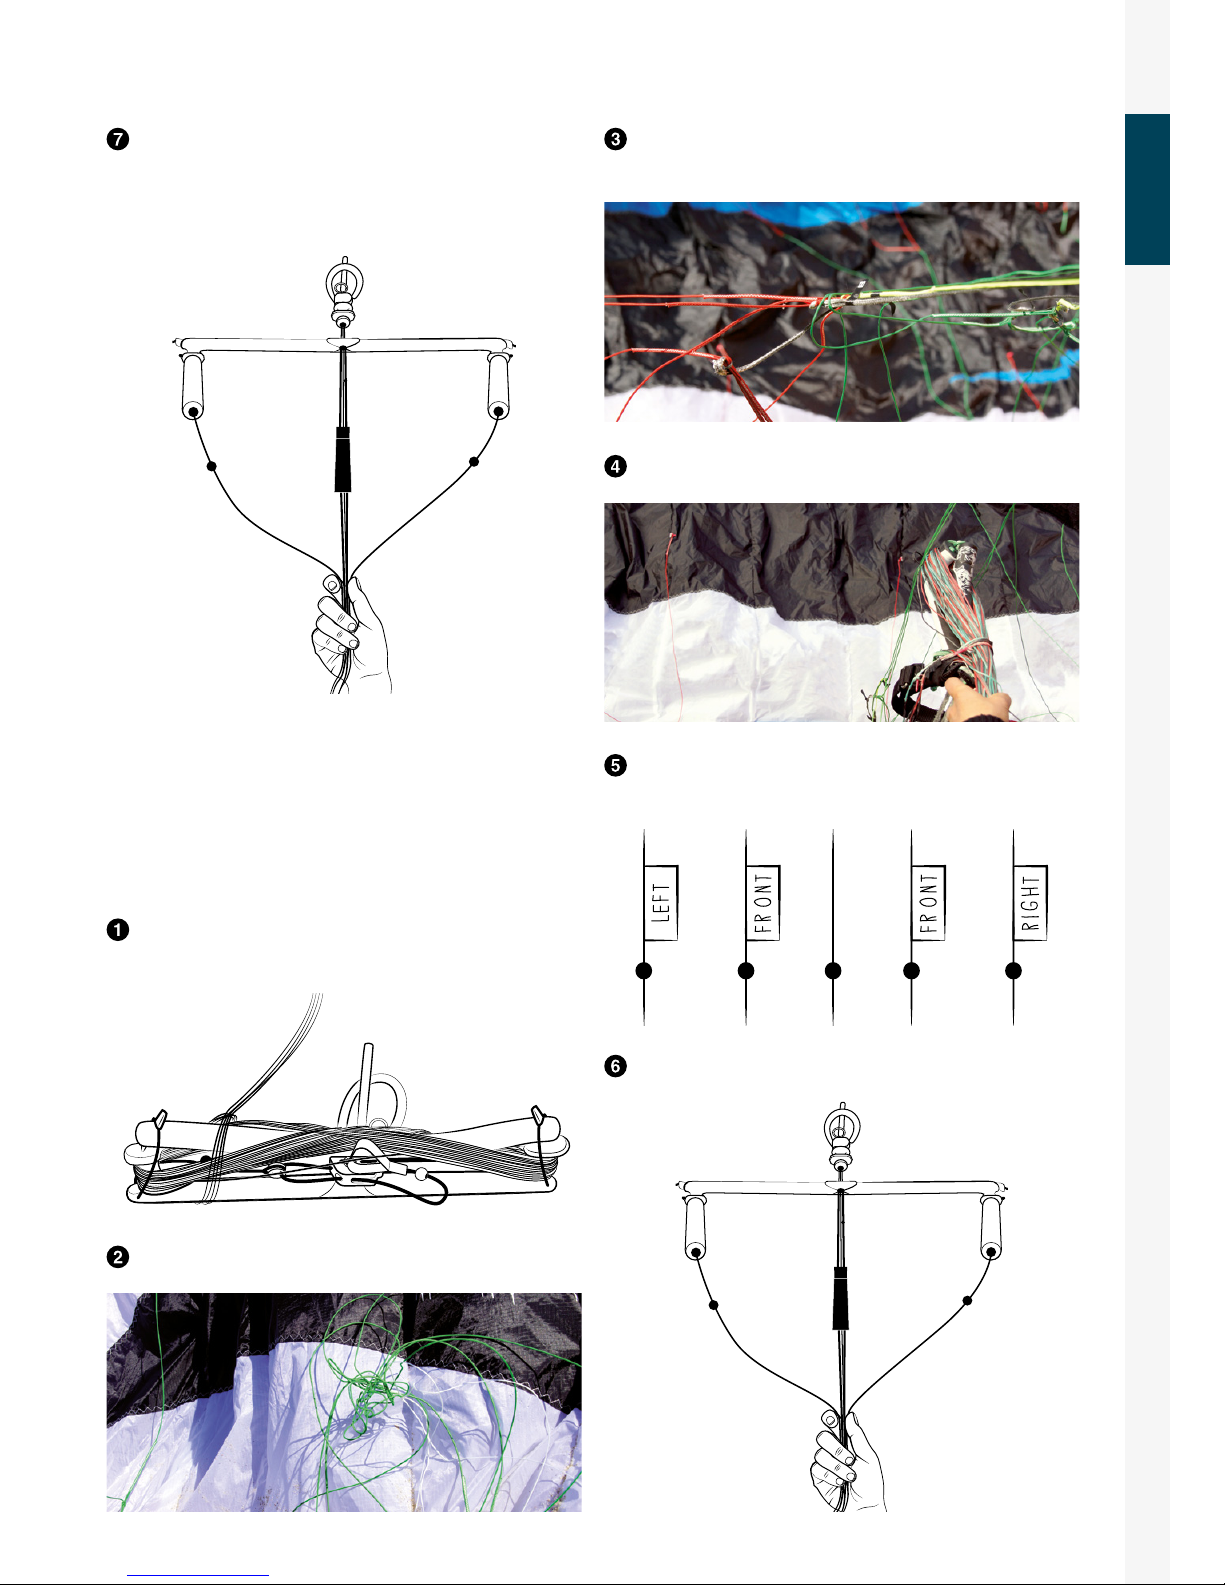
If the lines are still twisted, untwist them by turning the bar.
It may be possible (especially after not being careful when packing away or setting up the kite) that the bar has to be pushed
through the lines again to untwist.
03.02 Sorting the bridle
Even a badly tangled bridle can be quickly sorted out with the
right technique. If the bridle is tangled, it was probably caused
by mistakes made when packing or setting up the kite.
Roll up your lines onto the bar until you get close to the mixer and secure the lines with a half hitch and/or the bungie cord.
Undo any loops, knots or bunches that may have formed.
If the bridle is tangled, lines from one side of the bridle may
be running through the lines on the other side.
Stick the bar along these lines through the bridle.
Lightly tension up the bridle again to check it. If necessary,
repeat the last step till the left and right bridles are separated.
Unroll the lines from the bar and check as before.
Page 8
ENGLISH
8
LAUNCHING
04 LAUNCHING
Please check not only the wind and weather conditions, but also
all your equipment, especially the safety system before launching.
Do not use any kite outside of its recommended upper wind range.
When launching in strong winds, we recommend that you have an
assistant holding you from the back of your harness. During launching, always pay attention that your brilde lines do not get caught
on anything or become tangled.
04.01 Self launching at the edge
of the wind window
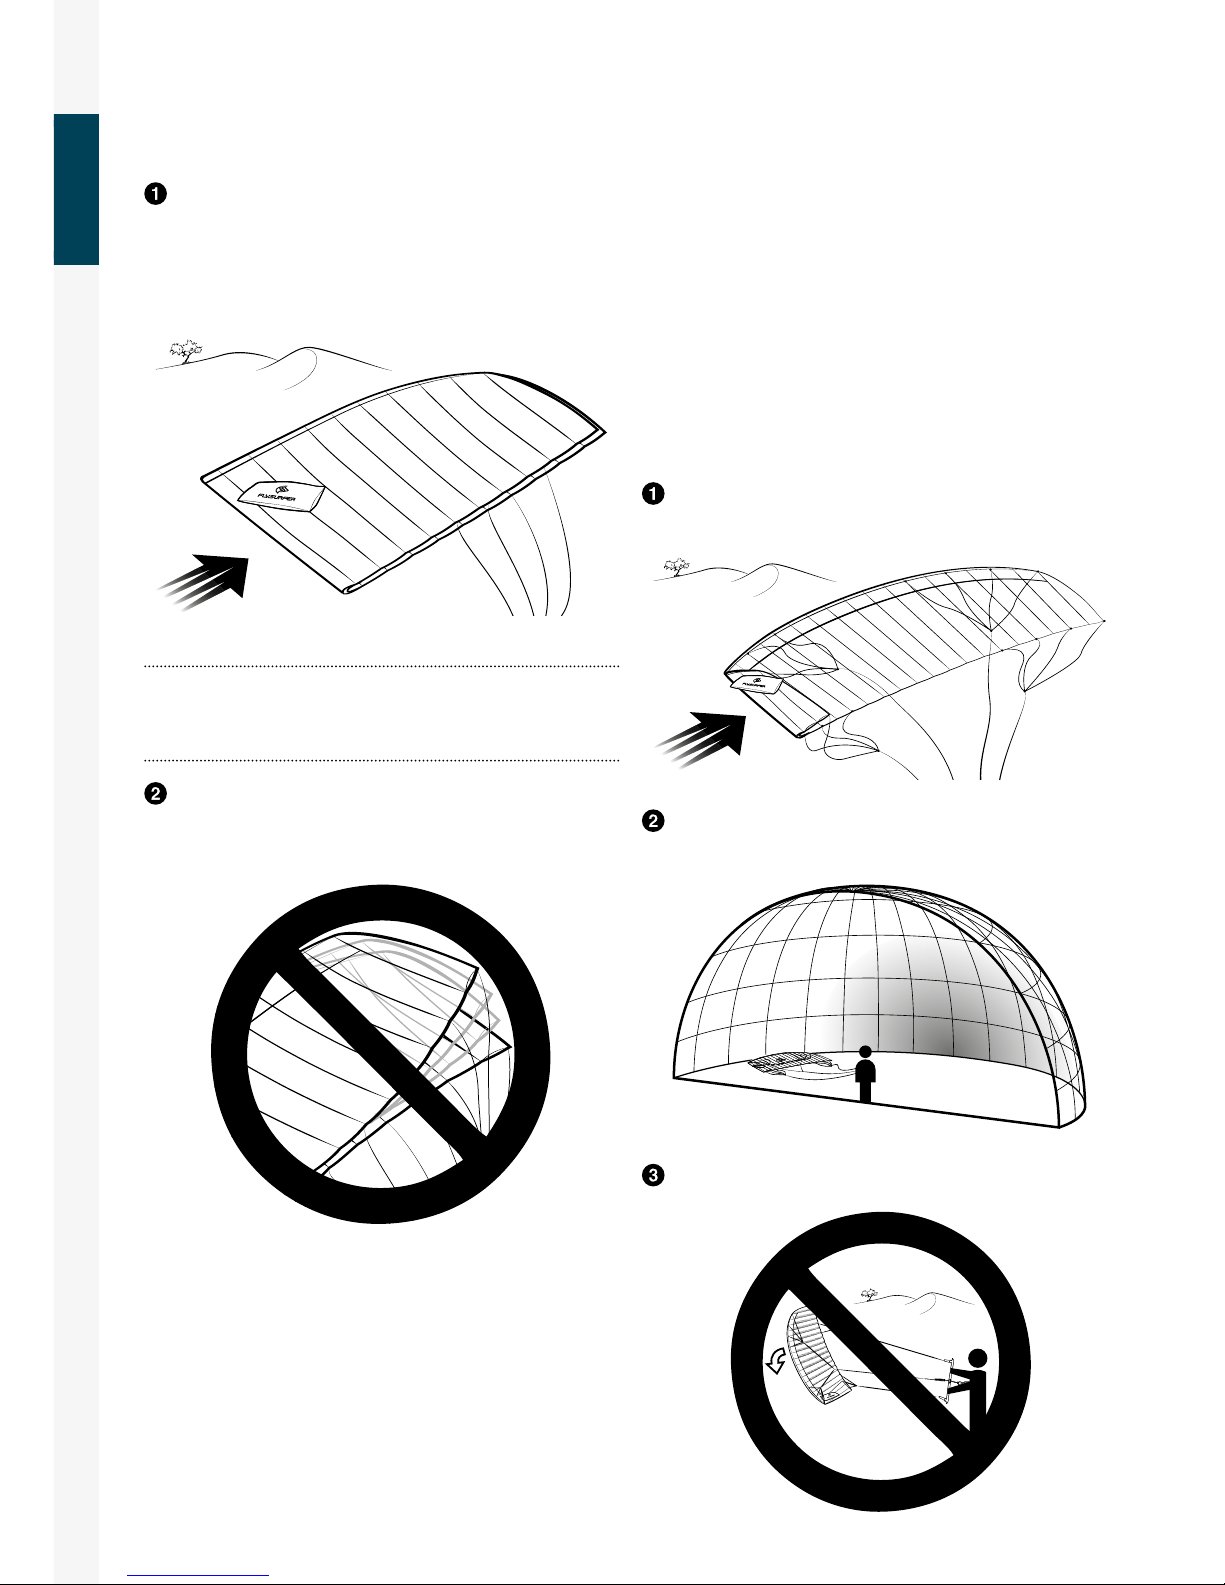
Lay the kite out 90° to the wind. Fold over the windward
wingtip and secure it near the leading edge.
The kite should be positioned 15-30° downwind of you when
you slowly tension the lines for launch.
Pay attention that the downwind wingtip does not fold over
upwind.
03.03 Securing a Single-Skin Kite
Fold your kite in the middle and let the tips flow out downwind. The bottom sail and the bridle will be facing inwards.
Weigh down the kite in the front third of the top sail. This method
prevents the tips from flapping in the wind. Opening the deflate
valve(s) can also help.
Tip:
The kite can also be secured using the same method as
the launch. However, it has been proven that the above method
keeps the kite more still in higher winds..
Make sure that the tips are not flapping too much. This can
lead to the bridle tangling. The tips can be additionally secured
with a bit of sand or other suitable object.
Page 9
ENGLISH
9
LAUNCHING
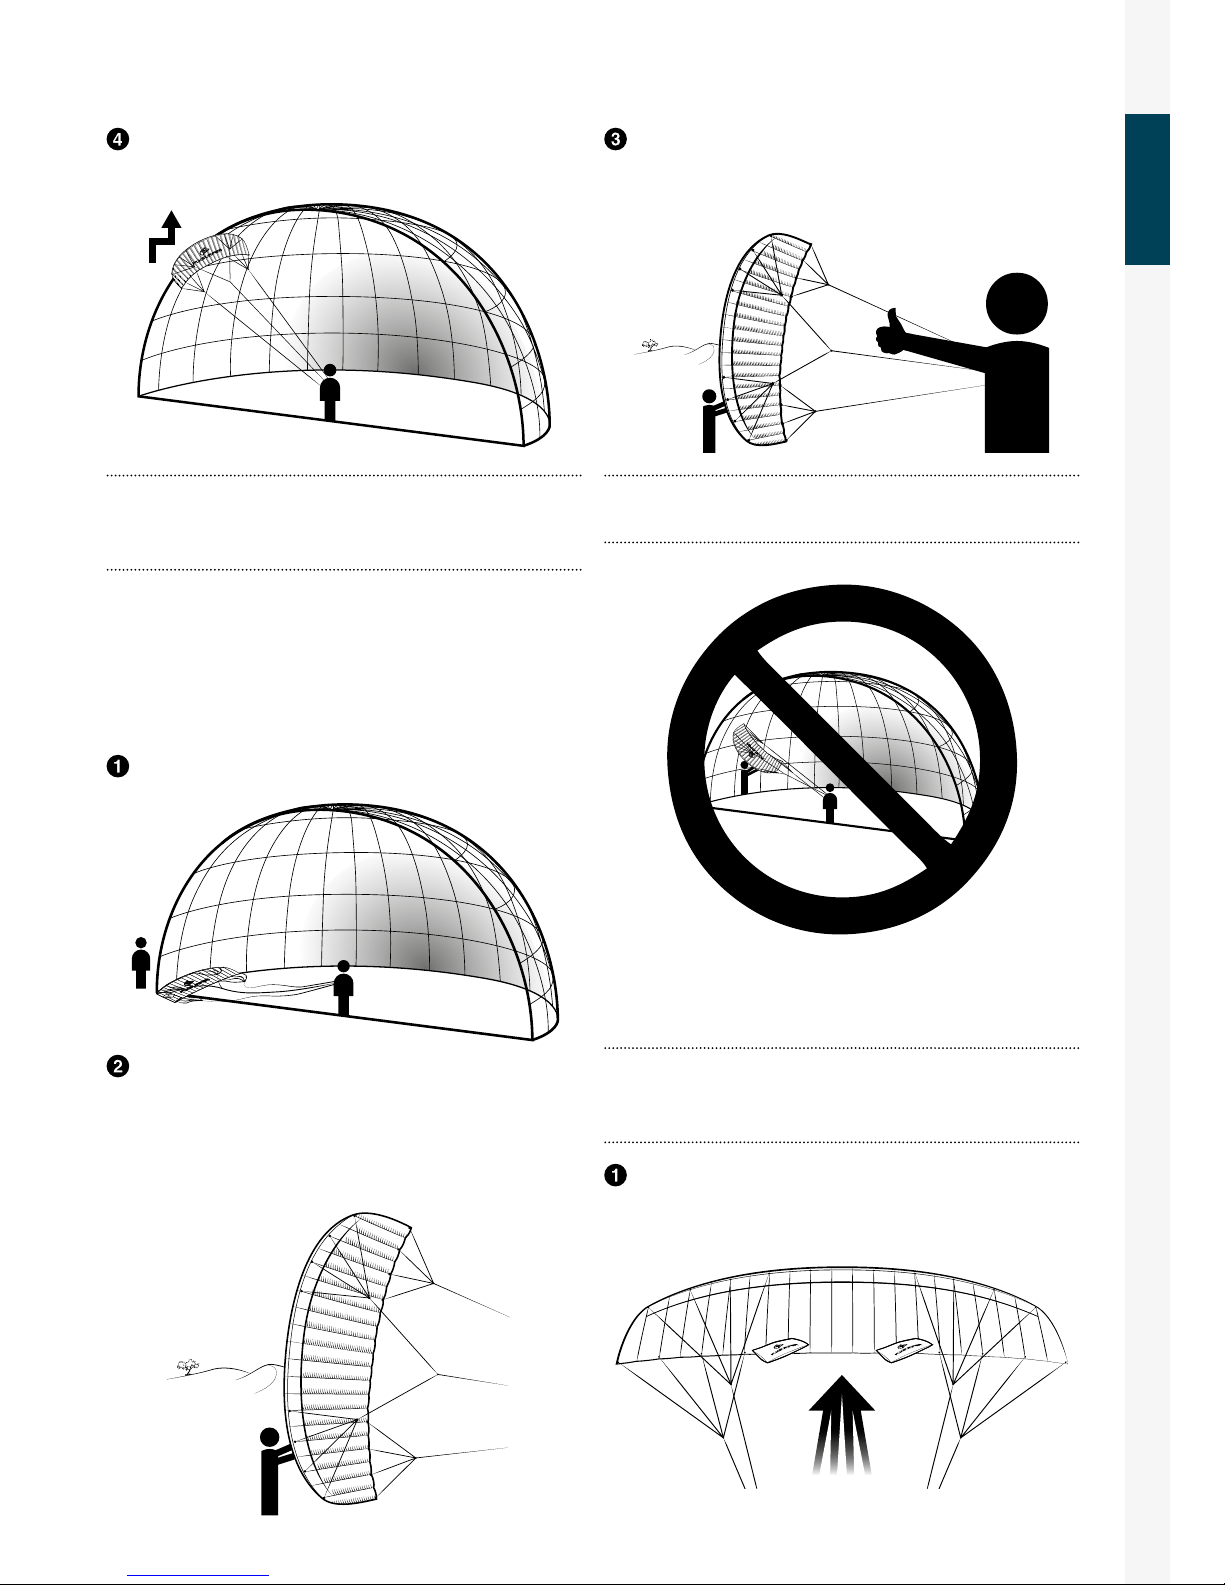
As soon as the kite is inflated and you are ready, give the
assistant the thumbs up signal that he can let go. Make sure to
once again check whether all lines run freely before doing this.
Note:
Get aligned with the wind, the assistant retains his posi-
tion and is not moving around.
04.03 Powerzone
Important:
Only start a kite in the power zone in light wind,
otherwise it can develop large forces/power spikes. Always
keep a large safety distance downwind of yourself.
After setting up the kite in the power zone make sure to
weigh the trailing edge with suitable objects or sucient sand
or snow.
Release the kite from the sand or object securing it with a
step backwards away from the kite and carefully steer it.
Tip:
You can prevent the lines getting caught around the bottom wingtip by folding over the tip once more and securing the
second fold with e.g. sand.
04.02 Edge of the wind window with an assistant
It is important that your assistant is experienced with this technique and you have explained them how it‘s done.
Position kite and assistant exactly on the edge of the window.
The assistant begins from the center of the kite with the
leading edge (LE) into the wind. As the kite shapes its form, the
assistant slowly works his hands down the leading edge until
the kite is fully opened and lets the kite rise up. The bottom tip
should not be touching the ground anymore.
Page 10
ENGLISH
10
RELAUNCH
Put the flying lines under tension so that the kite rises slowly. Take another step to windward to release the weight from the
trailing edge of the kite.
Depower the kite until it reaches the zenith.
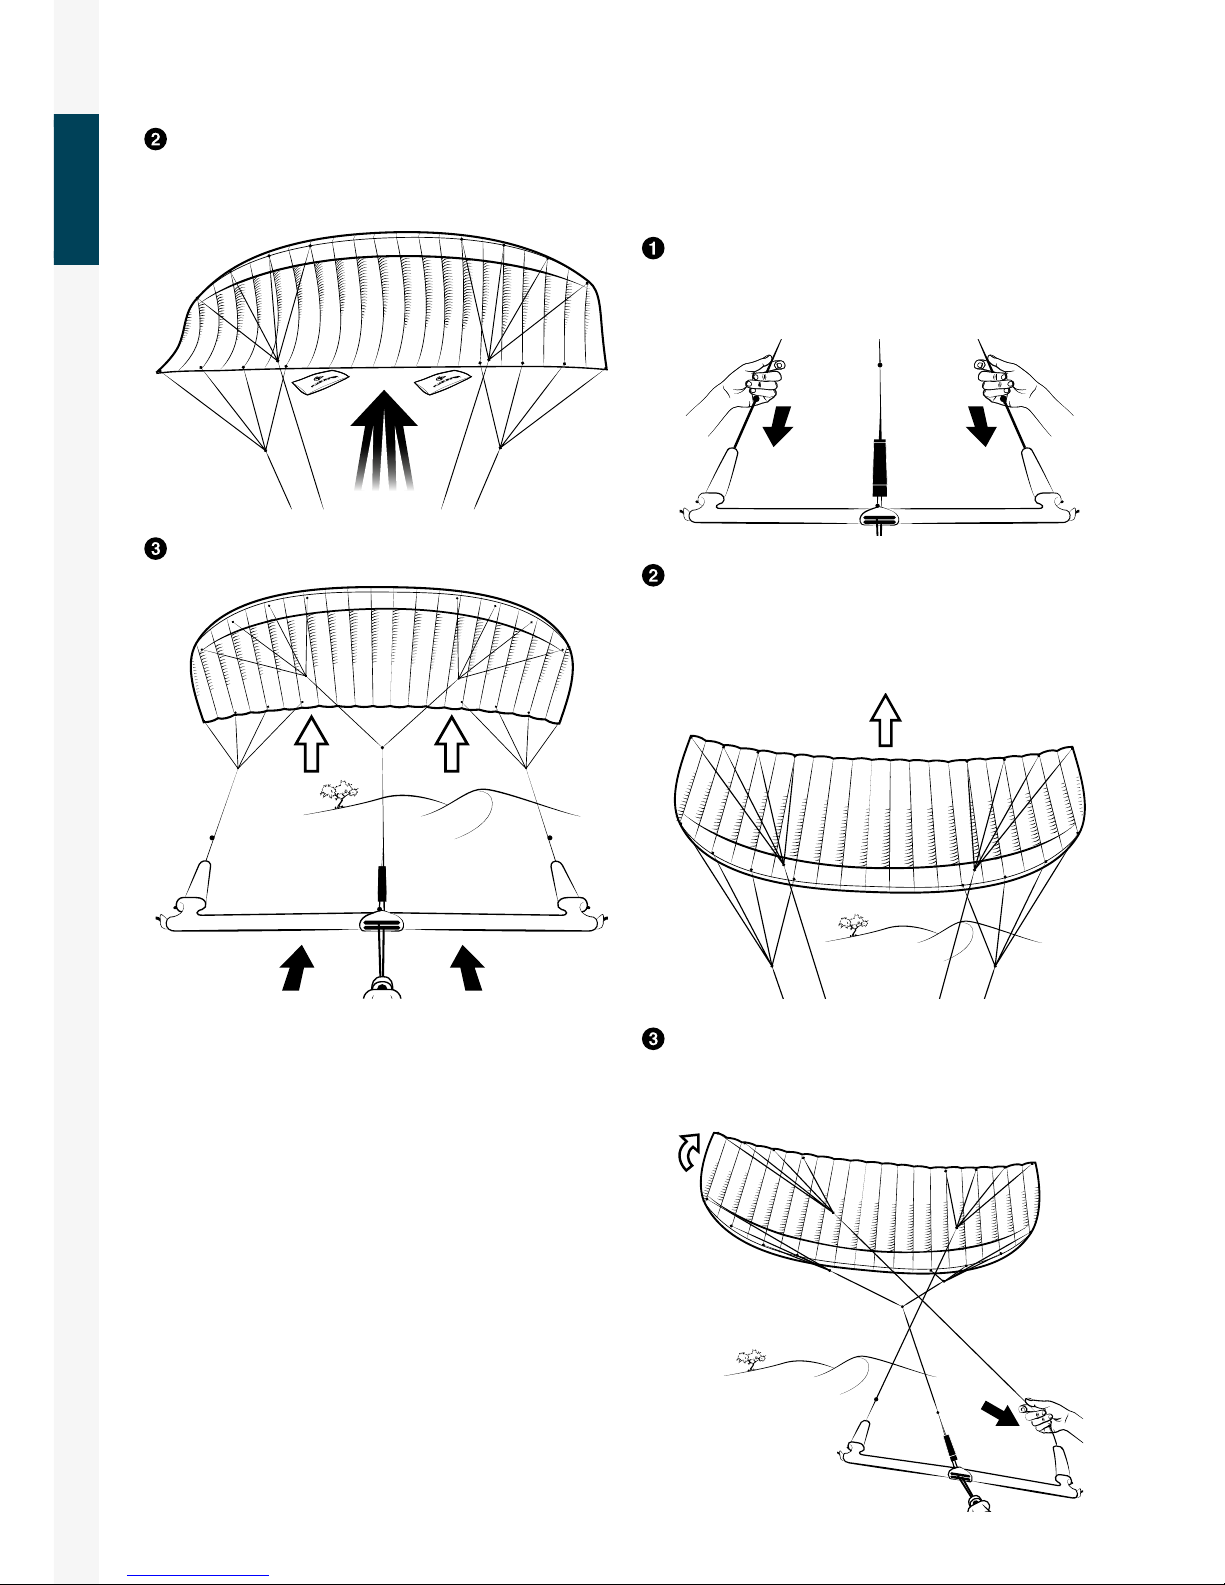
05 RELAUNCH
05.01 Reverse Launch
Grab the leader lines above the floaters as high up as you
can. Make sure that the bar is the right way up. Do not cross
over your hands.
Pull in both leader-lines as far towards yourself as possible
to reverse the kite o the ground. Strong pulls or pumping the
lines may help in light winds. If the kite does not release from
the ground, grab the leader lines higher up.
When the kite is at least one wingspan above the ground,
let go of one of the leader lines. Make sure you keep hold of the
other one and the bar is in the right position.
Page 11
ENGLISH
11
LANDING
The kite will now spin around. As soon as the leading edge
of the kite points up let go of the remaining leader line and put
your hand back on the bar. Depower the kite till its back in the
sky towards the zenith.
Tip:
The reverse launch is the recommended relaunch method
when kiting on solid terrain. This minimises potential damage
from abrasion..
05.02 One Line Relaunch
Grab one steering line high above the floater. Pull back the
line far enough towards you so that the kite starts to peel to the
side you are pulling. Keep pulling until the kite launches at the
edge of the wind window.
If the kite does not lift up and peel to one side when pulling the
leader line, try pulling the opposite leader instead. If this still
does not work, then use the reverse launch method.
Let go of the steering line as soon as the leading edge of the
kite points up. Grab the bar and keep it depowered until the kite
is flying again.
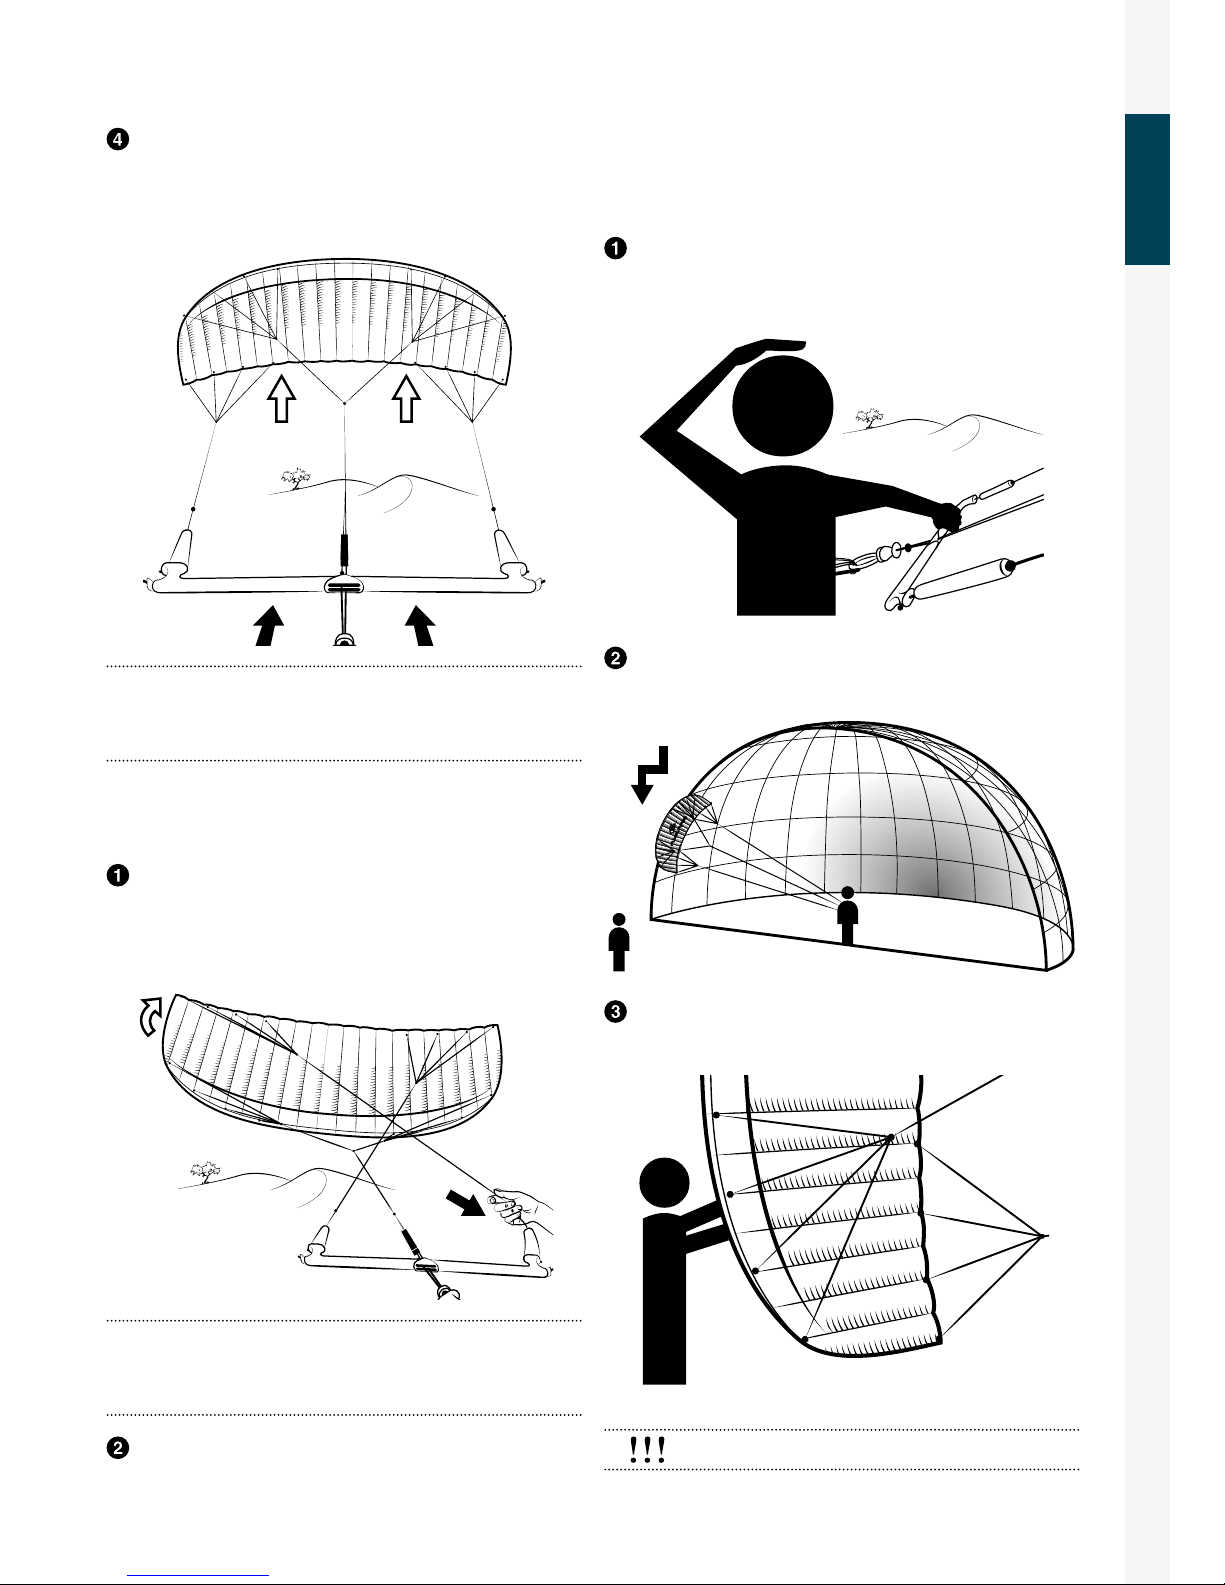
06 LANDING
06.01 Landing with an assistant
The easiest and safest way to land your kite is with the help of
an assistant. Signal a trained assistant that you want to land. The
assistant should be standing well upwind of the kite.
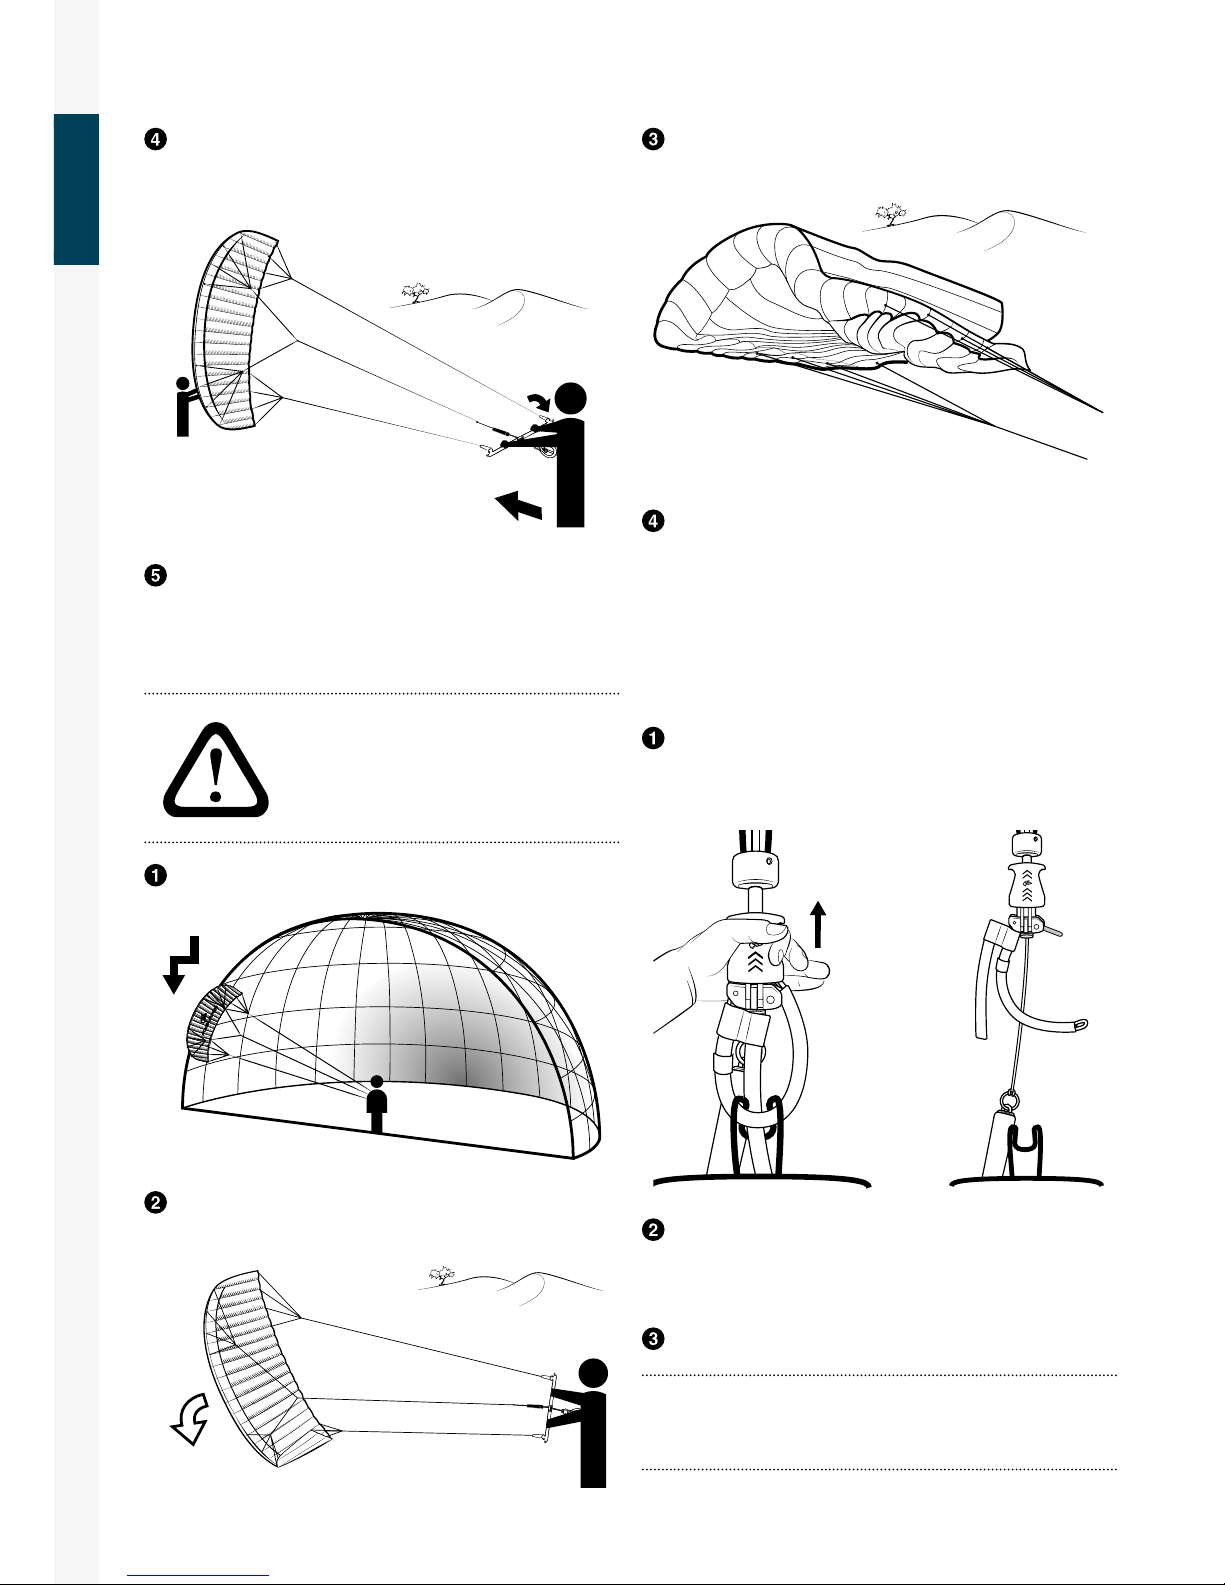
Lower the kite towards the assistant along the edge of the
wind window.
The assistant can now approach the kite and grab hold of the
leading edge of the kite.
Warning:
The assistant should never grab any lines.
Page 12
ENGLISH
12
LANDING
Go quickly toward the kite until it comes to rest entirely on
the ground.
Secure the kite as described in “Securing the Kite“.
06.03 Self-landing using the B-Safe System
Make sure that you have a large enough landing area that is free
of any obstacles that can damage the kite.
Activate the quick release and the kite falls powerless from
the sky. Optionally, you can pull on the 5th line until the kite falls
pressureless from the sky.
Attach the safety leash to a suitable object (e.g. a post or
a board tightly buried in the sand) and work your way up to the
kite a.s.a.p.
Secure the kite as described in “Securing the Kite“.
Tip:
The kite can also be landed in a controlled manner (by
backstalling) by pulling slightly on the safety leash without
activating the quick release.
As soon as the assistant has the kite securely in their hands,
walk towards them until all flying lines are no longer under tension. This way the kite will flag out downwind of the assistant.
Secure the kite as described in “Securing the Kite“.
06.02 Landing without an assistant
at the side of the wind window
Warning: Keep at least two line-lengths safety distance downwind. We generally recommend landing with the help of an assistant.
Landing the kite by backstall should only be
attempted in light winds.
Fly down the kite on the edge of the wind window.
Steer the kite down hard so that the kite collapses on the
ground.
Page 13
ENGLISH
13
SAFETY SYSTEM
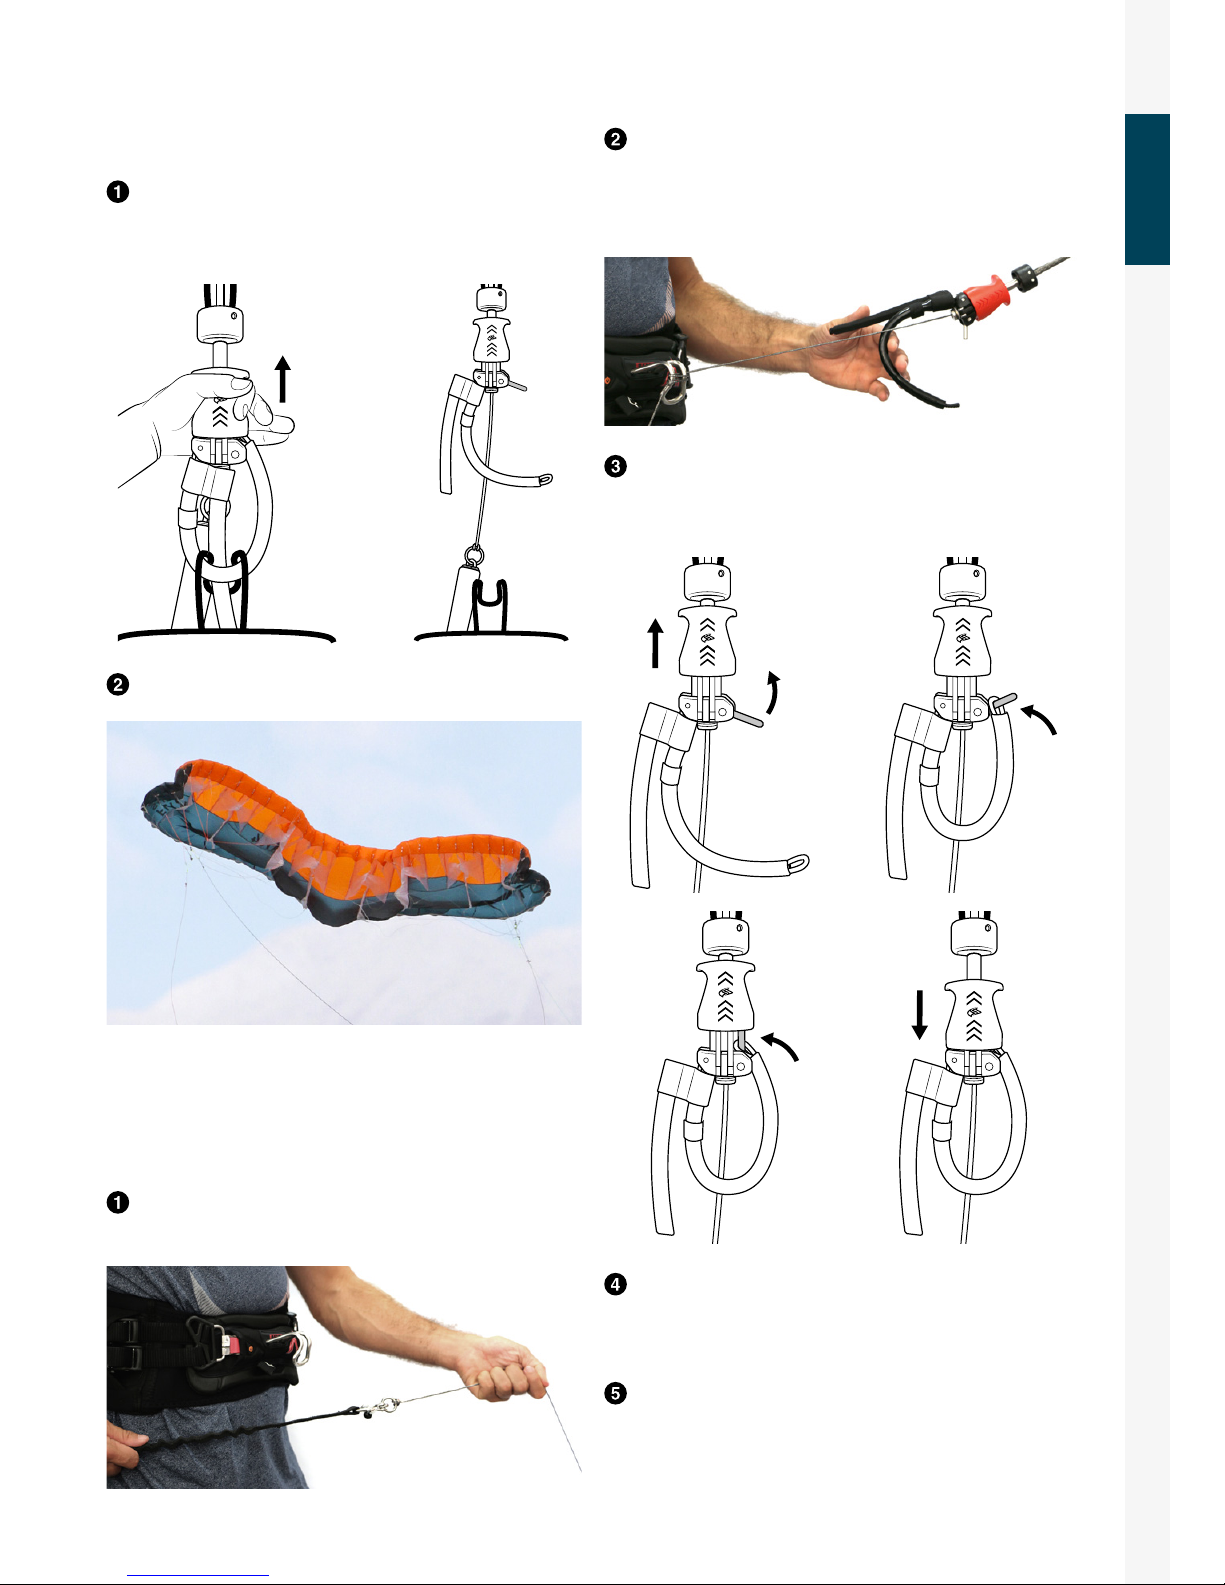
When you reach the bar, secure the endline to your harness
hook. This is done by wrapping the side of the endline which is
under tension two times around the harness hook and then the
loose side one time in the opposite direction.
When the endline is secured, the quick release can be reassembled. Place the end of the chicken loop over the trigger pin
while holding the red activation handle open.
Let the chicken loop go and unwrap the endline. Make sure
you have a good grip on the endline as you hook in the chicken
loop and secure it with the chicken dick.
Slowly release the endline bit by bit. Make sure that it has
not wrapped itself around any part of your body. Do not let the
endline slip too quickly through your fingers as to avoid getting
burns or cuts. Because of this, it is recommended that you let go
of the entire endline when you get to the last two meters.
07 SAFETY SYSTEM
The PEAK4 kites are equipped with our B-Safe system. After activating the quick release, the control bar slides up to the
stopper knot.
The kite falls from the sky without pressure.
07.01 Reactivating the kite
After leashing out, the kite can easily be reset on the ground and
relaunched again.
Work your way up the Safety-Endline until you get to the
control bar. Be careful not to get tangled in the loose endline.
Page 14
ENGLISH
14
EMERGENCIES
08 EMERGENCIES
In an emergency situation it is important not to panic, and to
react purposefully and goal orientated.
Especially in very gusty conditions the kite
can overfly its pilot. This can be corrected
by powering up the kite by pulling the bar towards you or pulling in the leader lines (red
and green). It is also possible to counter the
kite‘s overflying, or get it back into the wind
window by flying it back and forth.
Should the center of the kite collapse towards the pilot (e.g frontstall) it is important
to activate the quick release before it opens
again, as the kite can develop a lot of power
when it opens again in the wind-window.
A backwards flying kite (backstall) can be
recovered by depowering (pushing the bar
towards the kite). In very light winds you can
grab hold of the adjuster and give short effective pulls to accelerate the kite.
If one is in danger of drifting away from the
shore with an un-relaunchable kite, then
it may be prudent to abandon the kite and
swim back to shore if possible. Otherwise it
is wise to stay with your kite, as it will make
you easier to spot for rescuers.
Caution: It is very easy to get caught up
in the bridle lines that are floating around.
Avoid unnecessary swimming movements.
A line knife in your harness is a very useful
tool in a worst case scenario.
09 PACKING UP
A FLYSURFER kite can be packed into its bag very quickly. It is
important that the bridle is securely packed inside the kite and
the bar never gets into or goes through the bridle lines.
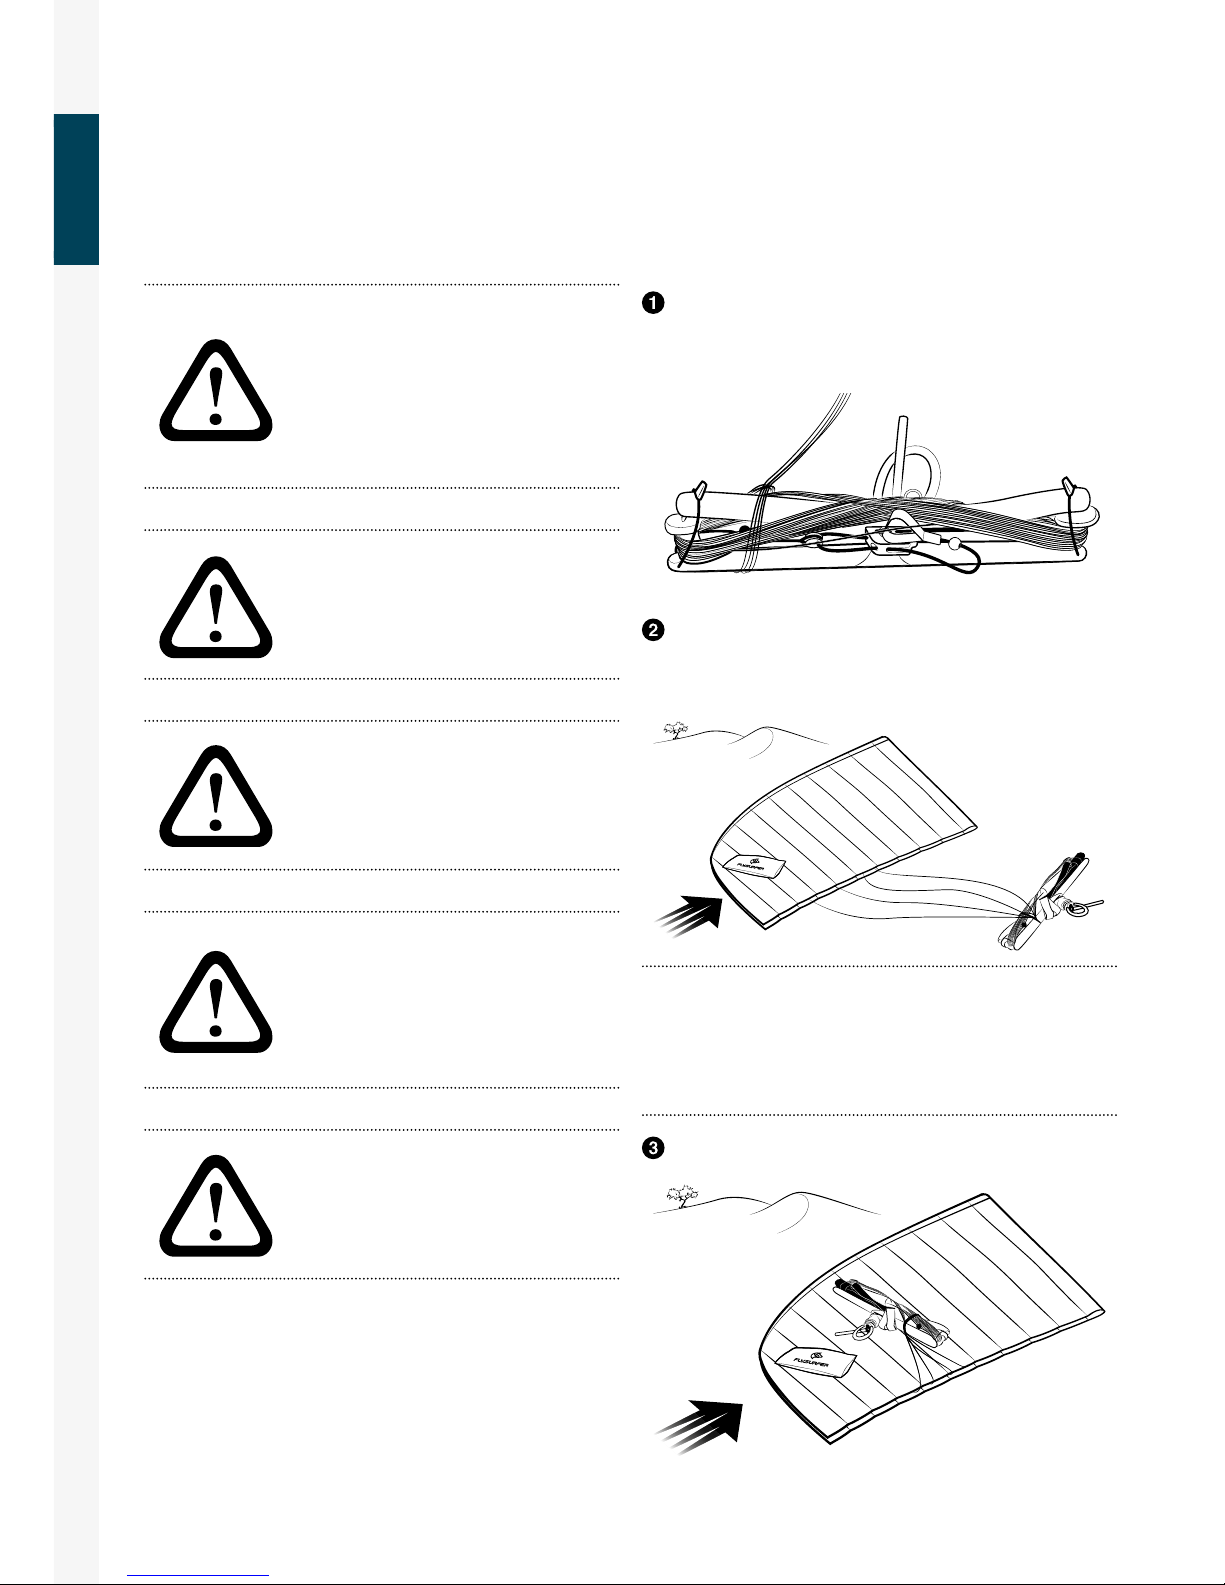
Wind the lines round the bar until you get to the mixer. Secure the lines with the elastics or a half hitch. Keep hold of the
bar, or put it down somewhere out of the way of the bridle lines.
Fold the kite in half along the middle (tip on tip) and make
sure that the bridle is inside both halves. Also make sure that
there are no bridle lines over the outside skin.
Tip:
If you do not want to roll a wet bar into your kite, there is a
method to attach the bar to the outside of the bag. Fold the kite
in the middle (tip on tip) and then roll up the kite, including the
bridle, and put it into the bag. Then roll up the bar and attach it
to the outside of the kitebag.
Lay the bar on-top of the kite and a bit away from the tips.
Page 15
ENGLISH
15
KITE CARE
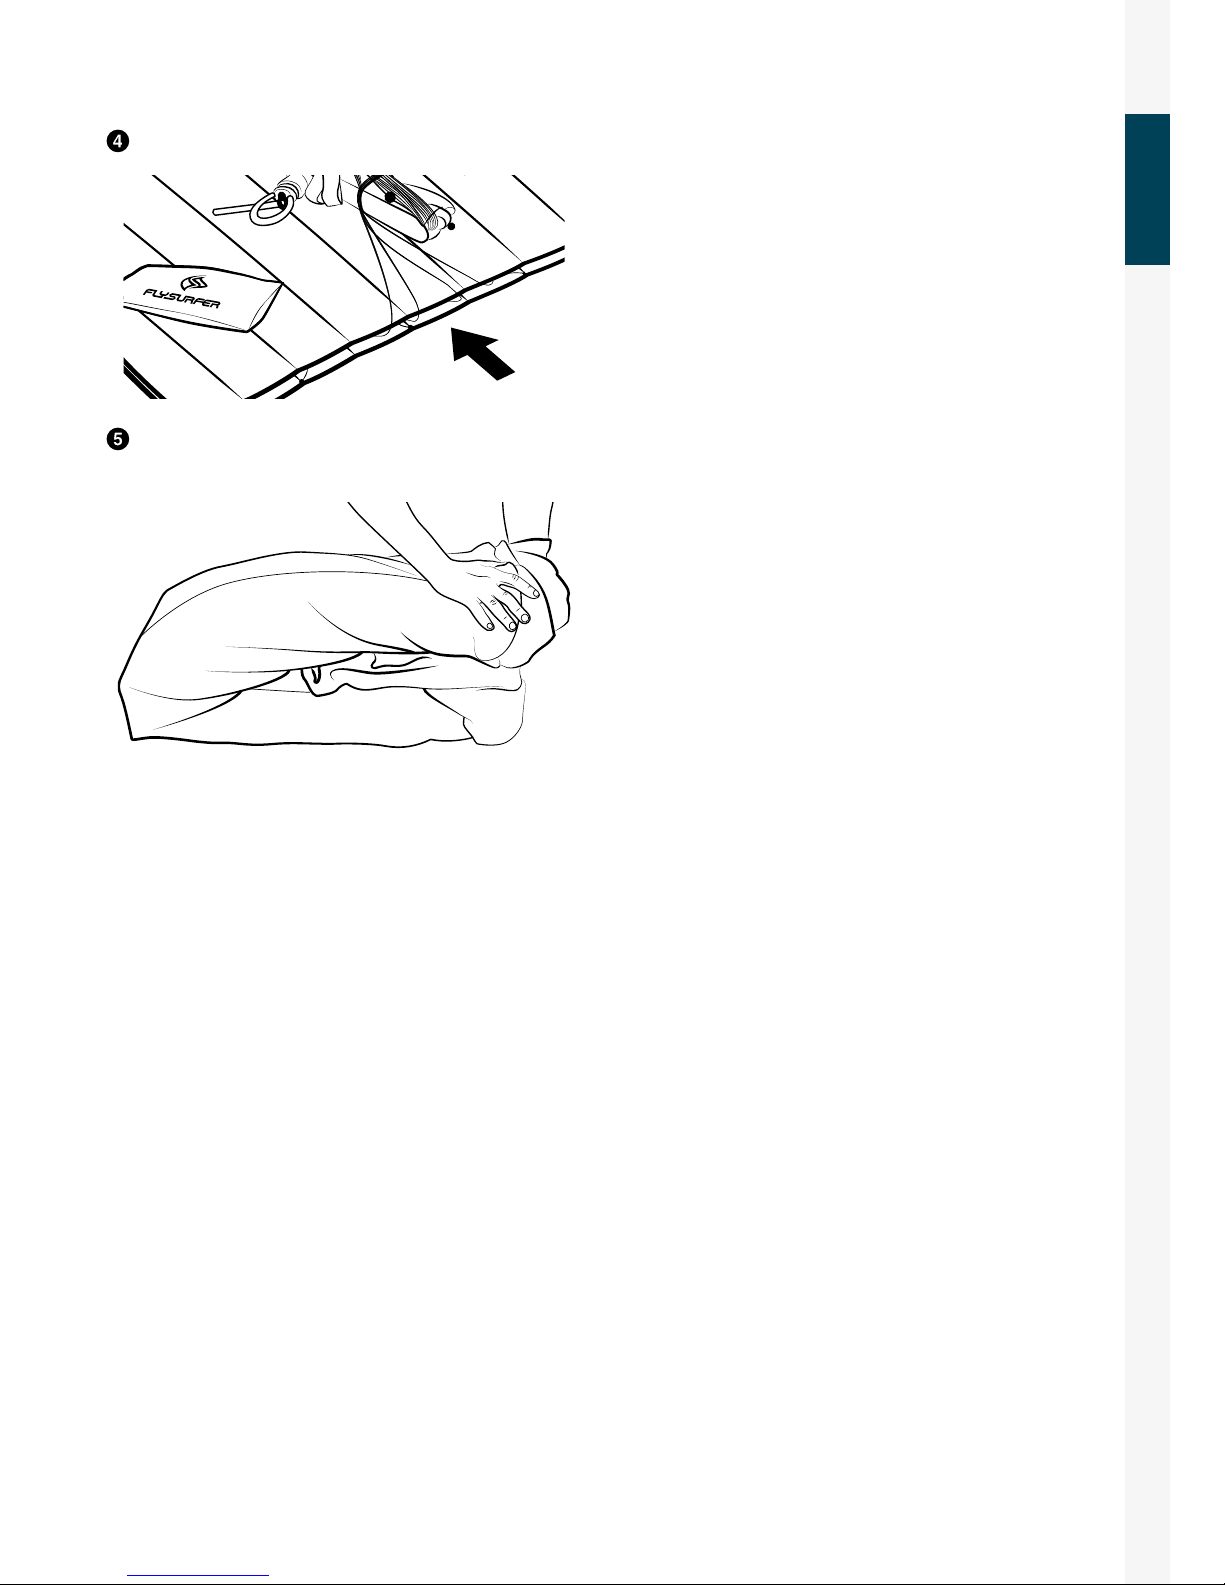
Throw the bridle lines in between the folded kite.
Roll up the kite around the bar. Make sure that no sharp ob-
jects on the beach damage the cloth.
10 KITE CARE
FLYSURFER kites are very durable and very UV and saltwater resistant. With proper care, your kite may last even longer. Eventual color changes of the cloth can be caused by environmental
causes, UV-exposure, mechanical strain as well as it getting dirty. A color change has no influence on the flight characteristics
whatsoever and is not covered by warranty.
Do not leave the kite exposed to the elements.
People who pack away their kite right after a session, or for a
longer break, will minimise the amount of time the material is
exposed to the sun and flapping in the wind, extending the “active“ lifespan of their kite.
Drying
If a kite is packed away wet and left for a long period of time it
can develop ugly mildew spots, rust on the metal parts or color
bleeding of the cloth. This does not eect how the kite performs,
but will reduce the value of your kite. In extreme cases the kite
may get mouldy. To dry, simply continue to fly the kite until the
canopy is dry.
Rinsing
Rinse your kite from time to time with clear water, after using
it in salt water, and leave it to dry in the shade. Do not use any
detergents. The warranty will be void after the use of detergents
on the cloth.
Check
Check all parts of the kite before each use. Especially parts that
can wear out. Material failure on those parts can lead to further
damages, or put the kiter at risk.
Page 16
ENGLISH
16
ASSEMBLY OF B-SAFE SYSTEM
11 ASSEMBLY OF B-SAFE SYSTEM
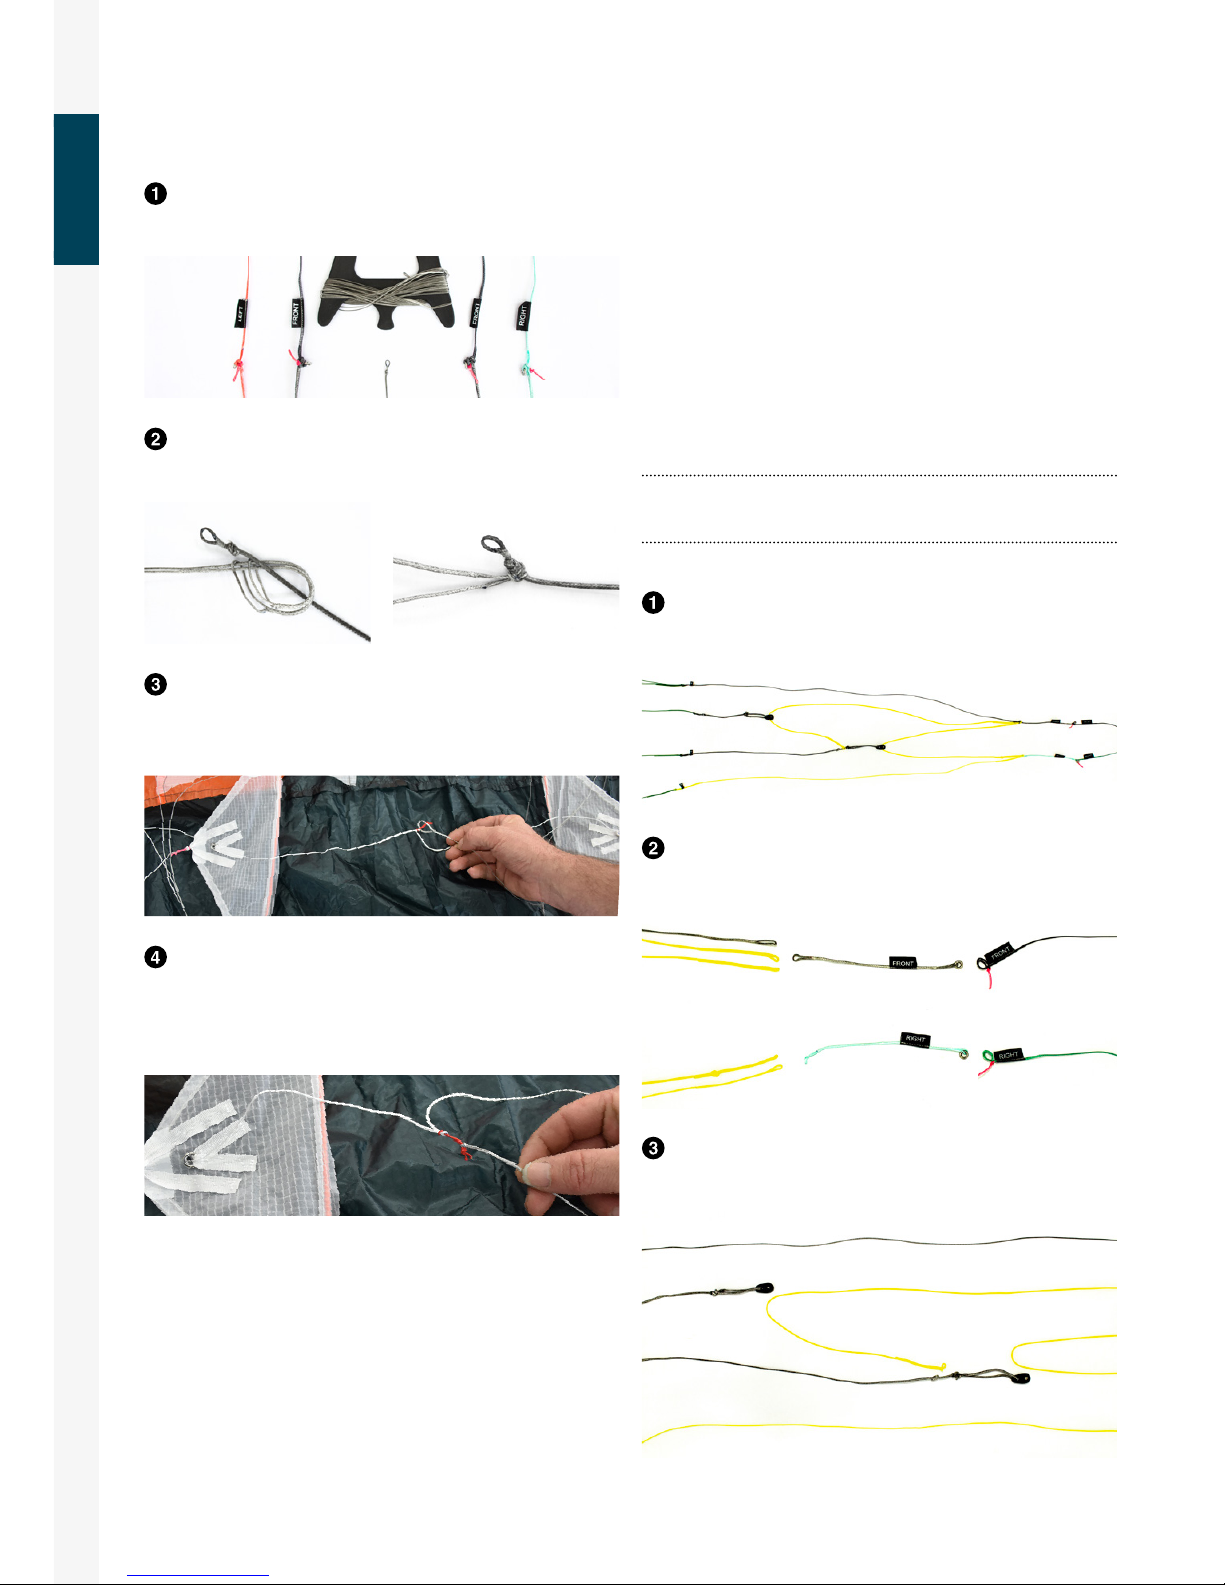
Take out the gray B-Safe top lines, which are in the side po-
cket of the PEAK4 bag.
Connect both gray B-Safe top lines with a larkshead to the
end of the 5th line of the CONNECT bar.
Spread out your PEAK4 kite flat in front of you. The white BSafe system line runs through the polypropylene sliding rings on
the B level.
Connect each of the gray B-Safe top lines per wing side to
the red LCL attachment points of the white B-Safe system line
and make sure that the lines run free after assembly and do not
cross any lines!
12 MAINTENANCE
The main parts that wear on the kites are the Depower Line, the
Safety Endline (see the bar manual), as well as the Sparepart
Lines and the pulleys. Depending on use, the flying lines and
other parts will need to be replaced within the lifespan of your
kite. If you do not service these parts, it can lead to damage to
the kite and will void the warranty.
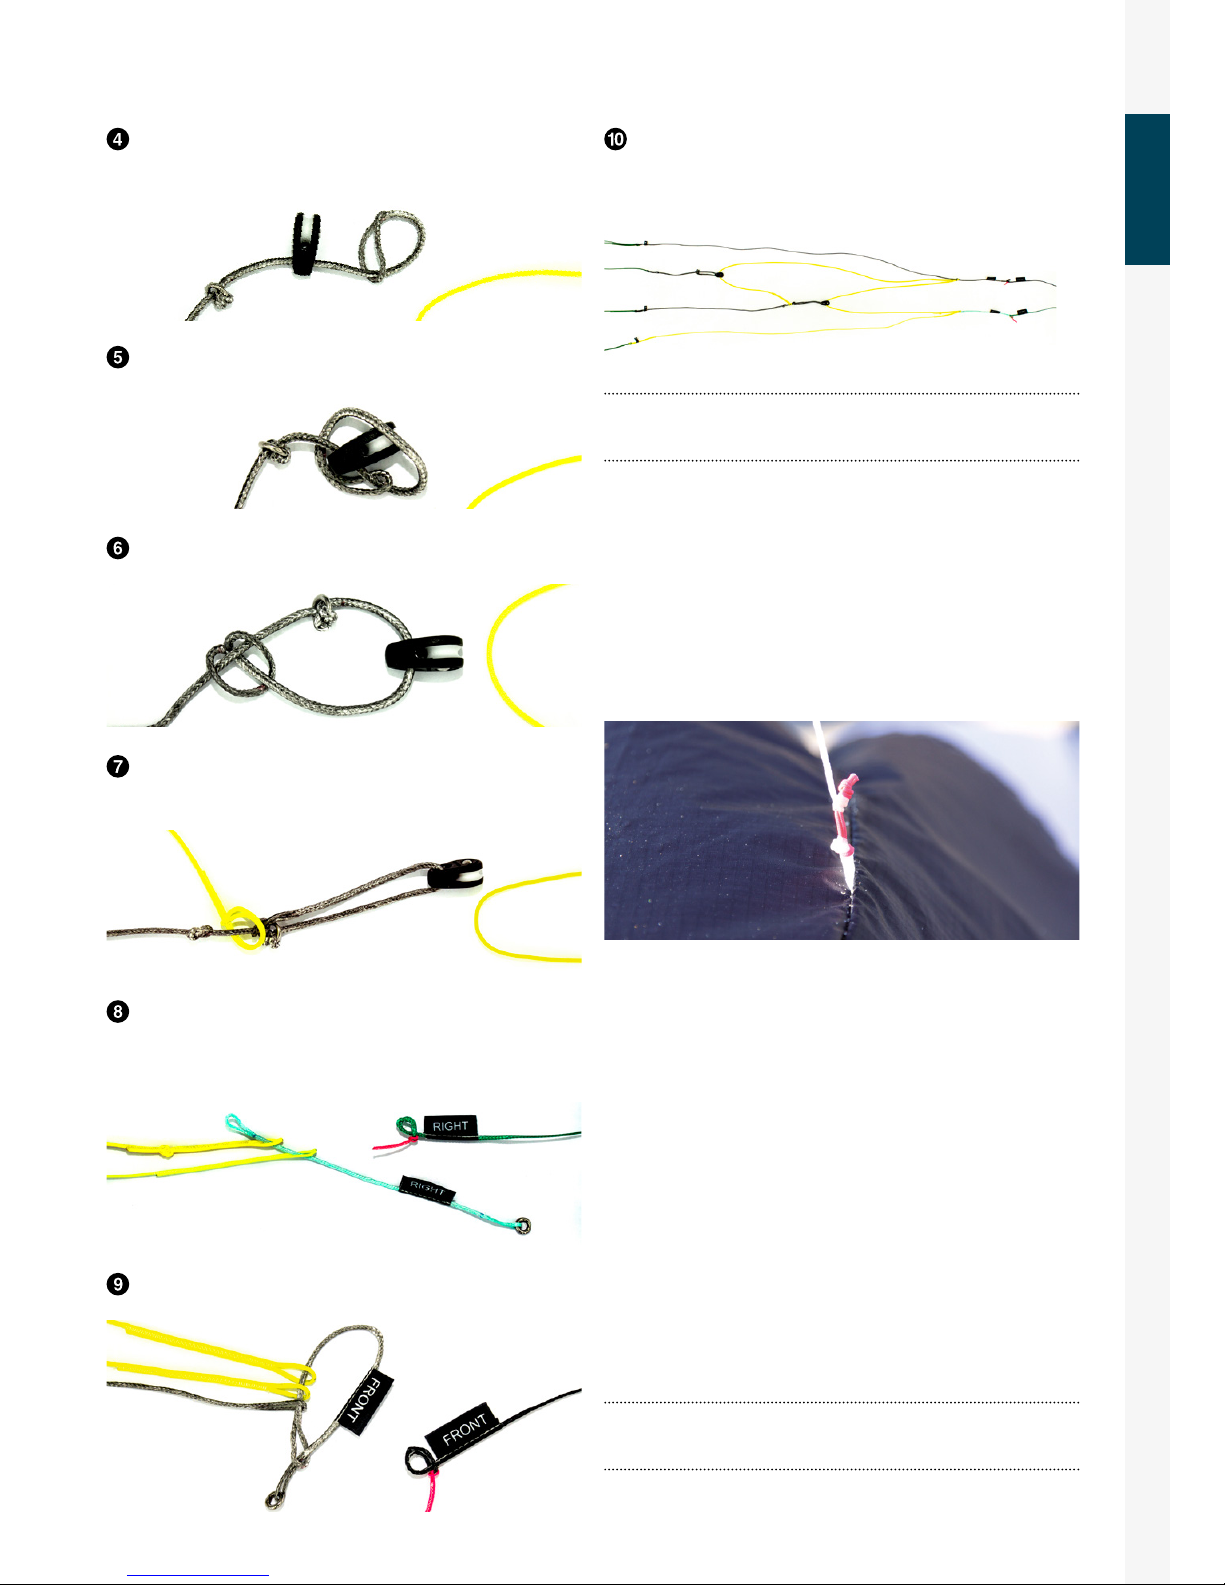
12.01 Replacing the Sparepart Lines
The Sparepart Lines are the yellow lines that run through the
pulley system known as the mixer. The sparepart line should
be replaced before the sleeving could tear or fray (approx. 100
h). The pulleys should be changed after about 250 hours of use.
Before exchanging your sparepart lines, perform a mixertest to
note down your current mixertrim. When exchanging sparepart
lines, this trim will change and you might want to keep your preferred trim, after the line exchange you can then adjust to your
previous setting.
Tip:
Always exchange only one side at a time and use the other
side as a template how the mixer should look like.
Lay out the kite and sort out the bridle. Make sure that the li-
nes do not get crossed or mixed up through the whole procedure.
Disconnect the front and steering lines on one side. Undo the
short line pieces at the mixer.
Pull the old sparepart lines out of the pulley. Always ex-
change both lines.
Page 17
ENGLISH
17
MAINTENANCE
When exchanging a pulley (after 250h of use) concentration
is needed. First make a larks head at the end of the line.
Put the pulley through the loop.
Pull the larks head knot tight.
Make sure to attach the new sparepart line in the same way
as the old one.
The long sparepart line has a knot at the end, this knot is
there to block the pulley from sliding over. Now pull the ring
through the loop and attach to the flying line.
Redo the short line pieces and pull the knots tight.
Reconnect the flying lines again, and then repeat the same
procedure on the other side. Pull all knots tight and check the
bridle carefully.
Warning:
After exchanging the sparepart lines, do a mixertest
and adjust the mixer accordingly.
12.02 Little Connection Lines
The “Little Connection Line“ (LCL) allows you to quickly exchange
a bridle line and also works as a predetermined overload weak
point that prevents the canopy from getting damaged. Should
an LCL break, replace it with new one, in the same colour (same
breaking strength) LCL.
12.03 Repairing the Cloth
In case you get a small tear (e.g. through contact with a sharp
object) we have included a repair kit with your kite. The area
that needs to be repaired must be clean, dry and grease-free.
Temporary repairs are possible with spinnaker repair tape, but
the tear should be taped from the inside of the kite. It is recommended that you round o the edges of the repair tape. A special binding agent (silicone sealing compound) for the X-Light
Cloth is available through Flysurfer sales partners or directly at
FLYSURFER. A repair manual is included with the binding agent.
There is the possibility to have a professional repair done by us.
We can exchange whole parts of the canopy, so that there will be
no trace of the damage.
Tip:
When a tear is close to a seam (less than 5cm), we recom-
mend using sewing to repair the damaged area.
Page 18
ENGLISH
18
TRIMMING
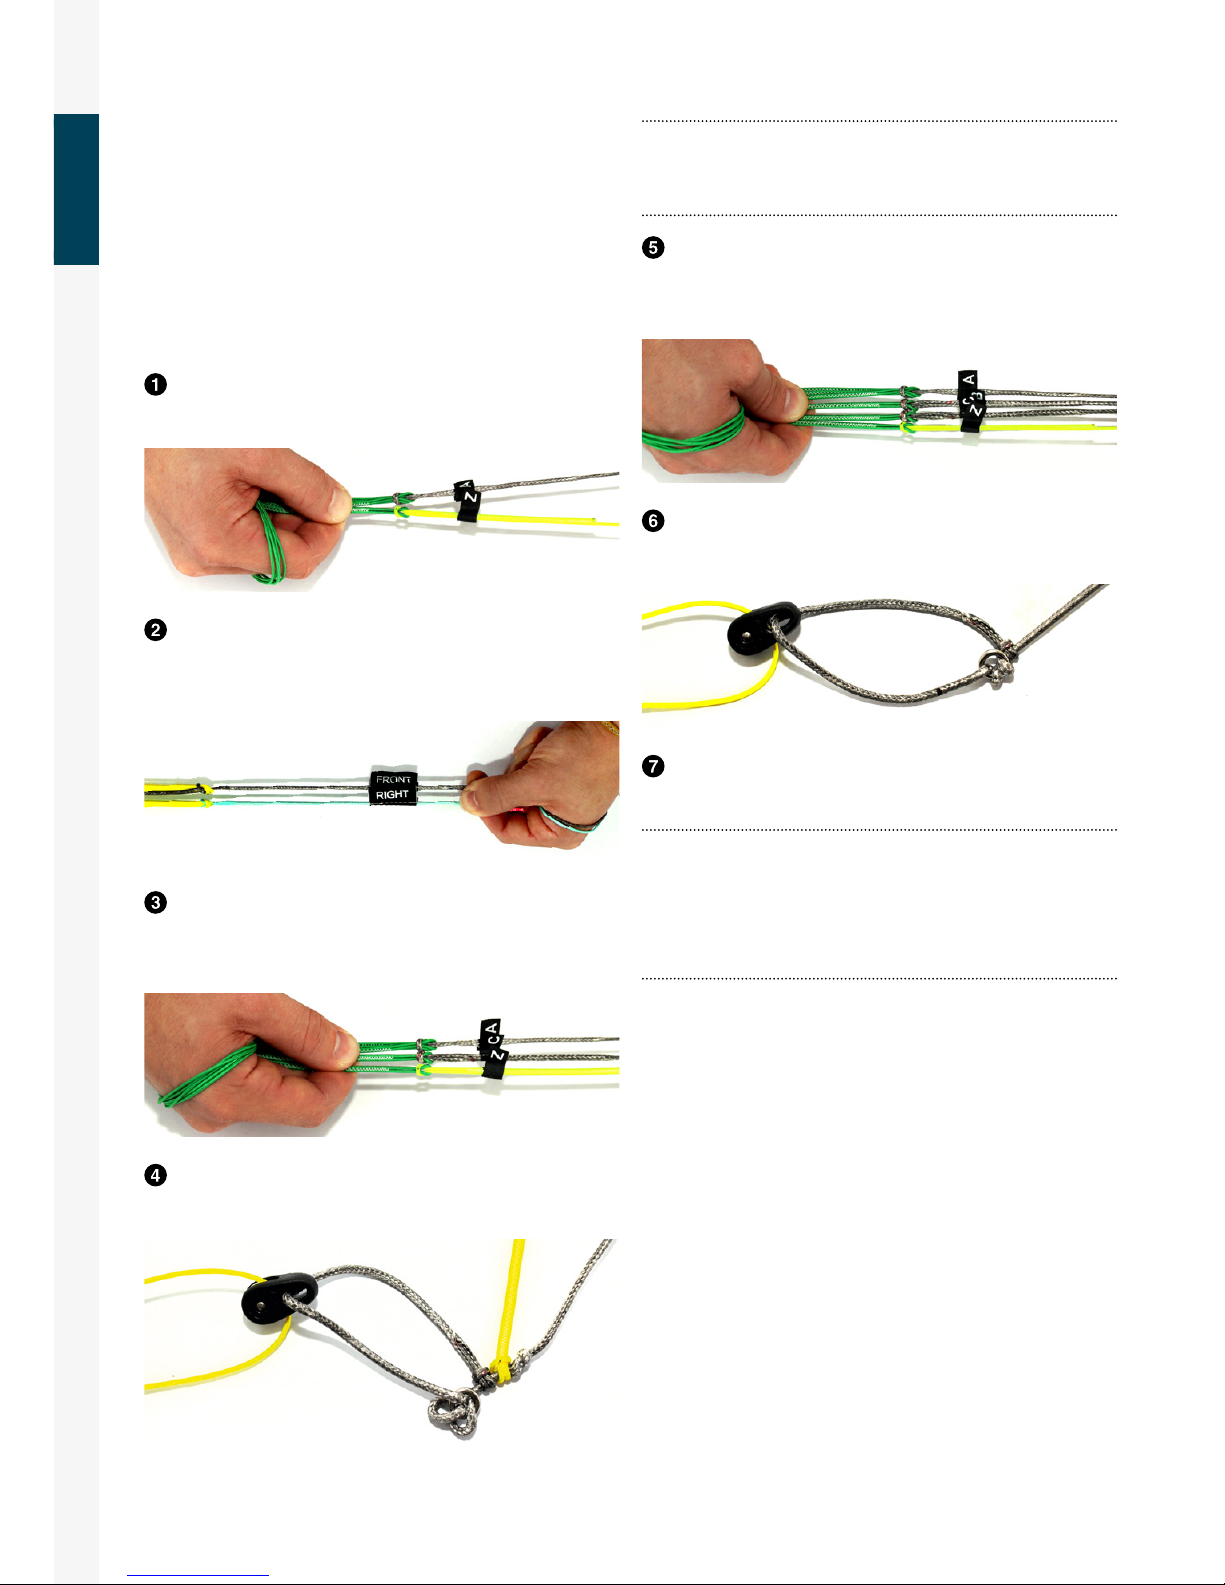
Tip:
The mixer is basically a 2:1 pulley system. If you want to
change the B-Level by one centimeter, you will need to move
the ring by two centimeters.
Bring the B-Level up to the A, C and Z bridle connection knots
and tension the mixer. All four knots at the same level create a
standard factory trim(+/- 0cm).
If this is not the case, you just have to move the metal ring of
the mixer (B-Level) until all 4 knots are at the same level.
Done. Be sure to pull everything properly tight again after
adjusting, so that the trim stays under tension.
Tip:
When the mixer is set to the standard trim (+/- 0cm), e.g.
all four knots are at the same level. It is enough to only move
the metal ring of the mixer (C-Level) to change the basic trim.
The B-Level automatically adjusts half the amount of the CLevel when modifying.
13.02 Optimum trim of the flying lines
Steering (back) lines shorten over time in relation to the flying
(front) lines. Underneath the floaters, the back line can be shortened or extended by using knots. Extension of the back lines is
necessary when the trimmer needs to be pulled in too much to
keep the kite flying normally in its intended wind range. (backstall tendency).
14 REPAIR & SPARE PARTS
Repairs can be done at either our workshop in the head oce,
or by a Flysurfer sales partner who oers a repair service. High
quality original spare parts for all our Flysurfer products can be
ordered directly from our Online-Shop: shop.flysurfer.com
13 TRIMMING
As all lines change length over time, we have built in a way to
correct the flying characteristics quickly and easily. Adjustments
after heavy use over years should be done to keep the products
performance and ensure a long-term use of the PEAK4.
13.01 Mixer Test
Sort out the mixer. Hold the loops next to the little flags in
line and set A & Z on the same level.
Now tension the mixer and secure the ends of the front and
steering lines (e.g. an assistant can hold them). The position of
the lines should not change during the whole mixer test.
Bring the C-Level up to the A and Z bridle connection knots
and tension the mixer (min. 5 kg tensile load per line). All three
knots should be at the same level at standard trim..
If this is not the case, you just have to move the metal ring of
the mixer (C-Level) until all 3 knots are at the same level.
Page 19

ENGLISH
19
REPAIR & SPARE PARTS
Page 20

FLYSURFER Kiteboarding
Brand of Skywalk GmbH & Co. KG
Windeckstr. 4
83250 Marquartstein, GERMANY
WEBSITE: www.flysurfer.com EMAIL: info@flysurfer.com PHONE: +49 (0) 86 41 69 48 - 30
 Loading...