

Page 1
Vario. Light. Simple.
ENG
USER MANUAL
v 1.4
www.rpmsport.net
Page 2

1.Vario LS Overview
2. Display layout
3. Designer Software
4. Firmware update
5. Reset and Fail Safe mode
6. Place and secure the Vario LS
7. Battery
8. Basic Settings
9. Menu sequence
10. Advanced Settings
11. Flights log
12. Downloading flights
13. Important notes
Index
USER MANUAL
v 1.4
Page 3
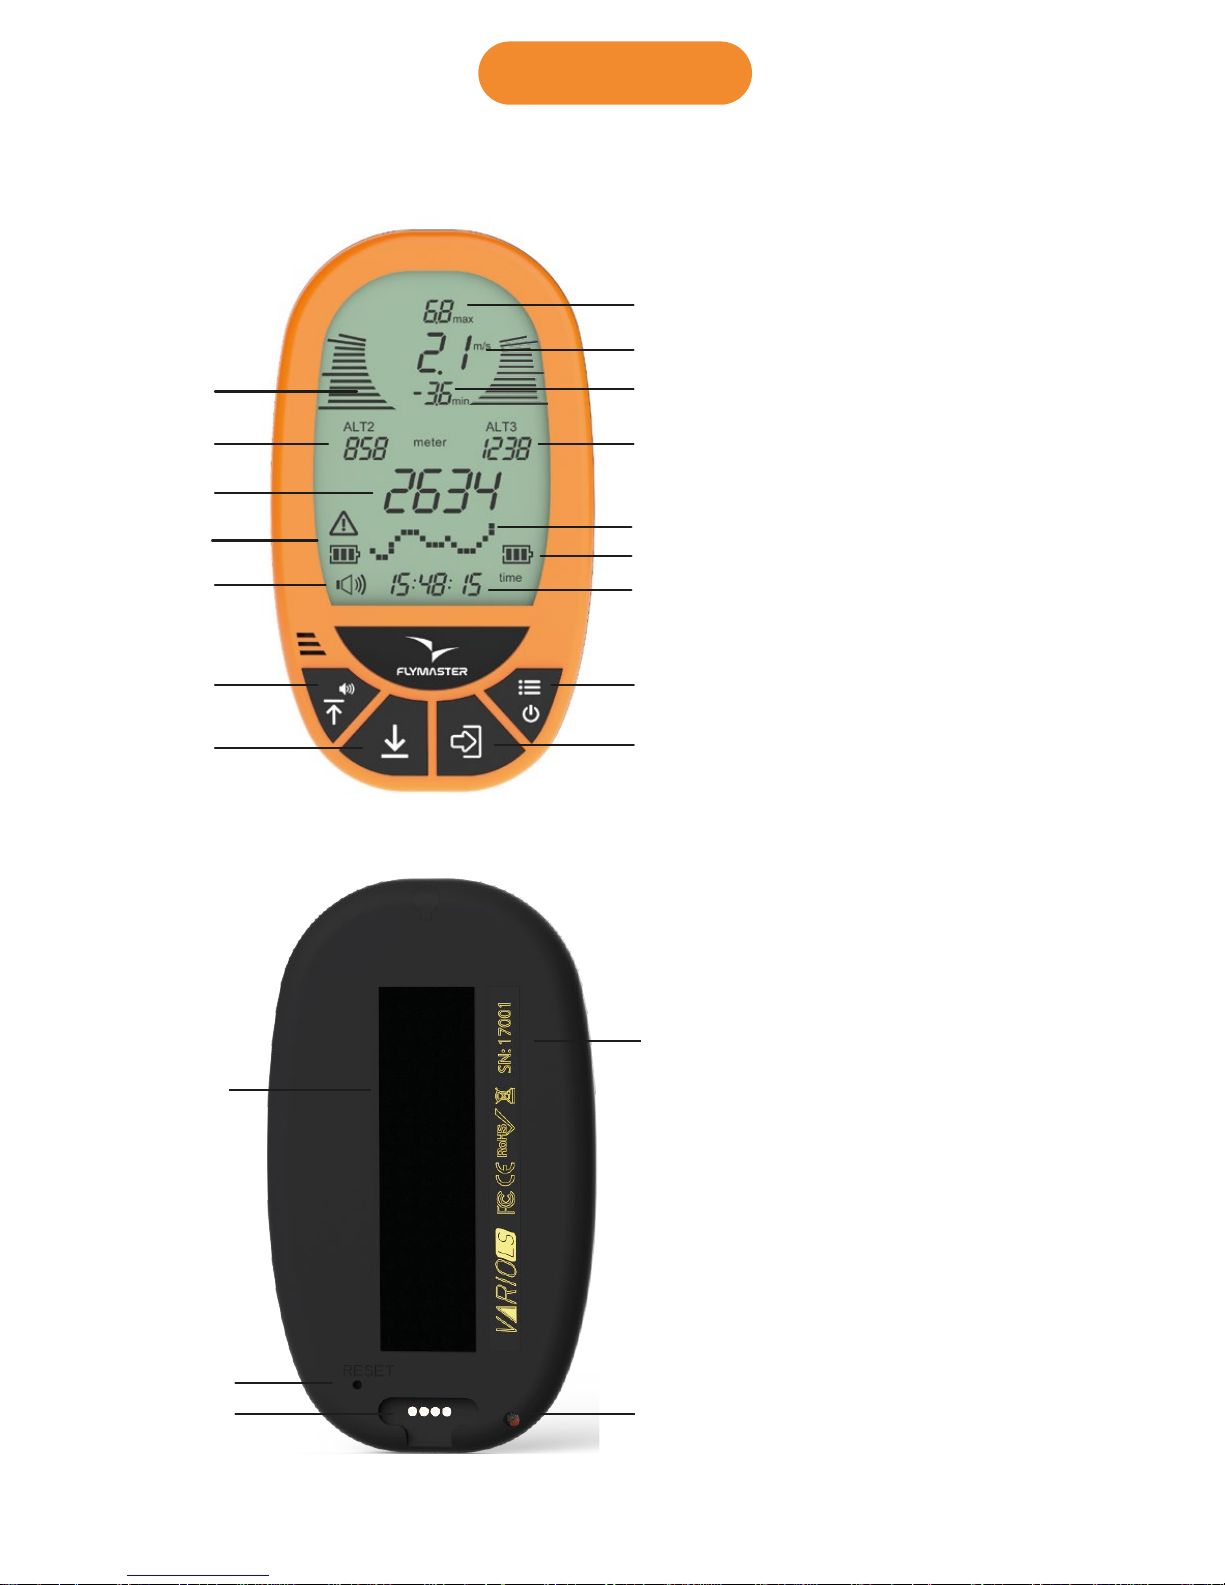
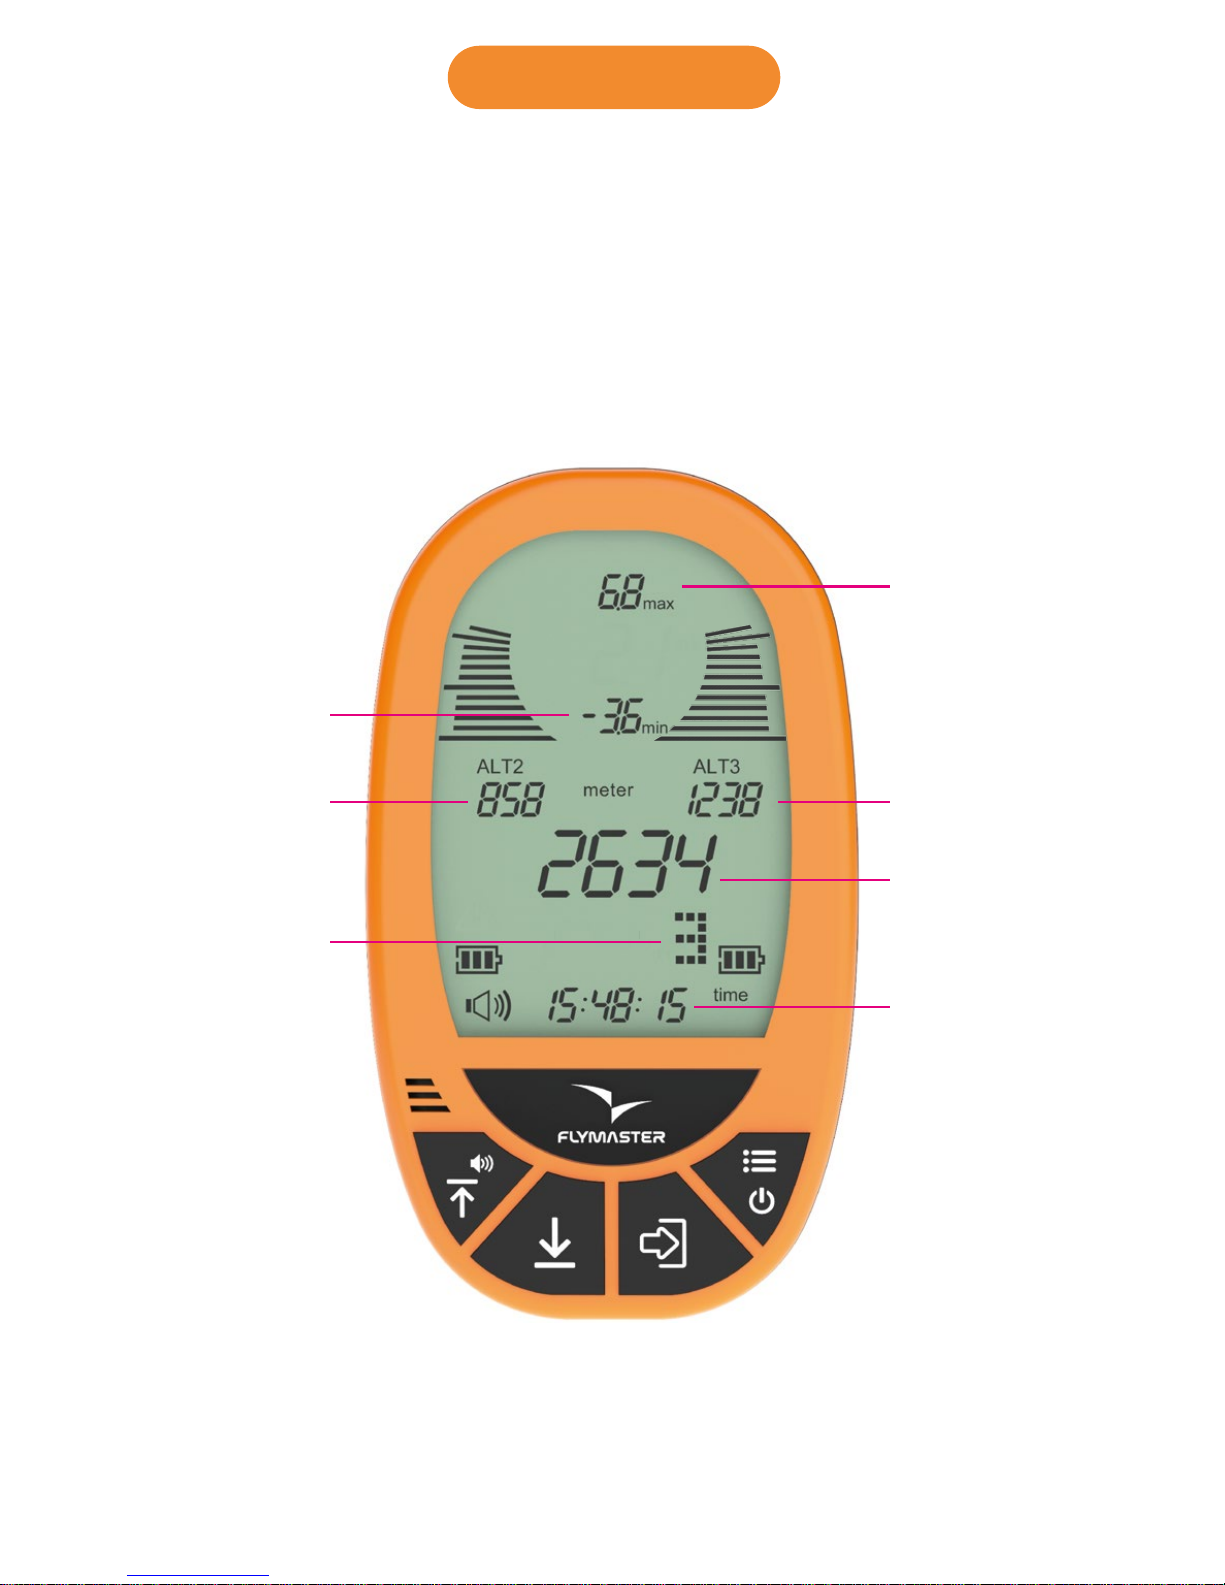
1 - Max. climb rate
Flight page and buttons
Back view
2 - Digital Int. Vario
3 - Max. sink rate
5 - Barograph/Menu
7 - Clock / Flight time
8 - Power/Menu/Esc
14 - Up/Volume
15 - Down/Quick Reset Alt 3
9 - Enter
11 - Altimeter 1
10 - Altimeter 2
4 - Altimeter 3
12 - Low battery
6 - Battery level
13 - Volume level
17 - Velcro
18 - Reset
19 - Lanyard hole
16 - Serial number
20 - Mag. Connector
21 - Analog Inst. Vario
1
2
3
4
5
6
7
8
9
10
21
11
12
13
14
15
16
17
18
19
20
1. Overview
Page 4
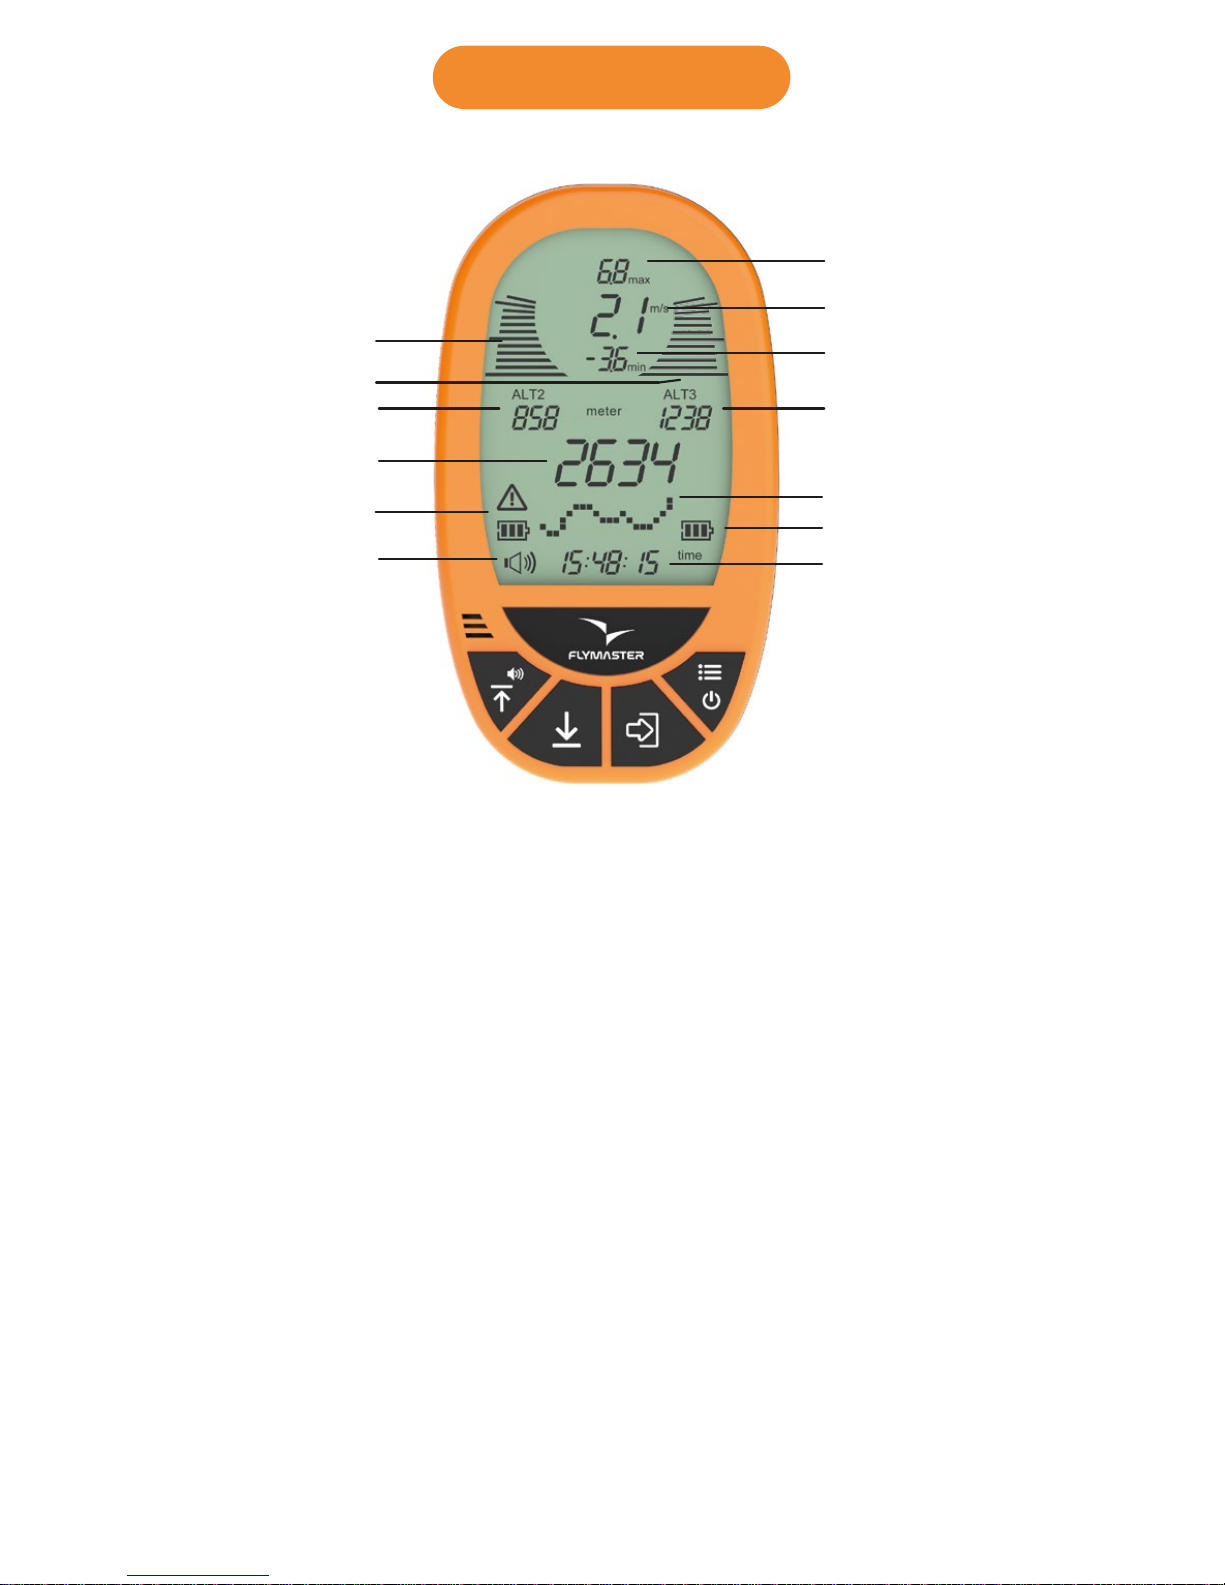
Flight page
1. Max. climb rate: This value indicates the maximum climb rate
achieved during the current flight
2. Digital Integrated Vario: This value indicates the integrated climb/sink
ratio.
3. Max. sink rate: This value indicates the maximum sink rate achieved
during the current flight.
11 . Altimeter 1: Can be used as main altimeter (can be used as ASL
altitude).
10 . Altimeter 2: Second altimeter (can be used as an altimeter of any
desired reference)
4 . Altimeter 3: Third altimeter (can be used as an altimeter of any
desired reference). Can be reseted any time by pressing DOWN key.
5 . Barograph/Menu: This field can show either the altitude graph during
the flight, the options menu or any other info.
6. Battery level: This indicates the 3 level battery state (full, medium, low)
12 . Low bat. - This indicates that the battery entered in a “reserve” state.
Also have a 3 level indicator.
13 . Audio level: This indicates the volume level of the VarioLS speaker
(Mute, Low, Medium, High).
7. Time/Flight duration: This will show either the clock or the flight
duration.
21. Analog instant Vario: This value indicates the instant climb rate.
22. Analog instant Vario: This value indicates the instant sink rate.
21
22
1
2
3
4
5
6
7
10
11
12
13
2. Display layout
Page 5
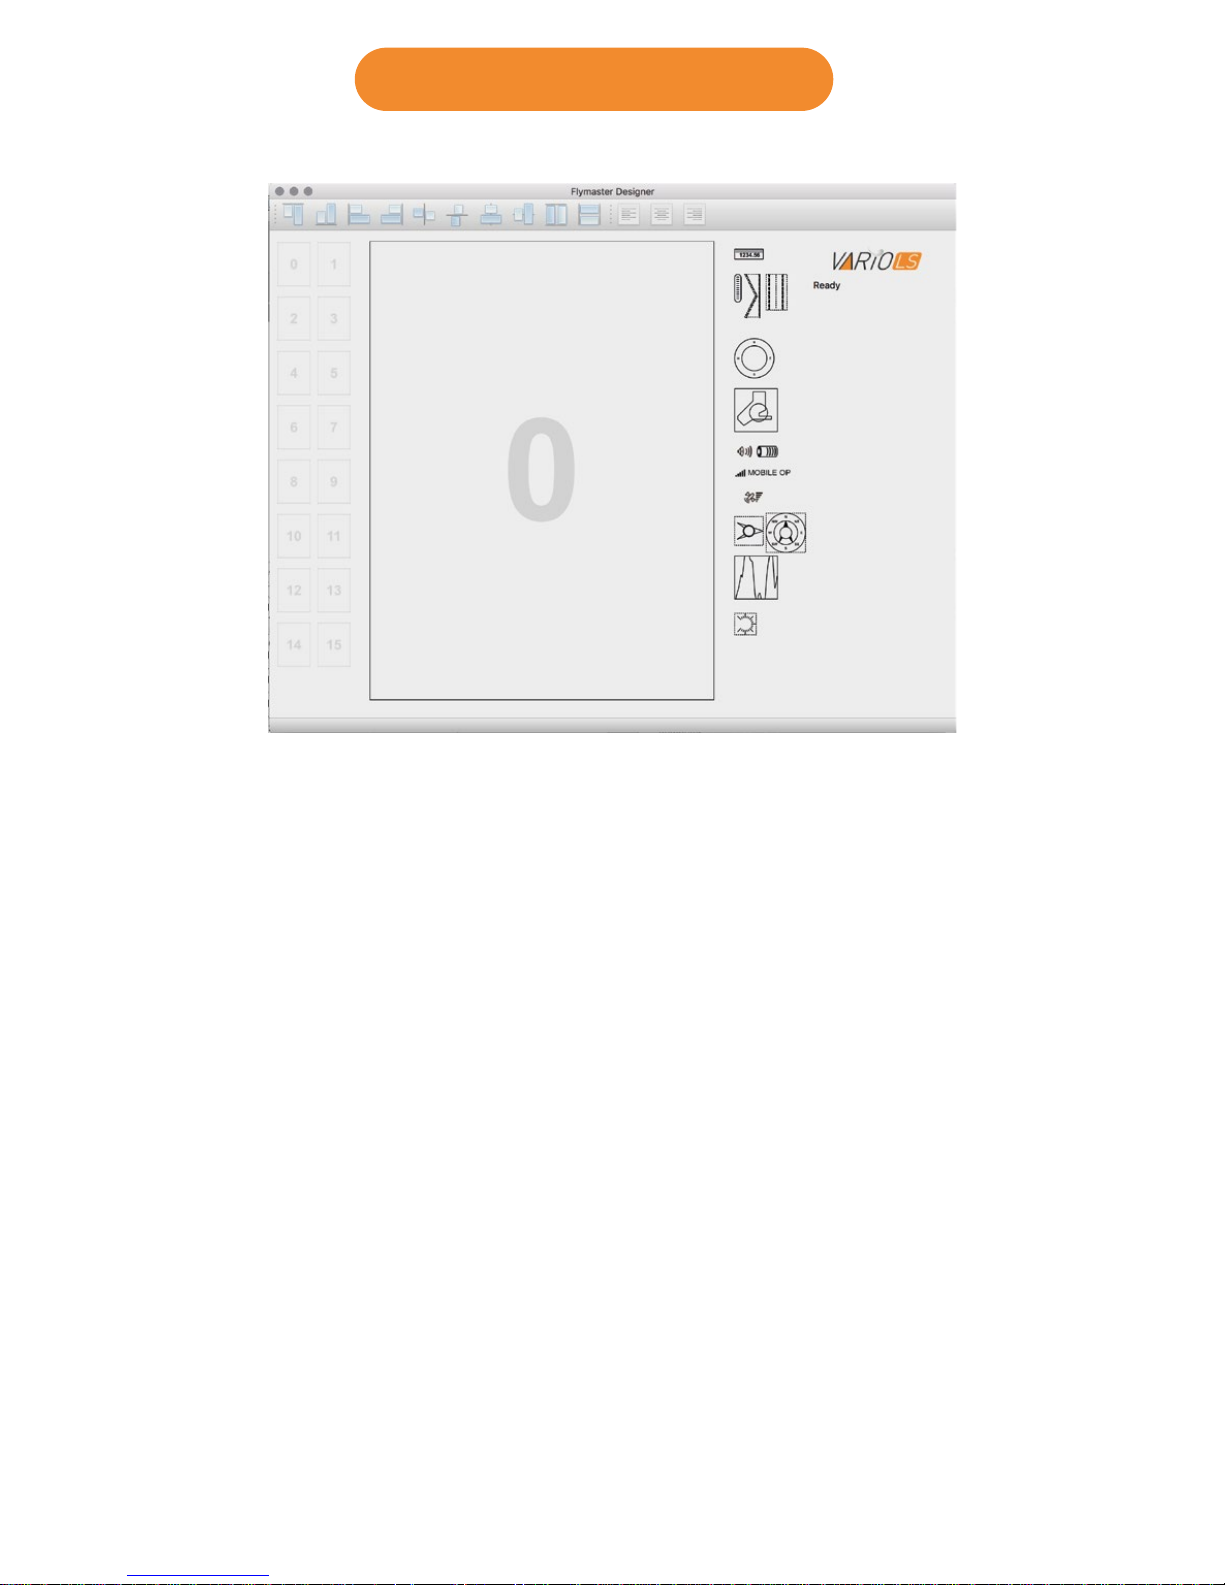
Designer in an application, available for Mac OS, Windows and Linux,
developed by Flymaster. Designer allows you to manage the entire
range of Flymaster instruments including the VarioLS.
For the Vario LS the following functions are available:
- Firmware upgrade
- Download and sync your flights to Flymaster Cloud Flights (see chapter
8)
1. Download the Designer from: https://www.flymaster.net/downloads#
2. Install it on your computer
3. Run the Designer
4. Connect the Vario LS with the supplied Magnectic USB cable to
your computer. Turn ON the Vario LS.
5. Click on the instrument logo
3. Designer software
Page 6
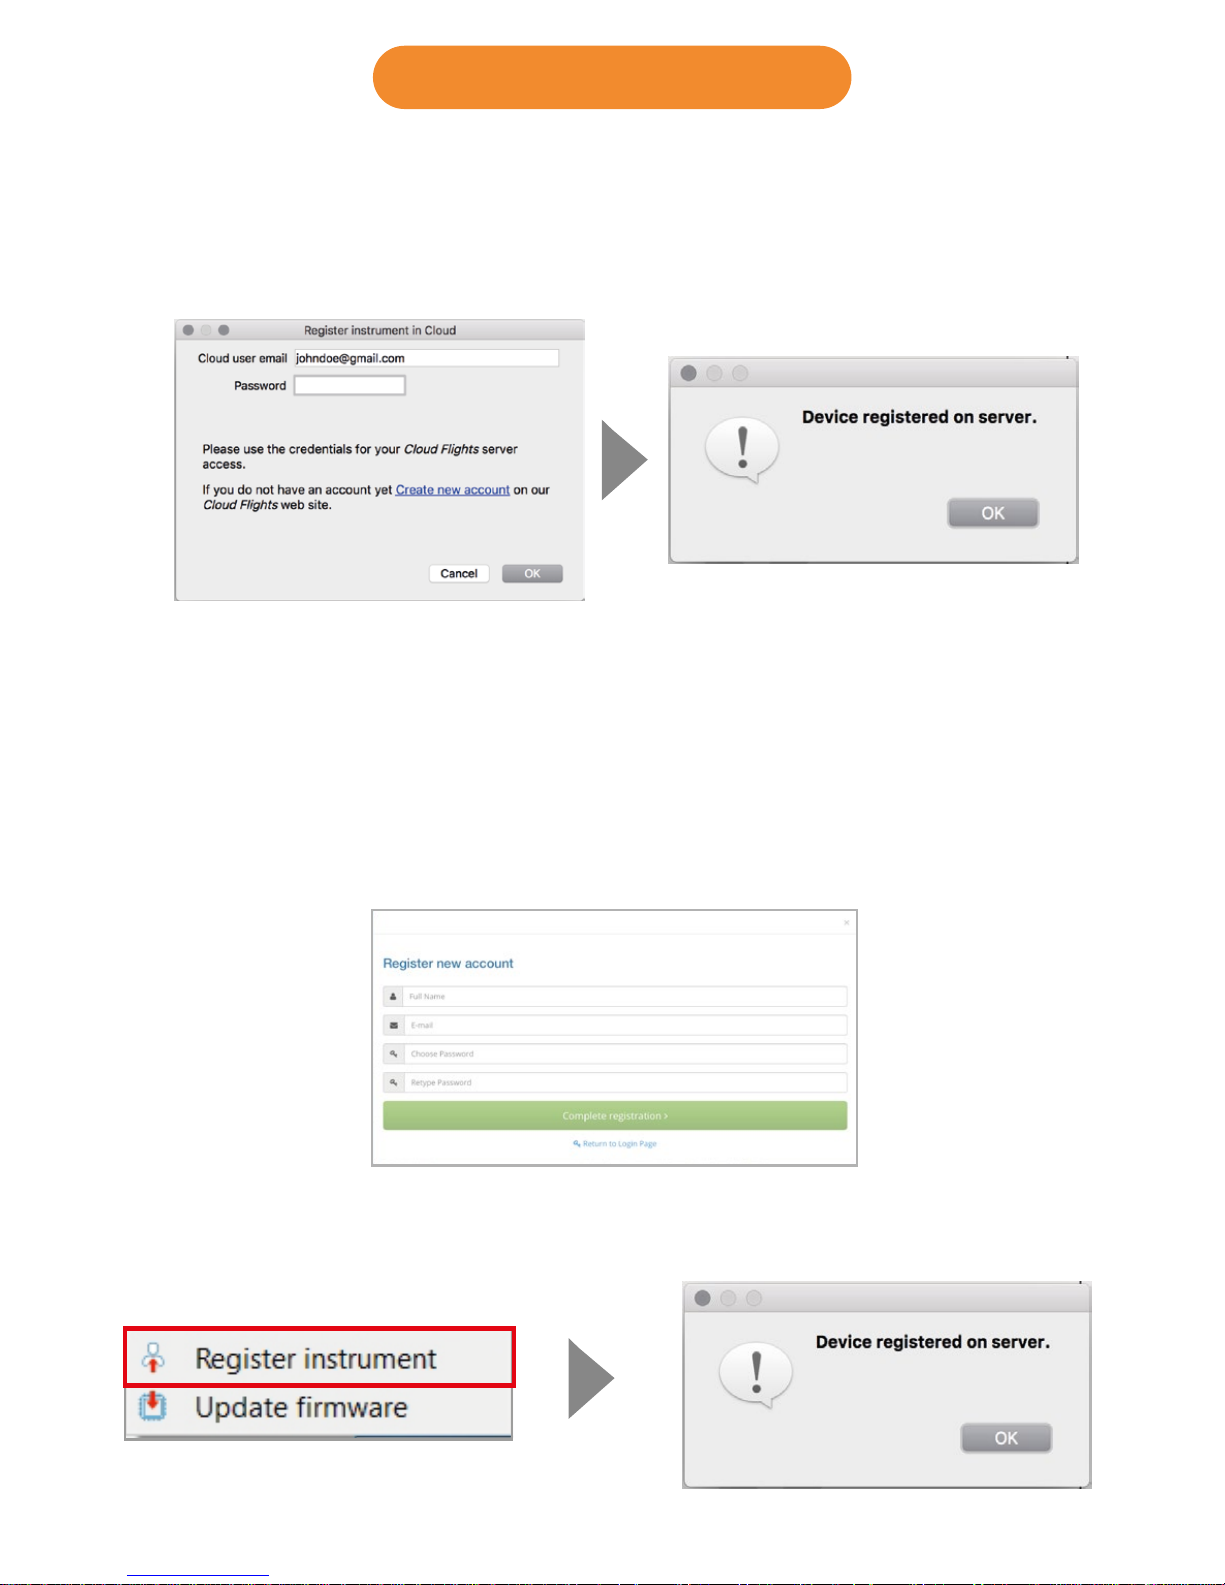
6. Register instrument : If you already have an account on the Flymaster
network, just log in with your Cloud user email and password.
7. If you don’t have an account, create one. During the account creation
process a verification email will be sent to the provided email, so be sure
to use a valid email account. If you do not receive the verification email
within a couple of minutes double check you spam to be sure it hasn't
been snagged.
7.1. Now you can register you instrument.
3.1. Designer software
Page 7
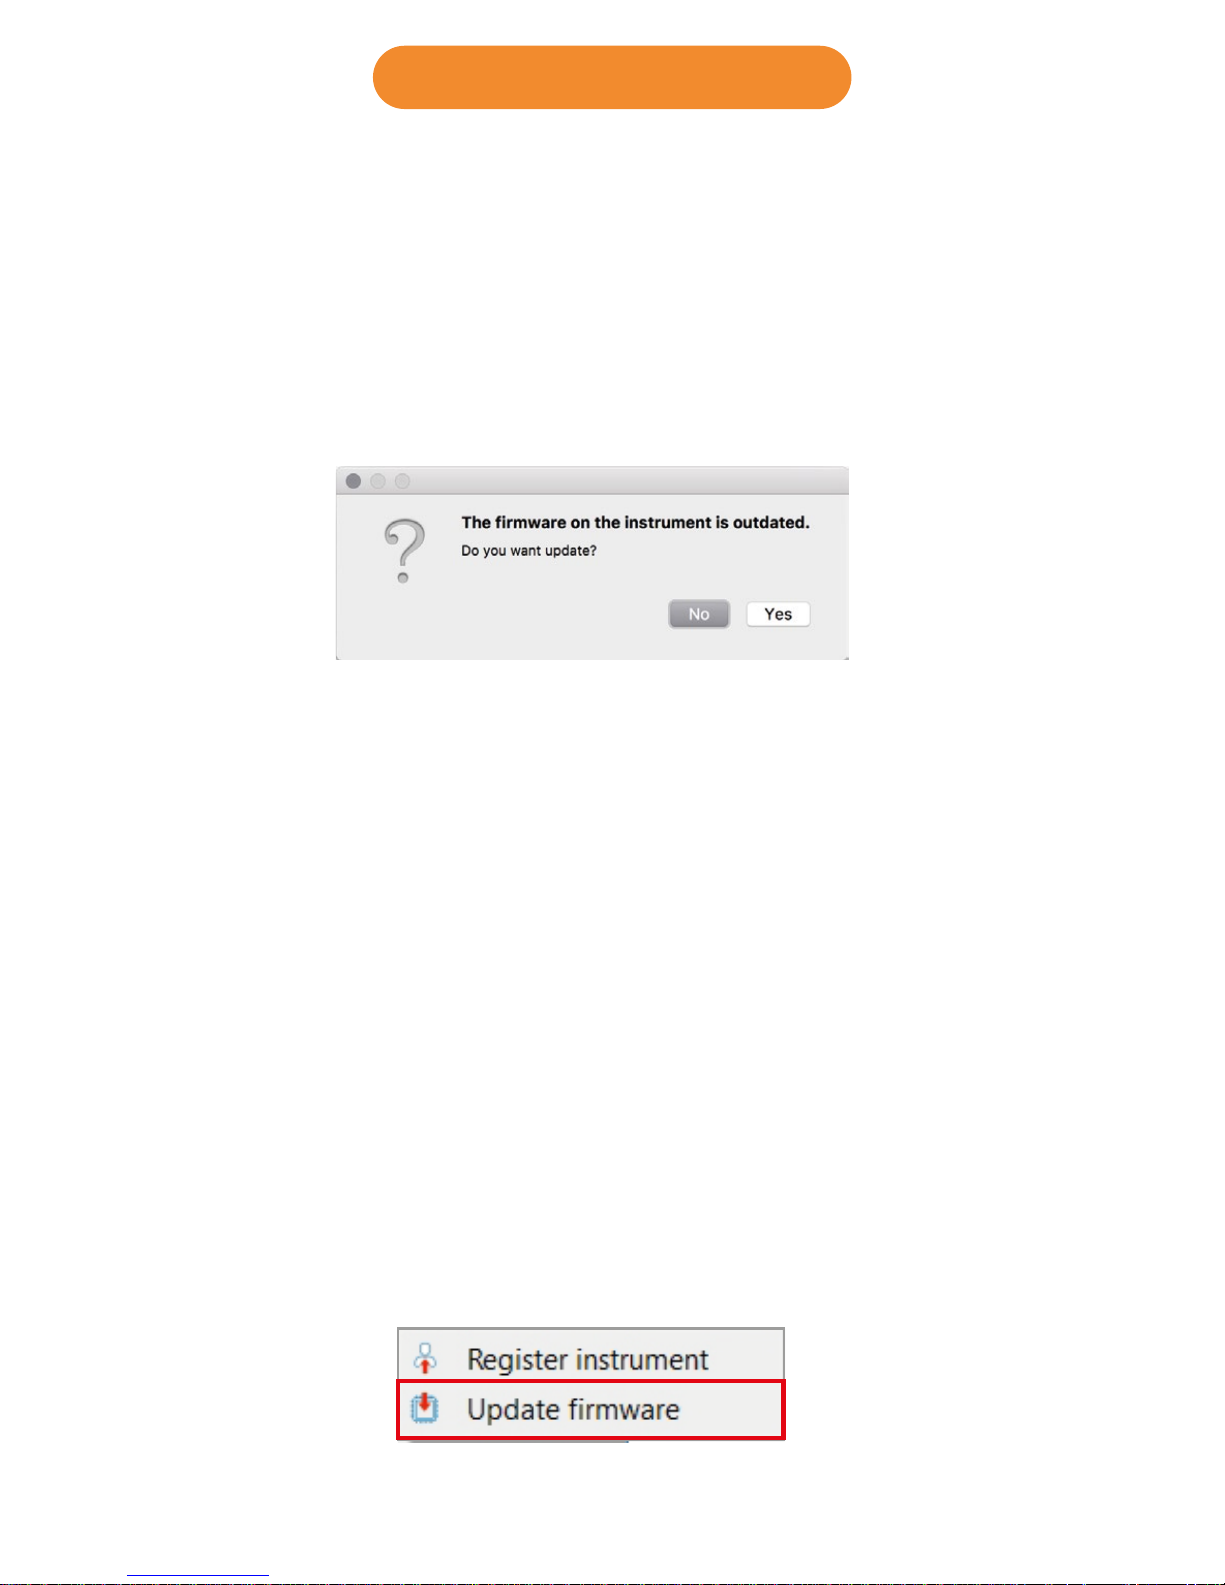
Automatic update
1. Connect the Vario LS with the supplied Magnectic USB cable to your
computer. Turn ON the Vario LS.
2. Run the Designer
3. The Designer should detect an outated version of the firmware and will
prompt you to update.
4. Click “Yes” and the Vario LS shoud load the firmware and reboot itself.
4. Firmware update
Manual update
If for some reason the Designer does not detect the outdated firmware
version, or if want to use any previous firmware version, you can force a
manual firmware install.
1. Connect the Vario LS with the supplied Magnectic USB cable to your
computer. Turn ON the Vario LS.
2. Run the Designer
3. Click on the instrument logo and choose “Update firmware”
(Continues on next page)
Page 8
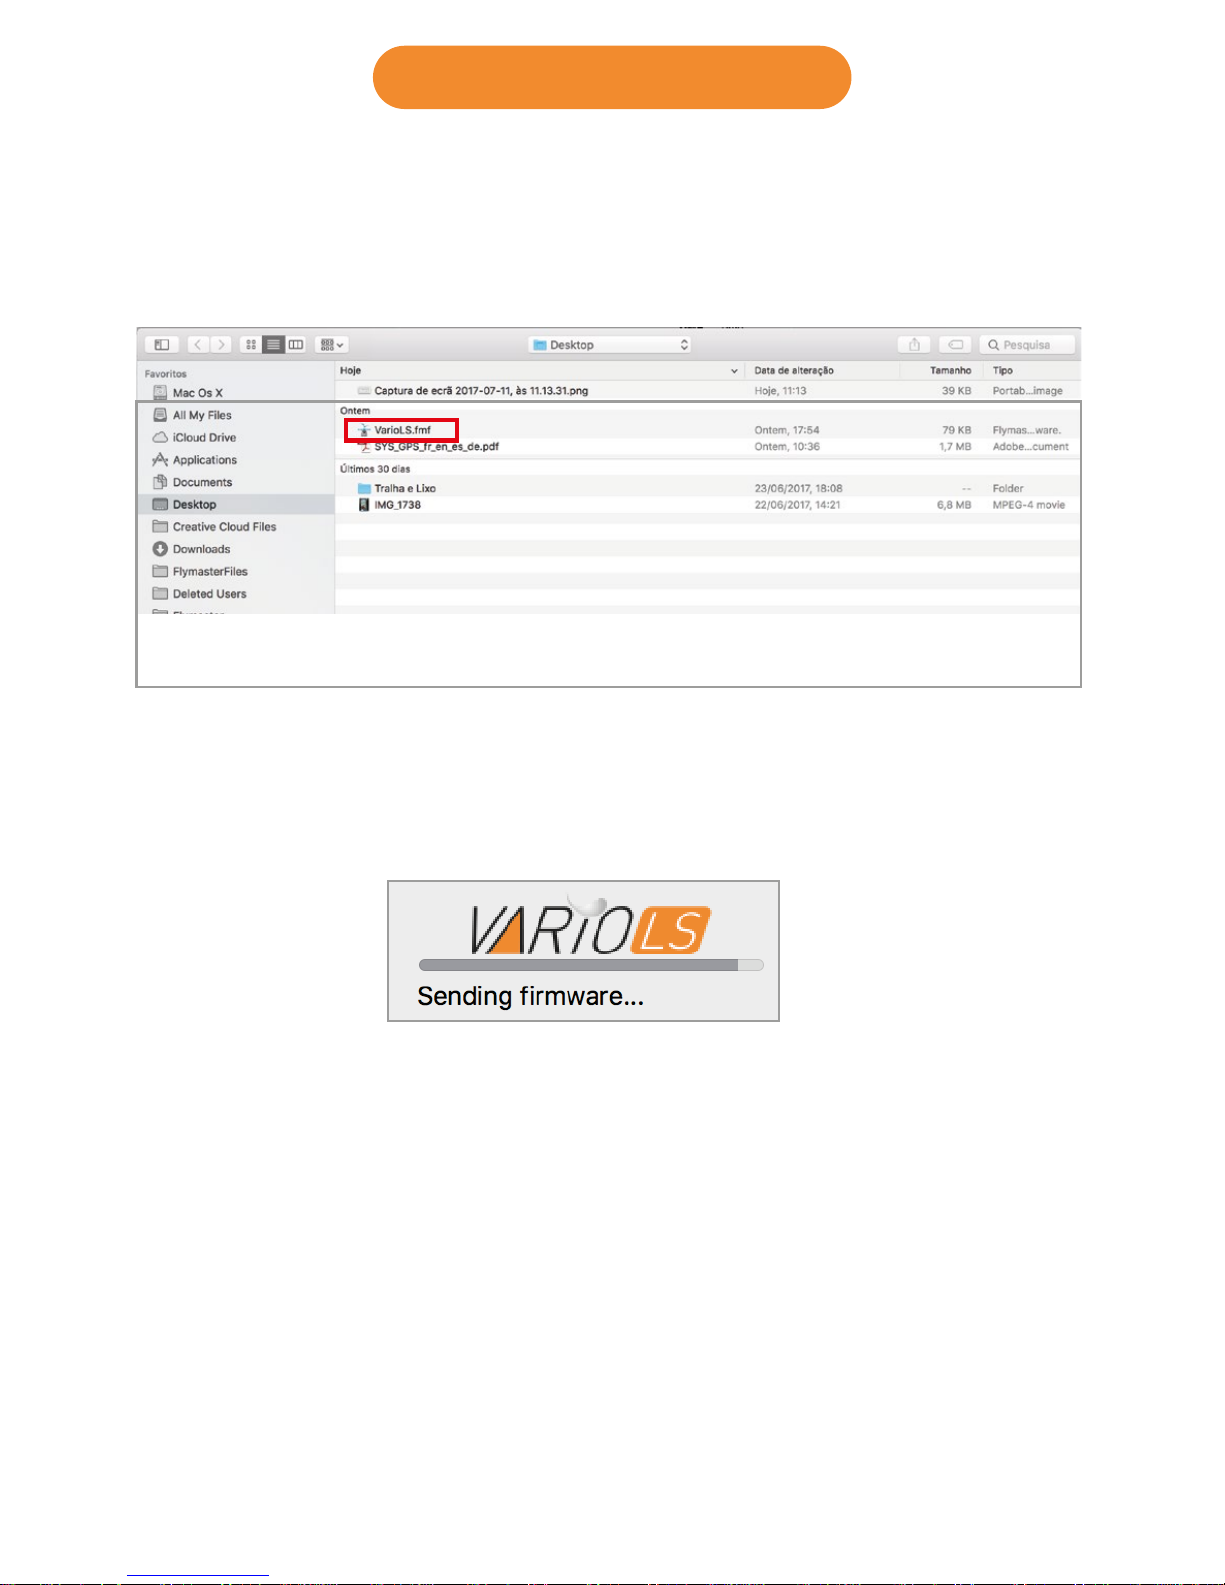
4.1. Firmware update
4. Choose the firmware file, that can be downloaded at:
https://www.flymaster.net/downloads?product=Vario%20LS
on the tab: Downloads
5. The Vario LS shoud load the firmware and reboot.
Page 9
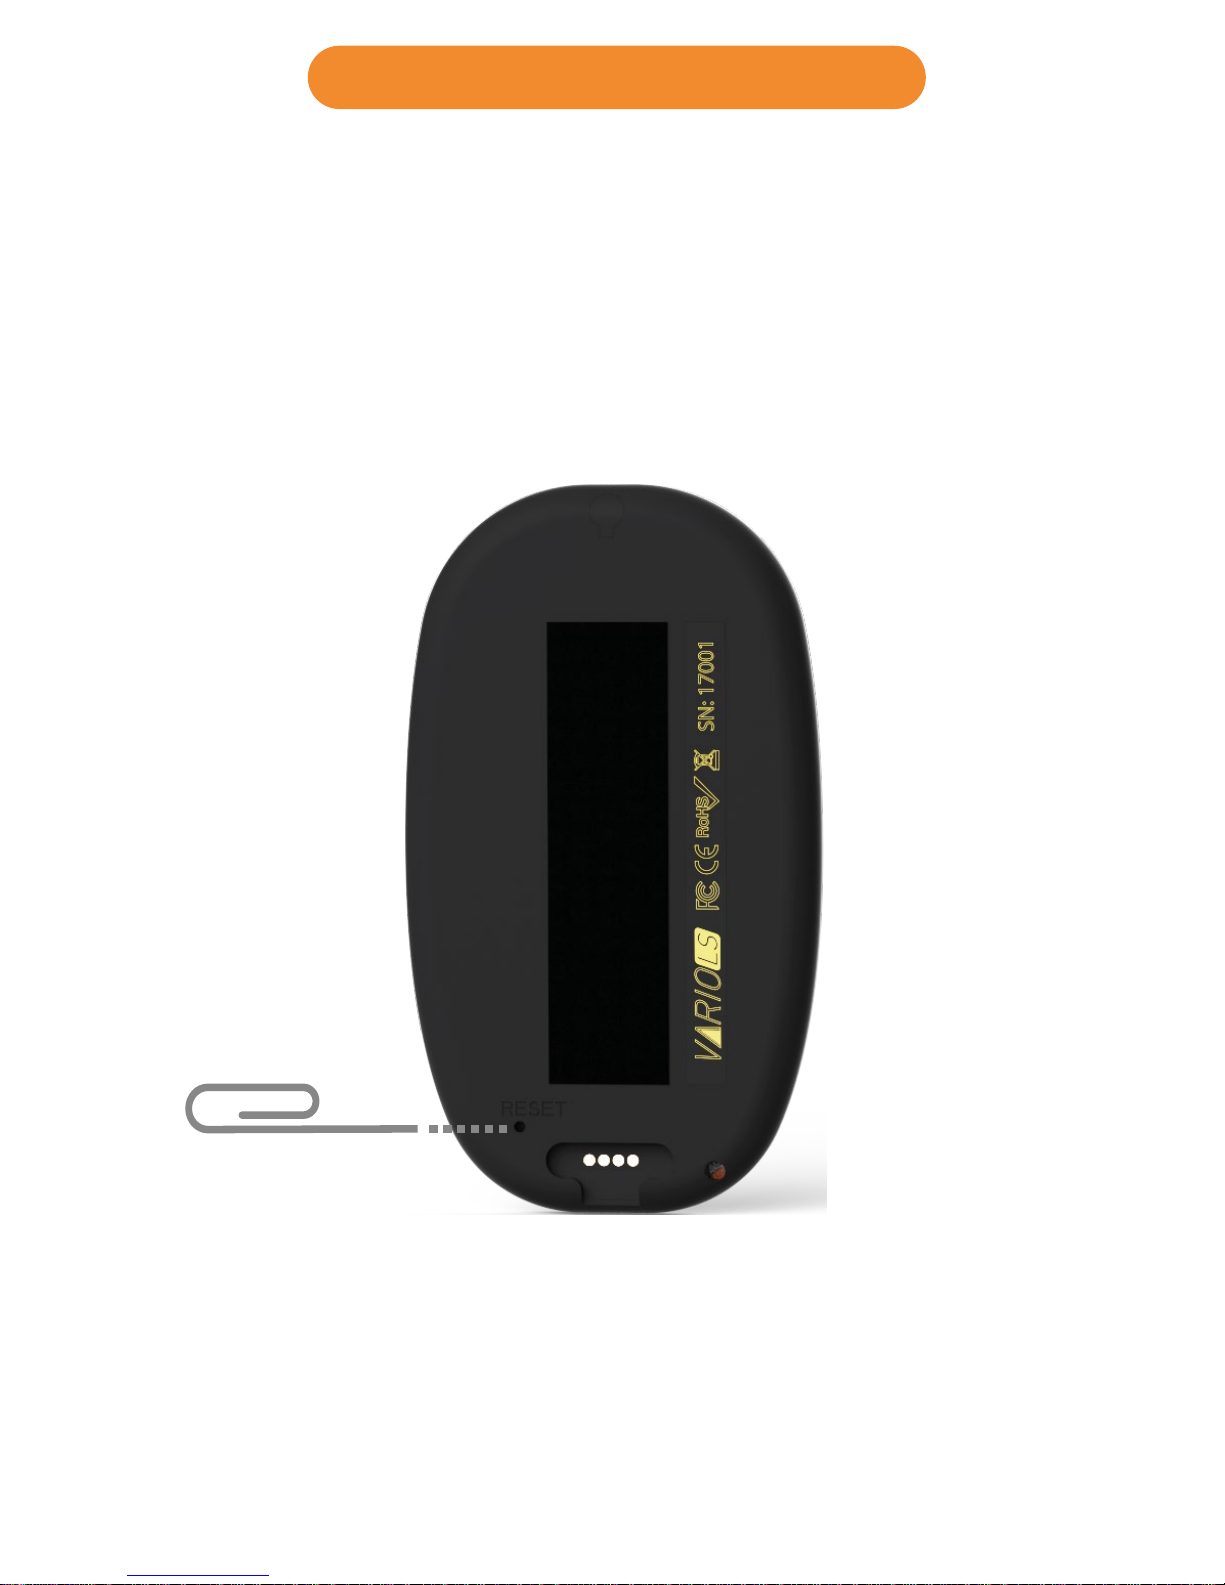
5. Reset and Fail Safe mode
If for any reason your Vario LS becomes unresponsive or does not boot
up, please try the following procedures.
1. Reset the Vario LS
Insert a paper clip into the reset hole and push it gently. Do not use
extreme force or use a sharp tip tool to do this operation.
2 . Put the Vario LS into “fail safe” mode: keep the Power/Menu button
pressed, while pressing the reset button. Keep the Power/Menu button
pressed untill a counter is displayed on the screen. After the counter
ends the Vario LS shoud display “SAFE” text on the graphic area. The
firmware can now be installed by using manual update (chapter 4), or,
exit the “fail safe mode”, pressing the reset button again.
Page 10
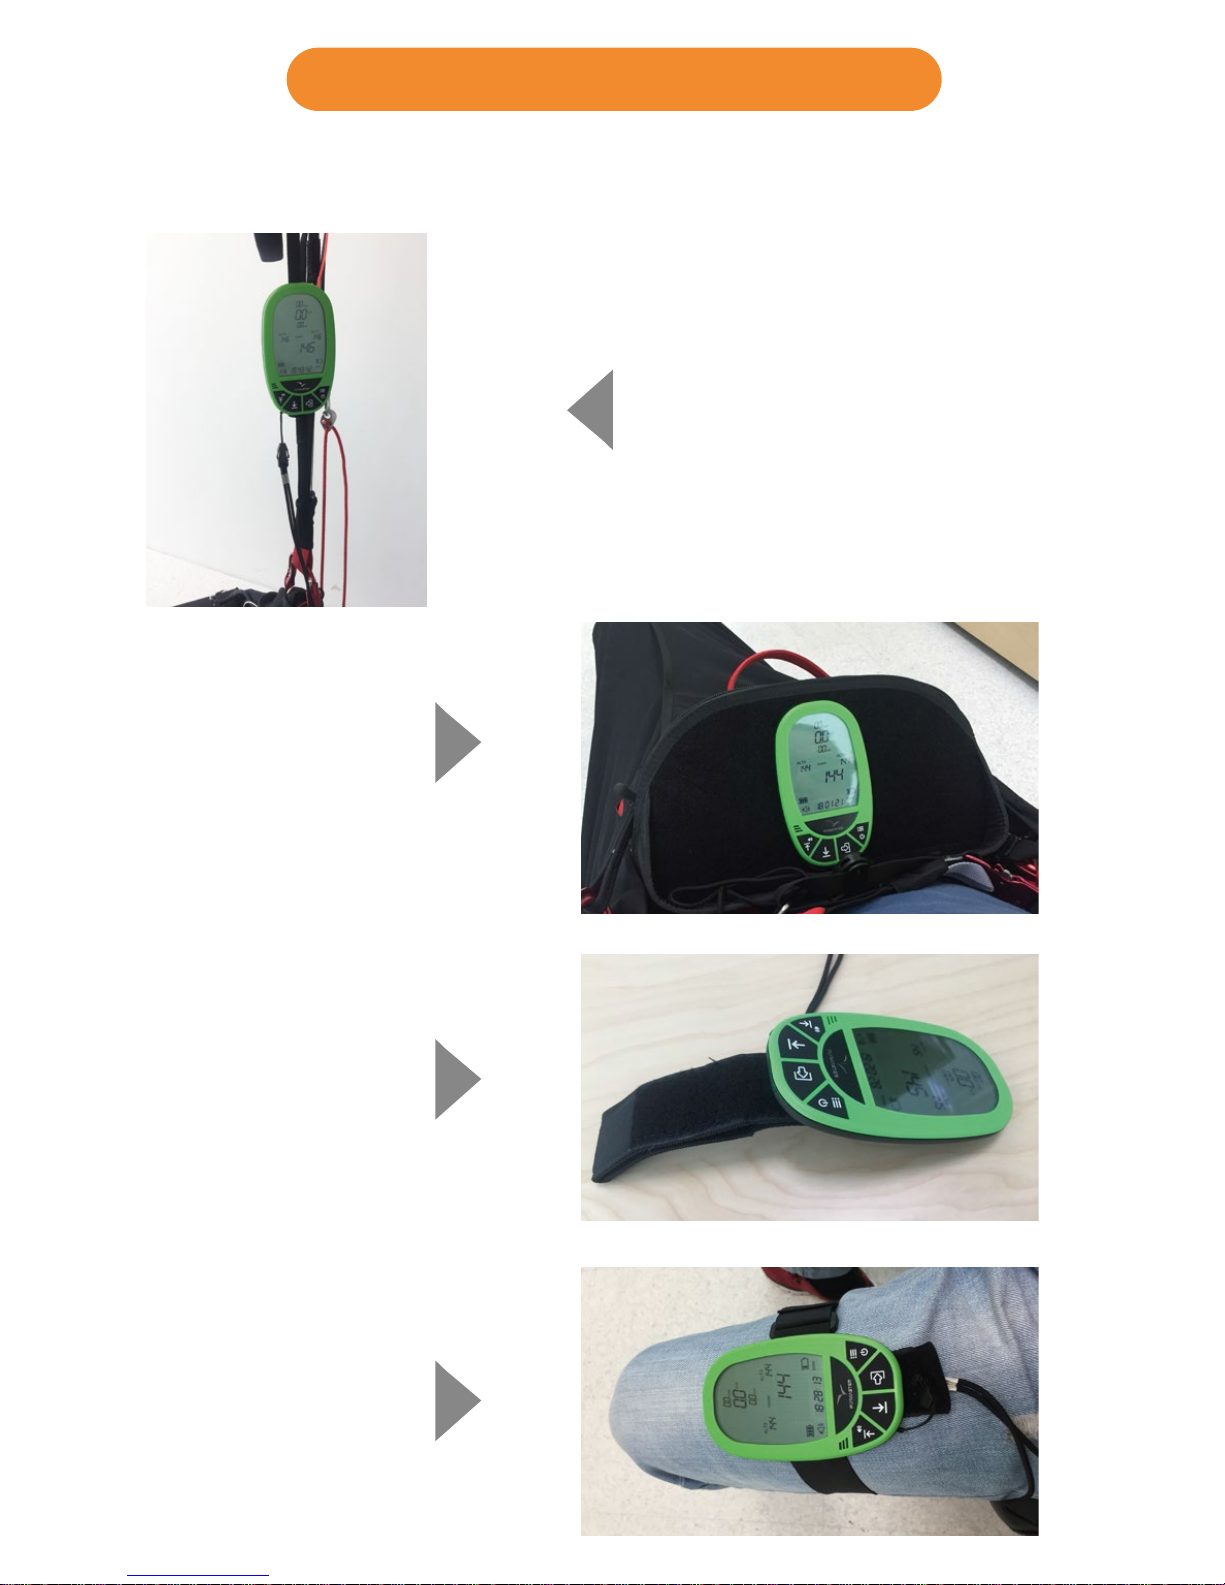
6. Place and secure the Vario LS
There are 4 recommended options to secure your VarioLS for flying.
Remember to allways secure the Vario LS with the supplied safety
lanyard.
3. On the harness
Using the optional arness
adapter
2. On the cockpit
No accesory needed
1. On the riser
Using the supplied
velcro piece
4. On the leg
Using the optional leg
strap
Page 11
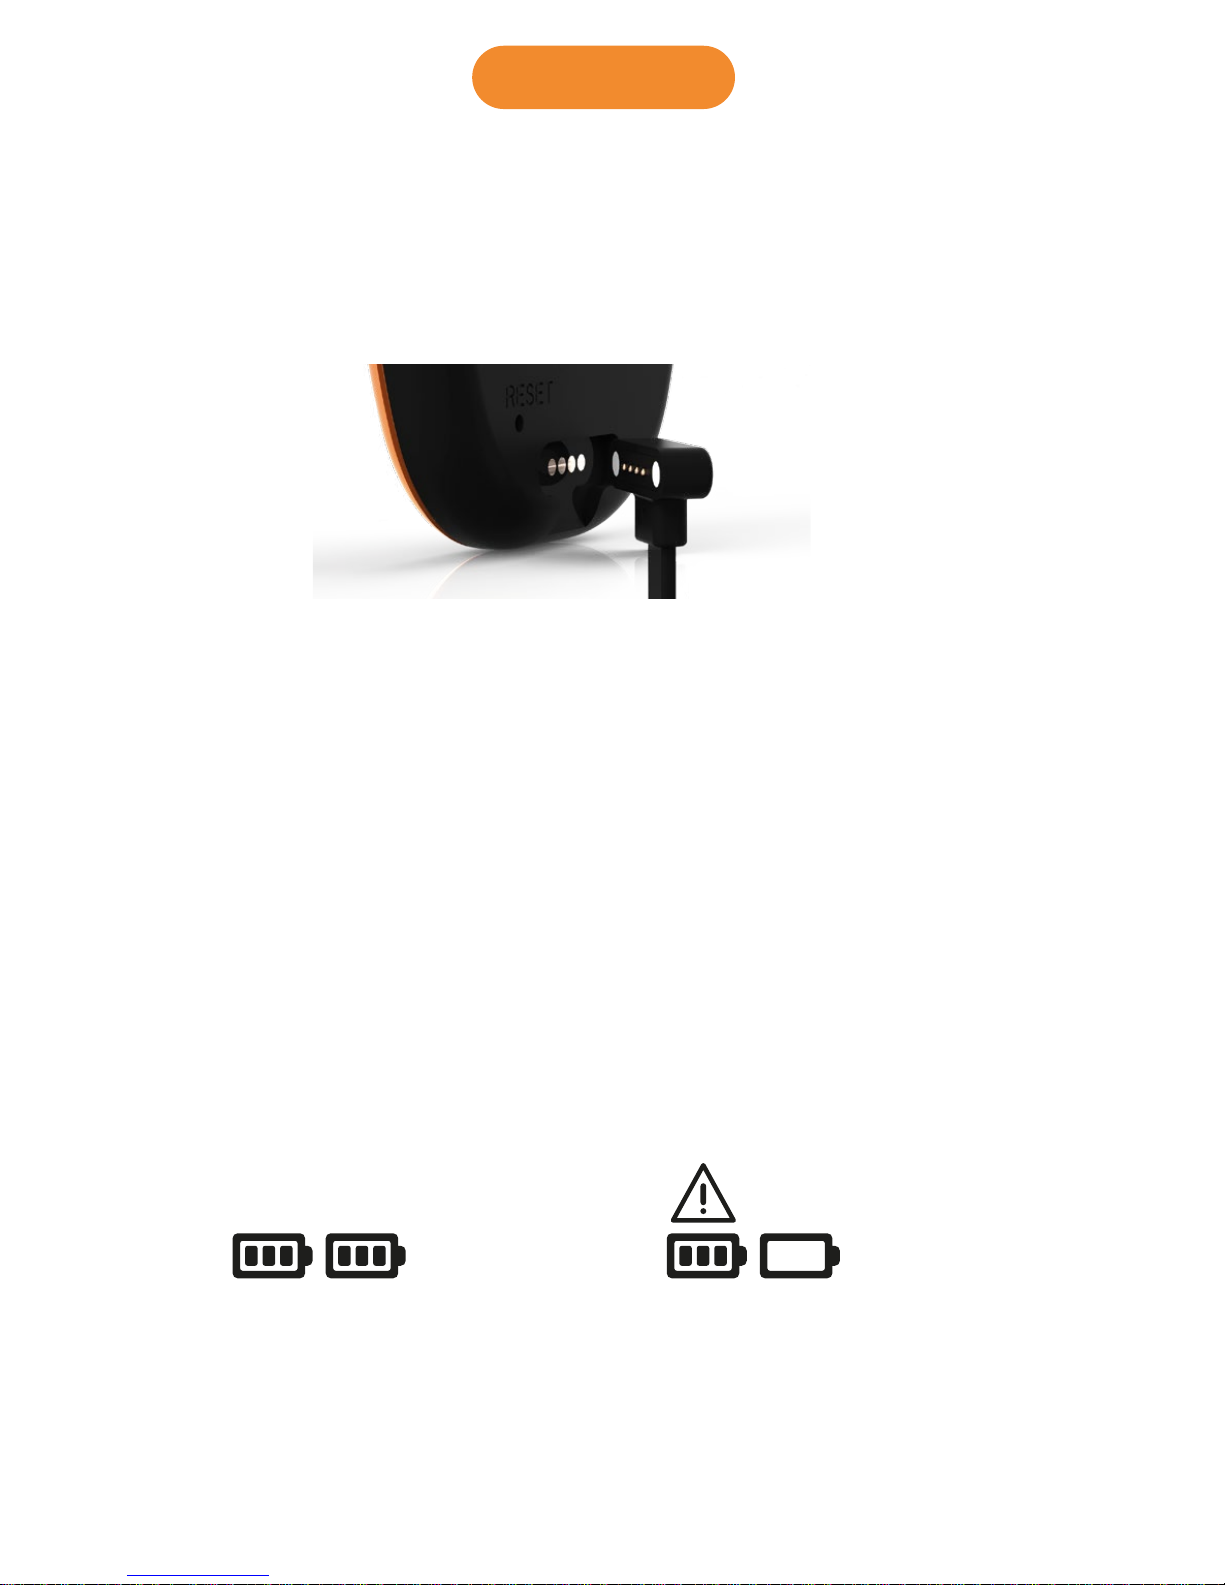
7. Battery
Charging the Vario LS
1. Use the supplied USB magnetic cable
2. Use any 5V USB charger with at least 1A output. The Vario LS also
charges when connected to a computer.
3. When the Vario LS is OFF and connected to the power source the
display shows the message “CHRG”. When the battery is fully charged
the display shows the message “FULL”. If the Vario LS detects some
problem with the battery the display shows the message “BAD”, this can
be caused by trying to charge the instrument in an excessively hot
environment.
When the Vario LS is ON the two battery symbols show an animation,
informing that the battery is being charged.
Battery Status:
The right-hand side battery status symbol shows the battery status.
The Left-hand side battery status symbol shows the reserve power status.
About 60 hrs.
Flight time*
*These are estimated durations. External factors such as temperature
and natural ageing of the battery may affect these durations.
Remaining less than 11 hrs flight time.
The battery should be recharged the as
soon as possible*.
Page 12

8. Basic settings
Basic settings for a quick start:
Setting the time and date: Press Power/Menu key, press UP or DOWN
key until TIME or DATE appears on the display. Press ENTER to start the
setup , and change the values with
UP and DOWN keys. Press ENTER to
confirm. Press MENU to exit to main menu and again to return to the flight
page.
Time and flight duration: After a flight is started, the time (clock) and the
flight duration are displayed alternately.
Setting the altimeters: Press Power/Menu key, press UP or DOWN key
until ALTI appears on the display. Pressing UP or DOWN will change
between ALT1, ALT2 or ALT3. Press ENTER to edit any of the selected
altimeter, use UP or DOWN to change the values. Press ENTER to accept
the value. Press MENU to exit to main menu or to the flight page
Changing units : Press Power/Menu key, press UP or DOWN key until
UNIT appears on the display. Press ENTER to edit the units. Use UP and
DOWN keys to change value between meter/ms and feet/ftminx100 and
press ENTER to accept. Press MENU to exit to main menu or to the flight
page.
Adjust the speaker volume : On the main screen, press up/volume key
to change the speaker volume, each press selects a louder volume level,
when the maximum volume is reached pressing it again will mute the
speaker and restart the process.
Restore the VarioLS to factory defaults: Press Power/Menu key, press
UP or DOWN key until FACT appears on the display. Press ENTER, select
YES with the UP or DOWN key. Press ENTER to restore to factory
defaults. Press MENU to exit to main menu or to the flight page.
Page 13
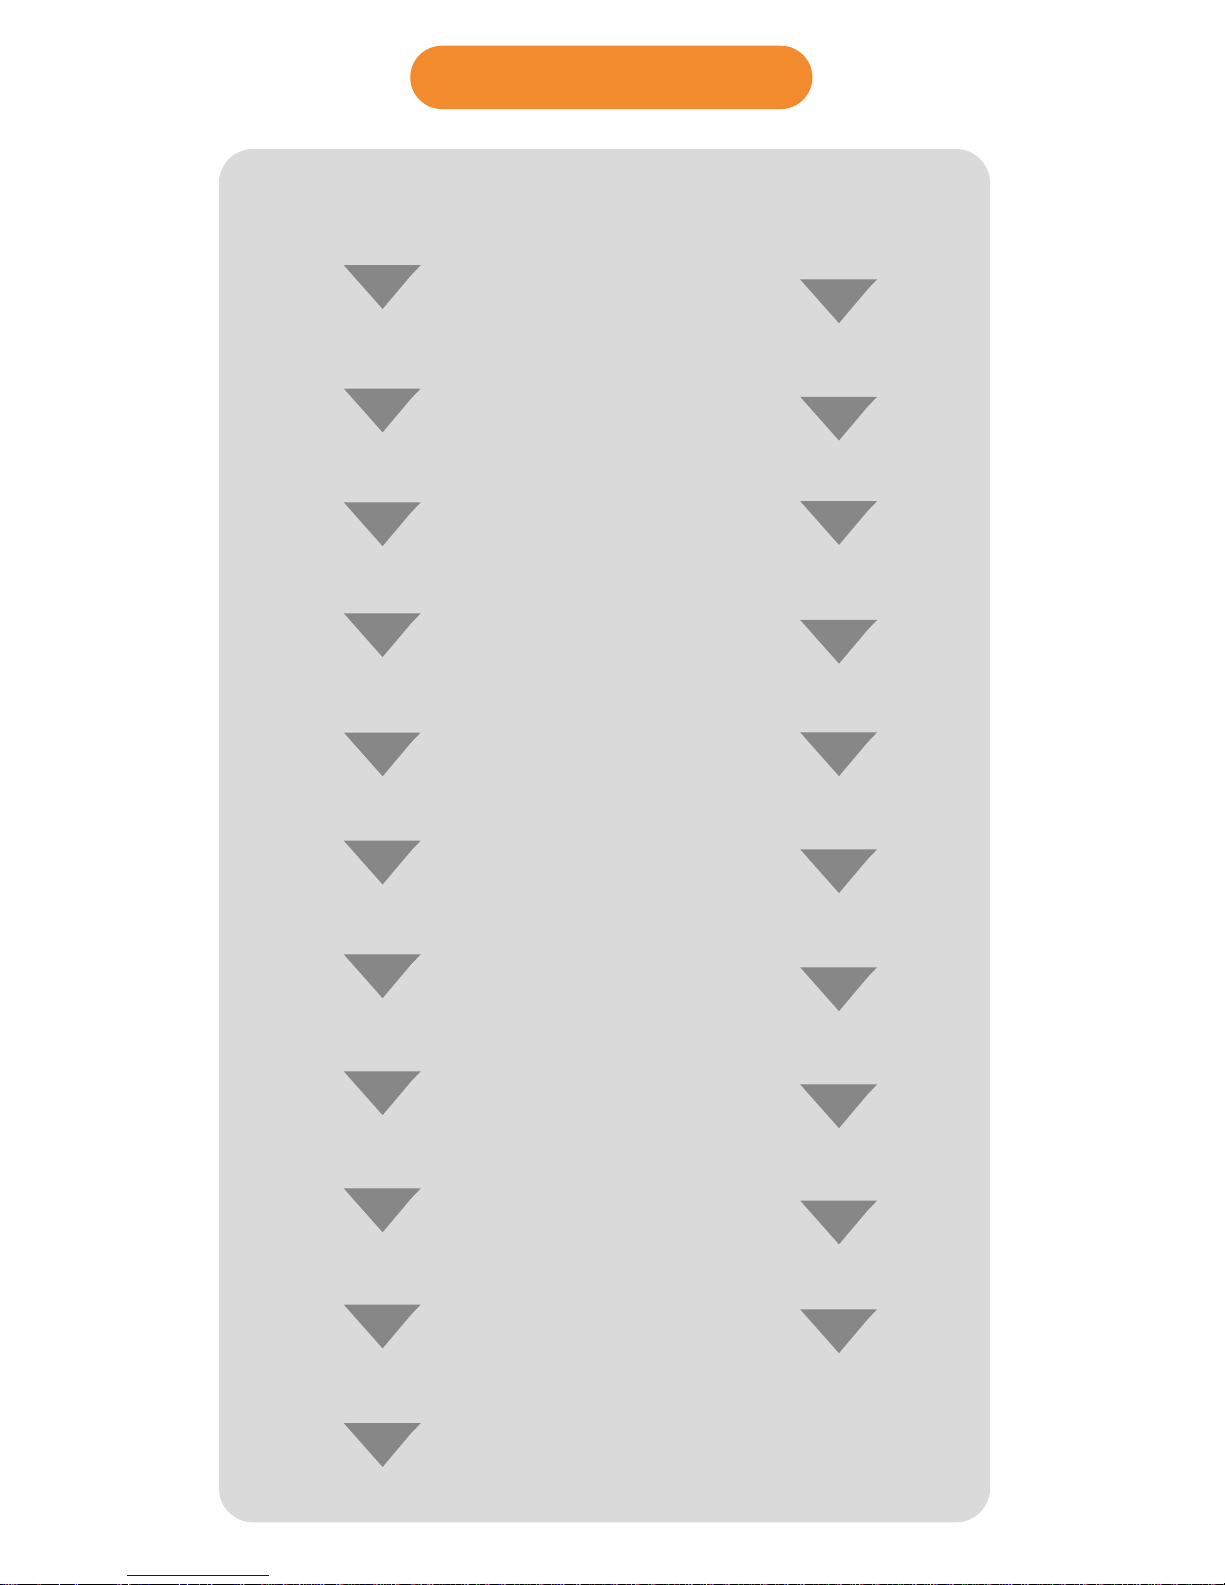
9. Menu sequence
OFF
ALTI (ALT 1)
ALTI (ALT 2)
ALTI (ALT 3)
CLTH
SKTH
SKAL
INTG
FREQ
INCR
DAMP
CADE
BUZZ
UNIT
DATE
TIME
CTRS
SLNT
LOG
ERAS
FACT
Page 14

10. Advanced settings
OFF - Turns the Vario LS OFF
ALTI (ALT 1) - Altimeter 1
ALTI (ALT 2) - Altimeter 2
ALTI (ALT 3) - Altimeter 3
CLTH - The Climb Threshold defines the rate of climb at which the vario
will start beeping. The frequency of the first beep is defined through the
Base Frequency parameter,and steadily increases according the
Increments parameter value.
The default value for Climb Threshold is 0.1m/s. This means that beeping
starts once the instantaneous vario value goes above 0.1m/s.
SKTH - The Sink Threshold is the rate of descent at which the vario will
emit a low frequency sound. Contrary to the climb sound the sink sound is
continuous. The deeper the sink rate the lower the sound frequency.
Default value for this parameter is -2 m/s, we suggest setting a value lower
than the natural sink rate of the glider when flying on speed bar in still air.
SKAL - The Sink Alarm defines a vertical speed value at which a sound
(alarm siren) starts to be produced. For example, if the Sink Alarm is set to
-10m/s, then if the instantaneous vario goes below -10m/s, and alarm will
be fired. This alarm can be used to identify high vertical speeds, as for
example, in a spiral dive. The Sink Alarm parameter can vary from 0 to
-25m/s. Set the Sink Alarm to 0 (ZERO) to disable the alarm.
INTG - The Integrated vario is calculated by integrating the vertical speed
during a period of X seconds defined by this value.
Page 15

10.1. Advanced settings
FREQ - The audio frequencies can be adjusted to match the user's
preference, by setting the Base Frq and Increments.
The Base Frq is the first frequency used to produce the initial sound which
corresponds to the climb threshold (by default 0.1 m/s). Later, as the
climb rate increases, a bip, bip sound is produced for which the cadence,
and frequency, also increase. The Base Frq can be set from 500 to 1500
Hz. The higher is the frequency value, the higher pitched the sound is. The
preset value for Base Frq is 700 Hz.
INCR - The Increments parameter sets the frequency increment for each
0.1 m/s climb rate increase. The increments can be set from 1 to 99 Hz.
The preset value for Increments is 10 Hz. Considering an Increments
value of 10, and Base Frq of 700 Hz, the vario frequency at 1 m/s is 800
Hz.
DAMP - The Vario LS vertical speed calculation is based on air pressure
variations. It is very seldom to have air pressure absolutely stable.
Turbulence caused by air moving near the sensor is suficient to cause
small variations in pressure. For this reason the Vario LS filters (averages)
the pressure data to prevent constantly detecting tiny pressure variations.
The value that defines how must the pressure is filtered is the Damper.
Setting a lower damper value caused the Vario LS to become more
responsive but harsher. Inversely a higher value causes the Vario LS to be
less responsive but smoother. The default value is 8.
CADE - When a rate of climb is higher than that specified by the Climb
threshold the Vario LS creates a beeping sound. The rate (cadence) of the
beeps increases as the climb rate increases. This increase in rate is not
linear. The cadence parameter species which cadence curve should be
used.
Page 16

10.2. Advanced settings
BUZZ - Is so called because of the sound it emits, which resembles a
buzzing sound.
The buzzer sound is produced when the rate of climb is close to, but has
not yet reached the specified Climb threshold (see 13.3.1). This value is
set between 0 and 9 with each unit corresponding to be 0.1 m/s, ie. 3 is
0.3m/s. Subtracting this decimal value from the climb threshold will give
us the value at which the Vario LS will start buzzing.
For example with the Vario LS default values, Climb threshold=0.1m/s,
and Buzzer=3 (0.3m/s) the buzzing with start at -0.2m/s because 0.1 -
0.3= -0.2. In this case at 0.1m/s directly below the Climb threshold the
Vario LS will emit a constant sound varying rapidly in pitch from around
100hz to the set base frequency at which the first beep is emitted. This is
the buzzer sound and may resemble a growl noise. Setting the Buzzer
value to 0 (zero) will disable the buzzer feature.
Although the Buzzer will sound very annoying on the ground it becomes
an amazing companion in flight allowing the pilot to pick-up thermals he
would have usually missed.
UNIT - Sets the Vario LS units to: meter and m/s or feet and f/min x100.
DATE - Sets the the date of the Vario LS
TIME - Sets the clock of the Vario LS
CTRS - Sets the contrast of the display.
SLTN - Setting Auto silent option ON will keep the Vario LS 's sound quiet
until a Start Flight has been detected. This function avoids listening the
vario sound while waiting to take off. The audio will then be kept active
until the VARIO LS is switched off. The default value for the auto silent
parameter is ON.
LOG - Shows the recorded flights into the Vario LS internal memory.
FACT- Restore al the values to factory defaults.
Page 17
To see your flights log:
- Press MENU, then press UP or DOWN key untill you see “LOG” on the
display.
Use the UP key or DOWN key to scroll between the flights.
11. Flights log
Max climb rate
achieved during
the flight
Max. Alt 3 achieved
during the flight
Max. Alt 1 achieved
during the flight
Flight start time*
Flight duration*
Flight date*
* The flight start time, flight duration and flight date are shown in sequence
Max. Alt 2 achieved
during the flight
Flight number
Max. Sink achieved
during the flight
Page 18
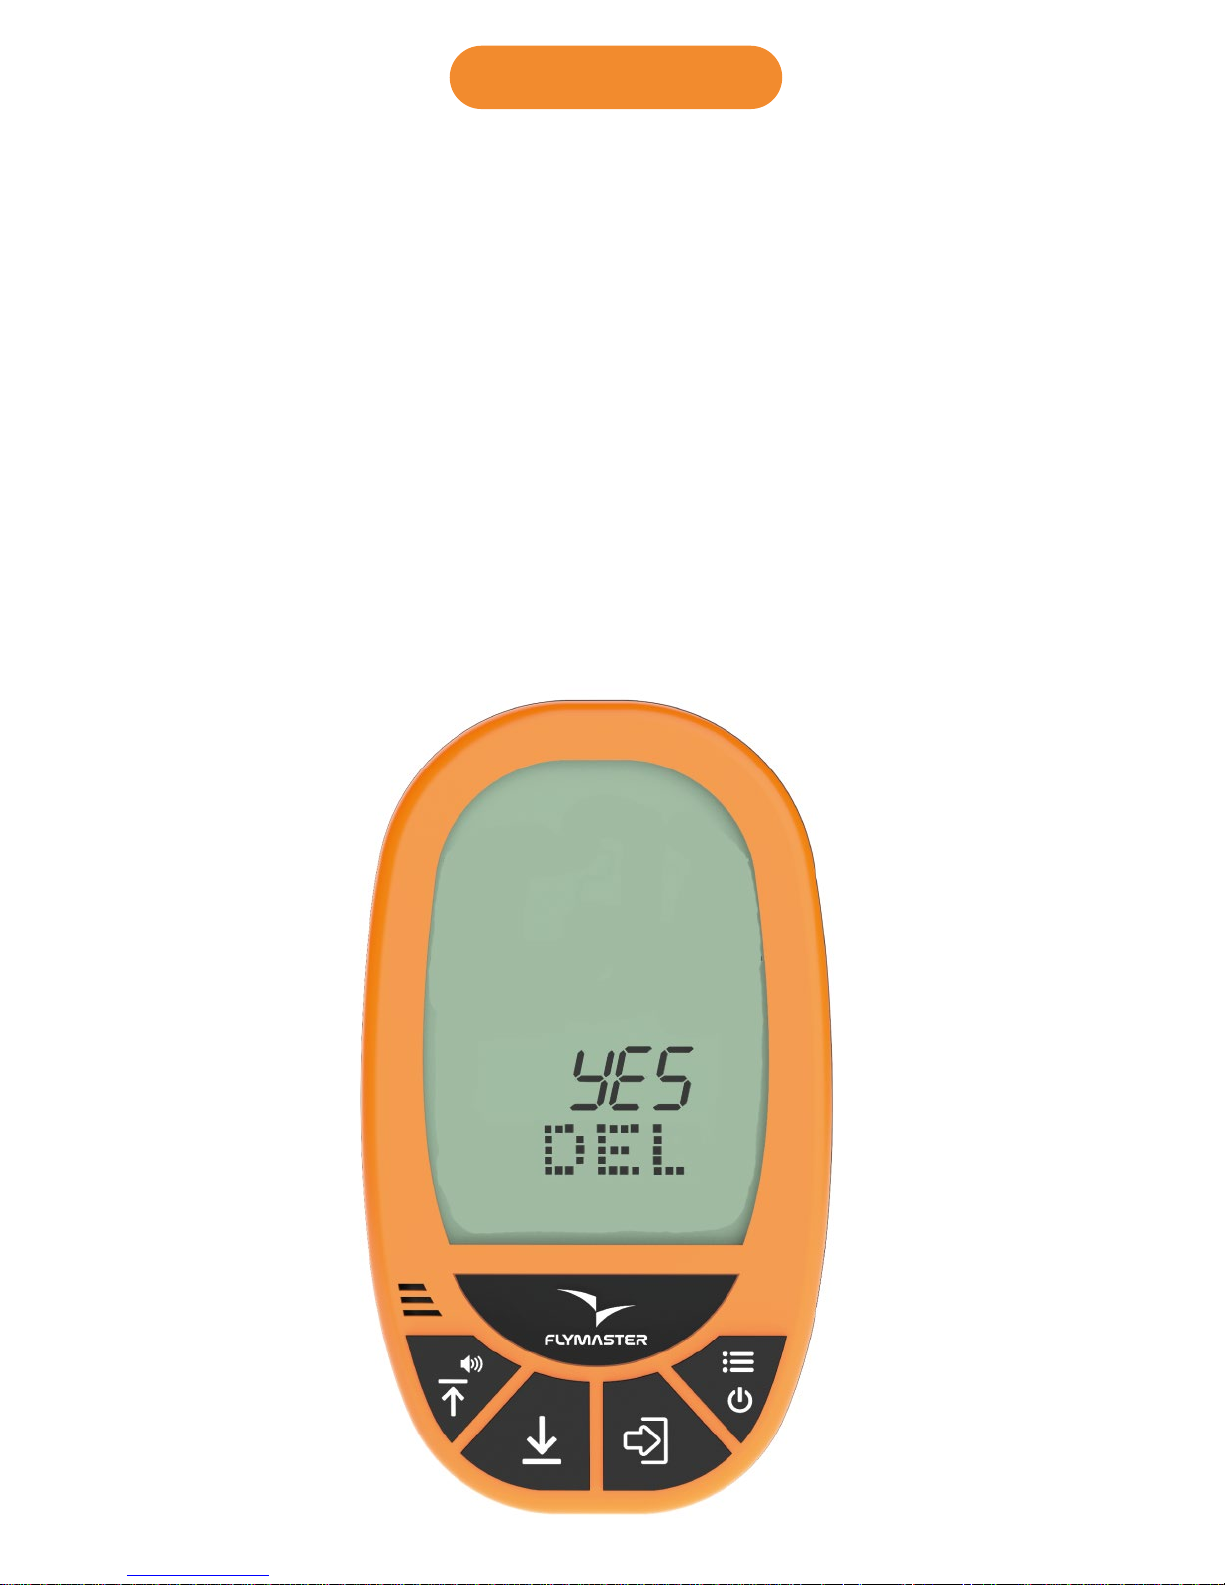
11.1 Flights log
Erase single flight from flights log:
- Press MENU, then press UP or DOWN key untill you see “LOG” on the
display.
Press ENTER to enter the LOG.
Use the UP key or DOWN key to scroll between the flights.
Press enter in the logged flight you want to delete, and DEL will appear
on the display, with the word NO on the ALT1 field.
Use the UP or DOWN key to select YES.
Press ENTER to confirm.
The flight is now erased from the LOG.
Press MENU to go back.
Page 19
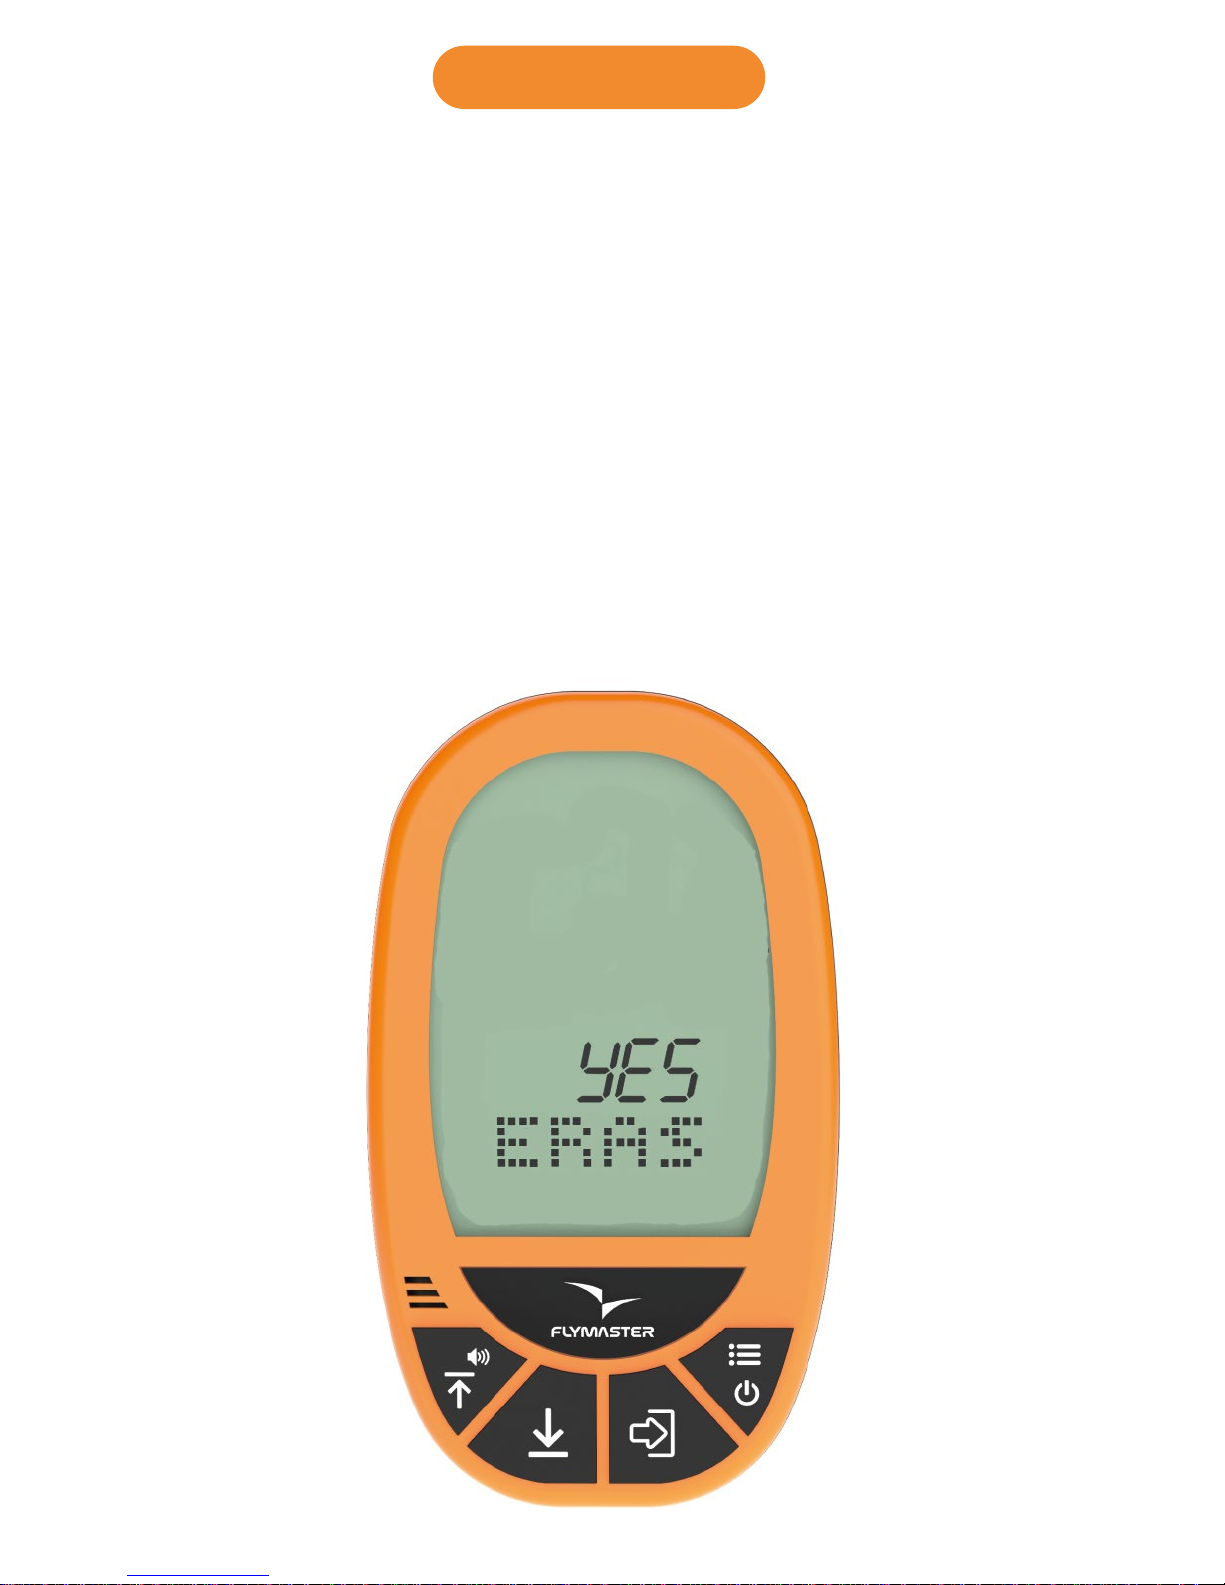
Erase all flights at once from flights log:
- Press MENU, then press UP or DOWN key untill you see “ERAS” on the
display.
Press ENTER to select erase funcion.
The word NO will appear on the display on the ALT1 field.
Use UP or DOWN key to change it to YES.
Press ENTER to confirm.
The word WAIT will appear during the erase process.
Press MENU to go back.
11.2 Flights log
Page 20
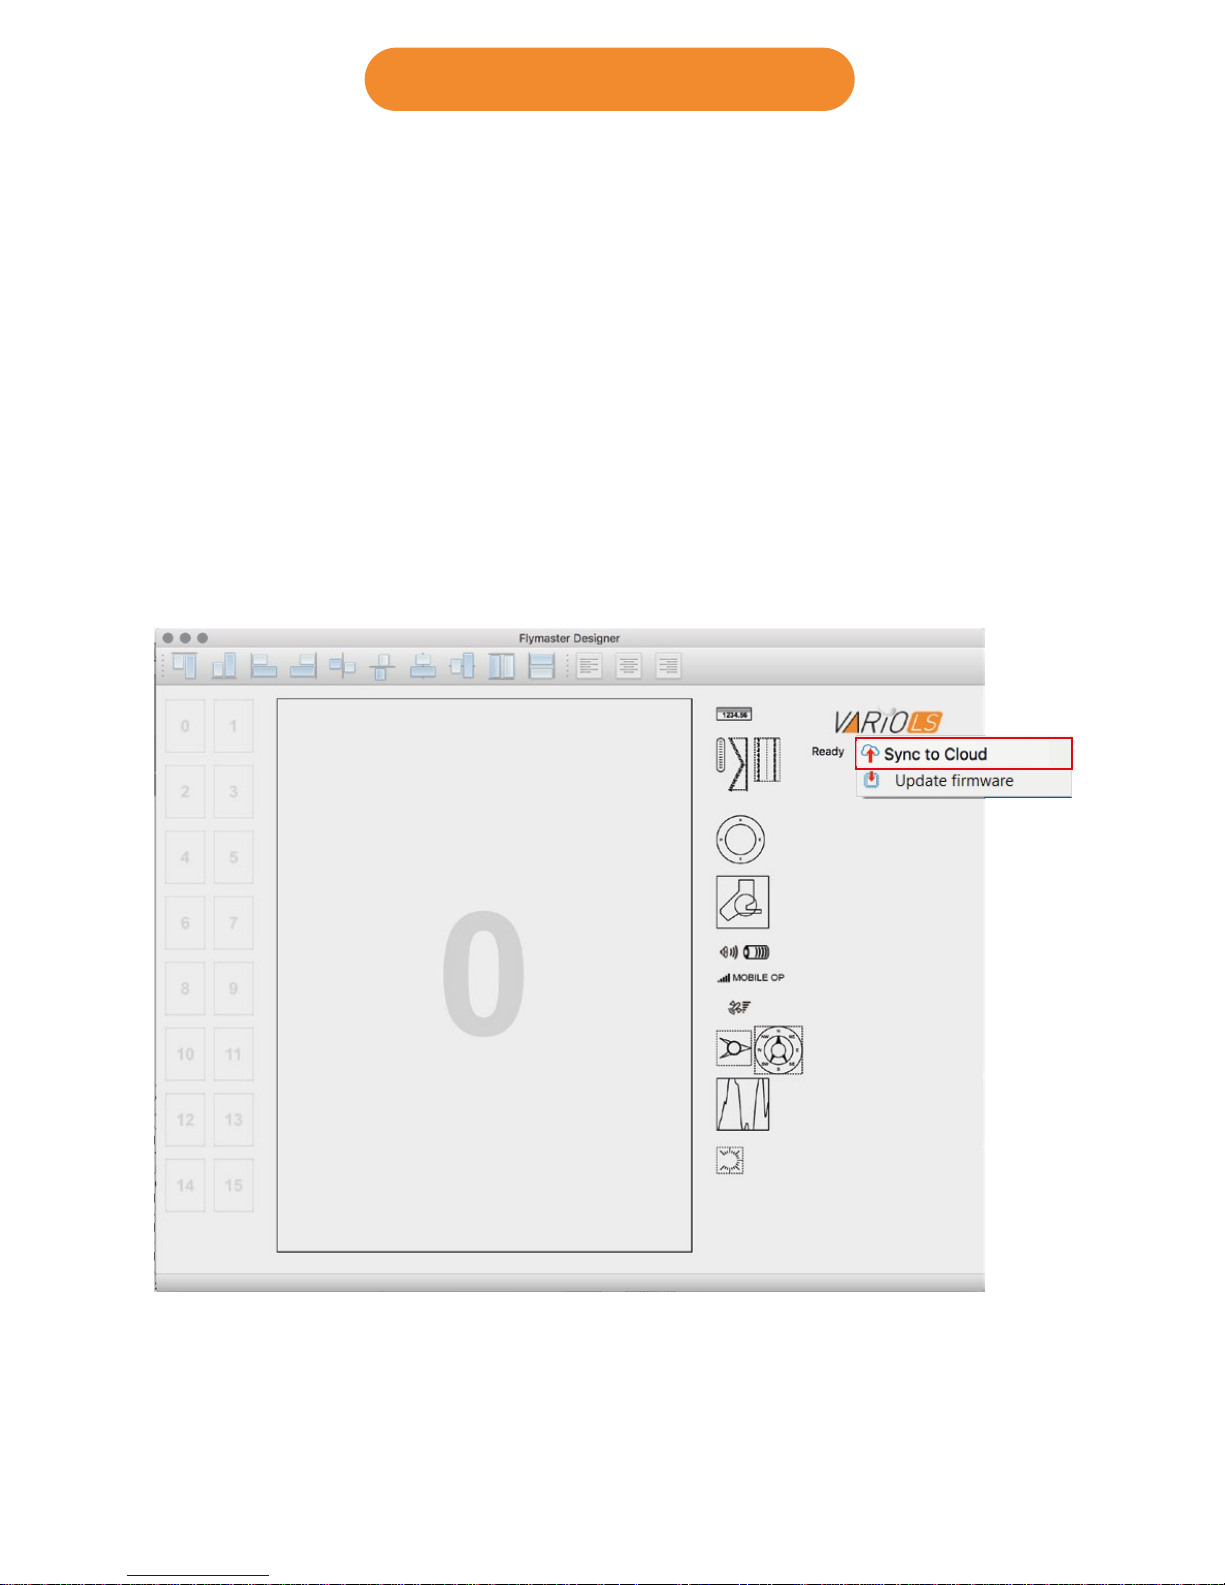
Dowloading flights from the Vario LS:
1. Be sure you have a Flymaster account and you intrument is
registered in your account. (Chapter 3)
2. Turn ON you Vario LS, and connect it to the Designer software.
3. Click on Vario Ls logo and “Sync to Cloud”
4. If there is a new flight not yet sync’d with your account the Designer
will send it to Cloud Flights.
12 Downloading flights
Page 21
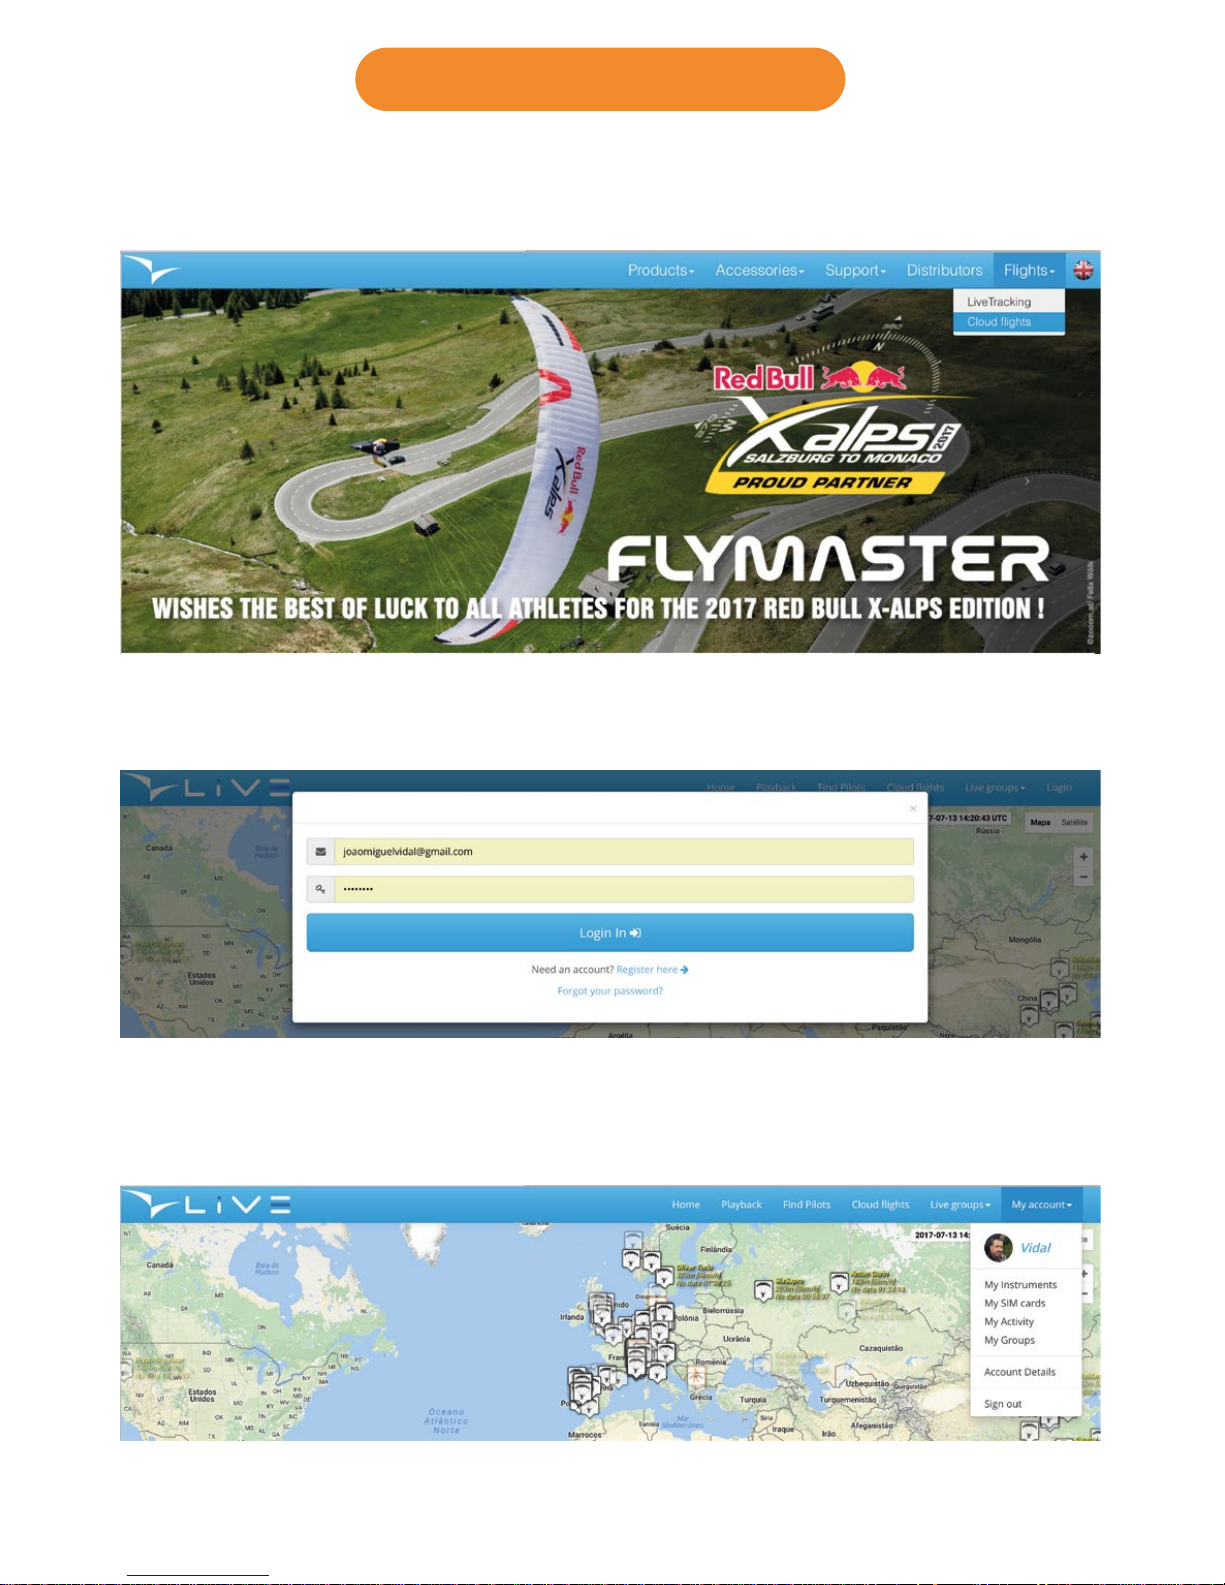
5. Go to www.flymaster.net and click on “Flights” - “Cloud flights”
6. Log into your account
7. Go to “my activity”
12.1 Downloading flights
Page 22
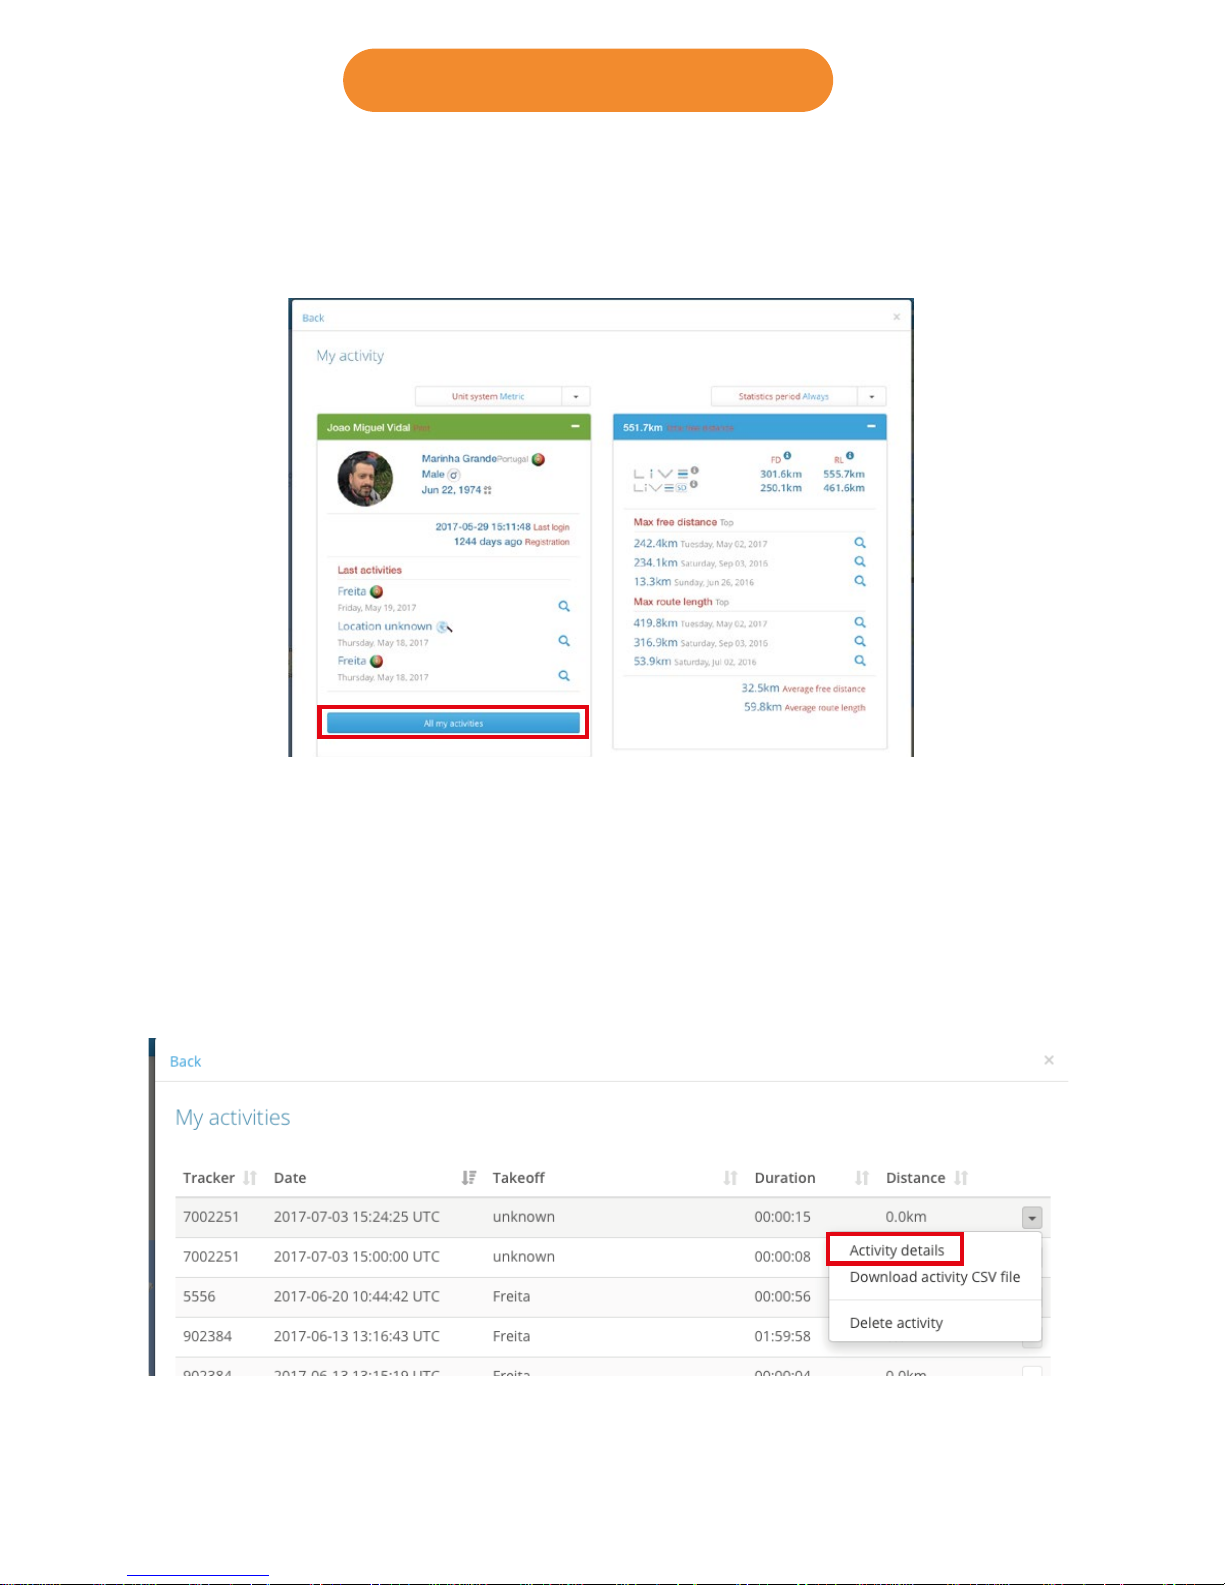
5. In your activity resume, click on “ All my activities”
6. Click in “activity details” to choose the flight you want to analyse or
download,
12.2 Downloading flights
Page 23
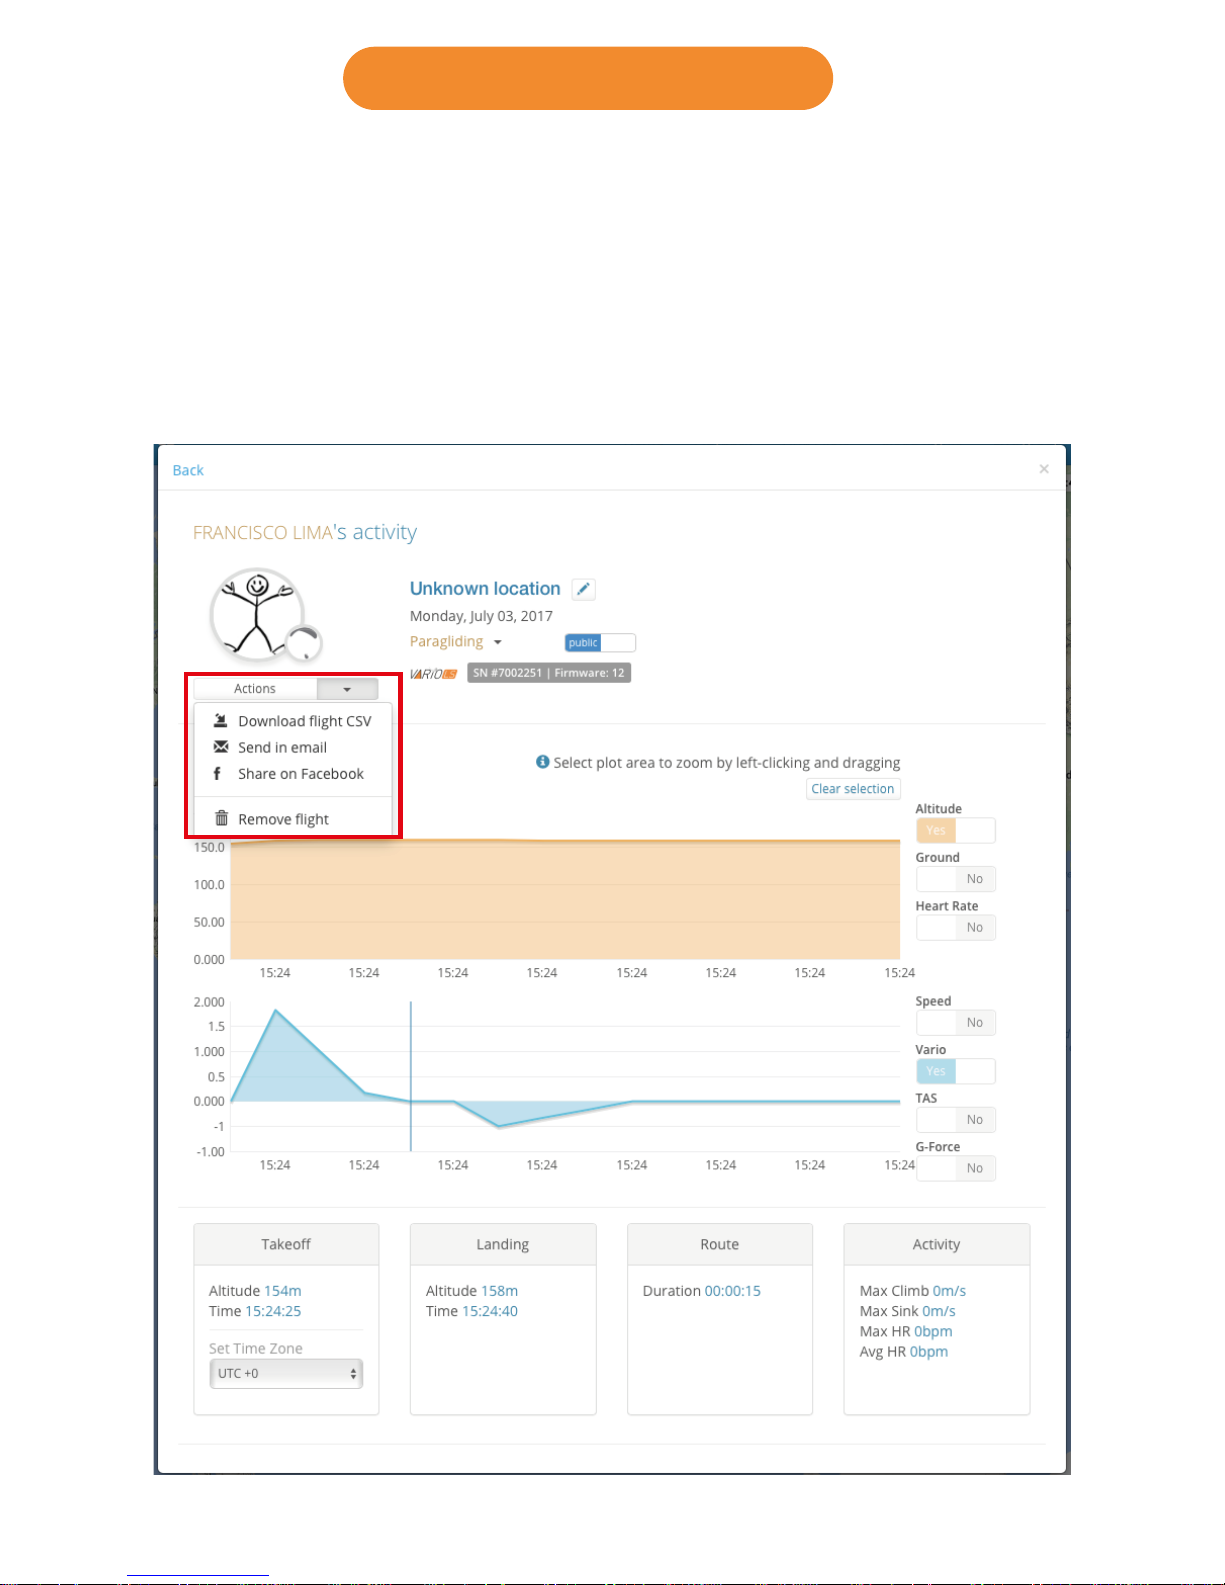
7. Here you can see the flight details.
It’s possible to download it CSV file, send it by email, share it in Facebook
or delete it from your flights list.
12.3 Downloading flights
Page 24
Warnings:
Take care of your instrument by cleaning regularly. Do not open the Vario
LS, doing this will void your guarantee. Do not expose your Vario LS to
extreme temperatures, high or low, this will permanently damage it. Avoid
leaving fully exposed to the sun, or in temperatures bellow -10ºC.
Ensure that the product is well in position before taking off. Flymaster
cannot be held responsible for the loss of the product during the flight
(takeoff included).
Battery
This product uses a lithium-ion battery. Do not expose to temperatures
above 50 ° C (120 ° F). Risk of fire, explosion or burning. If leakage and
contact with liquid leaking from the battery, clean thoroughly with water
and seek medical advice immediately. For safety reasons and to extend
battery life, charging can be done in an ambient temperature range.
Temperatures: Standard operation: 0 ° C (32 ° F) to +45 ° C (113 ° F)
short-term storage: -20 ° C (-4 ° F) at 60 ° C (140 ° F) Storage long term
-20 ° C (-4 ° F) at 25 ° C (77 ° F).
Do not check out, or do not attempt to remove the battery, which is not
user replaceable. If battery problem, please contact Flymaster support.
Notice to users regarding collection and disposal of batteries and
electrical and electronic equipment.
LITHIUM-ION BATTERY AND ELECTRONIC CIRCUIT IN THIS PRODUCT
CAN NOT BE ADDED TO THE HOUSEHOLD WASTE. To allow proper
recycling, please bring it to a collection point for.
Directive 2002/96/EC applies within the European Union. For the
procedure applicable in countries outside the European Union, please
check with local authorities
DO NOT ATTEMPT RECHARGING THE DEVICE WITH A DIFFERENT USB
CORD THAN THE ONE PROVIDED. RATING : 5VDC 500mA.
CE Mark
This product meets the requirements of the CE mark as part of a residential, commercial or light industrial.
About this document
The greatest care was taken in the preparation of this document. However, due to the commercial development of the product, some information
may not be quite up to date. The information in this document is subject to
change without notice. Flymaster is not responsible for any omissions or
technical or editorial errors in this manual, in the event of incidental or
consequential damages resulting from the content or use of this
document.
13. Important notes
Page 25

 Loading...