

Page 1
SMART WHEEL
MANUAL
Page 2
NOTE: We advise you to keep the box, in case you will ever need to send your
Smart Wheel back for repair or upgrade.
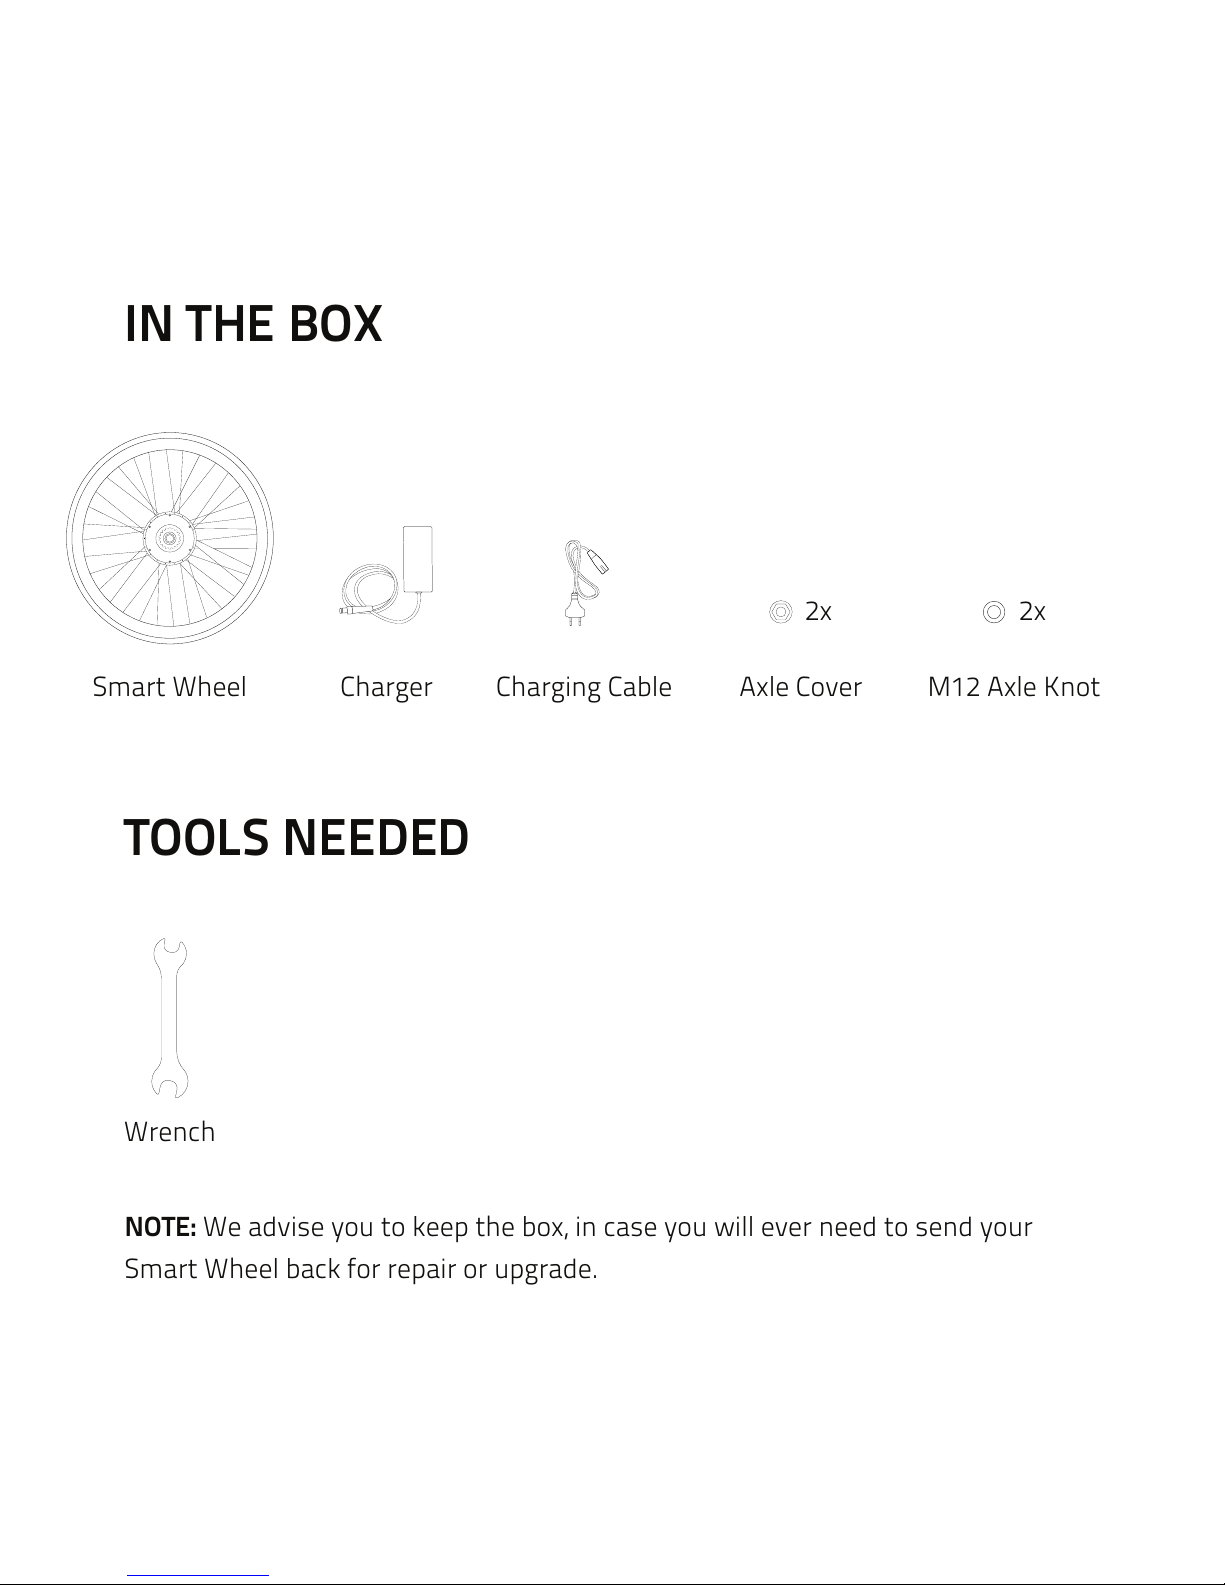
Smart Wheel Charger Charging Cable Axle Cover M12 Axle Knot
2x 2x
Wrench
IN THE BOX
TOOLS NEEDED
Page 3
INSTALLING THE SMART WHEEL
Find a video: flykly.com > support > smart wheel > first installation
Step 1
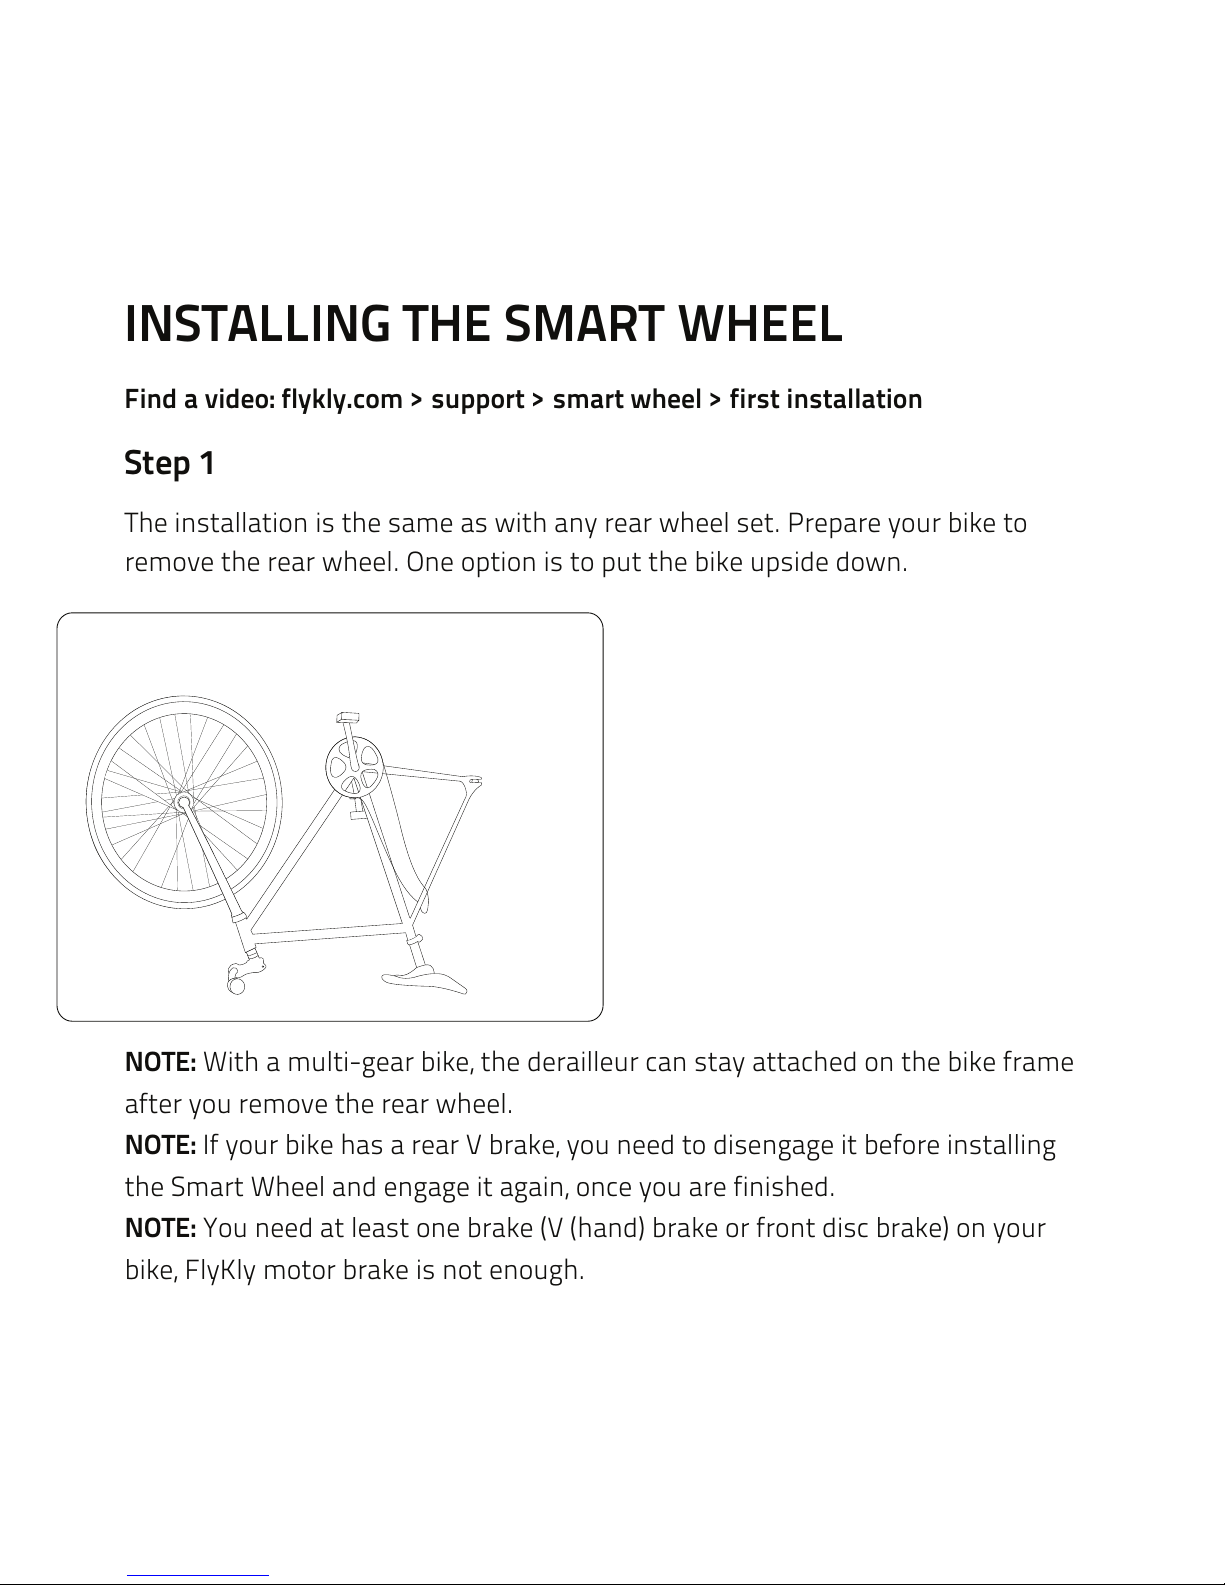
The installation is the same as with any rear wheel set. Prepare your bike to
remove the rear wheel. One option is to put the bike upside down.
NOTE: With a multi-gear bike, the derailleur can stay attached on the bike frame
after you remove the rear wheel.
NOTE: If your bike has a rear V brake, you need to disengage it before installing
the Smart Wheel and engage it again, once you are finished.
NOTE: You need at least one brake (V (hand) brake or front disc brake) on your
bike, FlyKly motor brake is not enough.
Page 4
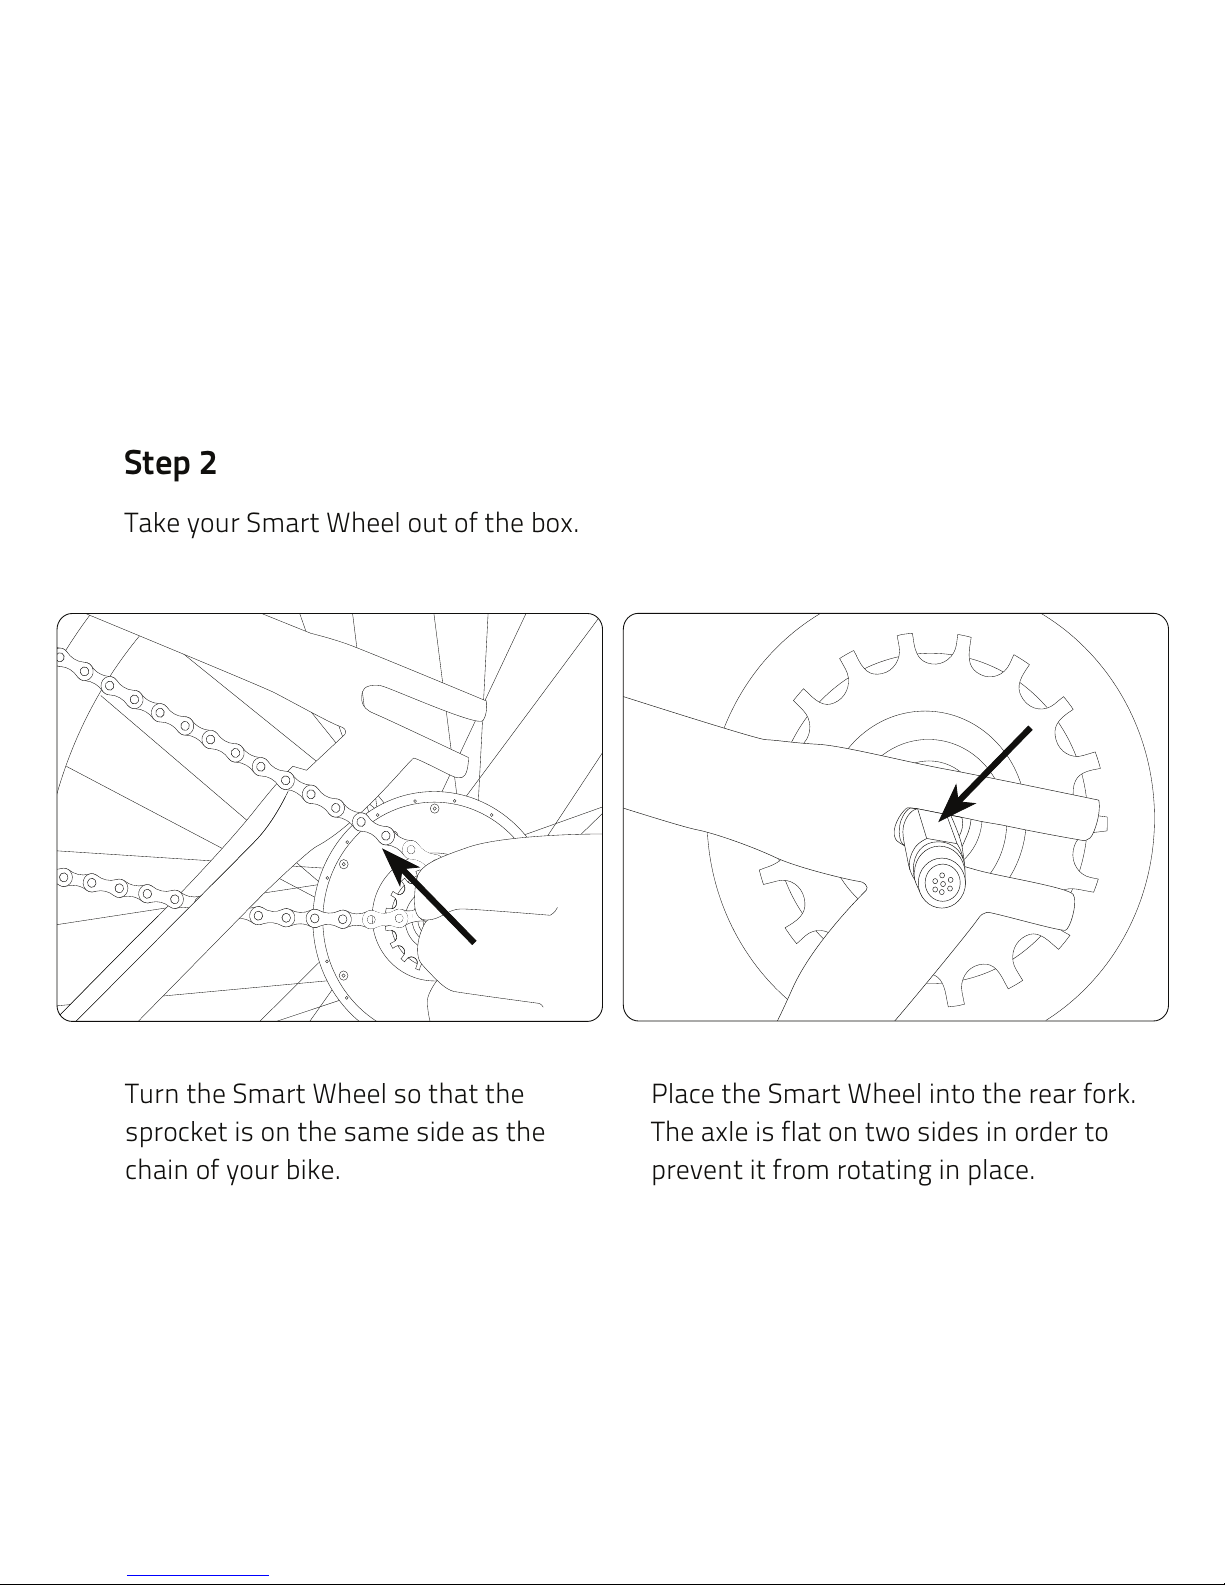
Turn the Smart Wheel so that the
sprocket is on the same side as the
chain of your bike.
Place the Smart Wheel into the rear fork.
The axle is flat on two sides in order to
prevent it from rotating in place.
Step 2
Take your Smart Wheel out of the box.
Page 5
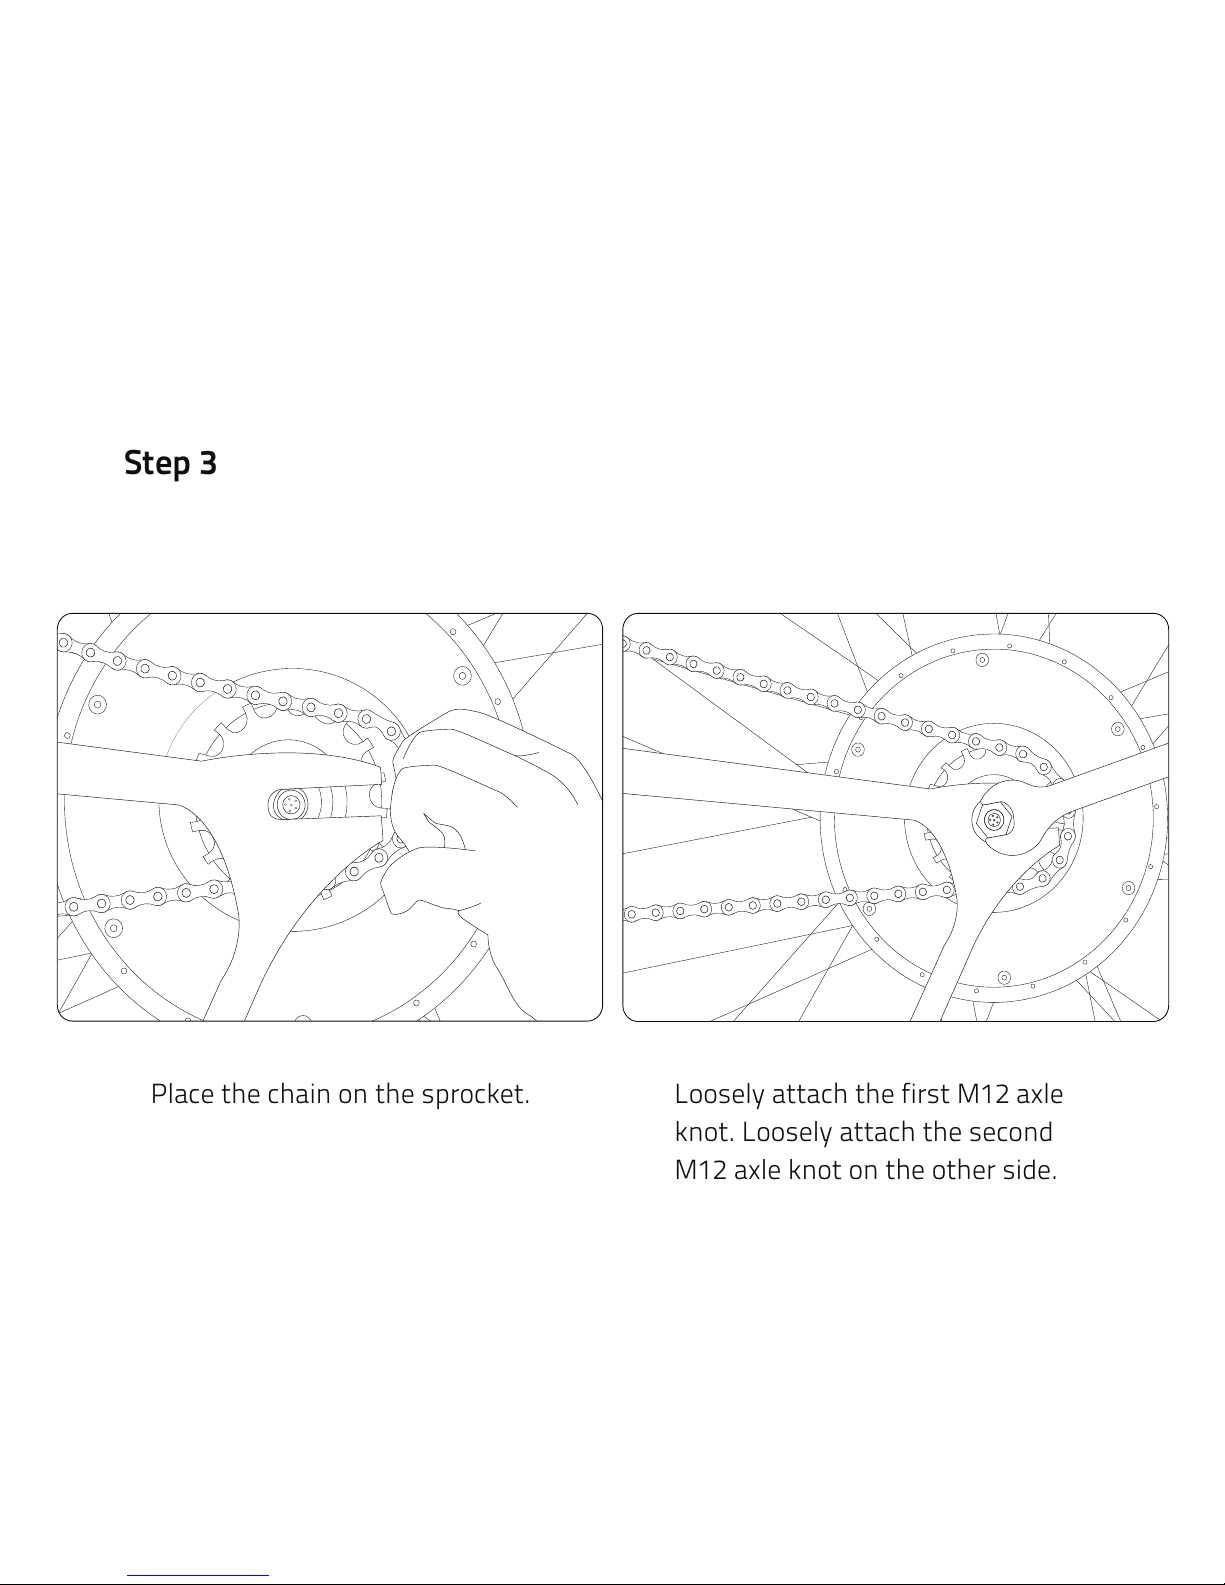
Place the chain on the sprocket. Loosely attach the first M12 axle
knot. Loosely attach the second
M12 axle knot on the other side.
Step 3
Page 6
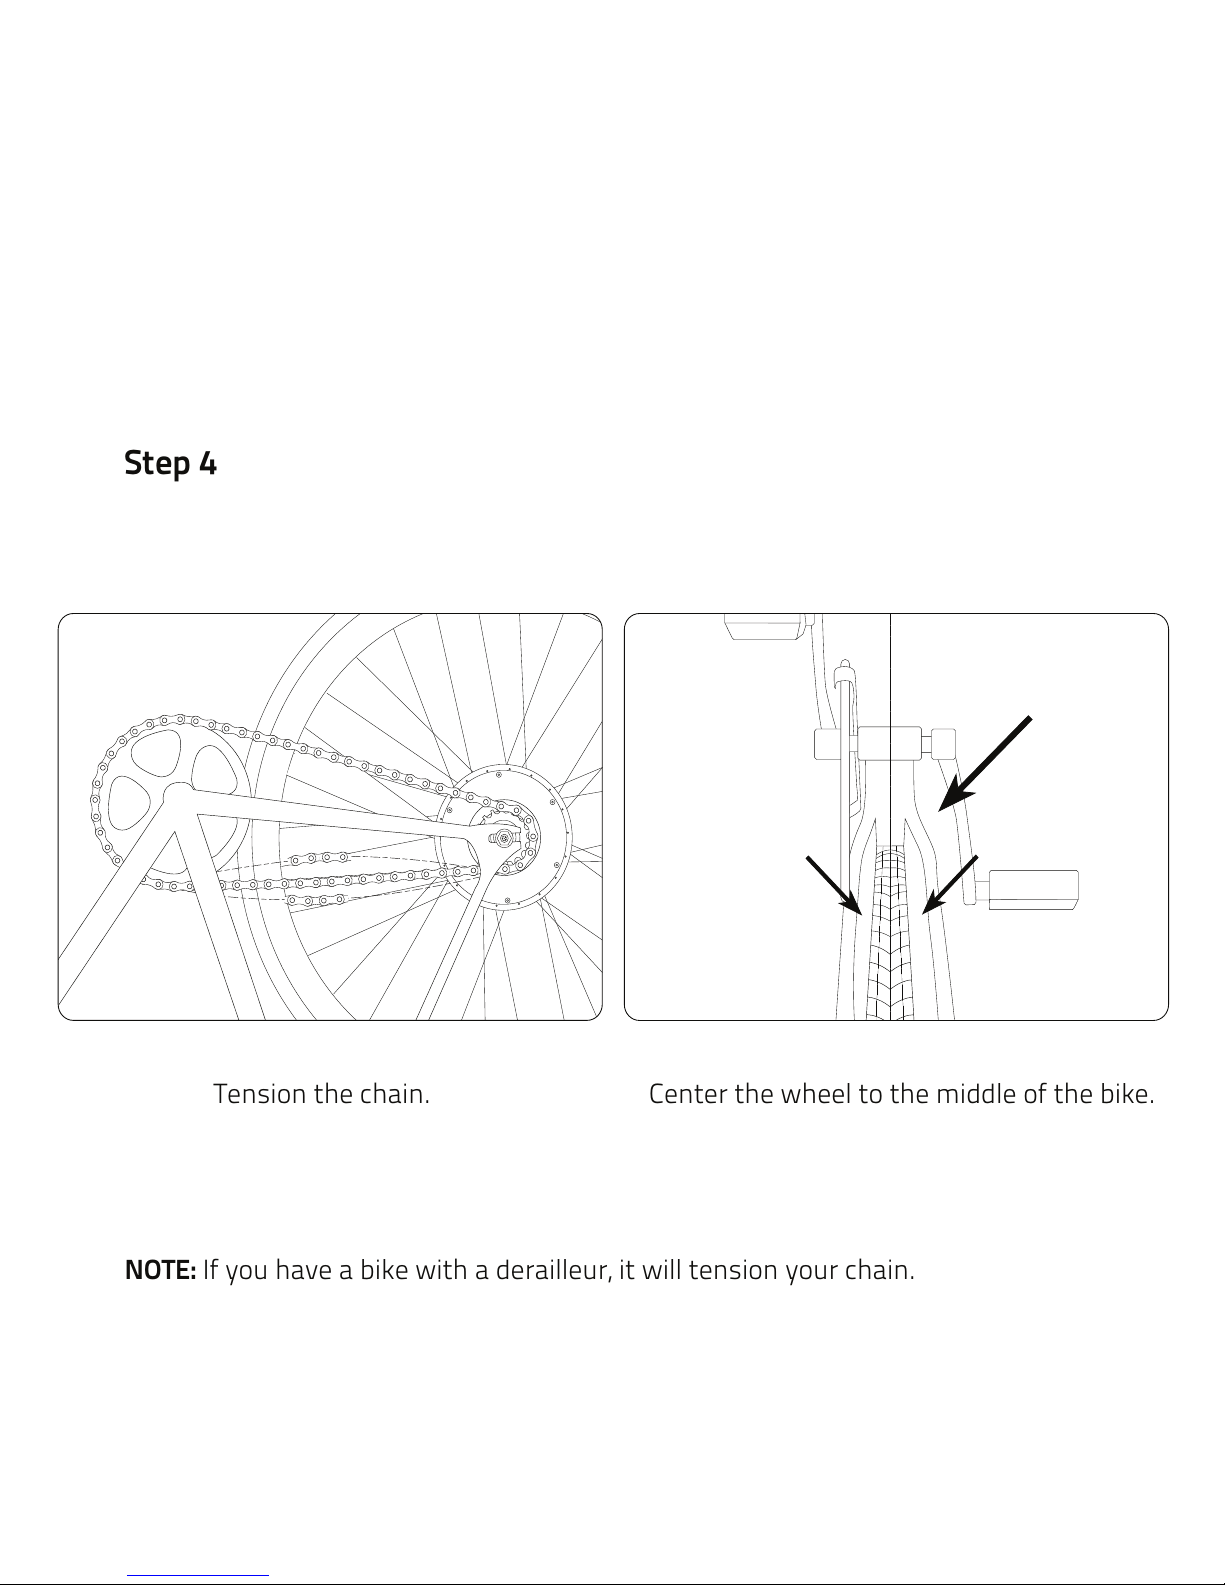
Tension the chain. Center the wheel to the middle of the bike.
NOTE: If you have a bike with a derailleur, it will tension your chain.
Step 4
Page 7
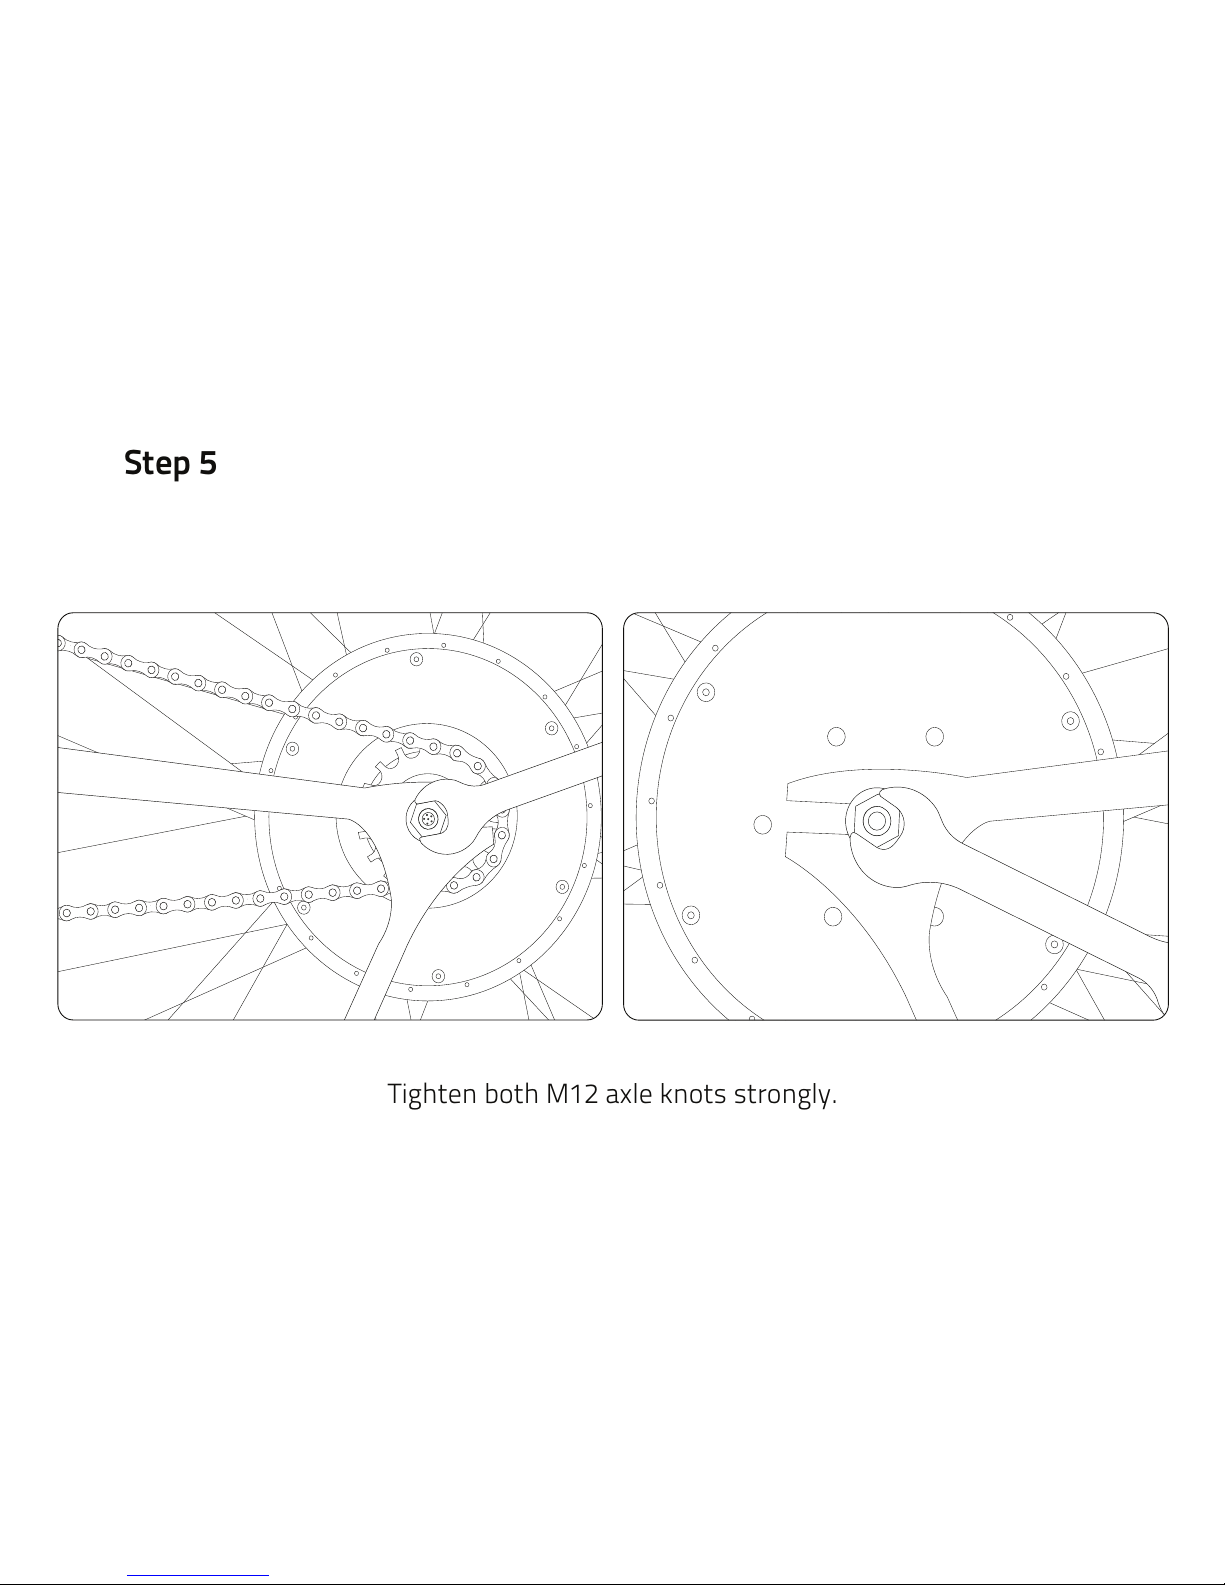
Tighten both M12 axle knots strongly.
Step 5
Page 8
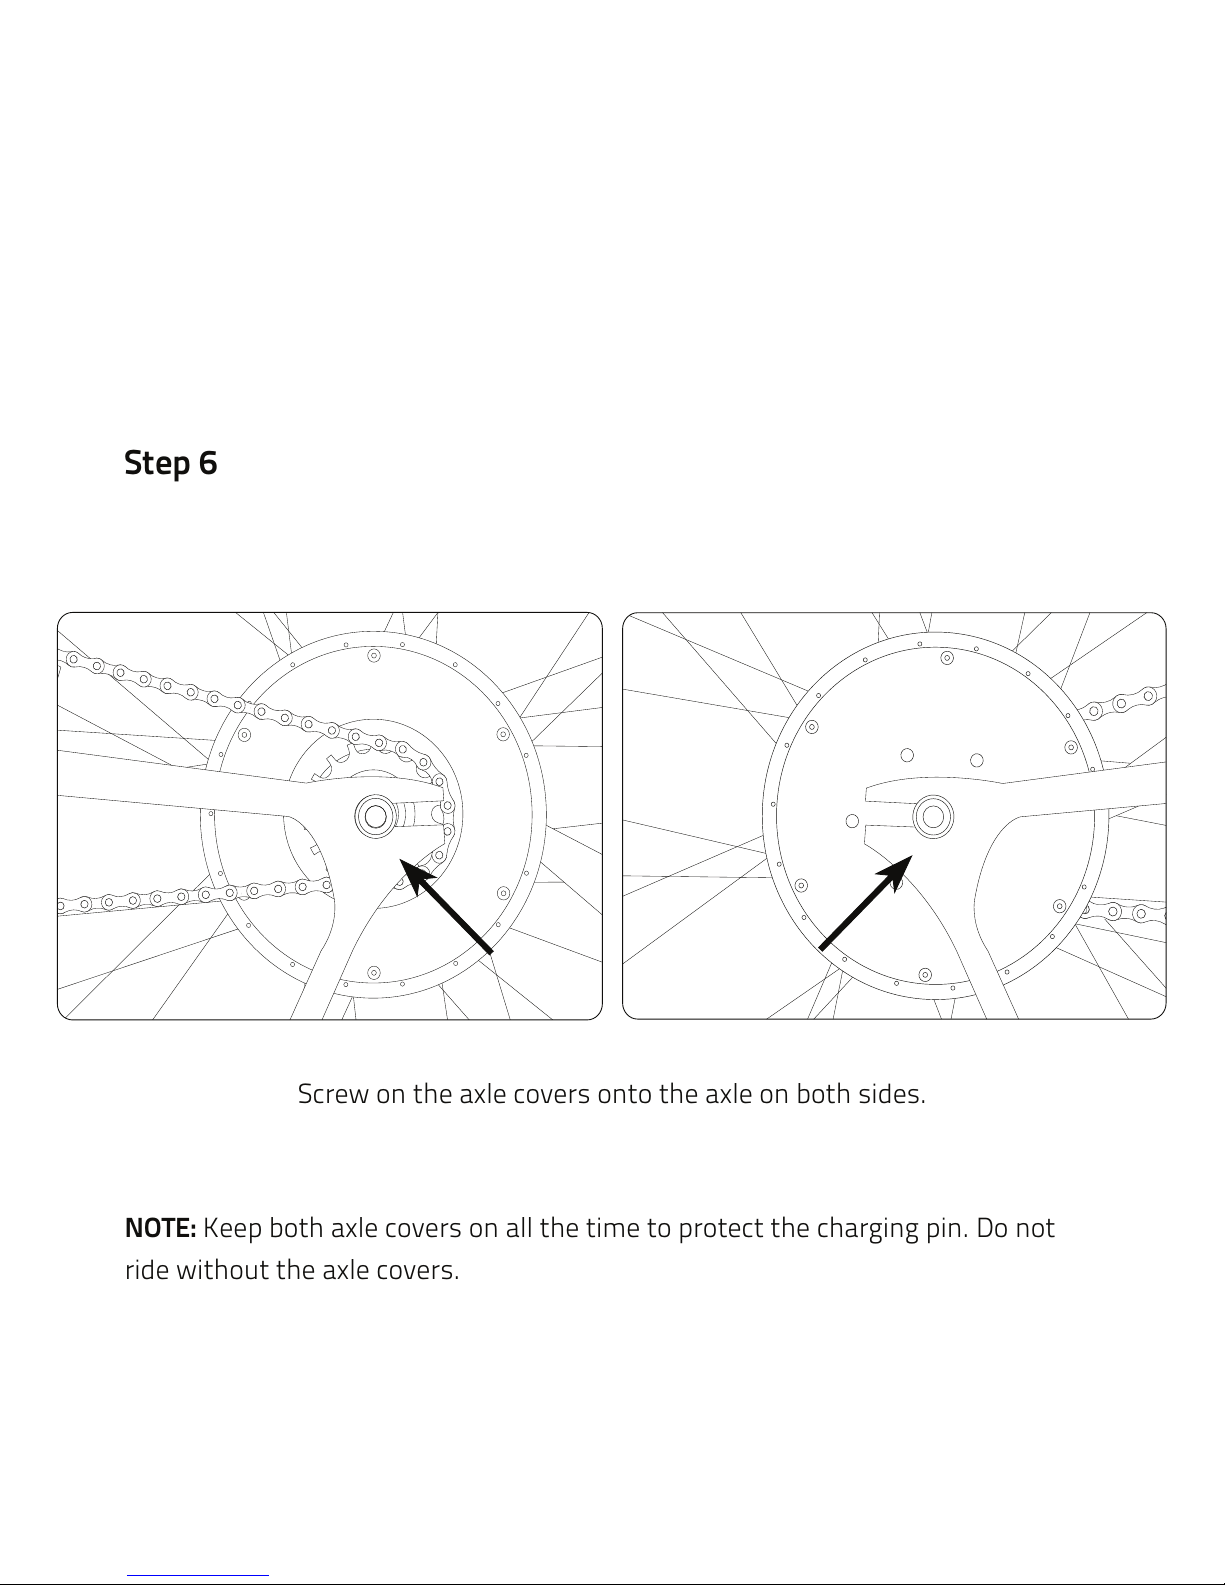
NOTE: Keep both axle covers on all the time to protect the charging pin. Do not
ride without the axle covers.
Screw on the axle covers onto the axle on both sides.
Step 6
Page 9
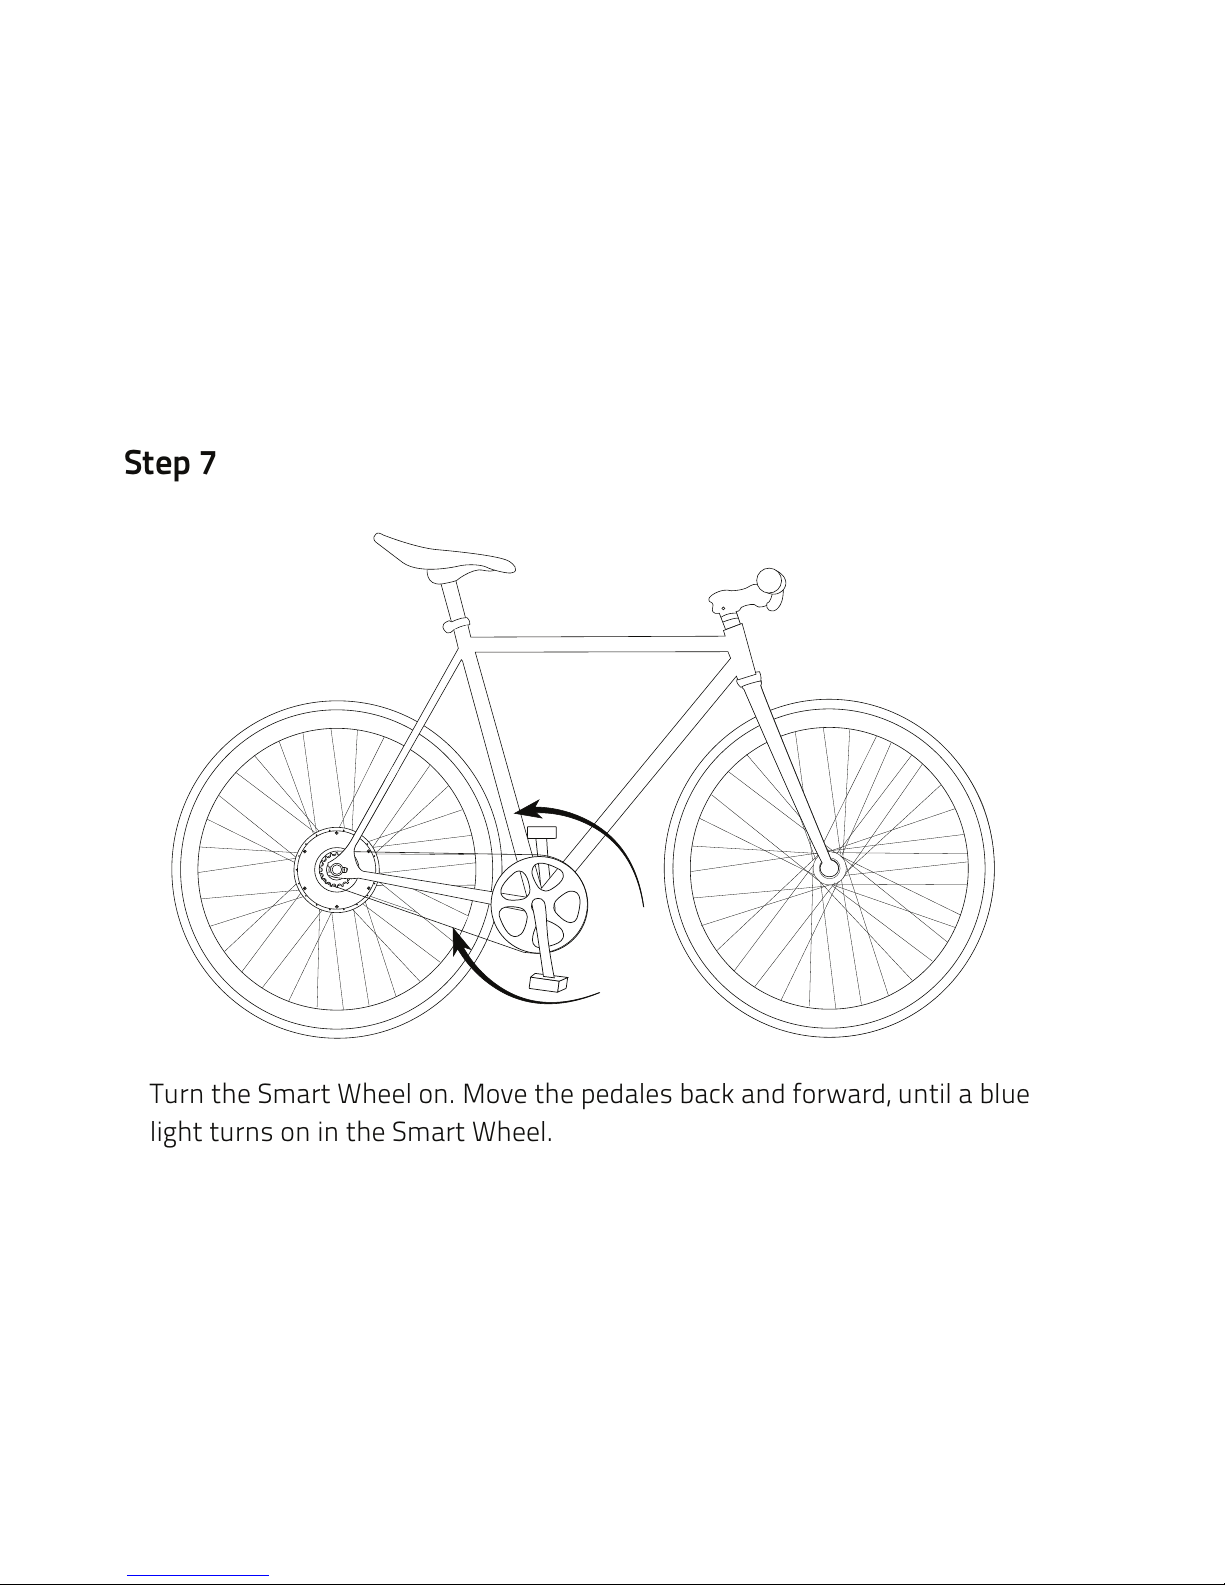
Turn the Smart Wheel on. Move the pedales back and forward, until a blue
light turns on in the Smart Wheel.
Step 7
Page 10
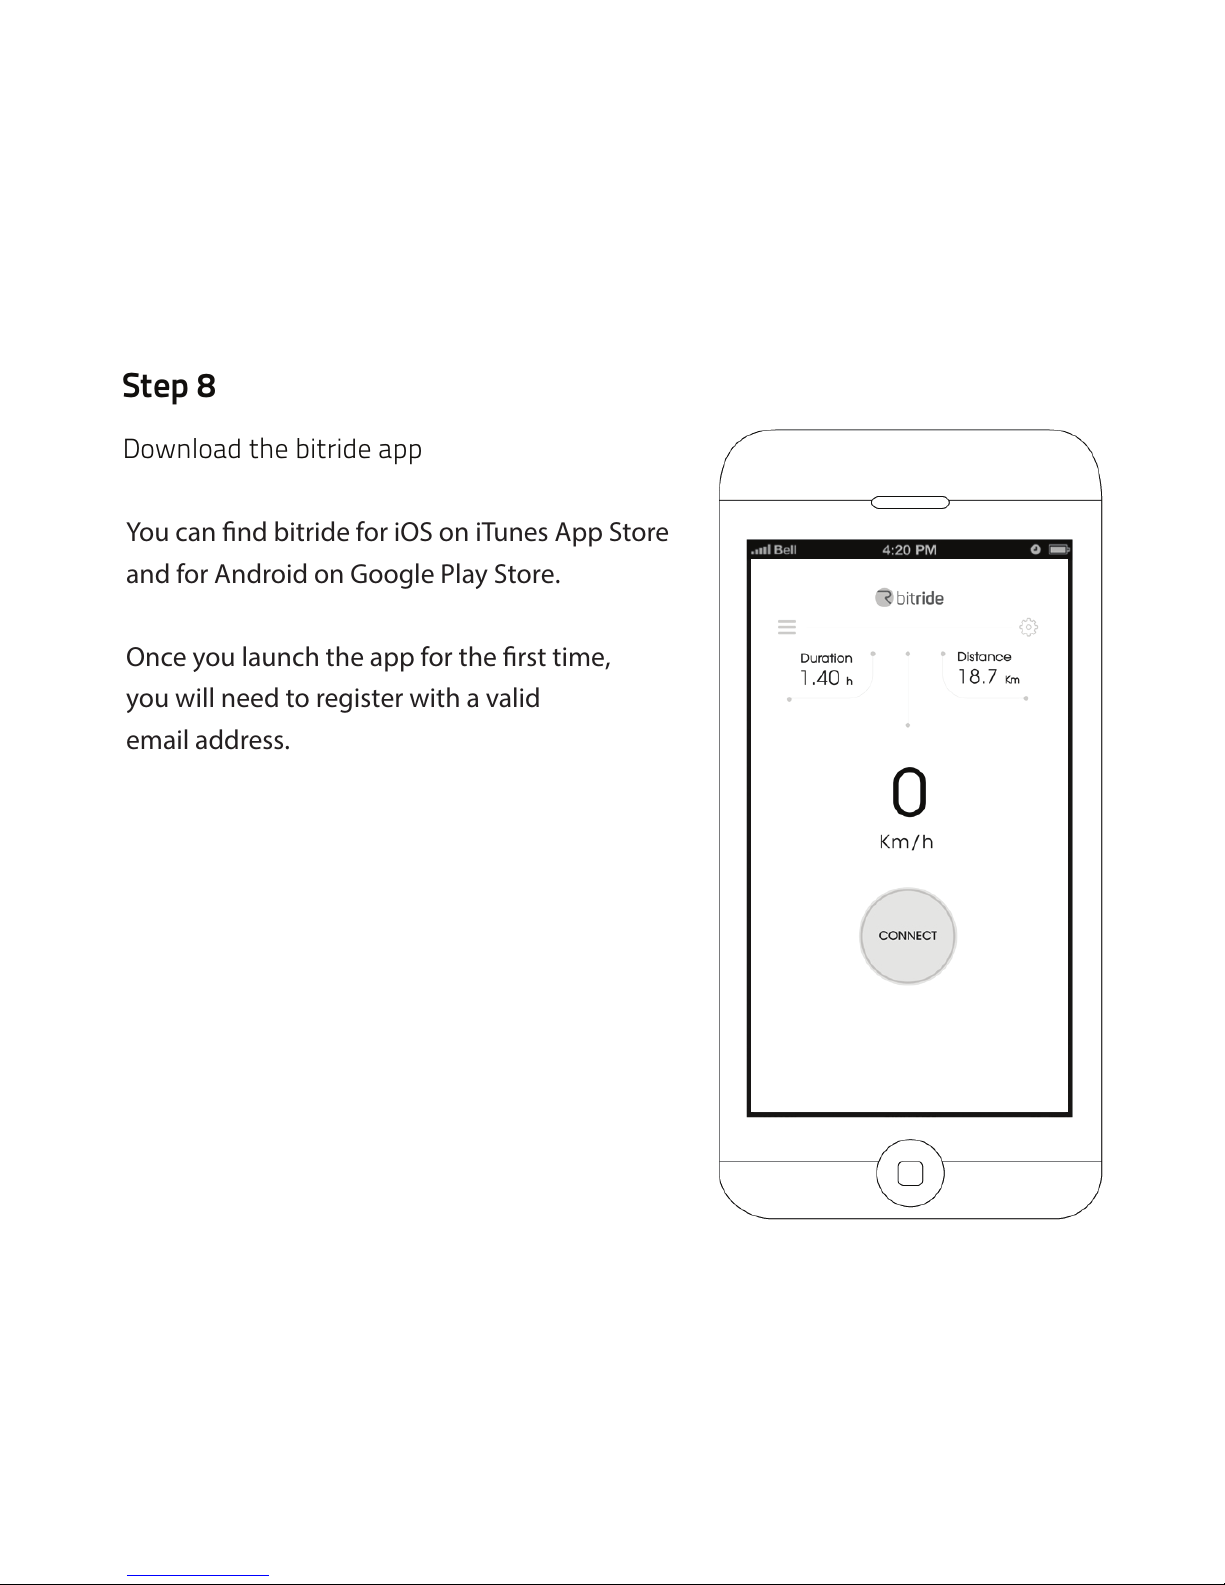
Download the bitride app
You can nd bitride for iOS on iTunes App Store
and for Android on Google Play Store.
Once you launch the app for the rst time,
you will need to register with a valid
email address.
Step 8
Page 11
Step 9
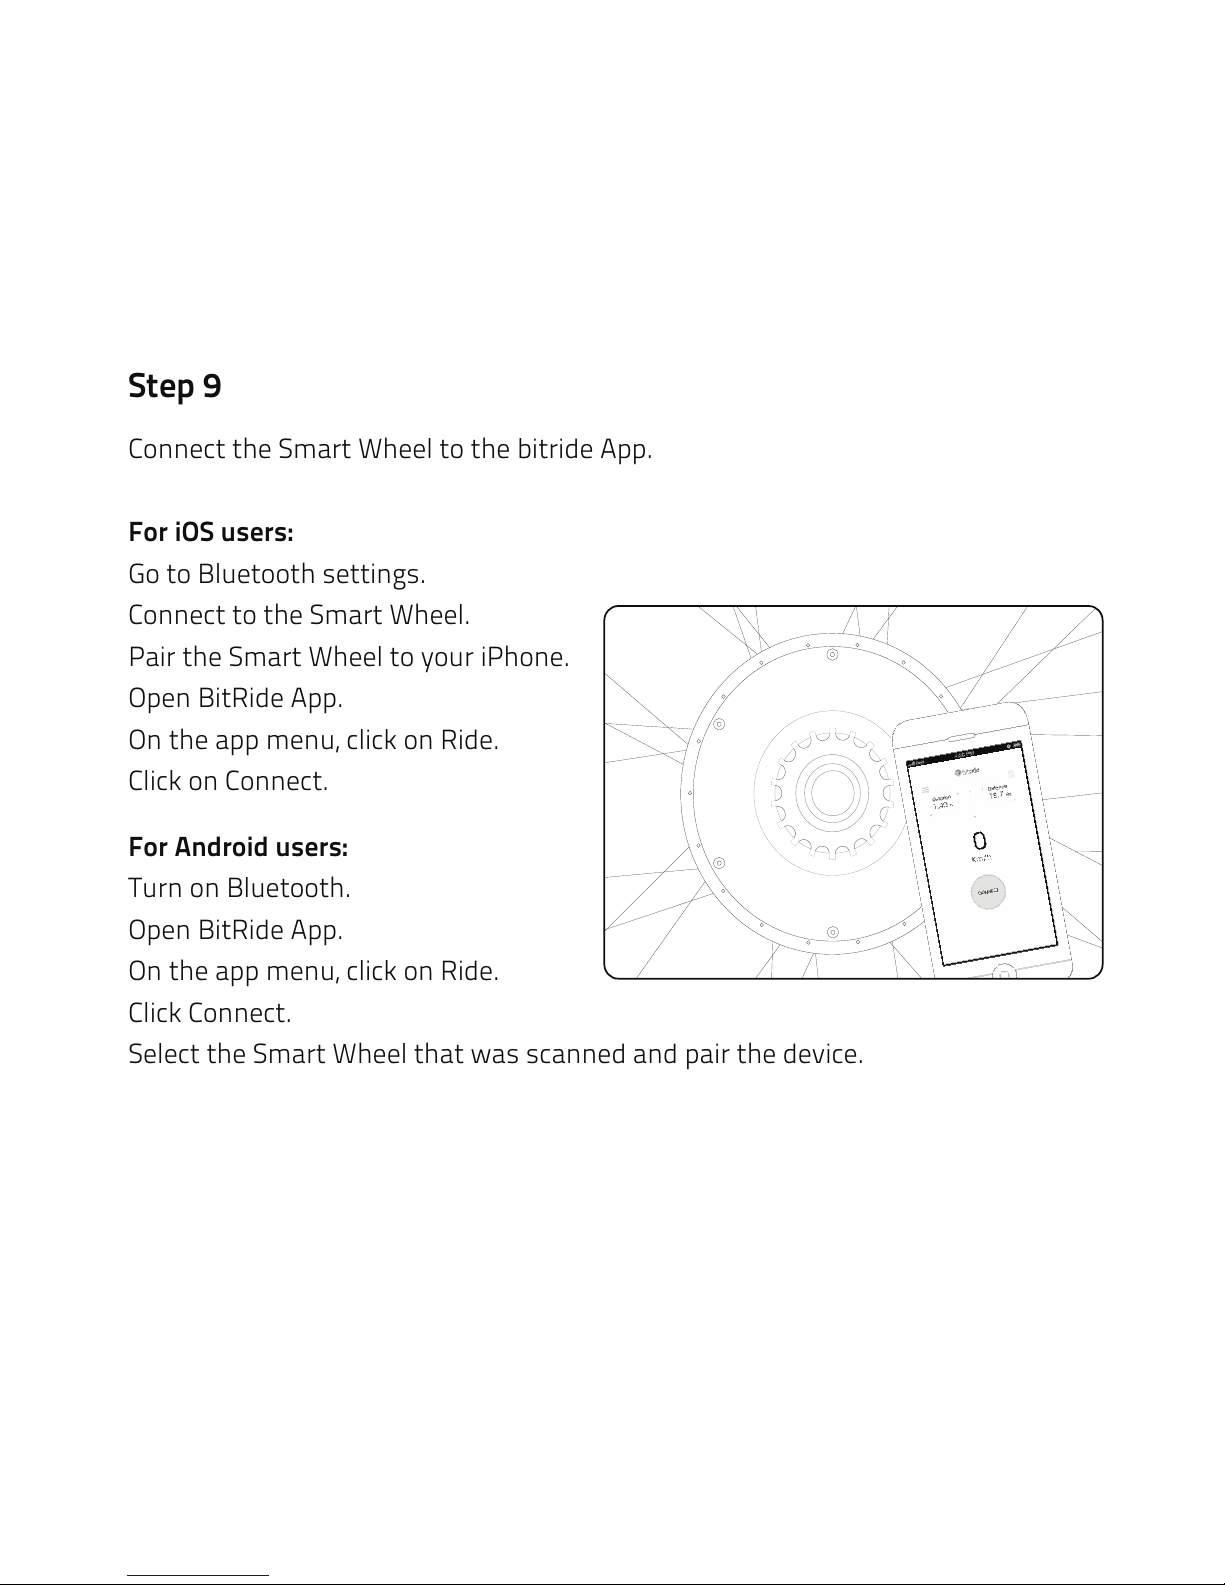
Connect the Smart Wheel to the bitride App.
For Android users:
Turn on Bluetooth.
Open BitRide App.
On the app menu, click on Ride.
Click Connect.
Select the Smart Wheel that was scanned and pair the device.
For iOS users:
Go to Bluetooth settings.
Connect to the Smart Wheel.
Pair the Smart Wheel to your iPhone.
Open BitRide App.
On the app menu, click on Ride.
Click on Connect.
Page 12
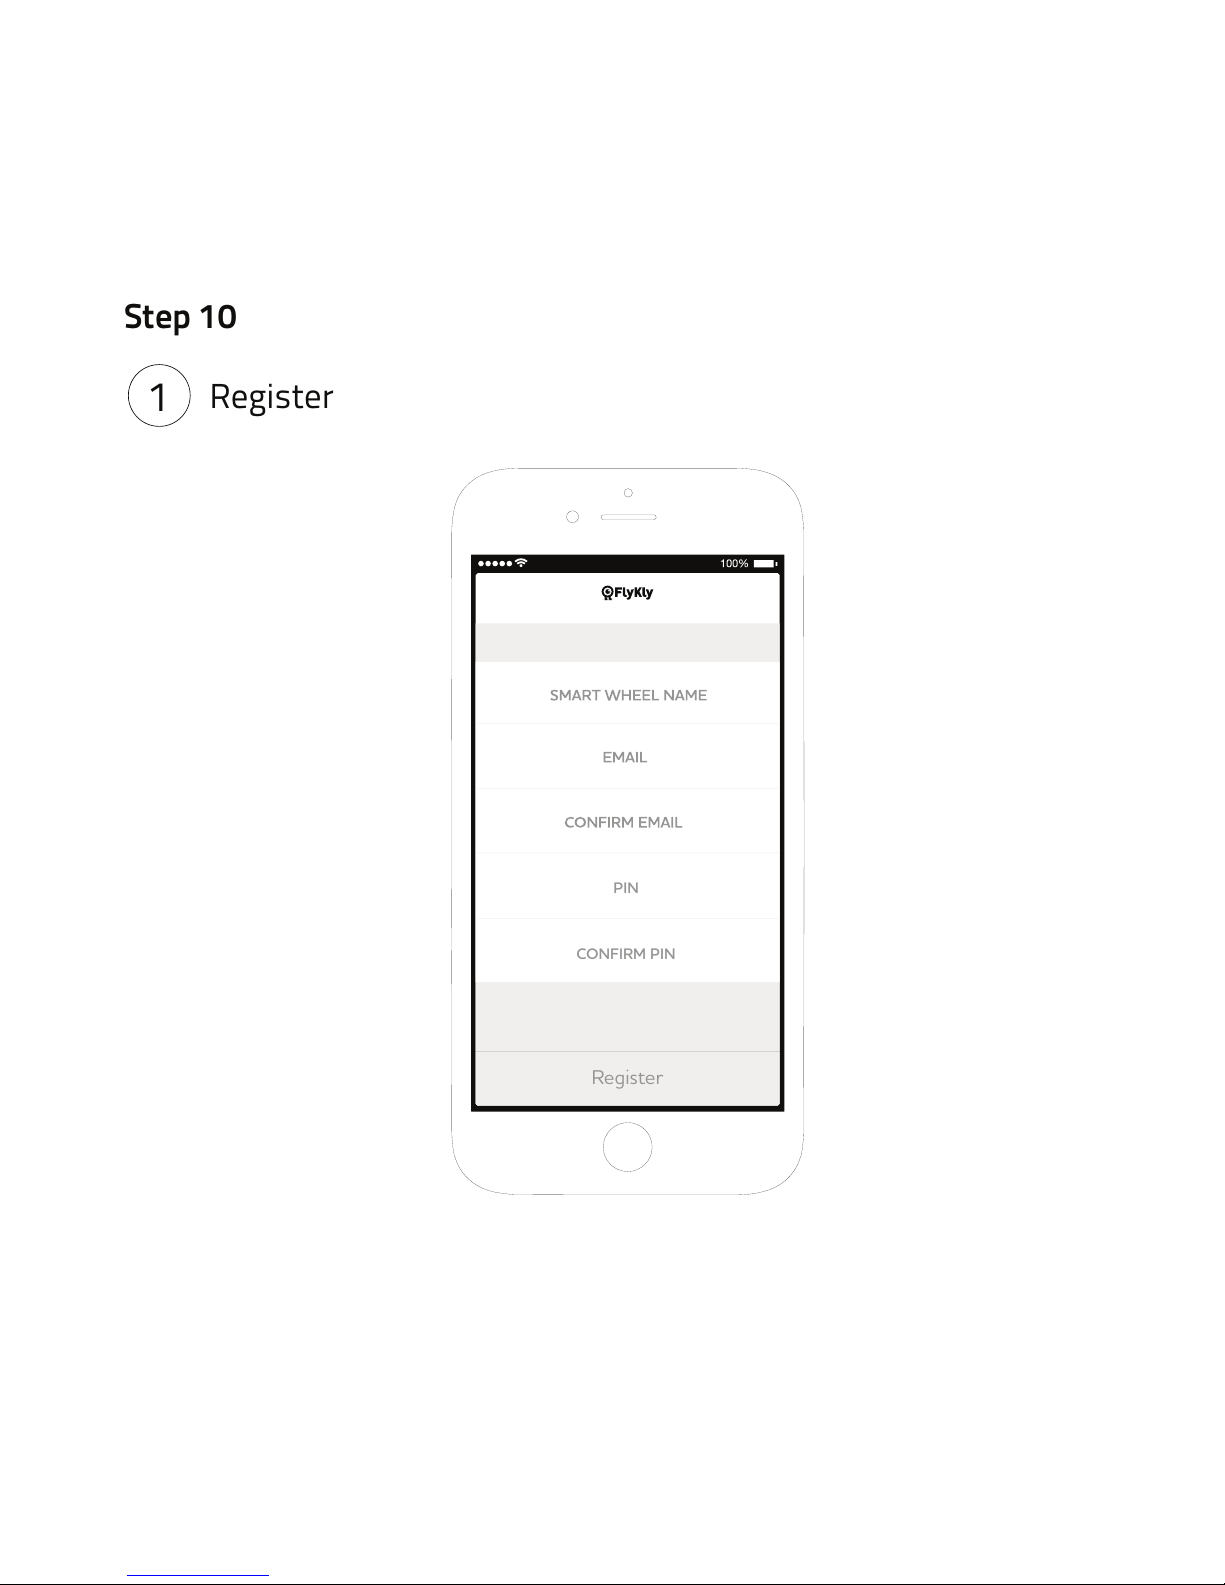
1
Step 10
PIN
Register
CONFIRM PIN
Register
Page 13
0
KM/H
73%
km
0
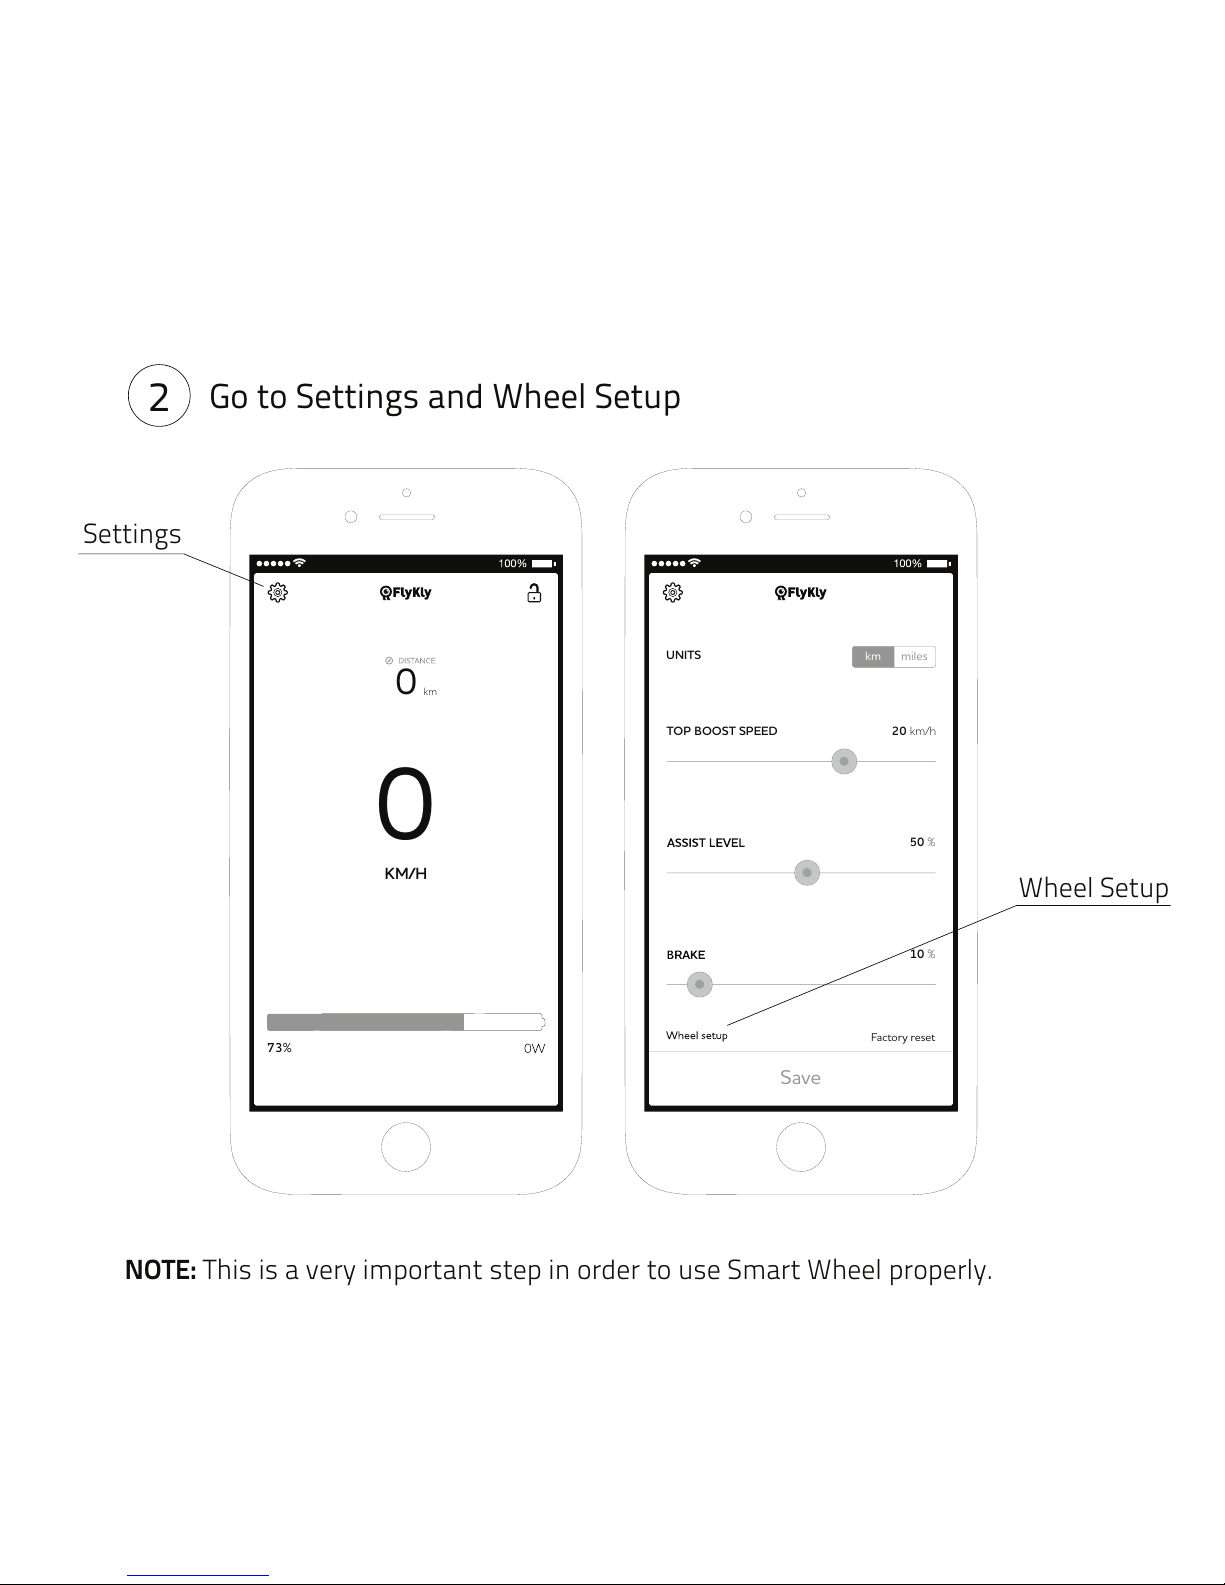
NOTE: This is a very important step in order to use Smart Wheel properly.
mileskm
Save
Factory reset
TOP BOOST SPEED 20 km/h
50 %
10 %
UNITS
Go to Settings and Wheel Setup
Wheel Setup
Settings
2
Page 14
Save
Front gear
Rear gear
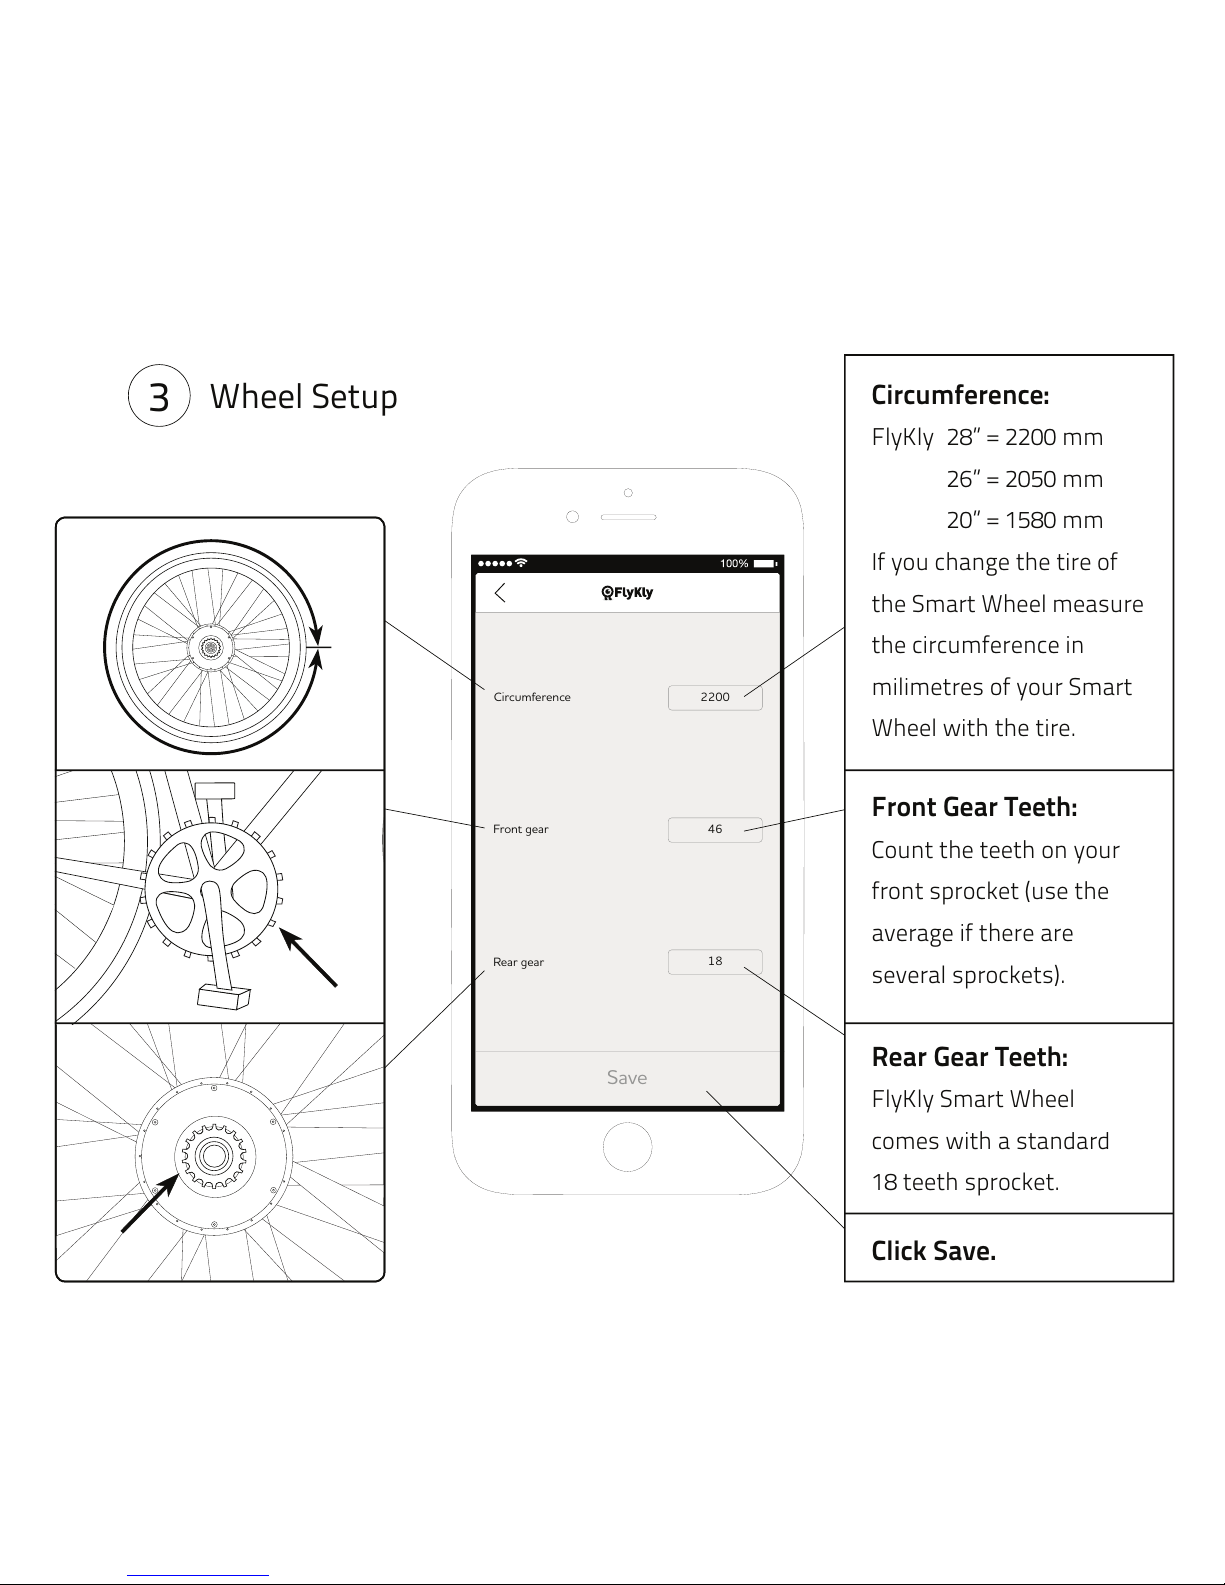
Circumference
2200
46
18
Circumference:
FlyKly
If you change the tire of
the Smart Wheel measure
the circumference in
milimetres of your Smart
Wheel with the tire.
28” = 2200 mm
26” = 2050 mm
20” = 1580 mm
Front Gear Teeth:
Count the teeth on your
front sprocket (use the
average if there are
several sprockets).
Rear Gear Teeth:
FlyKly Smart Wheel
comes with a standard
18 teeth sprocket.
Click Save.
Wheel Setup
3
Page 15
mileskm
Save
Factory reset
TOP BOOST SPEED 20 km/h
50 %
10 %
UNITS
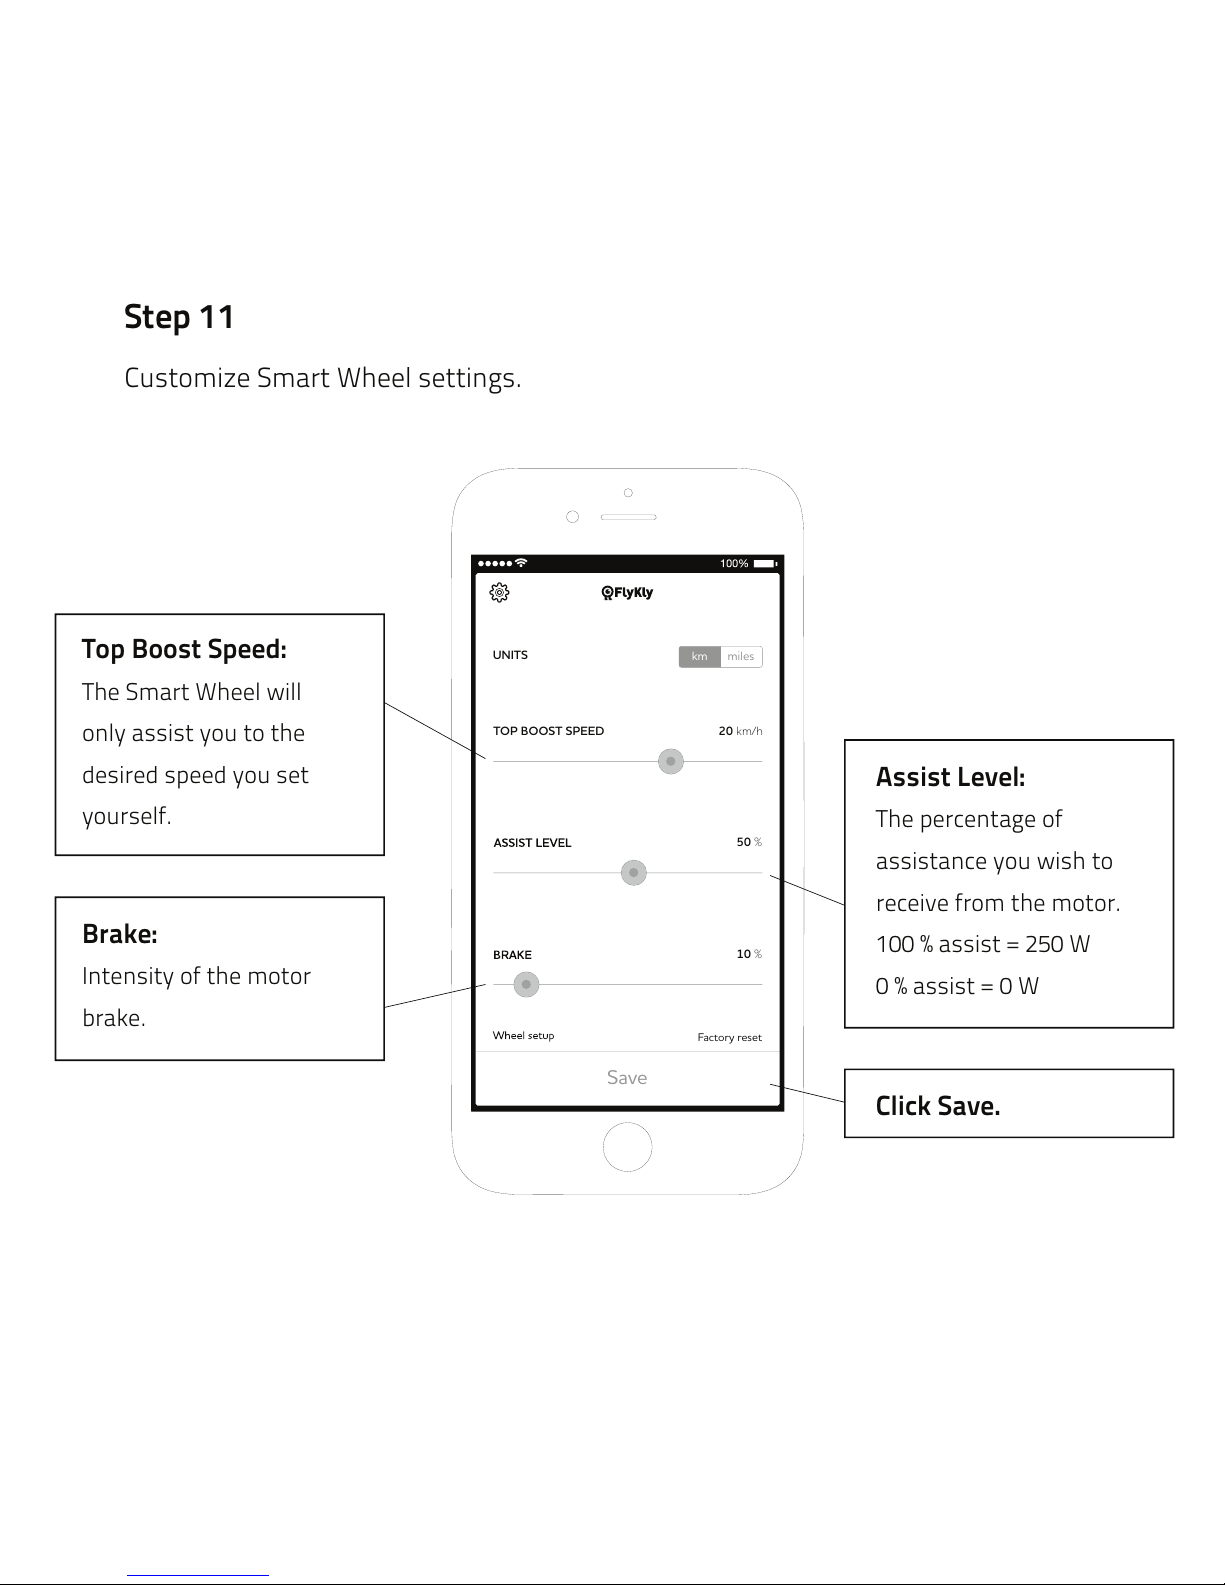
Assist Level:
The percentage of
assistance you wish to
receive from the motor.
100 % assist = 250 W
0 % assist = 0 W
Top Boost Speed:
The Smart Wheel will
only assist you to the
desired speed you set
yourself.
Brake:
Intensity of the motor
brake.
Click Save.
Step 11
Customize Smart Wheel settings.
Page 16
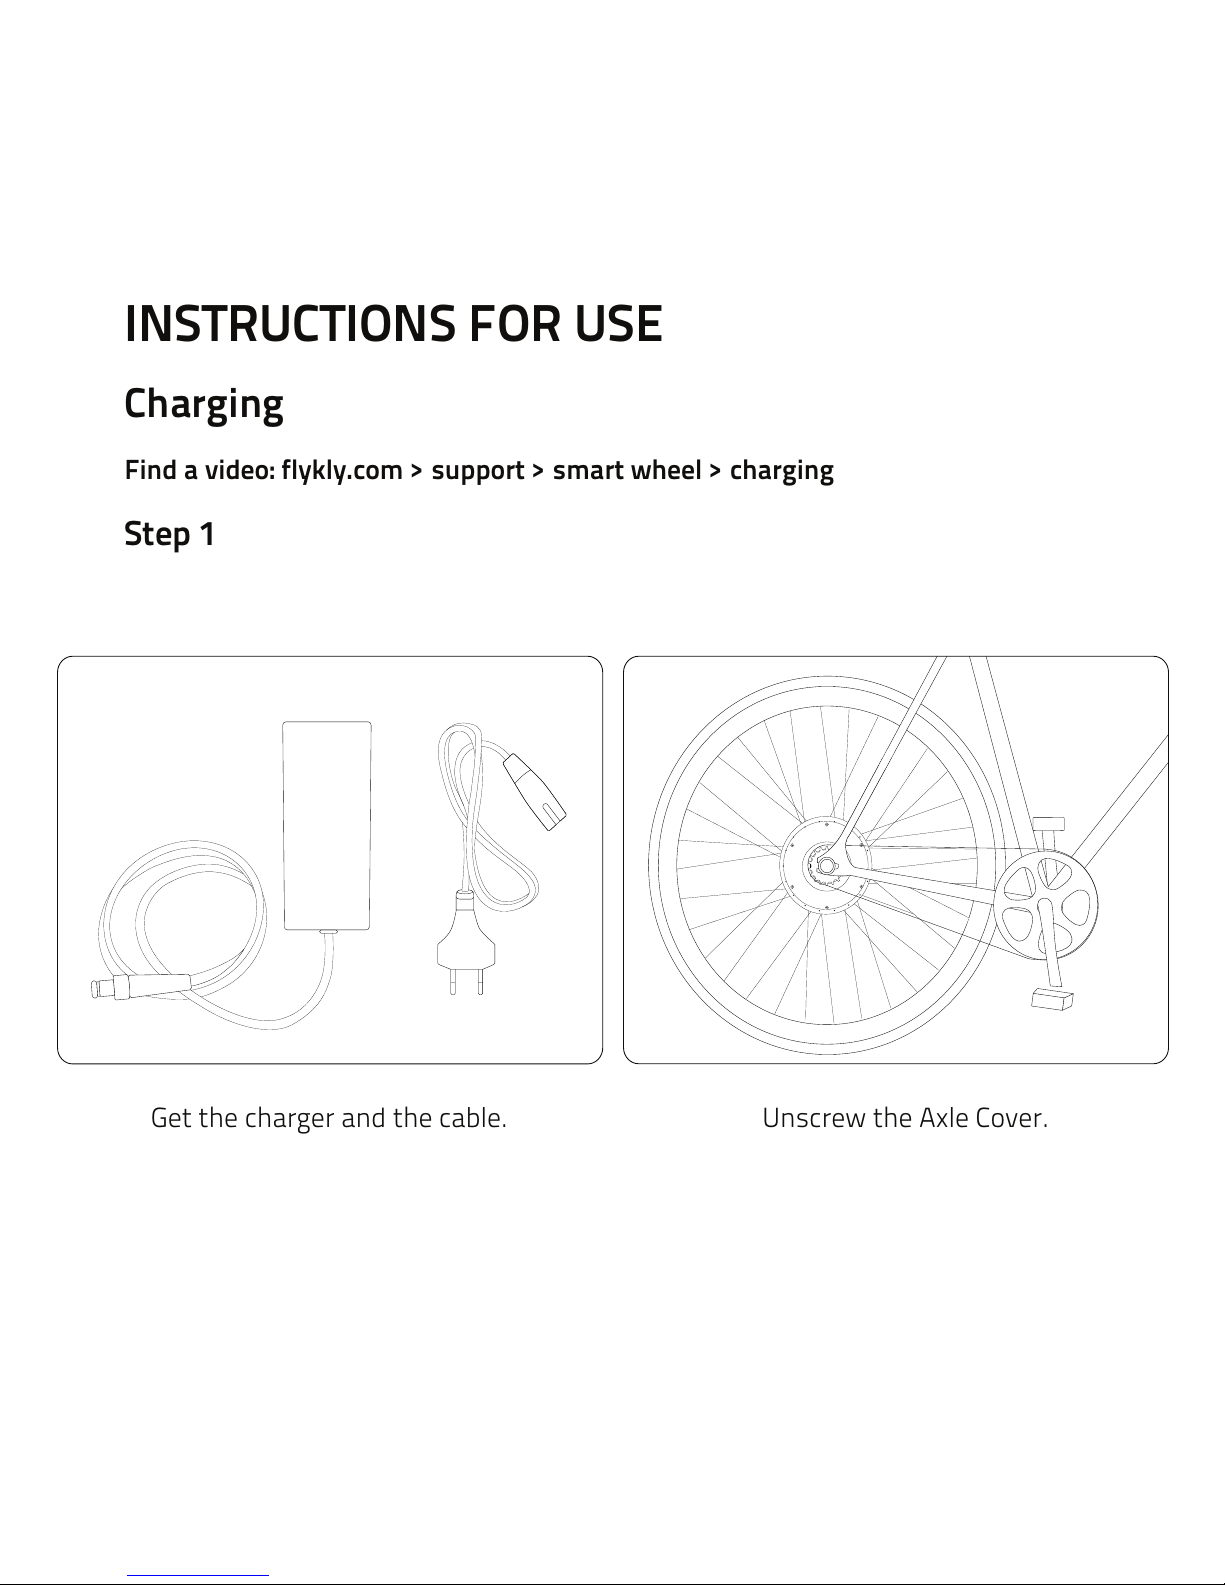
Get the charger and the cable. Unscrew the Axle Cover.
INSTRUCTIONS FOR USE
Charging
Find a video: flykly.com > support > smart wheel > charging
Step 1
Page 17
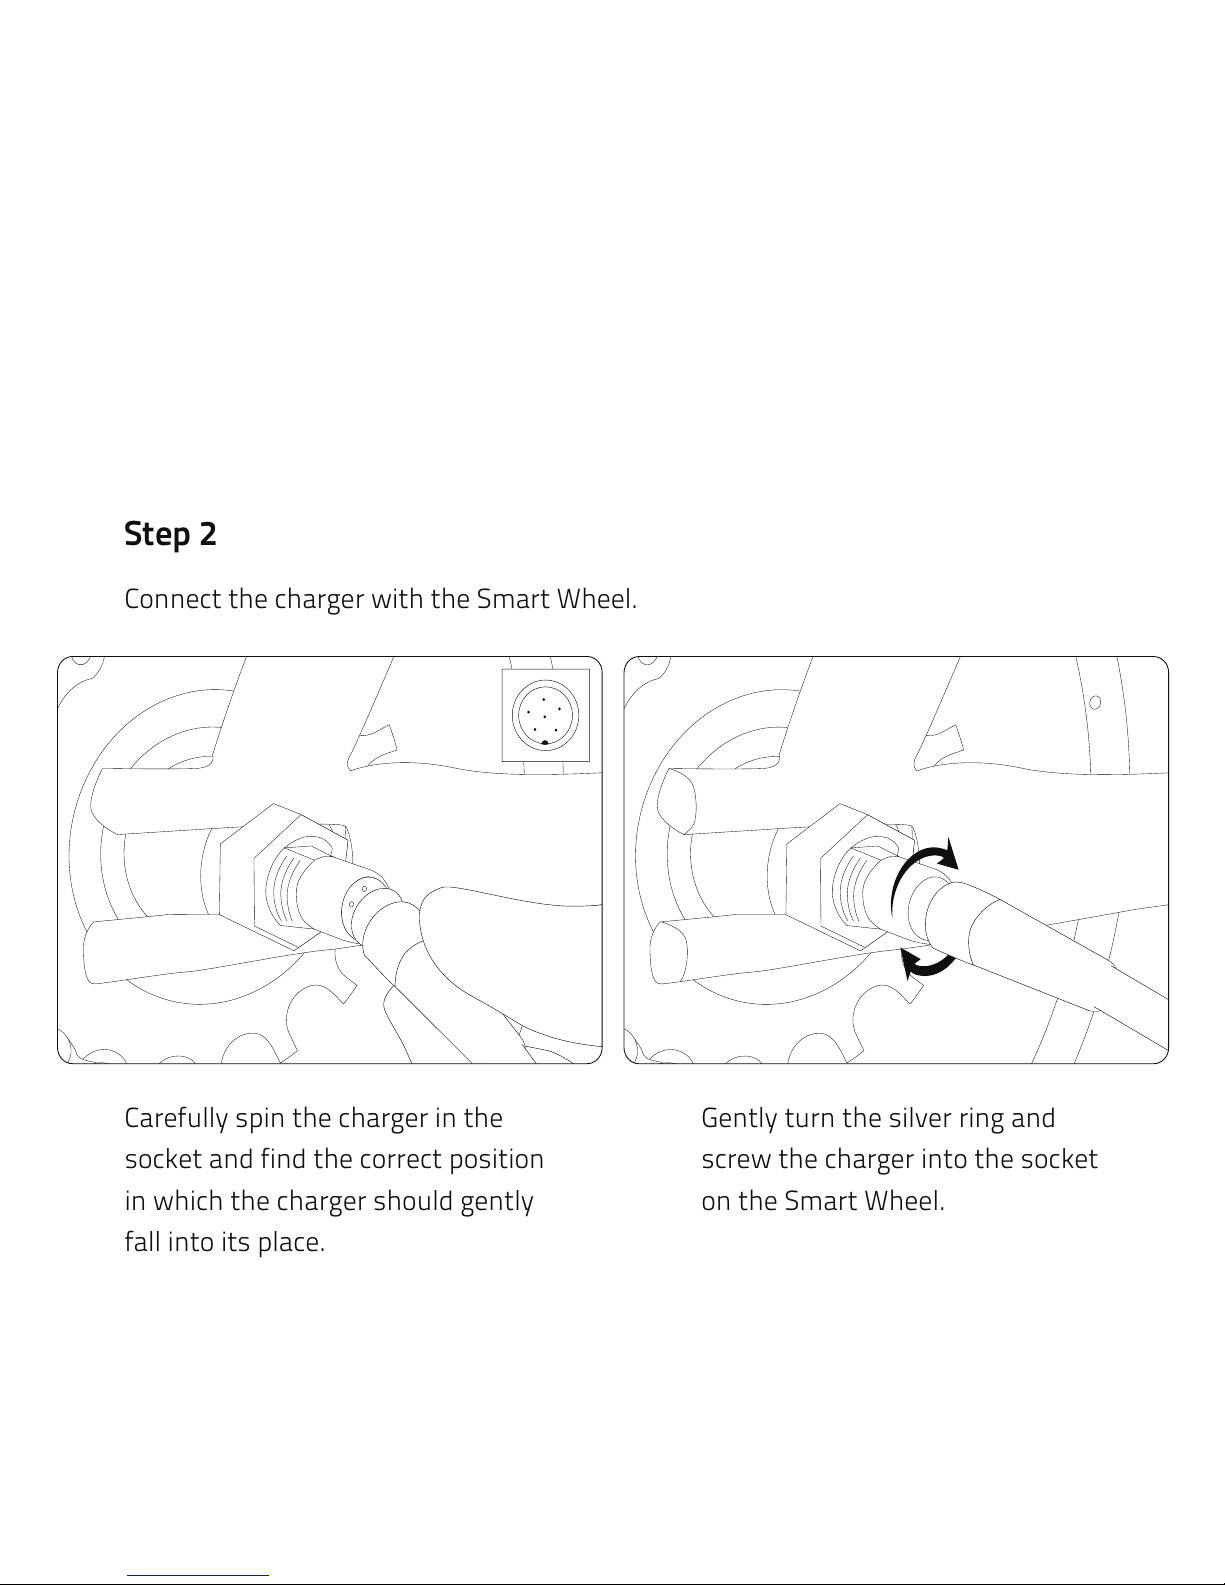
Carefully spin the charger in the
socket and find the correct position
in which the charger should gently
fall into its place.
Gently turn the silver ring and
screw the charger into the socket
on the Smart Wheel.
Connect the charger with the Smart Wheel.
Step 2
Page 18
0
KM/H
73%
km
0
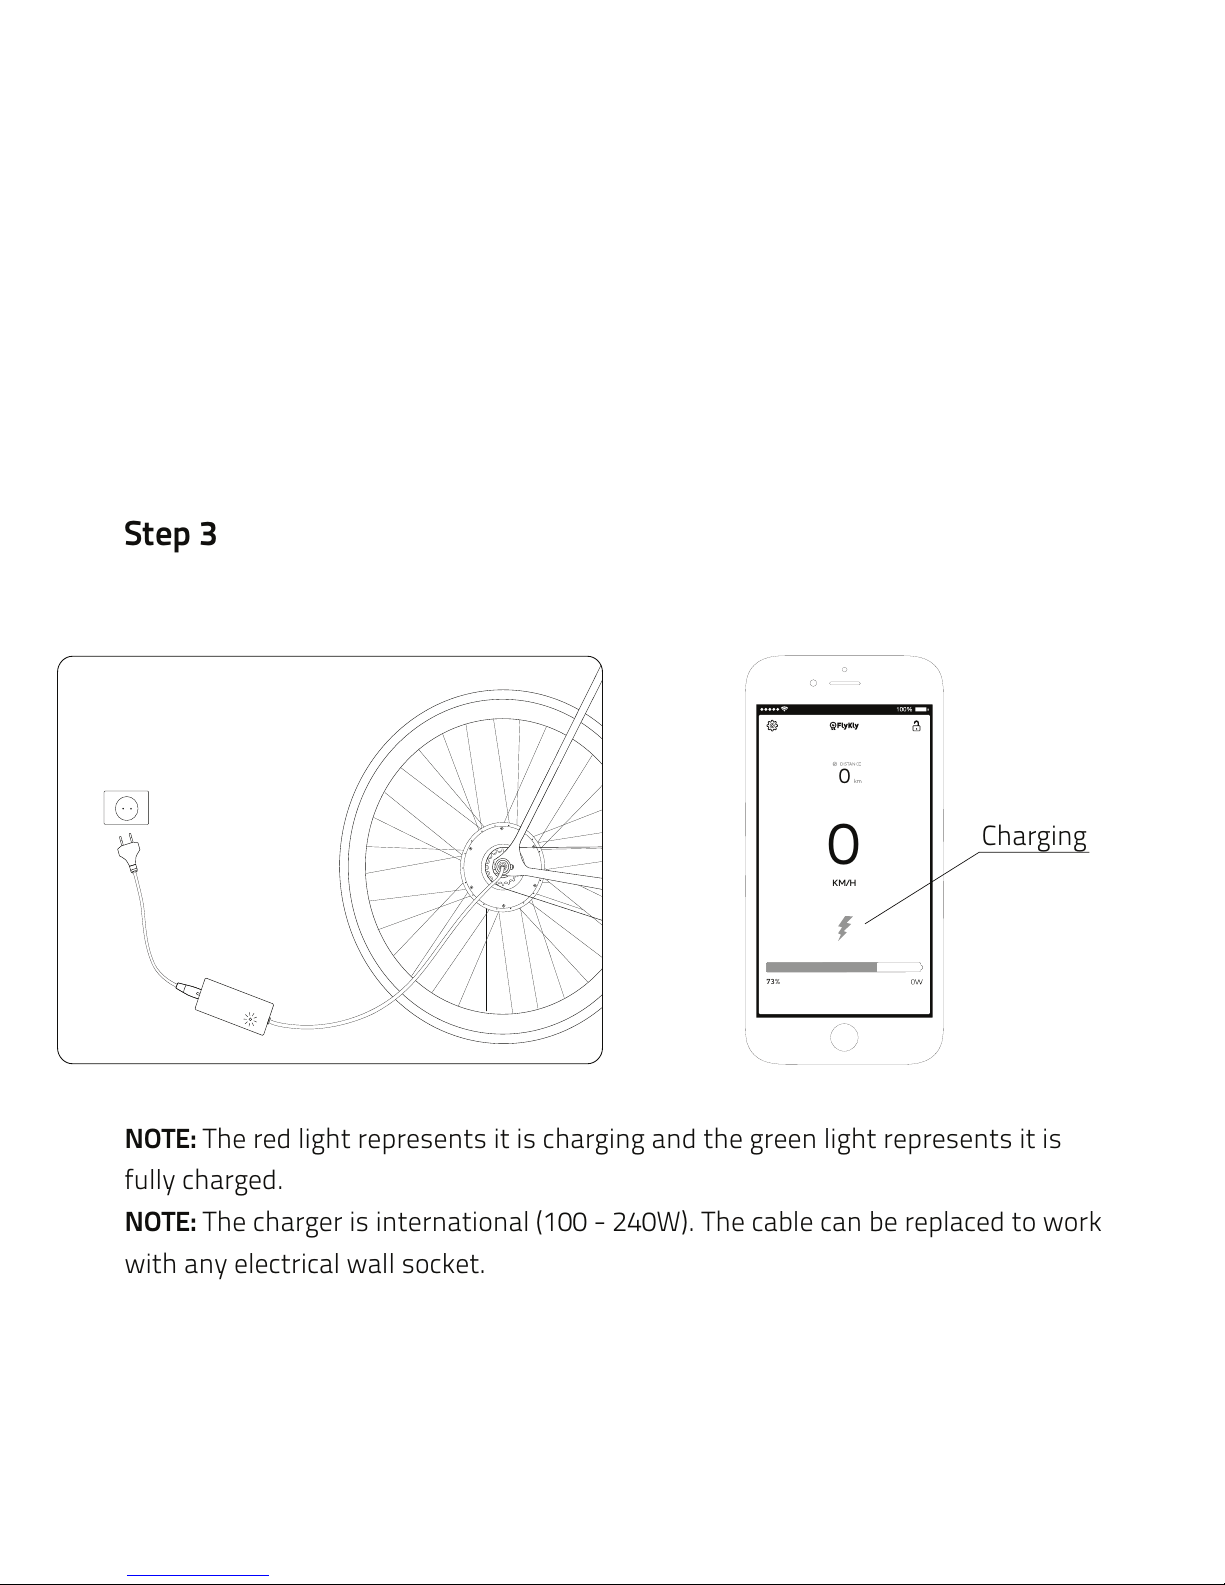
NOTE: The red light represents it is charging and the green light represents it is
fully charged.
NOTE: The charger is international (100 - 240W). The cable can be replaced to work
with any electrical wall socket.
Charging
Step 3
Page 19
Find a video: flykly.com > support > smart wheel > riding
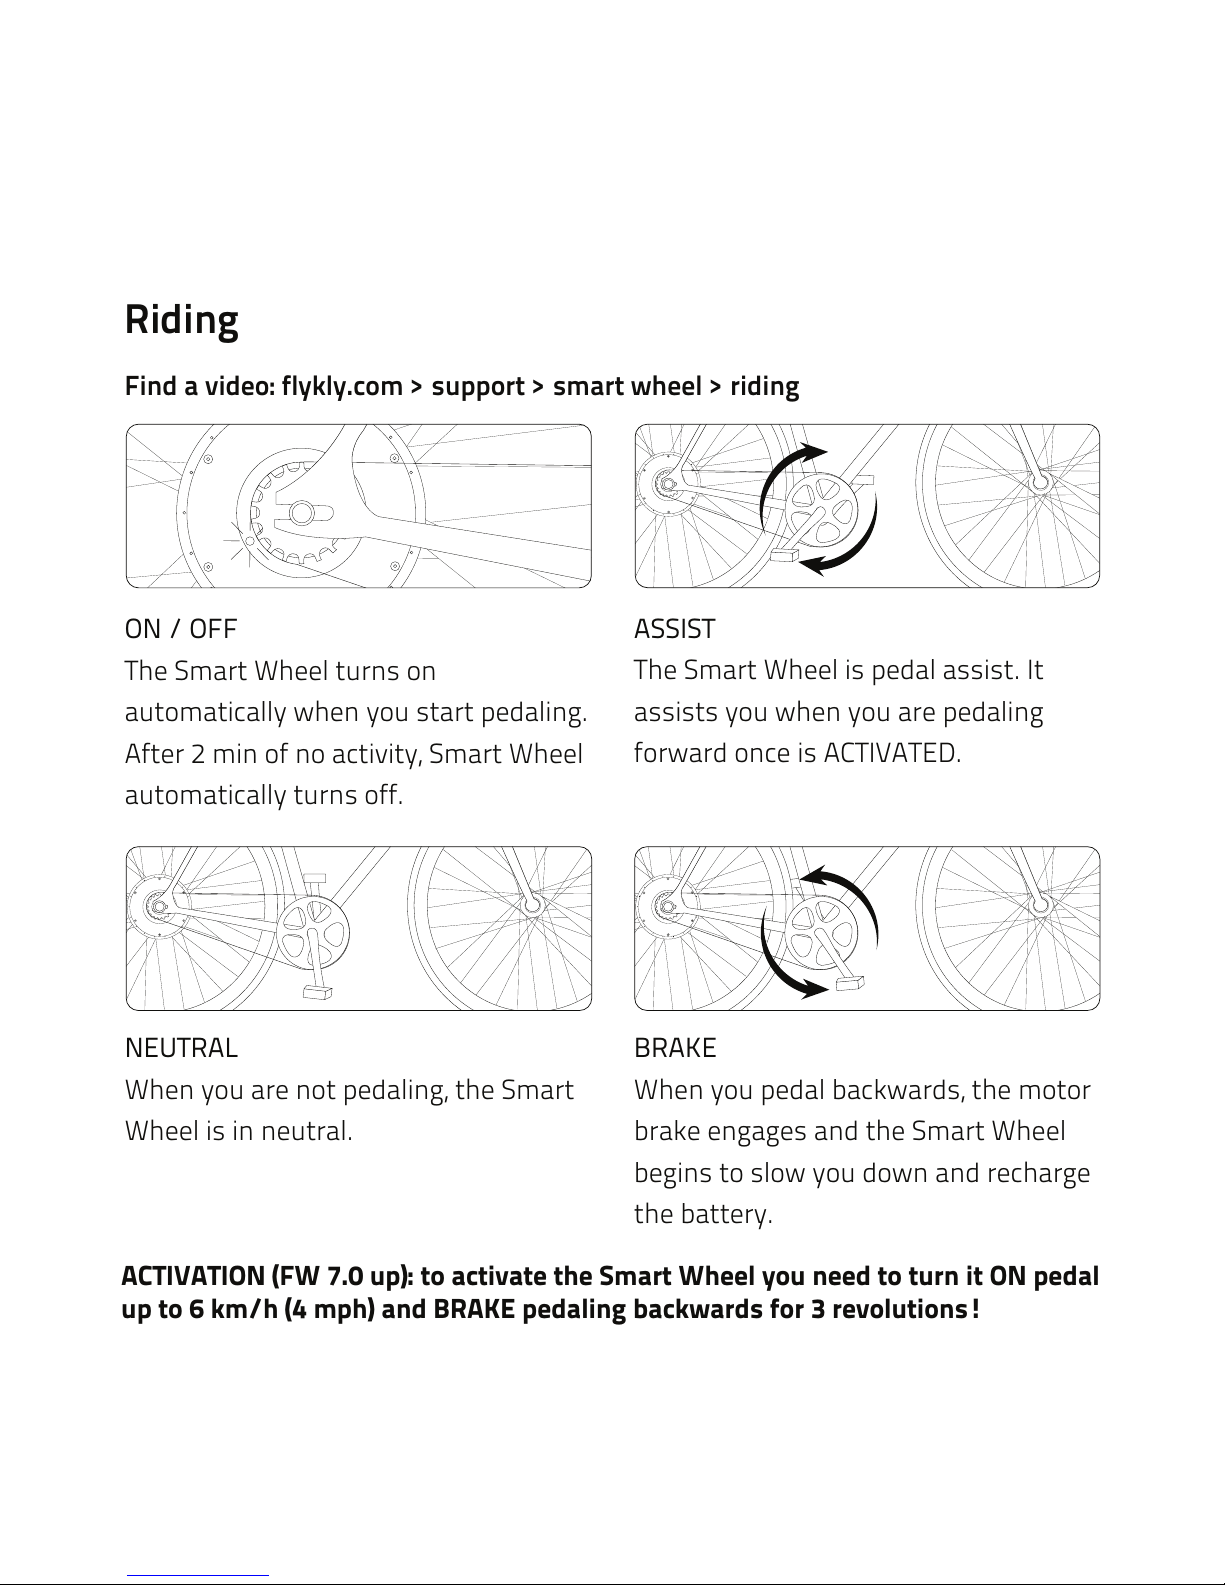
ON / OFF
The Smart Wheel turns on
automatically when you start pedaling.
After 2 min of no activity, Smart Wheel
automatically turns off.
ASSIST
ACTIVATION (FW 7.0 up): to activate the Smart Wheel you need to turn it ON pedal
up to 6 km/h (4 mph) and BRAKE pedaling backwards for 3 revolutions!
The Smart Wheel is pedal assist. It
assists you when you are pedaling
forward once is ACTIVATED.
NEUTRAL
When you are not pedaling, the Smart
Wheel is in neutral.
BRAKE
When you pedal backwards, the motor
brake engages and the Smart Wheel
begins to slow you down and recharge
the battery.
Riding
Page 20
0
KM/H
73%
km
0
Ride
App
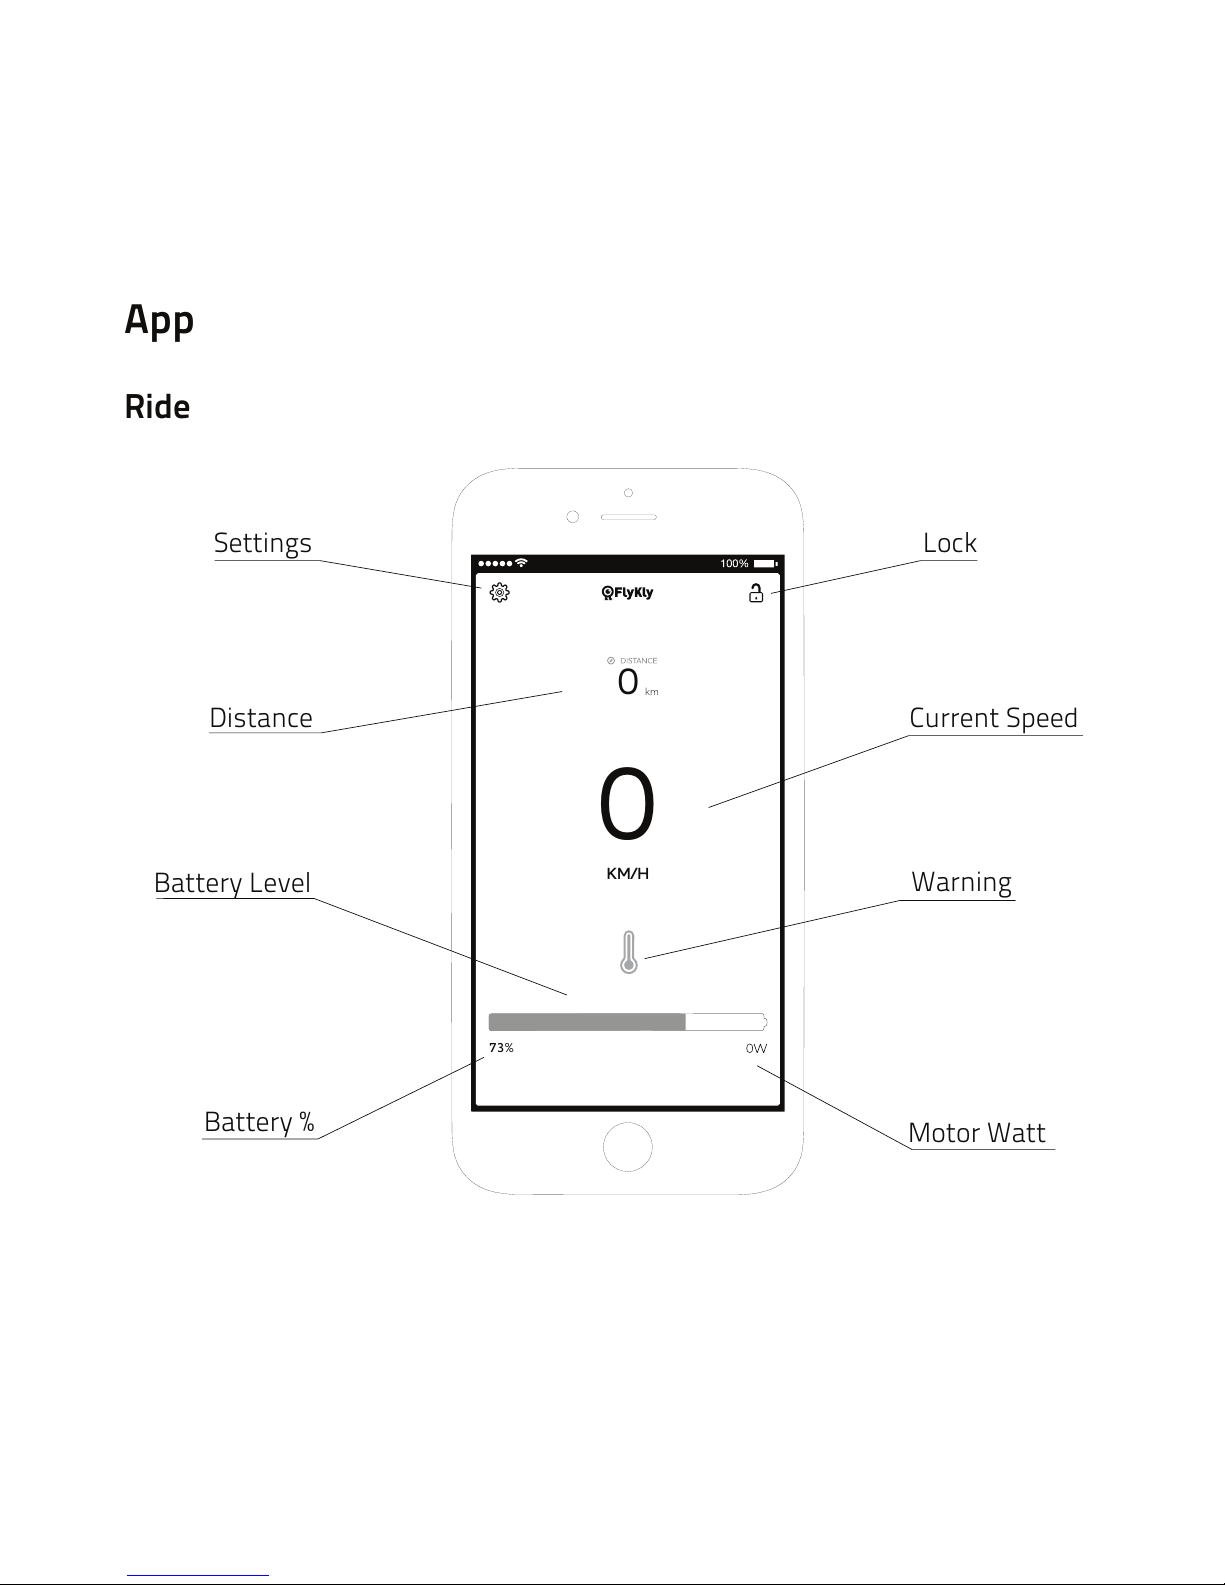
Settings
Lock
Current Speed
Warning
Motor Watt
Distance
Battery Level
Battery %
Page 21
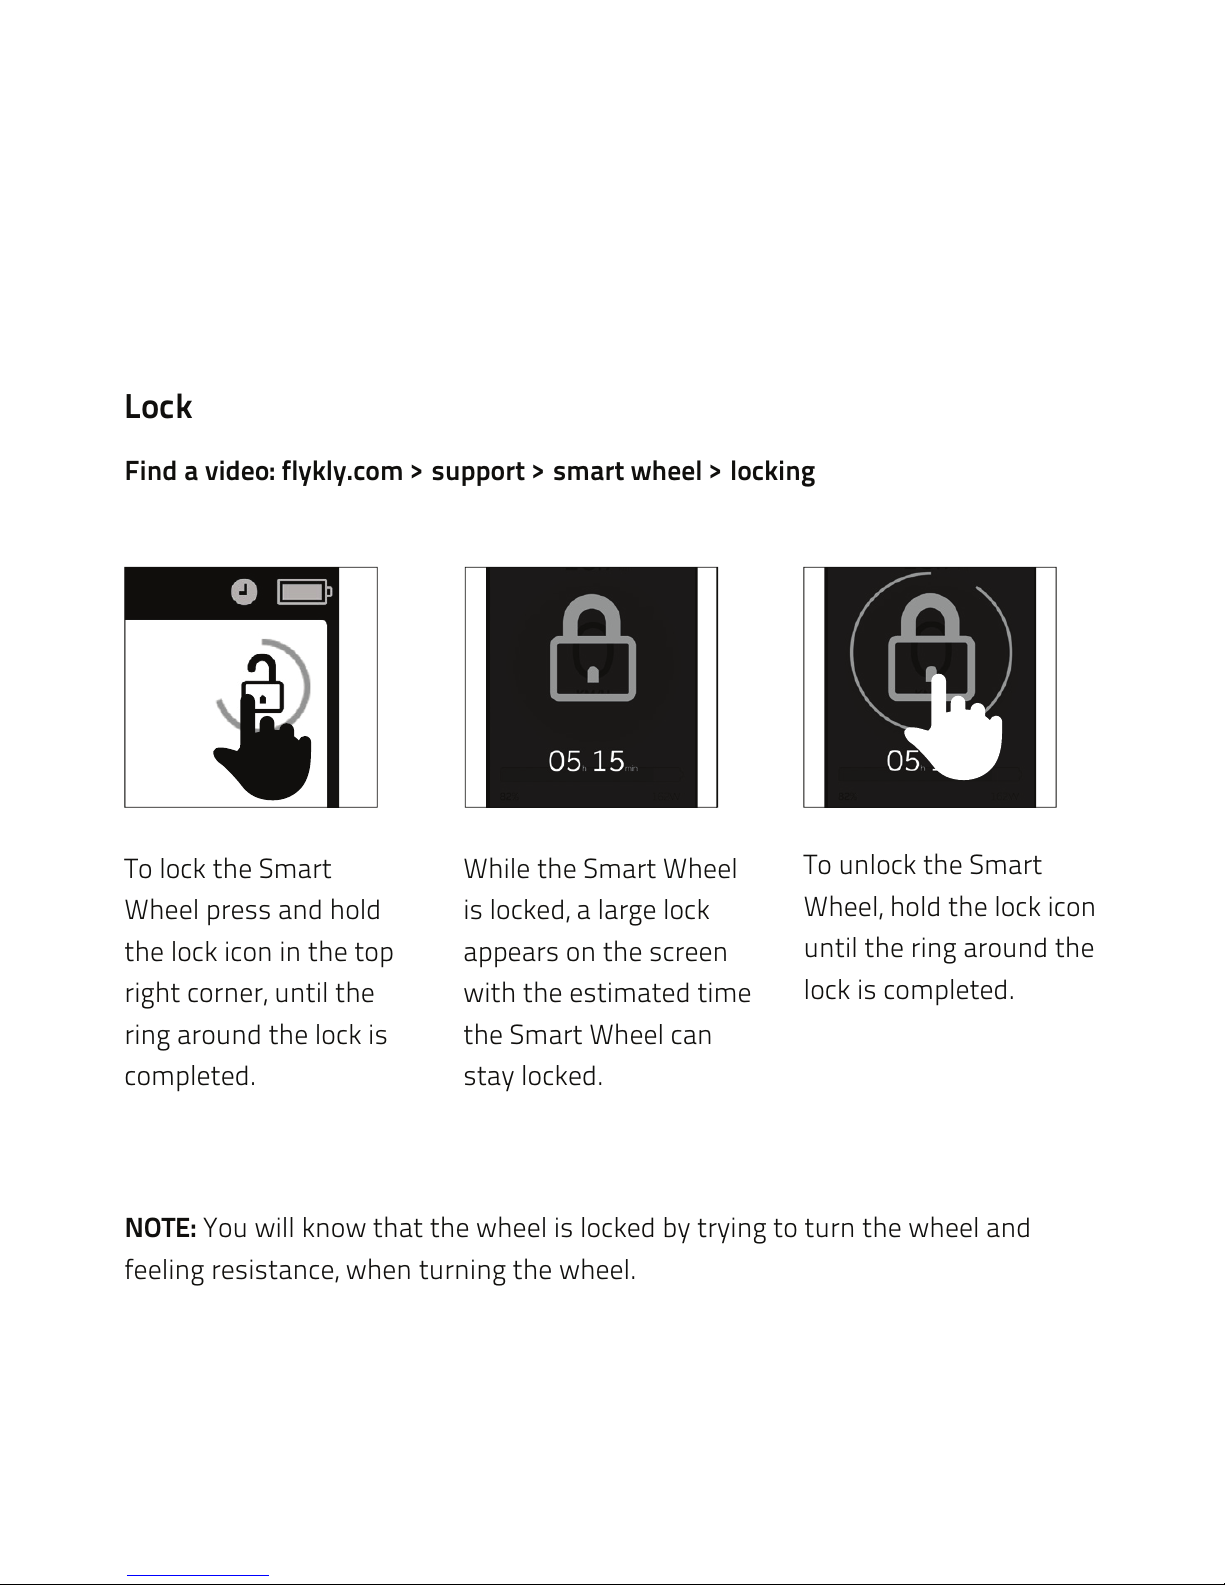
NOTE: You will know that the wheel is locked by trying to turn the wheel and
feeling resistance, when turning the wheel.
Lock
To lock the Smart
Wheel press and hold
the lock icon in the top
right corner, until the
ring around the lock is
completed.
While the Smart Wheel
is locked, a large lock
appears on the screen
with the estimated time
the Smart Wheel can
stay locked.
To unlock the Smart
Wheel, hold the lock icon
until the ring around the
lock is completed.
Find a video: flykly.com > support > smart wheel > locking
Page 22
mileskm
Save
Factory reset
TOP BOOST SPEED 20 km/h
50 %
10 %
UNITS
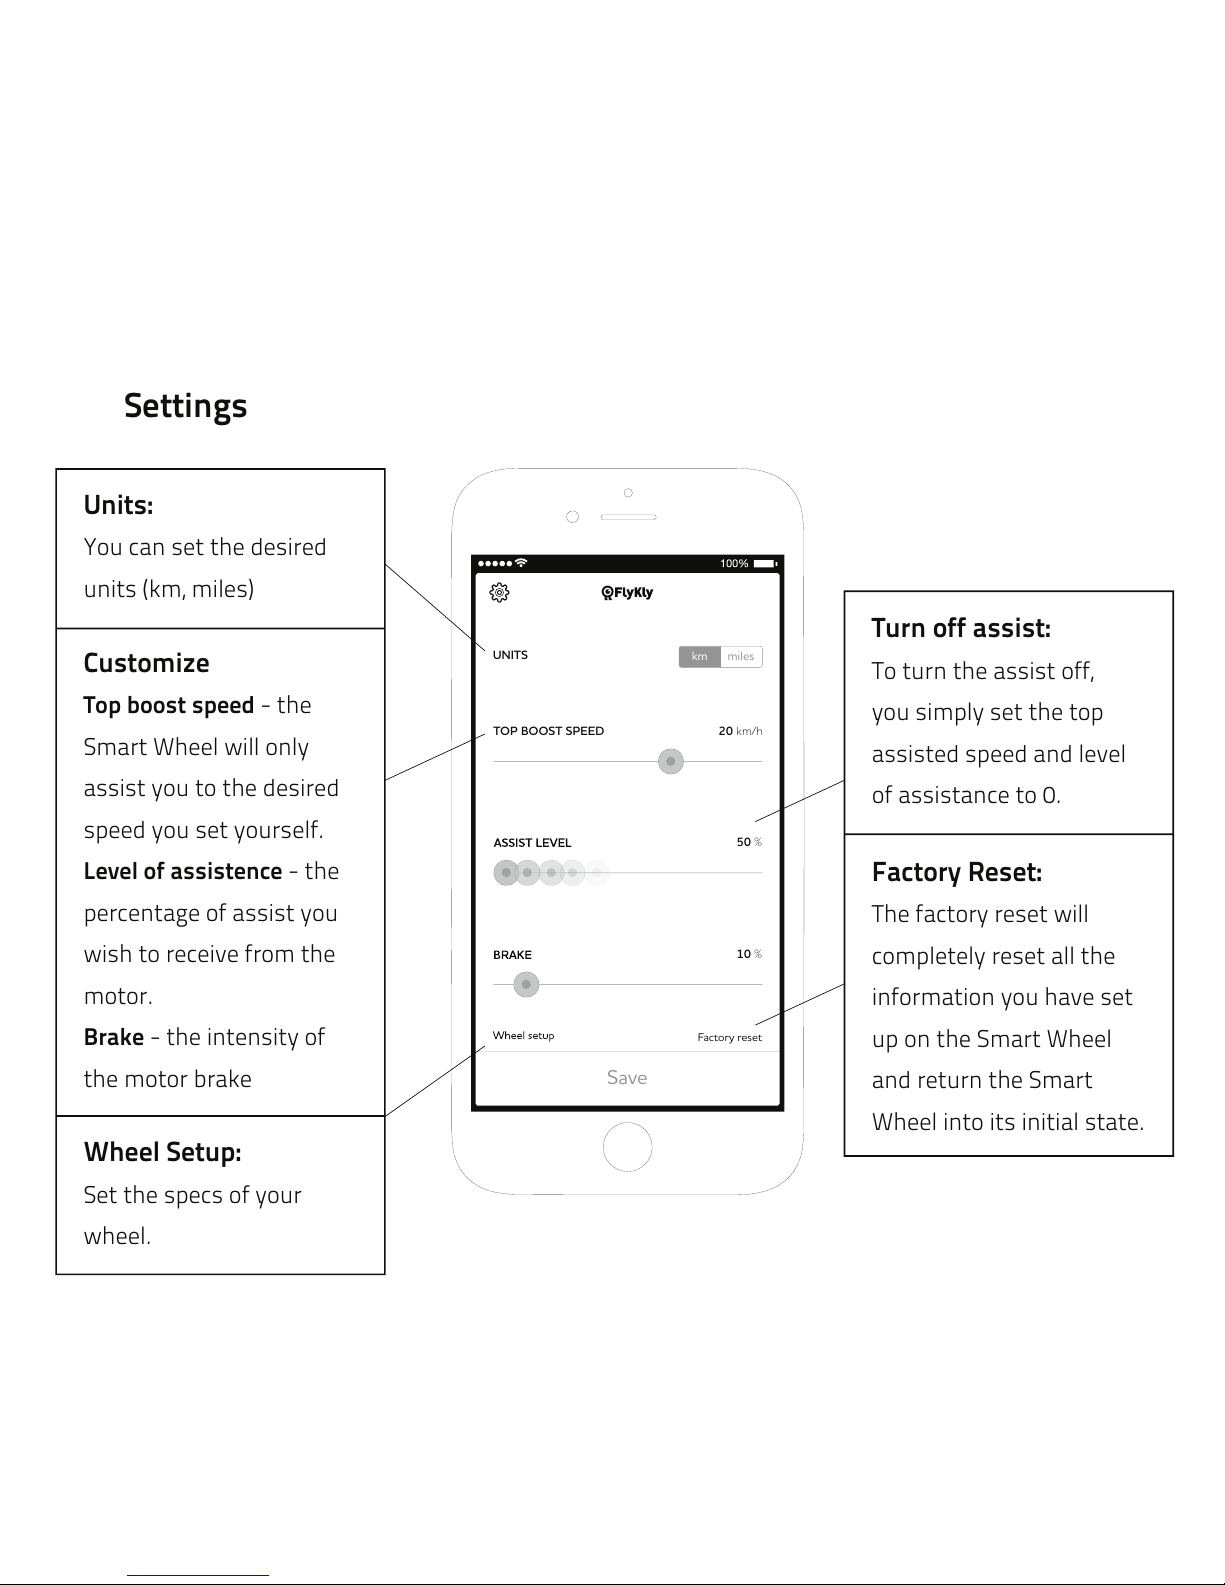
Units:
You can set the desired
units (km, miles)
Wheel Setup:
Set the specs of your
wheel.
Customize
Top boost speed - the
Smart Wheel will only
assist you to the desired
speed you set yourself.
Level of assistence - the
percentage of assist you
wish to receive from the
motor.
Brake - the intensity of
the motor brake
Turn off assist:
To turn the assist off,
you simply set the top
assisted speed and level
of assistance to 0.
Factory Reset:
The factory reset will
completely reset all the
information you have set
up on the Smart Wheel
and return the Smart
Wheel into its initial state.
Settings
Page 23
In case your Smart Wheel does not work the way you think it should, please go
through this Q&A. If this did not help, please contact us at [email protected].
1. Make sure you downloaded the correct app. The bitride app (and not FlyKly
app).
2. Make sure that your Smart Wheel is turned on (you can see the blue light).
3. Make sure that Bluetooth on your phone is on.
4.
When you try to connect with the phone, come closer to the blue light in the
Smart Wheel.
5. Be persistent.
6. If it still does not connect, visit our FAQ page - section on Smart App.
Troubleshooting
A You can not connect to the Smart Wheel using your smartphone:
Page 24
1. When you were installing the Smart Wheel did you completed all the steps in
this manual?
2. Did you set up the wheel? (inserted circumference, front and rear teeth
information?) and saved settings?
3. Is your % of assist level in the settings above 0%? (check in the app settings)
4. Is your battery full?
5. Does the wheel turn on when you charge it? (you see the blue light burning)
6. Does the wheel charge, when you plug the charger in? (red light on charger)
7. Is everything ok with your charger - are pins and cable ok?
If you answered all this questions with YES and your Smart Wheel still does not
B Your wheel does not give you any assist:
Page 25
1. Your chain could be worned out, you might need a new one.
2. Your chain is not standard and that is why it does not fit to our standard
sprocket.
3. Email us with the picture of your sprocket and chain, so we can tell, what is the
issue and advise you about the sprocket or chain you need.
C Your sprocket does not fit the chain:
Page 26
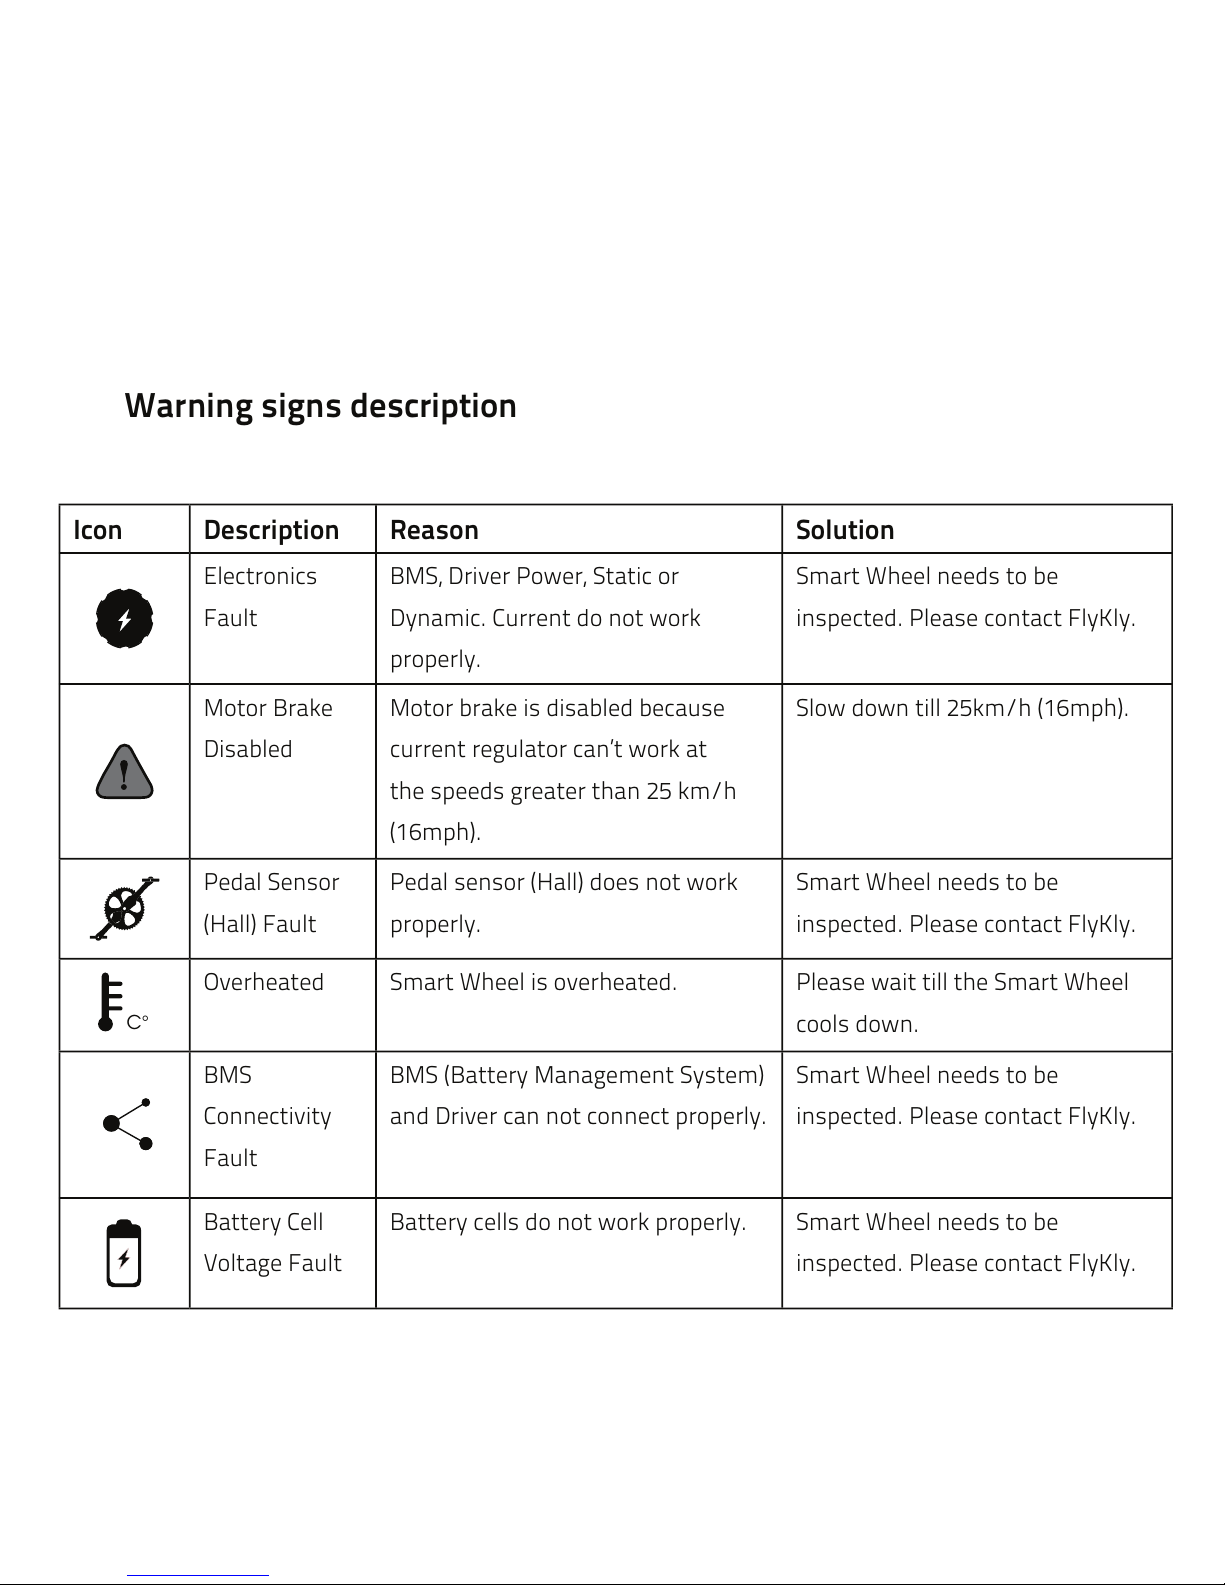
Icon Description Reason Solution
Electronics
Fault
BMS, Driver Power, Static or
Dynamic. Current do not work
properly.
Smart Wheel needs to be
inspected. Please contact FlyKly.
Motor Brake
Disabled
Motor brake is disabled because
current regulator can’t work at
the speeds greater than 25 km/h
(16mph).
Slow down till 25km/h (16mph).
Pedal Sensor
(Hall) Fault
Pedal sensor (Hall) does not work
properly.
Smart Wheel needs to be
inspected. Please contact FlyKly.
C
°
Overheated Smart Wheel is overheated. Please wait till the Smart Wheel
cools down.
BMS
Connectivity
Fault
BMS (Battery Management System)
and Driver can not connect properly.
Smart Wheel needs to be
inspected. Please contact FlyKly.
Battery Cell
Voltage Fault
Battery cells do not work properly. Smart Wheel needs to be
inspected. Please contact FlyKly.
Warning signs description
Page 27
1
2
3
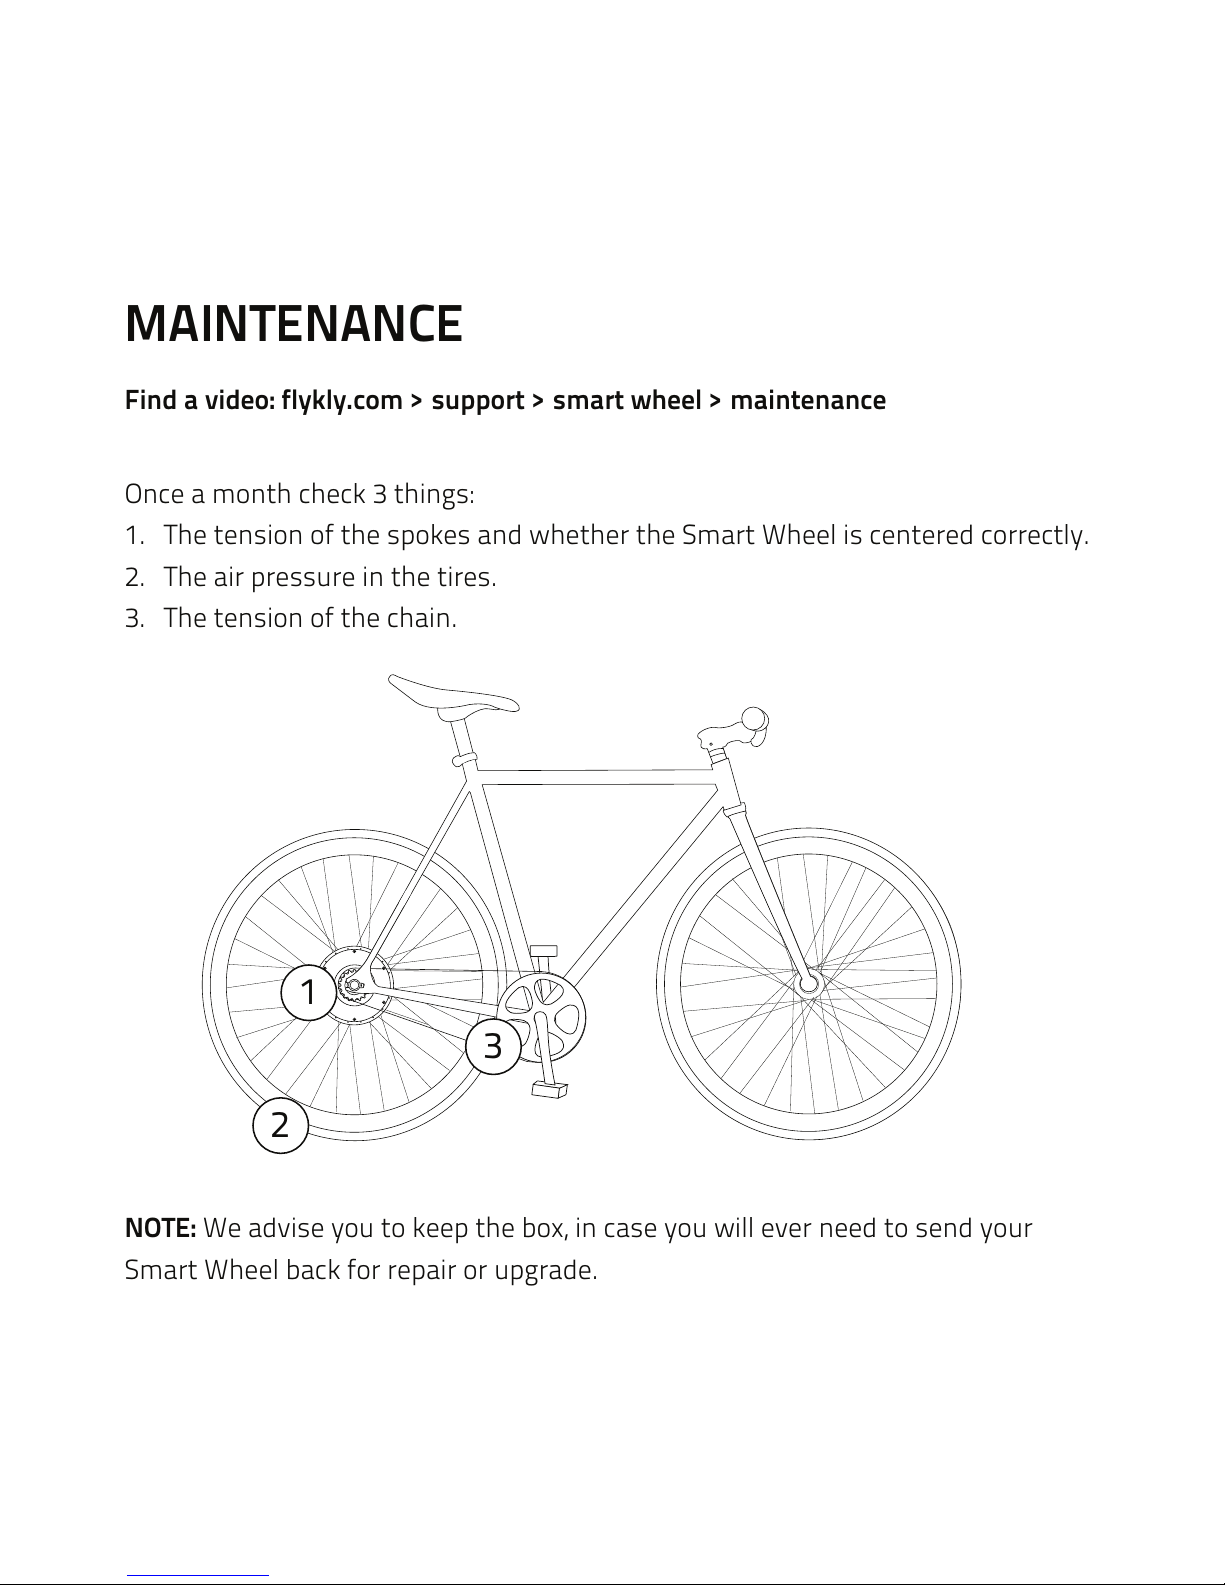
Find a video: flykly.com > support > smart wheel > maintenance
NOTE: We advise you to keep the box, in case you will ever need to send your
Smart Wheel back for repair or upgrade.
Once a month check 3 things:
1. The tension of the spokes and whether the Smart Wheel is centered correctly.
2. The air pressure in the tires.
3. The tension of the chain.
MAINTENANCE
Page 28
WARRANTY
FlyKly Smart Wheel comes with
one year warranty including the battery,
motor, electronics and electric charger.
For additional information go to
www.flykly.com/legal
Page 29

Page 30
THANK YOU
Congratulations on purchasing your new FlyKly Smart
Wheel. We hope you enjoy it safely and in style. We
would like to welcome you to the growing FlyKly
community and wish you many years of happy riding.
Please remember, your enjoyment of your FlyKly Smart
Wheel is of the utmost importance to us. If you have
any questions, comments or concerns do not hesitate to
contact us via email [email protected].
Stay Fly
Page 31

2015 FlyKly, Inc. Made in Italy.
©
 Loading...