

Page 1

SMART PED
Page 2

To reduce the risk of serious personal injury, you read carefully the instructions of this manual.
Your Smart Ped has been supplied fully assembled except for a few adjustments before use. This is an electric assisted vehicle with an innovative
kick-assist system, designed for urban commuting and short/medium distance travel.
Check the product thoroughly against this manual to ensure correct function
of components before your first ride; return the bike to your dealer in case of
any failure. The owner or main rider is then responsible for regular maintenance of the Smart Ped and to keep it in good operating condition.
Learn how to operate all standard parts and accessories equipment on the
Smart Ped.
Ensure that anyone who uses the Smart Ped has been fully instructed in the
operation of its mechanical and electrical functions.
Check our web site www.flykly.com for additional information or contact your
dealer.
YOUR INFORMATION.
YOUR RESPONSABILITY.
Thank you for your support, trust and for believing in the Flykly Project.
We could not have done it without you and we are honored you are now a
part of the Flykly community.
This is just the beginning of your experience with Flykly and we hope,
together, we will continue to build a stronger community to improve urban
mobility around the world.
Stay Fly,
Flykly Team
Page 3
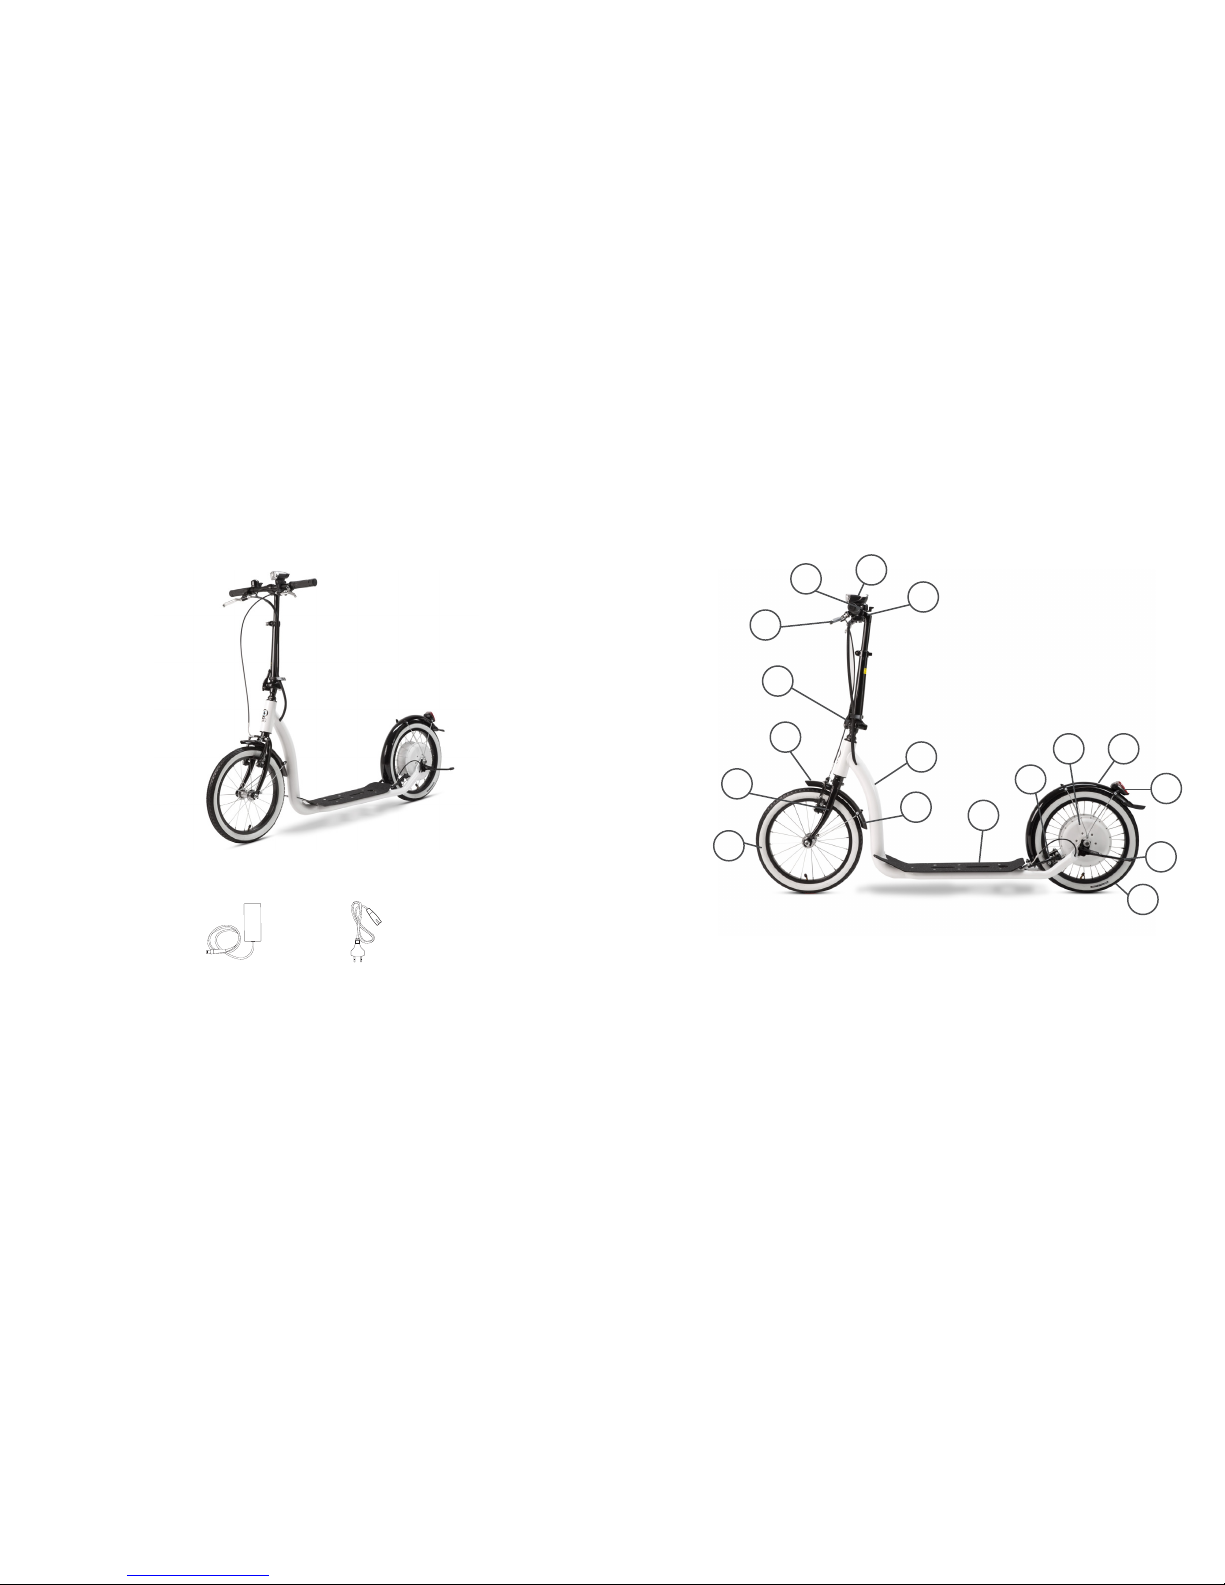
YOUR SMART PED.
1. Frame
2. Rear brake caliper
3. Rear wheel
4. Kickstand
5. Rear Light
6. Rear Mudguard
7. Alu board
8. Handlebar
9. Front light
10. Bell
11. Brake levers
12. Folding stem
13. Front brake caliper
14. Fork
15. Front Mudguard
16. Front wheel
17. All in one powertrain
IN THE BOX.
Smart PED
Charger
Multilingual Getting Started
1
8
9
10
11
12
13
14
15
16
7
3
4
5
617
2
Page 4
7
Read all safety warnings and all instruction. Failure to follow the warnings
and instructions may result in serious injury.
Save all safety warnings and instructions for future reference.
o DO NOT open the All in one powertrain (17) of your Smart Ped your-
self. The All in one powertrain (17) is maintenance-free and must
berepaired only by qualified experts and only with original spare
parts. Any unauthorized attempt to open the unit will void warranty
claims.
o DO NOT make any modification to your Smart Ped. This would yield
to an incorrect behavior of your Kick assisted e-bike and it may result
in severe injuries.
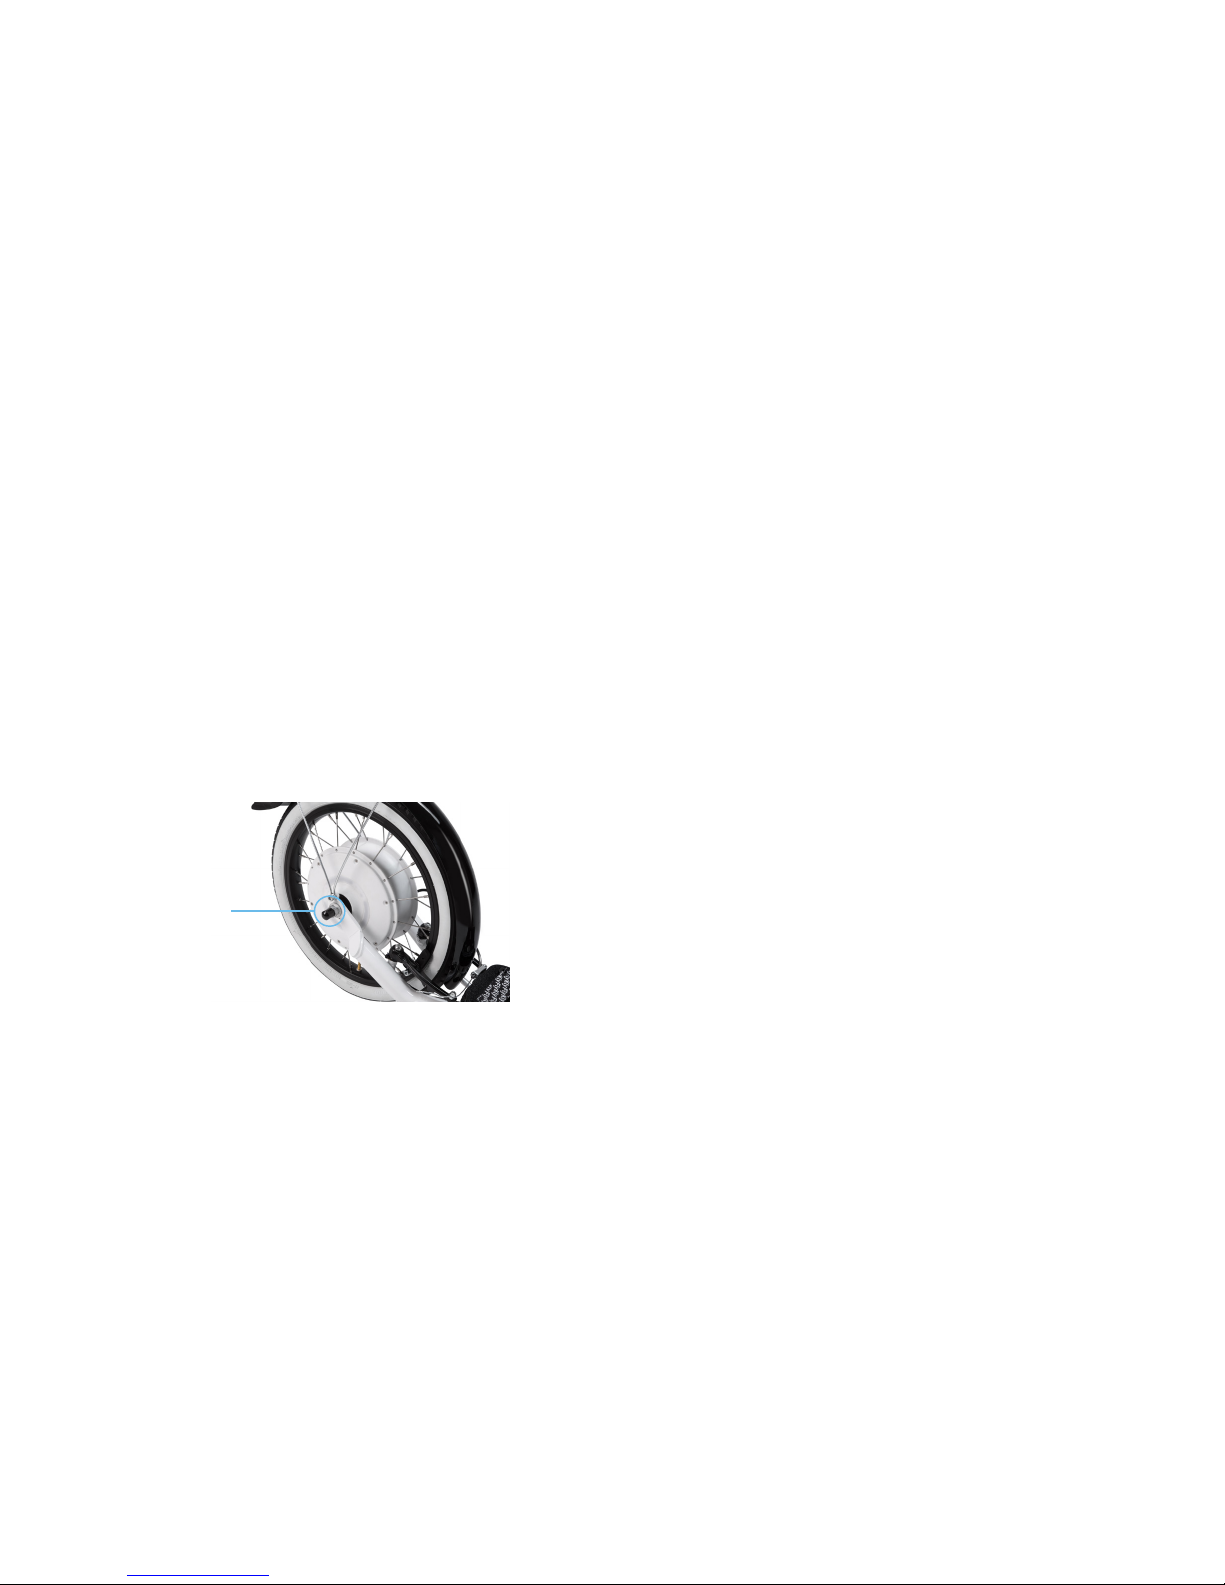
o DO NOT use your Smart Ped without the protection covers for the
charging connector (see Figure 1). Warranty is void if the Smart Ped is
being used without protecting the connector.
o Please observe all national regulations on registering and using the
Smart Ped.
o The term “battery pack” refers to an internal part of the All in one
powertrain (17). DO NOT try to access the battery pack yourself.
o The Smart Ped must not be subjected to direct mechanical impacts.
SAFETY NOTES.
YOUR FOLDING SMART PED.
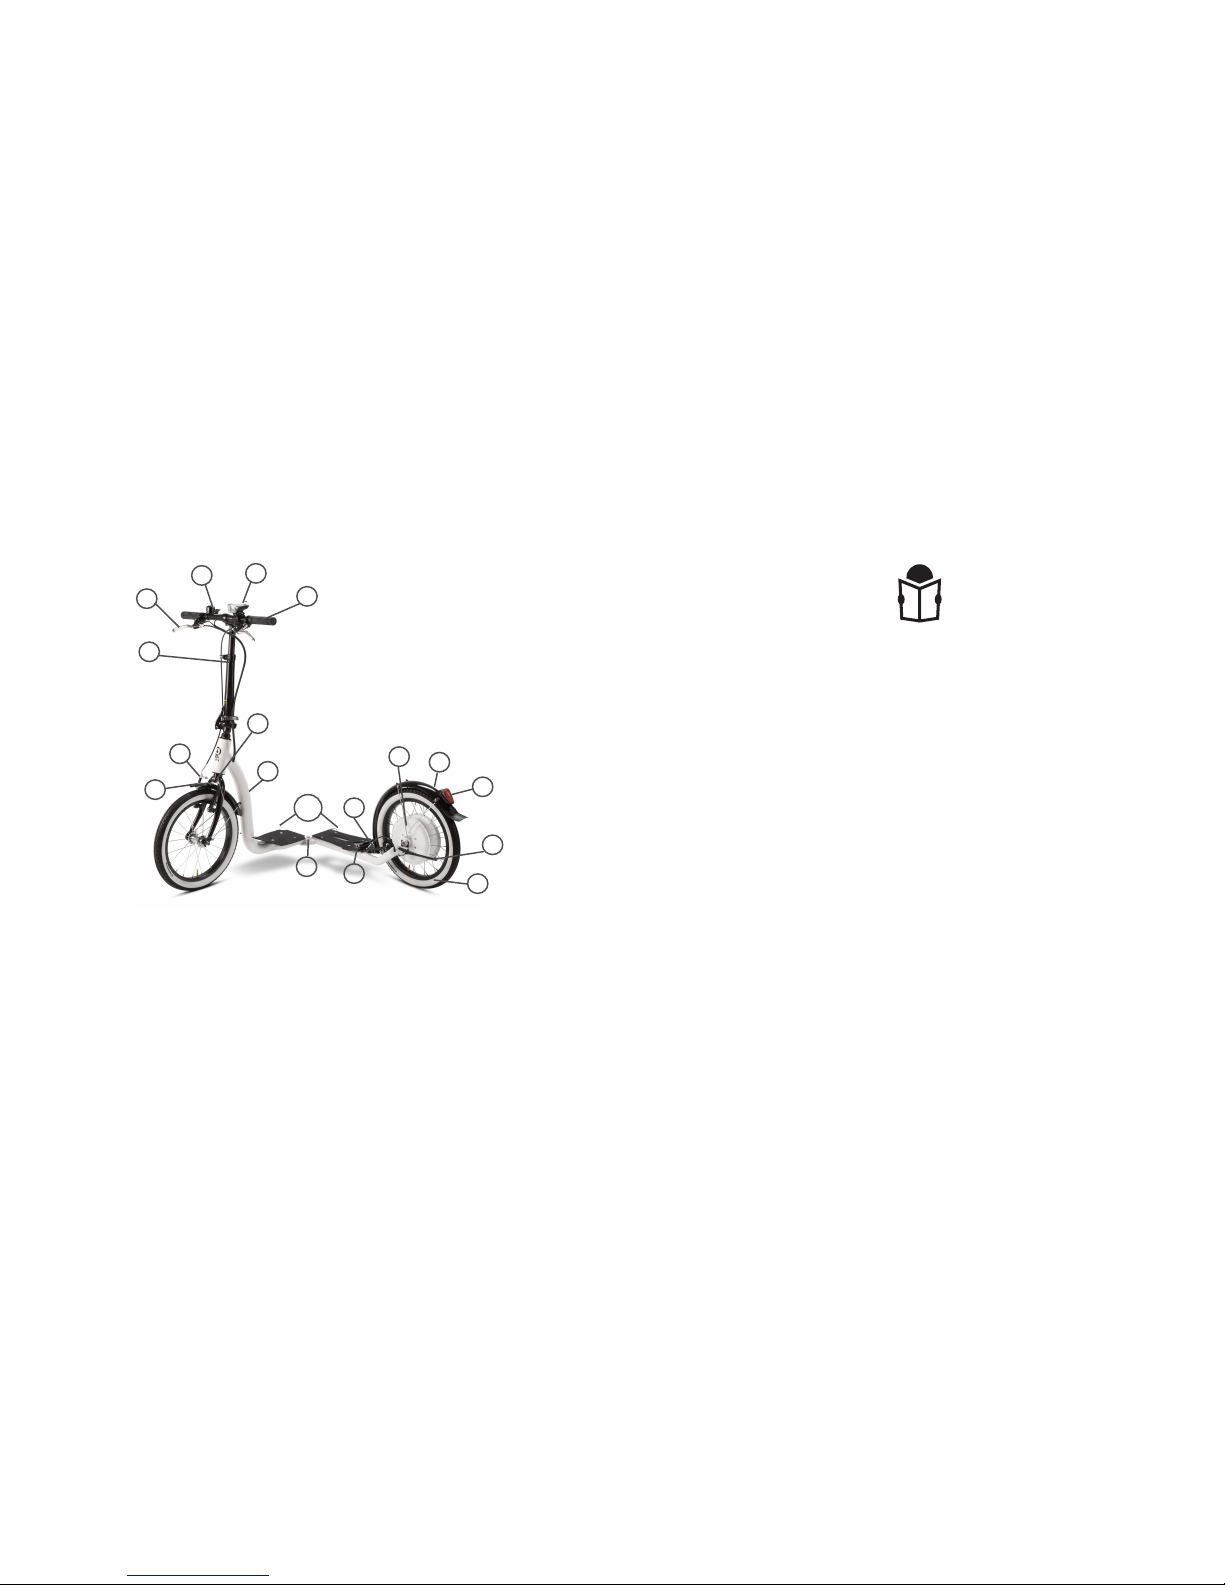
1. Frame
2. Rear brake caliper
3. Rear wheel
4. Kickstand
5. Rear Light
6. Rear Mudguard
7. Alu board rear
8. Alu board front
9. Handlebar
10. Front light
11. Bell
12. Brake levers
13. Folding stem
14. Front brake caliper
15. Fork
16. Front Mudguard
17. All in one powertrain
18. Front wheel
19. Block Pin
20. Velcro Stripe
1
9
10
11
12
13
14
15
16
2
3
4
5
6
17
19
7/8
20
Page 5
8
9
1. SAFETY CHECK BEFORE RIDING YOUR SMART PED
1.1 Fitting your Smart Peds for a safe ride
The Smart Ped and its equipment must fit properly the size and skills of
the rider to ensure safely and comfortably riding. A vehicle that is too big
or too small for the rider is hard to control and could be uncomfortable.
If your Smart Ped does not fit properly, you may lose control and cause
severe injuries.
1.2 Handlebar height
To adjust the handlebar height, release the lever on the folding stem (12),
adjust the height until the desidered level and lock the handlebar.
TIPS FOR A SAFER RIDE.
o There is a risk that the battery pack and the electronics will be
damaged.
o Protect the Smart Ped system against severe heat, fire and immersing
into water. Danger of fire and explosion.
o Vapors can escape the All in one powertrain (17) in case of damage or
improper use of the Smart Ped. Avoid contacts with those vapors, as
they can irritate the respiratory system.
o Charge the battery pack only with original FlyKly battery charger.
Damage can occur while using non original charging devices.
o DO NOT short circuit the pinout of the charging connector.
o Keep the battery charger away from rain or moisture. Keep the
battery charger clean. Danger of electric shock.
o Before any charging operation, check the battery charger status
(cable, plug, connectors). If any damage is detected, DO NOT use the
charger and contact a qualified retailer.
o Do not operate the battery charger on flammable surfaces.
o Vapors can escape in case of damage or improper use of the charger
Avoid contacts with those vapors, as they can irritate the respiratory
system.
o Keep the charger out of children reach.
o Please read this manual carefully
Never ride without the
protection cover
Page 6
10
11
CAUTION: Under no circumstances shall the stem lean out from the
head set beyond its ‘Minimum insertion’ or ‘Maximum extension’ mark.
The mark shall never be visible and it shall remain inside the frame
1.3 Position adjustment
The brake and shifting levers are positioned on your Smart Ped by the
dealer in order to fit most rider’s requirements. If you buy online, the
brake levers could be not in the optimal position to fit the box to prevent
damages during shipping. The angle of the shifting lever can be revised.
Ask your dealer to fit it to your needs if necessary.
2. SAFETY CHECK BEFORE RIDING YOUR SMART PED
2.1 Mechanical vehicle
o Check and tighten any nut, bolt, and strap. If you’re not sure, ask your-
bicycle dealer to help you.
o Ensure that all locking devices are correctly secured before riding.
o Tyres correctly inflated? Check by pushing down with your thumb on-
the top of the tyre. The tyre should depress slightly.
o Compare your ride to how it feels when you know the tyres are cor-
rectly inflated.
o Replace damaged or worn tyres before they puncture.
o Wheels true? Spin each wheel and check for brake clearance and
side-side wobble. If a wheel wobble or hits the brake pads, take the
bicycle to your dealer to adjust the brakes.
2.2 Clamp, nut and quick release
o Are nuts, clamps and quick release fixed correctly? Check if all fittings
mechanisms as seat clamp and wheel nuts are correctly and securely
closed.
2.3 Handlebar
o Is the handlebar fixed correctly, tight bolts and clamp enough so it
can’t twist? Handlebar is in good condition with grips completely
fitted? Is the safety plastic preventing the folding lever to open?
o Any broken or worn parts should be replaced BEFORE riding your
Smart Ped
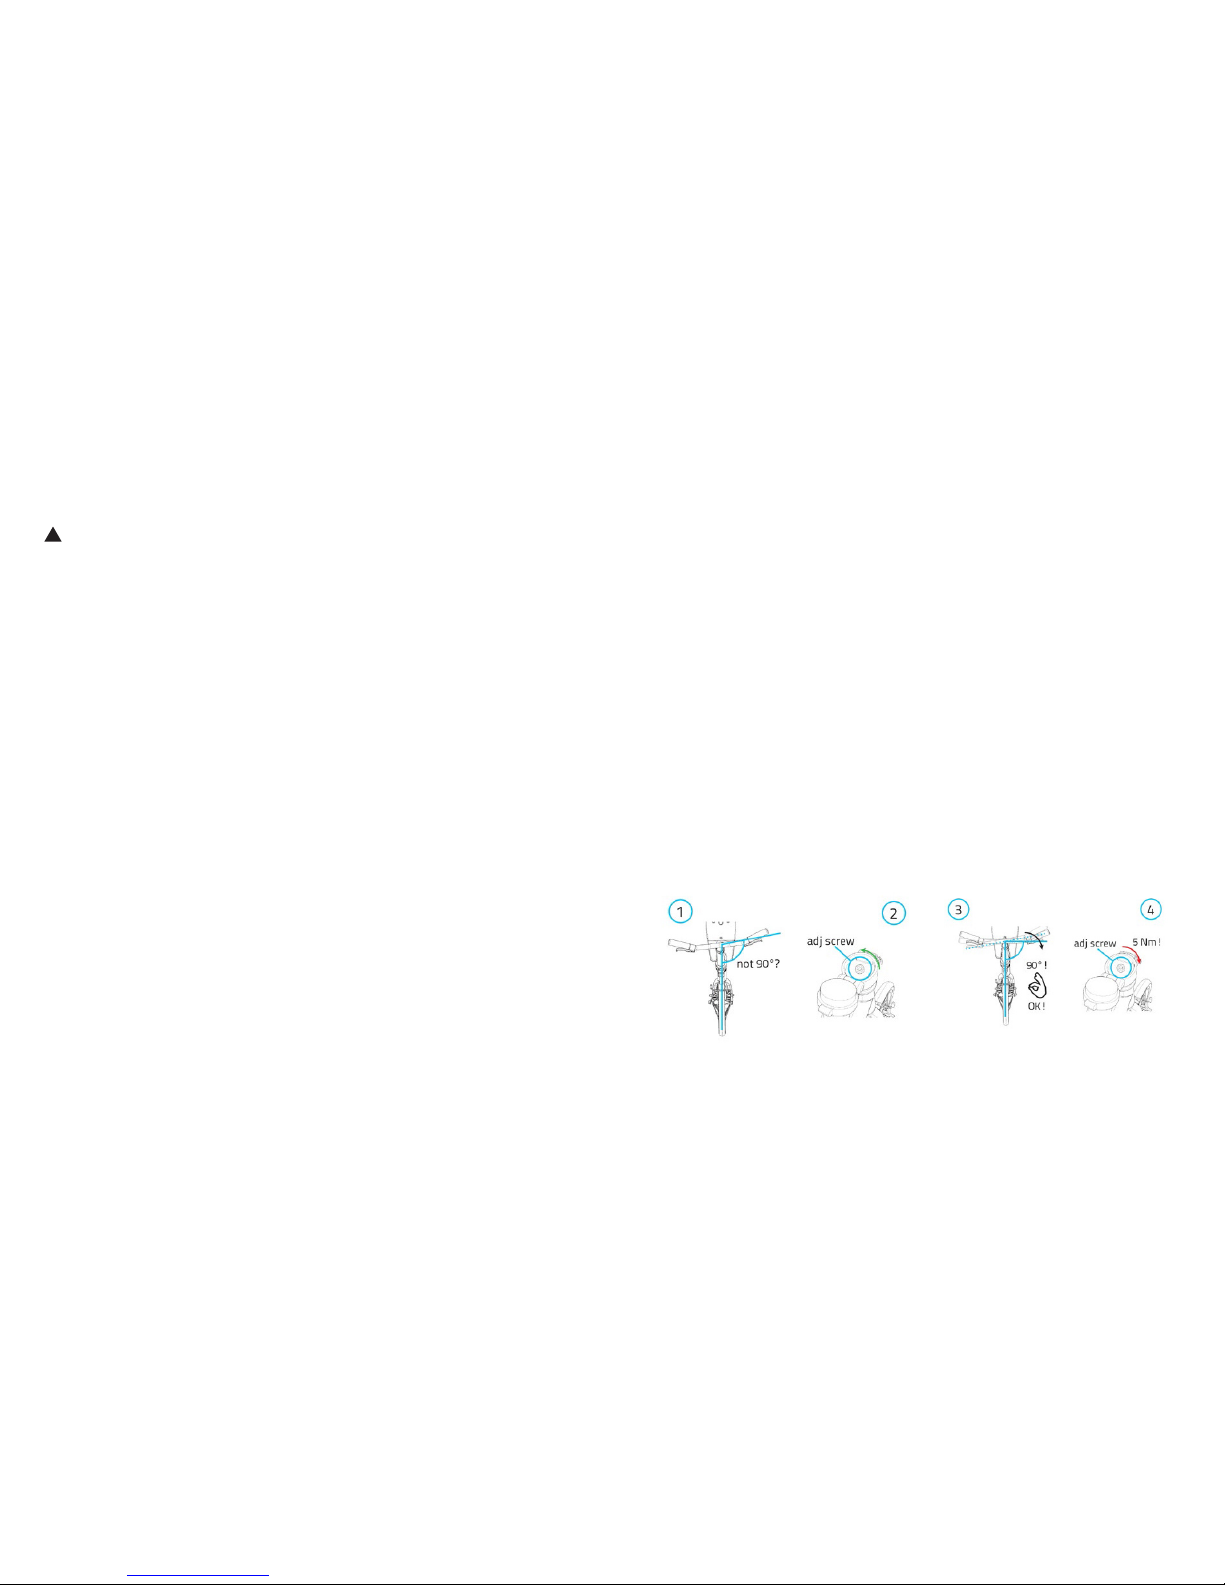
o If the handlebar is not straight (1), in order to adjust it in the
correctposition, fold the handlebar (see 5.3), release the adjustment
screw (2), unfold it and straighten the handlebar (3). Finally fold the
hadlebar again and tighten the adjustment screw with the proper
tightening torque.
!
Page 7

12
13
3. SAFETY EQUIPMENT AND SENSIBLE RIDING
As a road rider you are responsible for your own and others’ safety.
You need to know:
o road rules and regulation
o how to ride safely.
3.1 Your Smart Ped
Check your Smart Ped before using it. Know how to operate all of its parts.
3.2 Your clothing
Wear a correctly fitted and fastened approved helmet. Bright colored
clothes and reflective tape help to improve your conspicuity at night.
Wear shoes, not thongs or ride with bare feet.
3.3 Riding alert
o respect road regulations
o watch out for other road and pathway users
o adapt your riding to suit the weather and traffic conditions.
ATTENTION:
Certain activities may damage your Smart Ped and result in serious personal injury. Take these precautions:
o avoid jumping kerbs
o avoid potholes and gratings
o avoid stunt riding and jumping.
3.4 Carrying loads
Never load the Smart Ped beyond its capacity. See Technical Specifications
of the Smart Ped for details.
3.5 Riding in wet conditions
Wet weather affects visibility for all road users. It is harder to stop in the
wet conditions for any vehicle. Keep more distance to other vehicles to
brake safety.
4. SOMETHING IMPORTANT ABOUT YOUR SMART PED
4.1 Assembling
Your Smart Ped has been properly assembled and it is ready to be used. If
you find any damaged part or you needs further adjustment contact your
dealer.
!
CAUTION: Wrong torque applied on the screws or clamps may damage
the part or make the Smart Ped unsafe.
4.2 Brakes
o Check your fingers can reach and squeeze the brake levers comfort-
ably. Your brake lever has been adjusted for a proper gripping force
for most riders. If you find any difficult to squeeze the brake lever, ask
your dealer to adjust the cable tension or change the brake lever to
fit your requirements.
o Keep your wheel rims and brake pads clean and free of lubricants,
waxes or polishes.
Page 8
14
15
Brake pad-to-rim clearance can be adjusted changing the brake cable
length at the brake arm or through the brake lever cable adjuster.
The brake pads should be adjusted in order to be parallel to the rim
flank and keep about 1-2 mm clearance with the flank. Ask your Flykly
dealer how to reach the correct adjustment.
! CAUTION: Be sure that cable stopper and cable guide are correctly positioned when you repair of fit your brake system.
!
CAUTION: contact your dealer to fit your brakes in case of any doubt.
5. FOLDING YOUR SMART PED
!
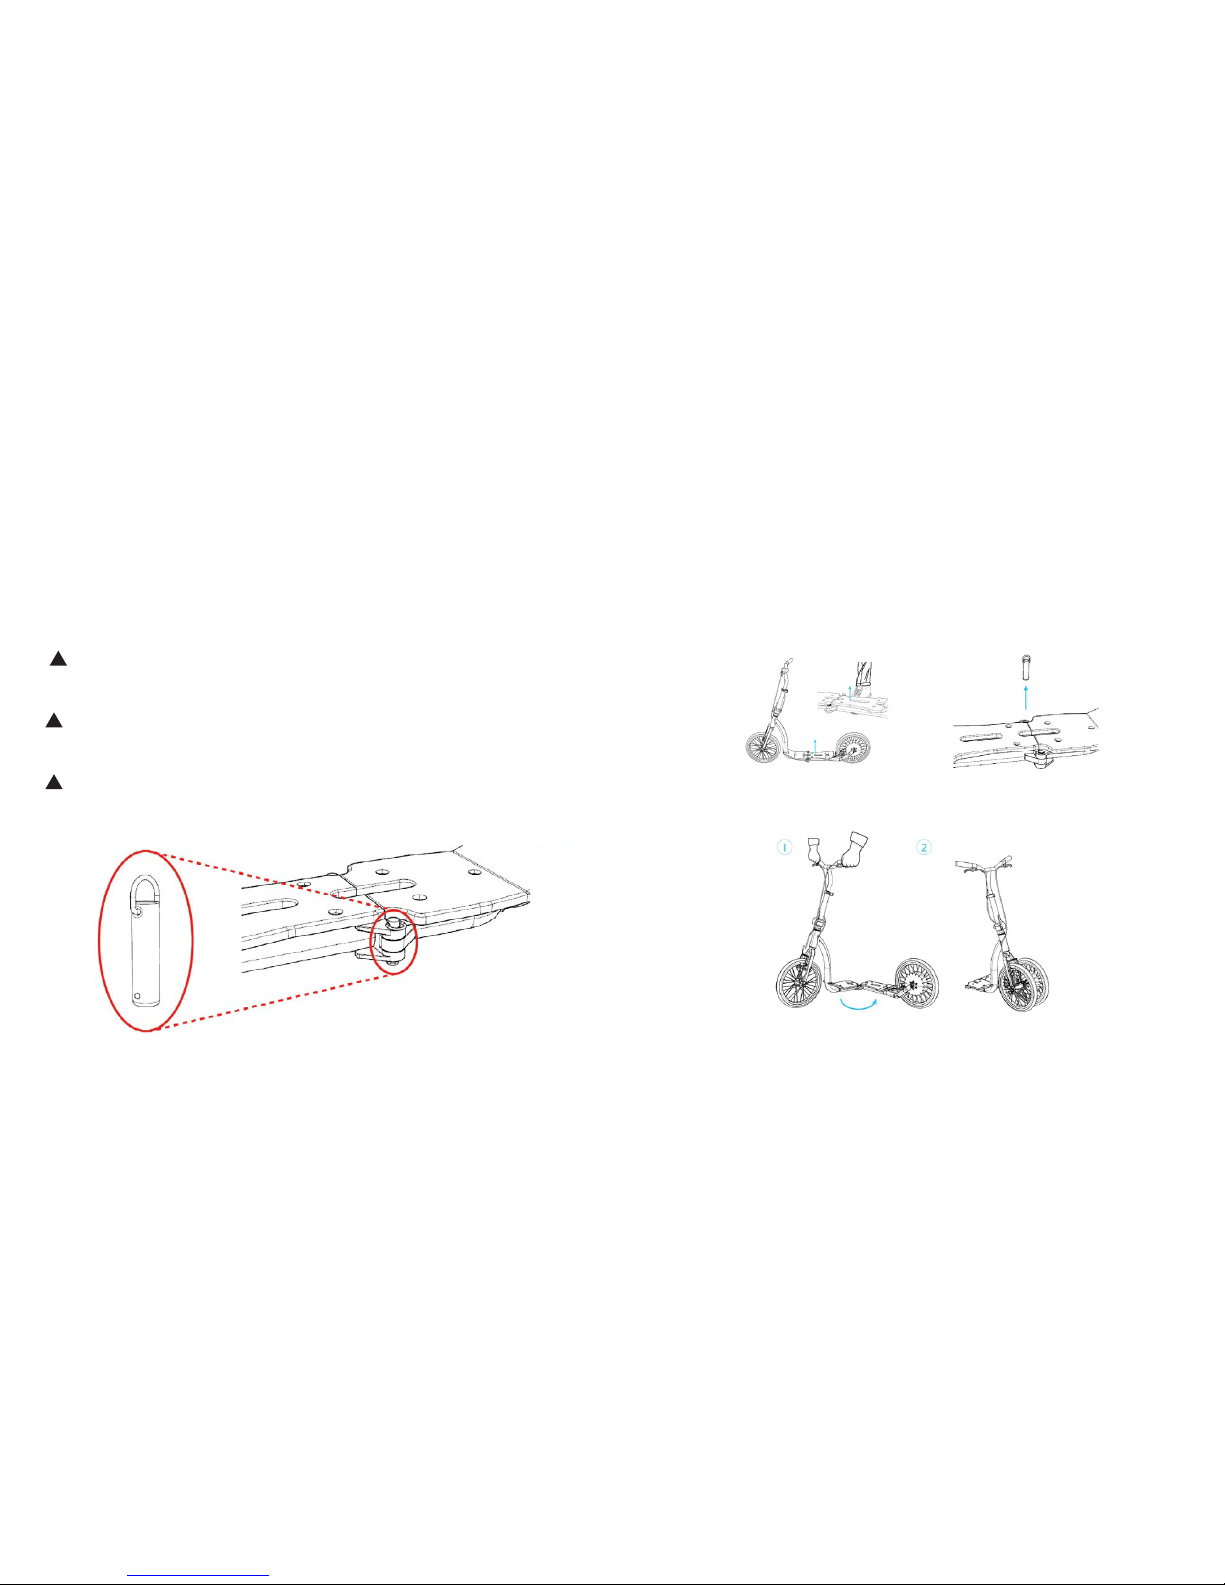
If you have a Folding Smart Ped NEVER ride without the Block Pin (19):
5.1 Folding the board 7a - 7b
This part applies to the folding model
In order to fold the board in half, please lift gently the joint with your foot
and extract the block pin. The axle play of the joint is necessary to perform
the folding movement. Even if you can feel a play, the joint has been
designed and tested to support up to 120 kgs.
Lean the smart ped towards you while holding the handlebar. Then lift
gently the front wheel and fold the board in half.
Secure the 2 parts of the board (7a) and (7b) with the velcro stripe (19).
Page 9
16
17
1. INITIAL OPERATION
Just to remember, your Smart Ped is not permitted for competition and
race use. The Kick assisted e-bike can only be activated when the battery
state of charge is sufficient. In order to check the battery state of charge
of your Smart Ped please refer to 4.1.
If your Smart Ped is folding, please refer to the folding instructions
1.1 Turning on your Smart Ped
The Smart Ped turns on automatically when the rear wheel reaches a speed
higher than 5 km/h. To turn on your Smart Ped just start pedaling as usual
or spin the rear wheel while you lift the frame.
1.2 Turning off the Smart Ped
The Smart Ped automatically turns off when no activities are detected
within 2 minutes.
!
WHEN A SMARTPHONE IS CONNECTED the system will stay active for 10
minutes. If the Smart Ped is electronically locked, the system will stay active
as long as possible (see 4.2 for details).
RIDING YOUR Smart Ped
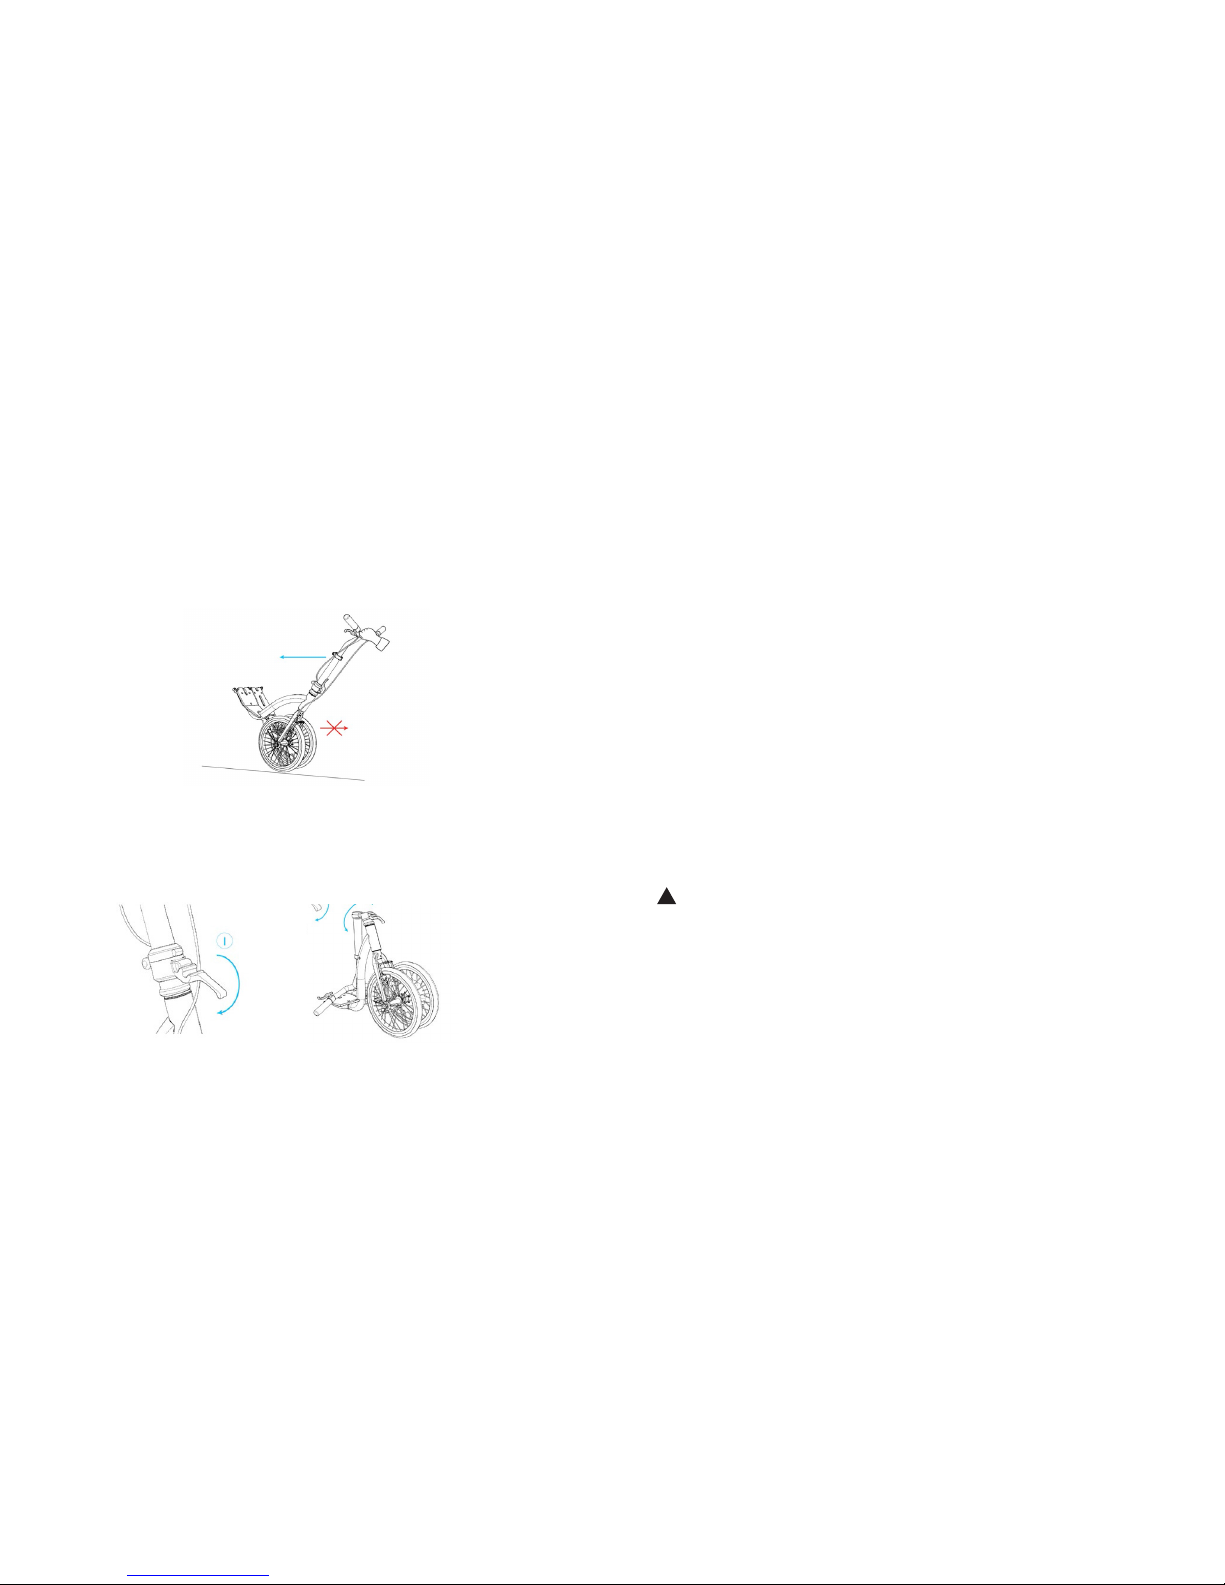
5.2 Trolley mode
This part applies to the folding model
Now you can use your smart ped in trolley mode by pushing it. Please be
careful NOT to pull the Smart Ped. It will not be drivable by pulling it.
5.3 Folding the handlebar 12
This part applies to the folding model
In order to fold the handlebar, remove the plastic protection by twisting it
and unlock the joint using the metal lever. The handlebar will fold down to
make your Smart Ped more compact.
Page 10

18
19
2. RIDING. JOYRIDING.
!
It is recommended to gather first experience with your Smart Ped away
from roads with heavy traffic.
Your Smart Ped features an innovative kick-assist technology that helps you
in reducing your effort during the ride. The system is configured with a power
mode, named “PEDELEC25” that is compliant to the EU laws on Electric Pedal
Assisted biCycle (EPAC). Please refer to 4.5 for more information.
WHEN THE SMART PED turns on, the street legal PEDELEC25 power mode
is automatically selected. BE CAREFUL to check that the “PEDELEC25” power
mode is engaged when you are riding on public streets.
2.2 Motor assistance
The motor assists the rider up to 25 km/h and with a maximum power of
250W with two different power modes. For instruction on how to change
the power mode and how the power modes perform, please refer to 4.5
2.3 Regenerative braking (KERS)
Your Smart Ped features a regenerative braking function; this allows you to
slow down the bicycle using the electric motor as a generator.
This will help you recharging the batteries thanks to the integrated Kinetic
Energy Recovery System (KERS).
In order to activate the regenerative braking, just hit the brake lever.
The integrated brake switch will activate the regenerative braking.
!
CAUTION: Regenerative braking DOES NOT substitute safety mechanical
brakes. Please do NOT remove the mechanical brakes from your bike.
!
CAUTION: Regenerative braking WILL NOT BE AVAILABLE when your Smart
Ped is fully charged.
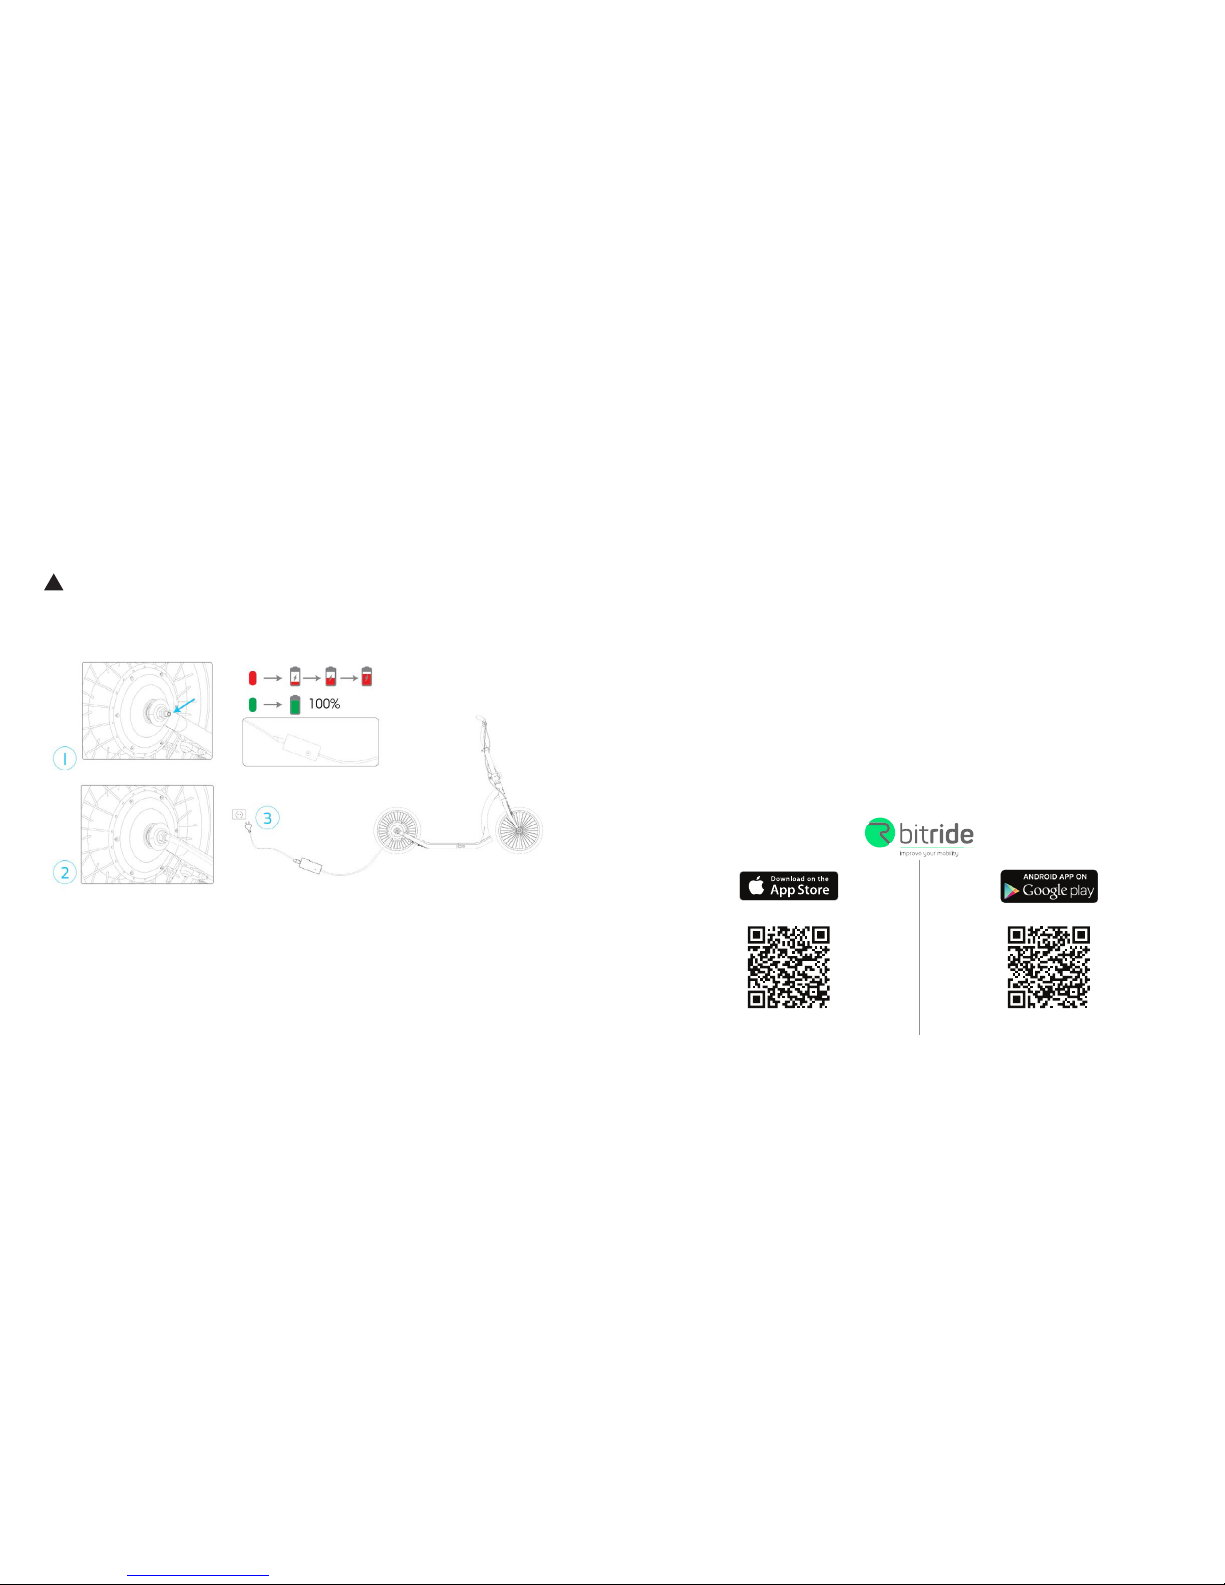
2.4 Charging your Smart Ped (see Figure 5)
To charge your Smart Ped, simply remove the protection cap from the
charging connector (I) and plug in the Flykly charger (2). Then connect the
Flykly charger to a power outlet (110~240 V).
The charging time is approximately 3 hours for a complete charge. While
the Smart Ped is charging the charger LED must turn RED. When the Smart
Ped is completely charged, the charger LED turns GREEN (3).
!
NOTE: when the charger get disconnected from the hub, the Smart Ped
will turn off.
2.5 Careful handling of the kick assisted e-bike
Please be careful about the operating storage temperature of your Smart
Ped. Protect the charging connector from impacts that can damage it.
The Smart Ped components can be damaged if exposed to extreme
temperatures.
!
Page 11
20
21
!
CAUTION: ALWAYS seal the connector on your Smart Ped with the proper
protection cap before riding. Using the Smart Ped without the protection cap
will void the warranty.
3. APP. APP AND AWAY
In order to access all the function of your Smart Ped, you would have to
connect a smartphone through the bitride app.
3.1 What is the bitride app?
The bitride app helps you to act smarter during your everyday mobility;
bitride also allows you to connect to a variety of devices via bluetooth,
including your Smart Ped.
3.2 How do you get the bitride app?
You can download the bitride app from the Google Play store (for Android
devices) or from the Apple store by searching for “bitride” or by using the
links below.
iPhone Android
TM
https://goo.gl/yo1axUhttps://goo.gl/ryvMuY
Page 12

22
23
3.3 Which devices does the bitride app support?
Devices with Android 4.2.3 or newer are supported; iPhone 4s, iPhone 5,
iPhone 5s, iPhone 5c, iPhone 6, iPhone 6+ are also supported.
3.4 How much is the bitride app?
The bitride app is available for free.
3.5 How do you install the bitride app?
Depending on your mobile device, go either to the Apple Store or to Google Play
and search for the bitride app. The detailed procedure is listed in the following.
On iPhone:
o Open App Store
o Tap the search icon
o Enter “bitride” in the search field
o Select bitride in the search results
o Follow the standard installation procedure
o Register with a valid e-mail address
On Android:
o Open Google Play
o Tap the search icon
o Enter “bitride” in the search field
o Select bitride in the search results
o Follow the standard installation procedure
o Register with a valid e-mail address
3.6 Connecting bitride to your Smart Ped
!
NOTE: bitride connects trough bluetooth to your Smart Ped. When first
connecting to a factory resetted Smart Ped, you will need to give a name to it!
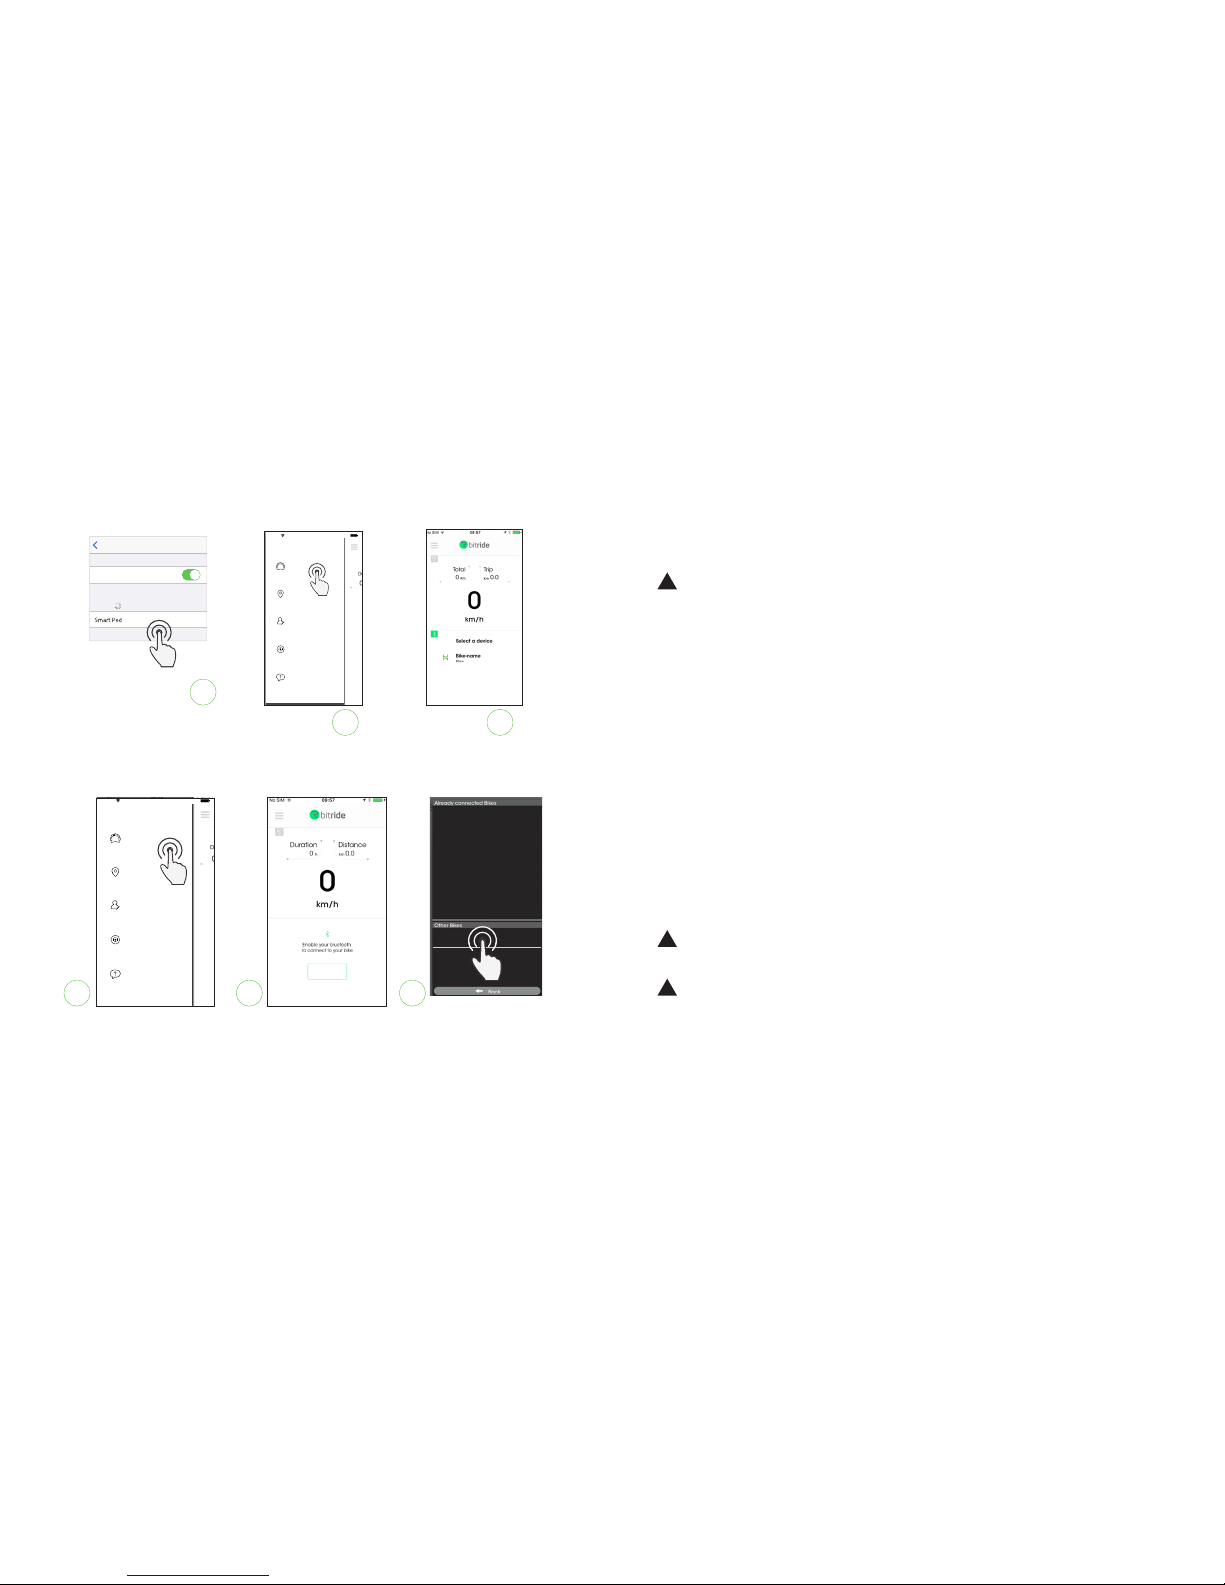
Once your Smart Ped is turned on (see 1.1), you can connect bitride to the
bike. Depending on your mobile device the procedure may change.
On iPhone:
o Open the bluetooth settings screen
o Tap your Smart Ped name
o Wait for connection
o Launch bitride
o Using the upper screen menu, select RIDE
o Press CONNECT
!
NOTE: If you have an iPhone bitride will auto-connect to your Smart Ped
after the first time the device is paired.
On Android:
o Launch bitride
o Using the upper screen menu, select RIDE
o Press CONNECT to access the connection menu
o Tap your Smart Ped name
o Wait for connection
!
NOTE: Once connected, your smartphone will auto-connect to your Smart
Ped if the device is in range and the Smart Ped is on, until you manually
Page 13
24
25
disconnect the device or you pair another device to bitride.
3.7 Smart Ped registration (rst use)
!
NOTE: it is not mandatory to perform this action. Your Smart Ped is ready
to go with the default motor settings (see 4.6)
In order to use your Smart Ped together with bitride, you need to register it
using your bitride app. By registering to bitride you will be able to:
o change your Smart Ped name
o change your motor settings
o access to online fault diagnosis
o access to remote manteinance
o access to remote anti theft service: if you reported your Smart Ped as
“stolen” any attempt to connect to your Smart Ped will be reported
to our servers
To register your Smart Ped please fill in the registration form in the app
welcome screen by providing:
o a bike name for your Smart Ped
o a 4-digit PIN code that you set as security for your Smart Ped
!
NOTE: the bike name will change at the first reboot of the bike.
!
INTERNET CONNECTION NEEDED to perform the registration
I
BluetoothSettings
Bikep-3D25
ÜÖká ÖÜí Ü~ïâ
Bluetooth
detectable as “iPhone ZEHUS”
DEVICES
Safari 100%8:08 AM
Ride
Maps
Prole
My devices
Support
32
Enable
Safari 100%8:08 AM
Ride
Maps
Prole
My devices
Support
2 3
Bikep-3D25
00:06:64:67:21:7F
I
Iphone first connection to the Smart Ped
Android first connection to the Smart Ped
Page 14

26
27
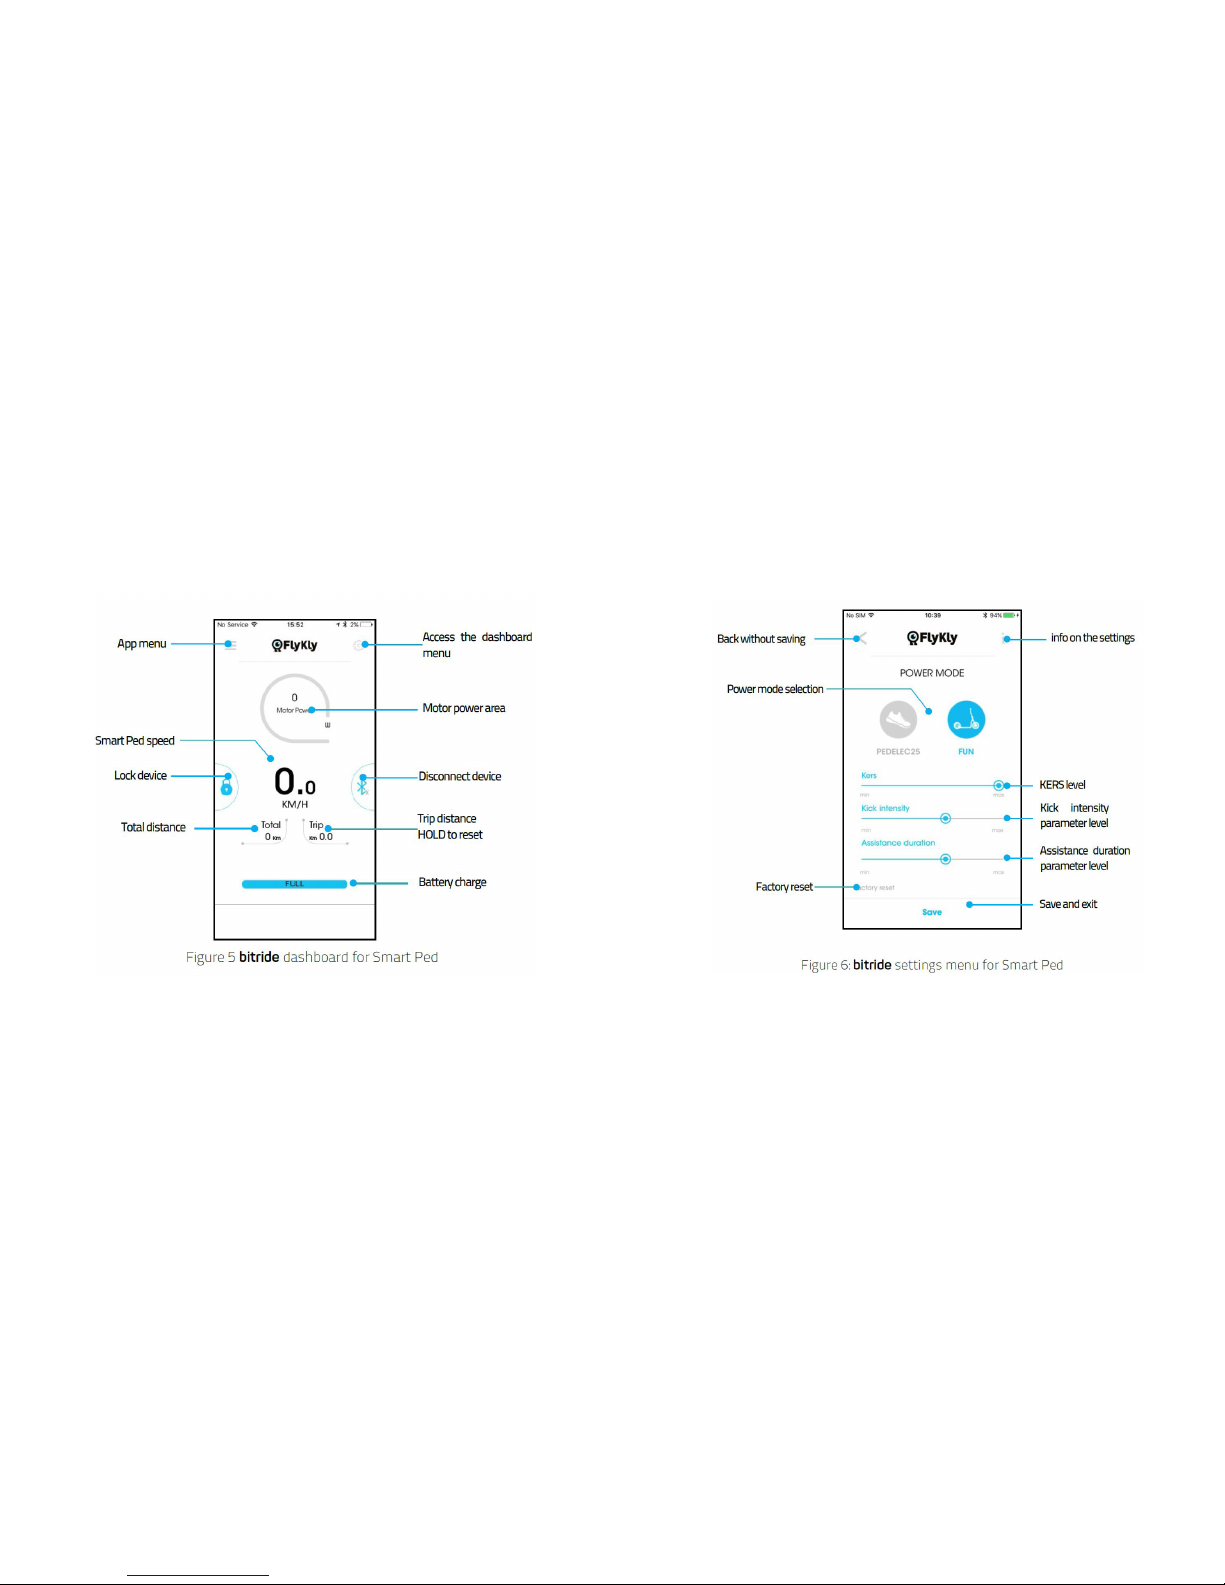
The bitride dashboard for the Smart Ped displays the following information:
o Bike SPEED [Km/h] or [mi/h]
o Total ODO [Km] or [mi]
o Partial ODO [km] or [mi]
o Motor Power [W]
o State of charge of the battery [%]
o Warning icon (see 4.8)
4.2 Locking / Unlocking your Smart Ped (Figure 7)
Your Smart Ped features an electronic lock that can be enabled by swiping to
the right the lock icon .
This function makes the rear wheel of your bike stiffer and very difficult to
pedal on. This function is available when the battery charge is greater than
20% AND the bike is at 0 km/h. This function is unavailable while charging
your Smart Ped. Once the lock is activated this will work even if you disconnect
your smartphone from the bike. To unlock the bike, just connect your
smartphone, press and hold the lock icon.
!
NOTE: the embedded electronic lock will not prevent thieves from stealing
your bike. Please use an additional mechanic lock during prolonged stops.
!
NOTE: the embedded electronic lock drains a little energy from the battery.
You can check the remaining energy on the lock screen of your smartphone.
4.3 Dashboard menu (Figure 6)
In this screen you can customize the motor assistance while pedalling (see
also 4.6), the amount of regenerative brake (KERS) and the units you prefer
to display speed and distance. Furthermore, you can perform the factory
reset of your Smart Ped by sliding the factory reset icon on the right side
of your screen.
For any modification performed in this screen the bike must be still (speed
must be 0 km/h).
4.4 Performing a factory reset on the Smart Ped
In order to perform a factory reset on your Smart Ped, please tap the
hyperlink “factory reset” on the dashboard menu. The app will ask you to
insert the pin of your bike to perform the factory reset.
This procedure will reset the bike name, the bike PIN and the e-mail
associated with your Smart Ped.
4. bitride HMI for Smart Ped
Even if it is possible to use the Smart Ped with out the bitride app, you can
access more features if you connect it to a smartphone.
To access the “ride” screen tap the hamburger menu on the upper left
side of the screen and select RIDE. To access the online dashboard please
connect to your Smart Ped by following the instruction in 3.6.
4.1 Using the dashboard (see Figure 6)
Page 15
28
29
Page 16

30
31
4.5 Wheel setup on your Smart Ped
Your Smart Ped let you choose between 2 power modes:
o PEDELEC25
o FUN
!
DISCLAIMER: “FUN” power mode can be only used on private properties
or closed circuits. This power mode does not comply the EU laws on Electric
Pedal Assisted biCycle (EPAC) and it may NOT be used on public streets.
You can easily customize 2 parameters for the PEDELEC25 power mode:
o KERS level (e-brake intensity): this parameter let you choose the
intensity of the e-brake. We suggest you to keep this parameter
always to the max value.
o Kick intensity: this parameter let you choose how much your kick
power is amplified by the motor. The motor assists you only during
your kick.
On the FUN power mode you have an additional parameter:
o Assistance duration: this parameter let you choose how much dis-
tance you cover with a single kick. The maximum distance is equivalentto 1km per kick on optimal riding conditions.
!
The intensive use of FUN power mode may result in overheating the
unit (see 4.7)
!
In both power modes, once the rider hit the brakes, the motor turns
into a e-brake istantaneously. If this does not happen please check your
e-brake settings and contact zehus customer service (see “After-sales
Service and Customer Care” on page 37).
4.6 Smart Ped motor settings
The range of the Smart Ped depends on many factors as:
o Motor settings
o Tire pressure
o Road conditions and route profile
o Head winds and ambient temperature
o Weight of the driver and luggage
o Age and using condition of the battery pack
o Rider pedaling effort
It is very difficult to predict a range for the different operational modes
indicated above.
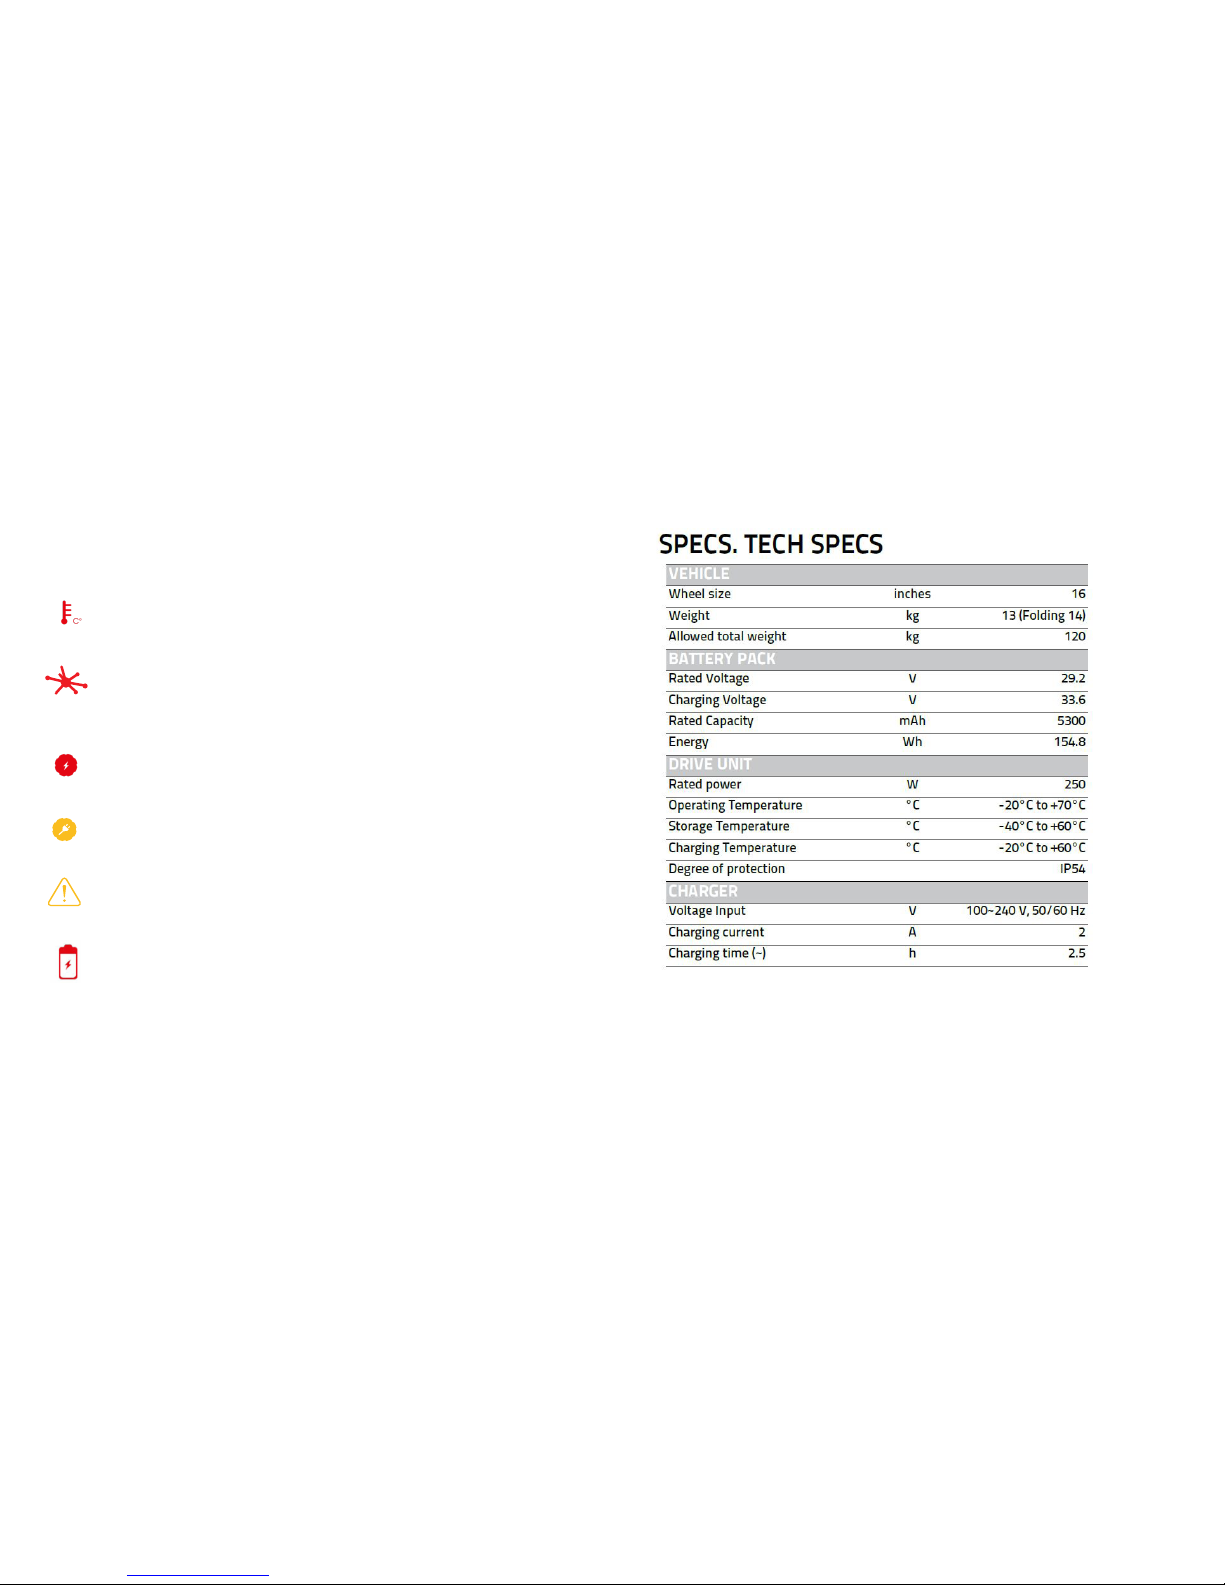
4.7 Smart Ped warning icons
Warning icons let you understand when there is something wrong with
your Smart Ped functioning (see 4.1). If you experience a problem that prevent you from using your Smart Ped correctly, please contact our customer care on our website or at [email protected]! Icons can appear both yellow
(warning) or Red (severe risk or damage).
The warning icons that can appear on the dashboard of your bitride app are
listed in the following page:
Page 17
32
33
Temperature WARNING
This icon appears when the temperature inside the hub reaches a critical level.
The system will automatically set the amount of power not to be damaged.
Connectivity WARNING
This icon appears when there is a connectivity problem with the wheel. Even if
the bluetooth is connecting to the bike, it could be possible to get this warning.
Powertrain WARNING
This icon appears when there is a problem with the electric powertrain. Please
contact us to get the powertrain xed!
WARNING icon
Tap on this generic Icon to be promped for the problem / useful info (e.g.
activation needed, scheduled manteinance, etc.)
Battery WARNING
This icon appears when there is a problem with the battery pack. Please
contact us to have your battery pack xed!
Charging WARNING
This icon appears when you are charging Smart Wheel.
bitride warning icons:
Page 18
34
35
1. Mechanical parts
1.1 Cleaning
o Mud and dust can be highly abrasive. Regular cleaning of the Smart
Ped, especially the electrical parts, help to maintain your Smart Ped
in good condition.
o Wipe the Smart Ped with wet cloth. Never flush the Smart Ped, the
electrical parts could be damaged.
o Always dry and lubricate your Smart Ped after washing to prevent
rust.
1.2 Lubrication
Keep your Smart Ped regularly lubricated to ensure good performance and
durability. Lubrication reduces friction and helps to protect against rust. All
bearings and other moving parts require regular appropriate lubrication:
o Grease type lubrication: bearings in head set, wheels, at least once
a year;
o Oil type lubrication: Brake and derailleur pivot; once a month.
Ask your dealer more information about correct lubricants for your
Smart Ped and parts.
!
CAUTION: NEVER LUBRICATE BRAKE PADS, RIMS AND TIRES!
1.3 Monthly operation
TAKING CARE OF YOUR Smart Ped
Page 19

36
37
TIRES AND TUBES
o Clean the tyres and check treads weariness.
o Remove any debris from tread or walls.
o Check tire pressure.
o Replace faulty tubes.
WHEELS
o Clean rims and check if they are dented or dimpled.
o Check rims alignment and spokes tension.
o Replace any bent or broken spoke.
BRAKES
o Check brake pad and brake lever fitting bolts.
o Check brake pads weariness and replace them if necessary
o Check the brake pad toe-in alignment.
BRAKE CABLE AND CABLE GUIDE
o Inspect all cable housing. Replace if damaged.
o Clean and examine all cable (kinks and frayed ends). Replace if nec-
essary.
o Adjust barrel adjusters and/or cable anchor bolts to compensate ca-
ble stretch.
HUBS
o Check front and rear hub bearings to prevent excess play or binding.
Fit cup-and-come bearings, tighten or release if necessary.
o Check if hubs are correctly lubricated.
o Tighten hub axle nuts and check any clamp.
GENERAL CONTROL
o Check frame alignment and any eventual dent or damage on the tubes.
o Check that all bolts, nuts and clamp are correctly fixed.
2. Electrical components
!
CAUTION: Every maintenance procedure (even cleaning the Smart Ped)
must be done without activating your Smart Ped (see 2.1) On the contrary,
severe injury may occur.
2.1 Cleaning the electrical component
The Smart Wheel
Please, keep the Smart Wheel clean. Clean it with a soft, damp cloth. The
Smart Wheel may not be immersed in water or cleaned with high pressure
cleaner. DO NOT use a high pressure water jet to clean The Smart Wheel.
For service, firmware upgrades, battery substitutions and repairs on the
hub, pleas refer to authorized Flykly dealers.
2.2 After-sales Service and Customer Care
In case of questions concerning your Smart Ped or one of its components
please read the FAQ on the Flykly website (www.flykly.it). In case you do
not find an answer, please or sending an e-mail to [email protected] .
Page 20

38
39
When contacting Flykly for an issue related to your Smart Ped please
provide one of the following information together with the problem
description:
o Registration e-mail for your Smart Ped
o Bike name
o Bike MAC address (it can be found in the bluetooth option on your
smartphone)
2.3 Transport
Item with internal battery packs are subject to Dangerous Goods Legislation requirements. Private users can transport such undamaged items by
road without further requirements.
When being transported by commercial users or third parties (e.g. air
transport or FWD agencies), special requirements on packaging and labeling must be observed (e.g. ADR regulations). If necessary, an expert for
hazardous materials can be consulted when preparing the item for shipping.
Dispatch your Smart Ped only when the housing is undamaged.
Tape or mask off the 6-pin connector in such a manner that the connector
itself cannot be damaged or broken. Inform your parcel service that the
package contains dangerous goods. Please also observe the possibility of
more detailed national regulations.
In case of questions concerning transport of the Smart Ped, please refer to
an authorized Flykly dealer.
Smart Ped dealers can also provide suitable transport packaging.
3. Notes on the battery pack
The battery pack is protected against deep discharging, overcharging,
overheating and short circuit through the Battery Management System
(BMS). In case of dangerous situation an electronic protection will switch
the battery pack off.
Although the battery pack is protected from deep discharging, it is recommended to fully charge the battery pack before the first use of the bike.
3.1 Charging your Smart Ped battery pack (see also 2.4)
The battery pack can be recharged at any time without shortening its lifespan. Interrupting the charging process does not damage the battery pack.
!
CAUTION: DO NOT charge a damaged Smart Ped. Please refer to an authorized Flykly dealer.
In order to recharge your Smart Ped connect the charger plug to the
charging connector located on the right side of the Smart Ped axle. Then
connect the charger plug to an outlet (see 2.4, Figure 5).
!
CAUTION: check the mains voltage: it must match the one indicated below
the charger itself!
The charging procedure will start as soon as the charger is connected both
to your Smart Ped and to the mains. While charging, the LED located on
the charger is red.
Page 21
40
41
!
Note: the system is deactivated while charging the battery pack.
When the charging procedure is over, the LED located on the charger turns
green. Disconnect the charger from the mains and from your Smart Ped.
Be careful when touching the charger, It can heat up considerably while
charging.
!
Note: Remember to seal the connector on the Smart Ped with the proper
protectioncap (see Figure 1). Using the Smart Ped without the protection cap
will void the warranty.
3.2 Battery pack storage conditions
Your Smart Ped has to be stored at the right temperature. The battery pack
life can be maximized by following the rules for a correct storage and handling.
In case of malfunctioning your battery pack will have to be replaced. Please
refer to a Flykly retailer to have your battery pack replaced.
!
Note: when not using the bike for long periods it is recommended to charge
the battery pack to 60% and to check the battery condition at least every 6
months. Before using the bike after a long period it is recommended to fully
charge the battery.
Store Your Smart Ped in a well-ventilated location, dry if possible. Pro-
tect the hub from moisture and water. The optimal storage temperature is
+20°C and the bike must be stored between -40°C and +60°C.
It is preferred not to leave the bike under the direct sunlight during hot
summer days.
3.3 Disposal
The Smart Ped and all its components should be sorted for environmental-friendly recycling.
Only for EC countries:
According to European Guideline 2012/19/EU, electrical devices/tools that
are no longer usable, and according to European Guideline 2006/66/EC,
defective or used battery packs/batteries the Smart Ped must be collected
separately and disposed of in an environmentally correct manner.
Subject to change without notice
2015-18 FlyKly, s.r.l.
©
 Loading...