

Flying Voice APX9102 User Manual

APX9102 User Manual
1
The APX9102
User Manual

APX9102 User Manual
2
Table of Contents
1 Prefac e ...............................................................................................................................................................................................................................................................................5
1.1 Declaration of Conformity ......................................................................................................................................................................................................................................5
1.1.1 Part 15 FCC Rules ..........................................................................................................................................................................................................................................5
1.1.2 Class B Digital Device or Perpheral ..................................................................................................................................................................................................................5
1.2 GNU GPL Information ...........................................................................................................................................................................................................................................6
1.3 Warning................................................................................................................................................................ ................................................................................................6
2 Overview ............................................................................................................................................................................................................................................................................7
2.1 LED Indicators and ports ........................................................................................................................................................................................................................................7
2.2 Hardware Installation .............................................................................................................................................................................................................................................8
3 Configuring Basic Settings .................................................................................................................................................................................................................................................. 10
3.1 Two-LevelManagement........................................................................................................................................................................................................................................ 10
3.2 AccessingWebPage .............................................................................................................................................................................................................................................. 10
3.2.1 From LAN port ............................................................................................................................................................................................................................................ 10
3.2.2 From WAN port ........................................................................................................................................................................................................................................... 10
3.3 Web Page ........................................................................................................................................................................................................................................................... 12
3.4 Setting up the Time Zone ...................................................................................................................................................................................................................................... 12
3.5 Setting up the Internet Connection ......................................................................................................................................................................................................................... 13
3.6 Setting up the Wireless Connection ........................................................................................................................................................................................................................ 13
3.6.1 Enable Wireless and Setting SSID ................................................................................................................................................................................................................... 14
3.6.2 Encryption ................................................................................................................................................................................................................................................... 14
4 Web Configuration ................................................................................................................................................................................................................................ ............................. 16
4.1 Login ................................................................................................................................................................................................................................................................. 16
4.2 Status ................................................................................................................................................................................................................................................................. 16
4.3 Network&Security ............................................................................................................................................................................................................................................... 17
4.3.1 WAN .......................................................................................................................................................................................................................................................... 17
4.3.2 LAN ........................................................................................................................................................................................................................................................... 22
4.3.3 MAC Clone ................................................................................................................................................................................................................................................. 24
4.3.4 VPN............................................................................................................................................................................................................................................................ 24
4.3.5 DMZ ........................................................................................................................................................................................................................................................... 26
4.3.6 DDNS Setting .............................................................................................................................................................................................................................................. 26
4.3.7 Port Forward ................................................................................................................................................................................................................................................ 27
4.3.8 Advance ...................................................................................................................................................................................................................................................... 28
4.3.9 Port Setting ................................................................ .................................................................................................................................................................................. 28
4.3.10 QoS ............................................................................................................................................................................................................................................................ 29
4.3.11 Routing ....................................................................................................................................................................................................................................................... 30
4.4 Wireless2.4GHz................................................................................................................................................................................................................................................... 31
4.4.1 Basic ........................................................................................................................................................................................................................................................... 31
4.4.2 Wireless Security .......................................................................................................................................................................................................................................... 33
4.4.3 WMM ......................................................................................................................................................................................................................................................... 35
4.4.4 WDS ........................................................................................................................................................................................................................................................... 36

APX9102 User Manual
3
4.4.5 WPS ........................................................................................................................................................................................................................................................... 36
4.4.6 StationInfo ................................................................................................................................................................................................................................ ................... 38
4.4.7 Advanced .................................................................................................................................................................................................................................................... 38
4.5 Wireless 5G ........................................................................................................................................................................................................................................................ 40
4.5.1 Basic ........................................................................................................................................................................................................................................................... 40
4.5.2 Wireless Security .......................................................................................................................................................................................................................................... 42
4.5.3 WMM ......................................................................................................................................................................................................................................................... 44
4.5.4 WDS ........................................................................................................................................................................................................................................................... 45
4.5.5 WPS ........................................................................................................................................................................................................................................................... 46
4.5.6 Station Info ................................................................ ................................................................................................................................................................ .................. 47
4.5.7 Advanced .................................................................................................................................................................................................................................................... 47
4.6 Application ......................................................................................................................................................................................................................................................... 49
4.6.1 UPnP .......................................................................................................................................................................................................................................................... 49
4.6.2 IGMP .......................................................................................................................................................................................................................................................... 49
4.6.3 Advance Nat ................................................................................................................................................................................................................................................ 50
4.7 Storage ................................................................ ................................................................................................................................................................ ............................... 50
4.7.1 Disk Management ................................................................................................................................................................................................................................ ......... 50
4.7.2 FTP Setting .................................................................................................................................................................................................................................................. 51
4.7.3 Smb Setting ................................................................................................................................................................................................................................................. 51
4.8 Administration .................................................................................................................................................................................................................................................... 52
4.8.1 Management ................................................................................................................................................................................................................................................ 52
4.8.2 Firmware Upgrade ........................................................................................................................................................................................................................................ 55
4.8.3 Provision ..................................................................................................................................................................................................................................................... 55
4.8.4 SNMP ......................................................................................................................................................................................................................................................... 56
4.8.5 TR069 ................................................................................................................................................................................................ ......................................................... 57
4.8.6 Diagnoisis.................................................................................................................................................................................................................................................... 58
4.8.7 Operation Mode............................................................................................................................................................................................................................................ 58
4.9 System Log ......................................................................................................................................................................................................................................................... 59
4.10 Logout................................................................................................................................................................................................................................................................ 59
4.11 Reboot................................................................................................................................................................................................................................................................ 60
5 IP PBX ............................................................................................................................................................................................................................................................................. 60
5.1AccessingWebPage ....................................................................................................................................................................................................................................................... 60
5.1.1 From LAN port ............................................................................................................................................................................................................................................ 60
5.1.2 From WAN port ........................................................................................................................................................................................................................................... 61
5.1.3 System Status ................................................................................................................................................................................................................................ ............... 61
5.1.4 Configure Hardware...................................................................................................................................................................................................................................... 62
5.1.5 Trunks ......................................................................................................................................................................................................................................................... 63
5.1.6 Outgoing Calling Rules ................................................................................................................................................................................................................................. 65
5.1.7 Dial Plan ..................................................................................................................................................................................................................................................... 67
5.1.8 Users........................................................................................................................................................................................................................................................... 67
5.1.9 Ring Groups................................................................................................................................................................................................................................................. 69
5.1.10 Voice Menu.................................................................................................................................................................................................................................................. 70
5.1.11 Time Intervals .............................................................................................................................................................................................................................................. 71

APX9102 User Manual
4
5.1.12 Incoming Calling Rules ................................................................................................................................................................................................................................. 72
5.1.13 Voicemail .................................................................................................................................................................................................................................................... 72
5.1.14 Paging/Intercom ........................................................................................................................................................................................................................................... 74
5.1.15 Conferencing................................................................................................................................................................................................................................................ 75
5.1.16 Follow Me ................................................................................................................................................................................................................................................... 76
5.1.17 Call Features ................................................................................................................................................................................................................................................ 77
5.1.18 Options........................................................................................................................................................................................................................................................ 77
5.1.19 Advanced Options ........................................................................................................................................................................................................................................ 78
5.1.20 Advanced Options -- SIP Settings ................................ ................................................................................................................................................................ ................... 79

APX9102 User Manual
5
1 Preface
Thank you for choosing APX9102 wireless PBX , APX9102 is a highly integrated, reliable, stable ,Wireless Mini device, which includes rich Router
and IP PBX functions. This manual introduces and describes how to install, how to configure and how to use APX9102.
This manual provides basic information on how to install and connect APX9102 wireless PBX with VoIP to the Internet. It also includes features
and functions of wirelessPBX with VoIP components, and how to use it correctly.
Before you can connect APX9102 to the Internet and use it, you must have a high-speed broadband connection installed. A high-speed
connection includes environments such as DSL, cable modem, and a leased line.
1.1 Declaration of Conformity
1.1.1 Part 15 FCC Rules
This device complies with Part 15 of the FCC Rules. Operation is subject to the following two conditions:
This device may not cause harmful interference, and
This device must accept any interference received, including interference that may cause undesired operation.
1.1.2 Class B Digital Device or Perpheral
Note: Changes or modifications not expressly approved by the party responsible for compliance could void the user‟s authority to operate the
equipment.
This equipment has been tested and found to comply with the limits for a Class B digital device, pursuant to Part 15 of the FCC Rules. These
limits are designed to provide reasonable protection against harmful interference in a residential installation. This equipme nt generates, uses and
can radiate radio frequency energy and, if not installed and used in accordance with the instructions, may cause harmful interference to radio
communications. However, there is no guarantee that interference will not occur in a particular installation.
If this equipment does cause harmful interference to radio or television reception, which can be determined by turning the equipment off and on,
the user is encouraged to try to correct the interference by one or more of the following measures:
Reorient or relocate the receiving antenna.
Increase the separation between the equipment and receiver.
Connect the equipment into an outlet on a circuit different from that to which the receiver is connected.
Consult the dealer or an experienced radio/TV technician for help.

APX9102 User Manual
6
1.2GNU GPL Information
APX9102 firmware contains third-party software under the GNU General Public License (GPL). FlyingVoice uses software under the specific
terms of the GPL. Please refer to the GPL for the exact terms and conditions of the license. The original GPL license, source code of
components licensed under GPL and used in FlyingVoice products can be downloaded online:
http://www.flyingvoice.com/index.php?m=content&c=index&a=lists&catid=169
1.3Warning
This device complies with Industry Canada license-exempt RSS standard. Operation is subject to the following two conditions: this device
may not cause interference, and this device must accept any interference, including interference that may cause undesired operation of the
device.
Le présent appareil est conforme aux CNR d'Industrie Canada applicables aux appareils radio exempts de licence.L'exploitation est autorisée aux
deux conditions suivantes : l'appareil ne doit pas produire de brouillage, etl'utilisateur de l'appareil doit accepter tout brouillage
radioélectrique subi, même si le brouillage est susceptible d'en compromettre le fonctionnemen.
This equipment must be installed and operated in accordance with provided instructions and the antenna used for this transmitter must be
installed to provide a separation distance of at least 20 cm from all persons and must not be co-located or operating in conjunction with any other
antenna or transmitter. End-users and installers must be provided with antenna installation instructions and transmitter operating conditions for
satisfying RF exposure compliance.

APX9102 User Manual
7
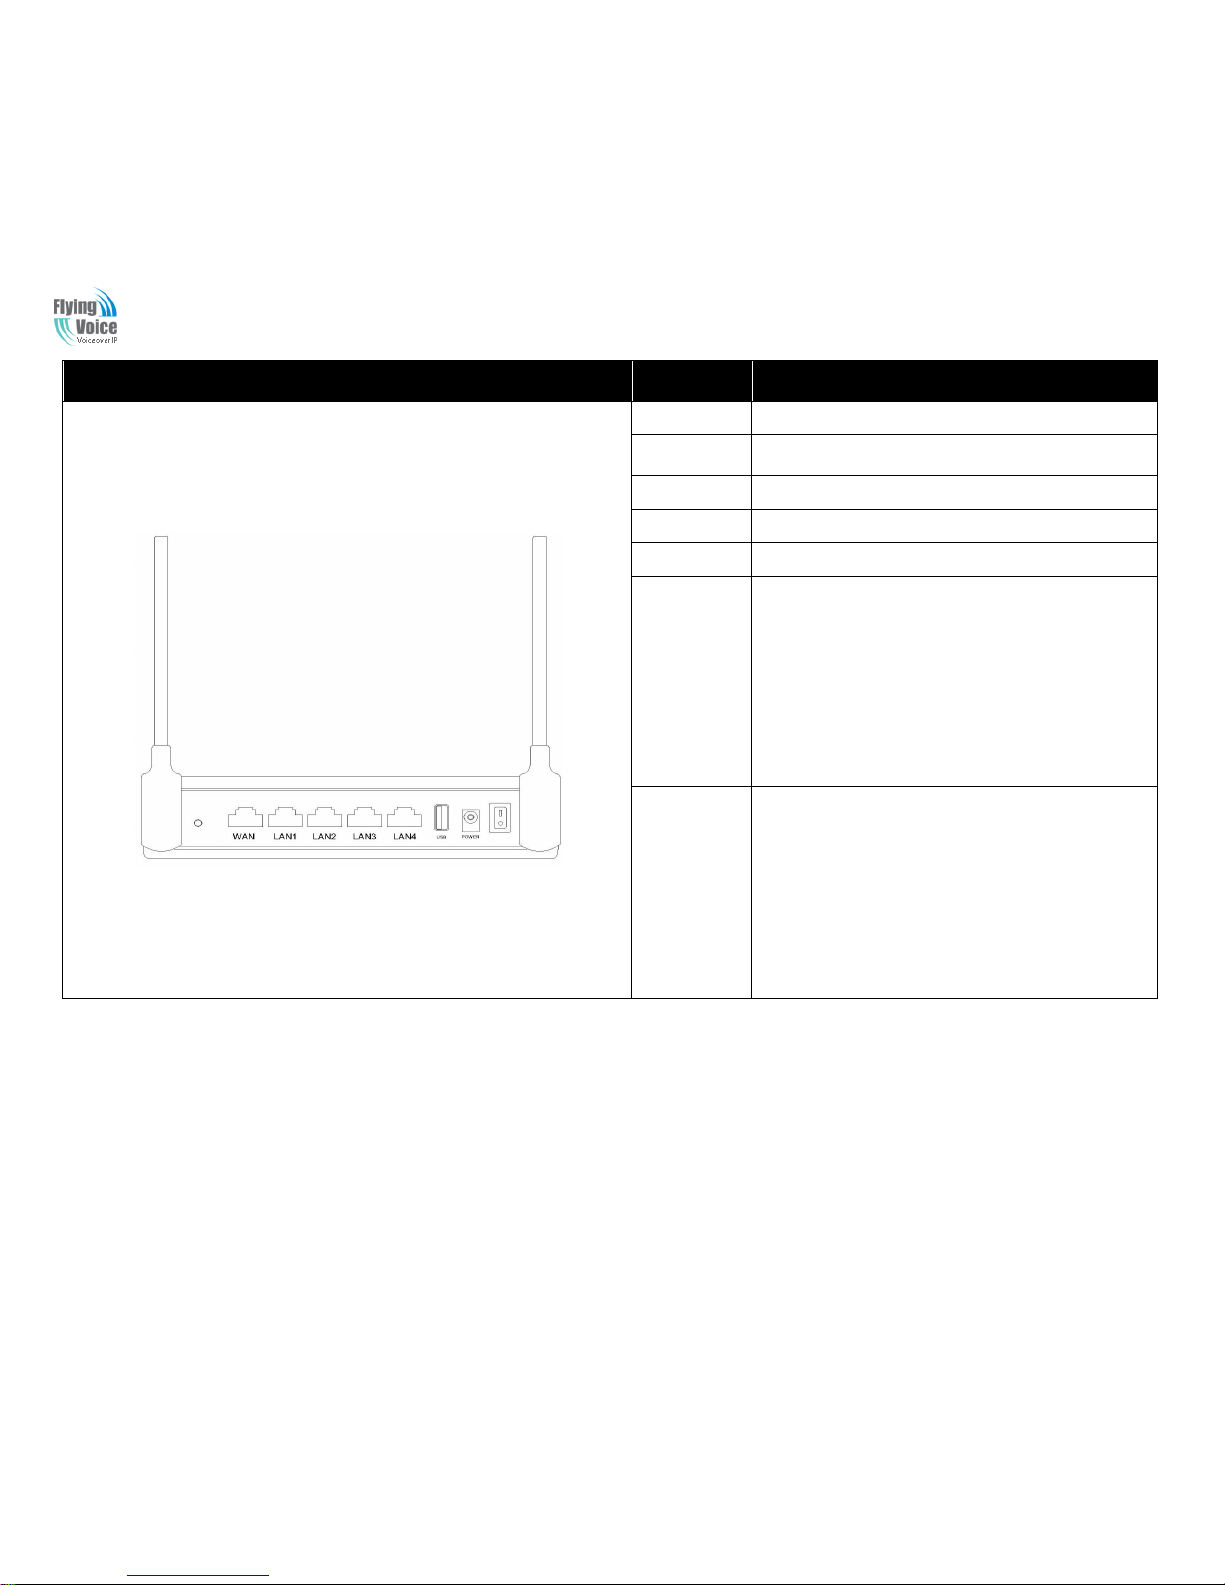
2 Overview
Before you use the high speed router, please get acquainted with the LED indicators and connectors first.
2.1 LED Indicators and ports
Front Panel
LED
Status
Explanation
22..44GG//55GG
OOnn ((GGrreeeenn))
WWiirreelleessss aacccceessss ppooiinntt iiss rreeaaddyy..
BBlliinnkkiinngg
((GGrreeeenn))
IItt wwiillll bblliinnkk wwhhiillee wwiirreelleessss ttrraaffffiicc ggooeess
tthhrroouugghh..
LLAANN
11//22//33//44
OOnn
((GGrreeeenn))
TThhee ppoorrtt iiss ccoonnnneecctteedd wwiitthh 110000MMbbppss..
OOffff TThhee ppoorrtt iiss ddiissccoonnnneecctteedd..
BBlliinnkkiinngg
((GGrreeeenn))
TThhee ddaattaa iiss ttrraannssmmiittttiinngg..
WWAANN
OOnn((GGrreeeenn))
TThhee ppoorrtt iiss ccoonnnneecctteedd wwiitthh 110000MMbbppss..
OOffff TThhee ppoorrtt iiss ddiissccoonnnneecctteedd..
BBlliinnkkiinngg((GGrreee
e
nn))
IItt wwiillll bblliinnkk wwhhiillee ttrraannssmmiittttiinngg ddaattaa..
PPOOWWEERR
OOnn((RReedd))
TThhee rroouutteerr iiss ppoowweerreedd oonn aanndd rruunnnniinngg
nnoorrmmaallllyy..
OOffff TThhee rroouutteerr iiss ppoowweerreedd ooffff..
UUSSBB
OOnn((GGrreeeenn))
CCoonnnneecctt ttoo tthhee uussbb ddeevviiccee..
OOffff TThhee ppoorrtt iiss ddiissccoonnnneecctteedd..
APX9102 User Manual
8
2.2 Hardware Installation
Before starting to configure the router, you have to connect your devices correctly.
Step 1.Connect Line port to land line jack with a PSTN RJ-11 cable.
Step 2.Connect the WAN port to a modem or switch or router or Internet with an Ethernet cable.
Step 3.Connect one port of 4 LAN ports to your computer with a RJ-45 cable. This device allows you to connect 4 PCs directly.
Back Panel
Interface
Description
OONN//OOFFFF
PPoowweerr SSwwiittcchh..
DDCC
1122VV//22AA
CCoonnnneeccttoorr ffoorr aa ppoowweerr aaddaapptteerr..
UUSSBB CCoonnnneecctt ttoo tthhee uussbb ddeevviiccee..
WWAANN
CCoonnnneeccttoorr ffoorr aacccceessssiinngg tthhee IInntteerrnneett..
RRSSTT FFaaccttoorryy RReesseett
FFXXOO
((SSiiddee PPaanneell ))
((11//22))
CCoonnnneecctt ttoo tthhee PPSSTTNN pphhoonnee lliinnee..
LLAANN
((11//22//33//44))
CCoonnnneeccttoorrss ffoorr llooccaall nneettwwoorrkkeedd ddeevviicceess..

APX9102 User Manual
9
Step 4.Connect one end of the power cord to the power port of this device. Connect the other end to the wall outlet of electricity.
Step 5.Push the ON/OFF button to power on the router.
Step 6.Check the Power and WAN, LAN LEDs to assure network connections.
Warning: Please do not attempt to use other different power adapter or cut off power supply during configuration or updating the device VoIP home
gateway. Using other power adapter may damage the device and will void the manufacturer warranty.
Warning:changes or modifications not expressly approved by the party responsible for compliance could void the user’s authority to operate the
equipment.
This equipment has been tested and found to comply with the limits for a Class B digital device, pursuant to Part 15 of the FCC Rules. These limits
are designed to provide reasonable protection against harmful interference in a residential installation. This equipment generates, uses and can
radiate radio frequency energy and, if not installed and used in accordance with the instructions, may cause harmful interference to radio
communications. However, there is no guarantee that interference will not occur in a particular installation.
If this equipment does cause harmful interference to radio or television reception, which can be determined by turning the equipment off and on,
the user is encouraged to try to correct the interference by one or more of the following measures:
-- Reorient or relocate the receiving antenna.
-- Increase the separation between the equipment and receiver.
-- Connect the equipment into an outlet on a circuit different from that to which the receiver is connected.
-- Consult the dealer or an experienced radio/TV technician for help.
APX9102 User Manual
10
3 Configuring Basic Settings
3.1 Two-LevelManagement
This chapter explains how to setup a password for an administrator/root user and how to adjust basic/advanced settings for accessing Internet
successfully.APX9102 supports two-level management: administrator and user. For administratormode operation, please type “admin/admin” on
Username/Password and click Login button to configuration.While for user mode operation, please type “user/user” on Username/Password and
click Login button for full configuration.
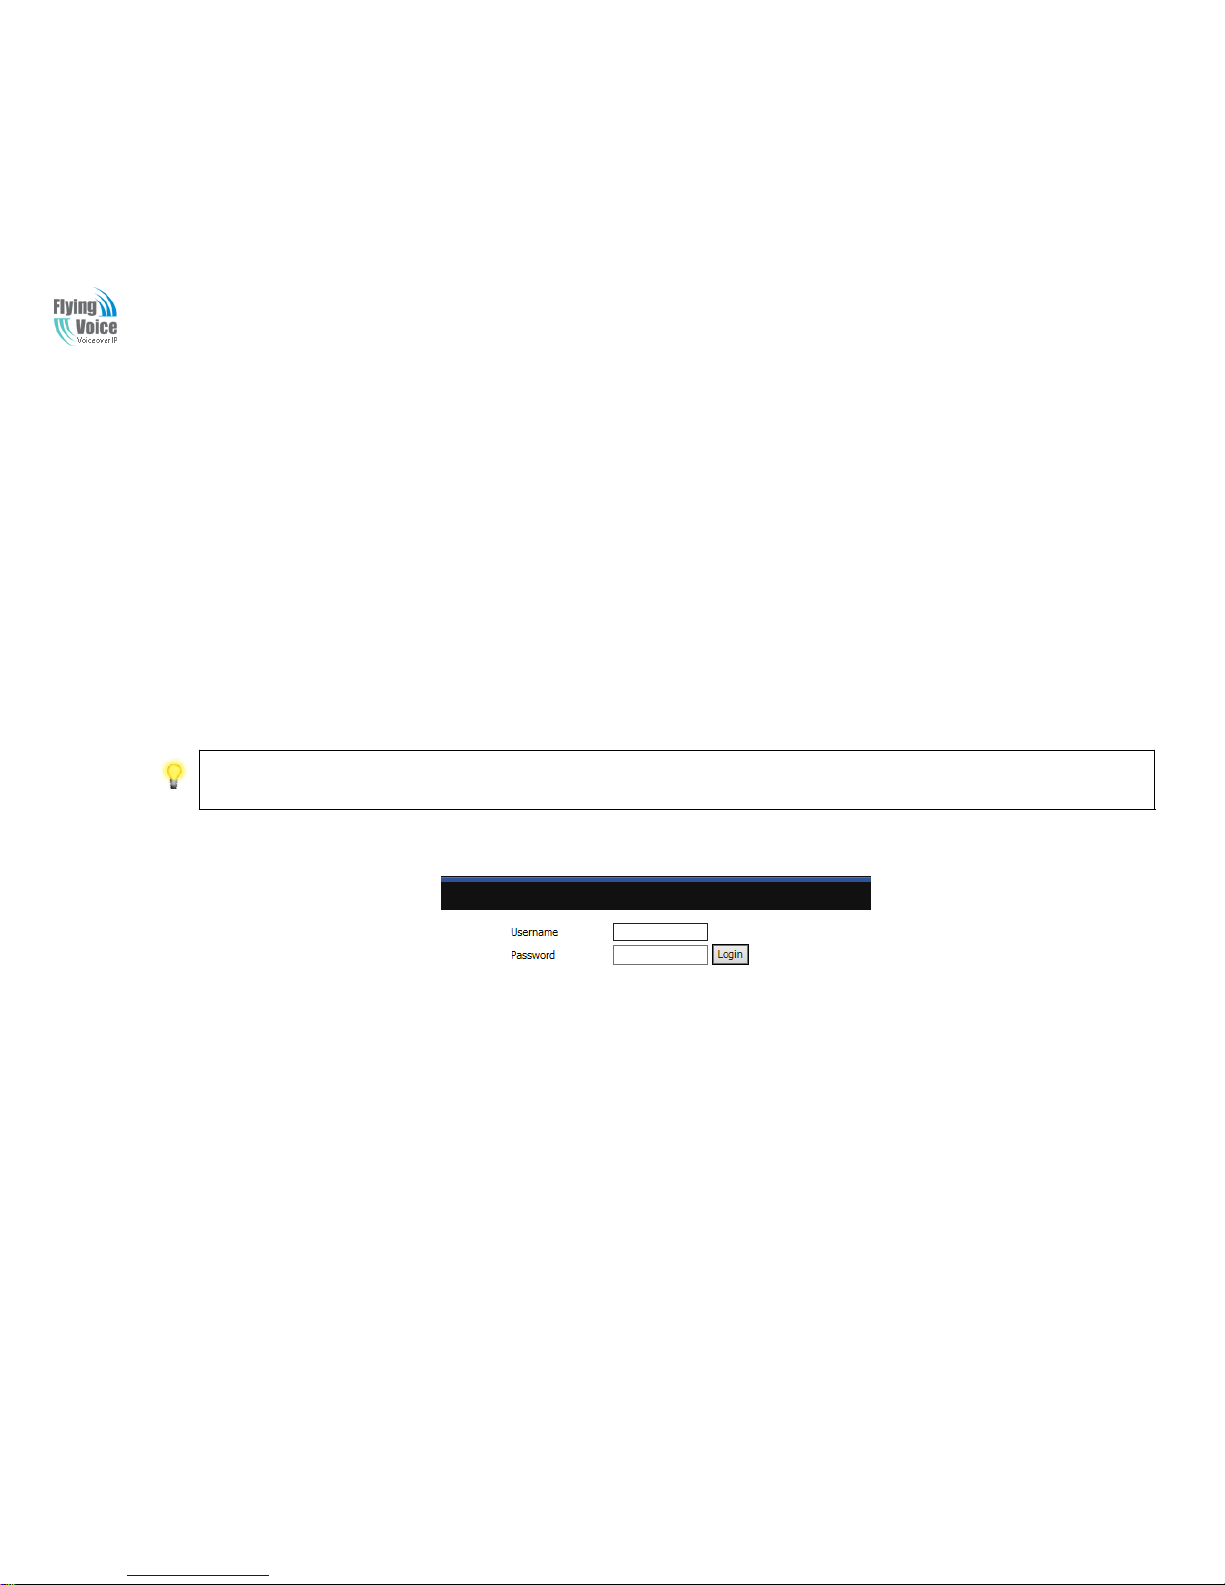
AccessingWebPage.
3.1.1 From LAN port
11.. MMaakkee ssuurree yyoouurr PPCC hhaavvee ccoonnnneecctteedd ttoo tthhee AAPPXX9911002
2
‟
‟
ss LLAANN ppoorrtt ccoorrrreeccttllyy..
Notice:YoumayeithersimplysetupyourcomputertogetIPdynamicallyfromtherouterorsetuptheIPaddressofthecomputertobethesamesubnetas the
defaultIPaddressofrouter is 192.168.1.1.Port is 8080.
22.. OOppeenn aa wweebb bbrroowwsseerr oonn yyoouurr PPCC aanndd ttyyppee hhttttpp::////119922..116688..11..11::88008800.. TThhee ffoolllloowwiinngg wwiinnddooww wwiillll bbee ooppeenn ttoo aasskk ffoorr uusseerrnnaammee aanndd
ppaasssswwoorrdd,,aanndd yyoouu ccaann cchhoooossee llaanngguuaaggee..
33.. FFoorr aaddmmiinniissttrraattoorrmmooddee ooppeerraattiioonn,, pplleeaassee ttyyppee
“
“
aaddmmiinn//aaddmmiin
n
”
”
oonn UUsseerrnnaammee//PPaasssswwoorrdd aanndd cclliicckk LLooggiinn ttoo ccoonnffiigguurraattiioonn..YYeett,, ffoorr rroooott uusseerr
mmooddee ooppeerraattiioonn,, pplleeaassee ttyyppee
“
“
uusseerr//uusseer
r
”
”
oonn UUsseerrnnaammee//PPaasssswwoorrdd aanndd cclliicckk LLooggiinn ffoorr ffuullll ccoonnffiigguurraattiioonn..
44.. TThhee wweebb ppaaggee ccaann bbee llooggggeedd oouutt aafftteerr 55 mmiinnuutteess wwiitthhoouutt aannyy ooppeerraattiioonn..
3.1.2 From WAN port
11.. MMaakkee ssuurree yyoouurr PPCC ccaann ccoonnnneecctt ttoo tthhee rroouutteer
r
‟
‟
ss WWAANN ppoorrtt ccoorrrreeccttllyy..

APX9102 User Manual
11
22.. GGeettttiinngg tthhee IIPP aaddddrreesssseess ooff WWAANN ppoorrtt uussiinngg vvooiiccee pprroommpptt..
33.. OOppeenn aa wweebb bbrroowwsseerr oonn yyoouurr PPCC aanndd ttyyppe
e
“
“
hhttttpp::///
/XXX.XXX.XXX.XXX:8080”. TThhee ffoolllloowwiinngg wwiinnddooww wwiillll bbee ooppeenn ttoo aasskk ffoorr uusseerrnnaammee aanndd
ppaasssswwoorrdd..
44.. FFoorr aaddmmiinniissttrraattoorrmmooddee ooppeerraattiioonn,, pplleeaassee ttyyppee
“
“
aaddmmiinn//aaddmmiin
n
”
”
oonn UUsseerrnnaammee//PPaasssswwoorrdd aanndd cclliicckk LLooggiinn ttoo ccoonnffiigguurraattiioonn..YYeett,, ffoorr rroooott
uusseerr mmooddee ooppeerraattiioonn,, pplleeaassee ttyyppee
“
“
uusseerr//uusseer
r
”
”
oonn UUsseerrnnaammee//PPaasssswwoorrdd aanndd cclliicckk LLooggiinn ffoorr ffuullll ccoonnffiigguurraattiioonn..
55.. TThhee wweebb ppaaggee ccaann bbee llooggggeedd oouutt aafftteerr 55 mmiinnuutteess wwiitthhoouutt aannyy ooppeerraattiioonn..
APX9102 User Manual
12
3.2 Web Page
NO.
Field
Name
Description
1
Navigati
on bar
Clicknavigation bar, many
sub-navigation bar will appear in
the place 2
2
Title
Click sub-navigation bar to
choose one configuration page
3
Paramete
r
To configuration the parameters
Save
1.Every time making some
changes, user should press this
button to confirm the changes.
2.After pressing the button, the
redwill appear to notice
rebooting
Cancel
To cancel the changes.
Reboot
Press it to reboot the router
3.3 Setting up the Time Zone

APX9102 User Manual
13
Open Administration/Management webpage as shown left, please
select the Time Zone for the router installed and specify the NTP
server and set the update interval in NTP synchronization.
3.4 Setting up the Internet Connection
FFrroomm WWAANN ppaaggee,, MMuullttii wwaann ccoonnnneeccttiioonn ccoouulldd bbee bbuuiilltt oorr ddeetteetteedd..
Field Name
Description
WAN IP Mode
Choose Internet connection mode.
LAN Connection
Mode
Local network connection mode.
DNS Mode
The default is Manual.
Primary DNS
Address
The primary DNS of Internet port.
Secondary DNS
Address
The secondary DNS of Internet port.
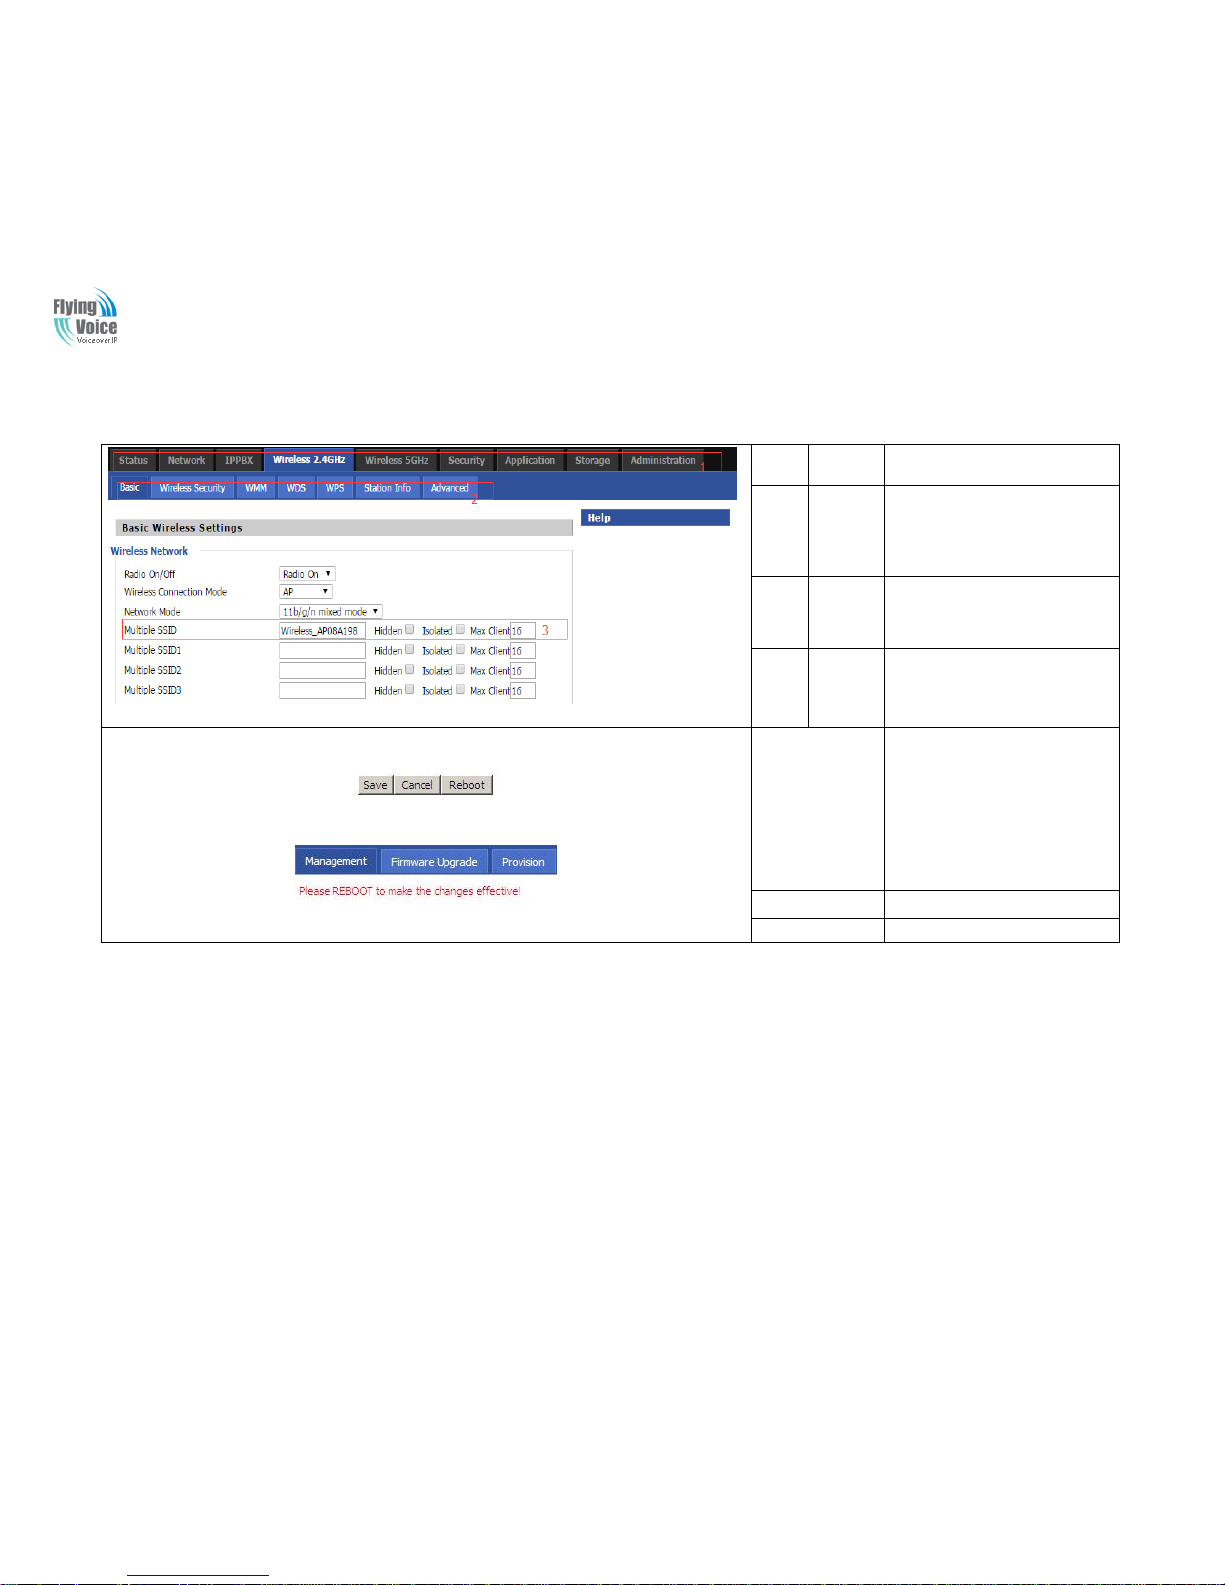
3.5 Setting up the Wireless Connection
TToo sseett uupp tthhee wwiirreelleessss ccoonnnneeccttiioonn,, pplleeaassee sskkiipp tthhee ffoolllloowwiinngg sstteeppss..

APX9102 User Manual
14
3.5.1 Enable Wireless and Setting SSID
OOppeenn WWiirreelleessss//BBaassiicc wweebb ppaaggee aass sshhoowwnn bbeellooww
Field Name
Description
Radio On/Off
Select “Radio Off” to disable wireless.
Select “Radio on”to enable wireless.
Wireless
Connection
Mode
AP
Repeater
Network Mode
Choose one network mode from the drop
down list.
SSID
The name of the wireless name, it can be any
text numbers or various special characters.
Multiple
SSSD1-3
Set more wireless network.
Frequency
Choose channel frequency.
3.5.2 Encryption
OOppeenn WWiirreelleessss//WWiirreelleessss SSeeccuurriittyy wweebbppaaggee ttoo sseett tthhee eennccrryyppttiioonn ooff rroouutteerrss..

APX9102 User Manual
15
Field Name
Description
SSID Choice
Choose one SSID from Off-premises 1,
off-premises 2 and Premises.
Security
Mode
Select an appropriate encryption mode to improve
the security and privacy of your wireless data
packets.
Each encryption mode will bring out different web
page and ask you to offer additional configuration.
APX9102 User Manual
16
4 Web Configuration
TThhiiss cchhaapptteerr wwiillll gguuiiddee uusseerrss ttoo eexxeeccuuttee aaddvvaanncceedd((ffuullll)) ccoonnffiigguurraattiioonn tthhrroouugghh aaddmmiinn mmooddee ooppeerraattiioonn..
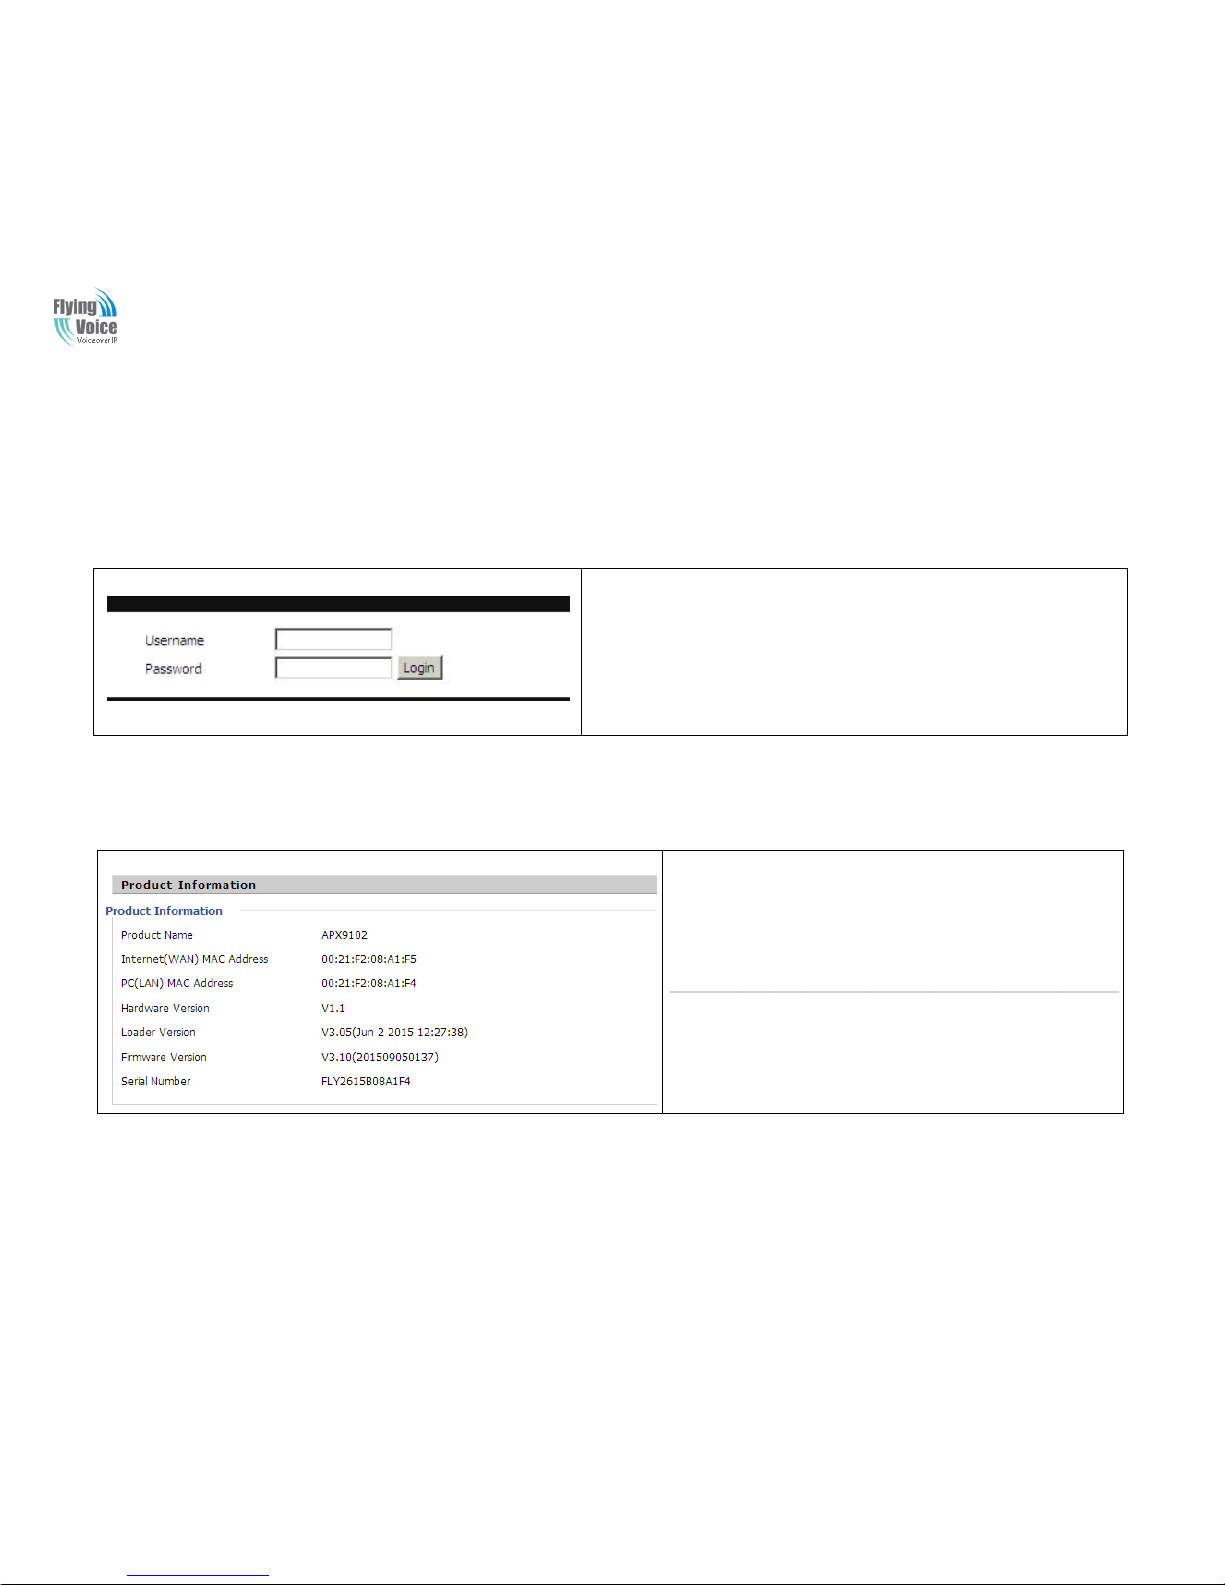
4.1 Login
Step 1.Connect the LAN port of the router to your PC.
Step 2.Open a web browser on your PC and type in http://192.168.1.1:8080. The
window
will ask for typing username and password. And you can choose language, too.
Step 3.Please type “admin/admin” o n User name/Password for ad ministration
operation.
4.2 Status
Product Information:
It shows the basic information of the product.
APX9102 User Manual
17
Network Status:
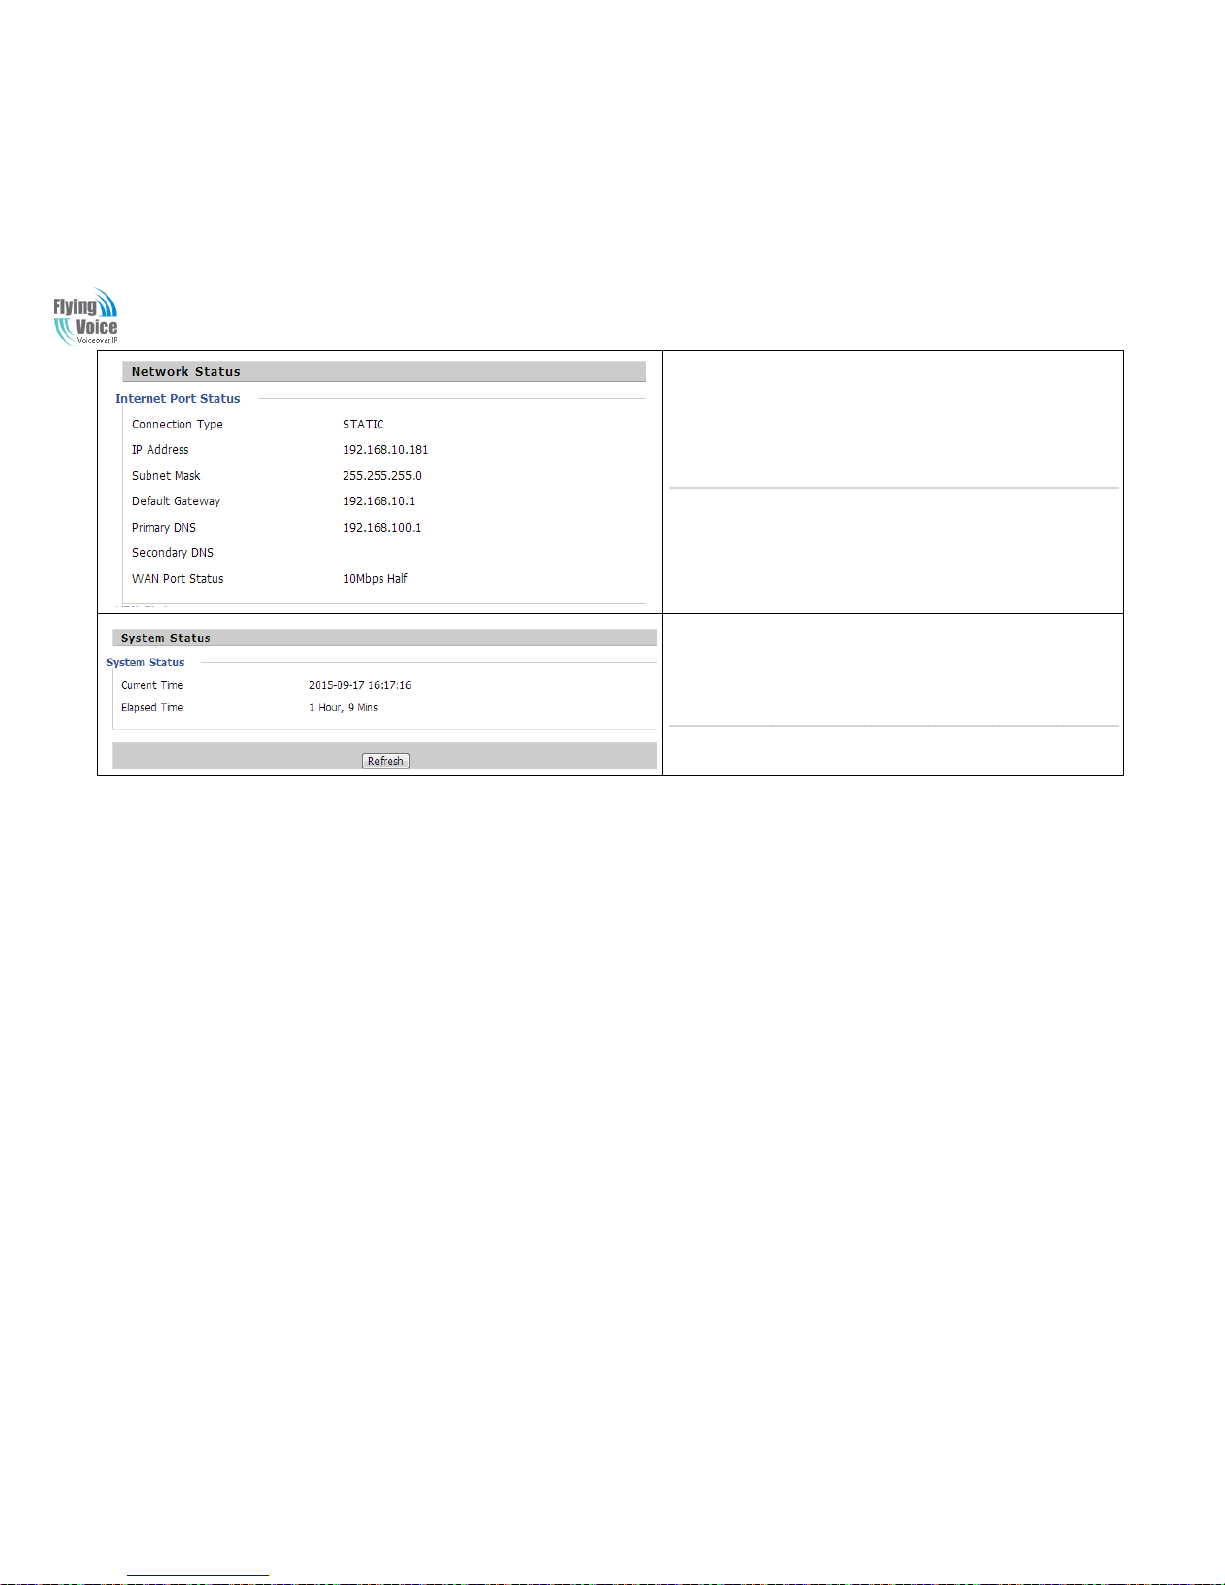
It shows the information of Internet Port,WIFI and PC port.
System Status:
It shows the current time and the running time of the product.
4.3 Network&Security
YYoouu ccaann ccoonnffiigguurraattiioonn tthhee WWAANN ppoorrtt,, LLAANN ppoorrtt,, DDDDNNSS,, MMuullttii WWAANN,,DDMMZZ,, MMAACC CClloonnee,, PPoorrtt FFoorrwwaarrdd aanndd ssoo oonn iinn tthheessee ttwwoo bbaarrss..
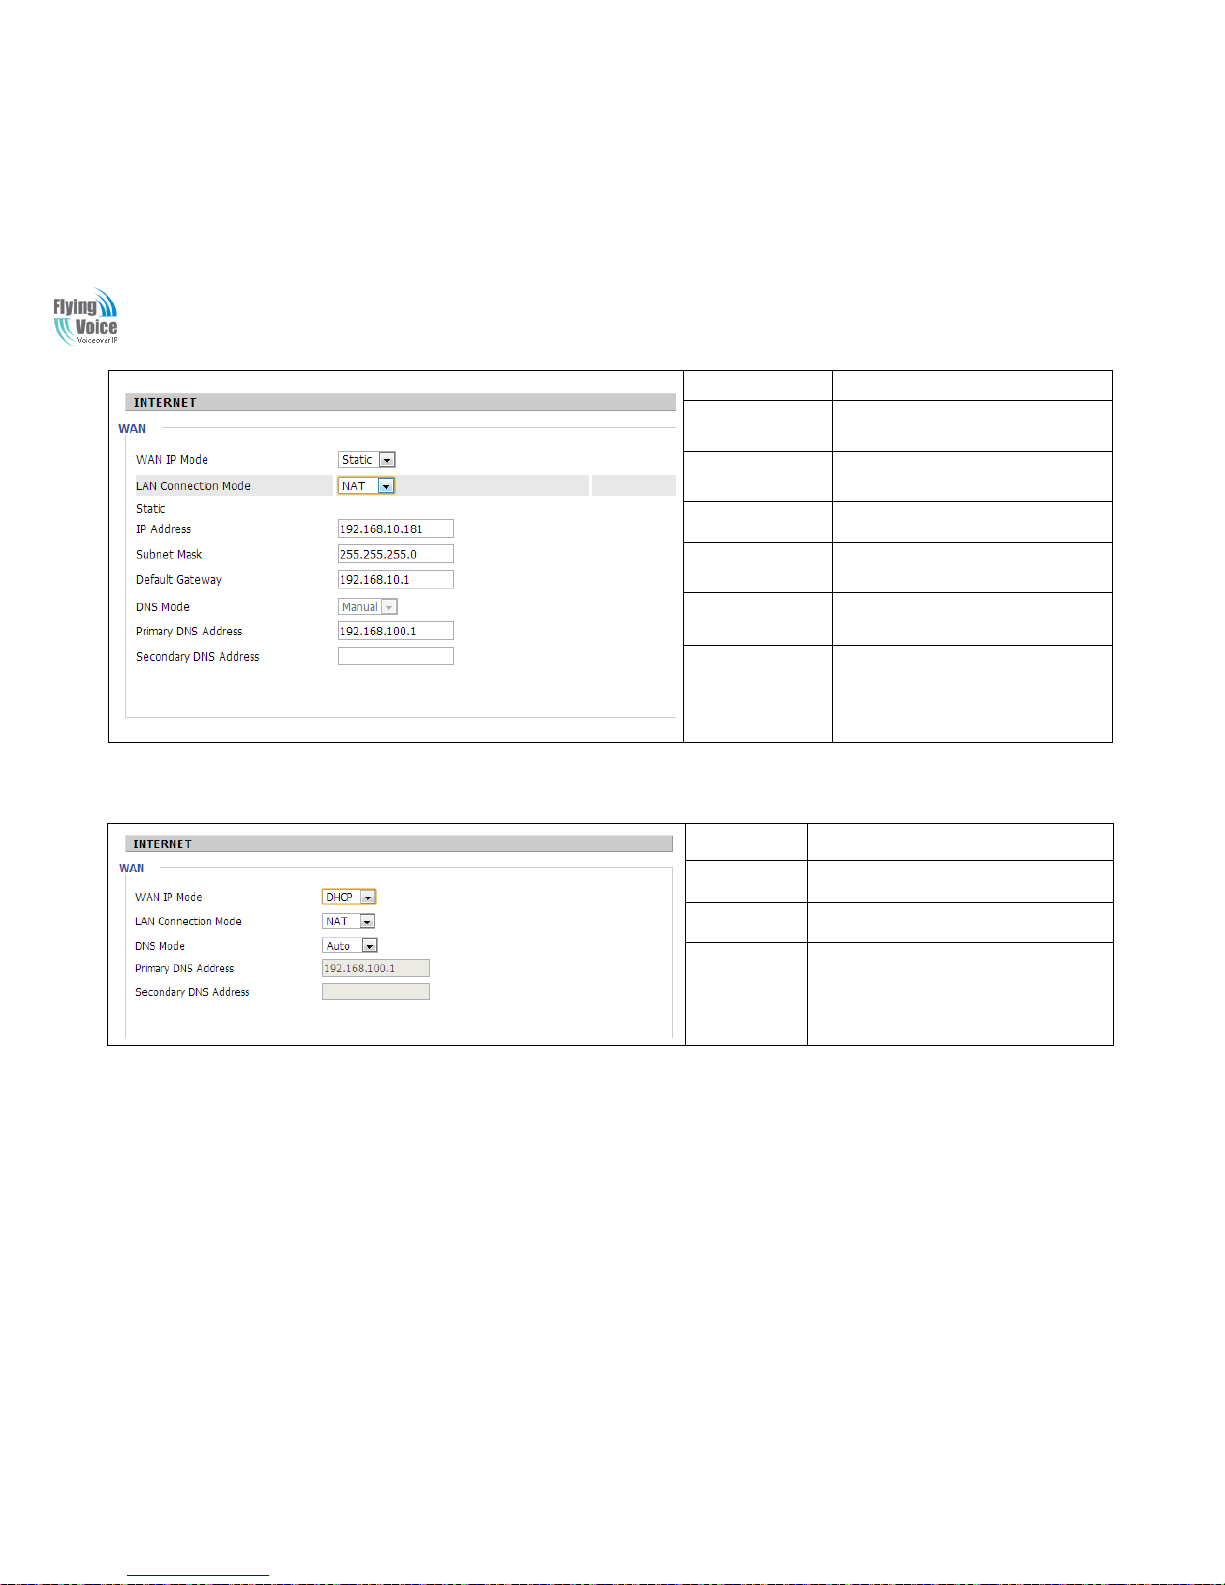
4.3.1 WAN
TThhiiss ppaaggee aalllloowwss yyoouu ttoo sseett WWAANN ccoonnffiigguurraattiioonn wwiitthh ddiiffffeerreenntt mmooddeess.. UUssee tthhee CCoonnnneeccttiioonn TTyyppee ddrroopp ddoowwnn lliisstt ttoo cchhoooossee oonnee WWAANN mmooddee aanndd
tthheenn tthhee ccoorrrreessppoonnddiinngg ppaaggee wwiillll bbee ddiissppllaayyeedd..
11.. SSttaattiicc IIPP
YYoouu wwiillll rreecceeiivvee aa ffiixxeedd ppuubblliicc IIPP aaddddrreessss oorr aa ppuubblliicc ssuubbnneett,, nnaammeellyy mmuullttiippllee ppuubblliicc IIPP aaddddrreesssseess ffrroomm yyoouurr DDSSLL oorr CCaabbllee IISSPP sseerrvviiccee pprroovviiddeerrss..
IInn mmoosstt ccaasseess,, aa CCaabbllee sseerrvviiccee pprroovviiddeerr wwiillll ooffffeerr aa ffiixxeedd ppuubblliicc IIPP,, wwhhiillee aa DDSSLL sseerrvviiccee pprroovviiddeerr wwiillll ooffffeerr aa ppuubblliicc ssuubbnneett.. IIff yyoouu hhaavvee aa ppuubblliicc
ssuubbnneett,, yyoouu ccoouulldd aassssiiggnn aann IIPP aaddddrreessss ttoo tthhee WWAANN iinntteerrffaaccee..
APX9102 User Manual
18
Field Name
Description
IP Address
The IP address of Internet port
Subnet Mask
The subnet mask of Internet port.
Default Gateway
The default gateway of Internet port.
DNS Mode
In Static mode, user need set the DNS
manually.
Primary DNS
Address
The primary DNS of Internet port.
Secondary DNS
Address
The secondary DNS of Internet port.
22.. DDHHCCPP
IItt iiss nnoott nneecceessssaarryy ffoorr yyoouu ttoo ttyyppee aannyy IIPP aaddddrreessss mmaannuuaallllyy.. SSiimmppllyy cchhoooossee tthhiiss ttyyppee aanndd tthhee ssyysstteemm wwiillll oobbttaaiinn tthhee IIPP aaddddrreessss aauuttoommaattiiccaallllyy ffrroomm
DDHHCCPP sseerrvveerr..
Field Name
Description
DNS Mode
The Default is Manual
Primary DNS
Address
The primary DNS of Internet port.
Secondary DNS
Address
The secondary DNS of Internet port.
33.. PPPPPPooEE
PPPPPPooEE ssttaannddss ffoorr PPooiinntt--ttoo--PPooiinntt PPrroottooccooll oovveerr EEtthheerrnneett.. IItt rreelliieess oonn ttwwoo wwiiddeellyy aacccceepptteedd ssttaannddaarrddss:: PPPPPP aanndd EEtthheerrnneett.. IItt ccoonnnneeccttss uusseerrss
tthhrroouugghh aann EEtthheerrnneett ttoo tthhee IInntteerrnneett wwiitthh aa ccoommmmoonn bbrrooaaddbbaanndd mmeeddiiuumm,, ssuucchh aass aa ssiinnggllee DDSSLL lliinnee,, wwiirreelleessss ddeevviiccee oorr ccaabbllee mmooddeemm.. AAllll tthhee uusseerrss
oovveerr tthhee EEtthheerrnneett ccaann sshhaarree aa ccoommmmoonn ccoonnnneeccttiioonn..
PPPPPPooEE iiss uusseedd ffoorr mmoosstt ooff DDSSLL mmooddeemm uusseerrss.. AAllll llooccaall uusseerrss ccaann sshhaarree oonnee PPPPPPooEE ccoonnnneeccttiioonn ffoorr aacccceessssiinngg tthhee IInntteerrnneett.. YYoouurr sseerrvviiccee pprroovviiddeerr
wwiillll pprroovviiddee yyoouu iinnffoorrmmaattiioonn aabboouutt uusseerr nnaammee,, ppaasssswwoorrdd,, aanndd aauutthheennttiiccaattiioonn mmooddee..

APX9102 User Manual
19
Field Name
Description
PPPoE
Account
Assign a valid user name provided by the ISP
PPPoE
Password
Assign a valid password provided by the ISP
Confirm
Password
Enter your PPPoE password again
Operation
Mode
Select the mode of operation, options are Keep Alive, On
Demand and Manual:
1.When the mode is Keep Alive, user need to set the 'keep
alive redial period' values range from 0 to 3600s, the
default setting is 5 minutes;
2. When the mode is On Demand, user need to set the 'on
demand idle time' value in the range of 0-60 minutes, the
default setting is 5 minutes;
3.
When the mode is Manual, no need to do other settings.
Keep Alive
Redial
Period
Set the interval to send Keep Alive
44.. BBrriiddggee MMooddee
BBrriiddggee MMooddee uunnddeerr MMuullttii WWAANN iiss ddiiffffeerreenntt wwiitthh ttrraaddiittiioonnaall bbrriiddggee sseettttiinngg.. BBrriiddggee mmooddee hhaass nnoo iipp aaddddrreessss aanndd oonnllyy wwoorrkk aass aa bbrriiddggee bbeettwweeeenn WWAANN
ppoorrtt aanndd LLAANN ppoorrtt.. SSoo RRoouuttee CCoonnnneeccttiioonn hhaass ttoo bbee bbuuiilldd ttoo ggiivvee iipp aaddddrreessss ttoo llooccaall sseerrvviiccee oonn ddeevviiccee..
Select Advanced Mode

APX9102 User Manual
20
Field Name
Description
Bridge
Type
IP Bridge
Allow all ethernet packets pass. PC could
connect to upper network directly.
PPPoE
Bridge
Only Allow PPPoE packets pass. PC need
PPPoE dial-up software.
Hardware
IP Bridge
Packets pass through hardware switch with
wired speed. Do not support wireless port
bind.
DHCP
Service
Type
Pass
Through
Dhcp packets can be forwarded between
WAN and LAN, dhcp server in gateway will
not allocate IP to hosts of LAN port.
DHCP
Snooping
When gateway forwards dhcp packets form
LAN to WAN it will add option82 to dhcp
packet, and it will remove option82 when
forward dhcp packet form WAN to LAN.
Local dhcp service will not allocate ip to
hosts of LAN port.
Local
Service
Gateway will not forward dhcp packets
between Lan and Wan, it also block dhcp
packet from WAN port. HostsofLAN port can
get ip from dhcp server run in gateway.
VLAN
Mode
Disable
The WAN interface is untagged. LAN is
untagged.
Enable
The WAN interface is tagged. LAN is
untagged.
Trunk
Only valid in bridge mode. All ports,
include WAN and LAN, belong to this VLAN
Id and all ports are tagged in this VLAN Id.
Tagged packets could pass
through WAN and LAN.
VVLLAANN IID
D
Set the VLAN ID.

APX9102 User Manual
21
55.. CCoonnnneecctt NNaammee aanndd SSeerrvviiccee
CCoonnnneecctt NNaammee TTaabbllee iiss aass bbeellooww::
Content
Define
Comment
No
1~99
WAN Connection id
Service
TR069
The connection only support
management application, like TR069,
WEB, SNMP and Provision
INTERNET
The connection only support
internet service
TR069_INTERNET
The connection support management
and internet application
VOICE
The connection only support voice
application, like sip and rtp
TR069_VOICE
The connection support both
management and voice application
VOICE_INTERNET
The connection support voice and
internet application
TR069_VOICE_INTERNET
The connection support management,
voice and internet application
Other
The connection support STB
NAT Mode
B
Bridge
R
Router
VLAN ID
VID
VLAN ID
FFoorr eexxaammppllee::
11.. 11__TTRR006699__RR__VVIIDD__22 ((FFiirrsstt IInntteerrffaaccee,, SSeerrvviiccee iiss TTRR006699,, NNAATT MMooddee,, VVLLAANN IIDD iiss 22))
22.. 22__IINNTTEERRNNEETT__BB__VVIIDD__((SSeeccoonndd IInntteerrffaaccee,, SSeerrvviiccee iiss IINNTTEERRNNEETT,, BBrriiddggee MMooddee,, VVLLAANN iiss ddiissaabblleedd))

APX9102 User Manual
22
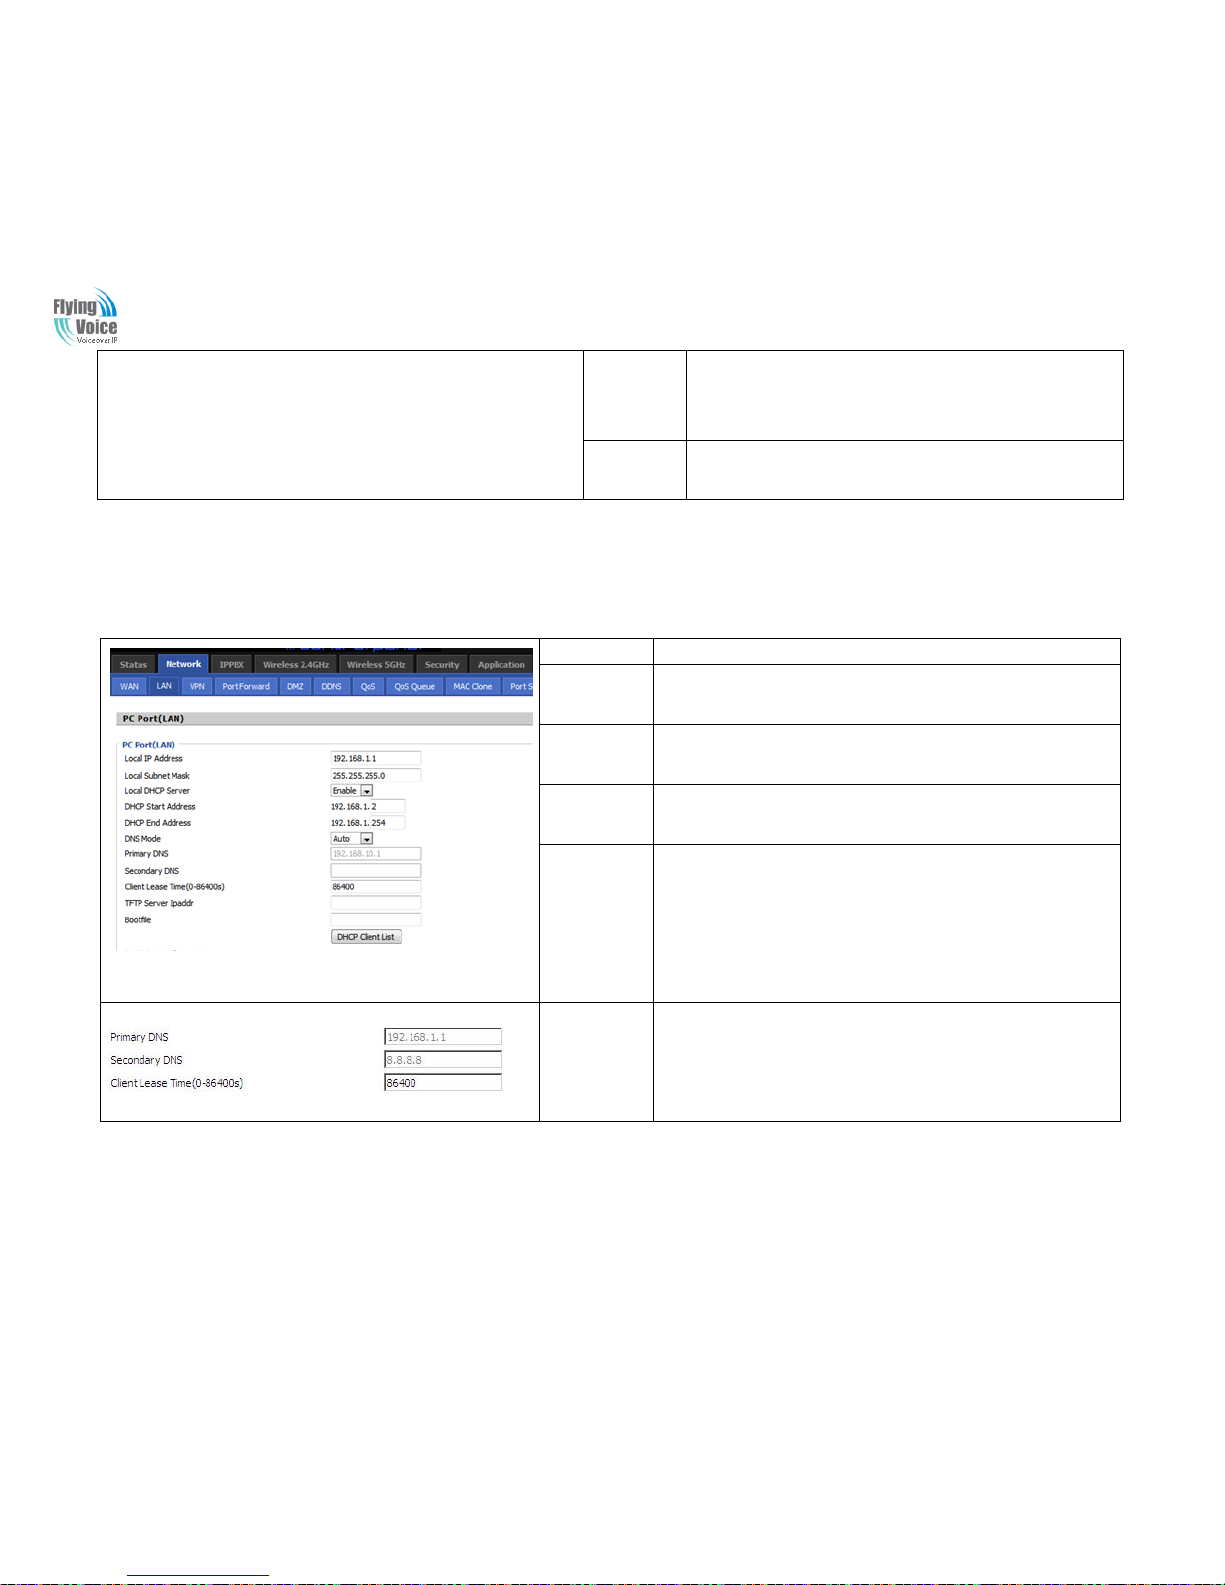
4.3.2 LAN
11.. LLAANN PPoorrtt::
TThhee mmoosstt ggeenneerriicc ffuunnccttiioonn ooff rroouutteerr iiss NNAATT.. WWhhaatt NNAATT ddooeess iiss ttoo ttrraannssllaattee tthhee ppaacckkeettss ffrroomm ppuubblliicc IIPP aaddddrreessss ttoo llooccaall IIPP aaddddrreessss ttoo ffoorrwwaarrdd tthhee
rriigghhtt ppaacckkeettss ttoo tthhee rriigghhtt hhoosstt aanndd vviiccee vveerrssaa..
Field Name
Description
IP Address
Enter the IP address of the router on the local area network, all
the IP addresses of the computers which are in the router’s LAN
must be in the same network segment with this address, and the
default gateway of the computers must be this IP address. (The
default is 192.168.1.1)
Local Subnet
Mask
Enter the subnet mask to determine the size of the network
(default is 255.255.255.0/24)
Local DHCP
Server
If or not enable Local DHCP Server
DHCP Start
Address
Enter a valid IP address as a starting IP address of the DHCP
server, and if the router’s LAN IP address is 192.168.1.1,
starting IP address can be 192.168.1.2 or greater, but should be
less than the ending IP address.
DHCP End
Address
Enter a valid IP address as an endIP address of the DHCP server.
DNS Mode
Select DNS mode, options are Auto and Manual:
1.When DNS mode isAuto, the device under LAN port will
automatically obtains the preferred DNS and alternate DNS.
2.When DNS mode is Manual, the user should manually
configure the preferred DNS and alternate DNS
Primary
DNS
Enter the preferred DNS address.
Secondary
DNS
Enter the secondary DNS address.
APX9102 User Manual
23
Client Lease
Time
This option defines how long the address will be assigned to the
computer within the network. In that period, the server does not
assign the IP addressto the other computer.
DNS Proxy
Enable or disable; If enabled, the device will forward the DNS
request of LAN-side network to the WAN side network
22.. DDHHCCPP SSeerrvveerr::
RRoouutteerr hhaass aa bbuuiilltt--iinn DDHHCCPP sseerrvveerr tthhaatt aassssiiggnnss pprriivvaattee IIPP aaddddrreessss ttoo eeaacchh llooccaall hhoosstt..
DDHHCCPP ssttaannddss ffoorr DDyynnaammiicc HHoosstt CCoonnffiigguurraattiioonn PPrroottooccooll.. TThhee rroouutteerr bbyy ffaaccttoorryy ddeeffaauulltt aaccttss aa DDHHCCPP sseerrvveerr ffoorr yyoouurr nneettwwoorrkk ssoo iitt aauuttoommaattiiccaallllyy
ddiissppaattcchh rreellaatteedd IIPP sseettttiinnggss ttoo aannyy llooccaall uusseerrccoonnffiigguurreedd aass aa DDHHCCPP cclliieenntt.. IItt iiss hhiigghhllyy rreeccoommmmeennddeedd tthhaatt yyoouu lleeaavvee tthhee rroouutteerr eennaabblleedd aass aa
DDHHCCPP sseerrvveerr iiff yyoouu ddoo nnoott hhaavvee aa DDHHCCPP sseerrvveerr ffoorr yyoouurr nneettwwoorrkk..
Field Name
Description
Local DHCP
Server
If or not enable DHCP server.
DHCP Start
Address
Enter a value of the IP address pool for the DHCP server to start with
when issuing IP addresses. If the LAN Interface IP
DHCP
EndAddress
Enter a value of the IP address pool for the DHCP server to end with
when issuing IP addresses.
DNS Mode
You should set “manual”in the “DNS Mode”if you set “DNS” by
yourself. And then fill the DNS in the two following texts. Generally
speaking, you can set “Auto” in the “DNS Mode”and the device will
get “DNS”from DHCP Server automatically.
Primary DNS
You must specify a DNS server IP address here because your ISP
should provide you with usually more than one DNS Server. If your
ISP does not provide it, the router will automatically apply default
DNS Server IP address: 192.168.1.1 to this field.

APX9102 User Manual
24
Secondary
DNS
You must specify a DNS server IP address here because your ISP
should provide you with usually more than one DNS Server. If your
ISP does not provide it, the router will automatically apply default
DNS Server IP address: 8.8.8.8 to this field.
If both the Primary IP and Secondary IP Address fields are left empty,
the router will assign its own IP address to local users as a DNS proxy
server and maintain a DNS cache.
Client Lease
Time
It allows you to set the leased time for the specified PC.
4.3.3 MAC Clone
SSoommee IISSPPss wwiillll rreeqquuiirree yyoouu ttoo rreeggiisstteerr yyoouurr MMAACC aaddddrreessss.. IIff yyoouu ddoo nnoott wwiisshh ttoo rree--rreeggiisstteerr yyoouurr MMAACC aaddddrreessss,, yyoouu ccaann hhaavvee tthhee rroouutteerr cclloonnee tthhee
MMAACC aaddddrreessss tthhaatt iiss rreeggiisstteerreedd wwiitthh yyoouurr IISSPP..TToo uussee tthhee CClloonnee AAddddrreessss bbuuttttoonn,, tthhee ccoommppuutteerr vviieewwiinngg tthhee WWeebb--bbaassee uuttiilliittyy ssccrreeeenn wwiillll hhaavvee tthhee
MMAACC aaddddrreessss aauuttoommaattiiccaallllyy eenntteerreedd iinn tthhee CClloonnee WWAANN MMAACC ffiieelldd..
Enabling MAC address cloning
1. Press the button gets PC's MAC address
2. Press the button to save your changes if users don't want to
use MAC clone, press the button to cancel the changes
3. Press the button to make the changes effective.
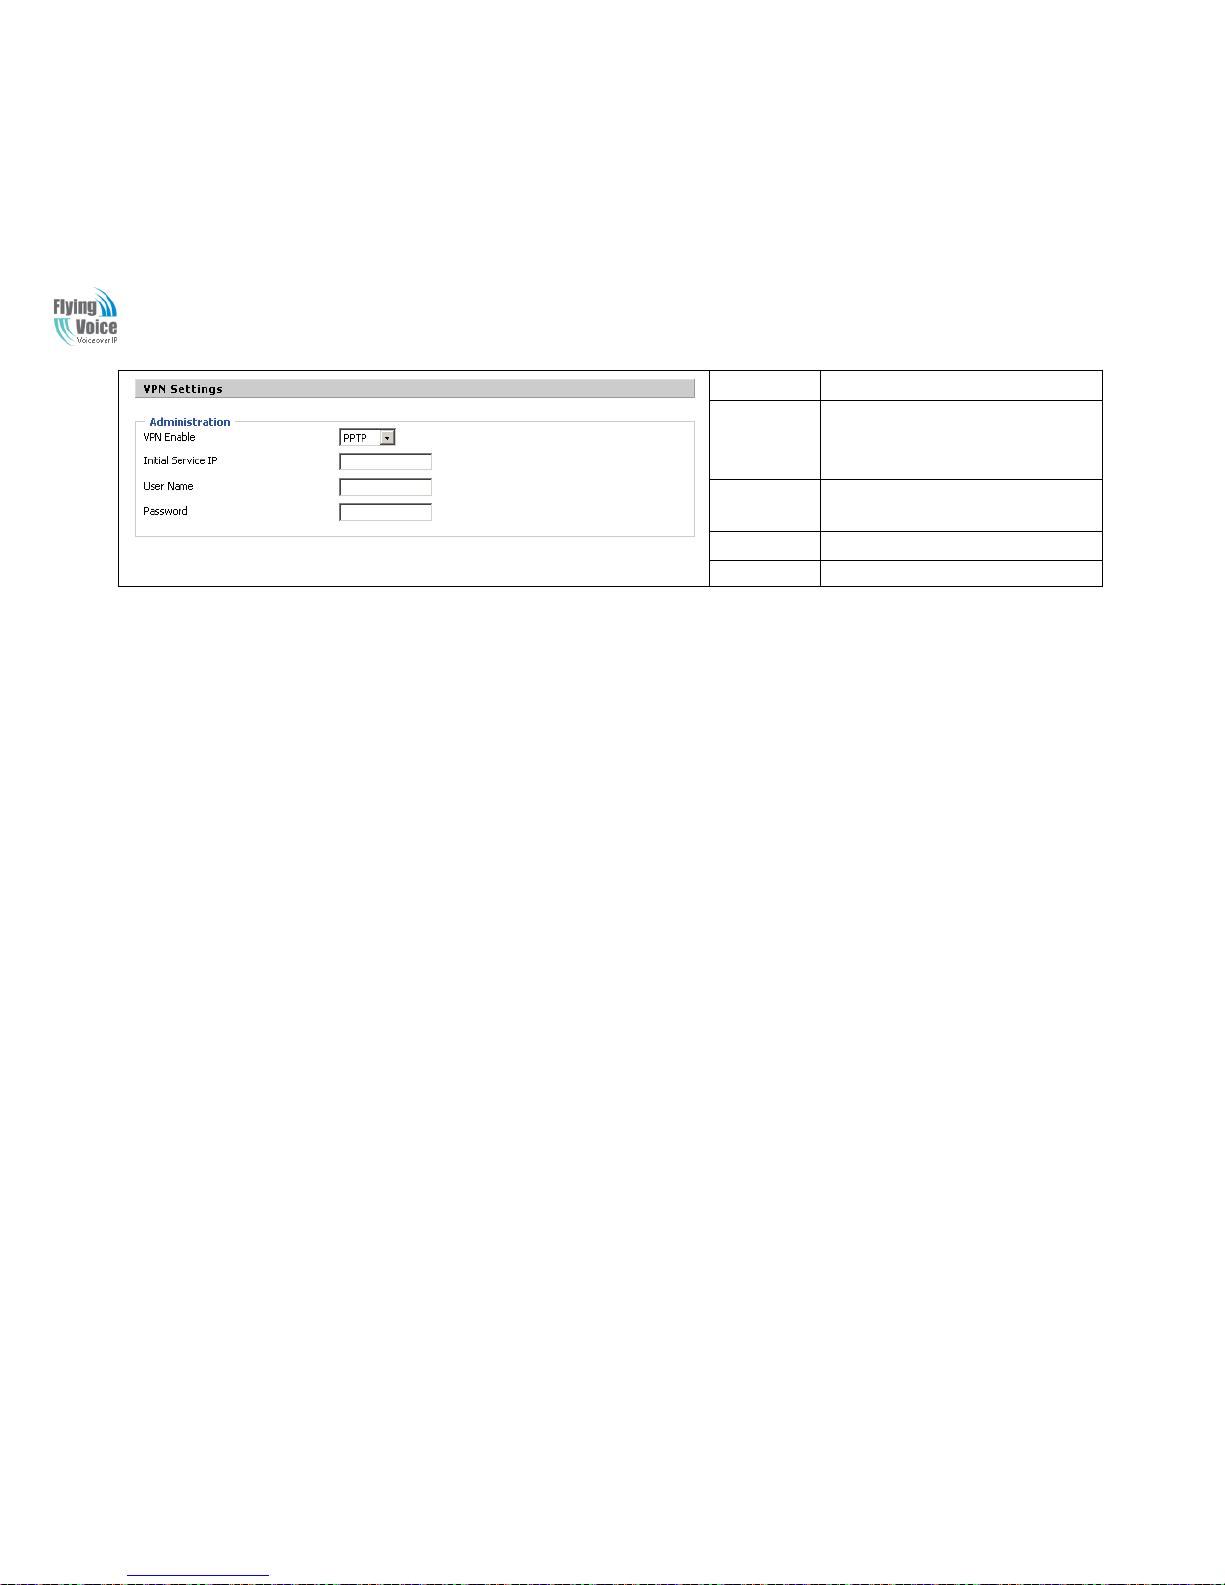
4.3.4 VPN
AA VVPPNN iiss aa kkiinndd ooff tteecchhnnoollooggyy wwhhiicchh eessttaabblliisshh aa pprriivvaattee nneettwwoorrkk bbaasseedd oonn tthhee ppuubblliicc nneettwwoorrkk.. VVPPNN nneettwwoorrkk ccoonnnneeccttiioonn bbeettwweeeenn aannyy ttwwoo nnooddeess
ddooeess nnoott rreeqquuiirree tthhee eenndd ttoo eenndd pphhyyssiiccaall ccoonnnneeccttiioonn aass tthhee ttrraaddiittiioonnaall pprriivvaattee nneettwwoorrkk;; iitt iiss ssttrruuccttuurreeddoonn tthhee nneettwwoorrkk ppllaattffoorrmm pprroovviiddeedd bbyy tthhee
ppuubblliicc nneettwwoorrkk sseerrvviicceess,, tthhee uusseerr ddhhoommee ggaatteewwaayy aarree ttrraannssmmiitttteedd iinn tthhee llooggiiccaall lliinnkk.. TThhrroouugghh VVPPNN tteecchhnnoollooggyy,, uusseerrss ccaann eessttaabblliisshh ccoonnnneeccttiioonn
bbeettwweeeenn aannyy ttwwoo ddeevviicceess wwhhiicchh aarree ccoonnnneecctteedd ttoo ppuubblliicc nneettwwoorrkk aanndd ttrraannssmmiitt ddhhoommee ggaatteewwaayy..
APX9102 User Manual
25
Field Name
Description
VPN Enable
If or not enable VPN.If enable, you can
select PPTP ,L2TP and OpenVPN mode
VPN.
Initial Service
IP
Fill in the VPN server IP address
User Name
Fill in the authenticationusername
Password
Fill in the authentication password
APX9102 User Manual
26
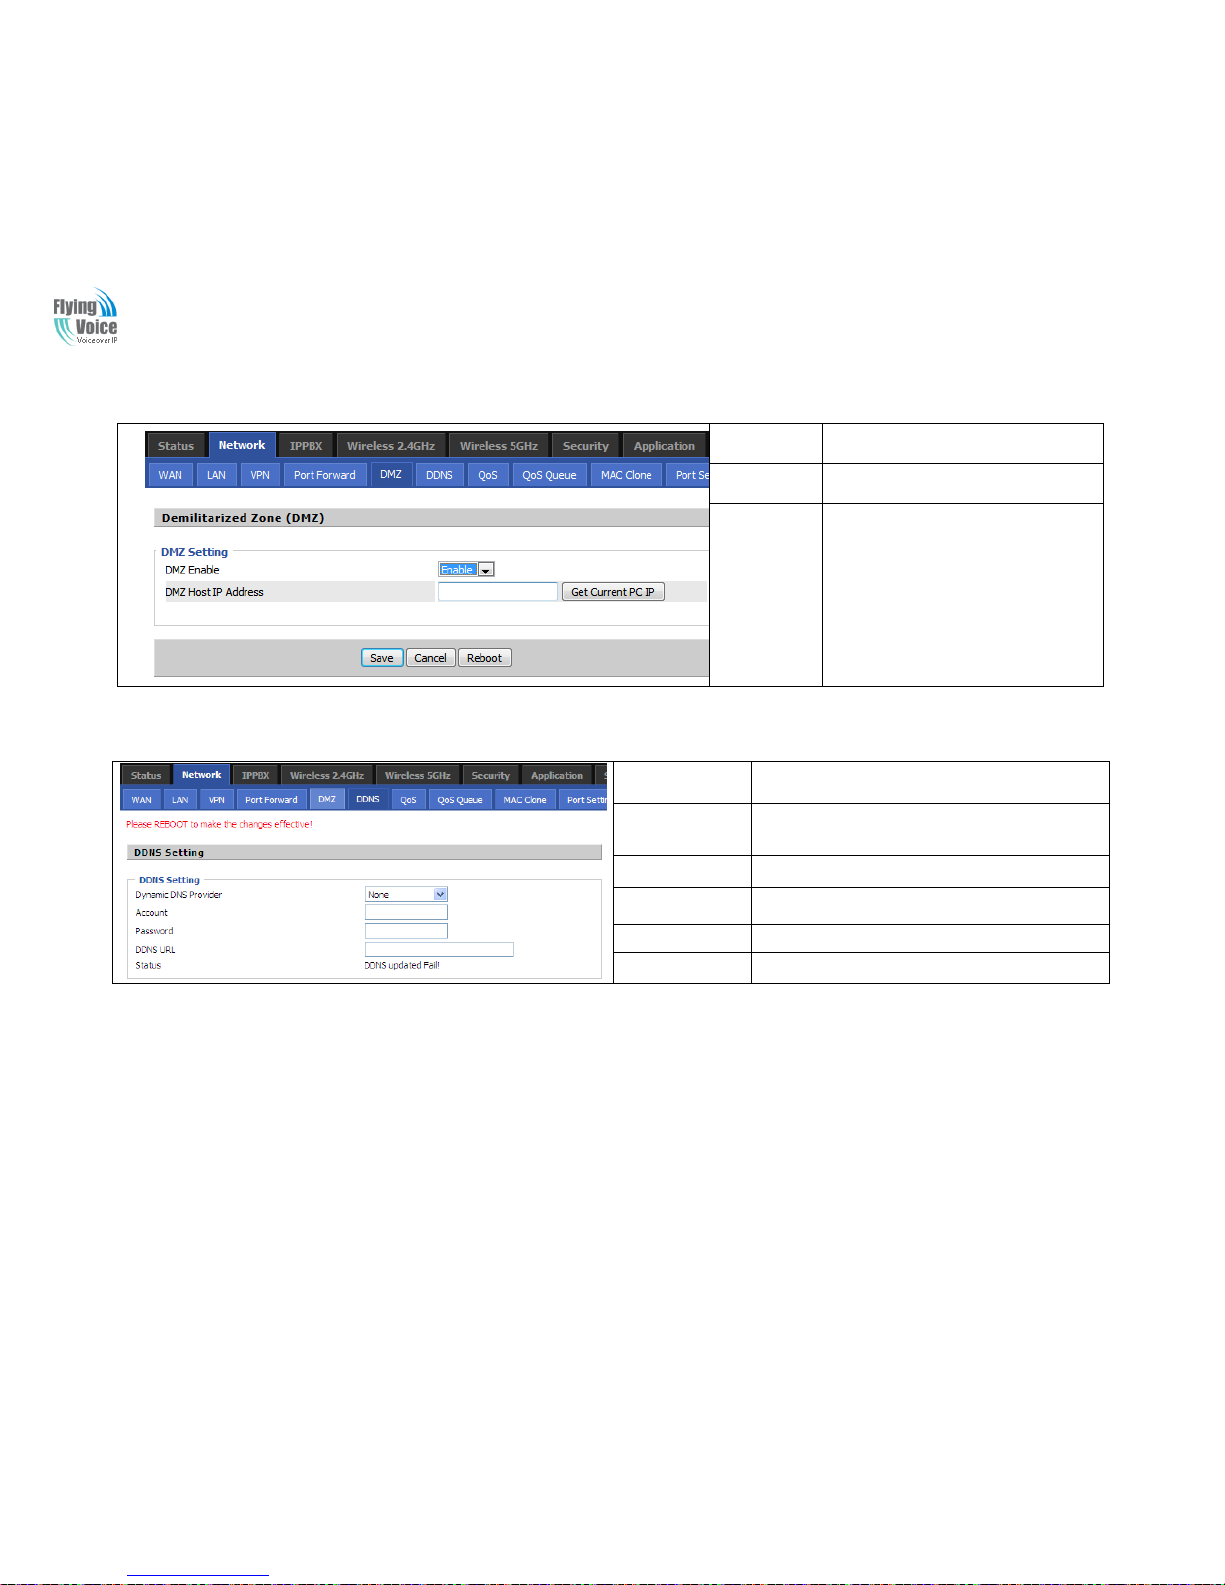
4.3.5 DMZ
Field Name
Description
DMZ Enable
If or not enable DMZ.
DMZ Host IP
Address
Enter the private IP address of the DMZ
host
4.3.6 DDNS Setting
Field Name
Description
Dynamic DNS
Provider
DDNS is enabled and select a DDNS service provider
Account
Enter the DDNS service account
Password
Enter the DDNS service account password
DDNS url
Enter the DDNS domain name or IP address
Status
See if DDNS is successfully upgraded
 Loading...