

Page 1
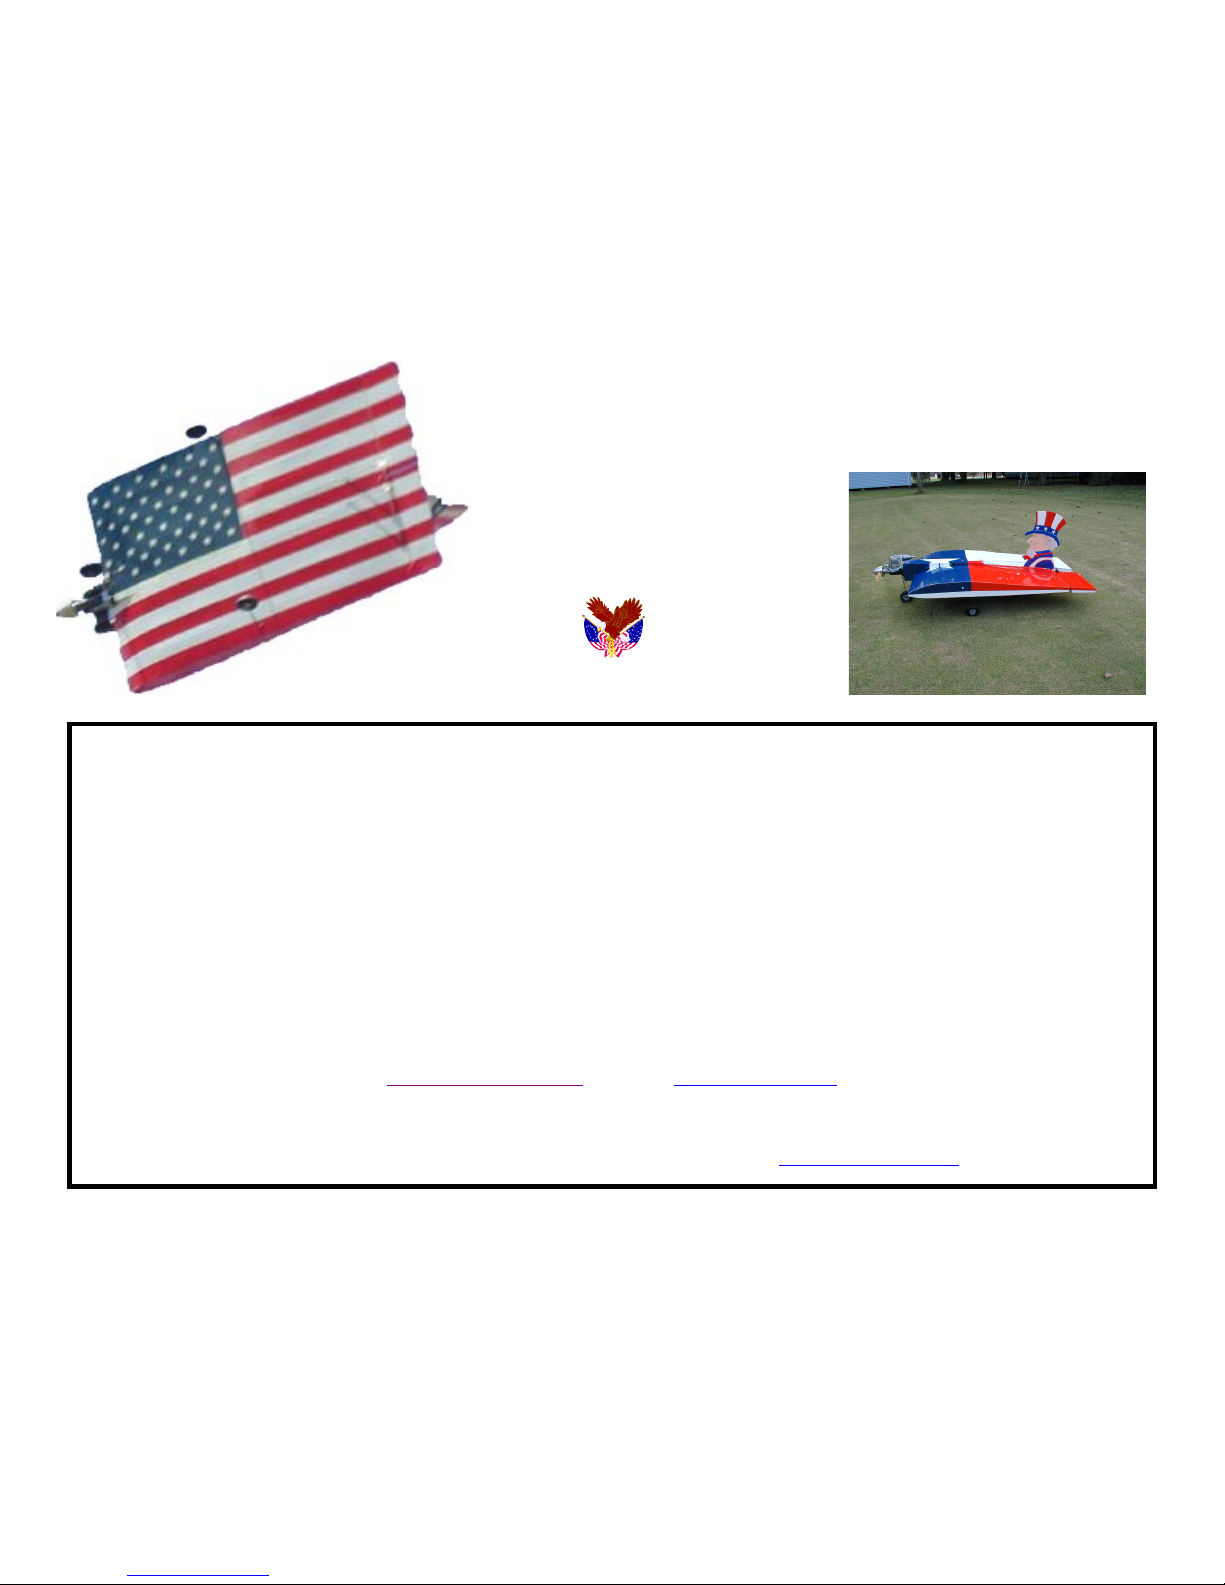
Flying Thingz
Flag Ship 40
Kit# FT3012
A Sport Scale
Flying Flag
Made In The USA!
About This Construction Manual
This booklet divides the construction into sub-assemblies; wing, fuselage, etc. Please read each section carefully before starting on that particular subassembly. There is a complete description of all parts under “Kit Contents” Please check to make sure your kit is complete. We are human, and occasionally
miss something! If you have trouble identifying a part, or are missing something, please contact us and we can help.
During the construction process the steps will outline what part to use. We have used actual pictures instead of unclear or often inaccurate illustrations
to assist in the building process. This manual was intended for English users, and all measurements are made in standard units. (Inch, foot, etc.) This
manual was intended to be used alongside of the plans. Please refer to the plans if any step is unclear.
Customer Service
Should you experience a problem building or flying this kit, we recommend you see your dealer first. If you are unable to solve the problem, feel free to
call or write:
Flying Thingz
2075 Grandview St.
Oceanside, CA 92054
[email protected] or online at www.flyingthingz.com
This product is sold with exclusion of all warrantees, expressed or implied, statutory or otherwise.
Pilot assumes all risk in building and operating this model. Refer to and abide by AMA rules at www.modelaviation.com for regulations on Radio
Control Models.
Page 2

© 2002, 2003 Flying Thingz All Rights Reserved.
2
Kit Contents
Part No.
QTY.
Dimensions
Description
9654 2 Laser Cut 1/8” balsa
Balsa fuselage sides
9655 1 ½” x 36” balsa triangle
Fuse and bar reinforcement
9658
1
4” x 1/16” x 36” balsa
Bottom fuse sheeting
9660
1
12” x 24” x 1/8” ply
Laser Cut Construction set
9659
1
Laser Cut 1/8” balsa
Fuselage hatch and sheeting
9661
1
¼” x ¼” x 36” balsa
Hatch reinforcement
9662
1
Metal
5/32” Nose Gear
9663
2
Metal
Pre-bent 5/32” Wire Main Gears
9664
1
4-40 bolt
1- hatch mount
9671
1
4-40 blind nuts
1- hatch mount
9691
2
Laser Cut Ply
Control horns
9694
1
1.5# CNC Cut Foam
CNC cut foam wing; elevons
9674
1
Coroplast (corrugated plastic)
Uncle Sam
9675
1
Paper
Full Color Construction manual (Your Reading It )
9684
1
36” x 48” Paper
Full size plan sheet
9690 1 Laser Cut 1/8” balsa
Balsa fuselage sides
Page 3

© 2002, 2003 Flying Thingz All Rights Reserved.
3
Additional items you will need to build a flyable R/C Mower
This is a list of parts used on the Sky Cutter prototype. Consult your hobby shop or our website at
www.flyingthingz.com for these additional items.
□ 3- 2 ½” wheels
□ Engine- .40-.53 2c or .45-
.72 4c
□ 4- Pushrods (Nyrods work)
□ Motor Mount
□ 6- 5/32” wheel collars
□ 8 oz fuel tank
□ 2’ medium fuel tubing
□ Foam rubber
□ 2” spinner
□ Prop- suitable for engine
□ Covering material (low
temp)
□ 4 Ch radio with elevon
mixing
□ Fiber Tape
□ Clear Packing Tape
Tools and materials you will need
□ Instant CA (superglue). Used
to instantly bond parts
□ #80; #120; #400 sand paper
□ Steel straight edge
□ Slow CA (superglue) Used to
bond parts that need to be
moved for alignment
□ Hobby Knife and extra blades
□ Tack Rag
Note: CA’s come in many grades,
and some are not compatible for
foam, balsa and ply woods.
□ Black Sharpie and Pen
□ Wire cutters and needle nose
pliers
□ Epoxy and resin glue
□ Assorted screwdrivers
□ Paper towels
□ CA Accelerator Used to
accelerate or instantly harden
CA (superglue).
□ Building pins
□ Scissors
□ Alphaic Resin glue (white
glue)
□ Razor saw
□ Sanding blocks
□ Small building square
□ Masking tape
□ Epoxy or Polyurethane
Paints
Page 4
© 2002, 2003 Flying Thingz All Rights Reserved.
4
Construction
Fuselage Construction
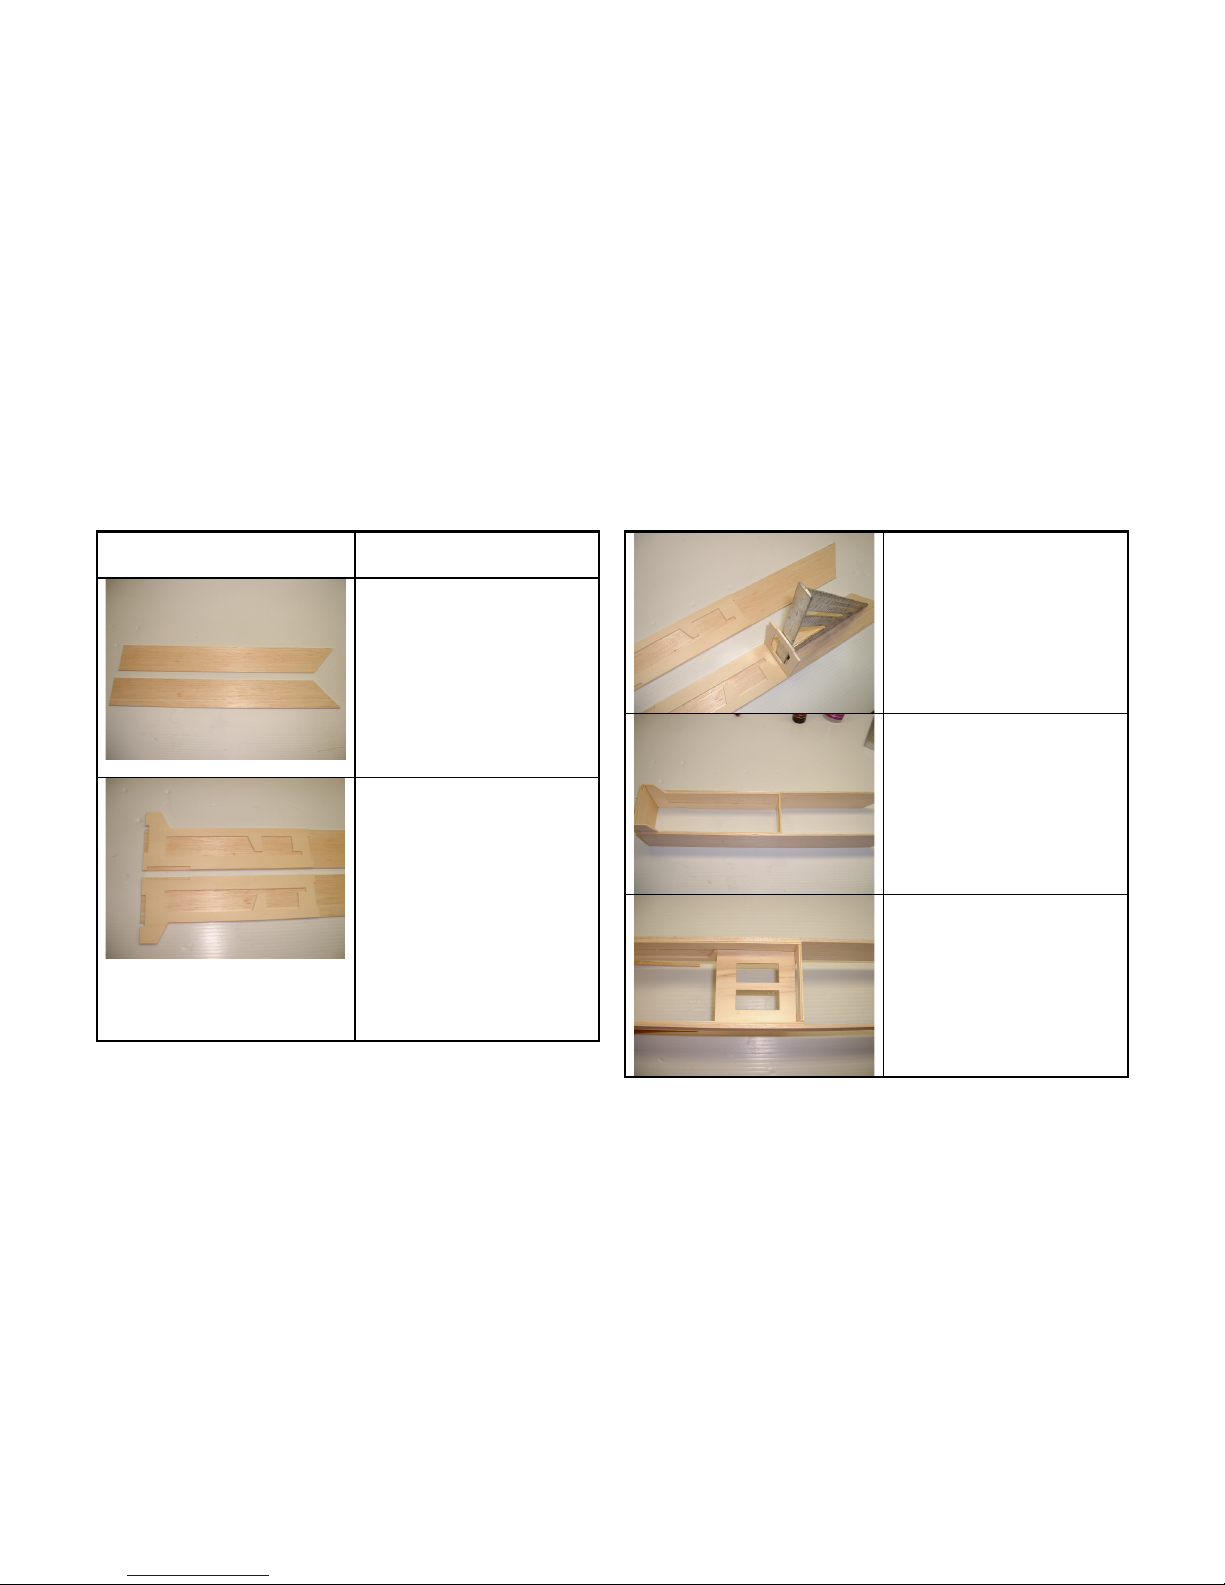
□ Begin by setting the
two fuselage sides
across from each other.
This way you will have a
left and right side.
(Reference the plans as
to which side to glue
the lower wing saddle
to!)
□ REMEMBER TO MAKE
2 OPPOSITE SIDES!
Using medium CA, glue
the LASER cut plywood
fuselage sides to the
balsa fuselage sides.
Use the top and the
front of the balsa
fuselage for alignment.
(Again, check the plans
as to what side the ply
wood doublers face!)
□ Glue F1 and F2 onto
ONE side of the
fuselage. Use a square
to get them perfectly
vertical. We will join the
other side to these in a
couple minutes.
□ Set the fuselage
upside-down, and glue
the other half of the
fuselage side to F1, F2,
and the servo tray.
□ Next add the forward
servo tray to it’s
location in front of F2.
Page 5
© 2002, 2003 Flying Thingz All Rights Reserved.
5
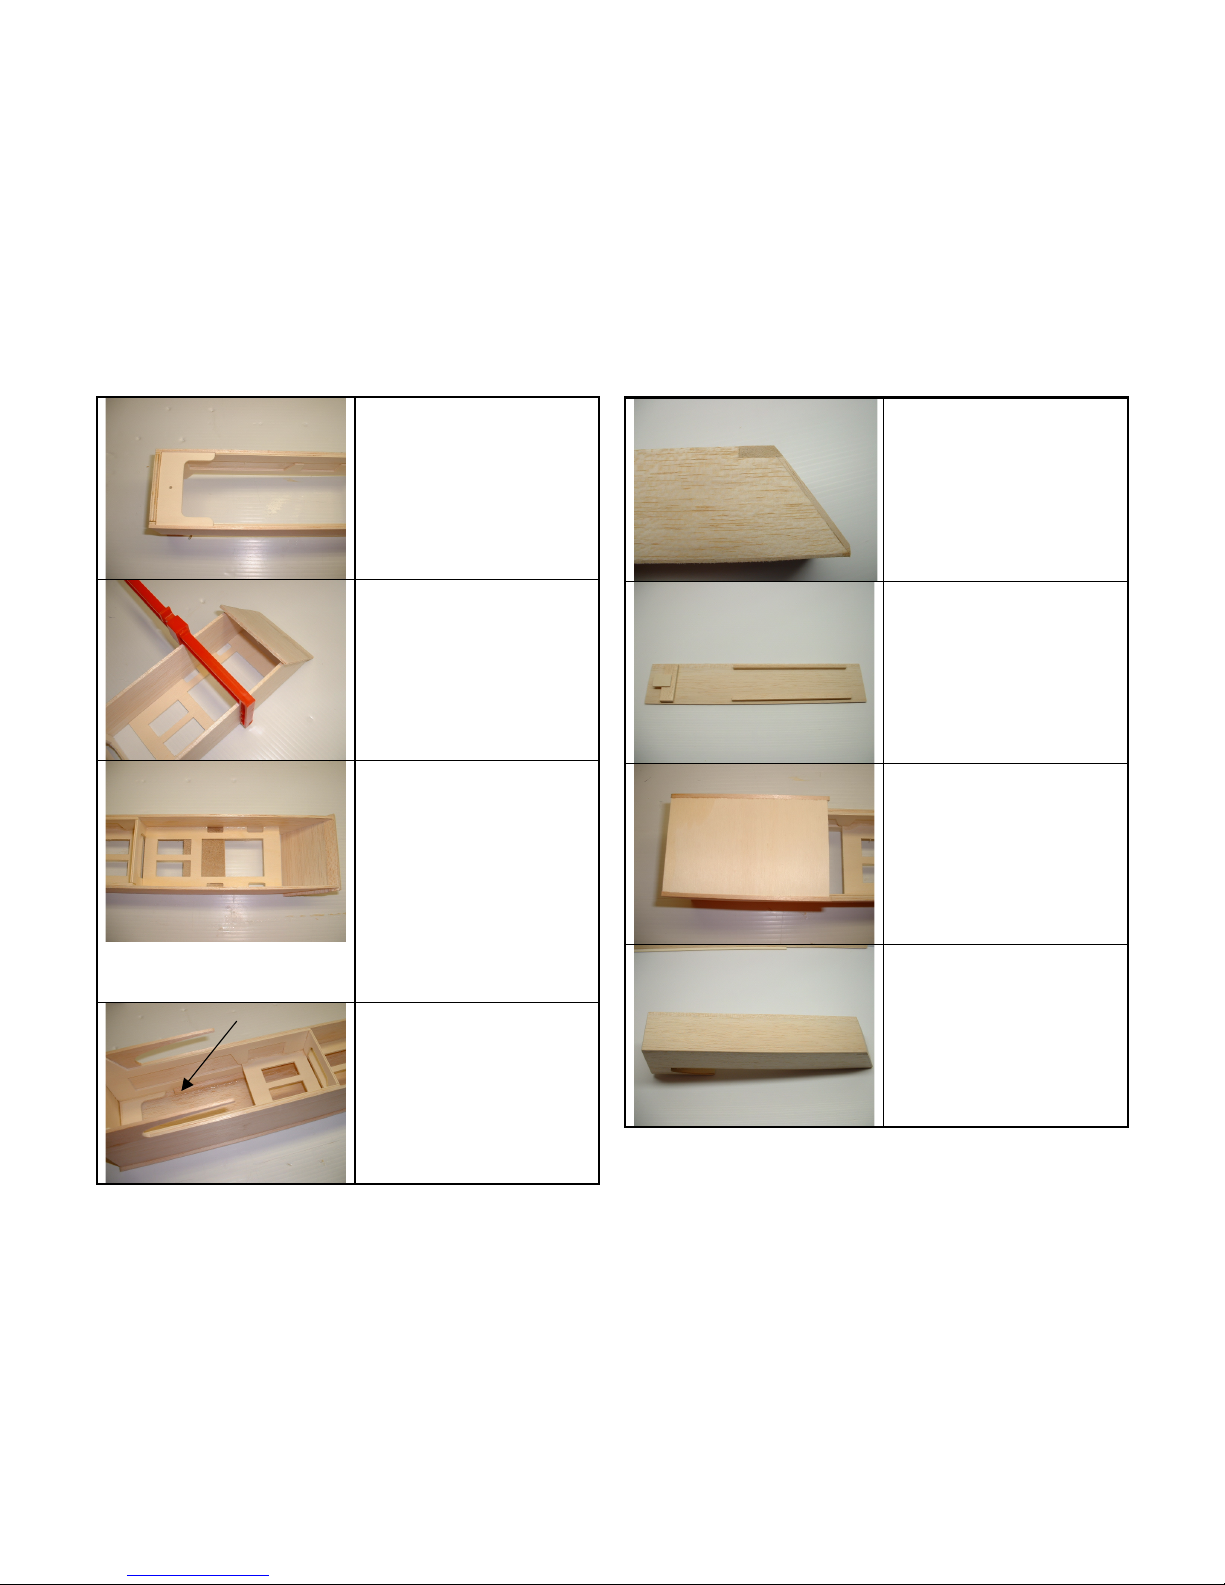
□ Now you will add the
forward hatch bolt plate
to the notch in the fuse
side behind F2
□ Using the rear servo
tray as a spacer, sheet
the rear of the fuselage
with the small laser cut
1/8” balsa. DO NOT glue
the servo tray at this
time.
□ With the fuselage still
UPSIDE DOWN, glue in
the rear servo tray. Use
a 1” block underneath
to support and space
the rear servo tray. (DO
NOT glue the block)
Add a few pieces of
triangle stock on the
bottom to support the
tray.
□ Set the1/8” balsa hatch
under the fuselage and
glue your ¼”x¼” stick
hatch support rails
between F1 and F2.
Glue only to the hatch,
DO NOT let glue get on
the fuselage body.
□ Glue the 1” x ¼” balsa
rear into the notch in
the fuselage. Sand flush
with fuselage sides.
□ Create a tongue for the
rear part of the hatch
with a piece of ¼” x 1”
balsa and a 1/8” ply
scrap. The ¼”x1” balsa
should fit snugly
between the two
fuselage sides.
□ Glue on the 1/8” ply
lower fuselage plate
between the wing
saddles.
□ Trim the excess hatch
to be flush with the
fuselage and sand
smooth.
Page 6
© 2002, 2003 Flying Thingz All Rights Reserved.
6
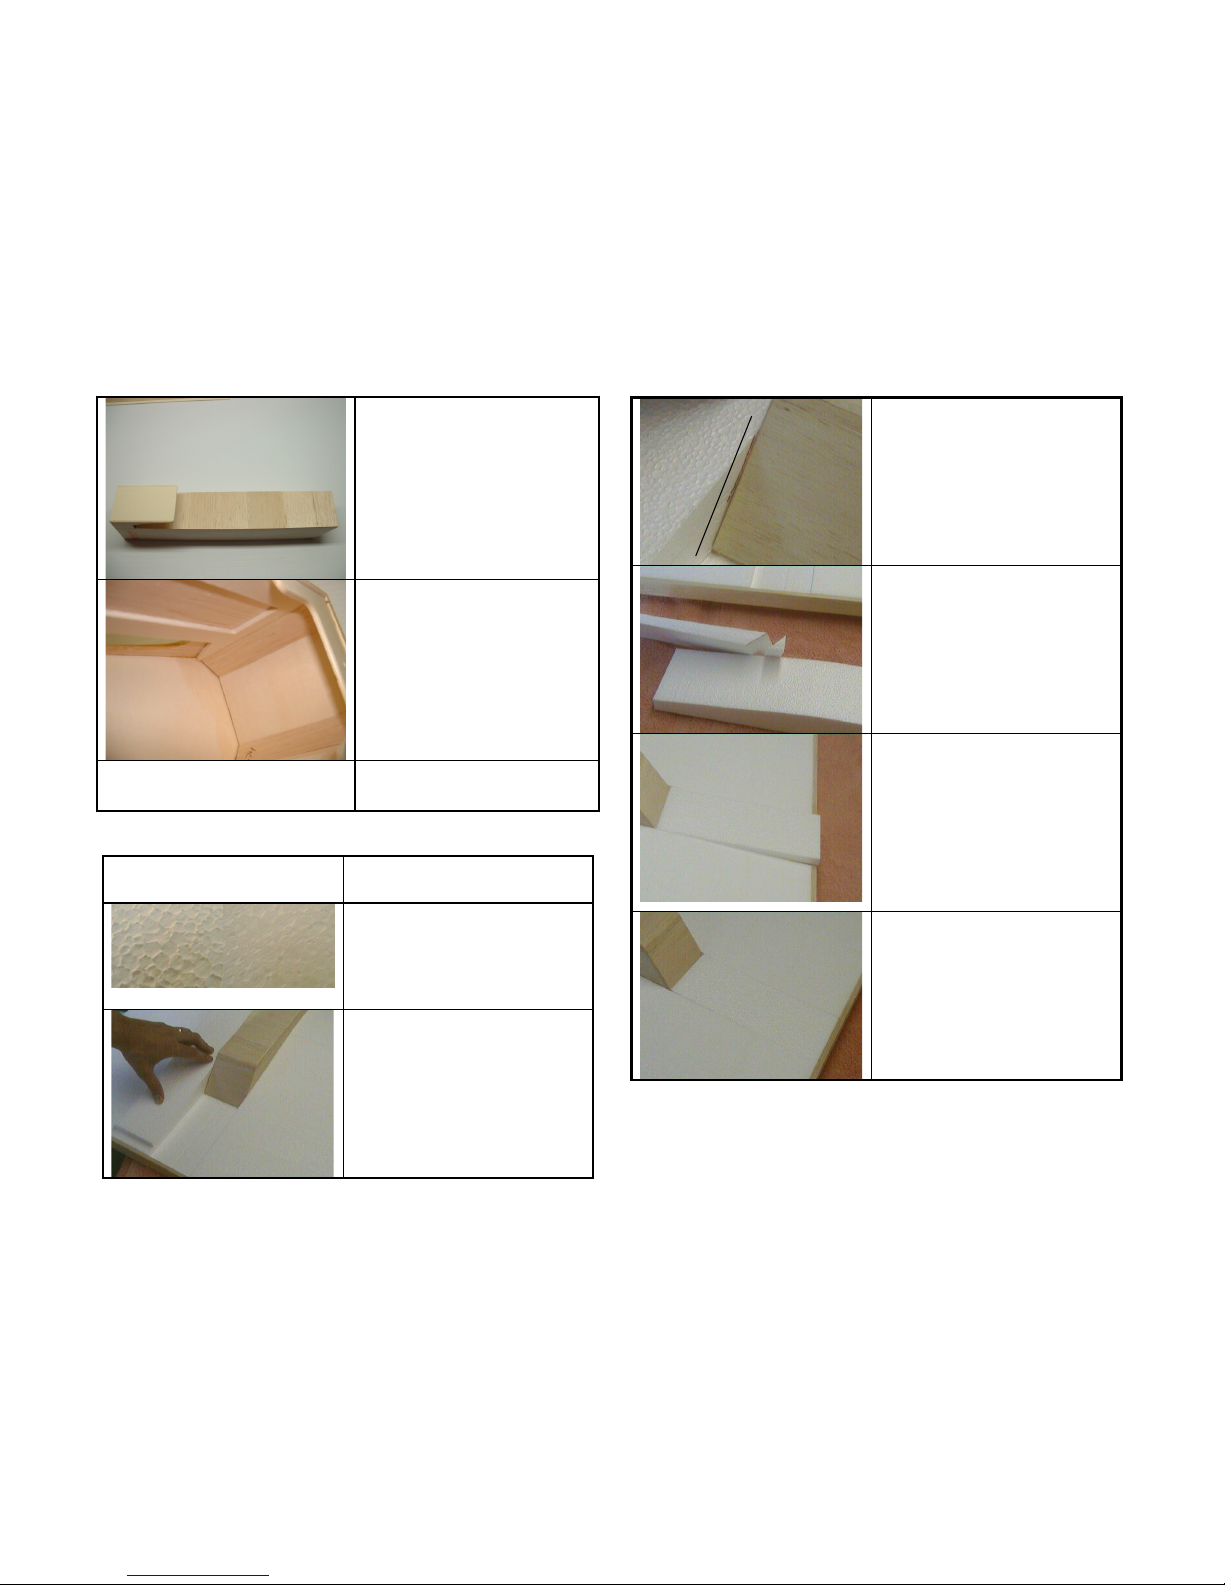
□ Using the 1/16”x4”
balsa, sheet the bottom
of the fuselage cross
grain. Sand the edges
flush.
□ Add the ½” tri stock to
the back of F-1
□ Do a final sanding, and
set aside till later.
Wing Construction
□ Sand the entire wing
lightly to remove any
roughness left from the
CNC cutting process.
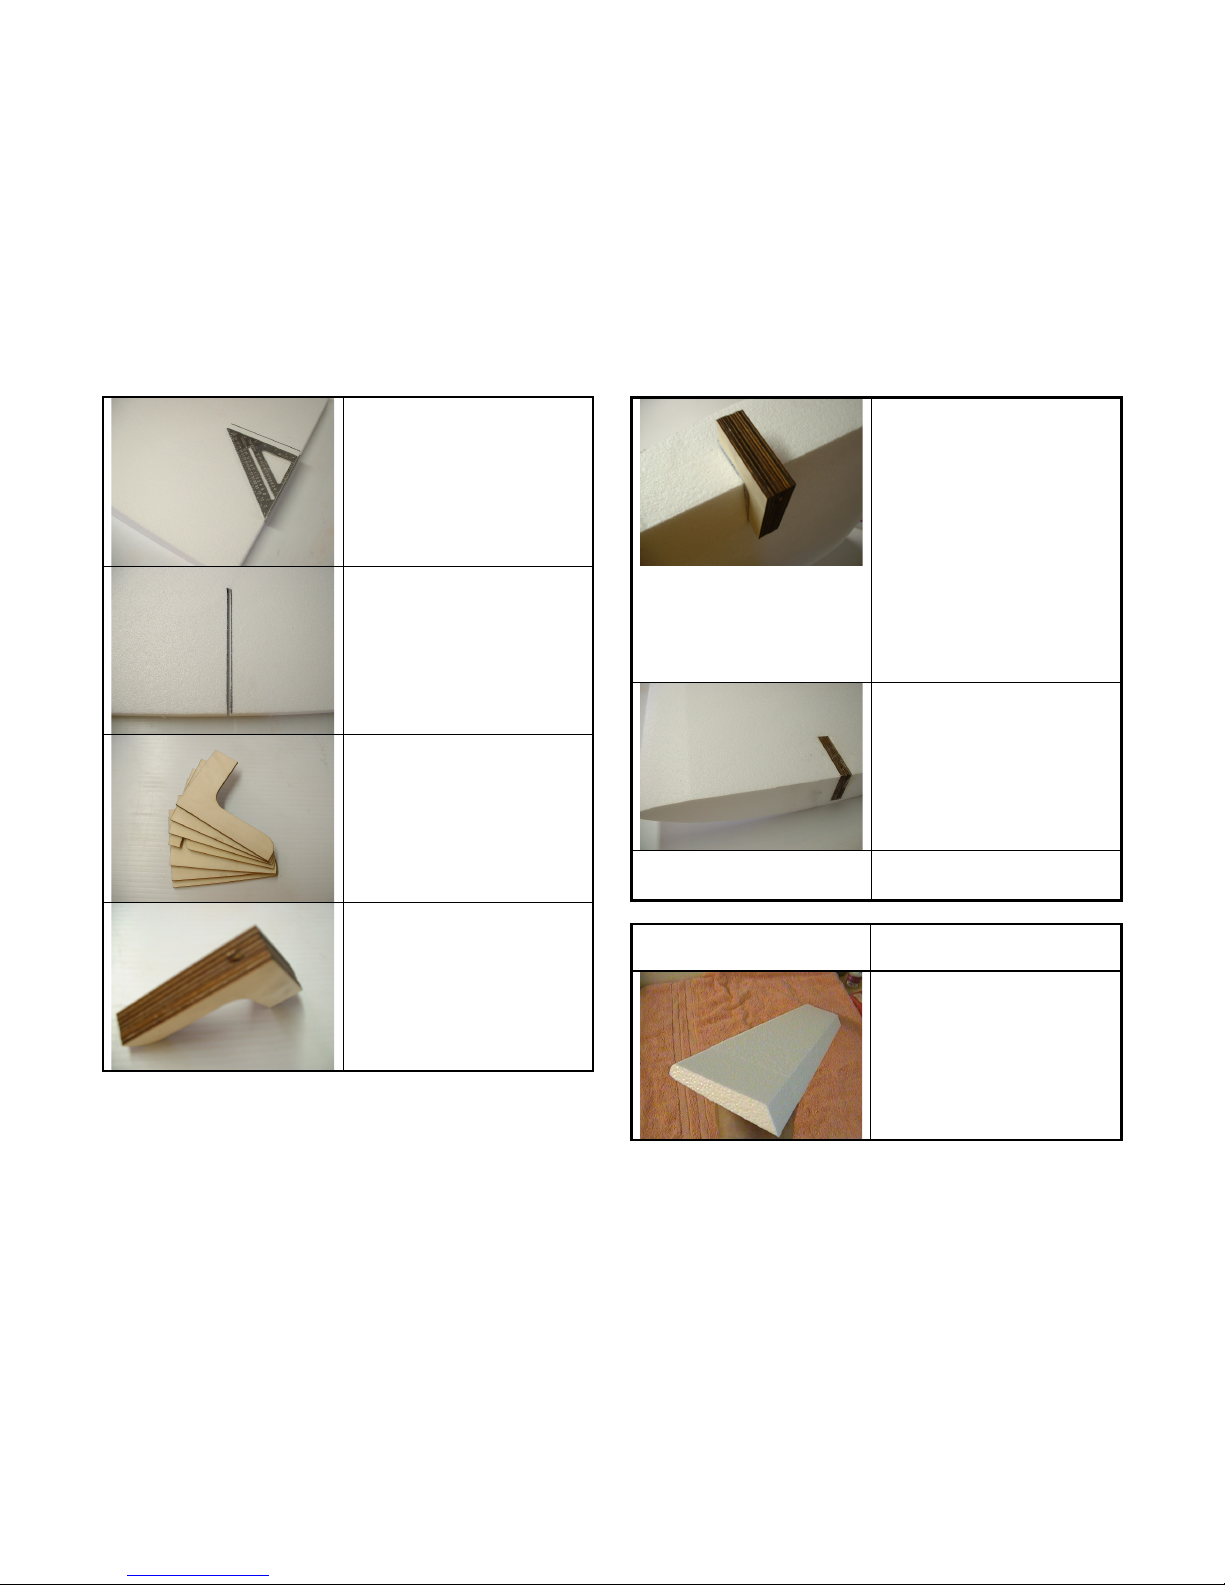
□ Place the center cut out
on the wing next to the
fuse so there is ¾” from
the back of the cut out to
the front of the TE.
□ Mark a line on the foam
that matches that of the
rear of the fuse.
□ Cut on your line to
make the filler for the aft
wing.
□ Place filler in cut out.
There will be a small
overhang at the TE. Cut
this off flush with the TE.
(We do it this way to
account for the loss of
foam from the cutting
process.)
□ Sand the foam filler
smooth, and glue into
place. You should have a
nice, even fit. Fill any
gaps with filler.
Page 7
© 2002, 2003 Flying Thingz All Rights Reserved.
7
□ Mark the center of the
wing at the trailing edge
for Uncle Sam. Use a
square to get it perfect.
This is important!
□ Cut a 3/16” wide slot for
Uncle Sam to fit into.
The slot goes all the way
through the wing. A table
saw makes this easy, but
a sharp knife or a Dremel
tool works well also.
□ Stack the laser cut gear
blocks in the order
shown to the left.
(Notched block is in
center)
□ Use Epoxy to assemble
the layers. Clamp in a
vise until dry. After dry,
sand edges flush, then
use a 5/32 drill bit to
enlarge the gear slot.
□ Flip the wing over and
reference the plans for
the locations of the
landing gear blocks.
Trace the outline of the
blocks onto the wing.
Using a Dremel tool or
razor blade, make a
channel that matches
the gear blocks. (MAKE
SURE YOU CUT THE
SLOT ON THE BOTTOM
OF THE WING!)
□ Using Epoxy, glue in
the gear blocks. Use
plenty epoxy to get a
good bond! (DO NOT
USE CA’s ON FOAM)
□ Sand the gear block
area smooth.
Elevons
□ We have already cut
the Elevons from foam,
sand if necessary to
remove cutting residue.
Cut the 24” elevon in
half for each side if the
wing.
Page 8
© 2002, 2003 Flying Thingz All Rights Reserved.
8
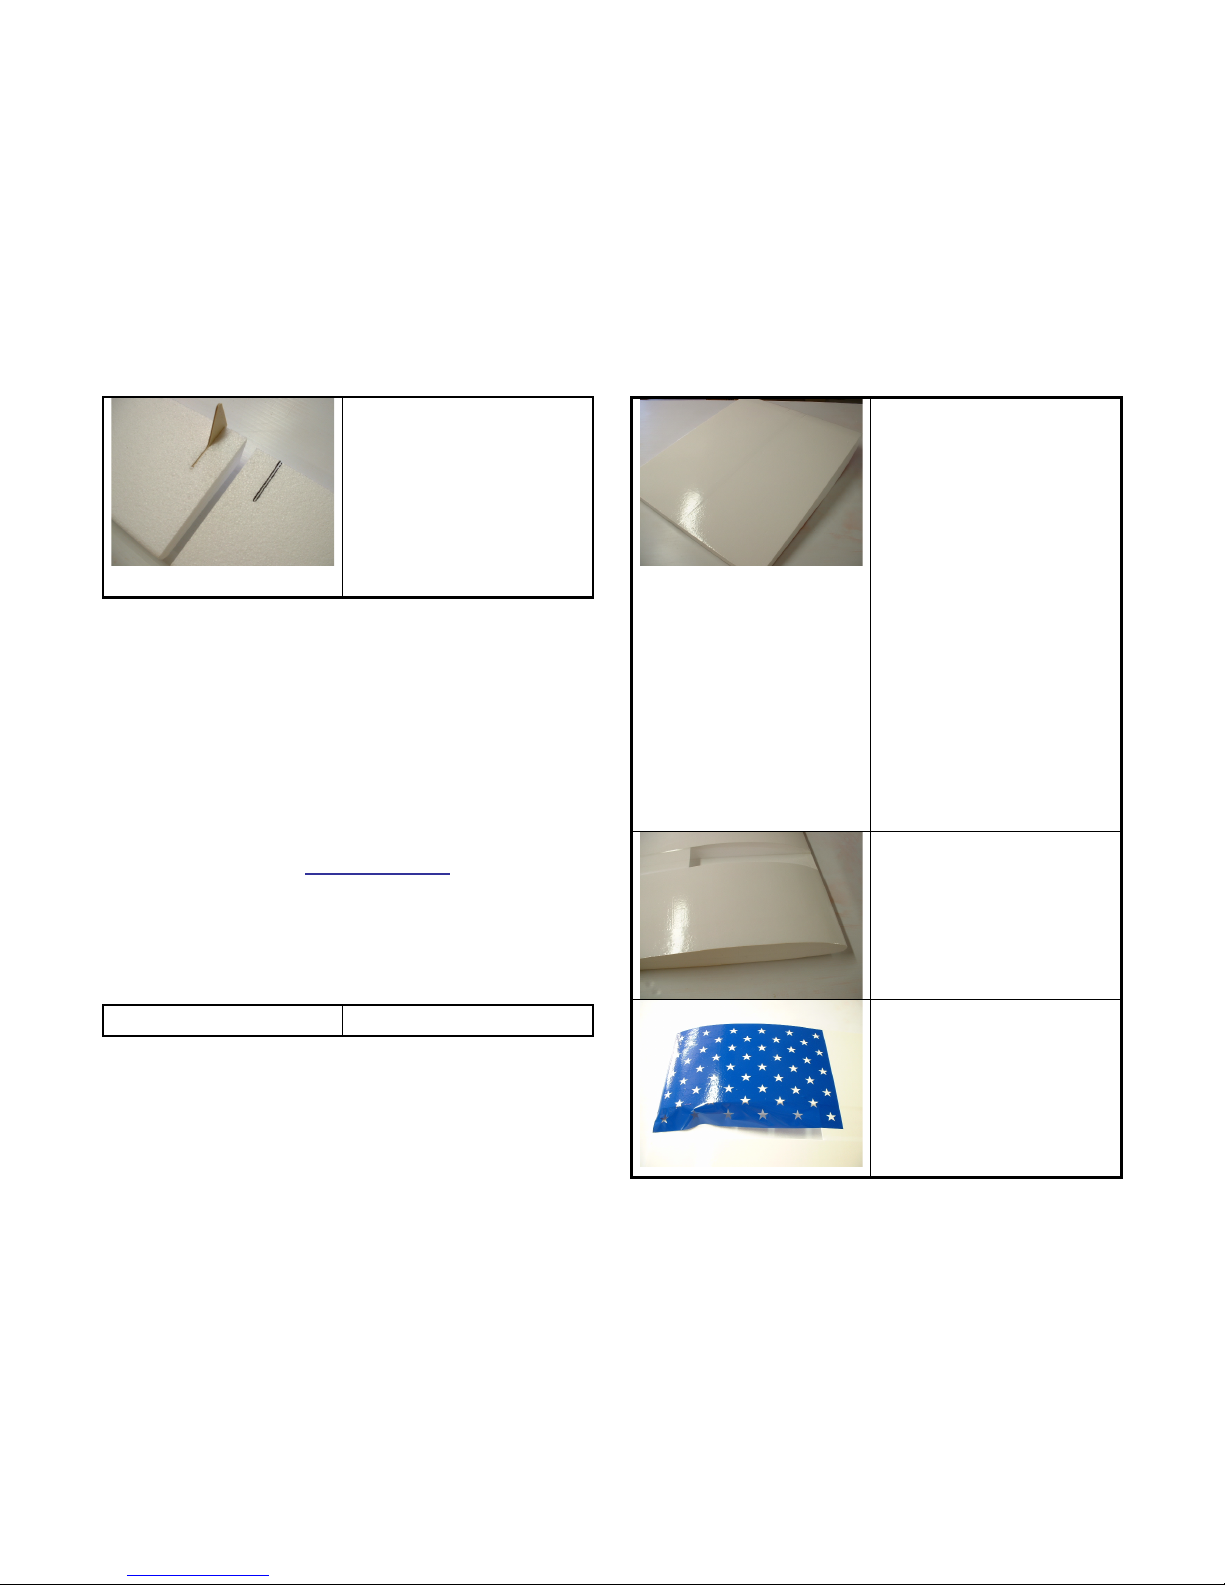
□ Use your drill, saw or
Dremel to cut a 2” long
slot for the laser cut
aileron control horn. The
slot is 1” from the end of
the aileron. Wait until
after covering to glue the
plywood control horn
into place.
Make Covering Easier!
We supply a special covering that is super
easy to use, needs no iron, lasts and is fuel
proof. It is also lighter than the other
coverings. We use this on all our planes
and have great results. The Computer cut
covering sets are available for the USA,
JAPAN, and ENGLAND flags. You can
order online at FlyingThingz.com
Covering
Wing:
□ Before covering the
foam, spray it with a
light coat of 3-M Super
77 spray adhesive. Let it
sit for 10 minutes! (This
lets the solvents
evaporate so they are
not trapped under the
covering) Cover the wing
bottom first. The seam
will go straight down the
center. Leave the rest to
wrap around the edges.
(HINT: Use a few strips of
fiber reinforced
strapping tape across
the length of the LE for
added durability from
bumps)
□ Use the same
technique on the top; go
LE to TE. Fold access
over the tips and trim
center section for a ½”
overlap. Cover the wing
tips last.
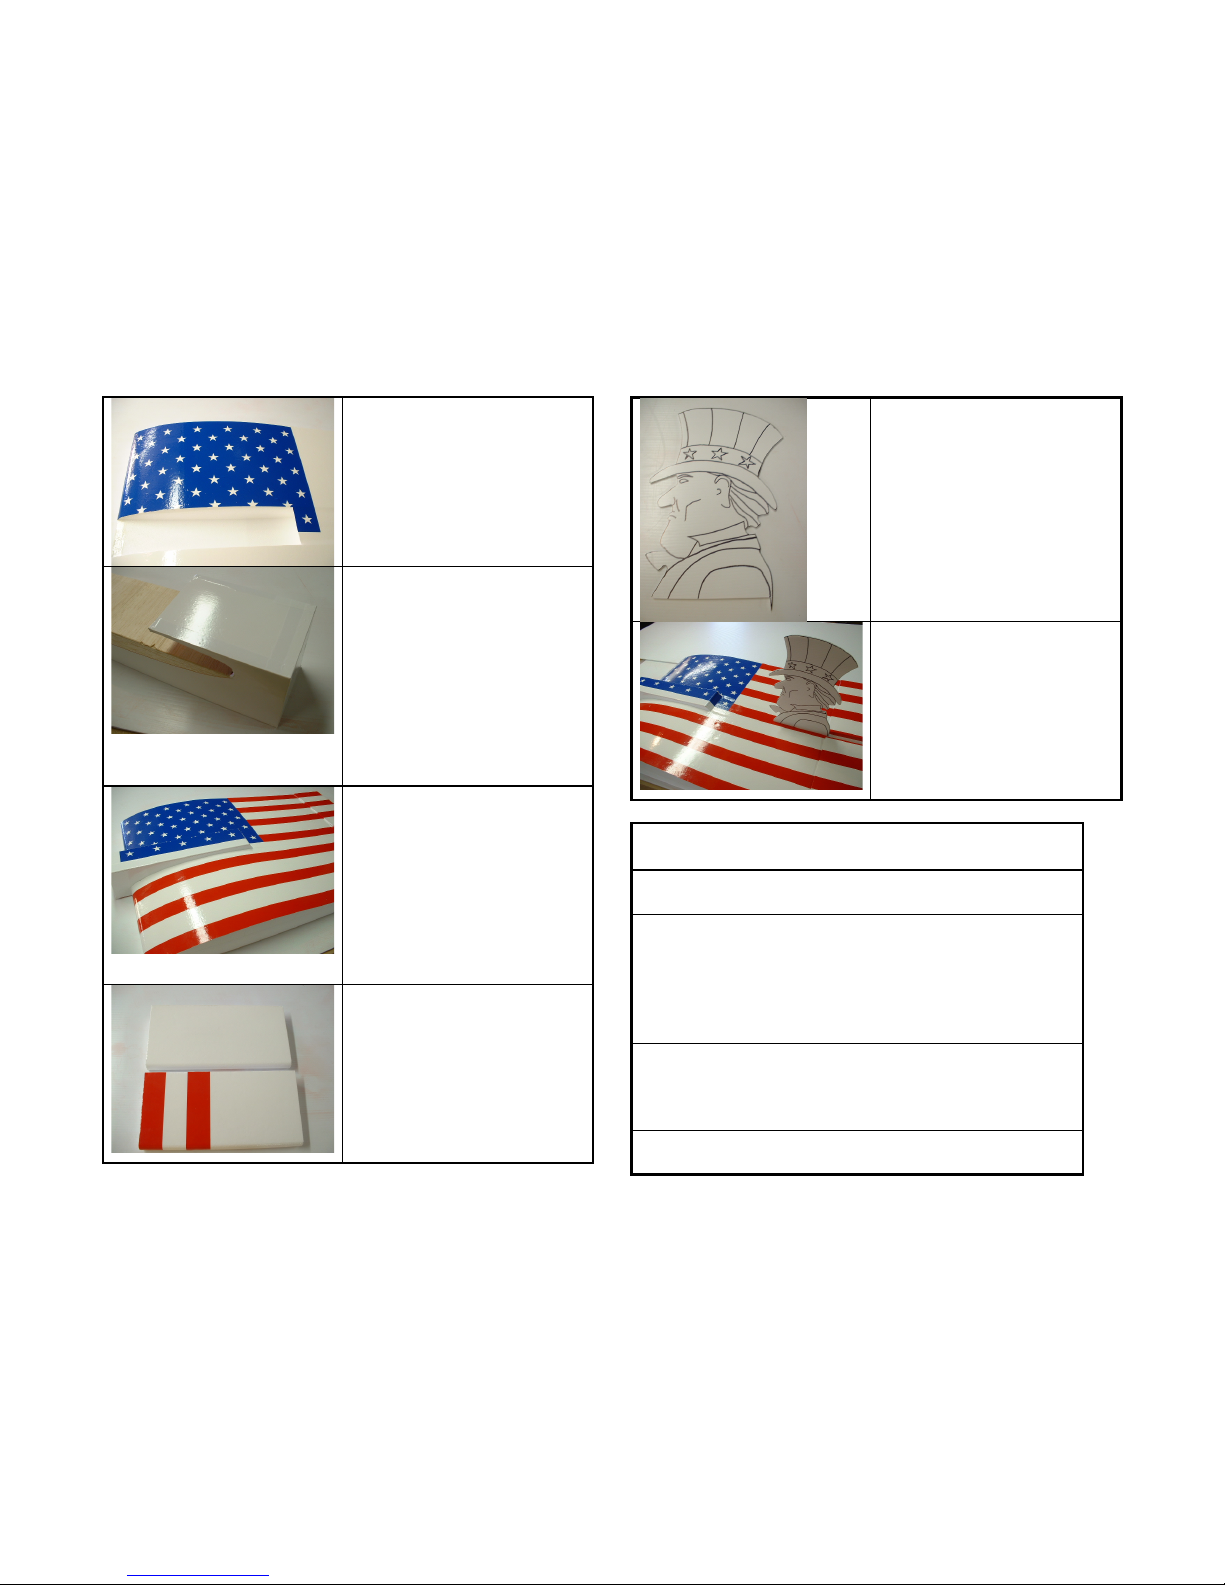
□ Carefully position the
blue stars section on the
leading edge of the Right
wing. Use care to push
out any bubbles. A light
misting of water before
applying the blue will help
placement.
Page 9
© 2002, 2003 Flying Thingz All Rights Reserved.
9
□ Carefully trim the blue
along the fuselage cut
out. SAVE THIS PIECE!!!
Set it aside on a piece of
nonstick backing.
□ Cover the fuselage with
the white covering. Use a
heat gun to help pull
around the corners for a
smooth finish. When
finished, remove the
covering that will be
hidden in the wing center
section. This will allow for
a good glue joint.
□ FIRST slide the fuse
into place and apply the
rest of the stars to the top
of the fuselage. Use blue
covering to fill in the rear
and right side of the
fuselage. LAST apply the
red stripes in the order
shown on the plans.
Elevons:
□ Use the same
technique as the wing to
cover the elevons in
white. Align the elevons
on the wing, and then
apply the red strips to
match the wing.
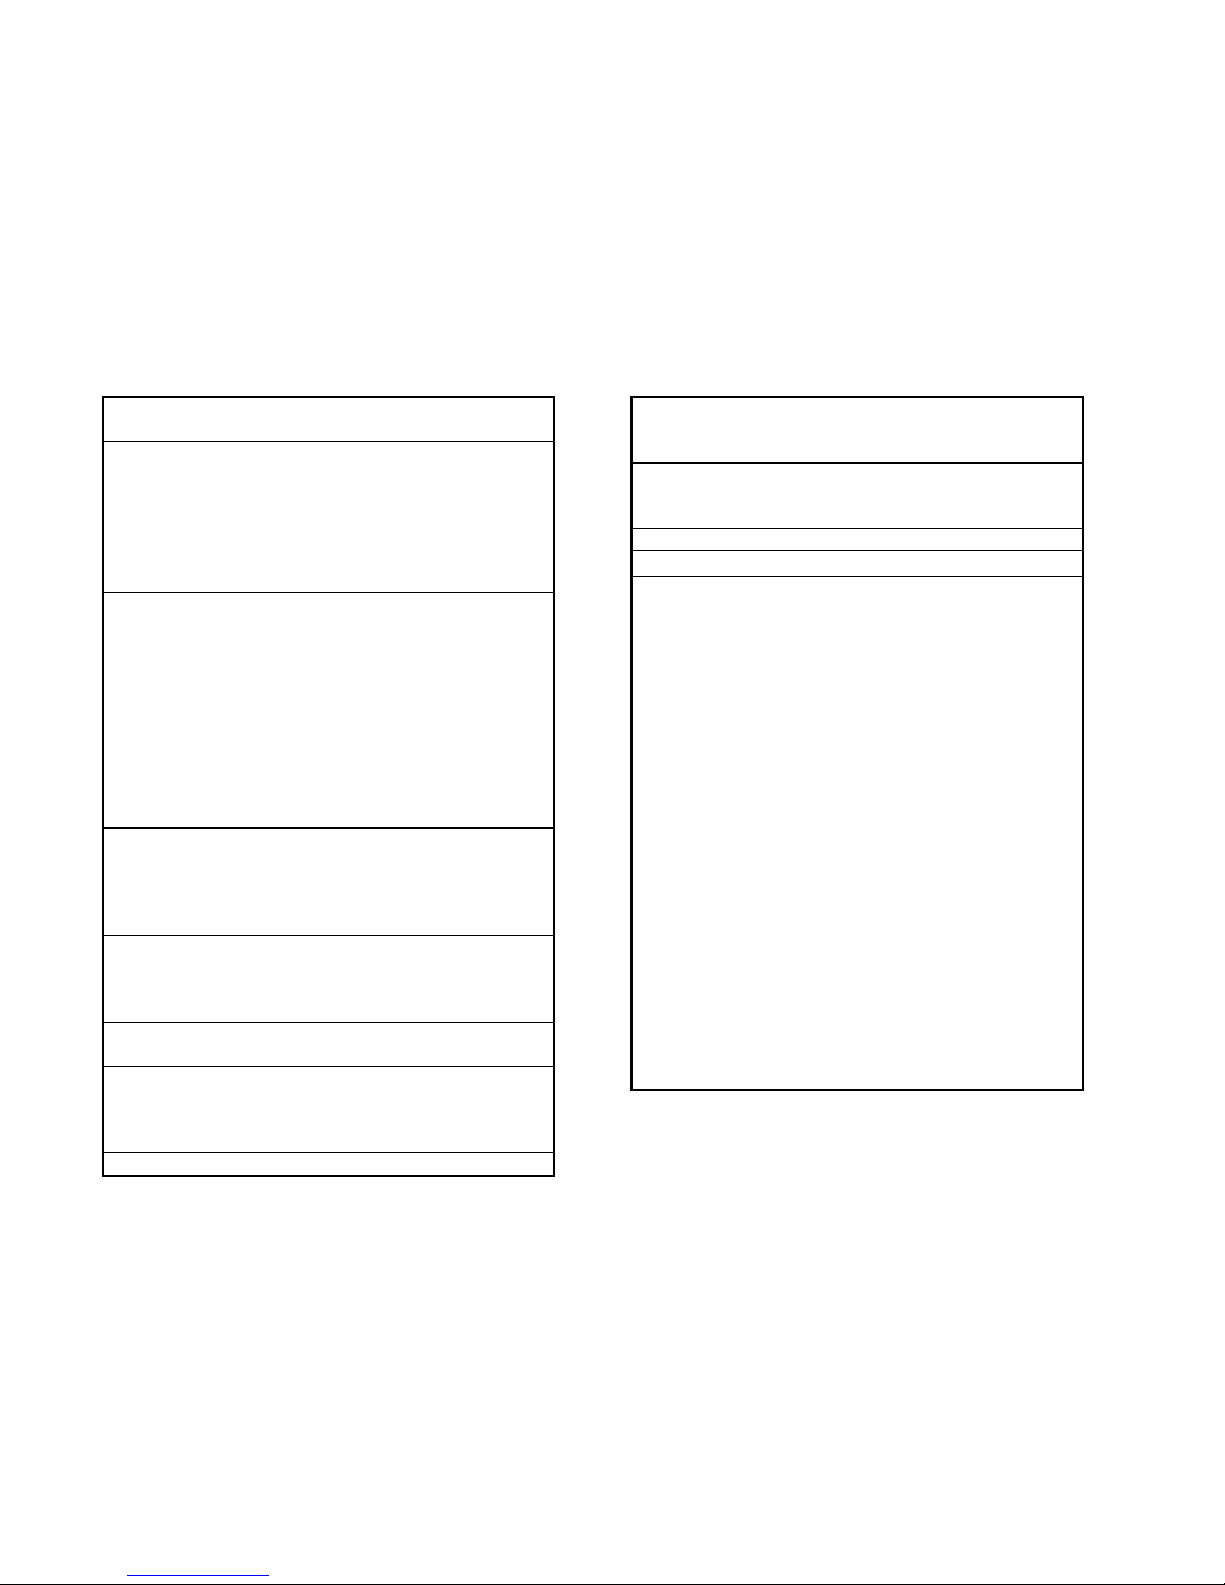
Uncle Sam
□ Using the plans as a
drawing reference, give
uncle same his looks
with a black sharpie
marker. Use paint or
some scrap covering for
the stripes on his hat.
□ Remove only the
covering on the TOP OF
THE WING over the
Uncle Sam mounting
slot. Using 5 min. epoxy,
glue him in place. Use a
square to keep him
vertical.
Final Assembly
Remove any covering where the fuse and wing
will be glued
Using epoxy, glue the fuse into the wing cradle,
making sure it is in the correct position and
seated both front and back. Use some white
alphaic resin glue to fill in the fuselage and wing
joint. This will keep out the fuel and will dry
clear.
Fit the main gear into place. Secure the landing
gear with the supplied gear straps and screws.
The gear is designed to break the straps before
damaging the wing!
Mount the nose gear to the fire wall. Make sure
to leave enough room for your engine and
Page 10
© 2002, 2003 Flying Thingz All Rights Reserved.
10
mounts. We like the engine mounts with a gear
hole built in.
Hinge the elevons using packing tape. Put a
layer of 2” tape across the top of the hinge, then
flip over the elevon, and do a layer on the
bottom. Use extra covering material to cover the
hinge if desired. Use epoxy to glue the control
horns into the elevons at this time. (see plans for
diagram)
If you desire the optional air rudder for improved
cross wind handling and aerobatics, cut ONE
SIDE of a flute on Uncle Sam-- at the back of his
neck, extending to the top of the hat. Attach the
rudder to the nose gear servo with a pushrod.
You will need 1 large nylon control horn for this
option. You may also consider adding a 3/16
dowel or carbon rod vertically down through
Uncle Sam for increased stiffness in aerobatic
maneuvers. You can also use string flying wires
to add rigidity.
Add your radio gear to the servo trays. The rear
servo tray has a receiver section to rubber band
to. Run the receiver antenna out the rear of the
plane, and tape down between the elevons. DO
NOT cut the excess wire, let it dangle.
Bolt on your engine to the engine mount before
mounting to set the spacing (if using a 2 piece
mount) Then drill and bolt the engine and mount
to the front of F-1.
Place your fuel tank behind F-1 and run fuel and
vent lines to the engine through F-1
Use threaded end pushrods for your controls.
Connect all surfaces to the servos securely, and
test for free movement. Make sure to use a
sleeve on the outside to eliminate any flexing.
Add your wheels and wheel collars to the main
and nose gear. Make sure that you airplane is
sitting at a slightly nose up attitude on the gear.
This will help the plane rotate for takeoff.
Do a final check over all parts and electronics to
make sure all is correct. And don’t forget to take
a picture now!
Flying
Do the standard range checks, and make sure
your controls are moving in the right directions,
including the nose wheel and throttle. Double
check your CG! Get used to the taxi and show off
your new toy to all those watching! When you
are ready to take off, advance throttle SLOWLY,
you don’t want it to torque around on you. Since
we have no air rudder, if you are in a crosswind,
uses down elevator to keep the nose wheel on
the ground until you are ready to rotate for take
off. When you are up to flying speed, gently ease
off the down, and slowly pull back. It is
responsive, and needs no extra help finding its
home in the clouds! Get used to the way it flies
up high, try a few stalls (it won’t do any thing
crazy) and play around. When it’s time to land,
set up normal, but keep on a little power until
you are over the runway. With its low 1:1 aspect
ratio, it is not the best glider out there. If you find
your self in a power out situation, just keep the
nose down to maintain speed. A little practice up
high will make this kind of incident a snap. You
will find it to be fun to fly and a real crowd
pleaser! Have FUN and be safe!!
Don’t forget to send Pictures
and Comments to us!
Page 11

© 2002, 2003 Flying Thingz All Rights Reserved.
11
Flying Thingz
2075 Grandview St
Oceanside, CA 92054
[email protected] or online at www.flyingthingz.com
 Loading...