

Page 1

Flydigi
Page 2
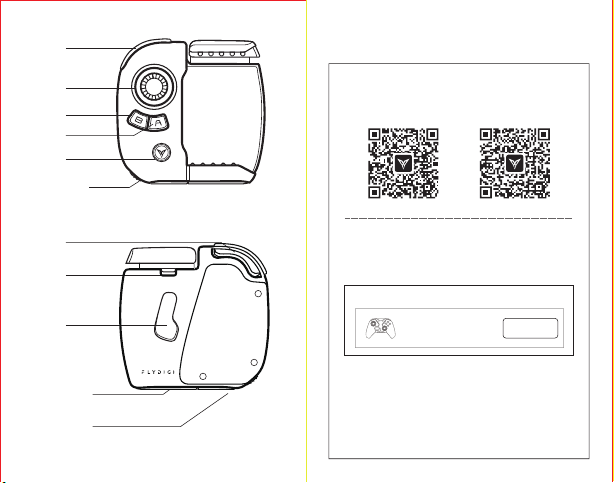
LB
User Guide
Joystick
B
A
Logo
(LED indicator)
Power switch
LT
Lock
M
(No M button
in standard edition)
Utool Cable
(to activate Android devices)
Charging Port
(Charging LED indicator)
STEP1: Download Flydigi Game Center
Scan the QR code to download and install Flydigi
Game Center
App Store Google Play
STEP 2: Connect to device via Bluetooth
In Flydigi Game Center > Gamepad, tap Connect and
follow the instructions displayed to connect the
gamepad.
GamePad
Disconnected
Flydigi Device Only
The paired gamepad will automatically reconnect
when it is turned on, as long as your device is within
the specified range and the Bluetooth is on.
If you wish to pair the gamepad with another device,
you must first turn off Bluetooth on the current device,
then go to Flydigi Game Center and tap Connect
Gamepad.
Connect
Page 3
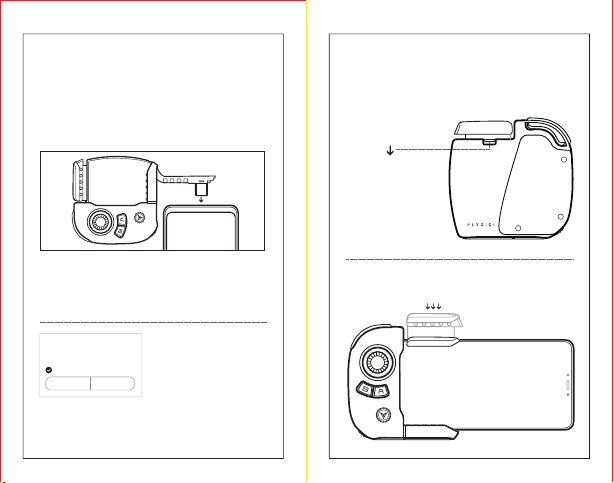
STEP 3: Activate button mapping
(Android users only)
iOS users please skip toSTEP 4
Follow the activation instructions in Flydigi Game
Center - Key Mapping to enable USB debugging and
complete the activation.
Pull out the Utool cable from Wasp 2, plug it into the
charging port of your device, then turn on the gamepad.
If your device has Micro-USB only, you needto purchase
*
an additional Type-C to Micro USB adapter.
Allow USB debugging?
The computer’s RSA key fingerprint is:
C7:BB:CC:19:26:38:24:97:09:C6:BE:98:EA:5B:16:D7.
Always allow this computer to debug.
Cancel OK
Once activation is successful, the indicator light will stop
blinking and stay in blue. You can then unplug the Utool
cable.
If your device prompts
you to authorize USB
debugging, tap OK.
STEP 4: Install the gamepad
1. Press the lock button to pop up the handle.
2. Press on the handle until your device is secured.
Page 4
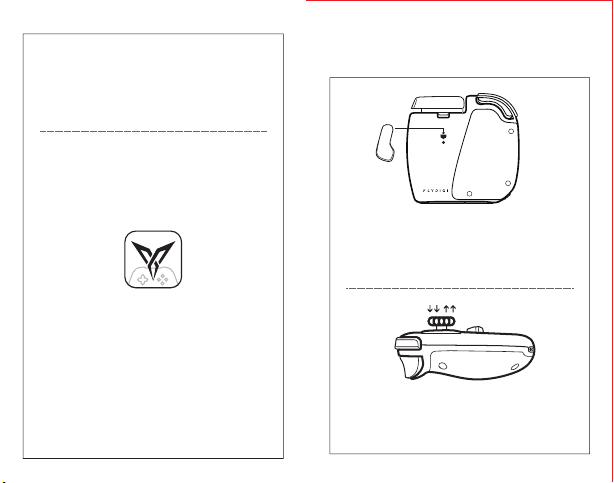
STEP 5: Start game
For a better gaming experience, please launch
the game inFlydigi Game Center.
For all users across Android and IOS:
Please tap “Gamepad” > “Add Game” to add a
game downloaded from App Store or Google Play,
then open the game to start.
Accessories Installation Instructions
This part is only applicable to Elite version.
M
Follow the steps in the diagram to insert the buckle
of the M button into the holder at the back of the
gamepad and the M button will be automatically
placed in the correct position.
Joystick
Follow the steps in the diagram to apply a force
perpendicular to the gamepad to remove or install
the joystick.
Page 5
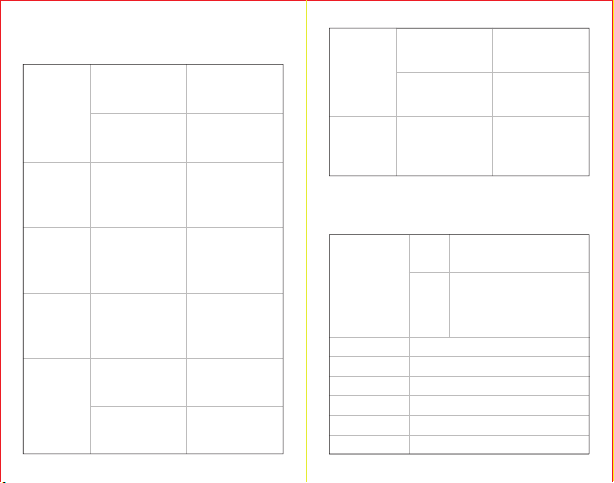
Basic Operations
and LED indicator Status
Switch the power
urn
T
on/o
device
Bluetooth
Pairing
Normal
Mode
Reconnect
Low
Battery
button to the left.
Switch the power
button to the right.
Power on the
device for the first
time.
Gamepad works
properly after the
pairing is
completed.
Paired devices
automatically
reconnect when
powered on.
Remaining power is
within 20% to 10%.
Remaining power is
less than 10%.
LED indicator blinks
and gamepad
powers on.
LED indicator blinks
and gamepad
powers off.
LED indicator blinks
in blue and
gamepad enters the
pairing mode.
LED indicator stays
in blue when device
is connected.
LED indicator stays
in blue when device
is connected.
LED indicator blinks
in green slowly.
LED indicator blinks
in green quickly.
USB charging port is
connected to a
Charging
Calibrate
joystick
power source.
Charging is
completed.
Press and hold the
Logo and LB buttons
for 3 seconds when
device is on.
Specication
iOS
Supported
Devices
Wireless frequency
Bluetooth range
Dimensions
ttery capacity
Ba
Charging time
Working current
Android
2402-2480MHz
83.25*82*36mm
LED indicator
stays in red.
LED indicator
turns off.
LED indicator blinks
in green twice after
the calibration is
completed.
s and above with iOS
iPhone 5
9.3 and above.
Android devices with Android
6.0 and above & Bluetooth 4.0,
thickness of less than 10.5 mm
and width of less than 86 mm.
<10 m
280mAh
1.5-2 hours
Working current <4 mA; Standby current <0.2 mA
Page 6
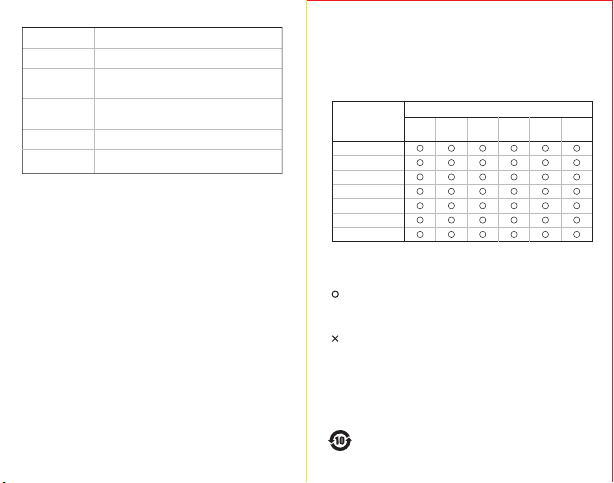
Char
ging current
Battery life
Storage
temperature
Operating
temperature
Weight
onducted Peak
C
Output Power
Charging voltage: 5V; charging current < 280 mA80h
80 hours
-20°C to +80°C
0°C to +40°C
Approx. 90g
Approx. 90gApprox. 90g
1. 1dBm
1.71dBm
Name and Concentration of T
oxic
or Hazardous Substances and
Elements
Part Name
PCBA
Outer casing
Packaging
Wires
Polymer battery
Silicone
Metal, adhesive tape and
small structural parts
This t
able is based on the regulations of SJ/T 11364-2014
indicates that the concentration of the toxic or hazardous substance
in all homogeneous materials in this part is below the limit
requirement in GB/T 26572-2011
indicates that the concentration of the toxic or hazardous substance
in at least one homogeneous material of this part exceeds the limit
requirement in GB/T 26572-2011
The envir
years based on normal operating conditions.
Toxic or Hazardous Substances and Elements
Hg Cd Cr PBB PBDE
Pb
onmentally-friendly use period of this product is 10
Page 7
Any Changes or modifications not expressly approved by the party
responsible for compliance could void the user’s authority to operate
the equipment.
This device complies with part 15 of the FCC Rules. Operation is subject
to the following two conditions:
(1) This device may not cause harmful interference, and
(2) This device must accept any interference received, including interference
that may cause undesired operation.
RF warning for Portable device:
The device has been evaluated to meet general RF exposure requirment.
The device can be used in portable exposure condition without restriction.
Page 8
 Loading...