

Flybrix Building and Flying Instructions:
< Back
Next >
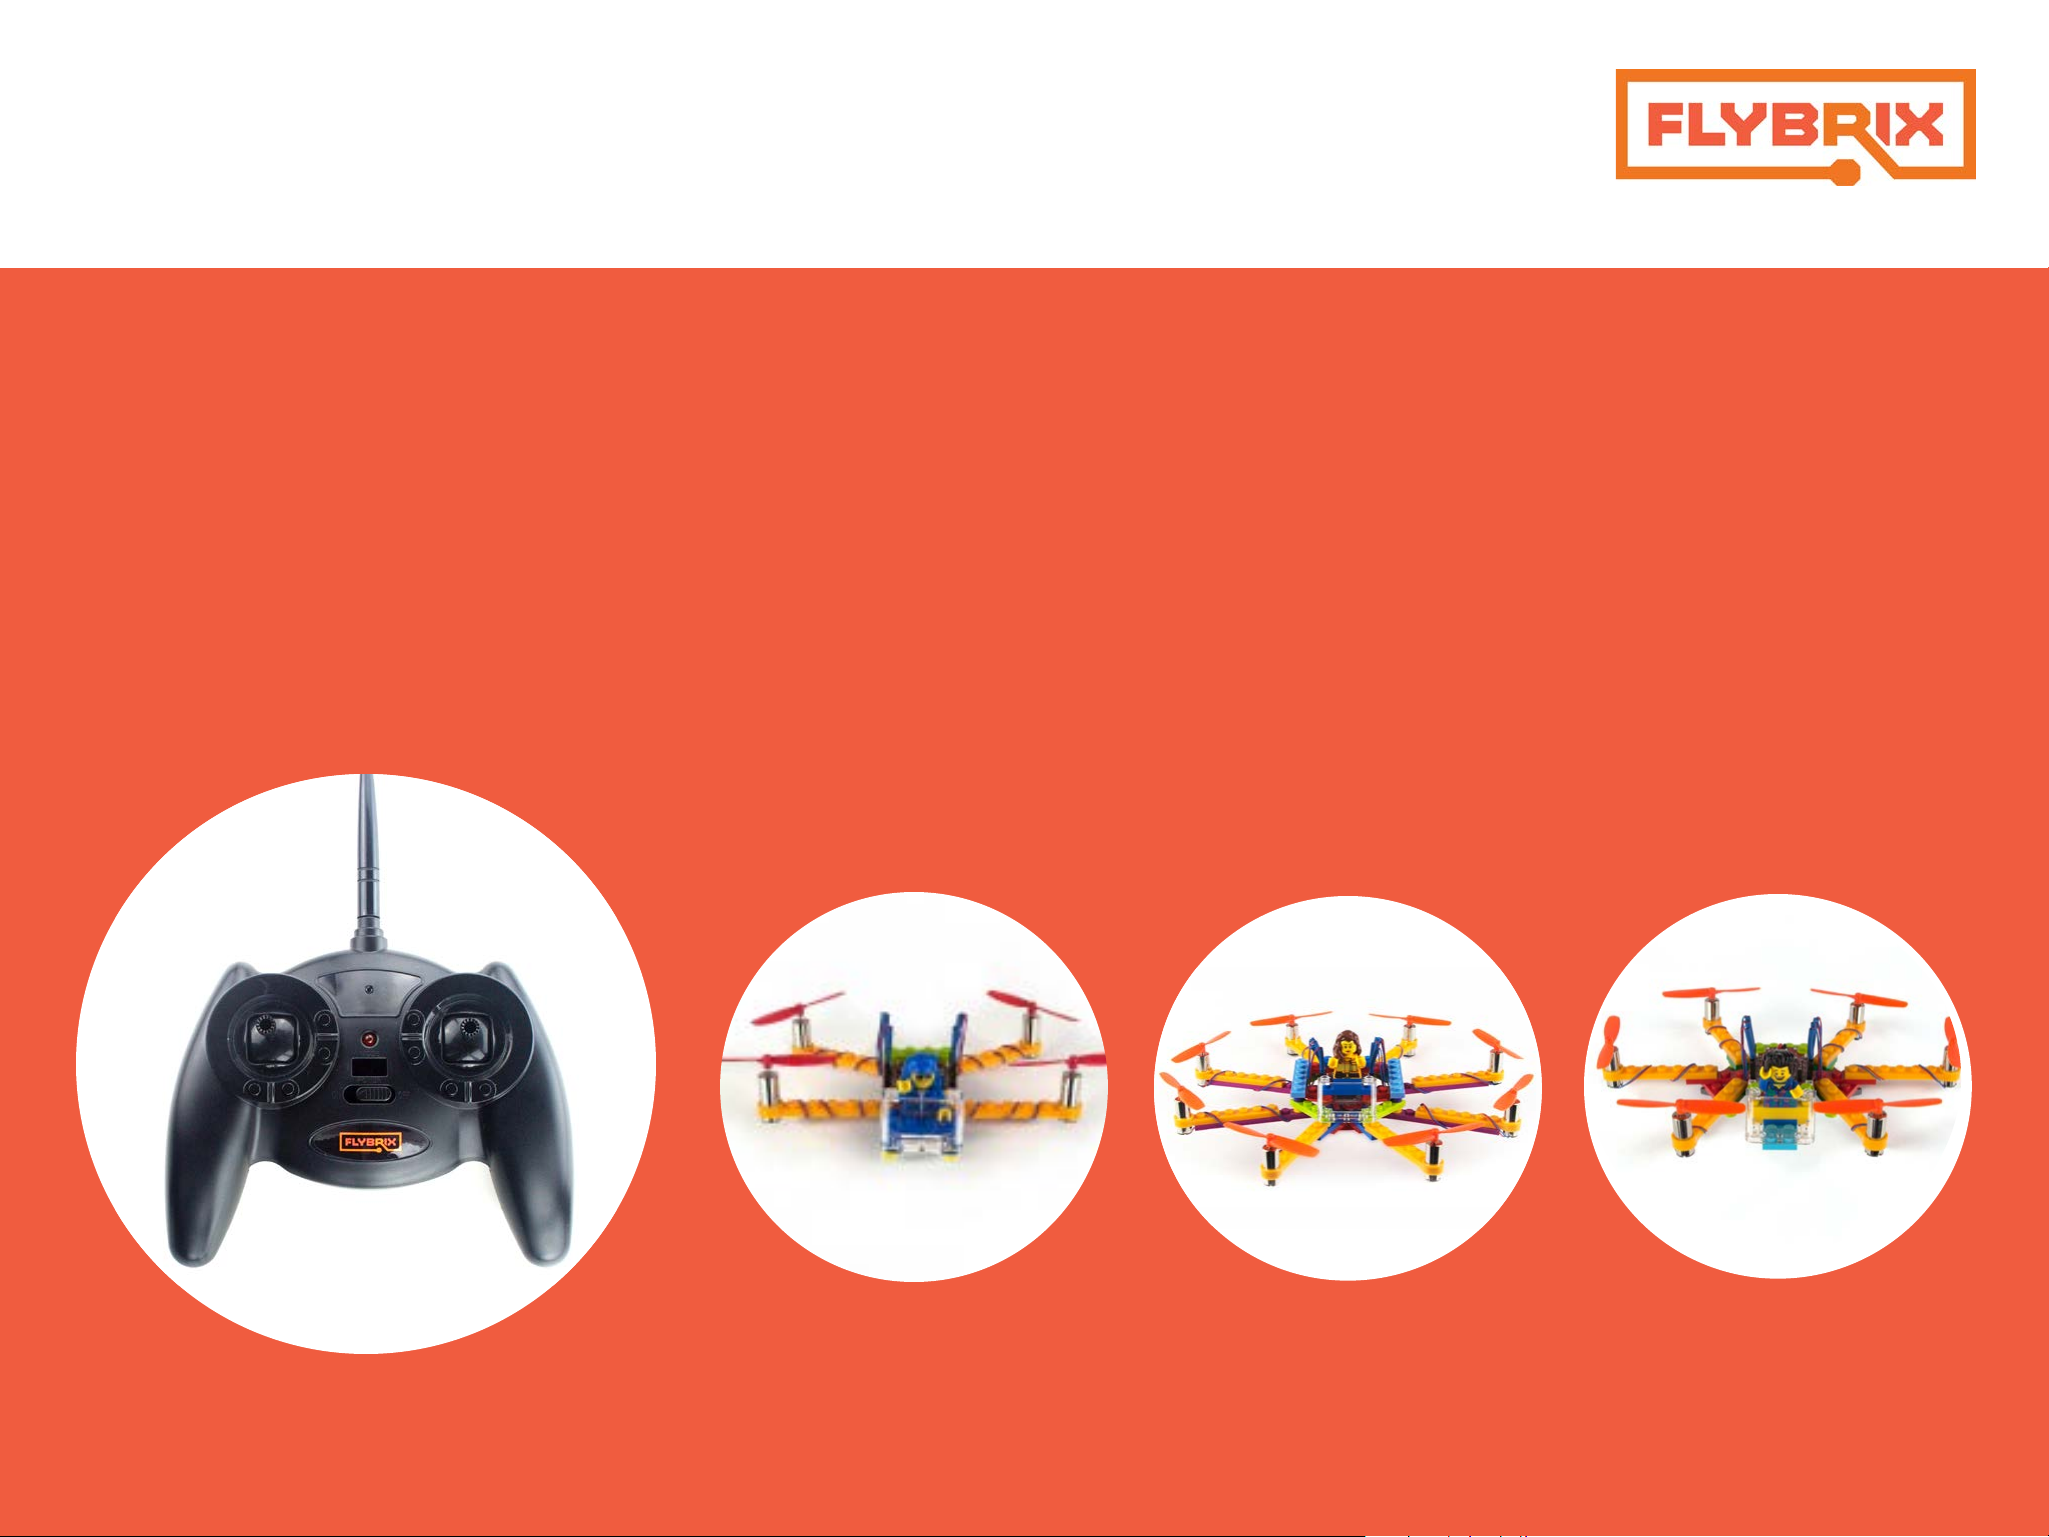
Basic Quad, Octo & Hexo Designs
JC-S Controller
Version 1.4 March 2017

Build More, Learn More
< Back
Next >
3. Introduction
4. Getting Started
5. Safety
6. Building a quadcopter
14. Flying
15. Troubleshooting
15. Configuration Software
31. Building a hexocopter
17. Building an octocopter
40. Games
Start with the Quad.
Table of Contents
Click links to auto-navigate the .PDF
1.
2.
Learn the basics of building,
connecting motors and flying.
Try the Octo next.
Take what you’ve learned from the
quad build, apply your know-how to
the octo build.
Level up to the Hexo.
3.
Now that you’re almost a pro, give the
Hex build a shot. Use the software to
change motor specs to fly your Hexo
build.

Introduction
< Back
Next >
Flybrix is designed for experimentation, creativity and learning. Trial and
error is the heart and soul of this kit. Why? That’s where the “a-ha” moments
happen, that’s where the learning happens, that’s where the lines between
fun and education get blurred. Flybrix is all about providing a safe, fun,
sometimes silly platform for asking and answering “how” and “why” questions that take us on the journey of understanding how things work.
In this manual is the first build (the basic quadcopter) of 3 designs that take
you on a learning arc that introduces all the aspects of your Flybrix kit. The Octocopter is the next build and finally the Hexocopter.
If you happen to get turned around in the process, we’re here for you! Visit the
forum on flybrix.com, or email support@flybrix.com for help.
Taking to the skies: Once you’ve built your airframe, it’s time to fly! Ask anyone
who flies drones, quads, hexo, and octocopters. They’ll tell you flying is “a thing”.
It takes practice to do well. Some people even go to special piloting schools to
learn how to do it! Flybrix is the perfect platform to learn how to become an
ace pilot because the drones you build are small, light and they collapse on
hard crashes. And, they go back together in a jiffy. The designs we’ve given you
are stable, balanced frames that fly well. Experiment with flying these designs
first to get a feel for how to fly Flybrix. Or not… You do you!
Exploring more: Once you’re ready, take your kit to the next level by visiting the user forum on flybrix.com. You’ll see other ways to use the parts you
already have, plus see some exciting new ones, learn how to tweak your airframes, share schematics, and meet the Flybrix community. On the last page of
these instructions we have a few game ideas that are fun to play, even with just
two people!
Leveling up: Download the Flybrix Chrome extension from the Chrome Web
Store for access to our code, configuration tools, community, and more! The
Configurator visualizes the data that comes off your Flybrix and your controller.
Features like: sensor feedback, balance, thrust levels, motor positioning, battery output etc. When you start getting into new designs with different motor
placements and adding motors, The Configurator will be your go-to in order to
get your airframes adjusted to get them flying.
We love feedback! Email support@flybrix.com with any feedback you think
could help us improve the product.
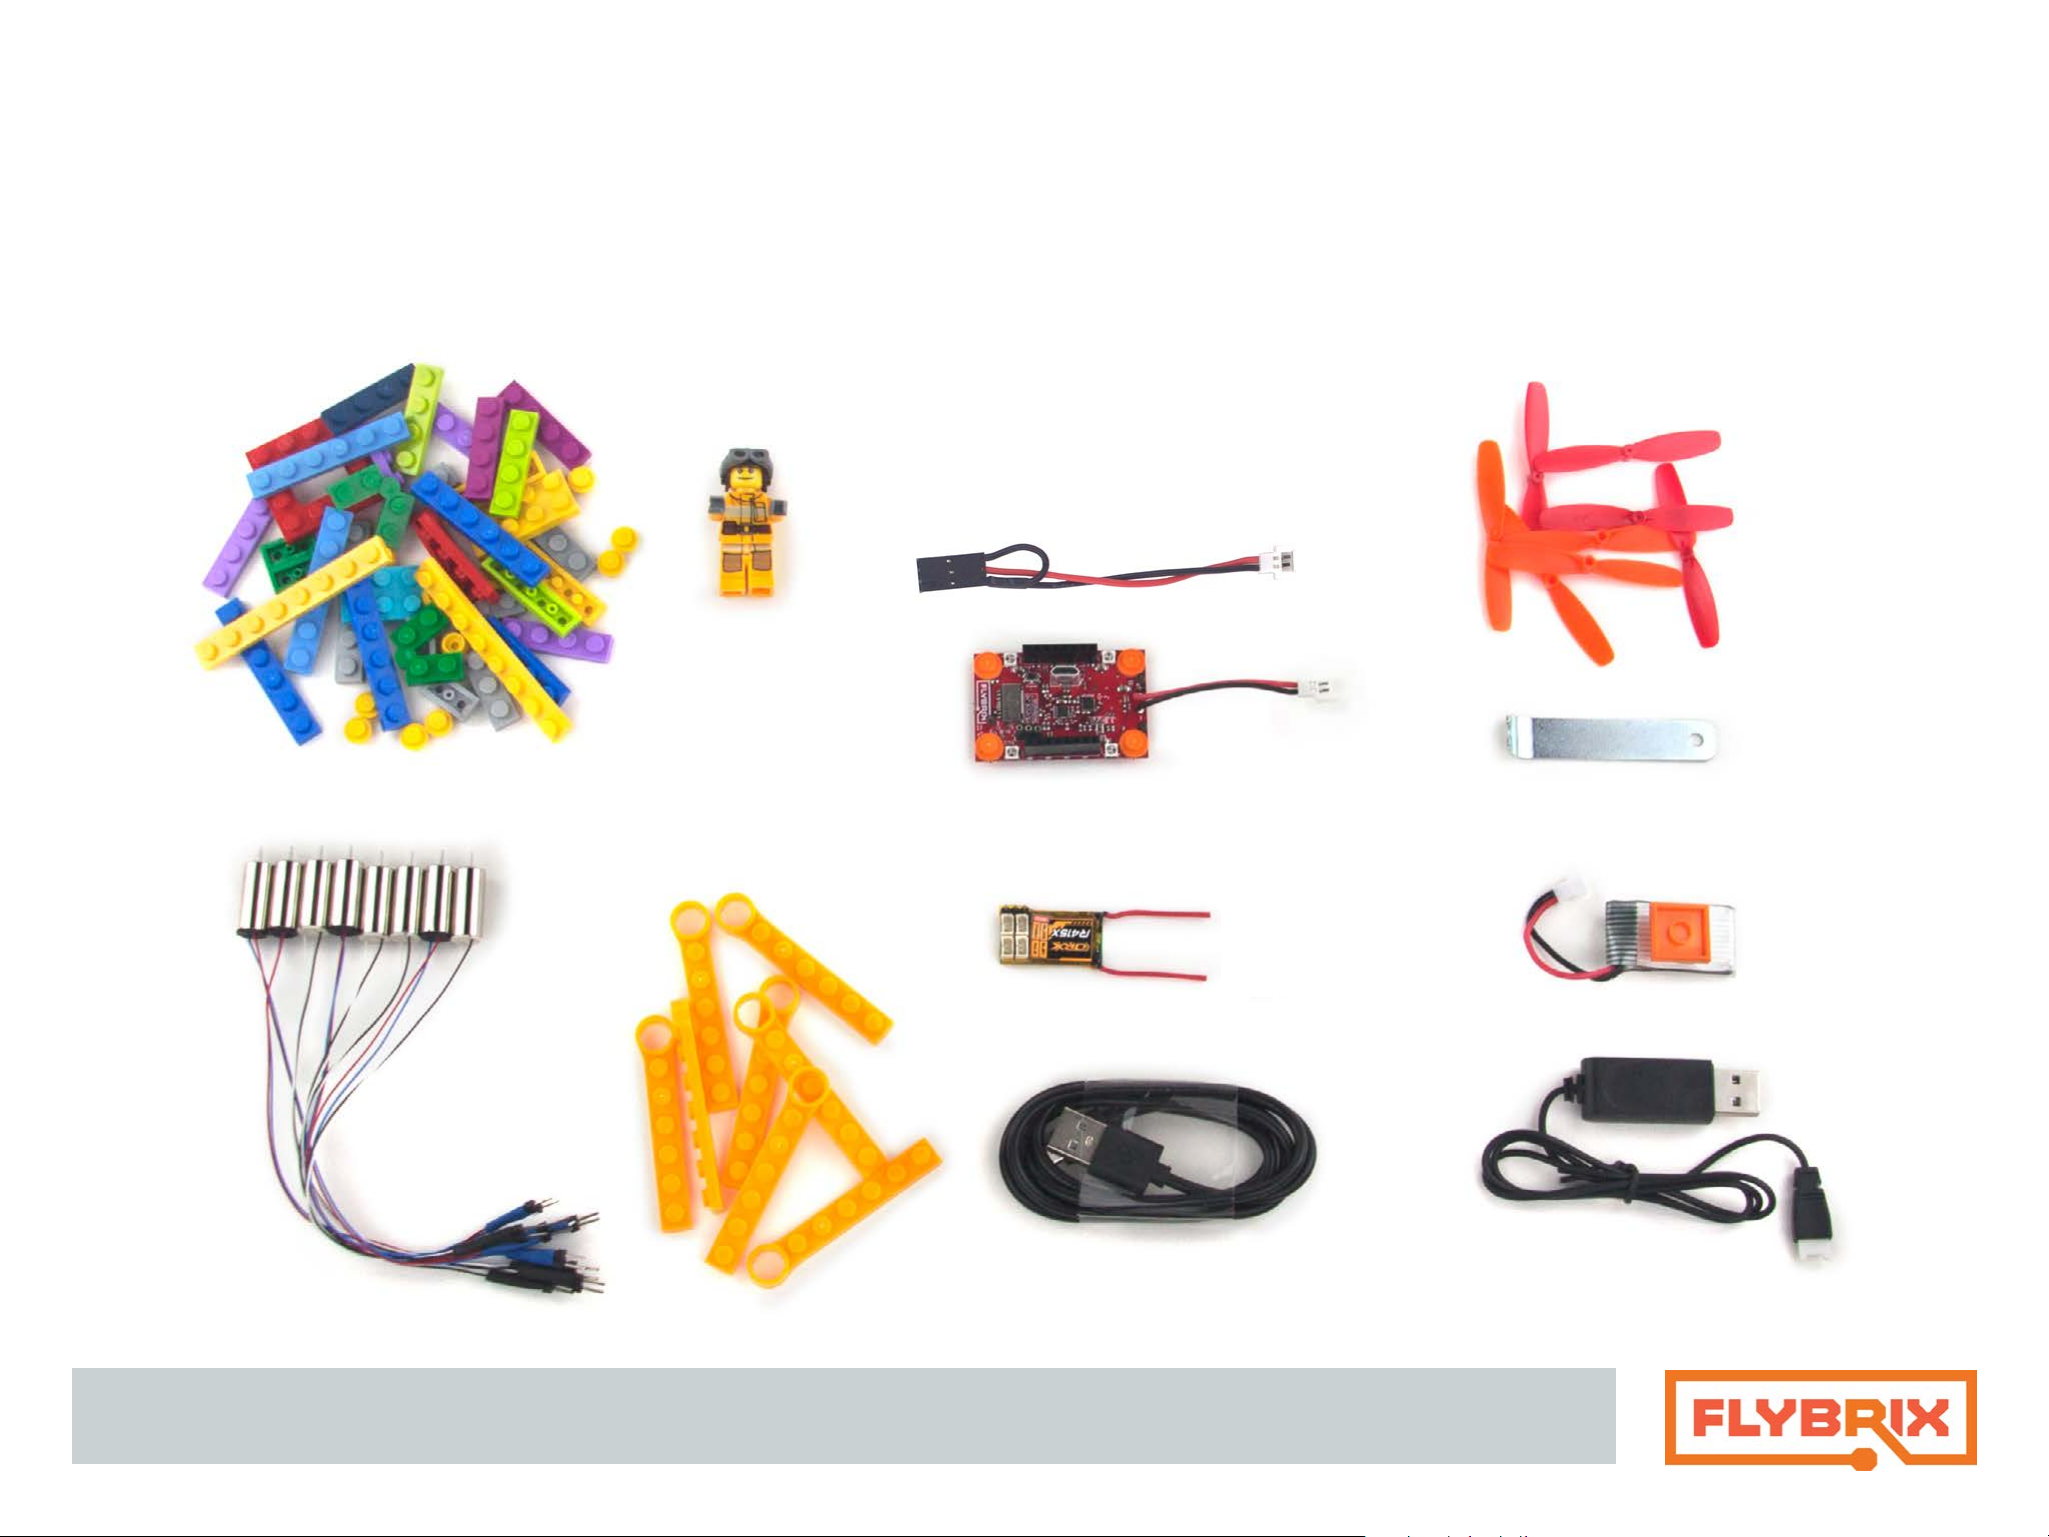
Getting Started: know your kit
< Back
Next >
Tweezer
Binding Cord
Propellers
LEGO Bricks & Minifig
Motors Boom-Arms
Flight Control Board Propeller Wrench
Receiver* Battery
USB Cord Battery Charger
* If you ordered a kit that includes the R/C Controller, you will have the receiver board, binding cable and controller in your kit.
Getting Started: Know Your Kit
< Back
Next >
LEGO Bag: There are enough bricks in this kit to build a quadcopter, hexocopter and octocopter, plus several extra bricks to use for tweaking your design. Get creative later on by adding your own LEGO bricks! The color of your LEGO bricks will most likely be different from the instruction pictures. It’s important to reference
shape and size of LEGO while you’re building, not color matching.
RC Controller*: You’ll use the controller to fly your airframes. Take off the bubble wrap, and it’s ready to go. The controller uses four AA batteries and they’re already inside.
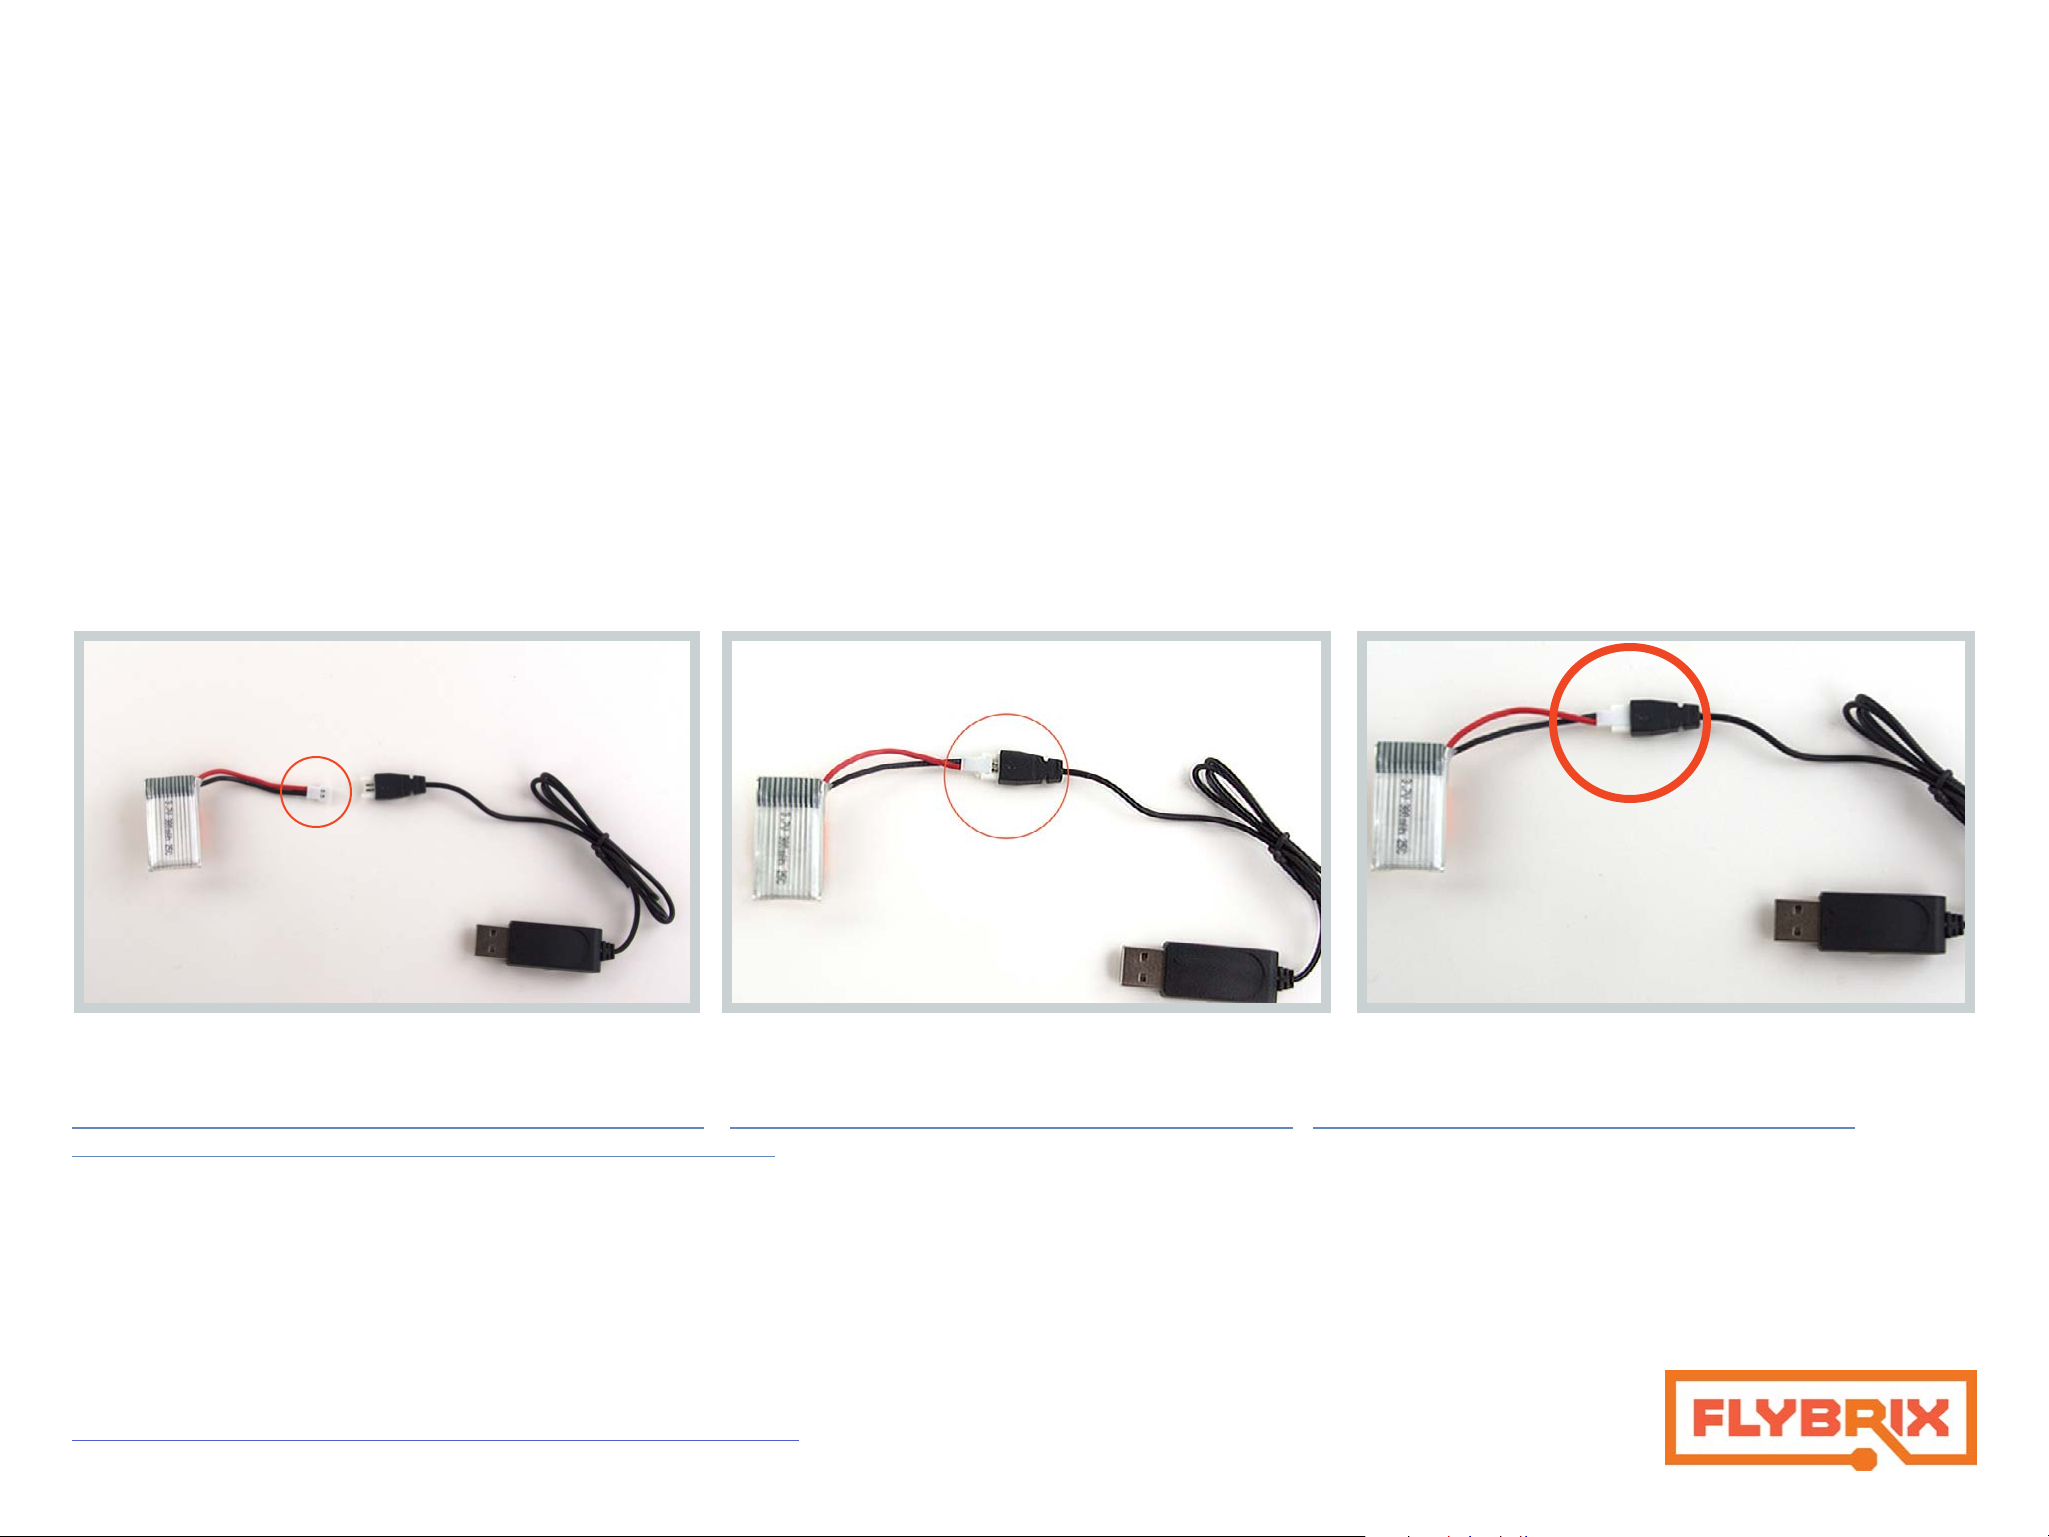
Battery: Pay close attention to the way the battery connector is keyed.
It’s dangerous to plug the battery in backwards to both the charger and the flight board.
The battery has one side of the connector plain plastic and
the other side has metal connection points.
Here are some additional resources so you can read up on battery safety:
http://www.rchelicopterfun.com/rc-lipo-batteries.html http://thedronegirl.com/2015/02/07/lipo-battery/ http://www.towerhobbies.com/help/ama_lipo/
http://www.rcgroups.com/forums/showthread.php?t=209187
Propeller wrench: Use this wrench to pop your propellers off to avoid damage to your motors.
Connect the battery with the plain plastic side up.
Properly connected battery!
Receiver, Binding Cord: These components are used when you’re flying with an external RC controller. The receiver attaches to the flight control board and the
biding cord is used to bind the controller to the flight control boar and receiver. We’ll cover this further in the flight instructions.
BEFORE YOU START BUILDING... UPDATE YOUR FIRMWARE. We are constantly updating the
software and firmware that improve the Flybrix experience.
https://flybrix.com/pages/upgrading-your-firmware

Let’s Build a Quadcopter!
< Back
Next >
1.
Attach (4) Boom-Arms to (2) 1x8 bricks.
*Notice the next few instruction pictures are in black and white. That’s
to remind you that the colors of your LEGO bricks don’t matter. Use the
shapes of your LEGO as your reference for which bricks to use.
2.
< Back
Next >
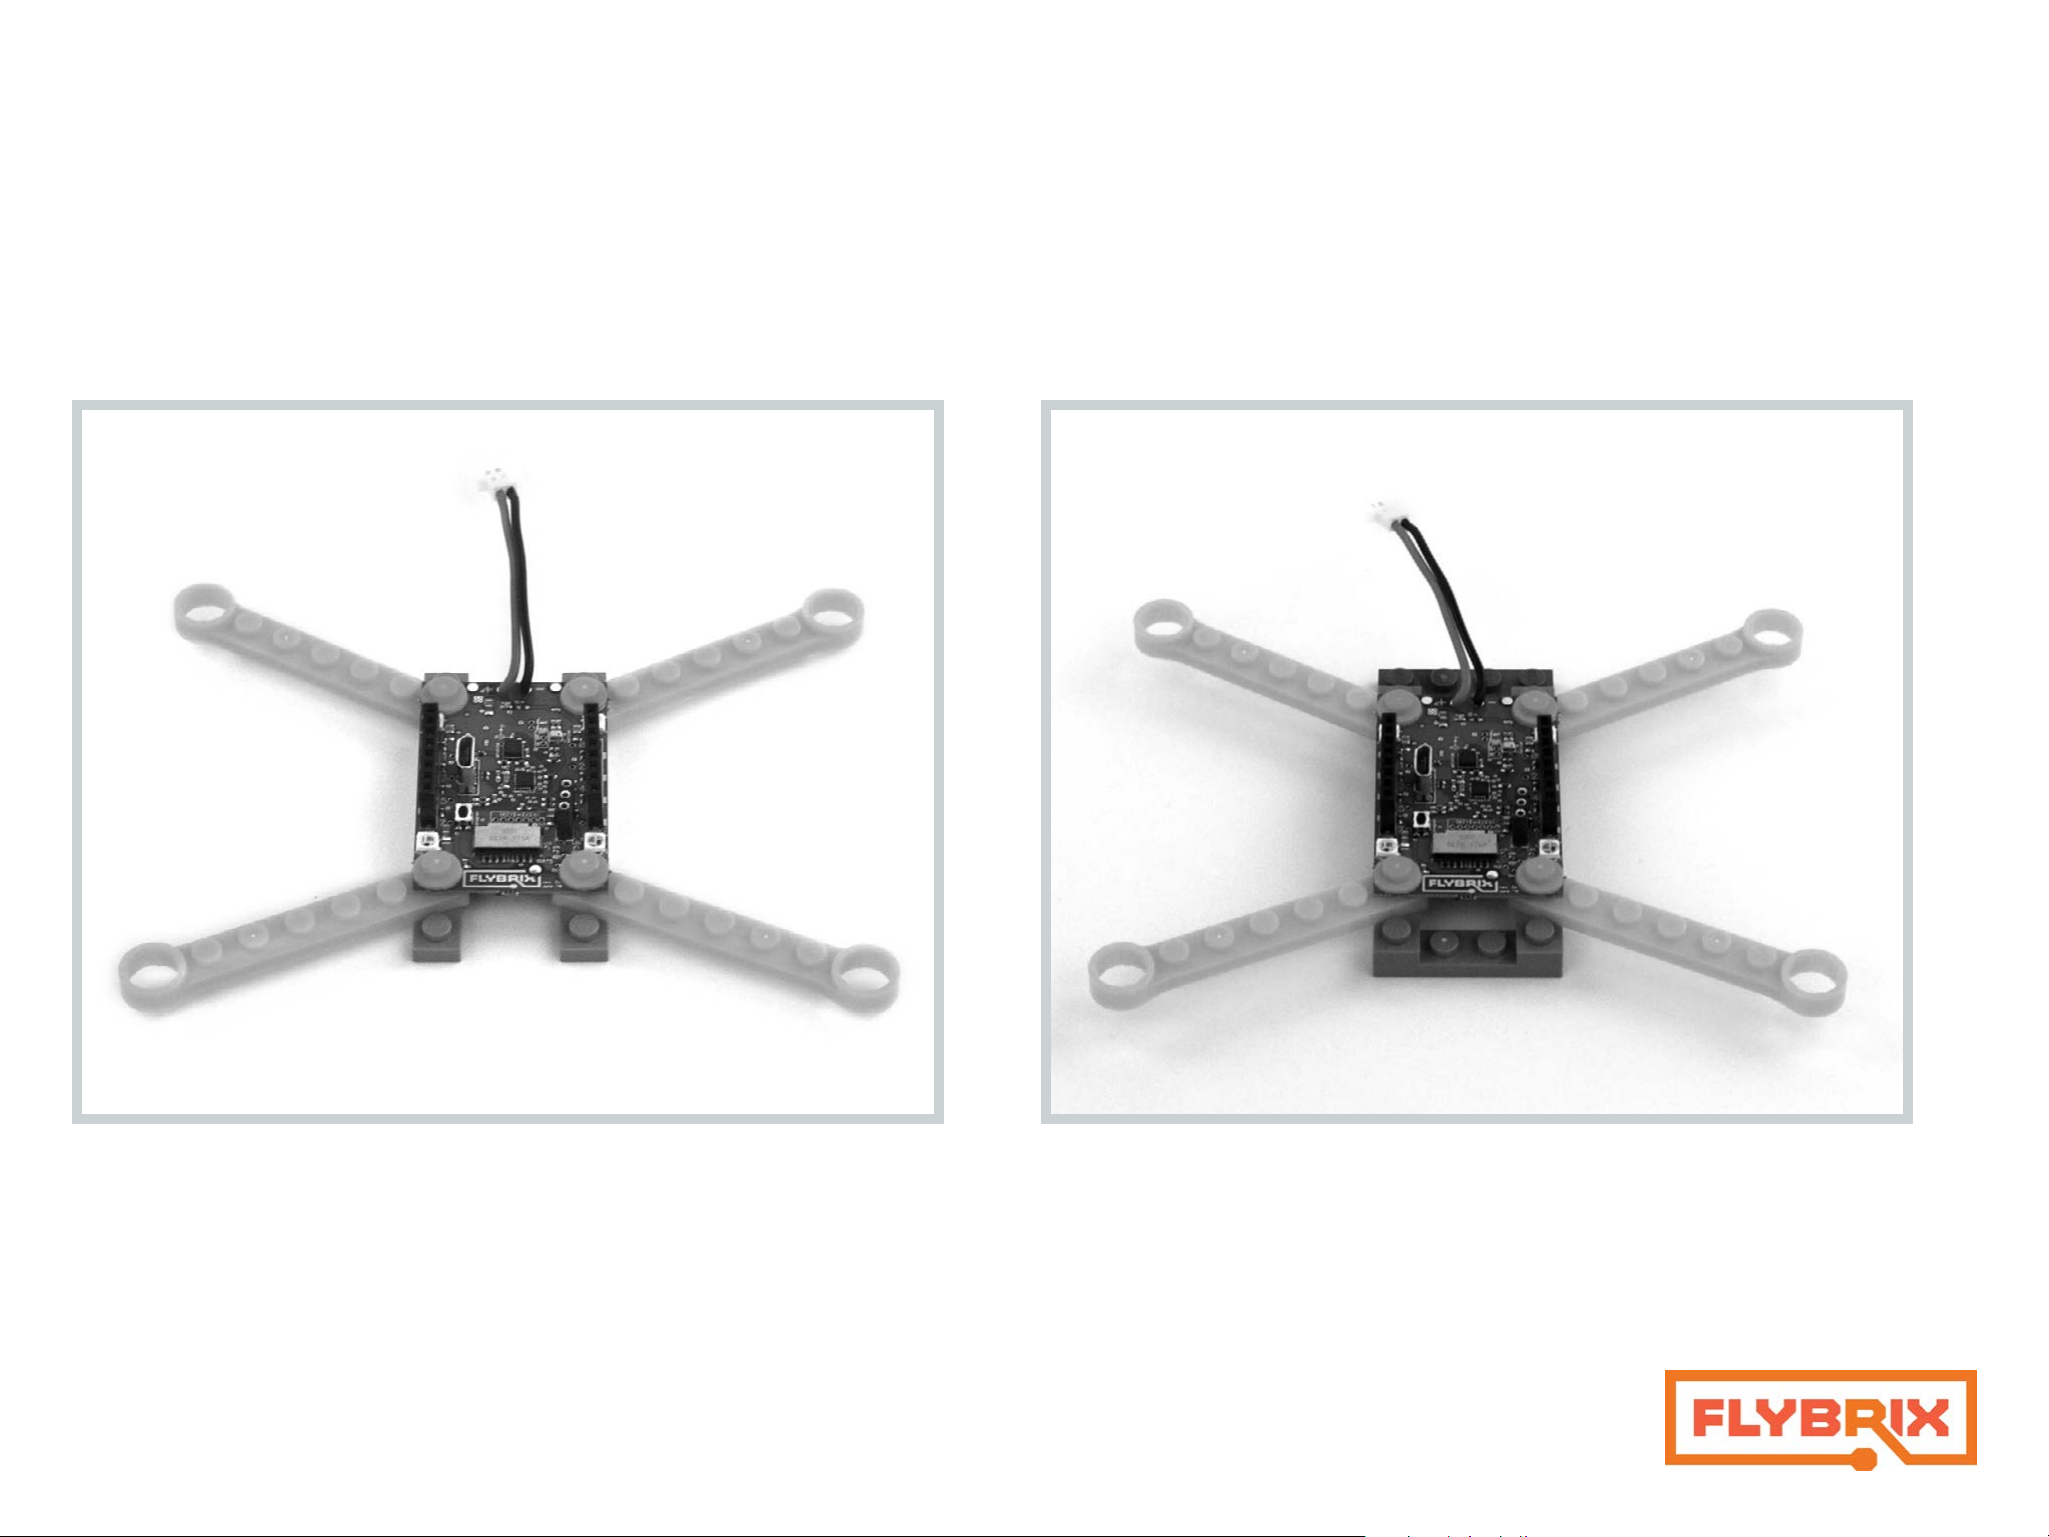
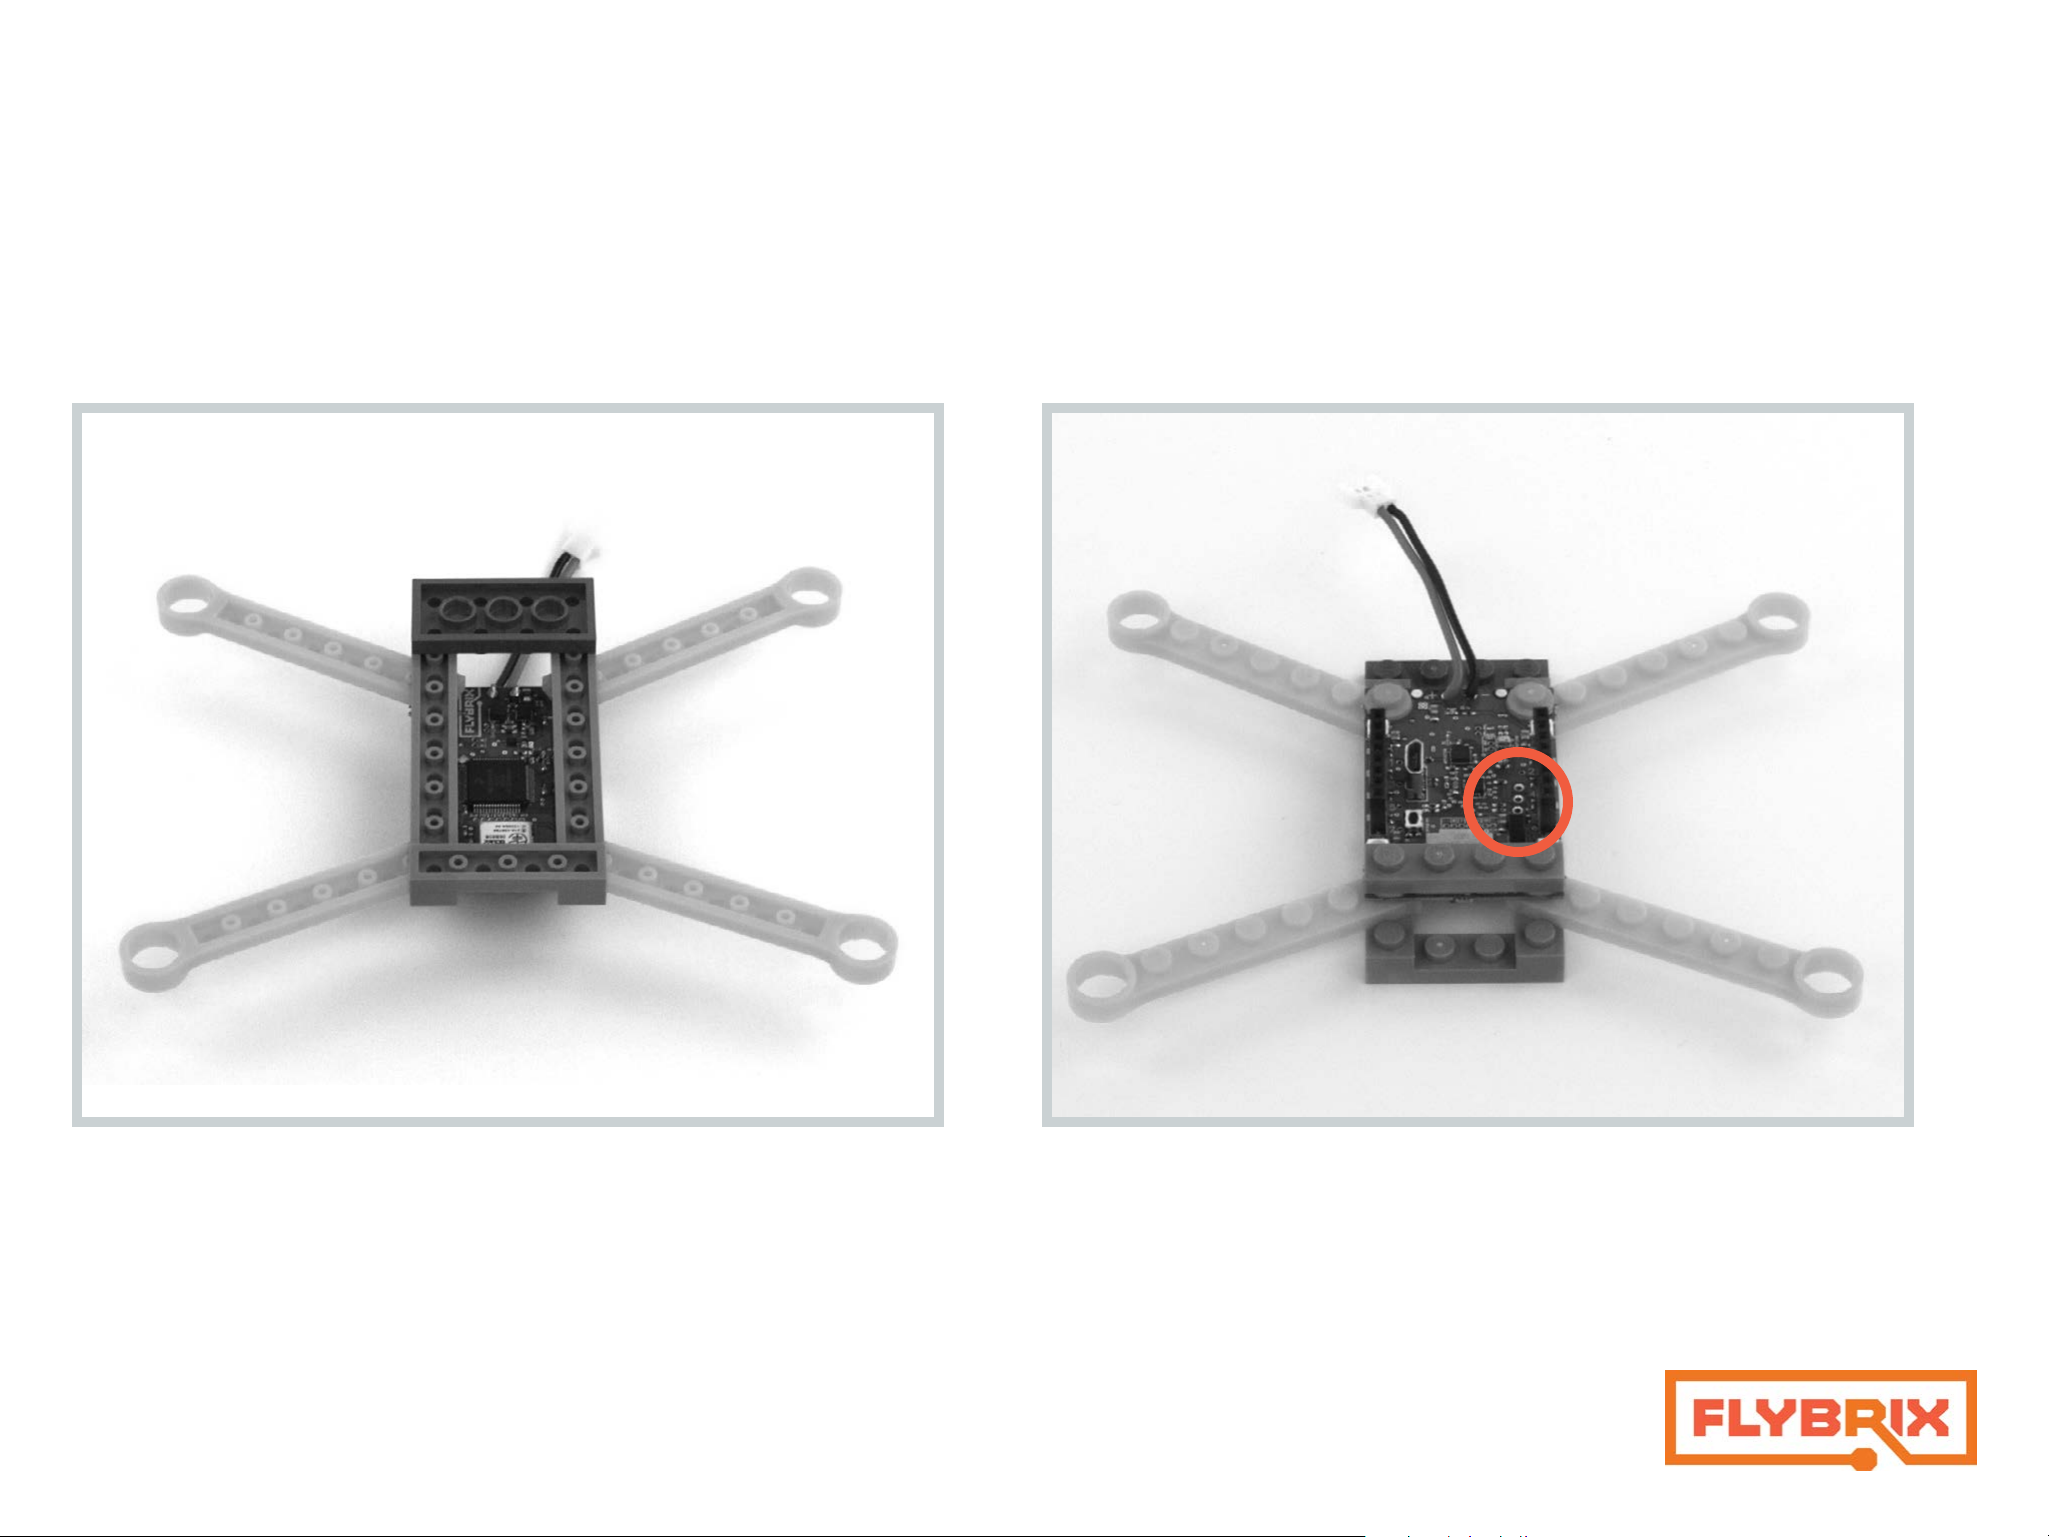
3.
Front
Front
Attach the flight control board.
*The “front” of your airframe is where the cables attach to the flight con-
trol board. Orientation is important when you’re building!
Back
Back
Attach (1) 2x4 brick to the back of your airframe below the battery connector cords, with one row of the brick sticking out past the 1x8 bricks.
Attach (1) 1x4 brick to the front of your airframe, flush with the 1x8 bricks.
Design check-In
< Back
Next >
4.
Front
Front
Back
Back
Attach (1) 1x4 brick to the top of the flight board.
If you have an RC Controller, take a look at your flight control board and
notice where these 3 pins are located for the next step. If you’re using
the app to fly your airframe, these pins don’t matter.
5. Only if you are using an RC controller to fly your quad.
< Back
Next >
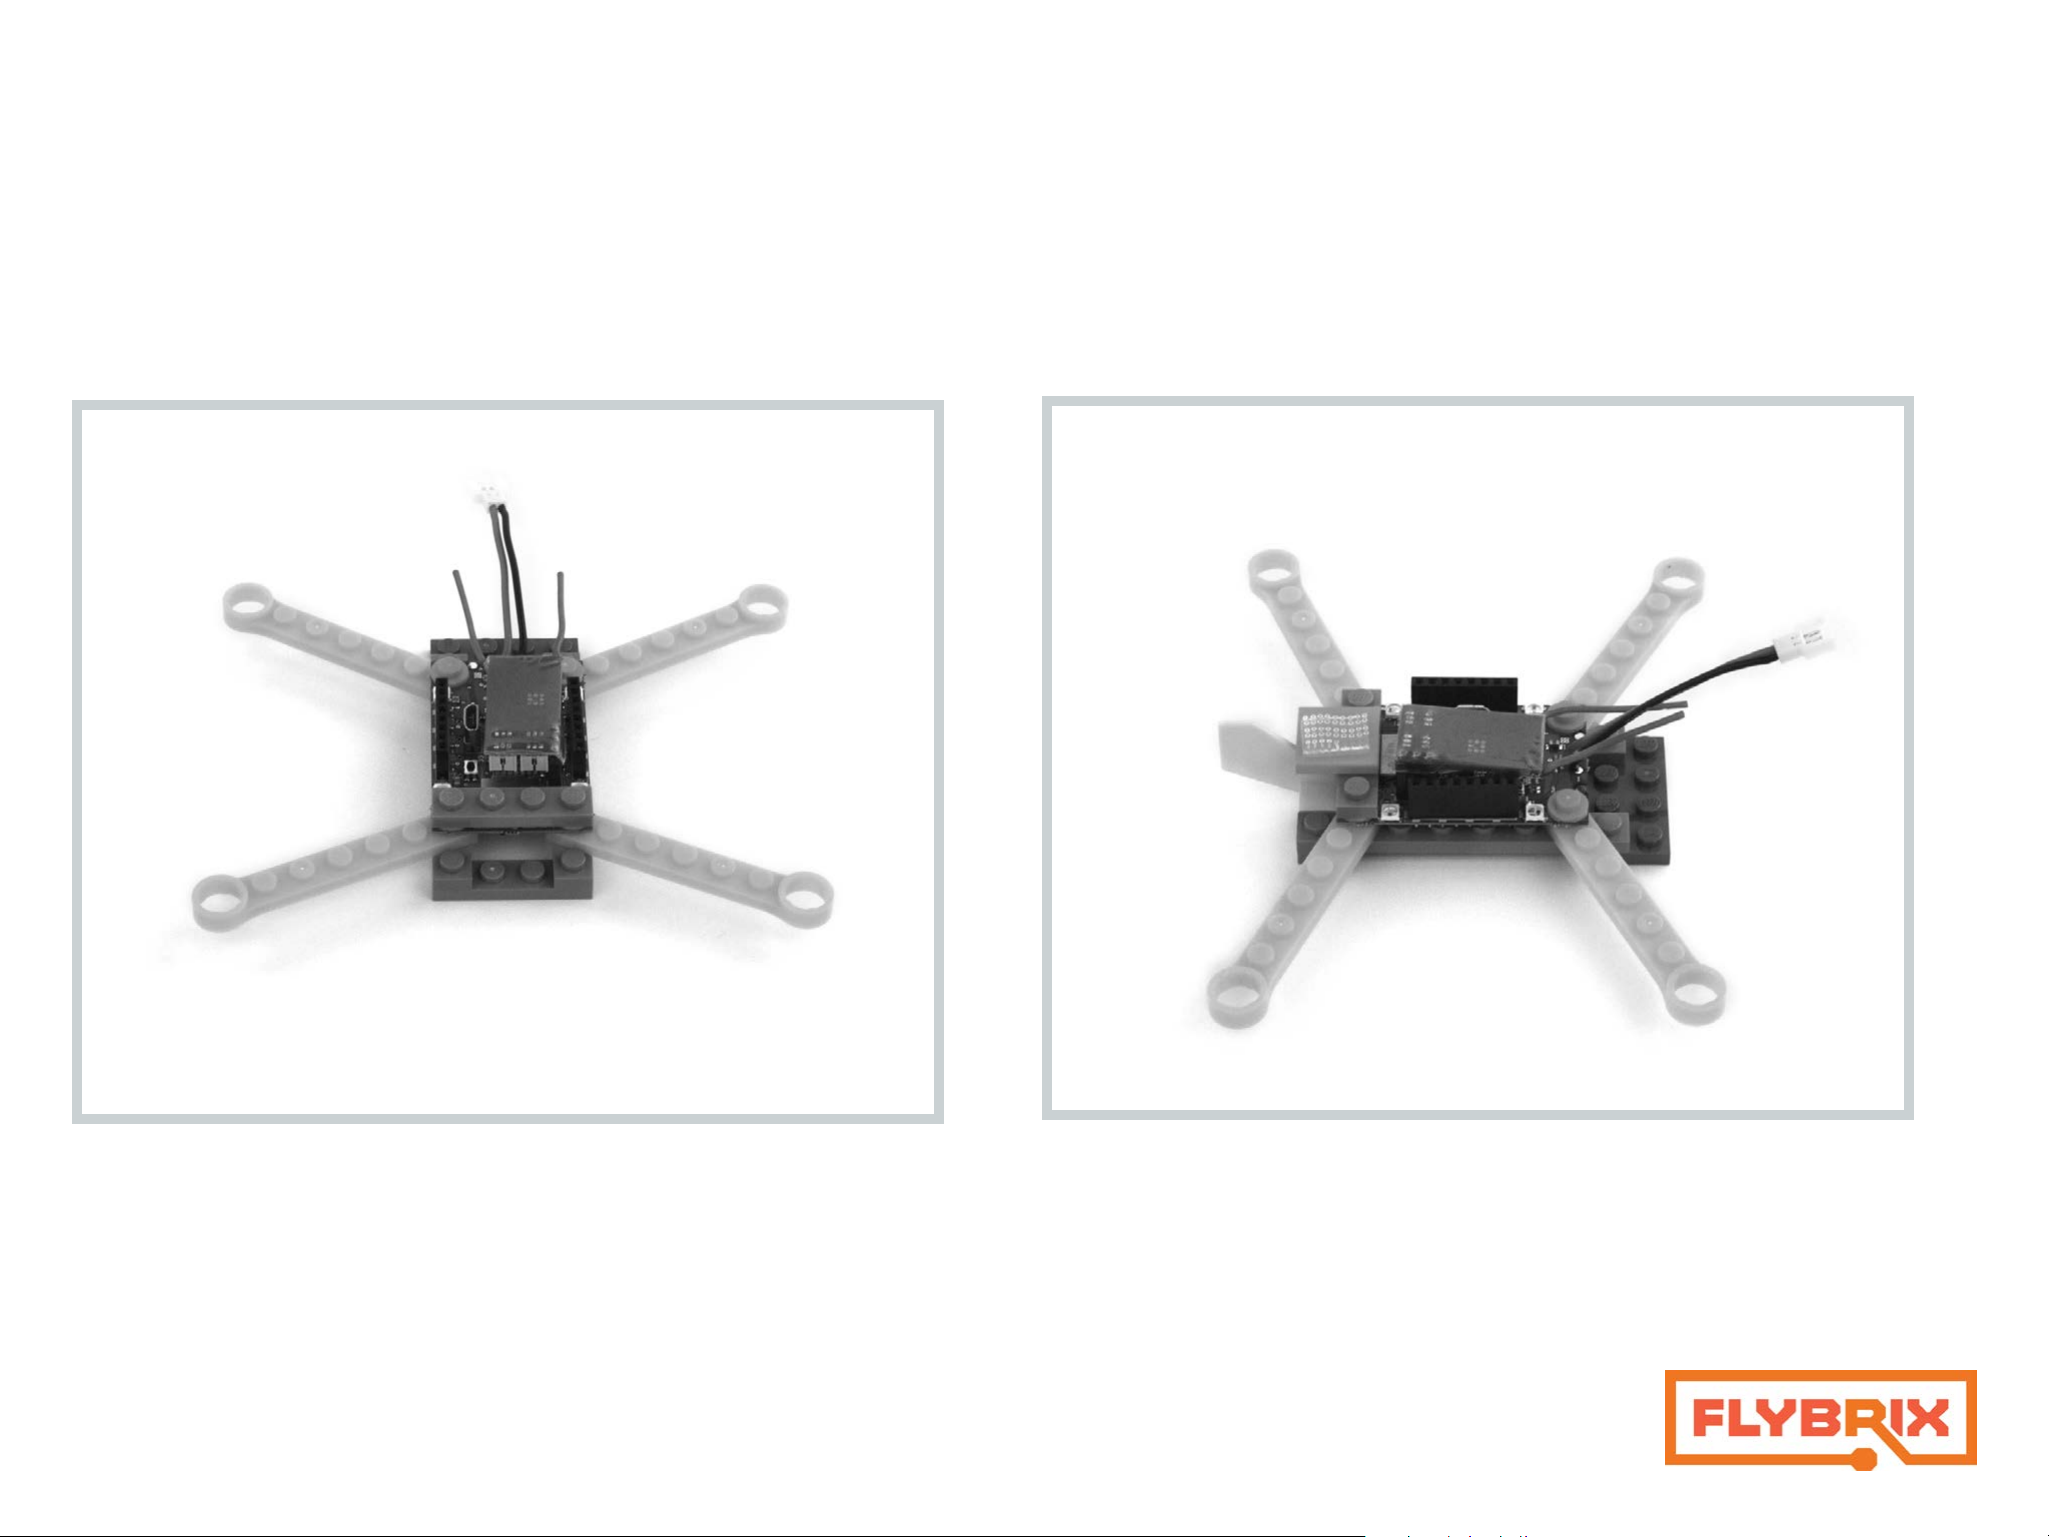
Front
6.
Back
Line up the 3 pins on your receiver board with the 3 holes on your flight
control board and attach the two boards by pushing them together.
This illustration is meant to show where the R415x connects to your
board. Before you fly for the first time, you’ll remove this board and go
through a pairing sequence (later on in the instructions) for now you can
keep your R415x attached.
Back
Attach (1) tail fin.
Attach the flat brick that comes with your battery. It has velcro on it.
Front
7.
< Back
Next >
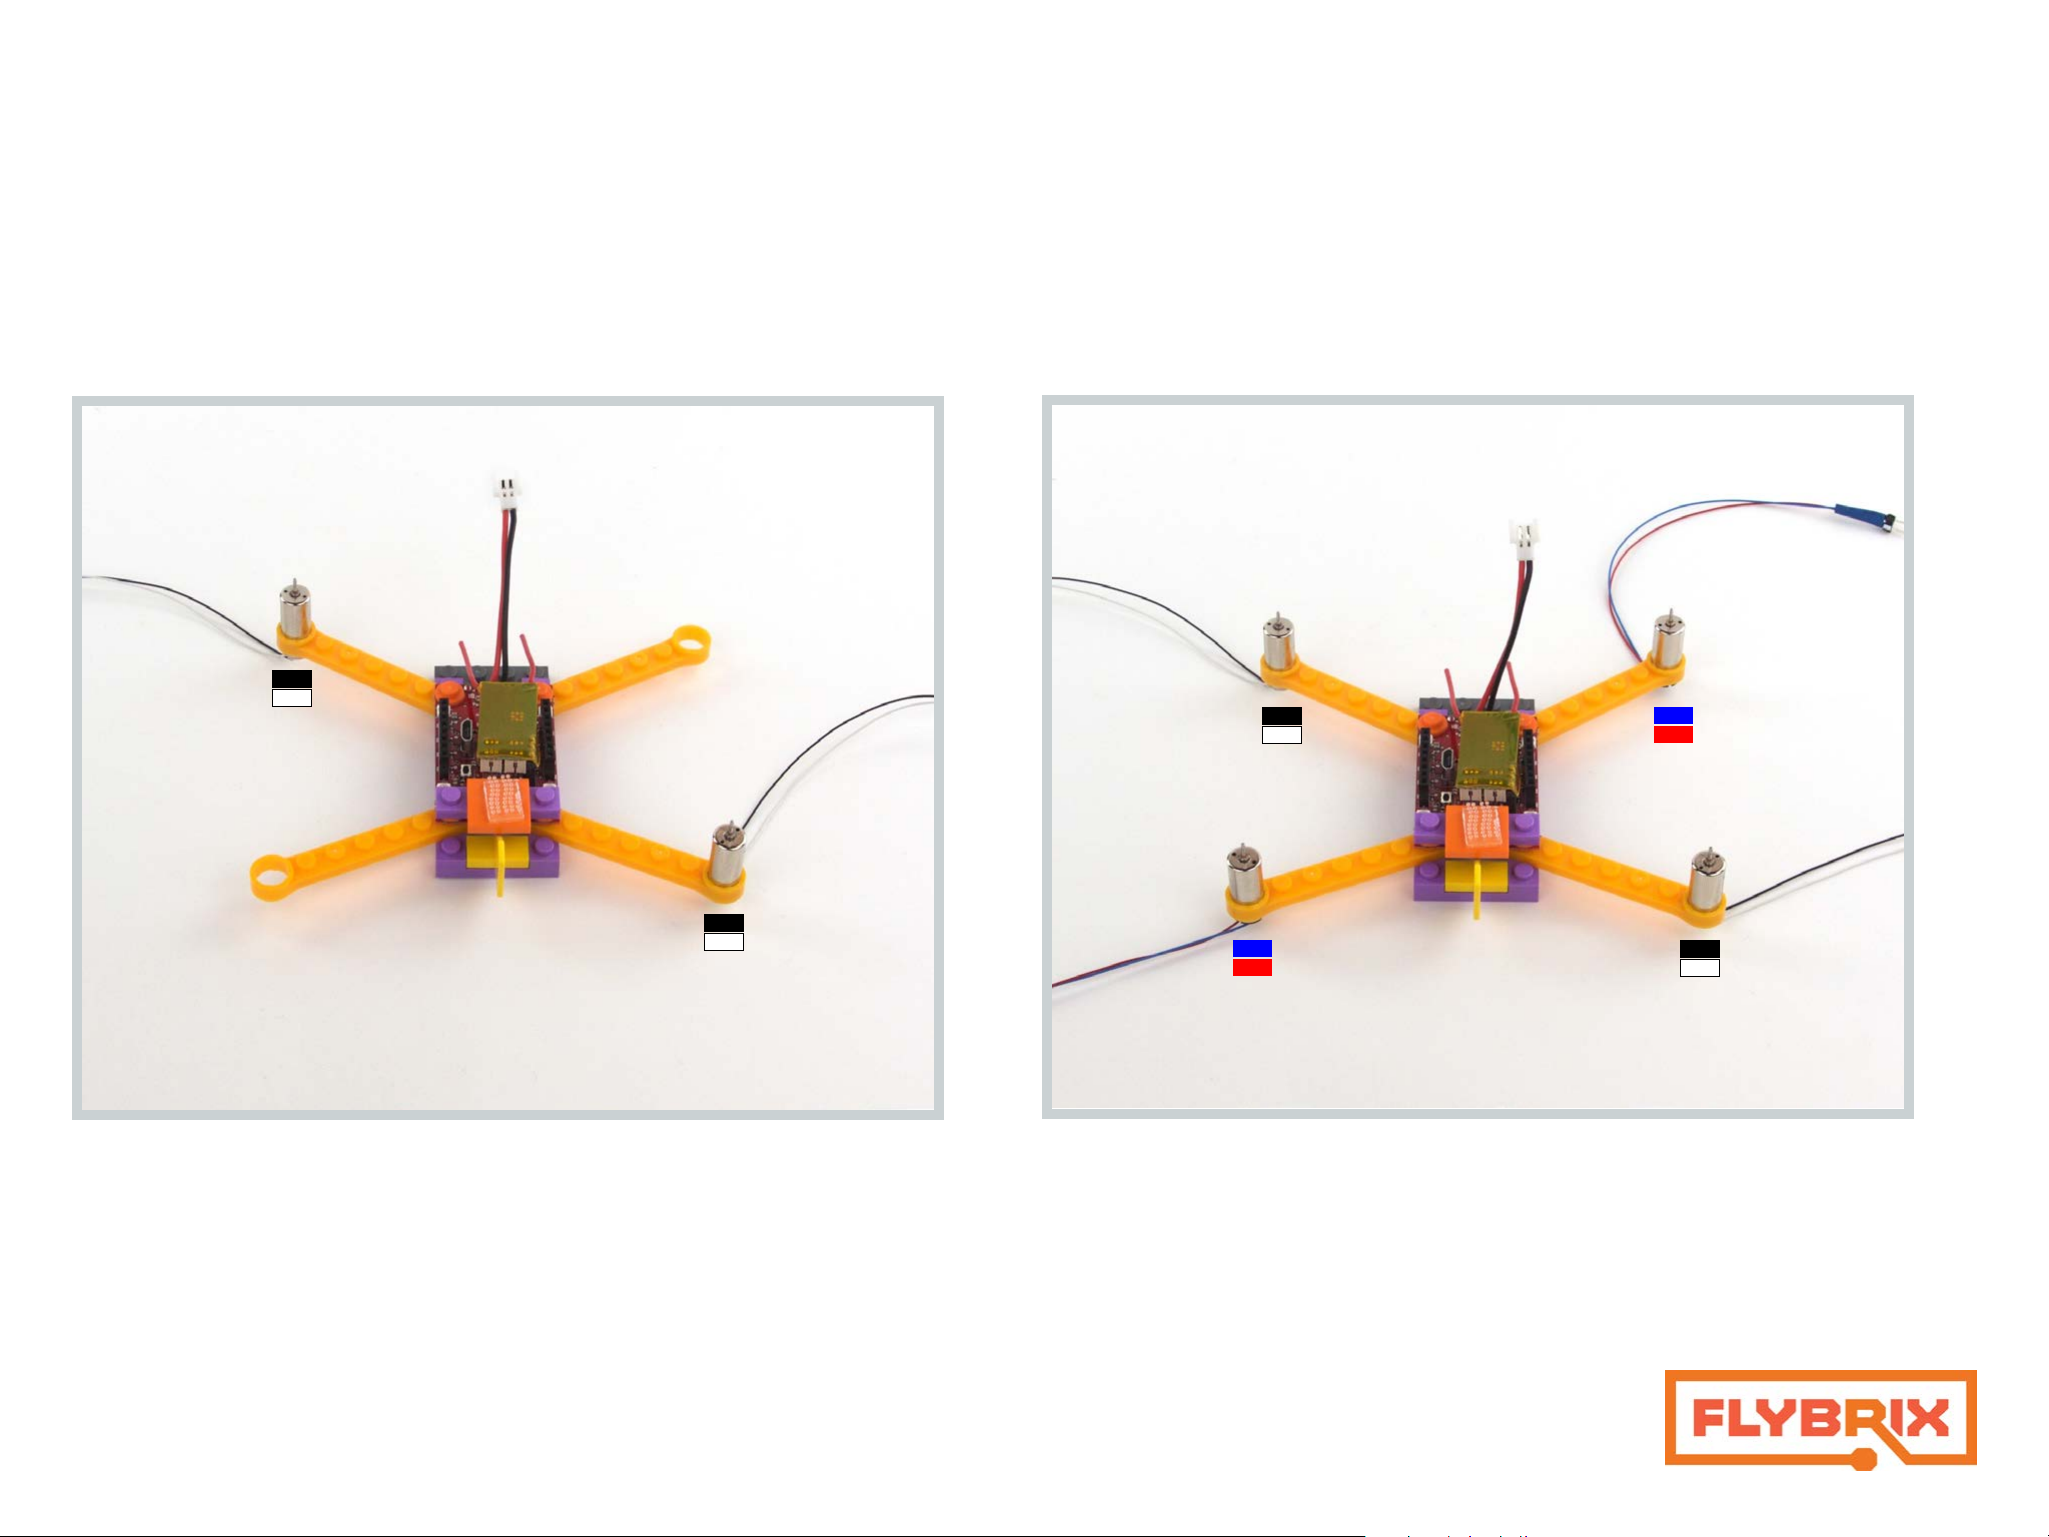
8.
Front
Front
Colors and placement really matter in the next few steps! Take two
motors that have black and white cables coming off the bottom. Gently
push the motors into the Boom Arms from the bottom to the top. Push
them in so they’re about even with the bottom edge of the Boom Arms.
Back
Back
Now, get two more motors that have the red and blue cables coming
off the bottom. Gently push the motors into the Boom Arms from the
bottom to the top. Push them in so they’re about even with the bottom
edge of the Boom Arms.
* The difference between the red/blue motors and the black/white
motors is that the red/blue motors spin clockwise and the white/black
ones spin counter clockwise. This is important for generating lift.
9. Pay attention to this step, it can be tricky!
< Back
Next >
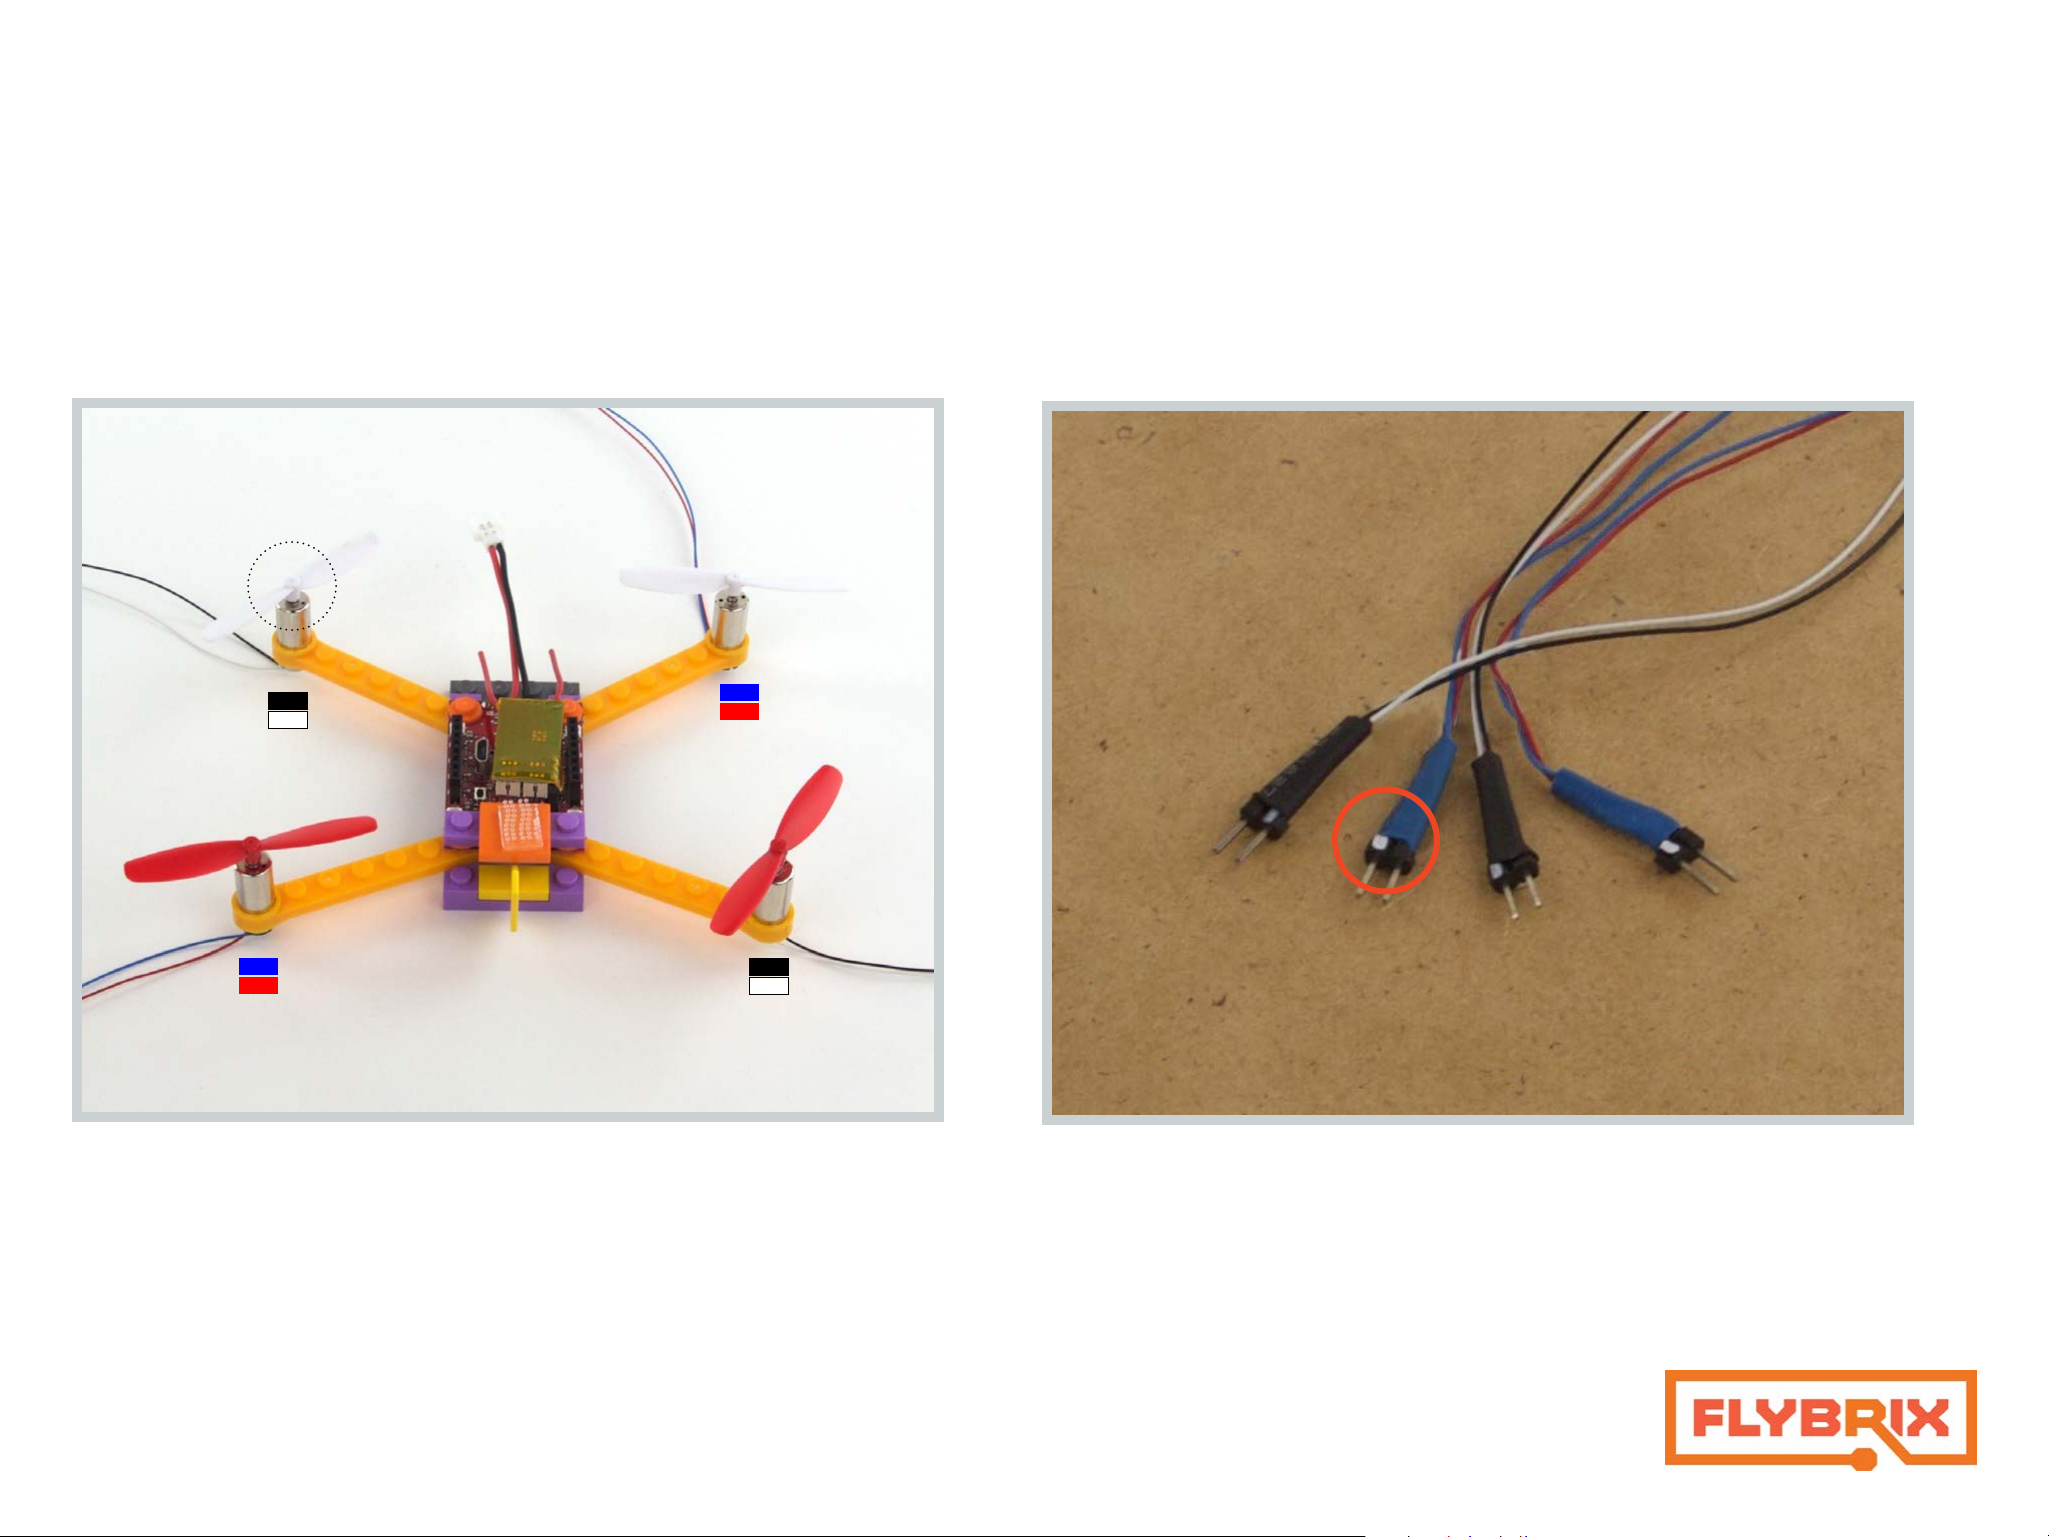
Front
Design Check-in
A
B
A
B
Back
Time to add the props!
One color goes in the front and one color goes in the back. Notice the
red ones are in the back and the white ones are in the front.
Each propeller has a very small label on it. The circle in the picture
shows about where the label is located. The props are labeled A and
B. A props and B props are shaped differently. They match up with the
direction the motors spin in order to push the air in the right direction
to generate lift. B props go on the black/white motors and the A props
go on the red/blue -- always.
It’s time to take a look at your motor connectors. On the very ends you
can see white marks. These marks will be used to line up the pins on
these connectors and your flight control board. Lining up these white
marks with marks on your flight control board takes a good set of eyes
and attention to detail.
Design Check-in
< Back
Next >
10.
FrontBack
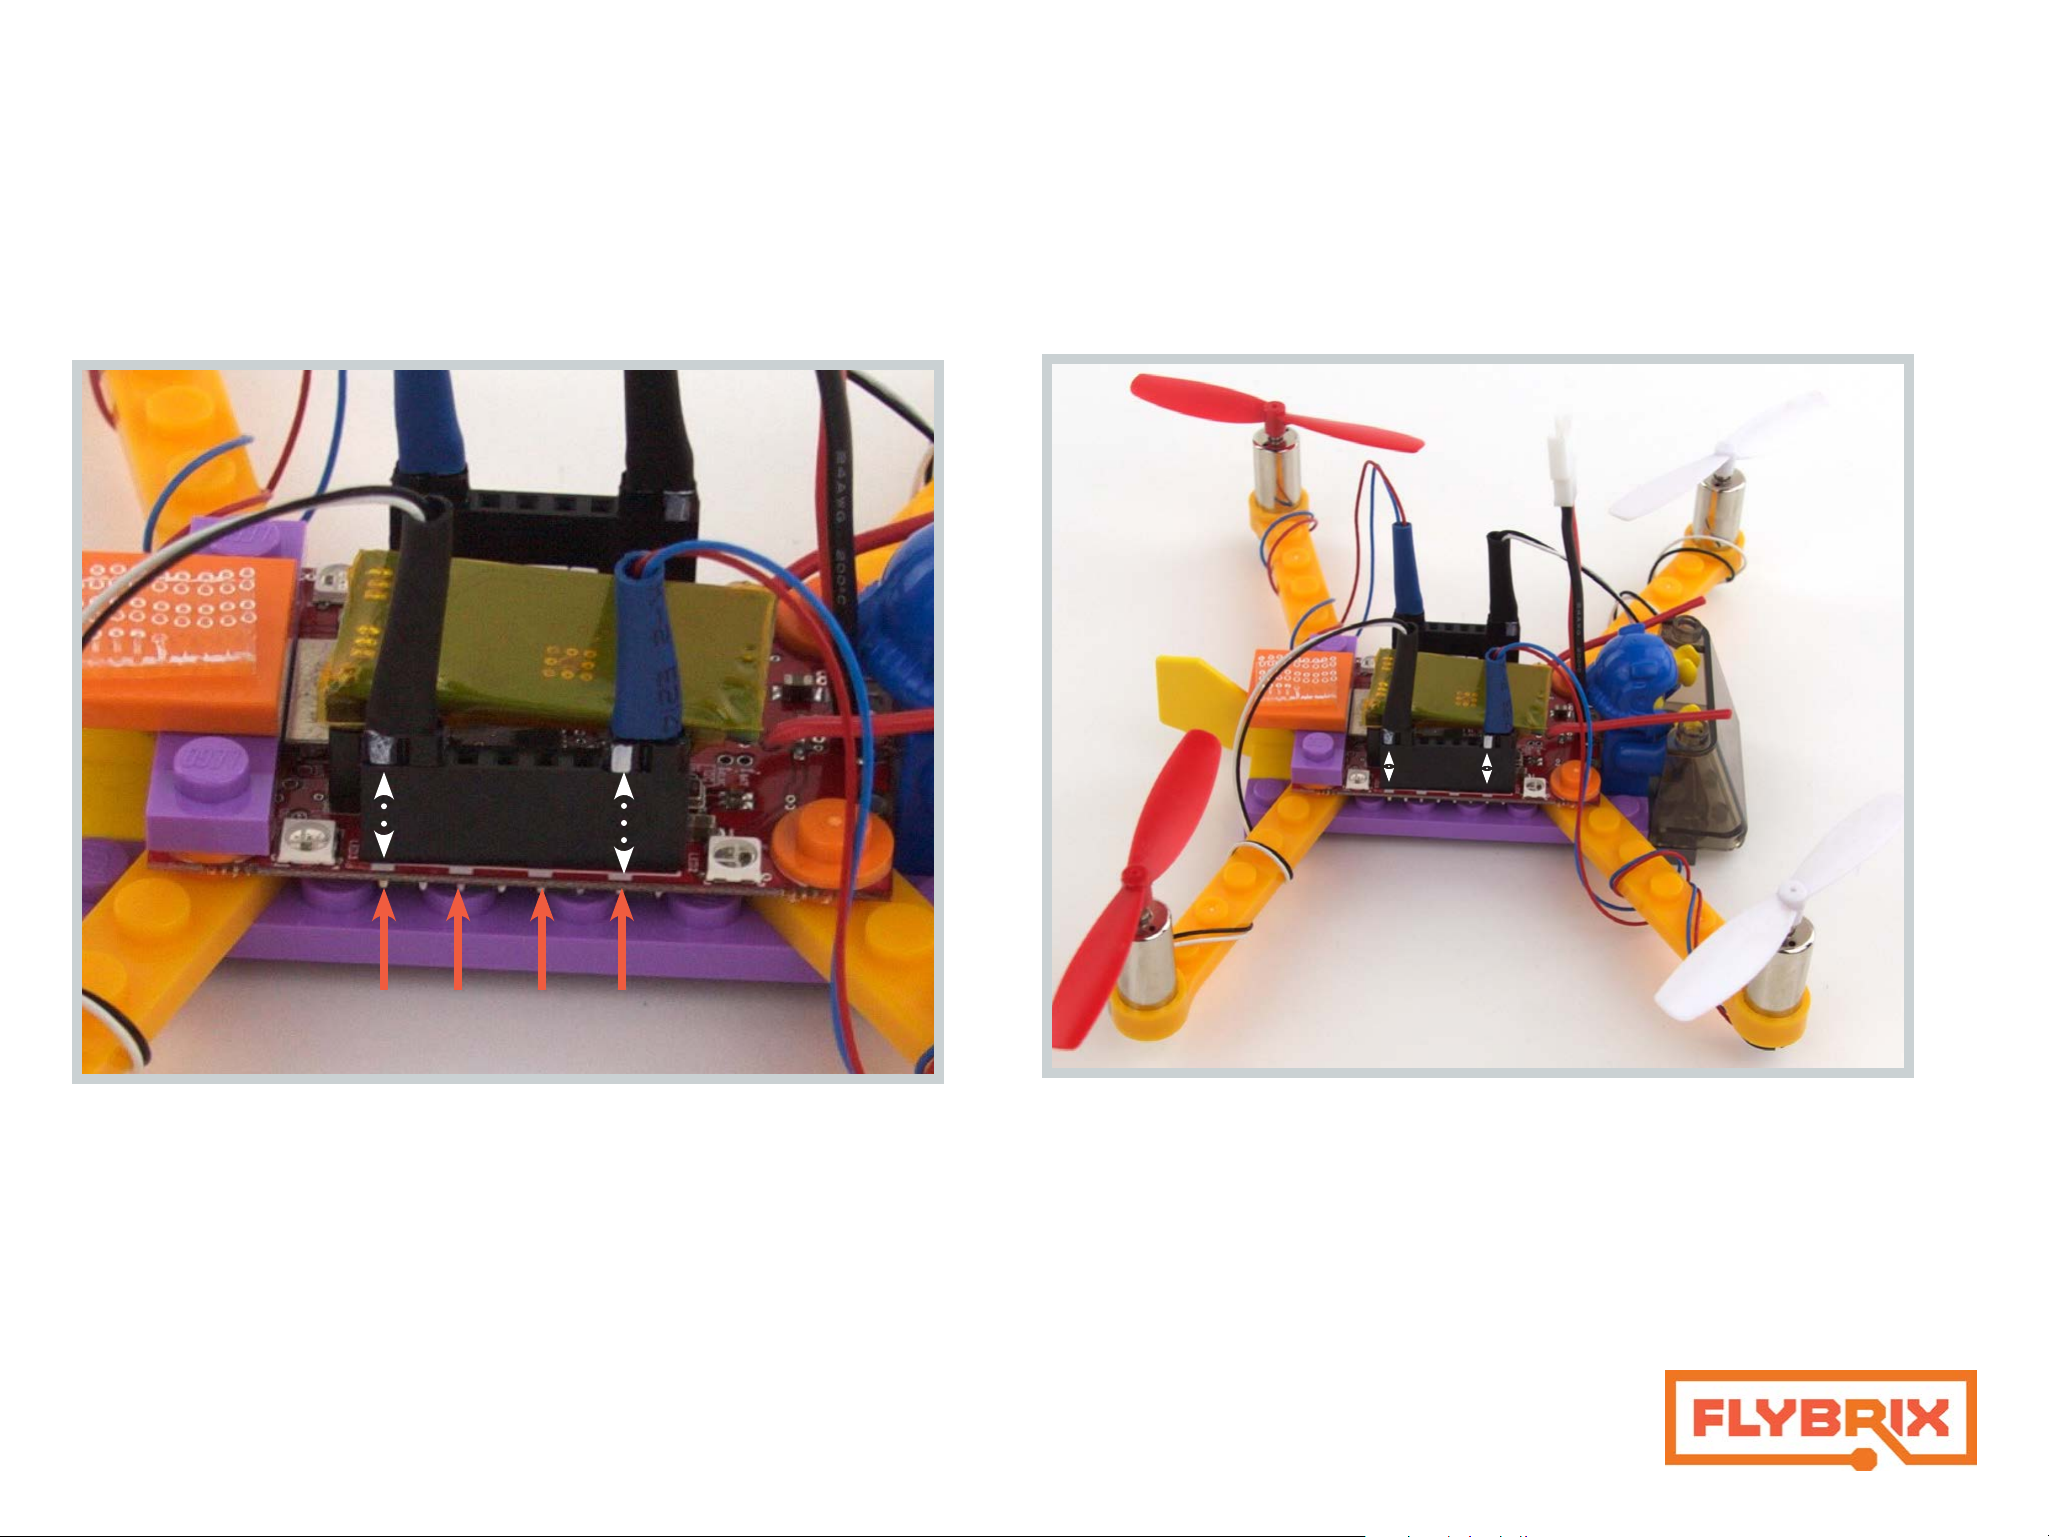
In the next step, we’ll show you how to connect your motors. For right
now, take a look at your airframe and find the 4 white marks on both
sides of the edge of your flight control board that you’ll use to line up
your motor connector pins. The red arrows show you where the white
marks are on the flight control board. The dotted line shows you how
to match up the marks on the flight control board and the motor connectors. *NOTE The white marks on the motor connectors are on the
opposite side of the motors, so it may be that to get the correct alignment, the white marks on your motor connectors face inward, toward
the board.
Let’s get the motors connected! One by one, wrap each motor cable around the boom
arm a few times so it stays out of the way of the spinning props and connect the motor
pins to the flight board. For your quad to fly, the motors need to be connected to the
correct ports on the flight control board. One way is to connect the motor to the ports
closest to it in each corner of the flight control board. Line up the white marks and
gently push the motor connector into the port. Another way to check to make sure
you have the right ports is to find the numbers on the ports on the opposite edge of
the motor ports from the white marks. Use ports 0 and 6 on one side and 1 and 7 on
the other.
Now, attach your pilot and windshield. If you’re a beginning pilot, its easeir to fly with
less weight on the quad. You can leave off the minifig and the windshield if you like.
11.
< Back
Next >
For a reminder, click here.
12.
Connect your battery to the cable attached to the flight control board.
Remember battery safety! Plugging in the battery the wrong way can
heat up and short circuit your flight control board.
Now stick your battery with the velcro side down to the brick with the
veclro tab.
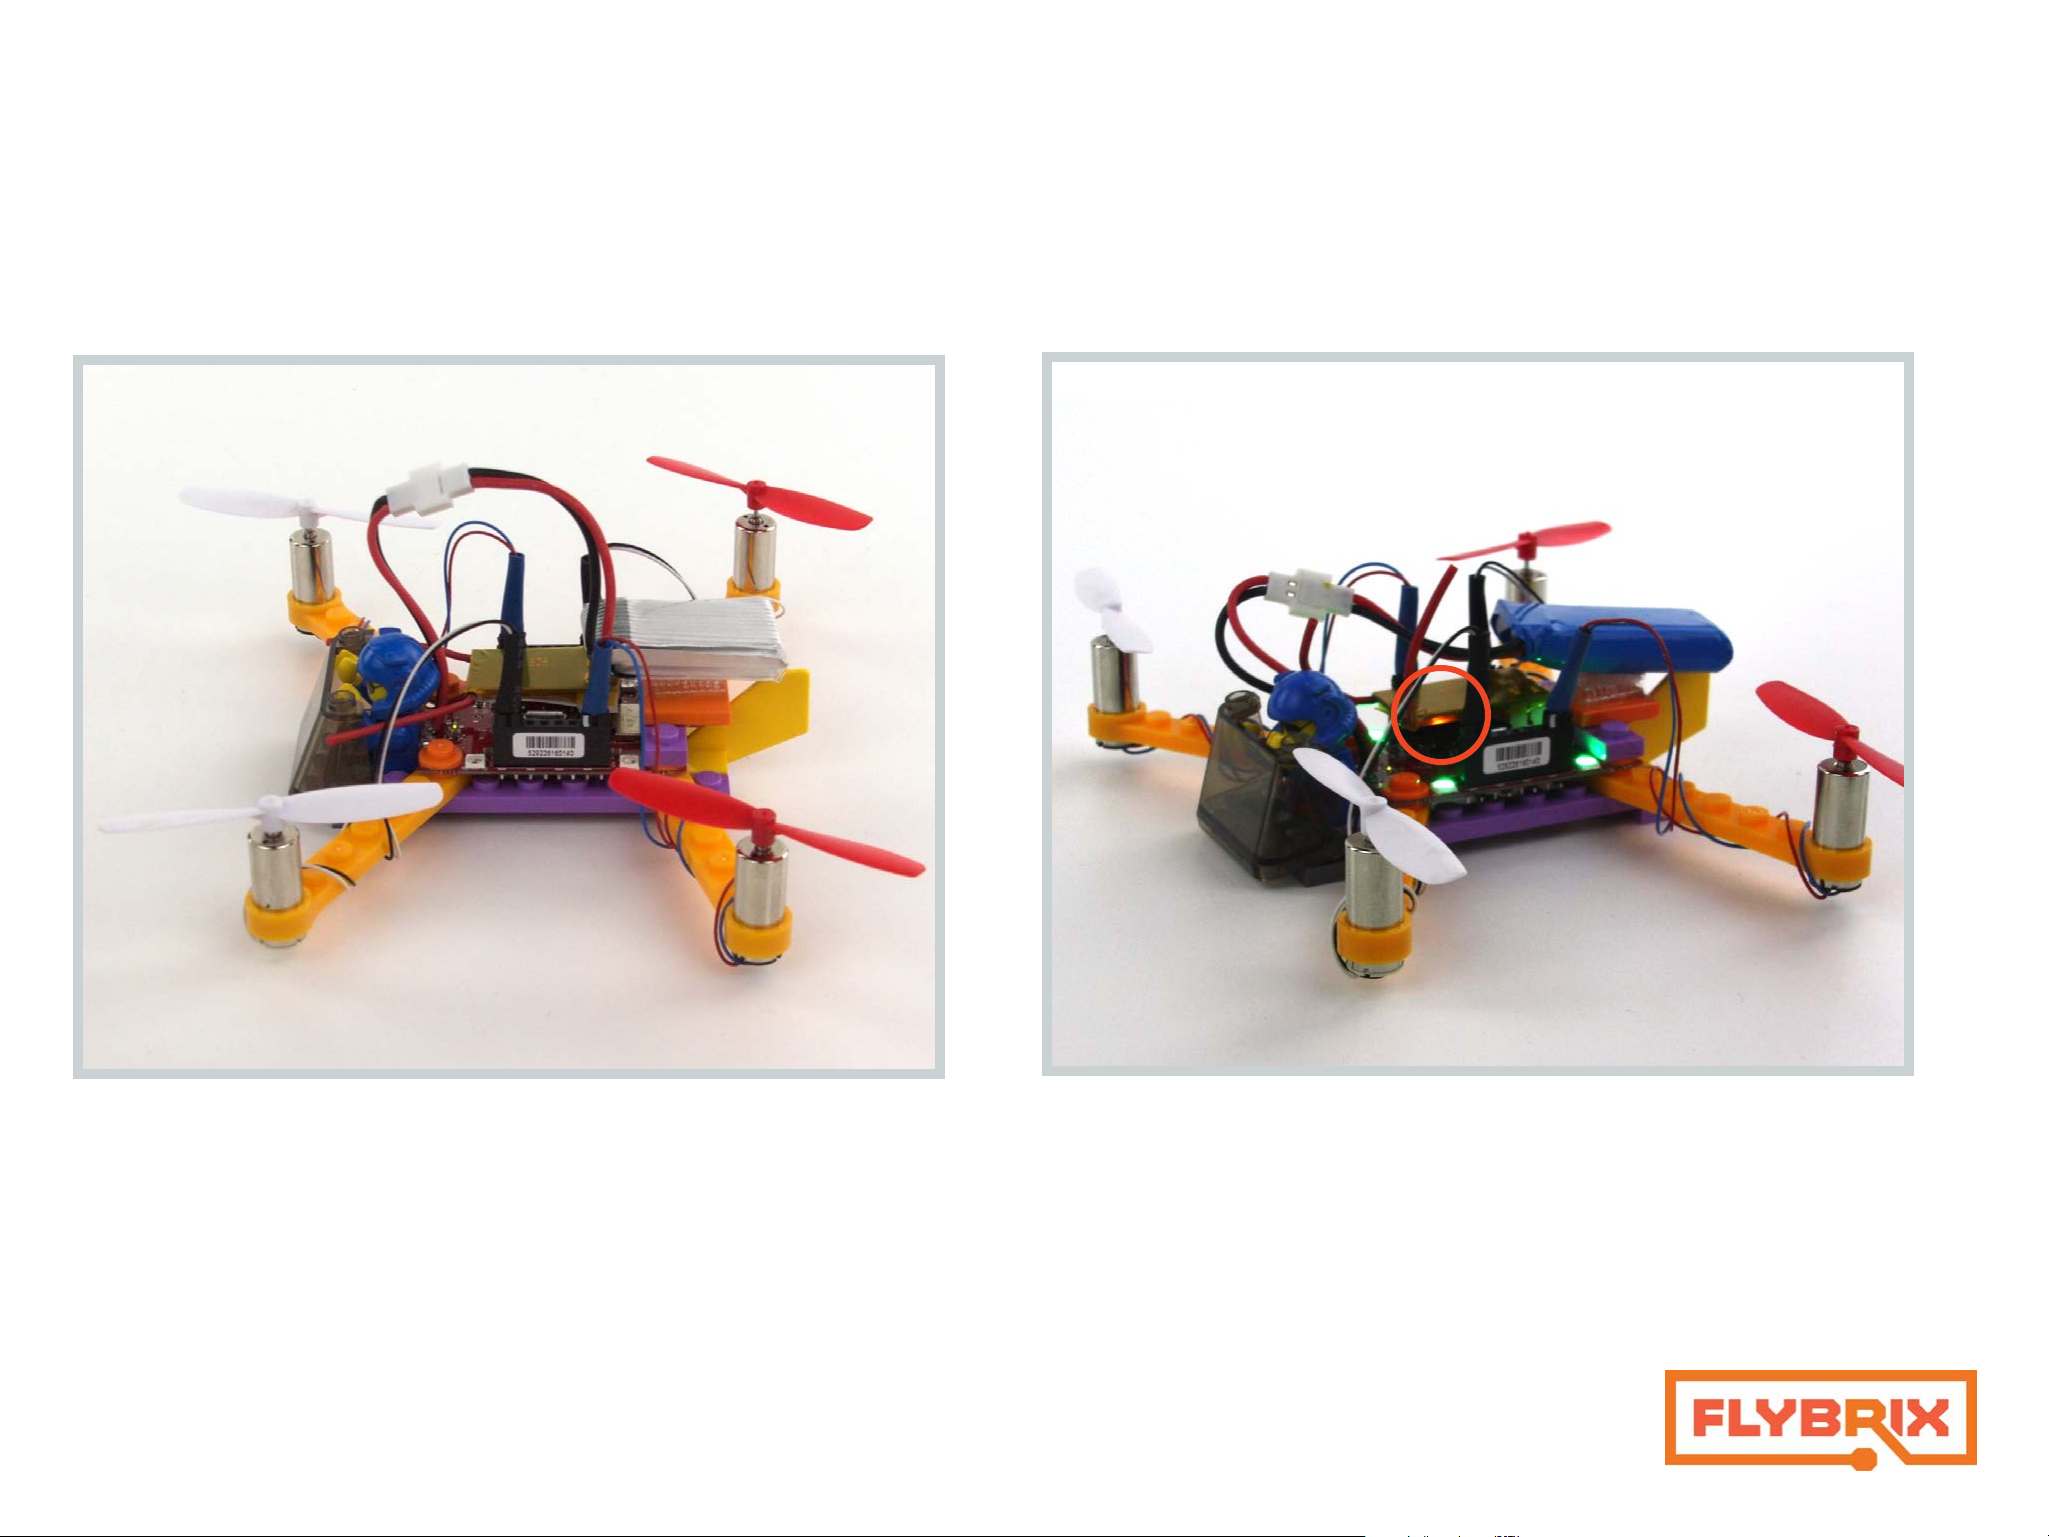
If your battery is properly charged, the LEDs on the flight control board
should be blinking. If not, it’s time to charge your battery!
Once your battery is connected go to the flybrix app to get airborne.
The instructions are easy as 1, 2, 3!
If you’re using an RC controller, find the orange LED that is under the
receiver board. It’s a bit hard to see since it shines from beneath the receiver board. This light tells you that the boards are connected properly
and you are set up to start the flying sequence with your controller.

Before You Fly - Get to Know Your Controller.
< Back
Next >
The app mimics the controls of an external controller, so knowing how an external controller works, applies to how the app controls work as well.
Learning how to fly starts with understanding how your controller works. Flying takes practice to master. There are many resources available online that help
explain further how to fly. Here’s one of our video picks. If you’re new to being a pilot, be patient with yourself as you learn, flying a quadcopter is not like a toy
that has one joystick, for example a toy helicopter. Flying multirotors are much more involved. Stick with it, you’ll get it!
Here are some terms that can get you started:
Thrust creates a force that lifts your airframe up off the ground.
Pitch creates a torque that tilts the nose of your airframe either up toward the sky or down toward the ground.
Roll creates a torque that tilts your airframe side to side. Imagine wings on an airplane, they can tilt back and forth toward the ground or toward the sky.
Yaw creates a torque that spins your airframe while remaining flat in the sky with no tilting either forward, backward, or side to side.
Yaw
Thrust
Thrust
Yaw
Roll
Pitch
Roll
Pitch

Taking Flight
< Back
Next >
We suggest reading all the way through these instructions before beginning.
There are 3 things you need to do to with your controller to fly. Pairing it to the
flight control board - that ensures the two pieces of equipment are “talking”.
Arming, which means props are able to spin. And finally disarming - stopping
props from spinning. If you’re flying with the app, go ahead and follow the
1, 2, 3 steps on the homescreen to get airborne. It may be handy however, to
read through the external controller instructions to better understand how the
app operates.!
Pairing, Arming and Disarming Recap: Here’s a video.
Time to fly! See the next section for a brief description of flight controls, pro tips and
troubleshooting. For more detailed how-to-fly information, visit the user forum on
www.flybrix.com.
FLYING TIPS / TROUBLESHOOTING:
If you’ve flown drones before, you’ll be able to fly your airframe just like a ready-to-fly
drone. Flybrix is about experimenting and learning through trial and error, Here are
some tips and tricks for flying.
External Controller:
Make sure the mode on your RC controller is set to mode 2 (It’s the switch
above the power). It should already be set to mode 2. If there isn’t a switch
between modes 1 and 2 on your controller, ignore this step.
BINDING: Your R415x board and Controller come factory bound. Which
means you are “paired” there are no additional steps you need to take to connect your R415x to your controller.
ARMING: Once you’re paired, there are two modes: idle and armed. To arm
the airframe, make sure the left joystick, the throttle, is all the way down
(pointing away from the antenna on the controller). Press in the right joystick like a button. Once armed successfully, the LEDs change to blinking
blue. You’ll notice the blinking goes into “airplane mode”. That means the
motors will start to spin when you increase the throttle. After you’ve successfully paired the first time to your controller, arming and disarming are the only
steps you need to do to fly from now on.
At this point, you’re ready to fly. There’s a bit of a delay for the controller to
activate the motors. You’ll be able to notice the blinking blue lights change
pattern subtly when the flight control board is armed.
Always take off from a flat, even surface. Every time you’re ready to fly, the flight control board calibrates to what it believes is “flat”. So, if you take off from an uneven
surface, the tilt or angle your airframe starts from will cause it to fly off in that direction.
This also means that any airframe you build should have a flat bottom, unless you want
to experiment with flight!
Throttle-up for a clean takeoff rather than letting your flyer sit on the ground with the
motors spinning and gently increasing the throttle. After a few tries, you’ll get a feel for
how much to throttle-up for a clean takeoff.
Wobbly takeoffs? You may notice that your first few flights start off a bit wobbly. Maybe your flyer goes off to one side when you first take off etc. (barring operator error, like
activating yaw, pitch or roll) What is happening is called “ground effect”. If you have
your flyer on the floor, the air from the motors is swirling around causing you to have
an off-kilter takeoff. Those types of takeoffs are hard to control and course correct. The
best way to deal with this is to commit to getting your airframe in the air.
Controls are opposite? You’re trying to bank right using your roll controls and your
airframe goes left. Make sure your airframe is facing with the battery leads on the flight
control board are facing you. If you have the leads pointing away from you, the controls are flipped and you’re flying like it’s “opposite day”.
As you increase the throttle (left joystick moving it up toward the controller antenna) the motors will start to spin. From there, you can increase the throttle
moreand get into the air!
DISARMING: To stop the motors from spinning, let’s say you happen to crash
(yes, everyone does)! Push in the right joystick like a button, same way you did
to arm the controller. That stops the motors from spinning immediately. Now
you’re back in idle mode. It’s important to stop your motors from spinning
as quickly as you can after a crash. If the motors are stuck in a position that
doesn’t allow the props to spin, they can burn out.
Erratic flight? This is a little tricky, because erratic flight can be caused by a number of
things, like piloting skill, the weight and balance of your builds etc. But let’s say you’ve
built an airframe according to the instructions we gave you, for example. You shouldn’t
experience erratic flight. Check to make sure your battery is fully charged and your
software is completely up-to date. (We’re making improvements all the time). Also try
taking off the minifig and windshield to reduce weight, that makes flying easier.

All motors aren’t spinning at takeoff? Check your motor connections. It’s easy
< Back
Next >
Rebinding instruction video
to miss a port or to misalign the white marks on your motor connectors with the
marks on the flight control board.
Rebinding or re Pairing the R415x. Once your controller is paired with your R415x
board, generally you will not have to pair it again. The R415x boards come factory
bound. With that said, there is a slight chance that your R415x could come unbound (or unpaired if there is a mistake when you arm and press in the left joystick,
rather than the right). If you do need to re-pair your R415x, connect your binding
cord to the R415x. Next connect a fully charged battery. You should see a blinking yellow light on the R415x. Next, push down the right joystick on your controller
like a button while simultaneously turning on the power to your controller. Let the
right joystick go and you’ll hear a sequence of 10 beeps. Once the beeps end, you
should see a solid yellow light on the R415X. Now you’ve re-paired your R415x. Go
ahead and disconnect the battery first, then the binding plug. The R415x can be re
attached to your flight control board.
Still struggling? Send us a note at support@flybrix.com. We can troubleshoot with
you and see if something is drastically wrong with your equipment, or step you
through getting flying. We flight test every unit before we ship them. It could be
there was damage in shipping or if you had an epically bad crash like a high alti-
tude nose-dive onto a concrete floor…we’re here to help sort it out.
FOR ADVANCED USERS -- MOTOR CONFIGURATION SOFTWARE:
Visit the Google Chrome Store to get the Flybrix Extension Configuration Software
to adjust more settings on your airframe, for example fine motor tuning. You can
also go to our GitHub (GitHub/Flybrix) to access the open source code.
BETA ZONE APP FEATURES
if you want to experiment with live sensor data and other new cool features, click
the Flybrix logo in the upper right corder of the app. From there you’ll be in the
BETA ZONE. Please note, the BETA ZONE features do not have any instructions,
these are new features we’re trying and want you to be able to experiment with us!

Octocopter Instructions
< Back
Next >
Start with the Quad.
1.
2.
Learn the basics of building,
connecting motors and flying.
Try the Octo now!
Take what you’ve learned from the
quad build, apply your know-how to
the octo build.
Level up to the Hexo.
3.
Now that you’re almost a pro, give the
Hex build a shot. Use the software to
change motor specs to fly your Hexo
build.

1.
< Back
Next >
2.
Start with the 4x4 brick with the open center. The steps with black and
white pictures indicate that the colors of your LEGO bricks don’t matter.
Use the shape and size as your guide for which pieces to use.
Attach (2) 1x4 bricks without the center knobs.

3.
< Back
Next >
4.
Attach (4) hinged bricks as shown.
Attach (4) 1x4 bricks on the hinge pieces. The 1x4s are almost perpendicular to the 1x4 bricks missing the middle knobs.

5.
< Back
Next >
6.
Attach (4) 1x8 bricks to the hinges.
Attach (4) 1x1 knobs to the 1x8 bricks on the 3rd knob from the center of
your airframe.

7.
< Back
Next >
8.
B
A
A
B A
A
B
Attach (4) boom-arms.
If your motors and propellers are already attached to your boom arms,
that’s fine. Keep them attached then make sure to follow the red/blue
& black / white motor placements with your full boom arm motor and
prop setup. (these should be the same as your quadcopter build).
B
B
A
Attach (4) boom-arms.
Again, if your motors and props are already installed into your motor
arms, then attach them paying attention to the red/blue & black/white
positioning.
B
A

9.
< Back
Next >
10.
Attach (4) 1x4 bricks. One side of the 1x4 bricks attaches to the 1x1
knobs, the other side attaches directly to the boom-arm.
Attach (8) 1x1 knobs.

11.
< Back
Next >
12.
Attach (2) 1x4 bricks.
Time to insert the motors to your boom-arms if you haven’t already done
this in steps 7 & 8 on page 21 Notice we popped back to a color image. That’s because colors matter in this step. Pay attention to the color
of the motor wires to install your motors properly. Remember from your
quadcopter build to gently push motors into the boom-arms from the
bottom. Level motor bottoms with the bottom of the boom-arm. It’s
fine to have your props attached from this step forward if you have some
boom-arms and motors assembled already from
your quad build. *reminder, A props go on the
blue/red motors and B props go on black/white
motors.

13.
< Back
Next >
14.
Front
Front
Back
Attach the flight control board with the battery connection cords between red/blue & black/white motors as indicated.
Back
Attach (4) 1x3 bricks to the 1x1 knobs.

15.
< Back
Next >
16.
Front
Front
Back
Attach (1) 1x4 brick across the flight control board (onto the 1x3 bricks).
Back
Attach the fin and the flat battery holder brick with the affixed velcro.

17.
< Back
Next >
18.
Front
Front
Back
Attach (2) 1x6 bricks
Back
Attach (1) 2x4 brick. The battery connection cords should be covered a
little bit by the 2x4 brick.

Design Check-in
< Back
Next >
Go to page 8
19. Skip this step if you’re using the app to fly your octocopter.
Front
Front
Back
Here’s another view of your airframe.
Back
Attach your RC receiver. If you forgot how to do this, get a refreseher
from the quadcopter instructions on page 8.

20.
< Back
Next >
Go to page 12
Back
Design Check-in
Front
Notice the airframe orientation has changed. The airframe “front” is
always the side of the board with the leads. Attach the windshield and
your minifig pilot. If you want him to sit down, take off his legs (yes,
that’s how Flybrix pilots fly, with no legs!)
Now that you’re about to connect your motors, take a quick look at your
flight control board as a refresher.
- The boxes show you the numbers on the motor ports that you’ll use to
connect your motors.
- The arrows show you the white marks on the board that you use to
align the white marks on the motors.
If you want to brush up a bit more, go to page 12 of the quadcopter
building instructions.

21.
< Back
Next >
22.
Back
Port 4
Port 2
Port 6
Port 7
Port 5
Port 3
Back
B
B A
BA
A
A
B
Front
Wrap your motor wires a few times around the boom-arms before you
connect the motors. If you want your airframe to look neater, feed the
cables under the 1x6 bricks on the sides of the airframe before you connect the motors.
Connect the motors to the ports indicated on the flight control board.
Port 0
Port 1
Front
Attach your propellers to the motors. Be careful not to press them down
on the motor pins too hard. It can damage the motor.
Propellers are labeled A and B. The blue circle shows you where the propeller motor is labeled. Notice that props marked A go on the red/blue
motors and the props marked B go on the black and white motors. The
colors of the propellers don’t matter.

23.
< Back
Next >
If you need a refresher, go to page 15.
You’re Ready to Fly!
Back
To fly using the app, follow the 1, 2, 3 steps and you’re airborne!
If you’re using an RC controller, follow the pairing sequence you used for
the quadcopter.
Front
Attach the battery to the brick with the velcro.
Plug in the battery.
If the LEDs don’t start flashing once your battery is plugged in, make
sure it’s fully charged.

Hexocopter Instructions
< Back
Next >
Start with the Quad.
1.
2.
Learn the basics of building,
connecting motors and flying.
Try the Octo now!
Take what you’ve learned from the
quad build, apply your know-how to
the octo build.
Level up to the Hexo.
3.
Now that you’re almost a pro, give the
Hex build a shot. Use the software to
change motor specs to fly your Hexo
build.

1.
< Back
Next >
2.
Start building your base with (2) 1x4 bricks, (2) 1x1 knobs, and (2) 1x4
bricks without center knobs.
*Again, these instructions are in black and white to remind you to use
shape references not colors to identify which bricks to use in your build.
Situate your base pieces plus (2) 1x8 bricks.

3.
< Back
Next >
4.
Attach your base pieces and 1x8 bricks with (1) 1x12 brick.
Two knobs in the middle between your 1x8s and one knob overlap on
each side of your base pieces.
Attach (2) 1x1 knobs.

5.
< Back
Next >
6.
Attach (4) hinges.
There should be one free knob between the hinges and the 1x12.
Attach (4) 1x1 knobs.
These knobs are in a 4x6 pattern and are used to attach the flight
control board.

7.
< Back
Next >
8.
Front
Front
Back
Attach the flight control board.
Back
Attach (1) 1x4 brick and (1) 2x4 brick.

9.
< Back
Next >
10.
Front
Port 1
Port 3
Port 7
Front
Port 0
Port 2
Port 8
Back
Attach (6) motor arms and motors.
Color of your motor leads and port placement is important in this step!
Back
Attach battery support brick with velcro.
Attach (1) tail fin.

11.
< Back
Next >
Design Check-in
Front
Front
Back
Attach (1) 2x4 brick (below the flight control board leads).
Back
Notice the airframe has been flipped around to show the flight control
board leads in the front.

12.
< Back
Next >
Skip this step if you fly using the app.
Back
Back
Front
Attach your pilot and the windshield on the 2x4 brick with the motor
leads right behind the pilot.
Front
Attach the R415x receiver board if it’s not already attached to your flight
control board. If you forgot how to attach it, refer to pages 8 & 9 (quad
building instructions).

13.
< Back
Next >
14.
Back
B
A
B
A B
Back
A
Front
Here’s where your previous build experience pays off! Attach the props
in the same pattern you’ve used before. A props go on the black and
white motors and the B props go on the red and blue. This will always
be the case since the way the motors spin (clockwise and counterclockwise) require motor shapes that match the direction the props spin to
give your airframe lift.
Front
Attach your battery and connect the leads from the flight control board to the battery leads... You’re ready to fly!
To fly with the app it’s easy... Follow the steps 1, 2, 3 and you’re airborne!
If you’re using the RC controller to fly the hex build, you need to use the app. The reason is because of the new motor
configurations and the port usage. We pre-programmed the flight board to automatically fly quads and octos out of
the box. The hexo requires changing airframe configuration settings in the app.
To fly with the RC controller, follow the app steps 1 &2. Then disconnect the bluetooth and use your controller like
you did with the quad and octo. If you need a reminder on how to pair with your RC controller, refer to pages 14 & 15.
*reminder, from now on, once you’ve changed the airframe configuration in
the app to the hexo, you will have to use the app to select your new airframe
configuration before you go back to flying octocopters or quadcopters. The
flight control board needs to be reminded of how many motors and what
ports are in use every time you change airframe configurations, even if you
use your rc controller to fly.

Flybrix Game Ideas
< Back
Next >
Here are a few simple thought-starters for new ways to play and learn with Flybrix. These are games that are just silly, fun things that we’ve used to structure play
with Flybrix — They’ve been tried with kids as young as 7 up to adults. You can play them with 2 people or more! Find more games at Flybrix.com.
“The Black Box Design Challenge”
The goal of this challenge is to see and show how people
can come up with wildly different airframe designs using the
same LEGO pieces. This challenge requires more LEGO than
come in the kit.
Everyone in the challenge gets the same number and shapes
of LEGO. If you’re getting fancy, weigh your bricks to come
in at around 50 grams or so. That way when you attach the
motors, PCB and battery, you’ll be able to fly your design.
Create the “black box” by blocking off what others can see
you and the other challengers are building. We’ve been
known to grab things that are handy like standing up books
or using a shoe box for black box privacy barriers.
Build your airframe in secret. When the challengers are
done, have a show and tell! Like a traditional art critique, talk
about the advantages, disadvantages of each person’s design. Ask questions from the challengers why they made the
decisions they did, and have the group comment on what
they like, don’t like or areas they could improve… Then of
course see if the designs fly!
“Pass the Potato”
Don’t ask where the name of this came from. We just made it up.
The goal of this challenge is to spur collaboration and cooperation.
Everyone in the challenge sits in a circle or around a table etc. Put a
big pile of LEGO in the center.
Set a timer for interval timing. Experiment with how much time
works for your group.
The first interval, everyone goes for the pile of LEGO and starts to
build an airframe. Buzz! Time’s up… Pass your work-in-progress airframe to the right. Then start the next interval. Everyone has a new
airframe to add-to. Time’s up… Pass the airframe to the right. You
get the picture. At the end, pass the airframes back to the person
who started with it. Let them see how other people riffed on their
design and where it ended up. Now, it’s tine to see if they fly. Add
the motors, flight control board and battery! Maybe they fliy, maybe
they don’t. It gets more silly and exciting when the time is tight!
You can rev on this game in a number of ways, Perhaps most of
the airframes don’t fly for various reasons. Go through the pass the
potato process again with the wonky designs with the directive of
changing the airframe to make it possible for them to fly. Rapid
problem solving can be really fun when you’re optimizing for flight.
This challenge gets to be particularly hilarious when you try to sabotage each other by making design decisions that would never fly
because - physics. Being handed a complete wreck of a design and
figuring out how to make it work is pretty fun. Loads of lulz with
this particular game.

“Battle Bricks”
< Back
Next >
“Cross the Line”
This is a game designed to practice controlled flying and
strategic building. Of course you don’t have to make a
battle out of it, but it’s sometimes fun to see who dominates!
Pairs of players create their airframes, whatever design
they want to make that flies. People quickly learn how to
build to sustain hits and defend their motors.
When players airframes are ready, tie equal length strings
to the bottom of the flyers (out of the way of the motors,
of course) There are hook LEGO pieces that work really
well for attaching the leash.
On the other side of the leash, attach a weight that the
airframe can’t lift off the ground. You can even tie the
strings to table legs, or chair backs, jars etc. Whatever is
handy.
Now that the flight is constrained, players can practice
maneuvering their airframes to attack or retreat and battle each other in the air. The challenger who’s airframe
stays flying the longest wins.
This is a relay game designed to test challengers piloting, building and problem solving skills. There are a range of variations of this game to accommodate fewer players
or a limited number of kits.
Setup: Two teams. Each challenger builds their airframes. There is a line or starting
area as a starting point for challengers. Depending on how challenging you want to
make it, there’s another line or a target on the floor a distance away from the starting
point. (*hint, really light simple designs may fly faster and be reconstructed quicker in
the event of a crash)
Once each challenger completes a successful landing— and you can determine what a
successful landing is. Is it crossing the line and landing in a pile of LEGO? Or is it landing with the airframe fully in tact?
The object is for each team member to pilot their airframe effectively from the starting
point and land it past the opposite line or in the target before the other team.
Here are some other ideas for how to make this challenge your own!
• Only one controller per team so binding and arming are part of the challenge.
• Limits on the number of batteries each team can use. So once there’s a successful landing the battery has to be shuttled back to the next challenge. Game ends
when batteries are dead.
• One “Fix it person” Say a challenger crashes before they hit the target, another
team member is the only one who can reconstruct or rejigger the airframe build in a
hurry to get their teammate back in the air to try again.
• Time it. The number of successful landings in a certain amount of time wins.
• Divide and conquer. Maybe you have a particularly good pilot, and another
talented fix-it person, and really fast builder, and a fast runner? Let the teams decide
who is in what role to maximize the number of successful landings etc.
You get the idea. Riff on what you want to optimize for. Cooperation, teamwork, specialization? Even with two people you can set this game up to accomplish “all time
records” and see if you can beat your last scores.
 Loading...