


FLYABILITY SA
+41 21 311 55 00 INFO@FLYABILITY.COM
EPFL INNOVATION PARK BLDG C | 1015 LAUSANNE | SWITZERLAND
FLYABILITY
ELIOS 1
USER MANUAL
VERSION 1.5.1
28/08/2019

0
ELIOS USER MANUAL Page 2 of 38

0
ELIOS USER MANUAL Page 3 of 38
Refer to the ELIOS Original Instructions for:
CE and FCC compliance declarations.
Product warranty and liability terms
Pilot Guidelines and Checklists

0
ELIOS USER MANUAL Page 4 of 38

0 Elios Pilot Certification
ELIOS USER MANUAL Page 5 of 38
Table of Contents
1 Elios Pilot Certification .............................................................................................................................................................. 6
Warranty ............................................................................................................................................................................................. 7
2.1 Warranty Limitations ........................................................................................................................................................................................... 7
2.2 50hours Maintenance ........................................................................................................................................................................................ 8
3 ELIOS System description........................................................................................................................................................ 9
3.1 Elios ................................................................................................................................................................................................................................... 9
3.2 Ground Control System .................................................................................................................................................................................12
3.3 Camera operator GCS (option) .................................................................................................................................................................17
4 Flying Elios ..................................................................................................................................................................................... 20
4.1 Setting up Elios.....................................................................................................................................................................................................20
4.2 Elios control .............................................................................................................................................................................................................22
4.3 Flight data logging and video recording ..........................................................................................................................................26
5 Battery .............................................................................................................................................................................................. 27
6 Maintenance ................................................................................................................................................................................. 28
6.1 Cleaning the drone ............................................................................................................................................................................................28
6.2 Changing a Propeller .......................................................................................................................................................................................28
6.3 Repairing the cage ............................................................................................................................................................................................30
6.4 Transporting Elios ...............................................................................................................................................................................................33
6.5 Firmware ....................................................................................................................................................................................................................34
7 Technical Specifications ........................................................................................................................................................ 35
7.1 ELIOS System Specifications ......................................................................................................................................................................35
7.2 ELIOS System transmitted Power ..........................................................................................................................................................37

1 Elios Pilot Certification
ELIOS USER MANUAL Page 6 of 38
1 Elios Pilot Certification
This manual and its referenced documents contain information which must be studied for the Elios 1 Basic
and Expert exams. The exams can be taken online.
Link to Basic Exam, activates the warranty for end users.
Link to Expert Exam, intended for Resellers and Instructors.

2 Warranty
ELIOS USER MANUAL Page 7 of 38
2 Warranty
2.1 Warranty Limitations
Every Elios comes with a 12-month warranty which is the expression of our commitment to quality. The
warranty covers all the malfunctions that could occur during the life of the product, arising from software or
equipment included in the Elios UAV & Pack. With the following exceptions:
No warranty
6 months
12 months
Propellers
x
Camera Servo
x
Propulsion System
1
x
Battery²
x
Battery charger
x
-Fiber Pentagons
x
Decoupling Mechanism (Ring and
Beam)
x
Range extender
x
Camera Operator GCS
x
1. One year and no more than 50 flight hours
2. Six months and no more that 40 charge/discharge cycles
Any damage due to improper usage or lack of basic maintenance, cleaning will not be covered by warranty.
In case of malfunction during the warranty period, Flyability commits, to its option, to repair the defective
product/part or to deliver to its customer an equivalent product/part to replace the defective item.
The warranty is active starting from the day the pilot has passed the
Basic certification and on condition that the Elios has not been
modified. Please refer to our GTC for all the conditions and limitations
related to the warranty.

2 Warranty
ELIOS USER MANUAL Page 8 of 38
2.2 50hours Maintenance
The warranty of the drone is valid for 50 flight hours. It is highly recommended to ship the drone system to a
maintenance center for servicing when this period expires, as this will renew the warranty for another 50 flight
hours. The following items are replaced during the maintenance.
Motors and propellers
Camera actuator
Video and thermal camera cables
In addition, the drone will be functionally tested to ensure it is safe to operate for another 50 flight hours.
For an up to date list of Flyability Service Centers, please consult our website:
www.Flyability.com

3 ELIOS System description
ELIOS USER MANUAL Page 9 of 38
3 ELIOS System description
The Flyability ELIOS was specifically developed as a flying platform capable of entering confined and
cluttered environments.
Figure 3.1: System overview
As the operator, you will enjoy a full control of Elios through the Ground Control System (GCS). A tablet allows
the operator to monitor a live video feed transmitted by Elios. The Flyability Inspector post-mission analysis
software provides a simple solution to visualize the recorded full HD optical video and the thermal video.
3.1 Elios
Figure 3.2: Elios overview
Cage
Elios is surrounded by a protective cage. The cage is there to prevent collisions between the propellers
and humans or other obstacles.
Decoupling System
The decoupling system allows the cage to rotate freely around the drone. It is composed of a ring and
a beam, giving it 3 degrees of rotation.

3 ELIOS System description
ELIOS USER MANUAL Page 10 of 38
Transmitter
The transmitter offers a reliable wireless link between the GCS and Elios.
Full HD Optical Camera
Elios is equipped with a Full HD optical camera. The Standard Definition (480p) live video feed is
transmitted to the pilot, and the FHD (1080p) footage is recorded on the SD cards. The camera is
mounted on a servo motor allowing it to tilt up or down.
Do not tilt the camera by hand, as this may damage the servo
motor.
The full HD Optical Camera has three modes:
- Automatic mode: The user sets the Exposure Value (EV) whereas the camera automatically
sets the ISO and the exposure time to keep the EV constant. The EV corresponds to the overall
brightness of the image.
- Manual low ISO: The user sets the Exposure time whilst the ISO is set to 50.
- Manual high ISO: The user sets the Exposure time whilst the ISO is set to 1600.
from
which the user can later export frames. The video recording starts when the robot is armed and stops
automatically when the robot is disarmed.
Thermal Camera
The FLIR LEPTON thermal camera is coaxially mounted next to the video camera and can also be tilted
up and down. The footage of the thermal camera is automatically saved in the LOG SD card and can
be reviewed using Flyability Inspector. The pilot can also switch to the video feed of the thermal
camera during flight.
Motors and Propellers
Four propellers create the thrust required to fly. Propellers on the arms annotated with an R are
spinning counter-clockwise whereas the other two others are spinning clockwise. The R propellers are
mounted on the R arms. The non-R propellers are mounted on the non-R arms. This is important when
replacing propellers.
Camera SD Card
The Camera SD Card records the full HD optical video feed whilst Elios is flying. Please only use the
provided SD card, as this has been tested to ensure it meets write speed requirements.
Log SD Card
The Log SD Card records the thermal video feed as well as plenty of telemetry data. The telemetry will
be useful for you to analyze your flight using Flyability Inspector software. Furthermore, it will help the
Flyability team run diagnostic tests in case of issues with your system. Please only use the provided SD
card, as this has been tested to ensure it meets write speed requirements.
Battery
A removable LiPo battery powers the aircraft, providing up to 10 minutes of flight time.
Onboard lighting
A powerful array of white LEDs offers bright lighting on the front, top, and bottom of the aircraft. It
helps operators navigate and gather high-value footage in dark environments, the intensity can be
adjusted in flight via the Ground Control Station.
Guiding LED
To help the pilot during Line of Sight (LOS) operations, two colored LEDs are installed to help improve
orientation awareness. The Red LED is located on the left and the Green LED on the right side of the
aircraft.
If the LEDs are blinking alternatively, it means Elios is waiting to connect to the ground control unit.
If the LEDs are blinking rapidly synchronously, Elios is performing a power-on self-test.

3 ELIOS System description
ELIOS USER MANUAL Page 11 of 38
Camera LED status
Gives information about the status of the camera
- Solid green: On and ready
- Blinking green: Recording
- Blinking red: Error or missing SD card
Avionics LED status
Gives information about the status of the avionics:
- Left LED blinking blue: Avionics working properly
- Right LED solid blue: telemetry is being recorded correctly
Transmitter LED status
Gives information about the status of the transmitter.
Right LED:
- Blinks red: Link button pressed. Air System is attempting to link with the Ground System
- Blinks green: Signal detected but not linked to the ground control system
- Solid green: Successfully linked to the ground control system
- Solid red: No signal detected, ensure ground control system is on.
Left LED:
- Solid green: Video from the camera is well received by the transmitter
- Solid red: Error

3 ELIOS System description
ELIOS USER MANUAL Page 12 of 38
3.2 Ground Control System
Figure 3.3: GCS overview
Setting up the ground control system
Mount the tablet
To mount the GCS, follow these steps:
1. Put the antennas and the tablet holder in a vertical position.
2. Press the button on the side of the tablet holder to release the clamp.
3. Secure the Tablet inside the clamp.
4. Connect your tablet to the remote controller via the USB cable.
Figure 3.4: Assembly of the GCS
Power on the controller
To turn the controller on/off:
press the power button once, it will display the battery level on the LED
Press it again and hold
The controller will turn on, the same sequence can be used to turn it off again.
Power on the tablet
To turn on/off the tablet, press and hold its power button.
Charging
To charge the tablet, connect the USB cable to the USB port of the tablet. Put the other end of the cable to
the USB wall charger. Plug the USB wall charger into the wall socket.
To charge the controller, connect the controller charger to the barrel jack of the controller. Plug the other end
of the charger to the wall socket

3 ELIOS System description
ELIOS USER MANUAL Page 13 of 38
Use only the provided charger to charge the Controller. The use of a non-approved charger may result in
battery damage and risk of fire. While the controller can be charged while in use for piloting the drone, this is
not a recommended practice as this may lead to the unit overheating.
Figure 3.5: GCS charging
Tablet
The tablet provides a visual interface with the Aircraft and controller. It displays the live video feed transmitted
by Elios, and important flight parameters. The SAMSUNG ACTIVE II tablet comes standard with every ELIOS
system.
Figure 3.6: Tablet overview
Power & lock button
Power on/off the tablet and lock the screen
Home button
Press this to return to the main menu
USB port
Used as a communication port with the controller, and to recharg
USB cable
The USB cable is used to connect the Tablet to the Controller.
Software
The tablet comes pre-installed with Cockpit and AZ Screen Recorder. It is recommended to avoid installing
other apps, as these might interfere with the performance and functionality of the device. Also avoid running
other apps in the background while using cockpit as these might reduce the performance and video quality.
Cockpit App
This app is developed by Flyability and functions as an interface with the drone during flight. It displays
the video stream from the drone, as well as important flight parameters and settings. For a complete
overview of its functions please refer to the Flyability Cockpit User Manual.
AZ Screen Recorder

3 ELIOS System description
ELIOS USER MANUAL Page 14 of 38
This is a third party app intended to provide a video backup in case of a loss of the drone. The App
records everything displayed on the screen, as well as the audio from the microphone. It can also be
used to record comments made during the flight.
Controller
The controller gives to the pilot full manual control of the aircraft. It is also used to change the camera and
lighting settings.
Figure 3.7: Pilot controller overview
The controller is set to Mode 2 by default consult the Cockpit App manual for information on how to switch to
Mode 1.
Left stick
Controls the aircraft altitude and yaw.
Right stick
Controls the aircraft horizontal motion (forward/backward, left/right).
The more you push a control stick away from its centre, the faster Elios will follow the command. Give
gentle and measured inputs to avoid any jerky and uncontrollable behaviour changes. While flying,
always keep your fingers on both control sticks to improve the reaction time and feeling for the controls.
Power button:
Turns the Controller on/off and displays the battery level of the controller. Tap once to view the battery
level, tap once and hold to turn on or off.
Status indicator
Indicates the connection status between the controller and Elios:
- Solid red: Controller is on, set as Master but not connected to the aircraft
- Blinks blue: Controller is attempting to bind to the aircraft
- Solid green: Controller is set as Master and connected to the aircraft

3 ELIOS System description
ELIOS USER MANUAL Page 15 of 38
- Solid purple: Controller is on, set as Slave, but not connected to the aircraft
- Solid cyan: Controller is set as Slave and connected to the aircraft
- Blinks red: Error. Use DJI GO for futher troubleshooting.
Battery level indicator
Displays the c . Each LED corresponds to 25% charge remaining.
Altitude mode
Up: Manual Thrust Control mode, gives direct control over the thrust
Down: Automatic Altitude Control mode, the altitude is automatically maintained.
The altitude of the drone is measured by an on-board pressure sensor. In some cases, the pressure in an
environment will not be stable and Elios will not be able to maintain a constant altitude. To have a better
control, the pilot can disable the Automatic Altitude Control mode to have a direct control on the
ght, the up/down
stick will regulate the thrust power. Operating in Manual Thrust Control mode is not covered by the
warranty.
Camera pitch
Clockwise, camera looks upward.
Counter clockwise, camera looks downward.
Camera home
Horizontally levels the camera when pressed
Camera mode
Set the camera mode
- A: Camera in automatic mode
- C1: Camera in manual low ISO mode
- C2: Camera in manual high ISO mode
FN button
Press and hold this button while turning the EV/Lighting wheel to turn on the LED lights.
EV/Lighting wheel
Wheel:
- Default:
- Sets the EV if camera in automatic mode
- Sets the Exposure time if the camera is in manual low ISO mode or in manual high ISO mode.
- While the FN button is pressed the wheel sets the onboard lighting intensity
POI Button
Save a point of interest which can be reviewed after flight in the Flyability Inspector software.
SRC Button
Switches the video feed between HD camera and Thermal camera.
Pro Mode
When pressed, Elios is in High-Speed mode. This makes the drone more responsive and increases the
attitude angle limitation to achieve higher flight speeds.
of 6.5m/s (14mph). If Elios needs to fly in higher wind speed conditions the airspeed can be increased
to 9m/s (20mph) by using the PRO Mode. This allows the drone to operate in wind speeds up to 5m/s
(11mph). Operating Elios in PRO mode is not covered by the warranty.
USB port
Connection to the provided tablet
HDMI port
Offers the possibility to connect an external screen to the GCS
Power port

3 ELIOS System description
ELIOS USER MANUAL Page 16 of 38
Connect to the controller charger to charge the internal battery of the controller. The battery can be
charged during flight.
Controller Pairing
Every drone is paired to its own GCS controller, if you wish to pair a drone to another GCS controller then you
must first perform this pairing procure.
Using the Cockpit App
Remove the screw located on the back of the transmitter block of the drone.
Place the controller and Elios at 1.5 m from each other.
Turn on Elios and the controller with the tablet connected.
Open Elios Cockpit and go to Settings > Pairing and tap on START.
The Controller Status Indicator will blink blue and emit a beep sound when the Controller is ready to
link.
Using the Sim card remover provided in the Tool kit (or a paperclip), press the link button on the
transmitter block on Elios. The controller status indicator will glow solid green and stop beeping if the
linkage is successful.
Put back the screw.
Using only the Controller unit
The process can also be performed without using the tablet and the Cockpit App by following all the
steps above, except that instead of step 4 you simultaneously press and hold the FN button, the Pro
Mode button, and the Camera home button. The controller will start beeping.

3 ELIOS System description
ELIOS USER MANUAL Page 17 of 38
will beep faster.
Then proceed with step 6.
3.3 Camera operator GCS (option)
Figure 3.8: Camera operator overview
The pilot can be assisted by a camera operator to acts as a copilot relieving the pilot from all other tasks than
piloting. In dual GCS mode, the pilot GCS controls the movement of the aircraft whilst the camera operator
controls the camera settings, pitch angle and LED lighting. At any time, the pilot can override the camera
operator command.
Both of Pilot and Camera Operator GCS receive the live video feed directly from the drone. If the Camera
operator GCS is used in combination with the Range Extender antenna module then the Camera Operator
must use the WIFI video stream directly from the Pilot GCS table. This can be enabled in the Cockpit App.
The buttons on the Camera Operator GCS, have the same functions as on the Pilot GCS, but all inputs which
control the drones flight are disabled. The only exception to this is that the Camera Operator is also capable of
disarming the drone.
Any ELIOS GCS unit can be reconfigured by the user to serve as a camera operator unit.

3 ELIOS System description
ELIOS USER MANUAL Page 18 of 38
Figure 3.9: Camera operator controller overview
Connect a Camera Operator GCS to a Pilot GCS
capability of performing this operation, so the use of the DJI GO
is required. As DJI GO and Elios Cockpit et along. We recommend that you do not install
it on the tablet provided by Flyability, instead install DJI GO on your personal device for example a smartphone.
Be sure to have the same firmware installed on both GCS, this can also be updated with the DJI GO App.
What you need:
2x USB Device with DJI GO installed (DJI GO for products before P4 version).
2x USB Cable.
2x GCS fully charged.
The following steps have to be followed:
Deploy, connect the USB cable and turn on the Pilot GCS and the Camera Operator GCS.
On the Camera Operator GCS:
Launch DJI GO.
Once the Remote Controller Picture appears, tap on Camera.
Tap the settings menu button in the top right corner ,
Select the RC Tab.
Set Remote Controller Function to Slave mode.
A confirmation window will appear, tap OK.
The status LED of the GCS will become purple, indicating that the GCS is in Slave mode.
On the Pilot GCS:
Launch DJI GO.
Tap on camera.
Go to the RC Tab in the settings menu and make sure that it is set as Master.
On the Camera Operator GCS:
Searc .
In the master list, the Remote Controller name will appear.
Select the correct RC in the list and tap the password of the Pilot GCS then press OK.

3 ELIOS System description
ELIOS USER MANUAL Page 19 of 38
Both GCS will emit a beep.
On the Pilot GCS:
The Slave RC will appear in the Slave GCS List.
On the Camera Operator GCS:
Tap on "Request Permission", then tap OK when a pop-up window will be displayed.
On the Pilot GCS:
A window will be displayed confirming the control of the camera, tap on Agree.
If a Pilot GCS is turned into a CamOp GCS then the drone it was previously paired to will have to be re-paired
with the new Pilot GCS.
If the Pilot (Master) GCS is paired to a new drone then the Camera Operator (Slave) GCS will automatically
follow it.

4 Flying Elios
ELIOS USER MANUAL Page 20 of 38
4 Flying Elios
4.1 Setting up Elios
Insert the SD cards
Please only use the provided SD card, as this has been
tested to ensure it meets write speed requirements.
Place the two SD cards in their corresponding slots .
Figure 4.1: SD card mounting
Clean the Full HD Optical Camera Lens
Be careful not to force the red camera assembly,
moving it by hand may damage the actuator.
Using the lens cleaner provided in the tool kit, follow those steps to properly clean the Full HD Optical Camera
Lens before each flight. This will significantly improve the image quality and and increase the value of the
footage obtained during an inspection.
1. Using the brush side, remove all the dust from the lens.
2. Using the dry cleaner side, remove all the grease and fingerprints from the optics.
Figure 4.2: Lens cleaner overview

4 Flying Elios
ELIOS USER MANUAL Page 21 of 38
Insert and plug in the Battery
1. Slide the Battery into the Battery Holder.
2. Secure the battery by gently tightening a the strap.
3. To plug in the battery, simply slide the green
connector. The red safety clip should click into place and prevent the connector from unplugging itself
during flight.
Figure 4.3: Battery insertion and connection
Once the battery is plugged in, Elios is in standby and ready to fly.
If the battery strap is not properly secured, the battery may slide
out during flight. This will severely affect the stability of the drone
and can lead a crash.
After flight, the battery can be removed in reverse order:
1. Unplug in the battery connector while pressing the red safety clip
2. Unstrap the battery.
3. Remove the Battery from the drone.

4 Flying Elios
ELIOS USER MANUAL Page 22 of 38
4.2 Elios control
Arming
Spinning propellers can cause serious injuries. DO NOT have any
body part inside the cage whilst arming the robot.
In case of doubt, go back to the Safety section and be sure you are
following the checklists.
When the battery is connected, Elios is turned on and in standby mode. The drone must be armed before take
off.
initially in an upright position. As its inner part is decoupled from
its cage the latter is in random orientation. Hence, Elios has to first perform an upright maneuver as soon as
the propellers spin up. Elios might roll around if is not held in place during this maneuver, and it is
recommended to constrain it between your feet while arming.
To arm Elios, perform the following arming sequence in rapid succession:
1. Place the left stick on the bottom right
2. Keeping the left stick down, slide it to the bottom left.
3. Slide back the left stick to the bottom right
Figure 4.4: Arming sequence
Once armed, Elios will perform the upright maneuver. If after 5 seconds, Elios is not in a stable upright position,
disarm Elios and contact Flyability.
Disarm
Once Elios has landed on the ground or is safely held by an operator, you must stop the motors. To do so
disarm the drone with the following input:
1. Left and right stick down and to the center
Figure 4.5: Disarming sequence 2

4 Flying Elios
ELIOS USER MANUAL Page 23 of 38
The Drone can also be disarmed in mid air, resulting in a free-fall. If
perfomed at an altitude of more than 1m above ground this will
seriously damage the drone.
The camera operator controller is also capable of disarming Elios by
using the same sequence.
Aircraft control
Elios' orientation and flight direction are defined regarding to the inner frame. It is very important that the
operator ignores the motion of the cage whilst piloting.
By default, the control of Elios is mapped to the control sticks in mode 2, this can be changed to Mode 1 via
the Cockpit App.
Controller
Aircraft
Explanation
In Automatic Altitude control:
Moving the left stick up and down
altitude.
Up increases altitude.
Down decreases altitude.
Centered Elios maintains its altitude.
In Manual Thrust control:
thrust.
Up increases thrust
Down decreases thrust
In this mode, keeping the stick centered will cause
Elios to descend slowly. The pilot has to give
constant inputs to maintain the aircraft at the
desired altitude.
Moving the left stick sideways controls the rotation
(yaw) of Elios.
Left makes the aircraft rotate counter clockwise.
Right makes the aircraft rotate clockwise
Centered, Elios maintains its orientation with a drift
of max. 1°/second.
The pilot should stay aware of Elios' heading at all
times, as the right stick
heading, i.e. where the front of the drone is pointing.

4 Flying Elios
ELIOS USER MANUAL Page 24 of 38
Moving the right stick up and down controls the
pitch angle of Elios, making the aircraft go forwards
or backwards.
Up makes the aircraft go forwards.
Down makes the aircraft go backwards.
Centered, Elios stays level.
Moving the right stick left and right controls the
bank angle of Elios, making the aircraft go to the left
or to the right.
Left makes the aircraft go to the left
Right makes the aircraft go to the right
Centered, Elios stays level..
The drone does not have an onboard GPS to help it stay fixed in one
place. The pilot must make continous inputs to correct the drift
caused by small trim errors and local air currents.
Failsafe
Loss of communication
If the communication link between Elios and the GCS is lost, the aircraft will automatically enter the
emergency landing mode. It will slowly descend and land on the ground, wait 30s and then shut down
the motors.
The aircraft will leave this mode if the communication link is re-established, after which flight may be
resumed.
Battery level critical
If the battery reaches a critical level, Elios will automatically enter the emergency landing mode, and
the aircraft will slowly descend. The pilot is still able to override this, but to prevent any accident, the
drone should be landed and turned off within 30sec.
Overriding this failsafe for too long might result in permanent
damage to the battery and could result in a crash.

4 Flying Elios
ELIOS USER MANUAL Page 25 of 38
Camera Control
The following control inputs can be made either by the Pilot of Camera Operator.
The left wheel of the Controller allows you to change the pitch of the cameras.
Counter-clockwise makes the camera look downwards.
Clockwise makes the camera look upwards.
Centered, the camera will keep its current pitch.
It is possible to reset the camera position to level with the
Camera home button.
Whilst flying, you can set several different parameters on the Full HD optical camera.
The three way Camera Mode switch sets the camera mode.
Auto You set the Exposure Value (EV) and the camera
changes with the ISO and exposure time. The EV is
equivalent to the overall brightness of the image.
C1: Camera in manual Low ISO mode ISO is set to 50 and
you set the exposure time.
C2: Camera in manual High ISO mode ISO is set
to 1600 and you set the exposure time.
The right wheel exposure value (in
automatic mode) (in the
manual low ISO mode and manual high ISO mode).
Clockwise increases brightness.
Counter-clockwise decreases brightness.
With the FN button on the back side of the controller is
pressed, the right dial sets the onboard lighting LED's
power.
Clockwise increases LED power.
Counter-clockwise decreases LED power.

4 Flying Elios
ELIOS USER MANUAL Page 26 of 38
4.3 Flight data logging and video recording
Data logging
As soon as the battery is plugged in, Elios is turned on and it starts to record data onto a LOG file on the LOG
SD card. This file contains the Thermal camera footage data, as well as flight information such as sensor values,
camera settings, and even controller inputs from the pilot. This data can be sent to Flyability engineers to
analyze malfunctions should they occur.
The LOG file can be read with the Flyability Inspector software in order to access the Thermal Camera footage
and flight parameters such as altitude and heading. Flight is not possible with the LOG SD card removed.
Video recording
The video recording starts as soon as Elios is armed and stops when Elios is disarmed, provided that the correct
SD card is inserted.
Tablet Backup Recording
The video stream received by the tablet can be saved locally to create a low quality backup of the flight vide
as well as some telemetry data, preventing a complete loss of data in case of an accident. This can be done in
two ways:
AZ Free Recorder
This app is pre installed on the GCS Tablet and can be used to record everything on the screen of the
tablet, as well as the audio recorded by the microphone. This can be useful to capture comments
made by the pilot of the observing inspector during the flight.
Cockpit Backup Recorder
This feature can be turned on in the settings menu of the Cockpit App. It records a video file with the
received video stream, and creates a subtitle file (.srt) with the telemetry data.
A loss of power (due to a crash or battery disconnection) while Elios
is flying may cause a loss of the video file being recorded on the
camera SD card.

5 Battery
ELIOS USER MANUAL Page 27 of 38
5 Battery
Chemistry
Lithium Polymer
Weight
170g
Capacity
2800mAh
Nominal Voltage
11,1 V
Cell Count
3
Dimensions
33.5x22.5x107mm
Only use batteries provided by Flyability.
To avoid fire, serious injury, and property damage, observe the safety
guidelines when using, charging, transporting, or storing your
batteries.
Please refer to the following documents for battery handling guidelines:
Elios Battery Safety Guidelines
Elios Balance Charger Manual
Elios Charger/Discharger Manual

6 Maintenance
ELIOS USER MANUAL Page 28 of 38
6 Maintenance
6.1 Cleaning the drone
It is important to clean the robot after a flight in a dusty or dirty environment. To do so, use compressed air
from an air blow gun or gas duster can. If necessary, Isopropanol alcohol can be used to clean the cage and
any surface of the robot. Apply gently with a toothbrush or a rag.
Avoid the use of water, as this may damage the electronics.
LED lights
Take special care of the onboard lighting system. Accumulated d will
reduce the lighting capacity of Elios.
Motors
Pay special attention to the motors. Dust or other particles may damage the motors if allowed to build up
inside. Use Compressed air to remove all dust and particles from the motors, check regularly for build up in
between flights, especially in a metallic dust environment, as this will stick to the magnets of the motor.
If you blow compressed air on the motors, please wear gloves and hold the
corresponding propeller. The air flow may make the propeller spin.
6.2 Changing a Propeller
A damaged or incorrectly installed propeller may seriously damage the aircraft.
Propellers should be changed when they are damaged. Damage is typically caused by large items entering
the cage, but dust and small particles will also abrade the propellers in the long term.
Unscrew the nut with the screw driver provided in the tool kit, turn counter clockwise to loosen.
Replace the propeller. Be careful, the robot has two kinds of propellers. Propeller 5040R shall be
placed on the front left and bottom right motors, propeller 5040 on the front right and bottom left
Elios is in an upright orientation. Do not use
pliers or other tools to hold the rotor. It might bend the motor shaft. Gloves should be used instead.
Screw on and tighten a new motor nut. Elios is shipped with a Dynamometric screwdriver which is
pre-set to the correct torque of 1.4Nm. Using this tool eliminates the risk of overtightening the motor
nuts and damaging the threaded motor shafts.
Note: If correctly tightened the propeller should not have any play on the motor shaft, nor should it be possible
to rotate the propeller in relation to the motor shaft. An insufficiently tightened nut can cause a crash and
might result in serious damage to the robot and injure people or infrastructure.

6 Maintenance
ELIOS USER MANUAL Page 29 of 38
Figure 6.1: Propeller marking
Never use the same motor nut more than once, as the nylon locking ring
will be less effective when re-used.
Use only the propellers provided by Flyability.

6 Maintenance
ELIOS USER MANUAL Page 30 of 38
6.3 Repairing the cage
A cage with damaged elements becomes softer and more fragile. Not maintaining the cage can significantly
reduce its collision tolerance.
Changing a pentagon
Identify the damaged pentagon, cut the surrounding zip ties with the cutting pliers and remove the
damaged pentagon.
Take
inner side of the cage.
Tighten the zip ties using the needle nosed pliers.
Using the cutting pliers, trim the zip ties flush with the ratchet.
Changing an "egg cup"a suspension
What you need*:
2x Bearings Ø8x3X4mm
1x Spacer bearing
1x M3x16 Screw with Tuflok
1x Suspension
1x Pentagon
Cutting pliers
Needle nosed pliers
5 Zip-ties
*The bearings, spacers and screws can be re-used if no new items are available.

6 Maintenance
ELIOS USER MANUAL Page 31 of 38
Assembly instructions:
Assemble the bumpers to the ring as shown on the schematic below
Place the zip-ties on the cage's connector, be sure that the zip-ties ratchets are located on the inside
of the cage.
Pass the zip-ties tape through the pentagon, then through the suspension.
Tighten zip-ties with the needle nosed pliers
Trim the zip ties close to the ratchet with the cutting pliers
Changing the carbon ring
The carbon ring may break during impacts above 4m/s or when the ring impacts a shark object directly. A
spare ring can be ordered from flyability in case a replacement is needed. It can be replaced by the end user.

6 Maintenance
ELIOS USER MANUAL Page 32 of 38
Install the bearing from the outside into the carbon ring.
Position the drone by inserting the Carbon Beam into the ring.
Tighten up the carbon beam into the ring with the black M3x12 screw. Use the small T10
screwdriver provided in the toolkit.
Repeat steps 1. 2. and 3. on the other side.
Tighten the Screw Top into the carbon ring on both sides with a flathead screwdriver. Apply a light
torque by hand.
6 Maintenance
ELIOS USER MANUAL Page 33 of 38
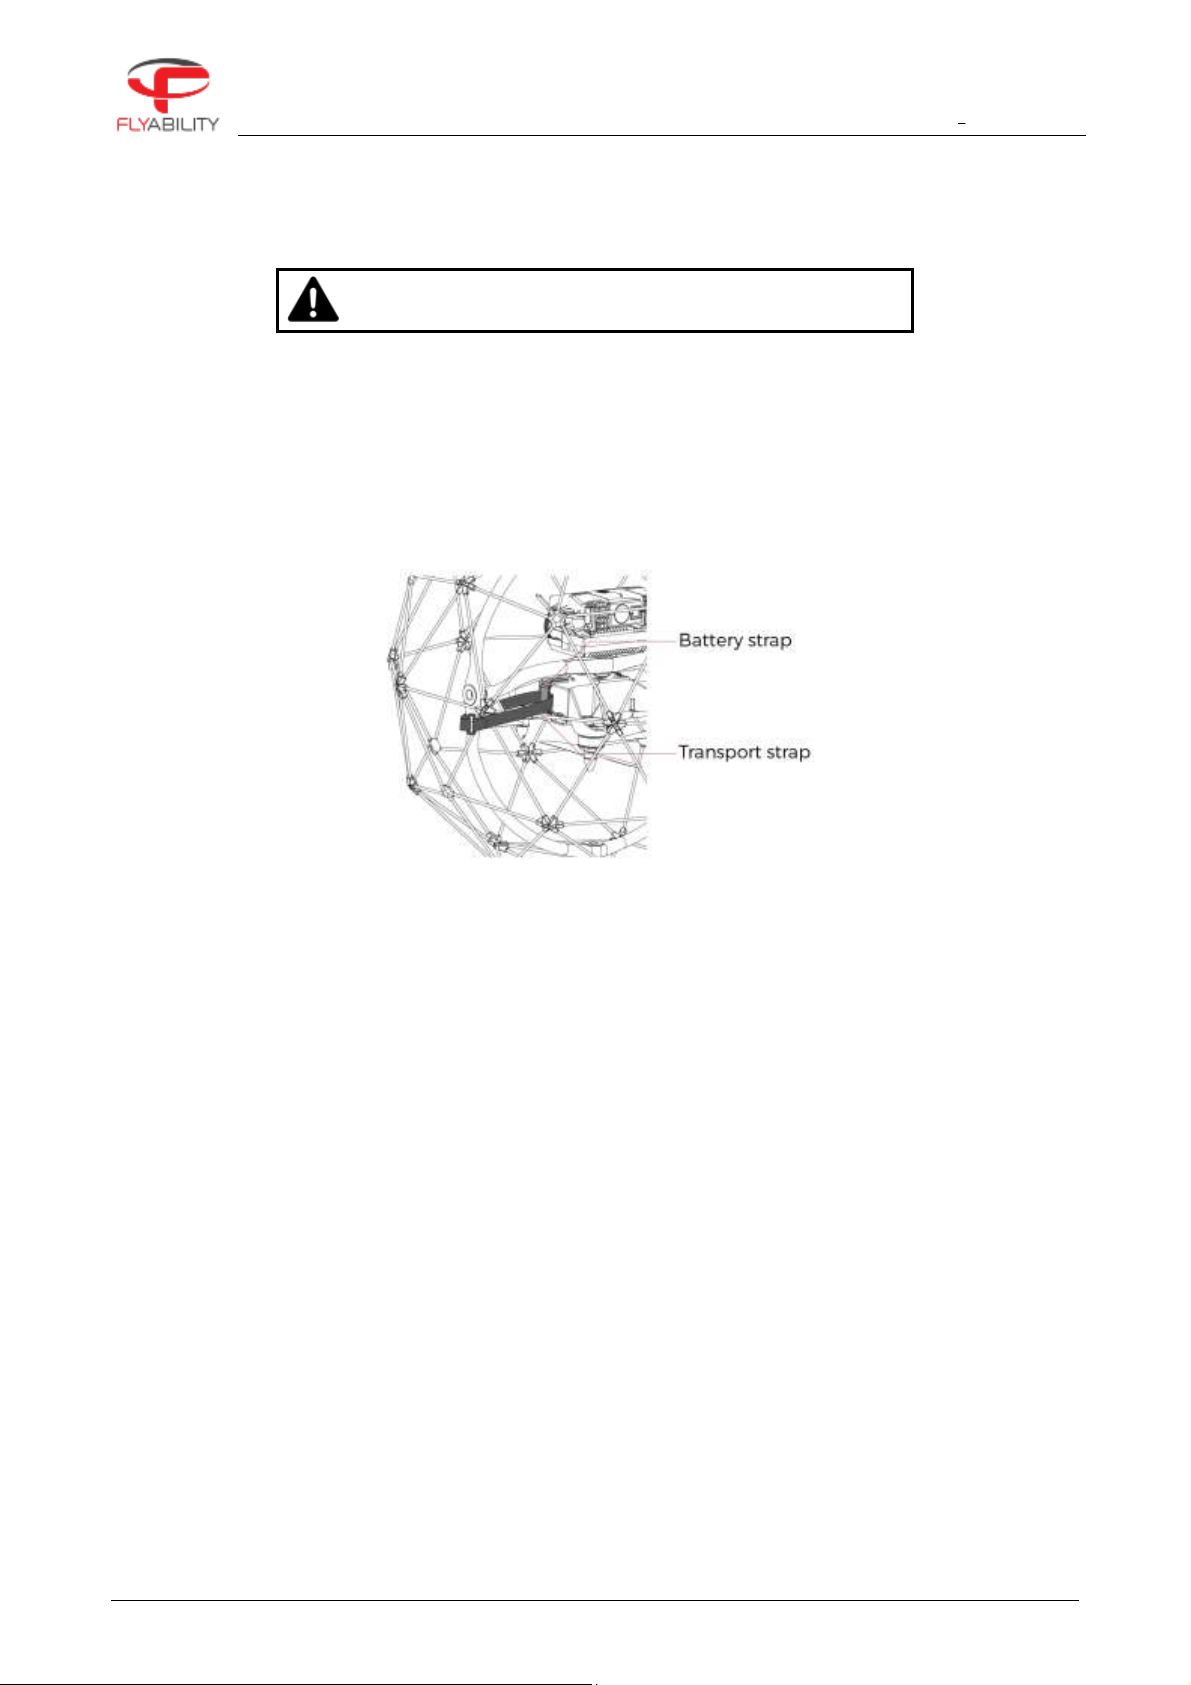
6.4 Transporting Elios
Elios should never be transported with a battery installed
Elios should be attached to its cage to keep the drone from spinning inside its cage during transportation, To
do so, follow these steps:
1. Make sure no battery is installed in the aircraft
2. Close the battery strap
3. Pass the transportation strap through the battery strap, the ring and the cage as shown below.
4. Do not tighten the yellow strap too much to avoid stretching out the battery strap.
Figure 6.2: Attaching the inner frame to the cage

6 Maintenance
ELIOS USER MANUAL Page 34 of 38
6.5 Firmware
The firmware is software running on the components of the Elios system. Updates are made available regularly
to improve functionality and add features, so make sure you are using the latest version on all the components
of the Elios System.
Cockpit Application
The Flyability Cockpit application is installed on the tablet of the ground control station. Cockpit
version 1.1 or above can be updated by connecting to the internet, an installation menu will
automatically appear if a new version is available.
It can be also be updated offline manually by running the latest APK installation file.
Avionics
The avionics firmware is installed on the Elios drone. This is automatically updated via the
cockpit app on the tablet.
It can also be updated manually by uploading a binary file on the LOG SD card.
Camera
The camera firmware controls the Elios' on board camera features, should it be necessary, it can also
be updated manually by uploading a binary file on the LOG SD card.
Ground unit
The ground unit also runs software which defines the control protocols with Elios and the tablet. This
firmware can be upgraded (or downgraded) via a tablet using the DJI GO "products before P4" app.
Flyability Inspector
The Inspector software can be installed on your computer to improve post flight footage It is regularly
updated to improve features and compatibility.

7 Technical Specifications
ELIOS USER MANUAL Page 35 of 38
7 Technical Specifications
7.1 ELIOS System Specifications
Flight mode
Types
Throttle: Altitude hold / Manual thrust
Control: Attitude mode / Speed mode
Speed: Slow / Fast / PRO mode
Availability
Switch between modes at any time
Fail safes
Controlled descent on low-battery (override available)
Controlled descent on signal loss
Onboard Electronics
Avionics-board
Autopilot, thermal video and system management
Power-board
Motor control
ELIOS Aircraft
Type
Quadcopter configuration
Dimensions
Fits in 400 mm sphere
Motors
4 electric brushless DC motors
Propellers
4 propellers, 5 inches diameter
Take-off weight
700 g including battery, payload & protection
Flight time
Up to 10 minutes
Max. climb rate
1.5 m/s (in altitude hold mode) 5 m/s (in manual thrust mode)
Max. airspeed
6.5 m/s (in normal fast mode) 9 m/s (in pro mode)
Wind resistance
Max. 5 m/s (in pro mode)
Max. Flight Altitude
Sustained flight at 2500m density altitude
Battery life allows up to 200m climb and descent
Flight sensors
IMU, magnetometer, barometer
Materials
Cage: carbon fiber + Epoxy, Polyolefin coating, TPU and PA12 Connectors
Propellers: Polycarbonate
Body: Polycarbonate, Magnesium, Aluminium, Steel
Cameras: Glass and Germanium Dioxide optics
Operating temperature
10 ºC to 40 ºC (50F to 104F)
0°C to 50°C (32F to 122F) with some restrictions
Ingress Protection
Equivalent to IP53
Radiation Resistance
Tested at 800 Rem/Hour (8 Sv/Hour) during 10 minutes
Remote controller (ground control system)
Type
Ergonomic joysticks and payload controls, integrated video outputs
Frequency
2.4GHz & 5.8GHz
Weight
810g
Operating temperature
0 ºC to 40 ºC (Tablet display max 35°C)
Output ports
HDMI, SDI, USB
Battery
6000 mAh, 2S
Controls
Payload settings and aircraft control
Options
Optional remote controller (camera operator) with video stream reception on a
secondary screen, and dual control of camera settings.
Range between the two remote controllers is 50m.
Wireless communication Remote Controller to UAV
Type
Digital, bidirectional, long range, video and data downlink to remote controller
(RC), command and data uplink to UAV
Frequency
2404 2480 MHz
Range
Up to 500 m in direct line of sight
EIRP RC to UAV
100mW
EIRP UAV to RC
CE Mode: 18dBm (60mW) EIRP on AirUnit. Limit is 20dBm
FCC Mode: 26.6dBm (456mW) RF power on AirUnit. Limit is 30dBm
Wireless communication Remote Controller to Camera Operator Remote Controller

7 Technical Specifications
ELIOS USER MANUAL Page 36 of 38
EIRP RC to RC
4mW
Frequency
5738-5808 MHz
920.6 MHz to 928 MHz (Japan)
System power
Type
Lithium polymer battery, 3 cells, 2800 mAh, 33.08 Wh
Charging time
1 h
Battery change time
< 1 mn
Integrated payload
Payload (camera) head
Damped from vibrations
Upwards tilt
+65 degrees
Downwards tilt
-60 degrees
Main camera
Video
FHD (1920 x 1080) at 30 fps, good low light performance, recorded on board
and streamed to pilot and camera operator
Horizontal field of view
130 degrees
Vertical field of view
75 degrees
Total vertical field of view
215 degrees (considering payload up/down rotation)
Control modes
Auto with EV correction, full manual mode
Thermal camera
Type
Uncooled FLIR camera core
Video
160x120 pixels at 9 fps, recorded on board
Horizontal field of view
56 degrees
Vertical field of view
42 degrees
Thermal sensitivity
<50mK
Range
10°C to 400°C
Wavelength
LWIR, 8 to 14 um
Lighting system
Type
5 arrays of high-efficiency LEDs for even lighting in front, top, and bottom
Control
From remote controller, adaptive light beam controlled by camera pitch
Power
11.4 W nominal power for front lighting, 28 W total installed max.
Operational safety & Crashworthiness
Navigation lights
Green (right) and red (left) lights
Protection cage
Carbon fiber cage with soft coating, modular subcomponents for maintenance
ease, thermoplastic elastomer suspensions, size of openings: triangles of about
11 cm sides allowing for hand to access inside to swap batteries
Collision tolerance
Uniform all around the drone, up to 3 m/s on sharp objects, up to 4 m/s on flat
objects
Decoupling
3-axes gimbal system, carbon fiber composite ring and transverse beam
Accessories
Transport case
IATA compliant transport case for checked-in luggage, dimensions: 60 cm x 52
cm x 50 cm
Chargers
3A / 35 W lithium polymer battery balance charger, with charging status
indicator, RC charger: 17.4 V, 57 W, tablet USB charger: 5 V
Mobile application used during flight (Elios Cockpit)
Features
Real time video and UAV telemetry, status visualization (remaining battery,
payload settings, warnings, etc. ), control payload settings and various
configurations.
Operating system
Android, optimized for tablet provided with UAV system
Post Flight Video, Thermal and Log Analysis (Flyability Inspector)
Features
Video and Thermal video viewer (frame by frame), flight log analysis including
point of interests recorded during flight, screenshots and flight data export.
Operating systems
Windows 7, 8 and 10 (64bit only)

7 Technical Specifications
ELIOS USER MANUAL Page 37 of 38
7.2 ELIOS System transmitted Power
Elios:
Frequency band Tx
2406 2476 MHz
Maximum output power
60mW, 18dBm in 2.4GHz band (CE mode)
456mW, 26.6dBm in 2.4GHz band (FCC mode)
Designation of emissions
Digital bidirectional video and data downlink to remote controller,
command and data uplink to to UAV
Technology
OFDM, wideband
Modulation type
OFDM
E-Field Strength
7.13V/m (measured at 20cm)
GCS:
Frequency band Tx
2404 2480 MHz
5738 5808MHz (CamOp)
920.6 MHz to 928 MHz (CamOp Japan)
Maximum output power
40mW, 16dBm in 2.4GHz band (CE and FCC mode)
6.3mW, 8dBm in 5.8GHz band (CE mode)
4.4mW, 6.4dBm in 5.8GHz band (FCC mode)
Designation of emissions
Radio Video Downlink and telemetry and uplink of the from Drone
Technology
OFDM, wide band
Modulation type
OFDM
In order to comply to both FCC and CE standards concerning transmission power, the ground unit uses a GPS module to determine its
geographic location and the power is adjusted accordingly. FCC mode is used in the following countries: USA, Canada, Mexico, Australia, Brazil,
Taiwan. In other countries, or if no GPS position can be obtained, the system uses the more conservative CE standard.

FLYABILITY SA
+41 21 311 55 00 INFO@FLYABILITY.COM
EPFL INNOVATION PARK BLDG C | 1015 LAUSANNE | SWITZERLAND
Flyability S.A.
Route du Lac 3
1094 Paudex
Switzerland
Email: support@flyability.com
Tel: +41 21 311 55 00
Content subject to change.
Find the latest version on:
flyability.com/knowledge-base
 Loading...