

Page 1
VERSION 1.0 – 04/11
© Copyright by
FLY
Products s.r.l.
Via Perù n. 30
63013 GROTTAMMARE (AP) - ITALY
tel./fax +39.735.632486
www.flyproducts.com - fly@flyproducts.com
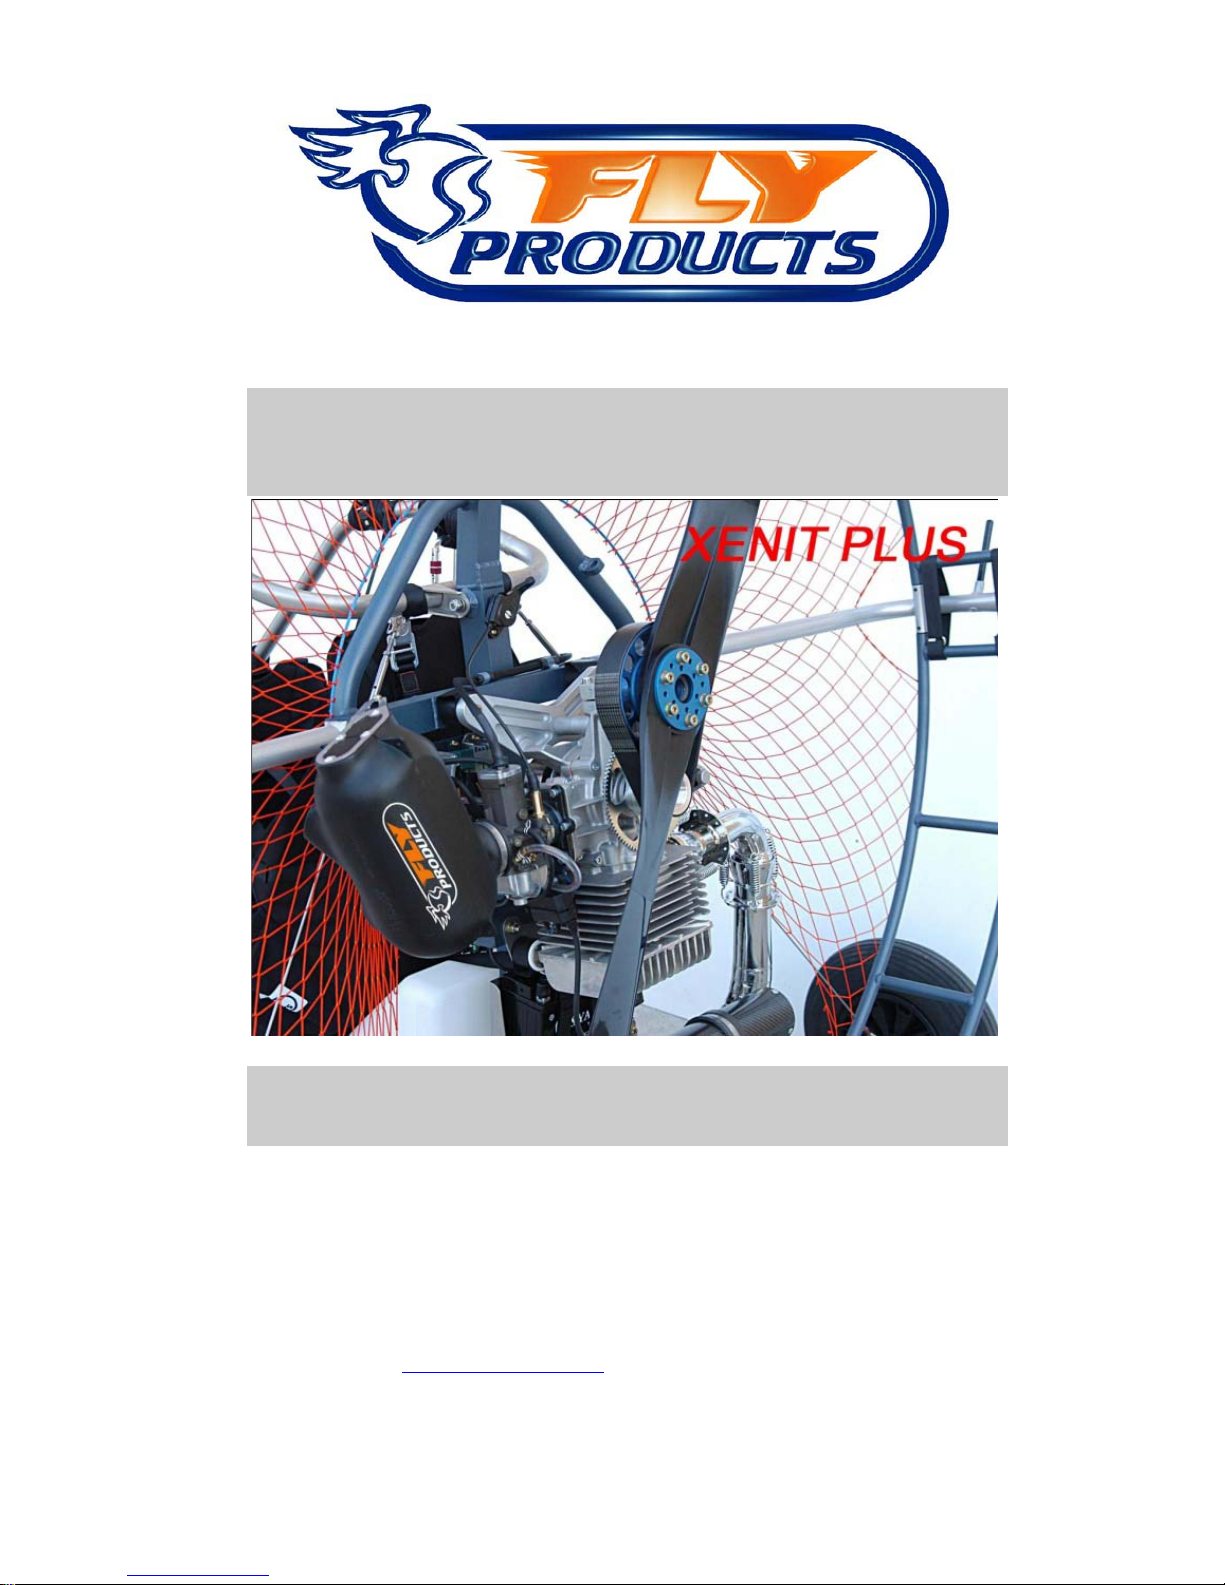
XENIT PLUS
OWNER’S MANUAL
Page 2

XENIT PLUS _ OWNER’S MANUAL ____ ___ VER. 1.1
___________________________________________________________________________
© Copyright
FLY
Products s.r.l. Page
2
Index
Chapter Description
1.0
INTRODUCTION GENERAL INFORMATION
2.0
UNPACKING AND ASSEMBLING Y OUR “XENIT PLUS”
3.0
PREPARING YOUR FLIGHT
4.0
FLYING YOUR NEW “XENIT PLUS”
5.0
MAINTENANCE
6.0
TROUBLESHOOTING
7.0
SPECIFICATION AND PERFORMANCE
8.0
MISCELLANEOUS
Page 3

XENIT PLUS _ OWNER’S MANUAL ____ ___ VER. 1.1
___________________________________________________________________________
© Copyright
FLY
Products s.r.l. Page
3
1.0
INTRODUCTION AND GENERAL INFORMATION
Safety first, WWW! (Who, Where and When can fly it)
To fly with Trike is the most exciting, less expensive, safest, and most accessible form of aviation
available! However, it is still aviation, and it brings with it all the inherent potential dangers of
aviation. People can, and do, get hurt, and even killed, in any form of aviation, including to fly with
Trike. For that reason it is imperative that before flying with this Trike you must receive proper
training from qualified instructors and obtain a valid license, an then to respect all aviation deserves,
respect weather and conditions, and realize that in the end, it is the pilot himself that is fully responsible
for his own safety and the safety of fellow pilots and bystanders.
Depending on every national regulations, the flights with Trike may only be operated in authorized
areas and flights within controlled airspace usually needs a permission given by radio.
Additional requirements like a valid insurance must be fulfilled.
To fly with Trike is an extremely demanding sport that requires exceptional levels of attention,
judgment, maturity, self-discipline, and attention to detail. It is unlikely that you will be able to
participate in it safely unless you make a conscious and continual commitment to your own safety.
Due to the inherent risks in flying this or any Trike, no warranty of any kind can be made against
accidents, bodily injury, equipment failure, and/or death.
This Trike is not covered by product liability insurance. Do not start it or fly it unless you are
willing to assume all risks inherent in the sport of Powered Paragliding and all responsibility for
any property damage, injury, or death which may result from the use of this product.
Please read and be sure you thoroughly understand this Operator’s Manual before
starting or flying your XENIT PLUS. It contains information critical to the safe
operation of the Trike.
Notation used
Certain special terms (NOTE, CAUTION, WARNING) will be used throughout this manual. Their usage
is defined below.
A NOTE provides supplemental information to help clarify a point being made in the text. Generally, a
“note” is provided to help assembly, use, or maintenance of the product. Disregarding a “note” could
cause inconvenience, but would not cause damage or personal injury.
A CAUTION provides supplemental information to help clarify an area where equipment damage
could occur. Disregarding a “caution” could result in permanent and significant mechanical damage,
however personal injury is unlikely.
A WARNING provides supplemental information to help clarify an area where personal injury or death
could occur from negligence. Disregarding a warning” could result in serious injury or death.
Page 4
XENIT PLUS _ OWNER’S MANUAL ____ ___ VER. 1.1
___________________________________________________________________________
© Copyright
FLY
Products s.r.l. Page
4
XENIT PLUS features
• Easy assembly and disassembly
• Electric Starter
• Power Ignition
• Reduction drive
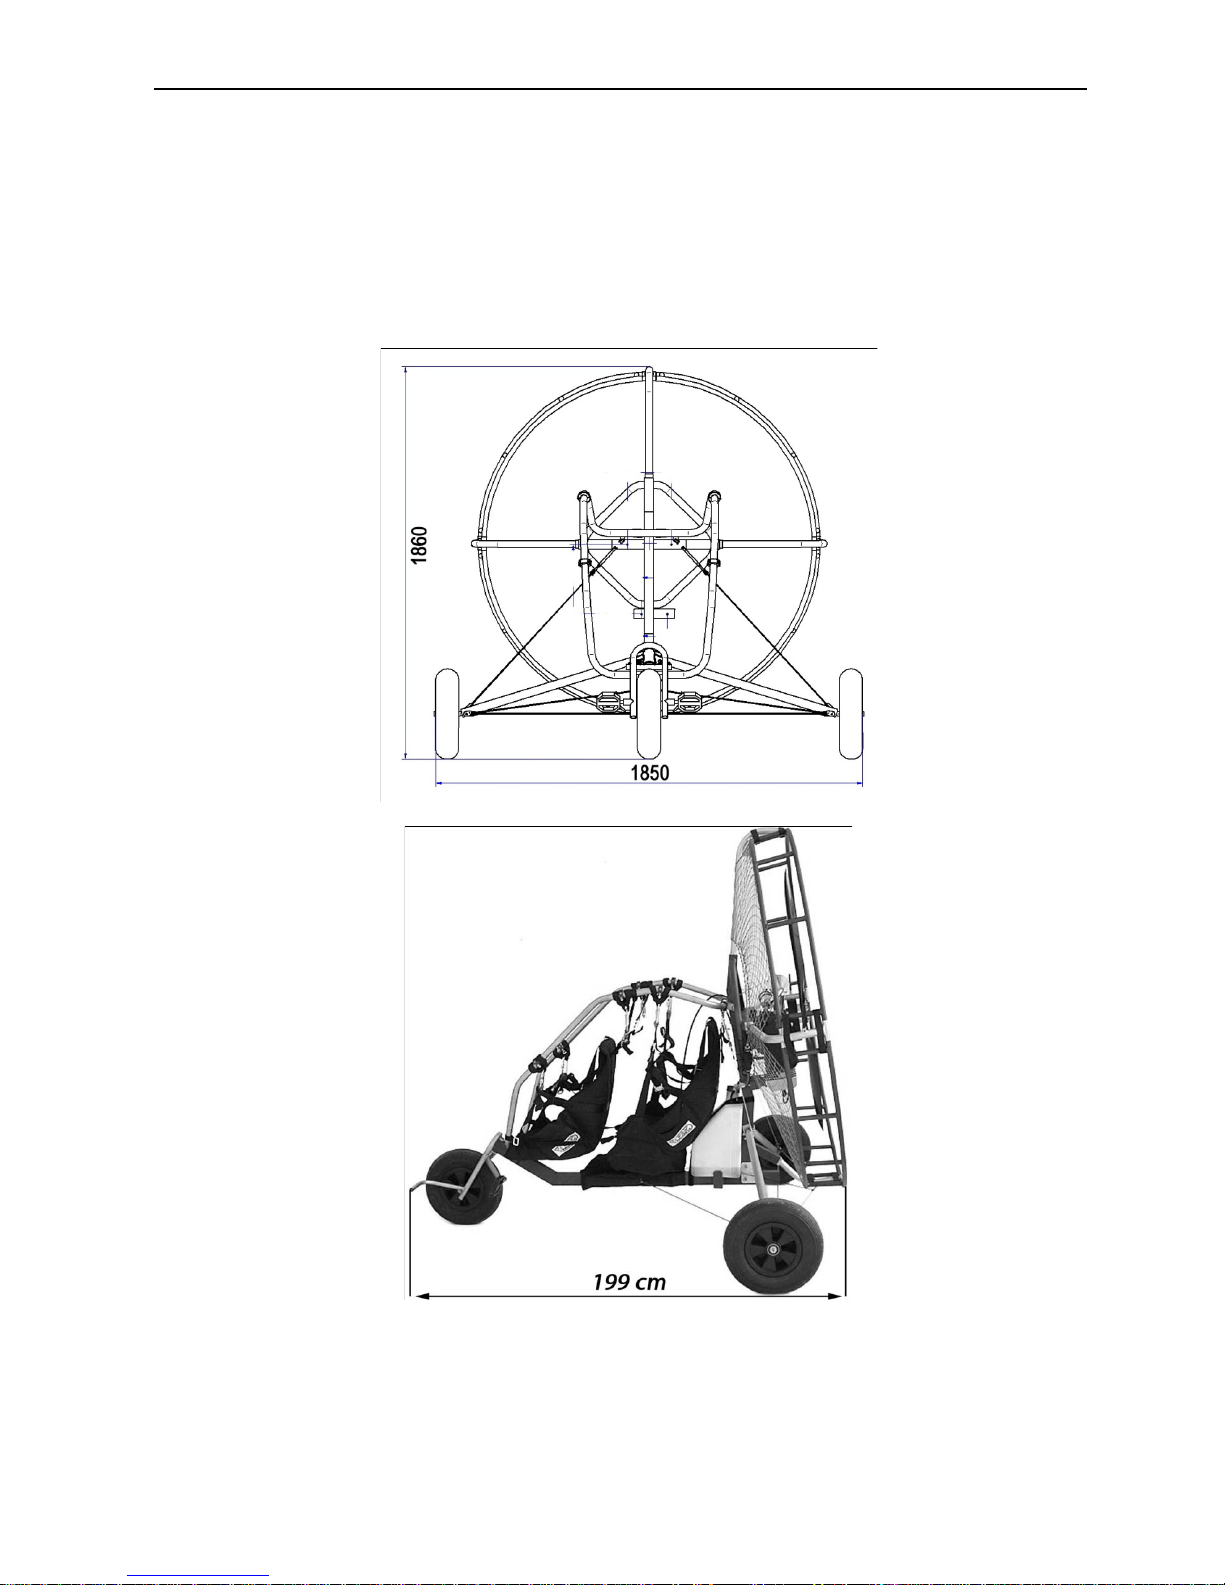
Dimensions
Page 5
XENIT PLUS _ OWNER’S MANUAL ____ ___ VER. 1.1
___________________________________________________________________________
© Copyright
FLY
Products s.r.l. Page
5
2.0
UNPACKING AND ASSEMBLING
“XENIT PLUS”
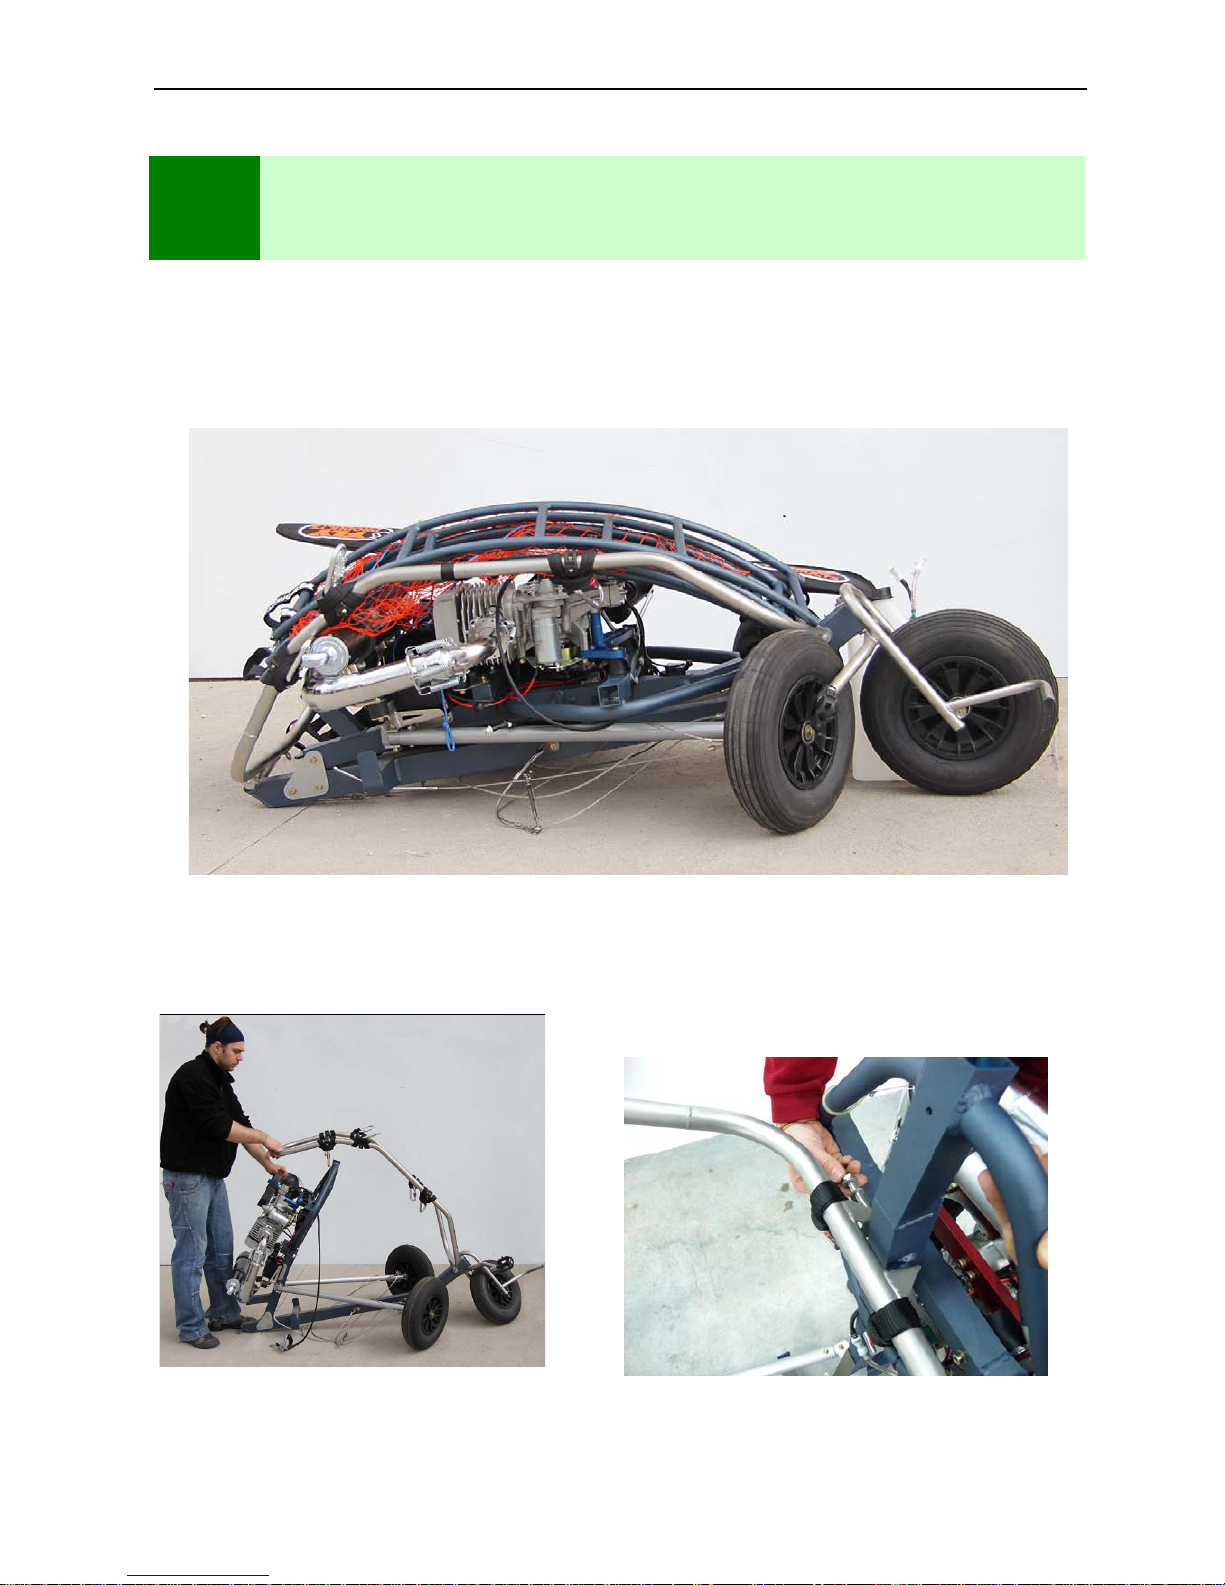
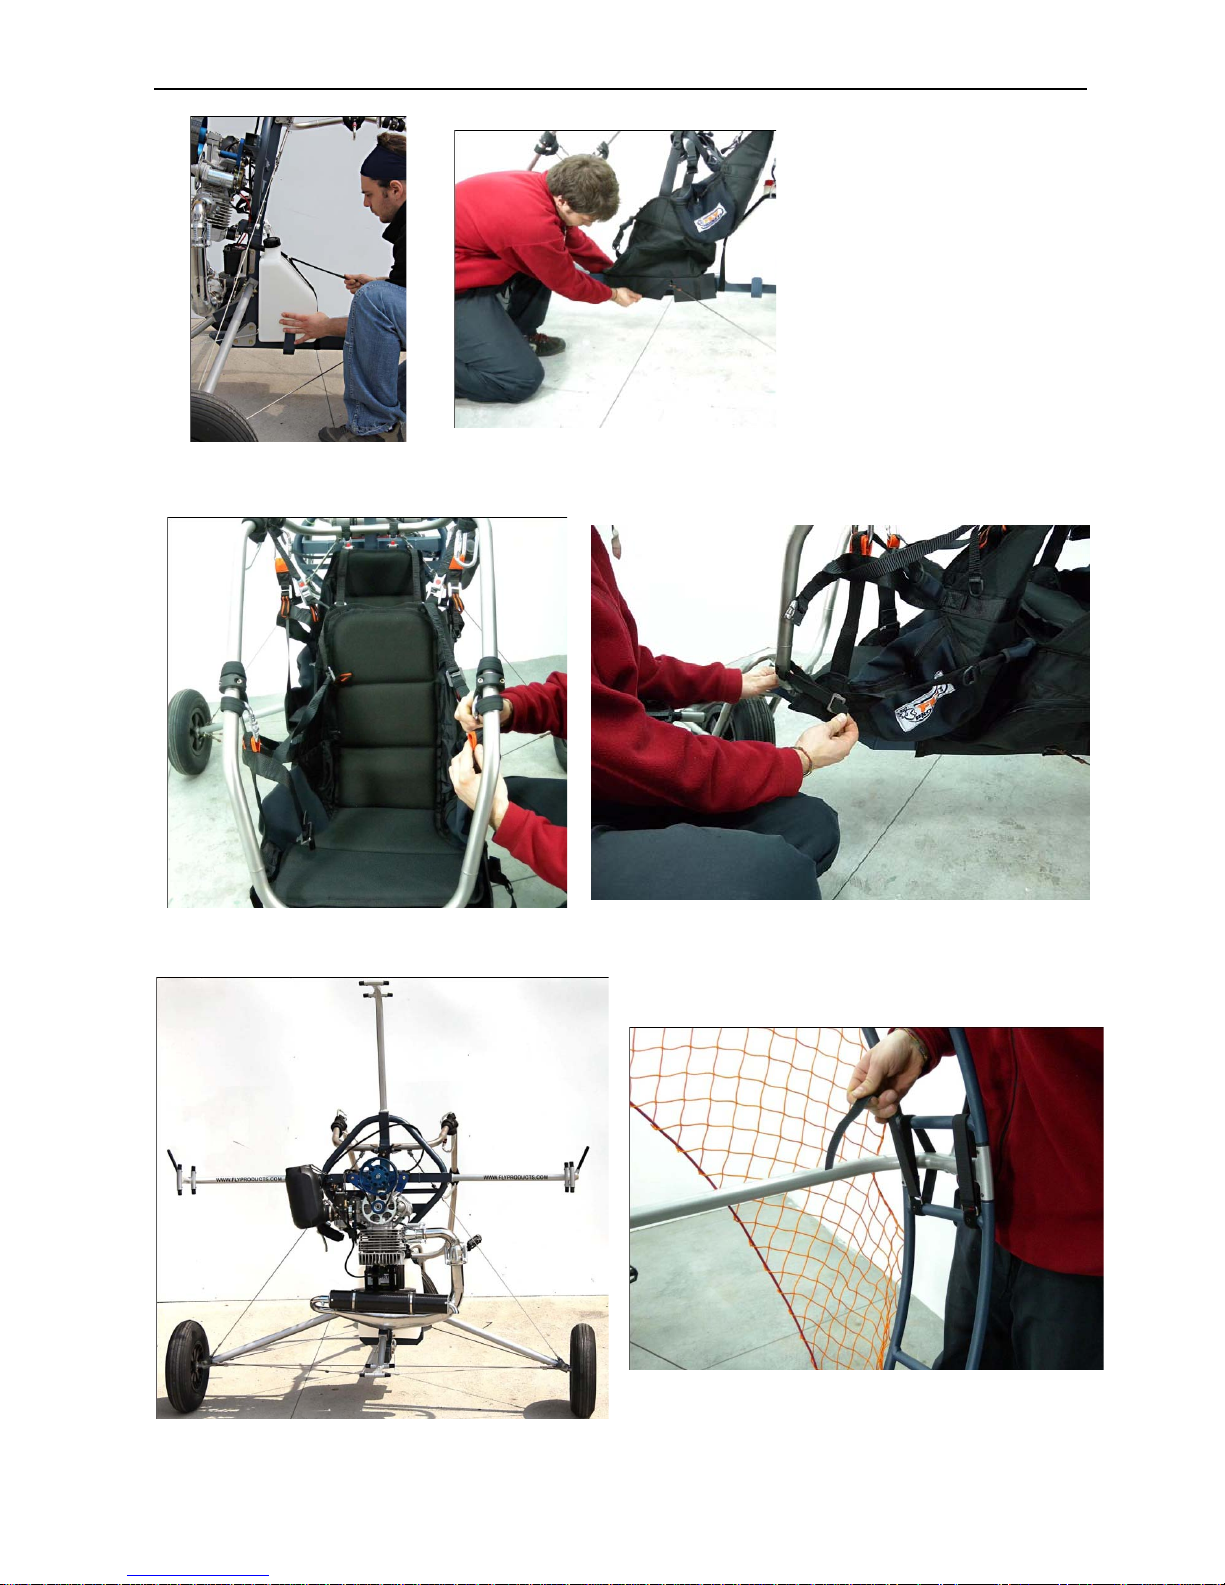
Frame assembly
Frame assembly and disassembly is very fast and easy.
The outer frame consists of four parts, and they are held together by the velcro straps.
For an easy and correct assembly pr oceed in the following order:
Open the Trike
Page 6
XENIT PLUS _ OWNER’S MANUAL ____ ___ VER. 1.1
___________________________________________________________________________
© Copyright
FLY
Products s.r.l. Page
6
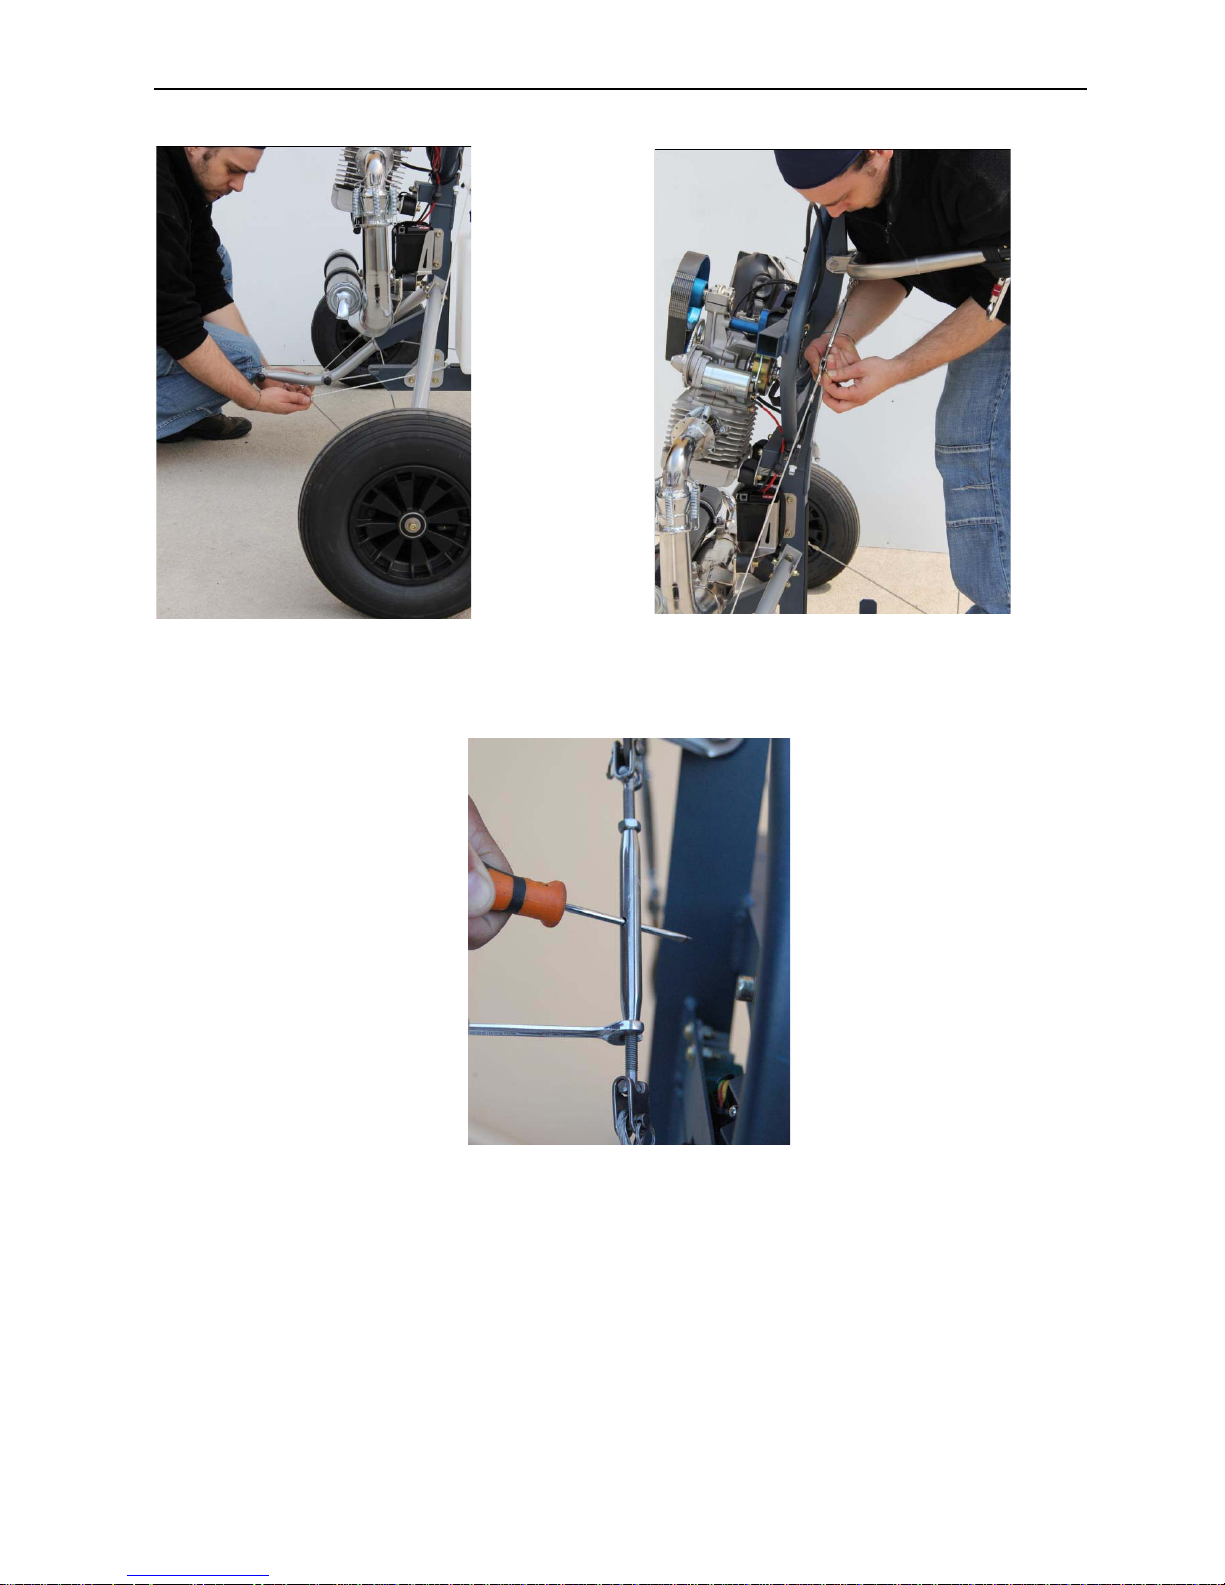
Locking the cable back
Locking cables side Symmetric tension cables
with the help of body weight.
The tensioner is locked by two nuts
as shown in the picture.
Page 7
XENIT PLUS _ OWNER’S MANUAL ____ ___ VER. 1.1
___________________________________________________________________________
© Copyright
FLY
Products s.r.l. Page
7
Lock the tank Mount the pilot harness
Mount the passenger harness
Place media cage
Block with velcro
Page 8
XENIT PLUS _ OWNER’S MANUAL ____ ___ VER. 1.1
___________________________________________________________________________
© Copyright
FLY
Products s.r.l. Page
8
Block with velcro
Net stretching
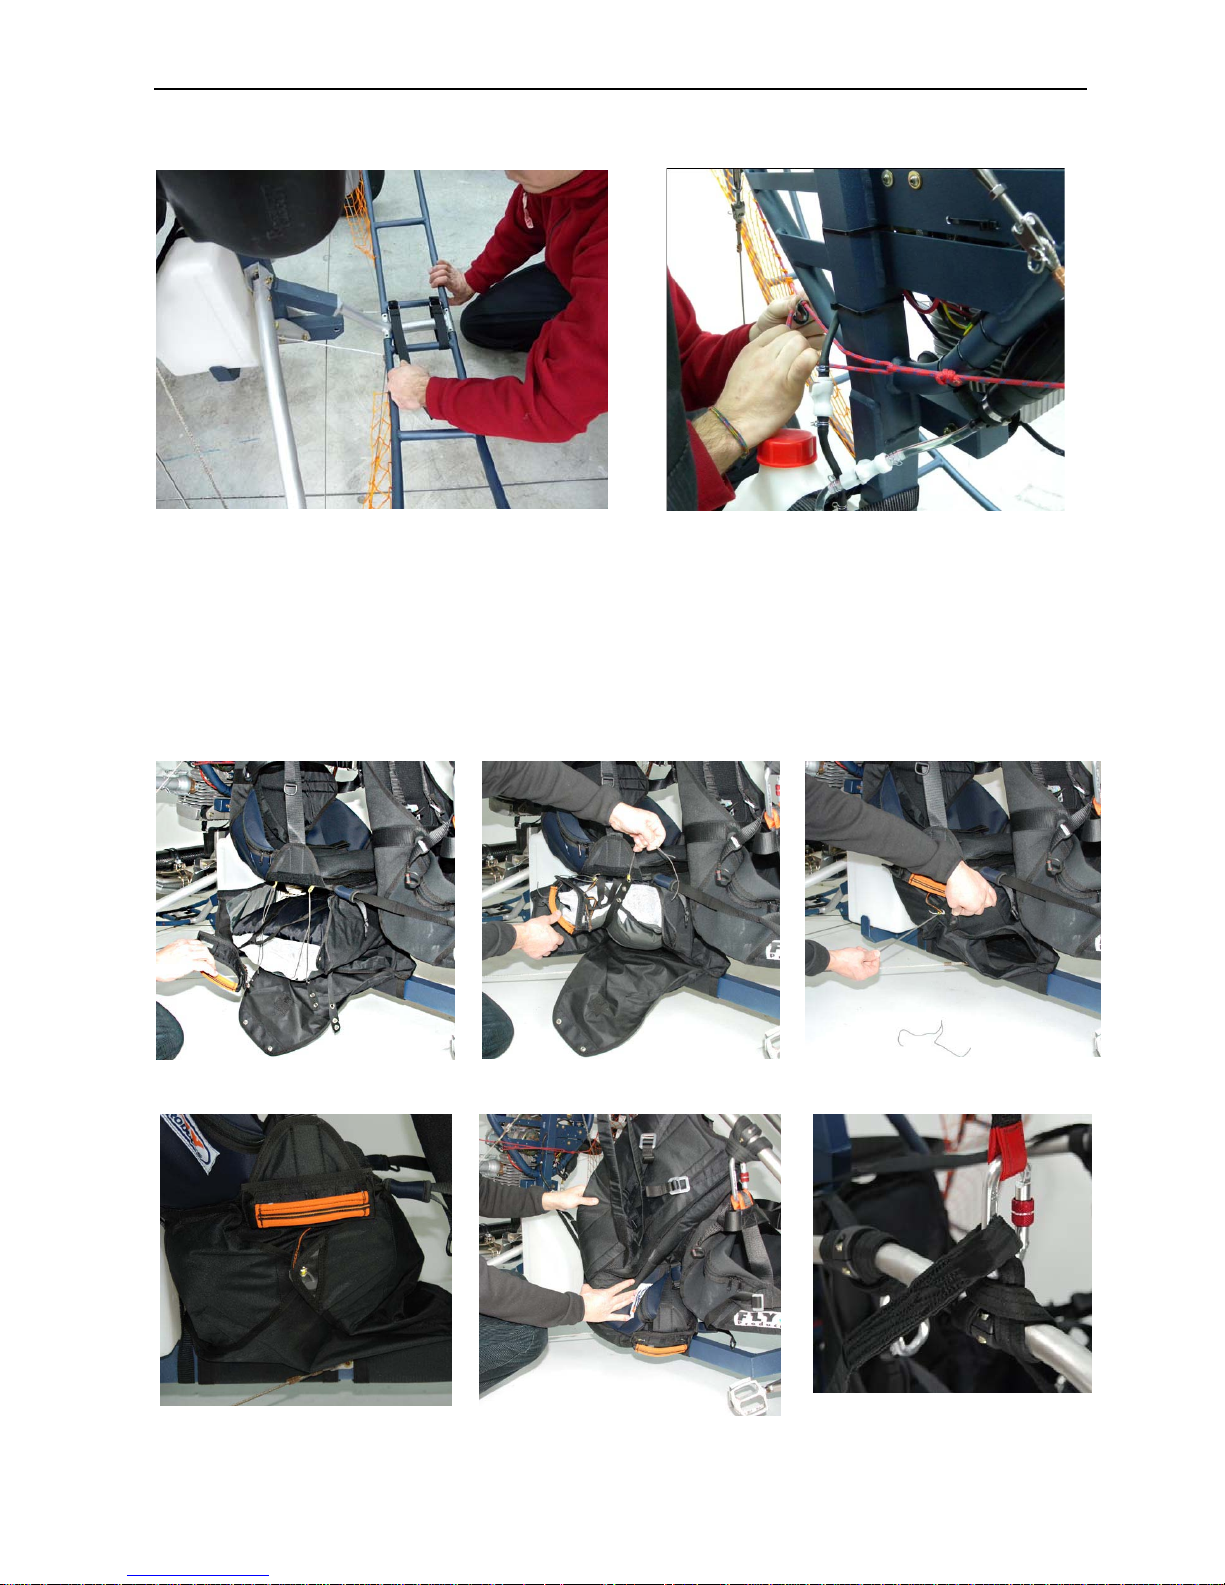
Emergency parachute
A reserve parachute can be attached to the XENIT PLUS and is highly recommended for obvious
security reasons. The reserve parachute is inserted under the harness of the pilot.
Assembly procedure of the emergency system:
Insert the emergency in the
pocket
Using a string to close the bag
Attach the handle
Side view after complete closure
Pass the straps behind the harness
Attach the straps to carabiner
Page 9
XENIT PLUS _ OWNER’S MANUAL ____ ___ VER. 1.1
___________________________________________________________________________
© Copyright
FLY
Products s.r.l. Page
9
where the glider is attached
Attention!
A parachute is a life-saving tool that should be used only in situations of real danger.
A reserve parachute should never be used "for fun", or just to see how it works. The use
of the reserve parachute is an act in itself dangerous, you lose control of the navigation,
you can not choose where to land. You may encounter rocks, roads, power lines, etc..
Even with a parachute used correctly, your speed ground impact is relatively high and
therefore there is no guarantee that nothing happens. Remember the proverb:
"A reserve parachute is not your second chance , but the last one!"
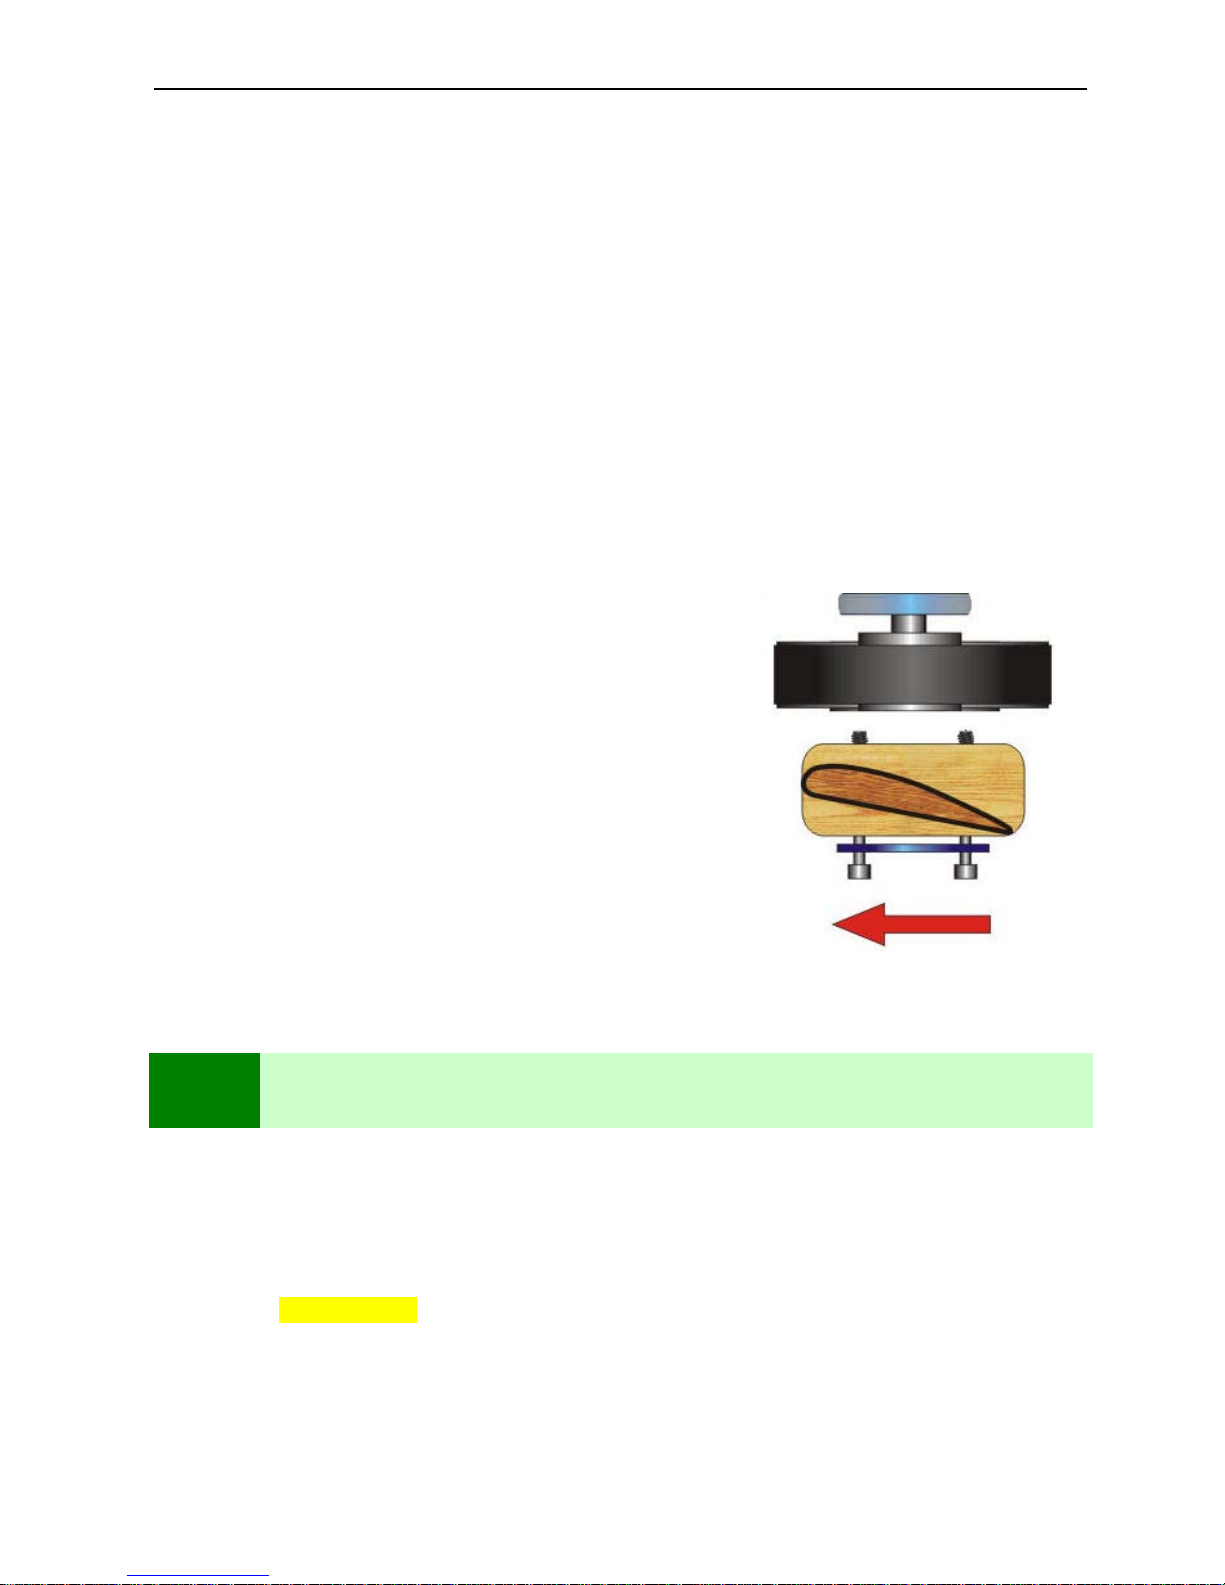
Prop mounting
Mounting the prop is quick and easy.
Place the rear prop flange on the rear side of the prop.
Insert the six (6) prop bolts through the rear prop flange and
prop.
The correct torque to use is 12 Nm
A more practical “field method” of torquing is to tighten the
bolts snuggly and evenly, but not enough to begin to crush the
wood of the prop.
Mounting the prop, the red arrow indicate the direction of
propeller rotation.
3.0 PREPARING FOR YOUR FLIGHT
Fuel and Oil
FLY PRODUCTS recommends the use of a unleaded automotive gasoline of 92 octane or higher, and
the use of semi-synthetic 2-cycle oil. Mix fresh gas and oil before each flying session.
Store your fuel/oil mixture in an approved, sealed container.
The recommended fuel/oil ratio is 3%. Be sure to thoroughly agitate the mixture to completely dissolve
the oil.
Page 10

XENIT PLUS _ OWNER’S MANUAL ____ ___ VER. 1.1
___________________________________________________________________________
© Copyright
FLY
Products s.r.l. Page
10
Use only fresh fuel and oil, and use clean containers, funnels, hoses, etc.
To fill the fuel tank, remove the fuel tank by unscrewing the fuel tank cap . Take care not to get dirt,
dust, etc. onto the fuel pickup.
It is recommended that the fuel be poured into the tank using a straining-type of funnel.
Fill the tank with the desired amount of fuel.. Tighten the fuel cap securely.
CAUTION: Wipe up any spilled fuel immediately, as the fuel/oil mixture is highly flammable, and an
in-flight fire would be catastrophic.
Also, the oil will leave a residue, which will attract and retain dust and dirt.
WARNING! Use common sense when refueling. Do not refuel a hot or running engine,
do not smoke or allow on-lookers to smoke while refueling. Do not refuel near heat or open flame
Before Starting the Engine
Before starting the engine on the ground, ensure that the unit is in an area free from dirt, rocks, dust, etc.
that could be sucked up and thrown around by the propeller.
Check assembly of the unit, and especially check any and all nuts, bolts, and screws, that could be loose.
Also check all parts of the prop cage for looseness. The prop produces a significant amount of thrust,
and can suck things into it from a surprising distance.
WARNING! Ensure that no bystanders or onlookers are close by when starting the motor.
The most dangerous place to stand is in the plane of the propeller. This is where dust, dirt, rocks, nuts,
bolts, etc. will be thrown if they are picked up by the prop.
At full RPM, the prop tips are moving in excess of 370mph, and pushing the air rearward at over 70mph.
This amount of force can pick up anything loose in the area and throw it around like a bullet.
Not only can it severely injure you or bystanders, even small items like dirt can inflict significant
damage to the prop
Starting and stopping engine
Stopping the engine
Before of proceed it's better to learn the function of the handgrip:
Page 11

XENIT PLUS _ OWNER’S MANUAL ____ ___ VER. 1.1
___________________________________________________________________________
© Copyright
FLY
Products s.r.l. Page
11
A – STOP” button
B – “START” button
C – Throttle lever
D – Cruise control setup
E – Velcro strap
F – Not in use
Since it’s important to know how to stop the engine once it’s started, let’s cover “Stopping the Engine”
first. To stop the engine, simply depress the “STOP” button A and hold it until the engine comes to a
complete stop.
CAUTION: It is important to be aware of some other engine stopping techniques, should the stop
switch not function correctly.
The stop switch may not function correctly due to
1) faulty switch
2) broken wires
3) bad connections to any part of the stop switch circuitry
For this reason, the following emergency stop procedures are available:
To stop the engine if the stop switch doesn’t function correctly, you can
• Unplug the electric cap of the spark plug
(there is a big risk to take an electric-shock, not dangerous but unpleasant...)
• Squeeze the fuel line
(requires an aggressive squeeze, and takes about two minutes to stop the motor).
• Close the inlet on the filter intake
Starting the engine
Now that we’ve covered stopping
the motor, let’s start the engine!
If everything is ready as
described
in the procedure preloads,
place the switch in ON
position
Page 12

XENIT PLUS _ OWNER’S MANUAL ____ ___ VER. 1.1
___________________________________________________________________________
© Copyright
FLY
Products s.r.l. Page
12
Pump the mixture
through the appropriate
manual blower.
There are Two different positions that can be used to start the engine. These positions are:
• Standing in front of the unit, holding the unit on the ground.
• In flight.
- Standing in front of the unit, holding the unit on the ground
WARNING! The method of holding the throttle handle is important in this position.
Hold the throttle handle such that you can easily reach the stop button, but not so that you can
inadvertently squeeze the throttle.
A common accident can happen where you hold the throttle in the same hand that you hold the motor
unit, and if you squeeze the throttle a little, the thrust of the machine will push the throttle onto your
hand, causing you to squeeze the throttle even more.
Make sure that you CANNOT inadvertently squeeze the throttle handle when starting in this position.
- In flight
One very valuable feature of the XENIT PLUS is its ability to be started while in flight.
This feature allows the pilot the freedom to turn-off the engine and glide silently, to enjoy the
exhilaration of thermal soaring, and then when he gets low, to start the engine and climb back up to do it
again.
WARNING! It's very important that immediately after landing, or when the equipment is not in use on
the ground, to turn the switch to the OFF position to avoid an accidental starting of the engine with
unpredictable results!
Page 13

XENIT PLUS _ OWNER’S MANUAL ____ ___ VER. 1.1
___________________________________________________________________________
© Copyright
FLY
Products s.r.l. Page
13
Carburetor Adjusting with BING
To adjust the idling, turn the screw shown in Fig
The (A) screw sets the revs at idle, by opening or closing the butterfly valve
Choke lever is used only for cold engine starting, do not leave it “ON” for long time to avoid a flooded
engine
Carburetor
Carburetor Adjusting with WALBRO WB 39
Standard carburetor setting
When purchased, the motor has a standard carburetor setting and testing. To modify this, you must
adjust the two screws of the carburetor. The screw on the right marked with a L (low) regulates the
entrance of fuel at the low rpm (the range of the accelerator from zero to half).
The screw on the left marked H (high) regulates the air fuel mix of the higher rpm
It is extremely important for maximum engine efficiency and engine life, to understand and keep in tune
your carburetor setting.
Page 14

XENIT PLUS _ OWNER’S MANUAL ____ ___ VER. 1.1
___________________________________________________________________________
© Copyright
FLY
Products s.r.l. Page
14
L screw adjust: rotate clockwise until completely closed.
Now carefully open the screw counter clockwise min 1 turn
to 1 turn and 1 half.
This is the standard factory setting for L.
H screw adjust: rotate clockwise until completely closed.
Now carefully open the H screw min 1 and half turn to 1 turn
and 3 quarter to arrive at the standard factory setting.
Keep in mind that these setting are extremely sensitive.
Increments of 1/10 of a turn are already sufficient to change
engine performance.
In particular be careful not to run your machine at the “too poor” of a fuel to air-mixture, as this can
result in possible overheating and engine damage due to lack of cylinder lubrification.
Pay much attention to the carburator setting at the maximum since if this mixture is too poor, it can
result in engine damage. No damage is done if the setting is too rich. Therefore, when in doubt, it is
better to have carburation, at the maximum rpm, somewhat more on the rich side.
A verification of carburation can be done after the engine has run 20-30 minutes checking of the
colour of the spark plug electrode. If the electrode is brown the carburation is correct. If is grey, it's
poor and if it is black it's rich.
Attention: If the carburation should be difficult by listening to engine runs, this means that the fuel
tube is absorbing air from the pump (in this case is better to change it) or else from the connections
between the tank and the carburator. You can see the air bubbles easily, while the engine is running
they passing through the tube.
THE WB 39 IS EQUIPPED WITH 3 SETTING
SCREWS:
1 H for high. Controls the mixture at full load
2 L for low. Controls the mixture in the lower and
medium speed range
3 Controls the idle
Page 15

XENIT PLUS _ OWNER’S MANUAL ____ ___ VER. 1.1
___________________________________________________________________________
© Copyright
FLY
Products s.r.l. Page
15
Engine Break-In
Break-in of the XENIT PLUS Engine is required before the first flight.
Proper break-in will provide you with a better running engine, it will also provide for considerably
longer engine life.
During the break-in, gently change RPM from idle to 3/4-throttle and back.
At this point, you can fly the XENIT PLUS however avoid long durations of full Power, and vary the
throttle setting often.
Break-in is complete after 10 liters of fuel have been run through the engine.
4.0 FL YING YOUR “XENIT PLUS”
Pre-flight Inspection
Before your first flight, and before every flight, it is absolutely essential to perform a pre-flight
inspection on your aircraft.
WARNING! Failure to perform a sufficient pre-flight has been a contributing factor to accidents in all
kinds of aircraft. Equipment damage, bodily injury, even death can occur due to equipment problems not
caught in a pre-flight inspection.
The essential items to check are:
• PARAGLIDER – Check the lines and canopy integrity.
• ENGINE – check everything is ok , the silent-block integrity and gasoline mixture level.
• PROPELLER – blades integrity, bolts clamping.
• RECOVERY SYSTEM (if there is) – ready and safety catch off.
• CAGE ASSEMBLY – check all the Velcro straps and all blockings.
Pre-Flight Checklist Examples
NOTE! Example of pre-flight checklists can be found at the end of this manual.
It is highly recommended that you use one of the examples, or create your own, print it out, laminate it,
and use it whenever you fly.
Also note that these Checklists are examples only, FLY PRODUCTS is not responsible for their use or
for their completeness. The following checklists are provided only as EXAMPLES.
Site/Conditions
Page 16

XENIT PLUS _ OWNER’S MANUAL ____ ___ VER. 1.1
___________________________________________________________________________
© Copyright
FLY
Products s.r.l. Page
16
• Current weather
• Long-range (next few hours) forecast
• Takeoff/landing direction
• Obstructions (especially Power lines)
Wing
• Lay wing out into wind direction
• Lines straight and clear
• Riser/Line condition
• Quick-links tight (hand tighten only)
• Correct brake length
Trike
• Webbing and straps for stress
• Prop Guard for alignment/stress/wear
• All fasteners tight
• Carabiners condition
• Radio secured and operating
• Tank air ventilation open and sufficient fuel level
Strap In, Hook Up
• Buckles secure
• Chest strap tight
• Harness adjusted properly
• Reserve parachute attachment
• Reserve parachute deployment pin
• Reserve parachute handle in sight
• Risers hooked up correctly
• Carabiners locked
• Nothing loose to get in prop
• Radio for volume, clearness
• Helmet on, tight, fastened
Adjustments version tandem or mono
Page 17

XENIT PLUS _ OWNER’S MANUAL ____ ___ VER. 1.1
___________________________________________________________________________
© Copyright
FLY
Products s.r.l. Page
17
Changing points of coupling
Lines position for take off
Page 18

XENIT PLUS _ OWNER’S MANUAL ____ ___ VER. 1.1
___________________________________________________________________________
© Copyright
FLY
Products s.r.l. Page
18
5.0 MAINTENANCE
Remember…
…that YOU are ultimately responsible for your motor and it’s proper care, FLY PRODUCTS and it’s
dealers assume NO responsibility for any engine problem resulting from improper use!
Before leaving the factory each motor has been tested for up to 30 minutes to insure that it is in proper
running order and all FLY PRODUCTS units are guaranteed of one year after purchase. The
extraordinary maintenance or repairs will do only by authorized personal.FLY PRODUCTS will replace
any defective engine parts during one year period after purchase.Note that any electric parts that are
damaged for improper use or modified in any way which could cause an engine malfunction are not
guaranteed.
Regular checks obligation.
In Germany the PPG (only with empty mass less than 120 Kg.) must not be checked once a year, it
depends on the manufacturer. Most of them declare: must be checked once a year by a qualified person.
We too align with this behaviour and recommend you to check it once a year!
The same with the canopy, it depends on the manufacturer of the canopy, most of them must be checked
in a TWO years cycle by manufacturer.
Maintenance overview.
Each time you use the engine, remember to perform routine checks pre-start-up:
• Check the silent block condition in complete integrity
• Make sure the exhaust does not present any cracks
• Ensure that the propeller does not present cracks or dents
• Make sure you have enough fuel, according to the duration of intended use of the
engine.
• Check that the electrical system and cables do not show abrasions or disruption.
• Check that there are no screws or parts loosened.
BELT TENSION
WARNING:
CARRY OUT THE OPERATIONS WITH THE ENGINE SWITCHED OFF AND COOLED DOWN
During operation, the belt is under strain and wear and as result, lengthening occurs,
which could lead to sliding on the pulleys, with a subsequent decrease in the general
engine performance.
To restore the proper tension, loosen the screw M8 (No. 42) on the foot of the engine
which fastens the pulley can, turn screw M12 (n°51) anti-clock wise using force of 1.8
Kgm and then re-tighten screw M8 (n°42)
Page 19

XENIT PLUS _ OWNER’S MANUAL ____ ___ VER. 1.1
___________________________________________________________________________
© Copyright
FLY
Products s.r.l. Page
19
INTERVENTIONS EVERY 20 HOURS
• Clean filter carburetor
• Clean fuel filter
• Check the belt tension and condition
• Lubricate the ball joint of the muffler
INTERVENTIONS EVERY 60 HOURS
• Replace the engine and exhaust silent blocks
• Replace the transmission belt
• Check the status of the intake manifold rubber
• Replace the exhaust pipe sound-absorbent material
• Check the electrode gap spark-plug: if it is over 0.6 mm, change the spark plug
• Rubber components such as belt transmission, silent block, intake manifold and
depression tube may be damaged by atmospheric agents. Their durability can therefore
be different from what is reported, you should therefore check their condition and
provide a possible replacement even outside the agreed time.
INTERVENTIONS EVERY 200 HOURS
• Replace all the bearings (N°64 + N°48)
• Replace all oil seals (N°63)
• Check the internal parts of the engine and carry out their replacement in case
the height limit confirm it is necessary.
• Cylinder:
- must not show signs of seizure or scratches on the filling material (nickel silicon);
- check the wear of the cylinder in the four points (shown in diagram 1) on X and Y
axles, none of the heights obtained must exceed the height limits:
SELECTION A: 72.830mm
SELECTION B: 72.840mm
SELECTION C: 72.850mm
SELECTION D: 72.860mm
The selection is shown with a letter at the bottom of the cylinder
Page 20

XENIT PLUS _ OWNER’S MANUAL ____ ___ VER. 1.1
___________________________________________________________________________
© Copyright
FLY
Products s.r.l. Page
20
• piston:
- There must not be any signs of seizure or deep cracks.
- Check the wear by measuring the piston at 18.5mm from the bottom keeping the
measuring instrument at a right angles to the axis pin.
Height limits:
SELECTION A: 72.690mm
SELECTION B: 72.700mm
SELECTION C: 72.710mm
SELECTION D: 72.720mm
• The pin must not be blue because that indicates a high working temperature and the
external diameter must not be less than 17.990mm.
• Measure the slack between the piston ring and its seat: slack height limit 0.1mm.
• Piston ring: insert a piston ring in the cylinder one by one, by using the piston, so it is
a square, measure the gap that is created between the two ends of piston ring using
feeler gauge. Height limit: 0.7mm
• Crankshaft: supporting the crankshaft at the two working points of oil seals, with two
comparators, measure the centering at the two working points of the bearings, marked
on diagram 2 with the letter A. Height limit: 0.05mm
Page 21

XENIT PLUS _ OWNER’S MANUAL ____ ___ VER. 1.1
___________________________________________________________________________
© Copyright
FLY
Products s.r.l. Page
21
• Measure the bearing seating, which must not be lower than the height limit: 24.98mm
• Check with a feeler gauge that the axle slack of the connecting-rod between the two
semi shaft, which must not exceed the height limit: 0.7mm
• Check the radial slack of the connecting rod on the coupling axle which must not
exceed the height limit: 0.05mm. This is detected by placing a comparator (B), as shown
in diagram 2, and moving the connecting rod vertically. The slack shown by the
comparator is assessed. Measure the diameter of the hole in the connecting-rod foot.
Height limit: 20.00mm
• Reed valve: Verify that between the frame and the reeds there is no space (diagram
3). Height limit: 0.2mm.
WARNING: The reeds should not and cannot be turned (diagram 4)
Page 22

XENIT PLUS _ OWNER’S MANUAL ____ ___ VER. 1.1
___________________________________________________________________________
© Copyright
FLY
Products s.r.l. Page
22
Operation
time (h)
Date check Inspector Remarks
Cleaning
Clean your XENIT PLUS with clean water and a mild soap. Dust and dirt can be brushed off, or
removed with water and mild soap. Grease and oil can be removed with a good water-based degreaser
such as “Simple Green”.
Prop Care
Avoiding Prop Damage
Page 23

XENIT PLUS _ OWNER’S MANUAL ____ ___ VER. 1.1
___________________________________________________________________________
© Copyright
FLY
Products s.r.l. Page
23
It is very easy to damage the propeller by sucking up dirt or rocks when running the motor on the
ground. To avoid this, either place the unit on a sheet of plywood or something similar, or use a nice
clean area such as a nicely mowed yard. An alternative is to strap the motor on and start it in the
standing position.
Prop Balancing
Balancing of the propeller is very critical. The prop blades are subjected to accelerations as high as
2000 G’s! Therefore, a weight difference of only 1 gram can cause forces as high as 2kg. This force
will cause a vibration at the speed of the propeller RPM, and can cause enough vibration to break welds
or tubes of the frame. Therefore, correct prop balance is of the utmost importance.
Keeping the Prop Clean
Wipe all dirt and oil from the prop when finished flying. Oil, if left on the prop for long periods of time,
can seep into the wood and cause an imbalance.
Store the Prop Horizontally
When storing the XENIT PLUS, rotate the prop to a horizontal position. This is because if the prop is
stored vertically, moisture and oils in and on the prop can migrate downward and cause prop imbalance.
This phenomenon can only happen on wood props.
Spark Plug
The recommended sparkplug for the XENIT PLUS motor is the NGK B10ES and NGK BR10ES .
Spark plug gap is 0.025” (0.635mm). Recommended cleaning and gapping interval is every 25 hours.
Recommended replacement interval is every 50 hours.
Repairs
Minor repairs can be performed on the prop, cage, cage guard, and harness.
Major repairs should be performed by a trained service technician, or by FLY PRODUCTS.
Caution! Repairs to the harness or any stress-carrying areas of the XENIT PLUS should only be
performed by a certified parachute rigger.
Page 24

XENIT PLUS _ OWNER’S MANUAL ____ ___ VER. 1.1
___________________________________________________________________________
© Copyright
FLY
Products s.r.l. Page
24
Reduction belt
ADJUSTING REDUCTION BELT
Attention:
Only qualified people can do this procedure, otherwise consult
your dealer.
The reduction belt is regulated by the manufacturer, in case of it
stretching, which is noticeable by a whistling sound and a harsh
increase in runs when accelerating, it should be adjusted.
This happens most likely when the engine is cold and when
there is a high level of air humidity.
Proceed as shown in picture,
with an allen screw keys 6 mm and 10 mm:
- loosen the four "A" bolts just sufficiently
- regulate belt tension with the "B" bolt
- tighten "A" bolts well.
BE VERY CAREFUL TO THE BELT TENSION!
CAUTION: an over-tighted belt can cause permanent damage to the bearings and to shaft of the pulley,
then we strongly recommend that you follow these instructions.
Before you begin, make a small mark from pin to the pulley so as to have a reference point for
measuring the displacement of the eccentric "C", these settings are "fine" and must not exceed 1 mm.
time!
Start the engine at each adjustment to check the result keeping in mind that the belt tension will increase
automatically with the expansion of the metal due to increased engine temperature.
Page 25

XENIT PLUS _ OWNER’S MANUAL ____ ___ VER. 1.1
___________________________________________________________________________
© Copyright
FLY
Products s.r.l. Page
25
6.0 TROUBLESHOOTING
Diagnosing and starting a flooded engine
A flooded engine can be identified by the smell of unburned gasoline coming from the exhaust pipe, or
by periodic weak firing and puffs of black smoke during starting attempts. If you have a flooded engine,
follow the procedure below:
• Remove the spark plug and thoroughly dry it.
• With the spark plug removed pull the starter cord 5 to 10 times while holding the throttle in the full-
open position. This will remove excess fuel from the engine.
• Install the dry spark plug, and start using the normal procedure.
WARNING! Ensure you have placed the spark plug cap away from all fuel sources before pulling the
starter cord or a fire could occur!
WARNING! Do not use a flooded engine procedure whereby you hold the throttle wide-open and then
attempt to start the engine.
If the engine were to start, the prop would rapidly spin to full RPM and damage or injury would most
likely occur!
Troubleshooting Chart
SYMPTOM POSSIBLE CAUSES SOLUTIONS
Engine
does not
start
No fuel in tank Fill tank per fuelling instructions
Fuel pickup does not reach all the
way to bottom of tank
Inspect fuel pickup and ensure that it
reaches the bottom
Spark Plug cap not in place Ensure spark plug cap is installed
Insufficient pull on starter rope
Give a strong,
sharp pull on the rope
Fouled Spark Plug
Inspect plug, clean and re-gap,
or replace with a new plug
Incorrect Spark Plug Gap Gap the plug to 0.025” (0.635mm)
Engine starts,
but does not
continue
to run
Engine is flooded Follow procedure outlined in section 8.1
Incorrect Idle Speed adjustment See section 3.4
Incorrect Idle Mixture adjustment See section 3.1
Excessive
Vibration
Prop out of balance See section 2.3
Loose fasteners
Check and tighten engine mounting
bolts, muffler bolts, prop bolts, etc.
Page 26

XENIT PLUS _ OWNER’S MANUAL ____ ___ VER. 1.1
___________________________________________________________________________
© Copyright
FLY
Products s.r.l. Page
26
7.0
SPECIFICA TIONS AND PERFORMANCE
Specification and Performance Summary Chart
ITEM TYPE
Engine Make and Model Simonini MINI-3
Engine Type Single cylinder, air cooled
Displacement cc. 270 (Bore 72,8 mm x Stroke 65 mm)
HP 36 at 7000 RPM
Static Thrust Over 100 Kg.
Carburettor Bing 36
Reduction System Poli-V Belt
Reduction Ratio 2.8:1
Rotation Direction Anticlockwise (as viewed from rear)
Prop cm./ blades 150 / 2 blade
Spark Plug NGK B9ES(cold places) B10ES (Warm places).
Air Cleaner Air box
Fuel Premium auto gas, 92 Octane or higher
Fuel/Oil Ratio
2,5% with premium-grade gasoline
3.0% with unleaded fuel
Fuel Tank Capacity 16 litres
Fuel consumption 3.2 Litr es / hour at 5400 RPM
Starting System Electric starter
Charger Alternator battery charge in flight
Frame Aluminium, aircraft tubing
Harness Rip-stop nylon
Dry Weight 62 kg
MAX Pilot weight Kg. 95 + 95
Page 27

XENIT PLUS _ OWNER’S MANUAL ____ ___ VER. 1.1
___________________________________________________________________________
© Copyright
FLY
Products s.r.l. Page
27
Torque Specification Chart
ELEMENTS TORQUE (Kgm)
Cylinder head bolts ( M8 BTR ) 2.8
Magnet fixing nut ( M10 x 1 ) 4.2
Reduction cam locking screw ( M8 ) 3,2
Primary pulley locking screw ( M12 x 1.25 ) 4.5
Exhaust bolts ( BTR M8 ) 2.2
Propeller bolts ( M6 ) 0.5
Bolts and nuts M10 4.5 - 5.0
Bolts and nuts M8 2.5 - 3.0
Bolts and nuts M6 0.8 - 1.2
Electric system
Following table shows the MINI3 electric connections
Page 28

XENIT PLUS _ OWNER’S MANUAL ____ ___ VER. 1.1
___________________________________________________________________________
© Copyright
FLY
Products s.r.l. Page
28
8.0
MISCELLANEOUS
Obtaining Repair Parts
To obtain repairs parts for your machine, call your FLY PRODUCTS local dealer or FLY
PRODUCTS directly.
MINI3 ENGINE SPARE PARTS
Page 29

XENIT PLUS _ OWNER’S MANUAL ____ ___ VER. 1.1
___________________________________________________________________________
© Copyright
FLY
Products s.r.l. Page
29
MINI3 engine spare parts list
MINI 3/01 KIT ENGINE SCREWS MINI 3/46 ECCENTRIC PINION
MINI 3/02
EXHAUST SYSTEM
MINI 3/47
SEEGER REDUCTION
MINI 3/03
COMPLETE SET OF GASKETS MINI 3/48 COMPLETE SET OF REDUCTION BEARINGS
MINI 3/04
COMPLETE SET OF ENGINE SCREWS
MINI 3/49
BEARING SPACER
MINI 3/05 CYLINDER HEAD GASKET
MINI 3/52
POLY-V BELT
MINI 3/06 KIT SCREWS FOR HEAD ( 4 )
MINI 3/53
REDUCTION PULLEY
MINI 3/07
CYLINDER HEAD MINI 3/54 ALUMINIUM PLATE FOR PROP
MINI 3/08
KIT SILENT-BLOCK (6) MINI 3/58 REDUCTION PINION
MINI 3/09
KIT SCREWS FOR CYLINDER
MINI 3/59
CROWN WHEEL
MINI 3/10
CYLINDER
MINI 3/61
ELECTRIC STARTER
MINI 3/11 CYLINDER GASKET
MINI 3/62
COMPLETE CRANKSHAFT AND ROD
MINI 3/16 STATOR
MINI 3/63
COMPLETE SET OF SEALS
MINI 3/17 FLY WHEEL
MINI 3/64
COMPLETE SET OF BEARINGS
MINI 3/19 SCREW AND WASHER FOR PINION MINI 3/65 COMPLETE ROD
MINI 3/23
ALUMINIUM PLATE FOR COIL MINI 3/66 ROD CAGE
MINI 3/25
COIL
MINI 3/69
COMPLETE PISTON AND RINGS
MINI 3/28 ALUMINIUM PLATE FOR STATOR MINI 3/69A TWO RINGS
MINI 3/29
WASHER-PRESSURE OUTLET MINI 3/70 RECTIFIER RECHARGE BATTERY
MINI 3/31 REED VALVE OLD MODEL MINI 3/71 SPARK PLUG
MINI 3/31° REED VALVE NEW MODEL MINI 3/72 PLATE FOR FIXING EXHAUST
MINI 3/33
AIR FILTER MINI 3/73 EXHAUST MANIFOLD AND SPRINGS
MINI 3/35 BING 54 CARBURETTOR MINI 3/74 EXHAUST GASKET
MINI 3/39
RUBBER MANIFOLD OLD MODEL MINI 3/75 RUBBER FOR SPARK PLUG
MINI 3/39° RUBBER MANIFOLD NEW MODEL MINI 3/76 NUT AND WASHER FOR FLYWHEEL
MINI 3/41 CRANK-CASE
Page 30

XENIT PLUS _ OWNER’S MANUAL ____ ___ VER. 1.1
___________________________________________________________________________
© Copyright
FLY
Products s.r.l. Page
30
Warranty
FLY PRODUCTS will warrant their product to be free from defects in materials and workmanship for a
period of one year from the date of purchase. This warranty applies to the product in normal usage
situations only. The dealer, from whom you purchased the product, or FLY PRODUCTS, will repair the
product free-of-charge.
To obtain warranty service, please contact your dealer or FLY PRODUCTS, and then either bring the
product in or have it shipped. Shipping charges are the responsibility of the purchaser.
CAUTION: This warranty does not apply even during the warranty period, and the purchaser shall pay
repair or replacement charges if:
• The cause of malfunction is due to misuse, neglect, negligence, etc. This includes seize of the
engine due by an improper carburetor adjustment or improper fuel/oil mix.
• The malfunction is caused by incorrect pilot operation, i.e. a crash, whack, dork, bang, splat,
ding, prong, bend, tweak, trip, fall, bounce, or any other piloting eventuality.
• The malfunction is caused by lack of normal maintenance, or modification, i.e. loose parts
falling off and breaking the prop.
• The malfunction is caused by an Act of God, including but not limited to fire, earthquake,
hurricane, flood, or other natural calamity.
Internet info and upgrade
For information, more details and news see our internet site: www.flyproducts.com
For safety information , data and rules you can visit the DULV website: www.dulv.de
© Copyright by
FLY PRODUCTS
s.r.l.
Via Perù 30
63013 GROTTAMMARE (AP) - ITALY
tel./fax +39.735.632486
www.flyproducts.it - fly@flyproducts.it
 Loading...