

Page 1

PUMA_T_FLY TechFaith Confidential Proprietary Version 1.0
Service Manual
PUMA_T_I_FLY
Service Manual
Author(s)
Xu Shujie(xushujie@mail.techfaith.cn)
Status:
Department/Group Review
General Review
Released
Revision to Released Document
Working Draft Status
Document ID:
Compass ID:
Version:
Date:
Supersedes:
N/A
1.0
8/20/2006
N/A
TechFaith, Ltd.
M8 West NO.1 Jiuxianqiao dong Rd,
Chaoyang Dist,Beijing
10016
CHINA
Abstract
This document provides block diagrams, test fixture flow and debug techniques for each test performed on
PUMA_T_FLY
TechFaith CONFIDENTIAL PROPRIETARY
This document and the information contained in it is CONFIDENTIAL INFORMATION of Techfaith,and shall not be used, or published, or disclosed, or
disseminated outside ofin whole or in part without TechFaith's consent. This document contains trade secrets ofTechFaith. Reverse engineering of
TechFaith Confidential Proprietary Page 1 of 1
any or all of the information in this documentis prohibited. The copyright notice does not imply publication of this document.
Copyright 2006 TechFaith, Ltd. CHINA
Page 2

PUMA_T_FLY TechFaith Confidential Proprietary Version 1.0
Service Manual
Release History
Version Release
Date
1.0 20/8/2006 Xu Shujie
Author(s) Change History
TechFaith Confidential Proprietary Page 2 of 2
Page 3

PUMA_T_FLY TechFaith Confidential Proprietary Version 1.0
Service Manual
Table of Contents
1 INTRODUCTION................................................................................................................................ 6
1.1 SCOPE.............................................................................................................................................. 6
1.2 CONVENTIONS................................................................................................................................. 6
2 PRODUCT SPECIFICATION............................................................................................................ 7
2.1 PRODUCT CONFIGURATION ............................................................................................................. 7
2.2 SPECIFICATIONS .............................................................................................................................. 8
3 LABELING..........................................................................................................................................11
3.1 MAIN UNIT REGULATORY LABEL (STICK ON THE KEYPAD HOUSING OF MAIN UNIT).......................11
3.2 SERIAL NUMBER DESCRIPTION........................................................................................................11
4 SERVICING TOOLS..........................................................................................................................12
4.1 OVERVIEW .....................................................................................................................................12
4.2 REPAIR LEVEL DEFINITION ............................................................................................................12
5 DISASSEMBLING AND ASSEMBLING.........................................................................................13
5.1 OVERVIEW .....................................................................................................................................13
5.2 DISASSEMBLING.............................................................................................................................13
5.3 ASSEMBLING..................................................................................................................................22
6 EQUIPMENT OF PROBLEM DIAGNOSTICS..............................................................................28
6.1 LIST OF TEST JIGS...........................................................................................................................28
6.2 HARDWARE REQUIREMENT FOR PC ...............................................................................................28
6.3 SOFTWARE REQUIREMENT .............................................................................................................28
7 DIAGNOSTIC PROGRAM ...............................................................................................................29
7.1 LIST OF TEST ITEMS .......................................................................................................................29
7.2 TEST ITEMS OPERATION.................................................................................................................30
7.3 HOW TO EXECUTE DIAG. TEST PROGRAM.......................................................................................30
8 SOFT UPGRADE PROCEDURE......................................................................................................31
DOC_UPDATE USER GUIDER (WINDOWS XP)...........................................................................................31
8.1 PREPARE FOR INSTALLATION:.....................................................................错误!未定义书签。
8.1.1 Close the firewall of Windows (It is very Important!)..........................
8.1.2 Close 3rd Party Firewall (such as: Trend OfficeScanNT personal firewall) 错误!未定义书
签。
8.1.3 Set Driver Signing Options................................................................... 错误!未定义书签。
8.2 INSTALL DOC_UPDATE................................................................................
错误!未定义书签。
错误!未定义书签。
8.3 CONNECT DEVICE WITH PC............................................................................................................40
8.3.1 Don’t press any key, Connect device with PC.......................................................................4 0
TechFaith Confidential Proprietary Page 3 of 3
Page 4

PUMA_T_FLY TechFaith Confidential Proprietary Version 1.0
Service Manual
8.3.2
Disconnect USB, long press the given key, (Smartphone: “2”key; Pocket PC: “volume
up” key) 41
8.4 CONFIGURE RNDIS VIRTUAL NETWORK ADDRESS.........................................................................43
8.5 DOC_UPDATE APPLY.....................................................................................................................44
8.6 HOW TO OPERATE...........................................................................................................................44
8.6.1 Considerations.......................................................................................................................46
9 RF TEST ..............................................................................................................................................47
9.1 GSM FUNCTION TEST.....................................................................................................................47
9.2 HARDWARE REQUIREMENT............................................................................................................47
9.3 RF TEST CONNECTION (FOLLOWING IS A EXAMPLE OF TECHFAITH RF TEST SOLUTION) 错误!未定
义书签。
9.4 RF ANTENNA SPECIFICATION.........................................................................................................47
10 TROUBLESHOOTING & REPAIR.............................................................................................53
10.1 CAN NOT DOWNLOAD PROGRAM ...................................................................
10.2 CAN NOT TURN ON......................................................................................... 错误!未定义书签。
10.3 NO DISPLAY, NO BACKGROUND LIGHT.......................................................... 错误!未定义书签。
10.4 CAN NOT IDENTIFY THE SIM CARD ...............................................................
10.5 CAN NOT CHARGE.......................................................................................... 错误!未定义书签。
10.6 NO BELL OR BELL ABNORMAL....................................................................... 错误!未定义书签。
10.7 T
10.8 CAN NOT TAKE PHOTO OR ABNORMAL........................................................... 错误!未定义书签。
10.9 KEYBOARD FUNCTION ERROR OR NO FUNC TION (ESPECIALLY THE SIDE KEY) 错误!未定义书签。
10.10 S
10.11 CAN NOT DELIVER VOICE SIGNAL (RECEIVE CALL IS ABLE)....................... 错误!未定义书签。
10.12 DROP CALL................................................................................................ 错误!未定义书签。
10.13 TRANSMIT ABNORMALLY .......................................................................... 错误!未定义书签。
10.14 RECEIVE ABNORMAL.................................................................................
HE MOTOR CAN NOT VIBRATE
IGNAL WEAKLY
....................................................................................... 错误!未定义书签。
......................................................................错误!未定义书签。
错误!未定义书签。
错误!未定义书签。
错误!未定义书签。
TechFaith Confidential Proprietary Page 4 of 4
Page 5

PUMA_T_FLY TechFaith Confidential Proprietary Version 1.0
Service Manual
Glossary
ABB Analog BaseBand
AFC Auotmatic Frequency Control
APC Automatic Power Control
BGA Ball Grid Array
CPU Central Process Unit
CSTN Color Super Twisted Nematic
DBB Digital BaseBand
DNP Don’t Process
DSP Digital Signal Processor
GSM Global System for Mobile communications
H/W HardWare
I2C Inter IC Control
IMEI International Mobile Equipment Identity
IMSI International Mobile Subscriber Identification
I/O Input/Output
ISO International Standards Organization
JTAG Joint Test Action Group
Flash Flash E2PROM
LCD Liquid Crystal Display
LCM LCD Module
MCC Mobile Country Code
MNC Mobile Network Code
MCU Micro-controller Unit
|MSIN Mobile Subscriber Identification Number
NC Not Connect
PLL Phase loop lock
PWL Pseudo-noise pulse Width Light
PWT Pulse Width Tone Generator
RISC Reduced Instruction Set Computer
RAM Random Access Memory
ROM Read Only Memory
RTC Real Time Clock
SIM Subscriber Identity Module
S/W SoftWare
TDMA Time Division Multiple Access
TMSI Temporary Mobile Subscriber Identification
TPU Time Processing Unit(Integrated in u201 DBB )
TSP Time Serial Port (Integrated in U201 DBB)
USART Universal Synchronous/Asynchronous Receiver Transmitter
USB Universal Serial Bus
TechFaith Confidential Proprietary Page 5 of 5
Page 6

PUMA_T_FLY TechFaith Confidential Proprietary Version 1.0
Service Manual
1 INTRODUCTION
1.1 Scope
The PUMA_T_I_FLY is one of a suite of smart phones,which base on Wince OS provide the personal
communication GSM .GPRS and Multi-media solutions.
This manual provides the technical information to support service activities of PDA phone
(PUMA_T_I_FLY). This document contains highly confidential information, any or all of this document
should not be revealed to any third party.
1.2 Conventions
The following conventions are used throughout this document:
Register bits are referenced in the form XXXX[YYYY] where XXXX is the register mnemonic used in the
appropriate device manual or datasheet and YYYY is the mnemonic for particular register bit(s).
All other registers are described using the same bit ordering.
Signals that are asserted or set are in their active state.
Signals that are negated or cleared are in their inactive state.
TechFaith Confidential Proprietary Page 6 of 6
Page 7

PUMA_T_FLY TechFaith Confidential Proprietary Version 1.0
Service Manual
2 PRODUCT SPECIFICATION
2.1 Product Configuration
Standard Package
Item Contains
1
2
3
4
5
6
7
8
9
Main Unit
AC Adapter w/ mini –USB plug
Stereo wired headset with microphone
Carrying Case
Car Kit
User’s Manual, Quick start guide, Sync., S/W (CD)
Battery
Travel charger
User’s Manual
TechFaith Confidential Proprietary Page 7 of 7
Page 8

PUMA_T_FLY TechFaith Confidential Proprietary Version 1.0
Service Manual
2.2 Specifications
The following table show the PUMA_T_I_FLY tech Specifications
Item Specifications
Soldering status Using Lead-free requirement
Platform Microsoft smart phone 2005
PDA form factor integrated quad-band GSM/GPRS, Bluetooth, 2
mega-pixel camera, and qwerty keyboard
Size 114.5mm (L) x 49mm (W) x 12mm (T)
Weight
Battery Removable rechargeable Lithium Polymer battery
Talk time:less than 4 hrs
Standby Time: less than 240 hrs
AC Adapter AC input: 100 ~ 240V AC, 50/60 Hz
DC output: 5.25V and 0.6A
GPRS/GSM (Tri-band) module Single mode: GSM/GPRS
- GSM900/DCS1800/PCS1900
Global Roaming
Audio Coded: AMR, EFR, FR
SMS
- Support concatenated SMS
- 9 build in SMS templates
- Support multi-recipients
Supplementary services
- Call holding/waiting/forwarding
- Call barring
- CLI (Calling Line Identity)
- Network selection
- - Multi-party conference capability
- Phase 2+ Unstructured Supplementary Service Data
STK
SIM 3V/1.8V SIM operation
- SIM Application Tool Kit
- Fixed Dialing Number (FDN)
- Abbreviation Dial Number (ADN)
- Security Pin 1 & 2 control
- Over the air provisioning
TechFaith Confidential Proprietary Page 8 of 8
Page 9

PUMA_T_FLY TechFaith Confidential Proprietary Version 1.0
Service Manual
Memory ROM: 128MB (for program and users’ storage)
RAM: 64 MB DDR SDRAM
Processor/Chipset TI OMAP 730
Continued
Item Specifications
LCD Module 2.2” 240x320 dots resolution
65K Colors, TFT LCD QVGA
Interface Bluetooth
Mini-USB connector: USB1.1 connection and power charging
Micro SD card slot
External RF connector with cover
1.8V & 3V SIM card slot
Keyboard/Button Buttons
- Home and Back buttons
- Two Soft-key Buttons
- 4 way navigation and action button
- Side buttons
Volume up, Music, Volume down and Camera
- Send Button
Short Press: Start a phone call
- End button
Short Press: End a phone call
Two Short Presses: Close GPRS Connection
Notification Three-color LED
Notification by LED, Sound, Vibration Motor
Camera Main Camera (manufacture option)
CMOS 2.1 mega Pixel with macro lens
Preview Mirror
Audio Handfree
Receiver
Speaker (support Hands-Free mode)
Audio sampling rate: 16-bits with 8 KHz, 16KHz
Stereo BlueTooth earphone
TechFaith Confidential Proprietary Page 9 of 9
Page 10

PUMA_T_FLY TechFaith Confidential Proprietary Version 1.0
Service Manual
Ring tone: support 64-chord MIDI, MP3, WMA, WAV,AMR
Playback: support MIDI, MP3, WMA, WAV, AAC,
AMRWAV/WMA/AMR/AAC/MP3 codec.
16 bits with 8KHz,11 KHz, 22KHz,44.1 KHz, sampling rate
Continued
Item Specifications
Bluetooth V1.2
- Class 2 transmit power
- Supported profiles:
Generic Access Profile
Serial Port Profile
Headset Profile
Object Push profile
DUN (dial-up networking profile)
Handsfree Profile)
Generic Object Exchange Profile)
A2DP (Advanced Audio Distribution profile)
AVRCP (Audio/Video Remote control Profile)
HID (Human interface device profile)
Certification
PTCRB
R&TTE: EMC/EMI, CEM, Safety
FCC
Bluetooth Certifiaction
Microsoft Windows Mobile version 5.0 logo
Accessories Inbox
- AC adapter
- USB Sync. Cable
- Earphone
- Battery
- CD
Table 1. PUMA_T_I_FLY Specifications
TechFaith Confidential Proprietary Page 10 of 10
Page 11
PUMA_T_FLY TechFaith Confidential Proprietary Version 1.0
Service Manual
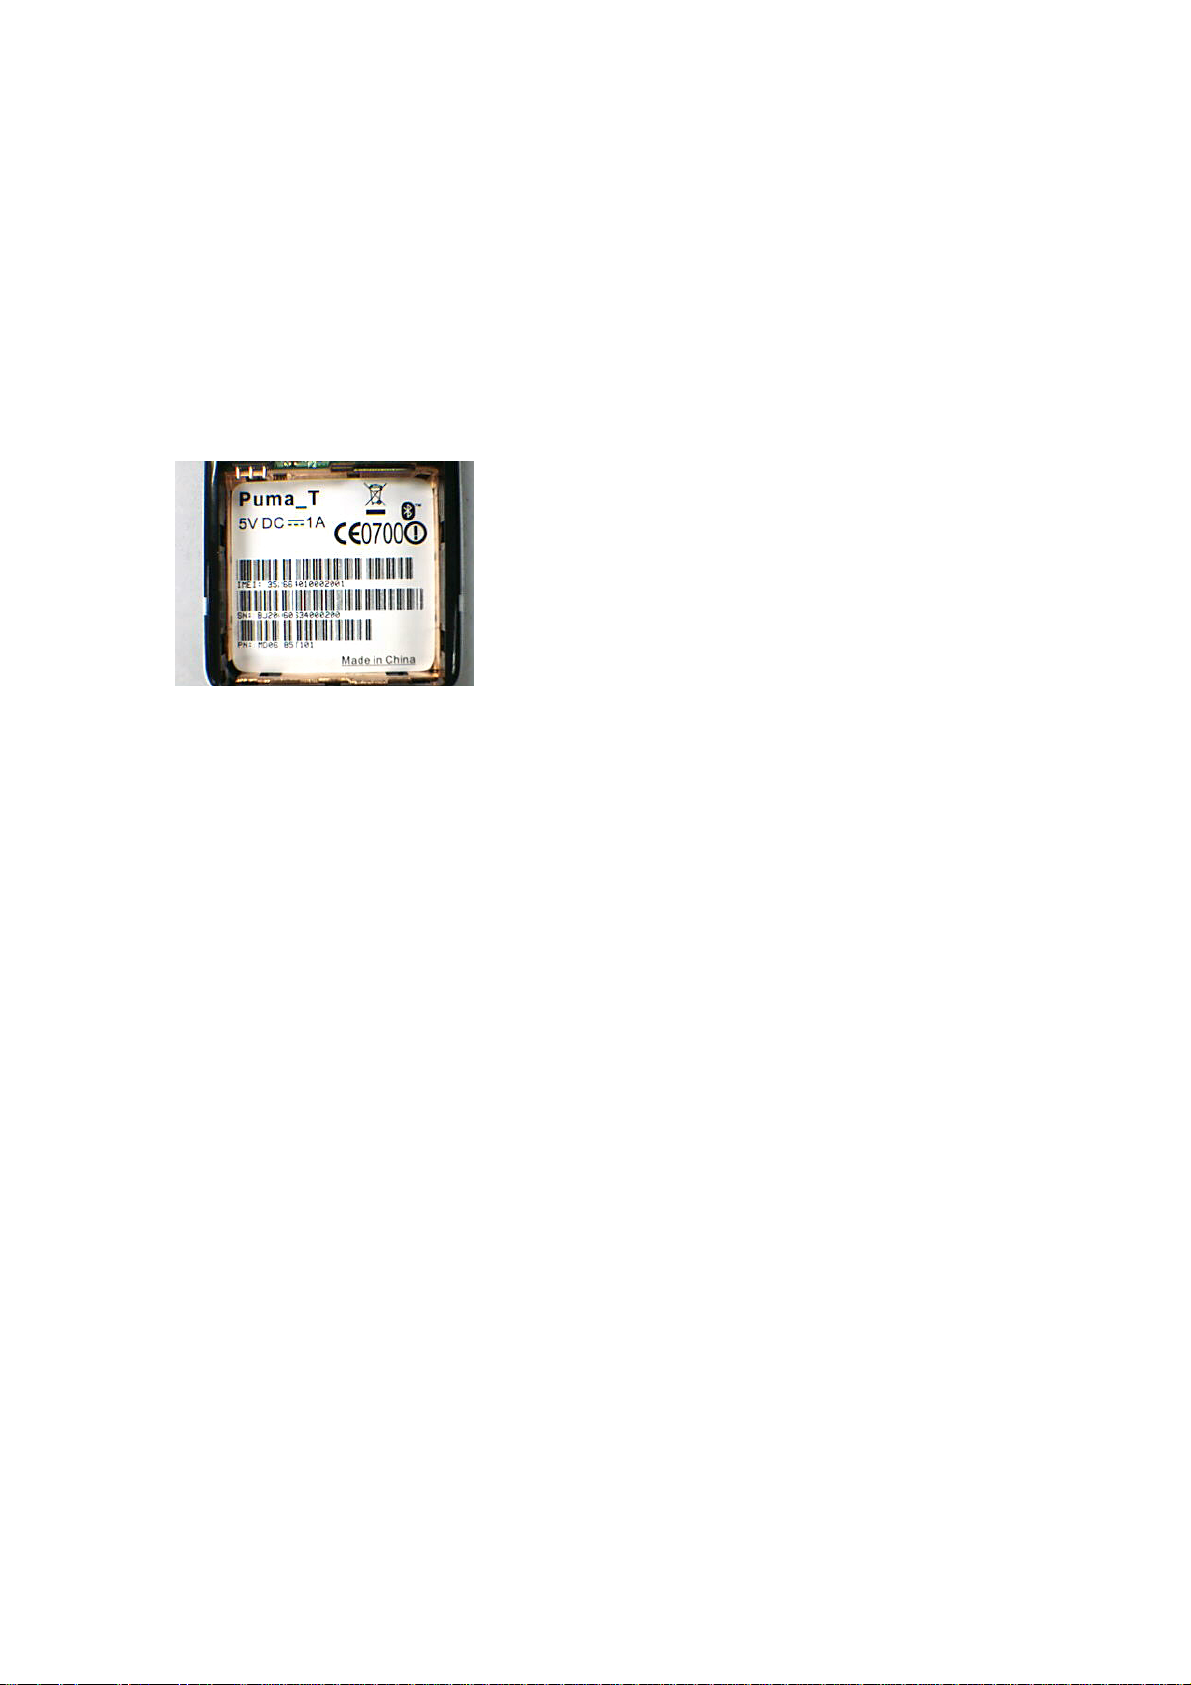
3 LABELING
3.1 Main unit Regulatory label (Stick on the keypad housing of main unit)
Here is an example only. Actually printing format is depended on customer’s request.Repair center need to
re-print new regulatory label once replacing M/B for new IMEI,As to printing format, please refer to
returned unit from end user.
Label Characteristic:
MMMXYmmS#######C
3.2 Serial number description
MMM = Model (Refer to the Appendix-3)
X = HW version
Y = Production Year (ex. 2002=2,2003=3,2004=4)
MM = Production Month (Jan=01, Feb=02, … Dec=12)
S = Factoy Code
####### = Serial number
C = Check digit
TechFaith Confidential Proprietary Page 11 of 11
Page 12

PUMA_T_FLY TechFaith Confidential Proprietary Version 1.0
Service Manual
4 SERVICING TOOLS
4.1 Overview
This chapter provides information for the servicing tools for PUMA_T_I_FLY .
4.2 Repair Level Definition
Unit
L0 Accessory test and unit swap
L1 Unit Test and ROM Re-flash
L2 Refurbishment and Module Swap +L1
L2.5 M/B Repair(connecter, button, MIC…) +L2
Level NO. Use Remark
L1
L2
L2.5
Mini USB DATA interface
Cable
Earphone Headset
AC Adapter
128MB mini SD memory card
Unit current consumption test
fixture
Power supply
Current Meter
Special Made Plastic Stick
Hand tools
Label printer
Lead-free Soldering station
Air heater
Check for mini USB Communication;
RUU re-flash
For Audio test.
Transfer AC to DC for Unit
For unit Re-flash ROM code transfer to
mini SD card
Measure Unit current consumption
Assembly & Disassembling
Assembly & Disassembling
Print agency label if replacing M/B
Board level repair
TechFaith Confidential Proprietary Page 12 of 12
Page 13
PUMA_T_FLY TechFaith Confidential Proprietary Version 1.0
Service Manual
5 DISASSEMBLING AND ASSEMBLING
5.1 Overview
This section describes how to Disassembling and Assembling before debug.
5.2 Disassembling
Tools using of Disassembling and Assembling
PUMA_T_I_FLY
List of the left picture
1 Screen Protect film
2. Tweezers
3. Screw Driver #15
4. Plastic Stick.
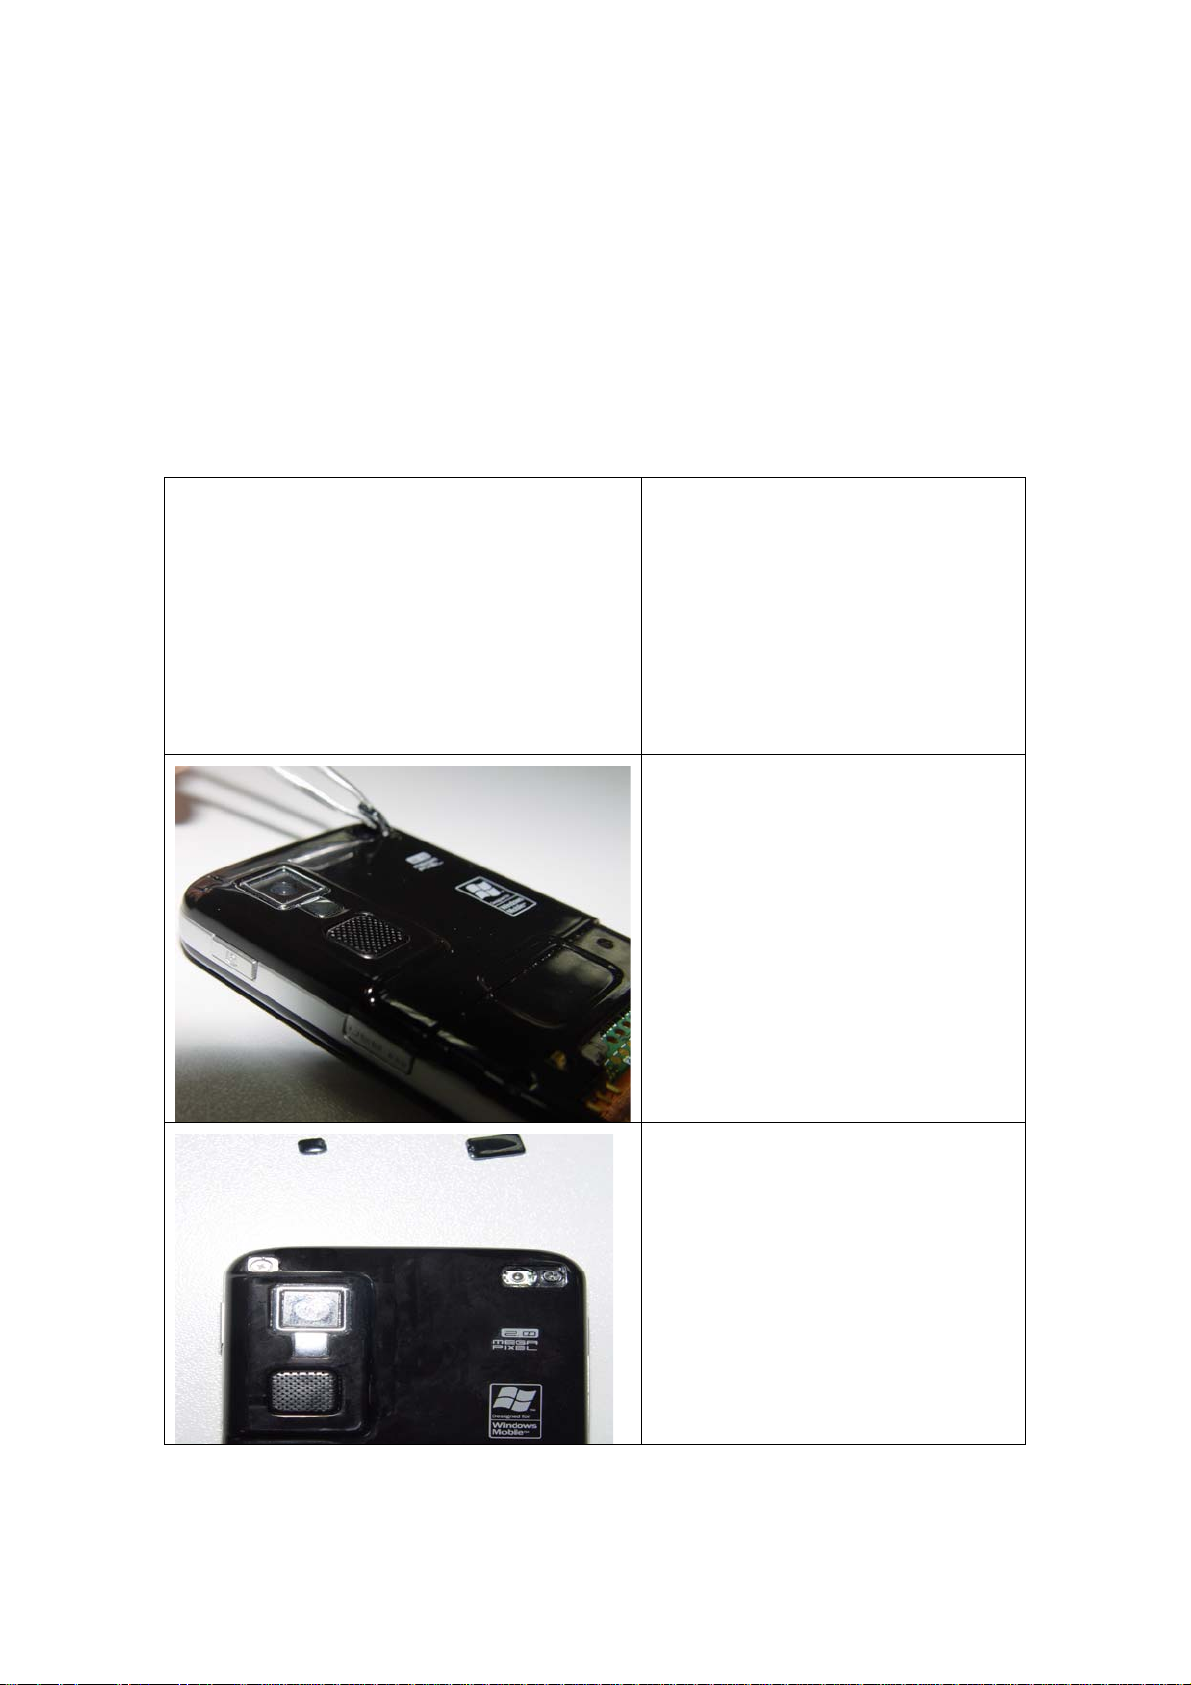
Remove the RF cover and screw cover using
Tweezers.
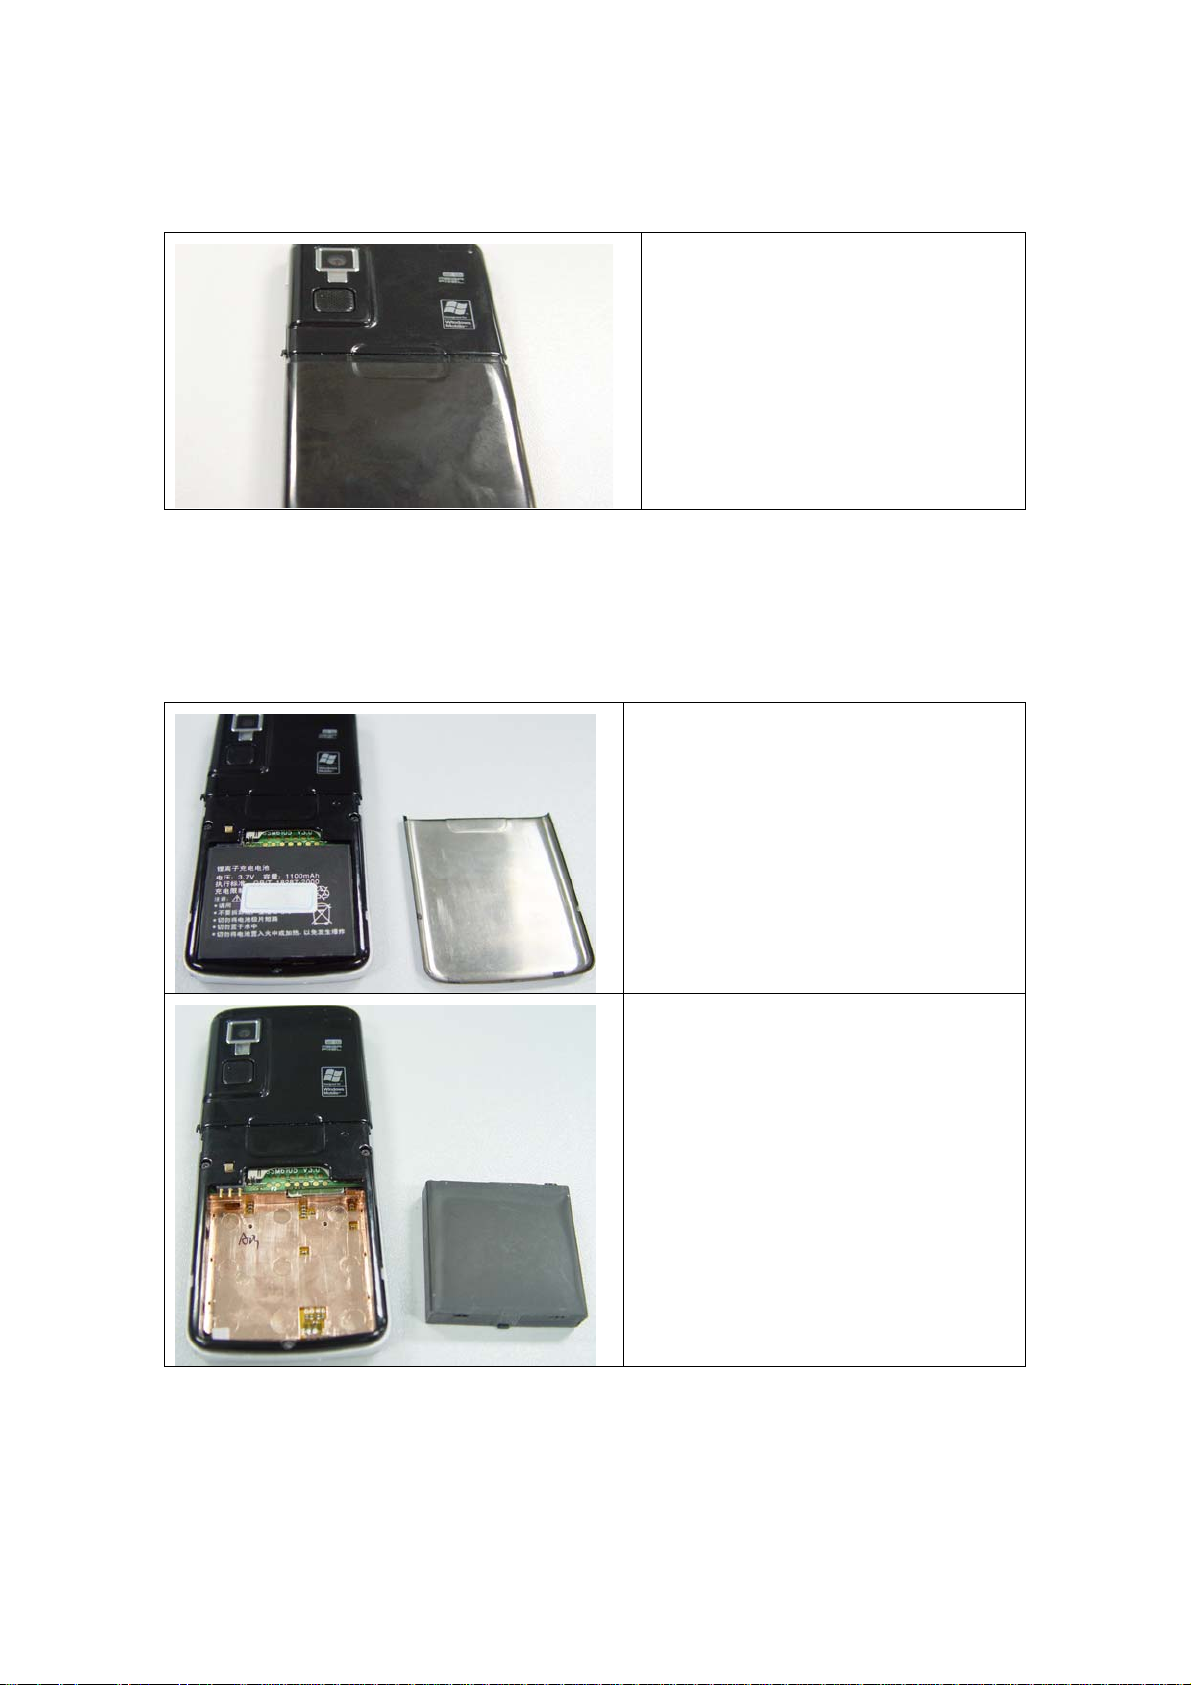
the RF cover and screw cover are removed.
TechFaith Confidential Proprietary Page 13 of 13
Page 14
PUMA_T_FLY TechFaith Confidential Proprietary Version 1.0
Service Manual
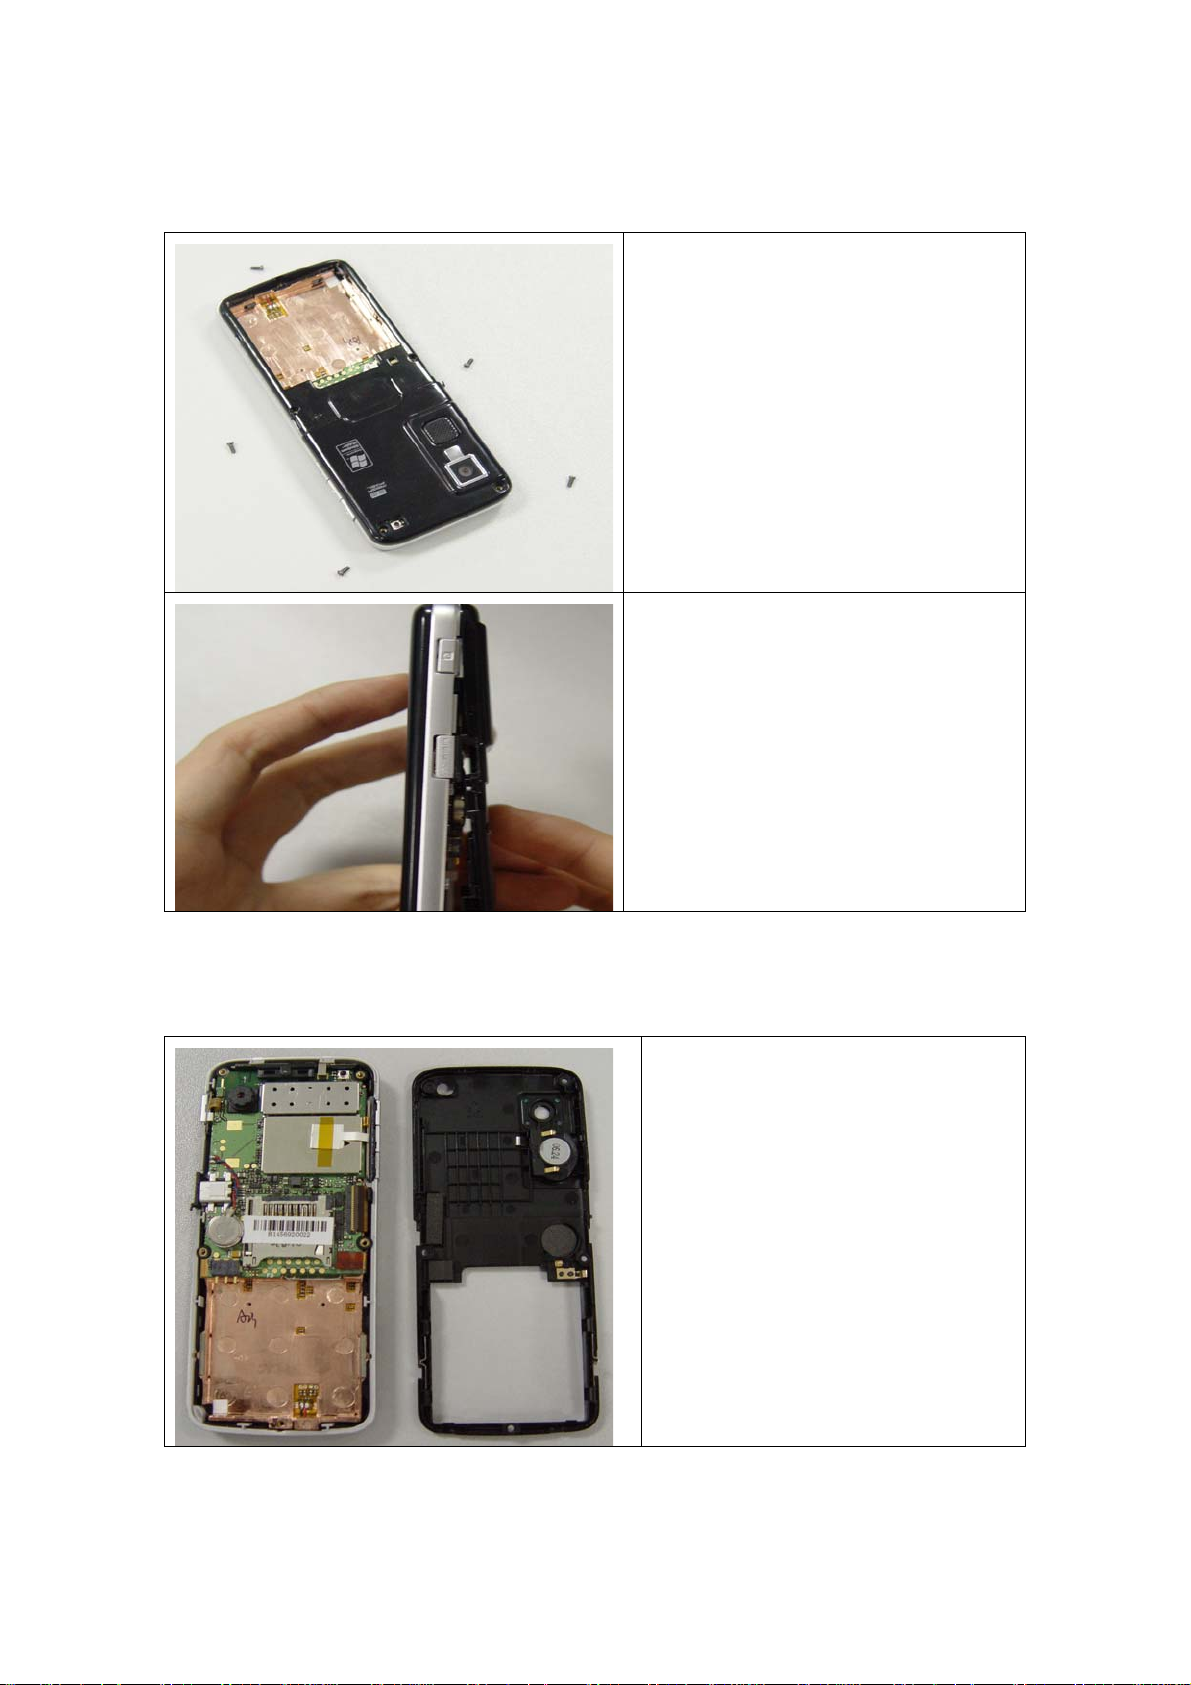
Push the battery back cover and remove it
Continued
The battery cover is removed.
Remove main battery from unit
TechFaith Confidential Proprietary Page 14 of 14
Page 15
PUMA_T_FLY TechFaith Confidential Proprietary Version 1.0
Service Manual
Release5 screws from back of the phone.
Insert plastic stick into the gap between the back
housing and front shell.
Continued
Remove the back housing
TechFaith Confidential Proprietary Page 15 of 15
Page 16
PUMA_T_FLY TechFaith Confidential Proprietary Version 1.0
Service Manual
Remove the camera button
Remove the volume button
Continued
Remove the main board and frame from the
front housing
TechFaith Confidential Proprietary Page 16 of 16
Page 17
PUMA_T_FLY TechFaith Confidential Proprietary Version 1.0
Service Manual
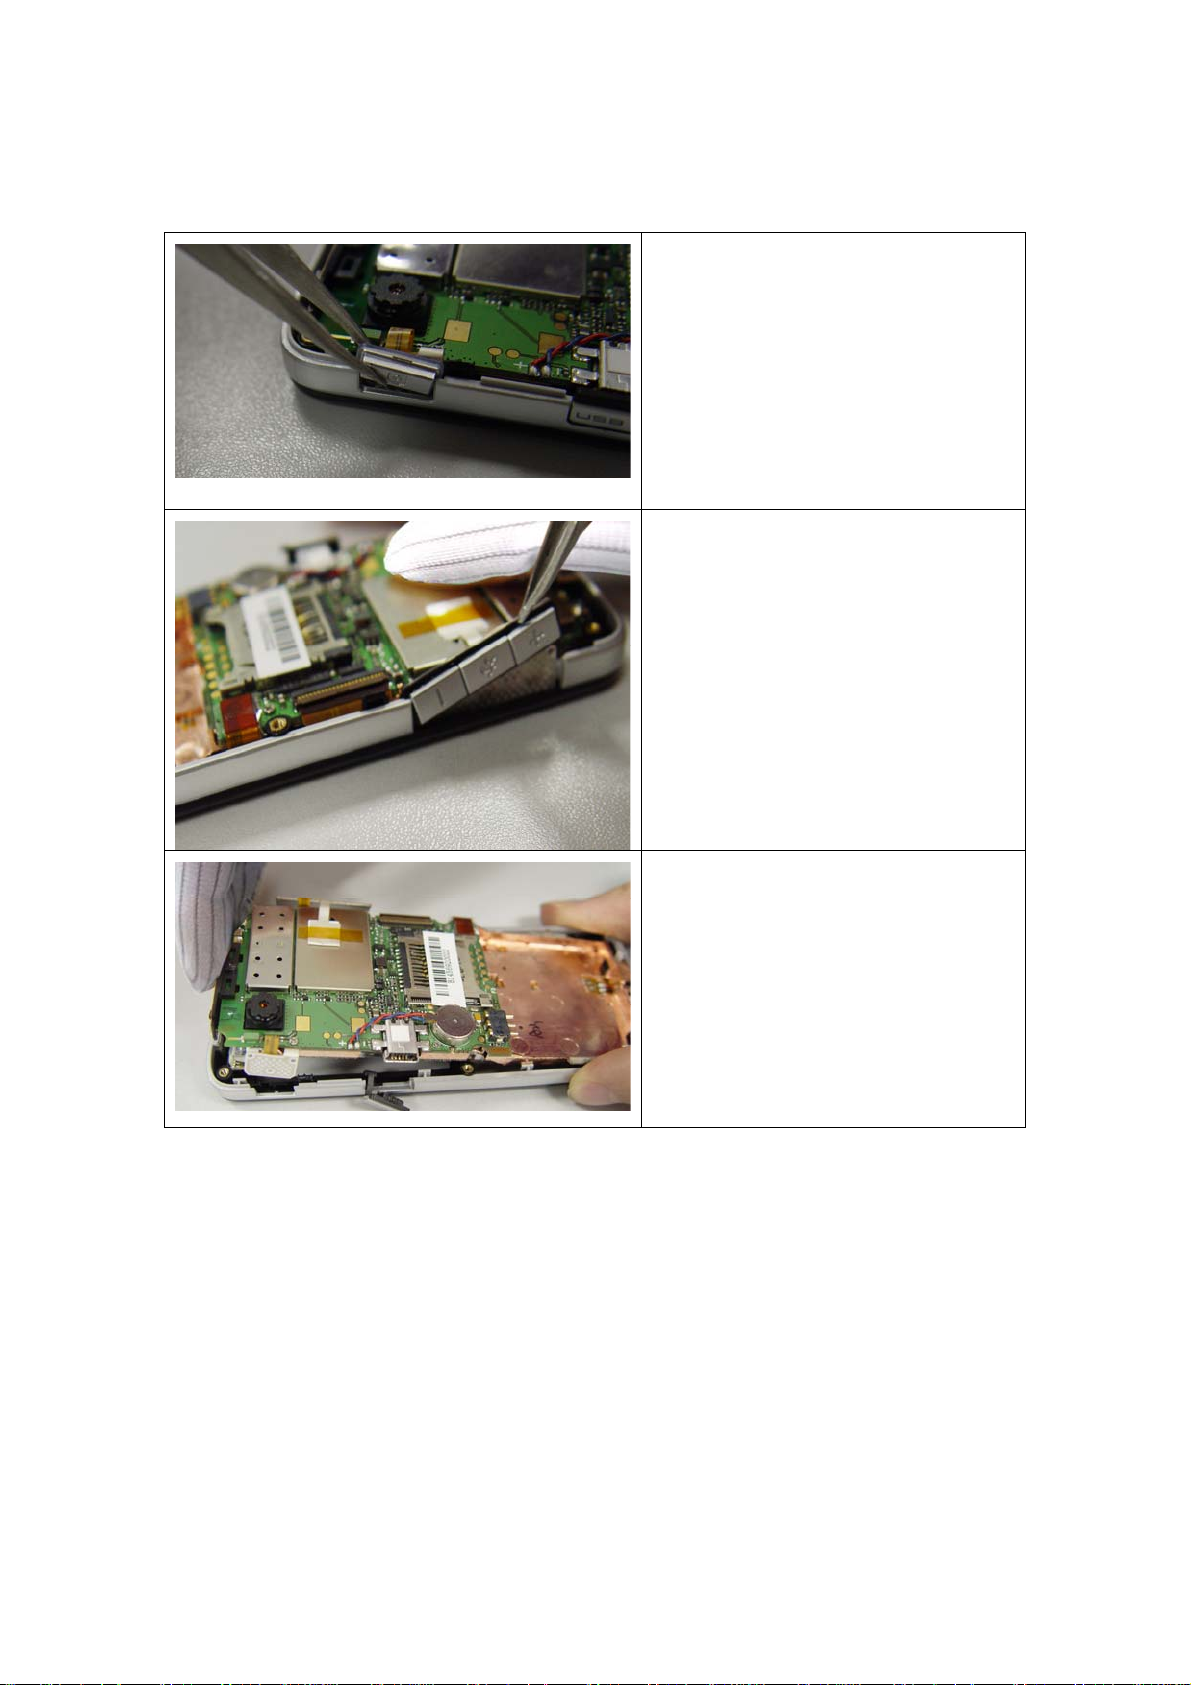
Take off the shield cover by tweezer
Release 4 screws from main board
4 screws are released.
TechFaith Confidential Proprietary Page 17 of 17
Page 18

PUMA_T_FLY TechFaith Confidential Proprietary Version 1.0
Service Manual
Lift the LCD connector board by hand
Remove the keyboard connector from the
main board
Continued
Pull the LCD screen and remove it
TechFaith Confidential Proprietary Page 18 of 18
Page 19

PUMA_T_FLY TechFaith Confidential Proprietary Version 1.0
Service Manual
LCD screen is remoced.
Lift up the sponge and Separating the electric
paper from the sponge
Continued
Remov e the main board from the
framework
TechFaith Confidential Proprietary Page 19 of 19
Page 20

PUMA_T_FLY TechFaith Confidential Proprietary Version 1.0
Service Manual
Remove the keyboard from the framework
Release 1 screws of the main board
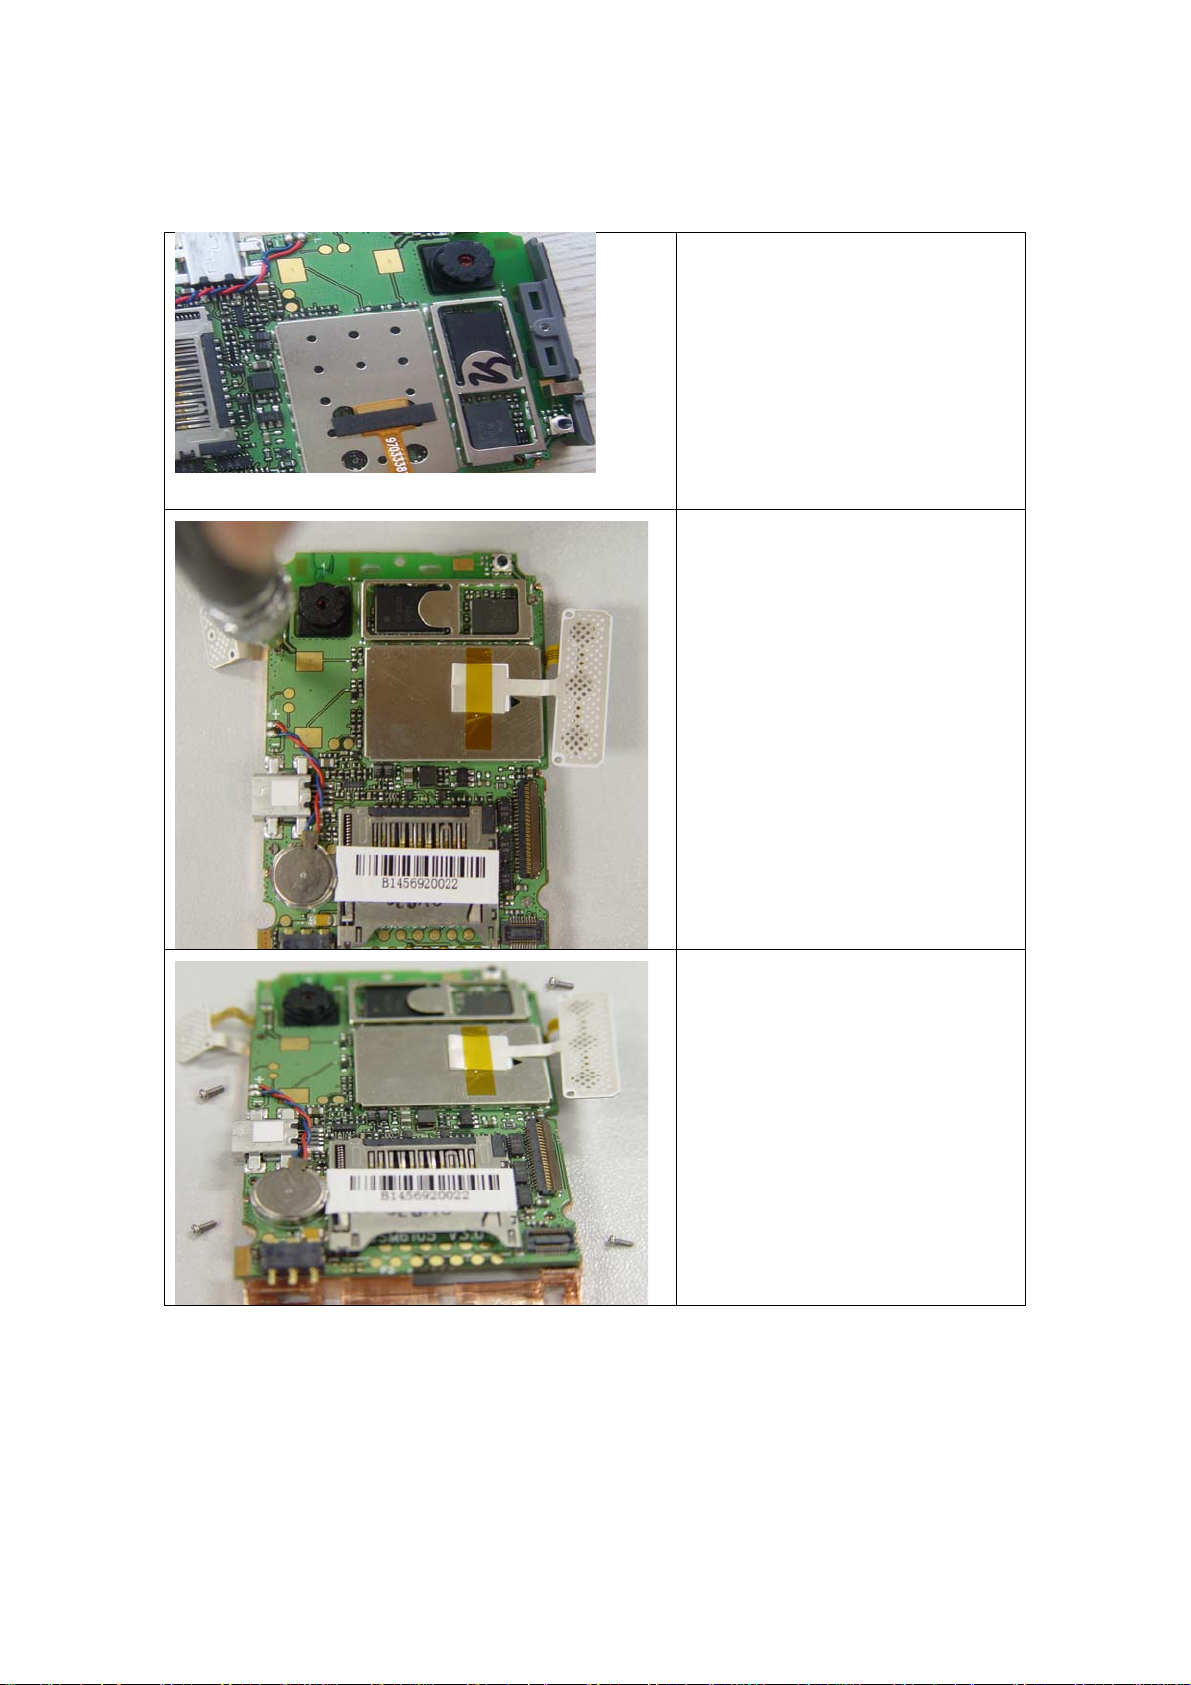
Remove the ANT from main board
TechFaith Confidential Proprietary Page 20 of 20
Page 21

PUMA_T_FLY TechFaith Confidential Proprietary Version 1.0
Service Manual
Remove the Camera
Disassembly process is done
The Unit Disassembly is done
TechFaith Confidential Proprietary Page 21 of 21
Page 22

PUMA_T_FLY TechFaith Confidential Proprietary Version 1.0
Service Manual
5.3 Assembling
Assembly the antenna to the mainbord.
Inatall the screws to fix the ANT fast to the
mainboard
Continued
Add the camera to the main board
TechFaith Confidential Proprietary Page 22 of 22
Page 23

PUMA_T_FLY TechFaith Confidential Proprietary Version 1.0
Service Manual
Install 4 screws to fix the main board to the
framework
Paste the electric paper to the framework
Continued
Push the LCD screen to the framework
TechFaith Confidential Proprietary Page 23 of 23
Page 24

PUMA_T_FLY TechFaith Confidential Proprietary Version 1.0
Service Manual
Connect the FPC to the LCD connector in the main
board
Paste the keyboard into back of the framework
Connect the keyboard to the main board
Install shield cover
TechFaith Confidential Proprietary Page 24 of 24
Page 25

PUMA_T_FLY TechFaith Confidential Proprietary Version 1.0
Service Manual
Continued
Assembly the mainboard and framework to the front
housing
Add the usb cover fastly
Continued
Add the camera button
TechFaith Confidential Proprietary Page 25 of 25
Page 26

PUMA_T_FLY TechFaith Confidential Proprietary Version 1.0
Service Manual
Add the volume button
Assembly the back housing fastly
Install 5 screws to fix the back housing
Add the RF cover and screw cover
TechFaith Confidential Proprietary Page 26 of 26
Page 27

PUMA_T_FLY TechFaith Confidential Proprietary Version 1.0
Service Manual
Continued
Put the battery into its place
Assembly battery cover.
Assembly process is done
Now The unit is ready for performing TEST.
The Unit assembly is done and ready for further tests.
TechFaith Confidential Proprietary Page 27 of 27
Page 28

PUMA_T_FLY TechFaith Confidential Proprietary Version 1.0
Service Manual
6 EQUIPMENT OF PROBLEM DIAGNOSTICS
6.1 List of Test Jigs
Item list Usage Remark
USB/mini_usb Cable For Sync test ; RUU re-flash ROM image
Special Plastic Tool For unit disassembly
Hand tools For unit disassembly
AC Adapter For battery recharge and power related tests
Earphone with Microphone For Audio test
Mini SD card with diagnostic For Function
PC or Notebook Use for Communication/Synchronization test
6.2 Hardware Requirement for PC
O.S.: Windows 2000 above
CPU: Pentium 166MHz or above
Memory: Above 64MB
6.3 Software Requirement
Microsoft Active Sync version 4.1 above
Diagnostic Program loaded on Mini SD card. ( encoded by TechFaith)
TechFaith Confidential Proprietary Page 28 of 28
Page 29

PUMA_T_FLY TechFaith Confidential Proprietary Version 1.0
Service Manual
7 DIAGNOSTIC PROGRAM
7.1 List of Test Items
NO. Item Description Remark
1 Version and Voltage test Check the S/W version and battery
voltage
2 Backlight test Backlight ON in 3 brightness level and
OFF
3 Keypad light test Test ON and OFF of the keyboard light
4 Led light test Test the message of LED Red led on and off, then green led
5 Vibrator Test Test the function of vibtaror
6 Keyboard test Test all the keyboard button(include
camera, volume up and down)
7 Speaker test Speaker test
8 Handset test External Handset test
9 Receiver test Internal Receiver test.
10 Display test Test the color palette(blue, green red and
mixed color)
11 Mini-SD card test Test the basic function of Mini-SD Create .txt file in “Storage Card”
12 Reset to the default setting Restore to the default manufacture setting All user information will be
Backlight is set to
high/medium/low/off, then restore
to the default state
on and off
When some key pressed, relative
rectangle pane is filled in green
Press left or right to switch to the
interface of various color
path and Copy it to specified path,
then delete it
deleted and execute it carefully
TechFaith Confidential Proprietary Page 29 of 29
Page 30

PUMA_T_FLY TechFaith Confidential Proprietary Version 1.0
Service Manual
7.2 Test Items Operation
How to enter the test mode
Caution: If you select the “reset to the default setting” the customer information will be clear and all
setting will restore to the default manufacture setting! And when Mini-SD will be tested, please insert
right SD into your phone.
When the phone is in the idle interface, press “**248##” on the dialboard and wait for about 2 seconds to
enter the main interface as follows:
7.3 How to execute Diag. test program
Using navigation button -"Up" or "Down" to select one of the test items.
Using navigation button -"OK " to execute testing.
When the menu item “Exit” is pushed, a message box will be popup to tell you which test items have been
finished or not.
TechFaith Confidential Proprietary Page 30 of 30
Page 31

PUMA_T_FLY TechFaith Confidential Proprietary Version 1.0
Service Manual
8 SOFT UPGRADE PROCEDURE
DOC_Update User Guider (Windows XP)
Caution: It is necessary to keep the connection stable, because this
downloading tool is based on TFTP protocol!
8.1 Soft upgrade
8.1.1 Update CE&Radio
Ensure the filesystem in your mini-SD card is FAT16. Then copy the MUPDAT.DIP file to the root
directory of mini-SD card.
Take off the battery and insert the SD card in the Phone.
Put on the battery, then press the power key and the ‘6’ key at the same time to trun on the Phone. In
this way, the phone can get into the update programer. Follow the picture below.
Then you will see the guage. If the update programmer successfully runs, the guage is blue.
TechFaith Confidential Proprietary Page 31 of 31
Page 32

PUMA_T_FLY TechFaith Confidential Proprietary Version 1.0
Service Manual
When the guage is up to the end, it indicates the update is complete. The Phone will reset automatically.
When window mobile start again and the begin picture appear, the update is successful.
8.1.2 Update IPL
Ensure the filesystem in your mini-SD card is FAT16. Then copy the WMIPL.DIP file to the root directory
of mini-SD card.
Take off the battery and insert the SD card in the Phone.
Put on the battery, then press the power key and the ‘6’ key at the same time to trun on the Phone. In
this way, the phone can get into the update programer. Follow the picture below.
TechFaith Confidential Proprietary Page 32 of 32
Page 33

PUMA_T_FLY TechFaith Confidential Proprietary Version 1.0
Service Manual
Then you will see the guage. If the update programmer successfully runs, the guage is green.
When the guage is up to the end, it indicates the update is complete. The Phone will reset automatically.
When window mobile start again and the begin picture appear, the update is successful.
8.1.3 Update CE&Radio and IPL
1. Ensure the filesystem in your mini-SD card is FAT16. Then copy the MUPDAT.DIP file and
WMIPL.DIP file to the root directory of mini-SD card.
2. Take off the battery and insert the SD card in the Phone.
Put on the battery, then press the power key and the ‘6’ key at the same time to trun on the
Phone. In this way, the phone can get into the update programer. Follow the picture below.
TechFaith Confidential Proprietary Page 33 of 33
Page 34

PUMA_T_FLY TechFaith Confidential Proprietary Version 1.0
Service Manual
Then you will see the guage. If the update programmer successfully runs, you firstly see the guage is green,
then it change blue.
When the guage is up to the end, it indicates the update is complete. The Phone will reset automatically.
When window mobile start again and the begin picture appear, the update is successful.
Caution:
If you can’t see the guage, the format of mini-SD card may be not compatible. Please format the mini-SD
card to FAT16 in windowsXP or windows2000.
TechFaith Confidential Proprietary Page 34 of 34
Page 35

PUMA_T_FLY TechFaith Confidential Proprietary Version 1.0
Service Manual
8.2 User Guide for RUU
1. Double click RUU icon, then you will see the interface of RUU below:
Click “I understand the caution indicated above” , then click “Next”.
TechFaith Confidential Proprietary Page 35 of 35
Page 36

PUMA_T_FLY TechFaith Confidential Proprietary Version 1.0
Service Manual
2. Power on the handset, and connect the handset to PC using Activesync, then click “I completed the step
indicated above”, and you have to choose the file used to update handset, then click “Next”. As show
below:
TechFaith Confidential Proprietary Page 36 of 36
Page 37

PUMA_T_FLY TechFaith Confidential Proprietary Version 1.0
Service Manual
TechFaith Confidential Proprietary Page 37 of 37
Page 38

PUMA_T_FLY TechFaith Confidential Proprietary Version 1.0
Service Manual
Click “Update” to update your han dset.
If the battery life percent of your handset is less than 50%, the update process will be delayed. As is shown
below.
TechFaith Confidential Proprietary Page 38 of 38
Page 39

PUMA_T_FLY TechFaith Confidential Proprietary Version 1.0
Service Manual
Caution:
If the connection is not stable, the update process will error. As is shown below:
TechFaith Confidential Proprietary Page 39 of 39
Page 40

PUMA_T_FLY TechFaith Confidential Proprietary Version 1.0
Service Manual
8.3 Connect device with PC
8.3.1 Don’t press any key, Connect device with PC
a. Connect device with PC and PC prompt “Found New Hardware OMAP730”
b. Choose “No, not this time”, choose “Next”
c.Choose “Install the software automatically [Recommended]”, choose “Next”
TechFaith Confidential Proprietary Page 40 of 40
Page 41

PUMA_T_FLY TechFaith Confidential Proprietary Version 1.0
Service Manual
d.choose “Finish”
If have already installed OMAP730 driver, skip this step!
8.3.2 Disconnect USB, long press the given key, (Smartphone: “2”key; Pocket
PC: “volume up” key)
a.And then Connect PC with USB. When Windows XP will found RNDIS KITL for OMAP730 as follow,
unpress the given key.
b. Choose “No, not this time” ,choose “Next”
TechFaith Confidential Proprietary Page 41 of 41
Page 42

PUMA_T_FLY TechFaith Confidential Proprietary Version 1.0
Service Manual
c. Choose“Install the software automatically [Recommended]”, choose “Next”
d. choose “Finish”
TechFaith Confidential Proprietary Page 42 of 42
Page 43

PUMA_T_FLY TechFaith Confidential Proprietary Version 1.0
Service Manual
8.4 Configure RNDIS virtual network address
If it connected PC with USB and the RNDIS devier have installed, PC terminal will appear a new network
connection, set the network connection’s property.
IP address: 100.100.100.3 (or 100.100.100.4 etc.)
Subnet mask: 255.255.255.0
a. double click the left network icon,Choose the “properties” and then choose “Internet Protocol(TCP/IP)”
b. Set IP address and Subnet mask and then choose “OK”
TechFaith Confidential Proprietary Page 43 of 43
Page 44

PUMA_T_FLY TechFaith Confidential Proprietary Version 1.0
Service Manual
8.5 DOC_Update apply
8.6 How to operate
Get off the battery and the fit on again.
Long press the given key(“2” key for Smart phone and “volume up” key for Pocket PC), and then
plug into USB port, until PC terminal appear the new network connection for a while as follow , then
unpress the given key.
a.Run DOC_Update.exe. you can see:
b. Select the file of Download to Target (doc.bin).Click the “Download to Target” button, Operation
indication as follow:
TechFaith Confidential Proprietary Page 44 of 44
Page 45

PUMA_T_FLY TechFaith Confidential Proprietary Version 1.0
Service Manual
c. Click the “OK”button, then start to download update as follow:
d. After Downloading complete, display as follow
So update completed.
Please remove the battery and put it again, then reboot the handset.
TechFaith Confidential Proprietary Page 45 of 45
Page 46

PUMA_T_FLY TechFaith Confidential Proprietary Version 1.0
Service Manual
8.6.1 Considerations
If appear “Timeout! The target may not in updating state, please check it and try again!” description, it
shows the handset don’t enter the download update state.
If appear “Timeout! Download to Target failure!” description, it shows abort, check the USB connection
is abnormal or not.
It may occur one to ten seconds pause in course of downloading update, don’t care it, it is normal
TechFaith Confidential Proprietary Page 46 of 46
Page 47

PUMA_T_FLY TechFaith Confidential Proprietary Version 1.0
Service Manual
9 RF TEST
9.1 GSM function test
For RF antenna test, you need to set up your mobile tester, Antenna coupler and Shielding box to meet
TechFaith specification and requirement.
9.2 Hardware Requirement
1. Mobile Tester.
2. Plane Antenna
3. Test Jig.
4. Shielding Box
5. RF golden sample
6. RF cable
9.3 RF Antenna specification
GSM Antenna Test Specification
Items Test Name Tx Level TCH
1 Camp @ DCS Band 0 512 -75 BCCH=600
2 BS Originate Call 0 512 -75
E-GSM 900 Receiver Test
3 Fast Bit Error Rate 5 975 -104 <= 2 %
4 Fast Bit Error Rate 5 37 -104
5 Fast Bit Error Rate 5 124 -104
E-GSM 900 Transmitter Test
5 Check TX Power 5 975 -75 >=29 dBm
6 Check TX Power 5 37 -75
7 Check TX Power 5 124 -75
DCS 1800 Receiver Test
8 Fast Bit Error Rate 0 512 -104 <= 2 %
1st Downlink Cell
Power
Note
9 Fast Bit Error Rate 0 698 -104
10 Fast Bit Error Rate 0 885 -104
DCS 1800 Transmitter Test
11 Check TX Power 0 512 -75 >=26 dBm
TechFaith Confidential Proprietary Page 47 of 47
Page 48

PUMA_T_FLY TechFaith Confidential Proprietary Version 1.0
Service Manual
12 Check TX Power 0 698 -75
13 Check TX Power 0 885 -75
PCS 1900 Receiver Test
14 Fast Bit Error Rate 0 512 -104 <= 2 %
15 Fast Bit Error Rate 0 662 -104
16 Fast Bit Error Rate 0 810 -104
PCS 1900 Transmitter Test
17 Check TX Power 0 512 -75 >=26 dBm
18 Check TX Power 0 662 -75
19 Check TX Power 0 810 -75
GSM 850 Receiver Test
20 Fast Bit Error Rate 5 128 -104 <= 2 %
21 Fast Bit Error Rate 5 189 -104
22 Fast Bit Error Rate 5 251 -104
GSM 850 Transmitter Test
23 Check TX Power 5 128 -75 >=29 dBm
24 Check TX Power 5 189 -75
25 Check TX Power 5 251 -75
TechFaith Confidential Proprietary Page 48 of 48
Page 49

PUMA_T_FLY TechFaith Confidential Proprietary Version 1.0
Service Manual
TechFaith Confidential Proprietary Page 49 of 49
Page 50

PUMA_T_FLY TechFaith Confidential Proprietary Version 1.0
Service Manual
TechFaith Confidential Proprietary Page 50 of 50
Page 51

PUMA_T_FLY TechFaith Confidential Proprietary Version 1.0
Service Manual
TechFaith Confidential Proprietary Page 51 of 51
Page 52

PUMA_T_FLY TechFaith Confidential Proprietary Version 1.0
Service Manual
TechFaith Confidential Proprietary Page 52 of 52
Page 53

PUMA_T_FLY TechFaith Confidential Proprietary Version 1.0
Service Manual
10 TROUBLESHOOTING & REPAIR
10.1 Main Unit Does Not Respond to Power Button
(1) Make sure the Battery is installed properly to activate the battery pack.
(2) Connect the AC Adapter, maybe the battery pack is exhaust.
(3) Check the Battery cover is close properly.
(4) Try with another battery pack.
(5) Replace battery pack if necessary.
(6) Try to enter boot loader mode, Perform Re-flash OS if successfully.
(7) CMOS Camera is not assembled properly.
(8) Check all connections including LCD FPC to Main Board. Try with another Main Board.
(9) Fuse blown .
(10) Customer abuse caused the power button fallen off
(11) Both item 9 & 10 , MB replacement is necessary unless you are authorized to do board level repair.
(12) Once the defective part has been identified, verify it again with the defective part whether the
symptom could be duplicated.
10.2 Buttons Do Not Respond
(1) Dismantle the unit, check the status of switches on the Main Board and the plastic parts of button of the
Button not responding.
(2) Try with another Main Board, rigid-Flex or keypad.
(3) Replace Main Board, rigid-Flex or keypad if necessary.
(4) Once the defective part has been identified, verify it again with the defective part whether the symptom
could be duplicated.
(5) Hard Reset The unit.
10.3 Unusual Vertical / Horizontal lines or partial display
(1) Check the connection of LCM FPC whether is properly connected.
(2) Try with another LCM.
(3) Try with another Rigid-Flex board
(4) Try with another Main Board.
(5) Replace LCM if necessary
(6) Replace rigid-Flex board if necessary
(7) Replace Main Board if necessary.
(8) Once the defective part has been identified, verify it again with the defective part whether the symptom
could be duplicated.
TechFaith Confidential Proprietary Page 53 of 53
Page 54

PUMA_T_FLY TechFaith Confidential Proprietary Version 1.0
Service Manual
10.4 Back Light Does Not Turn ON/OFF
(1) Check the connection of FPC whether is properly connected.
(2) Try with another LCM.
(3) Try with another Rigid-Flex board
(4) Try with another Main Board.
(5) Replace LCM if necessary
(6) Replace rigid-Flex board if necessary
(7) Replace Main Board if necessary.
(8) Once the defective part has been identified, verify it again with the defective part whether the symptom
could be duplicated.
10.5 Mini-SD Card cannot be used
(1) Check whether mini-SD Card is fully inserted to the slot until you hear a click.
(2) Try with another mini-SD card and Check whether it is Write Protected.
(3) Try with another Main Board.
(4) Replace Main Board if necessary.
(5) Once the defective part has been identified, verify it again with the defective part whether the symptom
could be duplicated.
10.6 PC Connection (USB) not possible
(1) Check whether “Connection Settings” in the MS ActiveSync is properly set.
(2) Check whether it connects with other cables or cradle, customer’s cable might be damaged.
(3) Check the external appearance of the connector on the unit whether it is physically damaged.
(4) Replace Main Board if necessary.
(5) Once the defective part has been identified, verify it again with the defective part whether the symptom
could be duplicated.
10.7 Wireless Connection (GSM / GPRS / BT /) not possible
(1) Make sure the user has been contacting the Carrier for SIM Card validation and activation.
(2) Make sure the Wireless Connection Settings has been properly set.
(3) Make sure the SIM Card is properly inserted to the SIM compartment. Make a life call or test it with the
RF Test Station (Antenna Test).
(4) Dismantle the Main Unit and check whether the Antenna cover is properly installed.
(5) Try with another Antenna cover.
(6) Try with another Main Board if necessary.
TechFaith Confidential Proprietary Page 54 of 54
Page 55

PUMA_T_FLY TechFaith Confidential Proprietary Version 1.0
Service Manual
(7) Once the defective part has been identified, verify it again with the defective part whether the symptom
could be duplicated.
10.8 Main Batt ery does not start
(1) Make sure the Battery cover is closed properly.
(2) Connect to the AC Adapter and see if it takes charge. Also check AC Adapter condition.
(3) Check whether AC Adapter is functioning properly.
(4) Check whether the condition of Battery Charging status is correct.
(5) Dismantle the unit and check the appearance of Battery cover.
(6) Try with another Main Board or Replace Main Board if necessary.
(7) Once the defective part has been identified, verify it again with the defective part whether the symptom
could be duplicated.
10.9 Battery discharges quickly even after fully charged
(1) Make sure the Battery Pack takes fully charge with AC Adapter.
(2) Check whether the condition of Battery Charging status is correct.
(3) Dismantle the unit and check the appearance of Battery cover.
(4) Try with another Battery or Replace Battery if necessary
(5) Try with another Main Board or Replace Main Board if necessary.
(6) Once the defective part has been identified, verify it again with the defective part whether the symptom
could be duplicated.
10.10 Main Battery does not recharge
(1) Make sure the Battery takes fully charge with AC Adapter.
(2) Check whether the condition of Battery Charging status is correct. Charge should be done in no more
than 3 hours.
(3) Dismantle the unit and check the appearance of Battery cover.
(4) Try with another Battery or Replace Battery if necessary
(5) Try with another Main Board or Replace Main Board if necessary.
(6) Once the defective part has been identified, verify it again with the defective part whether the symptom
could be duplicated.
10.11 No Sound from Speaker or Distorted sound
(1) Check “Sound & Notifications” Settings in the unit for Sound Enabling.
(2) Make sure it’s not MUTED.
(3) Dismantle and Check whether the Speaker is properly installed (Orientation)
(4) Make sure the connection point between MB and Speaker is free from contamination or dust.
TechFaith Confidential Proprietary Page 55 of 55
Page 56

PUMA_T_FLY TechFaith Confidential Proprietary Version 1.0
Service Manual
(5) Replace Speaker if necessary.
(6) Replace Main Board if necessary.
(7) Once the defective part has been identified, verify it again with the defective part whether the symptom
could be duplicated.
(8) Replace Camera if camera function was defect at the same time.
10.12 No Recorded Sound or Distorted sound
(1) Check “Sound & Notifications” Settings in the unit for Sound Enabling.
(2) Make sure it’s not MUTED.
(3) Dismantle and Check whether the Microphone is properly installed (check or missing rubber)
(4) Replace Microphone if necessary.
(5) Replace Main Board if necessary.
(6) Once the defective part has been identified, verify it again with the defective part whether the symptom
could be duplicated.
10.13 Bezel, Housing Cosmetic damage
(1) Unless it is for Refurbishment, all Bezel, housing replacement due to cosmetic damage shall treat as out
of warranty
TechFaith Confidential Proprietary Page 56 of 56
 Loading...