

Page 1

1
F40
User’s Manual
ALL RIGHTS RESERVED
© 2013. All rights are reserved. No part of this document may be
reproduced without permission.
While all efforts have been made to ensure the accuracy of all contents in
this User’s Manual, we assume no liability for errors or omissions or
statements of any kind in this User’s Manual, whether such errors or
omissions or statements are a result of negligence, accidents, or any
other cause. The contents of this User’s Manual are subject to change
without notice.
Protect our environment! We strive to produce products in compliance
with global environmental standards. Please consult your local
authorities for proper disposal.
Note: Specifications and information in this User’s Manual are furnished
for information only and are subject to change without prior notice. These
should not be construed as a commitment or a certificate of technology.
FLY mobile phones assumes no responsibility for any errors or omissions
that may appear in this manual.
Page 2

2
Table of Contents
ALL RIGHTS RESERVED ...................................................................... 1
1.SIM CARD ........................................................................................... 4
1.1 About SIM Card ...................................................................... 4
1.2 Installing and Uninstalling the SIM card……………………...5
2. T-FLASH CARD ..................................................................................... 5
3. INSTALLING AND UNINSTALLING THE BATTERY ......................................... 6
QUICK USER GUIDE ............................................................................. 7
1. POWER ON/OFF .............................................................................. 7
2. TURN ON /OFF SCREEN ................................ ................................... 8
3. LOCK AND UNLOCK ................................................................ .......... 8
4. SWITCH DESKTOPS .......................................................................... 8
5. HOT BUTTONS ................................................................................. 8
6. DESKTOP MENU .............................................................................. 9
7. MAIN MENU ..................................................................................... 9
8. MOVE APPLICATIONS ........................................................................ 9
9. DELETE APPLICATIONS ................................................................ ..... 9
10. NOTIFICATION BAR ........................................................................ 9
11. STATUS BAR ............................................................................... 10
12. ADD TO HOME SCREEN ............................................................... 10
13. BLUETOOTH CONNECTION ........................................................... 10
14. WLAN CONNECTION .................................................................. 10
15. INPUT METHODS ......................................................................... 11
16. DESCRIPTION OF KEYS ................................................................ 11
BASIC FUNCTIONS ............................................................................. 11
1. DIALER INTERFACE ......................................................................... 11
2. DIAL A CALL ................................................................................ 11
3. CONTACTS .................................................................................... 13
4. CALL LOG ................................................................ ...................... 16
6. MESSAGES .................................................................................... 16
Page 3

3
7. BROWSER ..................................................................................... 17
8. SEARCH ........................................................................................ 18
9. EMAIL ........................................................................................... 18
10. MUSIC ....................................................................................... 20
11. GALLERY ................................................................................... 21
12. MOVIES ..................................................................................... 22
13. CAMERA .................................................................................... 22
14. FM RADIO ................................................................ .................. 23
15. SOUND ...................................................................................... 23
16. FILE ........................................................................................... 23
17. LABEL ........................................................................................ 25
18. CLOCK ....................................................................................... 26
19. CALENDAR ................................................................................. 26
20. CALCULATOR .............................................................................. 26
21. SETTINGS .................................................................................. 27
TROUBLESHOOTING……………………...………….…………35
SAFETY……………………………………………………….……40
TECHNICAL SPECIFICATIONS…………………………..……..41
Page 4
4
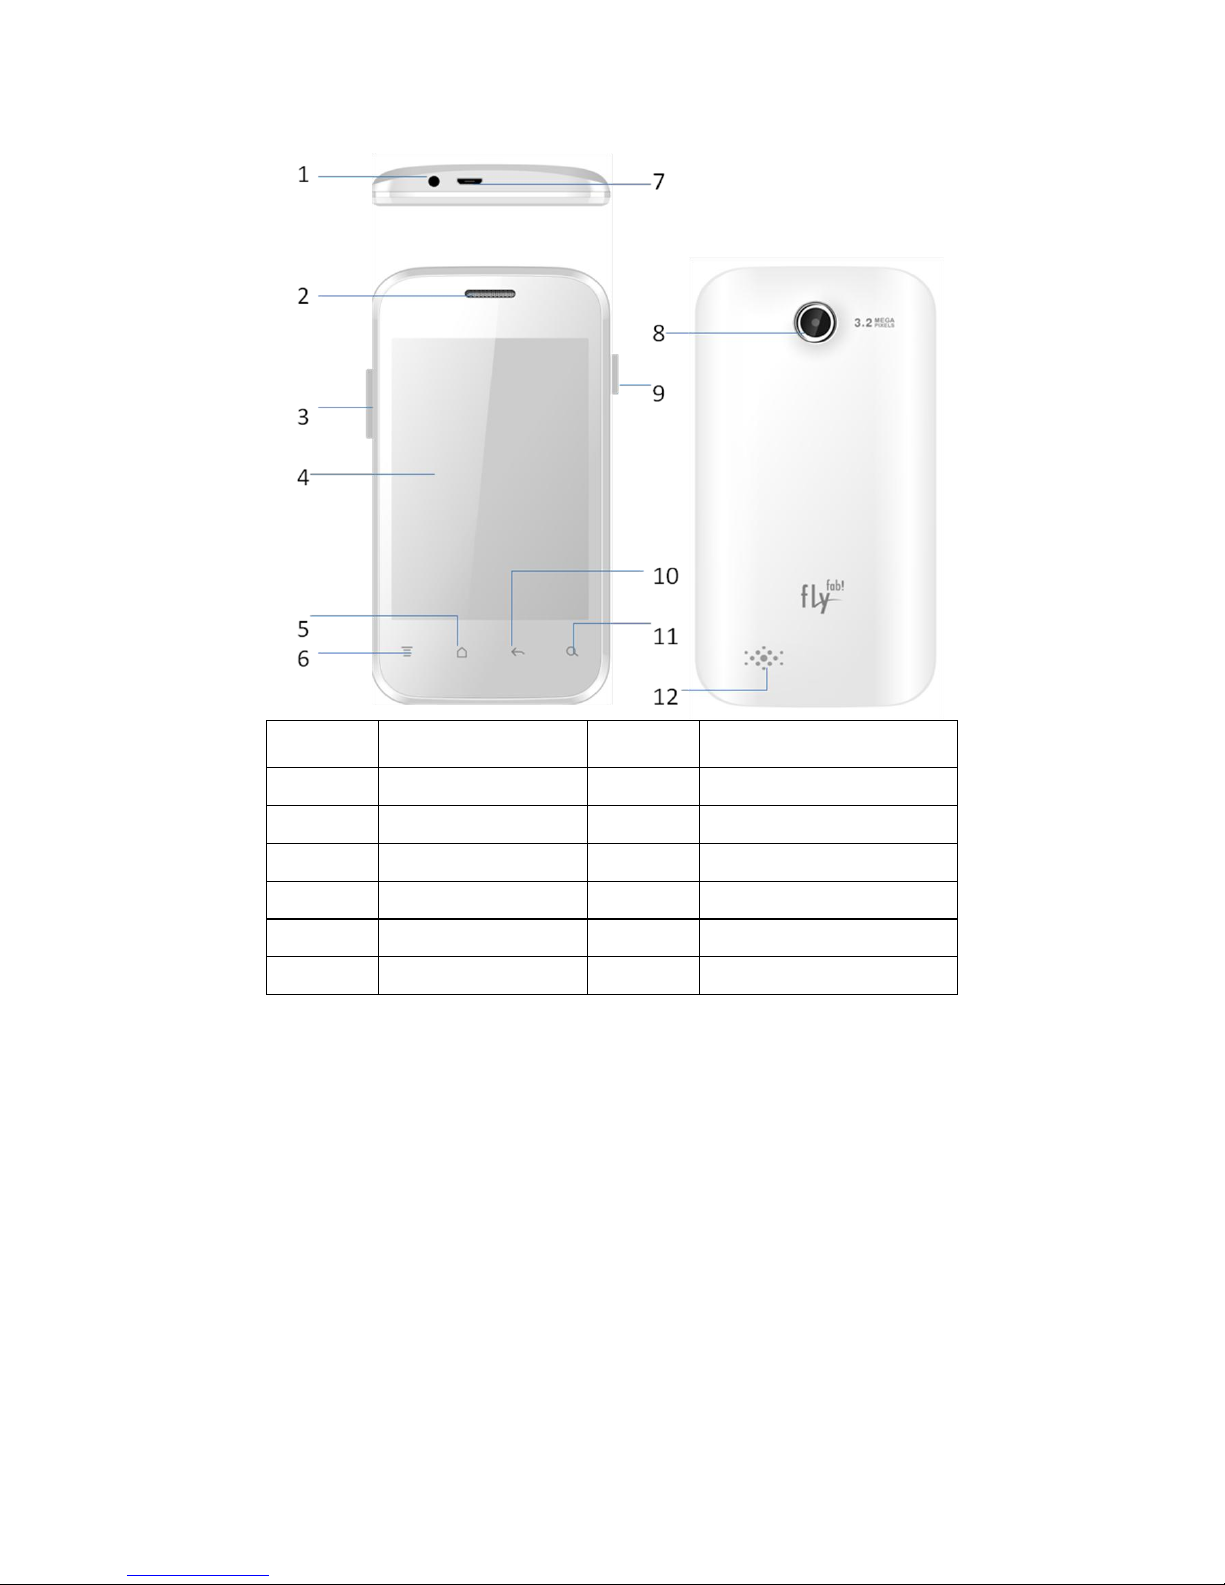
About Phone
Sno.
Description
Sno.
Description
1
Audio Jack
7
USB Jack
2
Receiver
8
Camera
3
Volume Key
9
Power ON/ OFF
4
Screen
10
Back
5
Home
11
Search
6
Menu
12
Speaker
1.SIM Card
1.1 About SIM Card
Before using the phone, you must insert a valid SIM (Subscriber
Identity Module) card(s) in the phone. A SIM card is provided by the
network service provider.
All the information related to a network connection is recorded in the
chip of SIM card. Also the names, telephone numbers and SMS that
you choose to save are recorded in the SIM card. You can take out
SIM card from your phone, and use it in any GSM mobile phone
Page 5
5
(Most new mobile phones will read/recognize the SIM card
automatically).
In order to avoid losing or damaging the information saved on the SIM
card, please don’t touch the metal contact surface of the SIM card, and
place it away from electricity and magnetic force. You will not be able to
use the phone if the SIM card is damaged.
Prompt: Before inserting and taking out the SIM card, always make
sure that the phone is switched off and disconnected from any
external power source; otherwise both the phone and the SIM card
may be damaged.
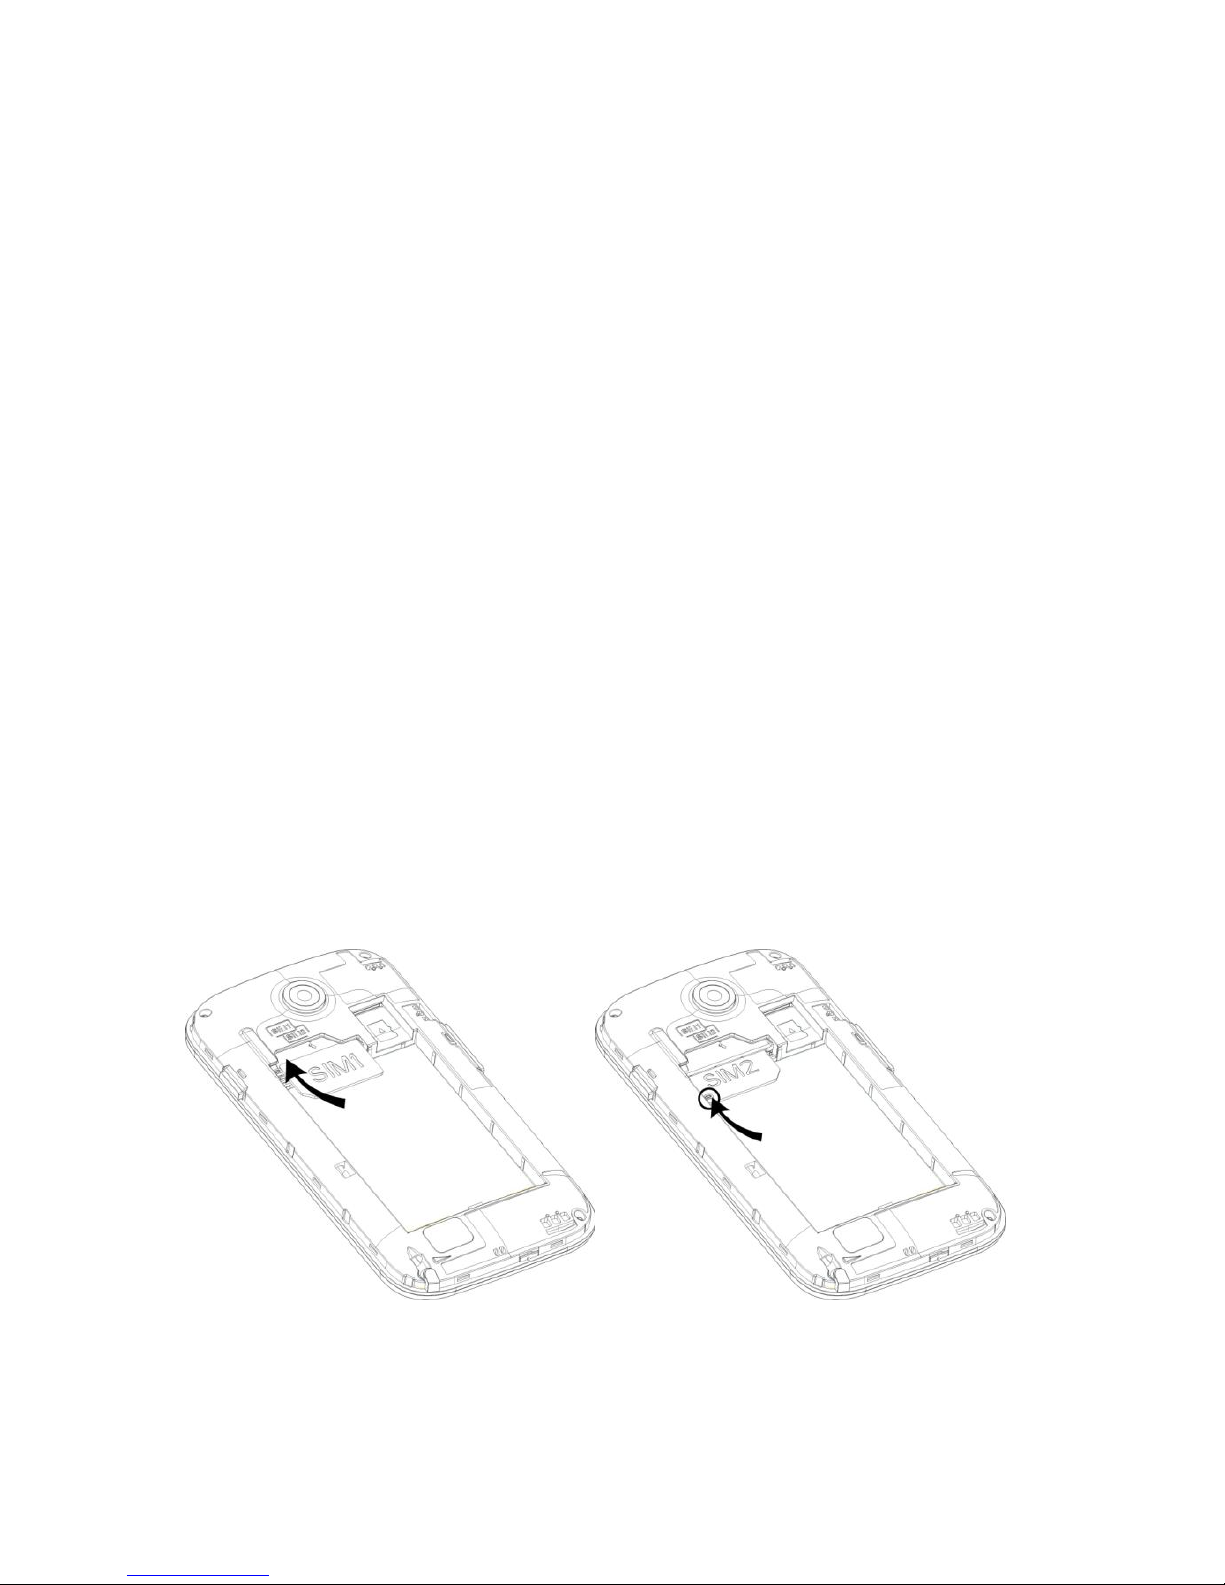
1.2 Installing and Uninstalling the SIM Card
Metal contact surface of SIM card is easily damaged by scratching.
You must be careful while trying to assemble it.
Power off the phone, remove the rear cover, battery or other external
power supply. Align the beveled corner of the SIM card with the SIM
card slot and insert the SIM card into the slot with its golden metal
contacts facing downward.Your phone supports two SIm cards, you
may install the other SIM card in the similar fashion.
To remove the SIM card, swich off the phone, disconnect any
external power source, remove the battery and directly pull the SIM
card outward..
Prompt: Without special explanation installing both the SIM cards is
defaulted in the manual. If only one SIM card is installed, some menu
options might be hidden/ won’t show.
2.T-Flash Card
To store additional multimedia files, you must insert a T-flash/
memory card. To insert a T-flash card remove the back cover and the
Page 6
6
battery. Insert the card gently with its metal contacts facing
downwards. Replace the battery and the back cover.
To remove the T-flash card, first unmount the same for safe removal
In idle mode, open the applications list and select
Settings>Storage>Unmount SD card Remove the back cover and
the battery. Gently pull the T-flash card out.
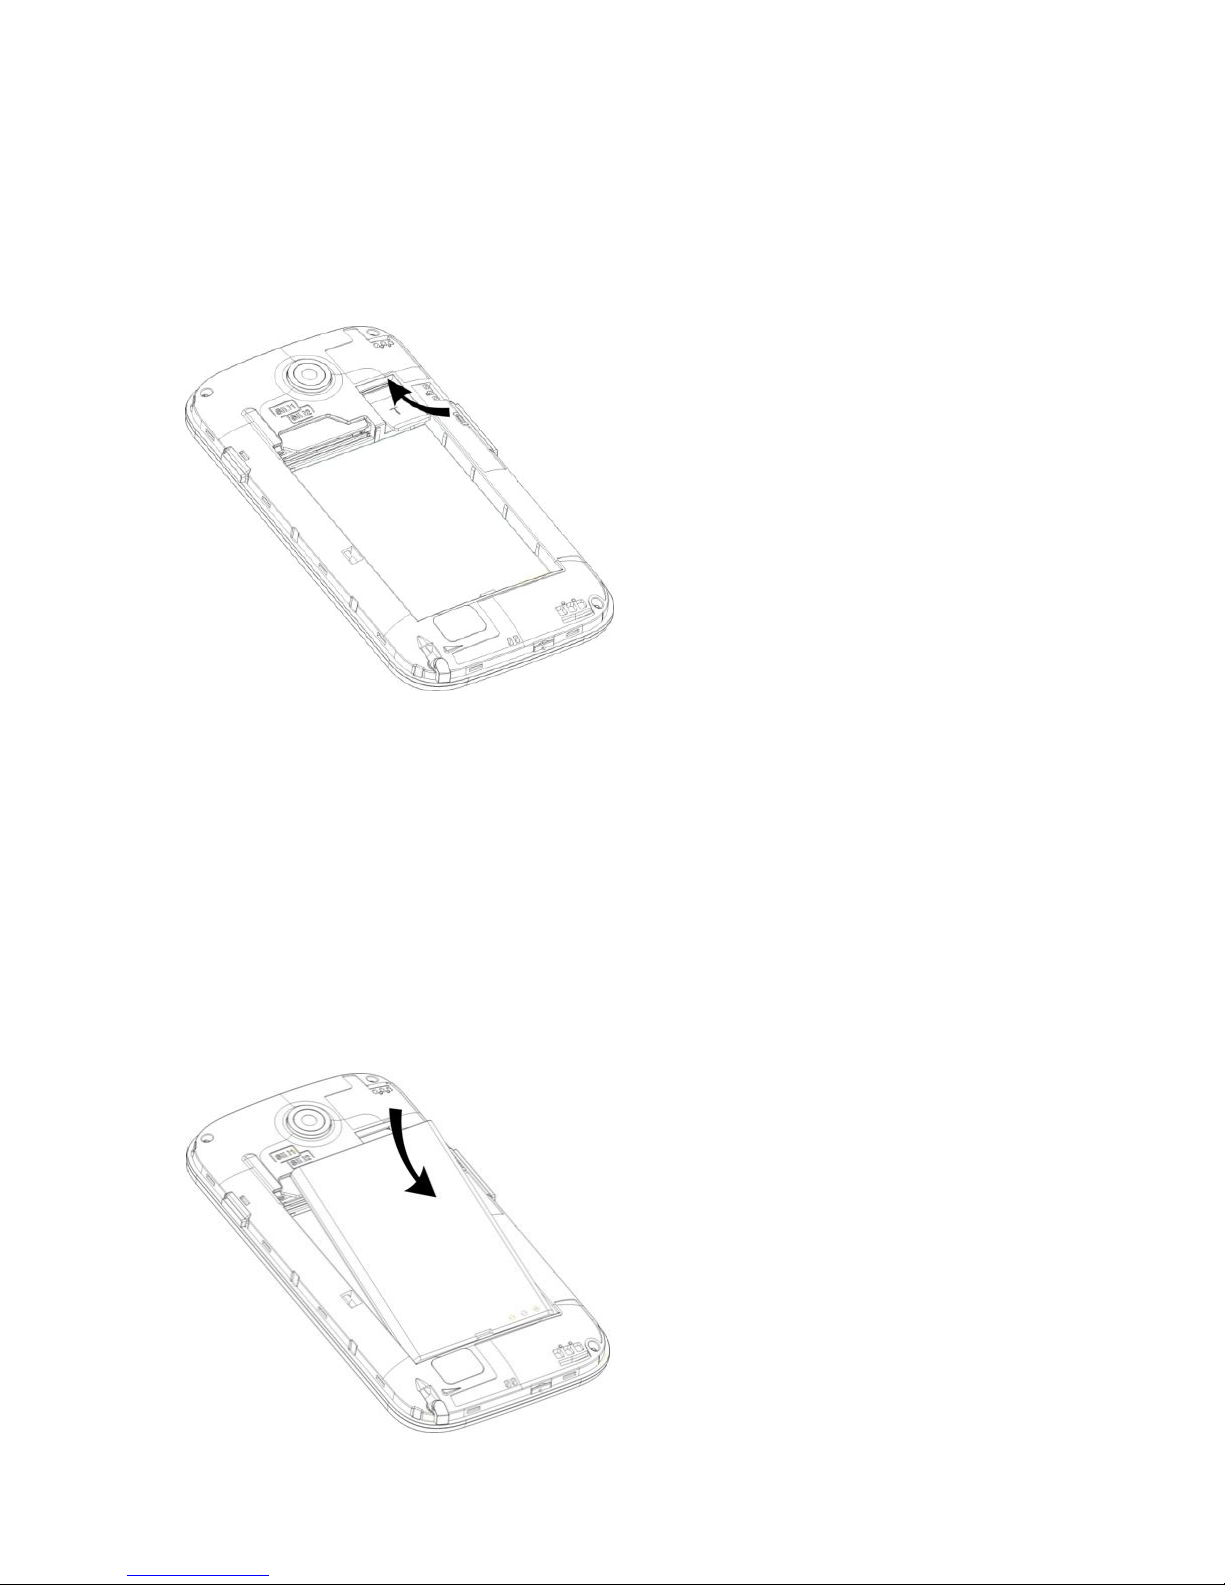
3. Installing and Uninstalling the
Battery
To install the battery, remove the back cover of the phone. Align the
golden contacts of the battery with the contacts on the battery
compartment of the phone. Gently snap the battery down in place.
To uninstall, flip the battery out of the battery compartment.
Page 7

7
4. Charger
Insert the charger into the charging interface at the top of the phone.
Connect the charger to an AC wall socket. The battery strength
indicator icon at the top right corner of the screen starts scrolling,
indicating that the charging is in process. When the batteryis fully
charged the icon stops scrolling.
Prompt: In order to ensure normal operation of the phone, please
make sure to use only the approved chargers. Failing to comply with
this will violate the Limited Warranty terms and conditions of your
phone
5.1USB Disk Identification
After a USB disk is inserted, you can deal with data in USB disk after
its light is on. Please refer to “File Manager” for the usage of USB
Disk.
5.2Transferring Data With Computer
4.2.1 Install USB
Connect mobile phone to a computer with a USB cable, drag down
the Notification bar. Touch “USB Connected”, choose and click “USB
Storage”, then on the computer, you can view data in Device and SD
Card storage. So data transfer can be performed between this device
and the computer.
4.2.2 Disconnect USB
After data is mounted onto the computer, you can drag down the
Notification bar, touch to turn off “USB Storage”, and then disconnect
with USB link.
Prompt: It is forbidden to disconnect USB link during transferring
data, because it can lead to data loss or damage.
Quick User Guide
The phone supports not only the basic functions of a mobile phone,
but also supports rich, practical and rapid feature functions, which
can be briefly introduced as follows:
1. Power On/Off
In the power-off mode, long press [Power] key, to switch on the
phone. In the power-on mode, long press [Power] key, and choose
Power off to switch off the phone. If you have set up SIM lock or
Page 8

8
phone lock, please input the code according to the requirements.
In any other interface, short press this button to lock the screen.
2. Turn On /Off Screen
2.1 Turn Off Screen
Please short press [Power] to turn off the screen to save power.
Prompt: To save power, you can also set screen timeout duration
under Display Settings.
2.2 Turn On Screen
When the screen is off, please short press [Power] to wake up the
screen.
3. Lock and Unlock
3.1 Lock
Please press [Power] to lock this screen to prevent some
unexpected operations.
Prompt: If screen timeout time is set in system settings, this
computer will turn off and lock its screen during the standby time if it is
idle.
3.2 Unlock
After the screen is off, please press [Power] to wake up the screen,
and then drag the slider towards right to unlock the screen.
Prompt: There are three sliders to open a specific phone
menu-Message, Dialer or Applicions menu.
4. Switch Desktops
In the idle mode, you can slide to switch between Home Screens. On
this device you can custttomize up to 7 Home Screens.
5. Hot Buttons
On the Shortcut bar, touch button to enter the Dialer interface;
touch button to enter the Contacts interface; touch button
to enter Message interface; touch button to enter the Main
Page 9

9
Menu.
6. Desktop Menu
On the desktop, press [Menu] key, you can display options, including:
Add, Edit, Manage applications, Settings, Search, Wallpaper.
Touch and choose one to operate the corresponding functions.
7. Main Menu
In Main Menu interface, you can slide the screen left and right to
browse all the applications. Touch and choose one, you can enter
and run this application.
8. Move Applications
Choose a desktop, touch button to enter Main Menu, long press
an application, drag it onto the free area of the desktop. You can
create this application shortcut on the current desktop. Like this, you
can create any favorite application shortcut onto the 1st-7th desktop.
Prompt: Before creating an application shortcut, you ensure that
there is free space to place this App. on this desktop.
9. Delete Applications
On the current desktop, long press an application shortcut, drag it
onto the top dustbin, you can delete this application shortcut from the
current desktop.
10. Notification Bar
On any interface, drag the screen downward from the top, you can
display Notification bar; then drag the screen upward from the bottom,
you can hide the notification bar.
You can operate the following on Notification bar:
10.1 SIM Card Info.
You can view the operator information of SIM 1 and SIM 2 on
Notification bar.
10.2 Running App.
You can view the running applications on Notification bar.
Tips: In any interface, long press【Home】,it displays the pop-up box
Page 10

10
of “Recent Apps and Running Apps”. Touch the option of “Recent
Apps” ,you can view the recently running applications, choose and
click one, you can enter directly this application; Touch “Running
Apps” to view the currently running applications, click one to kill it
from progress.
10.3 USB Status
You can view USB connection state.
10.4 View Notifications
After dragging downward Notification bar, you can view the
notifications of new SMS & Call & Email, etc. Touch an option to enter
its view interface.
On notification interface, touch [Clear] button, to clear any SMS,
MMS, Email, Missed Calls, WLAN or Bluetooth notifications.
Tips: After touching [Clear] button, you can’t clear the notifications of
the running applications.
11. Status Bar
On the LCD top of the idle interface, it is Status Bar. You can’t
operate the status bar, it displays some relevant information,
including: WLAN, Bluetooth, Battery power, System time, etc.
12. Add to Home Screen
You can customize the idle screen by adding shortcuts to applications or
items in applications, widgets, or folders. To add items to the idle screen:
In idle mode on the desktop, tap and hold a blank area, or press
[Menu]> Add to display “Add to Home Screen”, and then operate the
following: Shortcuts: Add Shortcuts to items such as applications,
bookmarks, and contacts
Widgets: Add widgets to the idle screen
Folders: Create a new folder or add folders for your contacts.
Wallpapers: Set a background image
13. Bluetooth Connection
This device supports Bluetooth 2.0, you can listen to music with
Bluetooth earphone. About Bluetooth settings and operations, please
refer to the section of Bluetooth in System Settings.
14. WLAN Connection
This device supports “Wi-Fi 802.11 b/g/n”. You can access to the
local network through Wi-Fi. About Wi-Fi settings and operations,
Page 11
11
please refer to the Wi-Fi section in System Settings.
15. Input Methods
This mobile phone is embeddedwith an“ Android Keyboard”.
Long press any input field to display the pop-up box of “Edit Text”,
then touch “Input Method” to display the pop-up box of “Select Input
Method”. You can click and choose the input method of “Android
Keyboard” or “Lomoxo inputmethod”. In system settings, you can set
Input languages, it supports english languages input.
16. Description of Keys
Key
Function
[ Menu ]
Button
Short press to display options box.
[ Home ]
Button
Short press to return to the desktop. Long
press to view the latest task.
[ Back ] Button
Press to return to the previous screen.
[Search ]
Button
Press to return to the search interface.
[ Volume ] Key
Press [Volume+] to turn the call voice louder;
press [Volume-] to turn it lower.
[ Power ] Key
Long press [Power] key to power on or off
mobile phone.
Short press [Power] key to end an ongoing
call. or to cancel the ringtone when there is
an incoming call.
Short press [Power] key to turn off & lock the
screen in any interface. Press again to activate
the screen.
Basic Functions
1. Dialer Interface
In the idle mode, click to enter Dialer interface.
2. Dial a Call
Page 12

12
2.1. Calls Category
2.1.1. Emergency Call
You can directly dial an emergency service call without SIM card.
Different network uses different emergency numbers, please consu.lt
your network operator for more details. Emergency calls from your
device may not be possible in some areas or circumstances. Before
traveling to remote areas, plan an alternative method of contacting
emergency service personnel
2.1.2. Domestic Call
Enter a phone number and choose SIM1 or SIM2 to make a call with
the desired SIM card.. If you're making a long-distance call, you
would be required to prefix a 0 in case of a mobile number or the area
code in case of a landline number.Tap
to make a call after
entering the desired number.
2.1.3. Extension Dial
After entering a telephone number, press [Menu] to perform the
following operations:
Add to Contacts:You can save the number that you have input
to store in to the phonebook.
Add 2-Sec Pause: Enter the host number, click “Add 2-Sec
Pause”, then enter extension number, choose SIM1 or SIM2,
after dialing the host number, pause for two seconds to dial the
extension number.
Add Wait: Enter the host number, click “Add Wait”, then enter
extension number, choose SIM1 or SIM2 after dialing the host
number, pause for the waiting time to dial the extension number.
Send text message: You can send a sms to the number that
you have entered.
2.1.4. International call
Press and hold 0 to enter +. Enter country code, area code (without
"0") & telephone number, choose SIM1 or SIM2 to make an
international call by SIM1 or SIM2.
2.1.5. Dial Contact Number
After entering Contacts list, choose a contact, select SIM1 or SIM2 to
make a call by SIM1 or SIM2.
2.1.6. Dial Call-log Number
Enter the Call Log menu, choose a call record, click , then
Page 13
13
choose SIM1 or SIM2 to make a call by the desired SIM.
2.2. Answer a Call
When an incoming call arrives, the phone will give out the
corresponding prompt (such as vibration, ringtone, and etc.).If the
network supports the feature, the phone screen will display the
telephone number and the name (if saved in the phonebook) of the
caller.Slide rightward to answer this call.
2.3. Refuse a Call
When a call is coming in, slide leftward to reject this call.
2.4. End a Call
After finishing a call, click to disconnect.
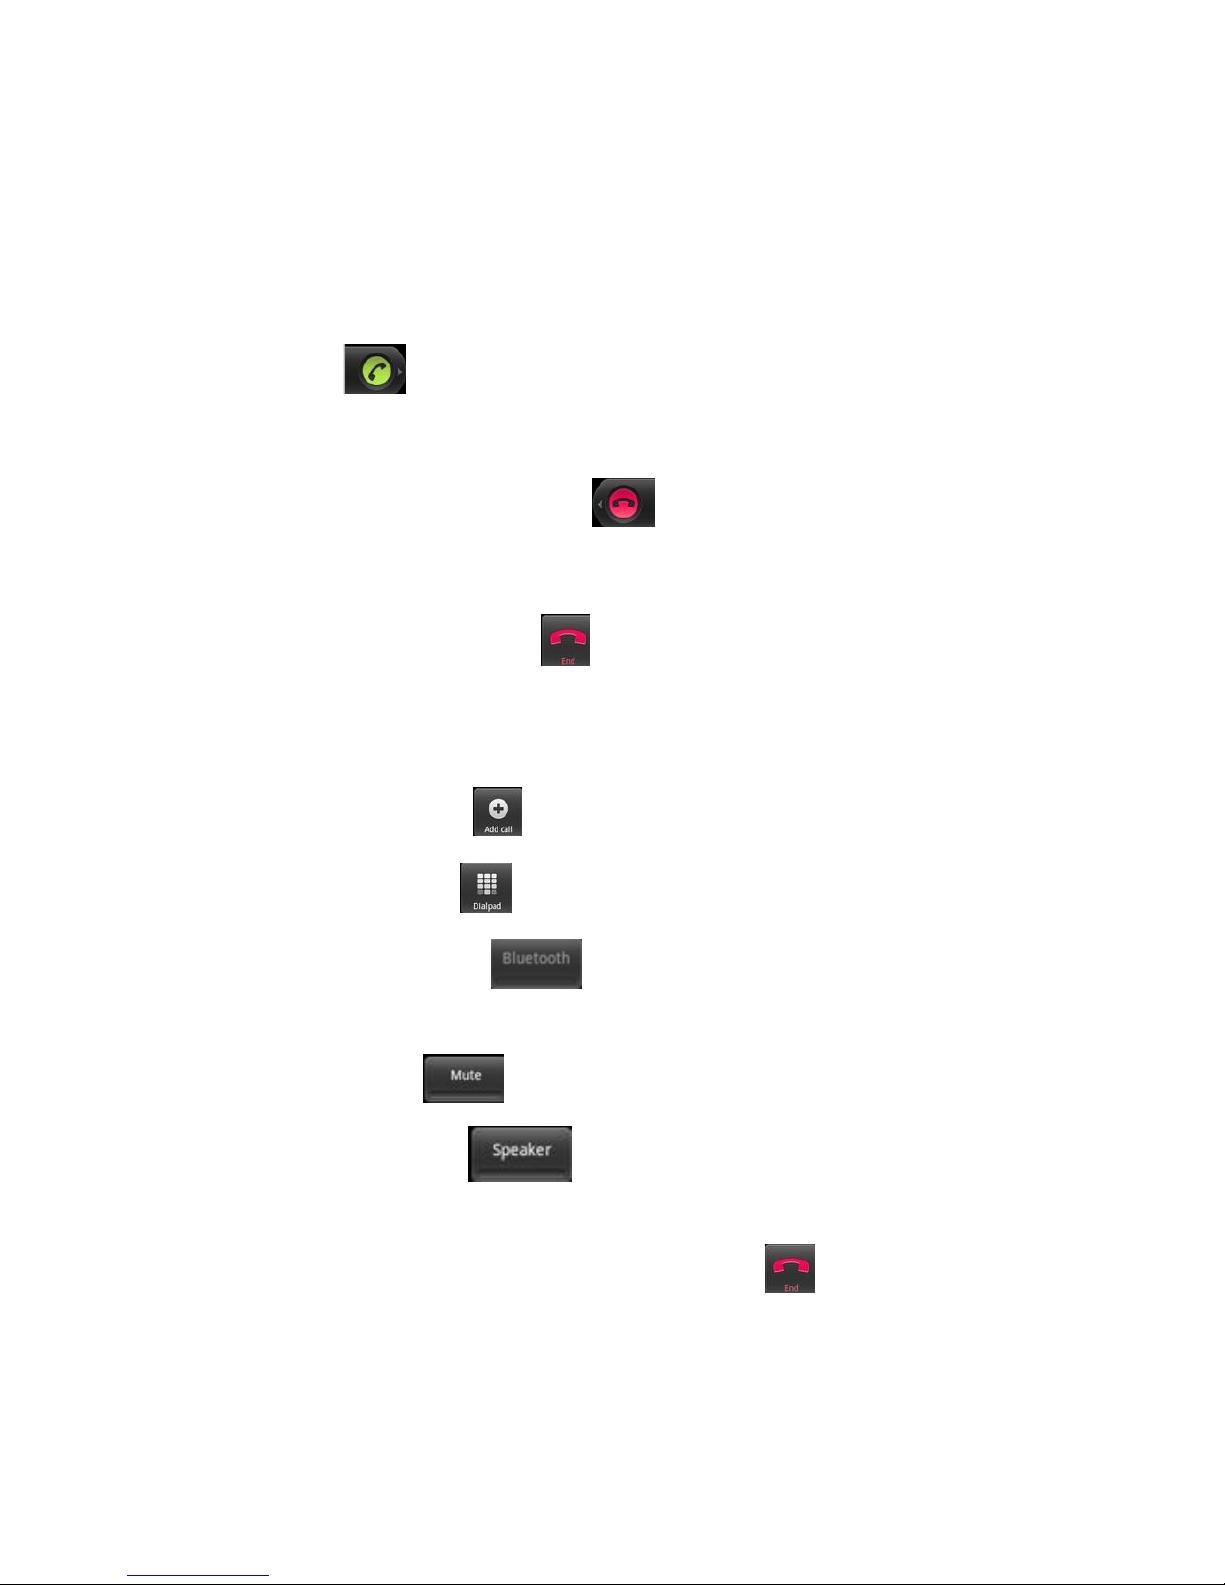
2.5. Call Operation
During a call, touch screen to operate the following:
Add Call: Click , enter a phone number, add another call.
Dialpad: Click to display Dialpad interface.
Bluetooth: Click , open Bluetooth device, switch call
voice to a Bluetooth headset.
Mute: Click to put an ongoing call on mute.
Speaker: Click , switch call voice to Speaker; click it
again to switch call voice to Receiver.
End Call: When finishing a call, touch to end call.
3. Contacts
This function could help you browse the name card holder, store, edit
and delete the names and phone numbers in the phone and SIM card.
Page 14

14
In contacts list, click “Contacts” or “Call log” or “Favorites”, it switches
among Contacts & Call log & Favorites.
3.1. Contacts List
In contacts list, press [Menu] button, perform the following functions:
3.1.1. Search
Search contacts by key words stored in phone and SIM cards or
scroll up and down on the contact list.
3.1.2. New Contact
Create contacts in SIM1,SIM2 & Phone.In idle mode, open the
applications list and select. Enter a phone number, tap
>
NEW.Select a memory location and create a contact
3.1.3. Display Options
Set contact list display style.
Only contacts with phones
Only display contacts that have phone numbers in contacts list.
Sort list by
Set contact names to display.
First Name: Sort contacts by their first names.
Last Name: Sort contacts as by their last names.
View contact names as
Set view style of contact names.
First Name First: Display contacts as their first names first.
Last Name First: Display contacts as their last names first.
Choose contacts to display
Set classification of contacts to display in contacts list.
Phone: Only display contacts in Phone.
SIM1: Only display contacts in SIM1.
SIM2: Only display contacts in SIM2.
3.1.4. Contacts Group
Set contact group, such as Student, Friend, Family, Colleague.
3.1.5. Contacts Delete
Delete one or some or all contacts.
3.1.6. More
Page 15

15
Accounts:
Accounts & Sync Settings: Set the way of “background data”
or Auto-Sync.
Manage Accounts: Add or delete accounts from Corporate or
Facebook,Google.
Import/Export:
Import from SD card: Import contacts from SD card.
Export to SD card: Export contacts to SD card.
Import from SIM1: Import contacts from SIM1.
Export to SIM1: Export contacts to SIM1.
Import from SIM2: Import contacts from SIM2.
Export to SIM2: Export contacts to SIM2.
Share visible contacts: Share visible contacts by Bluetooth or
Email or Messaging.
Memory Query
Show the memory query of Phone, SIM 1, SIM 2.
Black List:
Add some phone numbers into black list, to block them from
calling you up.
3.2. Long Press Options
In contacts list, long press a contact, display Options menu, perform
the following: View contact, Call contact, Text contact, Add to
favorites, Import to phone, Export to SIM1/SIM2 card, Edit
contact, Delete contact, Divide, Send contact by SMS, Send
contact by MMS, Send contact by BlueTooth, Send contact by
Email, Add to blacklist and so on.
3.3. Contacts View
On contacts view interface, press [Menu], perform the following
functions: Edit contact, Share contact, set Options such as
specific ringtone for the contact, Delete contact.
3.3.1. Dial Contact number
On contacts view interface, click , dial this contact phone number
by SIM1 or SIM2.
3.3.2. Send Message
Page 16

16
On contacts view interface, click , enter message edit interface,
input message content, send a message to this contact’s phone
number by SIM1 or SIM2.
4. Call log
Enter Call log.
4.1. Call log list
After entering Call log, it displays all call records. Touch to chose All
calls, Missed, Outgoing or Received call log.
4.2. Call log Details
On call record details, click to dial this call record number by
SIM1 or SIM2. Click , enter message interface, input message
content, send a message to this contact by SIM1 or SIM2. Click ,
add to contacts.
4.3 Call Log Interface
In the call log interface, press [Menu] for the following options:
4.3.1 Display Options
Set call log display options. Chosse to diplay calls log of SIM 1 or SIM
2 or both.
4.2.3 Clear call log
Delete call records from call log.
4.2.4 Black List
Add some phone numbers into black list to choose to bar them from
calling or messaging you.
5. Messages
On Main menu interface, enter “Messages”.
5.2 Messages List
Page 17

17
On messages list, touch “New Message” to enter message edit
interface. Touch a message to enter its view.
5.2.1 Options menu
On messages list, press [ Menu ] to display options menu, operate
the following:
Folder view: Choose to view in different Folder format or
Message format by selecting the desired option.
Compose: Enter message edit interface, enter the recipient’s
number and content, choose SIM1 or SIM2, to send message by
SIM1 or SIM2.
Delete threads: Delete all messages.
Search: Search message with key words.
Settings: Set Messaging settings, include Storage settings, Text
message (SMS) settings, Multimedia message (MMS) settings,
Notification settings, Forwarding settings, Font setting.
Cell Broadcast SMS:You can check the CB message here which
you received.
5.2.2 Long Press Menu
Long press a message, display its long press Menu.
View thread: View message content.
Add to contacts: Add the contact.
Delete thread: Delete message content.
5.3 Messages View
On message list, touch a message to enter its content interface. On
message view, press [ Menu ] to display options menu, operate the
following: Call, Add subject, Attach, Insert contacts, Insert smiley,
More.
6. Browser
On Main menu, enter and run Browser, to access the desired
webpage.
Press [ Menu ] to display options menu, operate the following:
New Window:Open a new window, and view the corresponding
website.
Bookmarks: Access bookmark page, add or delete bookmarks,
browse “History” or “Most Visited” .
Windows: Access to the window page, add or delete a window.
Refresh: Refresh webpage.
Stop: Stop webpage.
Exit: Exit webpage.
More: Include Forward, Add bookmark, Goto homepage, Find
on page, Select text, Page info, Share page, Downloads,
Page 18

18
Save page, Look Offline Page, Oma Download, Full screen
switcher, Settings.
7. Search
On Main menu, access Google Search, enter key words, the matched
result will display below, click ,perform the corresponding
operations. You can search All, Web, Apps or Contacts.
8. Email
On Main menu, enter Email. You can use this device to receive or
send your Email anywhere or at any time post the necessary email
account configuration.
Note: E-mail can be used normally when the wireless network is well
connected.
8.2 Create Account
When entering Email for the first time, it will directly enter new
account edit interface, input Email address, password, choose the
corresponding parameters of POP3, IMAP & Exchange Server, then
touch [Next], through POP3 and SMTP server detection, complete
Email account creation.
8.3 Accounts List
After creating accounts, access to accounts list. Click "Combined
Inbox", view all the mails of the accounts ; Click “Starred” , view all the
starred mails; Click , access to the Mailbox list of the current
account.
8.3.1 Options menu
On accounts list, press [ Menu ] to display options menu, operate the
following:
Refresh: Refresh and receive Emails.
Compose: Enter mail edit interface, write mail content, and then
send an email.
Add Account: :Create/ add an Email account.
8.3.2 Long Press Menu
On accounts list, long press an account, display options menu,
operate the following:
Open: Access to the current account mailbox.
Page 19

19
Compose: Enter Email interface, write Email content, and then
send an email.
Refresh: Refresh and receive Emails of the current account.
Account Settings: Access to Email settings.
Remove account: Delete the current account.
8.4 Inbox
On accounts list, click an account, and enter its inbox.
8.4.1 Options menu
On inbox interface, press [ Menu ] to display options menu, operate
the following:
Refresh: Refresh and receive Emails of the current account.
Compose: Enter mail edit interface, write Email content, and then
send an Email.
Folders: Access to Mailbox of the current account.
Accounts: Access to accounts list.
Account Settings: Access to account settings.
General Settings:
Account Name: Edit account name.
Your Name: Edit your name.
Signature: Edit signature.
Inbox Check Frequency: Set check frequency, e.g. Never,
Every 5 minutes, Every 10 minutes, etc.
Default Account: Set the current account as the default Email
account.
Notification Settings:
Vibrate: Set the device to vibrate to notify a new Email.
Select Ringtone: Set Email notification ringtone.
Server Settings:
Incoming Settings: Edit the corresponding parameters of the
incoming server.
Outgoing Settings: Edit the corresponding parameters of the
outgoing server.
8.4.2 Long Press Menu
In the inbox list, long press an email, display options menu, operate
the following:
Open: Access to the current Email view.。
Delete: Delete the current Email.
Forward: Forward the current Email to others.
Reply all: Reply to all the recipients of the current Email.
Reply: Reply to the sender of the current Email.
Mark as unread: Mark the current Email as unread.
Page 20

20
8.5 View Email
In the inbox list, click an Email, and enter its view interface.
On mail view interface, slide the screen up and down to view its
content. Touch [ Open ] button to play the attachment, touch [ Save ]
button to save the attachment. Touch [ Reply ] button to reply to the
sender; touch [ Reply all ] button to reply to all the recipients; touch
[ Delete ] button to delete the mail.
On mail view interface, press [ Menu ] to display options menu,
operate the following:
Delete: Delete the current Email.
Forward: Forward the current Email to others.
Reply: Reply to the sender of the current Email.
Reply all: Reply to all the recipients of the current Email.
Mark as unread: Mark the current Email as unread.
8.6 Compose
In the accounts list or mails list, press [ Menu ], touch “Compose”,
and enter Email edit interface. Input recipient & Title & content, touch
[ Send ] button to send this Email, or touch [Save as draft ] to save it
as a draft, touch [ Discard ] button to give up editing.
On Email edit interface, press [ Menu ] , display options menu,
operate the following:
Add Cc/Bcc: Add Cc/Bcc to the Email.
Send: Send the Email.
Save as draft: Save it as a draft.
Discard: Delete the Email.
Add attachment: Add attachment for this Email.
Prompt: The capacity of attachement should be less than 5 Mb
9. Music
Music player supports various audio formats, including: Midi, MP3,
amr and wav, etc.
9.2 Play Interface
On the play interface, when there are songs in the playlist, touch
to play; touch to pause. Drag the slider from left to right
to fast-forward or rewind. Touch to play the previous or
the next song. Touch to repeat playing all songs, touch to
repeat playing the current song. Touch to set shuffle on or off.
Page 21

21
Touch to access to playlist. Press [ Menu],touch to set
“Party Shuffle” on. Press [Volume] to adjust the volume.
Press [ Menu] , operate the following:
Library: Access to songs library.
Party Shuffle: Set Party Shuffle on or off.
Add to Playlist: Add the current song into playlist.
Use as Ringtone: Set the current song as SIM1 or SIM2 call
ringtone.
Delete: Delete the current song from T-flash Card.
9.3 Music library
Music library contains “Artists”, “Albums”, “Songs”, “Playlist”. Touch a
song in music library, it will start playing.
9.3.1 Long Press Menu
In the songs list, choose and long press a song, operate the following:
Play: Touch this option, start to play the current song.
Add to playlist: Add the current song into playlist.
Use as phone ringtone: Use the current song as phone ringtone.
Delete: Delete the current song from T-Flash card.
Search: Search songs from Browser or Music library.
9.3.2 Options Menu
In the songs list, press [ Menu ] , operate the following:
Play All: Start to play all the songs in library.
Party Shuffle: Set party shuffle on or off.
Shuffle All: Set shuffle all on.
9.4 Lyrics Display
If there are songs with available lyrics, when playing these songs, the
device would display those lyrics.
Note: The lyrics files must be stored in “Lyrics” folder of T-Flash card.
10. Gallery
On Main menu, enter Gallery. Touch to switch to Camera
interface.
Press [ Menu] , operate the following:
Share: Share picture folder(s) by Messaging or Bluetooth or
Email.
Delete: Delete the chosen folder(s).
More:
Page 22

22
Details: View the details of the chosen folder.
10.2 Photos
In the folders list, choose and touch a photo folder to enter, slide from
left to right to view pictures list. Touch a picture or photo to enter its
view.
10.2.1 Picture List
In the pictures list, touch to switch pictures display style,
drag to view the whole picture list.
Press [ Menu ] , operate the following:
Share: Share the chosen pictures by Bluetooth or Email or
Messaging.
Delete: Delete the chosen picture(s).
More: include Details, Rotate Left, Rotate Right.
Select All: Select all the pictures in this list.
Deselect All: Deselect all the pictures in this list.
10.2.2 Picture View
In the pictures list, choose and touch a picture to enter its view. Touch
to shrink or enlarge this picture. Touch to play
slideshow of all the pictures.
Press [ Menu] , operate the following: Share, Delete, More.
11. Movies
Enter Movies, in the folders list, choose and touch a video folder to
enter, slide from left to right to view videos list. Select the desired
video. Touch to play; touch to pause. Drag the slider
from left to right to fast-forward or rewind. Touch to
fast-forward or rewind. Press [Volume] key to adjust the volume.
12. Camera
On Main menu, enter Camera.
12.2 Camera
Page 23

23
On the findview interface, touch to take photos. Touch to
switch between back and front camera. Touch to switch
between Camera and Video recorder, Touch to preview the
photos. Touch these icons to display the parameters box. Include:
Focus mode, Exposure, Scene Mode, Preview mode, Picture size,
Picture quality, Brightness, Contrast, Color effect, Antibanding,
Capture mode, Camera Settings, White Balance, Zoom.
12.3 Video Recorder
After switching into Video Recorder, touch begin to camcorder;
touch to stop. The other operations refer to Camera.
13. FM Radio
On Main menu, enter FM Radio interface, to listen to your favourite
radio station. Please insert the handsfree to listen to the radio as the
same works as an antenna.
14. Sound
On Main menu, enter Sound Recorder. The format of recording files
is *.amr, the recording length depends on the size of T-Flash card.
Touch to record, touch to stop recording, touch to
play the recorded file in the list. Choose and long press a recorded file
to delete.
15. File
On Main menu, enter ES File Explorer.
15.2 Files / Folders List
On file explorer interface, touch or to switch
Page 24

24
between Local disk and T-Flash card; touch to enter
multi-select state, and select one or more files or folders; touch
to search audio or video or picture or other files; touch or
to switch between the list and matrix display mode; touch to
display the toolbar; Touch to exit step by step or move upwards
to previous menu..
Touch to display “Change View” option menu, choose “Local”
or “LAN” or “FTP” or “Bluetooth” or “Net”, perform the following
operations:
Local: Access Local root directory.
LAN: Access the shared directory of LAN server.
FTP: Access remote root directory of FTP.
Bluetooth: Access shared Bluetooth directory.
Net: Access shared Net directory.
15.3 Option Menu
On files or folders directory interface, press [ Menu ] to display option
menu, perform the following:
Operations: Display operations menu, including: Cut, Copy,
Rename, Delete, Select All, Set As Home, Properties.
New: Display options menu of New, including: File, Folder,
Search.
Manager: Display options menu of Manager, including: Task
Manager, App Manager, Security Manager, Bookmark Manager,
SD Card Analyst.
Show Tabs: Show the tabs of “Local” & “LAN ” & “FTP” & “Net” on
the toolbar.
Settings: Access to settings interface, include Display Settings,
View Settings, Path settings, Other settings, Root settings.
More: includes Refresh, Flip orientation, Help Centre, About
Us, Exit.
15.4 Long Press Options
On files or folders directory interface, choose and long press a file or
folder to display its options menu, perform the following:
Open As: Open this file or folder as Text or Audio or Video or
Page 25

25
Image.
Cut: Cut this file or folder.
Copy: Copy this file or folder.
Rename: Rename this file or folder.
Delete: Delete this file or folder.
Select All: Select all the files and folders in the current interface.
Shortcut: Create a shortcut of this file or folder on the desktop.
Bookmark: Create a bookmark of files on the SD card or internet
browser.
Compress: Compress the file or folder.
Share: Share this file by Bluetooth or Email.
Set As Home: Set this folder as home.
Properties: View the properties of this file or folder.
15.5 Open / Play
If there are some pictures & audio & video & other file formats in a
folder. Choose and touch one of them, perform the following
operations:
Picture file: View the picture.
Audio file: Play the audio file.
Video file: Play the video file.
Apk file: Install or replace this *.apk file.
Other format: Unable to open the file of other format(s).
15.6 LAN
In the shared directory, create a new LAN server, when it is
connected with the router , share the file or folder onto the LAN
server.
15.7 FTP
In case of connecting the router, access to remote root directory,
create a FTP server, access to the shared file(s) or folder(s) by the
remote login, operate the file(s) or folder(s), e.g. copy, move or delete
them.
16. Label
This phone supports a Note application, which can be used as a
reminder also.On Main menu, enter memo, touch to create a
note record, touch a record to view its content.
On its content view, press [ Menu ] to Delete, Refresh, Set Alarm or
Save this record.
Page 26

26
17. Clock
After entering Clock, touch to set Alarm; touch to access
Gallery; touch to access Music player; touch to return to
the desktop.
18. Calendar
On Main menu, enter Calendar. Press [Menu] to view options such as
Day, Week, Month, Agenda, Today and More
18.2 Month Display
On month display of Calendar, slide the screen up and down to view
the previous and the next month calendar. Press [ Menu ] to display
option menu, perform the following:
Day: Touch this option to switch to Day display.
Week: Touch this option to switch to Week display.
Month: Touch this option to switch to Month display.
Agenda: Touch this option to switch to Agenda list.
Today: On Month calendar, touch this option, highlight the system
date; On Agenda list, touch this option to browse today’s agenda
records.
More: Include New event, Select Date, Calendars, Settings,
Delete all events.
18.3 Day Display
On day display of Calendar, slide the screen up and down to view the
different time of the current day; slide the screen from left to right to
view the previous and the next day.
18.4 Week Display
On week display of Calendar, slide the screen up and down to view
the different time of the current day; slide the screen from left to right
to view the previous and the next week.
19. Calculator
On Main menu, enter Calculator. It supports four arithmetic
operations such as “+”, “-”, “x” and “/”.Slide the screen to switch to
advacnced panel for operations such as Sin, Cos, Tan, Ln, Log,!, π, e,
^, etc.
Page 27

27
20. Settings
In settings, you can perform: Wireless controls, Sound settings,
Display settings, Security & location, Applications, SD Card and Local
disk, Date and time, Accessibility, Speech synthesis, About phone,
etc.
20.2 Dual SIM Settings:
Standby SIM Card Setting: Set SIM1 or SIM2 or SIM1+SIM2
standby.
Data connection Setting: Set data connection of SIM1 or SIM2.
MMS Settings: Set message settings for SIM1 or SIM2 or Always
Ask.
20.3 Wireless & networks
In wireless network control, you can set Wi-Fi, Bluetooth, Networks,
VPN settings, Airplane mode, etc.
20.3.1 Airplane mode
Touch “Airplane Mode” to switch between “On” and “Off”. If Airplane
mode is On, all the wireless networks will be disconnected
automatically in this mode.
20.3.2 WLAN On/Off
Touch “Wi-Fi” to switch between “On” and “Off”.
Note: Please turn off Wi-Fi to save power when not using.
20.3.3 WLAN Settings
Set up and manage the wireless access points.
Scan WLAN: Scan and search available Wi-Fi devices.
WLAN: Same as Wi-Fi On/Off.
Network Notification: Touch this item to switch between “On”
and “Off”. If network notification is set as “On”, the owner will be
notified when an open network is available nearby.
Add WLAN network: Create a new Wi-Fi, input Network SSID
and Security, touch “Save ” to save it.
WLAN network: It lists the Wi-Fi network devices, touch one in
the list, you can perform such operations as connection,
disconnection or clear, etc.
20.3.4 Bluetooth On/Off
Touch “Bluetooth” to switch between “On” and “Off”.
Page 28

28
Note: To save power, please turn off Bluetooth when not in use.
20.3.5 Bluetooth settings
You can set Bluetooth On or off, Device name, Discoverable, Scan
for devices and list the scanned devices.
Bluetooth On/Off: Touch “Bluetooth” to switch between “On” or
“Off”.
Device Name: It displays the factory device name, touch this item
to edit the device name.
Discoverable: Touch “Discoverable” to switch between “On” or
“Off”. If it is “On”, The Bluetooth devices nearby can detect this
device.
Discoverable timeout: Set how long device will be discoverable.
Scan for devices: Touch this item to search the available
Bluetooth devices.
Bluetooth devices List: When this device finds other Bluetooth
devices , it will display them in this list, you can click one and then
input PIN for matching and connection.
20.3.6 Tethering & portable hotspot
Share your phone’s mobile data connection via USB or as a portable
Wi-Fi hotspot.
20.3.7 VPN Settings
In VPN settings, you can add a new VPN, set VPN server, enable
Encryption, DNS search domains, etc.
After adding a new VPN, touch it in the VPNs list, and you can
connect it to network.
20.3.8 Mobile Networks
In Mobile Networks, you can set Data enabled or Data Roaming or
Access Point Names or Network Operators.
Data Enabled: Activate or disable data access over Mobile
network.
Data Roaming: Set data roaming on or off.
UPLMN setting: Set USIM card settings.
Access Point Names: Choose Access Point Names.
Network Operators: Search networks by hand or automatically.
20.4 Call Settings
In Call Settings, you can set SIM1 or SIM2 call Setting or Voicemail or
Message Reject or Other call settings.
20.4.1 Call Settings
Page 29

29
Fixed Dialing Numbers
Enable FDN: Fixed Dialing Numbers are disabled or activated.
Change PIN2: Change PIN2.
FDN List: Manage phone number list.
20.4.2 Voicemail
In Voicemail, you can manage voicemail for SIM1 or SIM2.
Voicemail Service: View voicemail service of SIM1 or SIM2.
Voicemail Settings: Change voicemail number of SIM1 or SIM2.
20.4.3 Speed dial setting
Assign numbers to keys 2 to 9 on the keypad for speed dialing.
20.4.4 Message Reject
You can set the function of message reject.
Reply Message Hangup: Set Reply Message Hangup on or off.
When you reject an incoming call, it will automatically send a
message to the caller.
Automatically send information: Set Auto Replay Message on
or off.
Edit Message Content: Edit the message content to auto reply.
20.4.5 Other Call Settings
You can set call settings, e.g. Call forwarding, Additional settings,
Call barring.
Call forwarding:
After call forwarding function is activated, according to different
forward conditions settings (Always forward, Forward when busy,
Forward when unanswered, Forward when unreachable), you can
select to switch the incoming call to voice inbox or other telephone
numbers.
Call barring settings
Call barring settings include All outgoing, Outgoing international,
Outgoing international roaming, All incoming, Incoming calls when
roaming, Deactivate all, Change password.
Additional Settings:
Caller ID: Display my number in outgoing calls.
Call Waiting: After call waiting function is activated, during a call,
notify me of incoming calls.
20.4.6 Vibration
Page 30

30
When selected as ‘O’ the device will vibrate to notify any call or
message, etc.
20.5 Sound
In sound settings, you can set Sound settings such as General,
Incoming calls setting, Notification and Feedback.
20.5.1 General
You can set Profiles and Volume.
Profiles: You can set calling mode, e.g. General, Silent, Vibration,
Outdoor.
Volume: You can set the volume of Ringtone, Media, Alarm, or
In-call
20.5.2 Incoming Calls
You can set phone ringtone for SIM1 or SIM2.
20.5.3 Notifications
You can set notification ringtone.
20.5.4 Feedback
You can set feedbacks, such as the following:
Audible Touch Tones: Set Audible Touch Tones on or off. It plays
tones when using dial pad.
Audible Selection: Set Audible Selection on or off. It plays sound
when making screen selection.
Screen Lock Sounds: Set Screen Lock Sounds on or off. It plays
sound when locking and unlocking the screen.
Haptic Feedback: Set Haptic Feedback on or off. It vibrate when
pressing soft keys and on certain UI interactions.
20.6 Display
In display settings, you can perform such operations as “Brightness”,
“Auto-rotate Screen”, “Animation”, “Screen Timeout”, “Gravity
Calibration Utility”.
20.6.1 Brightness
The screen brightness can be adjusted manually.
20.6.2 Auto-Rotate Screen
Set Auto-Rotate Screen on or off.
Page 31

31
20.6.3 Animation
You can choose “No animations” or “Some animations” or “All
Animations”. If it is “Some animations” or “All Animations”, this device
displays the animation effect when changing interfaces or windows.
20.6.4 Screen Timeout
To save power, you can set the time of screen timeout at 15 seconds,
30 seconds, 1 min, 2 mins, 10 mins, or 30 mins.
20.6.5 Gravity Calibration Utility
Calibrate the accelerometer sensor.
20.7 Location & security
You can set My Location or Screen Unlock or SIM Card Lock or
Passwords or Credential Storage.
20.7.1 My Location
Touch this item to switch between “On” and “Off”. If it is “On”, the
device location can be determined by WLAN.
20.7.2 Screen Unlock
You can set Set up screen lock.
None: Disable screen unlock security.
Pattern: Draw pattern to unlock screen.
PIN: Enter a numeric PIN to unlock screen.
Password: Enter a password to unlock screen.
20.7.3 SIM Card Lock
You can set up SIM1 or SIM2 card lock.
Lock SIM1 or SIM2 Card: Set Lock SIM1 or SIM2 on or off.
Change SIM1 or SIM2 PIN: Change SIM1 or SIM2 PIN.
20.7.4 Passwords:
You can set Visible passwords on or off.
20.7.5 Device Administration
Add or remove device administrators.
20.7.6 Credential Storage
You can set Credential Storage.
Use Secure Credentials: Set Use Secure Credentials on or off,
to allow applications to access to secure certificates and other
credentials.
Install From SD Card: Install encrypted certificates from SD card.
Set Password: Set a password for the credential storage.
Clear Storage: Clear credential storage of all contents and reset
Page 32

32
its password.
20.8 Applications
20.8.1 Unknown sources
The third party application can be installed only if this function is
initiated. Otherwise, any third party application can’t be installed.
Note: When installing or using the third party applications, please
take care! Only the user is responsible for the data damage or data
loss, etc. that may result from the installation and use of the third
party application.
20.8.2 Manage Applications
User can manage and remove the installed applications.
20.8.3 Running services
User can view and control currently running services.
20.8.4 Storage use
View storage user by applications.
20.8.5 Development
Set the options for application development.
USB Debugging: Open or close USB debugging mode when
USB is connected.
USB settings: Set USB connection, Charge Only, USB tethering,
USB storage, Remenber my choice.
Stay Awake: The screen will never sleep during charging if this
function is “On”; If it is “Off”, the screen can sleep during charging.
Allow Mock Locations: The position can be simulated during
debugging.
20.9 Accounts & Sync
You can perform adding accounts and Sync settings.
20.9.1 General Sync Settings
Background Data: Set Background Data on or off, and it can
sync & send & receive data at any time.
Auto-Sync: Set Auto-Sync on or off.
20.9.2 Add Accounts
Add account to Twitter, Corporate, Facebook, Google
Page 33

33
20.9.3 Manage Accounts
You can manage/ delete sync accounts.
20.10 Privacy settings
20.10.1 Backup and restore
You can back up application data, WLAN passwords, and other
settings to Google servers.And you can automatically restore backed
up settings.
20.10.2 Personal Data
You can perform Factory Data Reset.
Note: Performing factory data reset will clear user data in mobile
phone, please ensure backing up your data before using this feature.
20.11 Storage
20.11.1 SD Card
Total Space: View the capacity of SD card when SD card is
inserted.
Available Space: View the available space of SD card.
Unmount SD Card: You can unmount SD Card for safe removal.
Erase SD Card: You can erase all data on the SD card.
20.11.2 Internal Phone Storage
Available Space: View the capacity of RAM.
20.12 Language & Keyboard
20.12.1 Select Language
You can select language, the default language is English.
20.12.2 User dictionary
Press [ Menu ] to add words to User Dictionary or delete words.
20.12.3 Android keyboard
Android keyboard settings: Includes Vibrate on keypress,
Sound on keypress, Popup on keypress, Touch to correct
words, Auto-capitalization, Show settings key, Input
languages, Quick fixes, Show suggestions, Auto-complete.
Page 34

34
20.13 Voice Input & Output
You can perform Voice Input & Output Settings such as
Text-to-speech.
20.14 Accessibility
Manage accessibility options. You can choose the Power button to
end the call instead of turning off the screen when pressed.
20.15 Date & Time
20.15.1 Automatic
Touch this item to switch between “On” and “Off”. If it is set as “On”, it
updates the date and time automatically. This function is based on the
services provided by the network.
Note: When this item is initiated, “Set Date”, “Select Time Zone” and
“Set Time” are not available.
20.15.2 Set Date
With time updating “Off”, touch it to display the dialog box of Date
Setting.
20.15.3 Select Time Zone
Touch this item to enter “Select Time Zone”, touch and select any one
of world cities, and set it as system time zone. The default time is
Beijing time.
20.15.4 Set Time
With time updating “Off”, touch it to display the dialog box of Time
Setting, and set system time.
20.15.5 Use 24-hour Format
Touch this item to switch between “On” and “Off”. If it is “On”, system
time is in 24-hour format, otherwise, it is in 12-hour format.
20.15.6 Select Date Format
Select one item to set date format.
20.16 About Phone
20.16.1 System updates
20.16.2 Status
You can check and view “ Phone Number”, “Network”, “Signal
Strength”, “Mobile Network Type”, “Service state” , “Roaming”,
Page 35

35
“Mobile network state” , “IMEI”, “IMEI SV”, “Battery Status”, ”Battery
Level”, “WLAN MAC address”, “Bluetooth address” and “Up time”,
etc.
20.16.3 Battery use
Check the battery being consumed by each application.
20.16.4 Legal information
Check the open source license.
20.16.5 Model number
Displays the device model number.
20.16.6 Android version.
Displays the device’s Android version.
20.16.7 Baseband version.
Displays the device’s Baseband version.
20.16.8 Kernel version
Displays the device’s kernel version
20.16.9 Software version
Displays the device’s software version.
20.16.10 Hardware version
Displays the device’s hardware version.
Troubleshooting
This section lists some problems that you might meet while using your
phone. If you feel that your phone do not operate normally, please reset
settings first, and then follow Troubleshooting Guide. If you are still
unable to solve problems, please contact the authorized service center
or the store from where you purchased the phone.
1. My Phone would not power on?
Possible Reasons for
Malfunction
Solutions
1. Press [Power] key
shorter.
Long press [Power] key over 3
seconds
2. Battery has run out.
Charge your battery for a few
Page 36

36
minutes then try power on
again.
3. The battery is installed
incorrectly.
Check if the battery is seated
correctly on the device.
4. Abnormally using leads
phone not to power on.
Please contact the local service
centre.
2. Audio quality seems poor?
Possible Reasons for
Malfunction
Solutions
1. The current signal strength
is unstable.
You may be in the fast-moving state
train or car, etc.), according to the
signal strength, select a place with
good signal to make a call to ensure
call quality.
2. You might be in an area
where the signal strength is
low.
Please move to open areas.
3. My device would not make and/or receive calls?
Possible Reasons for
Malfunction
Solutions
1. You might be in an area
where the signal strength
is low.
Make sure you are in the area with
good cell signal. To ensure it, see the
signal strength indicator on the top
right of your device screen
2. You might have set your
Call Forwarding on your
phone.
According to your needs, please
cancel call forwarding.
3. Check if your device is
set on Airplane mode.
Please Undo it
4. SIM card might not be
inserted properly
Please check, and insert the SIM card
properly.
4. You can’t make a call?
Page 37

37
Possible Reasons for
Malfunction
Solutions
1. Phone power off.
Please power on your phone.
2. Phone is out of the
network service area.
Please make sure the current network
is in good service.
3. Your SIM card is not
proper or out of service
fee.
Make sure your SIM card can work
properly.
4. Perhaps you set up call
barring.
According to your needs, please
cancel call barring.
5. The phone screen is
locked.
Please unlock the screen according to
the prompts.
5. I cannot hear and/or be heard from the other side?
Possible Reasons for
Malfunction
Solutions
1. Call volume is low.
Please raise the phone call volume.
2. Mute icon is pressed
during the call
Please deactivate the Mute function.
3. The signal is poor or
unstable
Please move to an open area or an
area with good signal strength.
6. The call alert doesn’t ring when a call coming in?
Possible Reasons for
Malfunction
Solutions
1. Incoming call alert is set
as silent.
Please re-set the incoming call alert as
a sound alert.
2. The ring volume is set too
low.
Please increase the phone call
volume.
3. You have set up call
forwarding on your phone.
Please cancel call forwarding.
7. Battery seems to drop really quickly.
Page 38

38
Possible Reasons for
Malfunction
Solutions
1. Battery power runs out
fast.
Please make sure your battery be
charged in full before use
2. Battery is not good with
the phone connection.
Please install battery properly.
3. Perhaps the charger or
battery is damaged.
Please contact the nearest FLY
Authorized Care Centre
4. Some features such as
playing the media files,
using camera or
camcorder, running
applications in the
background, constantly
syncing email and using
Wi-Fi or Bluetooth, can
drain the battery quickly
than usual.
Please keep these functions closed
when not required.
8. My device does not read a microSD card installed in
my device?
Possible Reasons for
Malfunction
Solutions
1. T-Flash card is not
installed properly.
Turn off your device, pull out microSD
card, put it on again and turn on your
device.
2. T-Flash card is damaged.
Please change T-Flash card.
3. Make sure microSD card
is mounted on your device
Go to Settings > SD card & device
storage and check if Unmount SD card
is highlighted or else tap Mount SD
card
Page 39

39
9. Phone is out of memory?
Possible Reasons for
Malfunction
Solutions
1. MMS or SMS takes up
too much storage space.
Please delete the unwanted SMS or
MMS to release space.
2. The browsing history
takes up too much
storage space.
Select "Browser - Settings - Privacy
Settings - to clear the cache to release
space.
3. Running too many
programs leads to lack of
space.
Enter “Settings –Applications-Manage
applications” or “Settings
–Applications-Running services”,
force stop some running applications
or services.
4. You have installed
many applications in
your phone.
Enter “Settings –Applications —
Manage applications”, choose and
touch the applications installed by
yourself, to uninstall them to release
space.
Note: The built-in applications can’t be
uninstalled.
10. Touch screen is not responsive or responsive but not
as I intended
Possible Reasons for
Malfunction
Solutions
1. If the screen or finger
touching the screen is wet,
it can cause a failure.
Please make sure your finger is dry
while using the phone.
2. Protective film on touch
screen may make touch
screen less responsive.
Please remove any such protective
screens.
3. Your device may become
slow, if you are running
many applications at the
Please close all applications, go back
to Home screen and try again.
Page 40

40
same time.
Read there simple guidelines before using the device.
ROAD SAFETY COMES FIRST
Obey all local laws, Always keep your hands free to operate the vehicle while
driving. Your first consideration while driving should be road safety.
INTERFERENCE
All wireless devices may be susceptible to interference, which could affect
performance.
ENHANCEMENTS AND BATTERIES
Use only approved enhancements and batteries. Do not connect incompatible
products.
SWITCH OFF NEAR BLASTING
Follow any restrictions. Do not use the device where blasting is in progress.
CONNECTING TO OTHER DEVICES
When connecting to any other device, read its user guide for detailed safety
instructions. Do not connect incompatible products.
BACK-UP COPIES
Remember to make back-up copies of keep a written record of all important
information.
SWITCH OFF IN AIRCRAFT
Follow any restrictions. Wireless devices can cause interference in aircraft.
SWITCH OFF IN HOSPITALS
Follow any restrictions. Switch the device off near medical equipment.
SWITCH OFF WHEN REFUELING
Do not use the device at a refueling point. Do not use near fuel or chemicals.
Page 41

41
PROTECT THE ENVIRONMENT
Do not dispose of batteries in a fire or as household trash. Obey any local
battery recycling laws or environment protection policy.
PROTECT THE CHILDREN
Do not store any small parts of the device such as a memory card where
children may access them.
EMERGENCY CALLS
Ensure the phone function of the device is switched on and in service. Enter
the emergency number. Give your location. Do not end the call without
permission.
TECHNICAL SPECIFICATION
GSM NETWORK
900/1800 MHz
DISPLAY SIZE
9.53 cm
BATTERY
CAPACITY
1400 mAh
CHARGER
SPECIFICATION
INPUT:AC 100-240V/50-60Hz
OUTPUT:DC 5V/500mA
SAR VALUE
1.119W/Kg
CAMERA
RESOLUTION
3.2 MEGA PIXEL + VGA
 Loading...