

Page 1
FLUSHMATE
®
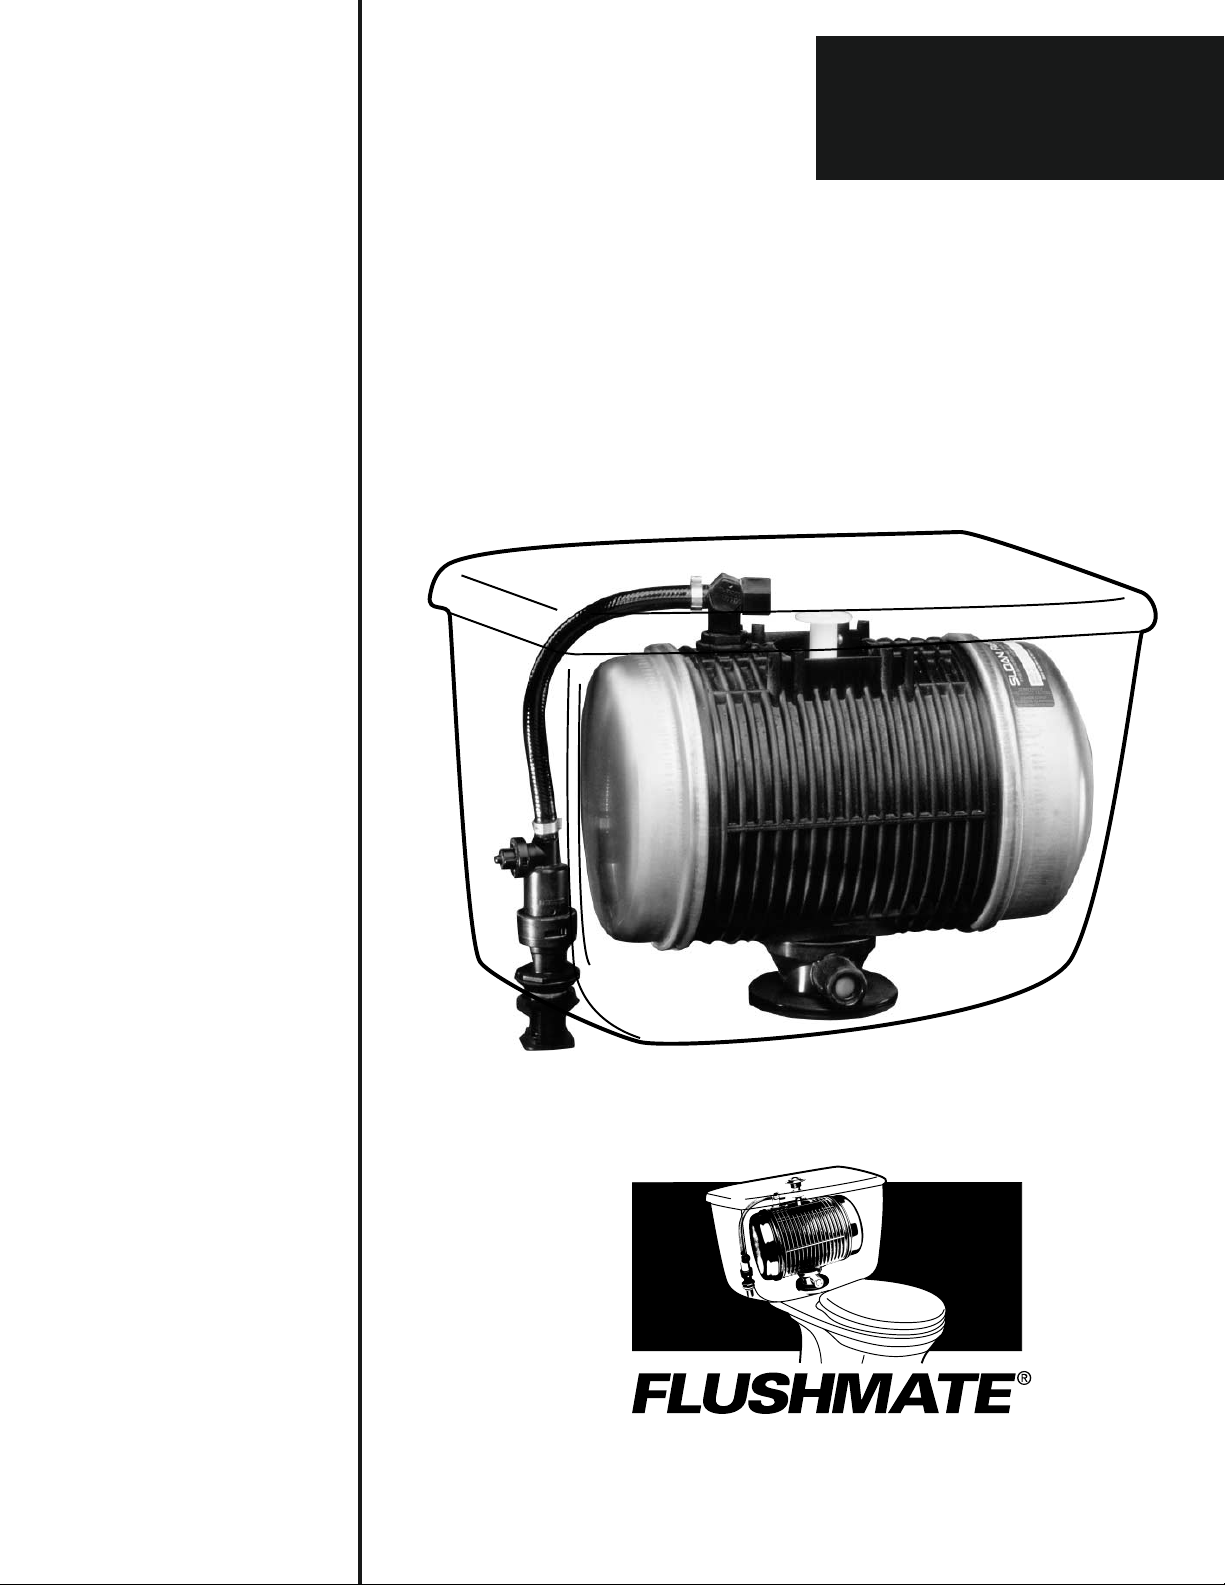
FLUSHOMETER - TANK
SYSTEM
501-A Series
A Division of Sloan Valve Company
30075 Research Drive • New Hudson, MI 48165
800-533-3450 • 248-446-5300
http://www.flushmate.com
Owner’s Service Manual
501-A Series
Page 2
FLUSHMATE®501-A SERIES_______________________________________________________
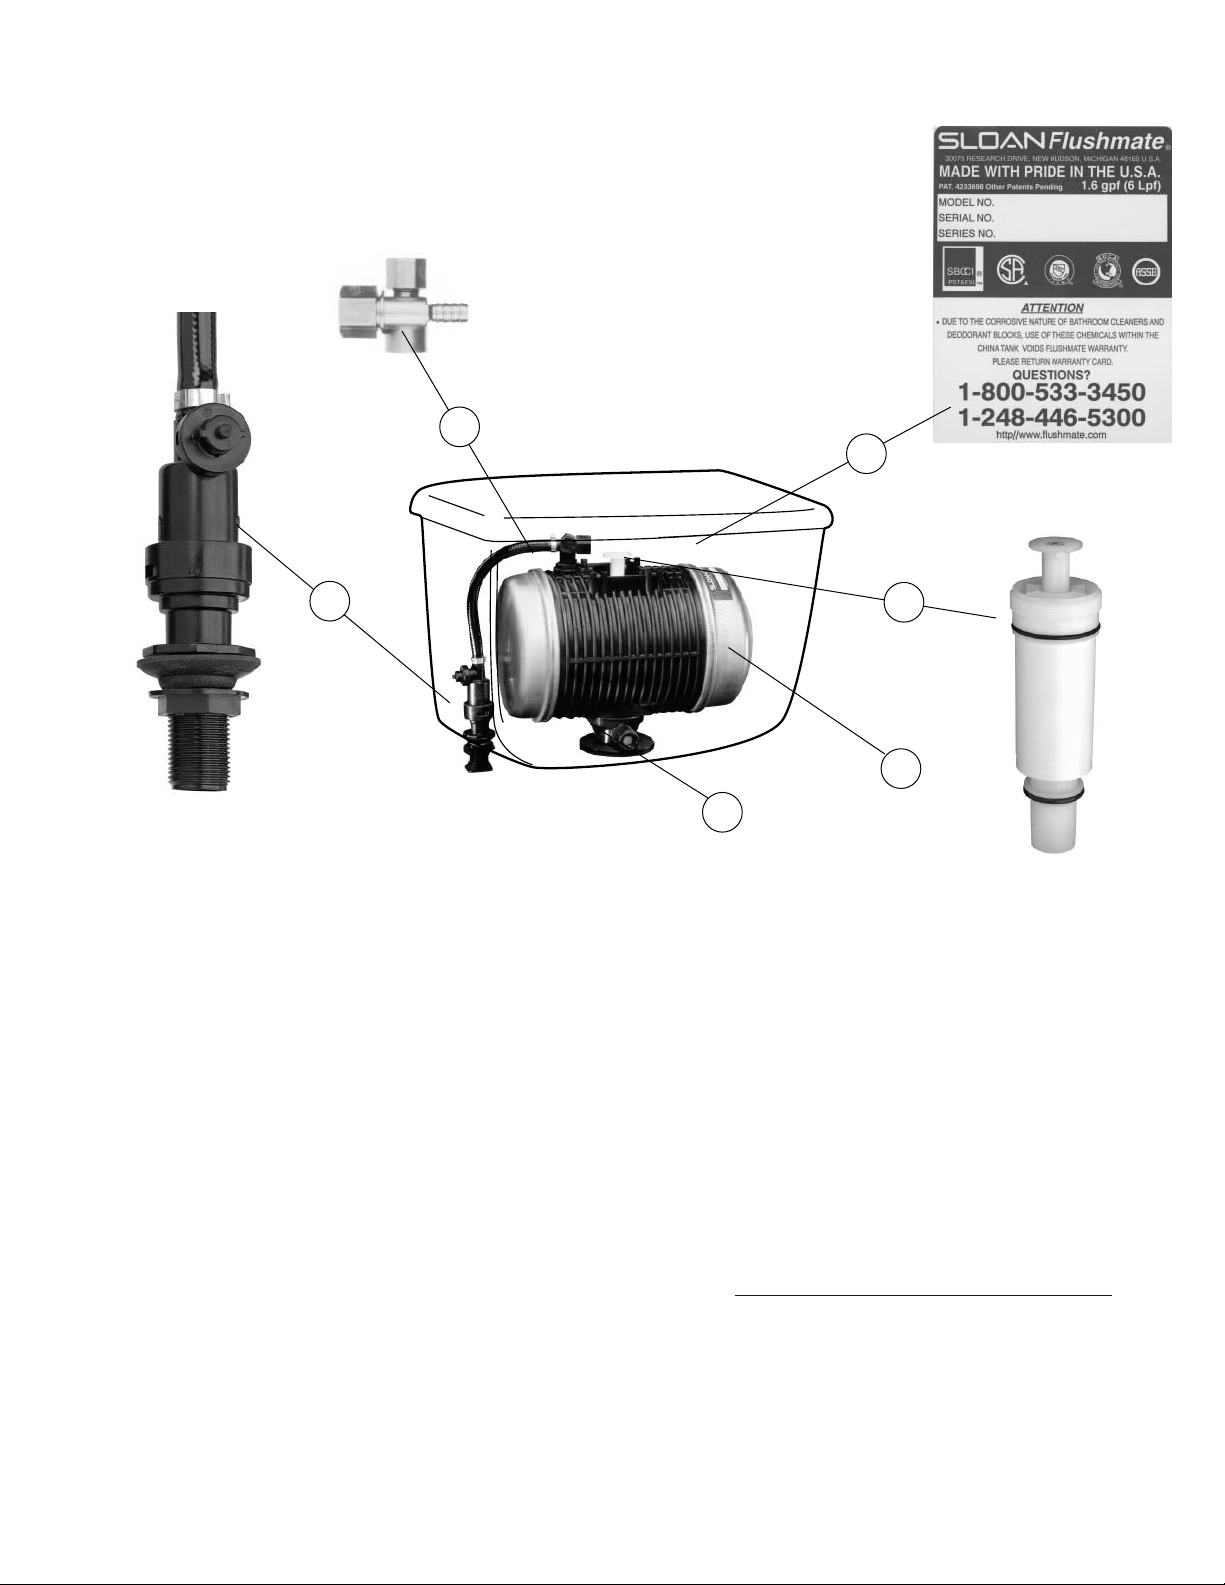
List of Components for 501-A Series*:
1. Lower Supply Group w/Hose BL100504
(A) Supply Shank with Screen
(B) Pressure Regulator w/Back Check
(C) Relief Valve
2. Upper Supply Group BU100505
(D) Air Inducer
(E) Vacuum Breaker
3. Name Plate w/Serial Number
4. Flush Valve Cartridge Assembly C-100500
(F) Actuator w/setscrew
5. Vessel
6. Discharge Extension w/Drain
FLUSHMATE
®
A Division of Sloan Valve Company
Manufactured under one or more of the following U.S. patents:
3,817,279 3,817,286; 3,817,489; 3,820,171,754; 4,233,698 and 5,802,628.
Also covered by various foreign patents (country and number available upon
request) and other patents pending.
The Sloan FLUSHMATE®Flushometer - Tank System provides the highest
performance capability available today in the ULF (Ultra-Low Fixture) category. That
means it consumes less than 1.6 gallons/6 liters of water per flush. It achieves this
remarkable performance by using compressed air inside the tank, which creates a
turbo-charged flushing action for effective bowl cleaning. Compared to other types of
low consumption water closets, FLUSHMA
TE offers many distinct advantages.
Outstanding FLUSHMATE®Features:
• Positive Bowl Extraction (No Double Flushing)
• Stronger Flushing Action Improves Drainline Carry &
Leaves Bowl Cleaner
• Large Water Spot for Reduced Housekeeping
• Uses less than 1.6 gallons per flush
• Larger Trapway to Eliminate Stoppages
• No Water Leakage Between Flushes
• Non-Sweating Tank Enclosure
(A)
(B)
(C)
(D)
(E)
(F)
1
2
3
4
5
6
* Components identified may appear different but are a direct replacement for this series.
Page 3
INSTALLATION __________________________________________________________________
The Sloan FLUSHMATE®Flushometer-Tank System Fixture installs in the same manner as other water closets. Please follow the
instructions provided by the fixture manufacturer.
Using the gasket, washer and nuts provided with the fixture, assemble the tank to the bowl. Before connecting the supply to the tank,
be sure the supply line is flushed clean. Do this by running water from the supply stop into a bucket until water flows clear.
After connecting the supply line to the tank, turn on the water again and check for leaks. You may be required to make adjustments to
the actuator for either pushbutton type or trip lever type units. Please follow the instructions provided by the fixture manufacturer.
TROUBLESHOOTING _____________________________________________________________
CONDITION: Water runs on and will not shut off.
A newly installed toilet that does not shut off may be caused by inadequate or low pressure, and is usually the result of an insufficient
water supply flow rate into the FLUSHMATE Vessel. (NOTE: The recommended static pressure range by code is 20 psi to 125 psi).
If sufficient supply pressure has been verified and the toilet continues to run, the following steps may be required:
Step 1. Make sure supply stop is fully open.
Step 2. Check the Supply Shank Screen for any obstruction that would
restrict the supply.
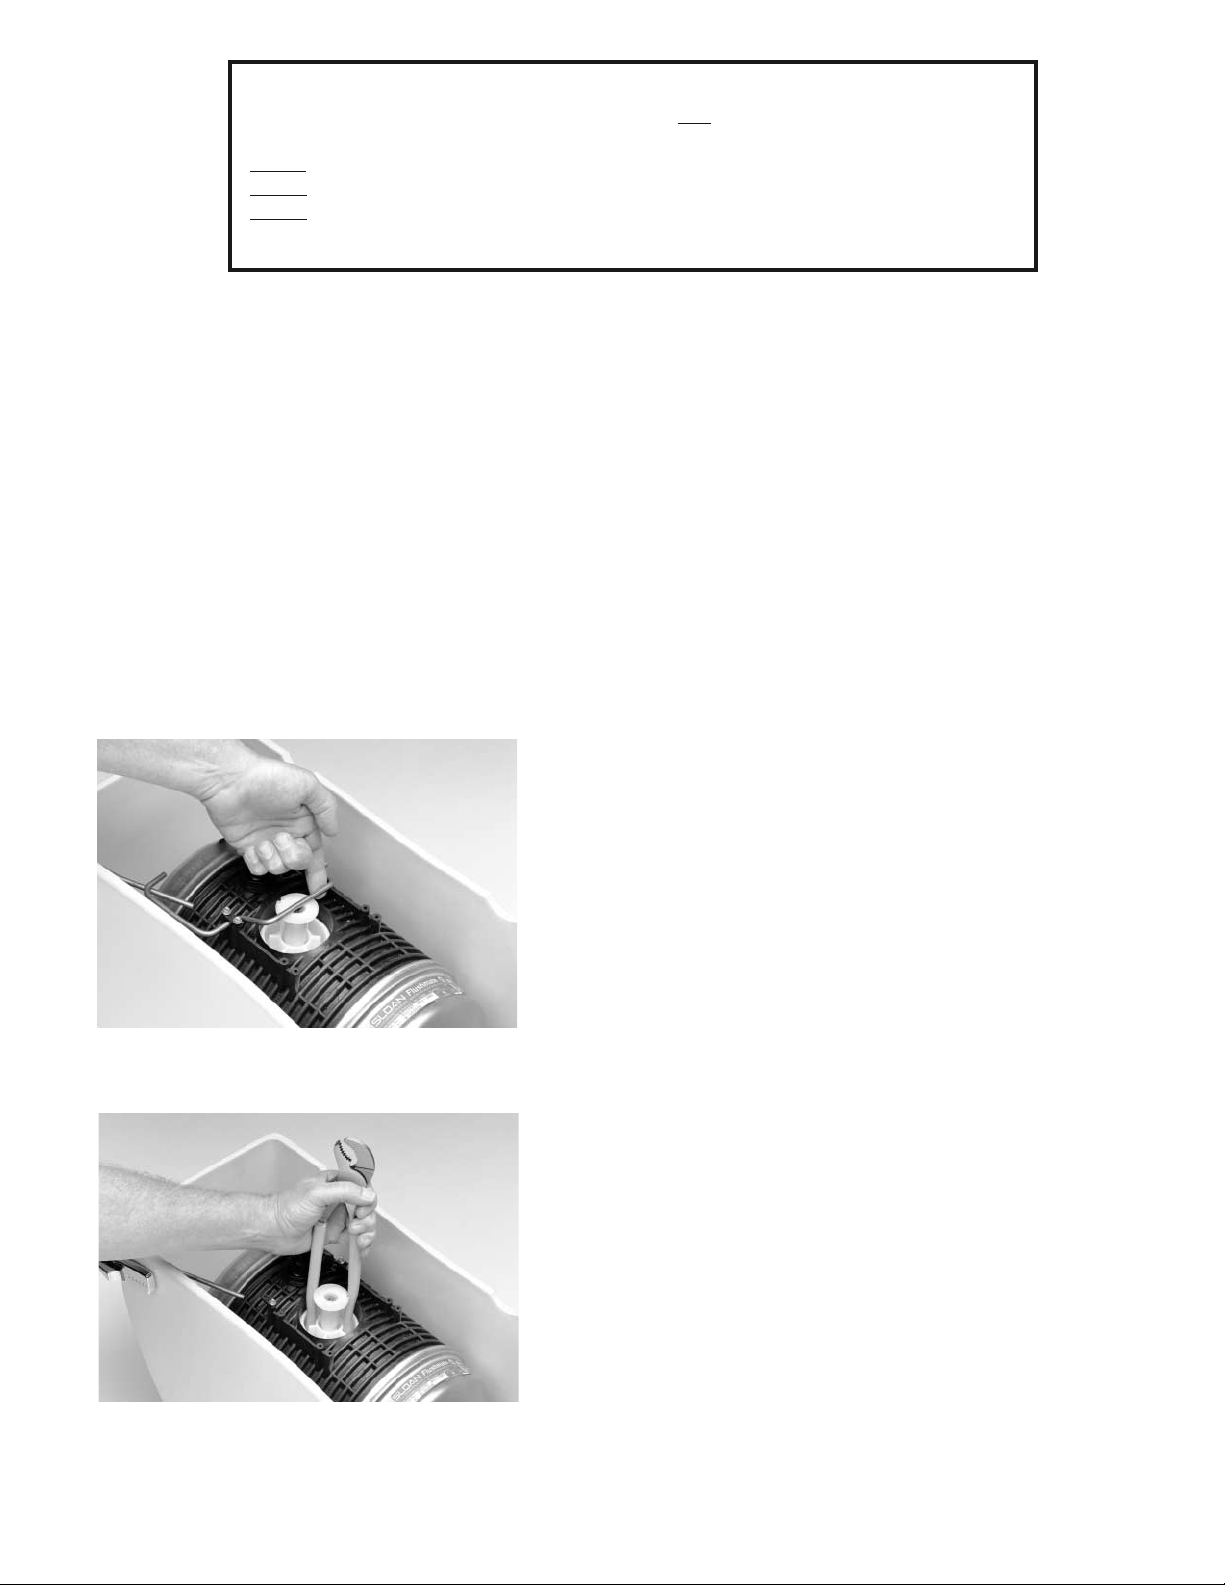
Step 3: Check the Actuator adjustment (see Installation Procedure). The
linkage rod or push button should not interfere with the flush. On
Pushbutton type units, loosen the setscrew on the actuator (See
Number 4F on the component list) and rotate the Actuator up or
down until proper clearance is obtained (1/8”). For trip lever units,
gently lift the actuator rod and observe proper clearance is
maintained (approximately 1/8” gap between rod and actuator). See
Figure 1.
Step 4. Check the Flush Valve Cartridge Assembly for proper installation.
Proceed as follows:
a) Turn off the water supply and flush the toilet.
b) Remove the Flush Valve Cartridge Assembly using pliers’
handles as shown in Figure 2. NOTE: You may be required to
disconnect the Actuator Linkage Rod to remove the Flush Valve
Cartridge Assembly.
c) Inspect the “O” Rings on the Flush Valve Cartridge and the
seating area inside the tank for wear and/or improper seating.
Step 5. Reinstall the Flush Valve Cartridge Assembly.
First, insert the cartridge into vessel and, while gently
pushing down on the Cartridge, turn the Cartridge counterclockwise until you hear an audible click, indicating that the
threads are now aligned. Screw Cartridge clockwise into
place until two black threads of the Vessel are showing.
Next, turn on the water and continue to turn cartridge until
the water stops running. Do not over-tighten.
WARNING:
When servicing or replacing components to the FLUSHMATE®Flushometer-Tank
System, make certain that the water supply is turned OFF
and the toilet is then flushed to
relieve pressure in the vessel.
NEVER
use lubricants on any of the components unless otherwise noted in this manual.
NEVER
use corrosive chemicals or household cleaners on FLUSHMATE products.
NEVER
use any chemicals or corrosive household cleaners on FLUSHMATE Products.
Note: It is normal for less than one inch of water to remain in the bottom of the china tank.
FIGURE 1
FIGURE 2
Page 4
Step 6. If the Tank continues to run on, push down lightly on the Flush Valve Actuator. If the water stops running, it is an indication that
the Flush Valve Cartridge requires tightening (clockwise). If water still runs on while pushing down on the Actuator, the Flush Valve
Cartridge requires loosening (counter-clockwise).
NOTE: Adjust the Flush Valve Cartridge Assembly in quarter- to half-turn increments until the water stops running. Always turn the water
supply off for all adjustments. Flush Valve Cartridge turns the water off.
Step 7. If replacement of the Flush Valve Cartridge is necessary, follow the instructions in Step 5.
TROUBLESHOOTING _____________________________________________________________
CONDITION: Weak or Sluggish Flush.
Step 1. Check the water pressure (20psi - 125psi recommended). If OK,
then check the Flush System by removing the Tank Cover and tripping the
Actuator. While the unit is flushing, gently raise the Actuator. Water should
flow freely and wash away any debris in the supply line and Vessel.
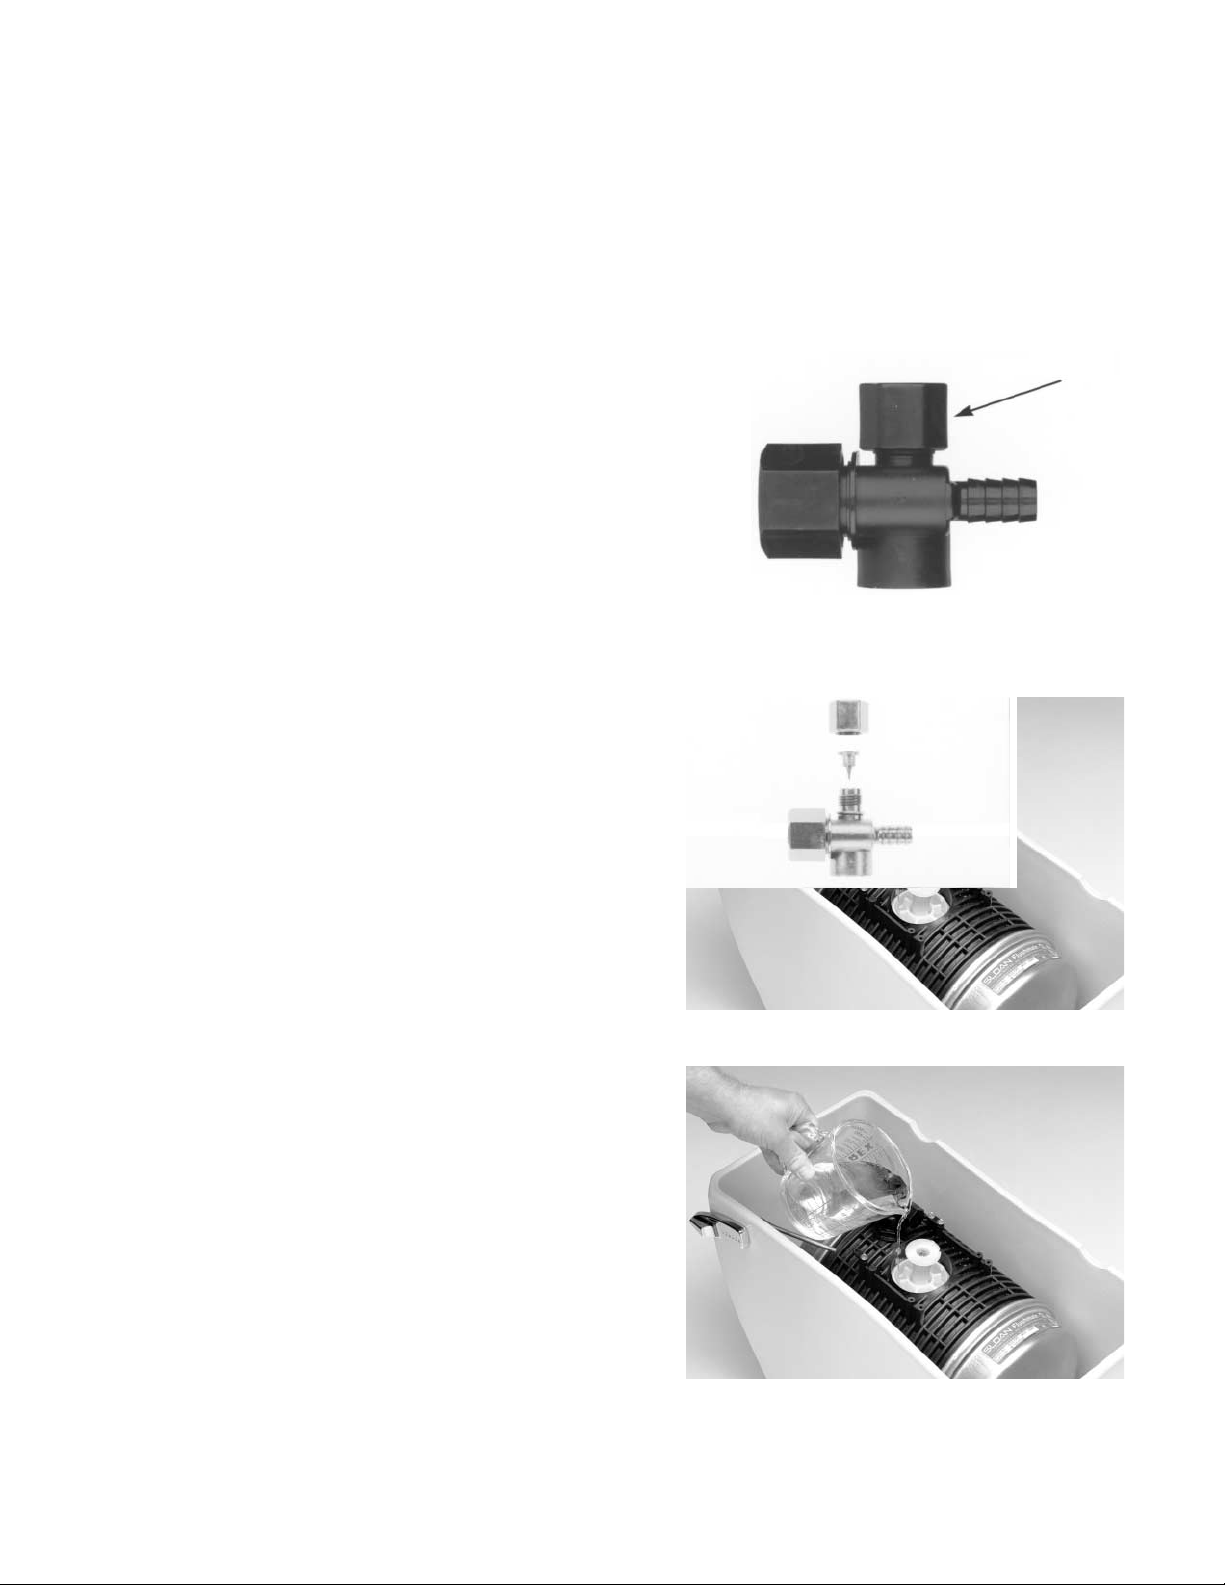
Step 2. Check the Air Inducer for sufficient air draw. The Air Inducer is
designed to draw air during the refill cycle. To test the Air Inducer, place a
small amount of water (2 to 3 drops) in the orifice of the Air Inducer cap
and flush the toilet. If the Air Inducer is functioning properly the water will
be drawn in. If not, it will need to be cleaned and tested again.
TO CLEAN AIR INDUCER: (Figures 3 & 4)
a) Turn off the water supply and trip the Actuator.
b) Unscrew the Air Inducer Cap, clean thoroughly and remove
any obstructions. Reassemble. (Hand tighten ONLY)
c) Turn on water supply. Wait for the Vessel to refill (30 to 60
seconds). Repeat Step 2 above. If the Air Inducer does not
function properly, replace the Upper Supply Assembly.
Step 3. Check the Flush Valve Cartridge for leaks. Turn the water supply off
and drain the Vessel by tripping the Actuator and holding it down until
completely drained. Next, pour a cup of water onto the Cartridge Housing
area as shown in Figure 5. Turn on the water supply. If a leak is detected
(a steady flow of bubbles from the center of the Cartridge Area), the
Cartridge should be replaced.
Step 4. Check Lower Supply. Turn the water off and relieve the Vessel
pressure by flushing the toilet. Remove the supply line connection to the
shank. Remove any obstruction in the supply shank screen. If necessary,
you can use a small brush to gently brush the screen. Reattach the supply
line to the supply shank and observe connections to assure no leakage.
IMPORTANT: If you are still experiencing a weak or sluggish flush after this
point, it is recommended you replace the entire lower supply group.
Step 5. Check the following:
1. water line pressure (20psi - 125psi)
2. obstruction in the bowl trapway
3. obstruction in the drain
4. proper drain ventilation
Consult a professional for their recommendations if any of these
conditions exist. If the drain and drain vent are clear, and the flush has not
been improved, replace the Lower Supply Group.
FIGURE 3
FIGURE 4
FIGURE 5
Air Inducer Cap
Page 5
TROUBLESHOOTING _____________________________________________________________
CONDITION: No Flush
Step 1. Check the water pressure (20 psi to 125 psi).
Step 2. Check the Air Inducer for sufficient air draw. Refer to Step 2 of
“Weak or Sluggish Flush”.
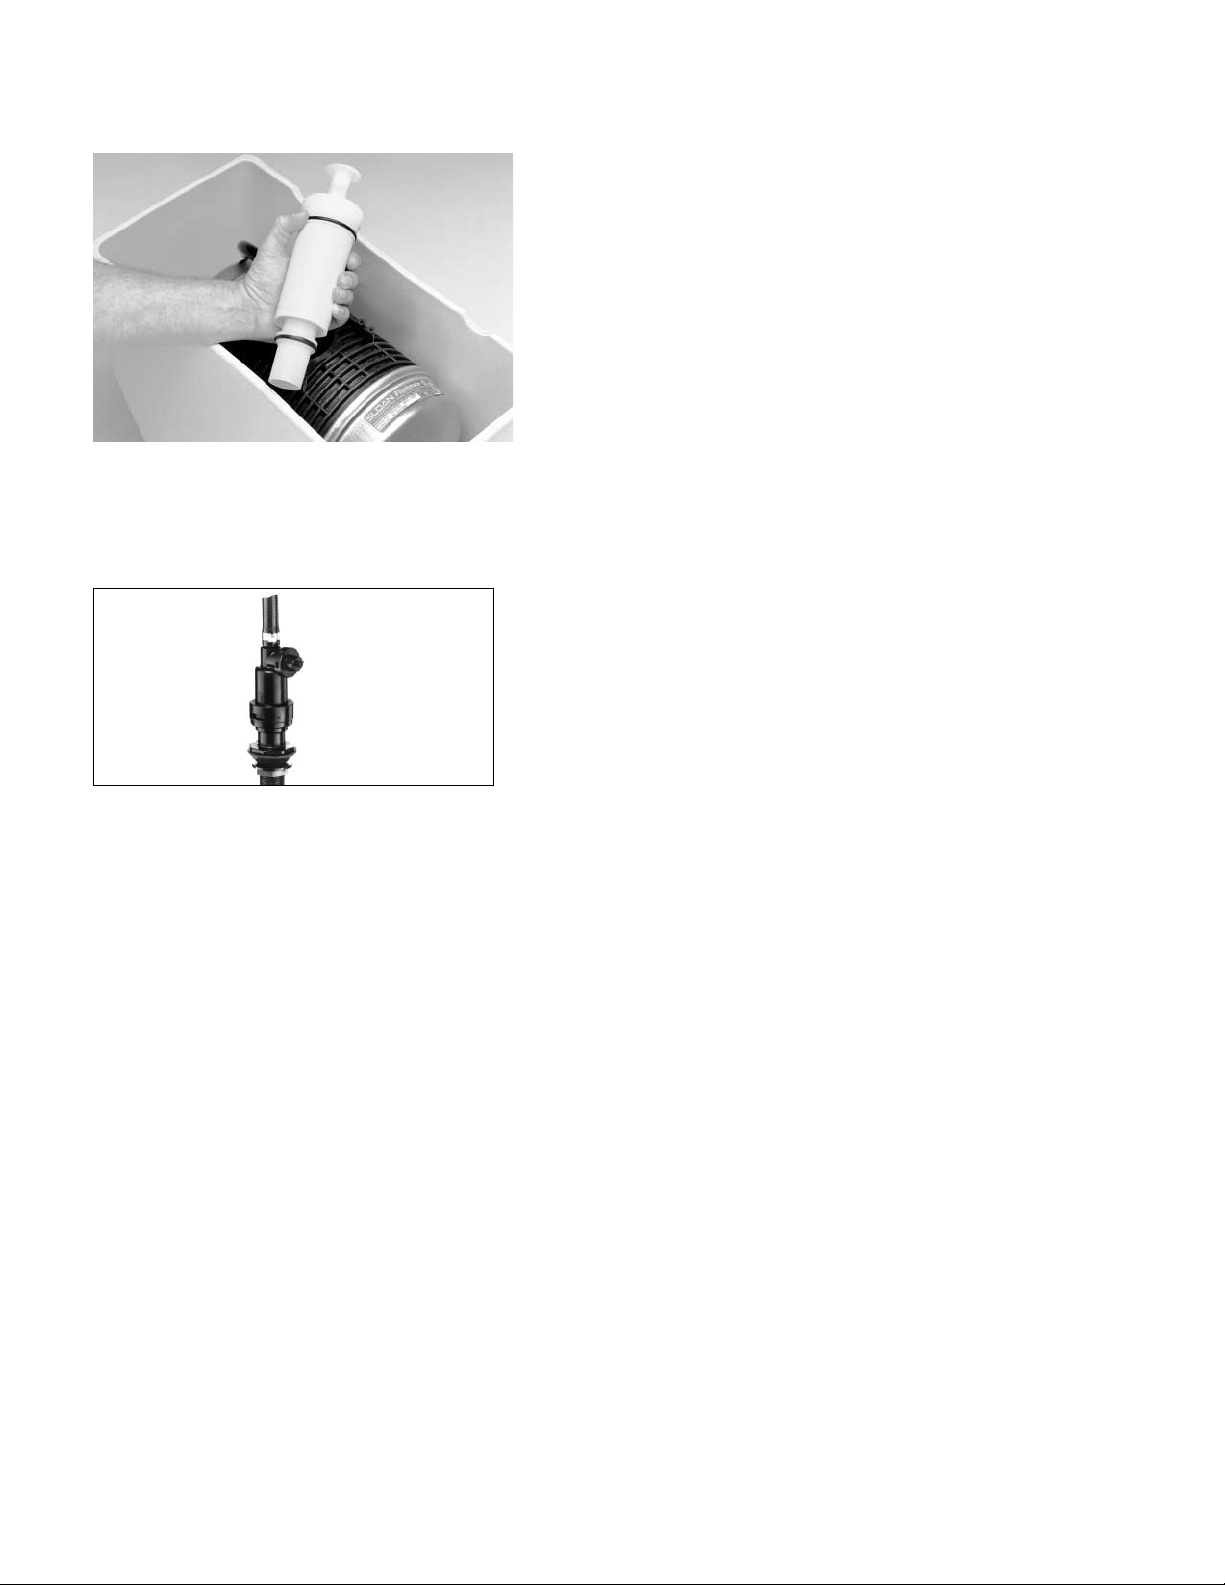
Step 3. Review all of Step 3 and Step 4 covered in “Weak or Sluggish Flush”
Condition.
Step 4. Replace the Flush Valve Cartridge. NEVER use lubricant on the “O”
Ring (Arrow - Figure 6).
CONDITION: Relief Valve Discharging
This is a sign that the Lower Supply Group (Number 1 from list of components) is not working properly and should be replaced. Follow
the procedure outlined below:
REPLACE PROCEDURE FOR LOWER SUPPLY:
Step1. Turn the water supply off. Flush the fixture to relieve pressure in the
vessel and disconnect the water supply from the shank.
Step 2. Remove the China Tank from the China Bowl by removing the
nuts/washers or wings nuts from the bottom of the China Tank.
Step 3. Unscrew the plastic locknut that holds the shank to the bottom of
the China Tank and remove the tank to bowl gasket.
Step 4. Unscrew the plastic nut that holds the vessel to the bottom of the
China Tank and carefully remove the entire vessel from the China Tank.
Step 5. Remove the Lower Supply Assembly by pulling in a downward motion. WHEN REMOVING OR REPLACING THE LOWER
SUPPLY, DO NOT WIGGLE THE LOWER SUPPLY FROM SIDE TO SIDE AS YOU MAY BREAK THE POST THAT THE LOWER SUPPLY
SLIDES ONTO. THIS IS A PRESS FIT AND ONLY MINIMUM DOWNWARD OR UPWARD FORCE IS REQUIRED. DO NOT PROCEED TO
STEP 6 UNTIL STEP 5 IS COMPLETE.
Step 6. Cut the hose just above the barbed fitting (about (1/4” above clamp) on the Lower Supply. Discard old Lower Supply.
Step 7. Insert the new Lower Supply into hose and secure with new Hose Clamp.
Step 8. Push the new Lower Supply onto the post using an upward motion.
Step 9. Reassemble vessel to China Tank, tighten securely, reconnect water supply and check for leaks.
WINTERIZING___________________________________________________________________
The Sloan FLUSHMATE®, when installed in a summer home, cottage or cabin, can be winterized to allow for periods for nonuse especially when the dwelling is subject to frigid conditions. Follow the procedures outlined below.
NOTE: A sponge, a pail and adjustable channel locks will be useful.
Tank Procedure:
Step 1. Turn off the water supply line valve and remove the Toilet Tank Cover.
Step 2. Push the Actuator on top of the Vessel to flush and discharge the water.
Step 3. Disconnect the supply line coupling nut from the Lower Supply located under the Toilet Tank Housing. NOTE:
A small amount of water will drip out of the Shank. Be prepared to collect it in a bucket or sponge it up. Remove the
Supply Shank and drain the water from the bottom of the china tank into a bucket.
Step 4. Push down on the Actuator one more time, then pull it up momentarily to allow air into the Vessel.
Bowl Procedure:
After flushing out the Vessel, remove the remaining water from the bowl or add from 1 pint to 1 quart of antifreeze
or RV antifreeze to the water remaining in the bowl.
NOTE: Refer to fixture manufacturer’s instructions for procedures to winterize bowl.
FIGURE 6
FIGURE 7
Page 6

POINTS TO REMEMBER ______________________________________________________
• When servicing any component, the water supply should be turned OFF and the Actuator tripped to relieve
the pressure in the Vessel.
• The Flush Valve Cartridge Assembly can be removed by inserting the handles of a pair of pliers into the top
of the Cartridge and turning counter-clockwise.
• It is normal for less than an inch of water to remain in the bottom of the outside China Tank. The FLUSHMATE
®
System will automatically recirculate this water with each flush to eliminate any stagnant condition.
• NEVER use any chemicals or corrosive household cleaners on FLUSHMATE®products.
The Sloan FLUSHMATE®Flushometer-Tank System has been engineered to provide reliable performance year after year. However, if
servicing is ever required, it is recommended that you follow the instructions included in this brochure. If you would like additional
information or require technical assistance, write or call us at the address or telephone number below.
ATTENTION OWNER
THIS IS YOUR WARRANTY REGISTRATION
Sloan FLUSHMATE (the "Company") warrants the FLUSHMATE®flushometer tank operating system (the "unit") to be free of defects in
material and workmanship for a period of two (2) years from the date of installation and the Company promises to replace any part of
this product that proves, upon our inspection and within two (2) years from date of installation, to be defective in material or
workmanship. All labor and transportation costs or charges incidental to warranty service are to be borne by the purchaser-user.
This warranty is subject to the following:
Specific Conditions to Warranty
A Warranty Registration card has been fully completed and mailed by the purchaser (the “user”) to the Company within thirty (30) days
of the date of installation.
The unit has been subject to proper installation, operation and maintenance as outlined in the installation instructions that were supplied
with the unit. Note carefully that this warranty is voided if the unit is installed and operated subject to water supply line pressures greater
than 125 psi (static) or less than 20 psi (static).
Service and repairs may only be performed by authorized representatives of the Company or by others upon specific approval by the
Company. Unauthorized repairs or alterations shall specifically void the warranty.
Use of chemical disinfectants or corrosive household cleaners on FLUSHMATE
®
products will void this warranty.
Proof of purchase is required.
Exclusions
IN NO EVENT SHALL THE COMPANY BE LIABLE FOR INCIDENTAL OR CONSEQUENTIAL DAMAGES, FOR DAMAGES RESULTING
FROM IMPROPER INSTALLATION, OR FOR DAMAGES CAUSED BY NEGLECT, ABUSE OR ALTERATION. ALL IMPLIED WARRANTIES,
INCLUDING ANY IMPLIED WARRANTY OF MERCHANTABILITY OR FITNESS FOR ANY PARTICULAR PURPOSE ARE LIMITED TO A
PERIOD OF TWO (2) YEARS FROM DATE OF INSTALLATION.
Some states do not allow limitations on the duration of an implied warranty and some states do not allow exclusions or limitations
regarding incidental or consequential damages, so the above limitations may not apply to you. This warranty gives you specific legal
rights and you may have other rights which vary from state to state.
No person is authorized to change, add to, or create any warranty or obligation other than that set forth herein.
To obtain warranty service contact Consumer Services toll free 1-800-533-3450
(outside North America, call 248-446-5300) or
write to us at:
FLUSHMATE
®
A DIVISION OF SLOAN VALVE CO.
30075 Research Drive
New Hudson, MI 48165 U.S.A.
800-533-3450 • 248-446-5300
http://www.flushmate.com
Installation Date ________________________________________________________________________________________
Serial Number __________________________________________________________________________________________
FLU6018 05/00
 Loading...