

Page 1
w w w . f l u r i d a a p p l i a n c e s . c o m
U S E R I N S T R U C T I O N S
I c e & W a t e r D i s p e n s e r
F D F B 1 0 5 0 1 & F D F T 1 0 5 0 1
SAFETY INSTRUCTIONS-----------------------2
FEATURES & SPECIFICATIONS----------------4
DISPENSER USE-------------------------------6
DISPENSER CARE-----------------------------10
INSTALLATION INSTRUCTIONS--------------13
TROUBLESHOOTINGS------------------------18
SERVICE & IMPORTANT NOTICE-------------21
G E N E R A L O P E R A T I N G I N S T R U C T I O N
Read these instructions before use and save them for future reference.
Let the unit rest and unplugged for 24 hours before use.
Remove all external and internal packaging materials. Be sure that all parts
have been included before discarding any packaging materials. You may
want to keep the packaging materials for use at a later date.
Upon receipt and inspection of the unit, the power cord must be replaced if
it is damaged.
Contact our customer service at 800-433-9938 or
info@fluridaappliances.com.
Page 2
2
i n f o @ f l u r i d a a p p l i a n c e s . c o m
SAFETY INSTRUCTIONS
Electrical Safety
DANGER
Improper use of the power cord plug can result in the risk of
electrical shock, property damage and personal injury or death.
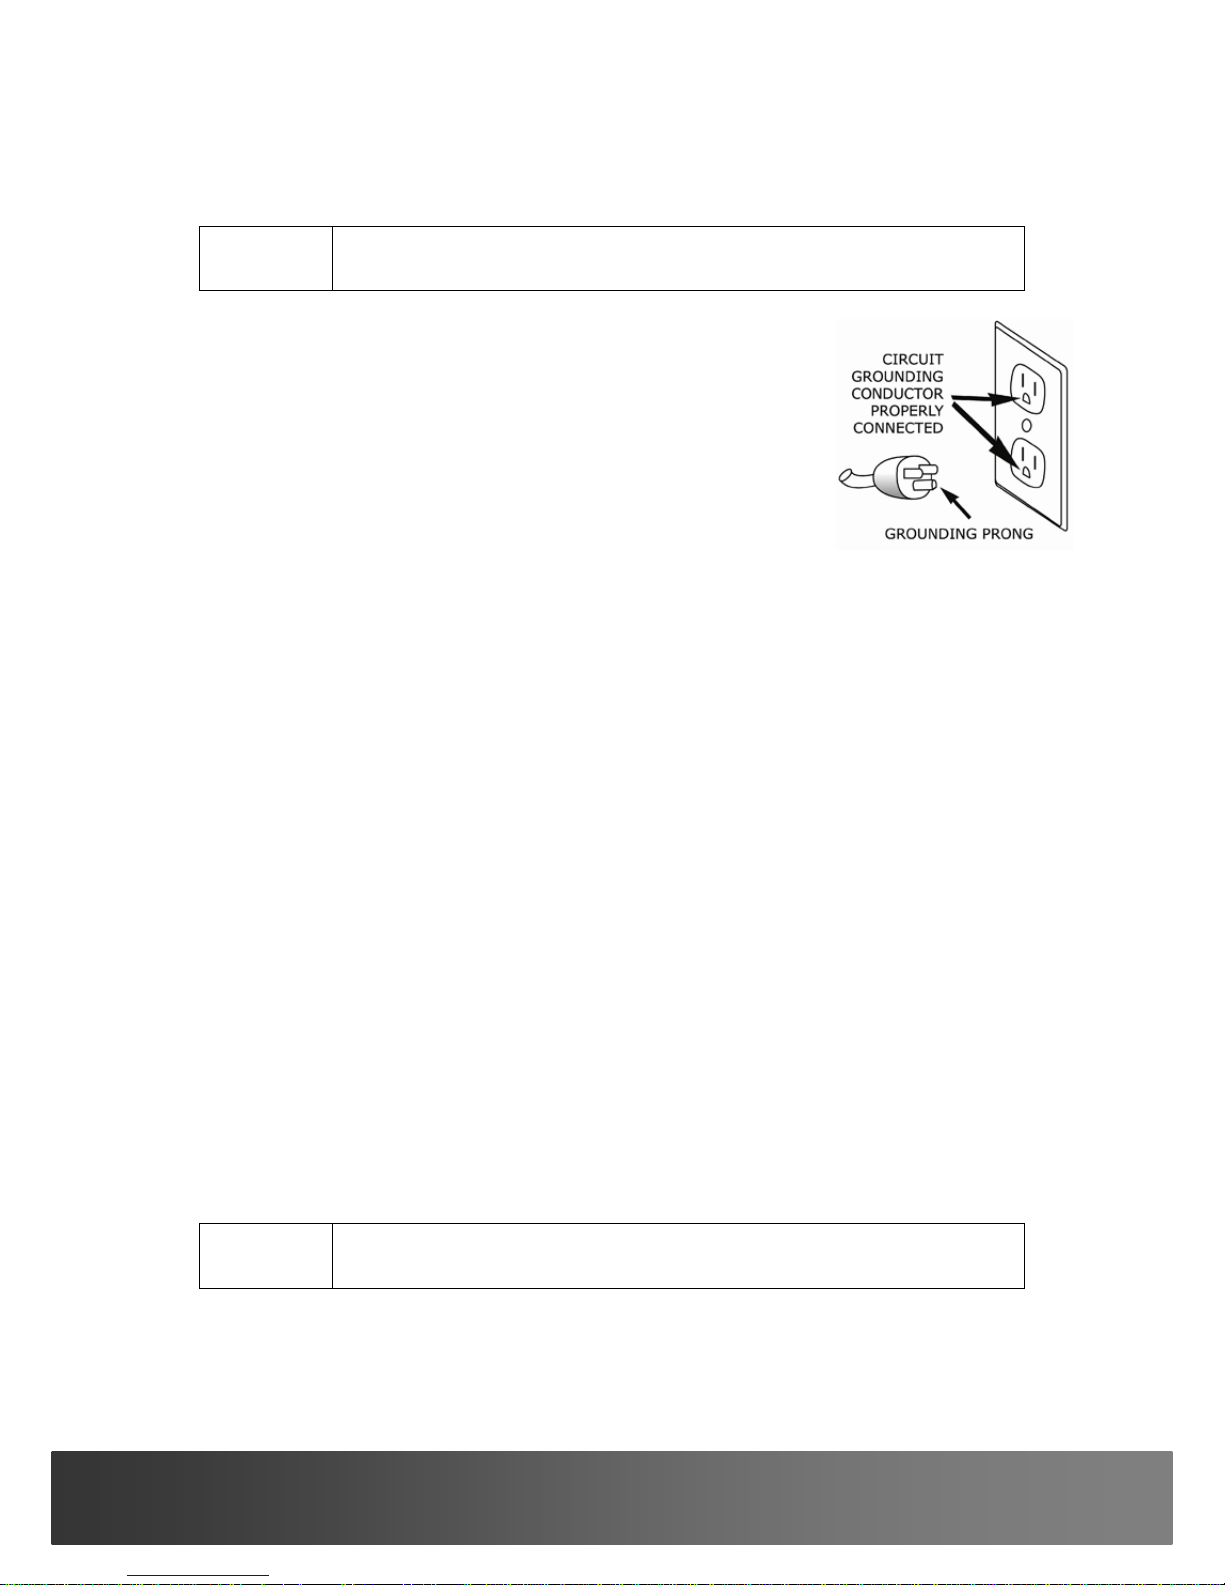
This appliance is equipped with a 3-prong grounding-
type plug, and shall be plugged into a properly
connected grounding-type outlet.
It is required to use a 3–prong grounding-type
electrical outlet properly grounded in accordance with
the National Electrical Code and local codes and
ordinances.
A separate adequately fused and grounded circuit
shall be used for this appliance. The voltage rating
must match the rating label on the unit.
Do not use an adapter or an extension cord.
Do not under any circumstances cut or remove the third ground prong from
the power cord.
Never unplug the appliance by pulling the power cord. To disconnect the
unit, always grip the plug firmly and pull straight out from the wall outlet.
Do not operate the appliance if the appliance housing is removed or
damaged.
Do not attempt to repair or replace any part of your appliance unless it is
specifically recommended in this manual. All other servicing shall be
referred to a qualified technician.
To protect against electric shock, do not immerse appliance, plug or cord
into water or other liquids.
Child Safety
Exercise caution and use reasonable supervision when appliance is used
near children. Never allow children to operate, play with or crawl inside the
unit. Keep packing materials away from children.
Keep fingers out of pinch point areas and be careful when closing doors if
children are around.
Hot Water Safety
DANGER
This unit can dispense hot water. Hot water can scald your hands
and body and cause serious injury.
To avoid hot water spilling, always put a cup under the dispenser before
you press the button to dispense hot water.
Page 3

3
2 4 4 1 2 M a i n S t . S u i t e 1 0 5 , C a r s o n , C A 907 4 5
Cleaning
DANGER
To reduce the risk of injury when cleaning your appliance, follow
these basic precautions.
Unplug the appliance or disconnect power before performing any
maintenance or cleaning.
Do not clean appliance with flammable fluids. Do not store or use gasoline
or other flammable vapors or liquids in the vicinity of this or any other unit.
The fumes can create a fire hazard or explosion.
Do not use solvent-based cleaning agents or abrasives on the interior or
exterior of the appliance. These cleaners may damage or discolor the
appliance.
Do not operate the appliance with wet hands, while standing on a wet
surface or while standing in water.
Moving
DANGER
To reduce the risk of injury when moving your appliance, follow
these basic precautions.
Exercise caution when moving and installing the appliance. The unit is
heavy, to prevent strain or injury, it may require two or more people to
move the unit.
Remove all ice, empty water and secure all loose shelves before you
transport the unit. Use protective materials to prevent the glass shelves
from being damaged.
Disposing
DANGER
When disposing of refrigerated appliances, special handling is
often required. It is the consumer’s responsibility to comply with
federal and local regulations when disposing of this product.
Keep the carton, plastic bags and any exterior wrapping materials in a safe
place where children cannot reach them. If you don’t need these materials,
destroy or recycle them. These items may cause suffocation to children.
To avoid entrapment and suffocation, before you discard this appliance,
remove the doors and leave the shelves in place, so that children may not
climb inside.
Page 4
4
i n f o @ f l u r i d a a p p l i a n c e s . c o m
FEATURES & SPECIFICATIONS
Overview
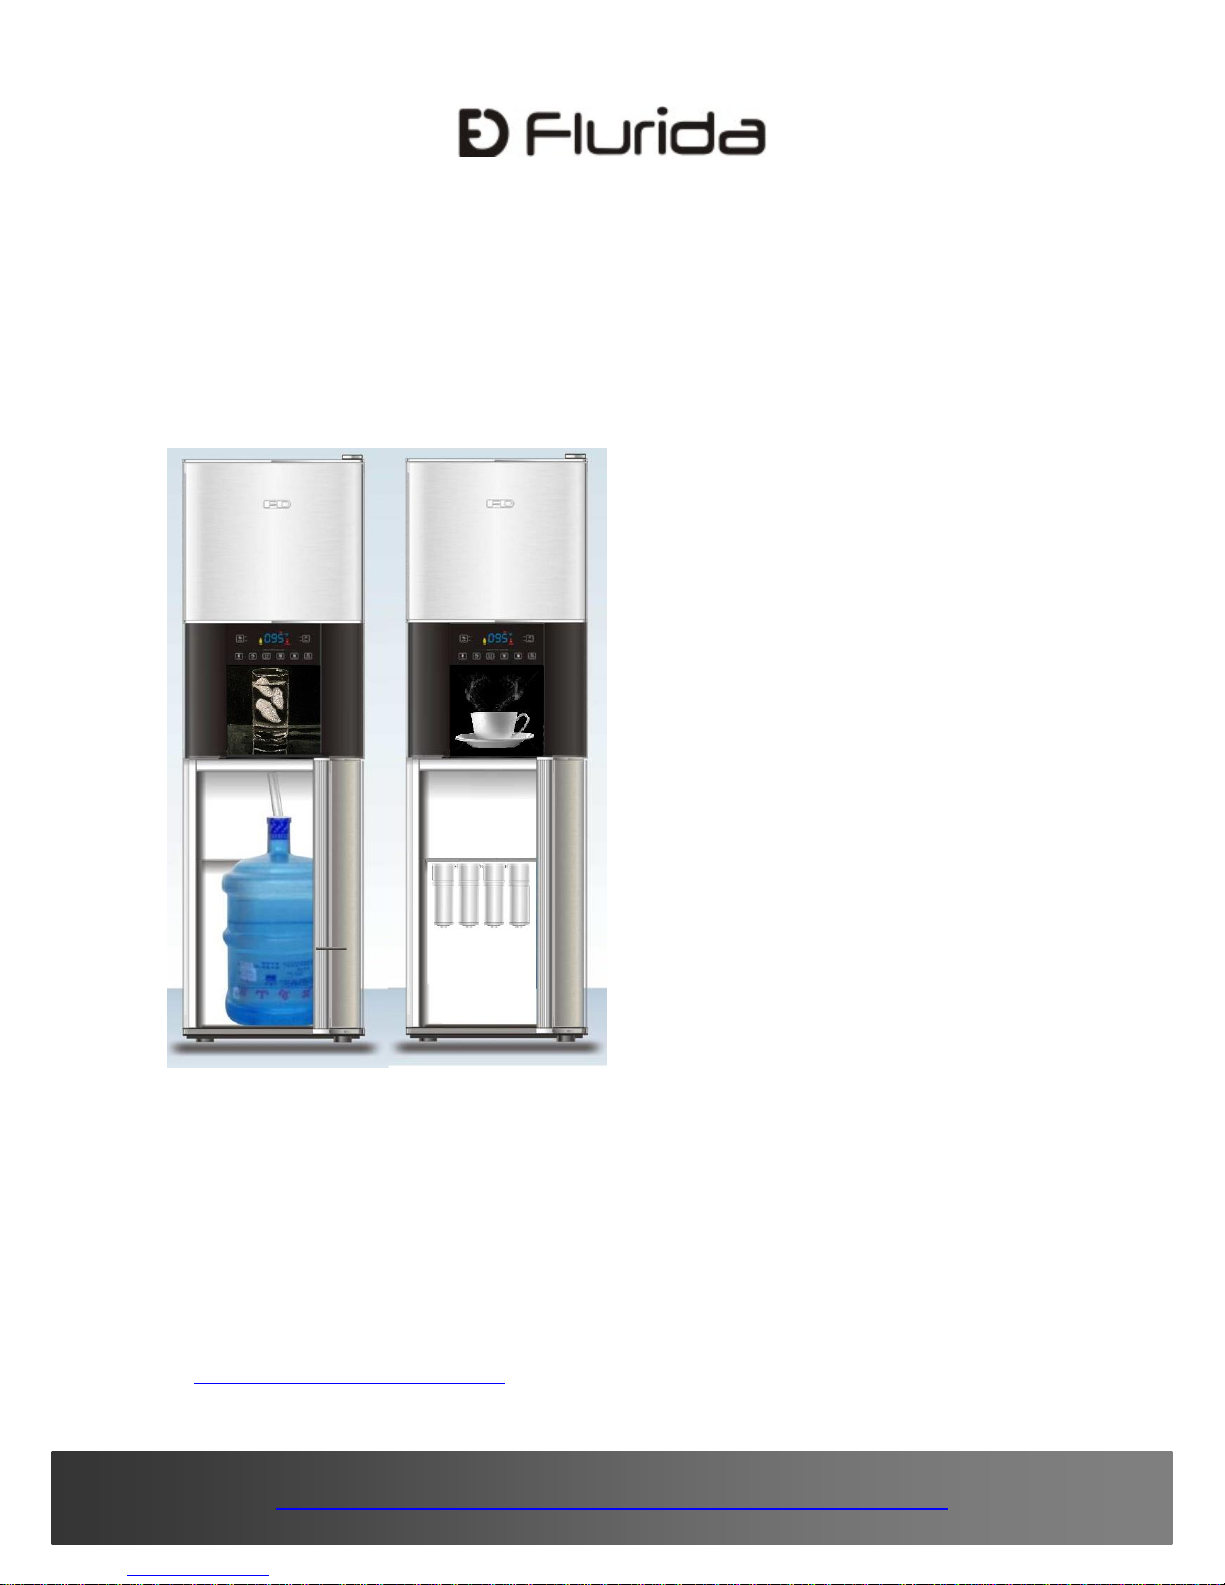
This is a great appliance to help you prepare cold or hot beverages and drinks.
The FDFB10501 and FDFT10501 ice and water dispensers are an innovative
design that combines cubed and crushed ice with hot and room-temperature
water in a single compact product. The freezer keeps 9 lbs of crescent ice cold
and available anytime. The bottled purified or plumbed filtered water system
creates the flexibility to place it anywhere in the office, break room, hotel,
home, boat or RV. Stainless look or black doors with silver accents give a sleek
and modern appearance.
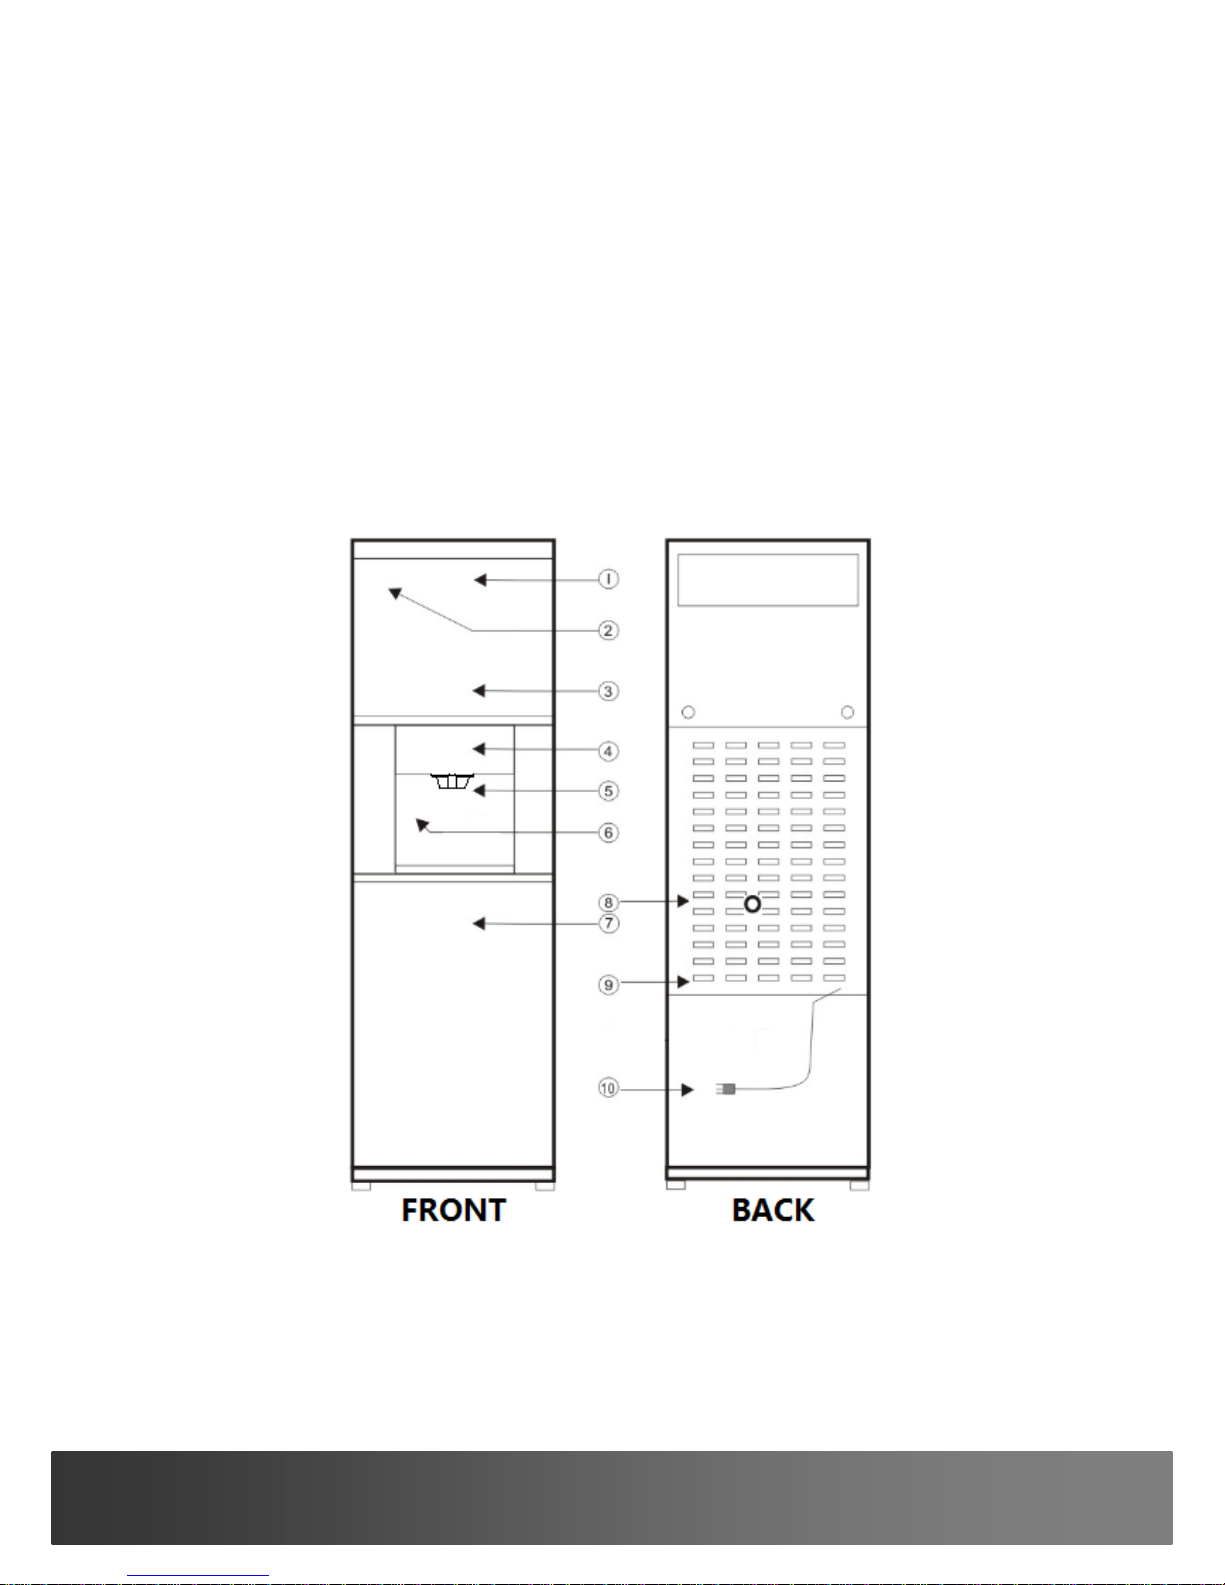
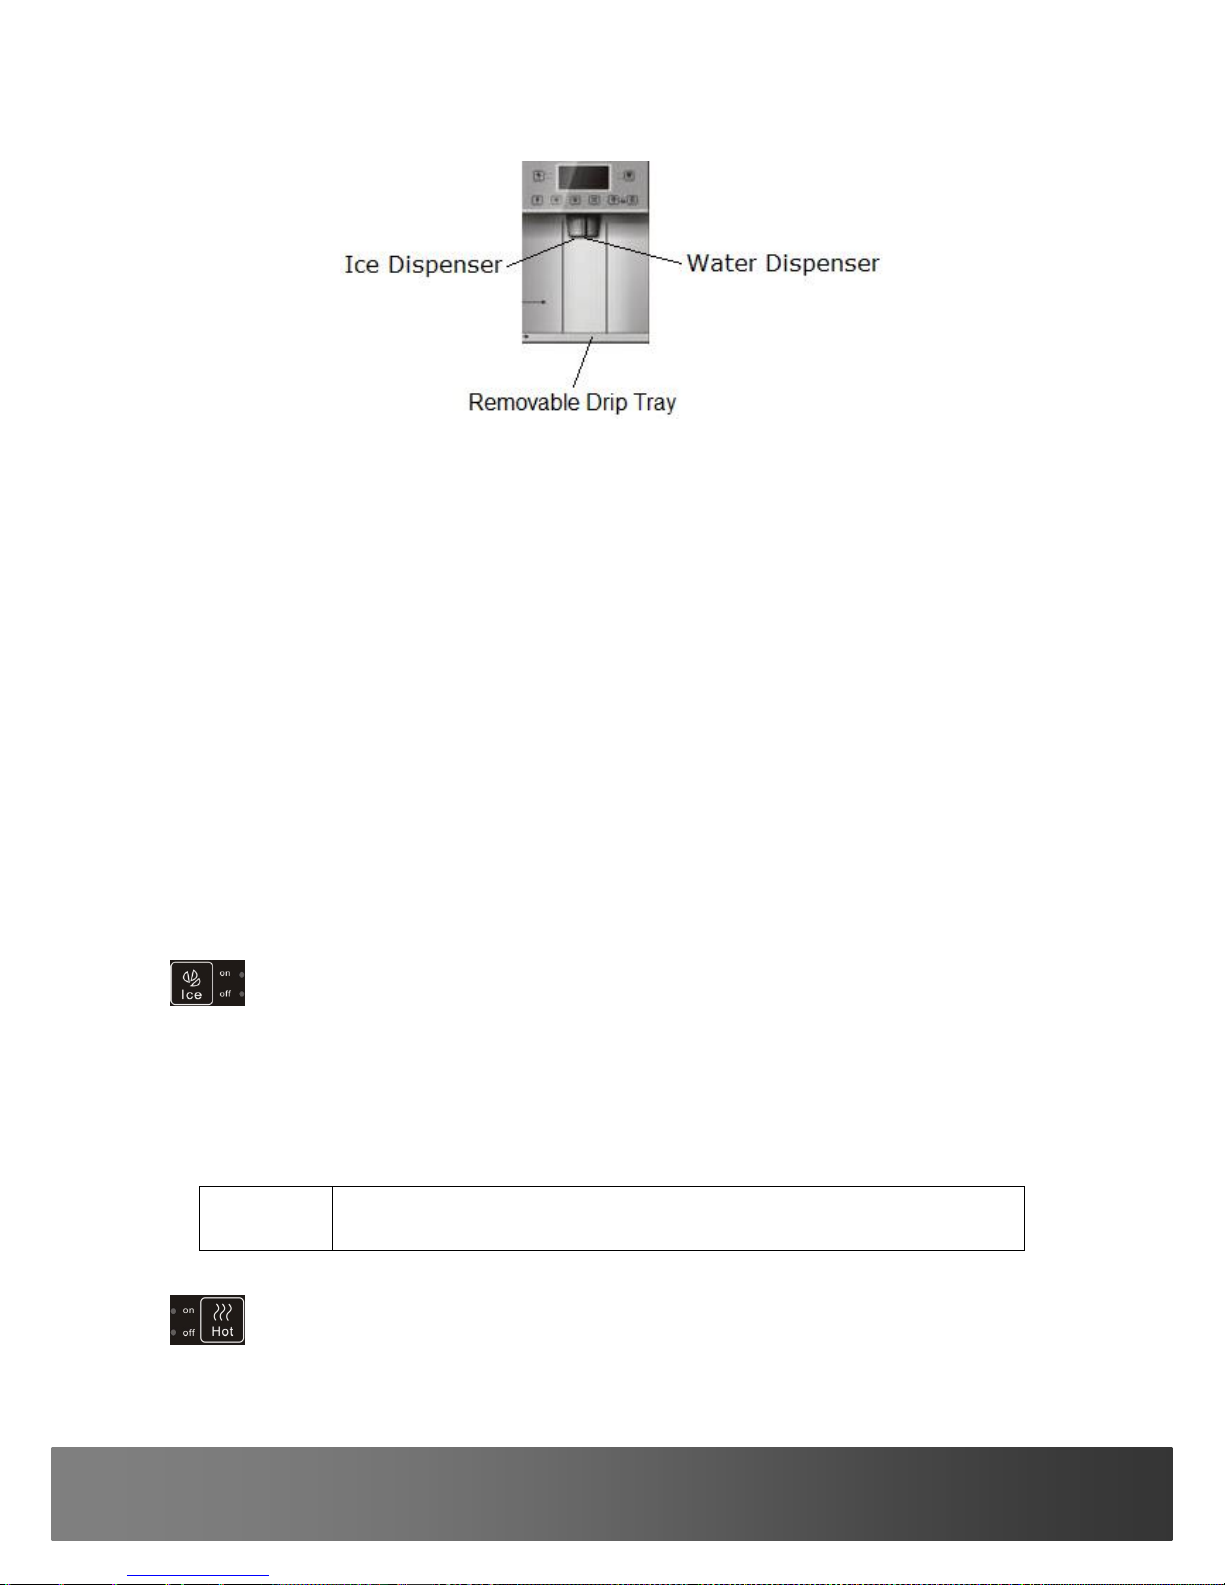
Features and Parts
1. Freezer Door
2. Ice Maker (located inside)
3. Ice Bin (located inside)
4. Control Panel
Page 5
5
2 4 4 1 2 M a i n S t . S u i t e 1 0 5 , C a r s o n , C A 907 4 5
5. Ice and Water Dispenser
6. LED light
7. Storage
8. Plumbed Water Line Connector
9. Back Cover
10. Power Cord
The dispenser allows you to enjoy cubed or crushed ice and hot or iced
water with the touch of a button.
The two-evaporator cooling system and the ice freezer keep ice from
melting and produce ice quicker.
The bottled or plumbed water supply design makes it perfect for all
applications. Bottled purified water or our four stage water filtration system
provides you with clean and great tasting water.
Touch control brings you the simplicity to select and dispense your
preferred types of ice and water.
Blue display and bright LED lights make it easy to use anytime and
attractive to display anyplace.
On/Off buttons save energy and give you the flexibility to use ice and hot
water.
Automatic alerts for water and filter will not allow you to run out of water or
leave water contaminated.
Child safety design protects your children from burning.
Specifications and Dimensions
Model No
FDFB10501
FDFT10501
Ice Type
Cubed and Crushed
Cubed and Crushed
Ice Production Rate
(70°F Air/50°F Water)
Crescent Ice 11 lb / 24 h
Crescent Ice 11 lb / 24 h
Ice Bin Capacity
9 lb
9 lb
Water Type
Hot and Room-Temperature
Hot and Room-Temperature
Hot Water Temperature
190 °F
190 °F
Hot Water Capacity
68 FL OZ
68 FL OZ
Operating Temperature for Ice
50~100 °F
50~100 °F
Water Supply
Bottled Purified Water w/
Optional Plumbed Filtered Water
Plumbed Filtered Water w/
Optional Bottled Purified Water
Storage Volume
3.5 cu ft
3.5 cu ft
Electrical Rating
115V/60HZ/5.6A
115V/60HZ/5.6A
Unit Dimensions
18-1/8”W x 20-1/8”D x 58-5/8”H
18-1/8”W x 20-1/8”D x 58-5/8”H
Depth w/ Door Open 90 Degree
37”
37”
Net Weight
120 lb
120 lb
Page 6
6
i n f o @ f l u r i d a a p p l i a n c e s . c o m
DISPENSER USE
DANGER
Hot water can scald your hands and body and cause serious injury.
CAUTION
Do not store food and drink in the ice freezer.
NOTE
For the first time use, allow 24 hours to produce the first batch of
ice. Discard the first three batches of ice produced.
NOTE
For the first time use or after connecting a plumbed water source or
after replacing the water filters, flush the water system by
dispensing several cups of water, then discarding them. Repeat
until water is clear and tasting good.
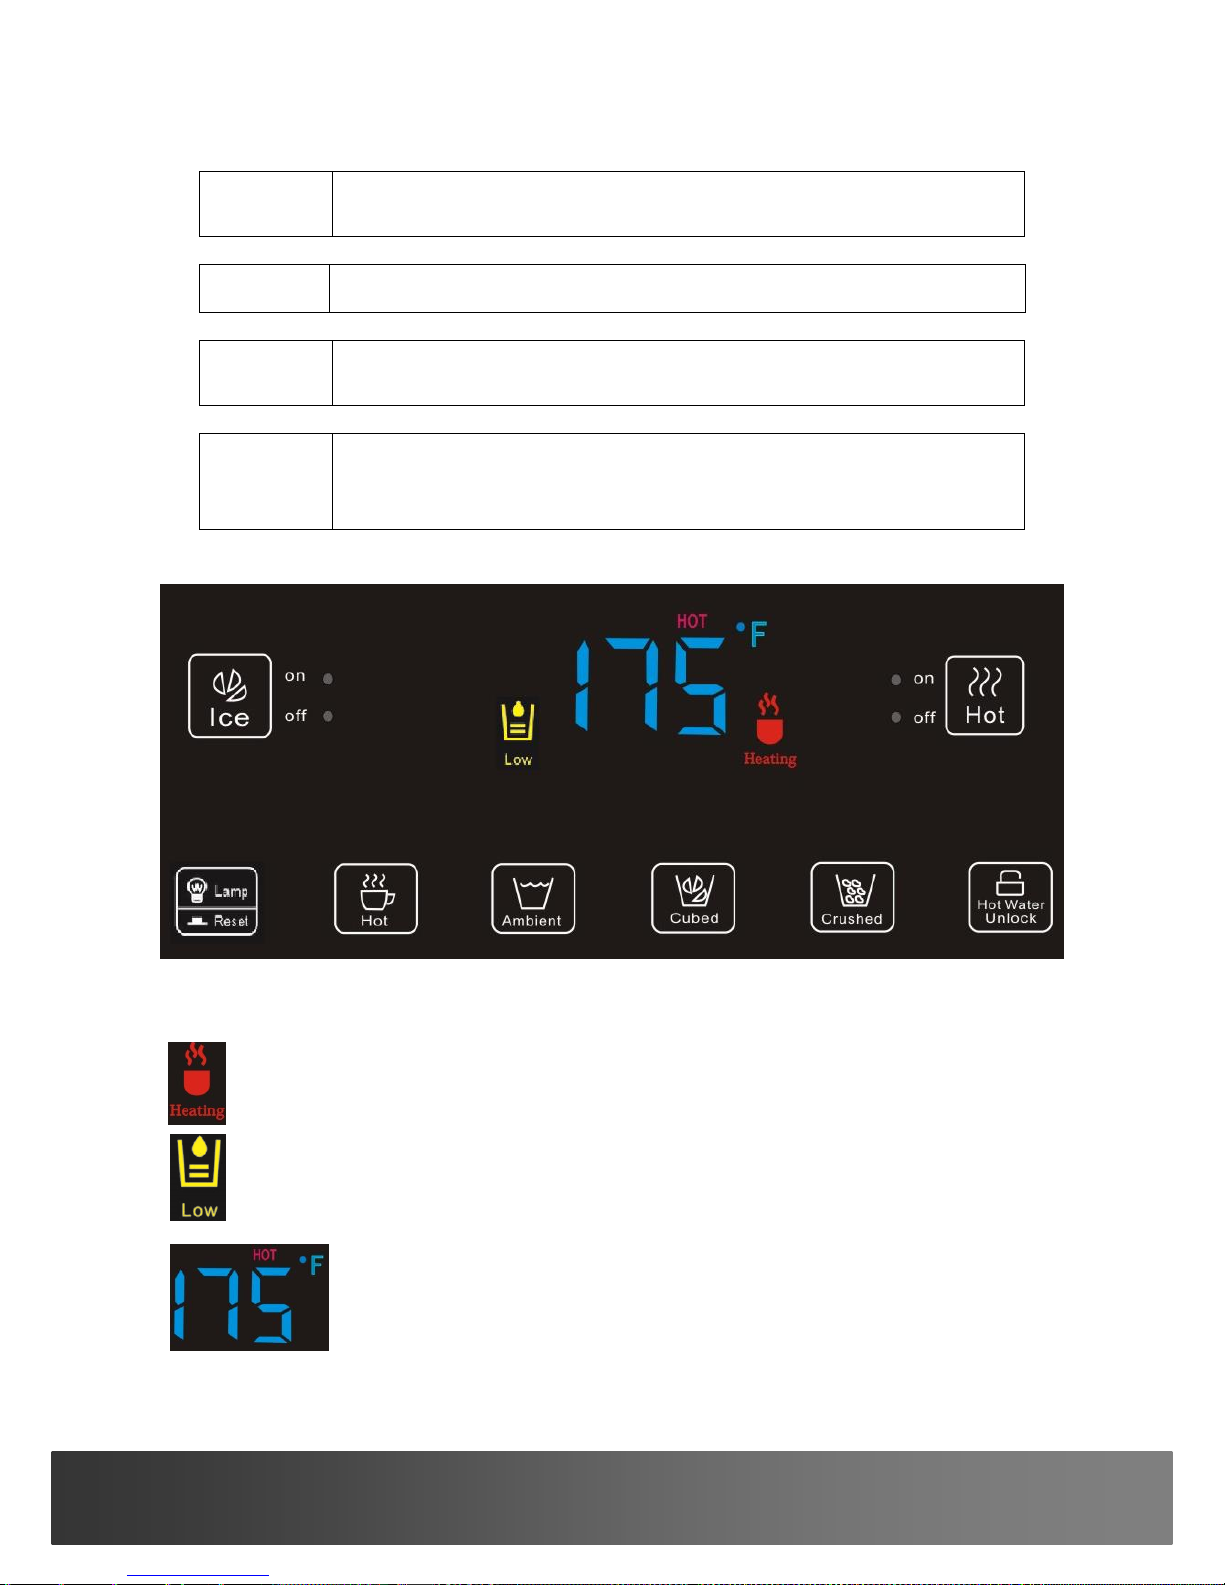
Indicator and Display Functions
Water heater indicator
Low water level indicator
Hot water temperature display
Page 7
7
2 4 4 1 2 M a i n S t . S u i t e 1 0 5 , C a r s o n , C A 907 4 5
Use of the Dispenser
Once the unit is powered, the ice and hot water functions will be turned
on and “ON” green LEDs will light accordingly.
If bottled water is selected, the water pump works immediately to pump
water from the bottle to the water tank. If plumbed water is selected,
the water inlet valve opens immediately to let water flow into the water
tank.
Once the water tank is full, the ice maker and water heater will start
working immediately. If the water tank is not filled with water within 4
minutes, the “Low” indicator will appear, and then the water pump,
water inlet valve, water heater, ice maker and water dispenser will stop
working.
While the water heater is on, the “Heating” indicator will appear and the
water temperature will be displayed.
The cooling system will start working in 5 minutes. The cooling system
will stop working automatically when ice is being ejected.
Turning the ice maker function on/off
Ice maker function button
Press the “Ice” button once to turn the ice maker off and the “OFF” red
LED will light; press the button again to turn it on and the “ON” green
LED will light.
Turning the hot water function on/off
NOTE
Normally the hot water function should be turned off to save
energy.
Hot water function button
Page 8

8
i n f o @ f l u r i d a a p p l i a n c e s . c o m
Press the “Hot” button once to turn the hot water off and the “OFF” red
LED will light; press the button again to turn it on and the “ON” green
LED will light.
You can turn off the hot water when it reaches the temperature you
prefer.
Turning the Light on/off
Lamp & Reset button
Press the “Lamp/Reset” button once to turn the light on. The light will
automatically turn off in 5 minutes; press the button again to turn it off.
Dispensing hot water
NOTE
If the “Hot” button is pressed without unlocking, continuous short
beeps will be heard. The “Hot” button will be locked automatically
once the button is released.
Hot water dispensing button
Hot water unlocking button
Place a cup under the water dispenser.
Press the “Hot Water Unlock” button once. You will hear a long beep
indicating the “Hot” button is unlocked.
Then press and hold “Hot” button within 5 seconds to dispense hot water.
Dispensing room-temperature water
Room-temperature water dispensing button
Place a cup under the water dispenser.
Press and hold the “Ambient” button to dispense room-temperature
water.
Dispensing ice
NOTE
Ice dispenser will stop working while the freezer door is open.
If ice cubes haven’t been used for days, they may freeze together
and unable to dispense. If this happens, pull out the ice bin and
shake it, then push it in.
Page 9

9
2 4 4 1 2 M a i n S t . S u i t e 1 0 5 , C a r s o n , C A 907 4 5
Dispensing cubed ice
Cubed ice dispensing button
Place a cup under the ice dispenser.
Press and hold the “Cubed” button to dispense cubed ice.
Dispensing crushed ice
Crushed ice dispensing button
Place a cup under the ice dispenser.
Press and hold the “Crushed” button to dispense crushed ice.
Replacing water bottle
When the “Low” indicator appears, water dispensing valves and water
pump will stop working automatically.
Check if the water bottle is empty and replace it.
Activate the water pump by pressing and holding “Lamp/Reset” button
for more than 3 seconds until you hear a long beep and the pump
starting. The “Low” indicator will disappear automatically once the water
tank is filled with water.
Replacing water filters
CAUTION
All water filters must be replaced at the same time.
The filters should be replaced at least once a year.
When “FLr” flashes, replace the water filters immediately.
Reset the “FLr” status by pressing and holding “Lamp/Reset” button for 3
seconds until you hear a long beep “FLr” disappears.
Dispense several cups of water to flush the system until water is clear.
Page 10

10
i n f o @ f l u r i d a a p p l i a n c e s . c o m
DISPENSER CARE
DANGER
Unplug the unit or disconnect power before performing any maintenance.
CAUTION
If ice cubes block the feeler arm, clear the ice cubes before you pull out
the ice bin.
Move the feeler arm up and keep it above the ice bin while you pull out
the ice bin. Otherwise the feeler arm may be damaged if it is obstructed
by the ice bin.
How to empty ice bin
Use the instructions below to remove the ice bin when emptying ice or
cleaning the ice bin.
Push the ice bin back until the auger is engaged in the auger coupler. If
it is stuck, rotate the auger 1/8 turn, then push it in again.
Page 11

11
2 4 4 1 2 M a i n S t . S u i t e 1 0 5 , C a r s o n , C A 907 4 5
How to release water
Use the water release drain located in the storage compartment to
release the water left in the unit.
How to remove condensate
The unit is operated with automatic defrost cycle. The water collects in a
water tray that is located at the compressor compartment. Normally, the
water evaporates through the hot gas tubing.
In very high humidity conditions, empty water if the tray is full.
How to clean the water system with citric acid
Citric acid may be used if heavy sediment has built.
Fill a bottle with cold water and add 1 lb of citric acid powder.
Dispense the hot water to flush the system.
Fill a bottle with clean cold water.
Dispense the hot water to rinse the system until water is clear
Release the remaining water.
When the “Low” indicator appears
Check water selection switch first.
If bottled water is used, check if the water bottle is empty and replace it
or check if the water pump is broken; then press and hold “Lamp/Reset”
button for more than 3 seconds until you hear a long beep and the pump
starting to activate the water pump.
If plumbed water is used, check if the water supply line is broken or the
water inlet valve is defective; check all water tubes for leakages.
If heavy frost builds up in the ice freezer
Press and hold the “Hot” button for more than 10 seconds until dEF is
displayed. You will hear a long beep when the defrost cycle starts.
Once the defrost cycle is complete, the hot water temperature will be
displayed.
If ice cubes are frozen together
Press the “Cubed” or “Crushed” button to dispense ice for a few minutes.
Open the upper door and pull out the ice bin to shake it or remove the
large clumps of ice cubes.
Page 12

12
i n f o @ f l u r i d a a p p l i a n c e s . c o m
If the ice bin is stuck
Unplug the unit.
Use a hair dryer with warm or cold air to melt the ice.
Pull out the ice bin and empty it.
Wipe up water and put the ice bin back.
Plug in the unit.
If ice cubes are jammed in the ice maker
Unplug the unit.
Use a hair dryer with warm or cold air to melt the jammed ice cubes.
Then remove the jammed ice cubes.
Plug in the unit.
If a power outage happens
Unplug the unit.
Pull out the ice bin and empty it.
Wipe up water and put the ice bin back.
If you are away on holidays or vacations
Unplug the unit or disconnect the power.
Open the upper door
Pull out the ice bin and empty it.
Let the freezer defrost.
Wipe up water and dry the freezer.
Release the remaining water.
What normal operating sounds you may hear
You may hear a boiling, rattling or gurgling sound produced by flow of
refrigerant through the evaporator.
You may hear air being forced through the unit by the evaporator fan.
You may hear air being forced through the condenser by the condenser
fan.
You may hear a clicking sound produced by the refrigerant valve or
dispensing valve.
You may hear a water dripping sound during automatic defrost cycle.
You may hear a high pitched hum or pulsating sound produced by the
compressor.
You may hear the ice cubes being ejected from the ice maker to the ice
bin.
Page 13

13
2 4 4 1 2 M a i n S t . S u i t e 1 0 5 , C a r s o n , C A 907 4 5
INSTALLATION INSTRUCTIONS
Location
CAUTION
This unit is designed for indoor use only.
Use the rear wheels to move the unit around.
Place the unit away from direct sunlight and heat sources.
Do not install the unit in moist areas.
Do not install the unit in garage.
Do not install the unit where the ambient temperature range will be
below 50 °F or above 100 °F. Otherwise, the compressor will not be able
to maintain proper temperature.
The unit must be placed in a properly ventilated location to prevent heat
build-up generated by the refrigeration system. Failure to do so will
prevent the unit from cooling properly, and may result in damage to unit
components as well as its contents.
The unit must be installed on a floor that is level and strong enough to
support a fully loaded unit up to 200 lb.
Clearance
CAUTION
This unit is designed for free-standing installation only.
Allow for minimum 2” on the back, 4” clearance on each side, and 12” at
the top for proper air circulation.
If the unit is installed next to a fixed wall on the right side, leave 6”
minimum clearance to allow the door to swing.
Adjust the levelling legs to level the unit at a height that allows the door
to be opened and closed properly.
Electrical Requirements
DANGER
It is required that you connect this unit only to a GFCI protected
receptacle. It is strongly recommended that you do not use an adapter
or an extension cord to connect this unit because of potential safety
hazards.
A dedicated 115V, 60Hz, 15 or 20A fused, grounded electrical supply is
required. It is recommended that a separate circuit serving only your
appliance be provided.
Connect to properly polarized outlets only.
Use outlets that cannot be turned off by a switch.
Plug the unit into a grounded 3 prong outlet only.
Page 14

14
i n f o @ f l u r i d a a p p l i a n c e s . c o m
How to insert or disconnect a tube or plug
1. Remove the lock clip first.
2. To install, insert a tube or plug until it is engaged;
To disconnect, press the release ring down and pull out a tube or plug.
3. Install the lock clip.
If You Use Bottled Purified Water
NOTE
Use 3, 4 or 5 gallon bottled purified water only. Drain is not required.
Pump pipe and water bottle installation
Page 15

15
2 4 4 1 2 M a i n S t . S u i t e 1 0 5 , C a r s o n , C A 907 4 5
Open the storage door more than 90 degrees.
Check if the water inlet (2) and outlet (3) are closed with plugs. They
cannot be open.
Remove the plug of the pump pipe connector (1) and insert the pump
pipe into it (1).
Place the bottle onto the loading area.
Use the following steps as described to complete the installation.
a. Hold the pipe connector (1) to insert the pump pipe into the bottle
and place the cap onto the bottle neck tightly
b. Hold the pipe connector and push the pipe until it stops
Turn the water selection switch (5) as indicated to use bottled water
Then plug in the unit to restart.
If You Use Plumbed Filtered Water
NOTE
A municipal water supply or other potable water with water pressure between
15 and 120 psig is required to operate this unit. Drain is not required.
NOTE
To get the best quality drinking water, A 4 stage water filter system is used.
Water line installation (only for the first time installation)
Prepare a water supply line using ¼” OD tubing (A) with a compression
nut (B) and sleeves (C) on one end. Connect the tubing to the shutoff
valve by screwing the compression nut.
Page 16

16
i n f o @ f l u r i d a a p p l i a n c e s . c o m
Place the free end of the tubing in a container or sink and turn the
shutoff valve on to flush the tubing until water is clear. Then turn the
shutoff valve off.
Remove the plug of the plumbed water line connector (8), which is
located at the back of the unit. Insert the free end of the tubing into the
water line connector (8) until it is engaged.
Water filter installation
Open the storage door more than 90 degrees.
Check if the pump pipe connector (1) is closed with a plug.
The water filters Q5305, Q5333, Q5321 and Q5320 must be removed
from left to right. To remove, turn the filter counter-clockwise (a small
amount of water may leak).
The water filters Q5320, Q5321, Q5333 and Q5305 must be installed
from right to left. To install, turn the filter clockwise until it stops.
Turn the shutoff valve on and make sure there are no water leaks.
Turn the water selection switch (5) as indicated to use plumbed water.
Then plug in the unit to restart.
Page 17

17
2 4 4 1 2 M a i n S t . S u i t e 1 0 5 , C a r s o n , C A 907 4 5
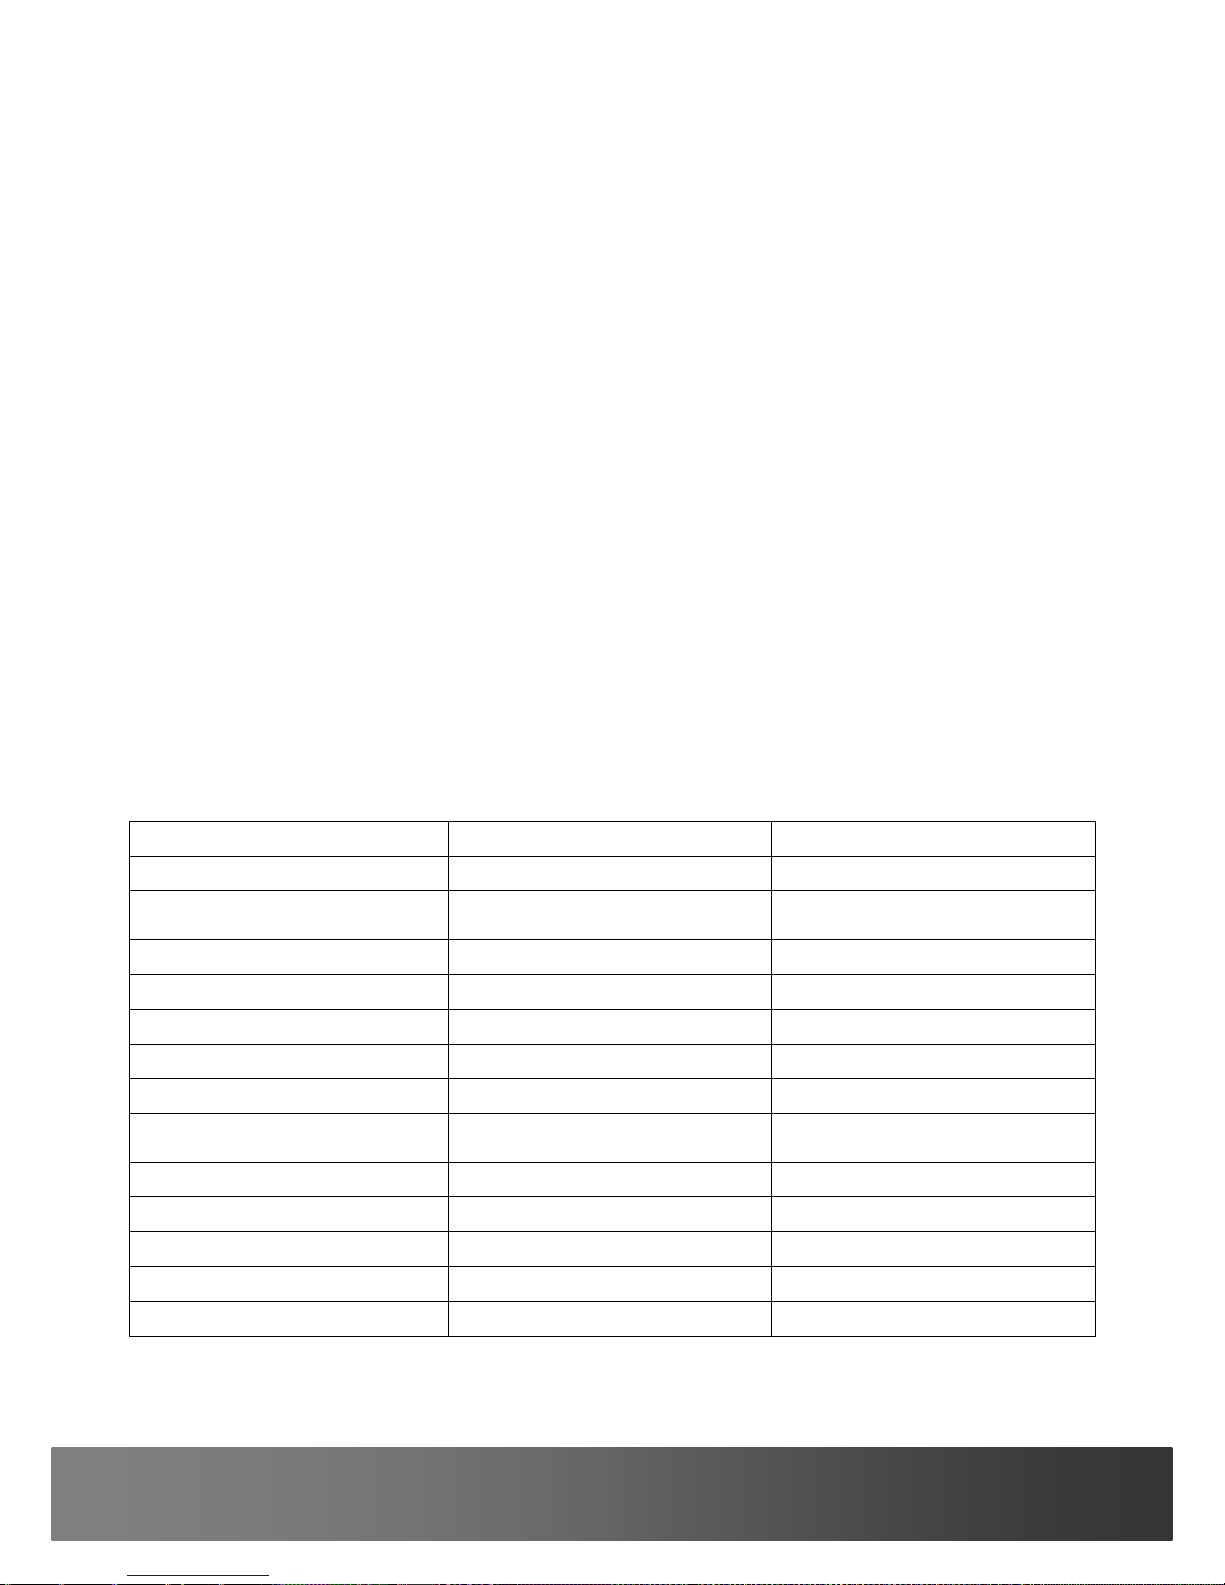
Parts for using filtered water
Description
Part No
Quantity
1/4" OD Water Line W/
Compression Nut & Sleeves
0111700110
1
Water Filter Q5305
0182000000
1
Water Filter Q5333
0182000100
1
Water Filter Q5321
0182000200
1
Water Filter Q5320
0182000300
1
Model Q5305
Model Q5333
Model Q5321
Model Q5320
Polypropylene
depth filtration
Reduction of
sediment as
small as 5
micron.
Protection of
downline
equipment
AWGAC 12x40
Mesh
Taste, odor
and chlorine
reduction
Post RO
Block GAC 10
Micron
Taste, odor
and chlorine
reduction
Block GAC 1
Micron
Taste, odor
and chlorine
reduction.
Cyst reduction.
Ideal for
equipment
protection
Page 18

18
i n f o @ f l u r i d a a p p l i a n c e s . c o m
TROUBLESHOOTINGS
Complaint
Possible Causes
Response
Unit is not
working and
display is not
lit
a. Power cord is unplugged
b. No power
c. Power cord problems
d. Control PCB is defective or
wiring problems
e. Display PCB is defective or
wiring problems
a. Plug in the power cord
b. Check for outlet and breaker or
fuse
c. Call for service
d. Call for service
e. Call for service
“Low”
indicator
appears
(to reactivate
the water
pump, press
and hold
“Lamp/Reset”
button for
more than 3
seconds)
a. The water selection switch
is not set correctly
b. The internal water tank is
not filled with water
c. The water bottle is empty
d. The plumbed water supply
line is broken
e. Water pipes or tubes are
loose, kinked or broken.
f. The water pump or water
inlet valve is defective or
wiring problems
a. Select the bottled or plumbed
water source, unplug and plug the
unit.
b. Reactivate the water pump and
wait until “Low” indicator
disappears
c. Change it
d. Fix it
e. Tighten, straighten or change
them.
f. Call for service
Ice maker is
not producing
ice
a. The water selection switch
is not set correctly
b. The ice maker is not
turned on
c. Ice cubes are jammed
d. The ice maker water tubes
are kinked and the ice
mould is not filled with
water
e. The water fill tube freezes
f. The water filters are
clogged
g. The ice maker water pump
is defective or wiring
problems
h. The ice maker is not
working or wiring problems
i. The cooling system is not
working
a. Select the bottled or plumbed
water source, unplug and plug the
unit
b. Turn the ice maker on
c. Clear the ice cubes
d. Straighten them
e. Unplug the unit and remove the
ice bin;plug in again when the
tube is free of ice.
f. Remove the water filters and
check if ice quality improves
g. Call for service
h. Call for service
i. Call for service
Ice maker is
not producing
enough ice
a. The water supply line is
kinked and the ice mould is
not filled with sufficient
water
b. The water filters are
clogged
c. The freezer door is not
sealed
a. Straighten it
b. Remove the water filters and
check if ice quality improves
c. Check for door seal and door
opening
Page 19

19
2 4 4 1 2 M a i n S t . S u i t e 1 0 5 , C a r s o n , C A 907 4 5
d. The ice maker water pump
is defective
e. The ice maker is not
working properly
f. The cooling system is not
working properly
d. Call for services
e. Call for service
f. Call for service
Ice cubes are
hollow or small
a. The water shutoff valve is
not fully open
b. The water supply line is
kinked
c. The water filters are
clogged
d. The ice maker water fill
time is not enough
e. The ice maker thermostat
is defective
a. Turn the valve fully open
b. Straighten it
c. Remove the water filters and
check if ice quality improves
d. Call for service
e. Call for service
Ice cubes are
frozen together
a. If ice cubes haven’t been
used for a long period of
time, they may freeze
together
b. Ice cubes are produced
continuously because the
feeler arm is blocked up
c. The ice mould is overfilled
because undersized ice
cubes are left
a. Pull out the ice bin and shake it or
remove the large clumps of ice
cubes
b. Clear ice cubes around the feeler
arm
c. Improve water pressure
Crushed ice is
not dispensed
a. There are not enough ice
cubes in the ice bin
b. Ice cubes are frozen
together on one side of ice
bin
c. The freezer door is open
d. The magnetic switch is
defective
e. The auger motor is broken
f. The flapper motor is
broken or wiring problems
g. Control PCB is defective or
wiring
h. Display PCB is defective or
wiring problems
a. see Ice maker is not producing
ice & Ice maker is not
producing enough ice
b. Pull out the ice bin and shake it
c. Close it
d. Replace it
e. Call for service
f. Call for service
g. Call for service
h. Call for service
Cubed ice is
not dispensed
a. The solenoid is defective
b. The same as crushed ice
a. Call for service
b. See Crushed ice is not
dispensed
Hot water is
not hot
a. The hot water function is
not turned on
b. The water heater stops
working when “Low”
indicator appears
c. The water heater is broken
d. The Thermostat is
defective
a. Turn the hot water function on
b. See “Low” indicator appears
c. Call for service
d. Call for service
Hot water is
a. The thermostat is defective
a. Call for service
Page 20

20
i n f o @ f l u r i d a a p p l i a n c e s . c o m
not hot enough
Hot water
heater smells
burning
a. The hot water tank is dry
a. Call for service
Water
dispensing is
not working
a. Water selection switch is
not selected correctly
b. The water dispensing valve
automatically stops
working when “Low”
indicator appears
c. Air is trapped
d. The dispensing valve water
tubes are kinked
e. The water dispensing valve
is defective
f. Control or display PCB is
defective or wiring
problems
a. Select the bottled or plumbed
water source, unplug and plug the
unit
b. See “Low” indicator appears
c. Release a cup of water from the
water release drain
d. Straighten them
e. Call service
f. Call service
Water
dispenser is
slow
a. The dispensing valve water
tubes are kinked
b. The water dispensing valve
is defective
a. Straighten them
b. Call service
Water is
leaking
a. The dispenser drip tray is
full
b. Ice is being melted
because of high freezer
temperature
c. The internal water tank is
leaking
d. The internal water tank
level sensor is defective
e. The water dispensing valve
is defective
a. Empty it
b. Check evaporator fan or wiring
c. Call for service
d. Call for service
e. Call for service
Both freezer
and ice maker
evaporators
are iced
a. The freezer door is not
closed
b. The defrost solenoid valve
is defective or wiring
problems
c. The defrost drip tray
heater is broken or wiring
d. The evaporator fan is
broken
a. Close it
b. Call for service
c. Call for service
d. Call for service
Page 21

21
2 4 4 1 2 M a i n S t . S u i t e 1 0 5 , C a r s o n , C A 907 4 5
SERVICE & IMPORTANT NOTICE
The manufacturer has a policy of continuous improvement on its products and
reserves the right to change materials and specifications without notice.
Contact us with any questions at 800-433-9938 or info@fluridaappliances.com
Or visit 24412 Main St. Suite 105 Carson, CA 90745 and
www.fluridaappliances.com
LIMITED WARRANTY: Seller warrants that the goods will be free of defects in materials and
workmanship for a period of 12 (twelve) months from date of sale, removal and re-installation
of unit is not included in warranted labour. For a scratch and dent or refurbished unit,
warranty is 3 months from your dated invoice (parts for function only, not cosmetic). There is
no warranty on parts purchased separately. Purchaser’s exclusive remedy is limited, at Seller’s
option; to repair or replace defective part[s] with either new or factory reconditioned part[s].
Purchaser is responsible for shipping the unit pre-paid to designated facility and Seller will pay
return shipping charges in the continental United States for items repaired under warranty
within 12 (twelve) months from date of sale. Improper placement of the unit will void the
warranty. This limited warranty does not cover damage due to such things as accident,
misuse, abuse, mishandling, neglect, acts of God, fires, earthquakes, floods, high winds,
government, war, riot or labour trouble, strikes, lockouts, delay of carrier, unauthorized
repair, or any other cause beyond the control of the Seller, whether similar or dissimilar to the
foregoing. Seller is not responsible for any damages caused to Seller’s property resulting from
the good. This limited warranty applies only inside the Continental US. (Alaska, Puerto Rico
and Hawaii are not warranted.)
Seller is not responsible for incidental or consequential damages, and there are no warranties,
expressed or implied, which extend beyond the Limited Warranty described above. The implied
warranties of merchantability and of fitness for a particular purpose are hereby expressly
disclaimed. Some states do not allow the exclusion of incidental or consequential damages, or
a waiver of the implied warranties of fitness and/or merchantability, so the above limitations
may not apply to you. This warranty gives you specific legal rights and you may also have
other rights which vary from state to state. In the event of any dispute between Seller and
Purchaser arising out of or relating to these terms and conditions or to the goods sold
generally, Purchaser must first file a written claim with Seller within ten days of the occurrence
giving rise to the claim and wait an additional thirty days for a response before initiating any
legal action. The sale and all terms are subject to Nevada law. Any legal proceeding arising out
of or relating to these terms and conditions or to the goods sold generally shall be brought
solely and exclusively in the City of Las Vegas. In no event may Purchaser initiate any legal
proceeding more than six months after the occurrence of the event giving rise to the dispute.
The above terms and conditions are the only ones governing this transaction and Seller makes
no oral representations of any kind. These Terms and Conditions can only be modified in
writing, signed by both Purchaser and Seller.
FD is a registered trademark of Flurida Appliances Inc. All products, features, and services are
subject to change without notice. We cannot guarantee the accuracy of the contents of this
document. We disclaim liability for errors, omissions, or future changes.
Copyright©2015 Flurida Appliances Inc. All rights reserved.
 Loading...