

Page 1

U S E R I N S T R U C T I O N S
P o r t a b l e I c e D i s p e n s e r
F D F M 1 J A 0 1
S A F E T Y I N S T R U C T I O N S - - - - - - - - - - - - - - - - - - - - - - - - - - - - 2
F E A T U R E S & S P E C I F I C A T I O N S - - - - - - - - - - - - - - - - - - - - 4
U S E O F D I S P E N S E R - - - - - - - - - - - - - - - - - - - - - - - - - - - - - - - - 6
D I S P E N S E R C A R E - - - - - - - - - - - - - - - - - - - - - - - - - - - - - - - - - - - 9
I N S T A L L A T I O N I N S T R U C T I O N S - - - - - - - - - - - - - - - - - - 1 3
T R O U B L E S H O O T I N G S - - - - - - - - - - - - - - - - - - - - - - - - - - - - - - 1 4
S E R V I C E & I M P O R T A N T N O T I C E - - - - - - - - - - - - - - - - - 1 5
G E N E R A L O P E R A T I N G I N S T R U C T I O N
Read these instructions before use and save them for future reference.
Let the unit rest and remain unplugged for 24 hours before use.
Remove all external and internal packaging materials. Be sure that all parts
have been included before discarding any packaging materials. You may
want to keep the packaging materials for use at a later date.
Upon receipt and inspection of the unit the power cord must be replaced if
it is damaged.
Contact customer service at 800-433-9938 or [email protected]
w w w . f l u r i d a a p p l i a n c e s . c o m
Page 2
2
Impro
per use of the power cord plug can result in the risk of
Electrical Safety
SAFETY INSTRUCTIONS
DANGER
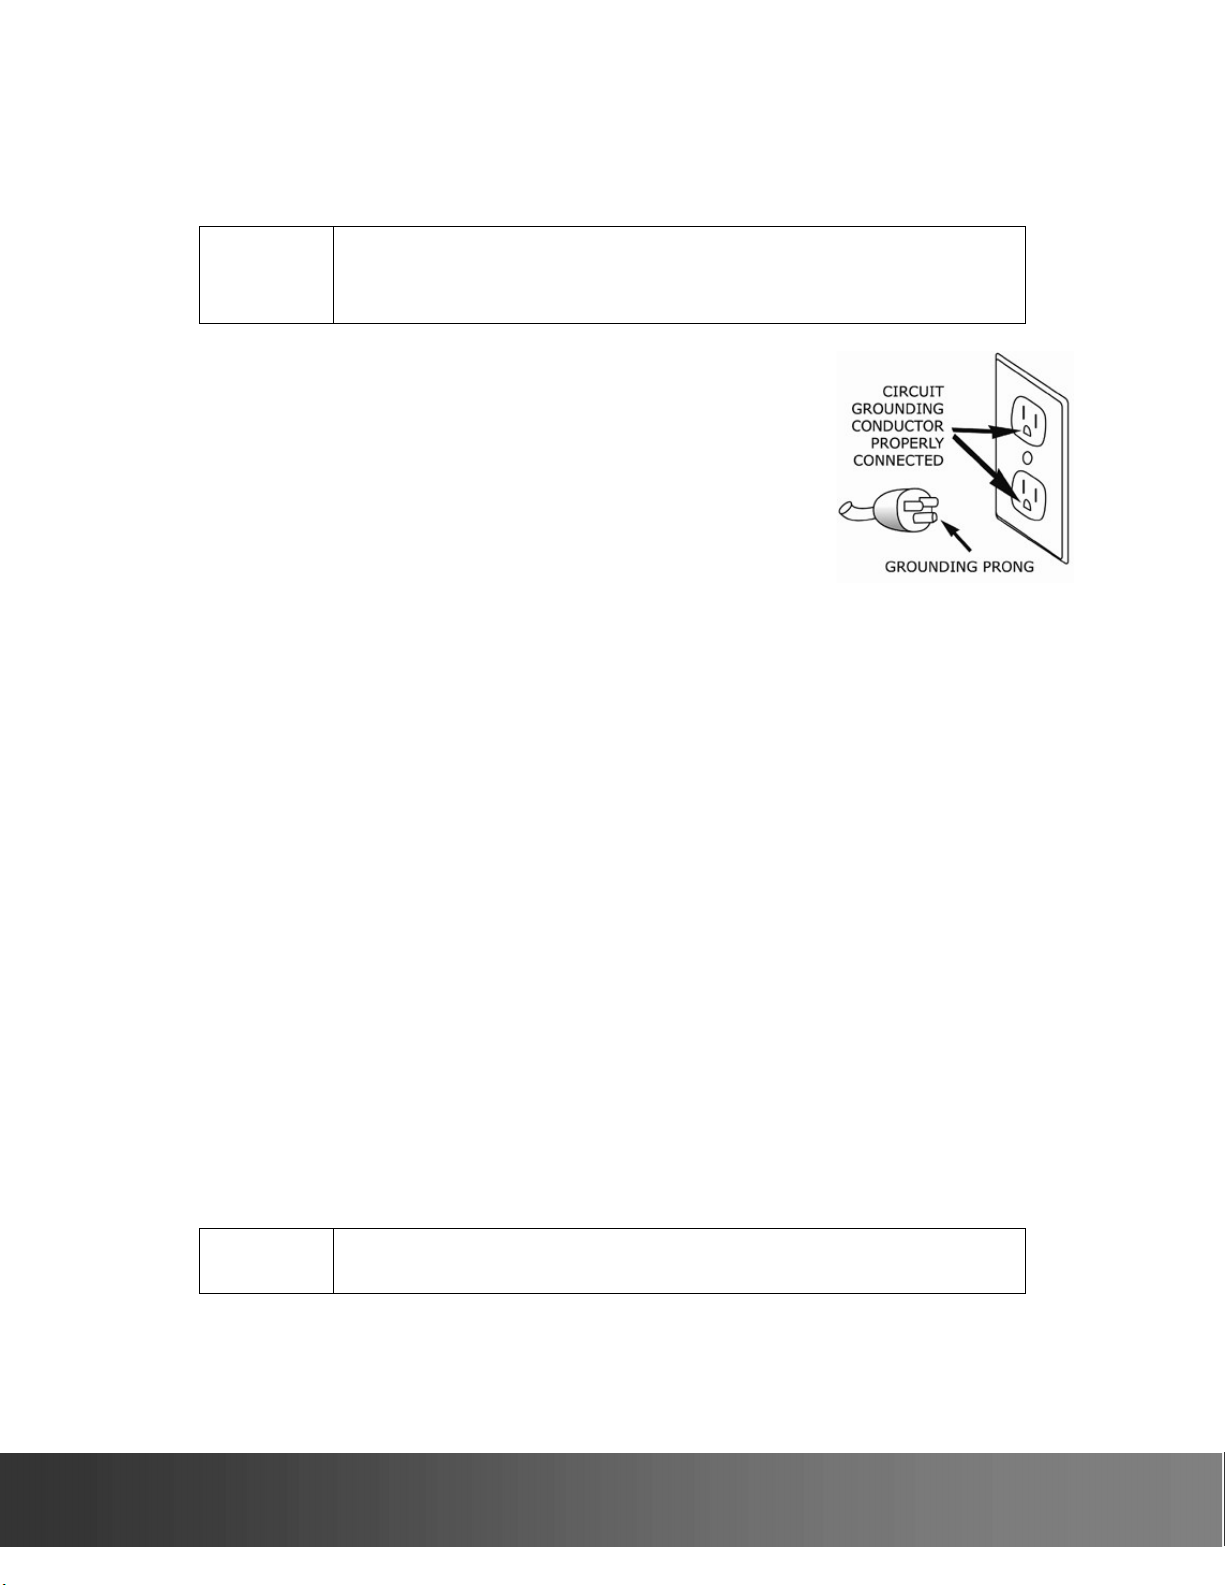
This appliance is equipped with a 3-prong grounding-
type plug and shall be plugged into a properly
connected grounding-type outlet.
It is required to use a 3–prong grounding-type
electrical outlet properly grounded in accordance with
the National Electrical Code and local codes and
ordinances.
A separate adequately fused and grounded circuit
shall be used for this appliance. The voltage rating
must match the rating label on the unit.
Do not use an adapter or an extension cord.
Do not under any circumstances cut or remove the third ground prong from
the power cord.
Never unplug the appliance by pulling the power cord. To disconnect the
unit always grip the plug firmly and pull straight out from the wall outlet.
Do not operate the appliance if the appliance housing is removed or
damaged.
Do not attempt to repair or replace any part of your appliance unless it is
specifically recommended in this manual. All other servicing shall be
referred to a qualified technician.
To protect against electric shock do not immerse appliance plug or cord into
water or other liquids.
Child Safety
Exercise caution and use reasonable supervision when appliance is used
near children. Never allow children to operate the unit. Keep packing
materials away from children.
Keep fingers out of pinch point areas.
Cleaning
DANGER
electrical shock, property damage and personal injury or death.
Unplug the unit or disconnect power before performing any
maintenance.
To reduce the risk of injury when cleaning your appliance follow
these basic precautions.
Unplug the appliance or disconnect power before performing any
maintenance.
i n f o @ f l u r i d a a p p l i a n c e s . c o m
Page 3

Do not clean appliance with flammable fluids. Do not store or use gasoline
or other flammable vapors or liquids in the vicinity of this or any other unit.
The fumes can create a fire hazard or explosion.
Do not use solvent-based cleaning agents or abrasives on the interior or
exterior of the appliance. These cleaners may damage or discolor the
appliance.
Do not operate the appliance with wet hands, while standing on a wet
surface, or while standing in water.
2 4 4 1 2 M a i n S t . S u i t e 1 0 5 , C a r s o n , C A 9 0 7 4 5
3
Page 4
4
FEATURES & SPECIFICATIONS
Overview
This compact automatic ice dispenser allows you to enjoy chewable ice with
the touch of a button. Manual water fill makes it portable and easy to use.
Features and Parts
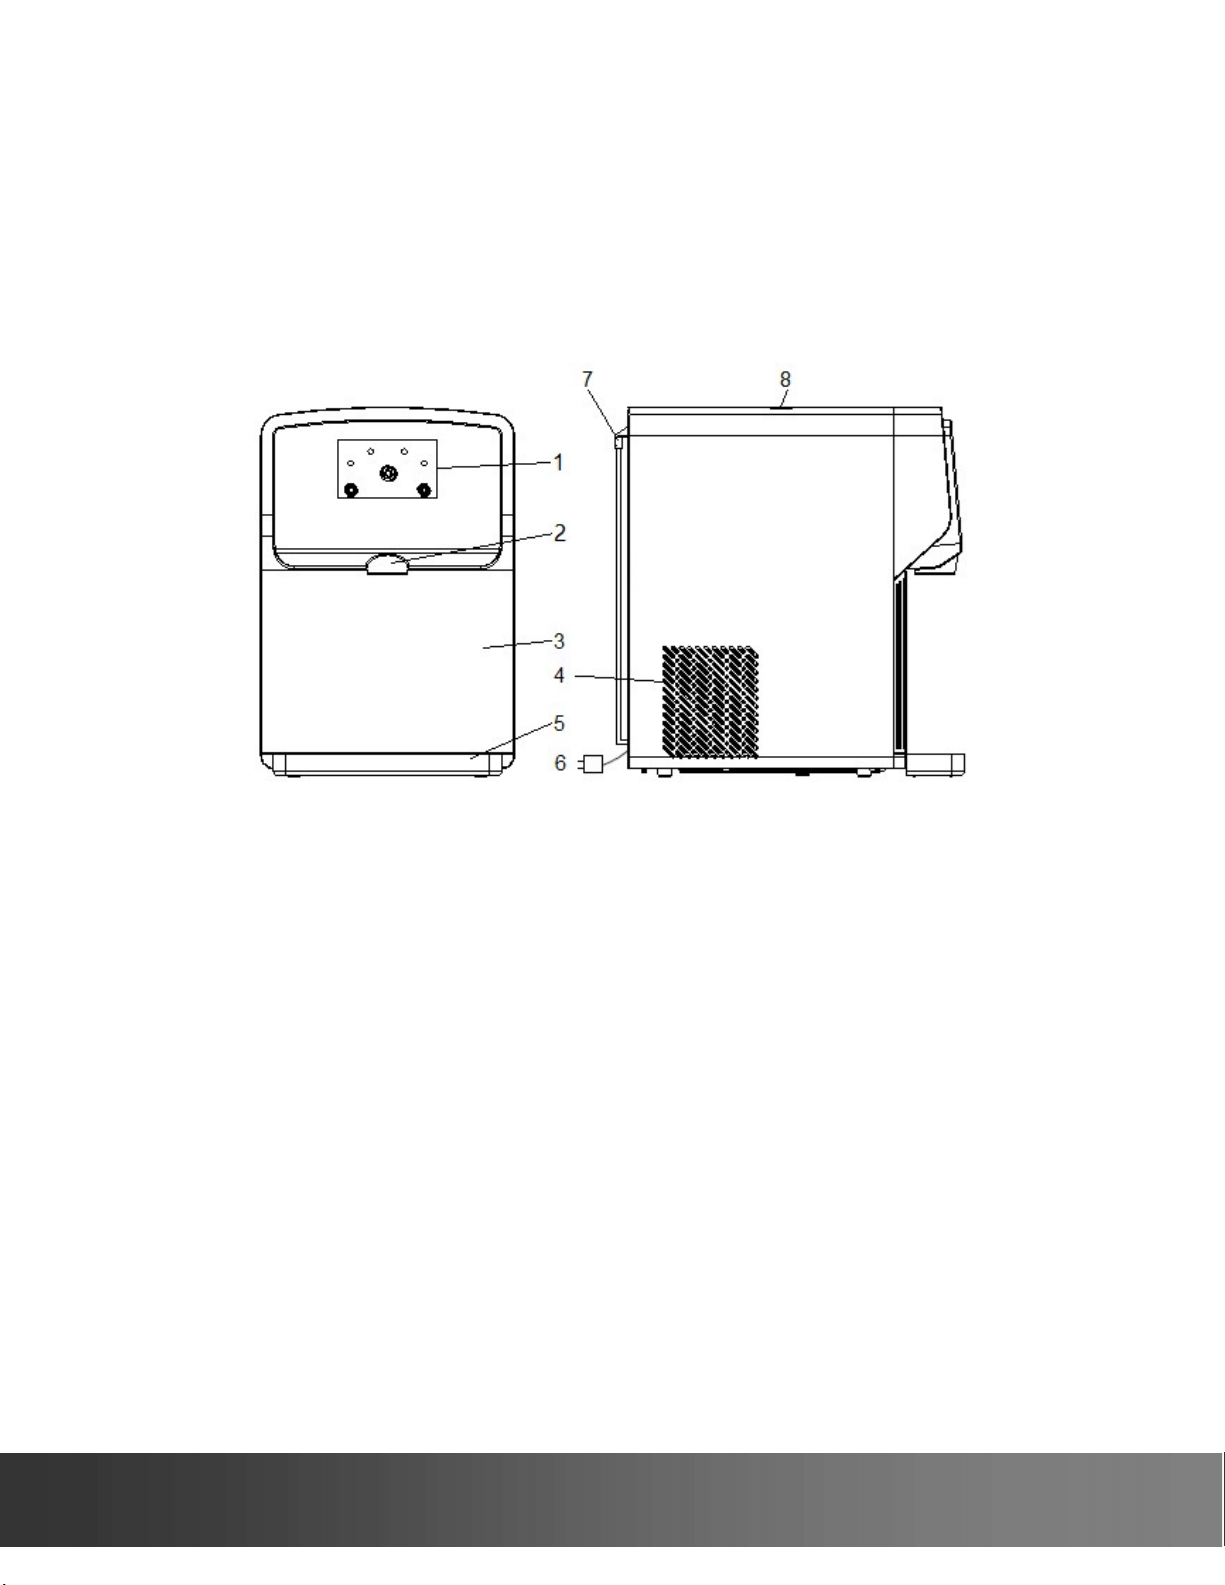
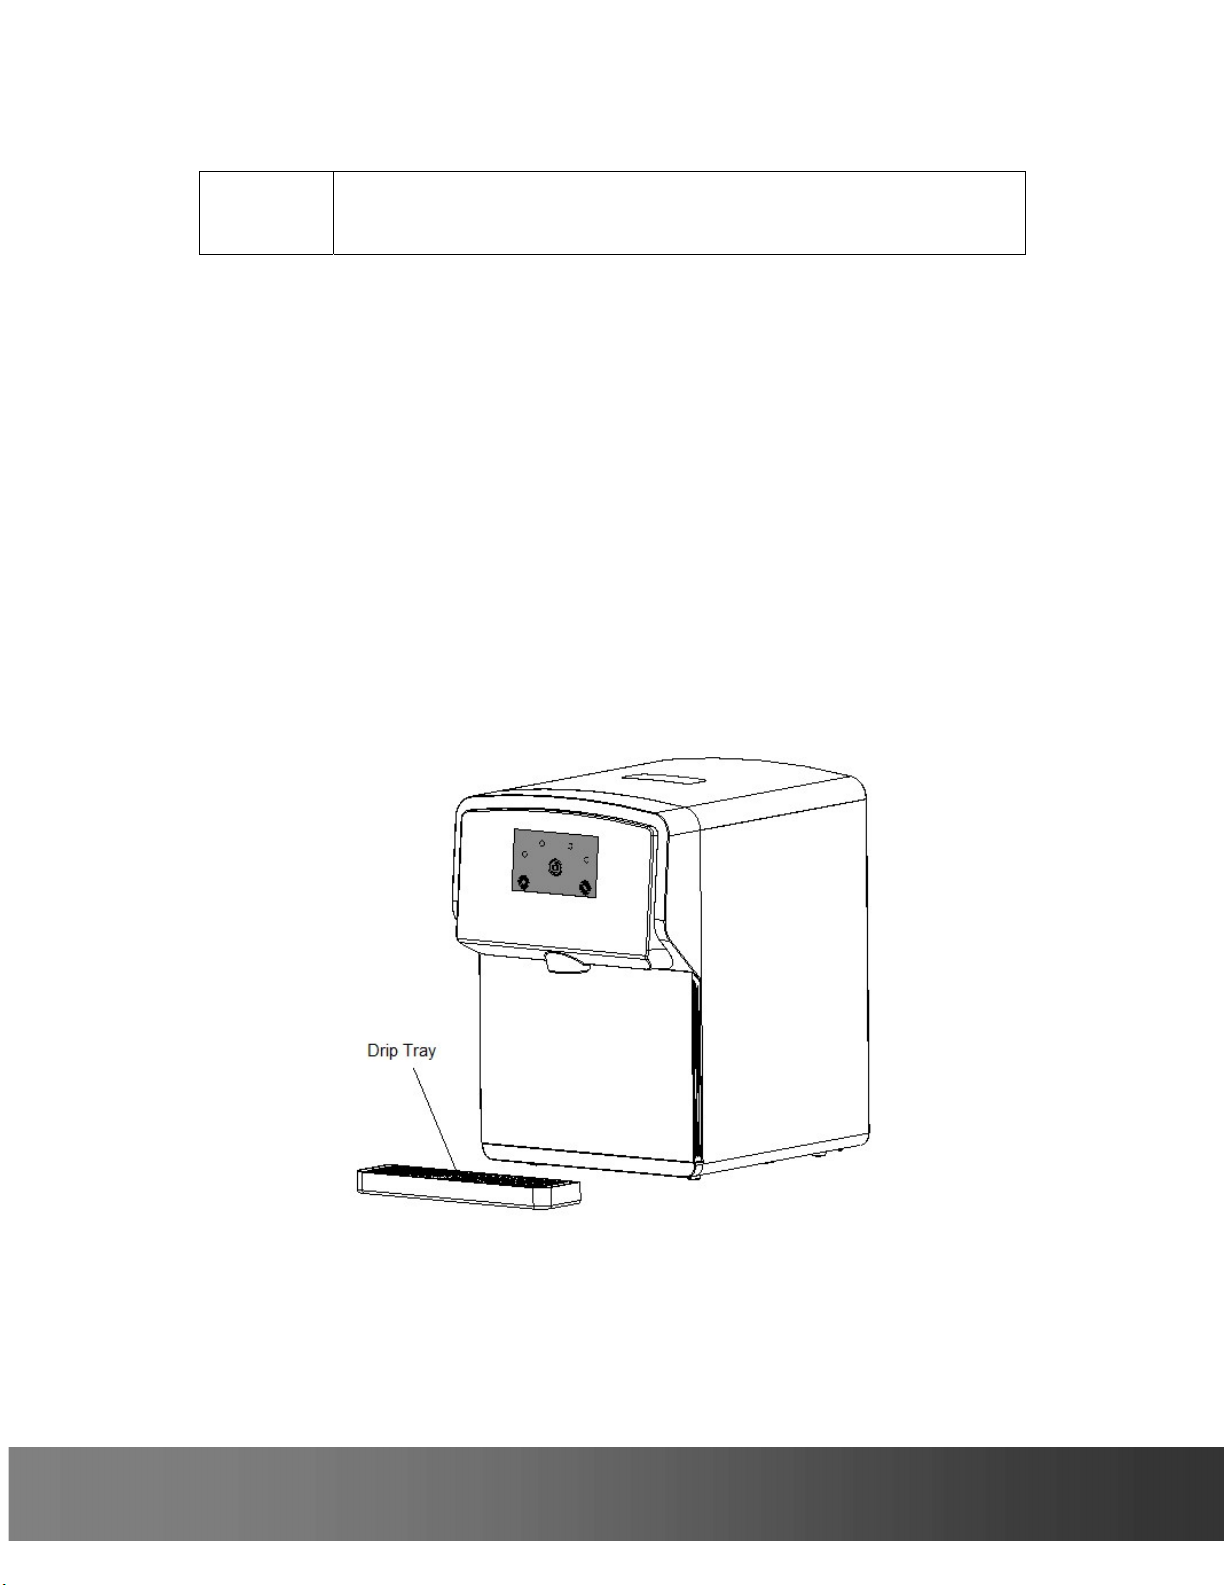
1. Display Panel
2. Ice Dispense Point
3. Water Reservoir Access Door
4. Air Vent
5. Water Drip Tray
6. Power Cord
7. Drain Tube Plugs/Holder
8. Ice Viewing Window
This compact automatic ice dispenser allows you to enjoy chewable ice with
the touch of a button.
The built-in ice engine can quickly make nugget ice within only 15 minutes
and produce 26 lbs of ice per day.
Automatic cleaning and descaling can keep the unit in a good sanitary and
operational condition all the time.
Manual water fill provides you with the convenience to use it anywhere.
Ice viewing window permits viewing ice production.
Less than 17.5 inches in height allows for installations on any counters and
tables.
i n f o @ f l u r i d a a p p l i a n c e s . c o m
Page 5
Specifications and Dimensions
Product Portable Nugget Ice Dispenser
Model No FDFM1JA01
Ice Type Chewable Nugget Ice
Ice Capacity (75°F Air) 26 lb / 24 h
Ice Bin Capacity 2 lb
Water Reservoir Capacity 100 fl oz
Ice Dispenser Automatic
Drip Tray Detachable
Drain Connection Not Required
Water Supply Manual Water Fill
Water Fill Port Front Access Water Reservoir
Touch Buttons Make Ice, Clean, Ice
LED Notifications Making Ice, Cleaning, Add Water, Power
Operating Temperature 50~100°F
Electrical Rating 115V/60Hz/2.5A
Refrigerant R600a
Installation Countertop
Unit Dimensions 12”W x 16” D x 17-1/2”H
Package Dimensions 15”W x 18-13/16”D x 22-3/8”H
Net Weight 35 lb
Shipping Weight 45 lb
2 4 4 1 2 M a i n S t . S u i t e 1 0 5 , C a r s o n , C A 9 0 7 4 5
5
Page 6
6
USE OF DISPENSER
NOTE
NOTE
Filling the Water Reservoir
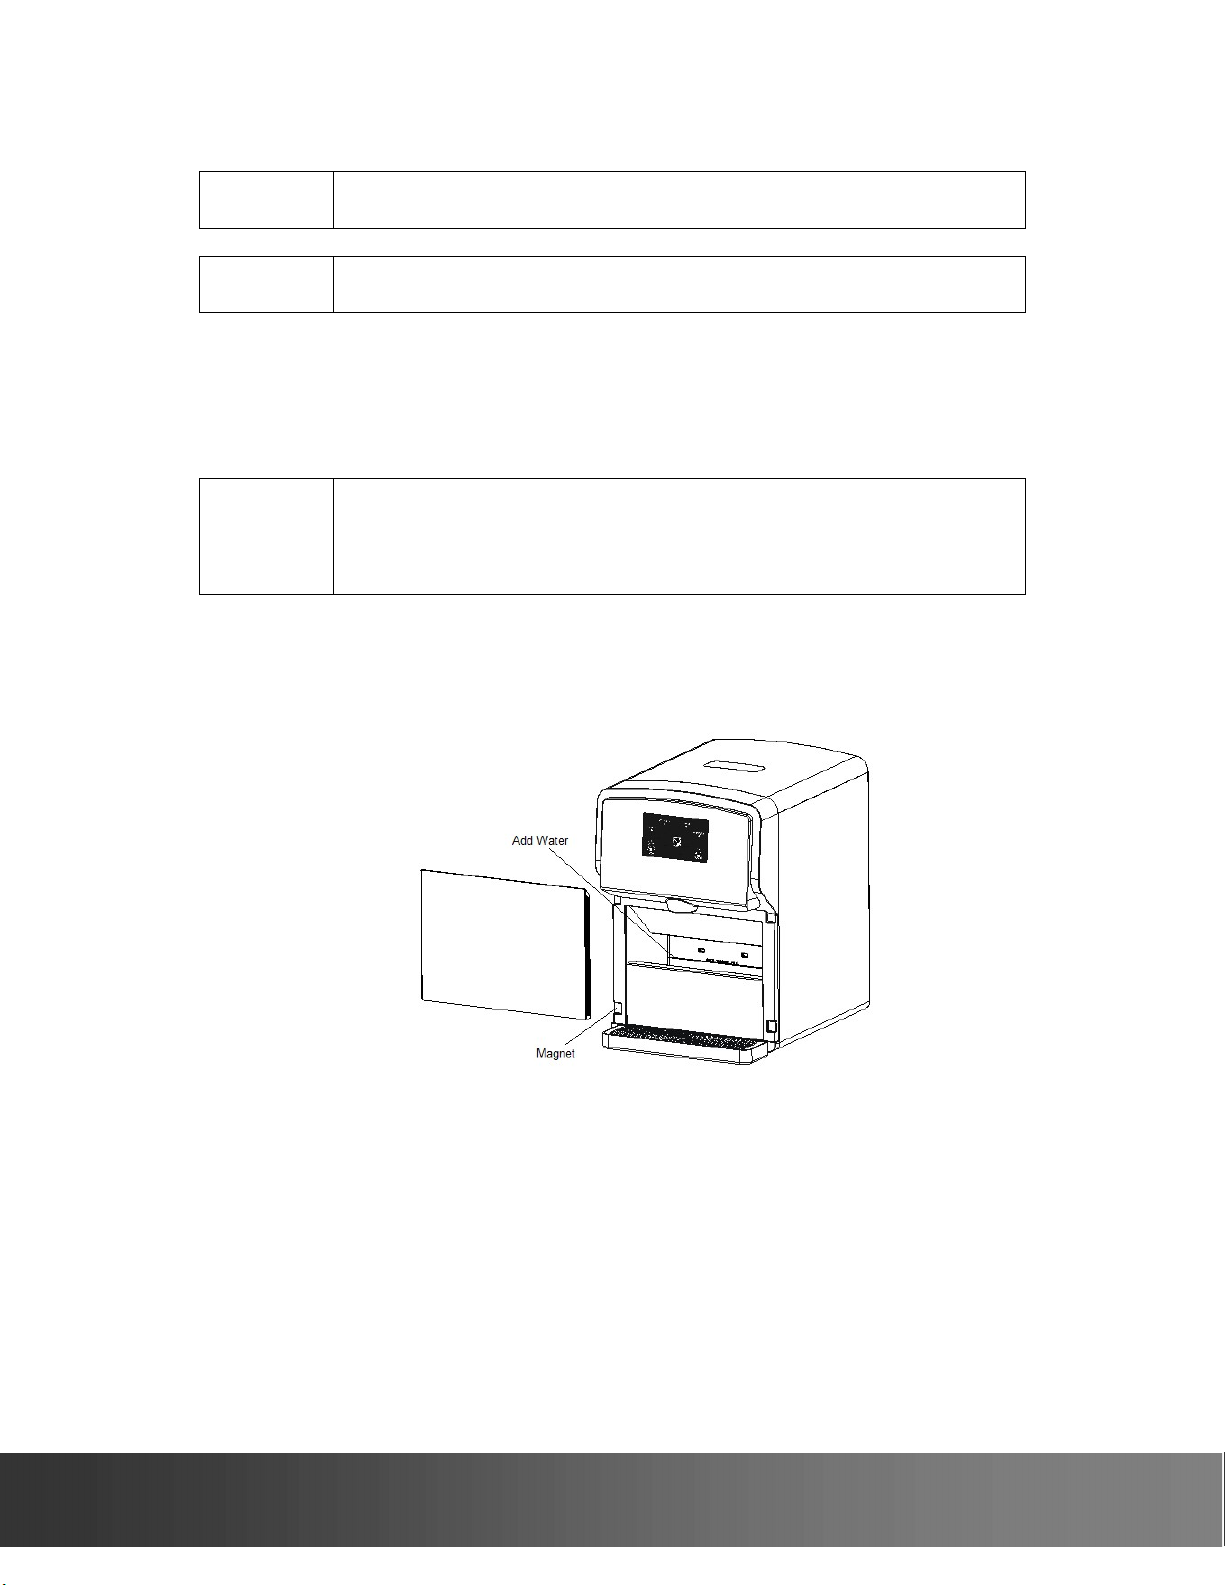
For the first time use or when the Add Water LED flashes, add water to the
water reservoir.
NOTE
Remove the reservoir access door by pulling it outwards.
Add water until it reaches the MAX WATER FILL mark.
Replace the magnetic latched door.
For the first time use flush the water system following instructions
below.
For the first time use dispense several cups of ice and then discard
them.
Use potable water only.
Water TDS level must be 5~400 mg/L or PPM
Water Hardness must be no greater than 10 grains/gal (180 mg/L or
PPM)
Flushing the water system
Fill the water reservoir with clean potable water up to MAX WATER FILL.
Plug the unit into power.
Press and hold Clean button for 3 seconds to start the Cleaning mode for
flushing process.
When the flushing process is complete (the Cleaning LED goes off),
unplug the unit.
Pull the drain tubes out of the plugs/holders and lower them to release
water to a bucket.
Push the drain tubes back into the plugs/holders.
i n f o @ f l u r i d a a p p l i a n c e s . c o m
Page 7
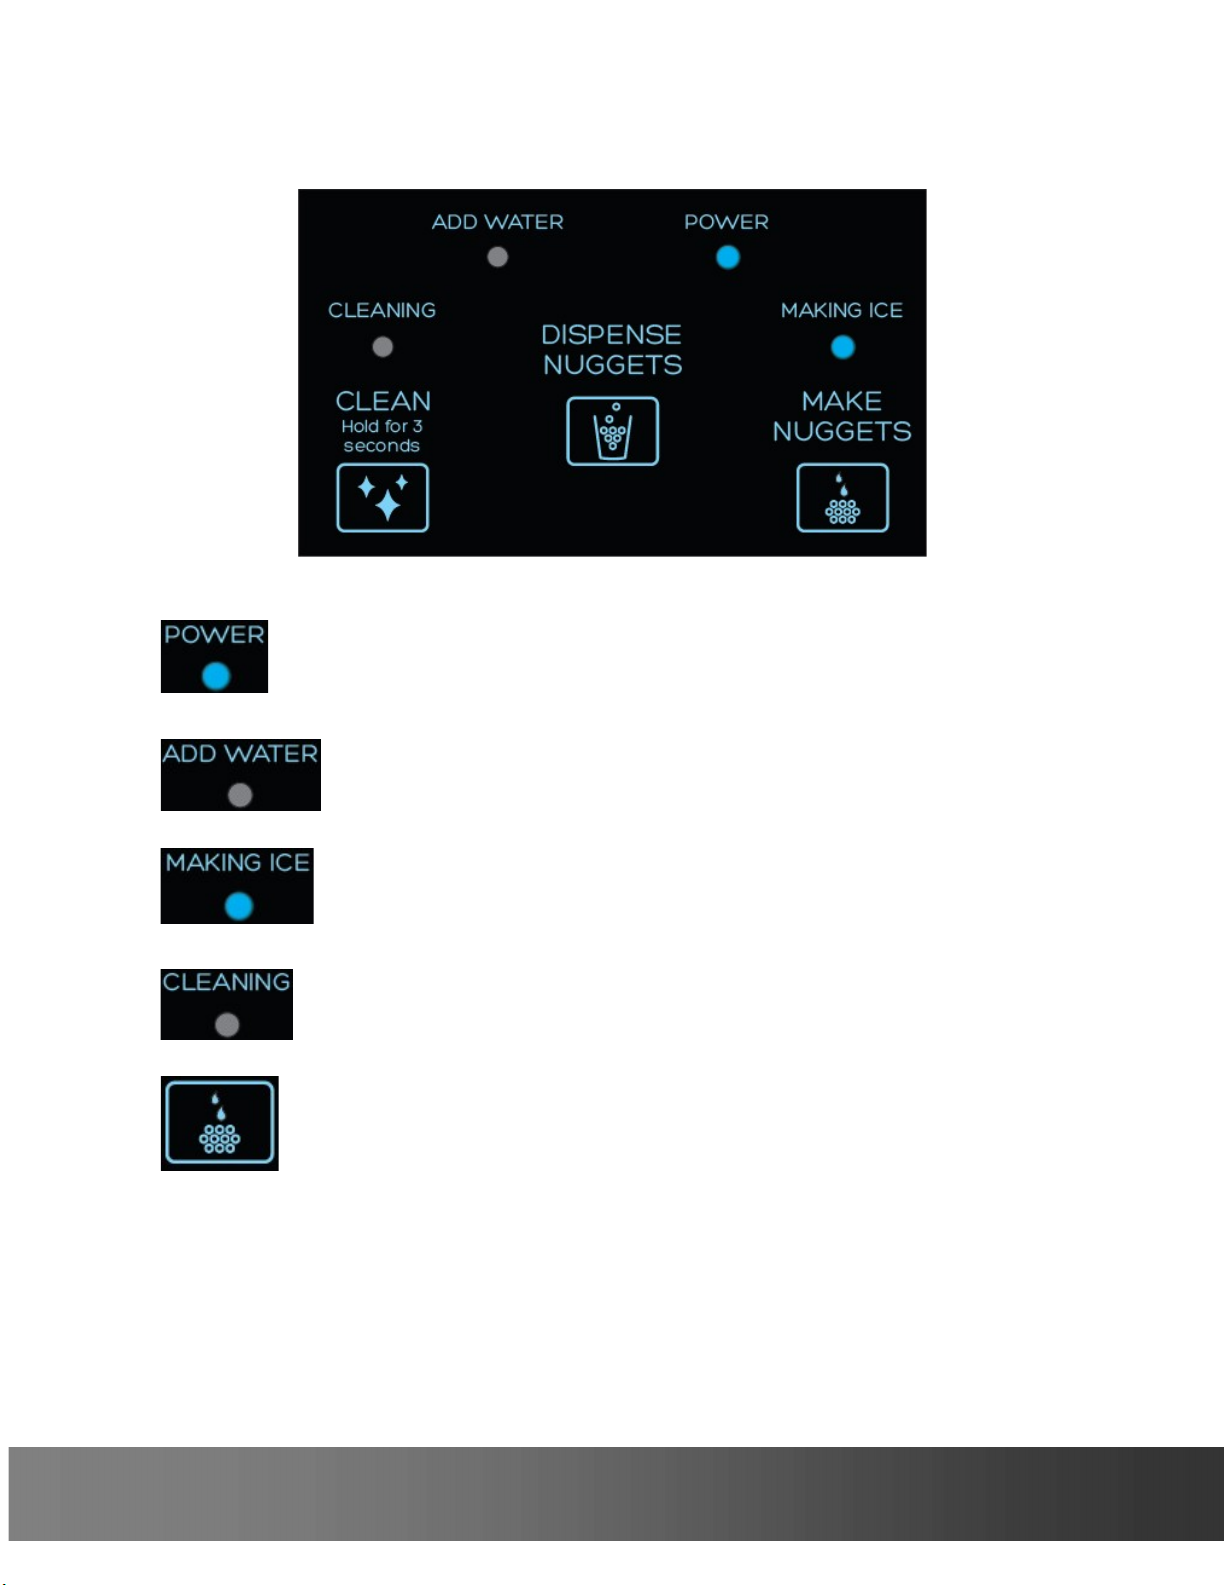
Display Panel
Illuminated when the unit is plugged into power
Illuminated when the unit is in the Cleaning mode
LED flashes when manual defrosting process is required. You can
start the Cleaning mode for this process.
Make Ice Button
Press and hold Clean button for 3 seconds to stop the Cleaning mode
first.
Press and release Make Ice button to start making ice, the Making
Ice LED is illuminated when ice production is in process.
Press and hold Make Ice button for 3 seconds to stop making ice, the
Making Ice LED turns off.
LED flashes when the upper or lower reservoir needs more
water
Illuminated when the unit is in the Ice Making mode
LED flashes when the unit is in the Defrosting mode
2 4 4 1 2 M a i n S t . S u i t e 1 0 5 , C a r s o n , C A 9 0 7 4 5
7
Page 8
8
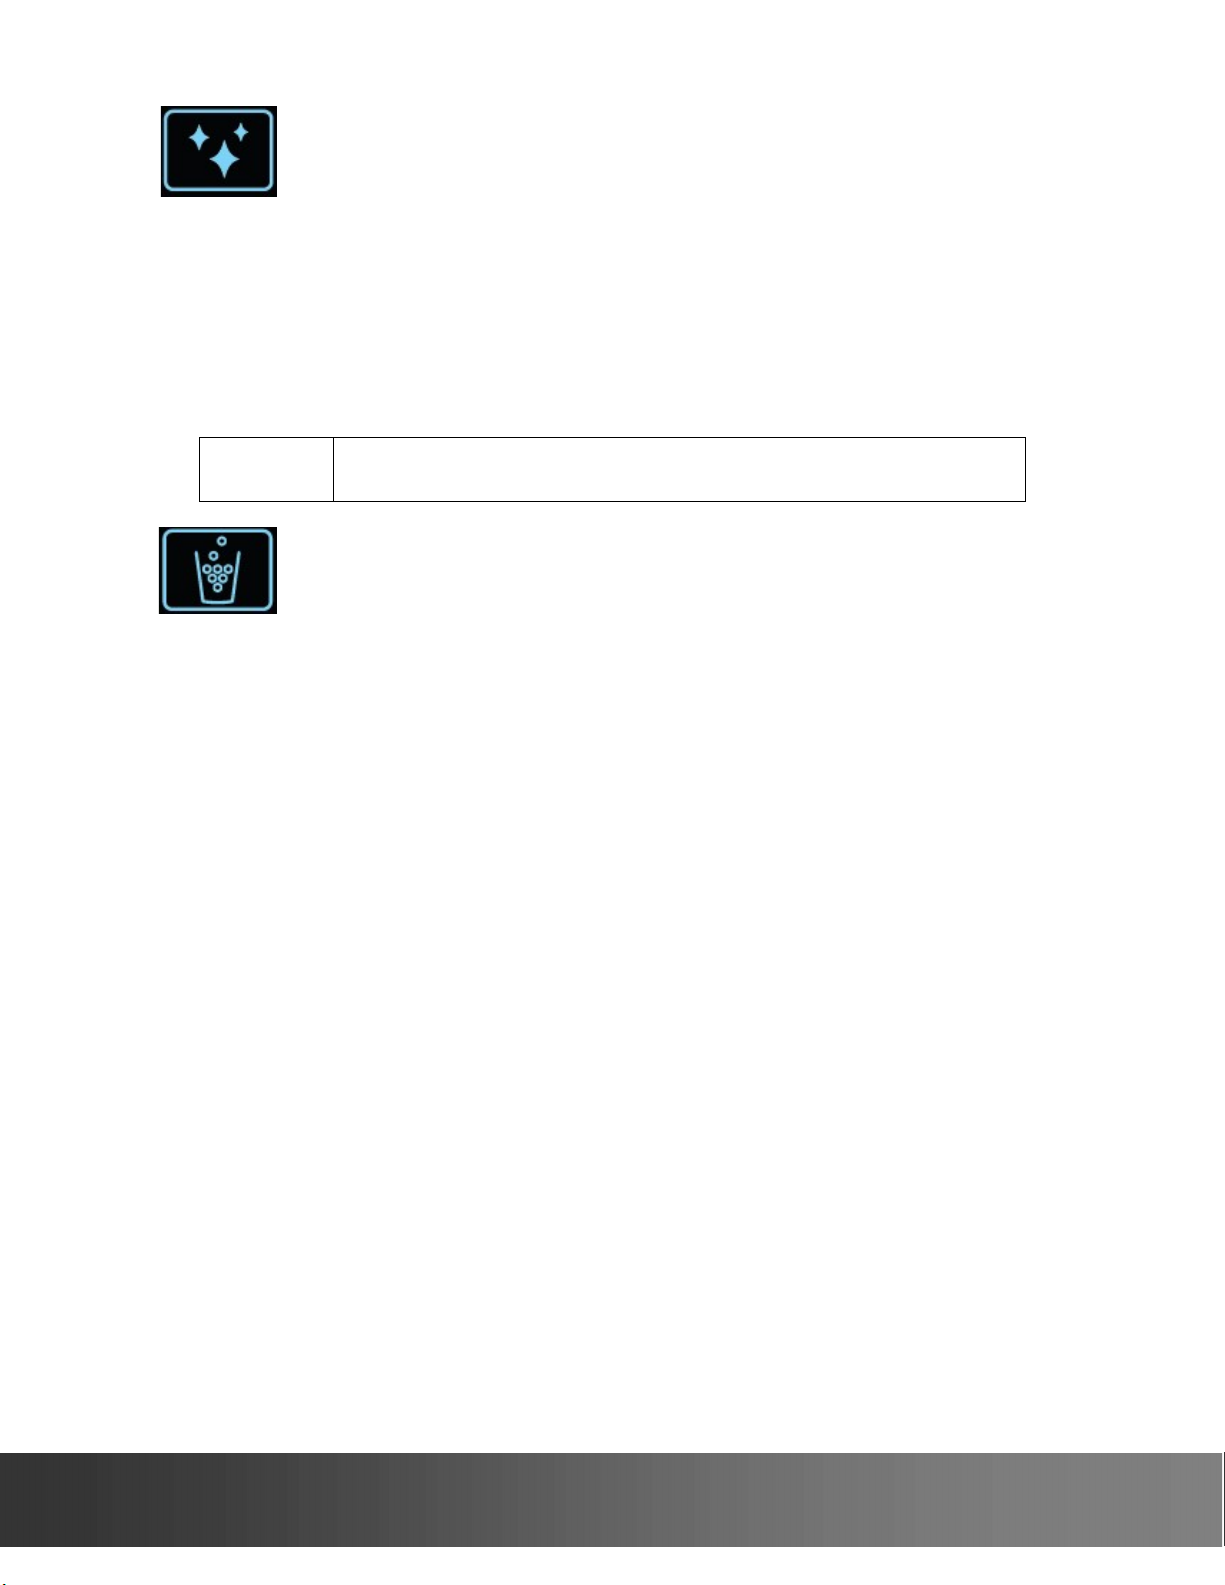
Clean Button
Press and hold Make Ice button for 3 seconds to stop the Ice Making
mode first.
Press and hold Clean button for 3 seconds to start or stop the
Cleaning mode, the Cleaning LED is illuminated when the system is in
the Cleaning mode.
Dispensing Ice
NOTE
Place a cup under the ice dispensing point.
Press and hold Dispense Nuggets button to dispense ice, release it to
stop.
Ice will not dispense automatically after 60 seconds elapse.
Ice does not dispense while the unit is in Cleaning mode.
Dispense Nuggets Button
i n f o @ f l u r i d a a p p l i a n c e s . c o m
Page 9
DISPENSER CARE
Use food grade citric acid powder and chlorine bleach only.
CAUTION
1-How to use the drain tubes to drain water
Unplug the unit.
Pull the drain tubes out of the plugs/holders.
Lower the drain tubes to release water to a bucket.
Push the drain tubes back into the plugs/holders.
2-How to empty the ice bin
Dispense ice until no more ice comes out of the dispenser.
Unplug the unit and let the ice melt.
Drain water following instructions in Section 1.
3-How to empty the drip tray
Empty the detachable drip tray when it is full.
Follow the product instructions carefully for First Aid
Keep them out of reach of children.
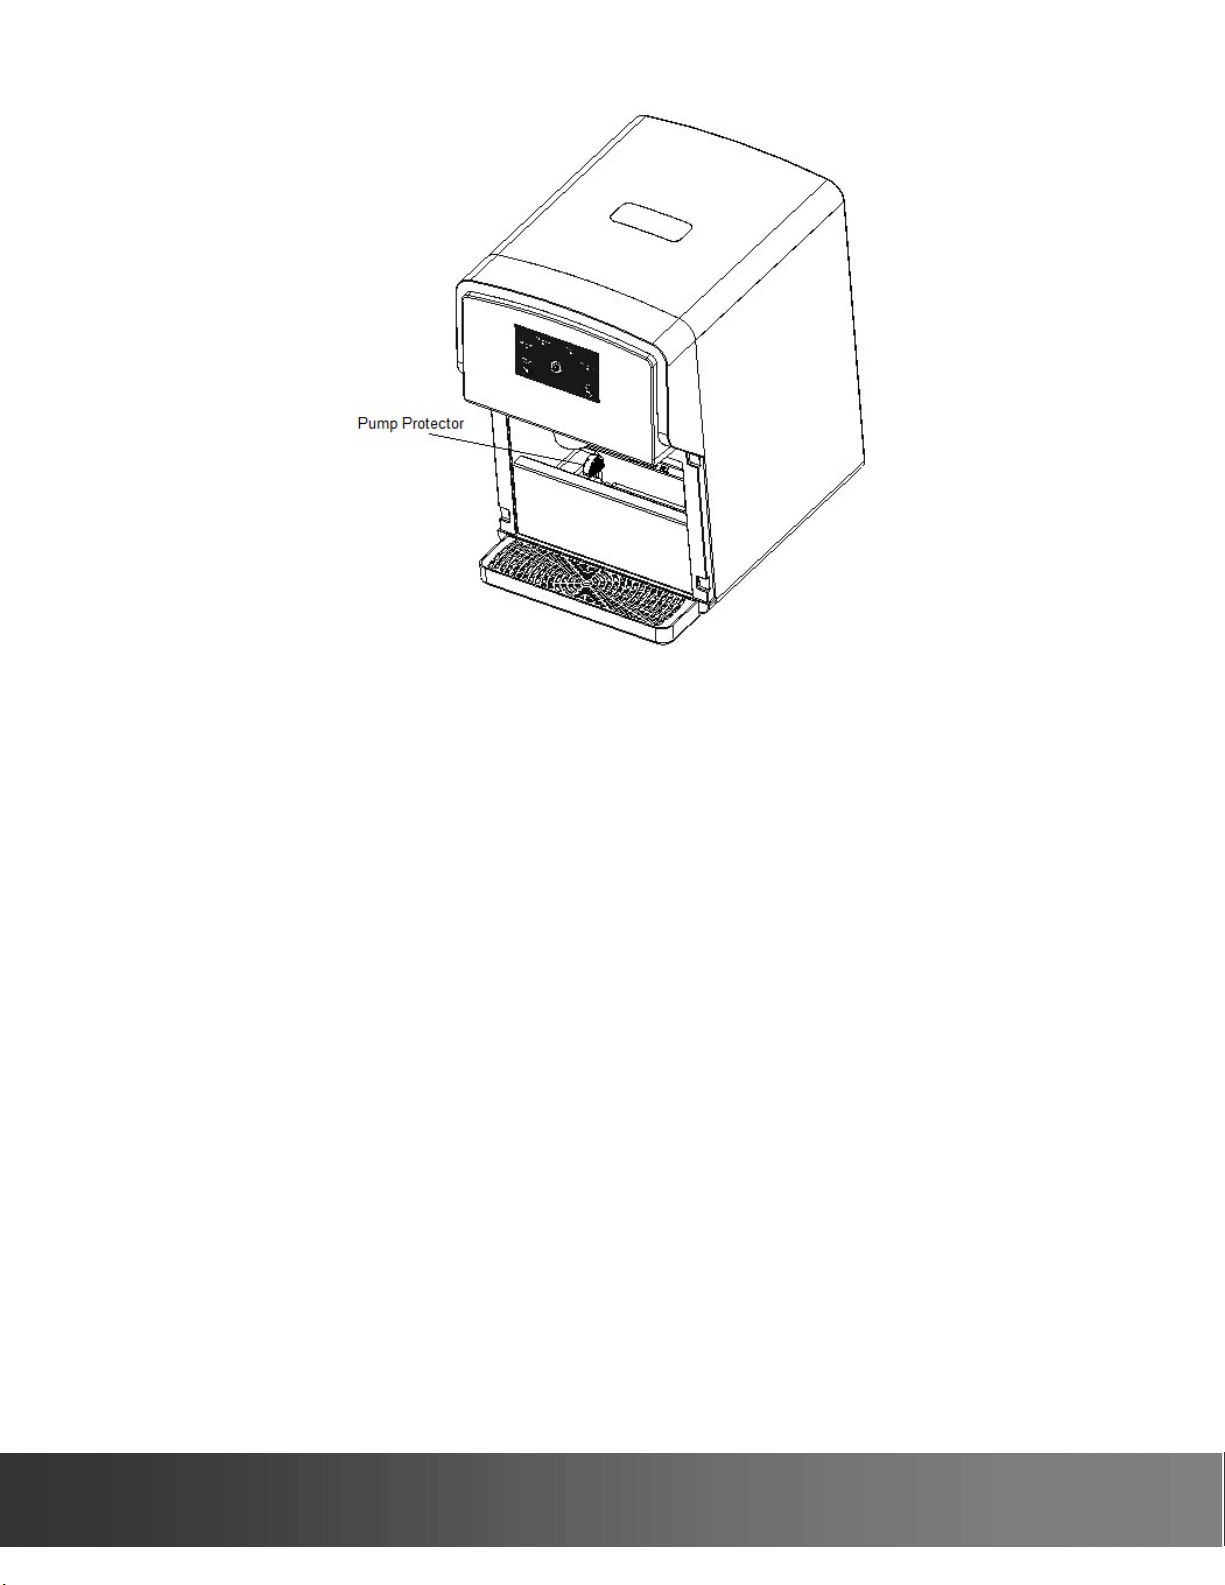
4-How to clean the pump protector
Lift up the pump protector to remove it.
Clean it with dishwashing liquid.
2 4 4 1 2 M a i n S t . S u i t e 1 0 5 , C a r s o n , C A 9 0 7 4 5
9
Page 10
10
5-How to clean the water system once a week to prevent high water
TDS or hardness
Empty the ice bin following instructions in Section 2.
Drain water following instructions in Section 1.
Fill the water reservoir with clean potable water up to MAX WATER FILL.
Plug the unit into power.
Press and hold Clean button for 3 seconds to start the Cleaning mode for
cleaning process.
When the cleaning process is complete (the Cleaning LED goes off),
drain water following instructions in Section 1.
6-How to descale the water system with citric acid once a month to
prevent sediment building
Empty the ice bin following instructions in Section 2.
Drain water following instructions in Section 1.
Mix 5 teaspoons of food grade citric acid powder with 50 fl oz potable
water to make descaling solution.
Fill the water reservoir with the descaling solution up to MAX WATER
FILL.
Plug the unit into power.
Press and hold Clean button for 3 seconds to start the Cleaning mode for
descaling process.
When the descaling process is complete (the Cleaning LED goes off),
drain water following instructions in Section 1.
i n f o @ f l u r i d a a p p l i a n c e s . c o m
Page 11

Fill the water reservoir with clean potable water again up to MAX WATER
FILL, press and hold Clean button for 3 seconds to start the Cleaning
mode for rinse process. Press and hold Clean button for 3 seconds in 5
minutes to stop rinsing.
Drain water following instructions in Section 1.
Repeat the rinse process 3 times until water is clean and tasting good.
7-How to disinfect the water system with chlorine bleach once a
month to prevent bacteria growing
Empty the ice bin following instructions in Section 2.
Drain water following instructions in Section 1.
Mix 1/2 teaspoon of 5% food grade chlorine bleach with 50 fl oz clean
potable water to make sanitizing solution.
Fill the water reservoir with the descaling solution up to MAX WATER
FILL.
Plug the unit into power
Press and hold Clean button for 3 seconds to start the Cleaning mode for
disinfecting process.
When the disinfecting process is complete (the Cleaning LED goes off),
drain water following instructions in Section 1.
Fill the water reservoir with clean potable water again up to MAX WATER
FILL, press and hold Clean button for 3 seconds to start the Cleaning
mode for rinse process. Press and hold Clean button for 3 seconds in 5
minutes to stop rinsing.
Drain water following instructions in Section 1.
Repeat the rinse process 3 times until water is clean and tasting good.
8-If the Cleaning LED flashes and ice maker doesn’t produce ice
Fill the water reservoir with clean potable water up to MAX WATER FILL.
Press and hold Clean button for 3 seconds to start the Cleaning mode for
manual defrosting process.
Drain water following instructions in Section 1.
Fill the water reservoir with clean potable water up to MAX WATER FILL.
Then press and release Make Ice button to start making ice.
9-If ice is stuck in the ice bin and unable to dispense
Press and release Dispense Nuggets button twice quickly to reverse the
ice bin auger to break stuck ice.
Then use Dispense Nuggets buttons to dispense ice.
10-If a power outage happens
Unplug the unit.
2 4 4 1 2 M a i n S t . S u i t e 1 0 5 , C a r s o n , C A 9 0 7 4 5
11
Page 12

12
11-If you are away on holidays or vacations
Empty the ice bin following instructions in Section 2.
12-What normal operating sounds you may hear
You may hear a boiling, rattling or gurgling sound produced by flow of
refrigerant through the evaporator.
You may hear air being forced through the unit by the evaporator fan.
You may hear air being forced through the condenser by the condenser
fan.
You may hear a clicking sound produced by the refrigerant valve or
water valve.
You may hear a water dripping sound during automatic defrost cycle.
You may hear a high pitched hum or pulsating sound produced by the
compressor.
You may hear ice being ejected from the ice engine to the ice bin.
13-How to dispose this unit
Risk of Fire or Explosion
Flammable Refrigerant R600a Used
Dispose of Properly In Accordance With Federal Or Local Regulations.
i n f o @ f l u r i d a a p p l i a n c e s . c o m
Page 13
INSTALLATION INSTRUCTIONS
It is
required
that you
connect this unit only to a GFCI protected
Location
CAUTION
Place the unit away from direct sunlight and heat sources.
Do not install the unit in moist areas.
Do not install the unit in garage.
Do not install the unit where the ambient temperature range will be
below 50 °F or above 100 °F. Otherwise, the unit will not be able to work
properly.
The unit must be placed in a properly ventilated location to prevent heat
build-up generated by the refrigeration system. Failure to do so will
prevent the unit from cooling properly, and may result in damage to unit
components as well as its contents.
The unit must be installed on a counter that is level and strong enough
to support up to 50 lb.
Clearance
CAUTION
This unit is designed for indoor use only.
This unit is designed for countertop installation only.
Allow for minimum 12 inches of clearance on both sides.
Allow for minimum 2 inches of clearance on the back.
Allow for minimum 1/2 inch of clearance at the top.
Electrical Requirements
DANGER
receptacle. It is strongly recommended that you do not use an adapter
or an extension cord to connect this unit because of potential safety
hazards.
A dedicated 120V, 60Hz, 15A fused, grounded electrical supply is
required. It is recommended that a separate circuit serving only your
appliance be provided.
Only connect to properly polarized outlets.
Use outlets that cannot be turned off by a switch.
Only plug the unit into a grounded 3 prong outlet.
2 4 4 1 2 M a i n S t . S u i t e 1 0 5 , C a r s o n , C A 9 0 7 4 5
13
Page 14
14
TROUBLESHOOTINGS
Complaint
Possible Causes
Response
Unit is not working
Ice maker
is not
I
ce
does
not dispense
Ice maker
is not producing ice
Water is leaking
and the Power LED is
not lit
producing ice
a. Power cord is unplugged.
b. No power at outlet.
c. Power cord is broken.
d. Control PCB is defective or
with wiring problems.
e. Display PCB is defective or
with wiring problems.
a. Add Water LED is illuminated
b. The ice maker is frozen
c. The ice maker is turned off.
d. The water pump is defective.
e. The ice maker is defective.
f. The cooling system is not
working.
a. There are not enough ice
cubes in the ice bin.
b. Ice is stuck together in the ice
bin.
c. The auger or motor is broken.
d. Control PCB is defective or
with wiring problems.
e. Display PCB is defective or
with wiring problems.
a. The dispenser drip tray is full.
b. The internal water reservoir or
tubing is leaking.
c. The water level sensor of the
internal water reservoir is
defective.
a. Plug in the power cord.
b. Check for outlet and breaker or fuse.
c. Call for service.
d. Call for service.
e. Call for service.
a. Fill the water reservoir.
b. Press and hold Clean button for 3
seconds to start the Cleaning mode
c. Turn the ice maker on.
d. Call for service.
e. Call for service.
f. Call for service.
a. See
.
b. Press and release Dispense Nuggets
button twice quickly to reverse the ice
auger to break stuck ice.
c. Call for service.
d. Call for service.
e. Call for service.
a. Empty it.
b. Call for service.
c. Call for service.
i n f o @ f l u r i d a a p p l i a n c e s . c o m
Page 15

SERVICE & IMPORTANT NOTICE
The manufacturer has a policy of continuous improvement on its products and
reserves the right to change materials and specifications without notice.
Contact us with any questions at 800-433-9938 or [email protected]
Or visit 24412 Main St. Suite 105 Carson, CA 90745 and
www.fluridaappliances.com
LIMITED WARRANTY: Seller warrants that the goods will be free of defects in materials and
workmanship for a period of 12 (twelve) months from date of sale, removal and re-installation
of unit is not included in warranted labour. For a scratch and dent or refurbished unit,
warranty is 3 months from your dated invoice (parts for function only, not cosmetic). There is
no warranty on parts purchased separately. Purchaser’s exclusive remedy is limited, at Seller’s
option; to repair or replace defective part[s] with either new or factory reconditioned part[s].
Purchaser is responsible for shipping the unit pre-paid to designated facility and Seller will pay
return shipping charges in the continental United States for items repaired under warranty
within 12 (twelve) months from date of sale. Improper placement of the unit will void the
warranty. This limited warranty does not cover damage due to such things as accident,
misuse, abuse, mishandling, neglect, acts of God, fires, earthquakes, floods, high winds,
government, war, riot or labour trouble, strikes, lockouts, delay of carrier, unauthorized
repair, or any other cause beyond the control of the Seller, whether similar or dissimilar to the
foregoing. Seller is not responsible for any damages caused to Seller’s property resulting from
the good. This limited warranty applies only inside the Continental US. (Alaska, Puerto Rico
and Hawaii are not warranted.)
Seller is not responsible for incidental or consequential damages, and there are no warranties,
expressed or implied, which extend beyond the Limited Warranty described above. The implied
warranties of merchantability and of fitness for a particular purpose are hereby expressly
disclaimed. Some states do not allow the exclusion of incidental or consequential damages, or
a waiver of the implied warranties of fitness and/or merchantability, so the above limitations
may not apply to you. This warranty gives you specific legal rights and you may also have
other rights which vary from state to state. In the event of any dispute between Seller and
Purchaser arising out of or relating to these terms and conditions or to the goods sold
generally, Purchaser must first file a written claim with Seller within ten days of the occurrence
giving rise to the claim and wait an additional thirty days for a response before initiating any
legal action. The sale and all terms are subject to Nevada law. Any legal proceeding arising out
of or relating to these terms and conditions or to the goods sold generally shall be brought
solely and exclusively in the City of Las Vegas. In no event may Purchaser initiate any legal
proceeding more than six months after the occurrence of the event giving rise to the dispute.
The above terms and conditions are the only ones governing this transaction and Seller makes
no oral representations of any kind. These Terms and Conditions can only be modified in
writing, signed by both Purchaser and Seller.
FD is a registered trademark of Flurida Appliances Inc. All products, features, and services are
subject to change without notice. We cannot guarantee the accuracy of the contents of this
document. We disclaim liability for errors, omissions, or future changes.
Copyright©2019 Flurida Appliances Inc. All rights reserved.
2 4 4 1 2 M a i n S t . S u i t e 1 0 5 , C a r s o n , C A 9 0 7 4 5
15
 Loading...