


MPG2-H / MPG2-H-HV
Manual Pressure Generator/Controller for Hydraulic Pressure
Operation and Maintenance Manual
PN 3340765
September 2012
© 2012 Fluke Corporation. All rights reserved. Specifications are subject to change without notice.
All product names are trademarks of their respective companies.

High pressure liquids and gases are potentially hazardous. Energy stored in these liquids and gases
can be released unexpectedly and with extreme force. High pressure systems should be assembled and
operated only by personnel who have been instructed in proper safety practices.

TABLE OF CONTENTS
T
AABBLLEE OOFF
T
TABLE OF CONTENTS ............................................................... I
TABLES .................................................................................. II
FIGURES ................................................................................. II
ABOUT THIS MANUAL ............................................................. III
1. INTRODUCTION ................................................................. 1
1.1 PRODUCT OVERVIEW ........................................................................................................................... 1
1.2 SPECIFICATIONS ................................................................................................................................... 1
1.3 LOCATION OF THE COMPONENTS ...................................................................................................... 2
1.4 DIMENSIONAL SCHEMATICS ................................................................................................................ 4
1.5 HYDRAULIC SCHEMATIC ...................................................................................................................... 5
2. INSTALLATION .................................................................. 7
2.1 UNPACKING AND INSPECTION ............................................................................................................ 7
2.2 SITE REQUIREMENTS............................................................................................................................ 7
2.3 INITIAL SETUP ........................................................................................................................................ 8
C
OONNTTEENNTTS
C
S
3. OPERATION ....................................................................... 9
3.1 GENERAL OPERATING PRINCIPLES AND INFORMATION ................................................................. 9
3.1.1 OVERVIEW .................................................................................................................................................... 9
3.1.2 VALVES ......................................................................................................................................................... 9
3.1.3 PRIMING PUMP ............................................................................................................................................. 9
3.1.4 VARIABLE VOLUME (VV) ............................................................................................................................. 9
3.1.5 RESERVOIR ................................................................................................................................................ 10
3.2 OPERATION .......................................................................................................................................... 10
3.2.1 FILLING AND PRIMING THE SYSTEM UNDER TEST, PRIMING PUMP .................................................. 10
3.2.2 GENERATING AND ADJUSTING PRESSURE, VARIABLE VOLUME AND FINE ADJUST VALVE ........ 11
3.2.3 REFILLING OR EMPTYING THE VARIABLE VOLUME WITHOUT RELEASING TEST PRESSURE ...... 12
4. MAINTENANCE AND ADJUSTMENTS .................................. 13
4.1 REPLACING LIQUID AND FLUSHING HYDRAULIC SYSTEM ............................................................ 13
5. WARRANTY ..................................................................... 15
Page I

MPG2-H OPERATION AND MAINTENANCE MANUAL
T
AABBLLEES
T
Table 1. MPG2-H and MPG2-H-HV Parts List ............................................................................................. 7
Table 2. DHI Authorized Service Providers ............................................................................................... 16
F
IIGGUURREES
F
Figure 1. Front view ..................................................................................................................................... 2
Figure 2. Rear view ...................................................................................................................................... 2
Figure 3. Top view ........................................................................................................................................ 3
Figure 4. Front view dimensions .................................................................................................................. 4
Figure 5. Bottom and side view dimensions ................................................................................................ 4
Figure 6. System schematic ......................................................................................................................... 5
S
S
Page II

ABOUT THIS MANUAL
A
BBOOUUTT
A
This manual provides the user with the information necessary to operate an MPG2-H Manual Pressure
Generator/Controller for Hydraulic pressure. It also includes additional information provided to help you
optimize MPG2 use and take full advantage of its many features and functions.
For those of you who “don’t read manuals”, go directly to Section 2.3 to set up your MPG2. Then go to
Section 3.2. This will get you running quickly with minimal risk of causing damage to yourself or your MPG2.
Then… when you have questions or start to wonder about all the great features you might be missing, get into
the manual!
(CAUTION) is used throughout the manual to identify user warnings and cautions.
(NOTE) is used throughout the manual to identify operating and applications advice and
additional explanations.
T
T
HHIISS
M
AANNUUAAL
M
L
Manual Conventions
Page III

MPG2-H OPERATION AND MAINTENANCE MANUAL
N
OOTTEES
N
S
Page IV

1. INTRODUCTION
11..
I
NNTTRROODDUUCCTTIIOON
I
N
1.1 PRODUCT OVERVIEW
The DHI Manual Pressure Generator/Controller for Hydraulic Pressure (MPG2-H) provides a compact
and easy to use system for manually generating, setting and finely adjusting pressures between
atmosphere and 200 MPa (30 000 psi) in closed volumes. MPG2 is a standard pressure generation and
control component for working with DHI PG7302 piston gauges or liquid operated RPM4 reference
pressure monitors. MGP2 and RPM4 are available as a single, integrated pressure calibration instrument
designated E-DWT
The MPG2-H-HV has a larger displacement variable volume (7 cc rather than 3 cc) and is intended for
applications with higher test volumes to reduce variable volume stroke needed to generate the desired
pressure. The maximum working pressure of MPG2-H-HV is 100 MPa (15 000 psi). The MPG2-H
requires less variable volume torque and adjusts pressure more precisely.
1.2 SPECIFICATIONS
MPG2-H MPG2-H-HV
Pressure range
Variable volume piston
Variable volume stroke
Priming pump displacement
Reservoir capacity
TEST1, TEST2 connections
diameter
Variable volume
displacement
Operating fluid
Dimensions
Weight:
Atmosphere to 200 MPa (30 000 psi) Atmosphere to 100 MPa
7.9 mm 12 mm
6 cm 6 cm
3
3 cc (0.18 in.
3.7 cc (0.23 in.
300 cc (18 in.
DH 500 (DH500 is a gland and collar type fitting for ¼ in. (6 mm) coned and
left hand threaded tube. DH500 is equivalent to AE F250C, HIP HF4, etc.)
Any non-corrosive oil, water, water/alcohol. Inquire about other fluids
400 mm W x 136 mm H x 300 mm D (15.8 in. x 5.4 in. x 11.8 in.)
(see Section 1.4 )
10 kg (22 lbs.)
) 7 cc (43 in.3)
3
)
3
)
(15 000 psi)
Due to a policy of continuous product improvement all specifications are subject to change
without notice.
Page 1

MPG2-H OPERATION AND MAINTENANCE MANUAL
1.3 LOCATION OF THE COMPONENTS
1. TEST1 connection (DH500)
2. Reservoir cover vent valve
3. Priming pump
4. Reservoir cover
5. Reservoir shut off valve
6. Variable volume
7. Test shut off valve and
fine pressure adjustment
Figure 1. Front view
1. Reservoir
2. Test shut off valve
3. Reservoir vent valve
4. Priming pump
5. TEST1 connection
6. Variable volume
7. Reservoir shut off valve and
fine pressure adjustment
Figure 2. Rear view
Page 2

1. INTRODUCTION
1. TEST1 connection
2. TEST2 connection
3. Reservoir cover vent valve
4. Priming pump
5. Reservoir cover
6. Test shut off valve and fine pressure
adjustment
7. Variable volume
8. Variable volume piston position indicator
9. Reservoir shut off valve
Figure 3. Top view
Page 3

MPG2-H OPERATION AND MAINTENANCE MANUAL
1.4 DIMENSIONAL SCHEMATICS
All dimensions are in millimeter [mm]
Figure 4. Front view dimensions
Page 4
Figure 5. Bottom and side view dimensions
1.5 HYDRAULIC SCHEMATIC
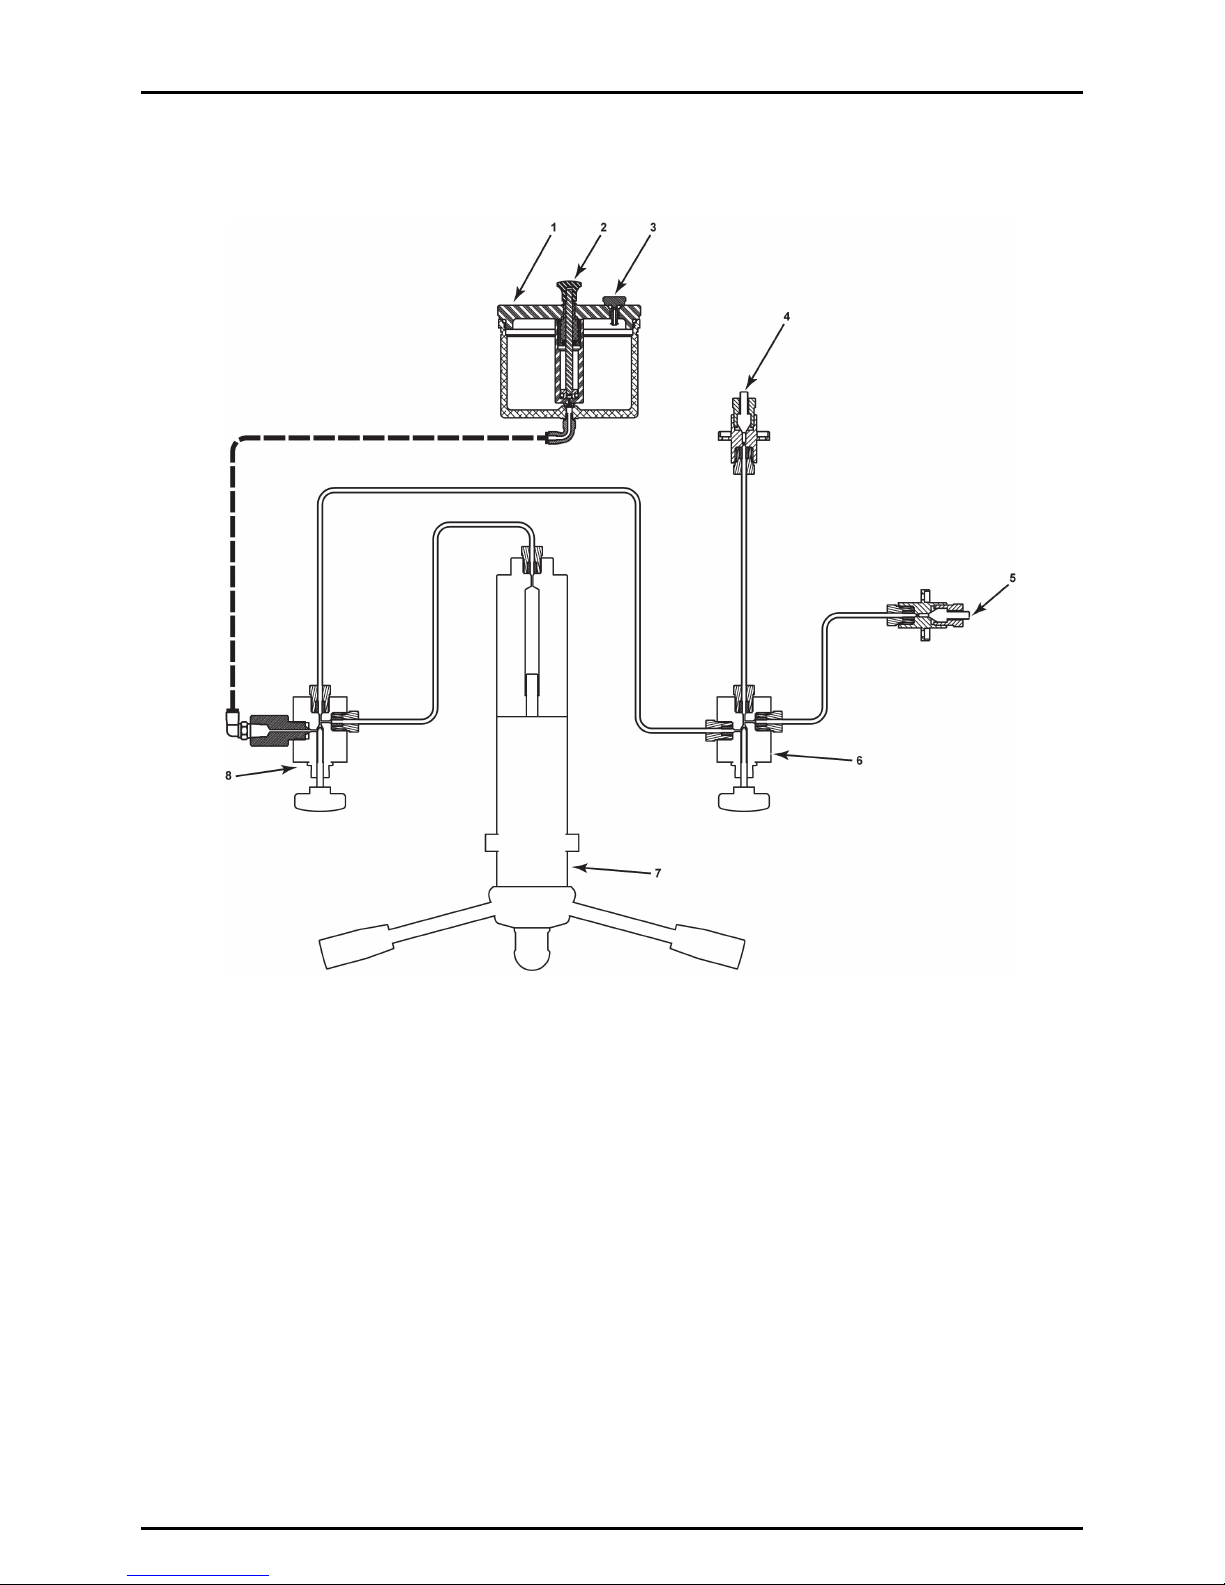
1. INTRODUCTION
1. Reservoir cover
2. Priming pump
3. Reservoir cover vent valve
4. TEST1 connection
Page 5
5. TEST2 connection
6. Test shut off valve and fine pressure adjustment
7. Variable volume
8. Reservoir shut off valve
Figure 6. System schematic

MPG2-H OPERATION AND MAINTENANCE MANUAL
N
OOTTEES
N
S
Page 6

2. INSTALLATION
22..
I
NNSSTTAALLLLAATTIIOON
I
N
2.1 UNPACKING AND INSPECTION
MPG2-H is delivered, along with its standard accessories, in a corrugated container held in place by
expandable foam.
The MPG2 is delivered with its valves closed and the variable volume (VV) fully screwed in. The
reservoir and the MPG2 plumbing are free of fluid.
Remove MPG2 and its accessories from the shipping container and remove each item from its protective bag.
Check that all items are present and have no visible signs of damage.
Table 1. MPG2-H and MPG2-H-HV Parts List
DESCRIPTION ITEM NO.
MPG2-H or MPG2-H-HV instrument
Accessories including:
4 ea. Variable volume handle 3329907
1 ea. Plug, DH500 3068470
1 Operation and Maintenance Manual 3340765
3323107 or 3341293
2.2 SITE REQUIREMENTS
• MPG2 should be installed on a stable surface. It may be necessary to anchor MPG2 using the
mounting holes in the bottom of the housing. This is to hold the housing firmly in place when turning
the variable volume, particularly at high pressures and to avoid applying the torque from variable
volume rotation to the tubing and fittings which may be connected to the MPG2. “C” clamps may also
be used, fitting in the openings on the lower front corners of the MPG2 housing.
• As the span of the variable volume handles is wider than the MPG2 housing, the MPG2 needs to be
mounted so that the handles hang over the edge of the mounting surface, for example over the front of a
work bench.
Page 7

MPG2-H OPERATION AND MAINTENANCE MANUAL
2.3 INITIAL SETUP
High pressure fluids are potentially hazardous. Energy stored in pressurized fluids can be released
unexpectedly and with extreme force. High pressure systems should be assembled and operated only by
personnel who have been instructed in proper safety practices.
To set up the MPG2 for operation, proceed as follows:
Set the MPG2 on a hard, flat surface. If desired, anchor the MPG2 to a stable working surface using
the mounting holes on the bottom of the MPG2 platform or the clamp openings on the front. The
mounting hole diameter is 6.4 mm (0.26 in.) suitable for M6 or 1/4 in. screws. If mounting to a wood
bench top, use of threaded inserts and machine screws is recommended.
Connect the TEST1 and/or TEST2 port to the system into which pressure is to be generated and
controlled. All MPG2 pressure connections are DH500 female (DH500 is a gland and collar type
fitting for 1/4 in. (6 mm) coned and left hand threaded tube. DH500 is equivalent to AE F250C, HIP
HF4, etc.). If a TEST port is not being used, plug it using the DH500 plug supplied in the MPG2
accessories.
ALWAYS use external tubing and fittings rated for pressures equal to or greater than the maximum
pressure which MPG2 will be used to generate.
DH500 F fittings are delivered with disposable, orange, plastic dummy plugs installed. These are NOT
intended to hold high pressure. They should be removed and replaced with appropriate fittings or stainless
steel plugs before high pressure operation. Each dummy plug carries a DH500 collar. Remove and retain the
collar for use in connecting to the mating tube.
Fill the fluid reservoir: Close the reservoir shutoff valve. Remove the reservoir cover by rotating it
CW. Pour the desired fluid into the reservoir. Do not overfill. MPG2 is tested with a low viscosity,
fluorinated liquid and should be free of significant fluid residue as delivered.
Prime and leak check pressurized system (see Section 3.2.1).
Page 8

3. OPERATION
33..
O
PPEERRAATTIIOON
O
N
3.1 GENERAL OPERATING PRINCIPLES AND INFORMATION
3.1.1 OVERVIEW
See Section 1.5, Figure 6
MPG2-H is used to manually generate and adjust liquid pressure from atmosphere to
200 MPa (30 000 psi) (limited to 100 MPa (15 000 psi) with MPG2-H-HV) or using a priming
pump, two valves and a variable volume. Fittings for connecting to a device or system under
test are located on the top and middle rear of the instrument housing. A reservoir holds a
supply of fluid.
3.1.2 VALVES
The reservoir shutoff and test shutoff valves are manually operated needle valves.
The reservoir shut valve isolates the reservoir from the pressurized circuit. It is opened use
the priming pump, to fill the variable volume with fluid and to open the pressurized circuit to
atmosphere (vent).
The test shutoff valve isolates the TEST1 and TEST2 ports from the rest of the MPG2 circuit.
It can be used to isolate the variable volume and reservoir from the pressurized test system,
for example, if it becomes necessary to refill the variable volume with fluid when it reaches
end of stroke.
As test shutoff the valve needle displaces fluid when it is operated, it can also be used as a
very fine variable volume for very fine pressure adjustment.
3.1.3 PRIMING PUMP
The priming pump is a syringe style fluid injector, built into the reservoir cover. On its plunger
upstroke, it draws oil from the reservoir into its barrel. On the down stoke, the barrel tip seals
with the connection on the bottom of the reservoir and the plunger pushes oil into the rest of
MPG2 and out the test port.
The priming pump is used to fill the MPG2 and system to which it is connected with hydraulic
fluid and then generate a low, starting pressure.
3.1.4 VARIABLE VOLUME (VV)
The variable volume (VV) is a piston-cylinder type screw press. Rotating the variable volume
handles, moves the piston in or out decreasing or increasing the volume and therefore
increasing or decreasing pressure.
The VV is used to generate and adjust pressure in the system to which MPG2 is connected
when the reservoir shut valve is closed and test shut off valve is open. The torque necessary
to rotate the VV handle is proportional to the pressure in the variable volume.
Generally, the starting position of the VV when beginning to generate pressure from
atmosphere is with the piston fully retracted (handles rotated maximum CCW) so that the full
stroke of the VV is available to fill the test system and generate pressure.
Page 9

MPG2-H OPERATION AND MAINTENANCE MANUAL
During operation, if the VV runs out of stroke, the test shut off and reservoir shutoff valves
can be used in sequence to allow the variable volume to be refilled without releasing the
pressure on the TEST1 and TEST2 port (see Section 3.2.3).
The maximum operating pressure of the variable volume is 200 MPa (30 000 psi) with
MPG2-H and 100 MPa (15 000 psi) with MPG-H-HV and. Do not generate pressure greater than
the maximum operating pressure.
3.1.5 RESERVOIR
The reservoir is a 300 cc (18 in3) aluminum vessel mounted inside the MPG2 housing. It is
accessed for filling or cleaning by a screw on cover on the top surface of the MPG2 housing. The
reservoir is connected to the RESERVOIR ISOLATION valve by flexible tubing.
3.2 OPERATION
Operation of the MPG2 can be divided into three common tasks: filling and priming the system under test
(See Section 3.2.1); generating and adjusting pressure (see Section 3.2.2); filling or emptying the variable
volume while maintaining test system pressure (see Section 3.2.3).
3.2.1 FILLING AND PRIMING THE SYSTEM UNDER TEST,
PRIMING PUMP
It is important to remove air from the test system by filling and priming it before using the
variable volume to generate pressure. Failure to fill and prime will result in the need to use
multiple variable volume strokes to generate pressure.
The reservoir pump is designed to push oil through the MPG2 and out the TEST port into the
test system. It can also generate an initial pressure, saving variable volume stroke.
To fill and prime the test system, prior to generating pressure with the variable volume,
proceed as follows:
Leave an open purge point (for example a loose fitting) at the highest point possible in
the system that is connected to the MPG2.
Open the reservoir shut off valve and the test shut off valve to connect the reservoir to
the rest of the system.
Position the reservoir cover correctly by rotating it CW until the reservoir vent valve is at
the CLOSE position. Do not over tighten; do not turn CW beyond CLOSE position.
Be sure that the reservoir cover vent valve is open (loosened CCW).
Pull the reservoir handle pump up slowly to fill it with oil from the reservoir. Then push
the handle down firmly with moderate speed to seal the tip of the pump against the
reservoir seat and inject oil into the MPG2 and out the TEST port.
Repeat while observing the open purge point in the test system. When only oil and no
air comes out of the purge point, close and tighten the purge point.
If desired, repeat to set an initial pressure with the reservoir pump.
Be sure the variable volume is already filled and in the start position (Section 3.2.2,
and the reservoir shut off valve is open.
Page 10
- ),

3. OPERATION
Press down on the pump handle but do not release your downward force when the pump
gets to end of stroke or becomes to difficult to push down. While maintaining the
downward force on the pump handle, close the reservoir shut off valve to capture the
priming pressure.
Do not attempt to generate greater than 700 kPa (100 psi) using the reservoir priming pump.
Once the system is filled and primed, use the variable volume to generate pressure to the
desired pressure set point (see Section 3.2.2).
When the reservoir cover vent valve is closed, the reservoir is not connected to atmosphere
so opening the reservoir shut off valve and the test shut off valve may not fully vent the system
connected to the MPG2. To be sure the system is fully vented to atmosphere, OPEN the reservoir
cover shut off valve and/or disconnect at the TEST port.
3.2.2 GENERATING AND ADJUSTING PRESSURE, VARIABLE
VOLUME AND FINE ADJUST VALVE
The variable volume can generate very high pressure very quickly. When using the variable
volume, use caution not to generate pressure more quickly than desired and not to exceed the
pressure rating of the MPG2 (see Section 1.2) or any component of the system to which it is
connected.
Before attempting to use the MGP2 to generate pressure, the system to which it is connected
should be as free of air as possible. See Section 3.2.1 to fill and prime the test system.
Once the system to which MPG2 is connected, filled and primed, to generate and adjust
pressure proceed as follows:
Open the reservoir shut off valve to connect the reservoir to the variable volume.
Close the TEST shut off valve to avoid ‘pulling’ oil out of the test system in step
.
Rotate the variable volume CCW until the piston position indicator is at the beginning of
its stroke (indicator white).
Close the reservoir shut off valve to shut off the reservoir from the variable volume.
Open the TEST shut off valve to connect the variable volume to the test system.
Rotate the variable volume CW to increase pressure to the desired set point. Using the
variable volume, it should be easy to adjust the set pressure within 700 kPa (100 psi) or
less of the desired pressure.
To adjust pressure more finely than is possible with the variable volume, use the fine
adjust valve (see Section 3.1.2).
If the variable volume runs out of stroke (piston position indicator red and variable volume
will not rotate CW further) before the desired set pressure is reached, the variable
volume can be isolated from the TEST port and refilled to continue generating pressure
(see Section 3.2.3).
To reduce pressure, rotate the variable volume CCW.
To vent the system to atmosphere, once the pressure is low enough to be safely be
dropped very rapidly, open the reservoir shut off valve (with the test shut off valve open).
Page 11

MPG2-H OPERATION AND MAINTENANCE MANUAL
Opening the reservoir shut off valve while the MPG2 is under pressure will very rapidly drop
the pressure. Generally, it is not recommended to drop the pressure applied to pressure
measuring devices very rapidly. To reduce pressure slowly, use the variable volume and only open
the reservoir shut off valve to open the system to atmosphere.
3.2.3 REFILLING OR EMPTYING THE VARIABLE VOLUME
WITHOUT RELEASING TEST PRESSURE
When working to high pressure with large test volumes or test volumes that are not fully
purged of air, the volume displaced by a single stroke of the variable volume may not be
sufficient to generate the maximum pressure desired. Conversely, when lowering pressure
the variable volume may run out of stroke before it is desirable to use the RESERVOIR
ISOLATION valve to release pressure rapidly. In these cases, the variable volume can be
backed off and refilled without releasing the pressure in the test system.
To refill or empty the variable volume without releasing test pressure, proceed as follows:
Close the test shut off valve. This isolates the system connected to the TEST port(s)
from the variable volume and the reservoir shut off valve. Note that after refilling the
variable volume, the test shut off valve will be opened again. At that time, the pressure
on both sides of the valve will not be perfectly equal so the pressure in the system
connected to the TEST port(s) will change. Consider this possibility before closing the
test shut off valve. For example, if using a piston gauge, put the piston gauge piston at
its bottom stop before closing the test shut off valve.
Open the reservoir shut off valve. This vents the pressure in the variable volume and
connects it to the reservoir.
Back out the variable volume (CCW) to fill it or screw it in (CW) to empty it, as desired.
Close the reservoir shut off valve. DO NOT OPEN THE TEST ISOLATION VALVE YET.
Operate the variable volume as needed to generate a pressure equal to the pressure in
the system connected to the TEST port(s). This is the pressure that was present on the
variable volume before the test shutoff valve was closed in
. The pressure may be
reasonably approximated by the feel (torque) on the variable volume.
Slowly open the TEST ISOLATION valve to equalize the pressure. Proceed to generate
and adjust pressure as desired (see Section 3.2.2).
Page 12

4. MAINTENANCE AND ADJUSTMENTS
44..
MPG2 was designed for maintenance free operation. The only recommended regular maintenance is to
flush the hydraulic system and replace the operating liquid.
4.1 REPLACING LIQUID AND FLUSHING HYDRAULIC SYSTEM
Regular replacement of MPG2’s operating liquid and flushing of the hydraulic system is recommended.
To empty the reservoir, remove the reservoir cover and siphon the bulk of liquid out of the reservoir.
Remove the balance of liquid from the system by screwing the variable volume all the way in (CW) with
the TEST1 port plugged and the TEST2 port open. Then use the filling and priming procedure described
in Section 3.2.1 to expel the rest of the liquid from MPG2. Collect the used liquid as it comes out of the
TEST2 port.
Refill the reservoir with fresh liquid.
Refill the MPG2 volumes with liquid by plugging the TEST1 port and opening the TEST2 port. Then use
the reservoir pump to inject liquid into MPG2 until only liquid and no air comes out of the TEST 2 port.
Plug the TEST2 port, and with the reservoir shut off valve open, fully unscrew (CCW) the variable
volume.
M
AAIINNTTEENNAANNCCE
M
A
A
NNDD
A
DDJJUUSSTTMMEENNTTS
A
E
S
When flushing the MPG2, repeat the procedure above until the liquid coming out of the TEST2 port is clean.
Page 13

MPG2-H OPERATION AND MAINTENANCE MANUAL
N
OOTTEES
N
S
Page 14

5. WARRANTY
55..
Each Fluke product is warranted to be free from defects in material and workmanship under normal use and service.
The warranty period is one year and begins on the date of shipment. Parts, product repairs, and services are
warranted for 90 days. This warranty extends only to the original buyer or end-user customer of a Fluke authorized
reseller, and does not apply to fuses, disposable batteries, or to any product which, in Fluke's opinion, has been
misused, altered, neglected, contaminated, or damaged by accident or abnormal conditions of operation or handling.
Fluke warrants that software will operate substantially in accordance with its functional specifications for 90 days and
that it has been properly recorded on non-defective media. Fluke does not warrant that software will be error free or
operate without interruption.
Fluke authorized resellers shall extend this warranty on new and unused products to end-user customers only but
have no authority to extend a greater or different warranty on behalf of Fluke. Warranty support is available only if
product is purchased through a Fluke authorized sales outlet or Buyer has paid the applicable international price.
Fluke reserves the right to invoice Buyer for importation costs of repair/replacement parts when product purchased in
one country is submitted for repair in another country.
Fluke's warranty obligation is limited, at Fluke's option, to refund of the purchase price, free of charge repair, or
replacement of a defective product which is returned to a Fluke authorized service center within the warranty period.
To obtain warranty service, contact your nearest Fluke authorized service center to obtain return authorization
information, then send the product to that service center, with a description of the difficulty, postage and insurance
prepaid (FOB Destination). Fluke assumes no risk for damage in transit. Following warranty repair, the product will be
returned to Buyer, transportation prepaid (FOB Destination). If Fluke determines that failure was caused by neglect,
misuse, contamination, alteration, accident, or abnormal condition of operation or handling, including overvoltage
failures caused by use outside the product’s specified rating, or normal wear and tear of mechanical components,
Fluke will provide an estimate of repair costs and obtain authorization before commencing the work. Following repair,
the product will be returned to the Buyer transportation prepaid and the Buyer will be billed for the repair and return
transportation charges (FOB Shipping Point).
THIS WARRANTY IS BUYER'S SOLE AND EXCLUSIVE REMEDY AND IS IN LIEU OF ALL OTHER WARRANTIES,
EXPRESS OR IMPLIED, INCLUDING BUT NOT LIMITED TO ANY IMPLIED WARRANTY OF MERCHANTABILITY
OR FITNESS FOR A PARTICULAR PURPOSE. FLUKE SHALL NOT BE LIABLE FOR ANY SPECIAL, INDIRECT,
INCIDENTAL, OR CONSEQUENTIAL DAMAGES OR LOSSES, INCLUDING LOSS OF DATA, ARISING FROM
ANY CAUSE OR THEORY.
Since some countries or states do not allow limitation of the term of an implied warranty, or exclusion or limitation of
incidental or consequential damages, the limitations and exclusions of this warranty may not apply to every buyer. If
any provision of this Warranty is held invalid or unenforceable by a court or other decision-maker of competent
jurisdiction, such holding will not affect the validity or enforceability of any other provision.
W
AARRRRAANNTTY
W
Fluke Corporation
P.O. Box 9090
Everett, WA 98206-9090
U.S.A.
Y
LIMITED WARRANTY AND LIMITATION OF LIABILITY
Fluke Europe B.V.
P.O. Box 1186
5602 BD Eindhoven
The Netherlands
11/99
Page 15

MPG2-H OPERATION AND MAINTENANCE MANUAL
Table 2. DHI Authorized Service Providers
DH INSTRUMENTS, A FLUKE COMPANY
WWW.DHINSTRUMENTS.COM
AUTHORIZED SERVICE PROVIDERS
COMPANY
DH Instruments, a Fluke
Company
Ohte Giken, Inc.
DHI Products Technical
Service Division
Minerva Meettechniek B.V.
4765 East Beautiful Lane
Phoenix AZ 85044-5318
USA
Technology Center
258-1 Nakadai Nihari-Gun
Ibaraki 300-0133
JAPAN
National Institute of Metrology
Heat Division
Pressure & Vacuum Lab
NO. 18, Bei San Huan Donglu
Beijing 100013
PR China
Chrysantstraat 1
3812 WX Amersfoort
the NETHERLANDS
ADDRESS
TELEPHONE
& FAX
Tel 602.431.9100
Fax 602.431.9559
Tel 0298-55-8778
Fax 0298-55-8700
Tel 010-64291994 ext 5
Tel 010-64218637 ext 5
Fax 010-64218703
Tel (+31) 33.46.22.000
Fax (+31) 33.46.22.218
EMAIL
cal.repair@dhinstruments.com
tohte@ohtegiken.co.jp
cxcen@mx.cei.go.cn
info@minervaipm.com
Page 16
 Loading...