

Page 1

OptiFiber® Pro
OTDR
Getting Started Guide
The OptiFiber® Pro Optical Time Domain Reflectometer (OTDR)
module attaches to a Versiv
™
main unit to make a rugged, handheld tester that lets you locate, identify, and measure reflective
and loss events in multimode and singlemode fibers. Typical
maximum test ranges are 35 km maximum at 1300 nm for
multimode fiber and 130 km maximum at 1550 nm for
singlemode fiber.
Accessing the Product Manuals
This guide provides basic information to help you get started
using the tester. For more detailed information, see the latest
versions of the Versiv Users Manual and the Versiv Technical
Reference Handbook provided on the Fluke Networks website.
Symbols
W
Warning or Caution: Risk of damage or destruction to
equipment or software. See explanations in the manuals.
X
Warning: Risk of fire, electric shock, or personal injury.
*
Warning: Class 1 or Class 2 lasers. Risk of eye damage
from hazardous radiation.
Consult the user documentation.
j
Do not connect this equipment to public communications
networks, such as telephone systems.
40 year Environment Friendly Use Period (EFUP) under
China Regulation - Administrative Measure on the
Control of Pollution Caused by Electronic Information
Products. This is the period of time before any of the
identified hazardous substances are likely to leak out,
causing possible harm to health and the environment.
1.800.561.8187
ShopFlukeNetworks.ca
Page 2

WSafety Information
WWarning
X
To prevent possible fire, electric shock, or personal injury:
Read all safety information before you use the
Product.
Carefully read all instructions.
Do not open the case. You cannot repair or replace
parts in the case.
Do not modify the Product.
Use only replacement parts that are approved by
Fluke Networks.
Do not touch voltages > 30 V AC rms, 42 V AC peak,
or 60 V DC.
Do not use the Product around explosive gas, vapor,
or in damp or wet environments.
Use this Product indoors only.
~
This product complies with the WEEE Directive marking
requirements. The affixed label indicates that you must
not discard this electrical/electronic product in domestic
household waste. Product Category: With reference to
the equipment types in the WEEE Directive Annex I, this
product is classed as category 9 "Monitoring and Control
Instrumentation" product. Do not dispose of this product
as unsorted municipal waste.
P
Conformite Europeene. Conforms to the requirements of
the European Union and the European Free Trade
Association (EFTA).
)
Certified by CSA Group to North American safety
standards.
Conforms to relevant Australian standards.
«
Conforms to relevant Russian standards.
Ã
KCC-REM-FKN-012001001: EMC approval for Korea
Class A Equipment (Industrial Broadcasting &
Communication Equipment)
This product meets requirements for industrial (Class A)
electromagnetic wave equipment and the seller or user
should take notice of it. This equipment is intended for
use in business environments and is not to be used in
homes.
This key turns the Product on and off.
1.800.561.8187
ShopFlukeNetworks.ca
Page 3

Use the Product only as specified, or the protection
supplied by the Product can be compromised.
Do not use and disable the Product if it is damaged.
Do not use the Product if it operates incorrectly.
Batteries contain hazardous chemicals that can
cause burns or explode. If exposure to chemicals
occurs, clean with water and get medical aid.
Remove the batteries if the Product is not used for
an extended period of time, or if stored in
temperatures above 50 °C. If the batteries are not
removed, battery leakage can damage the Product.
Replace the rechargeable battery after 5 years of
moderate use or 2 years of heavy use. Moderate use
is defined as recharged twice a week. Heavy use is
defined as discharged to cutoff and recharged daily.
Disconnect the battery charger and move the
Product or battery to a cool, non-flammable
location if the rechargeable battery becomes hot
(>50 °C, >122 °F) during the charge period.
The battery door must be closed and locked before
you operate the Product.
Repair the Product before use if the battery leaks.
Recharge the batteries when the low battery
indicator shows to prevent incorrect measurements.
Do not disassemble or crush battery cells and
battery packs.
Do not put battery cells and battery packs near heat
or fire. Do not put in sunlight.
Have an approved technician repair the Product.
For Products with rechargeable batteries, use only
AC adapters approved by Fluke Networks for use
with the Product to supply power to the Product
and charge the battery.
WWarning: Class 1 and Class 2
Laser Products
*
To prevent eye damage and personal injury:
Do not look directly into optical connectors. Some
optical equipment emits invisible radiation that can
cause permanent damage to your eyes.
Do not look into the laser. Do not point laser
directly at persons or animals or indirectly off
reflective surfaces.
1.800.561.8187
ShopFlukeNetworks.ca
Page 4
When you inspect fiber endfaces, use only
magnification devices that have the correct filters.
Use the Product only as specified or hazardous laser
radiation exposure can occur.
WCaution
To prevent damage to the Product or cables under test and to
prevent data loss, read all safety information given in all
documentation supplied with the Product.
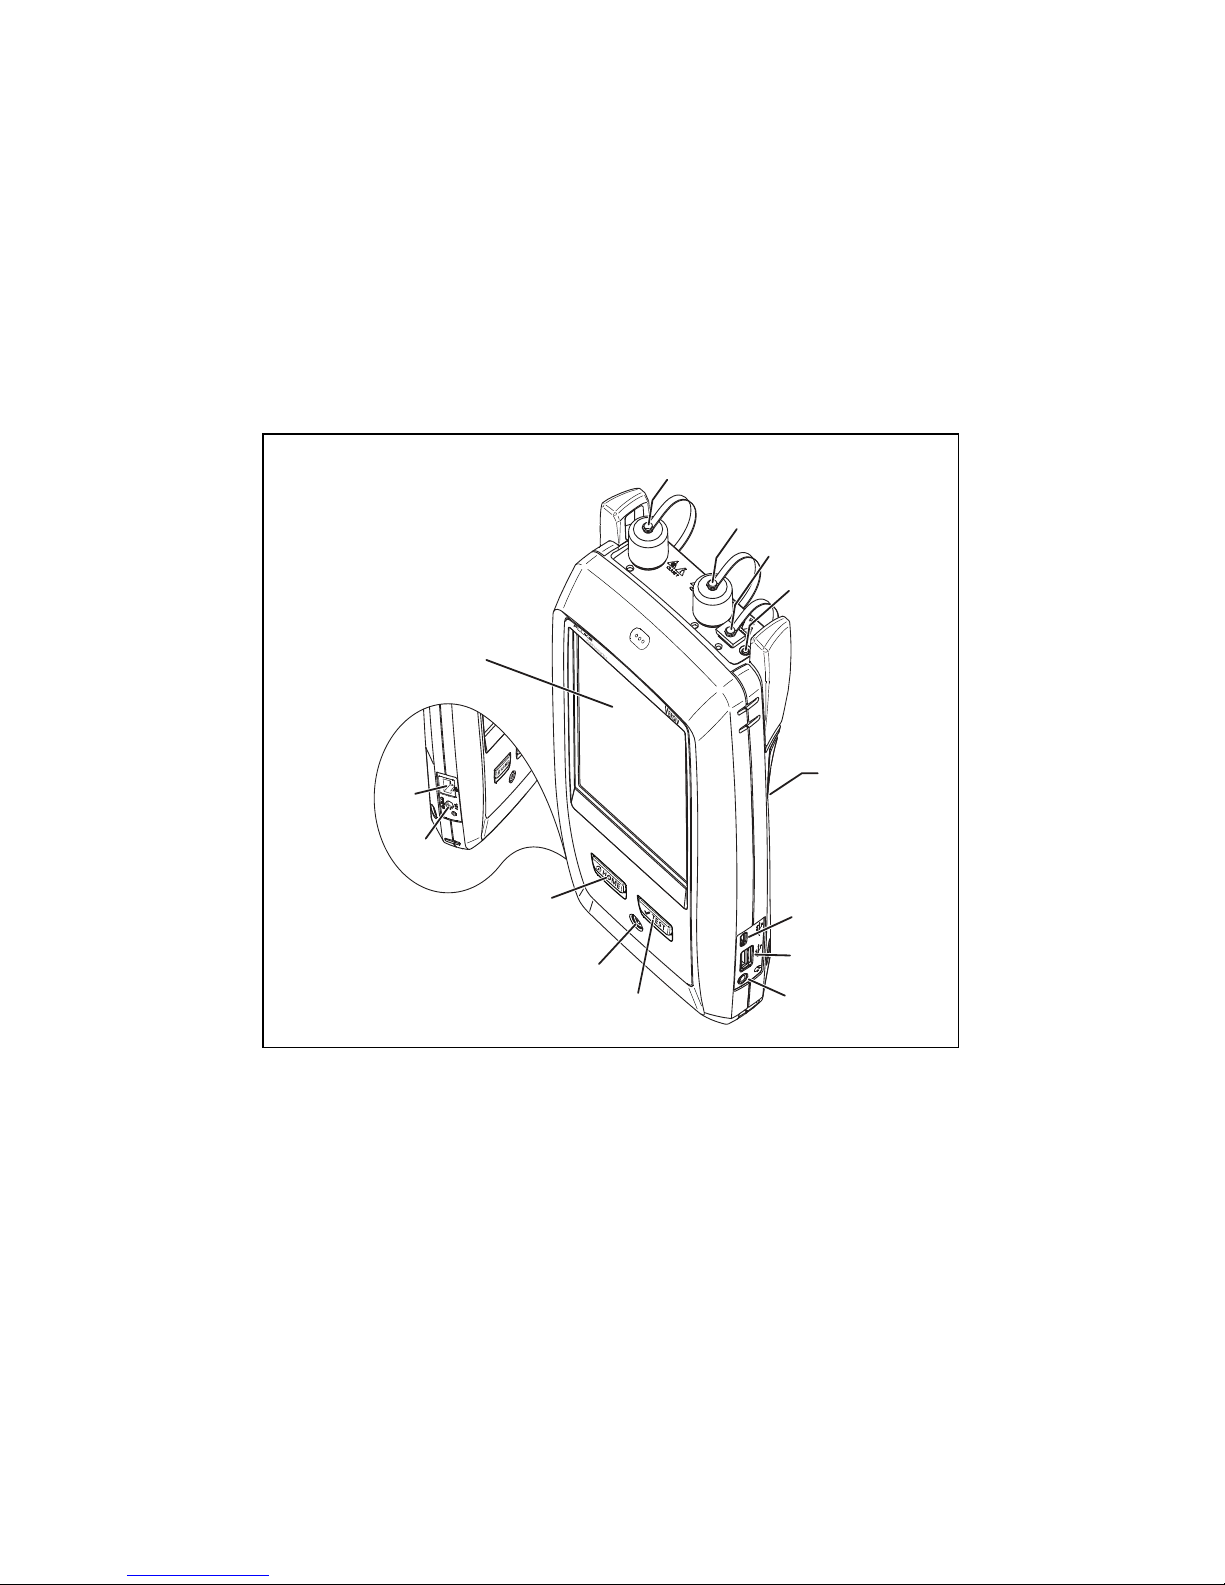
Connectors, Keys, and LEDs
GPU06.EPS
Figure 1. Connectors, Keys, and LEDs
LCD display with touchscreen.
Singlemode OTDR port with interchangeable SC adapter and
protective cap. The LED in front of the port turns on when the
port emits an optical signal.
Multimode OTDR port with interchangeable SC adapter and
protective cap. The LED in front of the port turns on when the
port emits an optical signal.
Visual fault locator port and protective cap. The LED in front of
the port turns on when the port emits an optical signal.
G
E
F
W*
C
B
D
M
L
A
H
N
K
I
J
1.800.561.8187
ShopFlukeNetworks.ca
Page 5
WWarning
*
Do not look directly into optical connectors. Some sources
emit invisible radiation that can cause permanent damage
to your eyes.
Button that controls the VFL.
Micro-AB USB port: This USB port lets you connect the tester to
a PC so you can upload test results to the PC and install
software updates in the tester.
Type A USB port: This USB host port lets you save test results on
a USB flash drive, connect the FI-1000 video probe to the tester,
or connect a Wi-Fi adapter for access to Fluke Networks cloud
services.
Headset jack.
: Starts a test. To start a test, you can also tap TEST on the
display.
Power key.
: Press to go to the home screen.
Connector for the ac adapter. The LED is red when the battery
charges, and green when the battery is fully charged. The LED
is yellow if the battery will not charge.
RJ45 connector: Lets you connect to a network for access to
Fluke Networks cloud services.
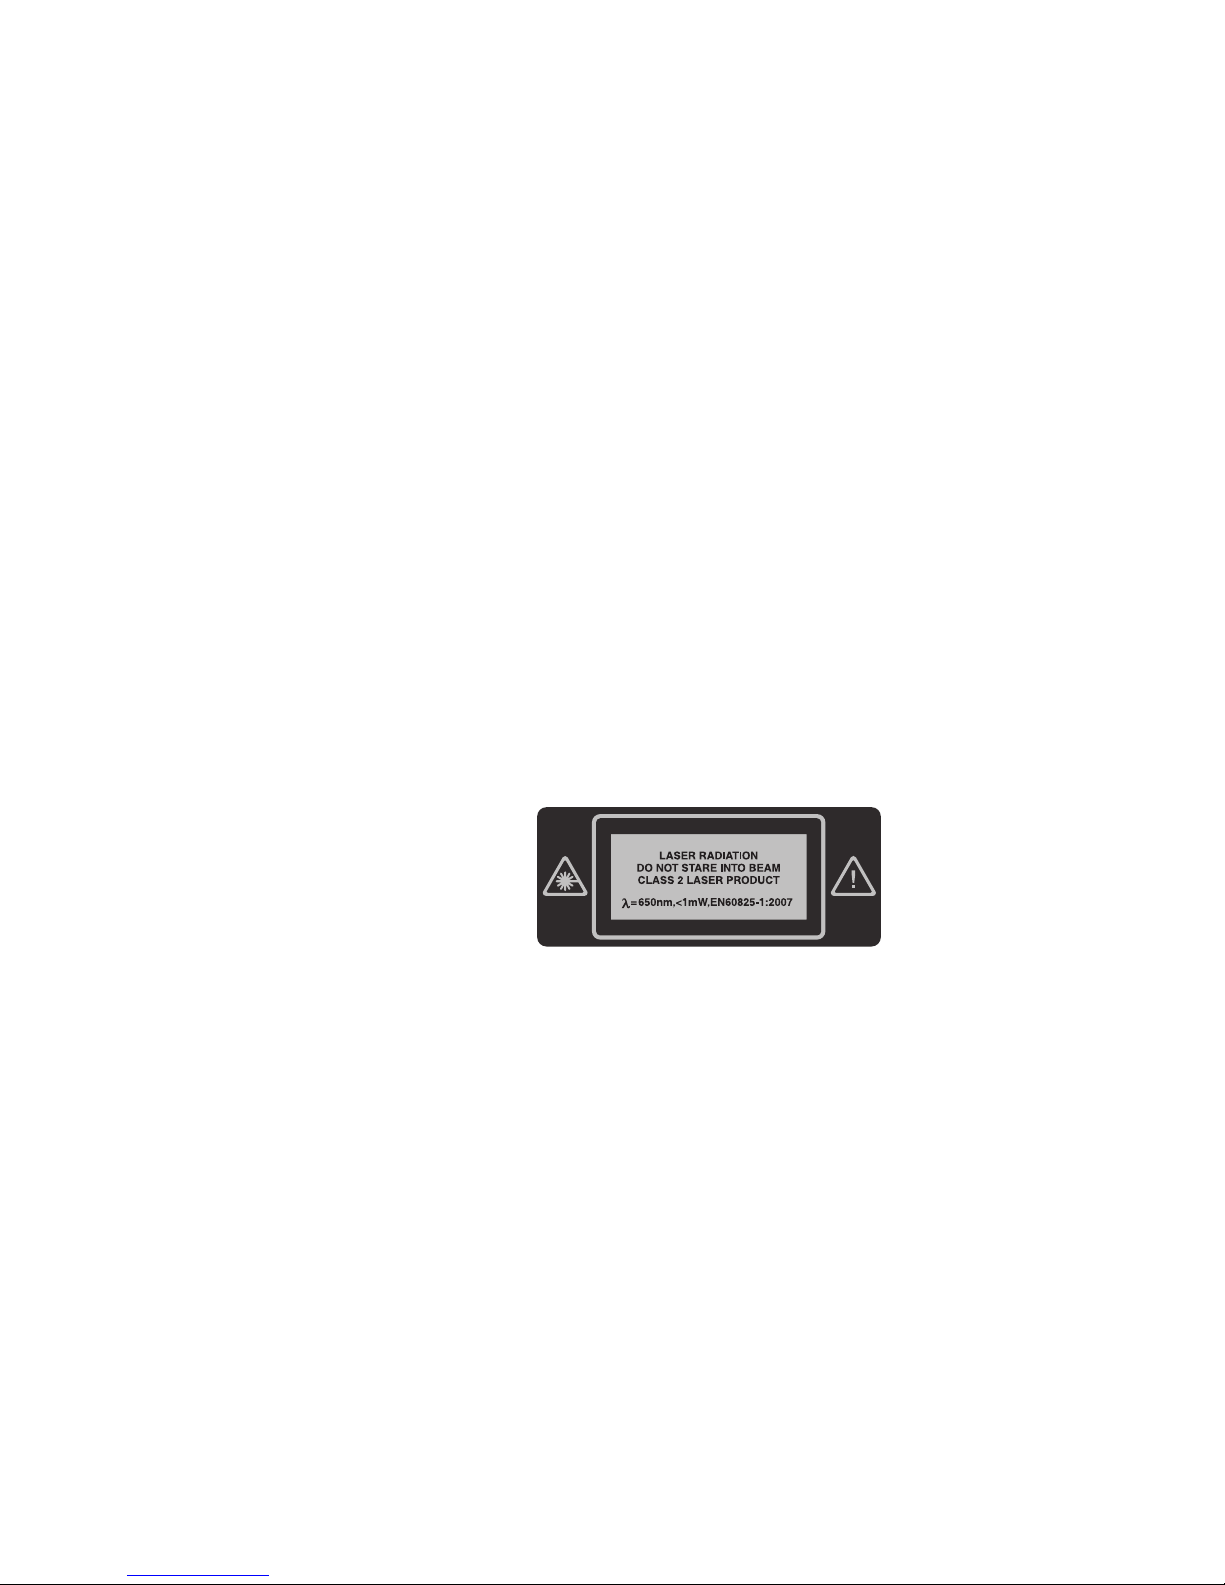
Decal with laser
safety information:
How to Do an OTDR Test
1.
Power the Tester
Charge the battery if necessary. Connect the ac adapter to
ac power and to the adapter connector () shown in Figure
1. You can use the tester while the battery charges.
2.
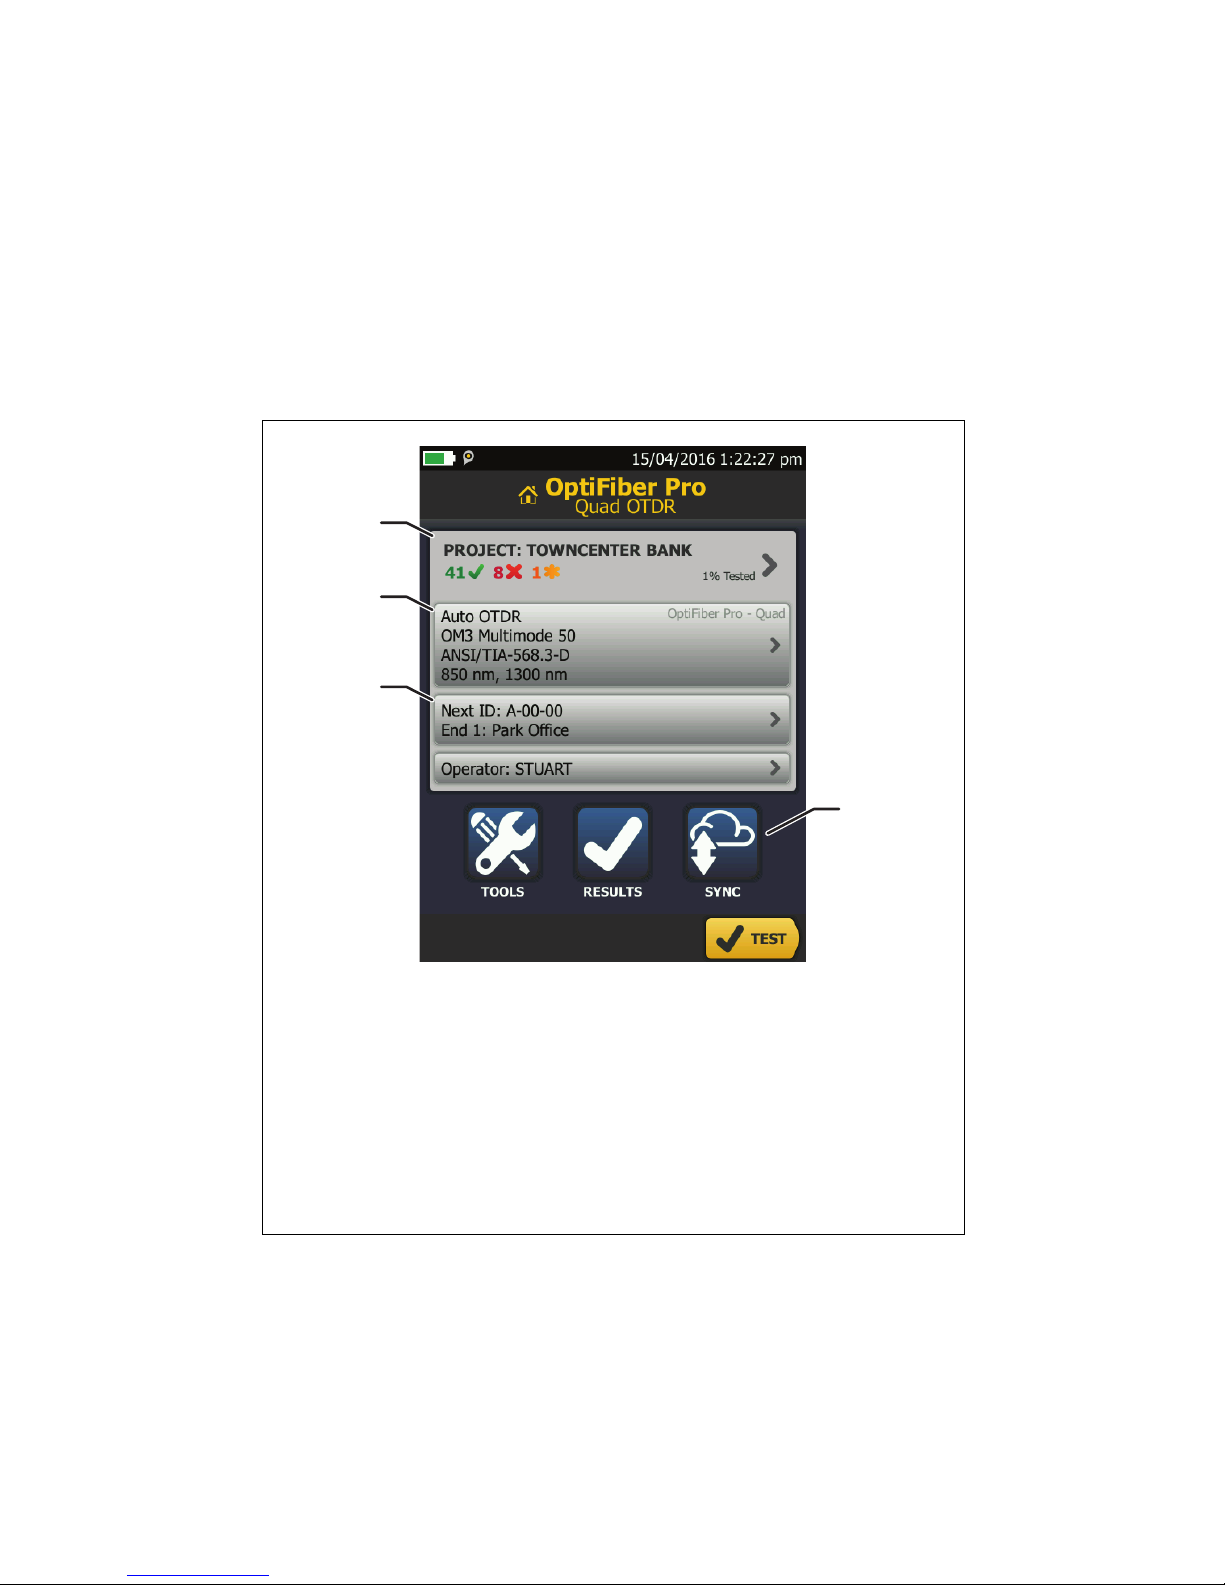
Select Settings
2-1
On the home screen, tap the test setup panel (see
Figure 2).
2-2
On the CHANGE TEST screen, tap EDIT.
2-3
On the TEST SETUP screen, tap the panels to change
settings:
Test Type: Select Auto OTDR.
-continued-
1.800.561.8187
ShopFlukeNetworks.ca
Page 6
Launch Compensation: If you will use launch/tail cords set
this to On.
Wavelength: Select the wavelengths for the test.
Fiber Type: On the FIBER TYPE screen, select a fiber type
that is applicable. To see a different group of fiber types,
tap MORE, then tap a group.
Test Limit: Select the correct test limit for the job. To see a
different group of limits, tap MORE, then tap the name of
a group.
2-4
To save the settings, tap SAVE on the TEST SETUP screen.
Figure 2. Panels on the Home Screen
GSM01.EPS
To set up a project, tap the PROJECT panel.
To change settings for the test or select a different test, tap
the test setup panel.
To set up cable IDs, turn on Auto Save, and change the
settings for the fiber End, tap the Next ID panel.
To upload test results to LinkWare Live, tap SYNC.
D
A
B
C
1.800.561.8187
ShopFlukeNetworks.ca
Page 7
3.
Compensate for Launch and Tail Cords
(recommended)
Launch and tail cords let the tester measure the loss and
reflectance of the first and last connectors in the cabling
and also include them in the measurement of overall loss.
Without launch and tail cords, no backscatter is available
before the first connector nor after the last.
Fluke Networks recommends that you use launch and tail
cords. You should also use the launch/tail cord
compensation function to remove the lengths of these
fibers from the OTDR measurements.
To compensate for launch and tail cords
3-1
Select launch and tail cords that have the same type of
fiber as the fiber you will test.
3-2
On the home screen, tap TOOLS, then tap Set Launch
Compensation.
3-3
On the SET LAUNCH METHOD screen tap Launch + Tail.
3-4
Clean and inspect the OTDR port and the launch/tail cord
connectors.
3-5
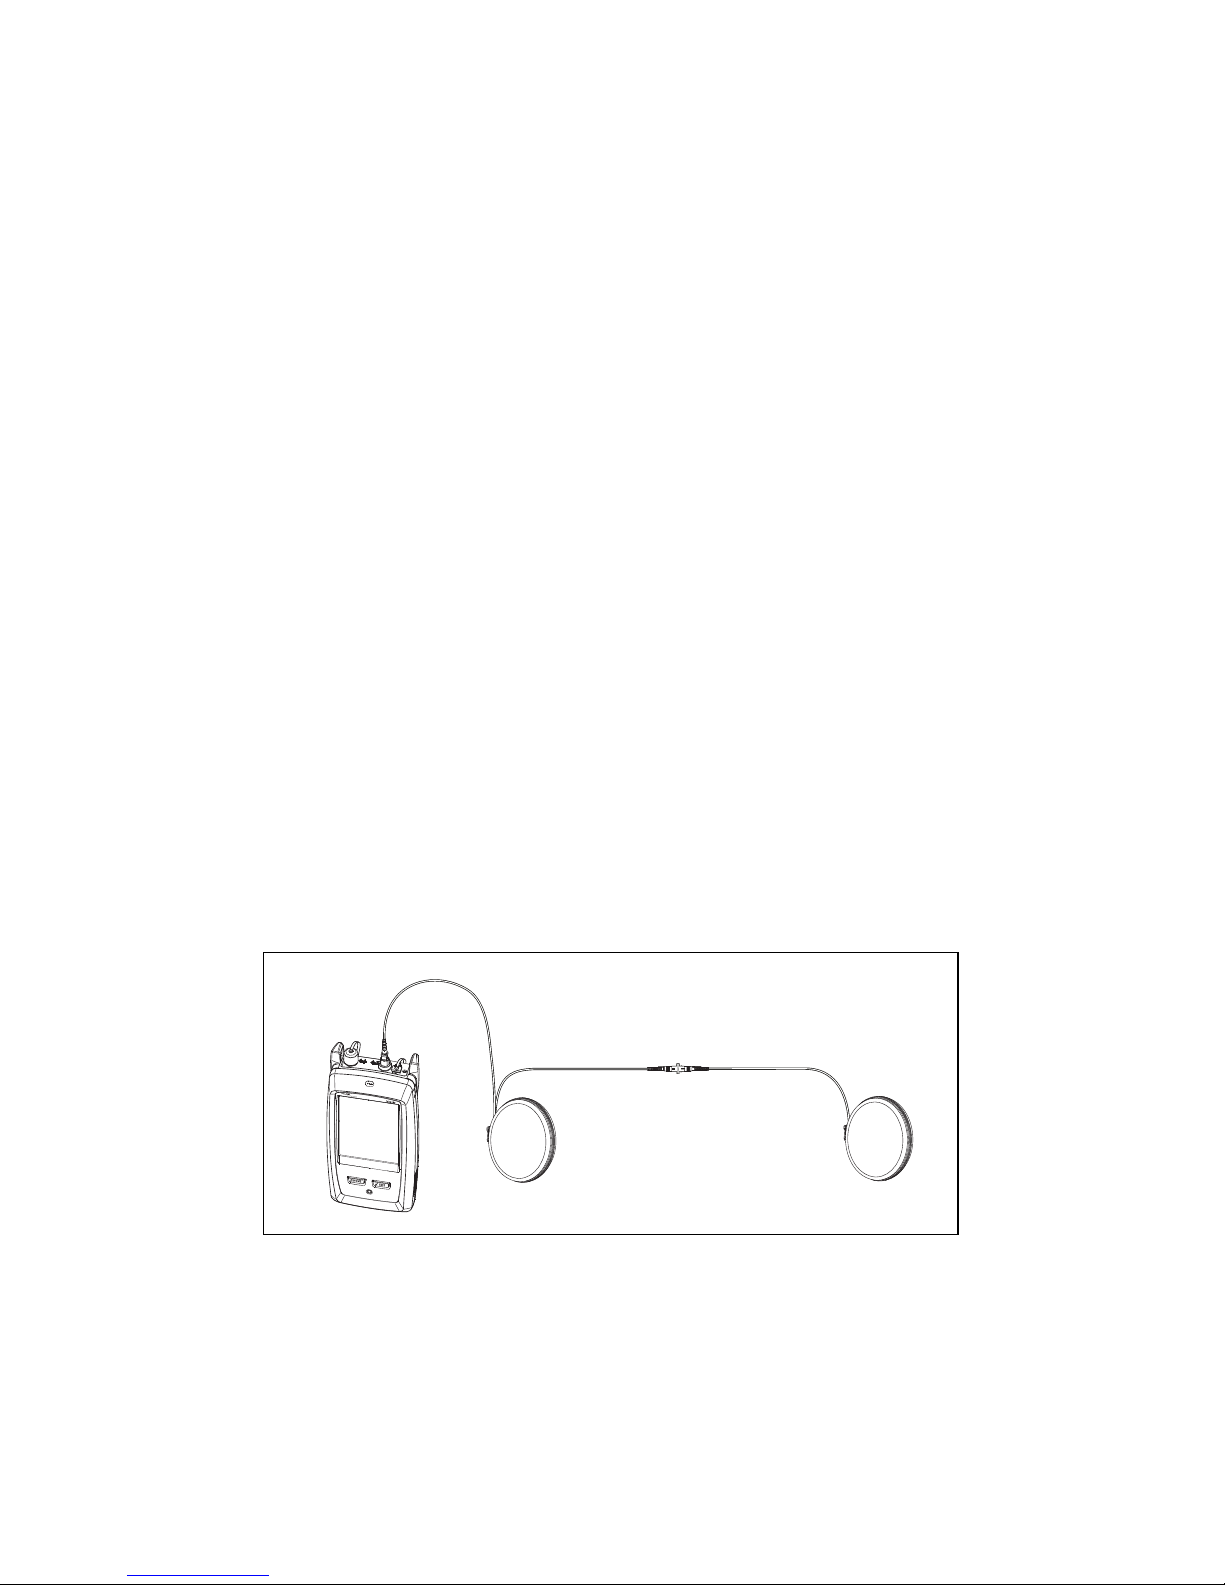
Make the connections shown in Figure 3.
3-6
Tap SET.
3-7
When the SET LAUNCH COMP screen shows, select the
event that is the end of the launch cord and the start of
the tail cord, if this event is not already selected.
3-8
Tap SAVE.
GSM03.EPS
Figure 3. Connections for Launch + Tail Compensation
Adapter
Tail cord
Launch cord
1.800.561.8187
ShopFlukeNetworks.ca
Page 8
4.
Do the OTDR Test
4-1
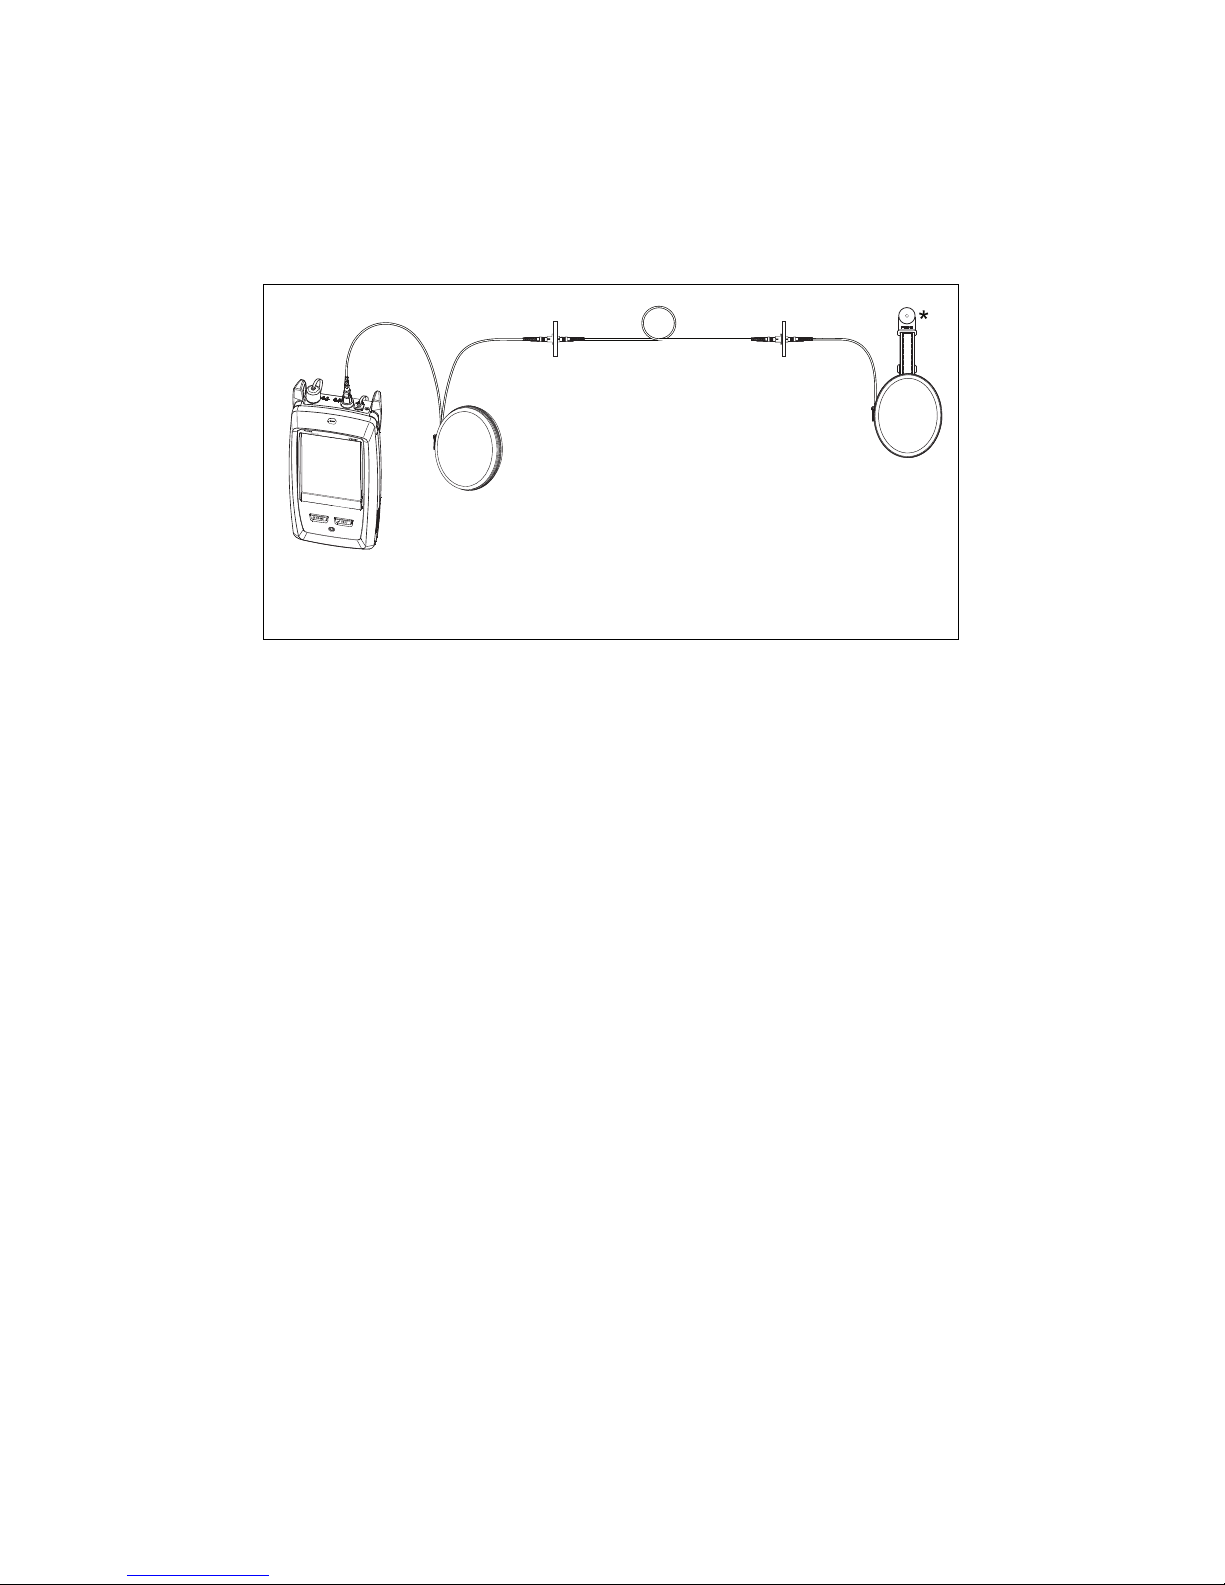
Clean and inspect the connectors on the launch and tail
cords and the fiber to be tested.
4-2
Connect the tester to the link as shown in Figure 4.
4-3
Tap TEST or press .
GSM02.EPS
Figure 4. Connections for an OTDR Test
5.
Examine the Results
The tester shows the OTDR results in three formats (Figure 5):
EventMap: Shows a diagram of the events on the fiber, the
fiber length, and the overall loss of the fiber. Use this
screen to quickly locate connectors and faults on the fiber.
To see details for an event, tap the event in the map, then
tap the information window for the event.
TABLE: Shows a table of the events on the fiber. Use this
screen to quickly see measurements for all events and see
the types of events that are on the fiber. The table includes
the distance to the event, the loss of the event, the size of
the reflection from the event, and the type of the event.
To see details for an event, tap the event in the table.
TRACE: Shows the OTDR trace. Use this screen to see the
deadzones of reflective events and examine the
characteristics of unexpected events such as ghosts and
gainers.
Launch cord
Tail cord
Fiber link
* Optional TPAK hanging strap lets you hang cords from a metal
surface.
1.800.561.8187
ShopFlukeNetworks.ca
Page 9
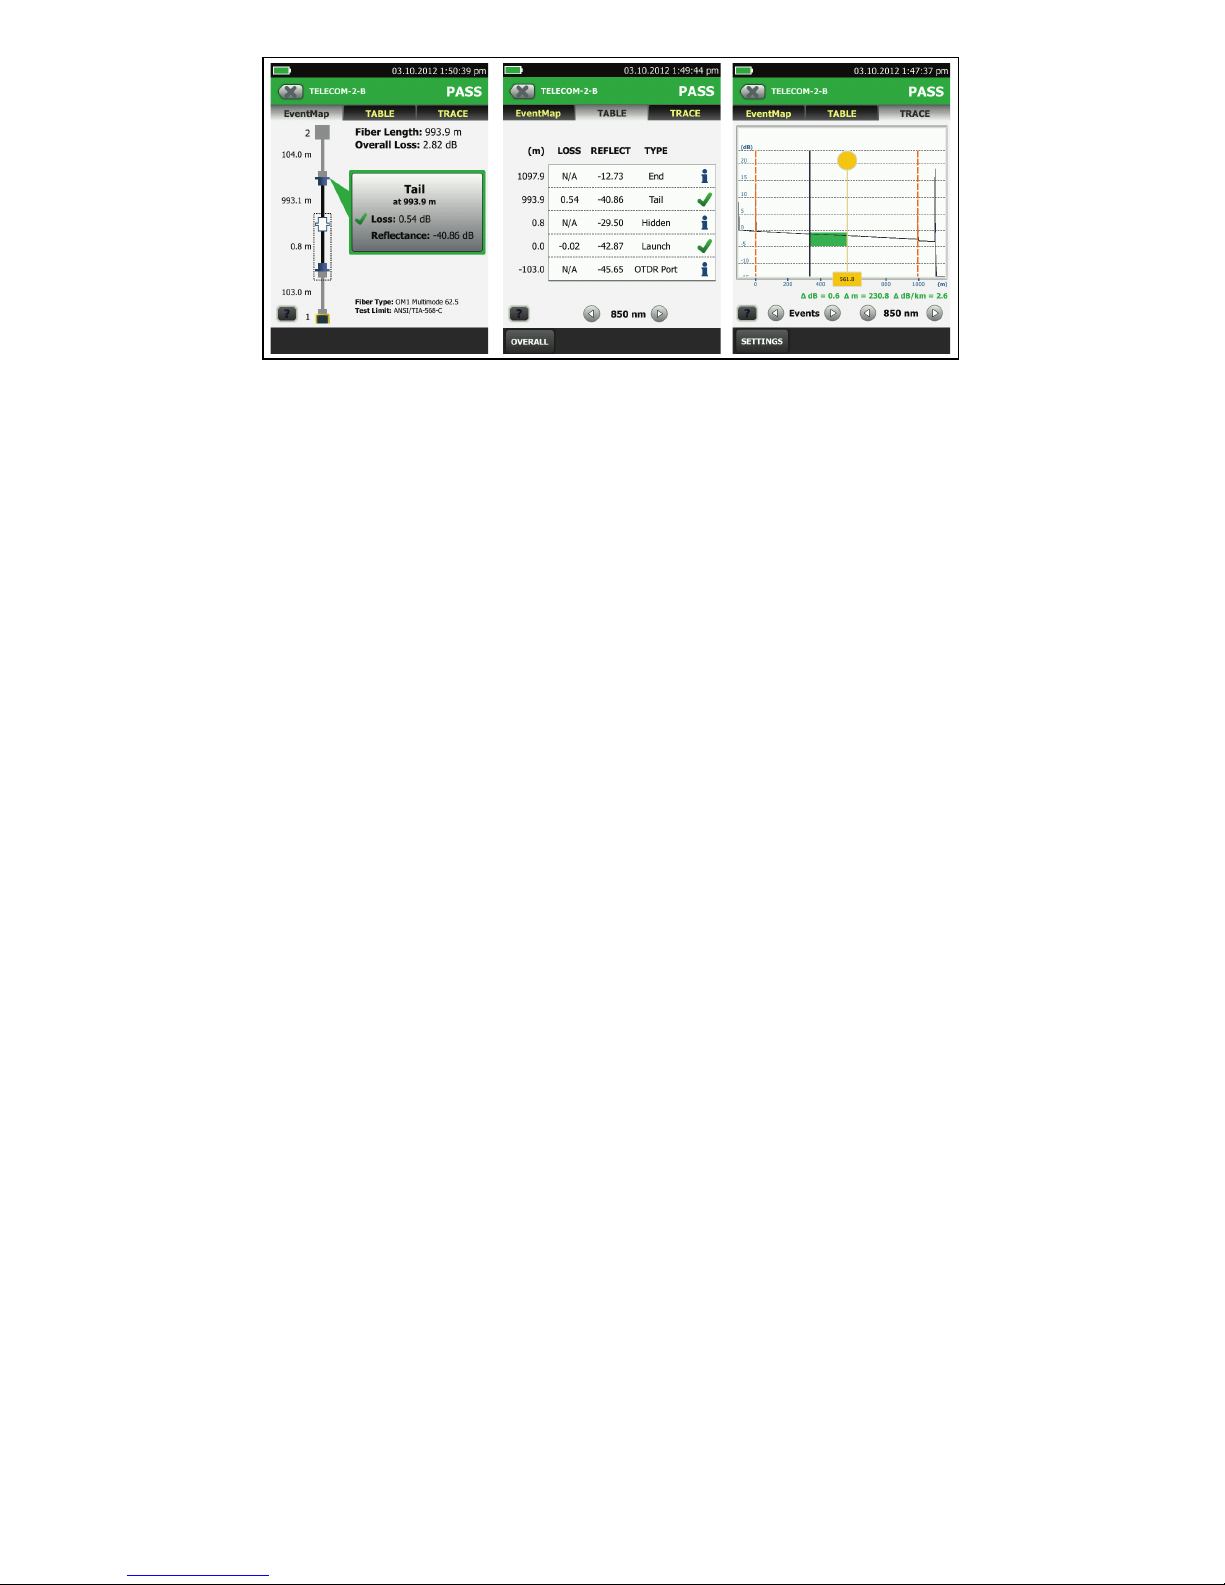
GPU26.EPS
Figure 5. Examples of OTDR Results Screens
6.
Save the Results
6-1
Tap SAVE if the test passed or FIX LATER if the test
failed.
6-2
If the Cable ID box shows the correct ID, tap SAVE.
To enter a cable ID, tap the Cable ID box on the SAVE RESULT
screen, use the keyboard to enter a name for the results, tap
DONE, then tap SAVE.
The tester saves the results in the DEFAULT project, unless you
selected a different project.
About Projects
You can set up a project to specify the settings and tests
necessary for a job, monitor the status of a job, and organize the
test results.
To start a new project, tap PROJECT on the home screen, tap
CHANGE PROJECT, then tap NEW PROJECT. See the Users Manual
or Technical Reference Handbook for more information.
About Fluke Networks Cloud Services
With a Fluke Networks web account and a wired or wireless
network connection, you can use the LinkWare Live web
application to store and manage projects in the cloud.
Go to https://www.linkwarelive.com/signin or see the Users
Manual or Technical Reference Handbook for more information.
Registration
Registering your product with Fluke Networks gives you access
to valuable information on product updates, troubleshooting
tips, and other support services.
To register, use LinkWare PC software. Download LinkWare PC
from the Fluke Networks website.
1.800.561.8187
ShopFlukeNetworks.ca
Page 10

Fluke Net
works operates in more than 50 countries worldwide.
For more contact information, go to our website.
General Specifications
Warranty
Limited 1-year warranty. See the product manual for details.
Battery Type Lithium-ion
Power
Adapter
Input: 100 to 240 VAC ±10%, 50/60Hz
Output: 15 VDC, 2 A maximum
Class II
Te mp er at ur e
Operating: -18 °C to +45 °C
Storage: -30 °C to +60 °C
Altitude
Operating: 4,000 m (3,200 m with AC adapter)
Storage: 12,000 m
1.800.561.8187
ShopFlukeNetworks.ca
 Loading...