Page 1

E-DWT-10000-AF
™
Electronic Deadweight
Technical Data
Tester
Features
• 0 MPa to 70 MPa
(10 000 psi) range
• ± 0.1 % of reading
measurement uncertainty from 1 % to 100 %
of range
• Not dependent on local
gravity or ambient
temperature
• Sets and reads any
pressure value directly
in any unit of measure,
without moving weights
• Built-in filling and
priming system
• “Ready” indication based
on pressure stability
• Electronic output allows
automated data collection using calibration
software
• Compact and transport-
able—rechargeable
battery pack for 8 hours
of field operation
• Selected by the US
Air Force to replace
conventional, mass/
piston-cylinder based
deadweight testers
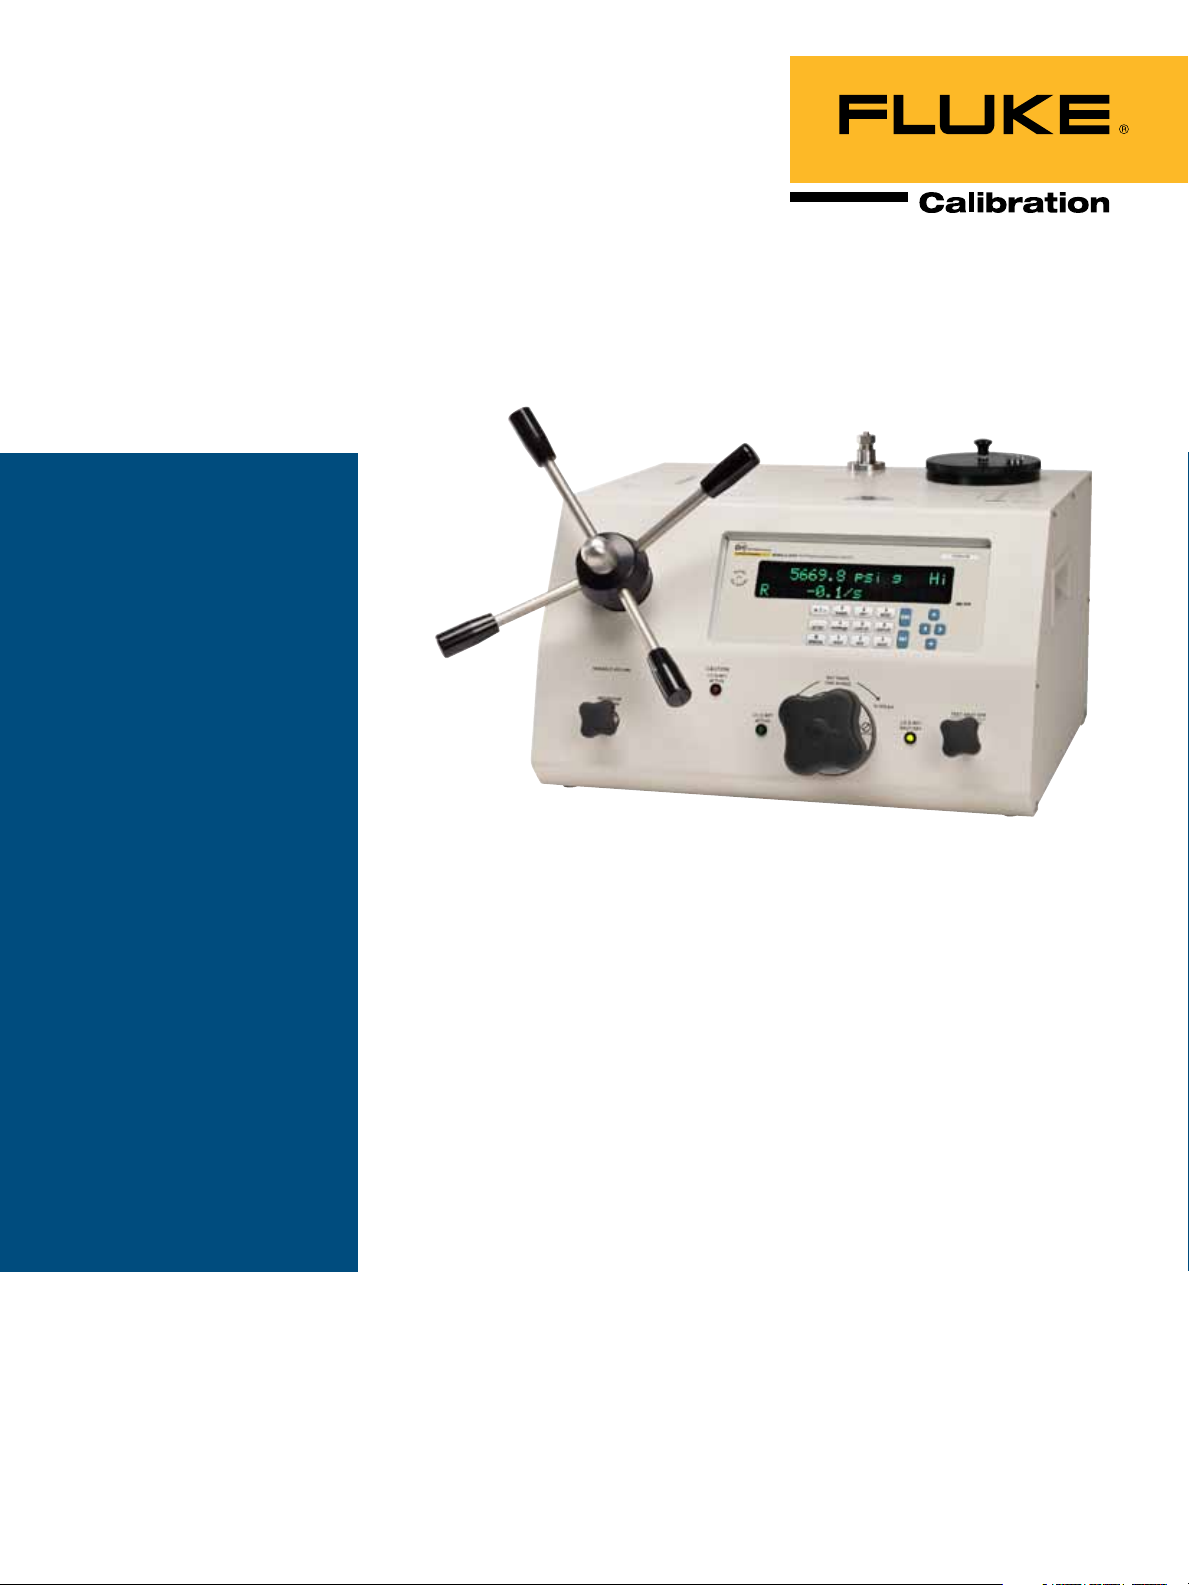
E-DWT-10000-AF is an electronic calibrator designed to replace mechanical
piston-cylinder based deadweight
testers. E-DWT is a lighter weight, easier-to-use deadweight tester alternative
that is at home in the lab or instrument
shop, as well as in the field performing
in-situ calibrations and tests.
With E-DWT you get a high performance hydraulic pressure calibration
system that combines an electronic
reference pressure monitor (RPM4) and
manually operated pressure generation and control hardware in a single,
compact and rugged package.
E-DWT offers the ease of use and
precision of continuous, real time
electronic pressure measurement with
the simple and direct pressure control
of high quality, manual hardware.
The electronic reference pressure
monitor is a special version of DHI’s
RPM4, designated RPM4-E-DWT
A70M/A7M-AF. It covers the range
from 0 to 10 000 psi gauge pressure
using two high precision quartz
reference pressure transducers, proven
over 20 years in thousands of DHI
calibration products.
E-DWT includes on-board calibration
routines to assist in setting up, running
and taking data, particularly when
calibrating analog gauges.
RPM4-E-DWT A70M/A7M-AF
includes an AutoRange feature to
automatically select the most appropriate Q-RPT and to optimize the E-DWT
setup to cover the desired range of
operation. A half-turn valve isolates
and protects the Lo Q-RPT from high
pressure when the Hi Q-RPT is in use.
Visual and audible indicators assist the
operator in setting the shut off valve
correctly.
RPM4-E-DWT A70M/A7M-AF is
controlled locally by the operator using
its front panel display, keypad and an
optional foot pedal or remotely by a
computer using COMPASS calibration
software or ASCII character command
strings over its RS-232 interface.
The E-DWT-10000-AF package was
specifically configured for the US Air
Force. It includes the E-DWT instrument, two eight-hour battery packs,
adaptors and a rugged, molded plastic
transport case.
Page 2

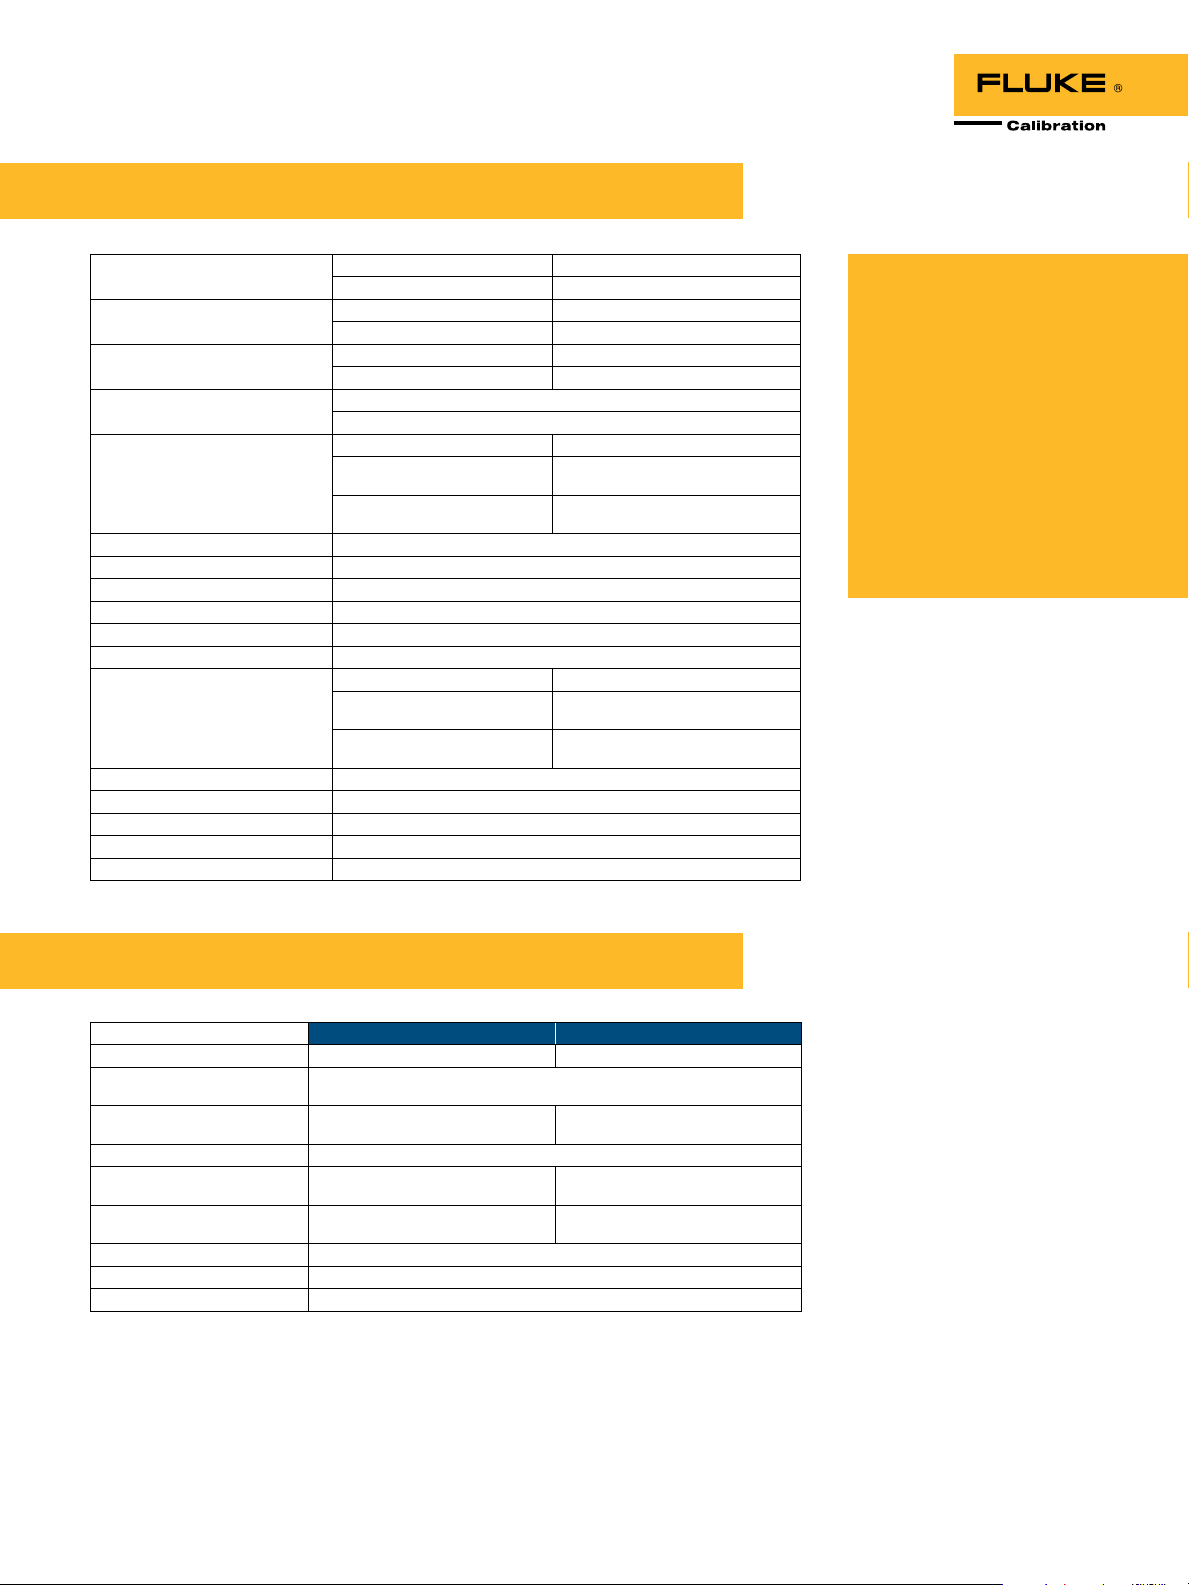
Specications
Power requirements RPM4-E-DWT 12 V dc, 1.2 A
AC V to 12 V dc power supply 100 V to 240 V ac, 50 Hz to 60 Hz
Temperature Operating 18 °C to 28 °C (64.4 °F to 82.4 °F)
Storage -20 °C to 70 °C (4 °F to 158 °F)
Relative humidity Operating 0 % to 70 %
Storage (in case) 0 % to 100 %
Weight 14 kg (30 lb) approx.
27 kg (60 lb) approx. with accessories in case
Dimensions (W x D) 41.4 cm x 37.1 cm (16.3 in x 14.6 in)
(H) 26.9 cm (10.6 in.), 33.6 cm (13.2 in.) to
System transport case (H x W x D) 39.4 cm x 79.5 cm x 51.8 cm
Pressure range 0 psi to 10 000 psi (70 M Pa) gauge pressure
Operating medium Oil (di-ethyl-hexyl sebacate)
Reservoir capacity 300 cc (18 in
Variable volume displacement 3 cc (0.18 in
Priming pump displacement 3.7 cc (0.23 in
TEST pressure connection DH500 female, adaptors to 1/4 in and 1/8 in NPT female included*
Pressure Limits Maximum working pressure 10 000 psi (70 M Pa)
Maximum pressure without
damage
Internal rupture disk burst
pressure
Maximum working pressure 1 000 psi (7 MPa)
Maximum pressure without damage 2 200 psi (15 MPa)
Pressure relief valve setting 1 500 psi (10 MPa)
Maximum priming pump pressure 100 psi (700 kPa)
Communication ports RS-232 (COM1, COM2)
3
)
3
)
3
)
max variable volume handle height
(15.5 in x 31.3 in x 20.4 in)
12 000 psi (80 MPa)
11 500 psi (80 MPa)
Ordering
information
Model
E-DWT-10000-AF
Electronic deadweight tester
Includes: Two 12 V dc
power packs, test connection
adaptors, A2LA accredited
calibration report, manual
Measurement specications (Q-RPT)
A7M Q-RPT A70M Q-RPT
Maximum range 1 000 psi (7 MPa) 10 000 psi (70 M Pa)
Resolution 0.01 % of active range default. User adjustable to 1 ppm of Q-RPT maximum
1
Precision
Temperature effect
Predicted stability
Measurement uncertainty
Warm up time 15-minute temperature stabilization recommended from cold power up
Compensated temperature range 5 °C to 35 °C (41 °F to 95 °F)
Operating temperature range 18 °C to 28 °C (64.4 °F to 82.4 °F)
1
Combined linearity, hysteresis, and repeata bility.
2
Maximu m influence of ambient temperat ure on indicated pres sure f rom 0 ºC to 5 0 ºC (32 ° F to 122 °F)
3
Pre dicted Q-R PT mea surement sta bility limit (k =2) o ver two years a ssuming regular use of AutoZero func tion a nd shor t term sta-
bility between rezeroing. As stabil ity ca n only be predic ted and varies from Q -RP T to Q-R PT, sta bility for a specifi c Q-R PT shou ld
be established from experience.
4
Maximu m deviation of t he Q-R PT indicat ion from the tr ue value of applied pressure i ncluding precision, pred icted t wo year
stabilit y with rezeroing, temp eratu re effect from 18 ºC to 28 ºC (64.4 °F to 82.4 °F) and calibrat ion unc erta inty (ass umes calibration
reference uncerta inty of ± 0.02 % of read ing, k =2), com bined a nd expanded ( k=2 ) following t he ISO “Guide to t he Expression of
Uncertainty in Measurement.”
2 Fluke Calibration E-DWT-10000-AF™ Electronic Deadweight Tester
2
3
4
± 0.015 % of reading, or 0.045 psi,
± 0.0006 % of span per ºC deviation from calibration temperature (23 ºC)
± 0.01 % of reading or 0.02 psi,
or 10 ppm of active AutoRange, whichever is larger.
± 0.015 % of reading, or 0.45 psi,
whichever is larger
whichever is greater
± 0.1 % of reading, or 0.1 psi,
whichever is greater
whichever is larger
± 0.01 % of reading or 0.1 psi,
whichever is greater
± 0.1 % of reading, or 1.0 psi,
whichever is greater
Fluke. Keeping your world
up and running.
Fluke Calibration
PO Box 9090, Everett, WA 98206 U.S.A.
Fluke Europe B.V.
PO Box 1186, 5602 BD
Eindhoven, The Netherlands
For more information call:
In the U.S.A. (800) 443-5853 or
Fax (425) 446-5116
In Europe/M-East/Africa +31 (0) 40 2675 200 or
Fax +31 (0) 40 2675 222
In Canada (800)-36-FLUKE or
Fax (905) 890-6866
From other countries +1 (425) 446-5500 or
Fax +1 (425) 446-5116
Web access: http://www.fluke.com
©2010 Fluke Calibration.
Specifications subject to change without notice.
Printed in U.S.A. 5/2010 3372366B B-EN-N
Modification of this document is not permitted
without written permission from Fluke Calibration.
®
 Loading...