

Page 1

9936A LogWare III
User’s Guide
Revision 850701
Page 2

Page 3

Table of Contents
1 Introduction ..............................................................................1
1.1 Symbols Used ........................................................................................... 1
1.2 Conventions .............................................................................................. 1
1.3 What is LogWare? ..................................................................................... 1
1.4 License Agreement ................................................................................... 2
1.5 Requirements ............................................................................................ 2
1.6 Installation ................................................................................................. 4
1.6.1 Upgrading from previous versions .................................................................. 5
1.6.2 Stand-Alone Single-User Installation ............................................................... 6
1.6.3 Client/Server Multi-User Installation ................................................................8
1.7 Running LogWare ................................................................................... 20
1.7.1 Getting Started .............................................................................................. 20
1.8 LogWare Main Display ............................................................................ 22
1.8.1 Menus ............................................................................................................ 25
1.9 Options ................................................................................................... 29
1.10 Methods of Communication .................................................................... 29
1.10.1 Serial (RS-232) Communications ..................................................................29
1.10.2 Ethernet (TCP/IP) Communications...............................................................31
1.10.3 Wireless Communications .............................................................................33
2 Security Features ...................................................................37
2.1 Administration ......................................................................................... 38
2.2 User Accounts ........................................................................................ 39
2.2.1 User Names and Passwords ......................................................................... 39
2.2.2 User Groups and Permissions ......................................................................39
2.2.3 Managing User Accounts .............................................................................40
2.2.4 Setting and Changing Account Passwords ..................................................45
2.3 LogWare User Login ............................................................................... 46
2.3.1 Change Password .........................................................................................47
2.4 Automatic Logins .................................................................................... 48
3 LogWare III Options ...............................................................51
3.1 General tab ............................................................................................. 51
3.2 Real-Time tab .......................................................................................... 55
3.3 Graph tab ................................................................................................ 59
3.4 Misc tab .................................................................................................. 63
i
Page 4

9936A LogWare III
4 E-mail Features ......................................................................65
4.1 Setting up E-mail SMTP Server ............................................................... 68
4.2 Setting up E-mail Recipients ................................................................... 70
4.2.1 Recipient Settings .........................................................................................71
4.3 Setting up E-mail Groups ........................................................................ 73
4.3.1 Group Settings ..............................................................................................74
4.4 Setting up E-mail Envelopes ................................................................... 76
4.4.1 Envelope Settings .........................................................................................78
4.5 Setting up Default Events ....................................................................... 79
4.5.1 Customizing Events ....................................................................................... 83
5 Real-Time Data Logging ........................................................85
5.1 Real-Time Log Session Settings ............................................................. 87
5.1.1 Logger ...........................................................................................................88
5.1.2 Session ..........................................................................................................95
5.1.3 Log Session Settings File ..............................................................................96
5.2 Real-Time Log Session ........................................................................... 97
5.2.1 Select Delayed Start Date/Time ..................................................................100
5.2.2 Select Graph to Print ...................................................................................101
5.2.3 Observation Mode ....................................................................................... 102
6 Remote Monitoring ..............................................................103
6.1 Remote Monitoring Options .................................................................. 104
6.2 Remote Monitoring ................................................................................ 108
7 Downloading Logged Data .................................................. 111
7.1 Download Options ................................................................................ 111
8 Importing Logged Data........................................................ 115
8.1 Import Options ...................................................................................... 115
8.2 Imported Data ....................................................................................... 117
9 Managing Logged Data .......................................................121
9.1 Viewing Logged Data ........................................................................... 122
9.1.1 View Logged Data Options .........................................................................122
9.1.2 Logged Data ...............................................................................................126
9.1.3 Annotations .................................................................................................128
9.2 Exporting Logged Data ........................................................................ 130
ii
Page 5

9.2.1 Export Logged Data Options ......................................................................132
9.2.2 Export Fields ...............................................................................................136
9.3 Printing Reports .................................................................................... 137
9.3.1 Print Logged Data Options .........................................................................138
9.3.2 Print Fields ................................................................................................... 143
9.3.3 Print Preview ................................................................................................ 144
10 Management Features .........................................................147
10.1 Managing Licenses .............................................................................. 147
10.1.1 Manage Licenses ........................................................................................149
10.2 Managing Assets and Locations .......................................................... 152
10.2.1 Manage Assets and Locations ....................................................................154
10.3 Managing Log Sessions ....................................................................... 162
10.3.1 Manage Log Sessions .................................................................................163
10.4 Deleting Log Sessions .......................................................................... 164
10.4.1 Delete Log Sessions Options ......................................................................165
11 Maintenance ........................................................................ 169
11.1 Database Maintenance ......................................................................... 169
12 Technical Support ................................................................ 171
13 Appendix A – License Agreement ......................................173
14 Appendix B – Copyright Notices ........................................175
15 Appendix C – Migrating Data From Previous Versions .....177
Index .............................................................................................181
iii
Page 6

9936A LogWare III
Tables
Table 1 User guide symbols .............................................................................. 1
Table 2 Text conventions .................................................................................... 1
Table 3 Security glossary ................................................................................. 37
Table 4 Account restrictions ............................................................................ 40
Table 5 E-mail glossary .................................................................................... 65
Table 6 View Logged Data Matching drop-down options ............................. 124
Table 7 Export Logged Data Matching drop-down options .......................... 134
Table 8 Print Logged Data Matching drop-down options .............................. 140
Table 9 Delete Log Sessions Matching drop-down options .......................... 166
iv
Page 7

Figures
Figure 1 Shared folder properties dialog - Sharing tab ................................... 14
Figure 2 Permissions dialog for shared folder ................................................. 15
Figure 3 Add a Port dialog ............................................................................... 16
Figure 4 Windows Firewall dialog - Exceptions tab ......................................... 17
Figure 5 Local Area Connection Properties dialog ......................................... 18
Figure 6 Folder Options-View Tab - Simple File Sharing ................................. 20
Figure 7 Main display window ......................................................................... 23
Figure 8 RS-232 Communication Settings dialog ............................................ 30
Figure 9 TCP/IP Communication Settings dialog ............................................. 31
Figure 10 Select Logger dialog ....................................................................... 32
Figure 11 RS-232 Communication Settings dialog - RF modem enabled ....... 34
Figure 12 RF Modem Properties dialog ........................................................... 35
Figure 13 Manage User Accounts dialog ........................................................ 41
Figure 14 User Account Settings dialog .......................................................... 43
Figure 15 User Account Settings dialog - Permissions tab ............................. 44
Figure 16 LogWare User Login dialog ............................................................. 46
Figure 17 Change Password dialog ................................................................ 48
Figure 18 LogWare III Options dialog .............................................................. 51
Figure 20 Windows® Auto-Logon Settings dialog ........................................... 54
Figure 21 LogWare III Options dialog- Real-Time tab ..................................... 55
Figure 22 LogWare III Options dialog - Graph tab .......................................... 59
Figure 23 Separate temperature graph ........................................................... 60
Figure 24 Separate humidity graph ................................................................. 60
Figure 25 Combined temperature and humidity graphs ................................. 61
Figure 26 LogWare III Options dialog - Misc tab ............................................. 63
Figure 27 SMTP E-Mail Settings dialog ........................................................... 69
Figure 28 SMTP E-Mail Settings dialog - Reciepients tab ............................... 70
Figure 29 Recipient Settings dialog ................................................................. 72
Figure 30 SMTP E-Mail Settings dialog - Groups tab ...................................... 73
Figure 31 Group Settings dialog ...................................................................... 75
Figure 32 Group Settings dialog - Recipients tab ........................................... 76
Figure 33 SMTP E-mail Settings dialog - Envelopes tab ................................. 77
Figure 34 Envelope Settings dialog ................................................................. 78
Figure 35 Envelope Settings dialog - To Groups tab ....................................... 79
Figure 36 Default Event Settings dialog .......................................................... 80
v
Page 8

9936A LogWare III
Figure 37 Real-Time Log Session Event Settings dialog ................................. 83
Figure 38 Real-Time Log Session Settings dialog ........................................... 87
Figure 39 Select Logger dialog ....................................................................... 89
Figure 40 Alarm Settings dialog ...................................................................... 91
Figure 41 Statistics Settings dialog ................................................................. 92
Figure 42 Statistics Settings dialog - Sliding Window tab ............................... 93
Figure 43 Color dialog ..................................................................................... 94
Figure 44 Real-Time Log Session Settings dialog - Session tab ..................... 95
Figure 45 Real-Time Log Session window ....................................................... 97
Figure 46 Real-Time Readings Grid popup menu ........................................... 98
Figure 47 Graph popup menu ......................................................................... 99
Figure 48 Statistics popup menu ................................................................... 100
Figure 49 Select Delayed Start Date/Time dialog .......................................... 101
Figure 50 Select Graph To Print dialog .......................................................... 101
Figure 51 Remote Monitoring Options dialog ................................................ 105
Figure 52 Remote Monitoring Options dialog - Misc Settings tab ................. 107
Figure 53 Remote Monitoring window ........................................................... 108
Figure 54 Remote Monitoring Statistics popup menu ................................... 109
Figure 55 Download Options dialog ............................................................. 112
Figure 56 Select Logger dialog - multiple loggers selected ......................... 113
Figure 57 Import Options dialog .................................................................... 116
Figure 58 Imported Data window .................................................................. 118
Figure 59 View Logged Data Options dialog ................................................ 123
Figure 60 View Logged Data Options dialkog - Misc Settings tab ................ 125
Figure 61 Logged Data window .................................................................... 126
Figure 62 Logged Data Grid popup menu .................................................... 127
Figure 63 Logged Data Calibration Overdue Annotations ........................... 127
Figure 64 Logged Data Statistics popup menu ............................................. 128
Figure 65 Annotations popup menu .............................................................. 128
Figure 66 Add Annotation dialog .................................................................. 129
Figure 67 Logged Data Annotations ............................................................. 129
Figure 68 Edit Annotation dialog ................................................................... 130
Figure 69 Export Logged Data Options dialog .............................................. 132
Figure 70 Export Logged Data Options dialog - Criteria tab ......................... 133
Figure 71 Export Logged Data Options dialog - Misc Settings tab ............... 135
Figure 72 Export Fields dialog ...................................................................... 136
vi
Page 9

Figure 73 Print Logged Data Options dialog ................................................. 138
Figure 74 Print Logged Data Options dialog - Criteria tab ............................ 139
Figure 75 Print Logged Data Options dialog - Misc Settings tab .................. 141
Figure 76 Example report .............................................................................. 142
Figure 77 Print Fields dialog .......................................................................... 143
Figure 78 Print Preview window ..................................................................... 144
Figure 79 Manage Licenses dialog ............................................................... 149
Figure 80 License Properties dialog .............................................................. 150
Figure 81 Remove Licenses dialog ............................................................... 151
Figure 82 Serial Number dialog ..................................................................... 152
Figure 83 Manage Assets and Locations dialog ........................................... 154
Figure 84 Manage Assets and Locations dialog - Loggers tab .................... 155
Figure 85 Manage Assets and Locations dialog - Sensors tab ..................... 156
Figure 86 Manage Assets and Locations dialog - Locations tab .................. 157
Figure 87 Logger Asset Settings dialog ........................................................ 158
Figure 88 Select Communication Protocol dialog.......................................... 159
Figure 89 Enter Password dialog - storing logger password ........................ 159
Figure 90 Sensor Asset Settings dialog ......................................................... 160
Figure 91 Location Settings dialog ................................................................ 161
Figure 92 Manage Log Sessions dialog ........................................................ 163
Figure 93 Delete Log Sessions Options dialog ............................................. 165
Figure 94 Confirm Deleting Log Session prompt .......................................... 166
Figure 95 LogWare III Database Migration Utility .......................................... 178
vii
Page 10

Page 11
Introduction
What is LogWare?
Introduction1
Symbols Used1.1
Table 1 lists the symbols that are used throughout this User Guide and their meanings.
Table 1 User guide symbols
This symbol indicates you must be logged in as an Administrator to perform the task.
This symbol indicates you must be logged in as an Administrator or have the appropriate
permission to perform the task.
This symbol indicates you must be logged in as a Typical user or higher or have the appropriate
permission to perform the task.
This symbol indicates you must be logged in as a Restricted user or higher or have the
appropriate permission to perform the task.
This symbol indicates important information.
This symbol indicates cautions or warnings.
Conventions1.2
The following conventions are used throughout this User Guide.
Text conventionsTable 2
Temperature scale Italics denote menus, menu options, dialog and window captions, and eld names
File | Print | Report The pipe symbol ‘|’ denotes submenu options
Play .WAV le Bold type denotes selectable options
<unknown format> Angle brackets ‘< >’ denote special markers
on dialogs and windows
What is LogWare?1.3
LogWare is a Windows® application that retrieves, stores, and analyzes data from the
Fluke Corporation, Hart Scientic Division’s (Hart) 1620A “DewK” Thermo-Hygrometer (logger). Hart’s 1620 “DewK” and Fluke’s 5020A Thermo-Hygrometers are also
supported by LogWare.
LogWare can either be setup in a single-user conguration on a stand-alone computer,
or it can be setup on an Ethernet network in a client/server, multi-user conguration
to maximize the use of LogWare’s features and provide access to LogWare’s data from
remote computers.
1
Page 12

9936A LogWare III
License Agreement
LogWare can log data from multiple loggers in real-time via RS-232, Ethernet, and
wireless communications. Real-time data may be logged from one or both of a logger’s sensors. LogWare also allows the data acquired by real-time log sessions to be
remotely monitored from any computer on the network where LogWare is installed. In
addition, LogWare can import data batches from PC cards or download data directly
from the logger’s memory.
All data, whether imported, downloaded, or acquired in real-time, is stored in LogWare’s data server and is easily retrievable using LogWare’s data retrieval features.
Congurable user login accounts and customizable group and permission settings can
ensure appropriate security and integrity of all stored data.
Both real-time and previously logged data may be viewed in customizable graphic and
tabular formats. Graphs can be displayed for both temperature and humidity in userselectable time-increments. A variety of critical statistical functions can also be shown
for each set of data, including minimum, maximum, spread, average, and standard
deviation. Alarm settings accompany imported, downloaded or real-time data. Alarm
events can also be triggered from the software while logging data in real-time or remotely monitoring a real-time log session.
LogWare allows onscreen viewing of logged data. It also prints reports and exports
data easily to multiple le formats that can be viewed in Excel® or other common
spreadsheet and word processing applications.
LogWare also includes e-mail features to keep you up to date wherever you are. E-
mail messages can be generated for alarm conditions, log session state changes, sensor
calibration due events, user login/logout, and more. E-mail messages can be sent via
SMTP server to any valid e-mail address including cell phones, PDAs, etc.
License Agreement1.4
For information and details regarding the software End User License Agreement
(EULA), refer to Section 13, Appendix A – License Agreement, on page 173.
1.5 Requirements
LogWare is designed to work with the following thermo-hygrometers (loggers):
Hart Model 1620A “DewK” Thermo-Hygrometer
Hart Model 1620 “DewK” Thermo-Hygrometer
Fluke Model 5020A “DewK” Thermo-Hygrometer
LogWare can either be setup in a single-user conguration on a stand-alone computer,
or it can be setup on an Ethernet network in a client/server, multi-user conguration.
Single-User Conguration – Stand-Alone Computer Requirements
The following minimum computer conguration is required to install and use LogWare in a stand-alone, single-user conguration:
Microsoft® Windows® 2000 (SP4), XP (SP2), or Vista operating system
2
Page 13

Introduction
Requirements
IBM Compatible Pentium® IV 1GHz processor or better
512MB RAM
200MB Hard Drive space for installation (2+GB recommended for data
storage)
USB port for installation and license application
Multi-User Conguration – Server Computer Requirements
The following minimum server computer conguration is required to install the LogWare server les:
Microsoft® Windows® Server 2003 or Server 2008 operating system
(recommended) or Windows® 2000 (SP4), XP (SP2), or Vista (limited to
maximum of 10 concurrent users)
IBM Compatible Pentium® IV 1GHz processor or better
1 GB RAM
200MB Hard Drive space for installation (10+GB recommended for data
storage)
USB port for installation and license application
Shared folder on network with Full Control for all LogWare users
Firewall exception for application server port
Multi-User Conguration – Client Computer Requirements
The following minimum client computer conguration is required to install and use
the LogWare client software:
Microsoft® Windows® 2000 (SP4), XP (SP2), or Vista operating system
IBM Compatible Pentium® III 700MHz processor or better
256 MB RAM (512 MB RAM or more recommended)
40MB Hard Drive space
Access to shared folder on server
Communications Requirements
To perform real-time logging or to download data from the logger’s memory, LogWare
supports using any of the following communication protocols:
Serial (RS-232) communications
Ethernet (TCP/IP) communications
Wireless communications (requires additional hardware)
Refer to Section 1.10, Methods of Communication, on page 29, for more informa-
tion on the requirements and details on how to use these communication protocols in
LogWare.
3
Page 14

9936A LogWare III
Installation
Additional Requirements
In addition to the requirements above, the following items may be required depending
on your system conguration and your intended use of LogWare:
1.6 Installation
LogWare can either be setup in a single-user conguration on a stand-alone computer,
or it can be setup on an Ethernet network in a client/server, multi-user conguration.
Before you begin installing LogWare, decide which conguration you want to use. Be-
low are some general guidelines to use to determine how you should proceed to install
LogWare. After deciding which conguration to use, refer to the appropriate following
section for the instructions to install LogWare.
Ethernet network connection for client/server conuration and/or Ethernet
communications
Ethernet patch cable(s) for Ethernet communications
Wireless RF modem(s) for wireless communications
RS-232 serial (COM) port(s) and “null modem” cable(s) for serial
communications
Access to a Simple Mail Transfer Protocol (SMTP) server for sending e-mail
messages
USB port for adding licenses
Note: Before installing LogWare, be sure to read Section 13, Appendix A –
License Agreement, on page 173. Also, refer to Section 1.5, Requirements, on
page 2, to make sure the computer(s) you are going to use meet the minimum
requirements.
Stand-Alone, Single-User Conguration
You should install LogWare in a stand-alone, single-user conguration if…
You only need to log data in a few locations or processes
You do not need access to LogWare’s data from other computers
You do not have Ethernet network capabilities
You do not plan to expand your system
Client/Server, Multi-User Conguration
You should install LogWare in a client/server, multi-user conguration if…
You need to log data in many locations or processes
Your computer is connected to an Ethernet network
You need access to LogWare’s data from multiple computers
You need access to LogWare’s data from remote locations using the internet and
a VPN connection to your network
4
Page 15

Introduction
You want to use a dedicated computer to log all data in real-time, but allow
other to monitor the data in real-time from other computers
You currently only need to use LogWare on a single computer, but may decide
to expand in the future
Preparing for Installation
Before beginning the installation process, make sure you follow these preparatory steps on the stand-alone computer or the server computer for a multi-user
conguration.
Make backup copies of all existing programs and data before starting the
installation process.
Run a disk-checking program to ensure that the disk has no lost clusters. This
normally involves running a program such as SCANDISK. You may also want
to run a disk defragmentation program. Consult the computer documentation or
a local support person for directions on how to perform these tasks.
Close all running programs except for the operating system itself.
You may also want to shut down and restart the computer. Doing this ensures
that all programs are cleared from memory. Be sure to close any applications
that may have started automatically.
Login to Windows® as an administrator or using an account with administrative
rights. If you do not have administrative rights on the computer, ask your
system administrator for assistance.
Installation
Upgrading from previous versions1.6.1
When upgrading LogWare III from a previous version, there are certain issues that you
need to be aware of and take into consideration. The following sections outline these
issues.
Upgrading from Version 1.x1.6.1.1
If you are currently running LogWare III version 1.x, upgrading to version 2.x requires
version 1.x to be uninstalled. The client installation process automatically detects and
uninstalls version 1.x for you.
Info: Uninstalling version 1.x does NOT delete the version 1.x database – all
data logged using version 1.x is contained in a database that may be imported
into the version 2.x data storage system using the migration utility. Refer to
Section 15, Appendix C – Migrating Data From Previous Versions, on page 177
for more information.
Upgrading from Version 2.01.6.1.2
If you are currently running LogWare III version 2.0, upgrading to version 2.x is very
easy. Simply shut down the LogWare client application and run the installation (on the
server computer if installed in client/server conguration).
5
Page 16
9936A LogWare III
Installation
Info: For client/server congurations, you do not need to run the installation on
each client computer. A new feature in this release will display a prompt on each
client computer the rst time LogWare is run indicating a new version has been
installed and requesting permission to update local les. Simply click Yes. All
local les are updated and the LogWare client runs.
Stand-Alone Single-User Installation1.6.2
When installing LogWare in a stand-alone, single-user conguration, only one com-
puter is required. Both the “server” les and the “client” les are installed on the same
computer.
Before beginning the installation process, make sure your computer meets the minimum requirements. LogWare will not run very efciently, or may not run at all, on
computers that do not meet these requirements. Refer to Section 1.5, Requirements, on
page 2 for more information on minimum requirements.
Note: To successfully install LogWare, you must be logged into Windows® as an
Administrator. If you do not have administrative rights, check with your system
administrator.
The LogWare installation process now allows the user to select between two installa-
tion options:
It is recommended to select the Simple Installation option. Selecting this option allows
the installation to use all default settings and requires minimal user interaction.
For advanced users, the Expert Installation option may be selected. Selecting this
option allows the installation to be customized, including selecting destination paths,
passwords, TCP ports, and other options as applicable.
Simple Installation
Expert Installation
Installing LogWare – Stand-Alone Computer Installation
To begin the installation process, insert the USB drive into a USB port on the 1.
computer and double-click the CDSetup.exe le located in the root directory.
The installation menu screen should be displayed. Click the icon for LogWare
III to launch the server setup process. If the setup les were downloaded from
the internet, double-click the LW3ServerSetup.exe le to launch the server
setup process.
If the 2. Open File – Security Warning dialog is displayed (XP), click Run. Or if
the User Account Control dialog is displayed (Vista), click Allow.
Welcome – 3. When the Welcome dialog is displayed, click Next > to proceed.
License Agreement –4. Read through the software license agreement. If you
accept the terms, select the I accept the terms of the license agreement option
6
Page 17

Introduction
Installation
and click Next > to proceed. You may print a copy of the license agreement by
clicking the Print button.
Select Installation Type –5. Click the Stand-Alone button.
Select Installation Option – 6. Select the option for the type of installation to
perform. It is recommended to select the Simple Installation option. However,
if you need to customize the installation, select the Expert Installation option.
Click Next > to proceed.
Enter Software Serial Number –7. Enter the serial number that was provided
when you purchased LogWare. If you are evaluating LogWare, leave the Serial
box blank. Click Next > to proceed.
For Expert Installation only…
If the a. Insufcient Memory Warning message is displayed, this computer may
not have enough memory to allow LogWare to run efciently in a stand-
alone conguration. If you want to continue and install LogWare anyway,
click Yes. Otherwise, click No to abort the process.
Important Installation Notes –b. Read the installation notes that are
displayed for important information regarding known installation issues, then
click Next > to proceed.
Enter PostgreSQL Database Information – c. Enter the password to use for
the PostgreSQL service account and default database user account in the
Password box. It is recommended to use the default password. The password
must meet system password complexity requirements. Also, enter the
installation path for the PostgreSQL database les. It is recommended to use
the default path. Click Next > to proceed.
Enter MET/BASE G2 Application Server Information –d. Enter the TCP
port that the application server should use to provide client access to the
data. It is recommended to use the default port unless that port is already in
use on this computer. A warning message will be displayed if the selected
port is already in use. Also, enter the installation path for the MET/BASE G2
Application Server les. It is recommended to use the default path. Click
Next > to proceed.
Installation Ready –8. Setup is now ready to begin installing the software. Click
Install to proceed.
Setup will begin copying les to the server computer. The PostgreSQL database 9.
les and MET/BASE G2 Application Server les are silently installed on
the computer. Status and progress dialogs are displayed as each of these
components are being installed.
The Log10. Ware III client application les are also silently installed. If a previous
version of LogWare III is detected on this computer, the previous version is
automatically uninstalled (version 1.x) or updated (v2.x).
7
Page 18
9936A LogWare III
Installation
Note: Uninstalling LogWare III version 1.x will not delete the database containing logged data. When the installation process is complete, data logged by the
previous version may be migrated into the new data storage system. Refer to
Section 15, Appendix C – Migrating Data From Previous Versions, on page 177
for more information.
Note: When restarting the computer, it is recommended that you login to
Windows® as an Administrator once more to allow the installation to complete.
You may login to Windows® normally on subsequent logins.
The installation process sets up a couple of services on the computer. These services
are congured to start automatically when the computer is booted and MUST be run-
ning in order for LogWare to run. It may take between 1 and 5 minutes for the services
to complete the startup process and allow LogWare clients to connect.
To Do List –11. When the installation process is complete, if there are any
remaining steps that need to be manually performed, or if any problems were
detected during the installation process, they are displayed in the To Do list.
You may print this list by clicking the Print button. Click Next > to proceed. If
there are no issues, this dialog is not displayed.
InstallShield Wizard Complete –12. The computer may need to be restarted
before you may begin using LogWare. Select the Yes, I want to restart my
computer now option and click Finish to restart the computer.
Client/Server Multi-User Installation1.6.3
When installing LogWare in a client/server, multi-user conguration, one computer is
required to act as the server and one or more computers are required to act as the cli-
ents. The computer being used as the server may also be used as a client. The “server”
les are installed on the server computer. These les consist mainly of the database
and application server les, as well as the client installation les. The “client” les
may then be installed on other computers by running the client installation from the
server computer. The client les are also always installed on the server computer.
Before beginning the installation process, make sure your computer meets the minimum requirements. LogWare will not run very efciently, or may not run at all, on
computers that do not meet these requirements. Refer to Section 1.5, Requirements, on
page 2 for more information on minimum requirements.
Note: To successfully install LogWare, you must be logged into Windows® as an
Administrator. If you do not have administrative rights, check with your system
administrator.
The LogWare installation process now allows the user to select between two installa-
tion options:
Simple Installation
Expert Installation
8
Page 19

Introduction
Installation
It is recommended to select the Simple Installation option. Selecting this option allows
the installation to use all default settings and requires minimal user interaction.
For advanced users, the Expert Installation option may be selected. Selecting this
option allows the installation to be customized, including selecting destination paths,
passwords, TCP ports, and other options as applicable.
All computers in a client/server conguration must be on the same network. All client
computers must be able to see and have access to the server computer. If your network
supports using Virtual Private Network (VPN) software, you may be able to install and
run LogWare from client computers over the internet. Consult your system or network
administrator for more information and assistance.
Note: Installing LogWare on a network may require you to enable le sharing
and congure rewall settings on the server computer. If you have never per-
formed these operations, are not familiar with how to do this, or if you are unfamiliar with these terms, you may want to consult your system or network administrator before beginning the installation process.
The LogWare III Server installation process attempts to automatically congure all
necessary settings on the server computer to allow client computers to connect and use
LogWare, including setting up a shared folder on the network, granting all users full
control to the shared folder and conguring the Windows® Firewall with an exception for a TCP port. If the installation fails to congure any of these settings, or if you
are using 3rd party rewall software, a To Do list is generated and displayed when the
installation process is complete. Review this list carefully as you may be required to
congure some or all of these settings manually before using LogWare. Refer to Sec-
tion 1.6.3.1, Sharing a Folder, on page 13 and Section 1.6.3.2, Server Firewall Conguration and File Sharing, on page 15 for more details on how to manually congure
these settings on the server computer.
Installing LogWare – Server Computer Installation
To begin the installation process, insert the USB drive into a USB port on the 1.
server computer and double-click the CDSetup.exe le located in the root
directory. The installation menu screen should be displayed. Click the icon
for LogWare III to launch the server setup process. If the setup les were
downloaded from the internet, double-click the LW3ServerSetup.exe le to
launch the server setup process.
If the 2. Open File – Security Warning dialog is displayed (XP), click Run. Or if
the User Account Control dialog is displayed (Vista), click Allow.
Welcome – 3. When the Welcome dialog is displayed, click Next > to proceed.
License Agreement –4. Read through the software license agreement. If you
accept the terms, select the I accept the terms of the license agreement option
and click Next > to proceed. You may print a copy of the license agreement by
clicking the Print button.
Select Installation Type –5. Click the Client/Server button.
9
Page 20

9936A LogWare III
Installation
Select Installation Option –6. Select the option for the type of installation to
perform. It is recommended to select the Simple Installation option. However,
if you need to customize the installation, select the Expert Installation option.
Click Next > to proceed.
Enter Software Serial Number –7. Enter the serial number that was provided
when you purchased LogWare. If you are evaluating LogWare, leave the Serial
box blank. Click Next > to proceed.
For Expert Installation only…
If the a. Insufcient Memory Warning message is displayed, this computer may
not have enough memory to allow LogWare to run efciently in a stand-
alone conguration. If you want to continue and install LogWare anyway,
click Yes. Otherwise, click No to abort the process.
If the b. User Limit Warning message is displayed (Windows® 2000/XP/Vista
only), acknowledge that you understand that there is a limit of 10 concurrent
client connections to the server. Click Yes to proceed. Otherwise, click No to
abort the process.
Important Installation Notes –c. Read the installation notes that are
displayed for important information regarding known installation issues, then
click Next > to proceed.
Enter Network Share Name –d. Enter the name to use for the network share.
This is the name of the folder that client computers must connect to on the
server computer to install and run the LogWare client application. Click
Next > to proceed. It is recommended to use the default share name.
Enter PostgreSQL Database Information –e. Enter the password to use for
the PostgreSQL service account and default database user account in the
Password box. It is recommended to use the default password. The password
must meet system password complexity requirements. Also, enter the
installation path for the PostgreSQL database les. It is recommended to use
the default path. Click Next > to proceed.
Enter MET/BASE G2 Application Server Information –f. Enter the TCP
port that the application server should use to provide client access to the
data. It is recommended to use the default port unless that port is already in
use on this computer. A warning message will be displayed if the selected
port is already in use. Also, enter the installation path for the MET/BASE
G2 Application Server les. It is recommended to use the default path. Click
Next > to proceed.
Installation Ready –8. Setup is now ready to begin installing the software. Click
Install to proceed.
Setup will begin copying les to the server computer. The PostgreSQL database 9.
les and MET/BASE G2 Application Server les are silently installed on
the computer. Status and progress dialogs are displayed as each of these
components are being installed.
The Log10. Ware III client application les are also silently installed on the server
computer. If a previous version of LogWare III is detected on this computer, the
10
Page 21
Introduction
Installation
previous version is automatically uninstalled (version 1.x) or updated (version
2.x).
Note: Uninstalling LogWare III version 1.x will not delete the database containing logged data. When the installation process is complete, data logged by the
previous version may be migrated into the new data storage system. Refer to
Section 15, Appendix C – Migrating Data From Previous Versions, on page 177
for more information.
To Do List –11. When the installation process is complete, if there are any
remaining steps that need to be manually performed on the server computer, or
if any problems were detected during the installation process, they are displayed
in the To Do list. You may print this list by clicking the Print button. Click
Next > to proceed. If there are no issues, this dialog is not displayed.
InstallShield Wizard Complete –12. The computer may need to be restarted
before you may begin using LogWare on the server computer. Select the
Yes, I want to restart my computer now option and click Finish to restart the
computer.
Note: When restarting the computer, it is recommended that you login to
Windows® as an Administrator once more to allow the installation to complete.
You may login to Windows® normally on subsequent logins.
The installation process sets up a couple of services on the server computer. These
services are congured to start automatically when the server computer is booted and
MUST be running in order for LogWare to run. It may take between 1 and 5 minutes
for the services to complete the startup process and allow LogWare clients to connect.
Note: Setup attempts to share a folder on the network, congure an exception in
the Windows® rewall, and setup local le sharing settings automatically, de-
pending on the operating system being used. If setup was unable to successfully
congure any of these settings, or if the server computer does not use the built-in
Windows® rewall, you may need to congure some of these items manually.
Any items such as these should be included in the To Do list that is displayed at
the end of the installation process. Make sure all of these items are addressed
before proceeding to install the LogWare III client on other computers. Refer to
Section 1.6.3.1, Sharing a Folder, on page 13 and Section 1.6.3.2, Server
Firewall Conguration and File Sharing, on page 15 for more information.
Installing LogWare – Client Computer Installation
To launch the Log1. Ware III Client Setup on other client computers, click the
Start button on the Windows® Taskbar and select Run. In the Open eld,
enter \\<SERVERNAME>\<ShareName>\ClientSetup\Setup.exe where
<SERVERNAME> is the name of the server computer recorded above, and
<ShareName> is the name of the share on the server where the LogWare les
11
Page 22

9936A LogWare III
Installation
Note: Uninstalling LogWare III version 1.x will not delete the database containing logged data. When the installation process is complete, data logged by the
previous version may be migrated into the new data storage system. Refer to
Section 15, Appendix C – Migrating Data From Previous Versions, on page 177
for more information.
are installed. The default share name is LogWareIII. Click OK to launch the
client setup.
If the 2. Open File – Security Warning dialog is displayed (XP), click Run. Or if
the User Account Control dialog is displayed (Vista), click Allow.
Welcome –3. When the Welcome dialog is displayed, click Next > to proceed.
If a previous version of Log4. Ware III (version 1.x) is already installed on this
computer, a prompt is displayed to uninstall the previous version. Click Yes
to uninstall the previous version before proceeding. The previous version is
uninstalled automatically. Otherwise, click No to abort the process.
If the 5. Insufcient Memory Warning message is displayed, this computer may
not have enough memory to allow LogWare to run efciently as a client in
the client/server conguration. If you want to continue and install LogWare
anyway, click Yes. Otherwise, click No to abort the process.
License Agreement –6. Read through the software license agreement. If you
accept the terms, select the I accept the terms of the license agreement option
and click Next > to proceed. You may print a copy of the license agreement by
clicking the Print button.
Optional Dialogs – These dialogs are only displayed if setup is unable to determine the correct settings to use.
Enter Software Serial Number –a. Enter the serial number that was provided
when you purchased LogWare. If you are evaluating LogWare, leave the
Serial box blank. Click Next > to proceed.
LogWare III Server Information –b. Enter the name of the computer being
used as the LogWare III Server in the Server box. Enter the TCP port on the
server that the MET/BASE G2 Application Server is congured to use in the
Port box. The default TCP port is 8080. Enter the name of the share on the
server computer where the LogWare III les are located in the Share box.
The default share name is LogWareIII. Click Next > to proceed.
Installation Ready –7. Setup is now ready to begin installing the software. Click
Install to proceed.
Setup will begin copying client les to the computer and setup the application 8.
shortcuts.
InstallShield Wizard Complete – 9. The computer may need to be restarted
before you may begin using LogWare. Select the Yes, I want to restart my
computer now option and click Finish to restart the computer.
12
Page 23

Note: When restarting the computer, login to Windows® as an Administrator to
allow the installation to complete. You may login to Windows® normally on subsequent logins.
1.6.3.1 Sharing a Folder
The LogWare III Server installation process attempts to automatically congure all
necessary settings on the server computer to allow client computers to connect and use
LogWare, including setting up a shared folder on the network and granting all users
full control to the shared folder. If the installation fails to do this for any reason, this
section gives an example of how to manually congure these settings on the server
computer.
The basic process of sharing a folder on a Windows® XP computer running on a Mi-
crosoft network is outlined below. This process may differ on other types of networks
and on other operating systems. Completing this process may require administrative
permissions. Consult your system or network administrator for assistance.
Sharing a Folder on the Network
On the computer that contains the folder to share (server computer), open 1.
Windows® Explorer and locate the folder.
Right-click on the folder to display the popup menu, and select the 2. Properties
option. This folder’s Properties dialog is displayed.
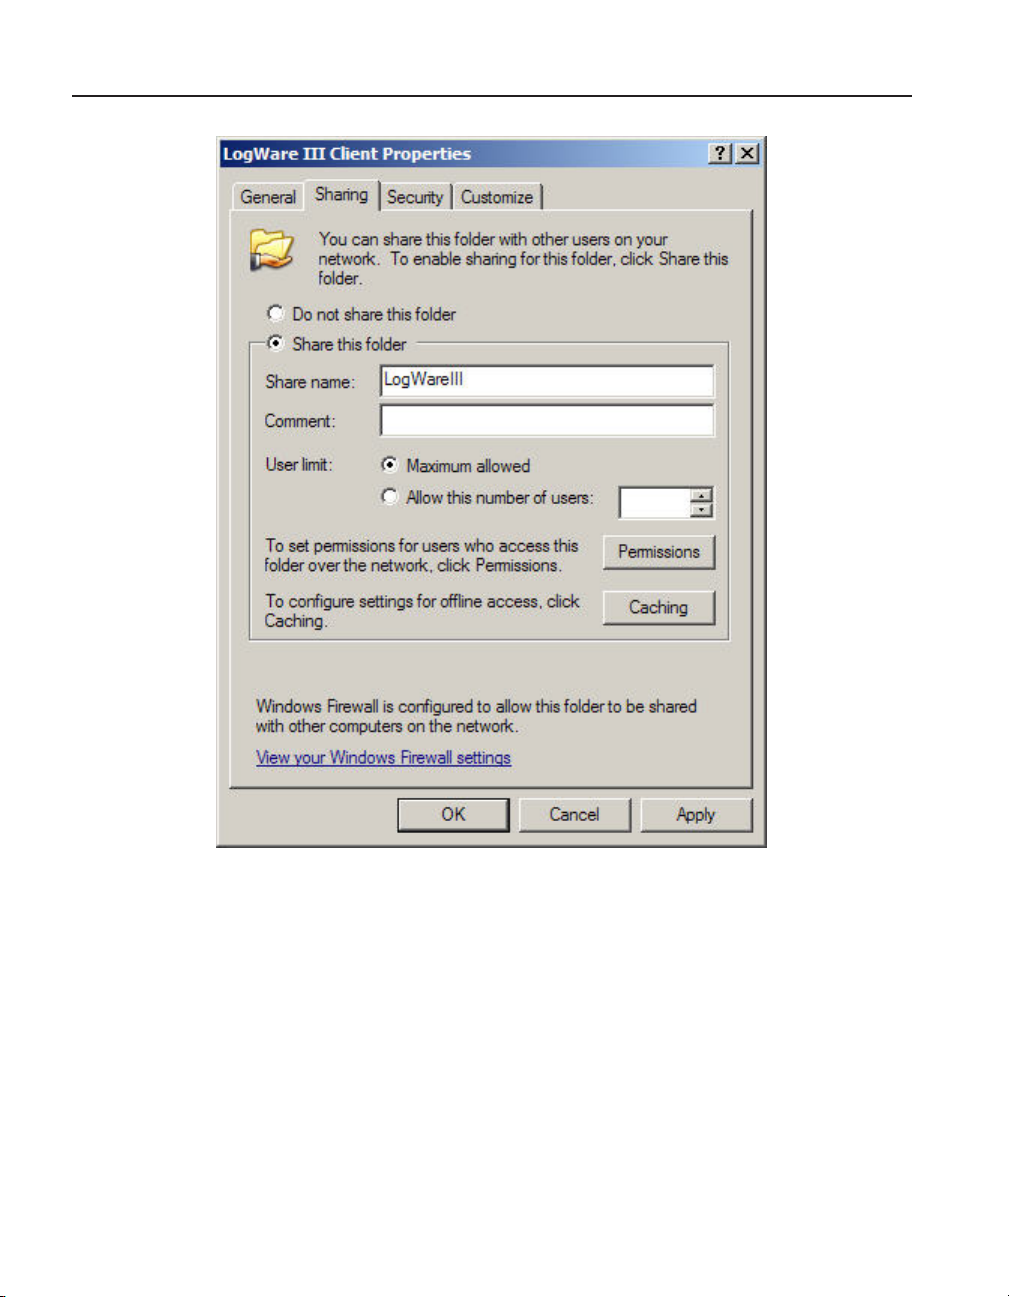
Click the 3. Sharing tab.
Select the 4. Share As or Share this folder option and enter a Share name, such as
LogWare III.
Introduction
Installation
13
Page 24
9936A LogWare III
Installation
14
Figure 1 Shared folder properties dialog - Sharing tab
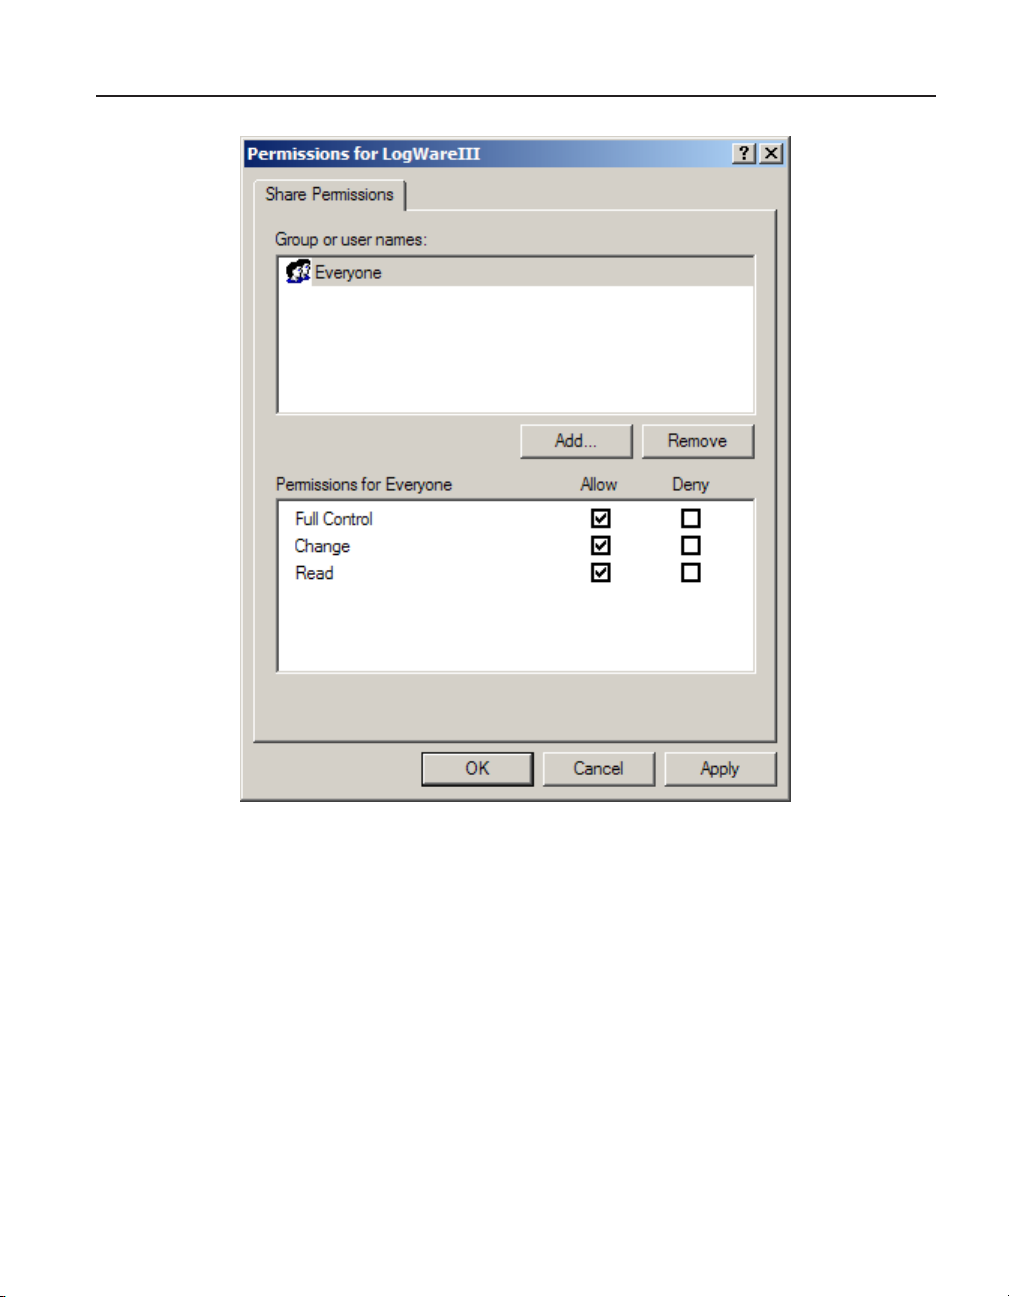
Click the 5. Permissions button to display the Permissions for <folder> dialog.
Select the 6. Everyone group in the Group or user names list and check the Full
Control checkbox in the Permissions for Everyone list. If the Everyone group
does not exist, click the Add button to create it rst.
Page 25
Introduction
Installation
Figure 2 Permissions dialog for shared folder
Click OK to close the 7. Permissions for <folder> dialog. Click OK to close the
Properties dialog.
1.6.3.2 Server Firewall Conguration and File Sharing
The LogWare III Server installation process attempts to automatically congure all
necessary settings on the server computer to allow client computers to connect and
use LogWare, including conguring the Windows® Firewall with an exception for a
TCP port. If the installation fails to do this for any reason or if you are using 3rd party
rewall software, this section gives an example of how to manually congure these
settings on the server computer.
When conguring LogWare to be used in a client/server, multi-user conguration, all
client computers must be able to communicate with the server computer. If the server
computer is running rewall software, the rewall software must be congured to al-
low LogWare client computers to connect to it by adding an exception for a TCP port.
The client/server installation process attempts to automatically create an exception in
15
Page 26
9936A LogWare III
Installation
the Windows® rewall on the server computer. However, under certain circumstances
it may fail.
Note: Improperly conguring rewall software can leave your network suscep-
tible to viruses and other attacks from malicious software. Always consult your
system or network administrator before changing rewall and le sharing
settings!
The steps below indicate how to congure the default Windows® XP rewall to allow
LogWare client computers to connect to the LogWare server computer. The process of
conguring rewall software will differ from one rewall software package to another
as well as one operating system to another. Consult your rewall software’s documen-
tation for details on adding exceptions for a TCP port.
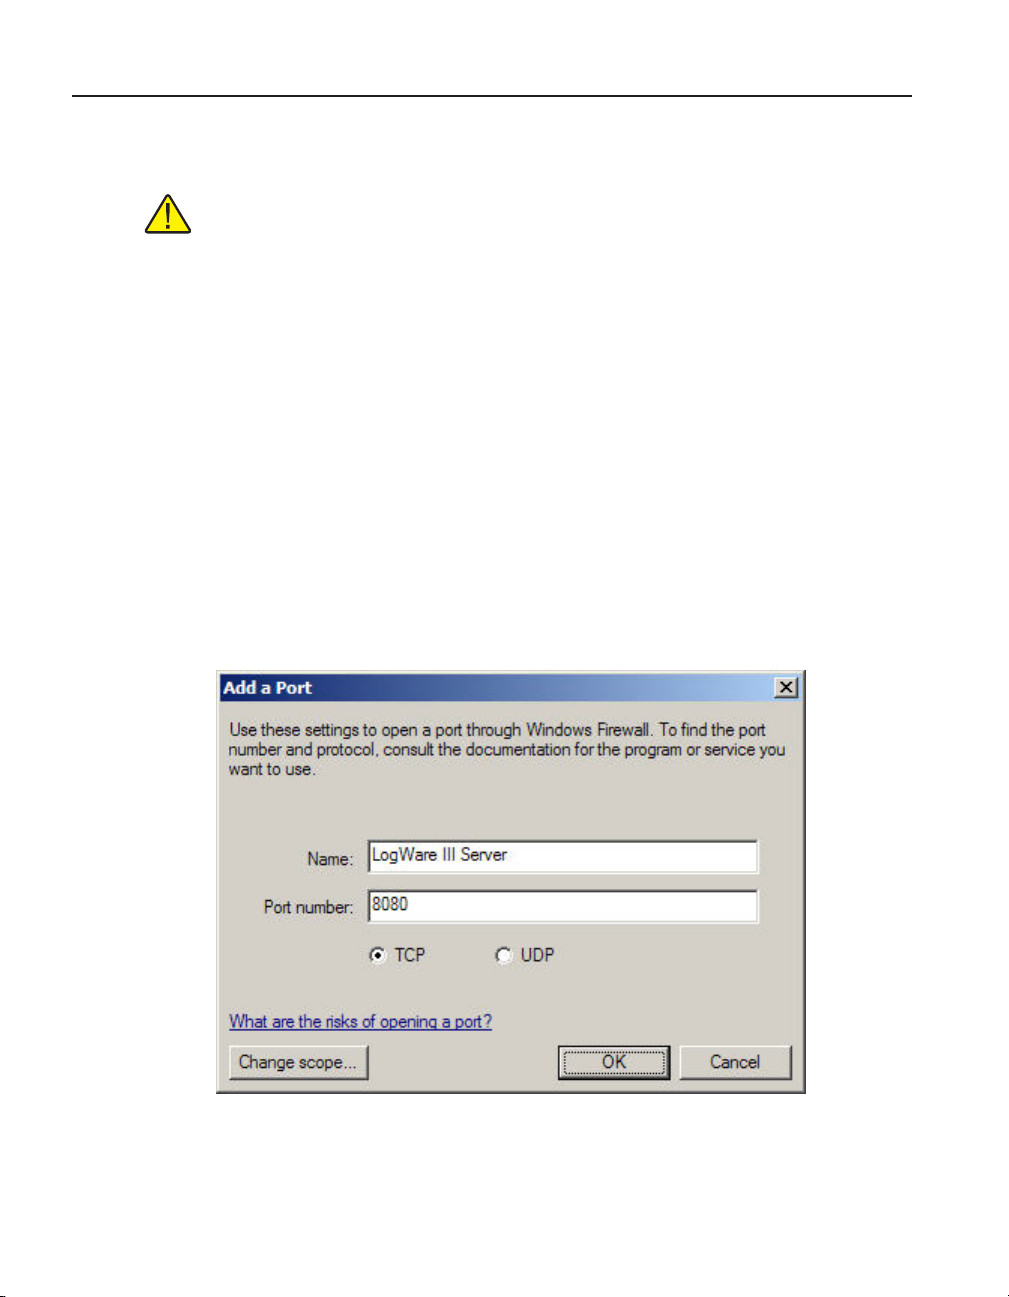
To congure the Windows® XP rewall settings on LogWare’s server computer…
On the server computer, open the 1. Control Panel window by clicking the Start
button and selecting the Control Panel option, or the Control Panel option in
the Settings menu, depending on your Start menu conguration.
In the 2. Control Panel window, click the Security Center icon and select Windows
Firewall (if in Category View) or double-click the Windows Firewall icon (if in
Classic View) to display the Windows Firewall dialog.
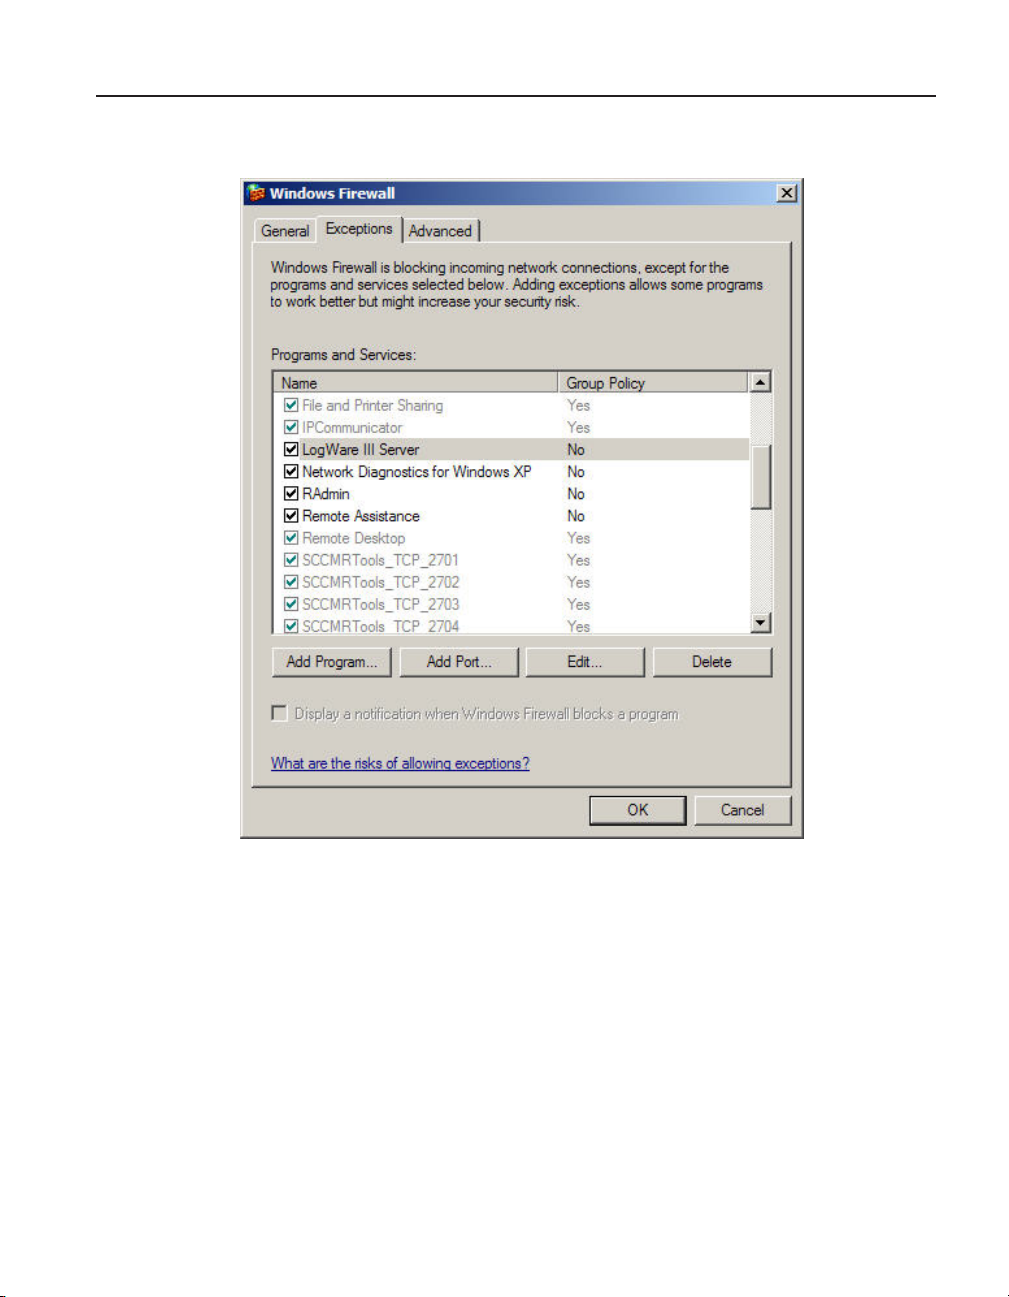
Select the 3. Exceptions tab and click the Add Port button. The Add a Port dialog
is displayed.
16
Figure 3 Add a Port dialog
In the 4. Port number eld, enter 8080 (default) or the TCP port that was entered
during the server installation. Select the TCP option and click OK to close the
Page 27
Introduction
Installation
dialog. This should appear as an entry in the Programs and Services list now.
The checkbox in front of the entry should be checked.
Figure 4 Windows Firewall dialog - Exceptions tab
Click 5. OK to close the Windows Firewall dialog.
The Windows® XP rewall is now congured to allow LogWare client computers to
connect to it.
File sharing must also be enabled on the server computer to allow other client com-
puters to access the shared client les. The steps below indicate the basic process of
conguring le sharing in Windows® XP for a Microsoft network. The process of
conguring le sharing will differ from one network to another as well as one operating system to another. Consult your operating system’s help les for details on
enabling le sharing.
17
Page 28
9936A LogWare III
Installation
To enable le sharing on Windows® XP for Microsoft networks on LogWare’s
server computer…
On the server computer, open the 1. Control Panel window by clicking the Start
button and selecting the Control Panel option, or the Control Panel option in
the Settings menu, depending on your Start menu conguration.
In the 2. Control Panel window, click the Network and Internet Connections
icon and select Network Connections (if in Category View) or double-click
the Network Connections icon (if in Classic View) to display the Network
Connections window.
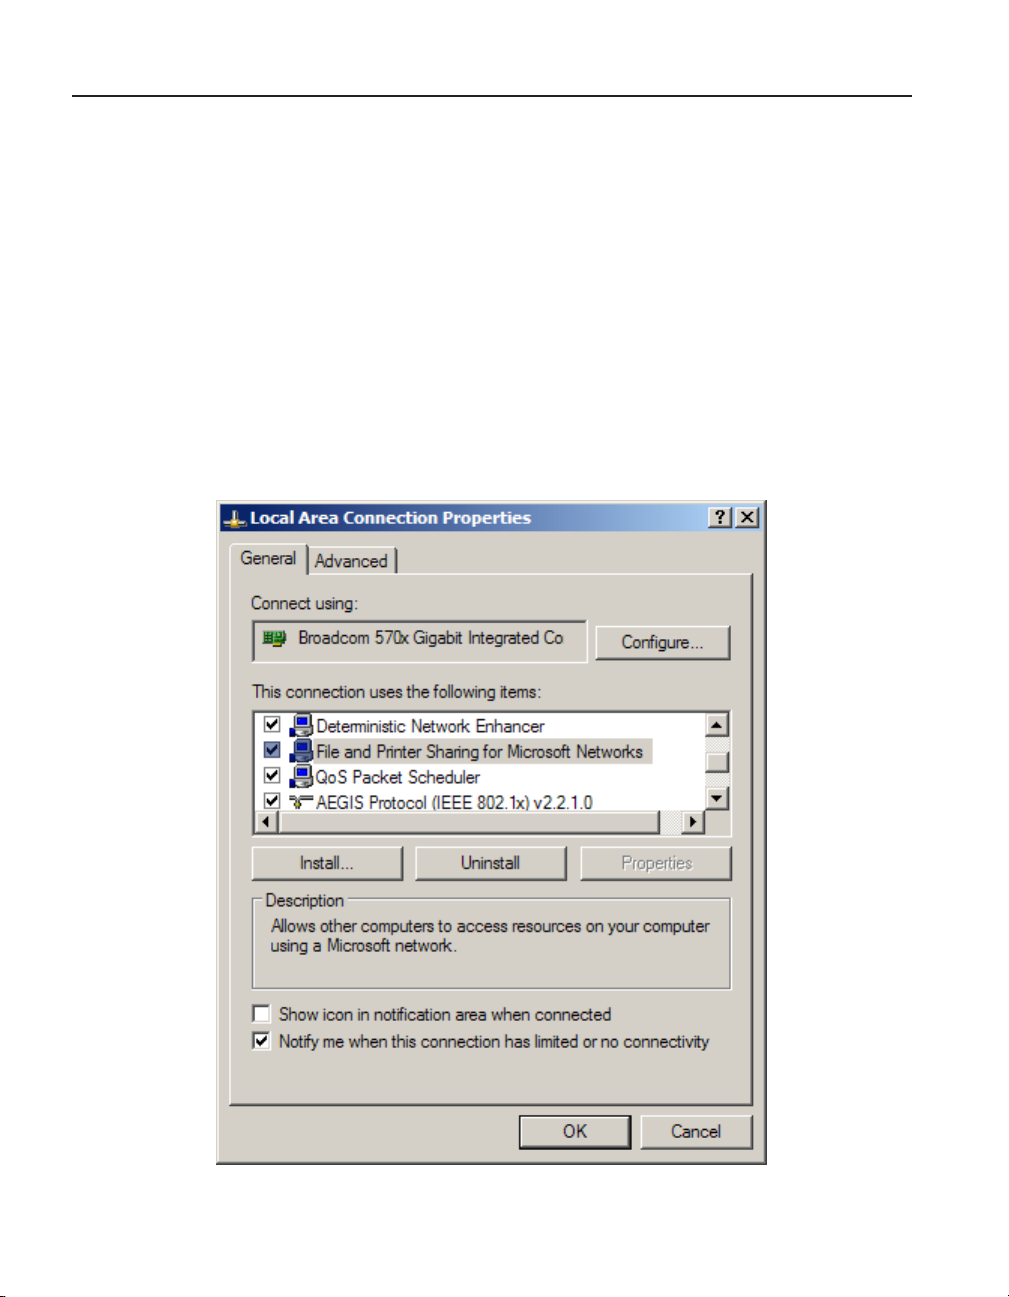
Locate and right-click on the icon for your local area connection and select 3.
Properties from the popup menu to display the Local Area Connection
Properties dialog.
In the 4. This connection uses the following items list, locate the File and Printer
Sharing for Microsoft Networks item. If this item is not checked, check it.
Click OK to close the Local Area Connection Properties dialog.
18
Figure 5 Local Area Connection Properties dialog
Page 29

Introduction
Installation
Close the 5. Network Connections window and/or Control Panel window.
File sharing is now enabled. You may be required to restart the computer for the
changes to take effect. If the installation process failed to share the folder on the server
containing the shared client les, you may need to share the folder manually. Refer
to Section 1.6.3.1, Sharing a Folder, on page 13, for more information on sharing a
folder.
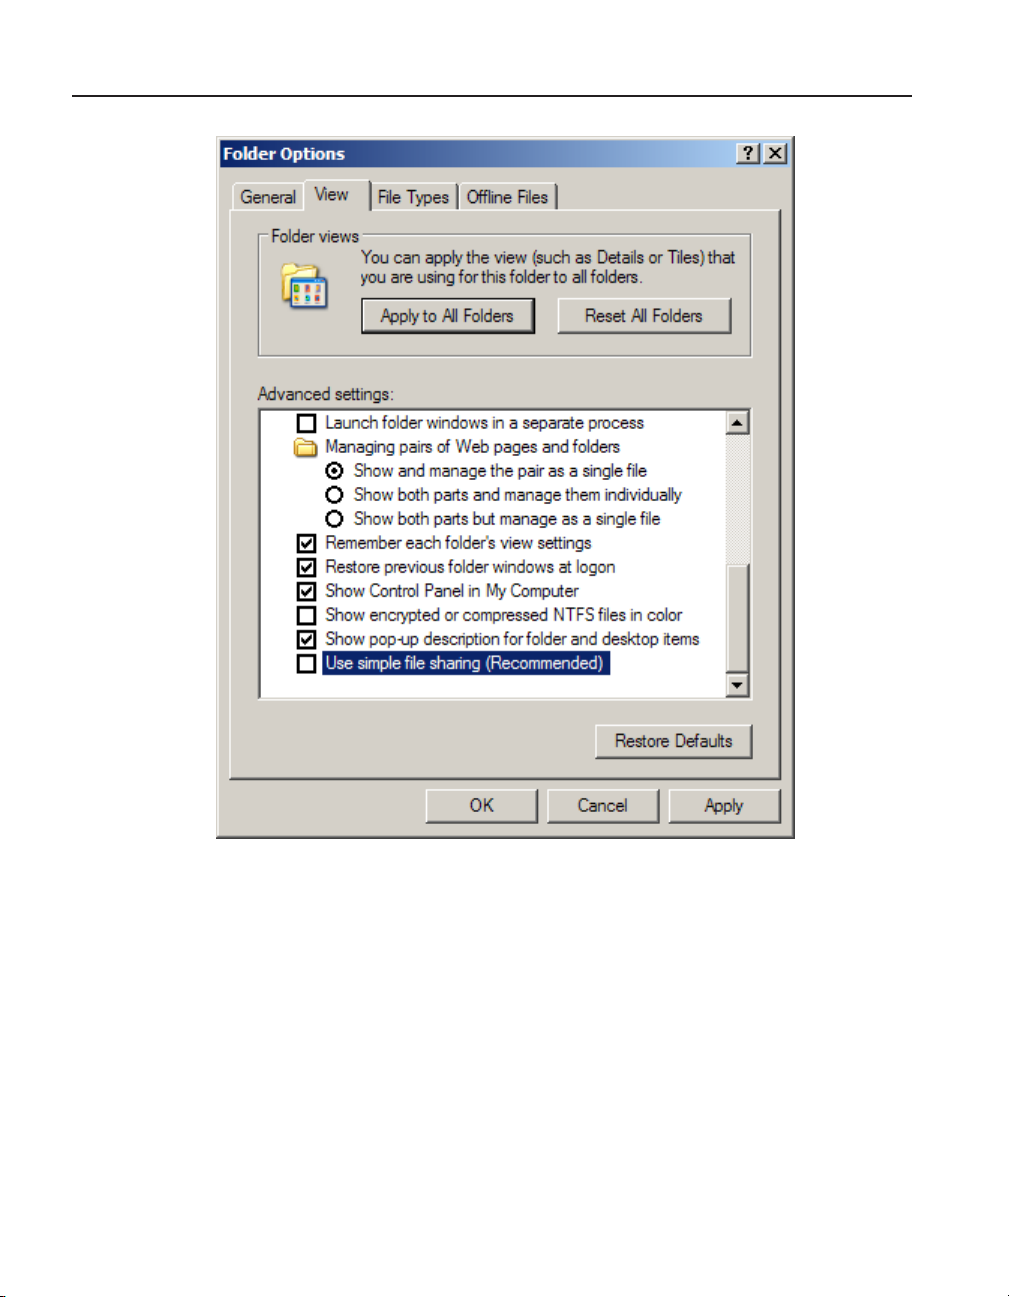
If the LogWare client is installed on a Windows® XP computer that is not a member of
a network (stand-alone) or is a member of a workgroup instead of a domain, you must
disable simple le sharing if you want all Windows® users for the computer to be able
to run LogWare.
To disable simple le sharing on Windows® XP computer…
Open 1. Windows® Explorer by right-clicking the Start button and selecting the
Explore option.
Select the 2. Folder Options option in the Tools menu to display the Folder
Options dialog.
Select the 3. View tab. In the Advanced settings list, locate and uncheck the Use
simple le sharing (Recommended) item.
Click 4. OK to close the Folder Options dialog.
19
Page 30
9936A LogWare III
Running LogWare
20
Figure 6 Folder Options-View Tab - Simple File Sharing
This will allow all users of the computer access to LogWare’s shared les.
1.7 Running LogWare
The following information is intended to provide a brief overview on how to get LogWare up and running quickly.
Getting Started1.7.1
Once the LogWare server and client installations are complete, you may run LogWare
and congure it for use. In a multi-user, client/server conguration, each LogWare cli-
ent computer should be congured for use according to the users of that client com-
puter. Some of LogWare’s default settings are system-wide, but most settings are local
to each client.
Page 31

Introduction
Running LogWare
To congure LogWare…
Click or double-click the Log1. Ware III icon to run LogWare. An icon was placed
on the desktop during installation, or locate the icon in the Programs or All
Programs option in the Start menu.
The software will start and display the 2. LogWare User Login dialog. Login
to LogWare using the built-in administrator account. Refer to Section 2.1,
Administration, on page 38, for more information on the built-in administrator
account.
3. Once logged in, select the Manage User Accounts option from the Tools
menu and create one or more user accounts. Assign each user account to the
appropriate user group. Passwords may be created the rst time an account is
used to login. Refer to Section 2.2.3, Managing User Accounts, on page 40, for
more information on creating user accounts.
Select the 4. Options option from the Tools menu and check LogWare’s default
settings. Customize the settings as needed for each client computer. Refer
to Section 3, LogWare III Options, on page 51, for more information on
LogWare’s default settings.
Info: For maximum security, change the password on the built-in administrator
account to prevent unauthorized use. Select the LogWare item from the Users list
and click the Reset Password button. DO NOT FORGET THE PASSWORD!
Refer to Section 2.2.4, Setting and Changing Account Passwords, on page 45,
for more information on changing user account passwords.
To use LogWare…
Login using one of the newly created user accounts. Select the 1. Login as New
User option from the File menu and enter the user name for the account to use.
Leave the Password eld blank when logging in using an account for the
rst time. The Change Password dialog is displayed. Enter a password for this
user account and click OK to continue. On subsequent logins, both the user
name and password must be entered.
Note: Be sure not to forget your passwords! Write down your passwords and
keep them in a secure place.
When Log2. Ware runs, the Real-Time Log Session Settings dialog is displayed
(this feature can be disabled if desired using the Options dialog). Use this
dialog to congure a real-time log session. Refer to Section 5.1, Real-Time Log
Session Settings, on page 87, for more information on setting up a real-time log
session.
To start a real-time log session, make sure the logger is connected and setup 3.
properly. Select the appropriate communication settings and click the Query
Logger button. LogWare reads in the current logger and sensor model numbers,
serial numbers, location settings (SENSOR ID), alarm settings, etc. and lls
in the information on the Logger tab. You may change this information as
21
Page 32

9936A LogWare III
LogWare Main Display
Log session settings can be saved to a conguration le by clicking the Save As button
on the Real-Time Log Session Settings dialog prior to starting the log session. Refer to
Section 3, LogWare III Options, on page 51, for options on loading conguration les
and starting a log session automatically when LogWare starts.
Note: LogWare supports automatic logins. However, there are some limitations
to using this feature. Be sure you fully understand this feature and its proper use
before implementing it. Refer to Section 2.4, Automatic Logins, on page 48, for
more information on setting up LogWare to automatically login.
LogWare Main Display1.8
When LogWare starts, the main display window is shown. The main display window
consists of the menus, toolbar, a workspace area and a status bar.
required. Be sure to set the Location eld for each sensor appropriately as
this information can be used to select logged data for viewing, printing, or
exporting.
Click the 4. Session tab. Select the logging interval and start and end criteria.
Click the 5. Start button to start logging data.
Additional real-time log sessions may also be setup by selecting the 6. New Log
Session option from the File menu and repeating steps 2 to 5.
22
Page 33

Introduction
LogWare Main Display
Figure 7 Main display window
Menus allow access to the various features of the software. A general description of
each menu is given below:
File – Create new real-time log sessions, open real-time log session
conguration les, import and export data, print reports and graphs, login as a
new user and exit LogWare. Refer to Section 1.8.1.1, File menu, on page 25, for
more information on the File menu options.
Datalog – Create new real-time log sessions, stop and close real-time log
sessions, mute alarms. Refer to Section 1.8.1.2, Datalog menu, on page 26, for
more information on the Datalog menu options.
View – Show/hide toolbar and status bar, view previously logged data, and start
a remote monitoring session. Refer to Section 1.8.1.3, View menu, on page 26,
for more information on the View menu options.
Graph – Show alarms, data points and annotations on the graphs, zooming and
printing graphs. Refer to Section 1.8.1.4, Graph menu, on page 27, for more
information on the Graph menu options.
Tools – Download data from a logger, manage assets and locations, user
accounts, log sessions and software licenses, create, edit and delete annotations,
and change LogWare options. Refer to Section 1.8.1.5, Tools menu, on page 27,
for more information on the Tools menu options.
23
Page 34

9936A LogWare III
LogWare Main Display
Toolbars allow quick access to the most common menu functions. Toolbars are divided
into sections that correspond to related functions. Toolbars may be rearranged as desired by clicking on the vertical bar on the left side of the section and dragging it to the
desired location. The following toolbars are available:
File Toolbar
Datalog Toolbar
Window – Rearrange and switch between open windows. Refer to Section
1.8.1.6, Window menu, on page 28, for more information on the Window menu
options.
Help – Display help topics and About dialog. Refer to Section 1.8.1.7, Help
menu, on page 28, for more information on the Help menu options.
New - Create a new real-time log session
Open – Open a real-time log session conguration le
Import - Import data from record les
Export - Export data to HTML, RTF, or CSV les
Print - Print reports and graphs
Setup - Create a new real-time log session
Stop – Stop a real-time log session
Close - Close a real-time log session window
Stop and close all – Stop and close all real-time log sessions
Mute all alarms - Prevents alarm events from occurring
24
View Toolbar
Logged data – Select logged data to display
Remote Monitoring – Open a remote monitoring session
Graph Toolbar
Show alarms - Shows horizontal alarm lines on the graphs
Show data points - Shows markers at data points on the graphs
Show annotations - Shows annotations on the graphs
Undo zoom - Restores the graphs to show all data
Tools Toolbar
Page 35

Introduction
LogWare Main Display
Download - Download data from a logger
Manage assets and locations - Manage loggers, sensors, and locations
Manage user accounts - Manage user accounts, passwords, and permissions
Manage log sessions – Manage real-time log sessions
Options - Change LogWare’s default settings
Help Toolbar
Help - Opens the on-line help le
The status bar, located along the bottom of the window, indicates the function that the
software is currently performing, server name and connection status, current user and
permission information, and the current system date and time.
Info: The date and time displayed are local time settings based on the comput-
er’s clock and can be modied through the Windows® Control Panel.
Menus1.8.1
The following sections briey outline each of LogWare’s menus and menu options.
1.8.1.1 File menu
The File menu contains the following options:
New log session - Creates a new real-time log session; Refer to Section 5.1,
Real-Time Log Session Settings, on page 87
Open Log Session - Opens a real-time log session conguration le
Import - Imports data from les; Refer to Section 8, Importing Logged Data,
on page 115
Export - Exports logged data to les; Refer to Section 9.2, Exporting Logged
Data, on page 130
Print - Provides options to print graphs and reports
25
Page 36

9936A LogWare III
LogWare Main Display
1.8.1.2 Datalog menu
The Datalog menu contains the following options:
Graph - Prints the graphs in the active window
Report - Prints reports of logged data; Refer to Section 9.3, Printing Reports, on
page 137
Login as New User - Logs out the current user and displays the LogWare User
Login dialog to login as a new user
Exit - Exits LogWare
Setup - Creates a new real-time log session
Stop - Stops a real-time log session
Close - Closes a real-time log session window
Stop and Close All - Stops all real-time log sessions and closes log session
windows
Mute All Alarms - Prevents real-time log session alarm events from occurring
26
1.8.1.3 View menu
The View menu contains the following options:
Toolbar - Shows/hides the toolbar buttons
Status Bar - Shows/hides the status bar at the bottom of the main display
Logged Data - Displays logged data; Refer to Section 9.1, Viewing Logged
Data, on page 122
Remote Monitoring - Allows real-time log sessions to be remotely monitored;
Refer to Section 6, Remote Monitoring, on page 103
Page 37

1.8.1.4 Graph menu
The Graph menu contains the following options:
Show Alarms - Shows/hides horizontal alarm lines on the graphs
Show Annotations - Shows/hides vertical annotation lines on the graphs
Show Data Points - Shows/hides data point markers on the graphs
Undo Zoom - Restores the graphs to their normal state
Print Graph - Prints the graphs in the active window
1.8.1.5 Tools menu
The Tools menu contains the following options:
Introduction
LogWare Main Display
Download - Downloads data from the logger’s memory; Refer to Section 7,
Downloading Logged Data, on page 111
Manage Assets and Locations - Manages loggers, sensors, and locations;
Refer to Section 10.2, Managing Assets and Locations, on page 152
Manage User Accounts - Manage user accounts; Refer to Section 2.2.3,
Managing User Accounts, on page 40
Manage Log Sessions - Manage real-time log sessions; Section 10.3,
Managing Log Sessions, on page 162
Manage Licenses - Add, remove, and manage licenses. Refer to Section 10.1.1,
Manage Licenses, on page 149
27
Page 38

9936A LogWare III
LogWare Main Display
1.8.1.6 Window menu
The Window menu contains the following options:
Delete Log Sessions - Delete log session data; Refer to Section 10.4, Deleting
Log Sessions, on page 164
Annotations - Provides options for managing annotations; Section 9.1.3,
Annotations, on page 128
Add - Adds an annotation to a data point
Edit - Edits an annotation of a data point
Remove - Removes an annotation from a data point
Options - Allows access to LogWare’s default options and settings; Section 3,
LogWare III Options, on page 51s
28
Cascade - Cascades all open windows
Tile Horizontal - Tiles all open windows horizontally
Tile Vertical - Tiles all open windows vertically
Arrange Icons - Arranges the icons for all minimized windows at the bottom of
the main display
Window List - Displays a list of all open windows
1.8.1.7 Help menu
The Help menu contains the following options:
Contents - Opens the on-line help le to the Contents topic
Technical Support - Opens the on-line help le to the Technical Support topic
About - Displays the About dialog
Page 39

Options1.9
LogWare has many features and settings that can be customized by the user to allow
LogWare to operate in certain ways. For more information on these options, please
refer to Section 3, LogWare III Options, on page 51.
1.10 Methods of Communication
LogWare supports communicating with loggers using various methods. Each method
of communication has certain properties and settings that need to be set properly.
The following methods of communication are currently supported by LogWare:
Serial (RS-232) – Refer to Section 1.10.1, Serial (RS-232) Communications,
on page 29
Ethernet (TCP/IP) – Refer to Section 1.10.2, Ethernet (TCP/IP)
Communications, on page 31
Wireless – Refer to Section 1.10.3, Wireless Communications, on page 33s
Any of these methods can be used to run real-time log sessions and download data
from a logger.
Info: The Hart Model 1620 “DewK” Thermo-Hygrometer and Fluke Model
5020A “DewK” Thermo-Hygrometer only support the serial (RS-232) communication protocol. An Ethernet to RS-232 adapter is available for connecting logger models 1620 and 5020A to an Ethernet network.
Introduction
Methods of Communication
The following sections describe in detail the use of each communication method.
1.10.1 Serial (RS-232) Communications
In order to use the RS-232 method of communication, you must connect the logger to
a serial (COM) port on the computer using the “null modem” cable provided with the
logger.
To setup LogWare to use the Serial method of communication, select Serial (RS-232)
as the communication protocol. The RS-232 Communication Settings dialog displays
the settings for the Serial (RS-232) method of communication. This dialog is displayed
when the Communication Settings button is clicked and the Serial (RS-232) communication option is selected.
29
Page 40

9936A LogWare III
Methods of Communication
Figure 8 RS-232 Communication Settings dialog
The COM port eld indicates which COM port on the computer should be used for
communicating with a logger. This list contains only COM ports which are currently
active and available on the computer at the time this dialog was displayed and includes
both standard and virtual COM ports. Use the drop-down list to select the COM port
to use. If the COM port to use is not listed, it may already be in use by LogWare or
another application.
The Baud rate eld indicates the default baud rate to use to communicate with a log-
ger. Use the drop-down list to select the default baud rate to use.
30
Info: LogWare is designed to automatically detect the baud rate that a logger is
operating at. Changing this setting only indicates which baud rate LogWare will
try rst when attempting to communicate with a logger.
The Use redirector option should only be checked when the selected COM port is a
virtual COM port that uses redirector software. Redirector software creates “virtual”
COM ports and allows them to be mapped to IP addresses or other supported communication devices. When using standard COM ports, this option should not be checked.
The Use RF modem (wireless) option should be left unchecked when using RS-232
to communicate with a logger. This option is only used when using wireless commu-
nications. Refer to Section 1.10.3, Wireless Communications, on page 33, for more
information on conguring wireless communications.
Many new computers today do not come with RS-232 ports built-in. LogWare sup-
ports using many off-the-shelf USB to RS-232 adapters. However, not all such adapt-
ers may be compatible with LogWare. Hart has tested many adapters and recommends
Page 41

some of them for use with LogWare. For the most up-to-date information, visit our
website at www.hartscientic.com/software.
1.10.2 Ethernet (TCP/IP) Communications
In order to use the Ethernet method of communication, you must connect the logger to
an Ethernet network using an Ethernet patch cable.
Before you can communicate with a logger using the Ethernet protocol, make sure the
logger’s Ethernet (LAN) communications are enabled and properly congured. By
default, the logger’s Ethernet communications are enabled. Refer to the logger’s User
Guide for more information on conguring the logger’s Ethernet communications.
Info: The Ethernet and wireless communication protocols are mutually exclusive
in the logger – only one may be enabled at a time. Enabling the Ethernet protocol automatically disables the wireless protocol, and vice-versa.
To setup LogWare to use the Ethernet method of communication, select Ethernet
(TCP/IP) as the communication protocol. The TCP/IP Communication Settings dialog
displays the appropriate settings for using Ethernet communications. This dialog is
displayed when the Communication Settings button is clicked.
Introduction
Methods of Communication
Figure 9 TCP/IP Communication Settings dialog
LogWare supports using both dynamic (DHCP) and static addressing of loggers con-
nected to the network. When possible, it is recommended to use dynamic addressing
to allow the logger to automatically obtain an IP address from the network’s DHCP
server. If you want or need to use static addressing, you should contact your network
administrator to allocate an IP address or range of IP addresses that you can use.
To use dynamic addressing, select the Dynamic addressing (DHCP) option. Selecting
this option allows LogWare to display a list of all detected loggers on the network at
31
Page 42

9936A LogWare III
Methods of Communication
the appropriate time. Refer to Section 1.10.2.1, Select Logger, on page 32, for more
information on selecting a logger.
To use static addressing, select the Static addressing option. The IP address and Port
boxes are enabled. Enter the IP address and port of the logger to communicate with in
the boxes provided. The logger must be congured to use this IP address. By default,
the loggers are congured to always use port 10001.
Info: An Ethernet to RS-232 adapter is available for connecting logger models
1620 and 5020A to an Ethernet network.
1.10.2.1 Select Logger
The Select Logger dialog allows the user to select the logger to use from a list of detected loggers on the Ethernet network. This dialog is displayed when using the DHCP
mode for Ethernet (TCP/IP) communications and clicking the Query Logger button on
the Real-Time Log Session Settings dialog or by clicking the Download button on the
Download Options dialog. Refer to Section 5, Real-Time Data Logging, on page 85,
and Section 7, Downloading Logged Data, on page 111, for more information on real-
time log sessions and downloading logged data.
32
Figure 10 Select Logger dialog
The Detected Loggers tab displays a list of all loggers detected on the Ethernet network. This list indicates the model, serial number, sensor location information (SENSOR ID) for active sensors, and IP address of each detected logger.
When using the DHCP mode for Ethernet (TCP/IP) communications, a broadcast com-
mand is sent over the network to detect all loggers. All loggers that responded to the
broadcast are listed. If a logger is busy when the broadcast command is sent, it may
not respond and therefore not appear in the list. Click the Refresh button to send the
broadcast command again. Refer to Section 1.10.2, Ethernet (TCP/IP) Communica-
tions, on page 31, for more information on using Ethernet communications.
Page 43

Select the logger to use from the list and click OK. To select multiple loggers, hold
down the CTRL or SHIFT key and click on each logger to select and click OK.
1.10.3 Wireless Communications
In order to use the wireless method of communication, you must purchase and install
a wireless RF modem. The RF modems currently come with either a RS-232 (Model
2633-232) or USB (Model 2633-USB) interface. Follow the instructions provided with
the RF modem to perform the installation, including installing COM port redirector
software if necessary. The RS-232 modem will connect directly to an existing COM
port on the computer. Installing the USB modem creates a virtual COM port for the
modem.
Info: The wireless communication feature of the logger is optional and is sold
separately or as an upgrade.
Before you can communicate with a logger using the wireless protocol, the logger’s
wireless (RF) communications must be enabled and properly congured, and the RF
modem must be congured. By default, the logger’s wireless communications are disabled. Refer to the logger’s User Guide for more information on enabling and cong-
uring the wireless communications.
Introduction
Methods of Communication
Info: The wireless and Ethernet communication protocols are mutually exclusive
in the logger – only one may be enabled at a time. Enabling the wireless protocol automatically disables the Ethernet protocol, and vice-versa.
To setup LogWare to use the wireless method of communication, select Serial
(RS-232) as the communication protocol. The RS-232 Communication Settings dialog
displays the appropriate settings for using the wireless communications. This dialog is
displayed when the Communication Settings button is clicked and the Serial (RS-232)
communication option is selected.
33
Page 44

9936A LogWare III
Methods of Communication
Figure 11 RS-232 Communication Settings dialog - RF modem enabled
The COM port eld indicates which COM port on the computer the RF modem is
connected to. This list contains only COM ports which are currently active and avail-
able on the computer at the time this dialog was displayed and includes both standard
and virtual COM ports. Use the drop-down list to select the COM port to which the
RF modem is connected. If the COM port is not listed, it may already be in use by
LogWare or another application or the COM port redirector software that came with
the RF modem may not be properly installed.
The Baud rate eld indicates the baud rate to use to communicate with the RF modem.
By default, the RF modem is set to operate at 9600 baud. The baud rate eld will be
set automatically when enabling the RF modem option below.
The Use redirector option should be unchecked when using wireless communications.
This option is only used for non-wireless RS-232 communications when the selected
COM port is a virtual COM port that uses redirector software Redirector software creates “virtual” COM ports and allows them to be mapped to IP addresses or other supported communication devices. When using standard COM ports, this option should
not be checked..
Check the Use RF modem (wireless) option to enable using the RF modem. The In-
strument address box and Properties button are enabled.
The Instrument address box indicates the address of the logger to communicate with.
Each logger on the wireless network must be assigned a unique address. Enter the
instrument address of the logger to communicate with in this box.
34
Page 45

Introduction
Methods of Communication
If the RF modem has not been previously congured, click the Properties button to
access the RF modem’s properties. The RF modem’s current settings are read in and
displayed in the RF Modem Properties dialog.
RF Modem Properties1.10.3.1
The RF Modem Properties dialog displays the RF modem’s current settings and allows
the settings to be changed. This dialog is displayed when the Properties button on the
RS-232 Communication Settings dialog is clicked.
Figure 12 RF Modem Properties dialog
The wireless communications supported by the logger follow the IEEE 802.15.4
protocol for wireless communications. For more information on this protocol, visit
the IEEE association website at www.ieee.org. Refer to the RF modem’s documenta-
tion for more details on each of these settings. It is not necessary to install or use the
modem conguration software included with the RF modem. All necessary settings
can be accessed using this dialog.
The PAN ID box indicates the unique Personal Area Network (PAN) ID for the wire-
less network using this RF modem. Both the modem and the logger must be congured to use the same PAN ID. Enter the PAN ID to use in this box.
The Channel box indicates the RF channel number to use for communications. Both
the modem and the logger must be congured to use the same channel number. Enter
the channel number to use in this box.
The Modem address box indicates the address of the modem on the network. Each log-
ger that is to communicate through this modem must be congured with this modem’s
address. Enter the modem address in this box.
The Serial number box indicates the serial number of this RF modem and is displayed
for informational purposes only.
35
Page 46

9936A LogWare III
Methods of Communication
The Power level box indicates the strength of the signal that the modem will transmit.
This setting is not editable on this dialog and is displayed for informational purposes
only. If you wish to change the modem’s power level setting, you should install and
use the conguration software that came with the modem.
Click OK to write the settings to the RF modem. A prompt is displayed to ask if the
settings should be written to NVRAM. Writing the settings to NVRAM allows the RF
modem to retain these settings even after power is disconnected from the RF modem.
If the settings are not written to NVRAM, disconnecting the power will cause the
settings to revert back to their previous values. It is recommended to always write the
settings to NVRAM.
36
Page 47

Security Features
2 Security Features
LogWare provides security features that allow an administrator to control which users
have access to certain functions and features of LogWare. Access to these features is
controlled by requiring a password protected login account.
The following security related terms are used by LogWare. Before setting up user ac-
counts, you should be familiar with and understand the meaning of these terms.
Security glossaryTable 3
Term Description
Administrator An administrator is someone who is in charge of setting up and conguring default
settings, user accounts, and other special features of the software. LogWare includes
a built-in administrator account that should be used initially to create additional user
accounts for each user, group, team, etc.
Group Groups are used to assign a pre-dened set of permissions to a user account. Each
user account must be assigned to a group. Permissions may be customized for any
user by assigning the user to the “Custom” group. Note: These groups are separate
and independent of LogWare’s e-mail groups which allow e-mail recipients to be
categorized and assigned to e-mail envelopes for sending e-mail messages!
Permissions Permissions are rights that are granted to a user account that allow that user to perform
certain tasks or allow access to certain features of the software.
User account A user account consists of a user name, password, set of permissions, and other
information that provide a means of allowing a person to gain access to LogWare and its
features.
LogWare’s security features can be accessed from the Manage User Accounts dialog.
To display this dialog, select the Manage User Accounts option from the Tools menu.
Refer to Section 2.2.3, Managing User Accounts, on page 40, for more information on
managing user accounts.
Note: To setup LogWare’s security features, you must login to LogWare using the
built-in administrator account, a user account that is assigned to the
Administrator group, or a user account that has been granted permission to create and/or manage user accounts. Refer to Section 2.1, Administration, for more
information on the built-in administrator account.
Setup User Accounts and Passwords
In order to use LogWare’s security features, you must create user accounts. User ac-
counts are used to login to LogWare. User accounts may be created for individuals,
teams, or groups. Each user account may have an associated password. LogWare does
allow certain user accounts to be congured to not require a password. This is useful
when you need to allow auditors or other guests “read only” access to the data, and is
required when using LogWare’s auto-login feature for automatic logins.
Setup User Account Permissions
User accounts can be congured to grant users access to the features of LogWare they
require by setting up permissions. Each user account must be assigned to a group.
Each pre-dened group has a xed set of permissions associated with it. However, a
37
Page 48

9936A LogWare III
Administration
“custom” group is provided that allows the administrator to assign any combination of
permissions to a user account as needed. It is recommended that whenever possible,
you should try to use the pre-dened groups and avoid customizing permissions.
Note: Certain features in the software can only be used if the user account is a
member of the Administrator group, even if the user account has been granted
the appropriate permissions using the Custom group!
LogWare allows the administrator to force a user to assign a new password to their
user account. The administrator may also assign a new password to the user account in
case the user forgot the current password.
Once user accounts have been created, they may be used to login to LogWare from
any client computer. LogWare does not attempt to restrict the number of computers
that can be logged in using a given account. The number of concurrent logins is only
restricted by the number of licenses you have purchased and applied to the system.
The following sections outline how to setup and congure LogWare’s user accounts
and other security features.
2.1 Administration
When LogWare is installed on a computer for the rst time, a built-in administrator
account is created. You must initially use this built-in account to login to LogWare
to create and manage user accounts. You may also setup additional administrator accounts. The user name and password for the built-in administrator account are:
User name: LogWare
Password: LogWare
Changing Passwords
38
Note: You should change the password for the built-in administrator account to
prevent unauthorized user access. Passwords are case-sensitive!
Every time LogWare runs, the LogWare User Login dialog is displayed. Enter the
built-in administrator user name and password as indicated above and click OK.
When logged in using any administrator account (accounts that are assigned to the
Administrators group), you are granted special permission to access and change many
of LogWare’s restricted settings. These restricted settings include, but are not limited
to, setting up an auto-login account, conguring automatic removal of inactive log ses-
sions, and managing software licenses. Also, some features of LogWare are disabled
when a user is logged in using any administrator account, such as automatically start-
ing real-time log sessions on startup.
Select the Manage User Accounts option in the Tools menu to create and manage user
accounts.
Page 49

Security Features
2.2 User Accounts
User accounts allow LogWare to identify users who perform certain tasks. They also
allow the administrator to determine permissions (which users have access to certain
features). Each user account consists of a user name, password, rst and last name
(optional), and user group and permissions settings.
By default, LogWare has one built-in administrator account. After LogWare is in-
stalled, the administrator must initially use this account to login and create accounts
for each person or team who will use the software. Also, the administrator should
change the password for the built-in administrator account to prevent unauthorized
access to the software.
Note: Do not forget your passwords! Administrators can change or reset user
account passwords, but they cannot recover passwords. If necessary, write the
passwords down and keep them in a secure location.
User Names and Passwords2.2.1
LogWare imposes some simple rules about user names and passwords that must be
observed.
User names…
are not case-sensitive
must be unique
must be between 4 and 20 characters in length
can consist of numbers, letters, and any of the following symbols: - + . < > @ !
# $ % & ^ _ | ~
Passwords…
are case-sensitive
must be between 4 and 20 characters in length
can consist of numbers, letters, and any of the following symbols: - + . < > @ !
# $ % & ^ _ | ~
User Accounts
Info: Currently, LogWare does not impose any restrictions regarding complexity,
minimum or maximum age, or re-use of passwords.
2.2.2 User Groups and Permissions
LogWare requires each user account to be assigned to a user group. User groups dene
the functions and features of LogWare a user is allowed to use. Refer to the table be-
low for information on the default permissions for each user group. The Custom user
group should be used when a user account needs to be assigned special permissions
that are not covered by any of the pre-dened user groups.
39
Page 50

9936A LogWare III
User Accounts
Note: The Custom user group should only be used to grant limited permissions
to a user account. When possible, a user account should be assigned to one of
the pre-dened user groups. It is not recommended to use the Custom user group
to grant a user account all permissions in LogWare. Some features of LogWare
are restricted only to members of the Administrator user group.
LogWare Functions/Features
Automatic login X X - Automatically start log sessions - X X View logged data X X X X
Print reports and graphs X X X X
Remote monitoring X X X X
Run real-time log sessions - X X X
Import data from les - X X X
Download data from logger - X X X
Create annotations for logged data - X X X
Export logged data - X X X
Add new assets (loggers and sensors) - - X X
Add new locations - - X X
Edit alarm settings - - X X
Edit e-mail settings - - X X
Change LogWare’s default settings - - X X
Manage log sessions - - X X
Create user accounts - - - X
Manage user accounts - - - X
Manage assets (loggers and sensors) - - - X
Manage locations - - - X
Delete log sessions - - - X
Manage logged data annotations - - - X
Manage licenses - - - X
Setup auto-login account - - - X
Enable/disable calibration due notications - - - X
Enable/disable graph customization dialog - - - X
Enable/disable automatically removing
inactive log sessions from Remote Monitoring
dialog
Account restrictionsTable 4
User Group
Guest Restricted Typical
- - - X
Administrator
40
2.2.3 Managing User Accounts
In order to use LogWare, users must login using a user account. User accounts are
created and managed by an administrator. Each user account has a user name and a
password.
To create and manage user accounts, you must login using an administrator account
or have the appropriate permissions. Select the Manage User Accounts option in the
Tools menu to display the Manage User Accounts dialog.
Page 51

Security Features
User Accounts
Figure 13 Manage User Accounts dialog
The Users list displays the currently congured user accounts. The group that the user
account is assigned to is indicated in parentheses. The group assignment determines
the specic permissions a user account has. All user accounts that are assigned to the
Administrator group are indicated in bold text and display a different icon from the
other user accounts. Items marked with an asterisk indicate this user is required to
change the account password on next login.
To setup a new user account…
Click the 1. New button to display the New User Account dialog.
Fill in the information on this dialog. 2.
On the a. User Account tab, the User name eld must be unique.
The b. First name and Last name elds are optional.
Leave the c. Require password checkbox checked unless you are creating a user
account that you do not want to require a password, such as for guest users or
for auto-login purposes.
On the d. Permissions tab, select on of the pre-dened groups using the Group
drop-down list.
If the purpose for this user account does not t one of the pre-dened groups, e.
select Custom using the Group drop-down list and check the appropriate
permissions for this account in the Permissions list.
41
Page 52

9936A LogWare III
User Accounts
Note: A user account should only be removed if it is never to be used again. If
you wish to temporarily disable an account, simply uncheck the Active option on
the Account Settings dialog instead of removing the account. If you unintentionally remove a user account from the system, refer to the Recovering Removed
Assets, Locations and Users topic in the online help. The built-in administrator
account LogWare cannot be removed!
Click 3. OK to close the dialog. The new user account should appear in the Users
list with the group indicated in parentheses. An asterisk should appear after the
user name if this account requires a password to be set by the user on rst login.
To change the settings for an existing user account…
In the 1. Users list, select the user account to change.
Click the 2. Settings button to display the <Username> Account Settings dialog.
Edit the information on this dialog. 3. Note: The User name eld is locked and
cannot be changed!
Click 4. OK to close the dialog. Updates to the user account group assignment or
password status should be reected in the Users list.
To remove an existing user account…
In the 1. Users list, select the user account to remove.
Click the 2. Remove button.
A prompt is displayed to conrm removing the user account. Click 3. Yes to
conrm. The user account should be removed from the Users list.
42
To reset a user account password…
In the 1. Users list, select the user account which requires the password to be
reset.
Click the 2. Reset Password button.
The 3. Change Password dialog is displayed. Enter the new password for this user
account in the New password and Conrm password elds.
Click 4. OK to reset the password.
Note: Changes to user accounts, with the exception of resetting passwords, will
not take effect until you click the OK button on the Manage User Accounts dialog. Clicking Cancel on the Manage User Accounts dialog discards all user account changes!
User Account Settings2.2.3.1
The User Account Settings dialog allows LogWare user accounts to be created and
changed. To display this dialog, select the New or Settings button on the Manage User
Accounts dialog.
Page 53

Security Features
User Accounts
Figure 14 User Account Settings dialog
On the User Account tab, enter the user name for this account in the User name eld.
This eld is required and is what the user must enter into the login dialog when Log-
Ware starts.
Enter the rst and last names for this user account in the First name and Last name
elds respectively. This information is optional and may be omitted. If you are creat-
ing a user account for a group, team, or for general use, you may want to leave these
elds blank.
To allow this user account to be used to login to LogWare, check the Active check-
box. To prevent a user from logging into LogWare using this account, uncheck this
checkbox.
The Change password on next login checkbox indicates whether the user will be
prompted to change their password the next time this user account is used to login
to LogWare. When creating a new user account, this checkbox is named Require
password and determines whether this user account has a password associated with
it. If this account is going to be used for automatic login, you must uncheck this
checkbox! This will allow login using this account without requiring a password to be
entered.
Note: The Require password option is checked and disabled by default if the
user account is assigned to the Typical or Administrator group (see below). User
accounts assigned to these groups always require a password and cannot be
used for automatic logins.
43
Page 54

9936A LogWare III
User Accounts
The Remarks eld can be used for entering notes regarding this user account. When
creating a new user account, this eld indicates the date the account was created and
the user that created the account. You may change it or add additional notes if desired.
To assign this user account to a group or setup custom permissions, select the Permis-
sions tab.
44
Figure 15 User Account Settings dialog - Permissions tab
Note: Certain tasks in LogWare can only be performed if the user account is assigned to the Administrator group. Some of these tasks include resetting user
account passwords, managing licenses, and conguring some of the default settings on the LogWare III Options dialog.
Assign this user account to a group using the Group drop-down list. By assigning a
user account to a group, you are giving that user account permission to access various features and perform certain tasks in LogWare. For more detailed information on
groups and permissions, refer to Section 2.2.2, User Groups and Permissions, on page
39. If the user is assigned to the Custom group, select the permissions that this user
should have from the Permissions list. Otherwise, the Permissions list indicates the
permissions for users that belong to the selected user group.
Note: Whenever possible, assign user accounts to one of the pre-dened groups.
Only select the Custom group if the purpose for the user account does not t one
of the pre-dened group’s permissions.
Page 55

2.2.4 Setting and Changing Account Passwords
Each user account may have an associated password. Passwords are set when a user
logs in for the rst time on new accounts. Passwords may also be changed by an
administrator at any time. Optionally, one or more user accounts can be congured
to not require a password as long as the user account belongs to either the Guest or
Restricted user groups.
Note: Do not forget your passwords! Administrators can change or reset user
account passwords, but they cannot recover passwords. If necessary, write the
passwords down and keep them in a secure location.
To set the password for a new user account…
Run Log1. Ware and login using an administrator account.
2. Select the Manage User Accounts option from the Tools menu. The Manage
User Accounts dialog is displayed.
Create the new user account. Make sure the 3. Require password checkbox is
checked.
Click 4. OK to close the Manage User Accounts dialog and create the user
account.
When the user attempts to login the rst time using the new user account, the user
should enter the user name for the account, leave the Password eld blank, and click
OK. The Change Password dialog will be displayed.
To force the user to change the password for their user account…
Run Log1. Ware and login using an administrator account.
Select the 2. Manage User Accounts option from the Tools menu. The Manage
User Accounts dialog is displayed.
In the 3. Users list, select the account and click the Settings button. The User
Account Settings dialog is displayed.
Check the 4. Change password on next login option. Click OK to close the User
Account Settings dialog.
Click 5. OK to close the Manage User Accounts dialog.
When the user attempts to login using the user name and current password, the
Change Password dialog will be displayed.
To reset the password for an existing user account…
Run Log1. Ware and login using an administrator account.
Select the 2. Manage User Accounts option from the Tools menu. The Manage
User Accounts dialog is displayed.
In the 3. Users list, select the account.
Click the 4. Reset Password button.
The5. Change Password dialog is displayed. Enter the new password in the New
password and Conrm password elds and click OK. The password is now set.
Security Features
User Accounts
45
Page 56

9936A LogWare III
LogWare User Login
When the user attempts to login, the user should enter the user name for the account
and leave the Password eld blank.
Info: Once a password has been assigned to an account, it is not possible to remove the password from that account. The password may be changed, but it can-
not be removed. You must create a new account without a password.
Click 6. OK to close the Manage User Accounts dialog.
To create a new user account without a password…
Run Log1. Ware and login using an administrator account.
Select the 2. Manage User Accounts option from the Tools menu. The Manage
User Accounts dialog is displayed.
Create a new user account.3.
On the a. User Account tab, make sure the Require password option is
unchecked.
On the b. Permissions tab, assign the user account to either the Guest,
Restricted, or Custom user group. If assigned to the Custom user group,
check the Auto-Login permission in the Permissions list.
Click 4. OK to close the Manage User Accounts dialog.
LogWare User Login2.3
The LogWare User Login dialog allows the user to login to LogWare.
Figure 16 LogWare User Login dialog
46
Page 57

Security Features
LogWare User Login
In order to use LogWare, you must rst login. The LogWare User Login dialog is dis-
played when LogWare runs unless LogWare is congured to automatically login.
User accounts must be created and managed by an administrator before users can
login. LogWare provides a built-in administrator account that can be used to create
new user accounts.
Once user accounts have been created, you can enter the user name and password on
this dialog to start using LogWare.
Enter the user name in the User name eld. User names are not case-sensitive. Enter
the password for this account in the Password eld. Passwords are case-sensitive. For
new user accounts that have not been assigned a password, leave the Password eld
blank. If required, the Change Password dialog will be displayed to allow a new pass-
word to be associated with this user account.
In order to successfully login to LogWare, there must be a valid license available. Each
login requires and uses one license. In a multi-user environment, if all licenses are cur-
rently being used, the login will not succeed and a message will be displayed indicat-
ing no licenses are available. Additional licenses may be purchased and applied to the
system by an administrator.
Change Password2.3.1
The Change Password dialog is used to set or change the password associated with a
user account. This dialog is displayed when logging in using a new user account for
47
Page 58

9936A LogWare III
Automatic Logins
the rst time or when the administrator has forced the password for a user account to
be changed on next login.
48
Figure 17 Change Password dialog
For existing user accounts, the Current password eld is displayed. The current pass-
word is automatically lled in with the password entered on the LogWare User Login
dialog. Otherwise, this eld is not displayed.
To set or change the account password, enter the new password in the New password
eld. Then, enter the password again in the Conrm password eld.
2.4 Automatic Logins
Note: There are some limitations to using the automatic login feature. Be sure
you fully understand the feature and its proper use before implementing it.
LogWare may be congured to automatically login on startup. This feature can be very
useful for:
Automatically resuming real-time log sessions after a power failure without
user interaction
Setting up a generic user account for people who need read-only access to
LogWare’s data
Page 59

Security Features
Automatic Logins
Bypassing LogWare’s security features for applications where security of the
data is not as important
Automatic login is restricted to user accounts that do not have a password associated
with them. In order to setup a user account without a password, the user account must
be assigned to either the Guest, Restricted, or Custom user group. User accounts that
are assigned to the Typical and Administrator user groups always require a password
and cannot be used for automatic login.
Note: When assigning a user account to the Custom user group, be sure to only
grant permissions for the necessary features of LogWare for this user account.
When possible, always assign user accounts to one of the pre-dened user
groups.
To congure LogWare to automatically login on startup…
Run Log1. Ware and login using an administrator account.
Create a new user account that does not require a password. Refer to 2. Section
2.2.4, Setting and Changing Account Passwords, on page 45 for more
information.
Select the 3. Options option in the Tools menu to display the LogWare III Options
dialog. Select the General tab.
Check the 4. Enable LogWare auto-login checkbox. This option will be disabled if
you are not currently logged into LogWare using an administrator account.
Using the drop-down list, select the account created above. Only user accounts 5.
that are assigned to the Guest or Restricted groups and accounts that have the
Auto-login permission selected will appear in the list.
Click 6. OK to close the LogWare III Options dialog.
Close Log7. Ware.
Run Log8. Ware. LogWare should automatically login using the selected user
account (the LogWare User Login dialog should not be displayed) and the status
bar at the bottom of the LogWare window should indicate the appropriate user
name.
49
Page 60

Page 61

LogWare III Options
3 LogWare III Options
The LogWare III Options dialog allows various default settings to be selected. This
dialog is displayed by selecting the Options option from the Tools menu.
The settings are divided into four tabs: General, Real-Time, Graph, and Misc. The set-
tings on each of these tabs are described in the following sections.
Some default settings are protected, and can only be changed when logged in using an
administrator user account. Each of these settings is indicated with the proper symbol.
General tab3.1
The General tab includes some of LogWare’s basic default settings.
General tab
Figure 18 LogWare III Options dialog
The Show Log Session Settings dialog checkbox determines whether LogWare should
automatically display the Real-Time Log Session Settings dialog every time LogWare
starts up. This setting can be used on client computers where real-time log sessions are
frequently congured manually. This setting should be unchecked on client computers
that are used only to remotely monitor log sessions and/or view logged data.
51
Page 62

9936A LogWare III
General tab
The Automatically start log session(s) upon login checkbox determines whether
LogWare should automatically open the specied real-time log session settings le(s)
every time LogWare starts up. This setting is useful when setting up a client computer
to automatically login to LogWare and run real-time log sessions. LogWare does not
limit the number of real-time log session settings les you can specify.
Info: When the Automatically start log session(s) upon login checkbox is
checked, LogWare expects that the logger(s) corresponding to each settings le
is running and accessible so that it can communicate with the logger.
To add a log session conguration le to the list, click the Add button. Navigate to
locate the log session settings le to add to the list. You may select multiple les by
holding down the CTRL or SHIFT key when clicking on the lenames.
To remove a log session conguration le from the list, select the le and click the
Remove button. To remove all log session conguration les, click the Remove All
button.
Info: You can override automatically starting Real-Time Log Sessions upon log-
in by holding down the CTRL key after the login prompt as LogWare is starting
up
The Automatically start Remote Monitoring session(s) upon login checkbox determines whether LogWare should automatically open a Remote Monitoring session
for each location specied every time LogWare starts up. This setting is useful when
setting up a client computer to monitor the data being logged in specic locations.
LogWare does not limit the number of Remote Monitoring sessions you can specify.
52
Info: When the Automatically start Remote Monitoring session(s) upon login
checkbox is checked, LogWare expects that data is being logged in real-time in
each location specied, either on this computer or on any other client computer.
To add a location to the list, click the Add button. Use the Select Remote Monitoring
Location(s) dialog to select the location(s) to add to the list. You may select multiple
locations by holding down the CTRL or SHIFT key when clicking on the location
names. Click OK.
Page 63

LogWare III Options
General tab
Figure 19
To remove a location from the list, select the location name and click the Remove but-
ton. To remove all locations, click the Remove All button.
Info: You can override automatically starting Remote Monitoring sessions upon
login by holding down the CTRL key after the login prompt as LogWare is start-
ing up.
The Enable LogWare auto-login checkbox determines whether the auto-login
feature of LogWare is enabled. If checked, LogWare attempts to login automatically
using the user account selected in the drop-down list. Select the user account to use
for auto-login using the drop-down list. Note that there are some very specic limita-
tions and requirements regarding the conguration and use of this feature. Be sure you
understand these before enabling this feature. Refer to Section 2.4, Automatic Logins,
on page 48, for more information.
Info: You can override the auto-login feature by holding down the SHIFT key as
LogWare is starting up.
To assist in setting up a computer to automatically recover from a power failure, the
Windows® operating system can be congured to automatically logon using a speci-
ed user account. Click the Windows® Auto-Logon button to specify the user account,
password, and domain to use to automatically logon to Windows® when the computer
starts up.
53
Page 64

9936A LogWare III
General tab
Note: Conguring a computer to automatically logon to Windows® is an impor-
tant step in setting up LogWare to automatically recover from a power failure.
However, doing so may violate you company’s security policies. Before using
this tool, check with your system administrator to ensure no security policies are
being violated.
54
Figure 20 Windows® Auto-Logon Settings dialog
To enable auto-logon, select the Enable auto-logon using these credentials option.
Enter the user name, password and domain information for the user account to use in
the User name, Password and Domain elds. Click OK. To disable auto-logon, select
the Disable auto-logon option and click OK.
The E-mail Options section provides access to the e-mail settings in LogWare. Click
the E-mail Options button to enable LogWare’s e-mail features and congure recipi-
ents, groups, and envelopes. Click the Event Options button to congure LogWare’s
default event settings for sending e-mail messages. Refer to Section 4, E-mail Fea-
tures, on page 65, for more information on LogWare’s e-mail features.
Page 65

LogWare III Options
Real-Time tab
Real-Time tab3.2
The Real-Time tab displays options that are applicable to performing real-time log ses-
sions. Some of these settings also apply to remote monitoring sessions, as indicated.
Figure 21 LogWare III Options dialog- Real-Time tab
Note: Changing these settings only affects real-time log sessions started after
closing the LogWare III Options dialog, unless otherwise indicated.
The Plot temperature and humidity readings on same graph checkbox determines
whether separate graphs are created in the Real-Time Log Session window for tem-
perature and humidity readings, or whether temperature and humidity readings are
plotted on the same graph. When plotting temperature and humidity readings on the
same graph, temperature readings use the left y-axis and humidity readings use the
right y-axis of the graph.
The Show alarm settings in statistics window checkbox determines whether the sensor
alarm settings should be included in the Real-Time Log Session window’s statistics
list. This setting also applies to remote monitoring sessions.
55
Page 66

9936A LogWare III
Real-Time tab
The Prompt to manually synchronize log session checkbox determines whether Log-
Ware displays a message that the user must respond to before starting a real-time log
session. This feature may be useful when you are trying to synchronize LogWare’s
real-time log session with some other external process. If conguring LogWare to
automatically login and start real-time log sessions, do not enable the manual syn-
cronization feature.
Note: Do not use the Prompt to manually synchronize log session option in conjunction with the delayed start date/time option when setting up a real-time log
session! Otherwise, your log session may not start as expected! LogWare checks
for this conict before starting a real-time log session.
The Sample all sensors simultaneously checkbox determines whether LogWare should
attempt to query readings from all enabled sensors at the same time, or whether readings should be taken from each sensor sequentially. If this checkbox is checked, the
Interval between scan sequences settings on the Session tab of the Real-Time Log Session Settings dialog are not displayed.
The Query logger’s status registers checkbox determines whether LogWare should
query the status of each enabled sensor on the logger prior to querying measurements.
This setting is critical and must be checked in order for LogWare to generate e-mail
messages related to sensor calibration due notications, sensor hot-swapping, and oth-
er sensor related information. It is recommended that this setting always be checked.
The Sync logger date/time when starting log session checkbox determines whether
LogWare sends commands to the logger when starting a real-time log session to syn-
chronize it’s system date and time to the client computer’s date and time.
56
Note: When using the Sync logger date/time when starting log session feature,
the Enter Password prompt will be displayed when starting a real-time log session if the TIME settings in the logger are password protected. If this setting is
being used in conjunction with the automatic login feature to automatically start
a real-time log session when LogWare is opened, it is recommended that the
password protection for TIME is turned off in the logger, or the Never attempt
to update password protected settings option should be checked.
The Stamp readings with logger’s date/time (instead of computer’s) checkbox de-
termines whether LogWare uses the client computer’s date and time or the logger’s
system date and time to stamp all readings taken during a real-time log session.
Note: When using the Stamp readings with logger’s date/time (instead of computer’s) feature, a caution message is displayed if the Sync logger date/time
when starting log session option is not enabled. It is recommended to sync the
logger to the client computer when starting a real-time log session if you are
using the logger’s system date/time to stamp the readings.
The Enable daily statistics (reset statistics at midnight) checkbox determines whether
LogWare should automatically reset each sensor’s statistical calculations each day (at
Page 67

LogWare III Options
Real-Time tab
midnight) during a log session. If unchecked, LogWare’s statistical calculations will
reect the statistics for all data logged since the log session started. Statistical calcu-
lations can be reset manually at any time during a log session. Changing this setting
affects all currently running real-time log sessions as well as all real-time log sessions
that are started after this setting is changed. This setting also applies to remote moni-
toring sessions.
The Enable sensor calibration due notications checkbox determines whether
LogWare will check the sensor’s calibration due date during a real-time log session. If
checked, LogWare displays a calibration due message in the Notes eld for the sensor
on the Real-Time Log Session window and may also generate a calibration due e-mail
message if the e-mail features are enabled and congured. Leave this setting un-
checked if LogWare should ignore the calibration due date of a sensor. Changing this
setting affects all currently running real-time log sessions as well as all real-time log
sessions that are started after this setting is changed.
The Enable Observation mode (do not record log session readings) checkbox
determines whether LogWare should run real-time log sessions in Observation mode.
In Observation mode, LogWare does not record any of the readings acquired during
a real-time log session. Readings are displayed in the Real-Time Log Session win-
dow, but no remote monitoring can be done on this log session, and there will be no
historical data to query. Also, LogWare does not set the alarms, location (SENSOR
ID), temperature scale, or resolutions of the logger. This feature can be useful if you
need to view the data from a logger in real-time but the real-time data does not need
to be kept or recorded, such as if you want to use the download or import features to
record historical data. This feature can also be enabled if LogWare is only being used
to acquire ambient conditions data for MET/CAL.
Warning: Be careful when using LogWare in Observation mode that you do not
need to retain the real-time data! This mode should only be used in specic circumstances. A warning message is displayed when closing the LogWare III
Options dialog if Observation mode is enabled. Also, indicators are displayed on
the Real-Time Log Session Settings dialog and in the Real-Time Log Session
window when Observation mode is enabled.
The Never attempt to update password protected settings checkbox determines wheth-
er LogWare should prompt the user to enter the logger’s password when starting a
real-time log session if any password protected setting needs to be updated. Password
protected settings include the logger’s date/time, sensor alarms and location (SENSOR
ID) settings, and the calibration alert setting. If this checkbox is checked, LogWare
will not synchronize any password protected logger settings with the settings used in
LogWare.
Warning: By checking the Never attempt to update password protected settings
checkbox, you may encounter inconsistencies in data logged in real-time by
LogWare and data downloaded or imported into LogWare from the logger’s
memory. Unless it is absolutely necessary, it is recommended to leave this
checkbox unchecked. LogWare will never prompt to enter a password when automatically starting a log session.
57
Page 68

9936A LogWare III
Real-Time tab
Info: In order to avoid the password prompts from being displayed, and to allow
LogWare to always update any necessary password-protected settings, you can
store the logger’s password in the LogWare data store. Refer to Section 10.2.1,
Manage Assets and Locations, on page 154 for more information on storing logger passwords.
The Verify logger’s identity before taking readings checkbox determines whether
LogWare queries the identication of a logger before each set of measurements is
taken to ensure the readings are coming from the expected logger. This setting is used
to prevent someone from exchanging loggers during a real-time log session, and also
to prevent dynamic IP address changes from causing data to be logged incorrectly.
Because each measurement that LogWare records is associated with the logger model/
serial number, the sensor model/serial number and the assigned location, it is very
important to verify the source of the data to maintain the highest level of integrity.
Info: When this feature is enabled, LogWare must make additional queries of the
logger prior to each measurement. Therefore, it may not be possible to log data
at very short intervals (less than 5 seconds) with this feature enabled, especially
when using RS-232 or wireless communication protocols, or when logging data
from multiple loggers.
The Logging interval settings indicate the default interval settings to use when creating a new real-time log session. The logging interval can be changed when conguring
a real-time log session using the Logging interval settings on the Session tab of the
Real-Time Log Session Settings dialog.
The Reading resolutions settings determine the number of decimal places to use when
logging temperature and humidity readings. LogWare sends commands to the logger to
congure it to use these settings when a real-time log session starts. Select the number
of digits to use for temperature readings using the Temperature eld and humidity
readings using the Humidity eld.
The Graph settings X-axis range setting determines the amount of time that is dis-
played on the x-axis of the graph(s) in the Real-Time Log Session window. Select the
amount of time to display using the drop-down list.
58
Page 69

LogWare III Options
Graph tab
Graph tab3.3
The Graph tab displays options and settings related to real-time log session graphs and
logged data graphs.
Figure 22 LogWare III Options dialog - Graph tab
Note: Changing these settings only affects graphs that are created and displayed
after closing the LogWare III Options dialog, unless otherwise indicated.
The Temperature graph settings indicate settings that are used for graphs that are plot-
ting temperature readings only, as in the example below:
59
Page 70

9936A LogWare III
Graph tab
Figure 23 Separate temperature graph
The Humidity graph settings indicate settings that are used for graphs that are plotting
humidity readings only, as in the example below:
60
Figure 24 Separate humidity graph
The Title and Y-axis title elds determine the default text that is displayed on the
graphs. The title is displayed at the very top of the graph. The y-axis title is displayed
on the left y-axis of the graph.
The Combined graph title eld determines the text that is displayed as the title of
graphs that plot both temperature and humidity readings, as in the example below:
Page 71

LogWare III Options
Graph tab
Figure 25 Combined temperature and humidity graphs
When both temperature and humidity readings are being plotted on the same graph,
the left y-axis title uses the Y-axis title eld below the Temperature graph heading and
the right y-axis title uses the Y-axis title eld below the Humidity graph heading.
The X-axis title (both graphs) eld determines the text that is displayed below the x-
axis of all graphs.
The X-axis time format setting determines the format for the date and time labels on
the x-axis of all graphs. Select the desired option using the drop-down list. The graph
automatically determines the exact labels that are used on the x-axis, depending on the
time duration displayed on the axis. This setting is used by the graphs as an indication
of preference.
The Subtitle options settings determine what information is displayed in the subtitle
of all graphs. Any combination of options may be checked. For real-time log session
graphs that display information for two sensors, the information for each sensor is
separated by a slash “/” with the information for the sensor on channel one indicated
rst. Models and serial numbers for sensors and/or loggers are separated with a dash
“-“.
Info: When viewing logged data, it may not be feasible to include logger and
sensor and location information on the graph. For example, when querying data
for a specic location, the location information will be included in the subtitle,
but it is possible, even likely, that the sensor and/or logger used to log that data
may have changed at some point over the selected date/time range. The applicable information should always be included in the graph subtitles.
The Enable customization dialog checkbox determines whether the graph customization dialog option is displayed in the popup menu when right-clicking on a graph.
Any graph settings changed when using the graph customization dialog apply to the
selected graph only. This feature is a built-in dialog of the graphing package used by
LogWare and access is allowed for convenience only. LogWare does not support sav-
ing any settings congured on the customization dialog.
61
Page 72

9936A LogWare III
Graph tab
The Color options list indicates the default colors that are used for various items on all
graphs. To change the default color for an item, select the item in the list and click the
items may be dened:
The Other options section denes default settings to be used when displaying graphs.
The Show alarms checkbox determines whether horizontal lines are drawn on the
graphs indicating the current alarm settings. This setting applies to all graphs.
The Show data points checkbox determines whether a symbol is drawn on the graphs
for each data point. This setting applies to all graphs.
The Show annotations checkbox determines whether the vertical lines for the selected
data point and data point annotations are drawn on the graphs. This setting applies to
graphs in a Logged Data window only.
The Synchronize graph zooming checkbox determines whether zooming in on a section of a temperature graph causes the corresponding humidity graph to zoom in to
the same section, or vice-versa. This setting is only applicable to graphs located in the
same window when temperature and humidity readings are plotted on separate graphs.
(Color) icon to display the Color dialog. The default color for the following graph
Selected data point – This item refers to the currently selected data point and
applies only to graphs in a Logged Data window. A vertical line is drawn on the
graph in the selected color to indicate where the currently selected data point
lies with respect to the entire data set.
Data point annotation – This item refers to annotations that have been
manually or automatically linked to a data point and applies only to graphs in a
Logged Data window. A vertical line is drawn on the graph in the selected color
to indicate data points that have an annotation associated with them.
Sensor 1 temperature trace – This item refers to the default color of the
temperature trace for the sensor on channel 1 of the logger. This setting applies
to all graphs.
Sensor 1 humidity trace – This item refers to the default color of the humidity
trace for the sensor on channel 1 of the logger. This setting applies to all graphs.
Sensor 2 temperature trace – This item refers to the default color of the
temperature trace for the sensor on channel 2 of the logger. This setting applies
to all graphs.
Sensor 2 humidity trace – This item refers to the default color of the humidity
trace for the sensor on channel 2 of the logger. This setting applies to all graphs.
62
Page 73

Misc tab3.4
The Misc tab displays other miscellaneous options.
LogWare III Options
Misc tab
Figure 26 LogWare III Options dialog - Misc tab
The Display logger rmware update messages checkbox determines whether LogWare should display a rmware update message and send a rmware update e-mail
message (if enabled) when a real-time log session is congured using a logger with
known outdated rmware. This feature is intended to advise users when the version of
rmware being used in a logger may have a known incompatibility with LogWare, and
a rmware update may be available. LogWare checks the rmware version of a logger
every time a real-time log session starts.
The Automatically remove inactive log sessions from Remote Monitoring dialog
checkbox determines whether LogWare should prevent log sessions from appearing
on the Remote Monitoring Options dialog if the log session has been inactive for a
specic period of time. This will prevent users from attempting to remotely monitor a
log session that has not been able to acquire new readings for a period of time. If a log
session is able to resume activity after being removed from the list, the log session will
automatically be re-added to the list of available log sessions. If this option is checked,
use the drop-down list to select the time interval to use.
63
Page 74

9936A LogWare III
Misc tab
Note: If LogWare is being used in a client/server conguration, this feature
should only be enabled on one client computer. The effect of removing an inactive log session from appearing on the Remote Monitoring Options dialog is system-wide.
When using the TCP/IP (Ethernet) communication protocol, you can choose to have
the location (SENSOR ID) of each active sensor displayed in the Select Logger dialog
by checking the Include sensor locations when auto-detecting loggers using TCP/IP
checkbox. Refer to Section 1.10.2.1, Select Logger, on page 32 for more information.
The Daylight Saving Time rule drop-down list determines whether the Windows®
operating system’s current Daylight Saving Time rule is applied to historical read-
ings or whether to apply a different rule to historical readings. Currently, the only
rule supported is, Apply previous U.S. transition dates for data prior to 2007. If this
rule is selected, all data that was logged prior to January 1, 2007 will use the Daylight Saving Time transition dates of the rst Sunday in April and the last Sunday in
October. All data logged since this date will use the current transition dates as dened
in Windows®.
The Data server name and Data server port elds indicates the name of the server
where LogWare’s data is being stored and the port that is being used to communicate
with the server. For a client/server conguration, the data server name is the name of
the computer that LogWare was installed from. For a stand-alone conguration, this
should always be “LOCALHOST”. These settings are for informational purposes only
and cannot be changed.
The MET/CAL interface options settings allow LogWare to be congured to write data
acquired during real-time log sessions to a le that can be read by Fluke’s MET/CAL
software when performing calibrations. This feature of LogWare can be used in place
of the RHT application that comes with MET/CAL for recording ambient conditions
during tests.
To use this feature, check the Write real-time log session readings to .INI le check-
box, and specify the location of the RHT.INI le by clicking the “…” (Browse) button
to display the Browse for Folder dialog. By default, LogWare writes the acquired data
to a section of this le identied by the serial number of the sensor that the data was
acquired from. If you want LogWare to use the serial number of the logger instead of
the sensor, check the Use logger’s serial number as section name checkbox.
64
Note: In order for MET/CAL to be able to see and use the data in the RHT.INI
le, this le MUST be located in the shared MET/CAL folder. Refer to the MET/
CAL product documentation for more information on the required location of
this le.
Page 75

E-mail Features
4 E-mail Features
LogWare includes e-mail features that allow notications for various events to be sent
to e-mail accounts, cell phones, PDAs, etc. LogWare allows you to dene who should
receive e-mail messages when specic events occur.
The following e-mail related terms are used by LogWare. Before setting up LogWare’s
e-mail features, you should be familiar with and understand the meaning of these
terms.
E-mail glossaryTable 5
Term Description
SMTP Mail Server SMTP stands for Simple Mail Transfer Protocol. This is the standard TCP/IP protocol
for transferring e-mail messages. A SMTP mail server is a computer that runs e-mail
server softWare. To use LogWare’s e-mail features, you must be able to access a SMTP
mail server. A typical SMTP mail server name may look like: mailhost.mydomain.com.
Consult your system or network administrator to determine the name of the SMTP mail
server for your company.
Sender Address This is the e-mail address that appears as the ‘From’ address when LogWare sends
e-mail messages. The sender address must follow the valid e-mail address format (i.e.
name@domain.com).
Envelope An envelope is the container for e-mail messages. LogWare events that generate an
-mail message are assigned to an envelope. The envelope determines who receives
the e-mail message. Each envelope can be addressed to one or more ‘To’ groups, ‘CC’
groups, and/or ‘BCC’ groups.
Event An event is an occurrence in LogWare that generates an e-mail message. Each event
in LogWare can be linked to an envelope, which is used as a “container” for the e-mail
message.
Group A group consists of a collection of e-mail recipients. Typically, all members of a group
belong to the same team or perform similar job functions. When an e-mail message is
sent to a group, all members of that group will receive a copy of the message. Note:
E-mail groups are separate and independent of LogWare’s user account groups,
which dene permissions to use certain features of LogWare!
Recipient A recipient is an individual who needs to receive e-mail messages. Each recipient
may have a single e-mail address. One recipient should be created for each e-mail
address that e-mail messages should be sent to. In order to receive e-mail messages,
a recipient must be assigned to one or more groups.
‘To’ Group The ‘To’ group identies the primary recipients of e-mail messages.
‘CC’ Group The ‘CC’ group identies public secondary (carbon copy) recipients of e-mail
messages.
‘BCC’ Group The ‘BCC’ group identies private secondary (blind carbon copy) recipients of e-mail
messages.
Messaging style The messaging style setting indicates the type of e-mail message a recipient should
receive. LogWare supports Short, Standard, and Verbose e-mail messages. Short
messages are intended for cell phones and PDAs where e-mail messages are limited
to a specic number of characters. Standard messages are what most recipients
should receive. Verbose messages are intended for supervisors, managers, and
administrators and include additional information regarding the condition or state
that caused the e-mail message to be sent. This information may be used for
troubleshooting.
LogWare’s e-mail settings can be accessed from the LogWare III Options dialog. To
display this dialog, select the Options option from the Tools menu.
65
Page 76

9936A LogWare III
Note: For client/server, multi-user congurations, LogWare’s e-mail settings are
system wide and apply to all clients. Enabling or disabling the e-mail features
on one client computer enables or disables the e-mail features on all client computers. Access to changing e-mail settings can be granted or denied to each
LogWare user by setting up the appropriate permissions. By default, only users
assigned to the Typical or Administrator user groups can change e-mail settings.
In order to use LogWare’s e-mail features, you must setup a link to a Simple Mail
Transfer Protocol (SMTP) mail server. If you do not know if you have access to a
SMTP mail server, consult your system or network administrator.
After setting up the SMTP mail server, you need to identify the potential recipients of
LogWare’s e-mail messages. In a typical application, these recipients may include…
You need to create one e-mail recipient for each e-mail address to which messages
should be sent. If a person wants to have a message sent to their work e-mail account,
their home e-mail account, and their cell phone, you must create three separate recipi-
ents for that person.
Setup SMTP Mail Server
Setup E-mail Recipients
Operators and technicians in areas where LogWare is monitoring environmental
conditions
Quality control/assurance personnel responsible to ensure environmental
conditions stay within specications
Facilities managers who are responsible for monitoring and adjusting
environmental controls
Managers and supervisors who have responsibility for maintaining test
equipment
Calibration laboratory personnel in charge of performing equipment calibrations
66
Setup E-mail Groups
After the e-mail recipients have been setup, you need to categorize the recipients into
groups. Groups can be used to identify personnel that work together in the same area
or who perform similar job functions. You may want to consider creating groups for…
Operators and technicians of each area being monitored
Quality control/assurance personnel
Calibration laboratory personnel
Managers and supervisors of teams
Team leaders
You need to create an e-mail group for each identied group of recipients and include
all appropriate recipients in the group. Each e-mail recipient can be included in as
many groups as necessary.
Page 77

E-mail Features
Setup E-mail Envelopes
After the e-mail recipients and groups have been setup, you need to create e-mail
envelopes that e-mail messages can be placed into. Envelopes are the containers for
e-mail messages. Each envelope needs to be addressed to the group or groups to
which e-mail messages should be sent. When an event happens, LogWare generates
the content of the e-mail message associated with that event. The message content is
then placed in an envelope and sent to the members of the group(s) that the envelope
is addressed to.
How you dene the envelopes and the groups assigned to each envelope is up to you.
You may want to consider creating envelopes for…
Operators and technicians of each area being monitored
Quality control/assurance personnel
Calibration laboratory personnel
Managers and supervisors of teams
Team leaders
Setup Default LogWare Events
Once the e-mail setup is complete, LogWare’s events may be linked to e-mail enve-
lopes. This is how LogWare knows who the recipients are for e-mail messages gener-
ated by these events. These settings will be used as the default settings when setting up
a new real-time log session or remote monitoring session. The events associated with
each real-time log session and remote monitoring session are independent of all other
session’s events and can be customized when setting up a session or on-the-y while
the session is running.
Note: In a client/server multi-user conguration, whereas LogWare’s e-mail re-
cipient, group, and envelope settings are system-wide and apply to all client
computers, e-mail event settings are “per client”. Each LogWare client com-
puter can and must be congured independently of other LogWare client
computers.
LogWare generates e-mail messages for events related to the LogWare application
itself, for real-time log sessions, remote monitoring sessions, and logger and sensor
events. These events include…
User login/logout
Real-time log session state (started, stopped, aborted, etc.)
Logger state (power failure, low battery, etc.)
Sensor state (sensor attached or detached, locked, etc.)
Sensor calibration due
Temperature and humidity alarm conditions
67
Page 78

9936A LogWare III
Setting up E-mail SMTP Server
This structure allows for a very exible e-mail system. LogWare can be congured as
simple or as elaborate as you wish. In a very simplistic approach, you could setup all
recipients to receive all e-mail messages by doing the following…
Create one recipient for each person or unique e-mail address
Create one group and assign all recipients to that group
Create one envelope and assign the group as the ‘To’ group for the envelope
Link all default LogWare events to the envelope
In a more exible approach, you could congure LogWare to send e-mail messages to
a different recipient for each event by doing the following…
Create one recipient for each person or unique e-mail address
Create one group for each recipient and assign only one recipient to that group
Create one envelope for each event, or create one envelope for each event for
each log session, and assign the appropriate group(s) to the envelope
Customize the link for each log session’s events to a different envelope when
setting up the log session
Of course, it makes sense to nd some middle ground between these two scenarios
that best suits your needs.
Setting up E-mail SMTP Server4.1
LogWare includes e-mail features that allow notications for various events to be
sent to e-mail accounts, cell phones, PDAs, etc. LogWare allows you to dene who
should receive e-mail messages when specic events occur.
LogWare’s e-mail settings can be accessed from the LogWare III Options dialog. To
display this dialog, select the Options option from the Tools menu. On the LogWare III
Options dialog, select the General tab and click the E-mail Options button to display
the SMTP E-Mail Settings dialog.
68
Note: For client/server, multi-user congurations, LogWare’s e-mail settings are
system wide and apply to all clients. Enabling or disabling the e-mail features
on one client computer enables or disables the e-mail features on all client computers. However, the events can be customized on each client computer independently of all other client computers. Access to changing e-mail settings can be
granted or denied to each LogWare user by setting up the appropriate permissions. By default, only users assigned to the Typical or Administrator user
groups can change e-mail settings.
Page 79

E-mail Features
Setting up E-mail SMTP Server
Figure 27 SMTP E-Mail Settings dialog
To enable LogWare’s e-mail features, select the General tab and check the Enable e-
mail features checkbox. All other controls on this tab are disabled until this checkbox
is checked.
Enter the name of the Simple Mail Transfer Protocol (SMTP) mail server to use in the
SMTP mail server eld. If you do not know if you have access to a SMTP mail server,
consult your system or network administrator. If you have one, they should be able to
provide you with the name of the SMTP mail server.
To test the SMTP mail server link, enter your e-mail address in the Sender address
eld and click the Send Test E-Mail Message button. This will generate a test e-mail
message and send it to the sender address specied. Check your e-mail inbox to ensure
you receive the test message. You may need to allow a few minutes to receive the message. If you do not receive the message, check the SMTP mail server name to ensure it
was entered properly.
After successfully testing the mail server, you may want to change the Sender address
eld to an address that allows e-mail recipients to easily identify the source of the
e-mail messages LogWare generates. This e-mail address does not have to be a valid
e-mail address, but it does have to follow the format of a valid e-mail address (for example, name@domain.com). If you want users to be able to reply to LogWare’s e-mail
messages, you need to use a valid e-mail address. Your system or network administrator may be able to create an e-mail account for you to use, or you can use your own
e-mail address.
Note: LogWare does not recognize or receive replies to e-mail messages it generates. It is a one-way (outbound) e-mail messaging system.
69
Page 80

9936A LogWare III
Setting up E-mail Recipients
If you want LogWare to keep a log of all e-mail activity, check the Log e-mail activ-
ity to le checkbox and enter the path and lename of the le to use to log activity
information. You can click the … (Browse) button to browse for the folder where the
le should be located. For client/server, multi-user congurations, the activity log le
should be located on the server and this eld should already be lled in. There should
be no need to change it. However, if you decide change it, it is recommended that the
activity log le be located on the server. The path to the log le should be in UNC
(Universal Naming Convention) format to allow all client computers to be able to
access it (for example, \\<SERVERNAME>\<sharename>\<foldername>\<lename>.
log).
Setting up E-mail Recipients4.2
LogWare’s e-mail features require the identication of those persons who should
receive e-mail messages (recipients) generated by LogWare for specic events. This
identies the e-mail address and name of the recipient as well as indicating the type of
message that should be sent.
70
Figure 28 SMTP E-Mail Settings dialog - Reciepients tab
To setup recipients, select the Recipients tab. By default, the Recipients list is empty.
To setup a new recipient, change the settings for an existing recipient, or remove recipients, follow the instructions below.
To setup a new recipient…
Click the 1. New button to display the Recipient Settings dialog.
Fill in the information on this dialog.2.
Page 81

E-mail Features
Setting up E-mail Recipients
Click 3. OK to close the dialog. The new recipient should appear in the Recipients
list.
To change the settings for an existing recipient…
In the 1. Recipients list, select the recipient to change.
Click the 2. Settings button to display the Recipient Settings dialog.
Edit the information on this dialog.3.
Click 4. OK to close the dialog. Updates to the recipient’s e-mail address or name
should be reected in the Recipients list.
To remove an existing recipient…
In the 1. Recipients list, select the recipient to remove.
Click the 2. Remove button.
A prompt is displayed to conrm removing the recipient. Click 3. Yes to conrm.
The recipient should be removed from the Recipients list.
To remove all existing recipients…
Click the 1. Remove All button.
A prompt is displayed to conrm removing all recipients. Click 2. Yes to conrm.
All recipients should be removed from the Recipients list.
Recipient Settings4.2.1
The Recipient Settings dialog allows e-mail message recipients to be created and
changed. To display this dialog, select the New or Settings button on the Recipients tab
of the SMTP E-Mail Settings dialog.
71
Page 82

9936A LogWare III
Setting up E-mail Recipients
Figure 29 Recipient Settings dialog
On the General tab, enter the e-mail address for the recipient in the E-mail address
eld. The e-mail address is required. A recipient may have one and only one e-mail
address. If you need LogWare to send e-mail messages to more than one e-mail ad-
dress for one person (for example, work e-mail address, home/personal e-mail address,
cell phone e-mail address, etc.), you need to setup a separate recipient for each unique
e-mail address.
Enter the user’s rst and last names in the First name and Last name elds respec-
tively. This information is optional and may be omitted. If you are setting up multiple
recipients for one person, you can use these elds to identify the e-mail address type
for this recipient. For example, if you are setting up a recipient for John Smith’s cell
phone e-mail address, you may want to set the First name eld to ”John (cell)” and the
Last name eld to “Smith”. When assigning recipients to groups, the name will appear
in the Recipients list as “Smith, John (cell)”.
Select the style of message LogWare should send to this address using the Messaging
style drop-down list. The exact content of the e-mail message generated and sent by
LogWare to this recipient depends on this selection. The choices for this setting are as
follows:
Short message – Use this style for cell phone, PDA, or other text messaging
devices that are limited in the number of characters they can receive or display.
LogWare includes only essential information about the event in the e-mail
message such as a very short description, models and serial numbers, location
information, and a date/time stamp.
Standard message – This is the default setting. Use this style for typical
recipients. LogWare includes basic information about the event such as a
72
Page 83

E-mail Features
Setting up E-mail Groups
description, models and serial numbers, location information, and other
available information about the event. These messages are formatted for
optimal viewing in an e-mail client application such as Microsoft® Outlook.
Verbose message - Use this style for LogWare administrators or others who are
responsible for maintaining the system. LogWare includes the same information
as is found in the standard message plus additional information that may help
troubleshoot and resolve issues. These messages are formatted for optimal
viewing in an e-mail client application such as Microsoft® Outlook.
Setting up E-mail Groups4.3
LogWare’s e-mail features require recipients to be included in groups. A recipient may
be included in as many groups as necessary.
Figure 30 SMTP E-Mail Settings dialog - Groups tab
To setup groups, select the Groups tab. By default, the Groups list is empty. To setup
a new group, change the settings for an existing group, or remove groups, follow the
instructions below.
To setup a new group…
Click the 1. New button to display the Group Settings dialog.
Fill in the information on this dialog.2.
Select the recipients who belong to this group.3.
Click 4. OK to close the dialog. The new group should appear in the Groups list.
73
Page 84

9936A LogWare III
Setting up E-mail Groups
Group Settings4.3.1
messages to be assigned to a group. To display this dialog, select the New or Settings
button on the Groups tab of the SMTP E-Mail Settings dialog.
For help on determining how to group e-mail recipients, refer to Section 4, E-mail
Features, on page 65.
Before setting up e-mail groups, you should rst setup e-mail recipients. In order to
receive e-mail messages, a recipient must be included in one or more groups.
To change the settings for an existing group…
In the 1. Groups list, select the group to change.
Click the 2. Settings button to display the Group Settings dialog.
Edit the information on this dialog.3.
Add or remove recipients from the group.4.
Click 5. OK to close the dialog. Updates to the group’s name or description should
be reected in the Groups list.
To remove an existing group…
In the 1. Groups list, select the group to remove.
Click the 2. Remove button.
A prompt is displayed to conrm removing the group. Click 3. Yes to conrm. The
group should be removed from the Groups list.
To remove all existing groups…
Click the 1. Remove All button.
A prompt is displayed to conrm removing all groups. Click 2. Yes to conrm. All
groups should be removed from the Groups list.
The Group Settings dialog allows recipients that should all receive the same e-mail
74
Page 85

E-mail Features
Setting up E-mail Groups
Figure 31 Group Settings dialog
On the General tab, enter the name of the group in the Group name eld. The group
name is required. Typically, the group name should indicate the included recipients,
such as “Calibration Laboratory Personnel” or “Managers”. However, LogWare allows
you to name groups however you want.
Enter a description for this group in the Description eld. The description is optional
but can be used to indicate the recipients included in this group or any other information about the group.
To select the recipients for this group, select the Recipients tab. A list of all e-mail
recipients is displayed.
75
Page 86

9936A LogWare III
Setting up E-mail Envelopes
Figure 32 Group Settings dialog - Recipients tab
Select the recipients for this group by checking the checkbox next to the appropriate recipients. To remove a recipient from the group, uncheck the checkbox for that
recipient.
To add all recipients to this group, click the Select All button. The checkbox will be
checked for all recipients.
To remove all recipients from this group, click the Unselect All button. The checkbox
will be unchecked for all recipients.
76
Setting up E-mail Envelopes4.4
LogWare’s e-mail features require envelopes to be addressed to one or more groups.
An envelope is used as the “container” for e-mail messages and isused to send the e-
mail message generated by an event to the proper group(s) of recipients. An envelope
may be addressed to be sent to as many groups as necessary.
Page 87

E-mail Features
Setting up E-mail Envelopes
Figure 33 SMTP E-mail Settings dialog - Envelopes tab
To setup envelopes, select the Envelopes tab. By default, the Envelopes list is empty.
To setup a new envelope, change the settings for an existing envelope, or remove
envelopes, follow the instructions below.
To setup a new envelope…
Click the 1. New button to display the Envelope Settings dialog.
Fill in the information on this dialog.2.
Select the primary groups (‘To’) to receive the e-mail messages that use this 3.
envelope.
Select the groups to receive a 4. carbon-copy (‘CC’) of the e-mail messages that
use this envelope.
Select the groups to receive a 5. blind-carbon-copy (‘BCC’) of the e-mail
messages that usethis envelope.
Click 6. OK to close the dialog. The new envelope should appear in the Envelopes
list.
To change the settings for an existing envelope…
In the 1. Envelopes list, select the envelope to change.
Click the 2. Settings button to display the Envelope Settings dialog.
Edit the information on this dialog.3.
Add or remove ‘To’, ‘CC’, or ‘BCC’ groups from the envelope.4.
Click 5. OK to close the dialog. Updates to the envelope’s name or description
should be reected in the Envelopes list.
77
Page 88

9936A LogWare III
Setting up E-mail Envelopes
To remove an existing envelope…
To remove all existing envelopes…
Envelope Settings4.4.1
The Envelope Settings dialog allows groups of recipients to be selected for receiv-
ing e-mail messages. To display this dialog, select the New or Settings button on the
Envelopes tab of the SMTP E-Mail Settings dialog.
For help on determining how to setup envelopes, refer to Section 4, E-mail Features.
Before setting up e-mail envelopes, you should rst setup e-mail groups. In order for
LogWare to successfully send e-mail messages, envelopes must be addressed to one or
more groups.
In the 1. Envelopes list, select the envelope to remove.
Click the 2. Remove button.
A prompt is displayed to conrm removing the envelope. Click 3. Yes to conrm.
The envelope should be removed from the Envelopes list.
Click the 1. Remove All button.
A prompt is displayed to conrm removing all envelopes. Click 2. Yes to conrm.
All envelopes should be removed from the Envelopes list.
78
Figure 34 Envelope Settings dialog
On the General tab, select whether this envelope should be allowed to be assigned
to LogWare events by checking or unchecking the Enable this envelope checkbox.
Page 89

E-mail Features
Setting up Default Events
Unchecking this box will prevent this envelope from being displayed when assigning
envelopes to events.
Enter the name of the envelope in the Envelope name eld. The envelope name is
required. Typically, the envelope name should indicate either the groups that the
envelope is addressed to, such as “All Managers and Supervisors” or it should indicate
the type of event that is assigned to use this envelope to send e-mail messages, such as
“Sensor Calibration Due”. However, LogWare allows you to name envelopes however
you want.
Enter a description for this envelope in the Description eld. The description is option-
al but can be used to indicate the groups this envelope is addressed to, the event(s) this
envelope should be used for, or any other information about the envelope.
To select the primary group(s) (‘To’) for this envelope, select the ‘To’ Groups tab. A
list of all e-mail groups is displayed. Check each of the groups that should receive e-
mail messages sent in this envelope.
Figure 35 Envelope Settings dialog - To Groups tab
To select the group(s) to receive a carbon-copy (‘CC’) of e-mail messages sent in this
envelope, select the ‘CC’ Groups tab. A list of all e-mail groups is displayed. Check
each of the groups that should receive a carbon-copy of the e-mail messages sent in
this envelope.
To select the group(s) to receive a blind-carbon-copy (‘BCC’) of e-mail messages sent
in this envelope, select the ‘BCC’ Groups tab. A list of all e-mail groups is displayed.
Check each of the groups that should receive a blind-carbon-copy of the e-mail mes-
sages sent in this envelope.
Setting up Default Events4.5
LogWare’s e-mail features allow various application, log session, logger, and
sensor events to be linked to an envelope. An envelope is used as the “container” for
79
Page 90

9936A LogWare III
Setting up Default Events
e-mail messages and is used to send the e-mail message generated by an event to the
proper group(s) of recipients. Each event can be linked to only one envelope.
LogWare’s default event settings can be accessed from the LogWare III Options dialog.
To display this dialog, select the Options option from the Tools menu. On the LogWare
III Options dialog, select the General tab and click the Event Options button to display
the Default Event Settings dialog.
Note: In a client/server multi-user conguration, whereas LogWare’s e-mail re-
cipient, group, and envelope settings are system-wide and apply to all client
computers, e-mail event settings are “per client”. Each LogWare client com-
puter can and must be congured independently of other LogWare client
computers.
80
Figure 36 Default Event Settings dialog
In order for LogWare to be able to send e-mail messages for an event, the event must
be linked to an envelope. Each of the events supported by LogWare can be linked to
one envelope. This becomes the default envelope for the event. However, each time a
real-time log session or remote monitoring log session is started, the user may custom-
ize the events for that log session only by linking the events to different envelopes. If
the user does not customize the event settings, the default settings are used.
To setup the default link for an event to an envelope, select the tab indicating the
category of event to congure. The events list on the left displays all events associated with the selected tab. The E-mail envelopes list on the right displays a list of all
enabled envelopes. If a check appears next to an envelope, this indicates the currently
selected envelope for the highlighted event. If an event is not linked to an envelope, no
e-mail message will be generated when the event occurs.
Page 91

E-mail Features
Setting up Default Events
To select the default envelope to use for an event, select the event in the events list on
the left and check the box corresponding to the envelope to use in the E-mail enve-
lopes list on the right. Repeat this process for other events.
To determine the recipients associated with an envelope, or to congure envelopes,
groups, and recipients, click the Options button to display the SMTP E-Mail Settings
dialog. For help on determining how to setup envelopes, refer to Section 4, E-mail
Features.
To clear (reset) the links for all events on all tabs, click the Clear All button.
LogWare supports the following categories of events.
Application Events
Application events are events that are not directly related to any given log session,
logger, or sensor.
Warning Message - The Warning Message event occurs when LogWare needs
to notify the user of an occurrence of notable importance but was unable to
display a message on-screen. For example, when automatically starting real-
time log sessions, if LogWare is unable to synchronize the logger’s clock or
change a password protected setting in the logger, a Warning Message event
occurs.
Application Error - The Application Error event occurs when a critical error
occurs in LogWare when it is not appropriate to display a message on screen,
such as during real-time log sessions. An e-mail message is generated that
contains information about the error including the error number, description,
and source of the error. This information can be helpful when contacting
Technical Support for assistance on resolving issues with the softWare.
Data Server Error - The Data Server Error event occurs when a critical
data server error occurs in LogWare. An e-mail message is generated that
contains information about the error including the description and source. This
information can be helpful when contacting Technical Support for assistance on
resolving issues with the softWare.
User Login/Logout - The User Login/Logout event occurs when a user logs
into or out of LogWare. An e-mail message is generated that contains user
information.
Log Session Events
Log Session events are events that are directly related to real-time log sessions only.
Log Session State - The Log Session State event occurs when the state of a
real-time log session changes. A log session state change event is generated
when a real-time log sessions is started, aborted, or nishes normally, or if a
real-time log session fails to start automatically. This event also indicates when
a real-time log session becomes inactive (readings cannot be acquired from the
sensor) or becomes active again after a period of inactivity. An e-mail message
is generated that contains log session state information.
81
Page 92

9936A LogWare III
Setting up Default Events
Logger Events
Logger events are events that are directly related to a logger when a real-time log ses-
sion is running.
Sensor Events
Sensor events are events that are directly related to a sensor.
Firmware Upgrade - The Firmware Upgrade event occurs when the user
congures LogWare to use a logger that contains outdated rmware with
known incompatibility issue with LogWare. An e-mail message is generated
that contains information regarding the logger’s current rmware version. Note:
This event does not notify the user when there is newer version of rmware
available for the logger - only if there is a known incompatibility in the current
rmware version.
Logger State - The Logger State event occurs when the state of a logger
changes during a real-time log session. A logger state change event is generated
when a logger’s backup battery is low and when the power was recently
disconnected from the logger and subsequently reconnected. An e-mail message
is generated that contains logger state information.
Alarm Settings Update - The Alarm Settings Update event occurs when a
user updates a sensor’s temperature or humidity alarm settings during a real-
time log session. An e-mail message is generated that contains alarm state and
settings information. Note: This event only applies to real-time log sessions,
and only occurs if an alarm is enabled or disabled, or if the alarm’s
threshold value is changed. This event does not occur if any other alarm
settings are changed.
Calibration Due - The Calibration Due event occurs when a sensor’s
calibration has expired or is coming due. An e-mail message isgenerated that
contains the sensor calibration due date information. Note: This event only
applies to real-time log sessions.
Hot-Swap Error - The Hot-Swap Error event occurs when a sensor is hot-
swapped during a real-time log session and LogWare is unable to successfully
acquire readings from the newly attached sensor. An e-mail message is
generated that contains information regarding the reason LogWare is unable to
acquire readings from the sensor. Note: This event only applies to real-time
log sessions.
Humidity Alarm - The Humidity Alarm event occurs when the humidity
reading from a sensor exceeds the current humidity alarm threshold value, or
when the humidity reading returns to within the threshold value after having
exceeded it. An e-mail message is generated that contains the sensor’s reading
and alarm settings information. Note: This event applies to both real-time log
sessions and remote monitoring log sessions.
Sensor State - The Sensor State event occurs when the state of a sensor
changes during a real-time log session. A sensor state event is generated when
a sensor is attached or detached (hot-swapping), or if the logger is unable
to get readings from the sensor, or if the logger is congured to lock out the
82
Page 93

E-mail Features
Setting up Default Events
sensor. An e-mail message is generated that contains sensor state information,
including the reason the logger cannot get readings from the sensor. Note: This
event only applies to real-time log sessions.
Temperature Alarm - The Temperature Alarm event occurs when the
temperature reading from a sensor exceeds the current temperature alarm
threshold value, or when the temperature reading returns to within the threshold
value after having exceeded it. An e-mail message is generated that contains the
sensor’s reading and alarm settings information. Note: This event applies to
both real-time log sessions and remote monitoring log sessions.
Customizing Events4.5.1
LogWare’s e-mail features allow various application, log session, logger, and
sensor events to be linked to an envelope. An envelope is used as the “container” for
e-mail messages and is used to send the e-mail message generated by an event to the
proper group(s) of recipients. Each event can be linked to only one envelope.
The events for any real-time log session or remote monitoring log session can be
customized independently of all other log sessions. If events are not customized, the
default event settings are used. To customize the e-mail event settings for a real-time
log session, click the E-mail Settings button on the Logger tab of the Real-Time Log
Session Settings dialog. To customize the e-mail event settings for a remote monitoring
log session, click the E-mail Settings button on the Sessions tab of the Remote Monitoring Options dialog. The Real-Time Log Session Event Settings dialog or the Remote
Log Session Event Settings dialog is displayed accordingly.
Figure 37 Real-Time Log Session Event Settings dialog
The Real-Time Log Session Event Settings dialog displays up to four tabs: Log Ses-
sion Events, Logger Events, and one Sensor Events tab for each enabled sensor. The
Remote Log Session Event Settings dialog displays only one Sensor Events tab cor-
83
Page 94

9936A LogWare III
Setting up Default Events
responding to the sensor for the selected log session to monitor. The default e-mail
envelope for each event is selected.
To customize an event, select the tab indicating the category of event to congure. The
events list on the left displays all events associated with the selected tab. The E-mail
envelopes list on the right displays a list of all enabled envelopes. Select the event in
the events list on the left and check the box corresponding to the envelope to use in the
E-mail envelopes list on the right. Repeat this process for other events. If an event is
not linked to an envelope, no e-mail message will be generated when the event occurs.
These settings apply only to the real-time log session or remote monitoring log session
currently being setup.
84
Page 95

Real-Time Data Logging
5 Real-Time Data Logging
The primary method of logging data using LogWare is real-time data logging. Real-
time data logging requires communicating with a logger using either a RS-232, Ethernet, or wireless connection. This allows LogWare to congure various logger settings
and to query the temperature and humidity measurements from the logger.
In a multi-user environment, any LogWare client computer can run any number of
real-time log sessions. LogWare does not limit the number of real-time log sessions
that can be run simultaneously on a client computer. However, practical limits do exist
based on the computer’s processor speed and amount of available memory, the realtime log session’s sample interval, and the method of communication being used.
One real-time log session can acquire the readings from one or both sensors on a
logger. However, if you need to acquire data from both sensors, you must do this in a
single real-time log session. You cannot setup one real-time log session to acquire data
from the sensor on channel 1 of a logger and a separate real-time log session to acquire
the data from the sensor on channel 2 of the same logger. LogWare prevents more than
one real-time log session from being run against any one logger. Only one logger’s
data can be displayed in a Real-Time Log Session window.
When a real-time log session is running, you should avoid communicating with the
logger using any other tools in LogWare (i.e. downloading data, etc) or from any other
application.
Warning: As a general rule, if you use LogWare to log data in real-time from a
logger over a period of time, you should not attempt to import or download
readings from the same logger that overlap that time period.
LogWare’s real-time data logging feature is very exible and can be congured
in many ways. Listed below are just a few examples of how LogWare could be
congured:
Log temperature data in Celsius or Fahrenheit
Log temperature data only, humidity data only, or both
Log data from one or both sensors simultaneously or sequentially
Log temperature data from one sensor and humidity data from another sensor
Log data at virtually any rate from 1 second to 24 hours
Start a log session immediately or at any future date and time
Allow a log session to run indenitely, or automatically terminate a log session
after a certain number of readings have been logged, or after a specic amount
of time has elapsed
Automatically start one or more real-time log sessions when you login to
LogWare
Setup LogWare to automatically login when the computer boots up to resume
real-time logging in case of a power failure
Setup alarms with related alarm events to perform a certain task if an alarm
value is exceeded
85
Page 96

9936A LogWare III
To setup a real-time log session…
Run Log1. Ware and login using an account with at least restricted access.
Make sure the logger to use is powered up and connected.2.
Select the 3. New Log Session option from the File menu, or select the Setup
option from the Datalog menu to display the Real-Time Log Session Settings
dialog.
On the 4. Logger tab, select the appropriate communication settings for
communicating with the logger. Click the Communication Settings button to
access detailed communication settings.
Click the 5. Query Logger button to establish communications with the logger.
LogWare will read in all current logger settings, including the temperature
scale, sensor information, location information, and alarm values.
Congure each sensor according to how the data should be logged. Selecting 6.
a sensor in the Sensors list and use the controls to setup the location, alarms,
statistics, and graph trace color.
On the 7. Session tab, select the logging interval, start log session and end log
session criteria.
Click the 8. Start button to start the real-time log session.
To open a real-time log session conguration le…
Run Log1. Ware and login using an account with at least restricted access.
Make sure the logger to use is powered up and connected.2.
Select the 3. Open Log Session option from the File menu to display the Open Log
Session Settings File dialog. Navigate to and select the log session settings le
to open, and click the Open button.
The log session settings le is opened and the 4. Real-Time Log Session Settings
dialog is displayed. Communication is automatically established with the
logger.
Check the log session settings and click the 5. Start button to start the real-time
log session.
86
A log session settings le may also be opened by clicking the Open… button on the
Real-Time Log Session Settings dialog.
LogWare can also be congured to automatically start one or more Real-Time Log
Sessions on login.
To setup LogWare to automatically open and start real-time log sessions on
login…
Run Log1. Ware and login using an account with at least typical access.
Select the 2. Options option from the Tools menu to display the LogWare III
Options dialog.
On the 3. General tab, check the Automatically start log session(s) upon login
checkbox.
Page 97

Real-Time Data Logging
Real-Time Log Session Settings
Click the 4. Add button to display the Open Log Session Settings File dialog.
Navigate to and select the log session settings le(s) to open, and click the Open
button. You may select multiple les by holding down the CTRL or SHIFT keys
while clicking on les.
The selected le(s) should appear in the list.5.
Click 6. OK on the LogWare III Options dialog to close the dialog and save the
settings.
Info: When logging into LogWare using an administrator account, auto-start
settings are ignored. LogWare will only automatically open and start real-time
log sessions when logging in using a restricted or typical user account.
Info: You can override automatically starting Real-Time Log Sessions upon log-
in by holding down the CTRL key after the login prompt as LogWare is starting
up.
5.1 Real-Time Log Session Settings
The Real-Time Log Session Settings dialog allows the user to congure a real-time log
session. This dialog is displayed when selecting the New Log Session option from the
File menu or when selecting the Setup option from the Datalog menu.
Figure 38 Real-Time Log Session Settings dialog
Real-time log session settings can be saved to a conguration le and opened using
this dialog. If you frequently want to use the same alarm settings, logging interval, and
87
Page 98

9936A LogWare III
Real-Time Log Session Settings
end log session settings to log real-time data, congure the session and save it to a log
session settings le (.LSS le) by clicking the Save As button. The next time you need
to start a log session, simply open the appropriate conguration le by clicking the
Open button and making sure the logger is available.
The Real-Time Log Session Settings dialog has two tabs: Logger and Session.
Warning: Before conguring a real-time log session, familiarize yourself with
the options on the Real-Time tab of the LogWare III Options dialog. In particular, be careful when using LogWare in Observation mode. This mode should only
be used in specic circumstances. An indicator is displayed next to the Query
Logger button when Observation mode is enabled. Refer to Section 3, LogWare
III Options, on page 51, for more information.
Logger5.1.1
The Logger tab allows the real-time log session settings regarding the logger and sen-
sors to be congured.
When this dialog is displayed, all elds on this tab are disabled except the communication elds and the Query Logger button.
Note: Before proceeding, make sure the logger to use is powered up and connected as applicable.
88
Select the communication protocol to use to communicate with this logger using the
Communication protocol drop-down list. LogWare supports communicating with log-
gers using serial (RS-232), Ethernet (TCP/IP), and wireless protocols. To use wireless
communications, select the Serial (RS-232) option from the drop-down list. Details
of the current communication settings are indicated in the Communication settings
details eld. Click the Communication Settings button to change the current communi-
cation settings details. Refer to Section 1.10, Methods of Communication, on page 29,
for more information on communication settings.
Info: In order to use the wireless method of communication, you must purchase
and install a wireless RF modem. The RF modems currently come with either a
RS-232 or USB interface. Follow the instructions provided with the RF modem
to perform the installation. The RS-232 modem will connect directly to an existing COM port on the computer. Installing the USB modem creates a virtual
COM port for the modem.
Once the communication settings are correct, click the Query Logger button. LogWare
attempts to communicate with the logger using the selected communication settings,
reads in the current logger settings, and lls in the remaining elds on this tab.
When using the Ethernet (TCP/IP) communication settings in DHCP mode, Log-
Ware searches for any loggers on the network and displays the Select Logger dialog.
Select the logger to use and click OK to proceed.
Page 99

Real-Time Data Logging
Real-Time Log Session Settings
Figure 39 Select Logger dialog
Info: LogWare keeps track of all of the loggers, sensors, and locations used to
log data. The rst time a logger, sensor, or location is used, LogWare creates
records for each item. Administrators can congure LogWare to prevent certain
loggers, sensors, and locations from being used to log data. Every time a logger
is queried, LogWare checks to make sure the logger, sensors, and locations are
active and can be used.
The Logger eld indicates the model and serial number of the logger being used. This
information cannot be changed.
The Temperature scale eld indicates the current temperature scale setting of the
logger. If you wish to log data in a different scale, use the drop-down list to choose
the scale to use. When running in Observation mode, the Temperature scale eld is
disabled.
The E-mail Settings button allows access to the e-mail event settings for this log
session. This button is disabled if the user does not have permission to change e-mail
related settings. The e-mail settings for a real-time log session default to the settings
congured on the Default Event Settings dialog, which is accessible from the General
tab on the LogWare III Options dialog
The Sensors list indicates the model, serial number, and state of the sensor(s) con-
nected to the logger. The checkbox next to each sensor in this list indicates whether
data should be logged from the sensor. Unchecking this checkbox indicates LogWare
should not log any data from the sensor. If the checkbox is checked, temperature and/
or humidity data will be logged, depending on the state of the Temperature and Hu-
midity checkboxes in the sensor settings section below.
89
Page 100

9936A LogWare III
Real-Time Log Session Settings
To change the settings for a sensor, select the sensor in the Sensors list. The elds in
the sensor settings section below are lled with the current settings for the selected
sensor.
The Location eld indicates the location of the selected sensor. LogWare uses the
SENSOR ID eld of the sensor to store the location information. When logging data,
it is important to know not only what sensor logged the data, but where the sensor was
located when the data was logged (i.e. LABORATORY, MYDESK, OFFICE, CHAMBER, etc). Use this eld to indicate where the selected sensor is located. Use the
drop-down list to select an existing location, or add a new location by clicking the
button. When running in Observation mode, the Location eld is disabled.
Note: By default, the SENSOR ID eld for a new sensor is set to a value of ‘ID’.
If LogWare detects the SENSOR ID eld is set to ‘ID’, a prompt is displayed in-
dicating you should select or create a valid location name for this sensor and the
Select Sensor Location dialog is displayed.
Note: You should avoid setting more than one sensor to the same location during
a real-time log session. Setting more than one sensor to the same location makes
it difcult to view the data by location after it is logged. Instead, create a new
location with a similar, but unique, name if necessary (i.e. LABORATORY1 and
LABORATORY2).
90
The Temperature and Humidity checkboxes determine whether temperature and/or
humidity readings for the selected sensor should be logged. To log both temperature
and humidity, check both checkboxes. To log only temperature, check only the Tem-
perature checkbox. To log only humidity, check only the Humidity checkbox. If both
options are unchecked, the checkbox in the Sensors list is automatically unchecked,
indicating no data from the selected sensor should be logged.
The three buttons next to the Temperature and Humidity checkboxes allow alarm set-
tings, statistics, and the trace color to be congured. These buttons are disabled if the
corresponding Temperature or Humidity checkbox is unchecked. The vertical bar to
the right of the buttons indicates the current trace color.
To congure the alarm settings, click the (Alarm Settings) button. When running in
Observation mode, the alarm settings can be changed, however the logger will not be
updated to reect these settings.
To congure the statistics, click the (Statistics Settings) button.
To congure the trace color, click the (Trace Color) button.
 Loading...