

Page 1

®
561 HVACPro
Infrared Thermometer
Users Manual
PN 2562924
February 2006
© 2006 Fluke Corporation, All rights reserved. Printed in USA
All product names are trademarks of their respective companies.
Page 2

LIMITED WARRANTY AND LIMITATION OF LIABILITY
This Fluke product will be free from defects in material and workmanship for two
years from the date of purchase. This warranty does not cover fuses, disposable
batteries, or damage from accident, neglect, misuse, alteration, contamination, or
abnormal conditions of operation or handling. Resellers are not authorized to extend any other warranty on Fluke’s behalf. To obtain service during the warranty
period, contact your nearest Fluke authorized service center to obtain return authorization information, then send the product to that Service Center with a description of the problem.
THIS WARRANTY IS YOUR ONLY REMEDY. NO OTHER WARRANTIES, SUCH AS
FITNESS FOR A PARTICULAR PURPOSE, ARE EXPRESSED OR IMPLIED. FLUKE IS
NOT LIABLE FOR ANY SPECIAL, INDIRECT, INCIDENTAL OR CONSEQUENTIAL
DAMAGES OR LOSSES, ARISING FROM ANY CAUSE OR THEORY. Since some
states or countries do not allow the exclusion or limitation of an implied warranty or
of incidental or consequential damages, this limitation of liability may not apply to
you.
Fluke Corporation
P.O. Box 9090
Everett, WA 98206-9090
U.S.A.
11/99
Fluke Europe B.V.
P.O. Box 1186
5602 BD Eindhoven
The Netherlands
Page 3

Table of Contents
Title Page
Introduction............................................................................................. 1
Contacting Fluke...................................................................................... 1
Safety Information................................................................................... 2
Features................................................................................................... 3
Display..................................................................................................... 4
Buttons and Connector............................................................................ 5
How the Thermometer Works .................................................................6
Operating the Thermometer ....................................................................6
Locating a Hot or Cold Spot ................................................................ 6
Distance and Spot Size........................................................................ 6
Field of View........................................................................................ 7
Emissivity ............................................................................................ 7
Switching Between °C and °F..............................................................8
Using the Contact Temperature Probe ................................................9
HOLD...................................................................................................10
Typical Measurements ............................................................................ 10
Measuring Heating/Cooling Duct Insulation Jacket Temperature ....... 10
Measuring Dewpoint Temperature ......................................................10
Testing Insulated Return Ducts........................................................... 11
Scanning Walls for Air Leaks or Insulation Deficiencies..................... 11
Testing Contactors (Starters).............................................................. 12
Testing Enclosed Relays...................................................................... 12
Testing Fuses and Buss Connections.................................................. 12
Testing Electrical Connections ............................................................ 12
Testing Bearings.................................................................................. 13
Testing Belts and Sheaves................................................................... 13
Checking Hydronic Radiant Heat Applications .................................... 14
Testing Radiant Heat Applications....................................................... 14
Testing Water Heater Insulation.......................................................... 14
Testing Steam Traps ........................................................................... 14
i
Page 4

561 HVACPro
Users Manual
Measuring Grille, Register, or Diffuser Discharge Temperature ......... 15
Verifying Thermostat/Room Sensor Accuracy ....................................15
Checking for Blockage in Air-To-Air Evaporators or Condensers........ 15
Checking Superheat on Fixed Restrictor or Capillary Tube
Equipped Evaporators .........................................................................16
Checking Subcooling on Air-To-Air Systems With Expansion
Valve Equipped Evaporators................................................................ 16
Maintenance ............................................................................................17
Changing the Battery........................................................................... 17
Cleaning the Lens................................................................................ 17
Cleaning the Housing ..........................................................................17
Troubleshooting ......................................................................................17
CE Certification........................................................................................ 17
Specifications ..........................................................................................18
ii
Page 5

561 HVAC PRO
Infrared Thermometer
Introduction
The Fluke Model 561 HVACPro Infrared Thermometer (hereafter, “the Thermometer”) can determine the
surface temperature by measuring the amount of infrared energy radiated by the target’s surface or by
contact using a thermocouple probe. The Thermometer was designed specifically for use in heating,
ventilating, and air conditioning (HVAC) applications.
Contacting Fluke
To contact Fluke, call one of the following telephone numbers:
USA: 1-888-44-FLUKE (1-888-443-5853)
Canada: 1-800-36-FLUKE (1-800-363-5853)
Europe: +31 40 267 5200
Japan: +81-3-3434-0181
Singapore: +65-738-5655
Anywhere in the world: +1-425-446-5500
For USA Service: 1-888-99-FLUKE (1-888-993-5853)
Or, visit Fluke's Web site at www.fluke.com
To register your product, visit register.fluke.com
.
.
1
Page 6
561 HVACPro
Users Manual
Safety Information
WWarning
A Warning identifies conditions and actions that pose hazards to the user. To avoid electrical
shock or personal injury, follow these guidelines:
• * Do not point laser directly at eye or indirectly off reflective surfaces.
• Before using the Thermometer inspect the case. Do not use the Thermometer if it appears
damaged. Look for cracks or missing plastic.
• Replace the batteries as soon as the battery indicator (B) appears.
• Do not use the Thermometer if it operates abnormally. Protection may be impaired. When
in doubt, have the Thermometer serviced.
• Do not operate the Thermometer around explosive gas, vapor, or dust.
• Do not connect the optional external probe to live electrical circuits.
• To avoid a burn hazard, remember that highly reflective objects will often result in lower
than actual temperature measurements.
• Do not use in a manner not specified by this manual or the protection supplied by the
equipment may be impaired.
Caution
To avoid damaging the thermometer or the equipment under test protect them from the
following:
• EMF (electro-magnetic fields) from arc welders, induction heaters, etc.
• Static electricity.
• Thermal shock (caused by large or abrupt ambient temperature changes- allow 30 minutes
for the Thermometer to stabilize before use).
• Do not leave the Thermometer on or near objects of high temperature.
Table 1 and Figure 1 show various symbols and safety markings that are on the Thermometer and in this
manual.
Table 1. Symbols
Symbol Explanation
W
*
P
~
B
„
Risk of danger. Important information. See Manual.
Warning. Laser.
Conforms to requirements of European Union and European Free Trade
Association (EFTA)
Do not dispose of this product as unsorted municipal waste. Contact Fluke or
a qualified recycler for disposal.
Battery
Chinese manufacturing mark for products manufactured in the Peoples
Republic of China (PRC)
2
Page 7
Infrared Thermometer
Features
N
IO
T
IA
D
A
R
R
E
S
A
L
E
R
U
S
O
P
X
E
D
I
O
V
E
A
R
U
T
R
E
P
A
IS
H
T
M
O
R
F
D
E
T
IT
M
E
IS
UTION
M
A
CA
E
B
O
T
IN
E
R
A
T
S
T
O
N
O
D
N
IO
T
IA
D
A
R
R
E
S
A
L
m
n
0
7
- 6
0
3
6
H
T
G
N
E
L
E
V
A
W
W
<
m
1
T
U
P
T
U
O
T
C
U
D
O
R
P
R
E
S
)
A
(
L
II
2
S
S
A
L
C
R
F
C
1
2
A
D
F
H
IT
W
S
IE
L
P
M
O
C
1
.1
0
4
0
1
D
N
A
0
.1
0
4
0
1
5
2
8
0
6
C
IE
H
IT
W
S
IE
L
P
M
O
C
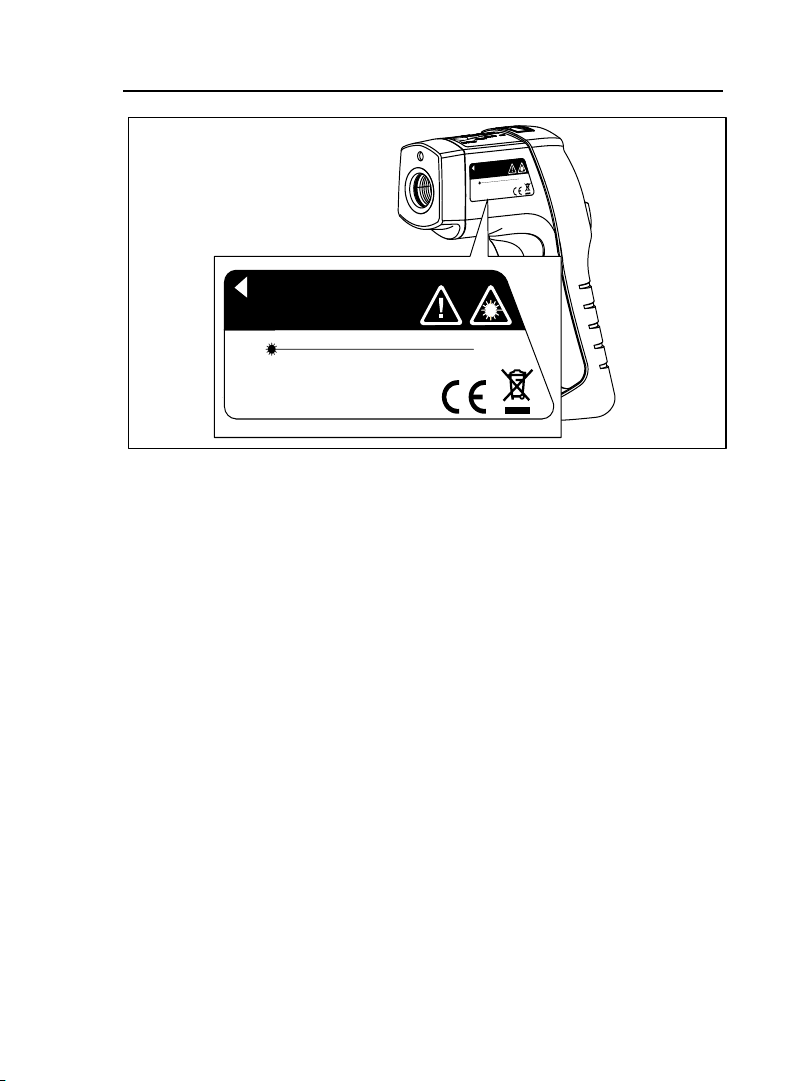
AVOID EXPOSURE - LASER RADIATION
IS EMITTED FROM THIS APERTURE
CAUTION
LASER RADIATION - DO NOT STARE INTO BEAM
OUTPUT < 1mW WAVELENGTH 630 - 670nm
CLASS 2 (II) LASER PRODUCT
COMPLIES WITH FDA 21CFR
1040.10 AND 1040.11
COMPLIES WITH IEC 60825
Figure 1. Symbols and Safety Markings
efh010f.eps
Features
The Thermometer includes:
• Single-spot Laser Sighting
• Backlit Display
• Hard Case
• Current Temperature Plus MIN, MAX, DIF Temperature Displays
• Easy Emissivity Selector
• Type-K Thermocouple, Velcro Pipe Probe
• Two AA Batteries
Thermometer features are shown in Figure 2.
3
Page 8

561 HVACPro
Users Manual
Laser
Display
Trigger
AA
Batteries
(2)
Function Buttons
Battery
Cover
Figure 2. Infrared Thermometer
efh007f.eps
Display
The primary temperature display reports the current or last IR temperature read until the 7-second hold
time elapses.
The secondary temperature display reports current thermocouple temperature when a type-K thermocouple
is attached. When a thermocouple is not connected, the small temperature display reports a choice of
maximum, minimum, or difference between maximum and minimum temperature.
You can toggle through the minimum, maximum, and difference IR temperatures anytime the display is on.
The MIN, MAX, and DIF temperatures are constantly calculated and updated when the trigger is pressed.
After the trigger is released, the MIN, MAX, DIF temperatures are held for 7 seconds.
Notes
When the battery is low, B appears on the display.
The last selection (MIN/MAX/DIF) is maintained on the secondary display even after the Thermometer has
been turned off, providing the batteries have not failed.
4
Page 9

Infrared Thermometer
Buttons and Connector
1
8
7
A Laser “On” symbol
B SCAN or HOLD
C °C/°F symbol (Celsius/Fahrenheit)
D Primary temperature display
E Secondary temperature display
F Emissivity LO, MED, HI
G
H
Temperature values for the MIN, MAX, DIF, KTC.
KTC indicates the thermocouple temperature.
Low Battery symbol. Appears when the battery charge
is < 25%.
Figure 3. Thermometer Display
Buttons and Connector
Button/
Connector
2
Description
3
4
5
6
efh01f.eps
C PressC and then press
The A button is used to show the MIN, MAX, and DIF functions in the secondary
A
D
display, whichever was pressed most recently.
Selects the emissivity setting. You can toggle between LO (0.3), MED (0.7), or HI (0.95)
.
using
A
K-type thermocouple probe used to make contact temperature measurement.
to toggle between the MIN, MAX, and DIF options.
A
5
Page 10

561 HVACPro
Users Manual
How the Thermometer Works
Infrared thermometers measure the surface temperature of an opaque object. The Thermometer’s optics
sense infrared energy, which is collected and focused onto a detector. The Thermometer’s electronics then
translate the information into a displayed temperature reading which appears on the display. The laser is
used for aiming purposes only.
Operating the Thermometer
The Thermometer turns on when you press the trigger. The Thermometer turns off when no activity is
detected for 7 seconds.
To measure temperature, aim the Thermometer at the target, pull and hold the trigger. Release the trigger
to hold a temperature reading.
Be sure to consider distance-to-spot size ratio and field of view. The laser is used for aiming only.
Locating a Hot or Cold Spot
To find a hot or cold spot, aim the Thermometer outside the target area. Then, slowly scan across the area
with an up and down motion until you locate the hot or cold spot. See Figure 4.
Figure 4. Locating a Hot or Cold Spot
efh014f.eps
Distance and Spot Size
As the distance (D) from the target being measured increases, the spot size (S) of the area measured by the
unit becomes larger. The spot sizes indicates 90 % encircled energy. The maximum D:S is obtained when
the Thermometer is 900 mm (36 in) from the target resulting in a spot size of 75 mm (3 in). See Figure 5.
6
Page 11

Infrared Thermometer
Operating the Thermometer
132 mm @
75 mm @
38 mm @
300 mm
900 mm
1.5 " @
12 "
Figure 5. Distance and Spot Size
Field of View
Make sure that the target is larger than the spot size. The smaller the target, the closer you should be to it.
See Figure 6.
1500 mm
3 " @
36 "
D:S=12:1
5.3 " @
60 "
S
D
efh005f.eps
Ye s
Figure 6. Field of View
No
efh004f.eps
Emissivity
Emissivity describes the energy-emitting characteristics of materials. Most organic materials and painted or
oxidized surfaces have an emissivity of about 0.95.
If possible, to compensate for inaccurate readings that may result from measuring shiny metal surfaces,
cover the surface to be measured with masking tape or flat black paint (< 148 °C/300 °F) and use the high
emissivity setting. Allow time for the tape or paint to reach the same temperature as the surface beneath it.
Measure the temperature of the tape or painted surface.
If you cannot paint or use tape, then you can improve the accuracy of your measurements with the
emissivity selector. Even with the emissivity selector, it can be difficult to get a completely accurate infrared
measurement of a target with a shiny or metallic surface. Experimentation, using the probe to determine
benchmark temperatures, and experience will help you choose the best setting for specific measurements.
The Thermometer has three emissivity settings: low (0.3), medium (0.7), and high (0.95). Refer to Table 2.
The reference to emissivity settings in the table are suggestions for typical situations. Your particular
situation may differ.
7
Page 12

561 HVACPro
Users Manual
Table 2. Surface Emissivity
Measured
Surface
Aluminum Iron, Cast
Oxidized Low Oxidized High, Medium
Alloy A3003 Unoxidized Low
Oxidized Low Molten Low
Roughened Low Iron, Wrought
Brass Dull High
Burnished Low Lead
Oxidized Low Rough Low
Copper Oxidized Low, Medium
Oxidized Medium Molybdenum
Electrical
Terminal Blocks
Haynes Nickel
Alloy Medium Oxidized Low
Inconel Platinum
Oxidized High, Medium Black High
Sandblasted Medium Steel
Electoropolished Low Cold-Rolled High
Iron Ground Sheet Medium
Oxidized High, Medium Polished Sheet Low
Rusted Medium Zinc
Oxidized Low
Switch Setting
Medium Oxidized Low, Medium
Measured
Surface
Switch Setting
Switching Between °C and °F
Open the battery compartment and locate the switch positioned between the left side of the battery near the
Thermometer wall. To toggle between °C and °F, use a small screwdriver or paper clip to move the switch
to the desired position. See Figure 7.
8
Page 13

Infrared Thermometer
Operating the Thermometer
Switch
Figure 7. Switching Between °C and °F
Using the Contact Temperature Probe
XWWarning
To avoid electrical shock or personal injury, do not connect the optional external probe to live
electrical circuits.
Connect the probe to the input on the top of the Thermometer. The probe temperature and KTC appears in
the secondary display. The live infrared temperature continues to show in the primary display. Connect the
temperature probe as shown in Figure 8.
efh012f.eps
Figure 8. Connecting the Temperature Probe
efh009f.eps
9
Page 14

561 HVACPro
Users Manual
Table 3 lists recommended Fluke temperature probes for use with the Thermometer:
Table 3. Recommended Temperature Probes
Probe Usage
The piercing probe is the most versatile option. Good for checking air temperature in
80PK-25
80PK-1
80PK-8
80PK-26
80PK-9
HOLD
The display will remain activated for 7 seconds after the trigger is released. HOLD appears in the upper
middle of the display. When the trigger is pulled again, the Thermometer will begin measuring in the last
function selected.
ducts, surface temperature under carpets/pads, liquids, thermometer wells, vent
temperatures, and for penetrating pipe insulation.
The general purpose bead probe is an alternative, for quick, accurate surface
temperatures and air temperatures within ducts, vent temperatures.
Pipe clamp probes (2) are essential for tracking continuously changing temperature
differentials on hydronic tubing and pipe loops, and good for quick, accurate
refrigerant temperatures.
The tapered probe is a good general-purpose gas and surface probe, with a good
length and low mass tip casing for faster reaction to surface and air temperatures.
The insulation piercing probe provides a sharp tip to pierce pipe insulation and flat
probe tip for good surface thermal contact, air temperatures within ducts, and vent
temperatures.
Typical Measurements
This section describes a variety of measurements often performed by HVAC technicians. The backlight and
laser are on whenever you are making readings with the Thermometer.
Measuring Heating/Cooling Duct Insulation Jacket Temperature
1. Press D and then press A to select an emissivity setting.
• HI emissivity for vinyl or PVC jacketed insulation
• LO emissivity for foil faced insulation
Note
Alternately, place black electrical tape on jacket surface. Scan to compare tape and insulation
jacket temperatures. Adjust emissivity so insulation jacket temperature is closest to tape
temperature.
2. Connect the thermocouple probe. The probe hangs in the air to measure ambient air temperature in
order to compare the temperature differential. Temperature deviation between the insulation jacket
and ambient air temperature indicates leaky or ineffective insulation.
3. Scan the insulation jacket temperature.
Measuring Dewpoint Temperature
The temperature of the duct insulation jacket at any single point is a critical temperature. If jacket
temperature reaches dewpoint temperature, condensation will form.
10
Page 15

Infrared Thermometer
Typical Measurements
• The most likely conditions for condensation formation are low dry bulb temperature and high wet
bulb temperature (low temperature, high relative humidity).
• Use the Fluke 971 to measure the attic/crawlspace relative humidity and determine the dew point
temperature. This is the temperature at which condensation will form on the duct wrap.
• Use the thermocouple to measure the duct wrap surface temperature. The temperature must remain
above the attic or crawlspace dew point temperature at all times.
• In attics, the most likely time for dew point concerns is at night after the attic has cooled. Less heat
in the attic means less heat gain by the duct wrap, which will be closer to the dew point temperature.
• Crawlspaces are always cooler and problematic. Tight ductwork and liberal duct insulation is
essential. Sealing openings, insulating perimeter walls, laying a continuous vapor barrier, and adding
a low temperature, high capacity dehumidifier is often required to eliminate moisture and fungal
problems.
Testing Insulated Return Ducts
1. Connect a thermocouple probe.
2. Place the thermocouple probe in the return air stream at the return grille.
3. Read the return air temperature in the secondary temperature display.
4. Open a small test hole in the return duct at the air handler.
5. Place thermocouple probe into the return air stream at the air handler (For consistency, use the same
probe as in step 2. 80PK-25, 80PK26 probes, or similar, are recommended for use through duct test
holes.)
6. Read the return air temperature in the secondary display.
7. Seal the test hole when finished.
Note
Temperature differential should be negligible (less than 1 to 2 degrees). If the temperature
difference is too much, air leaks or insufficient duct insulation is indicated.
8. Seal duct connections at grilles, boxes, plenums, transitions, and take-offs.
9. Retest.
If the test does not show satisfactory improvement, then remove duct insulation, seal duct seams and
joints, re-wrap insulation, seal insulation facing at all seams to ensure continuous vapor barrier.
Scanning Walls for Air Leaks or Insulation Deficiencies
1. Turn off heating, cooling, and blower.
2. Press
3. Press
4. Measure an interior partition wall surface temperature. Do not release the trigger. Record this
5. Face the wall to be scanned. Stand 2.4 m (8 ft) away to scan an 20.3 cm (8 in) spot on the wall.
6. Scan horizontal rows of wall from top to bottom, or horizontal rows of ceiling from wall to wall. Look
Turn on the blower (no heat, no cooling) and retest. If test results with the blower on are different than
results with the blower off, this may indicate air leaks in conditioned envelope walls. The air leaks are
caused by duct leaks that create a pressure differential across the conditioned space envelope.
D to select emissivity. Press A to select HI for painted surfaces or window surfaces.
C and select MIN when opposite side of wall is at lower temperature and or select MAX
when opposite side of wall is at higher temperature.
temperature as your baseline (or benchmark) for a “perfectly” insulated wall.
for greatest deviations from baseline temperature to identify problems. This completes the insulation
test scan.
11
Page 16

561 HVACPro
Users Manual
Testing Contactors (Starters)
1. Press D to select emissivity. Press A to select LO for bright contacts, or MED for darkened
contacts.
2. Press
3. Measure line and load side of one pole without releasing trigger.
4. A temperature difference between the line and load sides of a pole indicate increased resistance of
Testing Enclosed Relays
1. Press D and then press A to set emissivity to LO for uninsulated connectors or HI for plastic
2. Press
3. Start the scan.
4. Measure the relay casing, looking for hot spots.
5. Measure electrical connections on relay terminals looking for hot spots.
Testing Fuses and Buss Connections
1. Press D and then press A to set emissivity to HI for paper covered fuse body or insulated
2. Press
3. Scan the paper covered length of fuse.
4. Without releasing the trigger, scan each fuse. Unequal temperatures between fuses may indicate
5. Press
6. Press
7. Scan each end cap on each fuse.
Cand the press A to select MAX.
one point and a contactor may be failing.
encased relays or for bakelite enclosed relays or insulated connectors.
C and then press A to select MAX.
connections.
C and then press A to select MAX.
voltage or amperage imbalance.
D and then press A to select LO, for metal fuses end caps and uninsulated buss
connections.
C and then press A to select MAX.
Note
Unequal temperatures or a high temperature indicates loose or corroded connection through
the fuse buss spring clip.
Testing Electrical Connections
1. Press D and then press A to select LO emissivity for uninsulated connectors or buss
connections or HI for insulated connections.
Note
Conductors are typically smaller than the Thermometer’s spot size. If the spot size is bigger
than the connector, the temperature reading is the average within the spot.
2. Scan the conductor, moving toward direction of electrical connector (quick connect, wire nut, buss
connection, or lug).
12
Page 17

Infrared Thermometer
Typical Measurements
Testing Bearings
WWarning
To avoid injury when testing bearings:
• Do not wear loose clothing, jewelry, or anything around neck when working around moving
parts such as motors, belts, blower, and fans.
• Make sure an electrical disconnect is within reach and operating correctly and freely.
• Do not work alone.
Note
It works best to compare two similar motors operating similar loads.
1. Press
2. Press
3. Enable motor and allow it to reach steady state operating temperatures.
4. Disable the motor if possible.
5. Measure the two motor bearing temperatures.
6. Compare the two motor bearing temperatures. Unequal temperatures or a high temperature can
7. Repeat the sequence for the blower bearings.
Testing Belts and Sheaves
1. Press D and then press A to select HI emissivity.
2. Press
3. Enable the motor and allow it to reach a steady state operating temperatures.
4. Aim the Thermometer at the surface to be measured. Direct the Thermometer to outside face of belt
5. Start recording temperature.
6. Slowly move the Thermometer up the belt toward second sheave.
D
and then press A to select HI emissivity.
and then press A to select MAX.
C
indicate a lubrication or other bearing problem that is resulting from excess friction.
and then press A to select MAX.
C
where it rides in sheave or to the side of sheave at outer edge, whichever is safer or allows easier use
of the Thermometer.
• If belt is slipping, sheave temperature will be high from friction.
• If belt is slipping, belt temperature will remain high between sheaves.
• If belt is not slipping, belt temperature will reduce between sheaves.
• If inner surfaces of sheaves are not a true “V” shape, this indicates belt slippage and will
continue to operate at elevated temperatures until sheave is replaced.
• Sheaves must be properly aligned (including “pitch & yaw”) for belt and sheaves to operate at
appropriate temperatures. A straight edge or taut string, can be used to check alignments.
• Motor sheave should operate at a temperatures consistent with blower sheaves.
• If motor sheave is at a higher temperature at motor shaft than at outer circumference, belt is
probably not slipping.
• If outer circumference of sheave is at higher temperature than sheave at motor shaft, then belt
is probably slipping and sheaves may be misaligned.
Checking Hydronic Radiant Heat Applications
Radiant heat tubes in the floor will normally run parallel to the outside walls. Starting at the floor wall
juncture, scan parallel to the wall while moving into the room away from the wall. Parallel to the outside
13
Page 18

561 HVACPro
Users Manual
wall you should find parallel isothermal rows indicating the location of heat tubes below the surface.
Perpendicular to the outside wall, you should find rising and falling temperatures at equal distances. High
temperatures indicate you are scanning a heat tube beneath the floor surface, low falling temperatures
indicate a space between the heat tubes.
D
1. Press
2. Press
3. To locate radiant heat tubes in floor, temporarily elevate the loop temperature to create hotter spots
for identifying tubing runs.
4. Before releasing trigger, press
the temperatures for future comparison and trending under similar conditions.
Testing Radiant Heat Applications
1. Operate radiant heat loop until steady state conditions are achieved.
2. Attach the thermocouple to supply of radiant loop.
3. Record the supply temperature.
4. Attach thermocouple to return of radiant loop.
5. Record the return temperature.
6. Difference is Delta-T (temperature difference).
7. Repeat for each loop to zone and balance for equal Delta-T’s.
Testing Water Heater Insulation
1. Connect thermocouple probe to obtain ambient temperature near water heater.
2. Press
jacketed water heaters.
3. Press
4. Aim the Thermometer at the water heater.
5. Scan the water heater jacket.
6. Scan in horizontal rows from top to bottom
7. Press
• The closer the jacket temperature is to ambient temperature, the less jacket losses there are.
• Standby losses account for a majority of the water heater energy expenses. Increase water
• Standby losses are losses when water is not being re-heated by the burners or the elements.
and then press A to select HI emissivity.
and then press A to select MIN.
C
A to toggle between MIN, MAX, DIF floor temperatures and record
D and then press A to select HI emissivity for vinyl jacketed insulation or painted metal
C and then press A to select DIF.
C and then press A to read MAX and DIF jacket temperatures. Record your readings.
heater insulation to reduce standby losses.
When the water heater is idle (standing by) and no water is being drawn, heat loss through the
jacket (and flue on oil/gas systems) are waste heat losses that can be reduced by increasing
insulation and/or lowering the temperature setting.
Testing Steam Traps
Steam traps open on low temperature to allow steam flow to trap. Steam traps close at steam temperatures
to stop steam flow. As steam temperature drops, traps open to allow more steam flow and to return
(“drain”) condensate.
• If temperature is low in steam pipe, low in trap and low in condensate return, trap may be stuck
closed. If temperature is high in steam pipe, high in trap, and high in condensate return, trap may be
stuck open.
• If temperature is high in steam pipe, high in trap, and slightly lower in condensate return, trap is
probably operating properly.
14
Page 19

Infrared Thermometer
Typical Measurements
• If system pressure has been increased above design settings, this can result in symptom of trap
failure (stuck open). Check steam pressure.
1. Press
2. Press
3. Aim the Thermometer at the steam pipe.
4. Scan steam pipe upstream of trap.
5. Scan the steam trap. Scan downstream of trap on condensate return side.
6. Press
Measuring Grille, Register, or Diffuser Discharge Temperature
1. Press D and then press A to select HI emissivity.
2. Aim the Thermometer at the discharge air grille, register, or diffuser.
3. Measure discharge temperature.
4. Release the trigger to freeze the temperature reading for 7 seconds and record the temperature.
5. Grille, register, or diffuser temperature should be equivalent to discharge temperature at the air
6. Drill a sample hole in supply duct at air handler.
7. Connect thermocouple probe to Thermometer.
8. Insert thermocouple probe, such as the 80PK-25 or 26, into the supply duct.
9. Read supply air temperature on the secondary display.
10. Compare supply duct temperature to discharge air temperature. They should be nearly equivalent. If
11. Patch the sample hole.
Verifying Thermostat/Room Sensor Accuracy
1. Insert the thermocouple probe into the Thermometer. Record ambient air temperature.
2. Press
3. Press
4. Aim the Thermometer at the wall thermostat.
5. Compare the wall temperature reading to thermostat cover temperature and thermocouple air
6. Look for possible source of heat or heat sink that could be affecting thermostat accuracy.
7. The temperature of the thermostat cover and surrounding wall surfaces should be very nearly
D and then press A to select HI emissivity for black iron pipe and painted traps.
C and then press A to select DIF.
C and then press A and toggle to MIN, MAX, and DIF temperatures. Record your
readings.
handler.
they are not, check for duct leakage or insulation problems.
D and then press A to select HI emissivity.
and then press A to select DIF.
C
temperature reading.
equivalent (DIF reading should be close to 0).
Checking for Blockage in Air-To-Air Evaporators or Condensers
1. Remove panels to gain access to coil return bends or hairpins.
2. Press
3. Start the refrigeration system.
4. Aim the Thermometer at coil return bends/hairpins.
5. Start recording temperature.
6. Take temperature of each return bend/hairpin.
D and then press A to select LO emissivity for copper tube.
• All evaporator return bends/hairpins should be at or slightly above evaporator saturation
temperature from the pressure/temperature chart.
15
Page 20

561 HVACPro
Users Manual
• All condenser return bend/hairpins should be at or slightly less than condenser saturation
temperature.
• If a group of return bends/hairpins do not conform to expected temperatures, that indicates a
blocked or restricted distributor or distributor tube.
Checking Superheat on Fixed Restrictor or Capillary Tube Equipped Evaporators
Note
Superheat is a critical temperature.
1. Ensure that filter and blower are clean and all registers are open and unobstructed.
2. Clean section of suction line 15.2 cm (6 in) upstream of compressor.
3. Attach the thermocouple probe to the suction line with Velcro strap or use an 80PK-8 Pipe Clamp
Temperature Probe.
4. Connect low side gauge to suction line.
5. Start system and allow to run at least 10 minutes to reach a steady state condition.
6. Measure the wet bulb temperature in the return using a sling psychrometer or Fluke 971 humidity
meter.
7. Aim the Thermometer to shady spot on the ground or at a piece of paper held in a shaded area and
read outdoor temperature.
8. Determine evaporator saturation temperature from pressure-temperature chart
9. Read the suction line temperature on the secondary display.
10. Subtract saturation temperature from suction line temperature.
11. Correct superheat is based on outdoor temperature, return air wet bulb temperature, and 12.5 cubic
meters/minute per metric ton (400 cfm per ton) of air moving across the evaporator.
• Determine required superheat from manufacturer’s superheat tables or calculator.
• Add refrigerant to reduce superheat as necessary.
• Recover refrigerant to increase superheat.
Checking Subcooling on Air-To-Air Systems With Expansion Valve Equipped Evaporators
1. Ensure that filter and blower are clean and all registers are open and unobstructed.
2. Ensure that condenser is clean and dry.
3. Clean section of liquid line close to where liquid pressures can be read.
4. Attach furnished thermocouple probe to liquid line with Velcro fastener or use an 80PK-8 Pipe Clamp
Temperature Probe.
5. Connect high side rating pressure gauge to liquid line.
6. Start system and allow to run at least 10 minutes to reach a steady state condition.
7. Determine condenser saturation temperature from pressure-temperature chart.
8. Read the liquid line temperature in the secondary display.
9. Subtract liquid line temperature from condenser saturation temperature. Correct subcooling is based
primarily on equipment efficiency rating (EER) and pressure drop in liquid line due to friction and lift.
10. Determine required subcooling from manufacturer’s specification.
11. Add refrigerant to increase subcooling or recover refrigerant to reduce subcooling.
16
Page 21

Infrared Thermometer
Maintenance
Maintenance
Changing the Battery
To install or change the two AA batteries, open the battery compartment and insert the batteries as shown
in Figure 2.
Cleaning the Lens
Blow off loose particles using clean compressed air. Carefully wipe the surface with a moist cotton swab.
The swab may be moistened with water.
Cleaning the Housing
Use soap and water on a damp sponge or soft cloth.
WCaution
To avoid damaging the Thermometer, do NOT submerge it in water.
Troubleshooting
Symptom Problem Action
--- (on display)
B Low battery Replace battery
Blank display Possible dead battery Check and/or replace battery
Laser does not work 1. Low or dead battery
Target temperature is over or under
range
2. Ambient temperature above 40 °C
(104 °F)
Select target within specifications
1. Replace battery
2. Use in area with lower ambient
temperature
CE Certification
The Thermometer conforms to the following standards:
• EN61326-1 EMC
• EN61010-1
• EN60825-1 Safety
Certification testing was conducted using a frequency range of 80 to 1000 MHz with the instrument in three
orientations.
17
Page 22

561 HVACPro
Users Manual
Specifications
Infrared
Measurement Range ................................................................-40 °C to 550 °C (-40 °F to 1022 °F)
Spectral Range .........................................................................8 to 14 microns
Accuracy...................................................................................± 1 % or ± 1 °C (2 °F); < 0 °C (32 °F),
Repeatability............................................................................. ± 0.5 % of reading or ± 1°C (2 °F)
Response Time (95 %).............................................................500 ms
Distance to Spot (D:S)..............................................................12:1
Emissivity Adjustment..............................................................Three settings: low (0.3), medium (0.7),
Contact Probe
Probe Type ...............................................................................Wrap thermocouple type K probe with
Measurement Range ................................................................0 °C to 100 °C (32 °F to 212 °F)
Probe Accuracy ........................................................................± 2.2 °C (4 °F)
Display Resolution....................................................................± 0.1 °C (0.1 °F)
Secondary Display Information ................................................Maximum, Minimum, Differential, KTC
Laser
Sighting....................................................................................Single point laser
Power .......................................................................................Class 2 (II) operation; Output <1 mW,
Electrical
Power Supply ...........................................................................2 AA Batteries (alkaline or NiCD)
Power Consumption.................................................................At least 12 hours battery life
Physical
Weight......................................................................................17.69 cm (6.965 in) H x 16.36 cm (6.441
Size...........................................................................................0.322 kg (0.7099 lb)
Total Length of Thermocouple .................................................Approximately 100 cm (40 in)
Environmental
Operating Temperature Range..................................................0 °C to 50 °C (32 °F to 120 °F)
Relative Humidity .....................................................................0 to 90 %, noncondensing up to 30 °C
Storage Temperature................................................................ - 20 °C to 65 °C (-4 °F to 150 °F)
Optional Accessories................................................................Soft Case
± 1 °C (2 °F) ± 0.1°/1°
(Assumes ambient operating temperature
of 23 to 25 °C (73 to 77 °F))
high (0.95)
miniconnector
wavelength 630 to 670 nm
in) L x 5.18 cm (2.039 in) W
(86 °F)
18
 Loading...