

Page 1
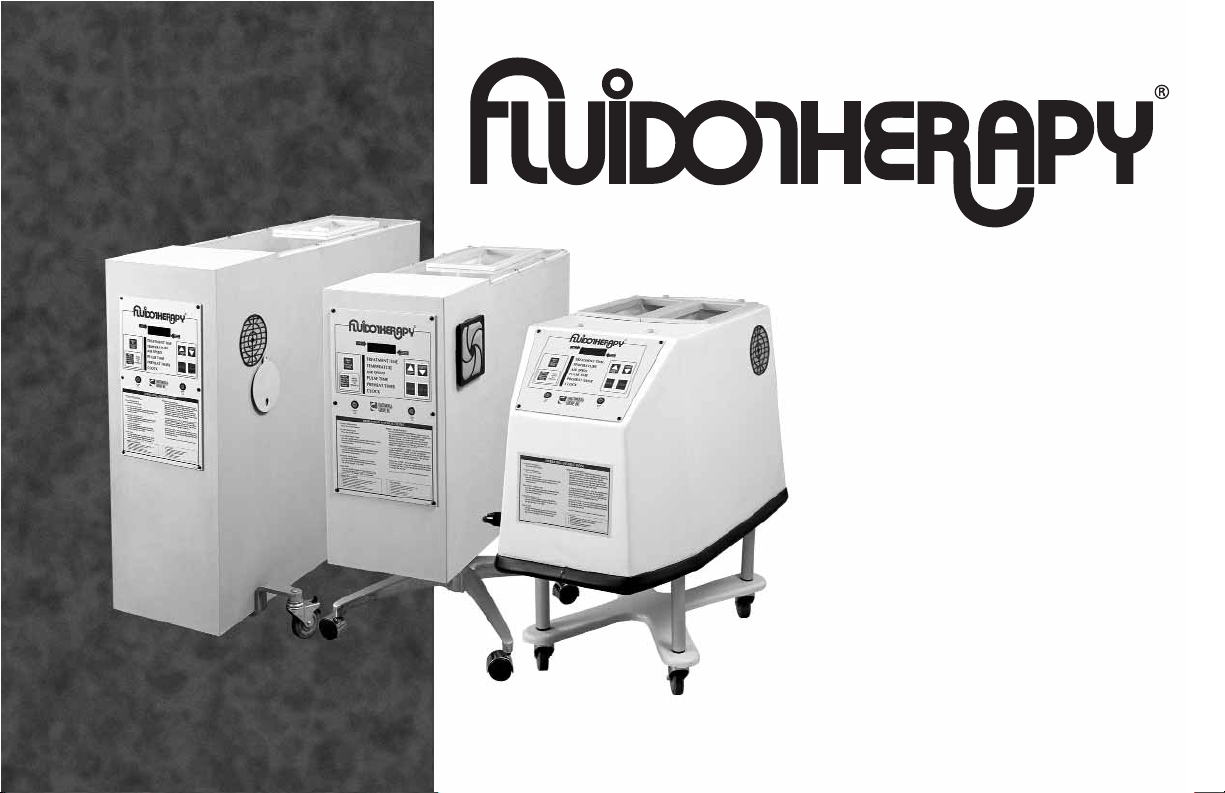
Innovation
Starts
Here™
Dry Heat Therapy Units
Models:
FLU110D
FLU110DE
FLU115D
FLU115DE
FLU210D
UUsseerr MMaannuuaall
Page 2

Operation.............................................................................................21
Patient Preparation...........................................................21
Starting Treatment............................................................21
Stopping Treatment..........................................................21
Required Maintenance............................................................22-29
Daily Maintenance.............................................................22
Weekly Maintenance..................................................23-26
ADDITIONAL FLUIDOTHERAPY PREVENTIVE
MAINTENANCE REQUIREMENTS
Quarterly...............................................................................27
Bi-Annual..............................................................................27
Annual....................................................................................27
Fluidotherapy Maintenance Record............................28
Factory Service....................................................................29
Accessories...........................................................................................30
Warranty ...............................................................................................31
Foreword.................................................................................................1
Dry Heat Therapy.............................................................................2-4
Precautionary Instructions............................................2-3
Indications & Contraindications......................................4
Nomenclature...................................................................................5-8
FLU110D & FLU110DE.........................................................5
FLU115D & FLU115DE.......................................................6
FLU210D..................................................................................7
Control Panel..........................................................................8
Specifications.................................................................................9-11
FLU110D & FLU110DE.........................................................9
FLU115D & FLU115DE......................................................10
FLU210D................................................................................11
Setup................................................................................................12-20
Treatment Mode Parameters...................................12-14
Time Controlled Parameters..........................................15
Preheat Standby Setup..............................................10-11
Preference Mode Default Parameters..................16-20
© 2001 Chattanooga Group, Inc., Chattanooga, Tennessee, USA. Any use of editorial,
pictorial or layout composition of this publication without express written consent from
Chattanooga Group, Inc. is strictly prohibited. This publication was written, illustrated
and prepared for print by Chattanooga Group, Inc.
Fluidotherapy®- Dry Heat Therapy
TABLE OF CONTENTS
Page 3

Page 4

Thank you for purchasing the Chattanooga Group, Fluidotherapy Dry Heat Therapy Unit.
This manual contains general safety, operating, maintenance and care instructions for the owners and operators of the
Fluidotherapy Dry Heat Therapy Units.
At the time of publication the information contained herein was current and up to date.However,due to continual
technological improvements and increased clinical knowledge in the field of Dry Heat Therapy,as well as Chattanooga
Group’s policy of continual improvement, Chattanooga Group, Inc. reserves the right to make periodic changes and
improvements to our equipment and documentation without any obligation on the part of Chattanooga Group,Inc.
Read, understand and follow the information contained in this manual.
Stay current with the latest clinical developments in the field of Dry Heat Therapy and observe all applicable
precautionary measures for treatment.
Keep informed on appropriate indications and contraindications for the use of Dry Heat Therapy.
This equipment is to be used only under the prescription and supervision of a licensed practitioner.
FOREWORD
1
Fluidotherapy®- Dry Heat Therapy
Page 5
2
DRY HEAT THERAPY
• Read, understand and practice the precautionary and operating
instructions found in this manual. Know the limitations and hazards
associated with using any electrical device.Observe the precautionary
and operational decals placed on the unit.
• DO NOT operate the unit when connected to any unit other than
Chattanooga Group,Inc.devices.
• Refill unit daily to proper fill level with Chattanooga Group Cellex® Dry Heat
Medium.
• Change Cellex Dry Heat Medium every six (6) months.
• Use only Cellex Dry Heat Medium in the Fluidotherapy units.
• Clean Inlet Filter(s) daily before unit startup.
• Use only fingers to operate button controls on the control panel(s). Use of
sharp objects such as pencils or pens will result in damage to the unit.
• Turn unit OFF before positioning a patient or removing a patient from the
unit.
• Secure all entry ports before turning the unit ON.
• Check unit temperature before treating patient to ensure correct
temperature.
• Place the patient in a comfortable position allowing for correct placement
of the limb being treated.
• Proper storage and transport temperature for the Fluidotherapy units are
-40°F - 158°F (-40°C - 70°C). Relative Humidity 10% - 100%.
CAUTION
Precautionary Instructions
The precautionary instructions found in this section and throughout
this manual are indicated by specific symbols. Understand these
symbols and their definitions before operating this equipment.The
definition of these symbols are as follows;
=CAUTION- Text with a “CAUTION”indicator will explain
possible Safety infractions that could have the
potential to cause minor to moderate injury or
damage to equipment.
=WARNING- Text with a “WARNING”indicator will explain
possible Safety infractions that will potentially
cause serious injury and equipment damage.
=DANGER- Text with a “DANGER” indicator will explain
possible Safety infractions that are imminently
hazardous situations that would result in death
or serious injury.
=EXPLOSION HAZARD-
Text with an “Explosion Hazard” indicator will
explain possible safety infractions if this
equipment is used in the presence of
flammable anesthetics.
NOTE:- Throughout this manual “NOTE” may be found. These are
helpful information to aid in the particular area or function
being described.
Fluidotherapy®- Dry Heat Therapy
Page 6
3
• Federal law restricts this device to sale by, or on the order of, a
physician or licensed practitioner.This device should be used only
under the continued supervision of a physician or licensed
practitioner.
• For continued protection against fire hazard, replace fuses only
with ones of the same type and rating.
•
Make certain the unit is electrically grounded by connecting
only to a
grounded electrical service receptacle conforming to
the
applicable national and local electrical codes.
• This device should be kept away from children.
• Care must be taken when operating this equipment around other
equipment. Potential electromagnetic or other interference could
occur to this or to the other equipment. Try to minimize this
interference by not using other equipment in conjunction with it.
•
Before administering any treatment to a patient you should become
acquainted
with the operating procedures for each mode of
treatment available, as well as the indications, contraindications,
warnings and precautions. Consult other
resources for additional
information regarding the application of Dry Heat Therapy.
• To prevent electrical shock, disconnect the unit from the power
source before attempting any maintenance procedures.
• Use only processed dry heat medium in the unit such as Cellex® to
prevent excessive dusting.
WARNING
Precautionary Instructions
DRY HEAT THERAPY
• Explosion hazard if used in the presence of flammable
anesthetics.
Fluidotherapy®- Dry Heat Therapy
DANGER
• Perform all Required Maintenance as described in this manual.
Strict adherence to the Required Maintenance for the
Fluidotherapy units is mandatory.Failure to perform the Required
Maintenance could result in the Cellex® medium entering the heat
chamber of the unit(s) and cause severe injury to patients as well
as smoke damage to the facility and the Fluidotherapy unit(s).
Page 7

4
DRY HEAT THERAPY
Indications, Contraindications & Adverse Effects
Indications
• Relief of local pain
• Treatment of local blood flow insufficiency
• Treatment in range of motion when combined with exercise
• Treatment for symptoms of non-rheumatoid arthritis
Contraindications
• This device should not be used for symptomatic pain relief
unless etiology is established or unless a pain syndrome has
been diagnosed.
• This device should not be used when cancerous lesions or
open wounds are present in the treatment area.
• Other counterindications are patients suspected of carrying
serious infectious disease and or disease where it is
advisable, for general medical purposes, to suppress heat
or fevers.
• Adequate precautions should be taken when treating
individuals with suspected or diagnosed medical conditions or
diseases such as heart problems, epilepsy, diabetes, etc.
• Prior to treatment, consult a medical professional familiar with
the precautionary measures to be taken for patients that may
experience allergic reactions to dust and pollen.
WARNING
Fluidotherapy®- Dry Heat Therapy
Page 8
5
Fluidotherapy®- Dry Heat Therapy
NOMENCLATURE
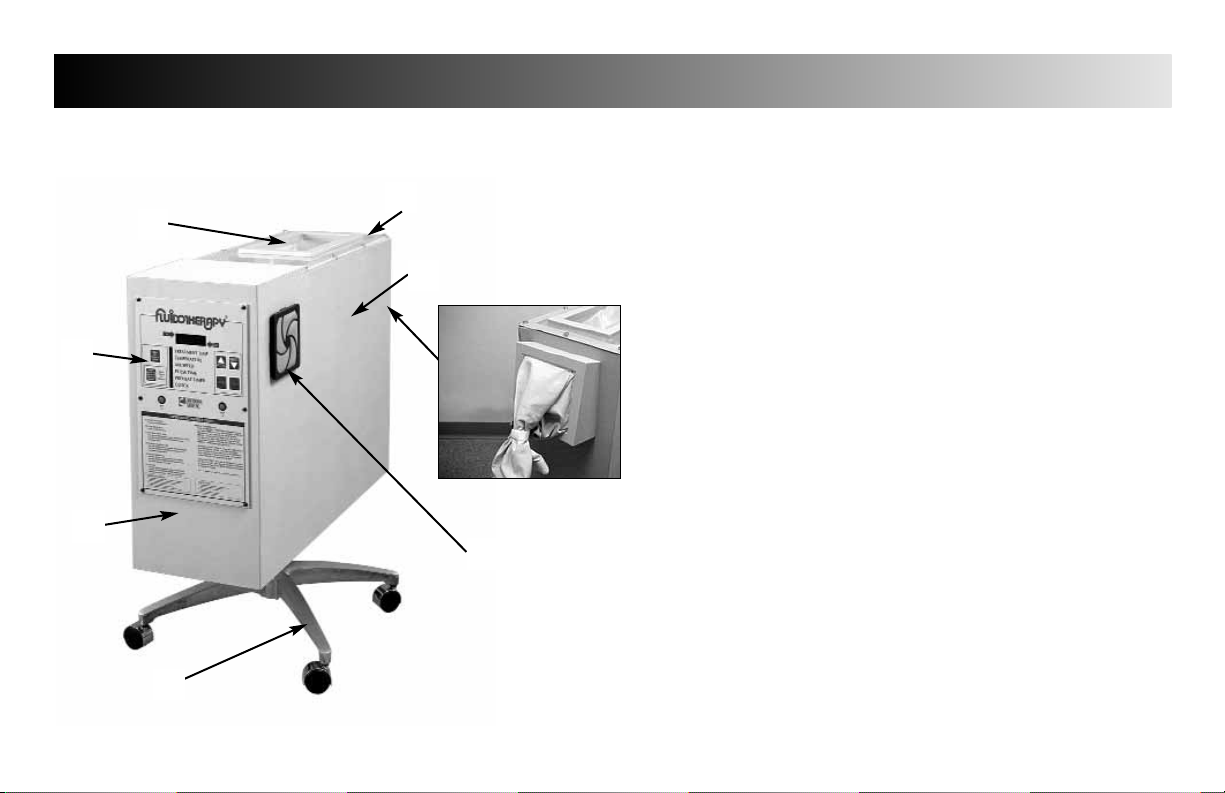
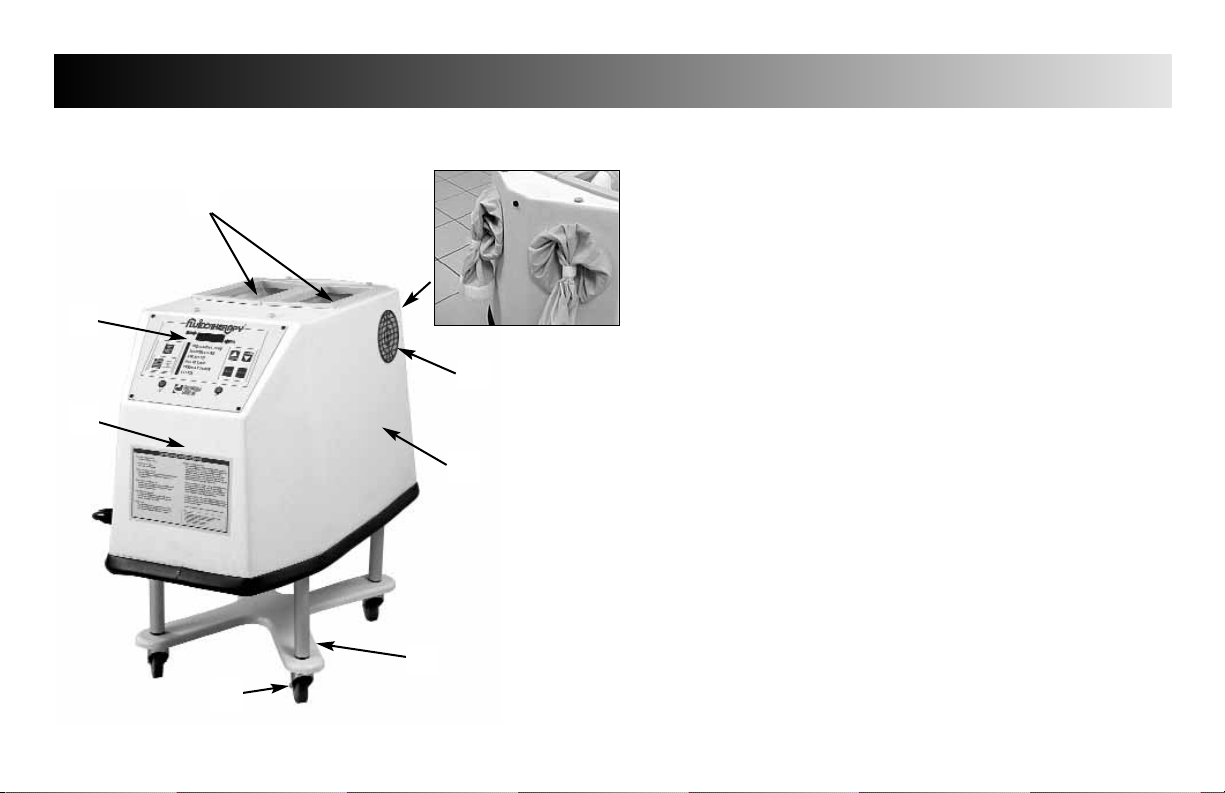
FLU110D & FLU110DE Unit Familiarization
1. RESERVOIR LID & TREATMENT VIEWING WINDOW
Access to add/change medium, view patient treatment and
clinician access to patient treatment area.
2. MEDIUM/TREATMENT RESERVOIR
Treatment access and medium reservoir
3. HAND/ARM ACCESS PORT
Treatment port for Hand/Arm Treatment (end of unit)
4. REPLACEABLE INLET FILTERS
Filters room air entering the Fluidotherapy unit (1 each side)
5. FOUR POINT BASE
Casters included to convert to a Mobile Base
6. BLOWER HOUSING
Houses Blower & Heater
7. CONTROL PANEL
See page 8 for detailed description of controls
8. ELBOW/FOOT TREATMENT ACCESS PORT
Treatment port for Elbow and Foot
1
2
4
5
6
7
8
3
Page 9
6
Fluidotherapy®- Dry Heat Therapy
NOMENCLATURE
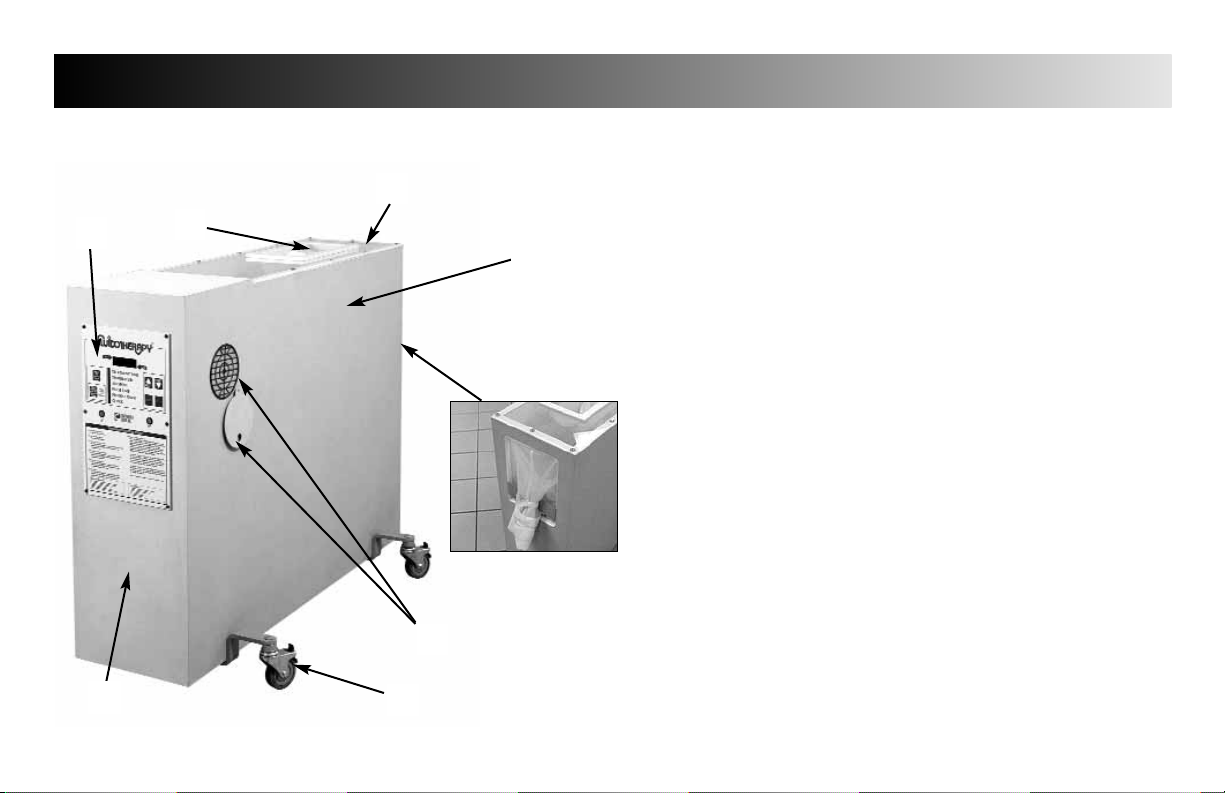
FLU115D & 115DE Unit Familiarization
1. ELBOW/FOOT ACCESS PORT
Treatment port for Elbow and Foot Treatment. Access to
add/change medium. Clinician access to patient treatment area.
2. HAND/ARM ACCESS PORTS
Treatment ports for Hand/Arm Treatment (end of unit)
3. INLET FILTERS
Filters room air entering the Fluidotherapy unit (1 each side)
4. MEDIUM/TREATMENT TUB
Treatment access and medium reservoir
5. MOBILE BASE
6. LOCKING CASTERS
7. BLOWER HOUSING
Houses Blower & Heater
8. CONTROL PANEL
See page 8 for detailed description of controls
1
3
4
5
6
7
8
2
Page 10
7
Fluidotherapy®- Dry Heat Therapy
NOMENCLATURE
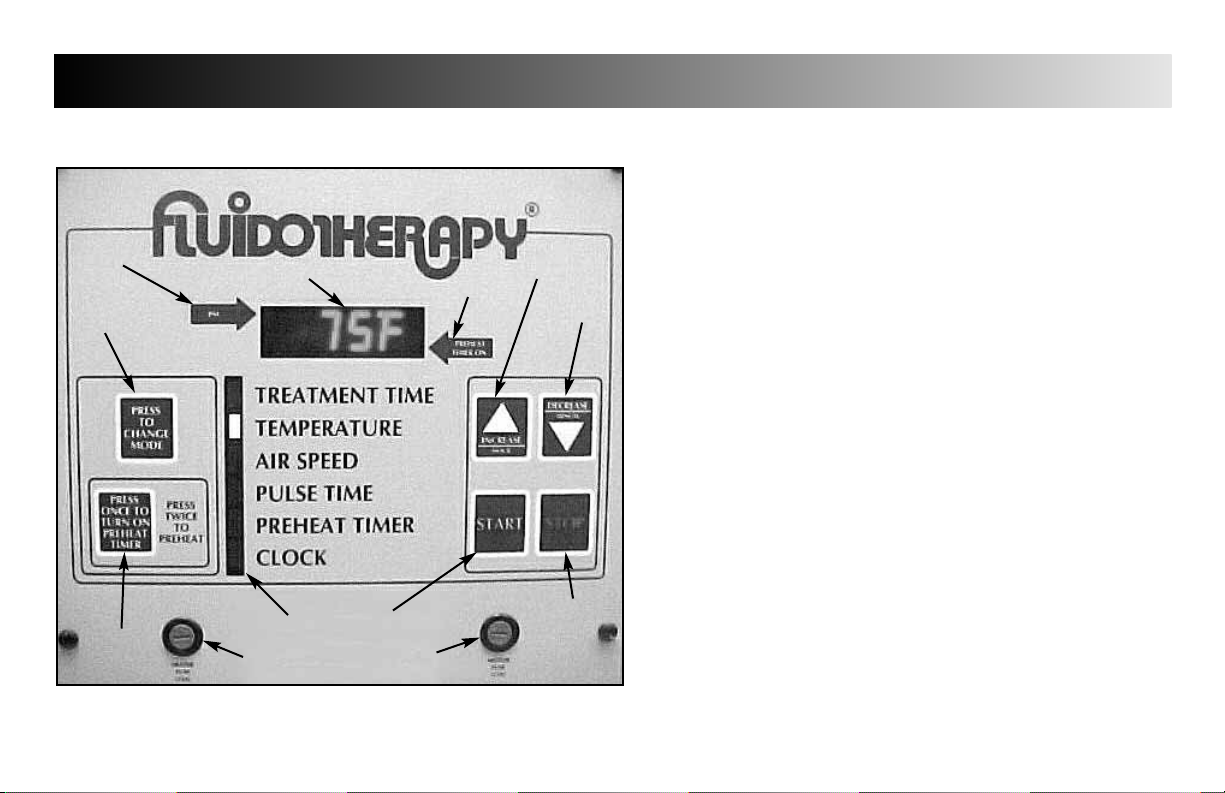
FLU210D Unit Familiarization
1. RESERVOIR LID & TREATMENT VIEWING WINDOW
Access to add/change medium, view patient treatment and
clinician access to patient treatment area.
2. MEDIUM/TREATMENT RESERVOIR
Treatment access and medium reservoir
3. HAND/ARM/LEG ACCESS PORT
Treatment port for Hand/Arm/Leg Treatment (end of unit)
4. INLET FILTERS WITH HEAT FLAPS
Filters room air entering the Fluidotherapy unit (1 each side)
Heat Flaps aid in shortening the Pre-Heat time
5. MOBILE BASE w/LOCKING CASTERS
6. BLOWER HOUSING
Houses Blower & Heater
7. CONTROL PANEL
See page 8 for detailed description of controls
8. ELBOW/FOOT TREATMENT ACCESS PORT
Treatment port for Elbow and Foot
1
2
4
5
6
7
8
3
Page 11
8
Fluidotherapy®- Dry Heat Therapy
NOMENCLATURE
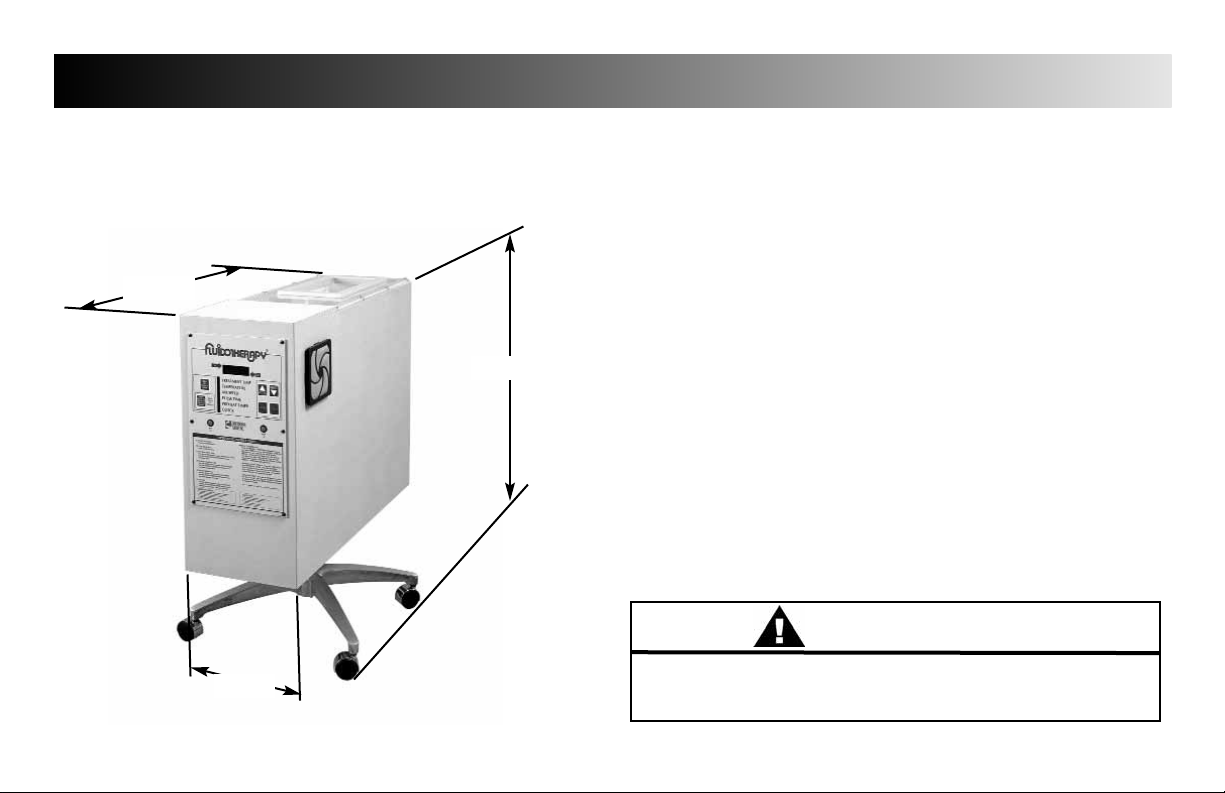
Operating Controls (All Units)
1. DISPLAY
Displays Treatment Time, Temperature, Airspeed, Pulse Time,
Preheat Timer and Clock when the respective Mode is indicated.
2. PREHEAT TIMER ON
Indicator light for Preheat Timer
3. INCREASE/HOUR
Use to increase Mode parameters and use to set the Hour when
setting Clock
4. DECREASE/MINUTE
Use to decrease Mode parameters and use to set the Minutes
when setting Clock
5. STOP
Use to stop treatment and Preheat Timer
6. MOTOR FUSE
7. START
Use to start treatment
8. INDICATOR BAR
Indicates Mode as they are chosen
9. HEATER FUSE
10. PREHEAT TIMER BUTTON
Press once to turn Preheat Timer On. Press twice to start
Preheat function
11. MODE SELECT
Use to select desired Mode
12. PM
PM indicator for Clock
1
2
3
4
5
6
78
9
10
12
11
Page 12
9
Fluidotherapy®- Dry Heat Therapy
SPECIFICATIONS
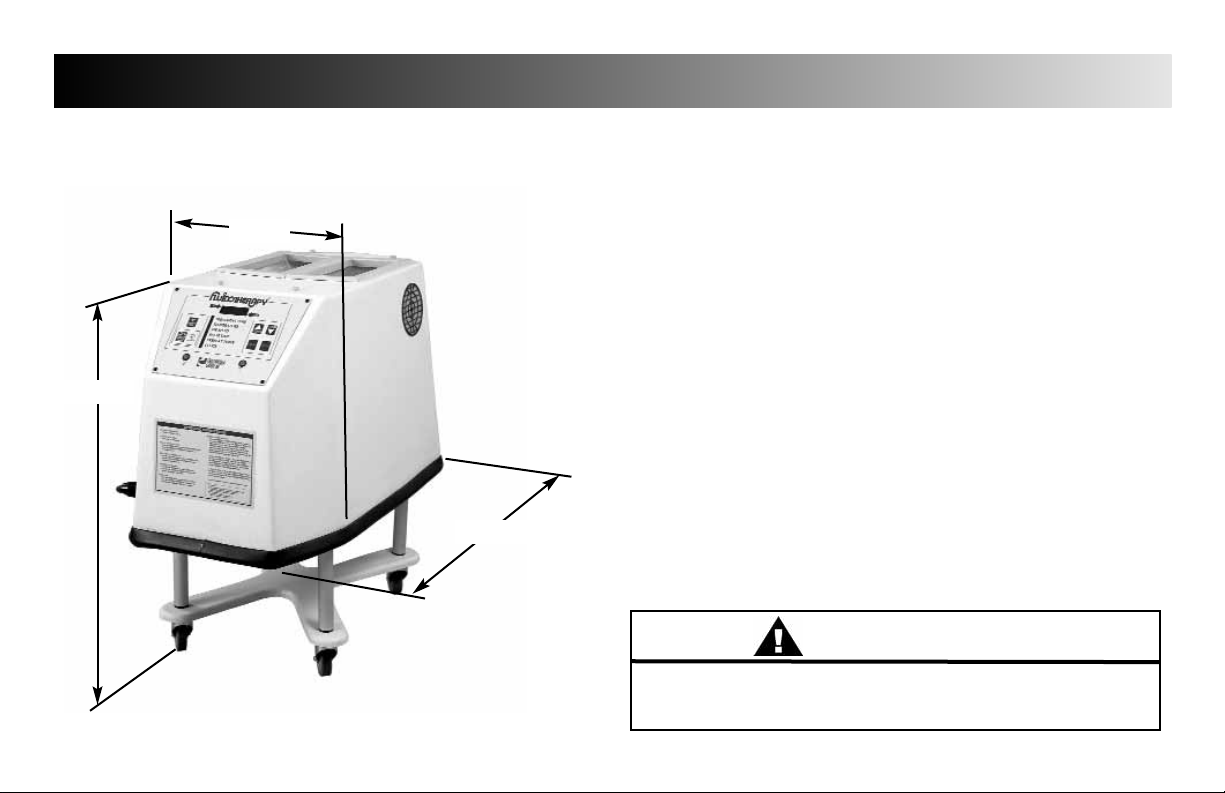
FLU110D & FLU110DE
Modes of Operation
Continuous (Default)
Variable Adjustments for Time, Temp and Air Speed
Pulse Mode........................................................OFF to 6 Sec ON/OFF
TREATMENT TIME..........................................................1 to 99 minutes
OPERATING TEMPERATURE...110 °F (43.3 °C) to 125 °F (51.6 °C)
AIR SPEED...............................................0% to 100% (5% increments)
PREHEAT TIMER..........................115 °F (46.1 °C) with 50% Air Flow
MEDIUM CAPACITY...........................Approximately 30 lb (13.6 kg)
Input Power (FLU110D).........................105-120Vac,50/60 Hz, 13A
Input Power (FLU110DE).........................210-250Vac,50/60 Hz, 8A
Physical Dimensions
Cabinet Length.............................................................34.0”(86.4 cm)
Cabinet Width...............................................................11.5”(29.2 cm)
Height...............................................................................33.0” (83.8 cm)
Weight..................................................70 lbs (31.7 kg) Less Medium
Shipping Weight......................................................100 lbs (45.4 kg)
WARNING
•
Make certain the unit is electrically grounded by connecting
only to
a grounded electrical service receptacle conforming to
the
applicable national and local electrical codes.
Length
Height
Width
Page 13
10
Fluidotherapy®- Dry Heat Therapy
SPECIFICATIONS
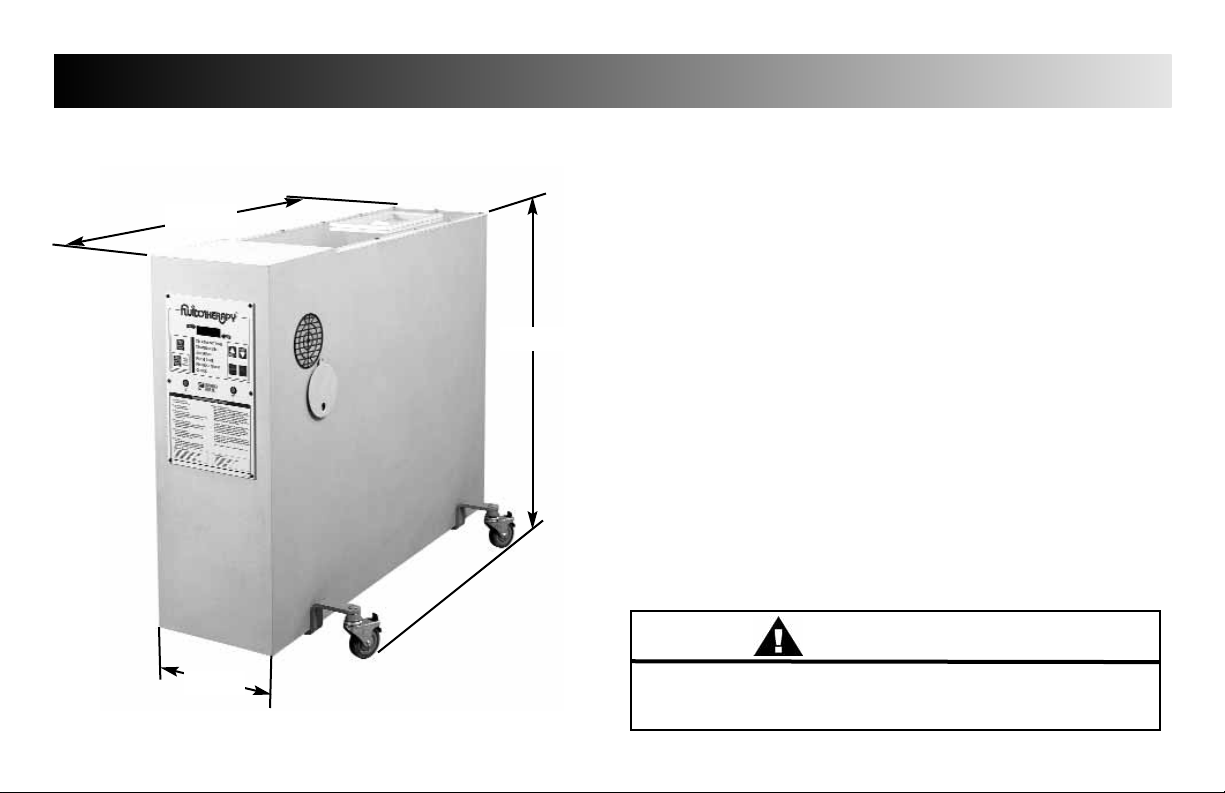
FLU115D & FLU115DE
Modes of Operation
Continuous (Default)
Variable Adjustments for Time, Temp and Air Speed
Pulse Mode........................................................OFF to 6 Sec ON/OFF
TREATMENT TIME..........................................................1 to 99 minutes
OPERATING TEMPERATURE...110 °F (43.3 °C) to 125 °F (51.6 °C)
AIR SPEED...............................................0% to 100% (5% increments)
PREHEAT TIMER..........................115 °F (46.1 °C) with 50% Air Flow
MEDIUM CAPACITY.........................Approximately 40 lbs (18.1 kg)
Input Power (FLU115D).........................105-120Vac,50/60 Hz, 13A
Input Power (FLU115DE).........................210-250Vac,50/60 Hz, 8A
Physical Dimensions
Cabinet Length......................................... ...................34.0” (86.4 cm)
Cabinet Width....... .......................................................18.5” (47.0 cm)
Height...............................................................................33.0” (83.8 cm)
Weight...................................................60 lbs (27.2kg) Less Medium
Shipping Weight......................................................100 lbs (45.4 kg)
WARNING
•
Make certain the unit is electrically grounded by connecting
only to
a grounded electrical service receptacle conforming to
the
applicable national and local electrical codes.
Height
Length
Width
Page 14
11
Fluidotherapy®- Dry Heat Therapy
SPECIFICATIONS
FLU210D
Modes of Operation
Continuous (Default)
Variable Adjustments for Time, Temp and Air Speed
Pulse Mode........................................................OFF to 6 Sec ON/OFF
TREATMENT TIME..........................................................1 to 99 minutes
OPERATING TEMPERATURE...110 °F (43.3 °C) to 125 °F (51.6 °C)
AIR SPEED...............................................0% to 100% (5% increments)
PREHEAT TIMER..........................115 °F (46.1 °C) with 50% Air Flow
MEDIUM CAPACITY.........................Approximately 60 lbs (27.2 kg)
Input Power (FLU210D).........................105-120Vac,50/60 Hz, 13A
Physical Dimensions
Cabinet Length..........................................................44.0”(111.8 cm)
Cabinet Width...............................................................12.5”(31.1 cm)
Height.............................................................................35.75” (90.8 cm)
Weight................................................140 lbs (63.5kg) Less Medium
Shipping Weight......................................................200 lbs (90.7 kg)
WARNING
•
Make certain the unit is electrically grounded by connecting
only to
a grounded electrical service receptacle conforming to
the
applicable national and local electrical codes.
Length
Height
Width
Page 15
12
Fluidotherapy®- Dry Heat Therapy
SETUP
Use the following Instructions to set the various Mode Parameters to
the desired settings.
TREATMENT MODE PARAMETERS
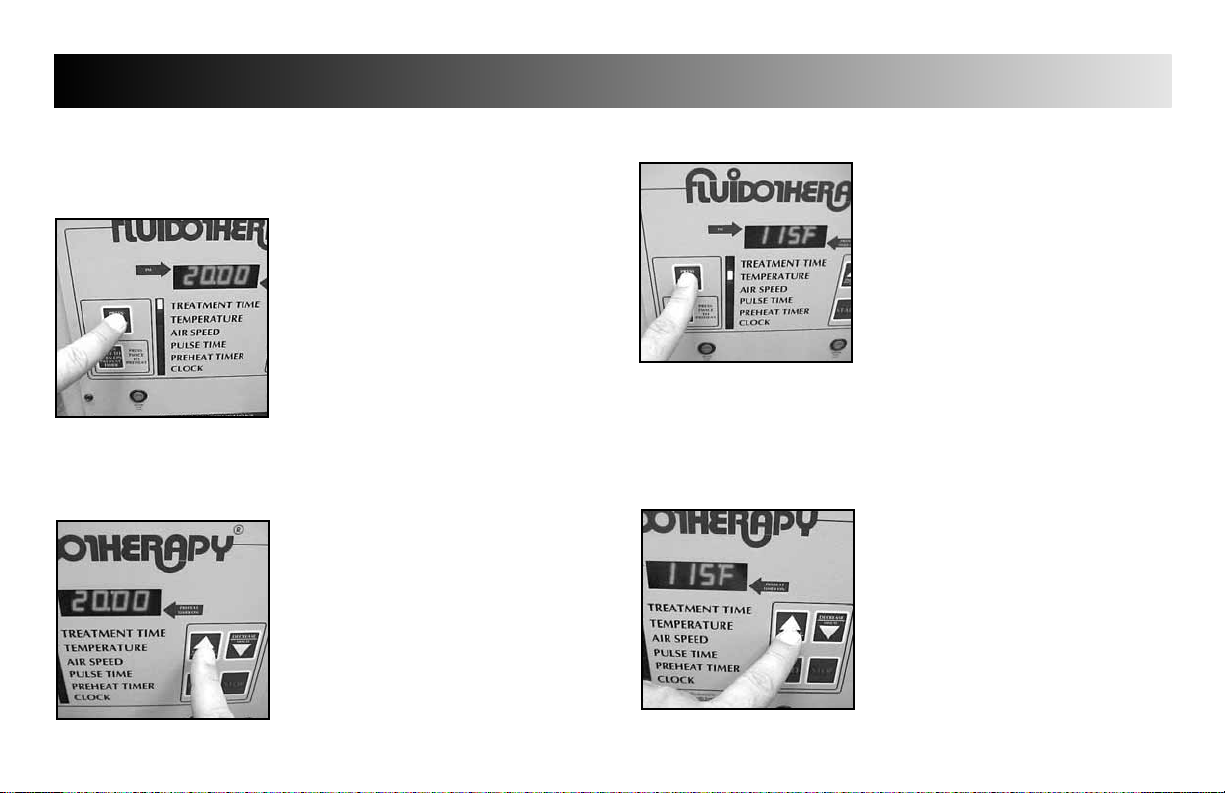
TREATMENT TIME
Press the “PRESS TO CHANGE MODE”
button until the indicator light is beside
“TREATMENT TIME”.
NOTE:
The default time of “20:00”will be
displayed.
Press the “INCREASE” or “DECREASE”
buttons until desired Treatment Time is
displayed.
NOTE:
The “TREATMENT TIME”can be adjusted in
one minute increments from 1 to 99.
TREATMENT TEMPERATURE
Press the “PRESS TO CHANGE MODE”
button until the indicator light is beside
“TEMPERATURE”.
NOTE:
The default temperature of “115°F (46.1°C)
will be displayed when unit is first plugged
into wall outlet.
The “F” or “C” and “TEMPERATURE”
indicator will flash while the programmed
Treatment Temperature is being displayed.
When the Bed Temperature is displayed,
the “F” or “C” and the “TEMPERATURE”
indicator will burn steadily.
Press the “INCREASE” or “DECREASE”
buttons until desired Treatment
Temperature is displayed.
NOTE:
°F can be changed to °C and vice versa as
desired. See page 17 for instructions.
Treatment Temperature can be adjusted in
1° increments from 88 °F to 130 °F
(31.1 °C
to 54°C).
Page 16
13
Fluidotherapy®- Dry Heat Therapy
SETUP
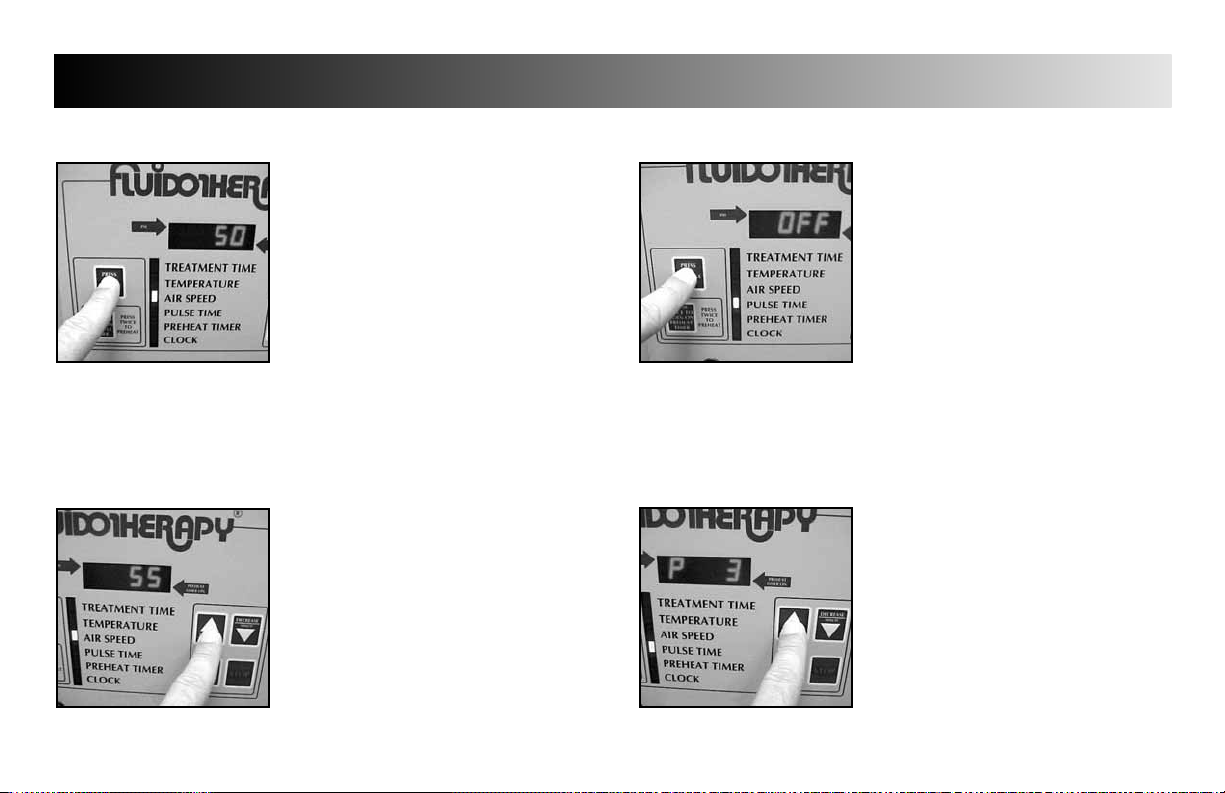
AIR SPEED
Press the “PRESS TO CHANGE MODE”
button until the indicator light is beside
“AIR SPEED”.
NOTE:
The default speed of “50”will be displayed.
Press the “INCREASE” or “DECREASE”
buttons until desired Air Speed
is displayed.
NOTE:
The “AIR SPEED” is adjusted in increments
of 5 from 0 to 100.
PULSE TIME
Press the “PRESS TO CHANGE MODE”
button until the indicator light is beside
“PULSE TIME”.
NOTE:
The “PULSE TIME”allows the unit to
operate by pulsing the medium during
treatment. If selected and set, the medium
will pulse on and off in equal increments.
The Factory Default is “OFF”.
EXAMPLE: “PULSE TIME” is set at “5”. The unit
will pulse the medium during treatment,
five seconds on and five seconds off.
Press the “INCREASE” or “DECREASE”
buttons until desired Pulse Time is
displayed.
NOTE:
“PULSE TIME”is adjusted in one second
increments from “OFF” to 6 seconds.
TREATMENT MODE PARAMETERS (Continued)
Page 17
14
Fluidotherapy®- Dry Heat Therapy
SETUP
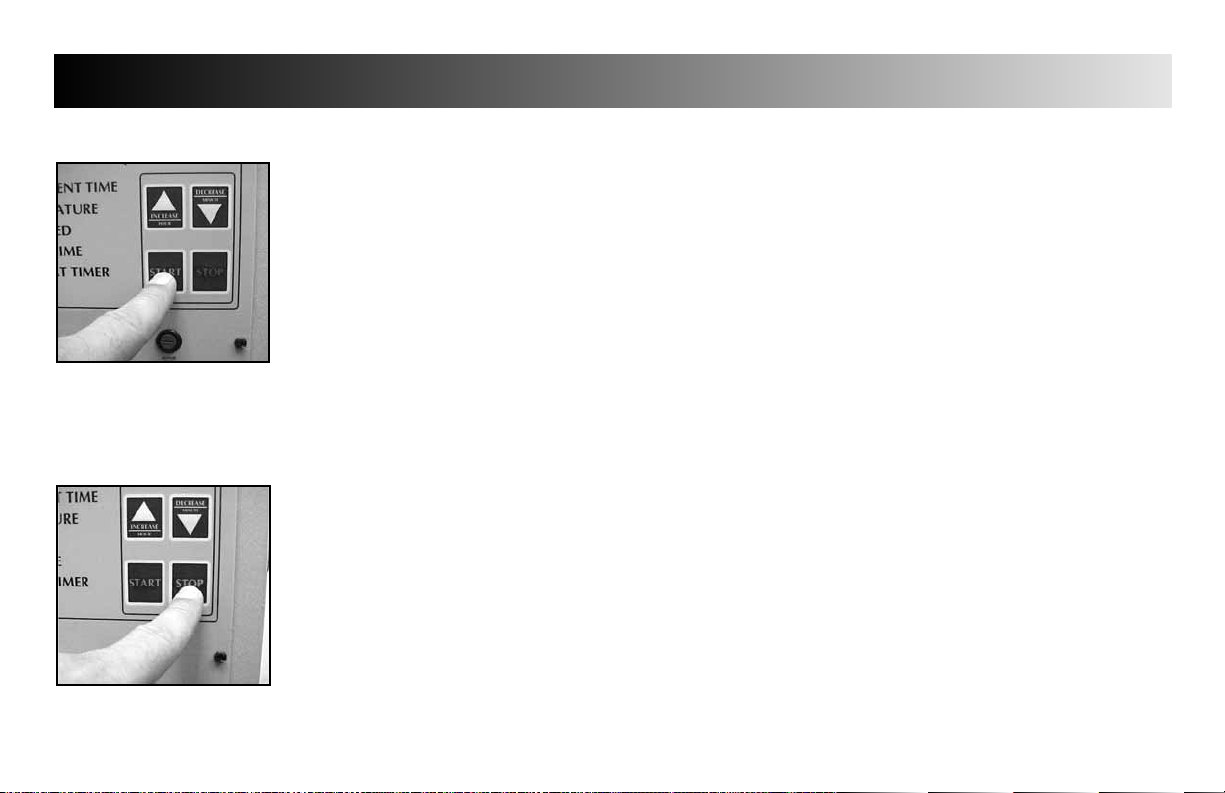
START TREATMENT
Press the “START” button.
STOP TREATMENT
Press the “STOP” button.
TREATMENT MODE PARAMETERS (Continued)
Page 18
15
Fluidotherapy®- Dry Heat Therapy
SETUP
TIME CONTROLLED PARAMETERS
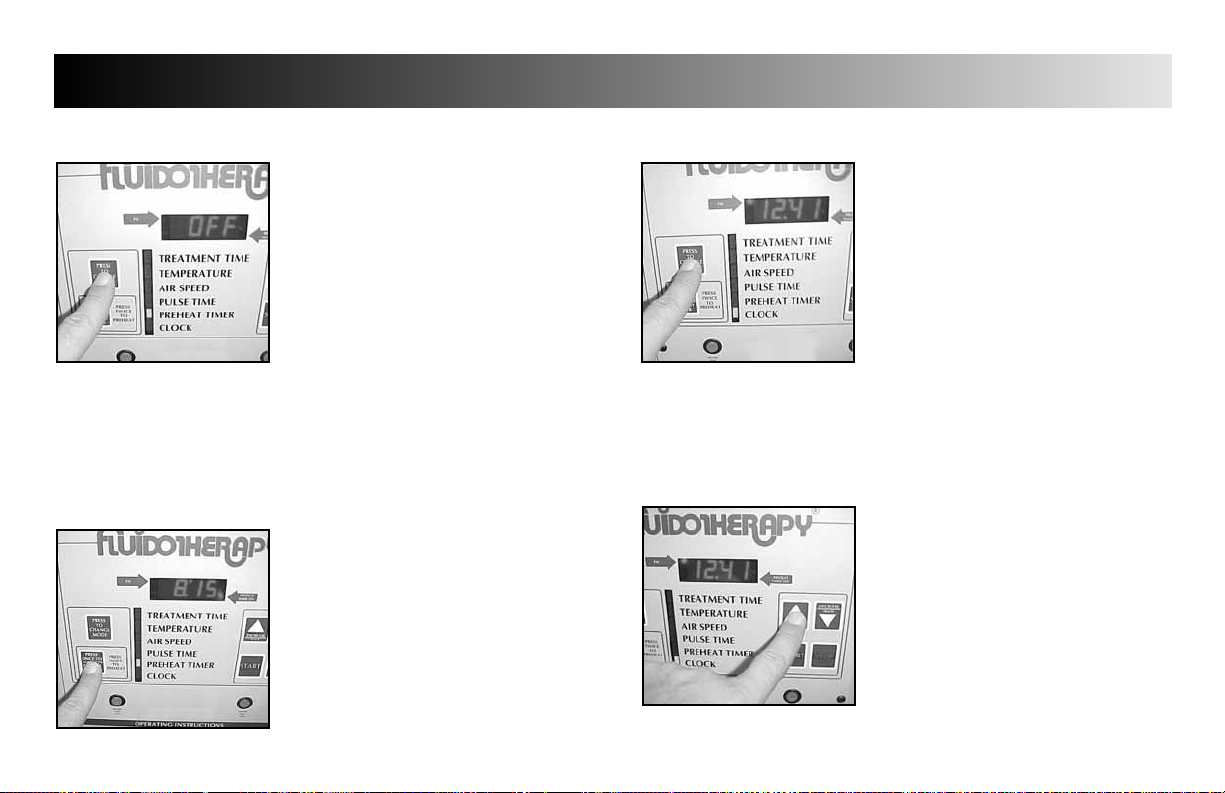
PREHEAT TIMER
Press the “PRESS TO CHANGE MODE”
button until the indicator light is beside
“PREHEAT TIMER”.
NOTE:
The “PREHEAT TIMER”allows the unit to
preheat the medium.The unit will run at
50% Air Speed until the unit reaches the
default preheat temperature or 90 minutes
whichever comes first.
The “PREHEAT TIMER ”will operate Monday
through Friday only and can be set to
automatically start at a predetermined time
and heat the medium to a predetermined
temperature. See page 18 for setting the
default parameters of the “PREHEAT TIMER.
Press the “PRESS ONCE TO TURN ON
PREHEAT TIMER”button to illuminate the
“PREHEAT TIMER ON”indicator light. Press
again to start the “PREHEAT TIMER”.
NOTE:
The “PREHEAT TIMER”indicator light must
be set at the end of each day in order for it
to automatically come on the next day.
The “STOP”button is used to turn off the
Preheat if desired.
CLOCK
Press the “PRESS TO CHANGE MODE”button
until the indicator light is beside “CLOCK”.
NOTE:
The “PREHEAT TIMER”will not function until
the Clock is set.
Press the “INCREASE” button to set hours.
Press the “DECREASE” button to set minutes.
NOTE:
The “PM”indicator light will illuminate when
PM hours are reached.
Page 19
16
Fluidotherapy®- Dry Heat Therapy
SETUP
PREFERENCE MODE DEFAULT PARAMETERS
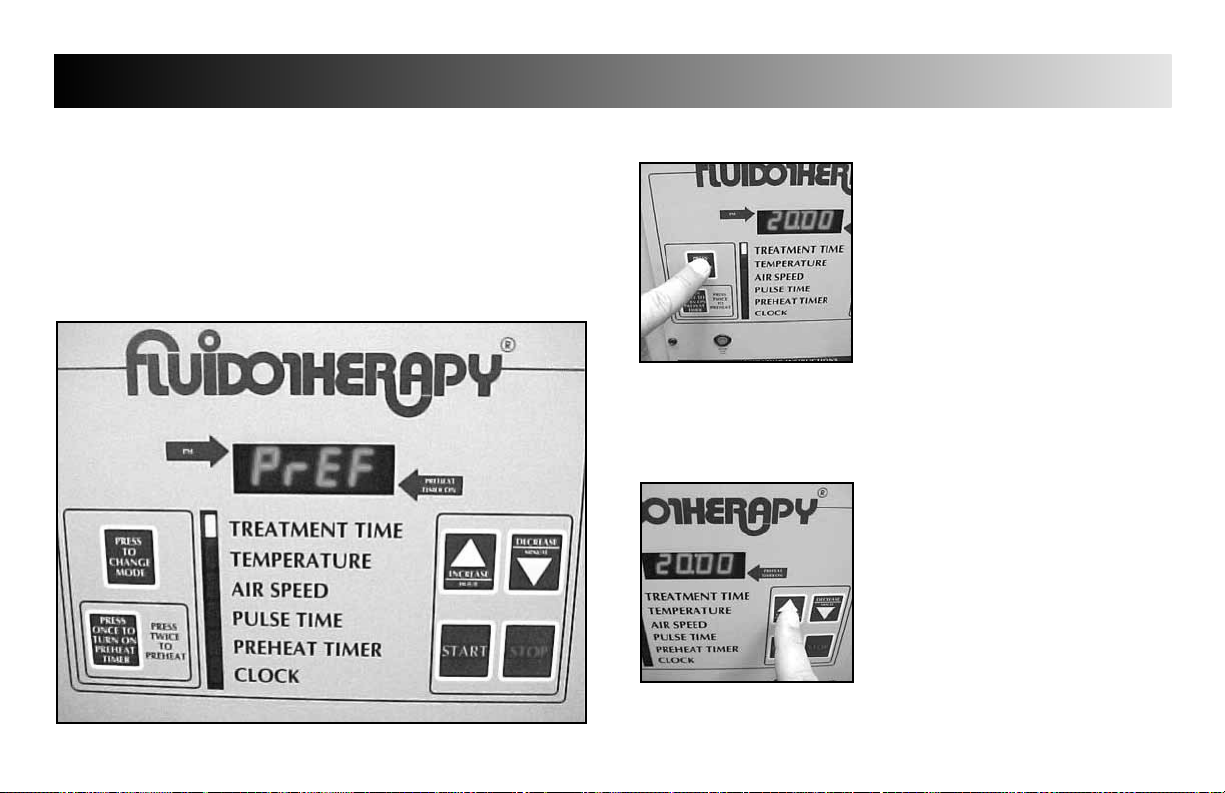
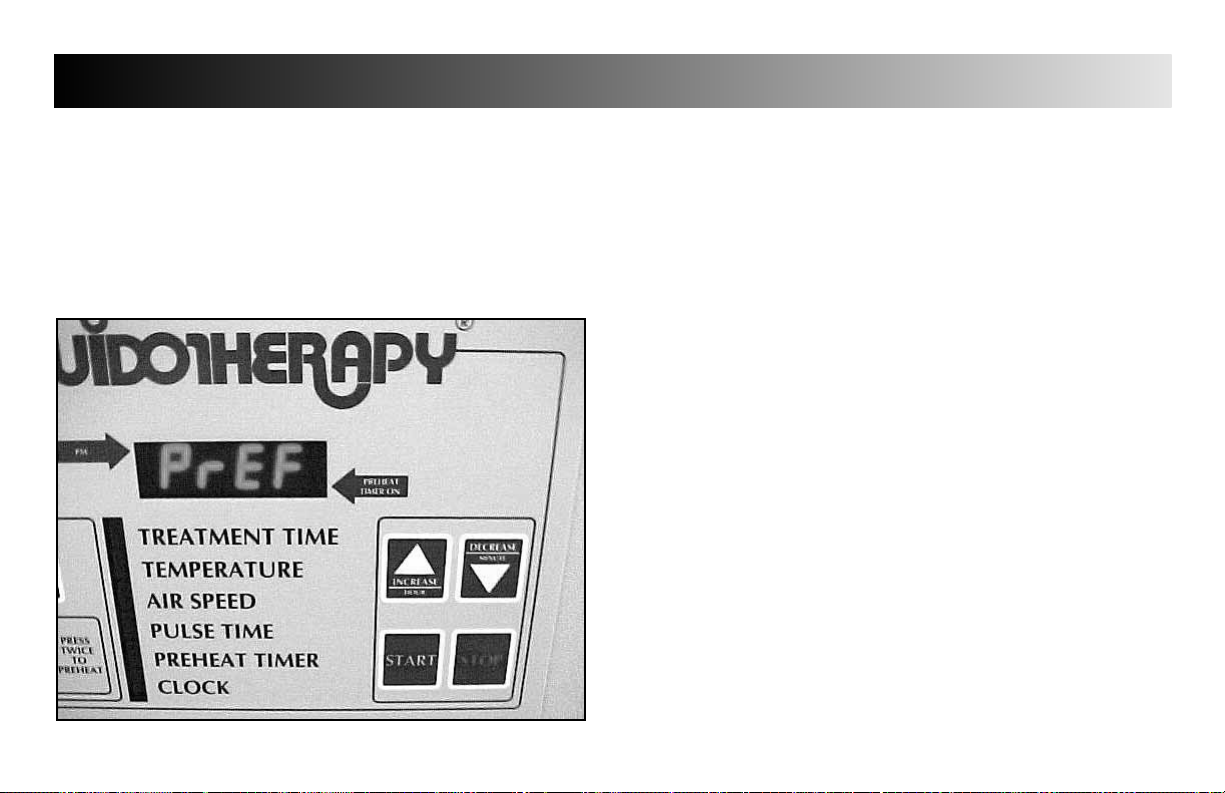
ENTERING “PrEF” MODE (PREFERENCE MODE)
Simultaneously press the “PRESS TO CHANGE MODE”,“INCREASE” and
“DECREASE” buttons.“PrEF”will be displayed.
NOTE:
The “PrEF”mode allows the user to change the unit default settings.
TREATMENT TIME DEFAULT
Press the “PRESS TO CHANGE MODE” button
until the indicator light is flashing beside
“TREATMENT TIME”.
Press the “INCREASE” and “DECREASE”
buttons to set unit to the desired default
treatment time.
Press the “PRESS TO CHANGE MODE” button
to save the new setting.
NOTE:
The factory default setting is 20:00 minutes.
Page 20
Fluidotherapy®- Dry Heat Therapy
17
SETUP
PREFERENCE MODE DEFAULT PARAMETERS (Continued)
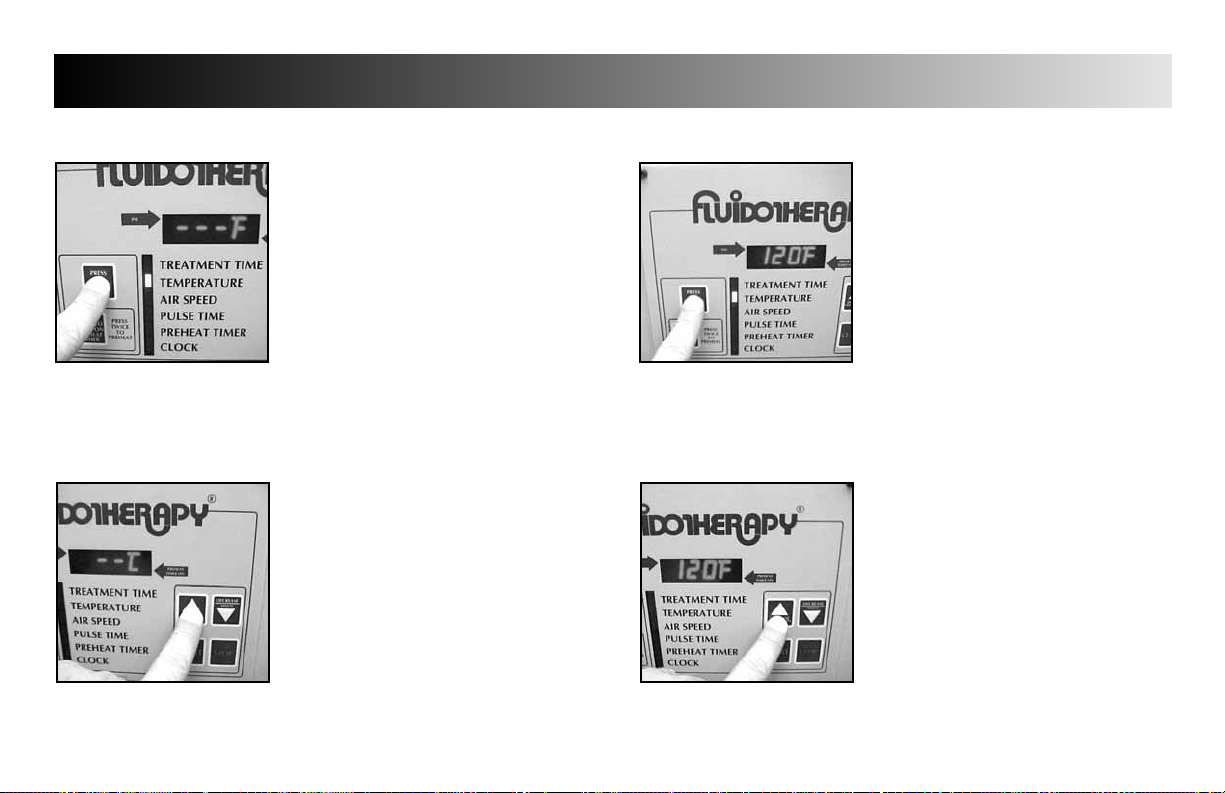
TEMPERATURE READING DEFAULT
Press the “PRESS TO CHANGE MODE”
button until the indicator light is flashing
beside “TEMPERATURE”.
Press the “INCREASE” button to set unit
to display °F or °C as desired for the
default setting.
Press the “PRESS TO CHANGE MODE”
button to save the new setting.
NOTE:
The factory default setting is °F.
TREATMENT TEMPERATURE DEFAULT
Press the “PRESS TO CHANGE MODE”
button until the indicator light is flashing
beside “TEMPERATURE”and the existing
default temperature is displayed.
Press the “INCREASE” and “DECREASE”
buttons to set unit to the desired default
treatment temperature.
Operating Temperature Range is:
110 °F - 125 °F (43.3 °C - 51.6 °C)
Press the “PRESS TO CHANGE MODE”
button to save the new setting.
Page 21
18
Fluidotherapy®- Dry Heat Therapy
SETUP
PREFERENCE MODE DEFAULT PARAMETERS (Continued)
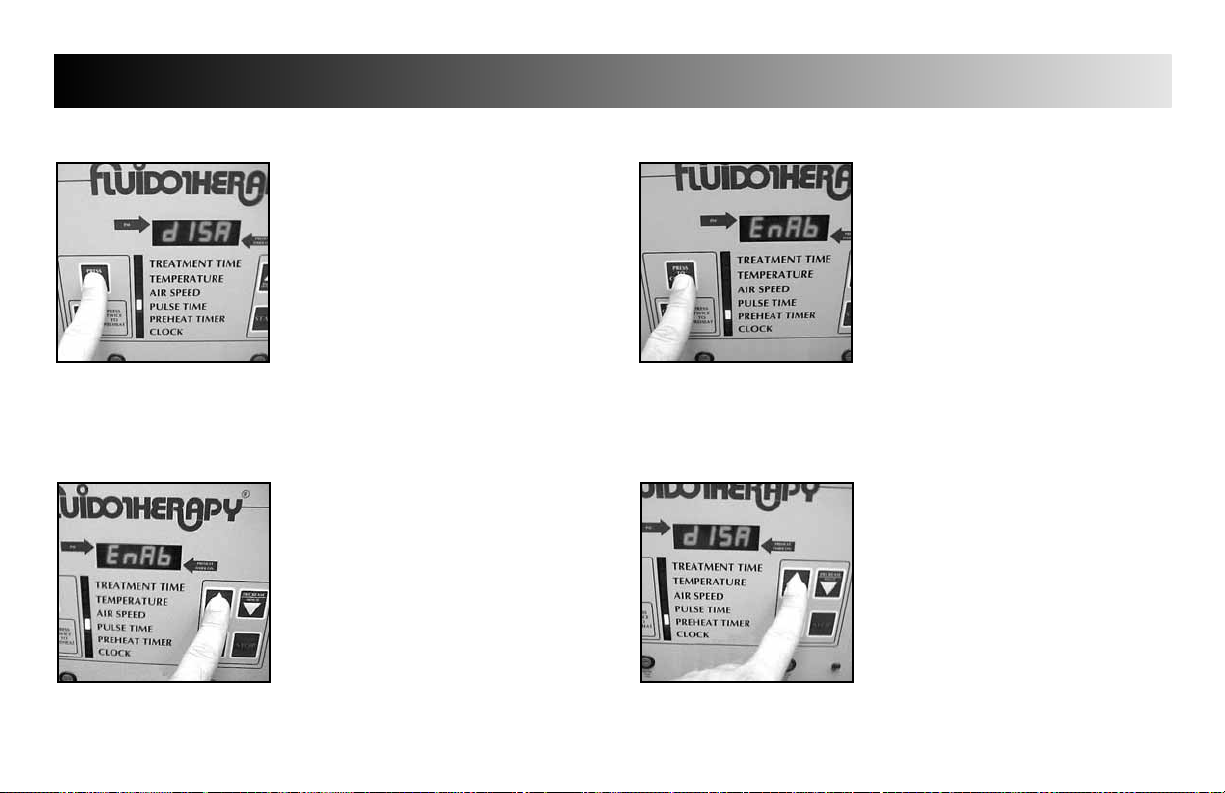
PULSE MODE (Enable/Disable)
Press the “PRESS TO CHANGE MODE”
button until the indicator light is flashing
beside “PULSE TIME”.
“EnAb”(enable) or “dISA” (disable)
will display.
Press the “INCREASE” button to set unit to
display “EnAb” or “dISA” as desired.
Press the “PRESS TO CHANGE MODE”
button to save the new setting.
PREHEAT TIMER MODE (Enable/Disable)
Press the “PRESS TO CHANGE MODE”
button until the indicator light is flashing
beside “PREHEAT TIMER ”.
“EnAb”(enable) or “dISA” (disable)
will display.
Press the “INCREASE” button to set unit to
display “EnAb” or “dISA” as desired.
Press the “PRESS TO CHANGE MODE”
button to save the new setting.
NOTE:
If Clock is disabled, the “PREHEAT TIMER”
will automatically be disabled.
Page 22
19
Fluidotherapy®- Dry Heat Therapy
SETUP
PREFERENCE MODE DEFAULT PARAMETERS (Continued)
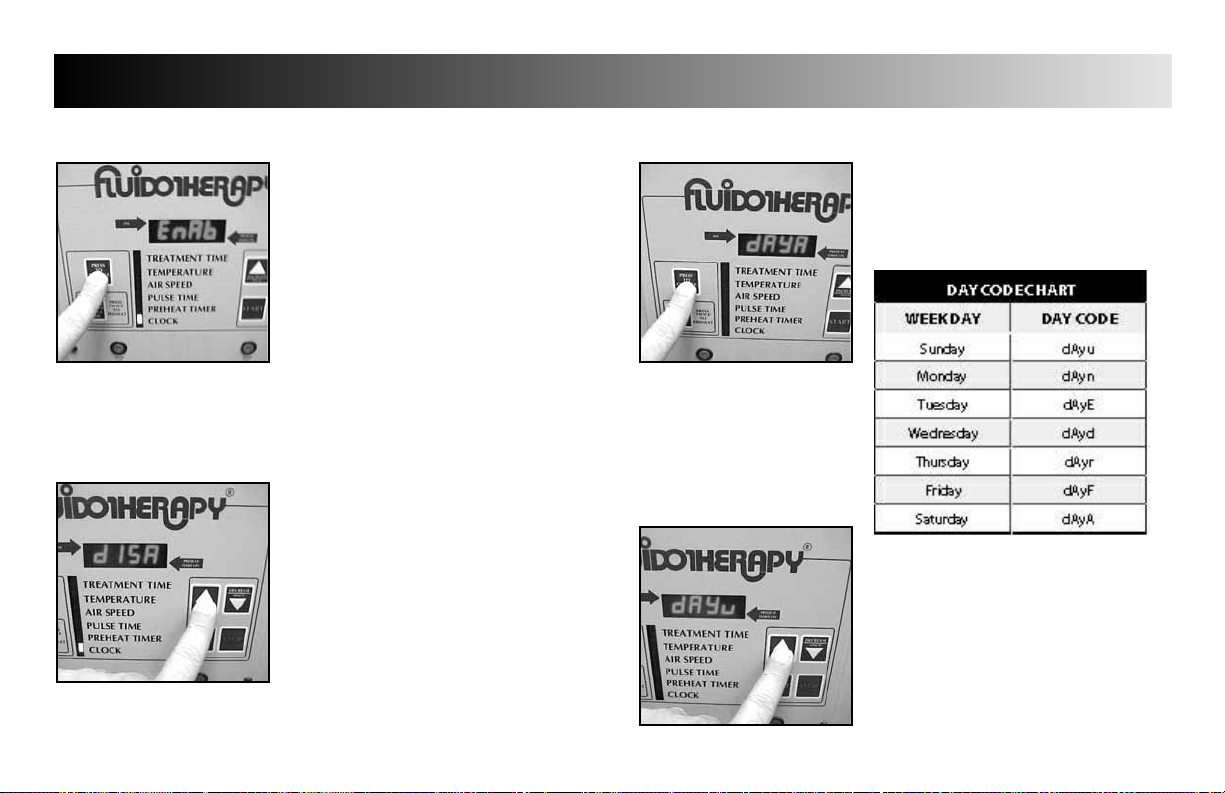
CLOCK (Enable/Disable)
Press the “PRESS TO CHANGE MODE”
button until the indicator light is flashing
beside “CLOCK”.
“EnAb”(enable) or “dISA” (disable)
will display.
Press the “INCREASE” button to set unit to
display “EnAb” or “dISA” as desired.
Press the “PRESS TO CHANGE MODE”
button to save the new setting.
NOTE:
If Clock is disabled, the “PREHEAT TIMER”
will automatically be disabled.
SETTING DAY OF WEEK
Press the “PRESS TO CHANGE MODE”
button until “dAy__”(__= day code)
is displayed.
Press the “INCREASE” or “DECREASE”button
to set unit to display the desired day code.
Press the “PRESS TO CHANGE MODE”
button to save the new setting.
Page 23
20
Fluidotherapy®- Dry Heat Therapy
SETUP
PREFERENCE MODE DEFAULT PARAMETERS (Continued)
EXITING “PrEF” MODE
Press the “PRESS TO CHANGE MODE” buttons until “PrEF”is displayed.
Simultaneously press the “INCREASE”, “DECREASE” and “STOP” buttons.
The default treatment time will display and the indicator will be beside
“TREATMENT TIME”.
Page 24
21
Fluidotherapy®- Dry Heat Therapy
OPERATION
PATIENT PREPARATION
STOP TREATMENT
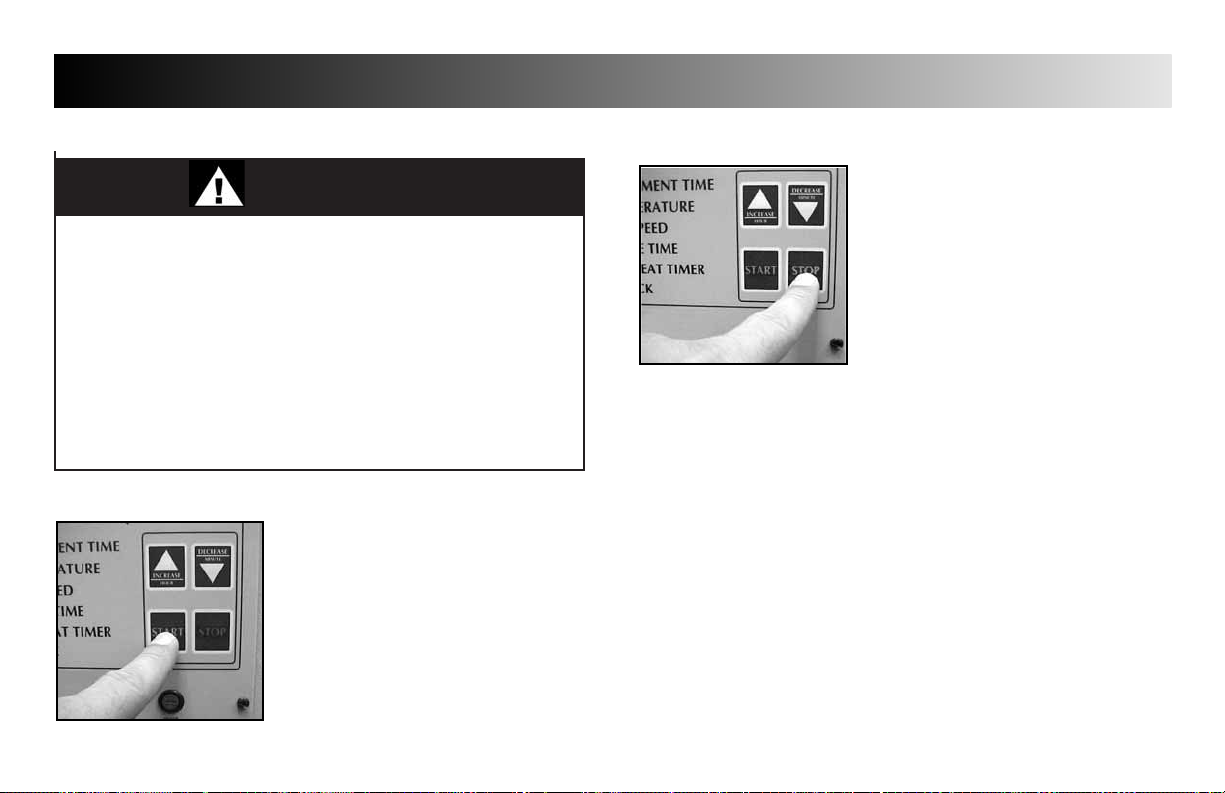
STARTING
Make certain all control panel settings have
been made, unit is preheated and patient is
in proper position with sleeve(s) secure
prior to starting the treatment. Refer to
pages 13 - 15 for setup of the unit.
Press “START” button to begin treatment.
STOPPING
Treatment will automatically stop when the
treatment time reaches zero.
Should it be desired to stop treatment
before the timer reaches zeros,push the
“STOP” button.
NOTE:
Should the treatment be stopped before
the timer reaches zero,it will be necessary
to re-set the “TREATMENT TIME” in order to
complete the prescribed treatment.
STARTING TREATMENT
CLEAN THE PATIENT TREATMENT AREA THOROUGHLY WITH AN
ANTIMICROBIAL SOAP AND CLEAN WATER AS PER INDUSTRY/
FACILITY/ REGULATORY STANDARDS, AND UNIVERSAL SKIN
WASHING PROCEDURES.
FOLLOWING THE SKIN WASHING PROCEDURE, APPLY A HOSPITAL
GRADE ANTISEPTIC SKIN CLEANSER, PER THE CLEANSER
MANUFACTURER'S RECOMMENDED INSTRUCTIONS FOR USE.
REFERENCE THE MAINTENANCE SCHEDULE AND MAKE CERTAIN
THE REQUIRED MAINTENANCE HAS BEEN PERFORMED PRIOR TO
STARTING THE UNIT.
DANGER
Page 25
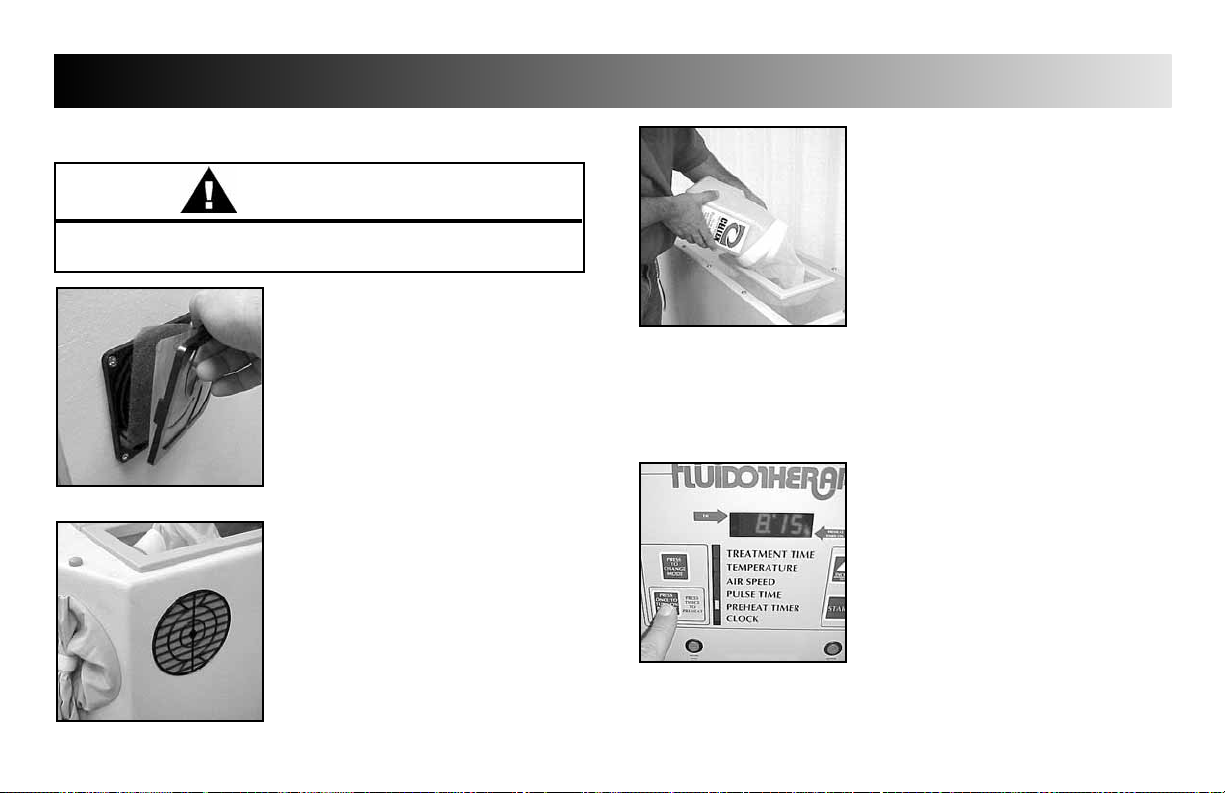
ARM PREHEAT TIMER
Plug the unit back into an approved power
source. If the “Preheat Timer”is used, press
the “PREHEAT TIMER ” button once, the
“PREHEAT TIMER ON”indicator will illuminate,.
in order for the Preheat Timer to
automatically come on at the default time
the next morning.
NOTE:
The Fluidotherapy Preheat Timer does not
operate on Saturday or Sunday. However,for
Monday morning preheat, set the unit as
described above on Friday evening.
REFILL WITH CELLEX® MEDIUM
Refill the unit with Cellex® Dry Heat Medium
to approximately one (1) inch above the
bottom of the arm treatment ports of the
unit.
NOTE:
Use of other than Cellex Medium may cause
premature failure of the fluidotherapy unit(s).
22
Fluidotherapy®- Dry Heat Therapy
REQUIRED MAINTENANCE
DAILY MAINTENANCE
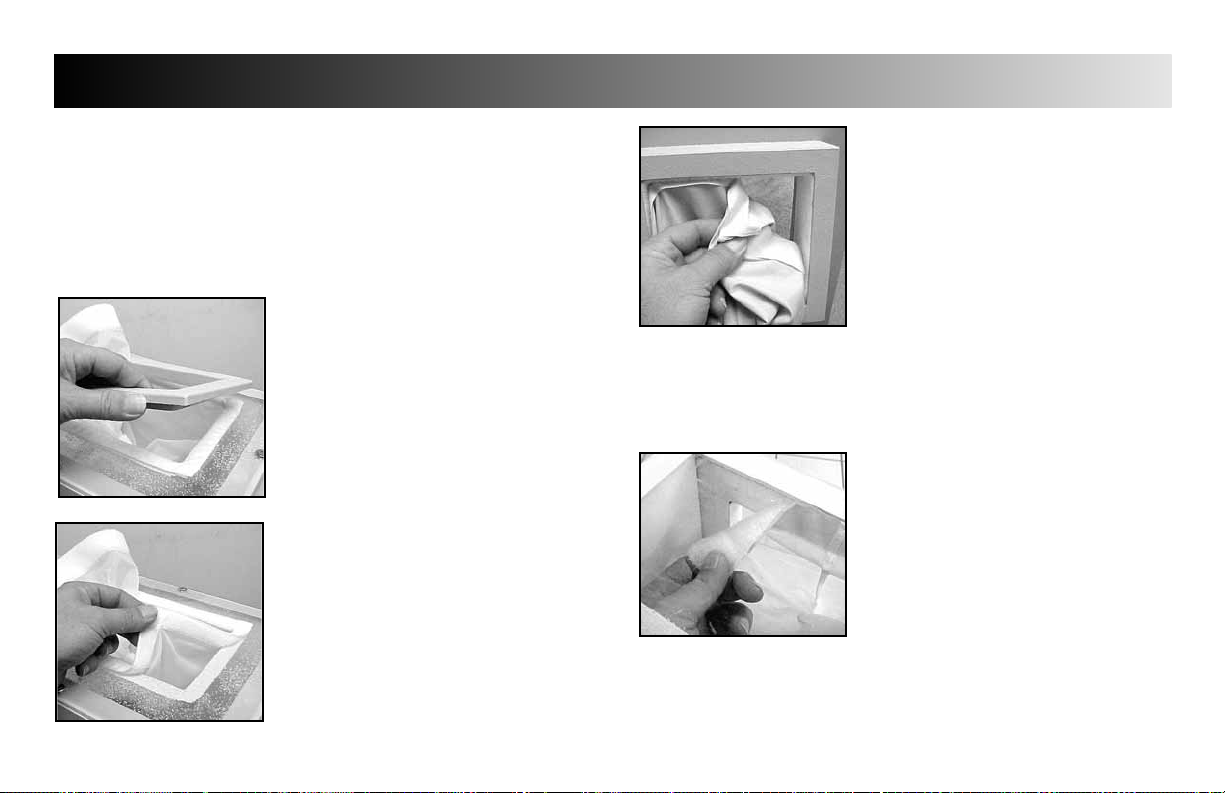
CLEAN INLET FILTERS
At the end of each work day, unplug the
unit and clean the Inlet Filters on the unit.
Carefully remove the filter retainer and
wash the filter and screen with a mild
antibacterial soap and water.Thoroughly
dry the filter and screen before placing
back on the unit.
NOTE:
Should your unit have the earlier style inlet
filters, gently clean the filter using a soft
bristle brush. Be careful not to puncture or
damage the filter.
Should the filter become damaged, torn or
punctured, call your dealer for replacement
of the filter before resuming operation.
• Before any Maintenance is performed or attempted,unplug the unit
from the power source to prevent the possibility of electrical shock.
WARNING
INSPECT SLEEVE CONDITION
Inspect the port sleeves for tears, rips and weak seams. Replace all sleeves
that show signs of tears, rips, weak or loose seams or excessive wear.
Keeping the sleeves in excellent condition prevents excessive spillage of
the Cellex medium and prevents the medium from entering the heat
chamber of the unit.
Page 26
23
Fluidotherapy®- Dry Heat Therapy
REQUIRED MAINTENANCE
WEEKLY MAINTENANCE
Each week all sleeves of the Fluidotherapy unit should be laundered in a
mild antibacterial detergent. Allow the sleeves to air dry or dry on a low
temperature setting. Drying the sleeves in high temperatures could cause
the sleeves to shrink or become distorted resulting in the sleeve(s) not
properly fitting when placing them back onto the unit.
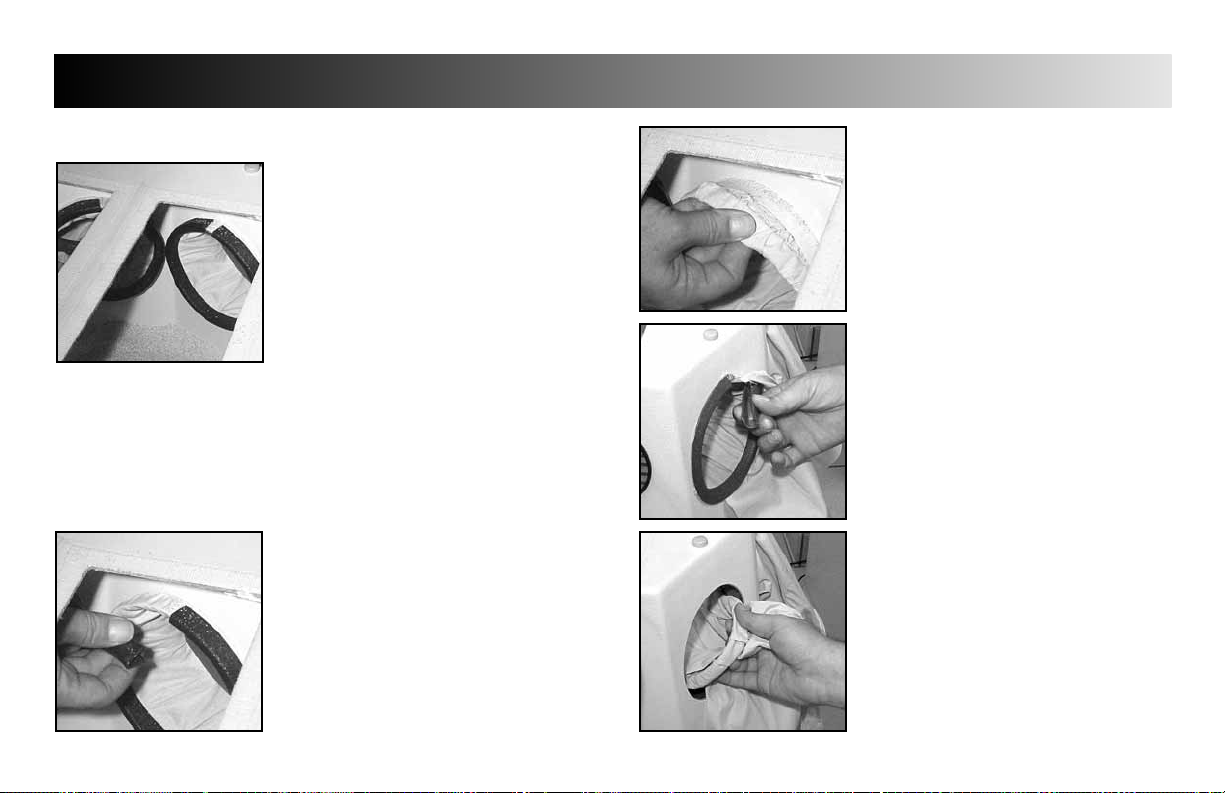
REMOVING TOP SLEEVES (All Models)
Unplug the unit from the power source.
Carefully remove the rectangular bezel(s)
from the top of the unit.
Carefully pull the hook and loop fasteners
apart to remove the sleeve from the unit.
Replace in reverse order making certain the
corners are well seated to form the seal
required to prevent excessive escape of
medium.
REMOVING END SLEEVE
(Model FLU110D & FLU110DE)
Carefully pull the hook and loop fastener
on the sleeve to remove sleeve from unit.
Replace in reverse order making certain the
corners are well seated to form the seal
required to prevent excessive escape of
medium.
REMOVING END SLEEVE
(Model FLU210D)
With Top Sleeve removed, reach in through
the top port and carefully pull the hook
and loop fastener of the sleeve away from
the unit.
Replace in reverse order making certain
the corners are well seated to form the
seal required to prevent excessive escape
of medium.
Page 27
24
Fluidotherapy®- Dry Heat Therapy
REQUIRED MAINTENANCE
WEEKLY MAINTENANCE (Continued)
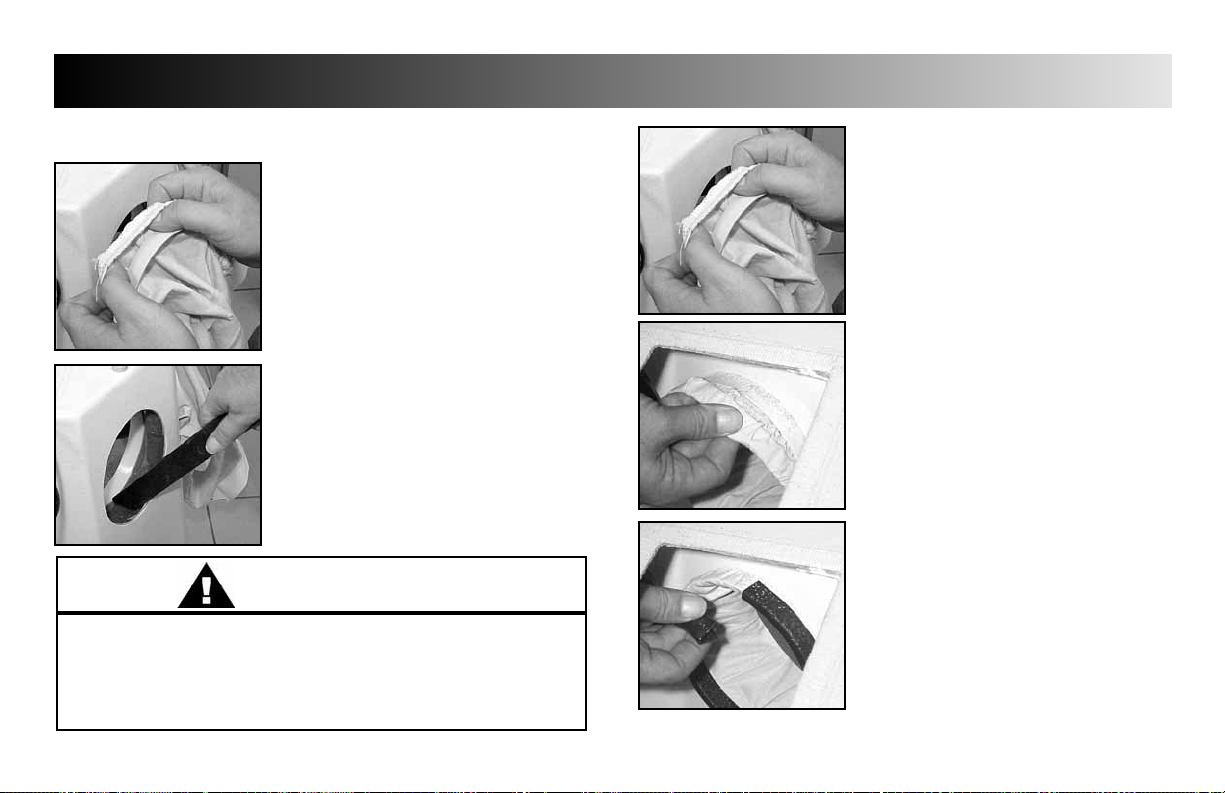
REMOVING END SLEEVES
(Model FLU115D & FLU115DE)
NOTE:
The sleeve in these photos has been
modified (cut away) for clarity.
Remove the top sleeves to gain access to
the inside of the unit. Refer to page 23.
Pull the medium back and away from the
arm ports.
Dust away all Cellex® medium from inside
the sleeve.
Pull the retainer ring from the sleeve and
lay aside for re-installation.
It is extremely important to move the medium away from the ports to
prevent the medium entering the space between the inner and outer
walls of the unit when the sleeves are removed and replaced.
Pull the sleeve away from the sleeve
extrusion in the inner housing of the unit.
NOTE:
There is a ring folded into the sleeve that
fits over the sleeve extrusion on the inside
of the unit.
From the outside of the unit, reach into
the sleeve and remove the other sleeve
retainer ring.
Carefully pull the sleeve and ring out of
the unit, avoiding Cellex medium from
entering the cavity between the two
housings of the unit.
Cellex medium entering the heat
chamber of the unit(s) can cause severe
injury to patients as well as smoke
damage to the facility and the
Fluidotherapy unit(s).
Page 28
25
Fluidotherapy®- Dry Heat Therapy
REQUIRED MAINTENANCE
WEEKLY MAINTENANCE (Continued)
Remove the ring from the folded end of
the sleeve.
Launder sleeves as described on page 23.
Vacuum out any of the Cellex® medium
that may have entered the cavity between
the inner and outer walls of the unit.
WARNING
Removal of all Cellex medium that has entered the cavity is essential to
maintain proper and safe operation of the unit. If the medium reaches
the heating chamber of the unit immediately call a certified technician
for removal of any suspected medium in the heat chamber. Do not place
the unit into service if medium is suspected to be in the heat chamber.
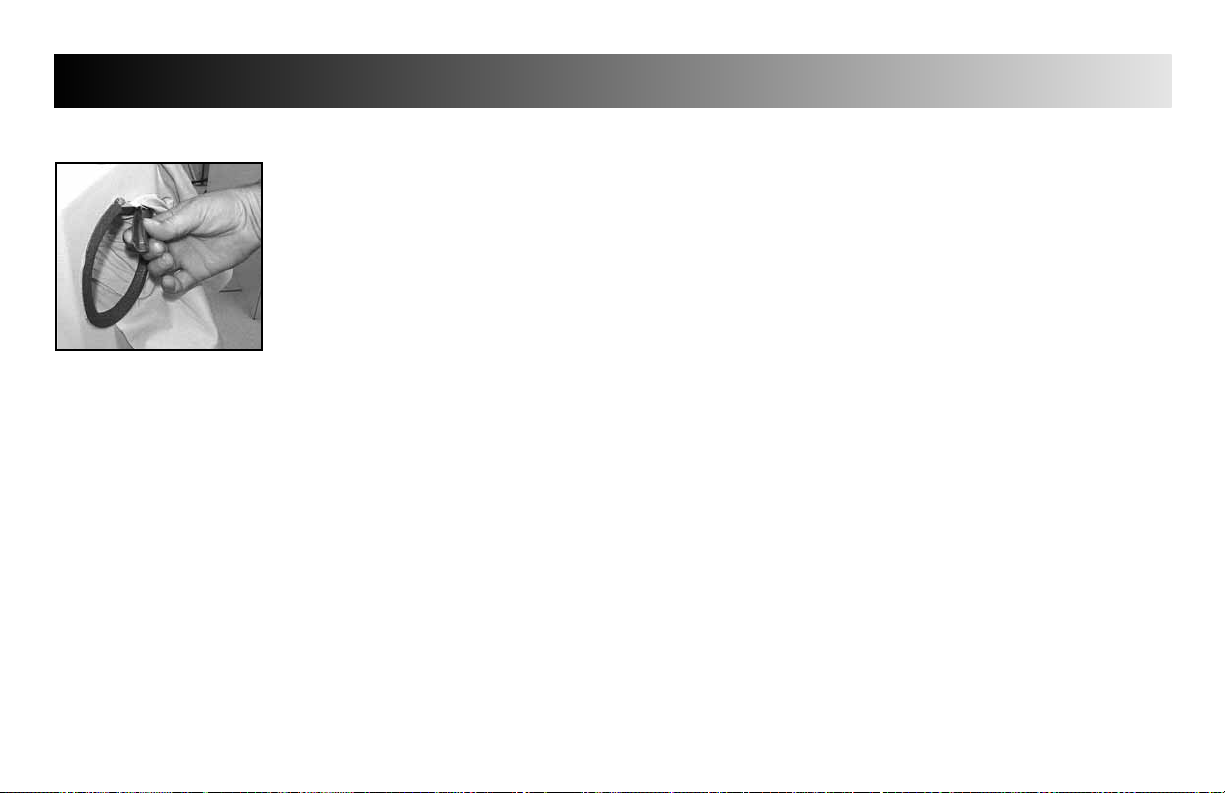
INSTALLING 115 Model SLEEVE
Fold the elastic end of the sleeve over
the ring.
Place sleeve through port hole.
Place the ring/sleeve assembly over the
sleeve extrusion on the inside of the unit.
NOTE:
Position the sleeve seam toward the top of
the unit and push the ring/sleeve assembly
completely onto the sleeve extrusion.
Install the inner sleeve retainer ring making
certain the ring split will be toward the top
of the unit.
Push the reatainer ring over the ring/sleeve
assembly until it is completely seated.
NOTE:
The retainer ring should fit tightly over the
sleeve. If necessary, use a pair of pliers to
tighten the ring in the area where it slides
over the sleeve.
Page 29
26
Fluidotherapy®- Dry Heat Therapy
REQUIRED MAINTENANCE
WEEKLY MAINTENANCE (Continued)
From the outside of the unit, reach in
through the sleeve and install the outer
sleeve retaining ring.
NOTE:
Start installation of the outer ring at the top
of the unit. As the ring is being seated pull
the area of the sleeve tight.This will aid in
the prevention of excessive medium
spillage and patient comfort.
Page 30
27
Fluidotherapy®- Dry Heat Therapy
REQUIRED MAINTENANCE
ADDITIONAL FLUIDOTHERAPY PREVENTIVE MAINTENANCE REQUIREMENTS
The following additional preventive maintenance requirements must be scheduled and performed as described to ensure that the unit(s) are operating
efficiently,safely and functioning at their optimum. A blank Maintenance Record is provided, on page 28, to aid in the scheduling and Record Keeping of
this prescribed preventive maintenance program.The following preventive maintenance procedures must be performed by a Chattanooga Group certified,
trained service technician trained in the maintenance requirements of the Chattanooga Group,Inc., Fluidotherapy units.
QUARTERLY (Every 3 Months)
The following Preventive Maintenance must be performed on all
Fluidotherapy units quarterly by a certified service technician.
• INTERNAL CAVITY INSPECTION AND CLEANING
• INTAKE FILTER REPLACMENT
• FULL FUNCTIONAL AND PERFORMANCE TESTS
• DISTRIBUTOR REPLACEMENT
Only if Performance Test results indicate replacement is necessary.
BI-ANNUAL (Every 6 Months)
The following Preventive Maintenance must be performed on all
Fluidotherapy units every six months in addition to the Quarterly
Maintenance requirements by a certified service technician.
• CHANGE Cellex® Medium
• BLOWER MOTOR(S) REPLACEMENT
• REPLACE DISTRIBUTOR
Required at the six month interval
ANNUAL (Once per Year)
The following Preventive Maintenance must be performed on all
Fluidotherapy units annually in addition to the Quarterly and Bi-Annual
Maintenance requirements by a certified service technician.
• CALIBRATION
If the level of Cellex medium suddenly drops one inch or more
below the operating level of the unit, immediately pull the unit out
of service and contact a certified service technician.
A sudden level drop in the Cellex medium indicates that medium is
in the heating chamber of the unit and must be repaired before the
unit is placed back into service.
DANGER
Page 31
28
Fluidotherapy®- Dry Heat Therapy
REQUIRED MAINTENANCE
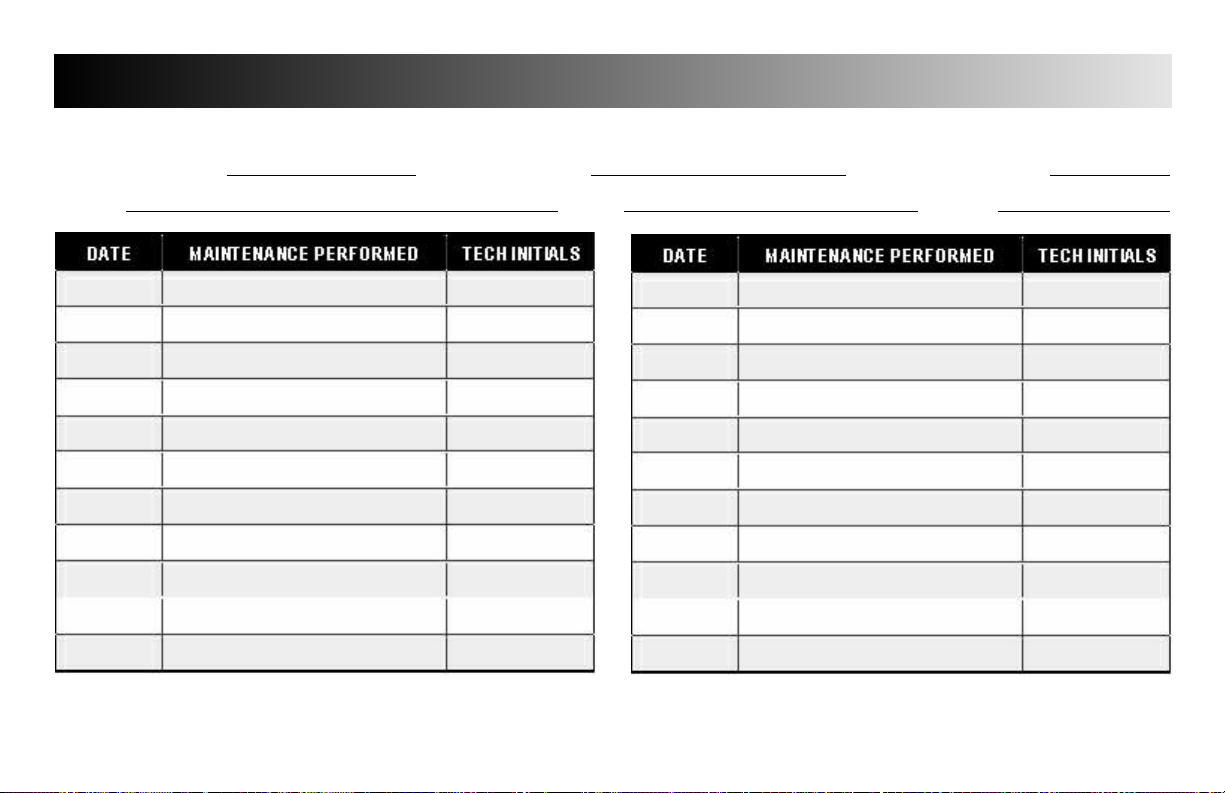
FLUIDOTHERAPY MAINTENANCE RECORD
UNIT SERIAL NUMBER UNIT MODEL NUMBER DATE PLACED IN SERVICE
DEALER: PHONE: CONTACT
Completing this form:
“DATE”-Date Service is performed “MAINTENANCE PERFORMED”- Quarterly, Bi-Annual or Annual “TECH INITIALS”- Certified Tech’s Initials
Page 32

29
Fluidotherapy®- Dry Heat Therapy
REQUIRED MAINTENANCE
SERVICE
When the Fluidotherapy Dry Heat Therapy unit requires sevice, or
preventive maintenance,contact the selling dealer or Chattanooga
Group, Inc. Service Department.
All units returned to the factory for service must include the following;
WARRANTY REPAIR/OUT OF WARRANTY REPAIR
1. Written statement containing the following information;
•
RGA Number- Obtain from Factory
•
Unit Model Number
•
Unit Serial Number
•
Contact person with Phone and Fax Numbers
•
Billing Address (for Out of Warranty Repair)
•
Shipping Address (Where to Ship Unit after Repair)
•
Detailed Description of Problem or Symptoms
2. Copy of original invoice issued at puchase of the unit.
3. Ship unit to Factory in the original container with all
accessories and information as required in item 1 above to:
Chattanooga Group, Inc.
4717 Adams Road
Hixson, TN 37343
Phone: USA: (800)-592-7329
Canada: (800) 361-3661
Outside USA: (423) 870-7200
FAX: (423) 875-5497
Web Address:www.chattgroup.com
Service to these units should be performed only by Service Technicians
Certified by Chattanooga Group, Inc.
Page 33
30
Fluidotherapy®- Dry Heat Therapy
ACCESSORIES
REPLACEMENT ACCESSORIES
When ordering additional accessories for the Chattanooga Group
Fluidotherapy units, use the follwing part numbers and descriptions.
HENLY No. CGI No.
MODEL FLU110D & FLU110DE
TOP SLEEVE SLE0003 31775
TOP SLEEVE BEZEL FRA0003 31456
ARM SLEEVE SLE0002 31774
MODEL FLU115D & FLU115DE
TOP SLEEVE SLE0003 31775
TOP SLEEVE BEZEL FRA0003 31456
INNER SLEEVE RETAINER TRI0034 31883
SLEEVE RING PPL0013 31679
OUTER SLEEVE RETAINER TRI0035 31834
ARM SLEEVE SLE0001 31773
MODEL FLU210D
TOP SLEEVE SLE0003 31775
TOP SLEEVE BEZEL FRA0003 31456
END SLEEVE SLE0004 31776
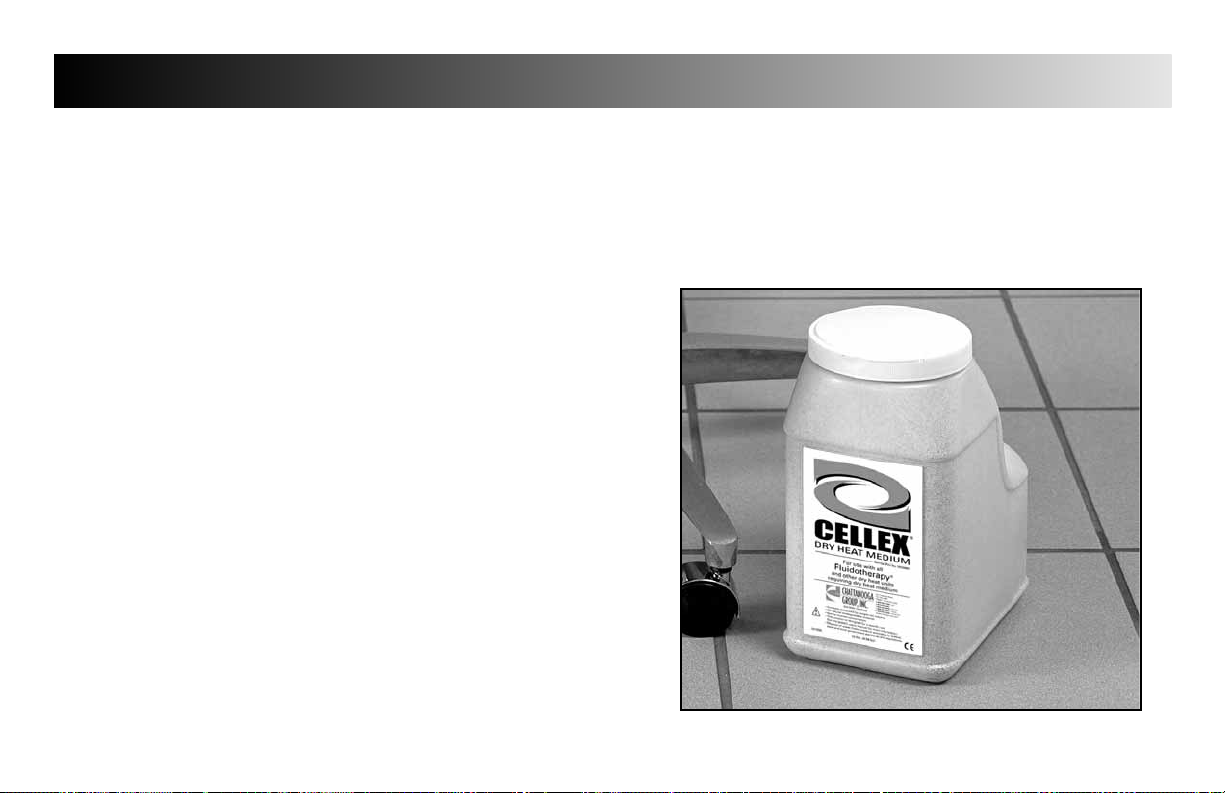
CELLEX® Dry Heat Medium 10 lbs (4.5 kg) MED0001
MEDIUM
Use only Chattanooga Group’s Cellex Dry Heat Medium in the
Fluidotherapy unit.The Cellex medium is designed specifically for use in
the Chattanooga Group Fluidotherapy units to ensure optimal and
efficient operation of all the Fluidotherapy products.
Page 34

31
WARRANTY
Chattanooga Group, Inc. ("Company") warrants that the Fluidotherapy® Dry Heat Therapy units ("Product") are free of defects in material and workmanship.This warranty shall
remain in effect for one year (12 months) from the date of original consumer purchase.If this Product fails to function during the one year warranty period due to a defect in
material or workmanship, Company or the selling dealer will repair or replace this Product without charge within a period of thirty (30) days from the date on which the Product
is returned to the Company or the dealer.
All repairs to the Product must be performed by a service center authorized by the Company. Any modifications or repairs performed by unauthorized centers or groups will void
this warranty.
The warranty period for accessories are 90 days.Accessories consist of sleeves and use replaceable intake filter(s).
The warranty period for the motor(s) and distributor are 180 days.
To participate in warranty coverage, this Product's warranty registration card (included with Product) must be filled out and returned to the Company by the original owner
within ten (10) business days of purchase.
This Warranty Does Not Cover:
Replacement parts or labor furnished by anyone other than the Company, the selling dealer or a certified Company service technician.
Defects or damage caused by labor furnished by someone other than Company, the selling dealer or a cerified Company service technician.
Any malfunction or failure in the Product caused by product misuse, including, but not limited to, the failure to provide reasonable and required maintenance or any use that is
inconsistent with the Product User's Manual.
COMPANY SHALL NOT BE LIABLE IN ANY EVENT FOR INCIDENTAL OR CONSEQUENTIAL DAMAGES.
Some states do not allow the exclusion or limitation of incidental or consequential damages,so the above limitation or exclusion may not apply to you.
To Obtain Service From Company or the selling dealer under this warranty:
1. A written claim must be made within the warranty period to the Company or the selling dealer. Written claims made to the Company should be sent to:
4717 Adams Road
P.O. Box 489
Hixson, TN 37343 USA
Telephone: 423-870-7200
Outside USA: (423) 870-2281
Facsimile: (423) 875-5497
and
2. The Product must be returned to the Company or the selling dealer by the owner.
This warranty gives you specific legal rights and you may also have other rights which vary from state to state.
The Company does not authorize any person or representative to create for it any other obligation or liability in connection with the sale of the Product.
Any representation or agreement not contained in the warranty shall be void and of no effect.
THE FOREGOING WARRANTY IS IN LIEU OF ALL OTHER WARRANTIES,EXPRESSED OR IMPLIED,
INCLUDING ANY WARRANTY OR MERCHANTABILITY OR FITNESS FOR A PARTICULAR PURPOSE.
Fluidotherapy®- Dry Heat Therapy
Page 35

AAcchhiieevveerr
™™
Supports
AAddaappttaa
®®
Treatment Tables
AA..EE..RR..®®BBoooott
Auto Edema Reduction Boot
CCaammbbiioonn
®®
Shock Dampening Foot Care Products
CCaarrppaall--TTrraacc
™™
Carpal Traction Accessory
CCoollPPaaCC
®®
Chilling Units and Reusable Cold Therapy Products
CCoonndduuccttoorr™™GGeell
Highly Conductive Ultrasound Gel
CCoonnttrraaccttuurree PPrroodduuccttss
Contracture Management Orthotic Products
CCTTSS
®®
Carpal Tunnel Stretching Device
DDUURRAA--SSTTIICCKK®®EElleeccttrrooddeess
Self-Adhesive Electrodes
EEMMGG RReettrraaiinneerr
®®
Dual Channel Surface EMG
FFlleexxii--PPAACC®®II aanndd IIII
Reusable Hot and Cold Compresses
FFlluuiiddootthheerraappyy
®®
Dry Heat Whirlpool Therapy Units
GGeell MMeeddeexx
™™
Gel Mattress Overlay
HHyyddrrooccoollllaattoorr
®®
Heating Units and HotPacs™
IInntteelleecctt®®LLeeggeenndd
Ultrasound and Electrotherapy Products
MMeeaassuurreemmeenntt IInnssttrruummeennttss
Dynamometers, Goniometers, etc.
MMyyoossssaaggee
®®
Massage Lotion
NNyyllaatteexx
®®
Elastic Wraps
OOppttiiFFlleexx
®®
Continuous Passive Motion
PPaarraa--CCaarree
®®
Paraffin Wax Unit
PPiillllooww PPeerrffeecctt
™™
Cervical Pillow Line
PPiivvoottaall TThheerraappyy SSyysstteemm
™™
Orthotics for the Spine
PPrrooPPoowweerr PPiillllooww
™™
Power Massage Pillow
PPrreessSSssiioonn
®®
Intermittent Compression
PPrroonn PPiilllloo
®®
Positioning Pillow
CCeerrvviiccaall TTrraaccttiioonn SSyysstteemm
Clinical Cervical Traction
SSPPOORRTT--PPAACC
™™
Soccer Ball Shaped Cold Pack
TThheerrmmaa--WWrraapp
™™
Hot and Cold Compression
TTrriittoonn
®®
Treatment and Traction Equipment
TTXX
®®
Treatment and Traction Equipment
VVeeccttrraa™™SSeerriieess
Electrotherapy products.
WWeellllnneessss 11sstt
™™
Back Support
WWoommeenn’’ss CCoonnttoouurr BBaacckk SSuuppppoorrtt
Back Support
HHAANNDDIISSIIZZEERR
™™
Hand Exersiser
VVeerrssaaBBaatthh SSeeaatt
™™
Aid to Daily Living
MMoorree TTrruusstteedd PPrroodduuccttss ffrroomm CChhaattttaannooooggaa GGrroouupp,, IInncc..
31588A
ISO 9001 CERTIFIED
4717 Adams Road
P.O. Box 4 89
Hixson, TN 37343 U.S.A.
1-423-870-2281
1-800-592-7329 U.S.A.
1-800-361-6661 CANADA
+ 1-423-870-2046 OUTSIDE U.S.A. FAX
www.chattgroup.com
Problem
Solving
Through
Innovation!
© 2001 Chattanooga Group, Inc.
 Loading...