

Fluidity Barre Owner's Manual

Fluidity® Barre
Owner’s Manual

Safety Instructions
Getting Started
Folding Up the Barre
Using the Fluidity Barre − Fold Over Seat Work
Using the Fluidity Barre − Attitude
Using the Fluidity Barre − Turned Out Ballet Stretch
Using the Fluidity Barre − Flat Back
Using the Fluidity Barre − Hang from the Barre
Using the Fluidity Barre − Pull Up
Exercise Guidelines
Finding Your Target Heart Rate Zone
Maintenance
Troubleshooting
Exploded Diagram
Parts Listing
Limited Warranty
To Order Other Fluidity Products
1
Table of Contents
Always consult your physician before beginning any exercise program.
2
4
6
8
10
12
14
16
18
20
22
24
25
26
27
28
30

Safety Instructions
2
Read and follow this instructional guide completely before using this unit.
Keep this guide in a safe place. Everyone who will use the unit should read
this guide. Keep the following points in mind when you use this equipment.
This product is designed for home use only. It is not intended for commercial
or institutional use. Use only as instructed.
WARNING: Improper use of the Fluidity Barre may result in serious bodily
injury. Use the Fluidity Barre in accordance with the instructions provided.
1) Never adjust the height of the barre from a seated position. Always
stand up at the barre to adjust barre height.
2) Consult with your physician before starting any workout or exercise
program, especially if you are pregnant, nursing or have a pre-existing medical condition. Have your doctor review your exercise and diet programs to
advise you on the routine that is best suited to you individually.
3) If at any time you feel faint, light-headed or dizzy, stop exercising immediately. If you experience undue stress, pressure or pain at any time, immediately cease further use until you have consulted with your physician.
4) Keep all children and pets away from the unit during set-up, use, and
when the equipment is unattended.
5) Check the unit before each use. Make sure that all bolts and nuts are
tight prior to each use. Periodic maintenance is required on all exercise
equipment to maintain good operating condition.
6) Use the unit on a flat, non-slip and level surface.
Always consult your physician before beginning any exercise program.

7) Wear proper clothing. Clothing that allows free movement such as yoga
pants, spandex shorts or running tights is best.
8) Always follow the correct operating procedure for the unit.
9) Know your limits and train within them. Always use common sense
when exercising.
10) Warm up your muscles by completing the warm-up section at the beginning of each video workout. Do not overstretch or bounce while stretching.
11) Follow your doctor’s recommendations in developing your own personal
fitness program.
12) Always use caution when handling and exercising with the Fluidity
Barre.
13) This product is designed for a weight limit of 300 lbs.
14) When setting up the Fluidity Barre, DO NOT place any body part, such
as your fingers, near the hinges of the unit.
15) When pushing or pulling on the barre, the unit may tip if you are not
standing on the center of the mat panel closest to the backboard.
16) When the mat is folded up, the equipment should be used as a balancing device only.
USE THIS PRODUCT AT YOUR OWN RISK. THE MANUFACTURERS, DISTRIBUTORS AND MARKETERS OF THE FLUIDITY BARRE ASSUME NO RESPONSIBILITY FOR PERSONAL INJURY OR PROPERTY DAMAGE SUSTAINED THROUGH
THE USE OF THIS PRODUCT.
3
Safety Instructions
To learn more about our products, please visit fluidity.com
Getting Started
4 To learn more about our products, please visit fluidity.com
1
3
2
4
5 6

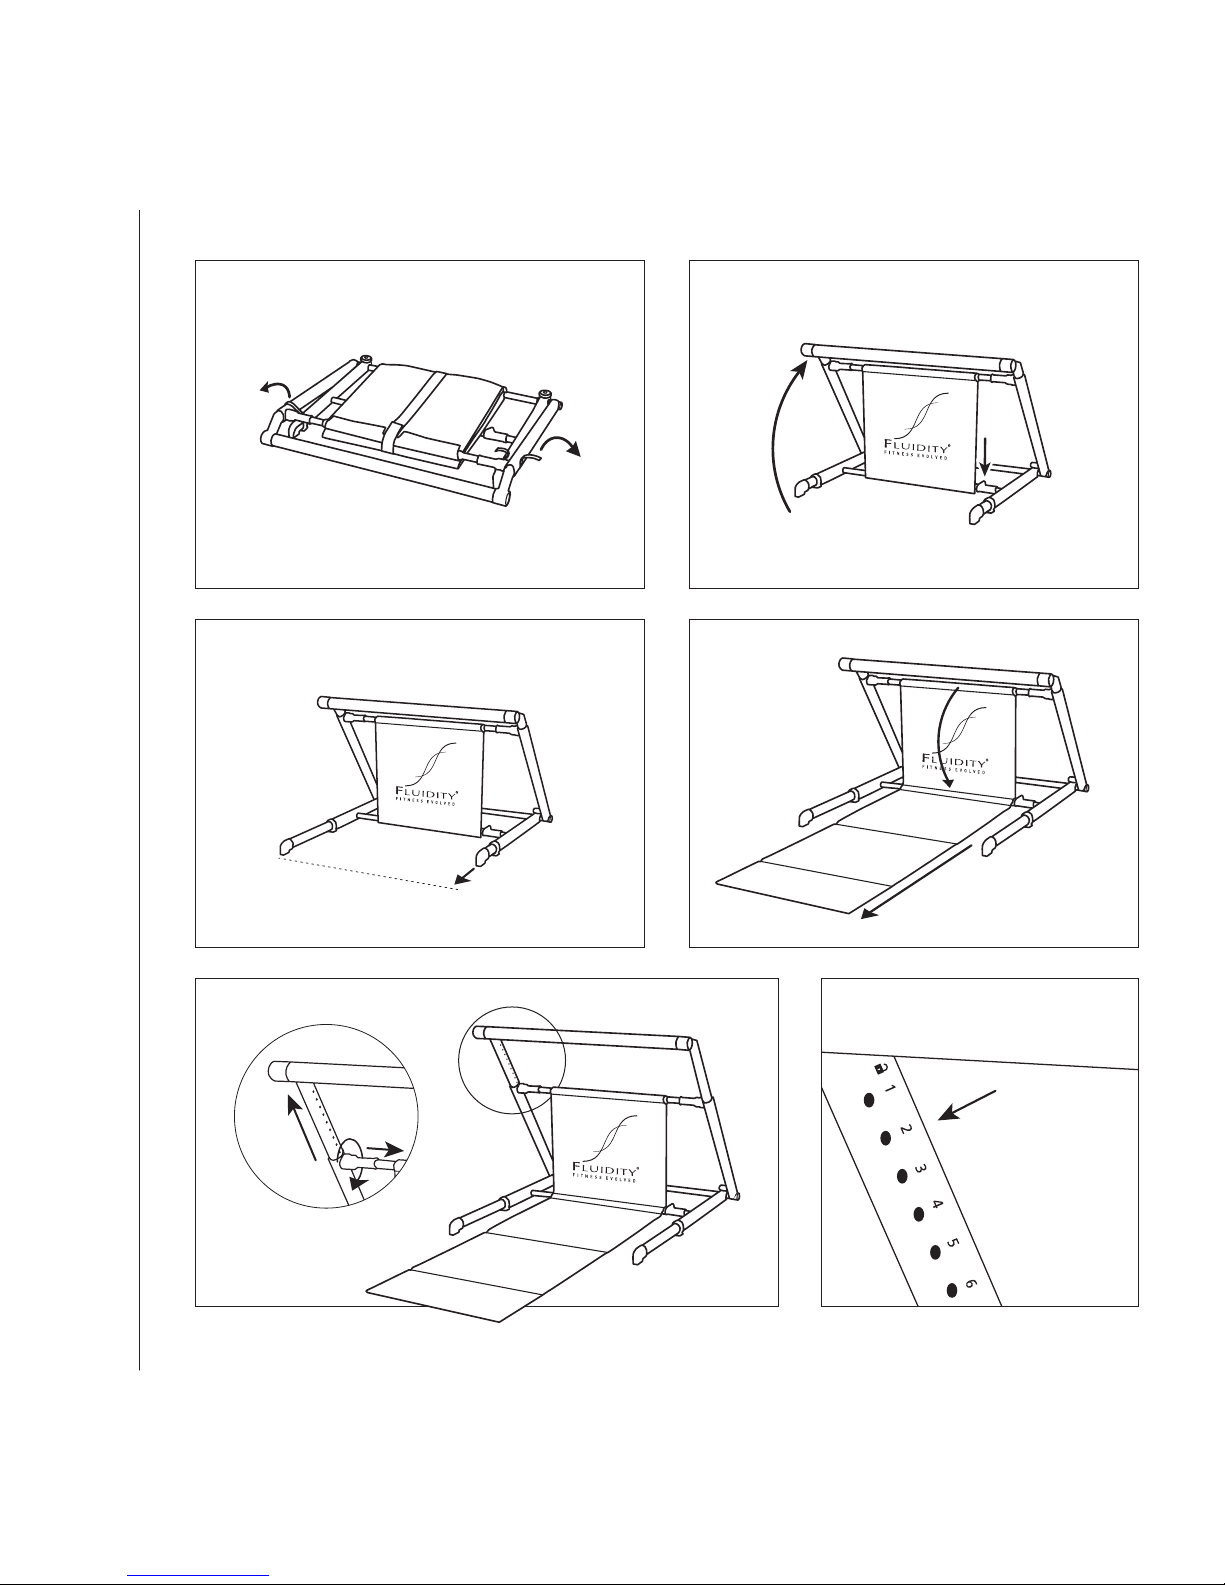
Your Fluidity Barre has been fully assembled at the factory. The illustrations
opposite show how to set up the unit for use. To get started, remove the
unit from the carton and follow these steps:
When setting up your Fluidity Barre, DO NOT place any body part, such as
your fingers, near the hinges of the unit.
1) Lay the unit down so that the legs are flat on the floor and open the
Velcro® straps that hold the legs together.
2) Lift up on the barre and then place the lower hinge of the backboard
into the lower metal crossbar so that the hinge locks into place.
3) Extend the bottom legs fully by gently pulling on the end caps.
4) Undo the mat strap and while still holding onto the strap, carefully
lower the mat down to the floor.
5) To set barre height, stand facing the barre. Pull out and twist
the locking handles on either side of the unit so that they are not
engaged with the pin holes. Note: Never adjust the barre while seated.
Adjust barre height to approximately 2 inches below your hip height
and then lock the barre into place by re-engaging the locking handles.
6) Use the numbers on the side columns as a guideline to level the barre.
Ensure that the barre is locked in place before use.
On the following pages, illustrations will show several of the exercises possible with your new unit. The illustrations are intended only to give you an
overview of the exercises included in our instructional video. Please refer to
the video when you are ready to begin your workout. When the unit is not
in use, it is advised to return it to its storage or handling position to avoid
any injury while it is not in use.
5
Getting Started
Always consult your physician before beginning any exercise program.
Folding Up the Barre
6 To learn more about our products, please visit fluidity.com
3
6
4
5
1 2

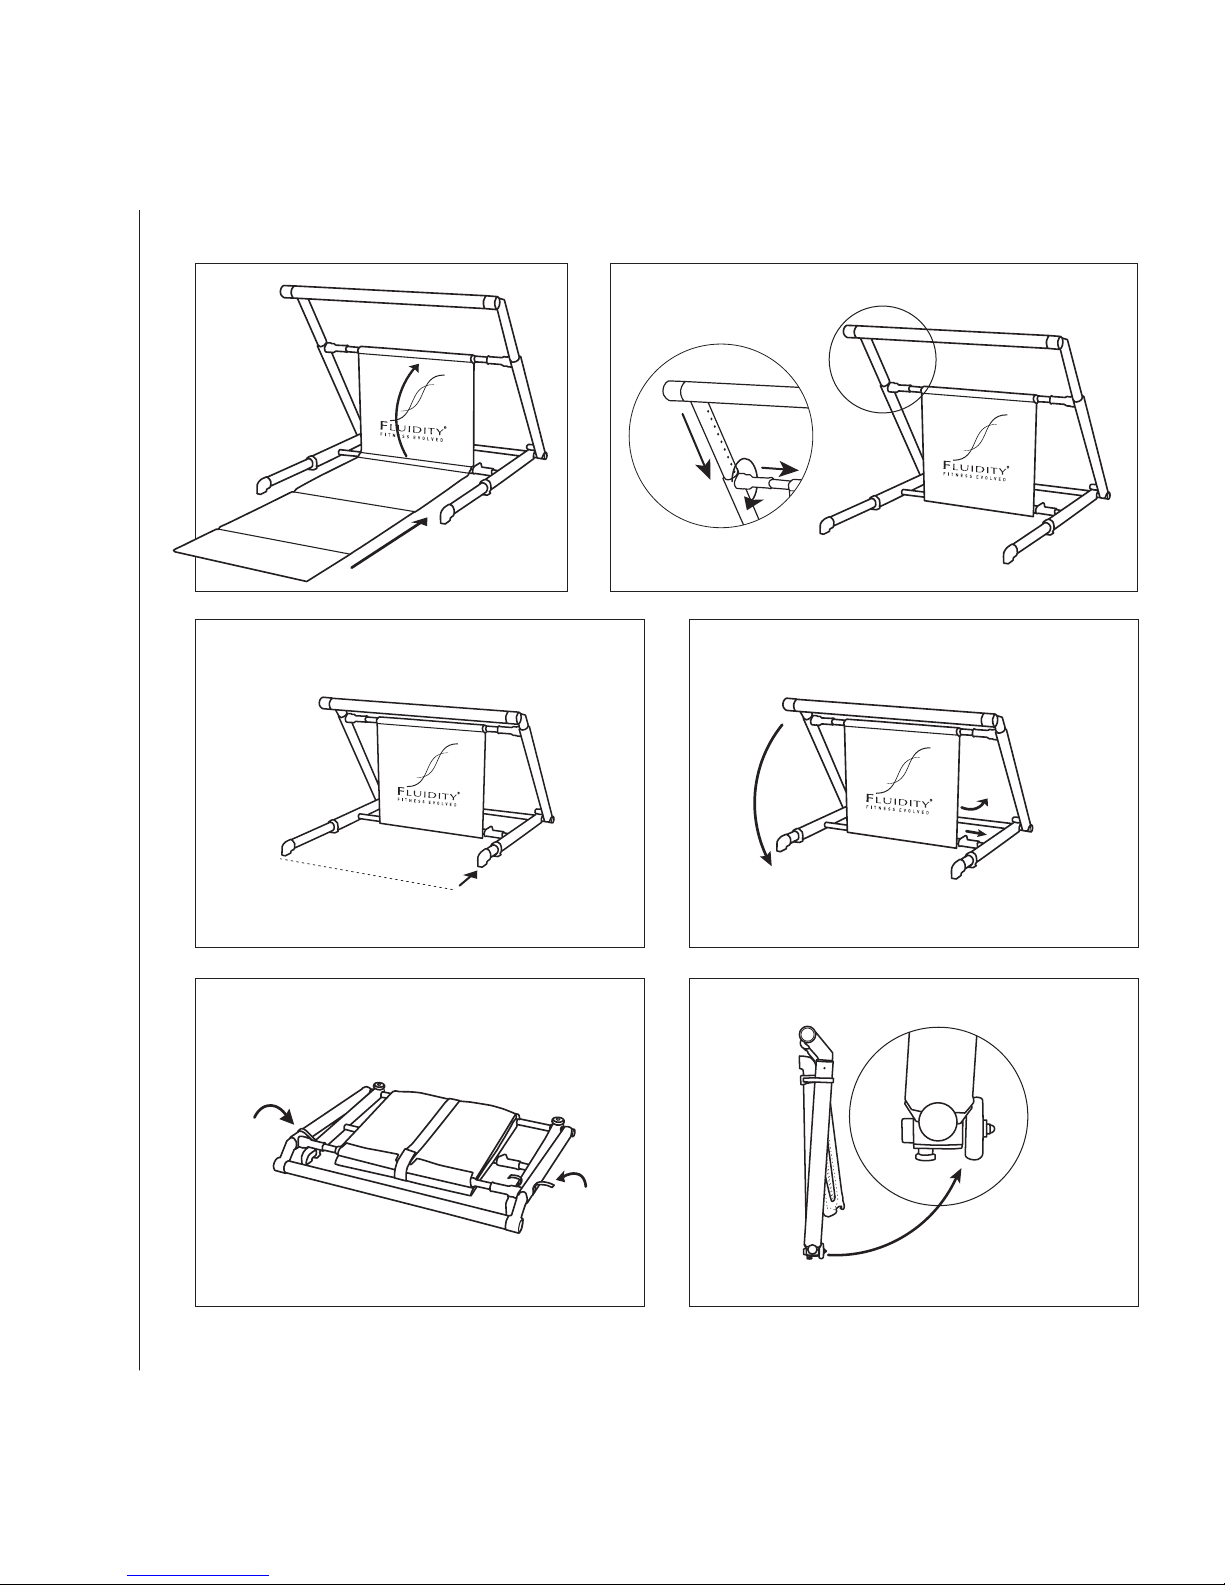
To fold up the unit for storage, follow these steps:
When folding up your Fluidity Barre, DO NOT place any body part, such as
your fingers, near the hinges of the unit.
1) Fold the mat up and loop the Velcro® strap through the metal loop at
the top of the backboard.
2 To lower barre, pull out and twist the locking handles on either side
of the unit so that they are not engaged with the pin holes.
Note: Never adjust barre height while seated. Lock the barre into its
lowest position by re-engaging the locking handles.
3) Holding onto the end caps, gently slide the bottom legs in.
4) Holding onto the wooden barre, use your foot to slide the locking
mechanism to the right to release the backboard off the lower metal
crossbar. Gently lower the backboard face down on the floor. Do not let
the backboard drop.
5) Secure the Velcro straps around the legs.
6) Holding onto the wooden barre, lift the unit to an upright position and
roll away for storage.
7
Folding Up the Barre
Always consult your physician before beginning any exercise program.
Using the Fluidity Barre
8 Always consult your physician before beginning any exercise program.

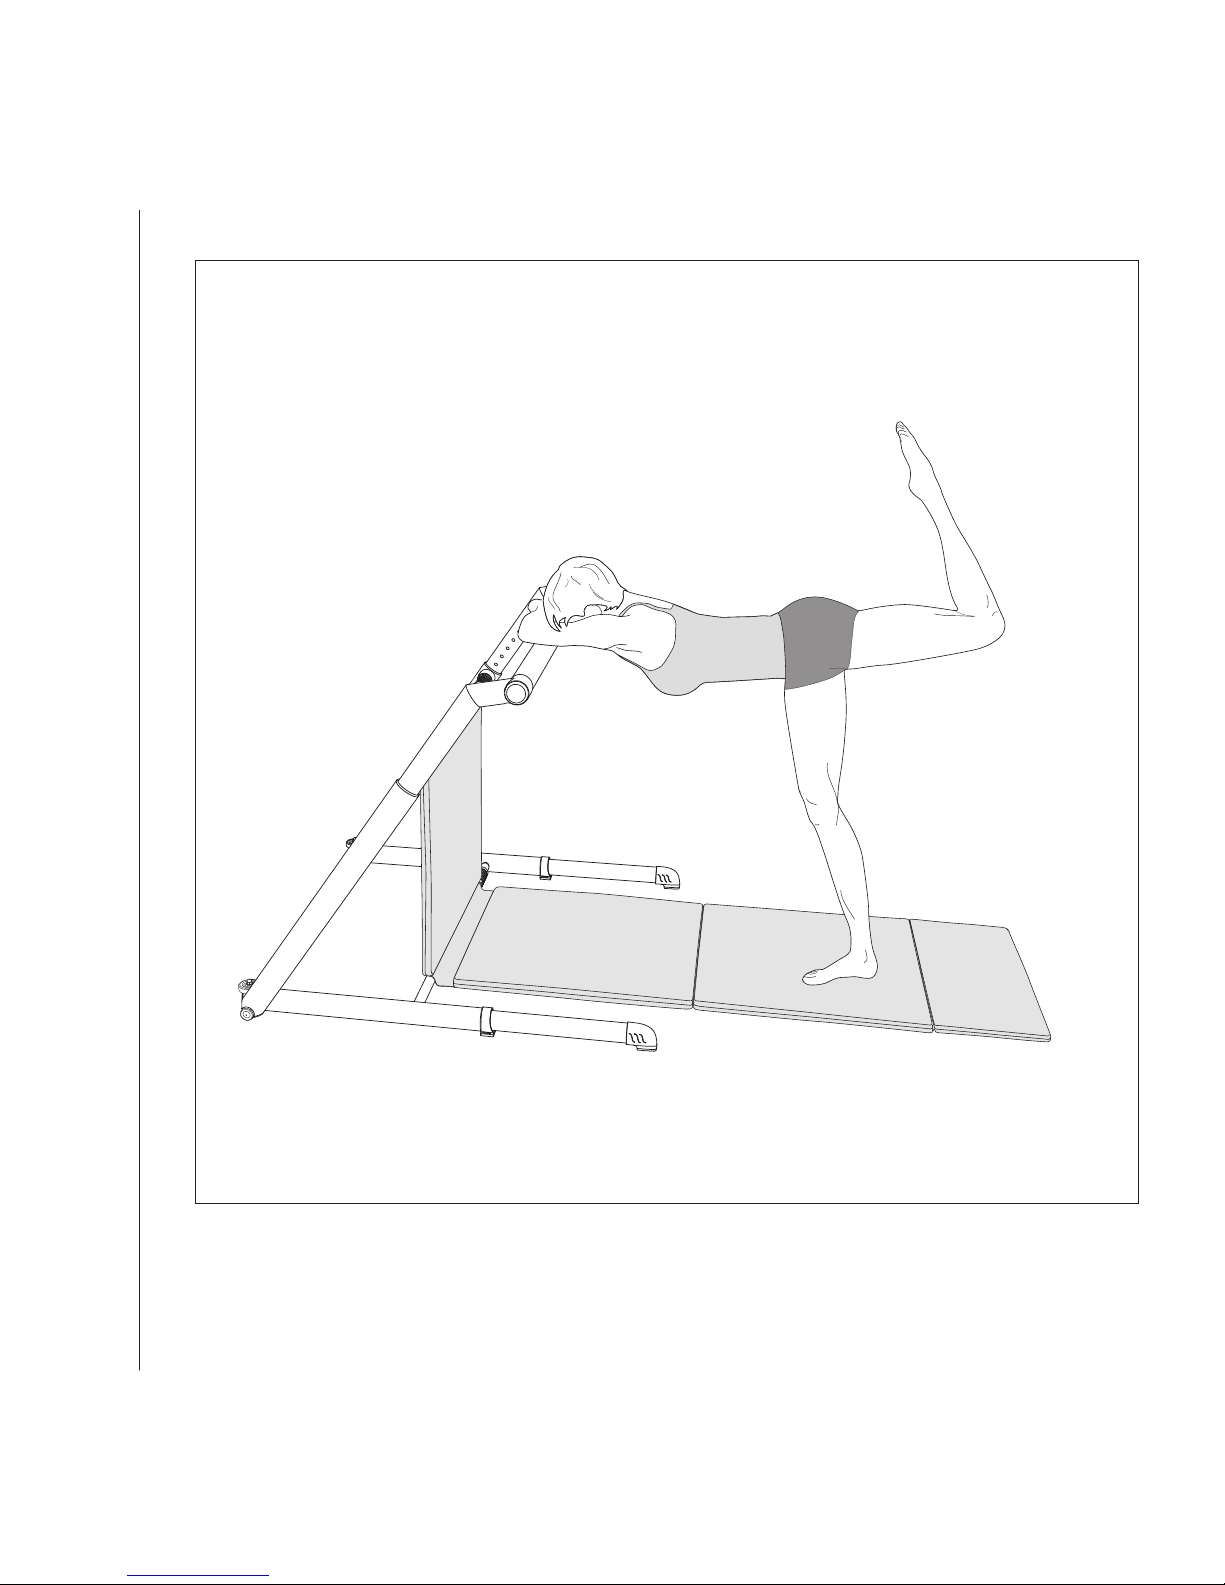
Set-Up
Cross forearm over forearm and place them on the barre, resting your
forehead on your forearms.
Walk your feet back until they are directly below your hips. Relax your shoulders so that they are at the same level as your hips, forming a flat back.
Pull your navel into your spine as you lift one leg, keeping your hips and
shoulders parallel to the floor.
Bend your standing leg slightly.
Shift your weight to the inside of the foot of your standing leg.
Bend your working leg to form a 90-degree angle so that your thigh is
parallel to the floor.
Point your toes and bring your foot as close to your seat as possible.
Movement
Press your working leg to the ceiling in slow, controlled pulses.
9
Fold Over Seat Work
To learn more about our products, please visit fluidity.com
Using the Fluidity Barre
10 To learn more about our products, please visit fluidity.com

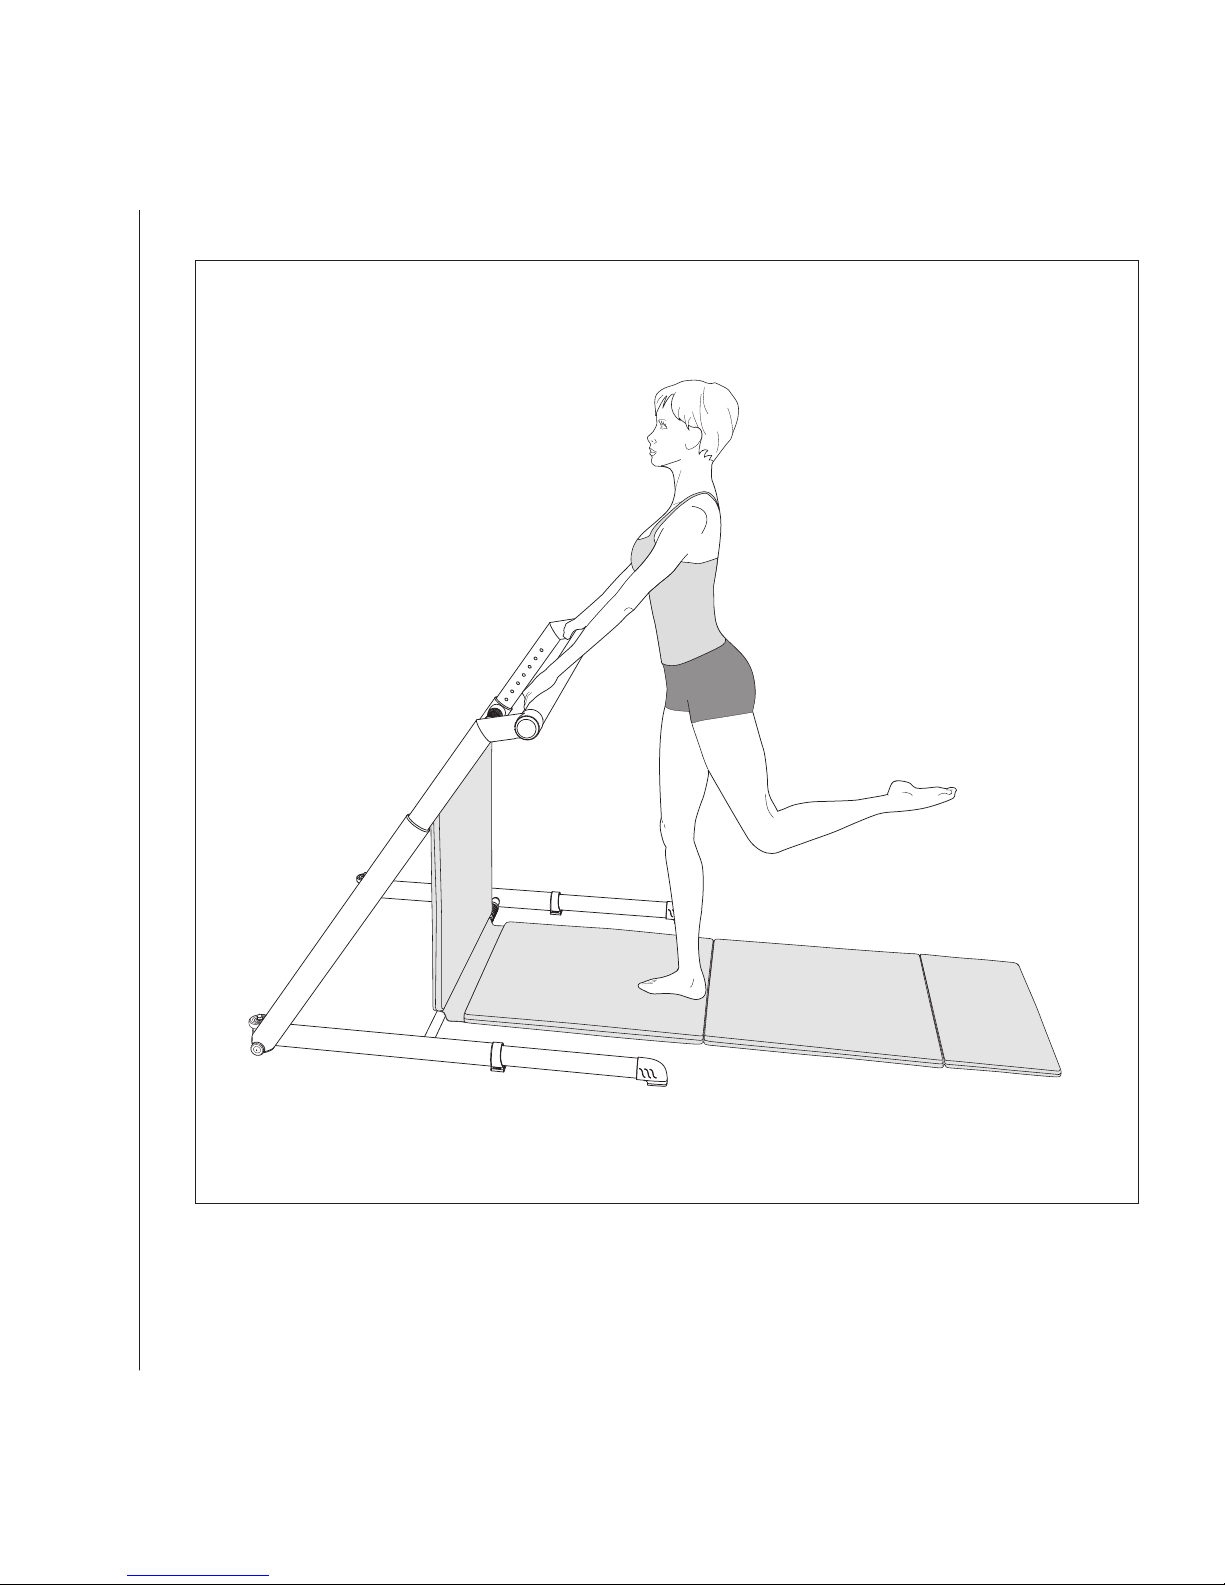
Set-Up
Walk yourself an arm’s length away from the barre and stand with your feet
and knees together.
Place your palms on the barre so that your arms form a wide ‘V’ position.
Separate your toes so that your feet form a ‘V’ position approximately two
to three inches wide.
Slightly bend your knees.
Bend your working leg to a 90-degree angle and point your toes.
Extend your working leg back as far as possible.
Keep the working leg behind the standing leg at all times.
Shift your weight onto the inside of the foot of the standing leg so that you
do not sit into the hip.
Lower your shoulder blades to your seat and relax your rib cage.
Movement
Extend your working leg back as far as possible, and from that point, press
the leg back in slow, controlled pulses.
11
Attitude
Always consult your physician before beginning any exercise program.
Using the Fluidity Barre
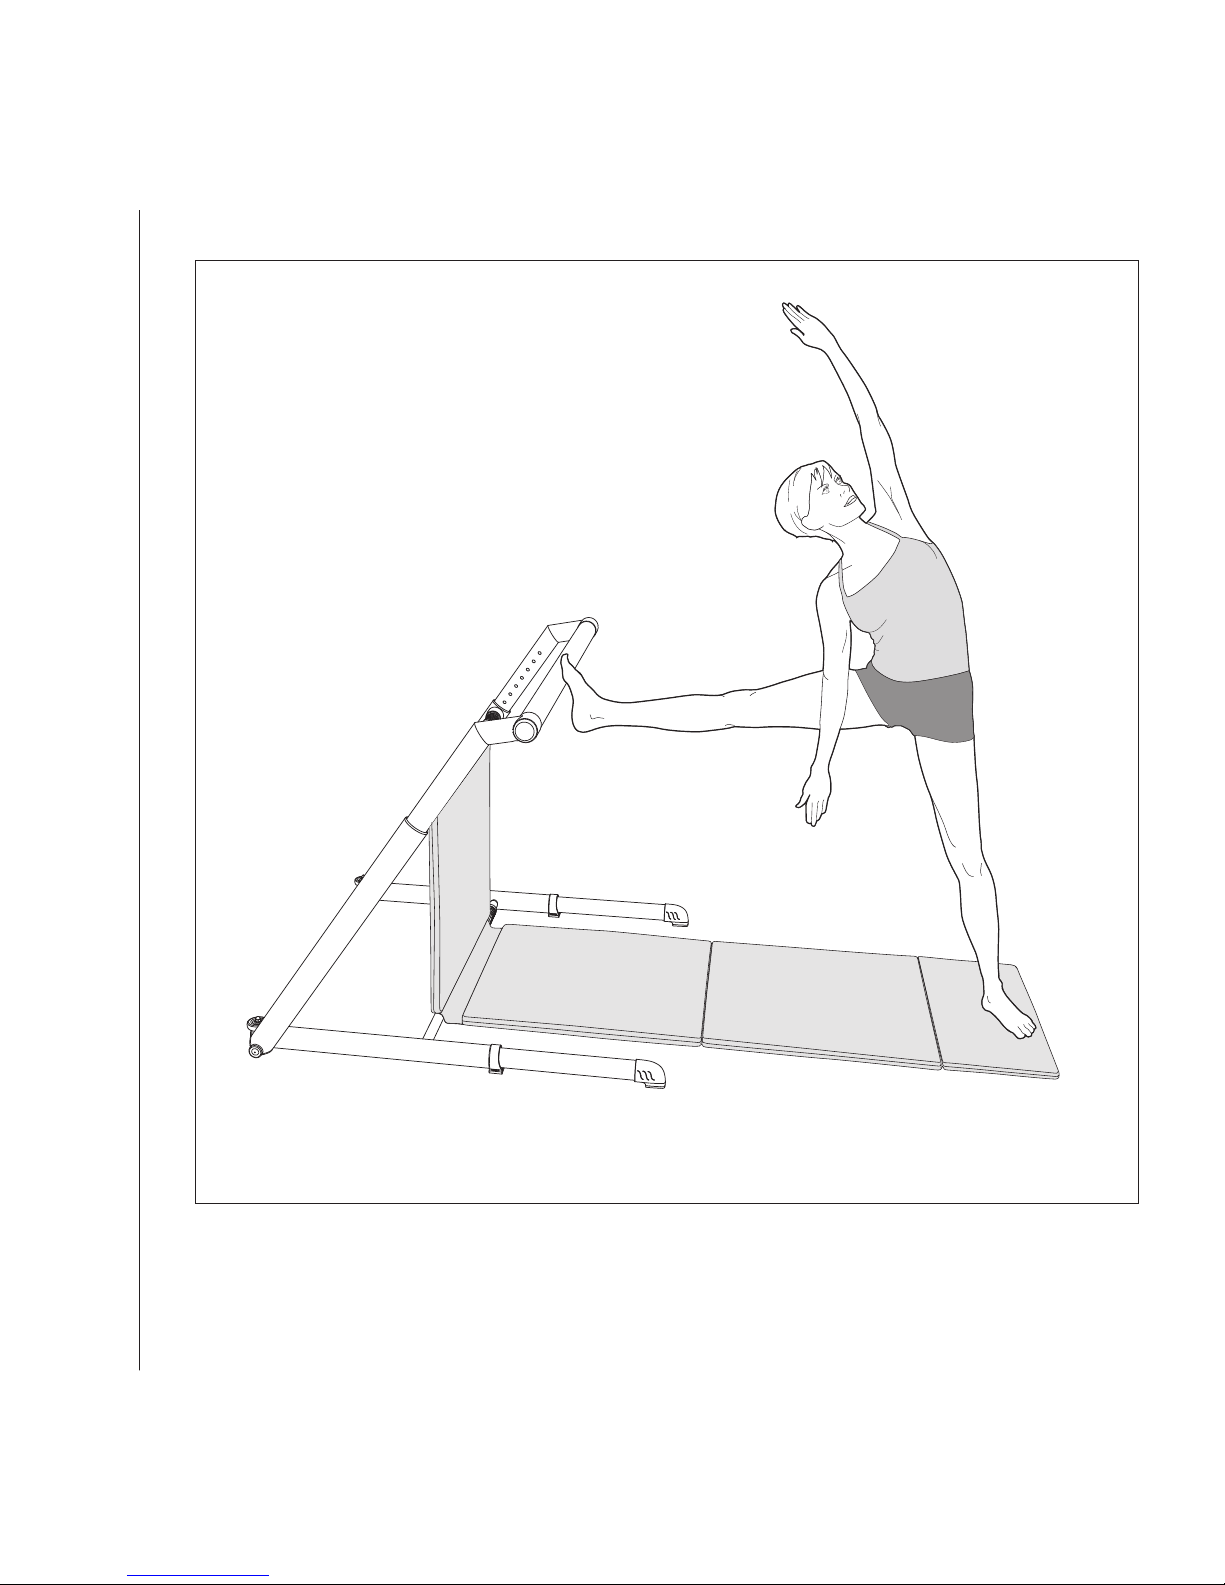
12 Always consult your physician before beginning any exercise program.

Set-Up
Stand facing the barre.
Stand a leg’s length away from the barre with feet parallel and hip-width
apart.
Extend one leg on to the barre so that the ball of your foot rests on the
barre and toes are free.
Turn your standing foot an angle slightly wider than 90° angle, opening the
body so that it is perpendicular to the barre.
Inch your foot forward on the barre two to three inches. Press the heel
under the barre.
Lower the inside hip down.
Rotate your pelvis under.
Movement
Press your inside arm against the inner thigh of your standing leg with your
palm facing forward.
Reach the outside arm over your head. Pull your navel into your spine and
then the lift up out of your hip and reach towards the barre.
Turn your head towards the outside arm and then look up, lifting your chin
to the ceiling as you try to reach the outside arm behind your ear.
Keep your shoulders squared.
13
Turned Out Ballet Stretch
To learn more about our products, please visit fluidity.com
Using the Fluidity Barre
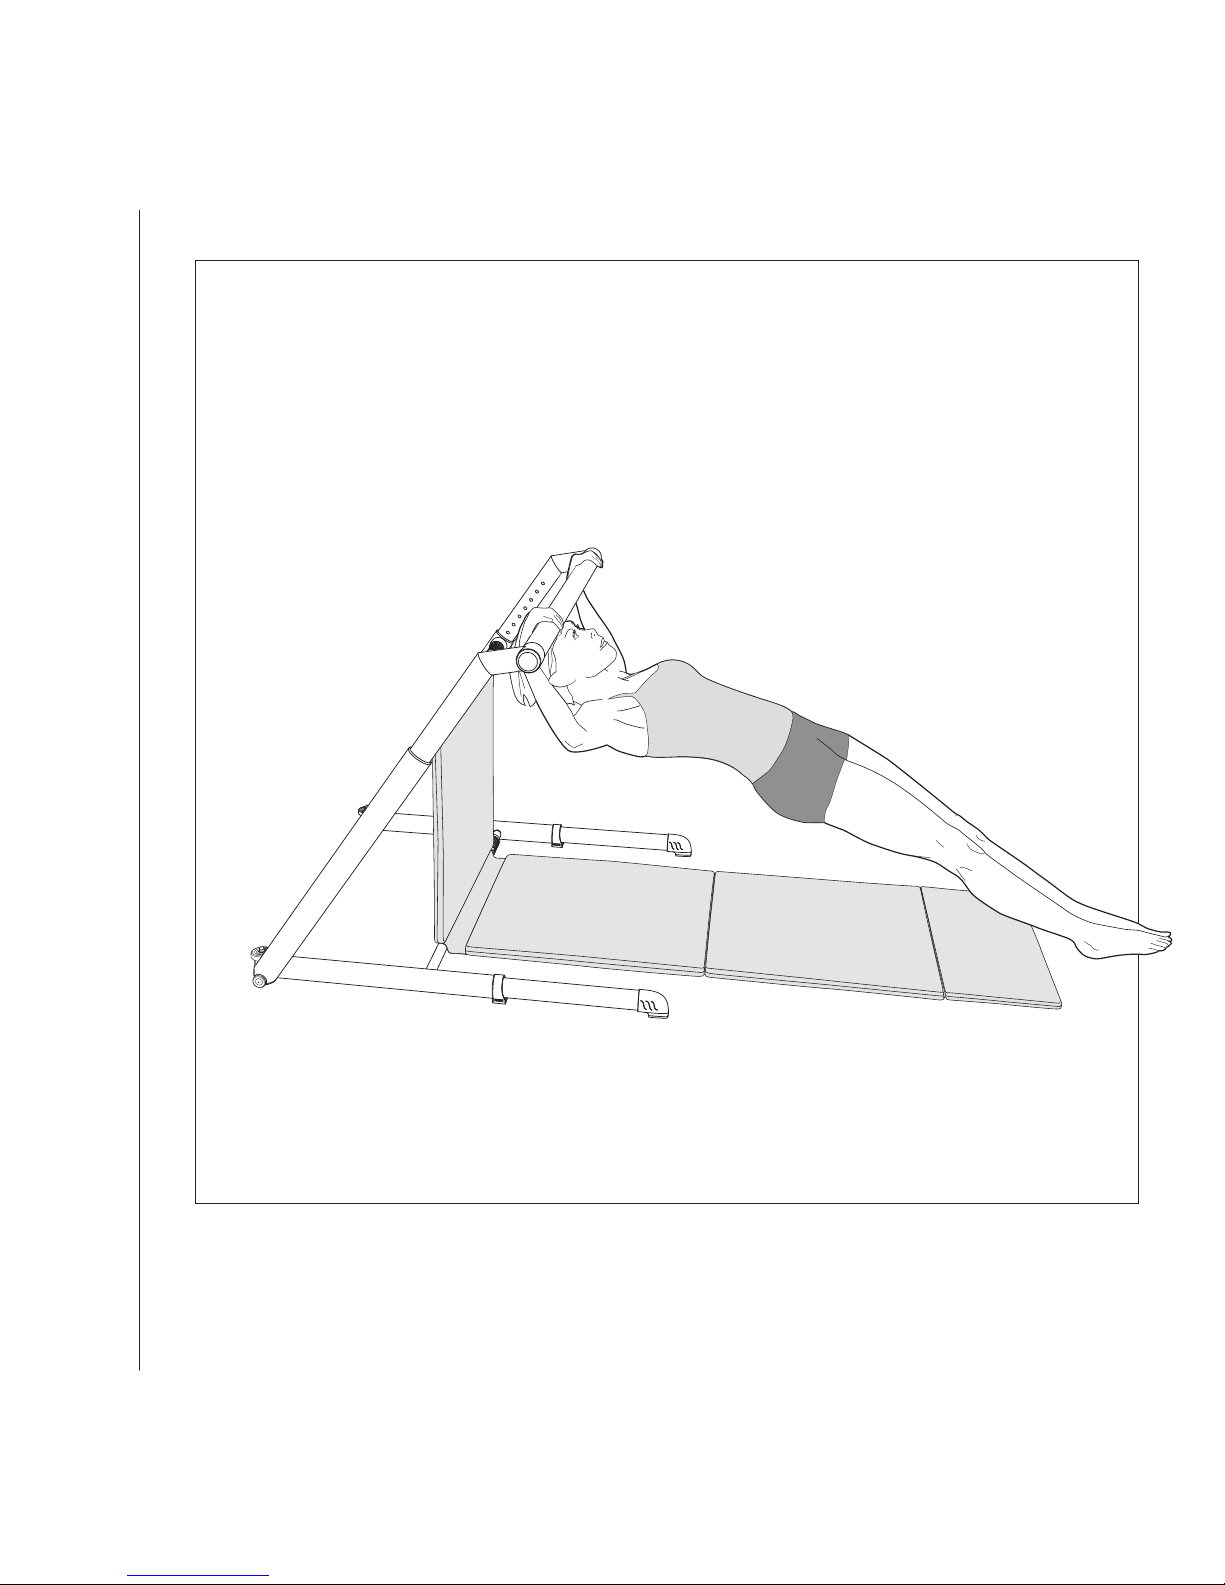
14 To learn more about our products, please visit fluidity.com

Set-Up
Sit with your back flat against the backboard so that there is no space between your seat and the backboard. Warning: Never adjust the barre height
from a seated position. If you need to adjust the barre so that it is a few
inches above your head, always stand up at the barre to adjust its height.
Extend your legs in front of you.
Lower your shoulder blades to your seat.
Relax your rib cage and pull your navel into your spine.
Movement
Press up on the barre with your hands wider than your shoulders.
Keeping your navel into your spine and shoulders relaxed, lift your feet off
the floor. Open and close your legs the width of the mat, touching your
knees together each time.
15
Flat Back
Always consult your physician before beginning any exercise program.
Using the Fluidity Barre
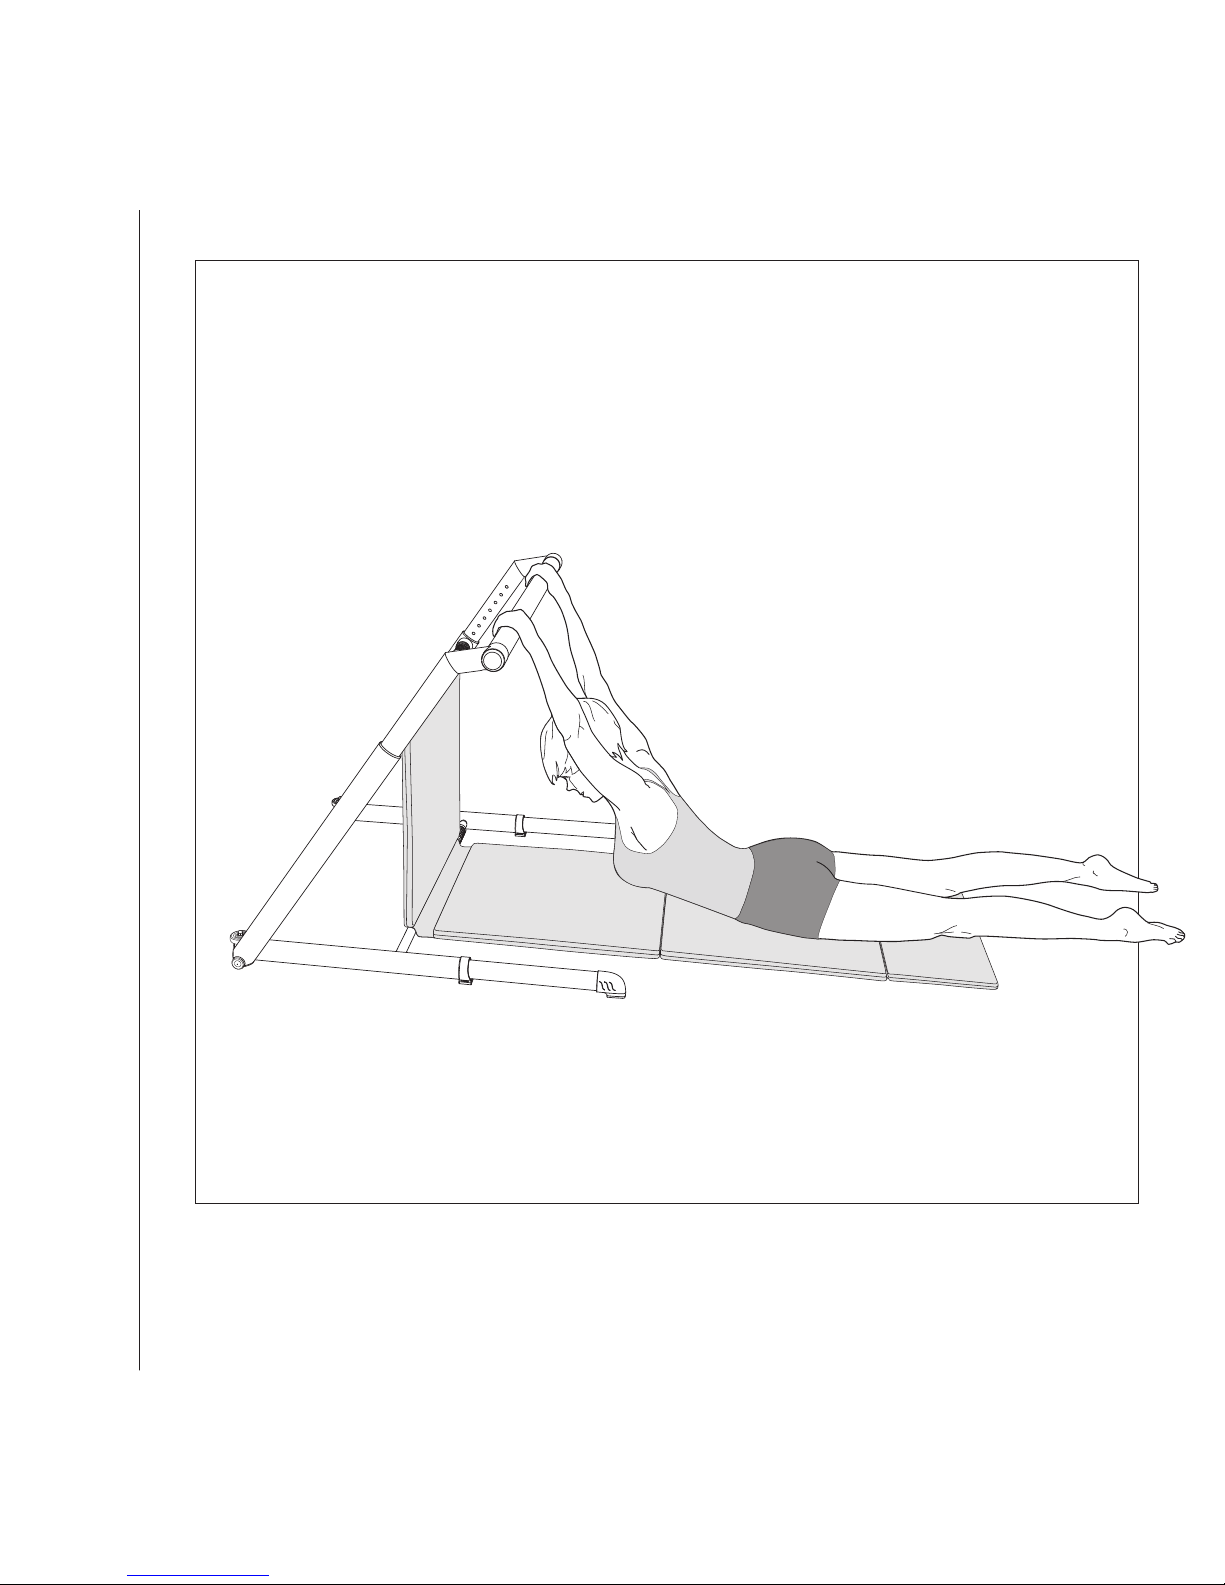
16 Always consult your physician before beginning any exercise program.

Set-Up
Lie face down on the mat so that your head is roughly a forearm’s length
from the backboard.
Separate your legs slightly and relax your seat.
Movement
Reach your arms up to hang from the barre, letting gravity pull your body to
the mat.
17
Hang from the Barre
To learn more about our products, please visit fluidity.com
Using the Fluidity Barre
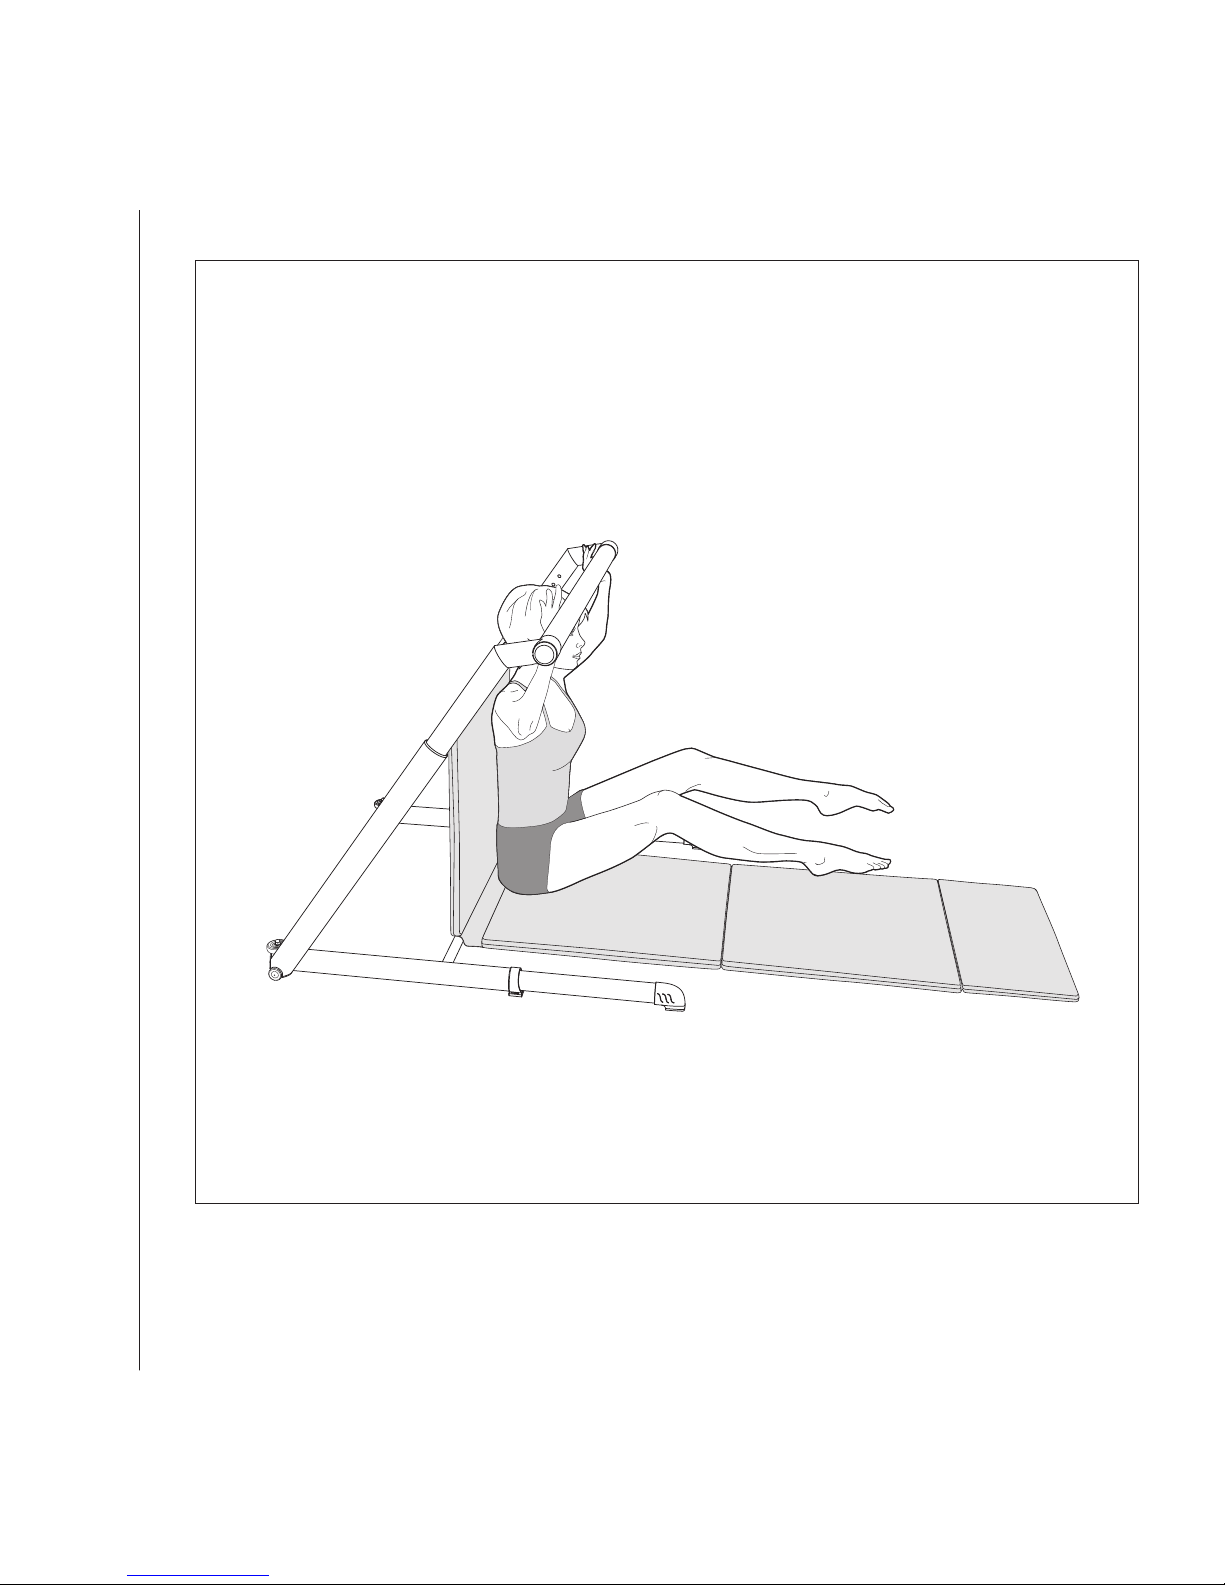
18 To learn more about our products, please visit fluidity.com

Set-Up
Sit on the mat facing away from the barre.
With hands wider than your shoulders, reach behind you and grasp the
barre.
Extend your legs straight in front of you with knees and feet together and
toes pointed.
Grip the barre and lift your pelvis off the mat so that your body forms a
straight line from shoulder to heel.
Pull your navel into your spine.
Lean your head back so that your neck is in line with your spine.
Movement
Bend your elbows as you pull yourself up to the barre as close as possible
without your head touching the barre.
Fully extend your arms to control the movement down to the starting
position, making sure not to drop your pelvis.
19
Pull Up
Always consult your physician before beginning any exercise program.
 Loading...