

Page 1
Genotyping
with Juno
Getting Started Guide
PN 100-7074 D1
Page 2

For Research Use Only. Not for use in diagnostic procedures.
Information in this publication is subject to change without notice. It is
Fluidigm policy to improve products as new techniques and components
become available. Therefore, Fluidigm reserves the right to change
specifications at any time. Every effort has been made to avoid errors in
the text, diagrams, illustrations, figures, and screen captures. However,
Fluidigm assumes no responsibility for any errors or omissions. In no
event shall Fluidigm be liable for any damages in connection with or
arising from the use of this publication.
Patent and Limited License Information
Fluidigm products are covered by issued and pending patents in the
United States and other countries. Patent and limited license information
is available at fluidigm.com/legalnotices
Limited Use License to Perform Preamplification with Fluidigm IFCs
A license to use Thermo Fisher Scientific’s patented preamplification
method workflows involving a Fluidigm integrated fluidic circuit (IFC) can
be obtained (i) with purchase of a Fluidigm IFC from Fluidigm Corporation
or (ii) by a separate license from Thermo Fisher Scientific. For licensing
information, contact outlicensing@lifetech.com.
Limited Digital PCR License
A license to use Thermo Fisher Scientific’s patented digital PCR method
in all fields other than in the Sequencing Field, the Mass Spectrometry
Field, and the Prenatal Field in workflows involving a Fluidigm IFC can be
obtained (i) with purchase of a Fluidigm IFC from Fluidigm Corporation or
(ii) by a separate license from Thermo Fisher Scientific. For licensing
information, contact outlicensing@lifetech.com.
Trademarks
Fluidigm, the Fluidigm logo, Biomark, EP1, Juno, and SNP Type are
trademarks or registered trademarks of Fluidigm Corporation in the
United States and/or other countries. All other trademarks are the sole
property of their respective owners.
For EU's WEEE directive information, go to fluidigm.com/compliance
© 2017 Fluidigm Corporation. All rights reserved. 09/2017
For technical support visit fluidigm.com/support.
North America +1 650 266 6100 | Toll-free (US/CAN): 866 358 4354 | techsupport@fluidigm.com
Latin America +1 650 266 6100 | techsupportlatam@fluidigm.com
Europe/Middle East/Africa/Russia +44 1223 859941 | techsupporteurope@fluidigm.com
Japan +81 3 3662 2150 | techsupportjapan@fluidigm.com
China (excluding Hong Kong) +86 21 3255 8368 | techsupportchina@fluidigm.com
All other Asian countries/India/Australia +1 650 266 6100 | techsupportasia@fluidigm.com
2
Genotyping with Juno Getting Started Guide
Page 3

Contents
About This Guide 4
Purpose 4
How to Use This Guide 5
Safety Alert Conventions 5
Safety Alerts for Chemicals 5
Safety Alerts for Instruments 5
Safety Data Sheets 6
Getting Started 7
Workflow 7
Best Practices 7
Related Documentation 7
Chapter 1: Product Information 8
Required Kit Contents 8
TaqMan Assay Kit 8
SNP Type Assay Kit 9
Required Reagents 10
TaqMan Assays 10
SNP Type Assays 10
Suggested Reagents 10
Required Consumables 11
Required Equipment 11
Obtain the Minimum Required Genomic DNA 14
Prepare the Sample Mix 15
Load and Run the IFC on Juno 16
Perform Genotyping Analysis on the Samples 19
19
Chapter 3: Genotyping with the Juno
96.96 Genotyping IFC Using SNP
Type Assays 20
Prepare Assay and Sample Mixes 20
Prepare the 200 nM Primer Pool for
Preamplification 20
Prepare 2X SNP Type Assays 21
Prepare the Assay Mix 22
Obtain the Minimum Required Genomic DNA 22
Prepare the Sample Mix 23
Load and Run the IFC on Juno 24
Perform Genotyping Analysis on the Samples 27
27
Appendix A: Suggested Kits 28
TaqMan Assay Kit 28
SNP Type Assay Kit 28
Suggested Reagents to Use with TaqMan
Assay and SNP Type Assay Kits 29
Suggested Equipment 11
Required Software 12
IFC Type and Related Scripts 12
Chapter 2: Genotyping with the
Juno 96.96 Genotyping IFC Using
TaqMan Assays 13
Prepare Assay and Sample Mixes 13
Prepare the Primer Pool for Preamplification 13
Prepare 2X TaqMan Assays for Genotyping 14
Prepare the Assay Mix 14
Genotyping with Juno Getting Started Guide
Appendix B: Safety 30
General Safety 30
Instrument Safety 30
Electrical Safety 31
Chemical Safety 31
Disposal of Products 31
3
Page 4

About This Guide
CAUTION ABBREVIATED SAFETY ALERTS. Hazard symbols and hazard
types specified in procedures may be abbreviated in this document. For
complete safety information, see the safety appendix on page 30.
Purpose
This guide describes how to perform genotyping of low-concentration DNA with
the Juno™ 96.96 Genotyping IFC (integrated fluidic circuit) on the Juno™ system.
This is possible through advanced microfluidics technology that integrates
preamplification and genotyping reactions of up to 96 samples and 96
genotyping assays in a single workflow on an IFC.
The IFC produces 9,216 genotypes in less than three hours using a simple
workflow with minimal hands-on time. Samples are loaded into individual inlets of
the Juno 96.96 Genotyping IFC, then distributed across multiple reaction
chambers in nanoliter-volume aliquots. With high-quality samples, detecting the
specific targets requires thermal cycling for preamplification and PCR for
genotyping on the instrument.
After genotyping is performed on the Juno system, the IFC is scanned on the
EP1™ system or the Biomark™ HD system to collect genotyping data for later
analysis.
4
Genotyping with Juno Getting Started Guide
Page 5

How to Use This Guide
The chapters in this guide are organized according to assay type. Refer to the
appropriate chapter to run the Juno 96.96 Genotyping IFC on the Juno system.
For detailed instructions on instrument and software operation, refer to the Juno
System User Guide (PN 100-7070).
Safety Alert Conventions
This guide uses specific conventions for presenting information that may require
your attention. Refer to the following safety alert conventions.
Safety Alerts for Chemicals
Fluidigm follows the United Nations Globally Harmonized System (GHS) for
communicating chemical hazard information. GHS provides a common means of
classifying chemical hazards and a standardized approach to chemical label
elements and safety data sheets (SDSs). Key elements include:
About This Guide
How to Use This Guide
• Pictograms that consist of a symbol on a white background within a red diamondshaped frame. Refer to the individual SDS for the applicable pictograms and
warnings pertaining to the chemicals being used.
• Signal words that alert the user to a potential hazard and indicate the severity level.
The signal words used for chemical hazards under GHS:
DANGER Indicates more severe hazards.
WARNING Indicates less severe hazards.
Safety Alerts for Instruments
For hazards associated with instruments, this guide uses the following indicators:
• Pictograms that consist of a symbol on a white background within a black triangleshaped frame.
Genotyping with Juno Getting Started Guide
5
Page 6

About This Guide
Safety Data Sheets
• Signal words that alert the user to a potential hazard and indicate the severity level.
The signal words used for instrument hazards:
DANGER Indicates an imminent hazard that will result in severe injury or death if not
avoided.
WARNING Indicates a potentially hazardous situation that could result in serious
injury or death.
CAUTION Indicates a potentially hazardous situation that could result in minor or
moderate personal injury.
IMPORTANT Indicates information necessary for proper use of products or
successful outcome of experiments.
Safety Data Sheets
Read and understand the SDSs before handling chemicals. To obtain SDSs for
chemicals ordered from Fluidigm Corporation, either alone or as part of this system,
go to fluidigm.com/sds and search for the SDS using either the product name or the
part number.
Some chemicals referred to in this user guide may not have been provided with your
system. Obtain the SDSs for chemicals provided by other manufacturers from those
manufacturers.
6
Genotyping with Juno Getting Started Guide
Page 7

Getting Started
Workflow
Reagent Handling Automated Steps Estimated Times
1 Prepare preamplification and
genotyping assay and sample mixes
2 Pipet preamplification, genotyping
mixes, and control line fluid into the IFC
3
4
Run a script to preamplify and
genotype the DNA
Perform genotyping analysis on
EP1 or Biomark systems
30–60 minutes
10–20 minutes
2.5 hours (TaqMan
protocol); 3.5 hours
(SNP Type protocol)
5–10 minutes
Best Practices
• Use good laboratory practices to minimize contamination of samples. Use a new
pipette tip for every new sample. Whenever possible, separate pre- and postPCR activities. Dedicate laboratory materials to designated areas.
• Unless otherwise specified, thaw reagents at room temperature, then use them
at room temperature. Store reagents at their specified storage temperatures.
(See “Required Kit Contents” on page 8.)
• Vortex reagents for 20 seconds, and then centrifuge reagents for 2 seconds
before use.
Related Documentation
Go to fluidigm.com/documents
Genotyping with Juno Getting Started Guide
7
Page 8
Chapter 1: Product Information
Required Kit Contents
The kits include the reagents required for preparing 10 IFCs to use on the Juno
system. For suggested kits, see “Suggested Kits” on page 28.
IMPORTANT
• Do not pipet reagents from the TaqMan and SNPType assay kits into the same IFC.
Use a different IFC for each kit. Do not mix reagents from different kits.
• Unless otherwise specified, thaw reagents at room temperature, then use them at
room temperature. Store reagents at their specified storage temperatures. Vortex
reagents for 20 seconds, then centrifuge reagents for 2 seconds before use.
TaqMan Assay Kit
Box Component Cap Color Quantity Volume
per Tube (mL)
Juno Genotyping Kit
for 10 IFCs
(PN 100-8362)
Juno GT Flux Fluid
Juno GT Preamp
Master Mix
Dilution Reagent Natural 2 tubes 1.7
Probe GT Master Mix Gold 2 tubes 1.6
Juno GT Flux Fluid Purple 1 tube 0.9
Juno 96.96
Genotyping IFC—
10 IFCs
Juno 96.96 GT
Control Line Fluid
Light
purple
— 10 IFCs —
— 2 boxes;
Probe GT Master Mix
Juno GT Preamp Master Mix
Dilution Reagent
1 tube 1.35
20 syringes/
box
—
Storage
–20 ºC
Room
temperature
Figure 1. Juno™ Genotyping Kit for 10 IFCs (PN 100-8362).
8
Genotyping with Juno Getting Started Guide
Page 9
SNP Type Assay Kit
Chapter 1: Product Information
Required Kit Contents
Box Component Cap Color Quantity Volume
per Tube
or Bottle
Juno SNP Type
Genotyping Kit for
10 IFCs
(PN 100-8364)
Juno GT Preamp Master
Mix
Juno SNP Type GT
Master Mix
60X SNP Type Reagent Amber
Light
1 tube 1.35 mL
purple
Light
2 tubes 1.6 mL
blue
2 tubes 70 μL
Juno GT Flux Fluid Purple 1 tube 1.0 mL
Dilution Reagent Natural • 2 bottles
• 1 tube
Juno 96.96 Genotyping
— 10 IFCs —
• 3.7 mL
• 1.7 mL
IFC—10 IFCs
Juno 96.96 GT Control
Line Fluid
— 2 boxes;
20 syringes/
—
box
Juno GT Flux Fluid
60X SNP Type Reagent
Storage
–20 ºC
Room
temperature
Dilution Reagent
Juno SNP Type GT Master Mix
Juno GT Preamp Master Mix
Figure 2. Juno™ SNP Type Genotyping Kit for 10 IFCs (PN 100-8364).
Genotyping with Juno Getting Started Guide
9
Page 10

Chapter 1: Product Information
Required Reagents
Required Reagents
TaqMan Assays
Product Name Company Part Number
20X, 40X, or 80X TaqMan
assays
®
genotyping
Thermo Fisher
Scientific
—
SNP Type Assays
Product Name Company Part Number
SNP Type assays specific target
amplification Primers (100 μM STA)
SNP Type assays ASP1/ASP2
(100 μM each)
SNP Type assays LSP
(100 μM each)
Fluidigm —
Fluidigm —
Fluidigm —
Suggested Reagents
Product Name Company Part Number
UltraPure
Water
™
DNase/RNase-Free Distilled
Thermo Fisher
Scientific
10977-015
10
Genotyping with Juno Getting Started Guide
Page 11

Chapter 1: Product Information
Required Consumables
Product Name Company Part Number
Juno 96.96 Genotyping IFC:
• Juno 96.96 Genotyping IFC
• Juno 96.96 Genotyping IFC, 10 Pack
Fluidigm 100-6499
100-8365
Required Consumables
Disposable microcentrifuge tubes,
polypropylene, 1.5 mL
96-well PCR plates MLS†
MicroAmp® Clear Adhesive Film Thermo Fisher
* Recommended: VWR® Slick Disposable Microcentrifuge Tubes, Polypropylene, 1.5 mL
(VWR PN 20170-666)
† Recommended: TempPlate® semi-skirted 96-well PCR plates (USA Scientific
PN 1402-9700)
Major laboratory
supplier (MLS)*
Scientific
—
—
4306311
Required Equipment
Product Name Company Part Number
Juno system, including system software version v3.1 or
later, instrument, software, MX Interface Plate, Interface
Plate Loading Fixture, Cleaning Plate, and Barrier Tape
Applicator and Adapter
For Juno 96.96 Genotyping IFC: SX Interface Plate Fluidigm 100-6368
Fluidigm 101-6455
Vortexer MLS —
Pipettes (P2, P20, P200, P1000) and appropriate
low-retention tips
8-channel pipettes and appropriate low-retention tips MLS —
Microcentrifuge MLS —
Suggested Equipment
Product Name Company Part Number
Two biocontainment hoods (DNA hood and DNA-free hood)
to prevent DNA contamination of lab and samples
Genotyping with Juno Getting Started Guide
MLS —
MLS —
11
Page 12

Chapter 1: Product Information
Required Software
Required Software
• Fluidigm Data Collection software v4.2 or later
• Fluidigm SNP Genotyping Analysis software v4.2 or later
IFC Type and Related Scripts
Barcode (prefix) Scripts Description
180x Juno 96.96 Fast Preamplification and genotyping of samples by
TaqMan assays (180x)
180x Juno 96.96 Preamplification and genotyping of samples by SNP
Type assay (180x).
12
Genotyping with Juno Getting Started Guide
Page 13

Chapter 2: Genotyping with the
Juno 96.96 Genotyping IFC Using
TaqMan Assays
Prepare Assay and Sample Mixes
Prepare the Primer Pool for Preamplification
1 If necessary, adjust the concentration of TaqMan genotyping assays with DNase-free
water to 18 μM (20X).
2 In a new, labeled 1.5-mL microcentrifuge tube, combine 2 μL of each 20X TaqMan
genotyping assay up to a total of 96 assays. The total volume of assays is 2Y in
Table 1, where Y is the number of assays used. Each assay is at a final concentration
of 0.2X in the primer pool.
3 Add Dilution Reagent to the 20X TaqMan assays:
Table 1. Prepare the primer pool for preamplification
Component Volume (μL) Final Concentration
20X TaqMan genotyping assays,
18 μM*
Dilution Reagent 200 – 2Y —
Total 200.0 —
* See step 1.
The final concentration of each primer in the preamplification reaction is 45 nM.
NOTE The volume can be adjusted proportionally based on the number of samples
to be amplified.
2Y (up to 96 assays) 180 nM (0.2X)
Genotyping with Juno Getting Started Guide
13
Page 14

Chapter 2: Genotyping with the Juno 96.96 Genotyping IFC Using TaqMan Assays
Prepare Assay and Sample Mixes
Prepare 2X TaqMan Assays for Genotyping
1 If necessary, adjust the concentration of TaqMan genotyping assays with DNase-free
water to 18 μM (20X).
2 In a new 96-well plate, dilute the 20X TaqMan genotyping assays in Dilution
Reagent or DNase-free water to a final concentration of 2X for each assay:
Component Volume (μL) Final Concentration
20X TaqMan genotyping assays 1.0 2X
Dilution Reagent or
DNase-free water
Total 10.0 —
9.0 —
Prepare the Assay Mix
1 Label a new 96-well plate, “TAQMAN ASSAY PLATE.” In a DNA-free hood, pipet
2.5 μL of Probe GT Master Mix into each well. (See Table 2.)
2 In a DNA-free hood, pipet 2.5 μL of 2X TaqMan assays into a well of the TaqMan
assay plate for each assay. (See “Prepare 2X TaqMan Assays for Genotyping”.)
3 In unused assay inlets, combine 2.5 μL of Probe GT Master Mix with 2.5 μL DNase-
free water.
4 Seal the plate with MicroAmp Clear Adhesive Film, vortex it for 5 seconds, then
centrifuge it at 1,000 x g for 1 minute.
Table 2. Assay mix
Component Volume (μL)
Probe GT Master Mix 2.5
2X TaqMan assays*
Total 5.0
* See “Prepare 2X TaqMan Assays for Genotyping”.
Obtain the Minimum Required Genomic DNA
For high-quality human samples, the minimum DNA required is 2.5 ng/μL in 2.75 μL.
Larger genomes require higher concentrations of genomic DNA.
14
2.5
Genotyping with Juno Getting Started Guide
Page 15

Chapter 2: Genotyping with the Juno 96.96 Genotyping IFC Using TaqMan Assays
Prepare Assay and Sample Mixes
Prepare the Sample Mix
1 In a DNA-free hood, in a new 1.5-mL microcentrifuge tube labeled “Sample Pre-Mix,”
combine the Juno GT Preamp Master Mix and the primer pool for preamplification to
prepare the sample pre-mix. (See Table 3.)
2 Label a new 96-well plate “SAMPLE PLATE.” Pipet 2.25 μL of the sample pre-mix
into each well of the plate. Skip wells that are for no template controls. Do not add
sample pre-mix to no template control wells.
IMPORTANT Prepare at least one no template control.
3 In a DNA sample hood, pipet 2.75 μL of genomic DNA into the appropriate wells of
the sample plate.
4 In a DNA sample hood, pipet 5.00 μL of Dilution Reagent into each no template
control well.
5 Seal the plate with MicroAmp Clear Adhesive Film, vortex it for 5 seconds, then
centrifuge it at 1,000 x g for 1 minute.
Table 3. Sample mix
Component Volume per
Inlet (μL)
SAMPLE PRE-MIX
Juno GT Preamp Master Mix
Primer pool for preamplification†
Genomic DNA
Total
* 120 reactions for ease of pipetting
† See “Prepare the Primer Pool for Preamplification” on page 13.
Volume per
Inlet with
Overage
0.8 1.00 120.0
1.0 1.25 150.0
2.2 2.75 —
4.0 5.0 270.0
(μL)
Sample Mix
for IFC with
Overage*
(μL)
IMPORTANT Do not go past the first stop on the pipette. Doing so may introduce air
bubbles into the inlets. To avoid bubbles, pipet 4.0 μL into each inlet from the 5.0 μL
overage volume.
Genotyping with Juno Getting Started Guide
15
Page 16

Chapter 2: Genotyping with the Juno 96.96 Genotyping IFC Using TaqMan Assays
Load and Run the IFC on Juno
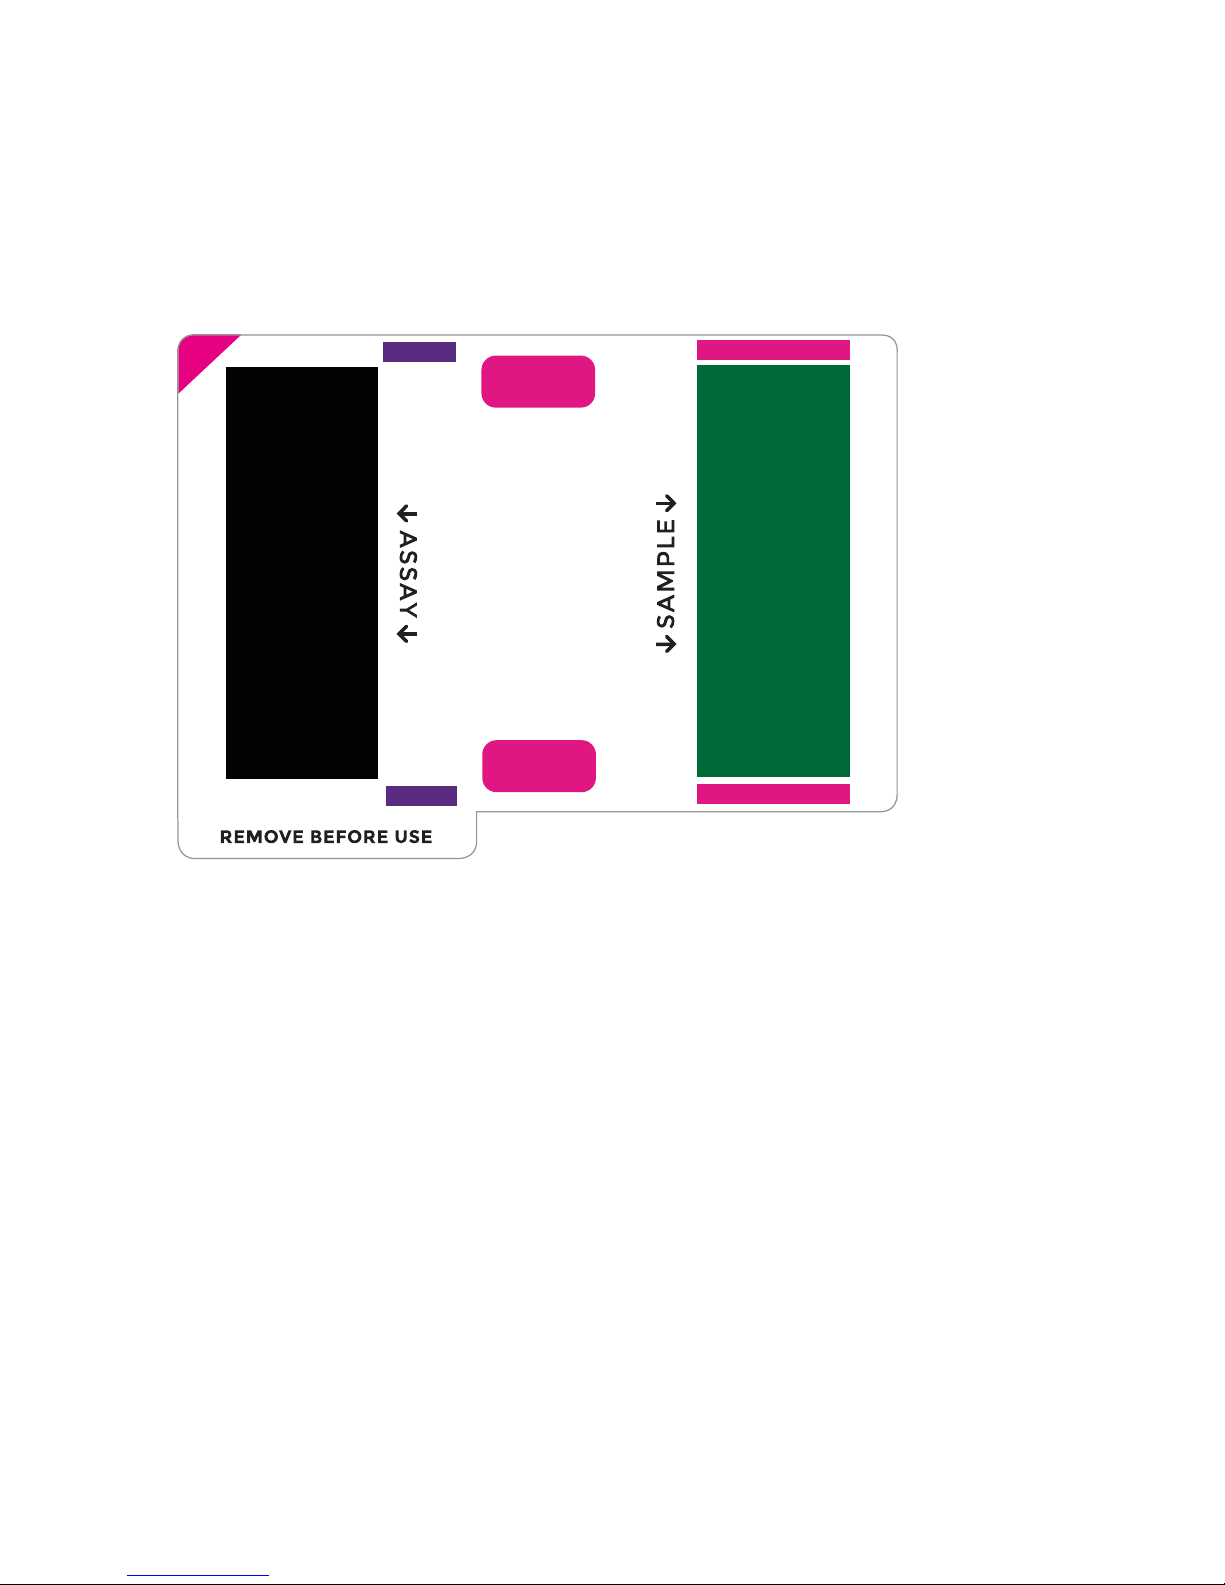
Load and Run the IFC on Juno
1 Review the loading map, which is affixed to the bottom of every new Juno 96.96
Genotyping IFC. The loading map is a general guide to show you how to pipet
samples, assays, flux fluid, and control line fluid:
A1
16
Genotyping with Juno Getting Started Guide
Page 17
Chapter 2: Genotyping with the Juno 96.96 Genotyping IFC Using TaqMan Assays
Load and Run the IFC on Juno
2 Review the pipetting map, which provides specific instructions for pipetting reagents
in the IFC. Pipet reagents from the TaqMan assay plate and the sample plate to the
IFC. On the pipetting map, each inlet is labeled with the plate well location of the
sample or assay to be pipetted into that inlet:
A1
A01
A02 A03 A04 A05
A07
A08 A09 A10 A11
B01
B02 B03 B04 B05
B07
B08 B09 B10 B11
C01
C02 C03 C04 C05
C07 C08 C09 C10 C11
D01 D02 D03 D04 D05
D07 D08 D09 D10 D11
E01
E02 E03 E04 E05 E06
E07
E08 E09 E10 E11 E12
F01 F02 F03
F04 F05
F07 F08 F09 F10 F11
G01
G02 G03 G04 G05
G07
G08 G09 G10 G11
H01
H02 H03
H04 H05
H07
H08 H09
H10 H11
A06
A12
B06
B12
C06
C12
D06
D12
F06
F12
G06
G12
H06
H12
Acc 1
Acc 2
A01
A02 A03 A04 A05
A07
A08 A09 A10 A11
B01
B02 B03 B04 B05
B07
B08 B09 B10 B11
C01
C02 C03 C04 C05
C07 C08 C09 C10 C11
D01 D02 D03 D04 D05
D07 D08 D09 D10 D11
vv
E01
E02 E03 E04 E05 E06
E07
E08 E09 E10 E11 E12
F01 F02 F03
F07 F08 F09 F10 F11
G01
G02 G03 G04 G05
G07
G08 G09 G10 G11
H01
H02 H03
H07
H08 H09
Key
Load 1 Load 2
Juno 96.96 GT Control
Line Fluid
Juno GT Flux Fluid,
15 μL
F04 F05
H04 H05
H10 H11
A06
A12
B06
B12
C06
C12
D06
D12
F06
F12
G06
G12
H06
H12
Assay mix, 4.0 μL
Sample mix, 4.0 μL
Juno 96.96 GT Control
Line Fluid
—
Empty
Figure 1. Pipetting map for the Juno 96.96 Genotyping IFC
3 Ensure that the notched corner of the IFC (“A1”) is at the top left.
4 Load an entire syringe of Juno 96.96 GT Control Line Fluid in Acc1 and a second
syringe in Acc2. (See pink squares on the pipetting map.) To ensure correct
accumulator volume, only use syringes containing Juno 96.96 GT Control Line Fluid.
Genotyping with Juno Getting Started Guide
17
Page 18

Chapter 2: Genotyping with the Juno 96.96 Genotyping IFC Using TaqMan Assays
Load and Run the IFC on Juno
5 Load an entire syringe of Juno 96.96 GT Control Line Fluid into a reservoir and a
second syringe into the second reservoir. (See long pink rectangles on the right side
of the pipetting map.)
IMPORTANT Carefully dispense control line fluid into the reservoirs. If control line
fluid comes into contact with the sample inlets, use a new IFC.
6 Pipet 15 μL of Juno GT Flux Fluid into each of the six ports. (See purple circles on the
pipetting map.)
7 Unseal the TaqMan assay plate and pipet 4.0 μL of each assay mix into an assay
inlet. (See black circles on the pipetting map and “Prepare the Assay Mix” on
page 14.)
8 Unseal the sample plate and pipet 4.0 μL of each sample mix into a sample inlet.
(See green circles on the pipetting map and “Prepare the Sample Mix” on page 15.)
IMPORTANT Do not go past the first stop on the pipette. Doing so may introduce air
bubbles into the inlets. Pipet 4.0 μL from the 5.0 μL overage volume to ensure that
no air bubbles enter the inlet.
9 Pull the sticker front tab down and away from the IFC to gently peel off the loading
map. Do not invert the IFC.
10 If necessary, remove any bubbles from an IFC inlet by removing the contents by
pipette and then carefully re-pipetting the contents into the inlet.
11 Ensure that the SX interface plate (silver label) is installed in the instrument. [See the
Juno System User Guide (PN 100-7070).]
12 Place the IFC into the Juno instrument, then start the run <60 minutes after pipetting
the reagents into the IFC.
13 On the Juno Scripts screen, tap the Probe GT tab, Juno 96.96 Fast, then Run. It
takes ~2.7 hours to complete.
The script contains these thermal cycling protocols:
Cycles Temperature Time
Hot start 95 ºC 2 min
14 95 ºC 15 sec
60 ºC 4 min
Cycles Temperature Time
Hot start 95 ºC 2 min
45 95 ºC 2 sec
18
60 ºC 20 sec
Genotyping with Juno Getting Started Guide
Page 19

Chapter 2: Genotyping with the Juno 96.96 Genotyping IFC Using TaqMan Assays
Perform Genotyping Analysis on the Samples
14 After the run is finished, tap EJECT to eject the IFC.
IMPORTANT After a run, perform an end-point read of the IFC in ≤1 hour. Do not
leave the IFC overnight in the instrument. Doing so will adversely affect the reaction.
Perform Genotyping Analysis on the
Samples
Refer to the appropriate document:
• SNP Genotyping User Guide (PN 68000098)
• Biomark HD Data Collection User Guide (PN 100-2451)
• Biomark/EP1 Data Collection User Guide (PN 68000127).
Genotyping with Juno Getting Started Guide
19
Page 20

Chapter 3: Genotyping with the Juno
96.96 Genotyping IFC Using SNP Type
Assays
Prepare Assay and Sample Mixes
Prepare the 200 nM Primer Pool for Preamplification
1 In a new 1.5-mL microcentrifuge tube, combine 2 μL of 100 μM SNP Type assays
specific target amplification primers (100 μM STA) up to a total of 96 assays. The total
volume is Y in Table 4.
2 In the same microcentrifuge tube, combine 2 μL of 100 μM SNP Type assays locus-
specific primers (100 μM LSP) up to a total of 96 assays. The total volume is Z in
Table 4.
3 Add Dilution Reagent to the SNP Type assays:
Table 4. Pool SNP Type assays
Component Volume (μL) Final Concentration
(nM*)
SNP Type assays specific target amplification
primers (100 μM STA)
SNP Type assays locus-specific primers
(100 μM LSP)
Dilution Reagent 1,000 – (Y + Z)—
Total 1,000.0 —
* The final concentration of each primer in the preamplification reaction is 50 nM.
NOTE
• Volume can be adjusted proportionally based on the number of
samples to be amplified.
• You can store the pooled SNP Type STA assays at –20 °C for 1 year or ≤10
freeze-thaw cycles, whichever is shorter.
Y (up to 96 assays) 200.0
Z (up to 96 assays) 200.0
20
Genotyping with Juno Getting Started Guide
Page 21

Chapter 3: Genotyping with the Juno 96.96 Genotyping IFC Using SNP Type Assays
Prepare Assay and Sample Mixes
Prepare 2X SNP Type Assays
Prepare 50X Primer Mix for Each Single Assay Inlet
In a DNA-free hood, in a new 96-well plate, combine the following reagents for each
assay:
Component Volume per 40 μL
Stock (μL)
SNP Type assays allele-specific primers
pooled ASP1 and ASP2 Primers (100 μM
ASP1/100 μM ASP2)
SNP Type assays locus-specific primers
(100 μM LSP)
Dilution Reagent 29.0 —
Total 40.0*
* A 40.0-μL volume is sufficient for 40, 2X SNP Type assays.
Final Concentration
(μM)
3.0 7.5
8.0 20.0
Prepare 2X SNP Type Assays from the 50X Primer Mix for
Genotyping
In a DNA-free hood, in a new 96-well plate, combine the following reagents for each
assay:
Component Volume per 25 μL
Stock (μL)
Concentration
Final
—
50X Primer Mix*
Dilution Reagent 24.0 —
Total 25.0†
* See “Prepare 50X Primer Mix for Each Single Assay Inlet”.
† A 25.0-μL volume is sufficient for 10 IFC runs.
1.0 2X
NOTE You can store the 2X SNP Type assays at –20 °C for up to one week.
Genotyping with Juno Getting Started Guide
—
21
Page 22

Chapter 3: Genotyping with the Juno 96.96 Genotyping IFC Using SNP Type Assays
Prepare Assay and Sample Mixes
Prepare the Assay Mix
1 In a DNA-free hood, in a new 1.5-mL microcentrifuge tube labeled “Assay Pre-Mix,”
combine the Juno SNP Type GT Master Mix and 60X SNP Type Reagent to prepare
the assay pre-mix. (See Table 5.)
2 Label a new 96-well plate “SNP TYPE ASSAY PLATE.” In a DNA-free hood, pipet
2.5 μL of the assay pre-mix into each well.
3 Pipet 2.5 μL of 2X SNP Type assay into each well of the SNP Type assay plate.
4 In unused assay or no-assay control inlets, combine 2.5 μL of assay pre-mix with
2.5 μL of Dilution Reagent.
5 Seal the plate with MicroAmp Clear Adhesive Film, vortex it for 5 seconds, then
centrifuge it at 1,000 x g for 1 minute.
Table 5 Assay mix
Component Volume per
Inlet (μL)
ASSAY PRE-MIX
Juno SNP Type GT Master Mix
60X SNP Type Reagent
2X SNP Type assays†
Total
* 120 reactions for ease of pipetting
† See “Prepare 2X SNP Type Assays” on page 21.
1.933 2.417 290.0
0.066 0.083 10.00
2.00 2.5 —
4.00 5.00 300
Volume per
Inlet with
Overage
(μL)
Assay Mix
for IFC with
Overage*
Obtain the Minimum Required Genomic DNA
For high-quality human samples, the minimum DNA required is 2.5 ng/μL. Larger
genomes require higher concentrations of genomic DNA.
(μL)
22
Genotyping with Juno Getting Started Guide
Page 23

Chapter 3: Genotyping with the Juno 96.96 Genotyping IFC Using SNP Type Assays
Prepare Assay and Sample Mixes
Prepare the Sample Mix
1 In a DNA-free hood, in a new microcentrifuge tube labeled “Sample Pre-Mix,”
combine the Juno GT Preamp Master Mix and the primer pool for preamplification to
prepare the sample pre-mix. (See Table 6.)
2 Label a new 96-well plate “SAMPLE PLATE,” and then pipet 2.25 μL of the sample
pre-mix into each well of the plate. Do not add sample pre-mix to no template control
wells.
IMPORTANT Prepare at least one no template control.
3 In a DNA sample hood, pipet 2.75 μL of genomic DNA into the appropriate wells of
the sample plate.
4 In a DNA sample hood, pipet 5.00 μL of Dilution Reagent into each no template
control well.
5 Seal the plate with MicroAmp Clear Adhesive Film, vortex it for 5 seconds, then
centrifuge it at 1,000 x g for 1 minute:
Table 6 Sample mix
Component Volume per
Inlet (μL)
SAMPLE PRE-MIX
Juno GT Preamp Master Mix
Primer pool for preamplification†
Genomic DNA
Total
* 120 reactions for ease of pipetting
† See “Prepare the 200 nM Primer Pool for Preamplification” on page 20.
0.800 1.00 120
1.00 1.25 150
2.20 2.75 —
4.00 5.00 270
Volume per
Inlet with
Overage
(μL)
Sample Mix for IFC
with Overage* (μL)
IMPORTANT Do not go past the first stop on the pipette. Doing so may introduce air
bubbles into the inlets. To avoid bubbles, pipet
4.0 μL into each inlet from the 5.0 μL overage volume.
Genotyping with Juno Getting Started Guide
23
Page 24
Chapter 3: Genotyping with the Juno 96.96 Genotyping IFC Using SNP Type Assays
Load and Run the IFC on Juno
Load and Run the IFC on Juno
1 Review the loading map, which is affixed to the bottom of every new Juno 96.96
Genotyping IFC. The loading map is a general guide to show you how to pipet
samples, assays, and control line fluid:
A1
24
Genotyping with Juno Getting Started Guide
Page 25

Chapter 3: Genotyping with the Juno 96.96 Genotyping IFC Using SNP Type Assays
Load and Run the IFC on Juno
2 Review the pipetting map, which provides specific instructions for pipetting reagents
in the IFC. Pipet reagents from the SNP Type assay plate and the sample plate to the
IFC. On the pipetting map, each inlet is labeled with the plate well location of the
sample or assay to be pipetted into that inlet:
A1
A01
A02 A03 A04 A05
A07
A08 A09 A10 A11
B01
B02 B03 B04 B05
B07
B08 B09 B10 B11
C01
C02 C03 C04 C05
C07 C08 C09 C10 C11
D01 D02 D03 D04 D05
D07 D08 D09 D10 D11
E01
E02 E03 E04 E05 E06
E07
E08 E09 E10 E11 E12
F01 F02 F03
F04 F05
F07 F08 F09 F10 F11
G01
G02 G03 G04 G05
G07
G08 G09 G10 G11
H01
H02 H03
H04 H05
H07
H08 H09
H10 H11
A06
A12
B06
B12
C06
C12
D06
D12
F06
F12
G06
G12
H06
H12
Acc 1
Acc 2
A01
A02 A03 A04 A05
A07
A08 A09 A10 A11
B01
B02 B03 B04 B05
B07
B08 B09 B10 B11
C01
C02 C03 C04 C05
C07 C08 C09 C10 C11
D01 D02 D03 D04 D05
D07 D08 D09 D10 D11
vv
E01
E02 E03 E04 E05 E06
E07
E08 E09 E10 E11 E12
F01 F02 F03
F07 F08 F09 F10 F11
G01
G02 G03 G04 G05
G07
G08 G09 G10 G11
H01
H02 H03
H07
H08 H09
Key
Load 1 Load 2
Juno 96.96 GT Control
Line Fluid
Juno GT Flux Fluid,
15 μL
F04 F05
H04 H05
H10 H11
A06
A12
B06
B12
C06
C12
D06
D12
F06
F12
G06
G12
H06
H12
Assay mix, 4.0 μL
Sample mix, 4.0 μL
Juno 96.96 GT Control
Line Fluid
—
Empty
3 Ensure that the notched corner of the IFC (“A1”) is at the top left.
4 Load an entire syringe of Juno 96.96 GT Control Line Fluid in Acc1 and a second
syringe in Acc2. (See the pink squares on the pipetting map.) To ensure correct
accumulator volume, only use syringes containing Juno 96.96 GT Control Line Fluid.
5 Load an entire syringe of Juno 96.96 GT Control Line Fluid into each of the two
reservoirs. (See the long pink rectangles on the right side of the pipetting map.)
IMPORTANT Carefully dispense control line fluid into the reservoirs. If control line
fluid comes into contact with the sample inlets, use a new IFC.
6 Pipet 15 μL of Juno GT Flux Fluid into each of the six ports. (See the purple circles on
the pipetting map.)
Genotyping with Juno Getting Started Guide
25
Page 26

Chapter 3: Genotyping with the Juno 96.96 Genotyping IFC Using SNP Type Assays
Load and Run the IFC on Juno
7 Unseal the SNP Type assay plate and pipet 4.0 μL of each assay mix into an assay
inlet. (See the black circles on the pipetting map and “Prepare the Assay Mix” on
page 22.)
8 Unseal the sample plate and pipet 4.0 μL of each sample mix into a sample inlet.
(See the green circles on the pipetting map and “Prepare the Sample Mix” on
page 23.)
IMPORTANT Do not go past the first stop on the pipette. Doing so may introduce air
bubbles into the inlets. Pipet 4.0 μL from the 5.0 μL overage volume to ensure that
no air bubbles enter the inlet.
9 Pull the sticker front tab down and away from the IFC to gently peel off the loading
map. Do not invert the IFC.
10 If necessary, remove any bubbles from an IFC inlet by removing the contents by
pipette and then carefully re-pipetting the contents into the inlet.
11 Ensure that the SX interface plate (silver label) is installed in the instrument. [See the
Juno System User Guide (PN 100-7070).]
12 Place the IFC into the Juno instrument, then start the run <60 minutes after pipetting
the reagents into the IFC.
13 On Juno Scripts screen, tap the SNP Type tab, Juno 96.96, then Run. It takes
3 hours and 20 minutes to complete.
The script contains these thermal cycling protocols:
Table 7 Multiplex STA
Cycles Temperature Time
Hot start 95 ºC 2 min
14 95 ºC 15 sec
60 ºC 4 min
26
Genotyping with Juno Getting Started Guide
Page 27

Chapter 3: Genotyping with the Juno 96.96 Genotyping IFC Using SNP Type Assays
Table 8 SNP Type genotyping
Cycles Temperature Time
Hot start 95 ºC 10 min
95 ºC 15 sec
Perform Genotyping Analysis on the Samples
1
1
1
1
39
64 ºC 45 sec
72 ºC 15 sec
95 ºC 15 sec
63 ºC 45 sec
72 ºC 15 sec
95 ºC 15 sec
62 ºC 45 sec
72 ºC 15 sec
95 ºC 15 sec
61 ºC 45 sec
72 ºC 15 sec
95 ºC 15 sec
60 ºC 45 sec
72 ºC 15 sec
14 After the run is finished, tap EJECT to eject the IFC from the instrument.
IMPORTANT After a run, do not leave the IFC overnight in the instrument. Doing so
will adversely affect the reaction.
Perform Genotyping Analysis on the
Samples
Refer to the appropriate document:
• SNP Genotyping User Guide (PN 68000098)
• Biomark HD Data Collection User Guide (PN 100-2451)
• Biomark/EP1 Data Collection User Guide (PN 68000127).
Genotyping with Juno Getting Started Guide
27
Page 28

Appendix A: Suggested Kits
Reagents and IFCs are available separately.
IMPORTANT Unless otherwise specified, thaw reagents at room temperature, then
use them at room temperature. Store reagents at their specified storage
temperatures. Vortex reagents for 20 seconds, then centrifuge reagents for
2 seconds before use.
TaqMan Assay Kit
Box Component Cap Color Quantity Volume
per Tube
or Bottle
(mL)
Juno Genotyping
Reagent Kit for
10 IFCs
(PN 100-8361)
Juno GT Preamp Master Mix Light
purple
Dilution Reagent Natural 2 tubes 1.7
Probe GT Master Mix Gold 2 tubes 1.6
Juno GT Flux Fluid Purple 1 tube 0.9
1 tube 1.35
SNP Type Assay Kit
Box Component Cap Color Quantity Volume
per Tube
or Bottle
Juno SNP Type
Genotyping
Reagent Kit
(PN 100-8363)
Juno GT Preamp Master Mix Light
purple
Juno SNP Type GT Master
Mix
60X SNP Type Reagent Amber
Juno GT Flux Fluid Purple 1 tube 1.0 mL
Light
blue
2 tubes 70 μL
1 tube 1.35 mL
2 tubes 1.6 mL
Storage
–20 ºC
Storage
–20 ºC
Dilution Reagent Natural • 2 bottles
28
• 3.7 mL
• 1 tube
Genotyping with Juno Getting Started Guide
• 1.7 mL
Page 29

Suggested Reagents to Use with TaqMan Assay
and SNP Type Assay Kits
Appendix A: Suggested Kits
Box Component Cap Color Quantity Volume
per Tube
or Bottle
(mL)
Dilution Reagent
(PN 100-8726)
Juno GT IFC and
Control Line Fluid
Kit
(PN 100-8583)
Juno 96.96
Genotyping IFC
(PN 100-8365)
Juno 96.96
Genotyping IFC
(PN 100-6499)
Juno 96.96 GT
Control Line Fluid
(PN 100-8574)
Dilution Reagent Natural 1 bottle 25
Juno 96.96 Genotyping
IFC—10 IFCs
Juno 96.96 GT Control Line
Fluid
Juno 96.96 Genotyping IFC — 10 IFCs —
Juno 96.96 Genotyping IFC — 1 IFC —
Juno 96.96 GT Control Line
Fluid
— 10 IFCs —
— 2 boxes;
20 syringes/
box
— 20 syringes —
—
Storage
–20 ºC
Room
temperature
Room
temperature
Room
temperature
Room
temperature
Genotyping with Juno Getting Started Guide
29
Page 30

Appendix B: Safety
General Safety
In addition to your site-specific safety requirements, Fluidigm recommends the
following general safety guidelines in all laboratory and manufacturing areas:
• Use personal protective equipment (PPE): safety glasses, fully enclosed shoes, lab
coats, and gloves.
• Know the locations of all safety equipment (fire extinguishers, spill kits, eyewashes/
showers, first-aid kits, safety data sheets, etc.), emergency exit locations, and
emergency/injury reporting procedures.
• Do not eat, drink, or smoke in lab areas.
• Maintain clean work areas.
• Wash hands before leaving the lab.
Instrument Safety
WARNING Do not modify this device. Unauthorized modifications may
create a safety hazard.
CAUTION HOT SURFACE The Juno thermal cycler chuck gets hot and can
burn your skin. Use caution when working near the chuck.
CAUTION PINCH HAZARD. The Juno door and tray can pinch your hand.
Make sure your fingers, hand, shirtsleeves are clear of the door and tray
when loading or ejecting an integrated fluidic circuit (IFC).
WARNING BIOHAZARD. If you are putting biohazardous material on the
instrument, use appropriate personal protective equipment and adhere to
Biosafety in Microbiological and Biomedical Laboratories (BMBL) from the
Centers for Disease Control and Prevention and to your lab’s safety
protocol to limit biohazard risks. If biohazardous materials are used,
properly label the equipment as a biohazard. For more information, see the
BMBL guidelines at: cdc.gov/biosafety/publications/index.htm
For a full list of the symbols on the instrument, refer to the Juno System User
Guide (PN 100-7070).
30
Genotyping with Juno Getting Started Guide
Page 31

Electrical Safety
WARNING ELECTRICAL HAZARD. Electrical shock can result if the Juno
instrument is operated without its protective covers.
WARNING ELECTRICAL HAZARD. Plug the system into a properly
grounded receptacle with adequate current capacity.
Chemical Safety
Read and comprehend all safety data sheets (SDSs) by chemical manufacturers
before you use, store, or handle any chemicals or hazardous materials.
Wear personal protective equipment (gloves, safety glasses, fully enclosed shoes,
lab coats) when handling chemicals.
Do not inhale fumes from chemicals. Use adequate ventilation, and return caps to
bottles immediately after use.
Appendix B: Safety
Electrical Safety
Check regularly for chemical spills or leaks. Follow SDS recommendations for
cleaning up spills or leaks.
Disposal of Products
Used IFCs should be handled and disposed of in accordance with federal, state,
regional, and local laws for hazardous waste management and disposal.
Do not dispose of this product in unsorted municipal waste. This equipment may
contain hazardous substances that could affect health and the environment. Use
appropriate take-back systems when disposing of materials and equipment.
Learn more at fluidigm.com/compliance
Genotyping with Juno Getting Started Guide
31
Page 32

Back Cover
7000 Shoreline Court, #100
South San Francisco, CA
T: 650 266 6000
For technical support visit
fluidigm.com/support.
 Loading...