

Page 1
PN 100-5024 E2
Access Array System for the Ion Torrent
PGM Sequencing System
USER GUIDE
For Use Only with Access Array Reagents
Page 2

For Research Use Only. Not for use in diagnostic procedures.
Information in this publication is subject to change without
notice. It is Fluidigm policy to improve products as new
techniques and components become available. Therefore,
Fluidigm reserves the right to change specifications at any
time. Every effort has been made to avoid errors in the text,
diagrams, illustrations, figures, and screen captures. However,
Fluidigm assumes no responsibility for any errors or omissions.
In no event shall Fluidigm be liable for any damages in
connection with or arising from the use of this publication.
Patent and Limited License Information
Fluidigm products are covered by issued and pending patents
in the United States and other countries. Patent and limited
license information is available at fluidigm.com/legalnotices.
Limited Use License to Perform Preamplification with
Fluidigm IFCs
A license to use Thermo Fisher Scientific's patented
preamplification method workflows involving a Fluidigm
integrated fluidic circuit (IFC) can be obtained (i) with purchase
of a Fluidigm IFC from Fluidigm Corporation or (ii) by a separate
license from Thermo Fisher Scientific. Fo r licensing information,
contact outlicensing@lifetech.com.
Limited Digital PCR License
A license to use Thermo Fisher Scientific's patented digital PCR
method in all fields other than in the Sequencing Field, the
Mass Spectrometry Field, and the Prenatal Field in workflows
involving a Fluidigm IFC can be obtained (i) with purchase of a
Fluidigm IFC from Fluidigm Corporation or (ii) by a separate
license from Thermo Fisher Scientific. Fo r licensing information,
contact outlicensing@lifetech.com.
Trademarks
Fluidigm, the Fluidigm logo, Access Array, Advanta, D3, and
FC1 are trademarks or registered trademarks of Fluidigm
Corporation in the United States and/or other countries. All
other trademarks are the sole property of their respective
owners.
For EU's WEEE directive information, go to fluidigm.com/
compliance.
© 2018 Fluidigm Corporation. All rights reserved. 06/2018
For technical support visit fluidigm.com/support.
North America +1 650 266 6100 | Toll-free (US/CAN): 866 358 4354 | techsupport@fluidigm.com
Latin America +1 650 266 6100 | techsupportlatam@fluidigm.com
Europe/Middle East/Africa/Russia +44 1223 598100 | techsupporteurope@fluidigm.com
Japan +81 3 3662 2150 | techsupportjapan@fluidigm.com
China (excluding Hong Kong) +86 21 3255 8368 | techsupportchina@fluidigm.com
All other Asian countries/India/Australia +1 650 266 6100 | techsupportasia@fluidigm.com
2
Access Array System for the Ion Torrent PGM Sequencing System: User Guide
Page 3

Contents
About This Guide 5
Safety Alert Conventions 5
Safety Data Sheets 6
Chapter 1: Access Array System
Overview 7
Access Array System Components 10
Access Array IFCs 11
Specifications 11
Access Array System Workflow 12
Materials 12
Required Reagents 12
Required Consumables 13
Required Equipment 14
Example Sample and Primer Layout in 96-Well
Plates 14
Before You Begin 15
Chapter 2: Designing Targeted
Sequencing Primers 16
Chapter 3: Target-Specific Primer
Validation for 4-Primer Amplicon
Tagging on the LP 48.48 IFC 17
Reference Documents 17
Sample Quantitation 23
Sample Normalization 23
Chapter 5: Bidirectional Amplicon
Tagging on the LP 48.48 IFC 24
Reference Documents 25
Materials 25
Required Reagents 25
Prime the IFC 26
Prepare the 20X Primer Solutions 28
Prepare Sample Pre-Mix and Samples 29
Prepare the Sample Pre-Mix Solution 29
Prepare the Sample Mix Solutions 29
Load the IFC 30
Thermal-Cycle the IFC 31
Harvest the IFC 31
Attach Sequence Tags and Sample Barcodes 33
Prepare the Sample Pre-Mix Solution 33
Prepare a 100-Fold Dilution of the Harvested PCR
Products 33
Prepare the Sample Mix Solutions 33
Thermal-Cycle the 96-Well PCR Plate 34
Check PCR Products on the Agilent 2100
Bioanalyzer 35
Materials 17
Required Reagents 17
Prepare Primer Validation Reactions 18
Set Up the PCR Reactions in a 384-Well PCR
Plate 20
Run the PCR Reactions 20
Check PCR Products on the Agilent 2100
Bioanalyzer 21
Chapter 4: Sample Quantitation and
Normalization 22
Reference Documents 22
Materials 22
Required Reagents 22
Required Equipment 22
Access Array System for the Ion Torrent PGM Sequencing System: User Guide
Next Step 35
Chapter 6: Post-PCR Amplicon
Purification and Quantitation 36
Reference Documents 36
Materials 36
Required Equipment 36
Required Reagents 36
Quantitate PCR Products 37
Purify Harvested PCR Products 37
PCR Product Library Quantitation Procedure 38
Agilent 2100 Bioanalyzer Quantification 38
PicoGreen Fluorimetry Quantification 39
Pool the Products from Multiple Access Array
IFCs 39
3
Page 4

Contents
Appendix A: Electropherogram Examples 41
Appendix B: Access Array Barcode
Library for the Ion Torrent PGM
Sequencer - 96 43
Appendix C: Related Documents 47
Appendix D: Safety 48
General Safety 48
Instrument Safety 48
Symbols on the Instrument 49
Electrical Safety 50
Chemical Safety 50
4
Access Array System for the Ion Torrent PGM Sequencing System: User Guide
Page 5
About This Guide
IMPORTANT
• Before using the instrument, read and understand the safety guidelines in this document.
Failure to follow these guidelines may result in undesirable effects, injury to personnel,
and/or damage to the instrument or to property.
• This guide is for preparing sequencing libraries with Access Array™ reagents. To prepare
targeted DNA sequencing libraries with Advanta™ NGS Library Reagent Kits, see the
Advanta NGS Library Preparation with Access Array Protocol (PN 101-7885).
Safety Alert Conventions
Fluidigm documentation uses specific conventions for presenting information that may
require your attention. Refer to the following safety alert conventions.
Safety Alerts for Chemicals
For hazards associated with chemicals, this document follows the United Nations Globally
Harmonized System of Classification and Labelling of Chemicals (GHS) and uses indicators
that include a pictogram and a signal word that indicates the severity level:
Indicator Description
Pictogram (see example) consisting of a symbol on a white background within a red
diamond-shaped frame. Refer to the individual safety data sheet (SDS) for the applicable
pictograms and hazards pertaining to the chemicals being used.
DANGER Signal word that indicates more severe hazards.
WARNING Signal word that indicates less severe hazards.
Safety Alerts for Instruments
For hazards associated with instruments, this document uses indicators that include a
pictogram and signal words that indicate the severity level:
Indicator Description
Pictogram (see example) consisting of a symbol on a white background within a black
triangle-shaped frame. Refer to the instrument user guide for the applicable
pictograms and hazards pertaining to instrument usage.
DANGER Signal word that indicates an imminent hazard that will result in severe injury or death
if not avoided.
WARNING Signal word that indicates a potentially hazardous situation that could result in serious
injury or death if not avoided.
CAUTION Signal word that indicates a potentially hazardous situation that could result in minor
or moderate personal injury if not avoided.
IMPORTANT Signal word that indicates information necessary for proper use of products or
successful outcome of experiments.
Access Array System for the Ion Torrent PGM Sequencing System: User Guide
5
Page 6

About This Guide
Safety Data Sheets
Read and understand the SDSs before handling chemicals. To obtain SDSs for chemicals
ordered from Fluidigm, either alone or as part of this system, go to fluidigm.com/sds and
search for the SDS using either the product name or the part number.
Some chemicals referred to in this user guide may not have been provided with your system.
Obtain the SDSs for chemicals provided by other manufacturers from those manufacturers.
6
Access Array System for the Ion Torrent PGM Sequencing System: User Guide
Page 7
Chapter 1: Access Array System Overview
Design PCR primers and add tags
Qualify tagged primer sets
Select best tagged primer sets
Quantify samples
Normalize sample concentrations
Load samples and primers on Access Array IFC
PCR amplify for 35 cycles
Recover PCR products from Access Array IFC
Attach sequence tags and sample barcodes
Qualify/quantify PCR products
Select and pool samples
Clean up PCR product pool
Quantify PCR product pool for emulsion PCR
Amplicon tagging on the Access Array™ system significantly reduces the time required for
enrichment of targeted sequences by combining amplicon generation with library
preparation. The Access Array system workflow consists of five major phases: 1) designing
and validating target-specific primers for targeted resequencing, 2) quantifying samples, 3)
running an integrated fluidic circuit (IFC, either the LP 48.48 IFC or the Access Array 48.48
IFC), 4) attaching sequence tags and sample barcodes, and 5) qualifying and quantifying
harvested PCR products for sequencing. The chapters in this user guide detail this workflow
chronologically:
This Access Array target-specific PCR amplification scheme combines 48 target-specific (TS)
forward and reverse primers with 48 samples to generate 2,304 PCR reactions.
Access Array System for the Ion Torrent PGM Sequencing System: User Guide
7
Page 8
Chapter 1: Access Array System Overview
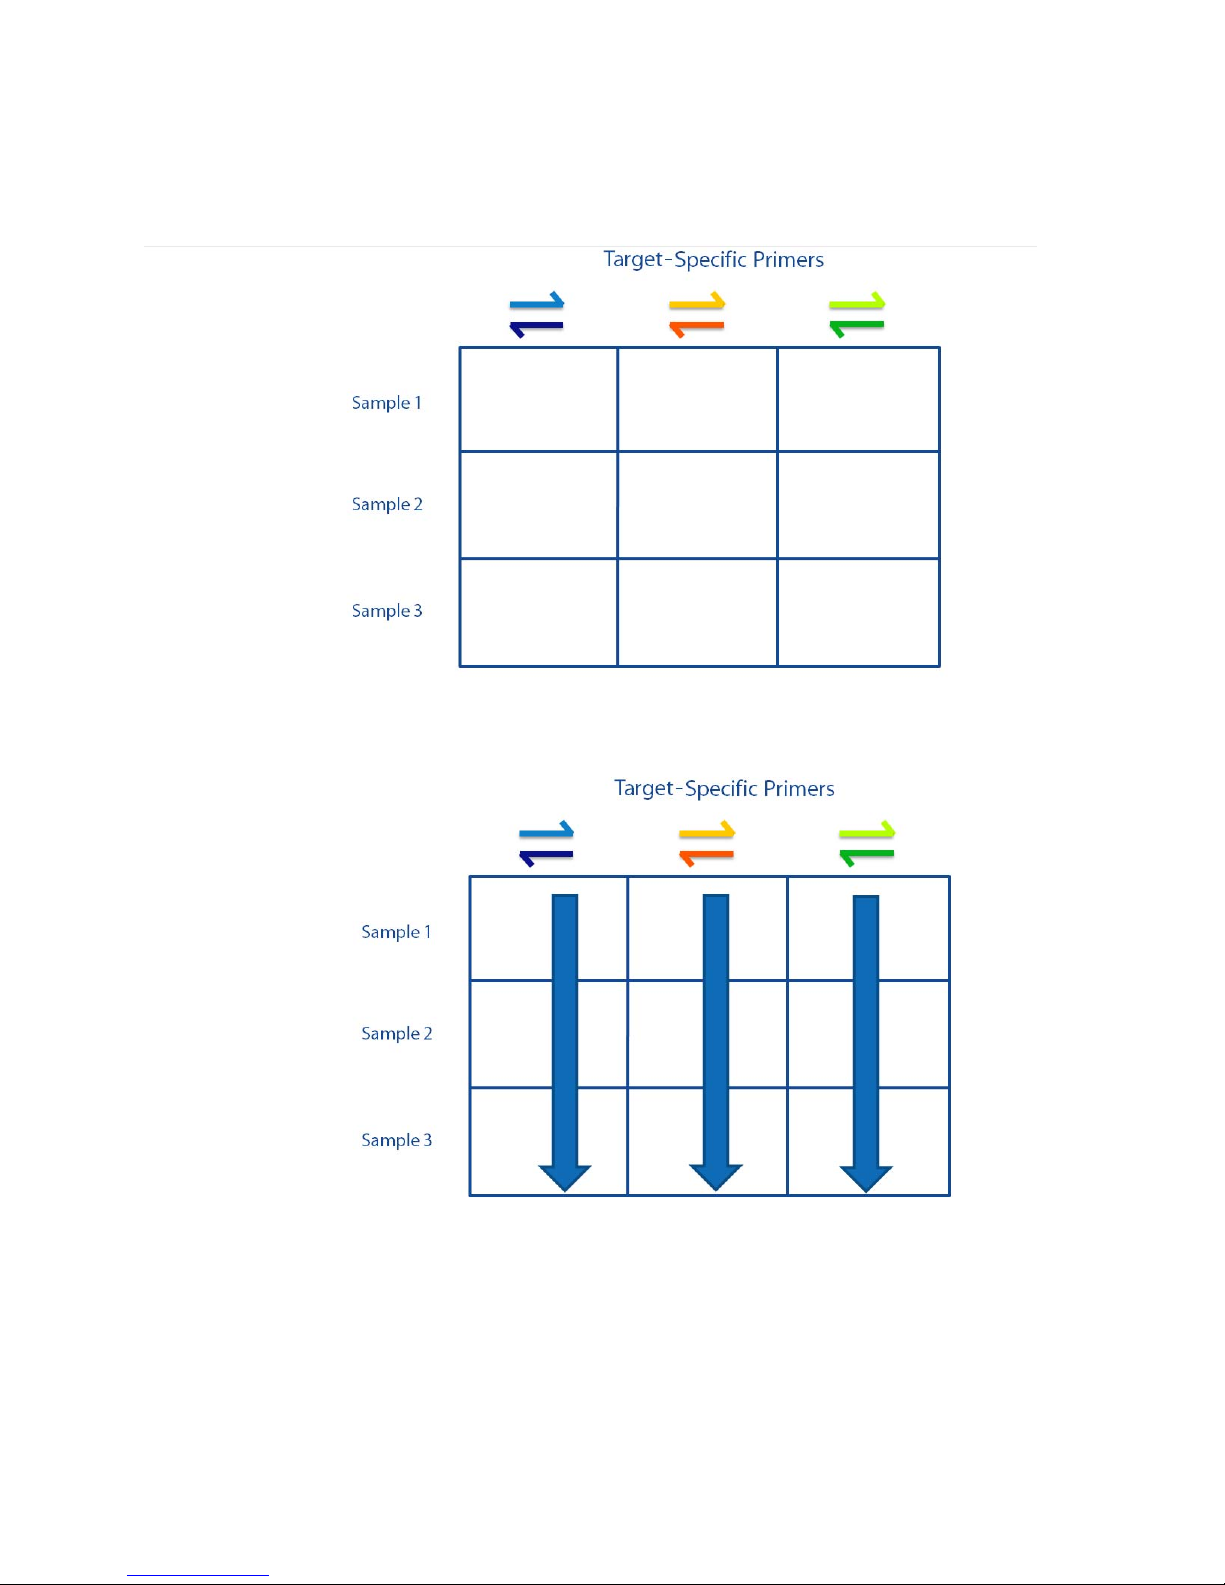
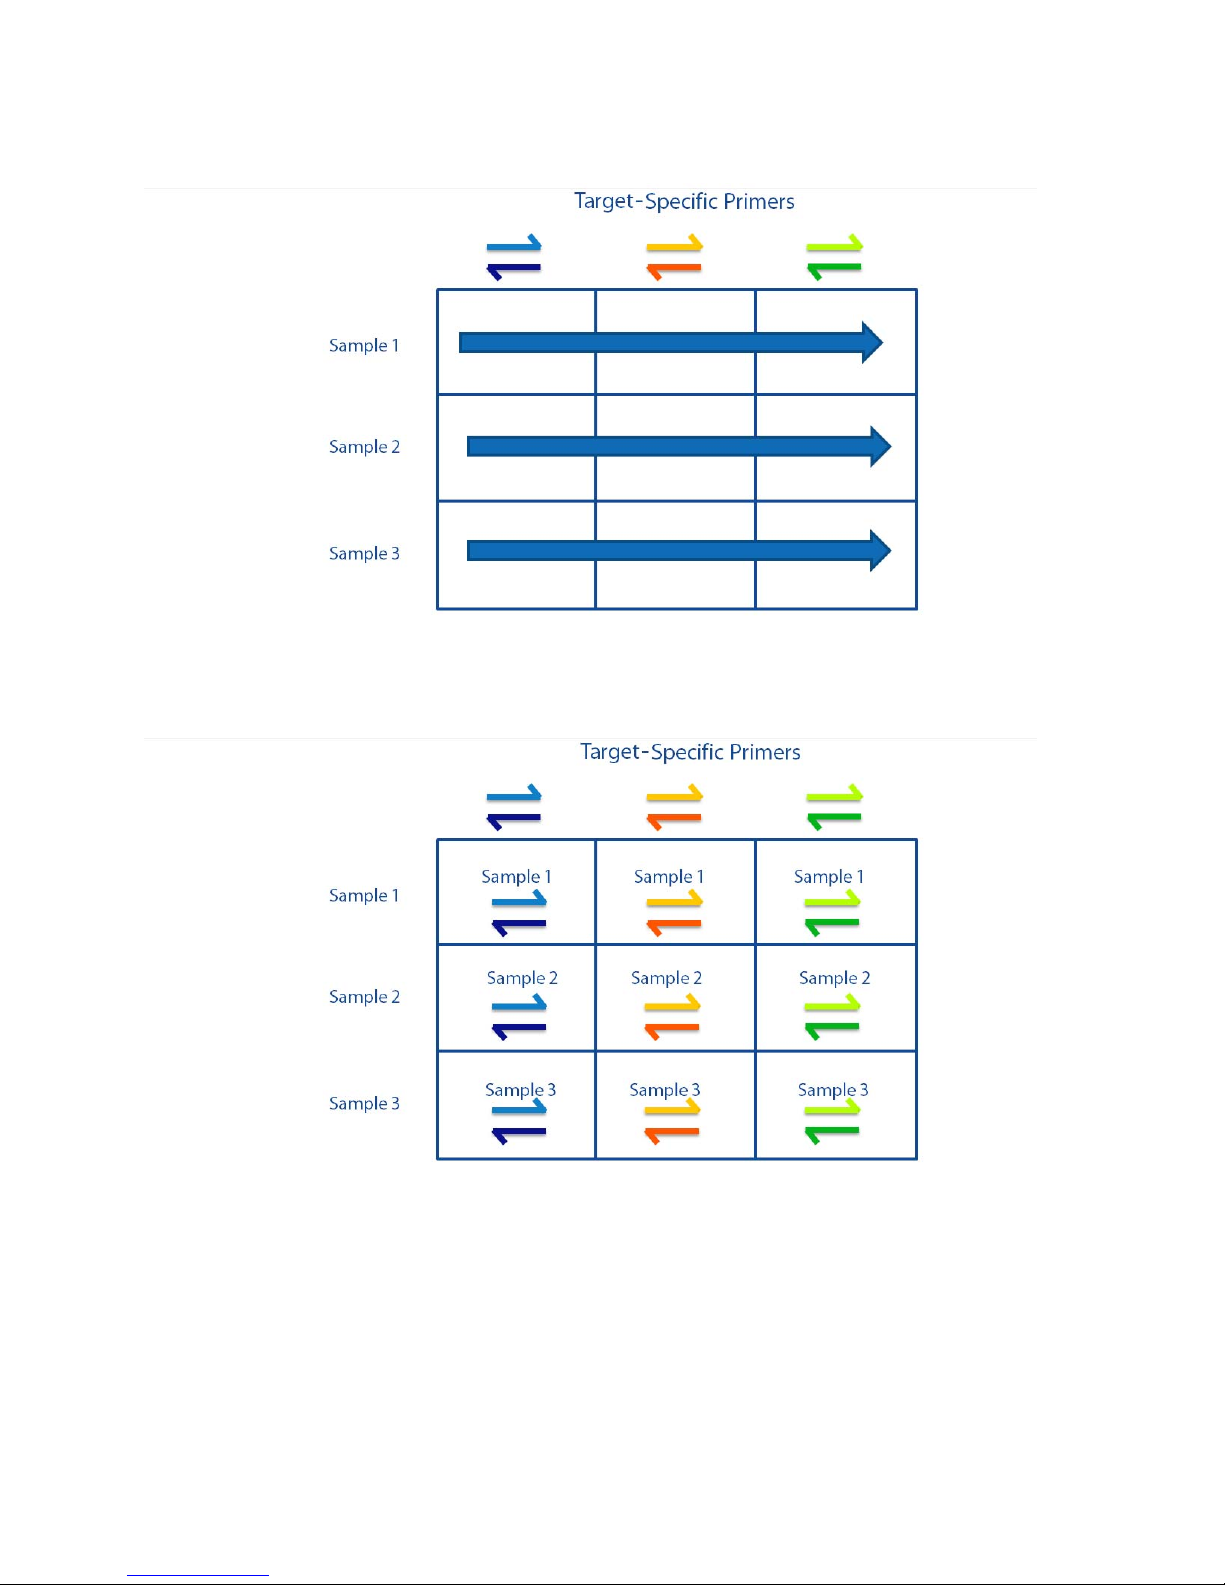
The following image shows a 3 x 3 grid of reaction wells containing the target-specific
primers and samples before reagents are loaded into the LP 48.48 IFC for library preparation
prior to sequencing on the Ion
Torrent™ PGM™ Sequencer - 96:
First, TS forward and reverse primers are loaded into each column of the reaction wells on
the LP 48.48 IFC.
8
Access Array System for the Ion Torrent PGM Sequencing System: User Guide
Page 9
Chapter 1: Access Array System Overview
Samples are then loaded into each row of reaction wells on the LP 48.48 IFC:
After loading the IFC, each reaction well contains a unique combination of TS primer pairs
and samples:
Access Array System for the Ion Torrent PGM Sequencing System: User Guide
9
Page 10
Chapter 1: Access Array System Overview
IFC Controller AX
Pre-PCR
FC1 cycler
IFC Controller AX
Post-PCR
Access Array System Components
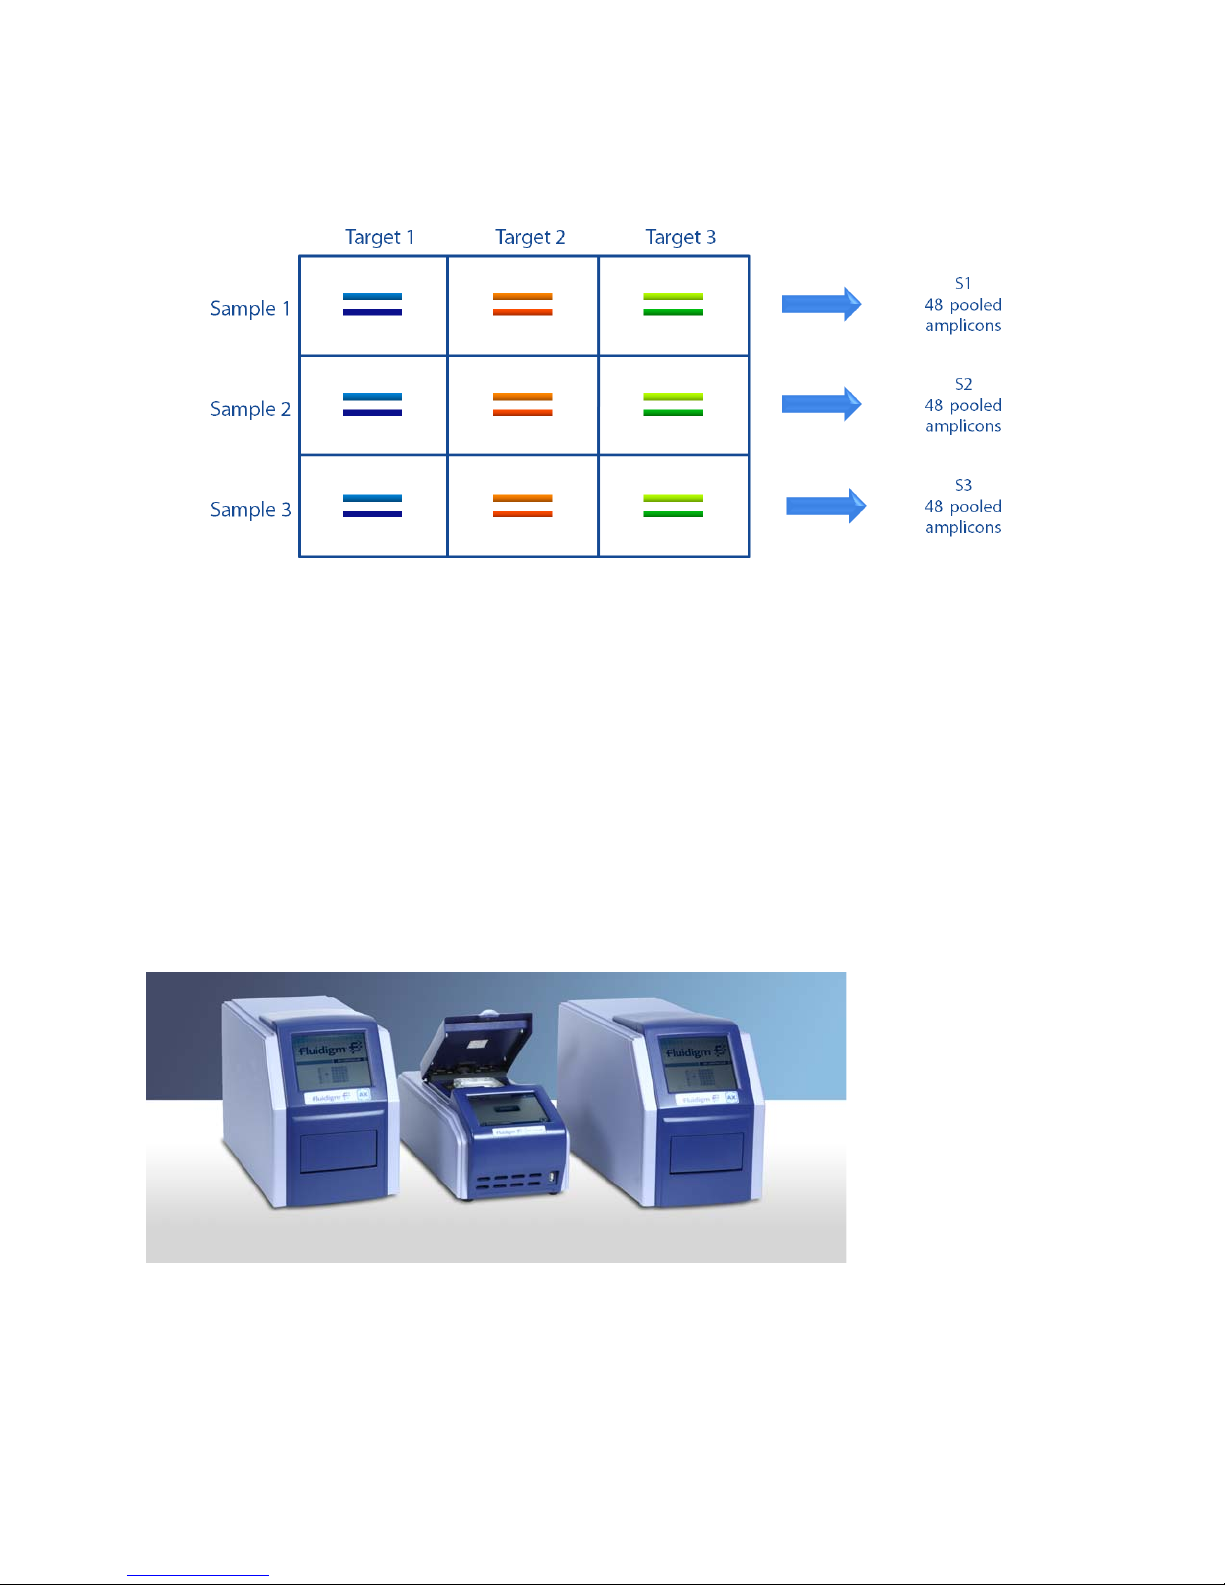
The resulting PCR products of pooled amplicons are as follows:
Access Array System Components
The Access Array system consists of the following components:
• IFCs for Access Array:
• LP 48.48 IFC
• Access Array 48.48 IFC
• IFC Controller AX (2 quantity, for pre-PCR and post-PCR)
• FC1™ cycler
NOTE The stand-alone thermal cycler has been discontinued. It has been replaced by the
FC1 cycler.
10
Access Array System for the Ion Torrent PGM Sequencing System: User Guide
Page 11
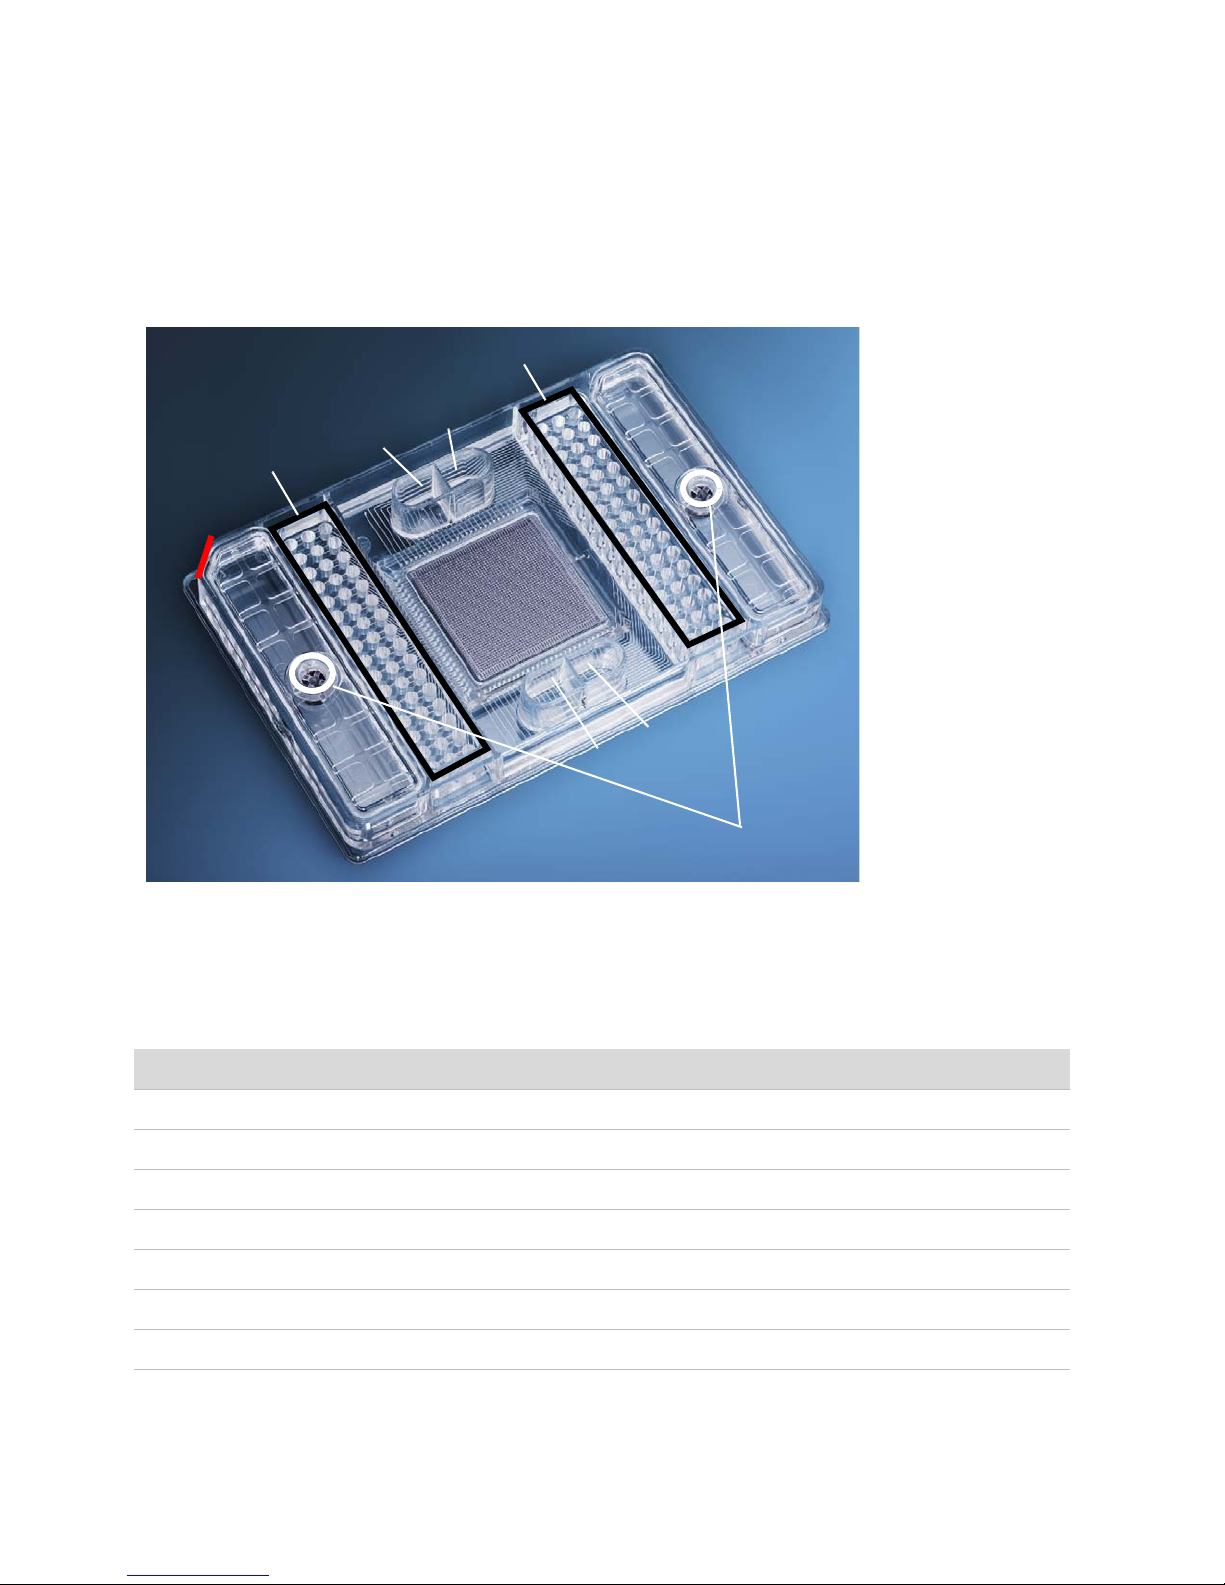
Access Array IFCs
Primer inlets
Sample inlets
Control Line Fluid
H1
H2
H3
H4
well
well
well
well
A1
Interface
accumulator
Containment
accumulator
Access Array reagents can be run on the:
• LP 48.48 IFC (PN 101-1926)
• Access Array 48.48 IFC (PN AA-M-48.48)
Chapter 1: Access Array System Overview
Access Array IFCs
The high-throughput LP 48.48 IFC (or Access Array 48.48 IFC) enables target enrichment of
48 unique samples at the same time.
Specifications
Description Parameter
Footprint dimensions 128 x 85 x 14 mm
Inlet spacing on input frame 4.5 mm pitch
Primer inlets 48
Sample inlets 48
Reaction chambers 2,304
Reaction volume 35 nL
Instrument compatibility IFC Controller AX, FC1 cycler, and stand-alone thermal cycler
Access Array System for the Ion Torrent PGM Sequencing System: User Guide
11
Page 12

Chapter 1: Access Array System Overview
Access Array System Workflow
Access Array System Workflow
The simplicity of running experiments is illustrated in the process below.
The Access Array system workflow consists of five major steps:
Workflow Step
1 Dispense
Transfer samples and primers to the inlets on the LP 48.48 IFC (or Access Array 48.48 IFC)
from a standard 96-well plate, using an 8-channel pipette.
2 Load
Reaction mixtures are automatically loaded and assembled on the IFC using the pre-PCR
IFC Controller AX.
3 Thermal-cycle
Perform PCR amplification using the FC1 cycler.
4 Harvest
PCR products from each sample are automatically pooled and harvested using the
post-PCR IFC Controller AX.
5 Recover
Recover the PCR products from each of the 48 sample inlets, using an 8-channel pipette.
Quantify the sequencing library.
Materials
This section describes the materials required to perform an Access Array experiment
including the supported reagents and consumables.
Required Reagents
IMPORTANT
• This guide is for preparing sequencing libraries with Access Array reagents. To prepare
targeted DNA sequencing libraries with Advanta NGS Library Reagent Kits, see the
Advanta NGS Library Preparation with Access Array Protocol (PN 101-7885).
• Store reagents according to manufacturer's storage recommendations as soon as they are
received.
12
Access Array System for the Ion Torrent PGM Sequencing System: User Guide
Page 13
Chapter 1: Access Array System Overview
Reagents Supplied by Fluidigm
Product Name Manufacturer Part Number Storage
20X Access Array Loading Reagent Fluidigm 100-0883
Materials
1X Access Array Harvest Solution
1X Access Array Harvest Solution is not packaged for
individual sale. It can be purchased in units of 10, under
the name Access Array Harvest Pack, PN 100-3155, or as
a component in the 48.48 Access Array Loading Reagent
Kit, PN 100-1032.
Access Array Hydration Reagent v2
Fluidigm 100-1031
–20 °C
Fluidigm 100-7966
IMPORTANT This reagent is only required when
using the Access Array 48.48 IFC, and it is not for
use with the LP 48.48 IFC.
Access Array Barcode Library for Ion Torrent PGM
Sequencer - 96
Fluidigm 100-4911
Reagents from Other Suppliers
Product Name Manufacturer Part Number
FastStart™ High Fidelity PCR System, dNTPack Sigma-Aldrich 04738292001
Agilent® DNA 1000 Kit Agilent 5067-1504
PCR Certified Water Teknova W3330
DNA Suspension Buffer (10 mM TRIS, pH 8.0, 0.1mM EDTA)
Agencourt
100% ethanol Major laboratory
®
AMPure® XP Reagent Beads Beckman
Teknova T0221
A63880
Coulter
—
supplier (MLS)
Required Consumables
Consumables Supplied by Fluidigm
Product Name Manufacturer Part Number Storage
LP 48.48 IFC or
Access Array 48.48 IFC
NOTE The Access Array 48.48 IFC has
been discontinued. It has been replaced by
the LP 48.48 IFC.
LP Control Line Fluid 48.48 or
Control Line Fluid for 48.48 IFCs
Fluidigm 101-1926
AA-M-48.48
Room temperature
Fluidigm 101-2345
89000020
Access Array System for the Ion Torrent PGM Sequencing System: User Guide
13
Page 14

Chapter 1: Access Array System Overview
Example Sample and Primer Layout in 96-Well Plates
Consumables from Other Suppliers
Product Name Manufacturer Part Number
Microcentrifuge tubes, 1.5 mL MLS —
96- and 384-well PCR plates MLS —
Adhesive seals for PCR plates MLS —
P2-P1000 pipette tips Rainin —
Required Equipment
Equipment Supplied by Fluidigm
Product Name Manufacturer Part Number
IFC Controller AX (2 quantity, pre-PCR and post-PCR) Fluidigm IFC-AX
FC1 cycler
NOTE The stand-alone thermal cycler has been discontinued. It has
been replaced by the FC1 cycler.
Fluidigm CYC-FC1
Equipment from Other Suppliers
Product Name Manufacturer Part Number
DynaMag™-2 Magnet Thermo Fisher
Scientific
Agilent 2100 Bioanalyzer® Agilent G2939BA
Microcentrifuge MLS —
Vortex mixer MLS —
Plate centrifuge MLS —
96- and 384-well PCR thermal cycler MLS —
Single-channel P2-P1000 pipettes Rainin —
8-channel P20 pipette Rainin —
123-21D
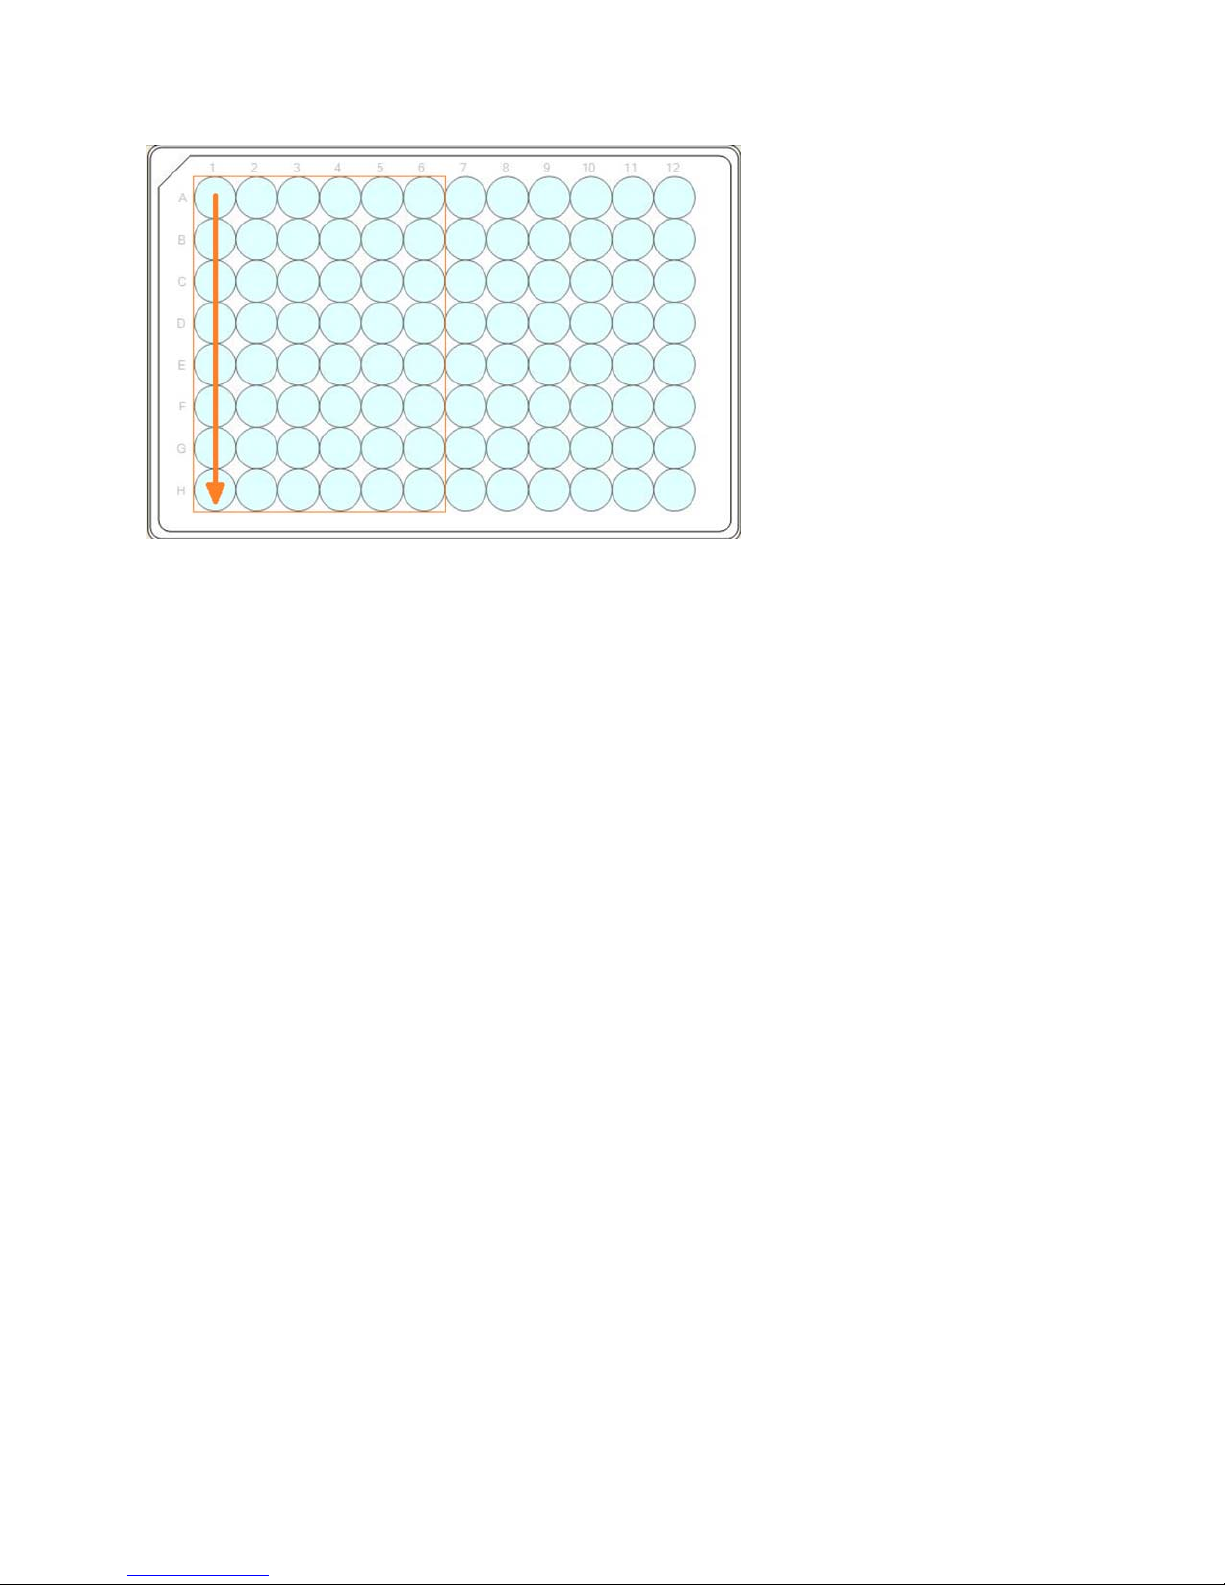
Example Sample and Primer Layout in 96-Well Plates
For ease of pipetting, fill the 96-well plates by columns, not rows.
14
Access Array System for the Ion Torrent PGM Sequencing System: User Guide
Page 15
Chapter 1: Access Array System Overview
Before You Begin
Before You Begin
IMPORTANT Before using the Access Array system, read and understand the detailed
instructions and safety guidelines in Appendix D.
• Use good laboratory practices to minimize contamination of samples:
• Use a new pipette tip for every new sample.
• Whenever possible, separate pre- and post-PCR activities. Dedicate laboratory
materials to designated areas.
• Unless otherwise specified, thaw reagents at room temperature (15–30 °C), and then use
them at room temperature.
• Retrieve only the reagents required from each kit based on the number of IFCs you will
run.
• Only use the reagents provided in the required kit.
• Do not swap reagents between kit lots.
• Mix and centrifuge reagents as directed.
• Avoid creating bubbles when transferring reagents to the IFC.
•
This protocols in this document require the use of updated scripts for FC1 (v1.6 or later) and IFC
Controller AX (v2.8 or later) that can be downloaded from fluidigm.com/software.
Access Array System for the Ion Torrent PGM Sequencing System: User Guide
15
Page 16

Chapter 2: Designing Targeted
Sequencing Primers
You can design your own Access Array target-specific primers using available online tools
(for example, UCSC website at genome.ucsc.edu/cgi-bin/hgGateway, Primer3 website at
bioinfo.ut.ee/primer3/, and in silico PCR at genome.ucsc.edu/cgi-bin/
hgPcr?hgsid=136961442) or by using the D3™ assay design service at Fluidigm.
Our D3™ assay design service provides Access Array target-specific primers for use in
Illumina MiniSeq™, MiSeq™, NextSeq™ and HiSeq® systems and in the Ion Torrent® PGM
system. They are designed to human genomic DNA. Uniplex primers are provided in
nuclease-free water at a final volume of 100 L per well in a single 96-well plate with mixed
forward and reverse primers at a final concentration of 50 M. Multiplex primer sets are
provided in nuclease-free water at a final volume of 100 L per well in six 96-well plates per
set at a final concentration of 60 M.
If you are using primers provided by the D3™ assay design service, refer to the order
informatics packet for primer sequences. If you are designing your own primers, see Access
Array–Generate Tagged Primers Workbook (Fluidigm, PN 100-3873).
This guide is for preparing sequencing libraries with Access Array reagents. To prepare
targeted DNA sequencing libraries with Advanta NGS Library Reagent Kits, see the Advanta
NGS Library Preparation with Access Array Protocol (PN 101-7885).
16
Access Array System for the Ion Torrent PGM Sequencing System: User Guide
Page 17

Chapter 3: Target-Specific Primer
Validation for 4-Primer Amplicon Tagging
on the LP 48.48 IFC
This chapter describes the validation procedure for the tagged TS primers designed in
Chapter 2.
IMPORTANT Access Array
be ordered prior to primer validation. See Table 1 for oligo sequences and order through an
oligonucleotide vendor.
™ Barcode 1 primers for the Ion Torrent™ PGM™ Sequencer - 96 must
Reference Documents
Agilent® DNA 1000 Kit Guide
Materials
Required Reagents
IMPORTANT
• This guide is for preparing sequencing libraries with Access Array reagents. To prepare
targeted DNA sequencing libraries with Advanta NGS Library Reagent Kits, see the
Advanta NGS Library Preparation with Access Array Protocol (PN 101-7885).
• Store reagents according to manufacturer's storage recommendations as soon as they are
received.
Reagents Supplied by Fluidigm
Product Name Manufacturer Part Number
20X Access Array Loading Reagent Fluidigm 100-0883
Access Array Barcode 1 primers for Ion Torrent with CS1/CS2 tags Fluidigm —
Target-specific primer pairs tagged with universal tags (CS1 forward tag,
CS2 reverse tag)
50 M CS1–tagged TS forward primer
50 M CS2–tagged TS reverse primer
Access Array System for the Ion Torrent PGM Sequencing System: User Guide
Fluidigm —
17
Page 18

Chapter 3: Target-Specific Primer Validation for 4-Primer Amplicon Tagging on the LP 48.48 IFC
Prepare Primer Validation Reactions
Reagents from Other Suppliers
Product Name Manufacturer Part Number
FastStart™ High Fidelity PCR System, dNTPack Sigma-Aldrich 04738292001
Agilent DNA 1000 Kit Agilent 5067-1504
PCR Certified Water Teknova W3330
60 ng/L genomic DNA (optional) Coriell NA17317
Prepare Primer Validation Reactions
The primer validation protocol prepares enough reagents to perform 48 primer validation
reactions.
IMPORTANT It is essential to have Access Array Barcode 1 primers before proceeding with
the primer validation. See Table 1 below for the oligo sequences.
Table 1. Access Array Barcode 1 primers for Ion Torrent
Name Sequence (5′-3′) Total Length
A_BC1_CS1 forward primer CCATCTCATCCCTGCGTGTCTCCGACTCAGACGAGTG
CGTACACTGACGACATGGTTCTACA
P1_CS2 reverse primer CCTCTCTATGGGCAGTCGGTGATTACGGTA
GCAGAGACTTGGTCT
62 bp
45 bp
1 Prepare the 5X target-specific primer solution for 48 individual primer pairs as shown in
the table below.
Table 2. 5X target-specific primer solution preparation
Component Volume
(μL)
Concentration* (nM)
50 M CS1-tagged TS forward primer 1 250
50 M CS2-tagged TS reverse primer 1 250
PCR Certified Water (Teknova) 198
Total 200
* The final concentration in this table refers to the amount of each listed component in 5 L of
the final primer solution.
Final
2 Vortex the 5X target-specific primer solution for a minimum of 20 seconds and
centrifuge for 30 seconds.
NOTE The final tagged TS forward and reverse primer concentrations are 250 nM in the
5X primer solution. The final TS forward and reverse primer concentrations in the PCR
reaction are 50 nM.
3 Prepare 2 M Access Array Barcode 1 primer solution.
18
Access Array System for the Ion Torrent PGM Sequencing System: User Guide
Page 19

Chapter 3: Target-Specific Primer Validation for 4-Primer Amplicon Tagging on the LP 48.48 IFC
Table 3. The 2 M Access Array Barcode 1 primers for Ion Torrent
Prepare Primer Validation Reactions
Component Volume
100 M A_BC1_CS1 forward primer 2.0 2
100 M P1_CS2 reverse primer 2.0 2
PCR Certified Water (Teknova) 96.0
Total 100
Final Concentration
(μL)
4 Prepare the primer validation reaction components.
IMPORTANT Warm the 20X Access Array Loading Reagent to room temperature before
use.
Table 4. 4-primer amplicon tagging primer validation reaction preparation
Component Volume
(μL)
10X FastStart High Fidelity Reaction Buffer
without MgCl2 (Roche®)
25 mM MgCl
DMSO (Roche) 0.25 15.0 5%
(Roche) 0.9 54.0 4.5 mM
2
0.5 30.0 1X
Volume
for 60 (μL)
Final Concentration*
(M)
10 mM PCR Grade Nucleotide Mix (Roche) 0.10 6.0 200 M each
5 U/L FastStart High Fidelity Enzyme Blend
(Roche)
20X Access Array Loading Reagent
(Fluidigm)
2 M Access Array Barcode 1 primers for Ion
Torrent (from step 3)
60 ng/L genomic DNA
(Coriell)
PCR Certified Water (Teknova) 0.12 7.2
Total 4.0 240.0
* The final concentration in this reaction mix table refers to the amount of each listed component in 5 L of the
final reaction mix.
0.05 3.0 0.05 U/L
0.25 15.0 1X
1.0 60.0 400 nM
0.83 49.8 10 ng/L
5 Vortex the primer validation reaction mix for a minimum of 20 seconds and centrifuge for
30 seconds.
NOTE Table 4 displays the volumes required to prepare 48 reactions with a 25%
overage to evaluate 48 target-specific primer pairs. Scale up appropriately if a higher
number of primer pairs are to be evaluated.
Access Array System for the Ion Torrent PGM Sequencing System: User Guide
19
Page 20

Chapter 3: Target-Specific Primer Validation for 4-Primer Amplicon Tagging on the LP 48.48 IFC
Set Up the PCR Reactions in a 384-Well PCR Plate
Set Up the PCR Reactions in a 384-Well PCR Plate
1 Prepare the primer validation PCR reactions:
a Add 4 L of primer validation reaction mix to each of the 48 wells.
b Add 1 L of the 5X target-specific primer solution.
The total PCR reaction volume is 5 L.
2 Vortex the 384-well PCR reaction plate for a minimum of 20 seconds and centrifuge for
30 seconds.
Run the PCR Reactions
1 Load the 384-well plate onto the PCR thermal cycler.
2 Run 35 cycles of PCR using the protocol described below:
Table 5. PCR protocol
PCR Stages Cycle
50 ºC 2 min 1
70 ºC 20 min 1
95 ºC 10 min 1
95 ºC 15 sec
60 ºC 30 sec
72 ºC 1 min
95 ºC 15 sec
80 ºC 30 sec
60 ºC 30 sec
72 ºC 1 min
95 ºC 15 sec
60 ºC 30 sec
72º 1 min
95 ºC 15 sec
80 ºC 30 sec
60 ºC 30 sec
72 ºC 1 min
95 ºC 15 sec
60 ºC 30 sec
72 ºC 1 min
95 ºC 15 sec
80 ºC 30 sec
60 ºC 30 sec
72 ºC 1 min
10
2
8
2
8
5
20
Access Array System for the Ion Torrent PGM Sequencing System: User Guide
Page 21
Chapter 3: Target-Specific Primer Validation for 4-Primer Amplicon Tagging on the LP 48.48 IFC
Check PCR Products on the Agilent 2100 Bioanalyzer
Check PCR Products on the Agilent 2100 Bioanalyzer
Use the Agilent DNA 1000 chips from the Agilent DNA 1000 Kit to check 1 L of PCR product from
each of the PCR reactions described above. Follow the Agilent DNA 1000 Kit Guide for details.
On-target products should account for a minimum of 50% of the total yield (by mass)
produced for a particular primer pair. If on-target products comprise <50% of total yield,
primers may have to be redesigned.
NOTE The product size should be the sum of the target region and the length of the
Access Array Barcode 1 primers for Ion Torrent (103 bp).
Figure 1. Example of 48 primer pairs checked on an Agilent chip. The red-labeled PCR reactions
generated multiple or incorrectly sized primers, which need to be redesigned and validated before
continuing.
Access Array System for the Ion Torrent PGM Sequencing System: User Guide
21
Page 22

Chapter 4: Sample Quantitation and
Normalization
This chapter provides a standard procedure to determine sample concentration using
fluorimetry. Sample concentrations need to be normalized before proceeding with the
LP 48.48 IFC protocol for Access Array™.
The Quant-iT
sample concentration.
™
PicoGreen® fluorescent assay requires 1 L of sample DNA to determine
Reference Documents
Quant-iT™ PicoGreen® User Guide
Materials
Required Reagents
IMPORTANT Store reagents according to manufacturer's storage recommendations as
soon as they are received.
Product Name Manufacturer Part Number
Quant-iT PicoGreen dsDNA Assay Kit Thermo Fisher Scientific P11496
Required Equipment
Product Name Manufacturer Part Number
Fluorimeter-compatible 96- or 384-well microtiter plates Major laboratory supplier
22
—
(MLS)
Access Array System for the Ion Torrent PGM Sequencing System: User Guide
Page 23

Chapter 4: Sample Quantitation and Normalization
Sample Quantitation
Quantitate the samples by fluorimetry, using the Quant-iT PicoGreen dsDNA Assay Kit.
Follow the manufacturer’s instructions.
Sample Normalization
The following recommendations apply to human genomic DNA samples. For other samples,
the recommendations on sample concentrations may be different. Contact Technical
Support for assistance in this case.
• If the sample concentration is 50 ng/L gDNA input (a total of 50 ng gDNA), the sample is
ready for amplification on the LP 48.48 IFC. For germline mutation, you might be able to
use as little as 525ng/L.
• If the sample concentration is below 50 ng/L gDNA, we recommend concentrating the
sample before amplification takes place on the Access Array.
• If the sample concentration is above 50 ng/L, we recommend diluting the sample to
50 ng/L using DNA Suspension Buffer before proceeding.
Sample Quantitation
Use the following formula to determine the correct volume of DNA Suspension Buffer
required to dilute each sample to 50 ng/L:
Y = X (B/50 – 1)
Where X is the volume of the original sample (L) to be used in the dilution
Y is the DNA Suspension Buffer volume (L) needed to dilute X L of the original sample
to 50 ng/L
B is the sample concentration (ng/L) measured by fluorimetry
50 is the desired sample concentration (ng/L)
For example: If a 10 L sample (X = 10 L) has a concentration of 200 ng/L
(B = 200 ng/L):
Y = 10 L * ((200 ng/L)/(50 ng/L) –1)
Y = 30 L
Therefore: Dilute 10 L of the 200 ng/L sample in 30 L of DNA Suspension Buffer to
obtain a 50 ng/L sample concentration.
• Normalize all sample concentrations to 50 ng/L.
Samples are now ready for amplification using the LP 48.48 IFC.
Access Array System for the Ion Torrent PGM Sequencing System: User Guide
23
Page 24

Chapter 5: Bidirectional Amplicon
Tagging on the LP 48.48 IFC
This protocol outlines the bidirectional amplicon tagging strategy for the Ion Torrent™ PGM™
Sequencer - 96
The goal of this protocol is to sequence both ends of an amplicon with a single-read
sequencing run. In the bidirectional amplicon tagging approach, tagged target-specific
primer pairs are combined with two sets of sample-specific barcode primer pairs. The
sample-specific barcode primer pairs are comprised of common sequence tags CS1 or CS2,
appended with the Ion Torrent adapter sequences (A and P1, Table 6). This approach
requires only one set of target-specific primer pairs, while the sample-specific barcode
primers are universal and can be used in multiple experiments.
In the figure that follows, you can see that bidirectional amplicon tagging generates two
types of PCR products per target region: one PCR product that allows for sequencing of the
5' end of the target region (Set A) and one PCR product that allows for sequencing of the 3'
end of the target region (Set B). Because both PCR products are clonally amplified onto the
Ion Sphere™ Particle (ISP) at the same time, one single-read sequencing run will yield
sequence information for both ends of the target region. Bidirectional sequencing will
produce high quality reads from both ends and across the full length of the amplicons.
for amplicon libraries that have been generated on the Access Array™ system.
Table 6. PCR products generated from bidirectional amplicon tagging
Primer Sequence
A_BC_CS1 5'-CCATCTCATCCCTGCGTGTCTCCGACTCAG-[BC]-ACACTGACGACATGGTTCTACA-3'
P1_CS2 5'-CCTCTCTATGGGCAGTCGGTGATTACGGTAGCAGAGACTTGGTCT-3'
A_BC_CS2 5'-CCATCTCATCCCTGCGTGTCTCCGACTCAG-[BC]-TACGGTAGCAGAGACTTGGTCT-3'
P1_CS1 5'-CCTCTCTATGGGCAGTCGGTGATACACTGACGACATGGTTCTACA-3'
This strategy uses a two-step PCR approach: (1) The first PCR is run on the IFC in the
presence of tagged, target-specific primers. (2) The harvested PCR product pools are then
split into two subsequent PCR reactions with two sets of sample-specific barcode primers,
Set A and Set B. Each is run on an independent 96-well plate. In Set A, the PCR reaction
products that are generated allow for sequencing of the 5' end of the target region and
utilize the A_BC_CS1 and P1_CS2 barcode primer combination. In Set B, the PCR reaction
products that are generated allow for sequencing of the 3' end of the target region and
utilize the A_BC_CS2 and P1_CS1 barcode primer combination.
24
Access Array System for the Ion Torrent PGM Sequencing System: User Guide
Page 25
Chapter 5: Bidirectional Amplicon Tagging on the LP 48.48 IFC
Reference Documents
Reference Documents
• IFC Controller AX User Guide (PN 68000157)
• Control Line Fluid Loading Procedure Quick Reference (PN 68000132)
•
Agilent® DNA 1000 Kit Guide
Materials
Required Reagents
Stored at –20 ºC
• FastStart™ High Fidelity PCR System, dNTPack (Sigma-Aldrich, PN 04738292001)
• 20X Access Array Loading Reagent (Fluidigm, PN 100-0883)
• 1X Access Array Harvest Solution (Fluidigm, PN 100-1031)
NOTE 1X Access Array Harvest Solution (Fluidigm, PN 100-1031) is not packaged for
individual sale. It can be purchased in units of 10, under the name Access Array Harvest
Pack, PN 100-3155, or as a component in the 48.48 Access Array Loading Reagent Kit,
PN 100-1032.
Access Array System for the Ion Torrent PGM Sequencing System: User Guide
25
Page 26

Chapter5:Bidirectional Amplicon Tagging on the LP 48.48 IFC
Accumulators
H1
H2
H3
Sample
Primer
inlets
inlets
H4
Prime the IFC
• 1X Access Array Hydration Reagent v2 (Fluidigm, PN 100-7966)
IMPORTANT This reagent is not required, but it ensures uniform harvest volumes if
used
during the priming step when using the Access Array 48.48 IFC. (It is not for use with
the LP 48.48 IFC.)
• Access Array Barcode Library for Ion Torrent PGM Sequencer - 96 (Fluidigm,
PN 100-4911)
• Target-specific primer pair with universal tags (CS1 forward, CS2 reverse), supplied in
separate forward and reverse primer pools in 96-well plates at the following stock
concentrations:
• 50 M CS1-tagged TS forward primer
• 50 M CS2-tagged TS reverse primer
• Template DNA at 50ng/L
Stored at 4 ºC
Agilent DNA 1000 Kit Reagents (Agilent, PN 5067-1504)
Stored at Room Temperature
PCR Certified Water (Teknova, PN W3330)
Prime the IFC
NOTE The location of the sample inlets is different from 48.48 Gene Expression or
Genotyping IFCs.
26
Access Array System for the Ion Torrent PGM Sequencing System: User Guide
Page 27

Chapter 5: Bidirectional Amplicon Tagging on the LP 48.48 IFC
123
456
789
10 11 12
13 14 15
16 17 18
19 20 21
22 23 24
25 26 27
28 29 30
31 32 33
34 35 36
37 38 39
40 41 42
43 44 45
46 47 48
123
456
789
10 11 12
13 14 15
16 17 18
19 20 21
22 23 24
25 26 27
28 29 30
31 32 33
34 35 36
37 38 39
40 41 42
43 44 45
46 47 48
PRIMER INLETS
H1
H3
SAMPLE INLETS
H2
H4
INTERFACE ACCUMULATOR
CONTAINMENT ACCUMULATOR
IMPORTANT
• Use the LP 48.48 IFC (or the Access Array 48.48 IFC) within 24 hours of opening the
package.
• Due to different accumulator volumes, use only 48.48 syringes with 300 μL of control line
fluid (PN 89000020).
• Control line fluid on the IFC or in the inlets makes the IFC unusable.
• Load the IFC within 60 minutes of priming.
• Be certain that the reagents 1X Access Array Harvest Solution and 1X Access Array
Hydration Reagent v2 are thawed completely to room temperature and mixed thoroughly
prior to use.
1 Inject Control Line Fluid into each accumulator on the IFC.
2 Add 500 L of 1X Access Array Harvest Solution (Fluidigm, PN 100-1031) into the
H1–H4 wells on the IFC.
Prime the IFC
NOTE If you are working with the Access Array 48.48 IFC, use 500 L of 1X Access
Array Hydration Reagent v2 (blue cap, Fluidigm, PN 100-7966) instead of 1X Access
Array Harvest Solution in the H4 well. Hydration Reagent v2 ensures uniform harvest
volumes when working with the Access Array 48.48 IFC, but it is not needed when
working with the LP 48.48 IFC.
3 Remove and discard the blue protective film from the bottom of the AA IFC.
4 Load the IFC into the pre-PCR IFC Controller AX located in the pre-PCR lab.
5 Press Eject to move the tray out of the IFC Controller AX.
6 Place the IFC onto the tray by aligning the notched corner of the IFC to the A1 mark.
7 Press Load Chip to register the barcode of the IFC and activate the script selection.
8 Prime the LP 48.48 IFC for Access Array. Select Prime (155x) and Run Script.
NOTE For Access Array 48.48 IFCs, select Prime (151x) and Run Script.
9 Once the script is complete, press Eject to remove the IFC.
Access Array System for the Ion Torrent PGM Sequencing System: User Guide
27
Page 28

Chapter5:Bidirectional Amplicon Tagging on the LP 48.48 IFC
123
456
789
10 11 12
13 14 15
16 17 18
19 20 21
22 23 24
25 26 27
28 29 30
31 32 33
34 35 36
37 38 39
40 41 42
43 44 45
46 47 48
123
456
789
10 11 12
13 14 15
16 17 18
19 20 21
22 23 24
25 26 27
28 29 30
31 32 33
34 35 36
37 38 39
40 41 42
43 44 45
46 47 48
PRIMER INLETS
H1
H3
SAMPLE INLETS
H2
H4
INTERFACE ACCUMULATOR
CONTAINMENT ACCUMULATOR
Prepare the 20X Primer Solutions
Prepare the 20X Primer Solutions
NOTE If you are using primers provided by the Fluidigm Assay Design Group, refer to the
order informatics packet for correct primer concentrations.
1 Prepare the 20X primer solutions for 48 individual primer pairs as shown in the table
below. These will be loaded into the primer inlets of an IFC.
IMPORTANT Warm the 20X Access Array Loading Reagent to room temperature before
use.
Table 7. Example for ASY-AA product (Fluidigm): Dilution of target-specific primers
Component Volume
50 M CS1-tagged TS forward primer/50 M CS2-tagged TS
reverse primer
20X Access Array Loading Reagent (Fluidigm) 5.0 1X
PCR Certified Water (Teknova) 87.0
Total 100
* The final concentration in this table refers to the amount of each listed component in 5 L of the final primer
mix.
2 Vortex the 20X primer solutions for a minimum of 20 seconds and centrifuge for
30 seconds.
NOTE The final tagged TS forward and reverse primer concentrations are 4 M in the
20X primer solution. The final TS forward and reverse primer concentrations in the
Access Array reaction chamber are 200 nM.
28
Final
(μL)
Concentration*
8.0 4 M
Access Array System for the Ion Torrent PGM Sequencing System: User Guide
Page 29

Chapter 5: Bidirectional Amplicon Tagging on the LP 48.48 IFC
Prepare Sample Pre-Mix and Samples
Prepare Sample Pre-Mix and Samples
All DNA samples need to be added into the sample pre-mix individually, prior to loading the
sample mix solutions into the sample inlets of an IFC.
Prepare the Sample Pre-Mix Solution
1 Working in a DNA-free hood, combine the components listed in the table below. This
protocol prepares enough sample pre-mix for 60 reactions. This is enough reagent to
load one IFC with 12 additional reactions to compensate for dead volume and pipetting
error.
Table 8. Sample pre-mix solution
Component Volume
(μL)
10X FastStart High Fidelity Reaction Buffer
without MgCl2 (Roche)
25 mM MgCl
DMSO (Roche) 0.25 15.0 5%
10 mM PCR Grade Nucleotide Mix (Roche) 0.1 6.0 200 M each
5 U/L FastStart High Fidelity Enzyme Blend
(Roche)
20X Access Array Loading Reagent
(Fluidigm)
PCR Certified Water (Teknova) 1.95 117.0
Total 4.0 240.0
* The final concentration in this sample pre-mix table refers to the amount of each listed component in 5 L of
the final sample mix.
(Roche) 0.9 54.0 4.5 mM
2
0.5 30.0 1X
0.05 3.0 0.05 U/L
0.25 15.0 1X
Volume
for 60 (μL)
Final
Concentration*
2 Vortex the sample pre-mix for a minimum of 20 seconds and centrifuge for 30 seconds.
Prepare the Sample Mix Solutions
1 Combine the components listed below in a 96-well plate to prepare 48 individual sample
mix solutions.
Table 9. Sample mix solution
Component Volume (μL) Final Concentration
Sample pre-mix 4.0
genomic DNA (50 ng/L) 1.0 10 ng/L
Total 5.0
Access Array System for the Ion Torrent PGM Sequencing System: User Guide
29
Page 30

Chapter5:Bidirectional Amplicon Tagging on the LP 48.48 IFC
1
4
7
8
11
10
13
16
17 18
21
19
22
23
26
29
32
24
27
30
33
36
39
42
45
48
25
28
31
34 35
37
38
40 41
44
47
43
46
20
14 15
9
12
5
6
2
3
Step 1
1
4
7
8
11
10
13
16
17 18
21
19
22
23
26
29
32
24
27
30
33
36
39
42
45
48
25
28
31
34 35
37
38
40 41
44
47
43
46
20
14
15
9
12
5
6
2
3
Step 2
1
4
7
8
11
10
13
16
17 18
21
19
22
23
26
29
32
24
27
30
33
36
39
42
45
48
25
28
31
34 35
37
38
40 41
44
47
43
46
20
14
15
9
12
5
6
2
3
Step 3
1
4
7
8
11
10
13
16
17 18
21
19
22
23
26
29
32
24
27
30
33
36
39
42
45
48
25
28
31
34 35
37
38
40 41
44
47
43
46
20
14 15
9
12
5
6
2
3
Step 4
21
24
27
33
3
1
4
7
8
11
10
13
16
17 18
19
22
23
26
29
32
30
36
39
42
45
48
25
28
31
34
35
37
38
40
41
44
47
43
46
20
14 15
9
12
5
6
2
Step 5
1
4
7
8
11
10
13
16
17
18
21
19
22
23
26
29
32
24
27
30
33
36
39
42
45
48
25
28
31
34 35
37
38
40 41
44
47
43
46
20
14 15
9
12
5
6
2
3
Step 6
Load the IFC
2 Vortex the sample mix solution for a minimum of 20 seconds and centrifuge for
30 seconds.
IMPORTANT It is essential to vortex all components to ensure complete mixing.
Load the IFC
1 Pipet 4 L of 20X primer solution into each of the primer inlets.
2 Pipet 4 L of sample mix solution into each of the sample inlets.
IMPORTANT While pipetting, do not go past the first stop on the pipette. Doing so may
introduce air bubbles into the inlets.
NOTE An 8-channel pipette is recommended to load the sample mix and 20X primer
solutions. The recommended pipetting order is shown below.
3 Load the IFC into the pre-PCR IFC Controller AX in the pre-PCR lab.
4 Press Eject to move the tray out of the IFC Controller AX.
5 Place the IFC onto the tray by aligning the notched corner of the IFC to the A1 mark.
6 Press Load Chip to register the barcode of the IFC and activate the script selection.
7 Load the LP 48.48 IFC for Access Array. Select Load Mix (155x) and Run Script.
NOTE For Access Array 48.48 IFCs, select Load Mix v7 (151x) and Run Script. Load Mix
v7 (151x) is a script update from Load Mix (151x) for Access Array 48.48 IFCs and can be
downloaded from fluidigm.com/software. Contact Technical Support for assistance.
8 Once the script is complete, press Eject to remove the IFC.
30
Access Array System for the Ion Torrent PGM Sequencing System: User Guide
Page 31

Chapter 5: Bidirectional Amplicon Tagging on the LP 48.48 IFC
Thermal-Cycle the IFC
Thermal-Cycle the IFC
IMPORTANT If you are using the Access Array reagents with the LP 48.48 IFC, use only the
AA 48x48 Standard v1 or AA48v1 thermal protocols specified in step 8. Do not use the LP-
48x48 protocol with Access Array reagents.
Place the IFC onto the FC1 cycler and start PCR by selecting the protocol AA 48x48
Standard v1. Refer to the FC1™ Cycler User Guide (PN 100-1279).
For stand-alone thermal cycler, select protocol AA48v1.
NOTE The protocol as programmed into the Fluidigm stand-alone thermal cycler takes
undershooting and overshooting of target temperatures into consideration and is therefore
not identical to the PCR protocol for the FC1 cycler. Contact Technical Support if you need
assistance in programming your cycler.
Harvest the IFC
1 After the PCR has finished, move the IFC into the Post-PCR lab for harvesting.
2 Remove the remaining fluids from the H1–H4 wells.
3 Pipet 600 L of fresh 1X Access Array Harvest Solution into each of the H1–H4 wells. (Do
not use Hydration Reagent v2 here.)
NOTE If you are working with the LP 48.48 IFC or the Access Array 48.48 IFC, use 1X
Access Array Harvest Solution in all four wells (H1-H4).
4 Pipet 2 L of 1X Access Array Harvest Solution into each of the sample inlets on the IFC.
5 Load the IFC into the Post-PCR IFC Controller AX located in the Post-PCR lab.
6 Press Eject to move the tray out of the IFC Controller AX.
7 Place the IFC onto the tray by aligning the notched corner of the IFC to the A1 mark.
8 Press Load Chip to register the barcode of the IFC and activate the script selection.
9 Harvest the LP 48.48 IFC for Access Array. Select Harvest (155x) and Run Script.
NOTE For Access Array 48.48 IFCs, select Harvest v7 (151x) and Run Script. Harvest v7
(151x) is a script update from Harvest v5 (151x) for Access Array 48.48 IFCs and can be
downloaded from fluidigm.com/software. Contact Technical Support for assistance.
10 Once the script is complete, press Eject to remove the IFC.
11 Label a 96-well plate with the IFC barcode.
12 Carefully transfer 10 L of harvested PCR products from each of the sample inlets into
columns 1
–6 of a 96-well PCR plate, using an 8-channel pipette.
IMPORTANT Transfer PCR products from the IFC to the 96-well plate in the same order
as the IFC was loaded.
Access Array System for the Ion Torrent PGM Sequencing System: User Guide
31
Page 32

Chapter5:Bidirectional Amplicon Tagging on the LP 48.48 IFC
123
456
789
10 11 12
13 14 15
16 17 18
19 20 21
22 23 24
25 26 27
28 29 30
31 32 33
34 35 36
37 38 39
40 41 42
43 44 45
46 47 48
123
456
789
10 11 12
13 14 15
16 17 18
19 20 21
22 23 24
25 26 27
28 29 30
31 32 33
34 35 36
37 38 39
40 41 42
43 44 45
46 47 48
DO NOT USE
H1H3H2
H4
Sample inlets with
harvested samples
INTERFACE ACCUMULATOR
CONTAINMENT ACCUMULATOR
Harvest the IFC
The following image displays a map of the PCR products when transferred from the IFC
to the 96-well plate:
32
Access Array System for the Ion Torrent PGM Sequencing System: User Guide
Page 33

Chapter 5: Bidirectional Amplicon Tagging on the LP 48.48 IFC
Attach Sequence Tags and Sample Barcodes
Attach Sequence Tags and Sample Barcodes
NOTE All subsequent steps need to be carried out in a post-PCR lab to avoid contamination.
Prepare the Sample Pre-Mix Solution
1 Working in a DNA-free hood, combine the components listed in the table below. This
protocol prepares enough sample pre-mix for 120 reactions. This is enough reagent to
amplify the 48 PCR product pools harvested from one IFC for Set A and Set B
bidirectional barcoding with 24 additional reactions to compensate for dead volume and
pipetting error.
Table 10. Sample pre-mix solution
Component Volume
(μL)
10X FastStart High Fidelity Reaction Buffer
without MgCl2 (Roche)
25 mM MgCl2 (Roche) 3.6 432.0 4.5 mM
DMSO (Roche) 1.0 120.0 5%
10 mM PCR Grade Nucleotide Mix (Roche) 0.4 48.0 200 M each
5 U/L FastStart High Fidelity Enzyme Blend
(Roche)
PCR Certified Water (Teknova) 7.8 936.0
Total 15.0 1,800.0
* The final concentration in this sample pre-mix table refers to the amount of each listed component in 5 L of
the final sample mix.
2.0 240.0 1X
0.2 24.0 0.05 U/L
Volume
for 120
(μL)
Final
Concentration*
2 Vortex the sample pre-mix for a minimum of 20 seconds and centrifuge for 30 seconds.
Prepare a 100-Fold Dilution of the Harvested PCR Products
1 In a 96-well plate pipet 99 L PCR Certified Water into 48 wells.
2 Add 1 L of PCR product from each sample harvested from the IFC to a separate well in
the 96-well plate as described in the section Harvest the IFC on page 31.
3 Vortex the PCR product dilutions for a minimum of 20 seconds and centrifuge for
30 seconds.
Prepare the Sample Mix Solutions
1 Combine the components listed below in two 96-well plates to prepare two sets of 48
individual sample mix solutions.
Access Array System for the Ion Torrent PGM Sequencing System: User Guide
33
Page 34

Chapter5:Bidirectional Amplicon Tagging on the LP 48.48 IFC
Attach Sequence Tags and Sample Barcodes
Table 11. Sample mix solution - SET A
Component Volume
Sample pre-mix 15.0
(μL)
Access Array Barcode Library for Ion Torrent PGM
Sequencer Plate A1
Diluted Harvested PCR Product Pool 1.0
Total 20.0
Table 12. Sample mix solution - SET B
Component Volume
Sample pre-mix 15.0
Access Array Barcode Library for Ion Torrent PGM
Sequencer Plate B1
Diluted Harvested PCR Product Pool 1.0
Total 20.0
4.0
(μL)
4.0
IMPORTANT It is essential to vortex all components to ensure complete mixing.
NOTE
• The final concentrations of the forward and reverse barcode primers are 400 nM per
well.
• Each well should receive a unique barcode primer pair.
2 Vortex the sample mix solutions for a minimum of 20 seconds and centrifuge for
30 seconds.
Thermal-Cycle the 96-Well PCR Plate
Place the PCR plates on two PCR thermal cyclers and run the following PCR protocol:
Table 13. PCR protocol for attaching sequence tags and sample barcodes
PCR Stages Cycle
95°C 10 min 1
95°C 15 sec
60°C 30 sec
72°C 1 min
72°C 3 min 1
34
15
Access Array System for the Ion Torrent PGM Sequencing System: User Guide
Page 35

Chapter 5: Bidirectional Amplicon Tagging on the LP 48.48 IFC
Check PCR Products on the Agilent 2100 Bioanalyzer
Check PCR Products on the Agilent 2100 Bioanalyzer
1 Use the Agilent DNA 1000 chips from the Agilent DNA 1000 Kit to check 1 L of PCR
product from each of the PCR reactions described above. Follow the Agilent DNA 1000
Kit Guide for details.
2 Check the results of the chip to determine if the PCR product pool has the expected size.
Depending on the expected sizes of the PCR products, a smear may be visible.
Comparison of the electropherogram to a histogram of the expected sizes indicates
correctness of the product size range. The PCR products of the barcoding step should
exhibit a band shift of +63 bp when compared to Harvest Pool Products.
3 Store the PCR products at –20 ºC.
Next Step
Continue with your library preparation as described in Post-PCR Amplicon Purification and
Quantitation on page 36.
Access Array System for the Ion Torrent PGM Sequencing System: User Guide
35
Page 36

Chapter 6: Post-PCR Amplicon
Purification and Quantitation
This chapter describes a standard Access Array™ procedure for the analysis of PCR products
harvested from an LP 48.48 IFC.
The quality of the PCR products prepared on an LP 48.48 IFC (or a Access Array 48.48 IFC) is
critical for successful amplicon sequencing. Any contamination of primers or primer dimers in
the PCR products will be directly reflected in the quality of sequencing reads. Therefore, the
PCR products generated on an IFC should to be qualified and purified before sequencing.
The PCR products generated on the IFC are first analyzed using an Agilent® 2100
Bioanalyzer to check for quality. Next, the PCR products are pooled together in equal volume
to create one PCR product library. The PCR product library is then purified using AMPure XP
beads, and quantified before proceeding to sequencing. It is recommended to use the
Quant-iT PicoGreen dsDNA assay kit for quantification of the final (cleaned-up) library prior to
sequencing.
Reference Documents
• Agilent® DNA 1000 Kit Guide
• Quant-iT™ PicoGreen® User Guide
Materials
Required Equipment
• SPRIPlate® 96R Magnet Plate (Agencourt, PN 000219)
or DynaMag™-2 magnet (Invitrogen, PN 123-21D)
• Agilent 2100 Bioanalyzer and DNA 1000 Kit (Agilent, PN 5067-1504)
• Fluorimeter-compatible 96- or 384-well microtiter plates
Required Reagents
Stored at 4 °C
• Agencourt AMPure XP Reagent beads (Beckman Coulter Genomics, PN A63880)
• Quant-iT
PicoGreen dsDNA Assay Kit (Invitrogen, P11496)
36
Access Array System for the Ion Torrent PGM Sequencing System: User Guide
Page 37

Chapter 6: Post-PCR Amplicon Purification and Quantitation
Quantitate PCR Products
Stored at Room Temperature
• DNA suspension buffer (10 mM TRIS, pH 8.0, 0.1 mM EDTA) (Teknova, PN T0221)
• 100% Ethanol
• PCR Certified Water (Teknova, PN W3330)
Quantitate PCR Products
The PCR product library can be quantified using an Agilent 2100 Bioanalyzer with DNA 1000
Chips.
1 Run 1 L of the 48 pooled PCR products from each sample on a Bioanalyzer DNA 1000
Chip following the manufacturer’s instructions.
a Ensure that amplicon sizes and distribution are within the expected range (±5% for
amplicons in the range of 200-400 bp including tags).
b Ensure that primer-dimer contamination in the PCR product pool (in the range of
50
–130 bp) is less than 25%, based on the Bioanalyzer quantification shown in
Appendix A: Electropherogram Examples.
2 Continue with the purification procedure below for all of the pooled PCR products that
contain less than 25% primer dimers.
Purify Harvested PCR Products
1 Remove AMPure XP beads from refrigerator and warm to room temperature for
30 minutes.
2 Prepare 70% ethanol solution:
a To a 15 mL tube, add 3 mL of PCR-Certified Water and 7 mL of 100% ethanol.
b Vortex for 5 seconds.
3 Pool 1 L of each barcoded sample PCR product (see Attach Sequence Tags and Sample
Barcodes on page 33) into a new microcentrifuge tube.
4 Vortex AMPure XP beads for 10 seconds to resuspend. Bead solution should appear
homogeneous and consistent in color.
5 Pipet the barcoded sample pool, DNA suspension buffer, and AMPure XP beads into a
1.5 mL microtube according to the table below:
Component Volume (μL)
Barcoded sample pool 12.0
DNA suspension buffer 24.0
AMPure XP Beads 36.0
Total 72.0
Access Array System for the Ion Torrent PGM Sequencing System: User Guide
37
Page 38

Chapter 6: Post-PCR Amplicon Purification and Quantitation
PCR Product Library Quantitation Procedure
6 Vortex the tube and incubate at room temperature for 10 minutes.
7 Place the microtube onto a magnetic separator and allow it to sit for 1 minute.
8 Carefully pipet out the supernatant without disturbing the beads (remove as much liquid
as possible).
9 Add 180 L of 70% ethanol and vortex for 10 seconds.
10 Place the microtube onto a magnetic separator and allow it to set for 1 minute.
11 Carefully pipet the supernatant without disturbing the beads.
12 Add 180 L of 70% ethanol and vortex for 10 seconds.
13 Place the microtube onto a magnetic separator and allow it to set for 1 minute.
14 Carefully pipet out the supernatant without disturbing the beads.
15 Allow the beads to air dry for approximately 10 minutes by leaving the tube on the bench.
Make sure the tube is completely dry before proceeding.
16 Add 40 L of DNA suspension buffer to the microtube and vortex for 5 seconds.
17 Place the microtube onto a magnetic separator and allow it to set for one minute.
18 Carefully transfer the supernatant to a new 1.5 mL microtube.
PCR Product Library Quantitation Procedure
Use one of the following quantitation methods to quantify the PCR product library.
IMPORTANT The Ion Library Quantification Kit (Ion Torrent, PN.4468802) is not compatible
with the library generated with Access Array Barcode Library for Ion
- 96
(Fluidigm, PN 100-4911).
Agilent 2100 Bioanalyzer Quantification
1 Run 1 L of the PCR product library on a Bioanalyzer DNA 1000 Chip following the
manufacturer’s instructions.
2 Define a region of interest in the electropherogram to determine the PCR product library
concentration.
a Select the Region Table subtab on the bottom panel of the Electropherogram tab.
b Right-click the electropherogram and select Add region. Define the region to cover
all of the PCR product library peaks.
Torrent™ PGM™ Sequencer
38
Access Array System for the Ion Torrent PGM Sequencing System: User Guide
Page 39
Chapter 6: Post-PCR Amplicon Purification and Quantitation
PCR Product Library Quantitation Procedure
c The Region Table listed below the electropherogram will show the concentration of
the Region containing the PCR product library. Refer to the Agilent 2100 Bioanalyzer
User Guide for additional information on Regions.
PicoGreen Fluorimetry Quantification
Quantitate the PCR product library by fluorimetry, using the Quant-iT PicoGreen dsDNA
Assay Kit, following the manufacturer’s instructions.
Independent IFC libraries should be quantitated separately. After quantitation, libraries must
be normalized and volumetrically combined into a single final library for sequencing. The
final library concentration based on Quant-iT is then used for the downstream sequencing
preparation.
Pool the Products from Multiple Access Array IFCs
To pool amplicons from more than one Access Array IFC, pool and purify each Access Array
IFC separately.
1 Follow the steps outlined in this chapter under Purify Harvested PCR Products on
page 37 for each Access Array IFC.
2 For bidirectional amplicon tagged libraries (generated in Chapter 5), pool products A and
B from the same Access Array IFC (up to 48 samples) together for purification.
Access Array System for the Ion Torrent PGM Sequencing System: User Guide
39
Page 40

Chapter 6: Post-PCR Amplicon Purification and Quantitation
PCR Product Library Quantitation Procedure
3 Continue to quantify the pooled, purified library by calculating the PCR Product Library
Concentration outlined later in this chapter.
4 Once each IFC Library has been purified and quantified, normalize the concentration of
each IFC Library and pool libraries volumetrically by adding an equal volume of each
library to a new microcentrifuge tube.
The pooled Access Array IFC library is now ready for sequencing.
40
Access Array System for the Ion Torrent PGM Sequencing System: User Guide
Page 41

Appendix A: Electropherogram Examples
The figures in this section are examples from an Agilent® 2100 Bioanalyzer
electropherogram of a harvested PCR product pool. The first two figures show a DNA 1000
Chip electropherogram of a pooled PCR product with 48 amplicons ranging between 180–
350 bp.
Figure A shows the harvested PCR product pool from a Access Array 48.48 IFC, and Figure B
shows the same harvested PCR product pool after SPRI cleanup:
Access Array System for the Ion Torrent PGM Sequencing System: User Guide
41
Page 42

Appendix A: Electropherogram Examples
The following figure shows a DNA 1000 Chip electropherogram overlay of an unpurified pooled PCR
product library and the same purified pooled PCR product library after AMPure XP cleanup:
42
Access Array System for the Ion Torrent PGM Sequencing System: User Guide
Page 43

Appendix B: Access Array Barcode
Library for the Ion Torrent PGM
Sequencer - 96
The Access Array™ Barcode Library for the Ion Torrent™ PGM™ Sequencer - 96 (Fluidigm,
PN 100-4911) is designed to be used for bidirectional sequencing strategy on the Ion Torrent
sequencer for amplicon libraries that have been generated on the Access Array™ system.
Table 14. Access Array Barcode Library for Ion Torrent PGM Sequencer - 96
PN Plate
Number
100-4912 A1 Access Array Barcode Library for Ion Torrent PGM Sequencer P1_CS2 /
100-4913 B1 Access Array Barcode Library for Ion Torrent PGM Sequencer P1_CS1 /
Table 15. Barcode Sequences for Access Array Barcode Library for Ion Torrent PGM Sequencer - 96
(Fluidigm, PN100-4911)
Barcode Name Barcode Sequence Barcode Well Plate
MID-1 ACGAGTGCGT A1 A1 & B1
MID-2 ACGCTCGACA B1 A1 & B1
MID-3 AGACGCACTC C1 A1 & B1
MID-4 AGCACTGTAG D1 A1 & B1
MID-5 ATCAGACACG E1 A1 & B1
MID-6 ATATCGCGAG F1 A1 & B1
Reagent Description Volume
A_BC_CS1_1-96 at 2 M per oligo
A_BC_CS2_1-96 at 2 M per oligo
(L)
50
50
MID-7 CGTGTCTCTA G1 A1 & B1
MID-8 CTCGCGTGTC H1 A1 & B1
MID-10 TCTCTATGCG A2 A1 & B1
MID-11 TGATACGTCT B2 A1 & B1
MID-13 CATAGTAGTG C2 A1 & B1
MID-14 CGAGAGATAC D2 A1 & B1
MID-15 ATACGACGTA E2 A1 & B1
Access Array System for the Ion Torrent PGM Sequencing System: User Guide
43
Page 44

Appendix B: Access Array Barcode Library for the Ion Torrent PGM Sequencer - 96
Barcode Name Barcode Sequence Barcode Well Plate
MID-16 TCACGTACTA F2 A1 & B1
MID-17 CGTCTAGTAC G2 A1 & B 1
MID-18 TCTACGTAGC H2 A1 & B1
MID-19 TGTACTACTC A3 A1 & B1
MID-20 ACGACTACAG B3 A1 & B1
MID-21 CGTAGACTAG C3 A1 & B1
MID-22 TACGAGTATG D3 A1 & B1
MID-23 TACTCTCGTG E3 A1 & B1
MID-24 TAGAGACGAG F3 A1 & B1
MID-25 TCGTCGCTCG G3 A1 & B1
MID-26 ACATACGCGT H3 A1 & B1
MID-27 ACGCGAGTAT A4 A1 & B1
MID-28 ACTACTATGT B4 A1 & B1
MID-29 ACTGTACAGT C4 A1 & B1
MID-30 AGACTATACT D4 A1 & B1
MID-31 AGCGTCGTCT E4 A1 & B1
MID-32 AGTACGCTAT F4 A1 & B1
MID-33 ATAGAGTACT G4 A1 & B1
MID-34 CACGCTACGT H4 A1 & B1
MID-35 CAGTAGACGT A5 A1 & B1
MID-36 CGACGTGACT B5 A1 & B1
MID-37 TACACACACT C5 A1 & B1
MID-38 TACACGTGAT D5 A1 & B1
MID-39 TACAGATCGT E5 A1 & B1
MID-40 TACGCTGTCT F5 A1 & B1
MID-41 TAGTGTAGAT G5 A1 & B1
MID-42 TCGATCACGT H5 A1 & B1
MID-43 TCGCACTAGT A6 A1 & B1
MID-44 TCTAGCGACT B6 A1 & B1
MID-45 TCTATACTAT C6 A1 & B1
MID-46 TGACGTATGT D6 A1 & B1
44
Access Array System for the Ion Torrent PGM Sequencing System: User Guide
Page 45

Appendix B: Access Array Barcode Library for the Ion Torrent PGM Sequencer - 96
Barcode Name Barcode Sequence Barcode Well Plate
MID-47 TGTGAGTAGT E6 A1 & B1
MID-48 ACAGTATATA F6 A1 & B1
MID-49 ACGCGATCGA G6 A1 & B1
MID-50 ACTAGCAGTA H6 A1 & B1
MID-51 AGCTCACGTA A7 A1 & B1
MID-52 AGTATACATA B7 A1 & B1
MID-53 AGTCGAGAGA C7 A1 & B1
MID-54 AGTGCTACGA D7 A1 & B1
MID-55 CGATCGTATA E7 A1 & B1
MID-56 CGCAGTACGA F7 A1 & B1
MID-57 CGCGTATACA G7 A1 & B1
MID-58 CGTACAGTCA H7 A1 & B1
MID-59 CGTACTCAGA A8 A1 & B1
MID-60 CTACGCTCTA B8 A1 & B1
MID-61 CTATAGCGTA C8 A1 & B1
MID-62 TACGTCATCA D8 A1 & B1
MID-63 TAGTCGCATA E8 A1 & B1
MID-64 TATATATACA F8 A1 & B1
MID-65 TATGCTAGTA G8 A1 & B1
MID-66 TCACGCGAGA H8 A1 & B1
MID-67 TCGATAGTGA A9 A1 & B1
MID-68 TCGCTGCGTA B9 A1 & B1
MID-69 TCTGACGTCA C9 A1 & B1
MID-70 TGAGTCAGTA D9 A1 & B1
MID-71 TGTAGTGTGA E9 A1 & B1
MID-72 TGTCACACGA F9 A1 & B1
MID-73 TGTCGTCGCA G9 A1 & B1
MID-74 ACACATACGC H9 A1 & B1
MID-75 ACAGTCGTGC A10 A1 & B1
MID-76 ACATGACGAC B10 A1 & B1
MID-77 ACGACAGCTC C10 A1 & B1
Access Array System for the Ion Torrent PGM Sequencing System: User Guide
45
Page 46

Appendix B: Access Array Barcode Library for the Ion Torrent PGM Sequencer - 96
Barcode Name Barcode Sequence Barcode Well Plate
MID-78 ACGTCTCATC D10 A1 & B1
MID-79 ACTCATCTAC E10 A1 & B1
MID-80 ACTCGCGCAC F10 A1 & B1
MID-81 AGAGCGTCAC G10 A1 & B1
MID-82 AGCGACTAGC H10 A1 & B1
MID-83 AGTAGTGATC A11 A1 & B1
MID-84 AGTGACACAC B11 A1 & B1
MID-85 AGTGTATGTC C11 A1 & B1
MID-86 ATAGATAGAC D11 A1 & B1
MID-87 ATATAGTCGC E11 A1 & B1
MID-88 ATCTACTGAC F11 A1 & B1
MID-89 CACGTAGATC G11 A1 & B1
MID-90 CACGTGTCGC H11 A1 & B1
MID-91 CATACTCTAC A12 A1 & B1
MID-92 CGACACTATC B12 A1 & B1
MID-93 CGAGACGCGC C12 A1 & B1
MID-94 CGTATGCGAC D12 A1 & B1
MID-95 CGTCGATCTC E12 A1 & B1
MID-96 CTACGACTGC F12 A1 & B1
MID-97 CTAGTCACTC G12 A1 & B1
MID-98 CTCTACGCTC H12 A1 & B1
46
Access Array System for the Ion Torrent PGM Sequencing System: User Guide
Page 47

Appendix C: Related Documents
This document is intended to be used in conjunction with these related documents:
Document Title Part Number
Access Array™ Multiplex 20X Primer Solution Preparation 100-3895
4-Primer Amplicon Tagging with the LP 48.48 IFC 68000161
2-Primer Amplicon Tagging with the LP 48.48 IFC 68000148
Access Array
Advanta NGS Library Preparation with Access Array Protocol 101-7885
Advanta NGS Library Preparation on the LP 48.48 IFC with Access Array Quick
Reference
IFC Controller AX User Guide 68000157
FC1™ Cycler User Guide 100-1279
Control Line Fluid Loading Procedure Quick Reference 68000132
–Generate Tagged Primers (an Excel Workbook) 100-3873
101-7886
Access Array System for the Ion Torrent PGM Sequencing System: User Guide
47
Page 48
Appendix D: Safety
IMPORTANT For translations of the instrument safety information, see Safety Information for
Genomics Instruments (PN 101-6810).
General Safety
In addition to your site-specific safety requirements, Fluidigm recommends the following
general safety guidelines in all laboratory and manufacturing areas:
• Use the appropriate personal protective equipment (PPE): safety glasses, fully enclosed
shoes, lab coats, and gloves, according to your laboratory safety practices.
• Know the locations of all safety equipment (fire extinguishers, spill kits, eyewashes/
showers, first-aid kits, safety data sheets, etc.), emergency exit locations, and
emergency/injury reporting procedures.
• Do not eat, drink, or smoke in lab areas.
• Maintain clean work areas.
• Wash hands before leaving the lab.
Instrument Safety
The instrument should be serviced by authorized personnel only.
WARNING Do not modify this instrument. Unauthorized modifications may create a
safety hazard.
WARNING BIOHAZARD. If you are putting biohazardous material on the
instrument, use appropriate personal protective equipment and adhere to Biosafety
in Microbiological and Biomedical Laboratories (BMBL), a publication from the
Centers for Disease Control and Prevention, and to your lab's safety protocol to limit
biohazard risks. If biohazardous materials are used, properly label the equipment as
a biohazard. For more information, see the BMBL guidelines online at
cdc.gov/biosafety/publications/index.htm.
WARNING PHYSICAL INJURY HAZARD. Do not attempt to lift or move any boxed
or crated items unless you use proper lifting techniques. The weight of the boxed
IFC Controller AX is 27 kg (59 lb) and the FC1 cycler is 11 kg (25 lb).
If you choose to lift or move the instrument after it has been installed, do not
attempt to do so without the assistance of others. Use appropriate moving
equipment and proper lifting techniques to minimize the chance of physical injury.
CAUTION PINCH HAZARD. The instrument door and tray can pinch your hand.
Make sure your fingers, hands, and shirtsleeves are clear of the door and tray when
loading or ejecting an integrated fluidic circuit (IFC).
48
Access Array System for the Ion Torrent PGM Sequencing System: User Guide
Page 49
Symbols on the Instrument
CAUTION HOT SURFACE HAZARD. Never press down on the integrated fluidic
circuit (IFC) when it is on the thermal cycler chuck. If you encounter a vacuum
problem, turn off the system, allow it to cool down, and remove the IFC. Clean the
bottom of the IFC and/or chuck surface with a lint-free cloth and 70% isopropyl
alcohol.
CAUTION HOT SURFACE HAZARD. Make sure the chuck has had time to cool. It
can get very hot and cause burn injury.
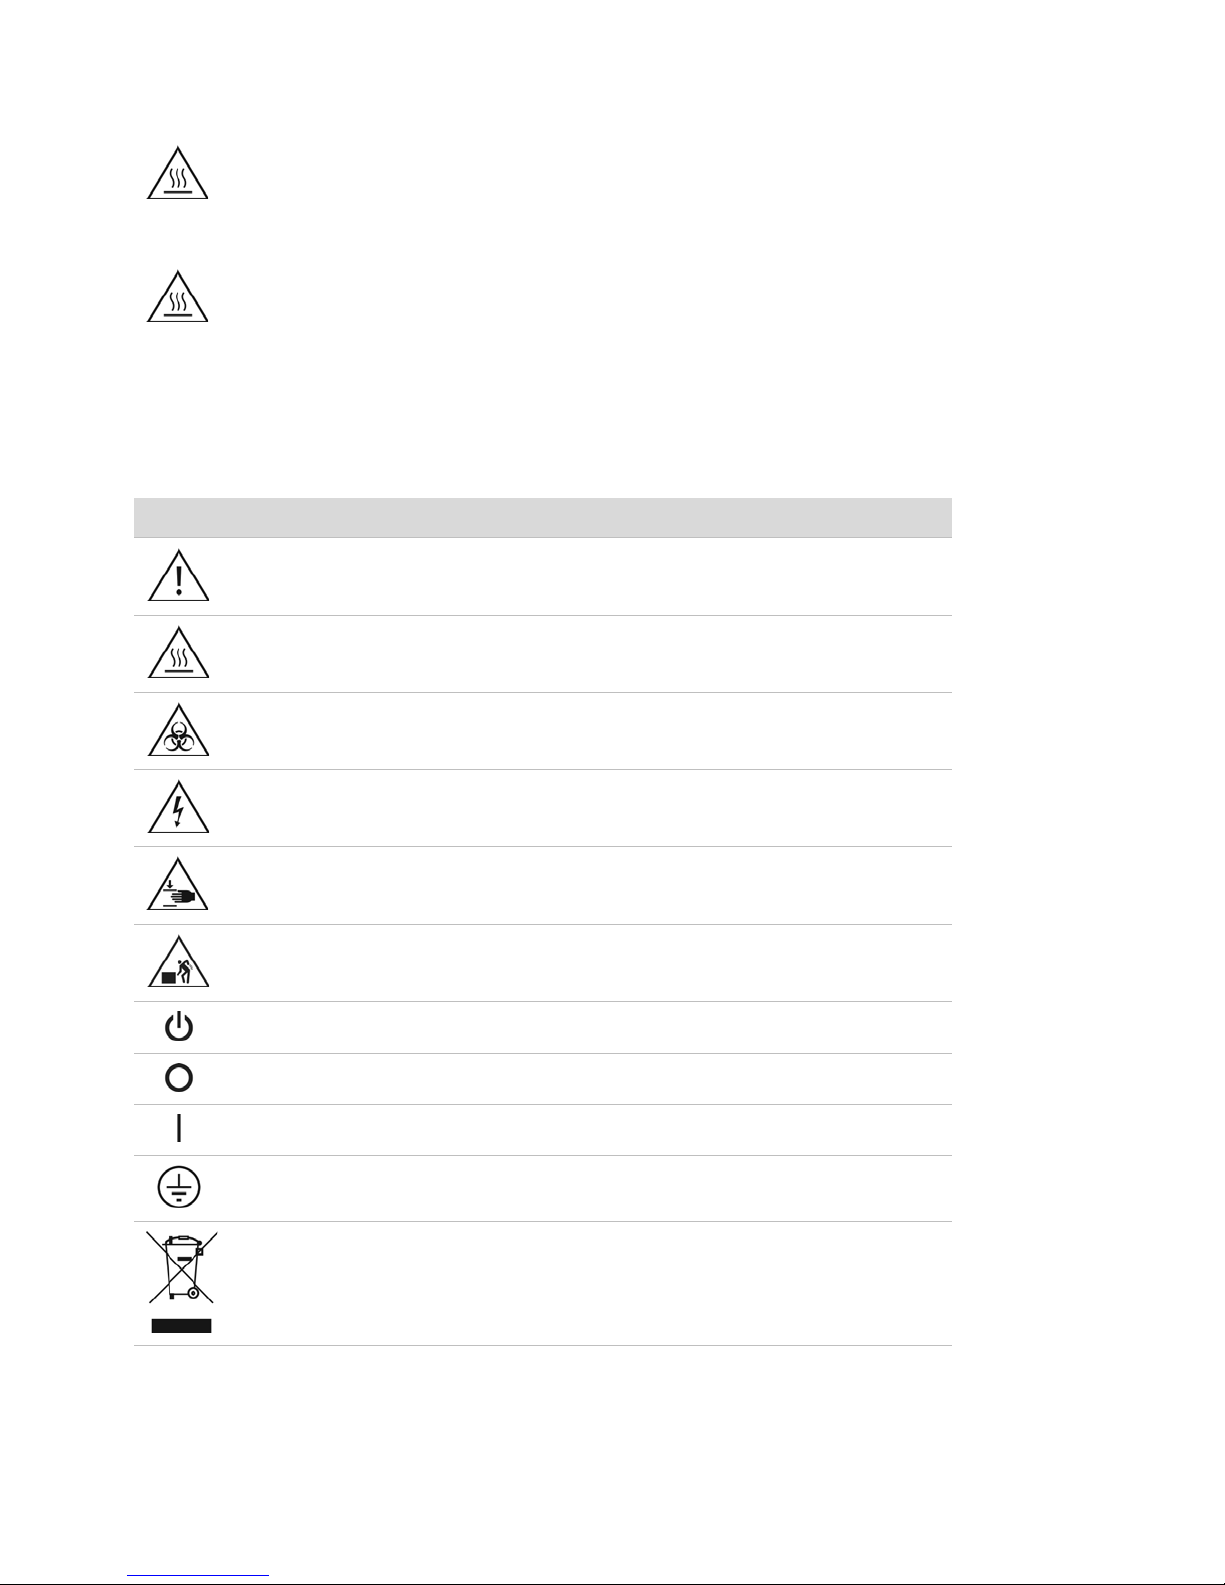
Symbols on the Instrument
The following table describes the hazard symbols that may be used in this document or on
labels on the instrument.
Symbol Description
Hazard. Consult the user guide for further information.
Hot surface hazard. Do not touch; potential for personal injury.
Appendix D: Safety
Biohazard.
Electricity hazard. Indicates high electricity levels and a threat of electric shock from
machines and/or equipment in the vicinity. You may suffer severe injuries or death.
Pinch hazard. Indicates where pinch hazards exist. Exercise caution when operating
around these areas.
Lifting hazard.
Power and standby symbol.
Power switch is in the Off position.
Power switch is in the On position.
Protective conductor terminal (main ground). It must be connected to earth ground before
any other electrical connections are made to the instrument.
To minimize negative environmental impact from disposal of electronic waste, do not
dispose of electronic waste in unsorted municipal waste.
Follow local municipal waste ordinances for proper disposal provision. Contact customer
service for information about responsible disposal options.
Access Array System for the Ion Torrent PGM Sequencing System: User Guide
49
Page 50

Appendix D: Safety
Electrical Safety
Electrical Safety
NOTE The main power disconnect is on the rear panel of the instrument.
WARNING ELECTRICAL HAZARD. DO NOT REMOVE THE COVERS. Electrical
shock can result if the instrument is operated without its protective covers. No
internal components are serviceable by the user.
WARNING ELECTRICAL HAZARD. Plug the instrument into a properly grounded
receptacle with adequate current capacity.
Chemical Safety
The responsible individuals must take the necessary precautions to ensure that the
surrounding workplace is safe and that instrument operators are not exposed to hazardous
levels of toxic substances. When working with any chemicals, refer to the applicable safety
data sheets (SDSs) provided by the manufacturer or supplier.
50
Access Array System for the Ion Torrent PGM Sequencing System: User Guide
Page 51

For technical support visit fluidigm.com/support.
 Loading...