

Fluid FLDC2801 Instruction Manual
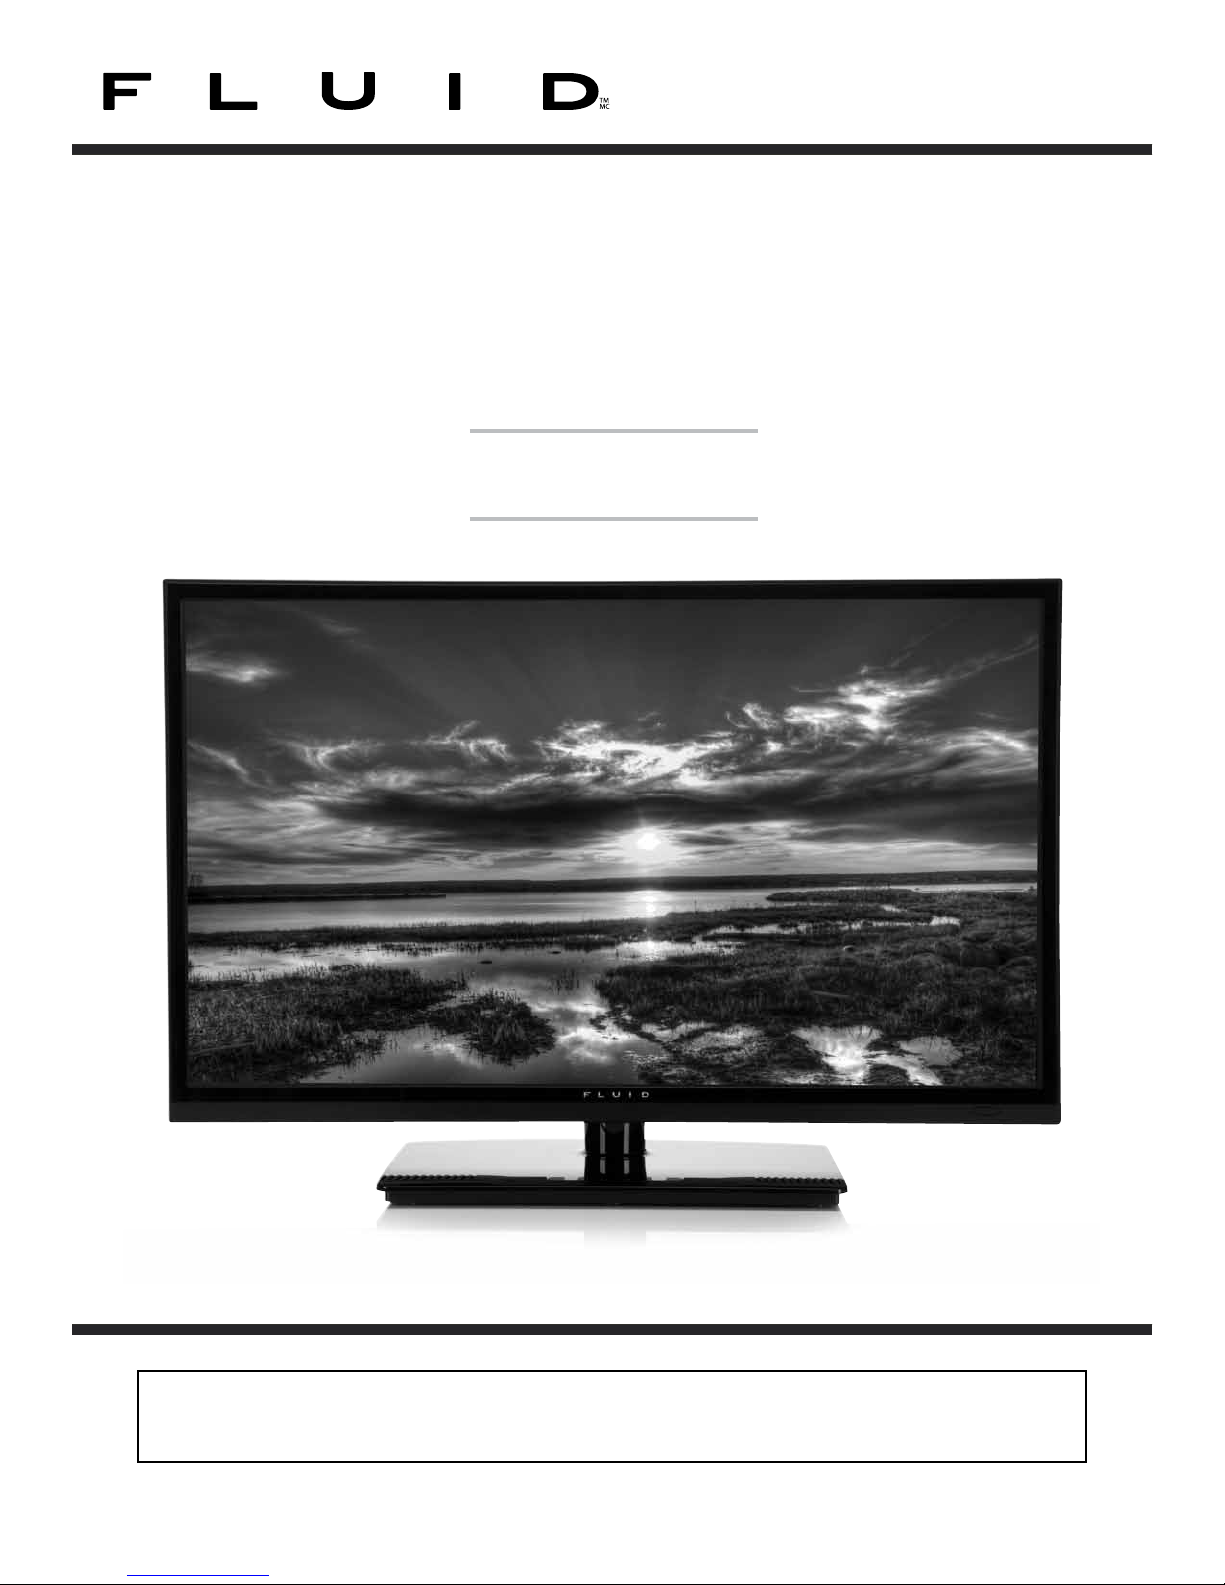
28" LED Combo
Television/DVD Player
FLDC2801
8009640C
Instruction Manual
Read all of the instructions before using this TV and keep the
manual in a safe place for future reference.
Important Safety Instructions
• Read these instructions – All the safety and operating instructions should be read before this product is
operated.
• Keep these instructions – The safety and operating instructions should be retained for future reference.
• Heed all warnings – All warnings on the appliance and in the operating instructions should be adhered to.
• Follow all instructions – All operating and use instructions should be followed.
• Do not use this apparatus near water – The appliance should not be used near water or moisture – for
example, in a wet basement or near a swimming pool, and the like.
• Clean only with dry cloth.
• Do not block any ventilation openings. Install in accordance with the manufacture’s instructions.
• Do not install near any heat sources such as radiators, heat registers, stoves, or other apparatus (including
amplifiers) that produce heat.
• Do not defeat the safety purpose of the polarized or grounding plug. A polarized plug has two blades
with one wider than the other. A grounding plug has two blades and a third grounding prong. The wide
blade or the third prong is provided for your safety. If the provided plug does not fit into your outlet,
consult an electrician for replacement of the obsolete outlet.
• Protect the power cord from being walked on or pinched particularly at the plugs, convenience
receptacles, and at the point where they exit from the apparatus.
• Only use attachments/accessories specified by the manufacturer.
• Use only with the cart, stand, tripod, bracket, or table specified by the manufacturer,
or sold with the apparatus. When a cart or rack is used, use caution when moving
the cart/apparatus combination to avoid injury from tip-over.
• Unplug the apparatus during lightning storms or when unused for long periods of time.
• Refer all servicing to qualified personnel. Servicing is required when the apparatus has been damaged in
any way, such as power supply cord or plug is damaged, liquid has been spilled or objects have fallen into
the apparatus has been exposed to rain or moisture, does not operate normally, or has been dropped.
• Please keep the unit in a well-ventilated environment.
• WARNING: To reduce the risk of fire or electric shock, do not expose this apparatus to rain or moisture.
The apparatus shall not be exposed to dripping or splashing and that objects filled with liquids, such as
vases, shall not be placed on apparatus.
• WARNING: The wall socket plug is used as disconnect device, the disconnect device shall remain readily
operable.
• WARNING: The batteries shall not be exposed to excessive heat such as sunshine, fire or the like.
• This lightning flash with arrowhead symbol within an equilateral triangle is intended to alert the user
to the presence of non-insulated “dangerous voltage” within the product’s enclosure that may be of
sufficient magnitude to constitute a risk of electric shock.
• To reduce the risk of electric shock, do not remove cover (or back) as there are no user-serviceable parts
inside. Refer servicing to qualified personnel.
• The exclamation point within an equilateral triangle is intended to alert the user to the presence of
important operating and maintenance instructions in the literature accompanying the appliance.
• This equipment is a Class II or double insulated electrical appliance. It does not require a grounded
connection.
2

Contents
Important Safety Instructions ............................................. 2
Safety Information ......................................................4
What’s Included ........................................................ 5
Getting Started ....................................................... 6-7
Front/Side View ....................................................6
Rear View ......................................................... 7
Wall Mounting ...................................................... 7
Connecting to External Devices ........................................... 8
Remote Control Button Functions .......................................9-11
Operating Your Television .............................................12-18
Select Your Onscreen Language Preference ............................12
Navigating the Onscreen Display ......................................13
Choosing a TV Channel ..............................................13
Selecting Input Source ..............................................14
Picture Menu Options ...............................................14
Picture Mode .......................................................14
Audio Menu Options ................................................15
Time Menu Options .................................................15
Setup Menu Options. . . . . . . . . . . . . . . . . . . . . . . . . . . . . . . . . . . . . . . . . . . . . . . . .16
Lock Menu Options .................................................17
Channel Menu Options ...............................................18
Show/Hide .........................................................18
Parental Menu Options ..................................................19
DVD Operation ..................................................... 20-22
DVD Functions ..................................................... 23-32
Supported DVD Format .......................................... 23-24
MP3/JPEG Playback ................................................ 25
Using the Built-in DVD Player ........................................26
Compatible disc types ..............................................26
Basic DVD Playback Functions .................................... 27-28
Playing Multimedia Discs ............................................ 29
Using the DVD Language Setup Page .................................30
Using the DVD Screen Setup Page ...................................30
Using the DVD Audio Setup Page .....................................31
Using the DVD Custom Setup Page ................................... 32
Troubleshooting ................................................ 33-35
Specifications .........................................................36
Warranty .............................................................36
3

Safety Information
To ensure reliable and safe operation of this equipment, please read carefully all the instructions
in this user guide, especially the safety information below.
Electrical safety
• The TV set should only be connected to a main power supply with voltage that matches the
label at the rear of the product.
• To prevent overload, do not share the same power supply socket with too many other
electronic components.
• Do not place any connecting wires where they may be stepped on or tripped over.
• Do not place heavy items on them, which may damage the leads.
• Hold the main plug, not the wires, when removing from a socket.
• During a thunderstorm or when not using the television for long periods, turn off the power
switch on the back of the television.
• Do not allow water or moisture to enter the TV or power adapter. Do NOT use in wet, moist
areas, such as bathrooms, steamy kitchens or near swimming pools.
• Pull the plug out immediately, and seek professional help if the main plug or cable is
damaged, liquid has spilt onto the set, if accidentally exposed to water or moisture, if
anything accidentally penetrates the ventilation slots or if the set does not work normally.
• Do not remove the safety covers. There are no user serviceable parts inside.
Trying to service the unit yourself is dangerous and may invalidate the product’s warranty.
Only qualified personnel should service this apparatus.
• To avoid battery leakage, remove exhausted batteries from the remote control, or when not
using for a long period.
• Do not break open or throw exhausted batteries in a fire.
Physical safety
• Do not block ventilation slots in the back cover. You may place the TV in a cabinet, but
ensure at least 5 cm (2”) clearance all around.
• Do not tap or shake the TV screen, this may damage the internal circuits. Take good care of
the remote control.
• To clean the TV use a soft dry cloth. Do not use solvents or petroleum based fluids.
• Do not install near any heat sources such as radiators, heat registers, stoves or other
apparatus (including amplifiers) that produce heat.
• Do not defeat the safety purpose of the polarized or grounding-type plug. A polarized plug
has two blades with one wider than the other. A grounding type plug has two blades and a
third grounding prong, the wide blade, or the third prong is provided for your safety. If the
provided plug does not fit into your outlet, consult an electrician for replacement of the
obsolete outlet.
• Protect the power cord from being walked on or pinched particularly at plugs.
• Unplug the apparatus during lightning storms or when unused for long periods.
• Refer all servicing to a qualified service personnel. Servicing is required when the apparatus
has been damaged in any way, such as power-supply cord or plug is damaged, liquid has
been spilled, or objects have fallen into the apparatus, has been exposed to rain or moisture,
does not operate normally, or has been dropped.
• Please always connect your television to a power outlet with protective ground connection.
4
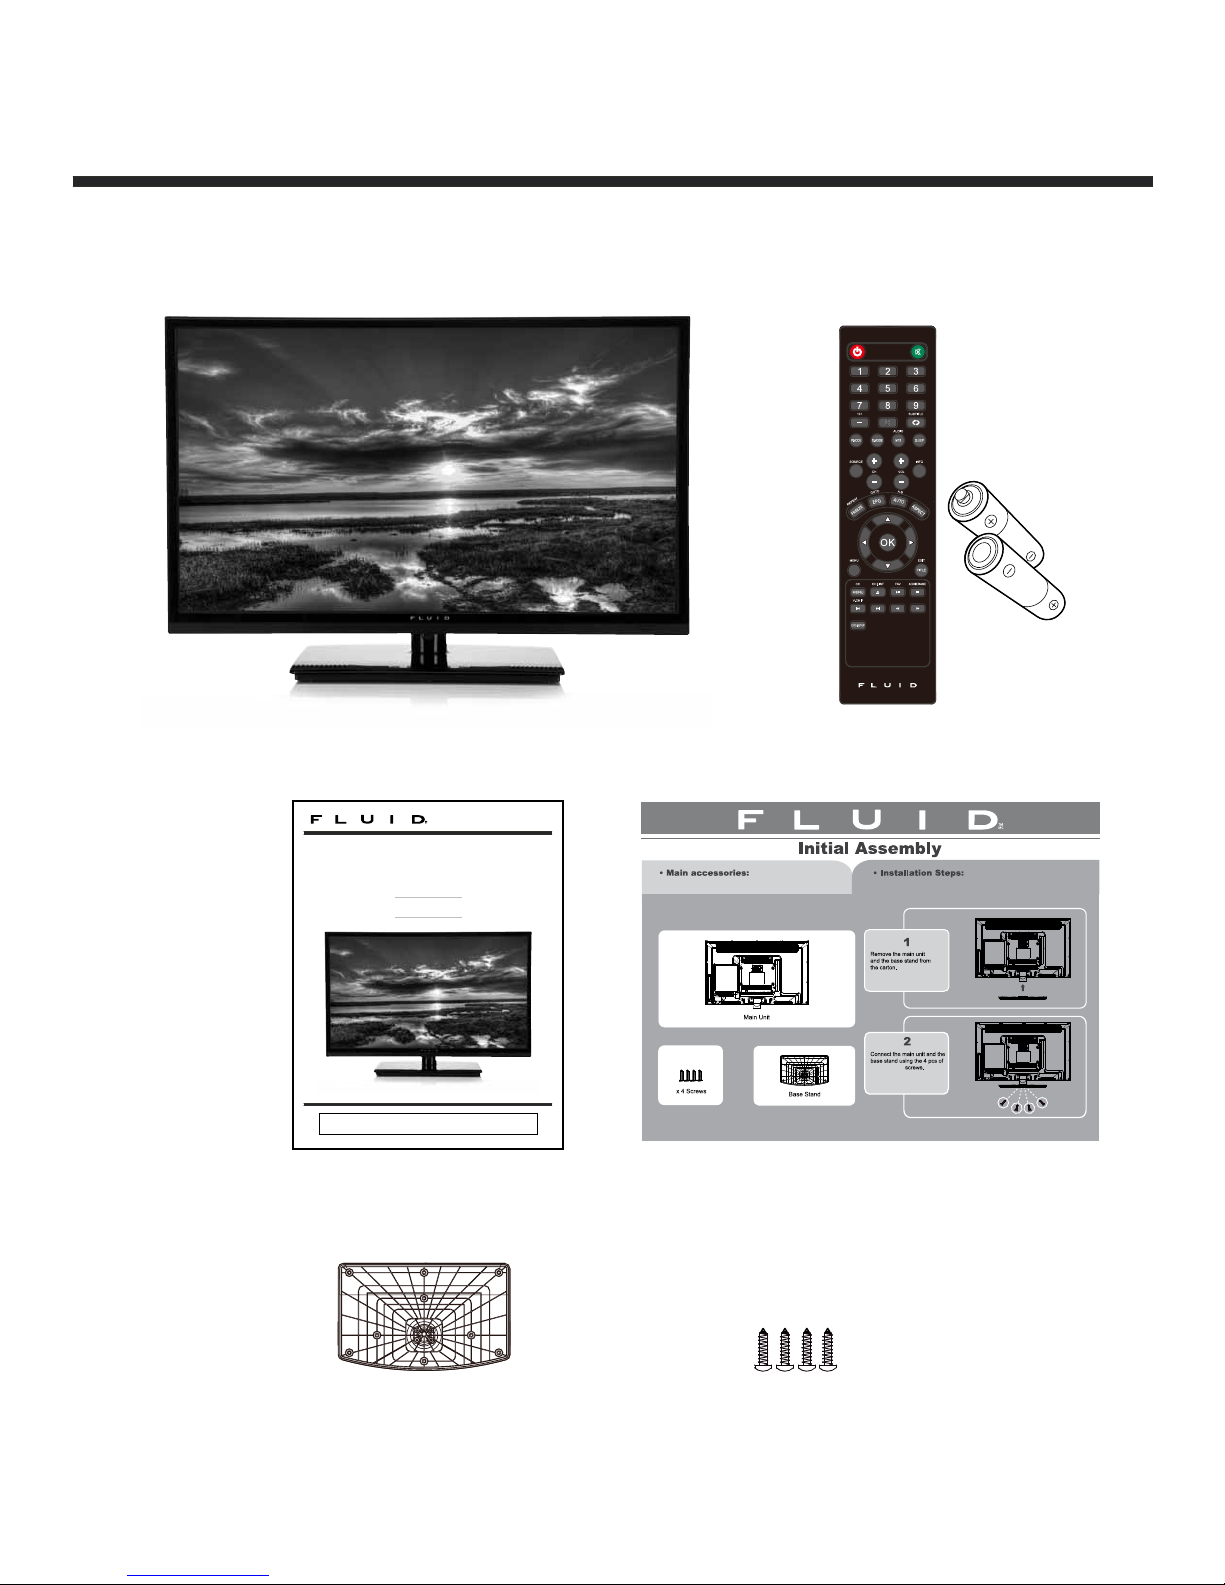
What’s Included
Unit and Accessories
TV Set
8009640C
Remote Control with Batteries
28" LED Combo
Television/DVD Player
FLDC2801
Instruction Manual
Read all of the instructions before using this TV and keep the
manual in a safe place for future reference.
User's Manual Initial Assembly
8009640C
TP4X12A-HO
Base Stand 4 Screws
(TPW4x12A-HO)
5

Getting Started
Front/Side View
Button Functions
1.
2. SOURCE : Displays the input source menu
3. MENU : Displays the OSD menu. Press again to exit the menu
4. CH +/- : Scans through channels
5. VOL +/- : Adjusts the volume
IR: Infrared Receiver
LED: The LED light indicates when the TV is activated
POWER : Turns on/standby the TV set
: Play/Pause button for DVD
: Open/Close button for DVD
6
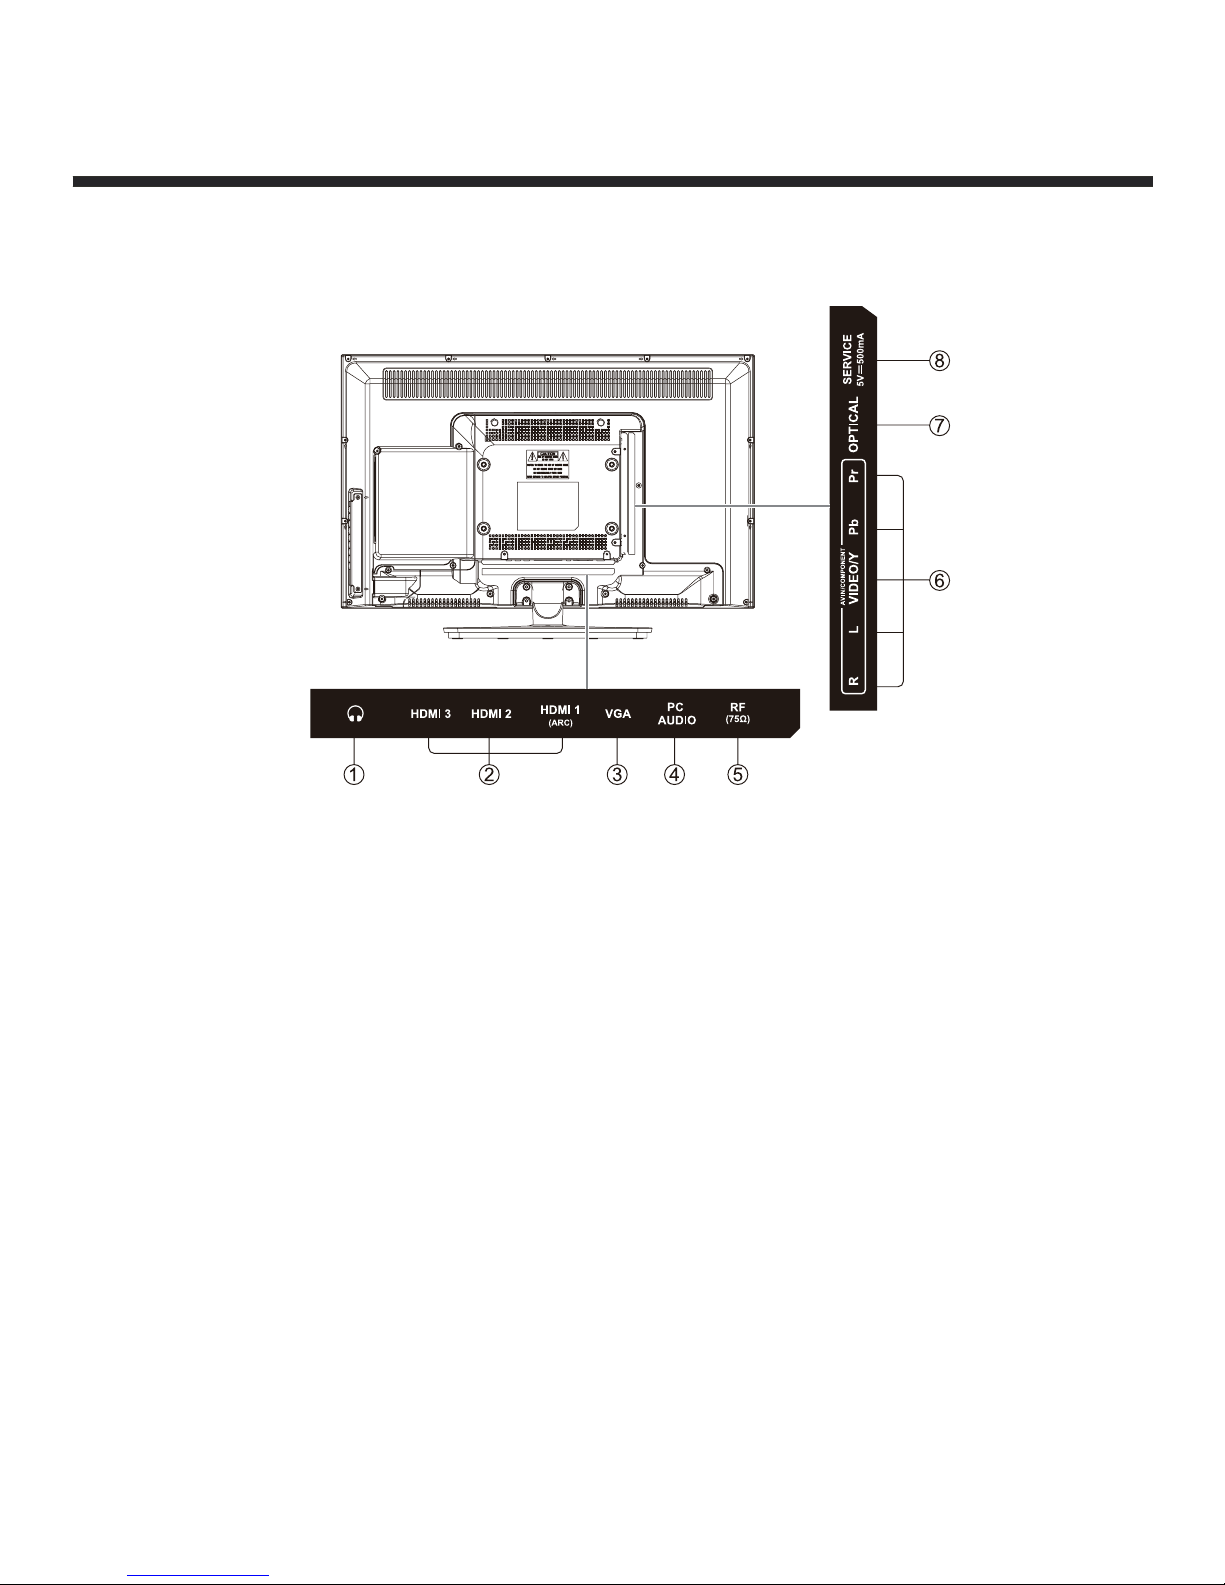
Getting Started
Rear View
1. Headphone output
2. HDMI inputs
3. VGA input
4. PC audio input
5. Antenna input (75 Ohm VHF/UHF)
6. Component and audio input terminal
7. Optical output
8. Service Port
Wall Mounting
The TV is provided with mounting holes for a VESA approved wall mounting bracket (NOT
SUPPLIED). The VESA mounting pattern is 200 x 100. Remove the screws holding the base to
the base bracket and lift the base away (do not remove the base mounting brackets). Mount the
VESA bracket using 4 x M5 isometric threaded screws (not supplied).
Caution: Your new TV is heavy; please consult with a professional wall mount installer to perform
this installation.
7
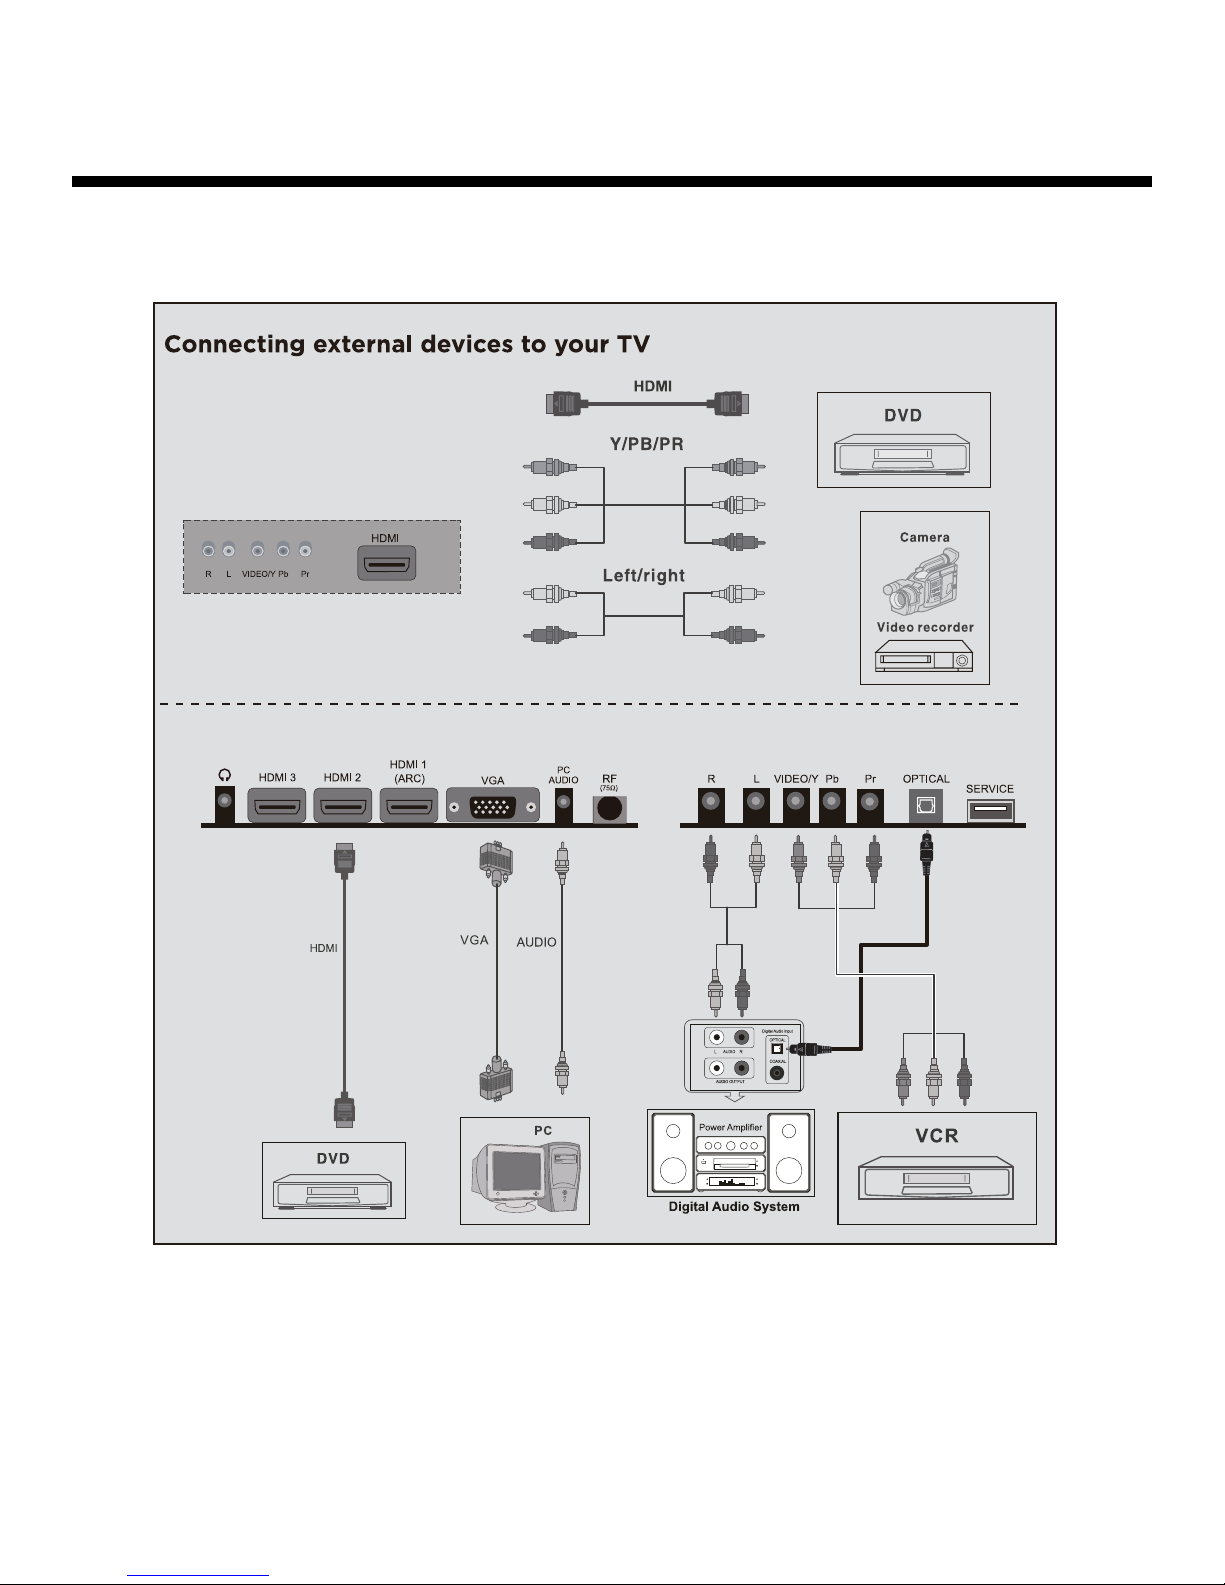
Connecting to External Devices
8

Remote Control Button Functions
Power button
Numeric buttons
Channel setup/DVD 10+ button
Sound mode button
Picture mode button
Signal SOURCE selection button
Channel selection buttons
EPG/GOTO button
FREEZE/REPEAT button
UP button
LEFT button
TV setup MENU button
OPEN/CLOSE/CH.LIST button
CC/DVD MENU button
NEXT button
PREV/V-CHIP button
DVD.SETUP button
1
2
3
4
5
6
7
8
9
10
11
12
13
14
15
16
18
Mute button
19
Return channel/DVD SUBTITLE
20
MTS/AUDIO button
21
SLEEP button
22
Information button
23
Volume adjust buttons
24
AUTO/A-B button
25
ASPECT button
26
ENTER button
27
RIGHT button
28
DOWN button
29
TITLE/EXIT OSD menu button
30
FAV/Play/Pause button
31
ADD/ERASE/STOP button
32
REWIND button
33
FORWARD button
17
If there is light around the TV, the remote control may fail or work abnormally.
If not using the remote for a long period of time, please remove the batteries.
9
Remote Control Button Functions
Button
Position
1
2
3
4
5
6
7
8
9
10/28
11/27
12
13
TV Functions
POWER: Power on/off button, press once to turn
TV on and press again to turn TV off.
0, 1-9: TV channel selection button.
— : Press this button to enter a program
number for multiple program channels
such as 2-1, etc.
S.MODE: Sets the sound mode.
P.MODE: Sets the picture mode.
SOURCE: Signal source selection button (TV/AV/
Component/DVD/HDMI/VGA).
CH +/- : Channel selection button, to increase or
decrease the channel.
EPG: Electronic Program Guide Function.
FREEZE: Freeze picture for TV.
e / d : (Up/Down) Up and Down button of OSD
menu. To change the OSD menu items.
f / g : (Left/Right) Left and right button of
the OSD menu. To select the OSD menu
items.
MENU: OSD menu button, to enter the TV set up
menu.
CH.LIST: Display program list.
DVD Functions
GOTO: Press GOTO button and then or to
choose Title, Chapter or Time, then press OK
button to enter the selected play mode.
REPEAT: Press REPEAT button to repeat a title,
chapter, track, chapter repeat or whole
disc. When playing DVD disc, press REPEAT
button continually, the TV screen shows
chapter repeat, title repeat, all repeat,
repeat cancel. When playing VCD, CD disc,
the options are track repeat, all repeat,
repeat cancel. When playing MP3 disc, the
options are single repeat, track repeat, file
repeat, all repeat, repeat cancel.
: Press OPEN/CLOSE with the power on. The
disc label should be facing towards the back.
Press OPEN/CLOSE again to close.
14
15
16
17
18
CC/DVD MENU: Closed Caption select button OFF,
ON or CC ON Mute.
NEXT
V-CHIP: Parental control set-up.
MUTE: Mute button, press once to disable the
audio and press again to enable the
audio.
10
I : When playing a DVD disc, press NEXT to
go to the next chapter. When playing SVCD,
VCD disc, press NEXT to go to the next
track.
I
: When playing a DVD disc, press PREV to
go to the previous chapter. When playing
SVCD, VCD, CD disc, press PREV to go to
the previous track.
DVD.SETUP : Press SETUP button to open DVD
setting menu.
Button
Position
19
20
21
22
23
24
25
26
27
28
TV Functions
: Previous channel button, return to the
previous channel watched.
MTS: Press to select the audio channel.
• Make sure the TV has searched the
channels and that there is an Analog
Stereo/Dual Sound Signal shown on the
program.
• Press the MTS (Multichannel Television
Sound) button to select STEREO and
MONO.
SLEEP: Sleep button, sets TV power off time.
INFO: Press the info button to view the current
channel. Press again to exit channel
information.
VOL +/-: Volume adjusting button, to increase and
decrease the volume.
AUTO: Auto adjust (only for use with VGA
source).
ASPECT: Select display mode: Wide/Zoom/
Cinema/Normal/Full 100% (only
available under HDMI inputs).
OK: Confirms the selection of the highlighted
menu item.
Right button.
Left button.
DVD Functions
SUBTITLE: (for DVD and Super VCD discs)
-Press the SUBTITLE button once to
display the current subtitle.
-Press again to toggle between different
subtitle modes in sequence.
Note: For Multi-language or subtitle DVD
and Super VCD discs, press SUBTITLE
button to select your desired subtitle
language.
AUDIO: Press AUDIO button to choose a different
audio channel.
INFO: Press INFO button for DVD information.
A-B: When playing DVD, VCD, CD, MP3 disc,
press A-B button to repeat certain
contents. Pres A-B key at the start point
(A) and again at the end point (B) to select
the repeated section. Press A-B a third
time to cancel the A-B repeat and return to
normal play.
29
30
31
32
33
EXIT: To exit operation.
FAV: Display favourite of program list.
ADD/ERASE: Add or delete favourite channel.
11
TITLE: When playing DVD, press TITLE to return
II : When playing the disc, press PLAY/PAUSE
: When playing DVD, SVCD, VCD, CD, press
to the main title page.
once to pause, press PLAY/PAUSE again
to return to normal play.
STOP once, the unit will retain in memory
the stop point. Press PLAY/PAUSE button
to continue play. Press STOP a second time
to stop the play and end the memory.
: Press for a quick rewind search
: Press button for quick forward search.
 Loading...