

Page 1
Standard User Manual
fluance.com
Page 2

Speaker Basics ................................................................................................... 3
5.1 & 7.1 Surround Sound Speaker Setup ............................................... 4
Bi-Amp Connection ......................................................................................... 5
Bi-Wire Connection .........................................................................................6
Wiring Guide ....................................................................................................... 7
Wall Mounting Recommendations ........................................................... 8
Care & Maintenance ......................................................................................... 9
Fluance Warranty ........................................................................................... 10
Warranty Information .....................................................................................11
Troubleshooting ...............................................................................................12
FAQ's .....................................................................................................................13
Knowledge ......................................................................................................... 14
Content
Page 3

Serious Performance™
3
Speaker Basics
Subwoofer
A separate subwoofer is
designed to accurately and
dynamically reproduce low
bass frequencies. It creates
a better sound experience
in the entire system
whether listening to movie
soundtracks or musical
recordings.
Center Speaker
A center speaker is usually placed
centered, above or below the visual
device. It must also be timbre
matched with the other speaker
products in the system.
Surround Speakers
The surround speakers in a home
theater system are used to create an
atmosphere and a sense of space.
Surround speakers are often
intended to radiate such that the
sound reflects off walls so that
the sound arrives at the listening
position indirectly as a reflection
rather than a direct wave.
*Dolby Pro Logic and Dolby Digital are registered trademarks and owned by Dolby Laboratories Licensing Corporation.
Front speakers
In home theater, the front left and right speakers provide a wide soundstage
that blends with the video or music to create a more realistic and exciting
experience.
Page 4
Serious Performance™
4
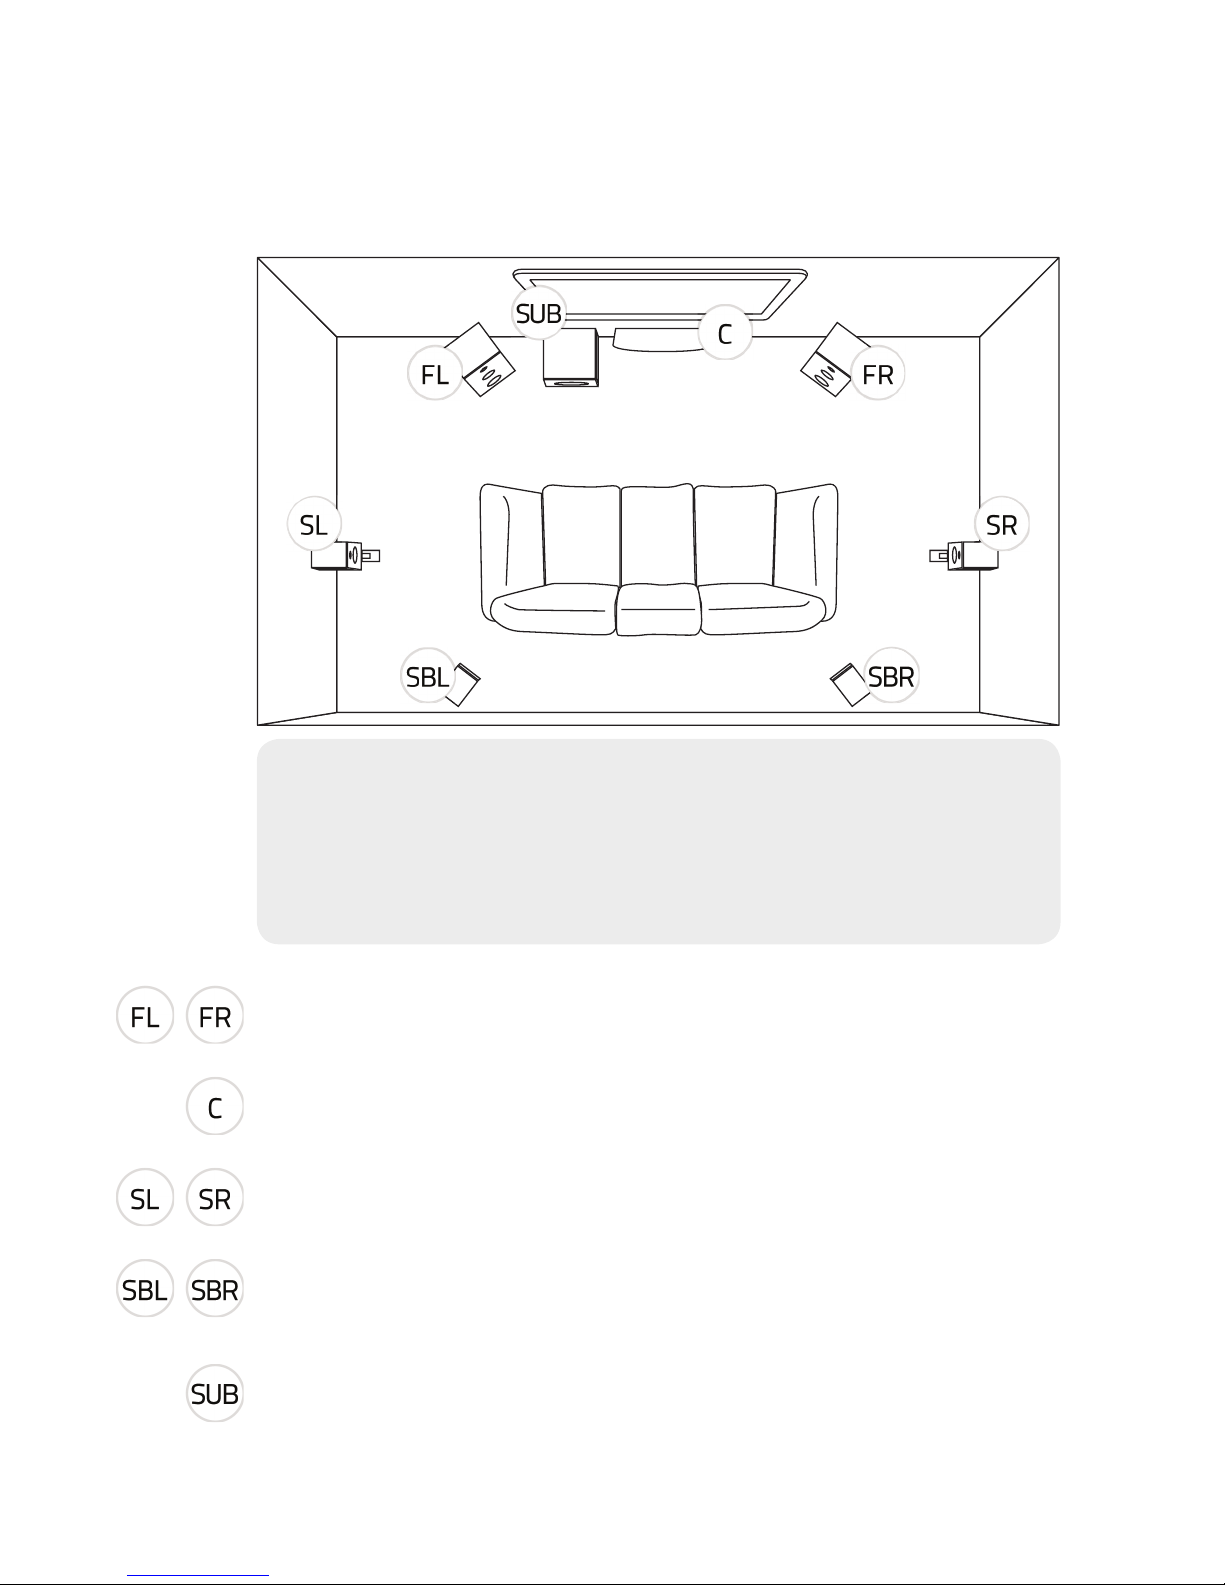
5.1 Surround System
Five audio channels: Front Left, Front Right, Center, Left Surround, Right
Surround and the Subwoofer.
7.1 Surround System
Seven audio channels: Front Left, Front Right, Center, Left Surround, Right
Surround, Back Left & Right Speakers, and the Subwoofer.
5.1 & 7.1 Surround Sound Speaker Setup
Speaker placement is the most important part of any Home Theater setup.
The proper placement will optimize surround sound and performance of
your Fluance speaker system.
Front Left & Right Speakers:
Place your front speakers 3 feet away from the TV on each side rotated at
22°-30° towards the main seating position. For optimal listening.
Center Channel Speaker:
Place your center channel speaker center with your TV. Above or below the
TV but more importantly at ear level.
Surround Left & Right Speakers:
Place the surround left & surround right speakers between 90° to 110°
directly to the sides of your seating position two feet or higher from the
ground.
Surround Back Left & Right Speakers:
Mount the back left and right surround sound speakers behind the seating
position at ear level in line with the front speakers 135° to 150° towards the
main seating position.
Subwoofer:
The location and angle of the subwoofer is not important as it will radiate
sound evenly throughout the room. Do not place in a corner or it will create
muddy undesirable bass.
Page 5
Serious Performance™
5
Bi-Amp Connection
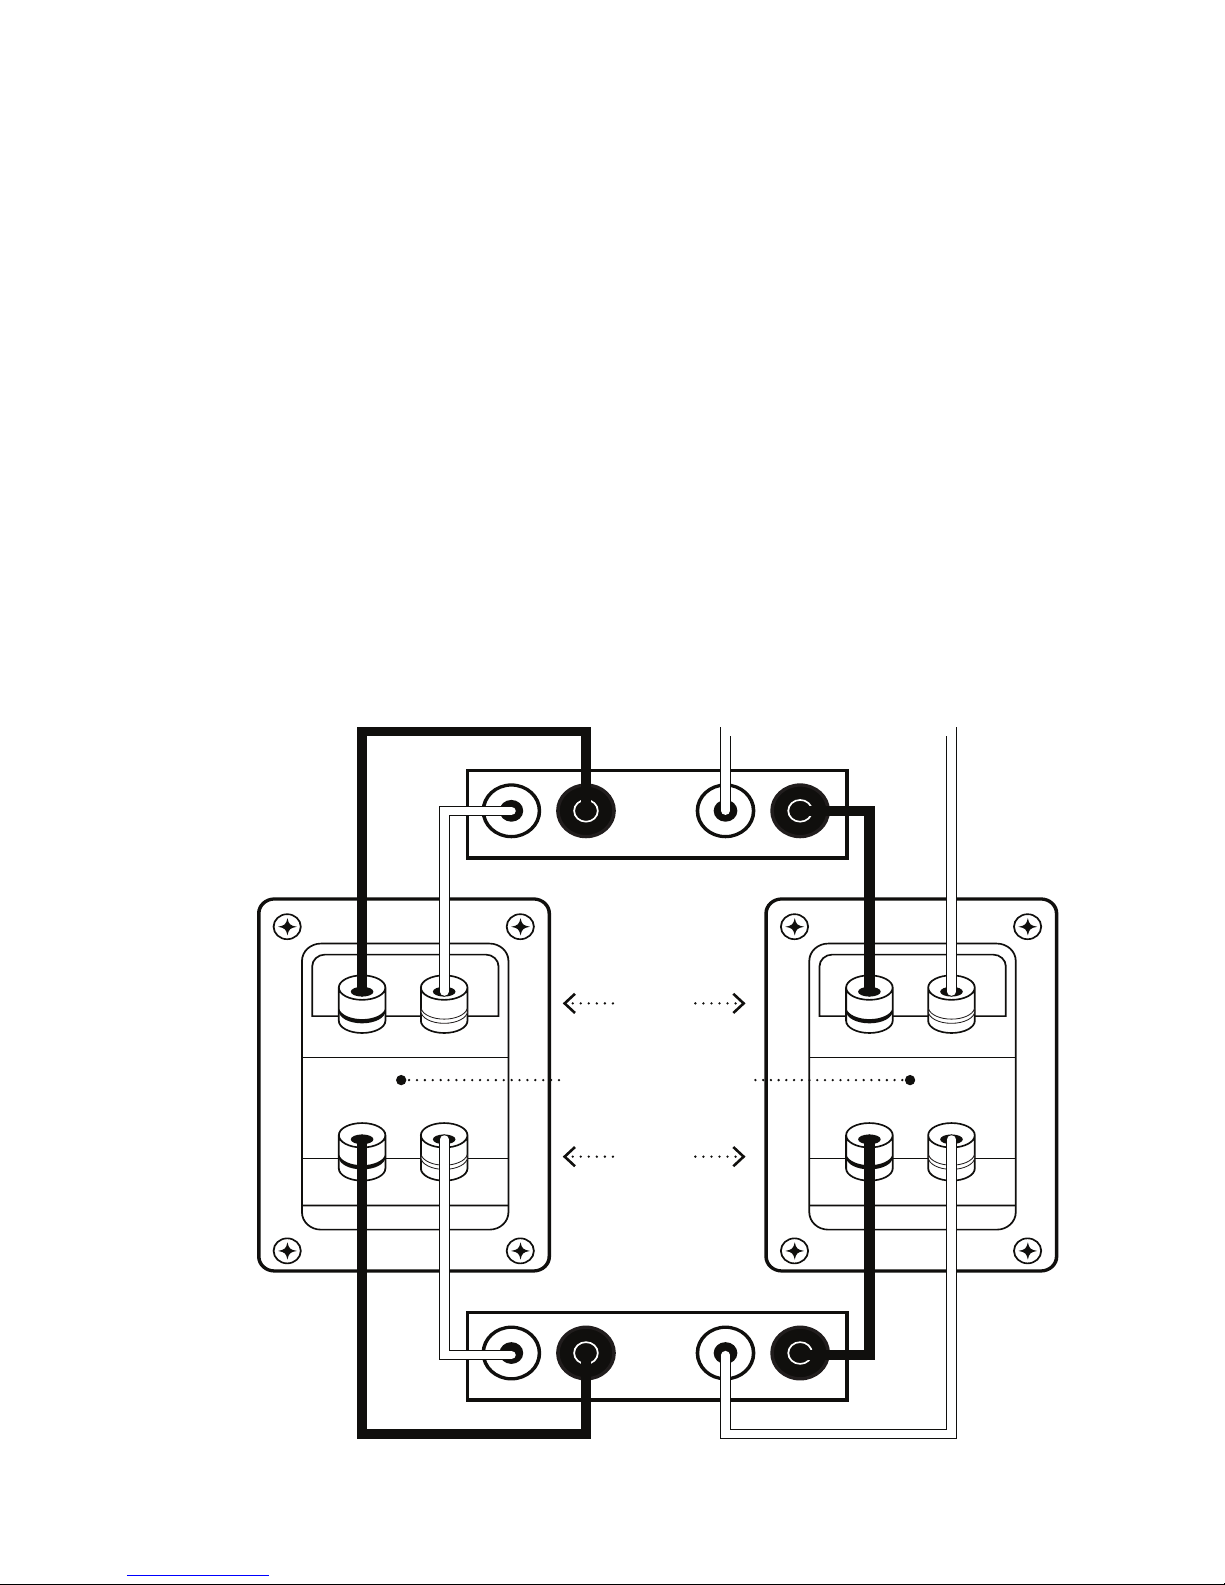
Bi-amping
Bi-amping involves the use of two separate amplier channels per speaker,
one to connect to each pair of binding posts. Benets include: transients
are less likely to cause amplier overload (clipping) and/or speaker damage,
reduced distortion, and better matching of the power amplier to speaker
drivers.
Here are the steps to connect speakers in the bi-amplification mode:
• Ensure that your system is powered OFF.
• Remove the bi-wire bridges from each speaker (this separates the low
pass lter & high pass lter crossovers).
• Connect each amplier channel to its respective speaker section as
shown.
• Set the level controls on the ampliers such that the signal will arrive at
all speaker terminals at the same power-volume level. If your ampliers
are identical, it is usually sufcient to set all the amplier level controls
the same. The speaker’s built-in crossovers are designed to match the
efciency of all the individual drivers (tweeters, midranges, and woofers)
When using the bi-amplier connection you must directly deal with
some of these issues by adjusting levels according to your listening
preference.
L
LEFT SPEAKER RIGHT SPEAKER
AMPLIFIER
HIGH
BRIDGES REMOVED
LOW
AMPLIFIER
R
LR
Page 6
Serious Performance™
6
Bi-Wire Connection
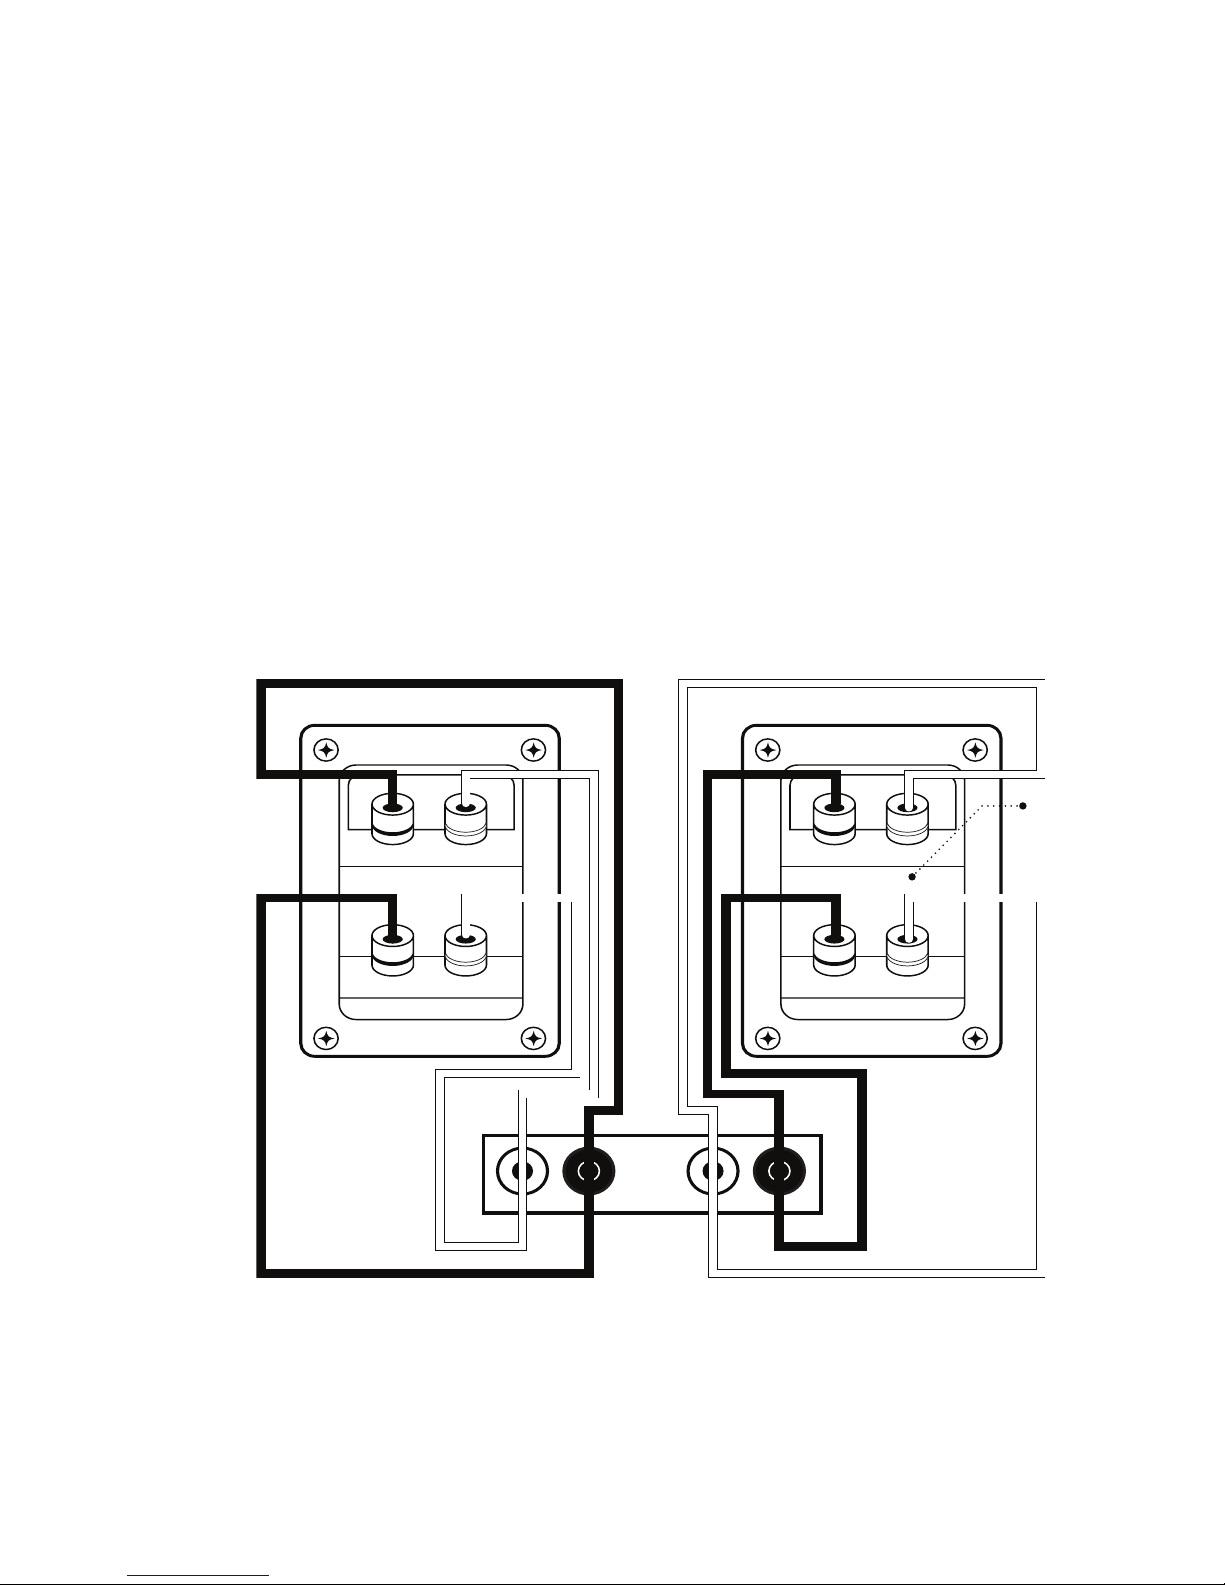
Bi-wiring
In bi-wiring, each loudspeaker has two pairs of connectors and two cables
are run from the same amplier output to the speaker cabinet – one for
the high frequency or tweeter driver and one for the low frequency driver
(through two separated crossover lters). The purported advantage of this
split is that it reduces magnetic interaction in the cable, resulting in a better
soundstage.
How to connect speakers in the bi-wire mode:
• Ensure that your system is powered OFF.
• Remove the bi-wire bridges from each speaker (this separates the low
pass lter & high pass lter crossovers).
• Connect each amplier channel to its respective speaker section as
shown.
LR
LEFT SPEAKER
AMPLIFIER
RIGHT SPEAKER
BRIDGES
REMOVED
Take care to maintain the correct polarity when connecting (+ or RED) to (+ or RED) and (- or BLACK) to (- or BLACK).
Before attempting the connection make sure that your amplier’s speaker wire connectors will accept a second set of
cables and that the equipment is turned OFF while you make the connections.
Page 7
Serious Performance™
7
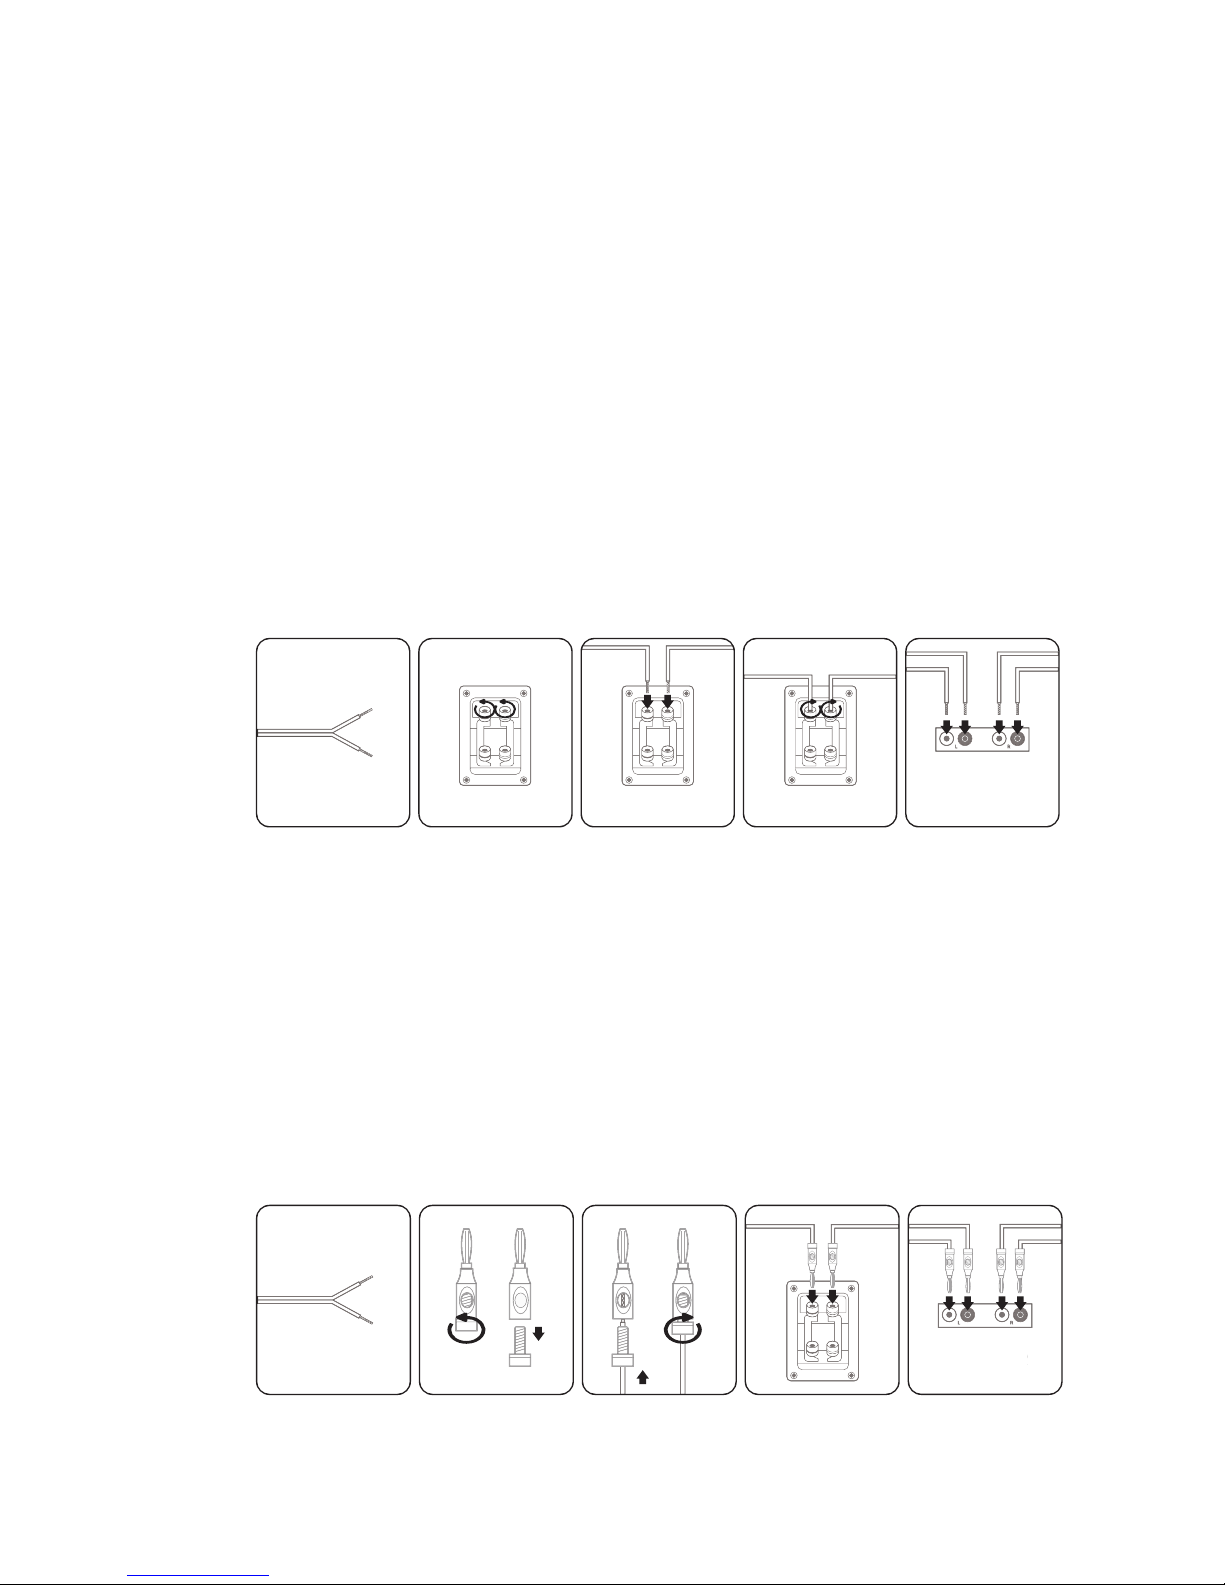
Wiring Guide
Your Fluance Home Theater products can be connected by internal lead
wire to connect your speakers to your receiver/amplifier. Fluance recommends 18 gauge or better wire for optimal sound quality.
Standard Method:
1. Cut insulation of lead wire to reveal 0.39 - 0.78 inches (1-2cm) of
exposed wire on both ends.
2. Rotate the positive and negative terminal on the back of the speaker
counter clockwise to unlock.
3. Insert positive/negative end of exposed wire into unlocked positive/
negative terminal of speaker.
4. Rotate positive and negative terminals clockwise to lock exposed wire
into terminal.
5. Insert positive/negative exposed wire of other end into positive/negative
terminal of receiver amplier
AMPLIFIER
Banana Plug Method:
1. Cut insulation of lead wire to reveal 0.39 - 0.78 inches (1-2cm) of
exposed wire on both ends.
2. Rotate the positive and negative ends on the back of banana plug
counter clockwise to unlock.
3. Insert positive/negative end of exposed wire into now unlocked middle
bracket of banana plug and rotate clockwise to lock.
4. Insert positive/negative front ends of banana plug into positive/negative
speaker terminals.
5. Insert positive/negative exposed wire of other end into positive/negative
terminal of receiver amplier
AMPLIFIER
AMPLIFIER
Note: do not let the positive and negative ends of the exposed speaker wire touch
Page 8
Serious Performance™
8
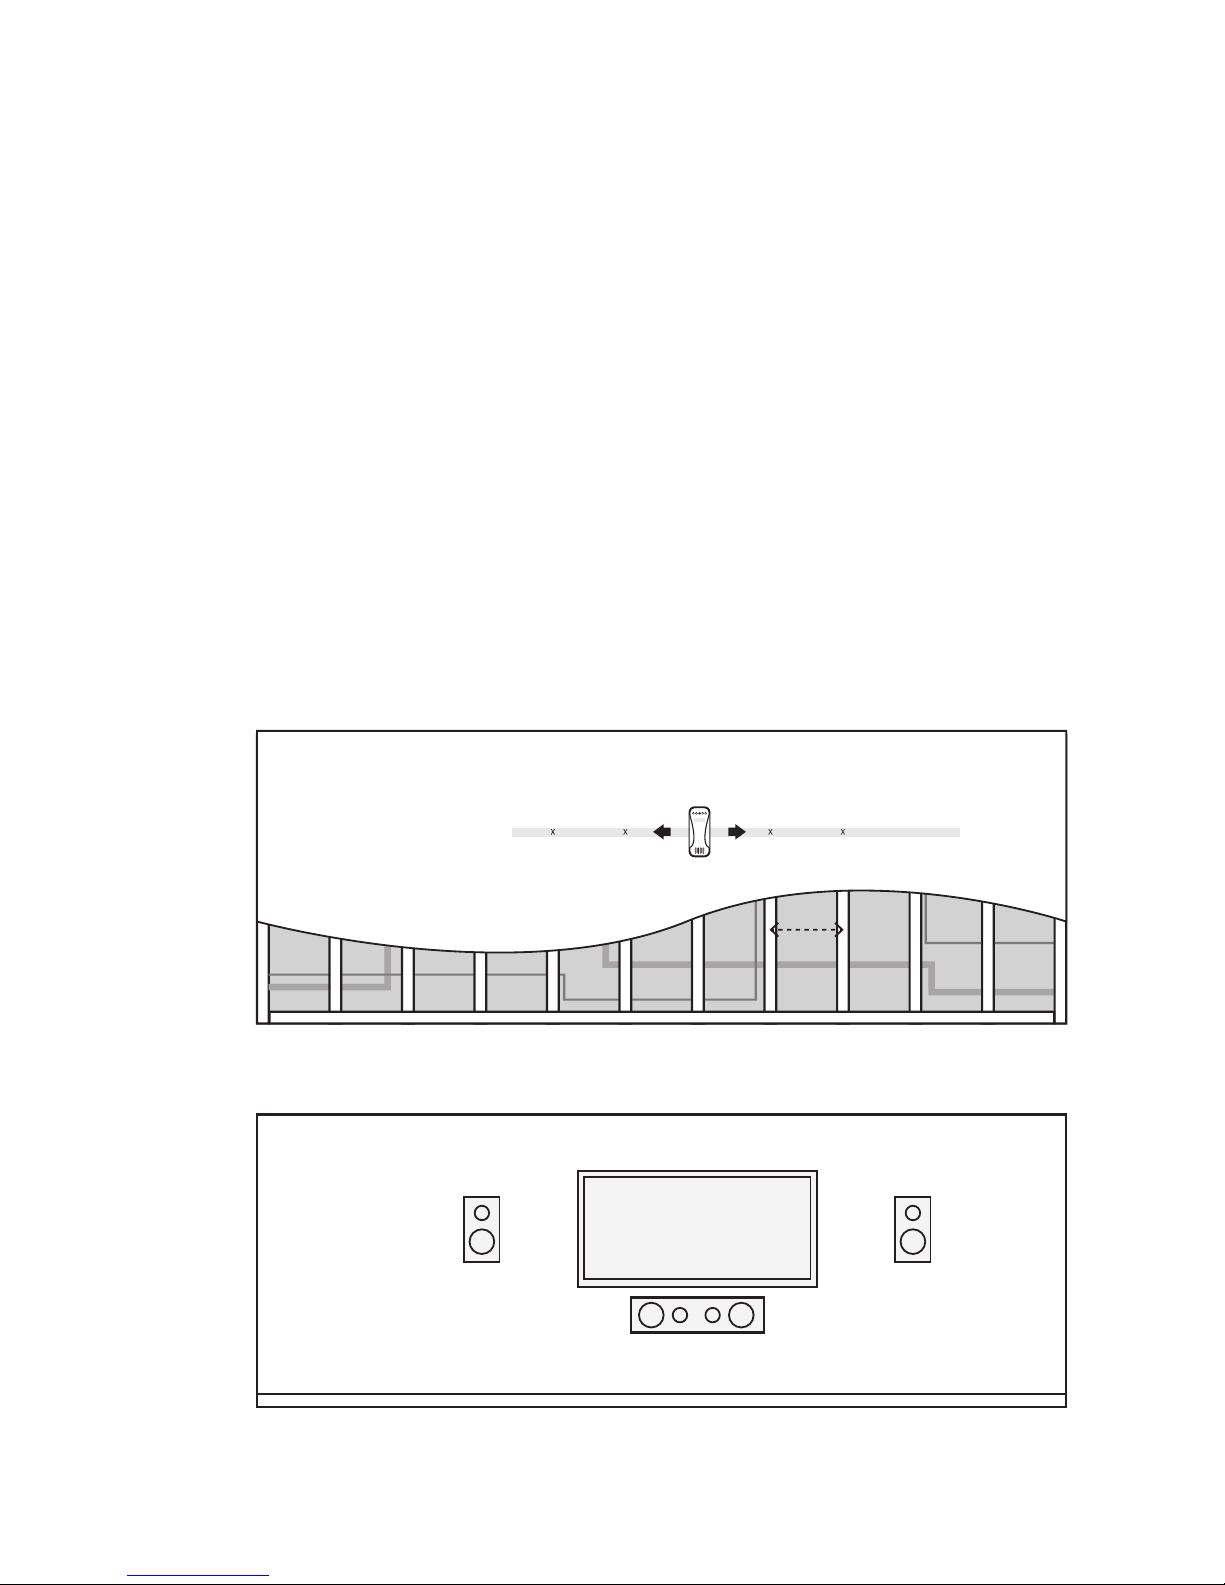
Wall Mounting Recommendations
Whether you are mounting a TV, speaker, or on-wall shelving, it’s always best
to anchor into a stud. Drywall anchors can work well, but you never really
know the quality of drywall. There may be cracks hidden under paint and
texture. There may have been water damage, or it may simply pull off the
wall if poorly installed. Because of these potential problems, it’s safest to hit
a stud.
Stud Finding Tips
• Most homes are built with 16” on-center studs, which means there should
be a stud every 16” If you have trouble nding studs on a wall, verify
how far apart they are in the home by locating and measuring them on
another wall.
• When using a stud nder, use painters’ tape to mark out at least three
studs in a row, then measure the distances between the studs. If the
studs are equidistant apart, you can be sure the stud nder actually
marked studs, as opposed to some other object in the wall.
16"
After wall mounting installation
Before wall mounting installation
Page 9

Serious Performance™
9
Care & Maintenance
• Refrain from touching the tweeter dome; if the tweeter is pushed in
the sound quality will be affected tremendously. The dispersion and
response of the tweeter is dependent on its shape.
• Ensure positive/negative speaker wire does not touch; this can lead to
blowing a fuse or shorting out your amplier/home theater receiver.
• Refrain from dragging oor-standing speakers across the oor when
oor spikes are attached as it is possible that surfaces can be scratched
and/or damaged.
• Keep them in a place where dust does not get inside the net of the
speaker or the interiors. Dust affects the performance a lot. Occasionally
use the vacuum cleaner to clean out the dust. You can use the blower to
blow away the dust from inside; compressed air is preferable here.
• Clean your speakers regularly with a damp cloth and do not use any
liquid cleaners or they might cause damage to the ampliers.
• Do not keep speakers on metals conducive to magnetism; you can use
wooden materials to stand them on, or any non-magnetic one. Do not
keep it near any magnetic source or the inbuilt electromagnet will get
damaged
• Static electricity is one of the hazards that can affect your electrical
systems. Please take necessary steps to avoid your speakers coming into
contact with static electricity.
• Keep speakers away from direct sun rays.
• If there is a port/vent on the speaker, avoid blocking the ventilation.
• It is recommended that the amplier is connected to a functional clean
power outlet or surge protector.
• Avoid running speaker wire parallel to electrical lines to avoid
interference
Page 10

Serious Performance™
10
Fluance guarantees your investment in our products is a solid one! Careful
thought, research, planning and design goes into every product we make.
High performance components combined with quality craftsmanship allow
us to maintain the highest possible production standards. Our quality control
is extremely extensive. All items are guaranteed against defects in materials
and craftsmanship. If something should go wrong with any of our products,
we will repair it free of charge!
All Fluance speakers (excluding powered subwoofers) come with a complete
lifetime parts and labor warranty, while Fluance powered subwoofers and
powered music systems come with a complete 2 year parts and labor
manufacturer’s direct warranty.
If in any situation your purchase displays a manufacturer’s defect and does
not function correctly, Fluance will repair your product and cover all parts,
labour, and return costs. Does not include damaged goods due to abuse or
misuse. Products returned to Fluance for warranty service must be shipped
prepaid (paid by the customer). Fluance will return serviced products under
warranty prepaid to the customer.
Your warranty registration is automatic and is processed by us when you
place your order directly with us (no additional paperwork required beyond
a copy of your invoice). All returns require return authorization and you will
receive complete instructions with the authorization.
Fluance Warranty
Regards,
Deepak Jain, President
uance.com
4080 Montrose Rd., Niagara Falls,
Ontario, Canada L2H 1J9
Fluance Audio Products Canada
Fluance is a Registered Trademark
Page 11

Serious Performance™
11
Warranty Information
Fluance gives the following warranty to the original customer of each new
Fluance product purchased from a dealer authorized by Fluance. Fluance
warrants that each new product, under normal use, is free from defects,
subject to the terms and conditions set forth. If a defect should occur within
the warranty period, repairs will be made free of charge for parts and labor
when such defects are determined by us to be attributable to faulty materials
or workmanship at time of manufacture.
Warranty Period
The Fluance products listed below are warranted for parts and labor for the
stated period from the date of original purchase and are subject to the terms
and conditions of the warranty.
Home Audio Passive Speakers: Lifetime Warranty
Active/Powered Speakers: 2 Year Warranty
Warranty Exclusions
Products purchased from a dealer not authorized by Fluance. Products with
the serial number defaced, altered or missing. Defects resulting from disaster,
accident, abuse, misuse, lightning, power surges, neglect, unauthorized
modi cation or water damage. Defects or damage as a result of repairs
performed by a person or party not authorized by Fluance. Defects or
damage occurring during shipping (claims should be made with the shipping
co mp any).
To Obtain Warranty Service
Should your Fluance product need warranty service, please contact your
Fluance Authorized Dealer and send your product fully insured and freight
prepaid to the nearest Fluance authorized service center. Before sending
to Fluance, you will be required to get a Return Authorization Number from
your dealer. Products shipped without a valid Return Authorization Number
will be refused. To avoid possible shipping damage, make sure the product is
properly packaged and well protected. Include a copy of your original bill of
sale and this warranty card as proof of warranty along with your name, home
and/or work telephone number(s), a complete return address and a detailed
description of the faults. Products repaired within warranty will be returned
freight prepaid. This warranty card in itself is not considered a valid proof of
purchase. When applying for warranty repairs, you must present the original
copy of your bill of sale and this warranty card as proof of warranty.
Page 12

Serious Performance™
12
Troubleshooting
Bass
• Too Heavy (“Muddy”) - Subwoofer placed in corner or too close to wall.
Check bass equalizer controls
• Too Thin - Raise volume of bass on amplier setting controls. Improper
speaker positioning
• Too “Boomy” - Excessive bass boost. Adjust amplier/subwoofer
settings to set desired performance
Treble
• Too Weak - Treble may be low on equalizer controls. Speaker positioned
incorrectly (Refer to page 4 for proper speaker placement)
• Too “Boomy” -Excessive treble boost.
• Distortion - Defective amp or preamp. Poorly tuned station. Low quality
audio les
Overall Sound
• Mufed - Improper speaker placement/positioning. Excessive bass
boost. Improper wiring.
• Distorted - Improper listening material. Excessive volume. Poorly tuned
station
• Buzzing Noise - Faulty connection cables, amp or preamp..
• Crackling - Poor or loose connections. Excessive equalizer controls or
volume control..
• No Sound - Receiver’s speaker switches off or poorly connected. Wrong
input selected. Mute on, blown fuse or short circuits.
Page 13

Serious Performance™
13
FAQ's
What is the break-in period for Fluance speakers?
The break in period for our speakers is about 10 hours of playing time at
normal listening volumes. After this period the drivers will have had enough
movement to perform at their peak level.
Do I need banana plugs for my Fluance Speakers?
No, banana plugs are not required; however they can provide the following
benets: It provides a stronger connection and is more convenient to plug
and unplug a banana plug than screw or clamp bare wire into the binding
posts. Check out our accessories section for the banana plugs you may want
in addition to your new speaker system.
Why is a 12 gauge speaker wire recommended?
At Fluance, we recommend that you use 12-gauge speaker wire when setting
up your Home Theater System. We recommend 12-gauge because the larger
amount of copper provides less resistance for electricity. With a larger gauge
(aka a smaller wire with less copper) can result in power loss, which in turn
means lower sound quality and lesser performance from your Home Theater
System.
What receiver should I use with Fluance speakers?
In order to get truly Serious Performance™ from your Fluance Speakers, they
must be paired up with a Home Theater Receiver capable of equally Serious
Performance™. With that in mind, the brand names most often used by
Fluance customers are: Denon, Harman Kardon, Onky, Yamaha.
What are Sound Isolation Floor Spikes?
Sound-isolation oor spikes eliminate vibration absorption to aid in
eradicating distortion. Floor spikes will isolate sound that is transmitted
through the oor by reducing the speaker surface area in direct contact with
the oor. In return the speakers will produce a clearer more dened sound.
Do you have a warranty?
All Fluance speakers (excluding powered subwoofers) come with a complete
lifetime parts and labor warranty, while Fluance powered subwoofers and
Smartphone Compatible Music Systems come with a complete 2 year parts
and labor manufacturer’s direct warranty.
How do I register my warranty?
Your warranty registration is automatic and is processed by us when you
place your order directly with us (no additional paperwork required beyond
a copy of your invoice). All returns require return authorization and you will
receive complete instructions with the authorization.
Page 14

Serious Performance™
14
Knowledge
Fluance’s knowledge center is designed with you in mind. These tips and
articles have been written by Fluance industry experts to help you optimize
your home theater system.
Visit us online to learn more: www.uance.com/Knowledge.html
Power Ratings
It is best to have an amplier that exceeds the power of the speakers that are
connected to it. For example, a 30 watt RMS rated amplier at high volume
will cause clipping and distortion when connected to a speaker with 100 watt
RMS. This will produce harmful electronic signals that will potentially damage
your speakers.
Do I have to bi-amp or bi-wire my connections with your speakers?
Some of our models have speaker wire connections to allow for bi-
amplication or bi-wiring. This is for your benet and can be used to enhance
the performance of your system. Connection of a basic audio system where
there is only one connection from the amplier is very simple and bi-amp or
bi-wire is not necessary. You can connect your speakers using the regular left
and right speaker wire connections and ignore the second set of terminals.
There are gold-plated bridges connecting the two sets of terminals that allow
the speaker to be connected as a traditional loudspeaker. Only remove these
bridges if you plan to bi-wire or bi-amp your speakers.
How do I use the bi-wiring connections to increase the performance of
my system?
A bi-wire compatible speaker has 4 binding post terminals. These two sets
of terminals allow the speaker to be split into two independent sections. The
split connects the mid and high frequency drivers to one set of terminals
and the low frequency driver to the other pair. In the bi-wire connection the
bridges connecting the two sets of terminals are removed and separate sets
of speaker wire are run from the amplier to each section as shown below.
How do I use the bi-amplification connections to increase the performance
of my system?
Bi-amplication is the use of two ampliers for both speakers. One amplier
is connected to the woofer section of a loudspeaker while the other is
connected to the combined mid and tweeter section. Each amplier
operates over a restricted frequency range. This restricted range presents
each amplier with a much simpler job and each amplier is less likely to
“inuence” the sound in some way.
For more frequently asked questions, please visit:
www.uance.com/faq.html
Page 15

Serious Performance™
15
Musical Content vs. Power Demand
There is a strong correlation between how hard an amplier must work and
the kind of material that it is being called upon to reproduce. A bass heavy
sound or musical piece will require more power and may cause a higher
potential for clipping then a lower bass demanding musical passage. Adjust
volume control accordingly to avoid clipping and damage to your speakers.
The Listening Room Environment
A well balanced Listening Room is neither square yet not extremely long
and narrow. Non-Parallel walls and high ceilings are ideal but not absolutely
necessary. The larger the listening area the more power is required to
maintain high volume levels without distortion. It is best to have a room with
a variety of hard and soft surfaces, so that the sound will reect and absorb
evenly throughout the room. Sound quality is greatly improved if the oor is
carpeted.
Building on your system
Surround sound systems range from as little as 2.0 to over 7.1, and enhancing
your system only means enhancing your sound quality. Practicality should
prevail, however. A studio apartment does not need a 7.2 surround sound
system, and a large 400 square foot living room needs more than two
surround sound speakers. You can always build on your current system
by adding in other components, which are typically more surround sound
speakers or a subwoofer.
If your system does not come with a subwoofer, you can add it to the
complete system and it will enhance the low frequency performance. A
subwoofer delivers low-frequency effects, which most of us hear and feel
across the oor. When the walls shake, the subwoofer is really working hard
to emphasize the explosions on screen.
Medium-density fibreboard (MDF) vs Natural Wood
Have you ever heard of the expression “no two snowakes are alike”? Well
the same can be said for natural wood speakers. Natural wood often has
organic characteristics like knots, rings and lines which can affect the way
a speaker system looks and sounds. Natural wood increases the price of
speakers dramatically even though Medium-density breboard uses recycled
wood materials to create. This also results in better value for the end
consumer and more trees that stay in our forests.
The characteristics of natural wood also create variations in the sonic
qualities of speakers. Expert craftsmen and engineers agree that the sound
that comes from a natural wood cabinet speaker varies between speakers
because of the density of the wood panels. An airtight construction is
necessary to producing great sound; natural wood shifts as time goes
on, altering the sound and destroying the construction. Medium-density
breboard wood allows for the sound to resonate throughout the system and
eliminate any distortion.
Page 16

fluance.com
 Loading...