

Page 1
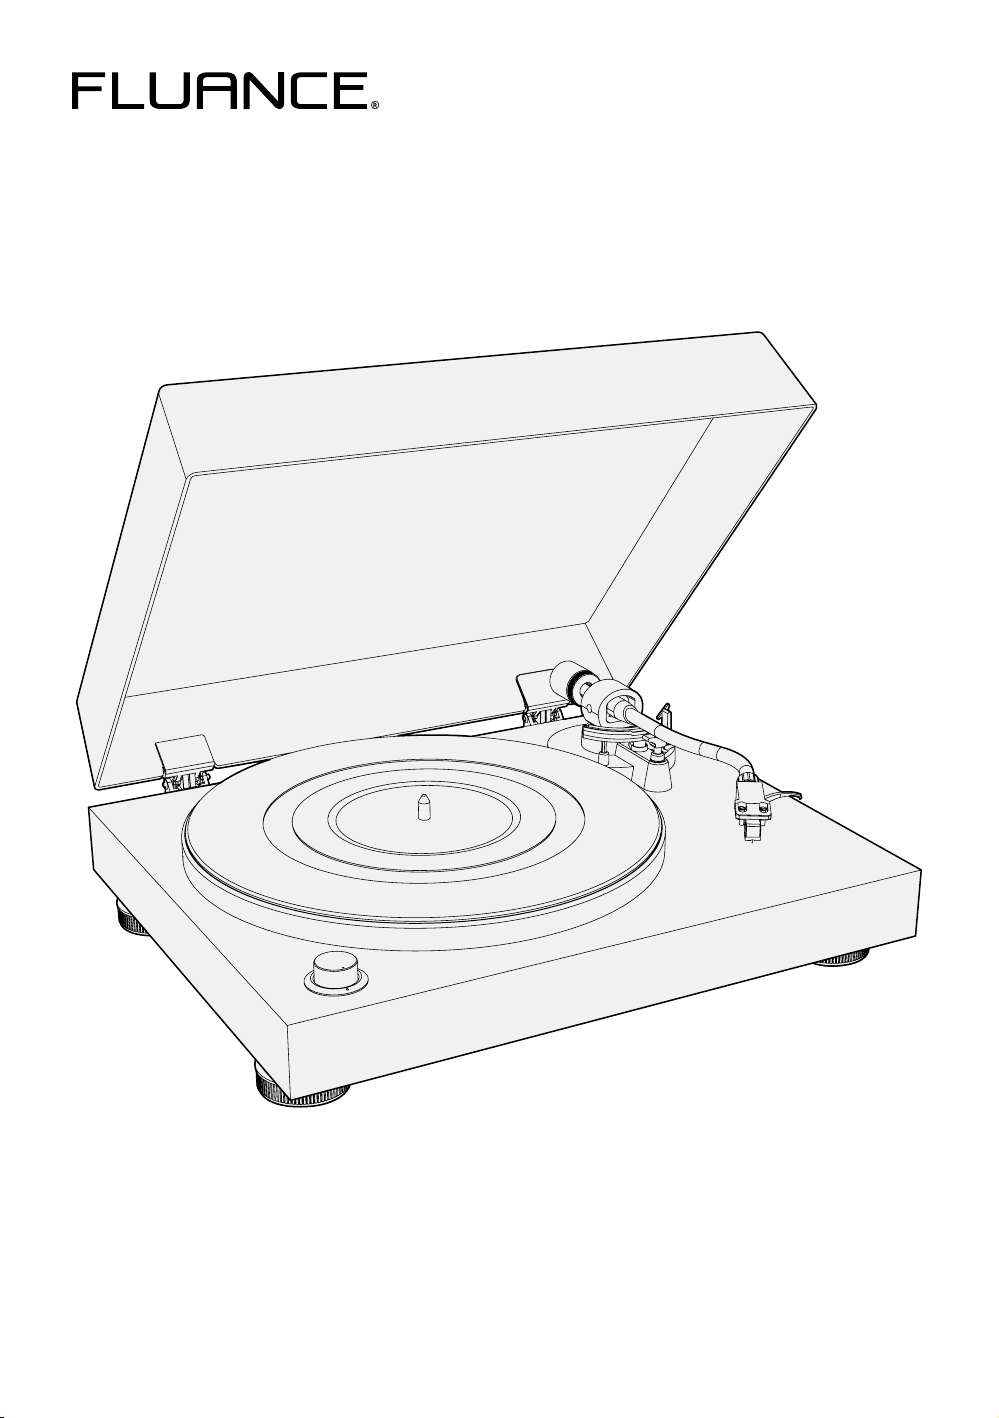
High Fidelity Series
Belt Drive Turntable System
RT80/RT81
Instructional Manual
Thank you for your purchase of this Fluance product. Please read this manual carefully before
using the product to ensure proper use. Keep this manual in a safe place for future reference.
fluance.com
Page 2
Fluance has successfully revolutionized the
home audio industry. Fluance develops a
broad line of high-delity products based
on ve key aspects: Sound Quality, Solid
Construction, Performance, Style, and Value.
These distinctive points make Fluance the
most reliable and respected name among
our fans and ensure your music is heard the
way your favorite artist intended.
Today, Fluance expands on this vision and
takes its approach to a new level. With our
dedicated team, Fluance assures its products
meet the most stringent marks of quality
control - overseeing each step from design
to manufacturing - and has raised the indus-
try bar in customer experience and quality to
be second-to-none.
Page 3

Table of Contents
What’s Included .................................................................................................................................................. 4
Components and Connections .................................................................................................................... 5
First Time Setup ................................................................................................................................................. 6
Step One:
Installing the Platter .................................................................................................................................. 6
Step Two:
Installing the Counterweight ................................................................................................................ 7
Step Three:
Installing the Headshell ........................................................................................................................... 7
Step Four:
Balancing the Tonearm ........................................................................................................................... 8
Step Five:
Setting the Preamp Switch ................................................................................................................... 9
Step Six:
Connecting the Power ............................................................................................................................. 9
Step Seven:
Connecting the RCA Cable ................................................................................................................. 10
Step Eight:
Playing a Record ...................................................................................................................................... 10
Auto Stop Function ..................................................................................................................................11
Maintenance ........................................................................................................................................................12
Cleaning the Unit ....................................................................................................................................... 12
Replacing the Stylus ................................................................................................................................ 12
Cartridge Connections ...........................................................................................................................12
Replacing the Rubber Belt ...................................................................................................................12
Record Care .................................................................................................................................................13
Troubleshooting ................................................................................................................................................13
Turntable not Spinning ...........................................................................................................................13
No Power ......................................................................................................................................................13
Wrong Speed ..............................................................................................................................................13
Stylus Care ...................................................................................................................................................13
Skipping .........................................................................................................................................................14
Audio Feedback ........................................................................................................................................14
Cueing Lever Not Lowering Tonearm ............................................................................................14
Low Volume .................................................................................................................................................14
Need Additional Help?............................................................................................................................14
Specications ......................................................................................................................................................15
Fluance Warranty .............................................................................................................................................17
Warranty Information .............................................................................................................................17
Important Safety Instructions .....................................................................................................................18
FCC & IC Information ......................................................................................................................................19
Page 4
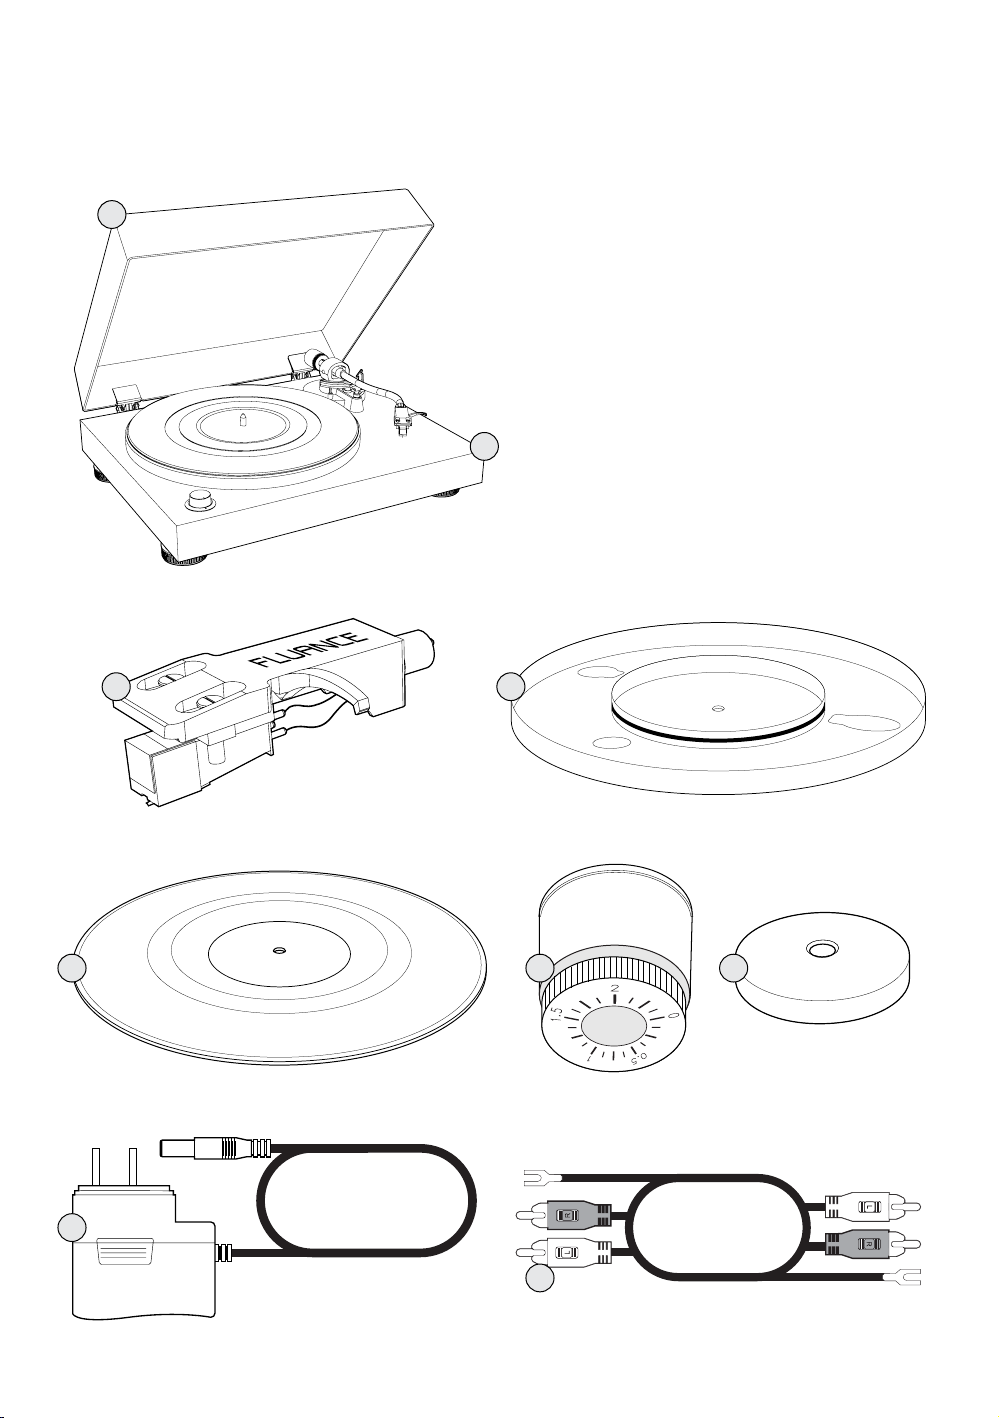
What’s Included
1
1. Dust Cover
2. Turntable
3. Headshell with Stylus
4. Platter with Rubber Belt
5. Turntable Mat
6. Counterweight
2
8. Power Adapter
9. RCA Audio Cable with Ground
7. 45 Adapter
3
5
4
6
7
8
9
4
Page 5
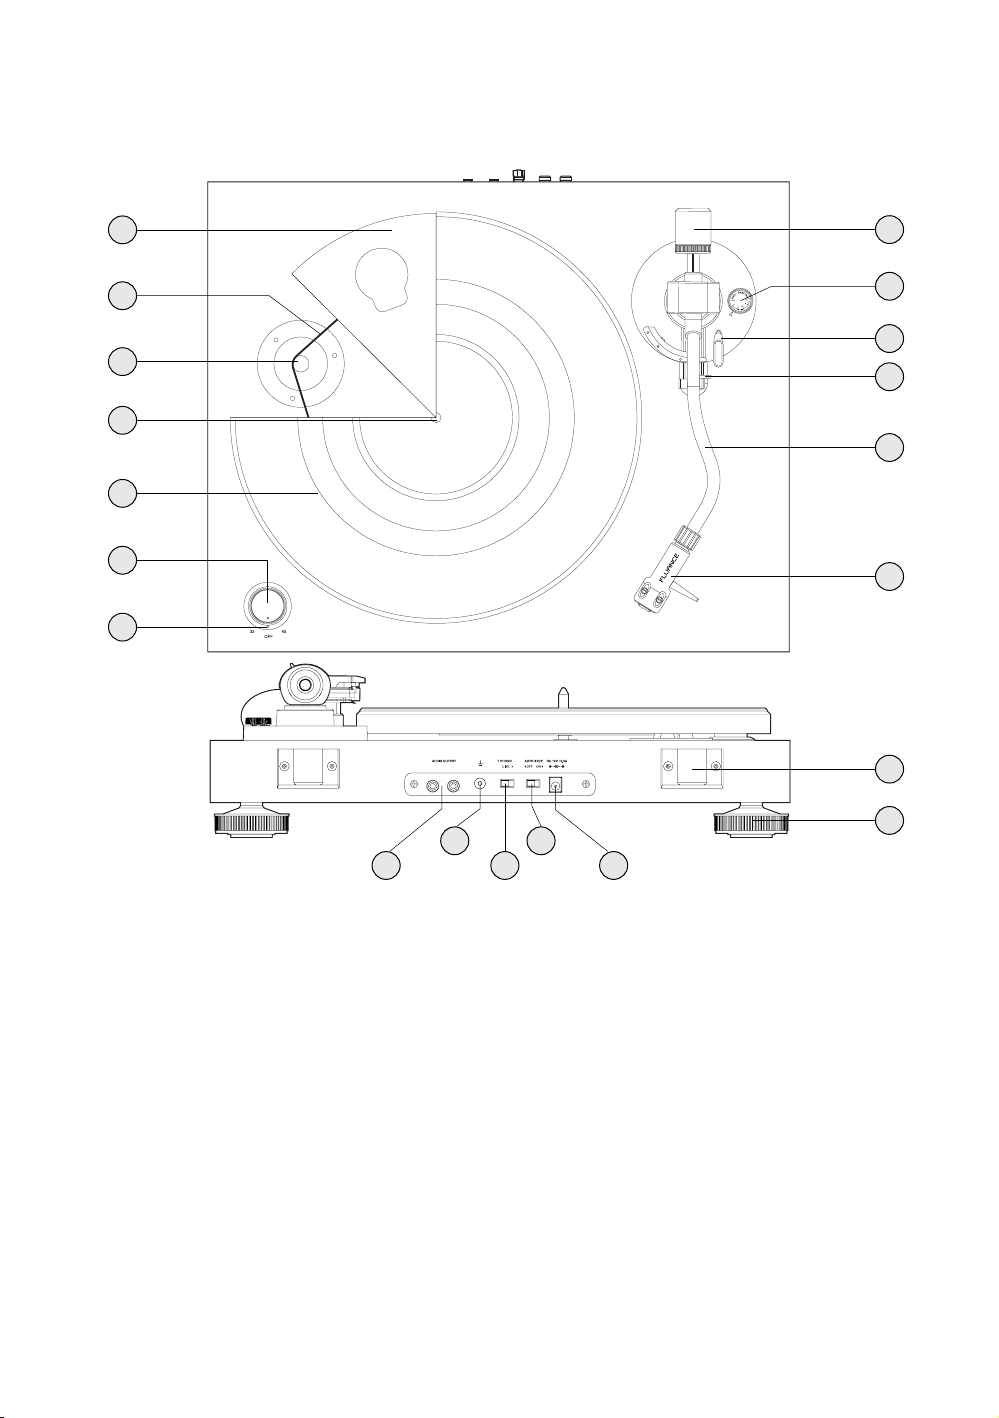
Components and Connections
1
2
3
4
5
6
7
8
9
10
11
12
13
19
1. Platter
2. Rubber Belt
3. Motor Pulley
4. Spindle
5. Turntable Mat
6. Speed Selection
7. Power LED
8. Counterweight
9. Anti-Skating Control
10. Cueing Lever
20
15 17
14 16 18
11. Tonearm Lock
12. Tonearm
13. Headshell & Stylus
14. RCA Audio Outputs
15. Ground Terminal
16. Preamp Switch
17. Auto Stop Switch
18. Power Input
19. Hinge
20. Isolation Feet
5
Page 6

First Time Setup
Step One:
Installing the Platter
1. Remove the protective packaging
and ensure the turntable is placed
on a sturdy and level surface. Place
the metal platter onto the spindle
located in the middle of the turntable.
Metal Platter Installation Ribbon
Spindle
2. Rotate the platter until the rubber belt
installation ribbon aligns with the motor
pulley. Remove the tape from the
installation ribbon.
Motor Pulley
3. Use the installation ribbon to lift the
rubber belt and place it around the
motor pulley. Remove the installation
ribbon and rotate the platter several
times to ensure the rubber belt
is secure and not twisted.
4. Place the turntable mat on top of
the platter.
Note: If using the Fluance rubber turntable
mat ensure the Fluance logo is facing up
when placing the mat.
Turntable Mat
6
Page 7
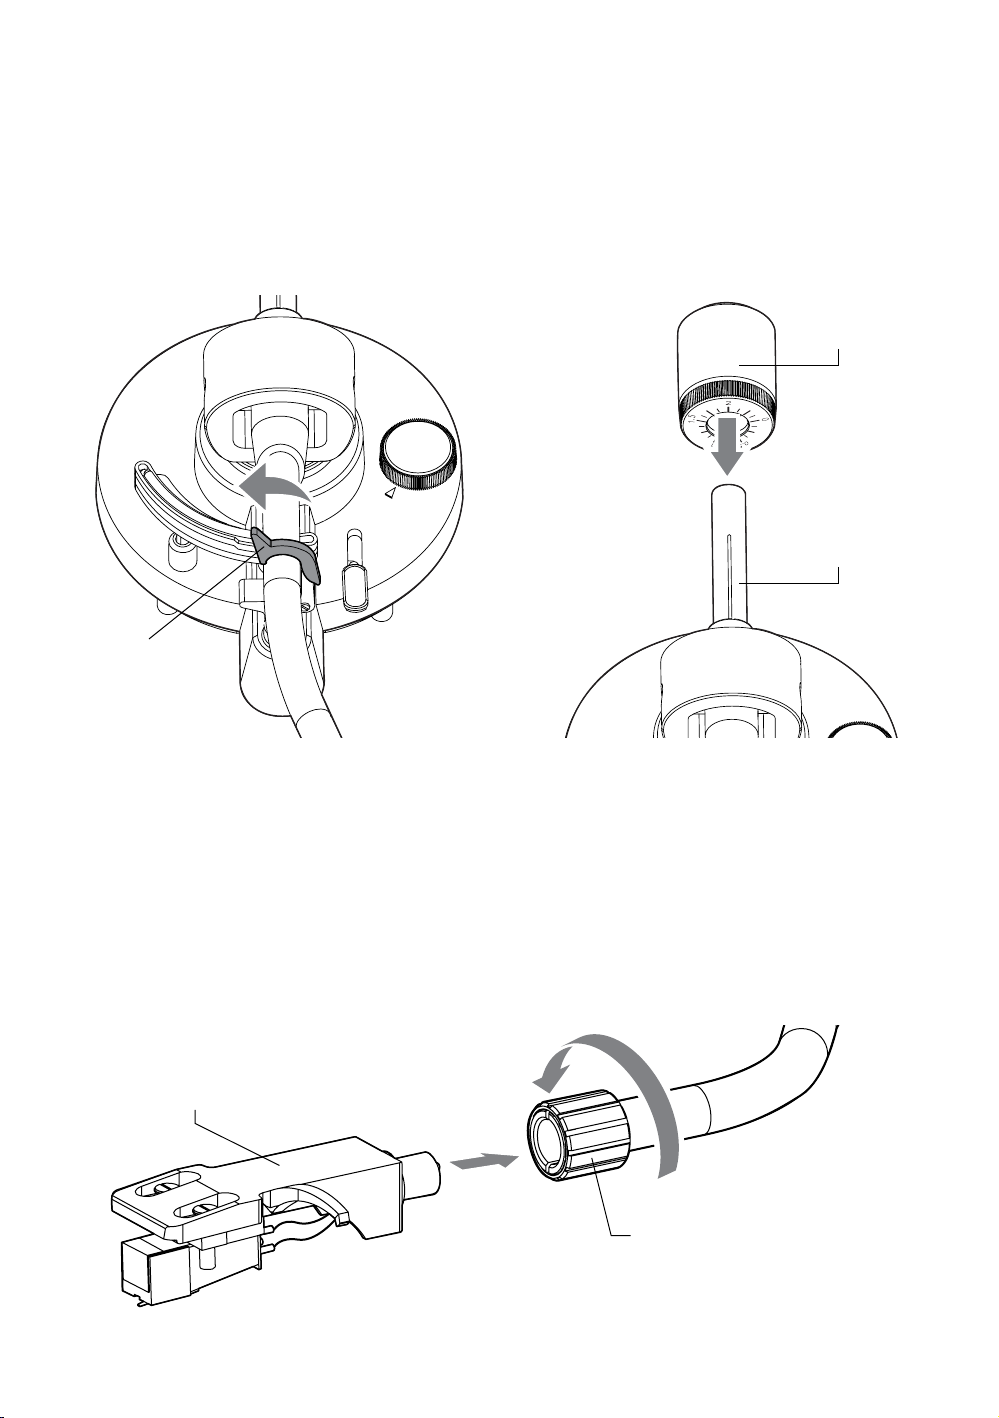
First Time Setup
Step Two:
Installing the Counterweight
1. Secure the tonearm using the
tonearm lock.
Tonearm Lock
2. Slide the counterweight onto the end
of the tonearm with numbers facing
forward until it clicks on.
Counterweight
Tonearm
Step Three:
Installing the Headshell
1. Remove the headshell from the
protective packaging and insert
into the end of the tonearm.
Headshell
2. Tighten the locking nut until the
headshell is secure.
Locking Nut
7
Page 8
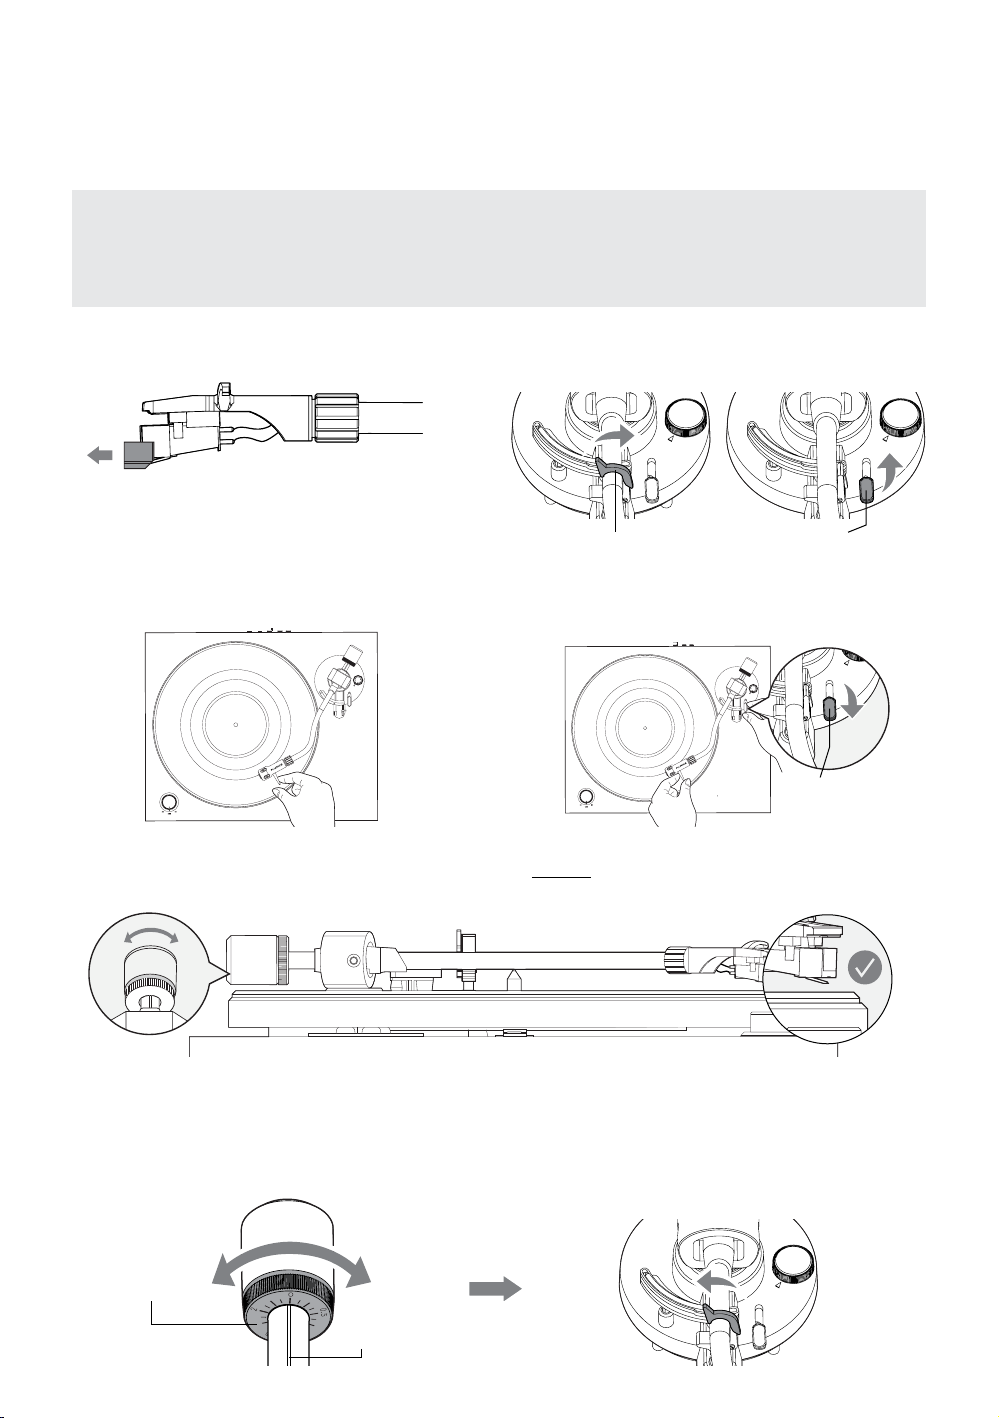
First Time Setup
Step Four:
Balancing the Tonearm
Important!
Complete all steps for balancing the tonearm. Incorrect tonearm balancing can cause damage to the
stylus and to your records. For additional assistance go to:
www.uance.com/support to watch a tutorial video for this process.
1. Remove the stylus protector. 2. Unlock the tonearm and lift the cueing
lever.
Lock Cueing Lever
3. Position the tonearm over the platter. 4. Hold the headshell and lower the
cueing lever completely. Protect the
stylus from touching the platter.
Cueing Lever
5. With the cueing lever now lowered, turn the entire counterweight until the tonearm
is balanced and floating horizontally when headshell is released.
Tip: When balancing the tonearm make sure the cueing level is down.
6. Set only the counterweight indicator ring to “0” on the center line while
keeping the tonearm balanced then lock the tonearm on the tonearm rest.
Counterweight
Indicator Ring
Center Line
8
Page 9
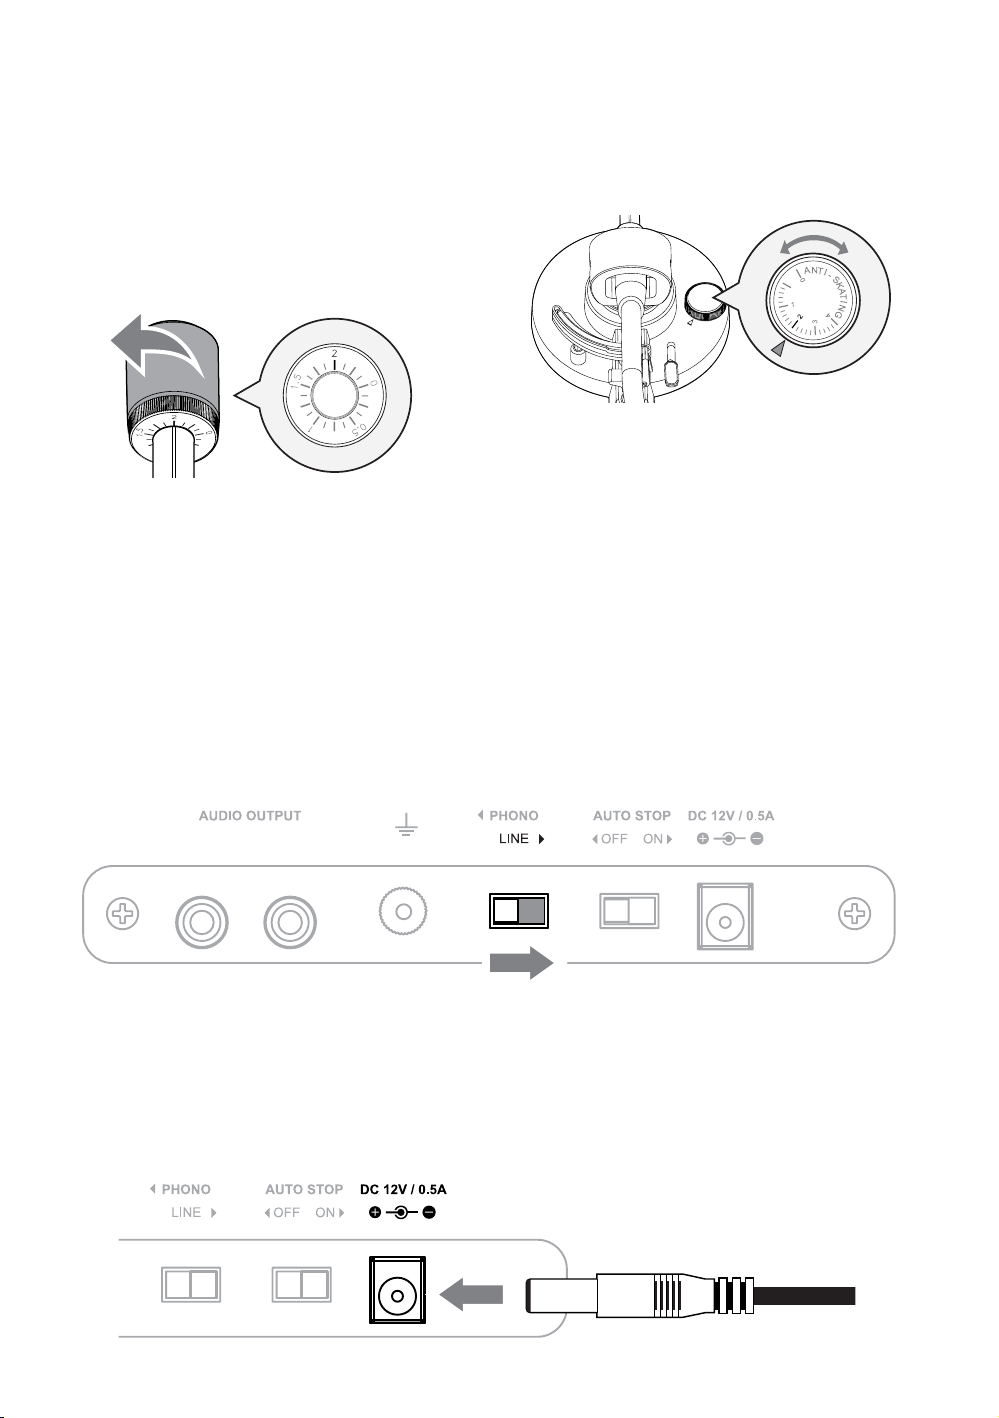
Step Four: Continued
Balancing the Tonearm
7. Rotate the entire counterweight
counterclockwise until the indicator
8. Set the anti-skating control to “2”
to match the tracking force.
ring is set to “2” on the center line.
This will set the tracking force to the
recommended 2.0 Gram tracking force
of the included Audio Technica stylus.
Tip: When setting the counterweight to 2 make sure you
are turning the entire weight and not just the counterweight
indicator ring.
Step Five:
Setting the Preamp Switch
This turntable includes a built-in preamp. To enable the internal preamp set the
switch on the back of the unit to the LINE position.
Optional:
If you wish to use an external preamp you can disable the internal preamp by moving the switch to the PHONO position.
Step Six:
Connecting the Power
Ensure the power adapter is securely connected to a power outlet. Insert the
power cable into the power input on the back of the turntable.
9
Page 10
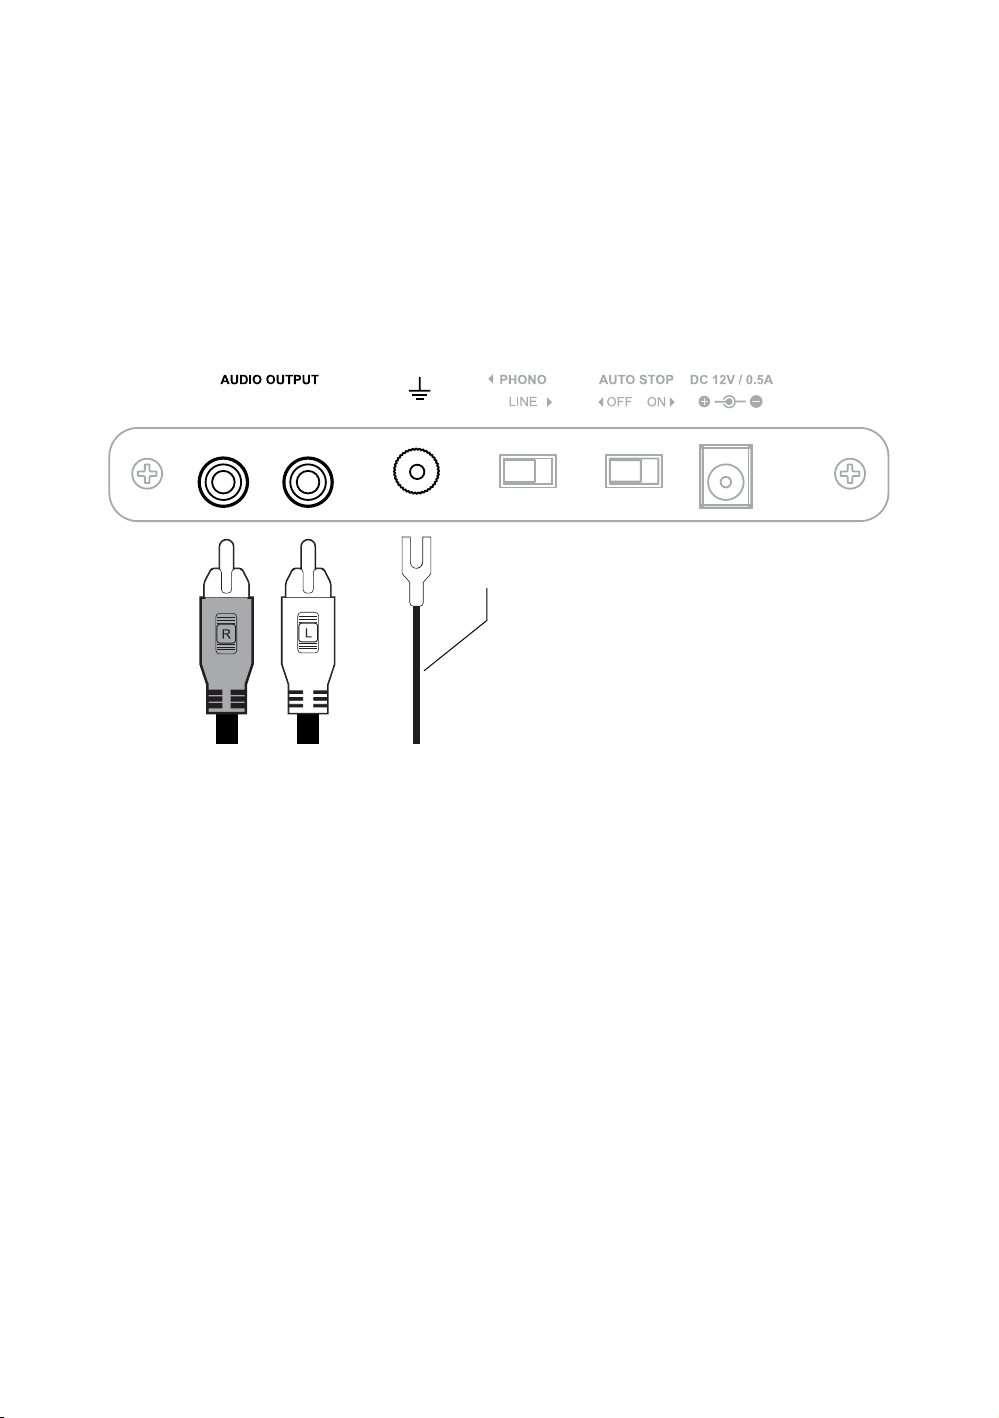
First Time Setup
Step Seven:
Connecting the RCA Cable
The included RCA cable has a ground cable attached. When using the internal
preamp the ground cable is not required. Connect the RCA cables to the audio
outputs on the back of the turntable and then plug the other end into your stereo.
Optional: When using an external preamp the ground cable should be connected to the ground terminal on the back of the
turntable and also connected to the external preamp. Connect the RCA cables to the audio outputs on the back of the turntable
and then plug the other end into your preamp.
Ground Cable (Optional)
Step Eight:
Playing a Record
1. Lift the dust cover
2. Place a record on the spindle
(use the 45 Adapter if necessary)
3. Turn the speed selection knob to
the correct RPM typically listed on
your record (Normal LP playback
speed is 33 RPM)
Tip: For best audio performance the dust cover should be removed during playback.
The turntable setup is now complete! Enjoy your Fluance turntable. Should you
require any further assistance please contact us at: www.uance.com/support
Note: When the turntable is not in use the speed selection knob should be set to OFF
to turn the turntable completely off.
4. Unlock the tonearm lock
5. Lift the cueing lever
6. Move the tonearm to the desired
starting point
7. Lower the cueing lever
10
Page 11
First Time Setup
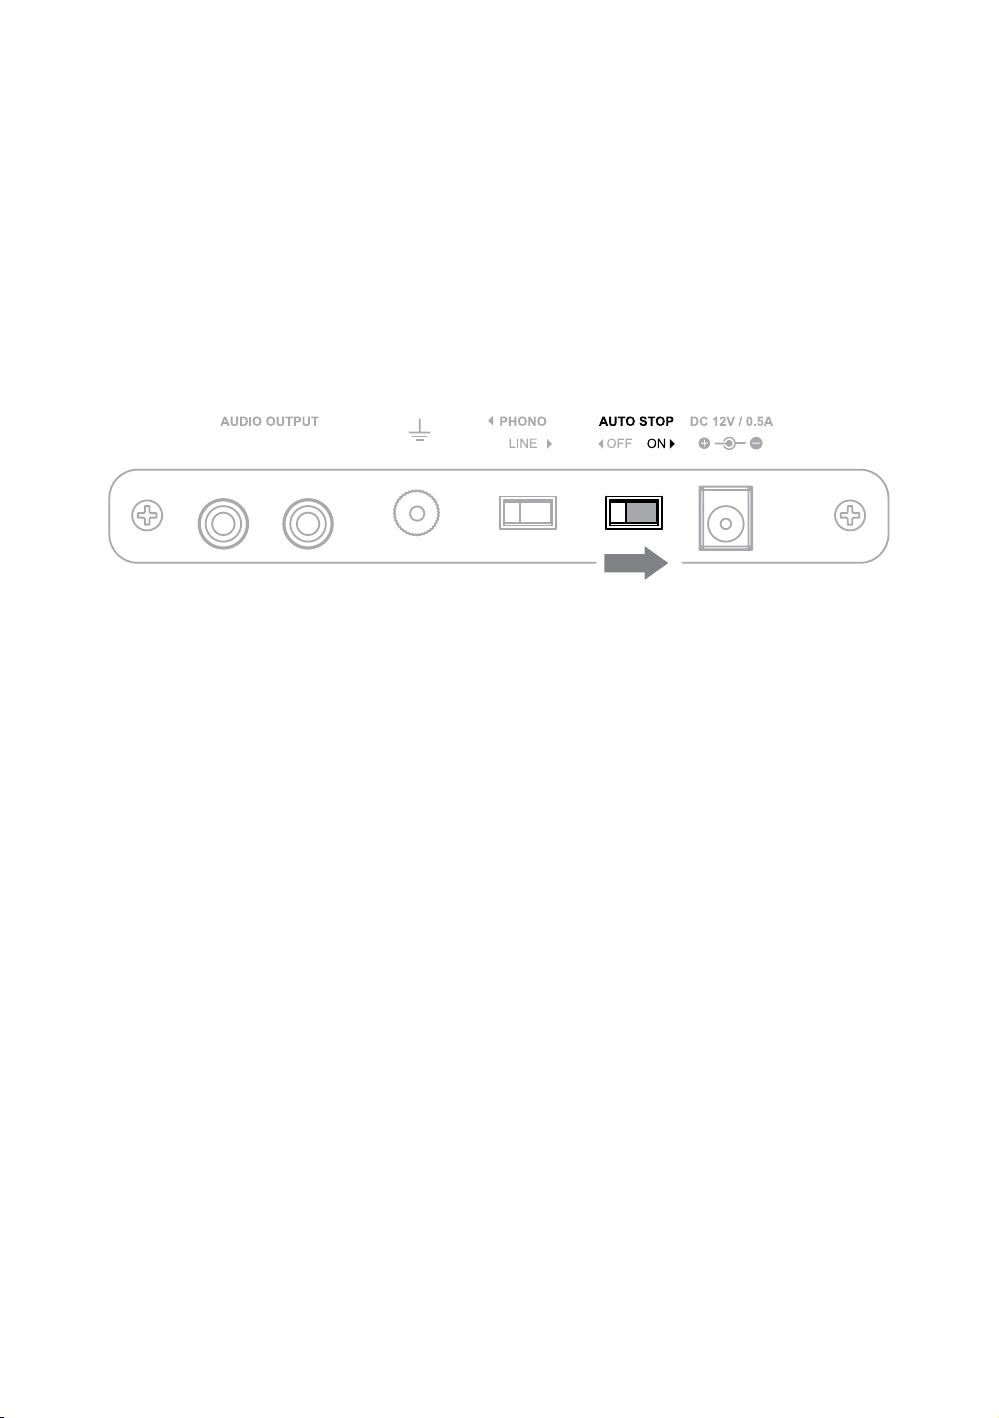
Auto Stop Function
The auto stop function is designed to save the life of your stylus. At the end of a
record the platter will automatically stop spinning if auto stop is enabled. This feature
will also require that the tonearm is moved over the record before the platter will start
spinning at the selected speed.
If the auto stop switch is set to the OFF position the platter will begin spinning as
soon as the speed selection knob is set to 33 or 45. To stop the record from spinning
set the speed selection knob to the OFF position.
Note: The Auto Stop function will take approximately 30 seconds at the end of the record
before the turntable stops spinning. Due to variances in vinyl record production some
records may not work correctly with the Auto Stop function.
11
Page 12
Maintenance
Cleaning the Unit
1. Use a soft dry cloth to wipe dust from the turntable surface.
2. Keep the dust cover closed to ensure the turntable components remain dust free.
Replacing the Stylus
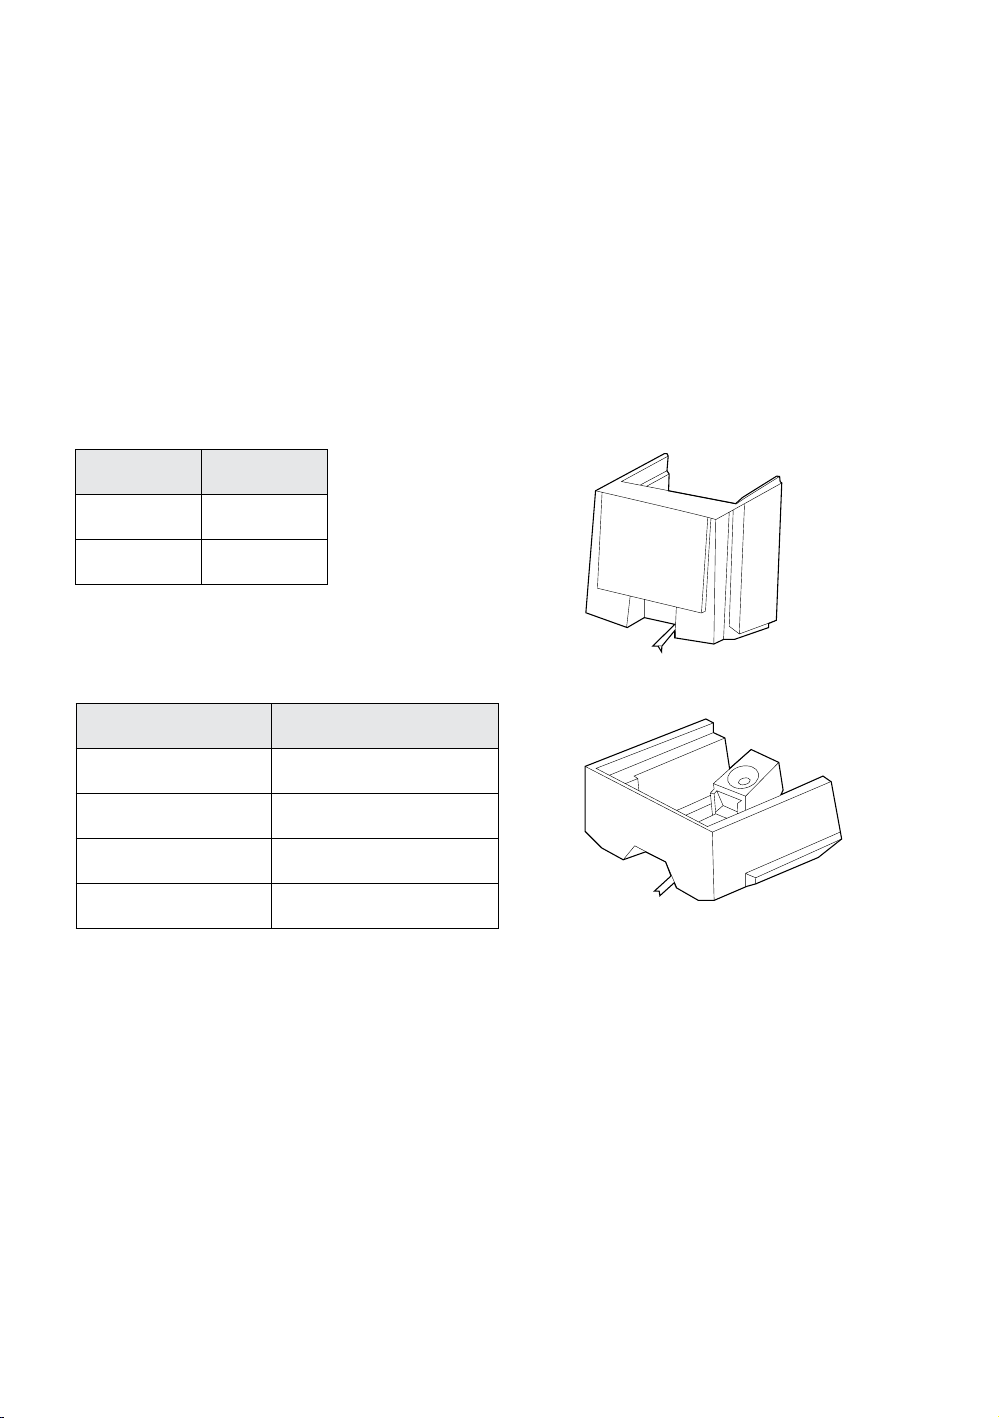
Use the chart below to ensure you replace your stylus with the correct model.
Replacement stylus and instructions are available at Fluance.com
Model Stylus
RT80 ATN91
RT81 ATN95E
Cartridge Connections
Wire Channel
White Left (+)
Blue Left (-)
Red Right (+)
Green Right (-)
Replacing the Rubber Belt
1. Remove the defective rubber belt
from the motor pulley.
2. Lift and remove the platter from the
spindle. Remove and discard the
defective rubber belt.
3. Wrap the new rubber belt around
the inner ring on the underside of the
platter and ensure the rubber belt is
not twisted.
ATN91
ATN95E
4. Place the platter on the spindle and
turn it until the motor pulley is visible.
5. Lift the rubber belt and place it over
the motor pulley.
6. Rotate the turntable several times to
ensure the rubber belt is secure and
not twisted.
Note: See images in Step One of the First Time Setup instructions.
12
Page 13

Maintenance
Record Care Stylus Care
1. Records should be stored verticaly
in a dry environment away from
sources of heat.
2. An anti-static brush can be used
to remove dirt from the record’s
grooved surface. Use a record
cleaning solution to further clean
your records to ensure crystal
clear playback.
3. It is important to use the cueing
lever when lifting or lowering the
tonearm to prevent accidental
slipping and scratching.
1. When the turntable is not in use
always use the provided stylus
protector to prevent accidental
damage.
2. A stylus cleaning brush can be
used to remove dust and debris
from the stylus.
3. Enabling the auto stop function will
reduce wear and tear on the stylus.
Troubleshooting
Turntable Not Spinning
• The turntable should be connected to a known good power outlet and the power
cable should be securely inserted into the unit.
• Remove the turntable mat and rotate the platter until the motor pulley is visible.
Ensure the rubber belt is intact and hooked around the motor pulley.
• Turn the speed selection knob to 33 or 45 (power led should light up). Lift the
tonearm over the platter and it should start spinning.
No Power
• The turntable should be connected to a known good power outlet and the power
cable should be securely inserted into the unit.
• The power LED should light up when the speed selection knob is set to 33 or 45.
Wrong Speed
• Check the record label for the correct playback speed and that the speed selection
knob is set to match it. Normal LP playback speed is 33 1/3 rpm.
• If incorrect speed persists more information is available at:
www.fluance.com/support
13
Page 14

Troubleshooting
Skipping
• Ensure the record surface is clear of dirt and debris. Also check that the record is
not warped or deformed.
• Inspect the stylus for built up dirt or debris. Use a stylus cleaning brush to clean if
necessary.
• Ensure the turntable is on a sturdy and level surface.
• Use instructions in step four of the first time setup instructions to confirm the
tonearm was balanced correctly and set to the correct tracking force of 2.0 Grams.
• Check that the anti-skating control is set to 2.
Audio Feedback
• If audio feedback occurs ensure the speakers are positioned away from the
turntable. The turntable should not be placed in front of the speakers.
• For best audio performance the dust cover should be removed during playback.
Cueing Lever Not Lowering Tonearm
• Use instructions in step four of the first time setup instructions to confirm the
tonearm was balanced and set to the correct tracking force of 2.0 Grams.
• Lock the tonearm and lower the cueing lever. Gently press down on the tonearm
bridge until fully lowered to reset the tonearm lowering mechanism.
Low Volume
• Ensure the Preamp switch is set correctly. If using the internal Preamp the switch
should be set to LINE.
• Check the RCA connections are correct and fully inserted.
• If low volume persists more information is available at: www.fluance.com/support
Need Additional Help?
• Do not return this product to the store.
• Please contact a Fluance Customer Support Representative first, regarding any
additional information on product features, specifications or assitance with setup.
• Online web chat or Support: www.fluance.com/support
14
Page 15

Specifications
Turntable Specications RT80 RT81
Drive System Belt Drive Belt Drive
Motor DC Motor DC Motor
Speed 33 1/3 RPM, 45 RPM 33 1/3 RPM, 45 RPM
Wow and Flutter 0.20% 0.20%
67dB or higher
Signal-to-Noise Ratio (Weighted)
Signal-to-Noise Ratio (Unweighted)
Platter Die-cast Aluminum Die-cast Aluminum
Diameter of Platter 12", 30cm 12", 30cm
Auto-Stop Yes Yes
Turntable Mat Felt Rubber
(A-weighted, 20kHz
LPF)
60dB or higher
(unweighted, 20kHz
LPF)
67dB or higher
(A-weighted, 20kHz
LPF)
60dB or higher
(unweighted, 20kHz
LPF)
Tonearm Specications
Type
Supported Cartridge Weight 3.5 to 6.5g 3.5 to 6.5g
Anti-skating Adjustment Yes Yes
Pivot Bearing Yes Yes
Static Balanced,
S-Type
Static Balanced,
S-Type
Material Metal Metal
Cartridge Specications
Type Moving Magnet (MM) Moving Magnet (MM)
Cartridge Model
Replacement Stylus ATN91 ATN95E
Stylus
Audio Technica:
AT91
0.6mil Bonded
Conical (Diamond)
Audio Technica:
AT95E
0.4x0.7mil Bonded
Elliptical (Diamond)
15
Page 16

Cantilever Carbon Fiber Aluminum
Mount Half inch Half inch
Frequency Response 20-20,000Hz 20-20,000Hz
Channel Separation 18dB at 1kHz 20dB at 1kHz
Channel Balance 2.5dB or less at 1kHz 2.0dB or less at 1kHz
Load Impedance/Capacitance 47k Ohms/100pF 47k Ohms/100pF
Output Voltage 2.5mV +/–3dB 2.5mV +/–3dB
Weight 5.0g 5.7g
Headshell Weight 10g 10g
Recommended Tracking Force 2.0g 2.0g
Vertical Tracking Angle 20 degrees 20 degrees
Output Specications
Connector RCA RCA
Preamp
Phono Output 2.5mV +/–3dB 2.5mV +/–3dB
Line Output 140mV (–17dBV) 140mV (–17dBV)
Ground Terminal Yes Yes
Yes, PHONO/LINE
Switchable
Yes, PHONO/LINE
Switchable
Power Specication
Input
Output 12V / 500mA 12V / 500mA
Consumption 1.5W 1.5W
100V - 240V AC
(50/60Hz)
100V - 240V AC
(50/60Hz)
General Specications
Unit Dimensions ( W x H x D ) 16.5" x 5.5" x 13.75" 16.5" x 5.5" x 13.75"
Unit Weight 4.5 kg (9.9 lb) 6.4 kg (14.41 lb)
Operating Temperature 5°C to 35°C 5°C to 35°C
Page 17

Fluance Warranty
Warranty Information
Fluance gives the following warranty to the original customer of each new Fluance
product purchased from a dealer authorized by Fluance. Fluance warrants that each
new product, under normal use, is free from defects, subject to the terms and
conditions set forth. If a defect should occur within the warranty period, repairs will
be made free of charge for parts and labor when such defects are determined by us
to be attributable to faulty materials or workmanship at time of manufacture.
Warranty Period
The Fluance products listed below are warranted for parts and labor for the stated
period from the date of original purchase and are subject to the terms and conditions
of the warranty.
Home Audio Passive Speakers: Lifetime Warranty
Active/Powered Speakers: 2 Year Warranty
HiFi Turntables: 2 Year Warranty
Warranty Exclusions
Products purchased from a dealer not authorized by Fluance. Products with the serial
number defaced, altered or missing. Defects resulting from disaster, accident, abuse,
misuse, lightning, power surges, neglect, unauthorized modication or water damage.
Defects or damage as a result of repairs performed by a person or party not
authorized by Fluance. Defects or damage occurring during shipping (claims should
be made with the shipping company).
To Obtain Warranty Service
Should your Fluance product need warranty service, please contact your Fluance
Authorized Dealer and send your product fully insured and freight prepaid to the
nearest Fluance authorized service center. Before sending to Fluance, you will be
required to get a Return Authorization Number from your dealer.
Products shipped without a valid Return Authorization Number will be refused. To
avoid possible shipping damage, make sure the product is properly packaged and
well protected. Include a copy of your original bill of sale and this warranty card as
proof of warranty along with your name, home and/or work telephone number(s),
a complete return address and a detailed description of the faults.
Products repaired within warranty will be returned freight prepaid. This warranty
card in itself is not considered a valid proof of purchase. When applying for warranty
repairs, you must present the original copy of your bill of sale and this warranty card
as proof of warranty.
17
Page 18
Important Safety Instructions
WARNING:
TO REDUCE THE RISK OF FIRE OR ELECTRIC
SHOCK, DO NOT EXPOSE THIS APPARATUS TO
RAIN OR MOISTURE
CAUTION:
TO REDUCE THE RISK OF ELECTRIC SHOCK,
DO NOT REMOVE COVER (OR BACK). NO USER
SERVICEABLE PARTS INSIDE. REFER SERVICING
TO QUALIFIED SERVICE PERSONNEL.
To prevent re or shock hazard, do not use this plug with an extension cord, receptacle or
other outlet unless the blades can be fully inserted to prevent blade exposure. To prevent re
or shock hazard, do not expose this appliance to rain or moisture.
1. Read these instructions.
2. Keep these instructions.
3. Heed all warnings.
4. Follow all instructions.
5. Do not use this apparatus near water.
6. Clean only with dry cloth.
7. Do not block any ventilation
openings. Install in accordance with
the manufacturer’s instructions.
8. Do not install near any heat
sources such as radiators, heat
registers, stoves, or other apparatus
(including amplifiers) that produce
heat.
9. Do not defeat the safety purpose of
the polarized or grounding type plug.
A polarized plug has two blades with
one wider than the other.
A grounding type plug has two
blades and a third grounding prong.
The wide blade or the third prong is
provided for your safety. If the
provided plug does not fit into you
outlet, consult an electrician for
replacement of the obsolete outlet.
10. Protect the power cord from being
walked on or pinched particularly at
plugs, convenience receptacles, and
point where they exit from the
apparatus.
11. Only use attachments / accessories
specified by the manufacturer.
13. Refer all servicing to qualified service
personnel. Servicing is required when
the apparatus has been damaged
in any way, such as power-supply
cord or plug is damaged, liquid has
been spilled or objects have
fallen into the apparatus, the appara
tus has been exposed to rain or
moisture, does not operate normally,
or has been dropped.
14. This appliance shall not be exposed
to dripping or splashing water and
no object filled with liquids such as
vases shall be placed on the
apparatus.
15. Do not overload wall outlet. Use only
power source as indicated.
16. Use replacement parts as specified by
the manufacturer.
17. The product may be mounted to a
wall only if recommended by the
manufacturer.
18. Upon completion of any service or
repairs to this product, ask the service
technician to perform safety checks.
19. Avoid installing this unit in places
exposed to direct sunlight or close
to heat radiating appliances such
as electric heaters, on top of other
stereo equipment that radiates too
much heat, places lacking ventilation
or dusty areas, places subject to
constant vibration and/or humid or
moist areas.
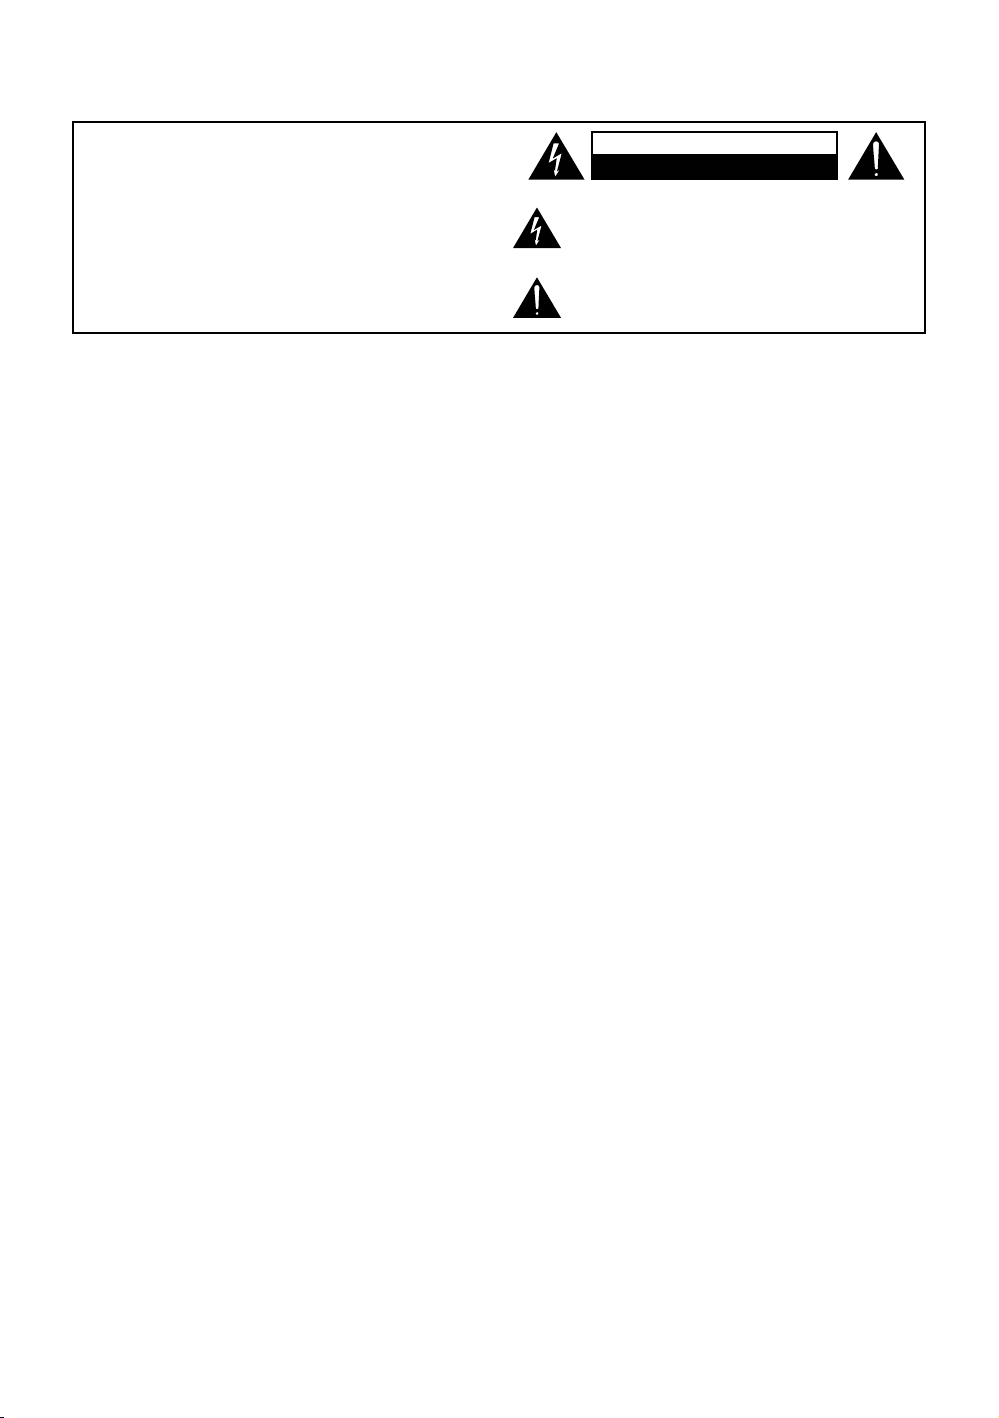
The lightning ash with arrowhead symbol within an
equilateral triangle is intended to alert the user to the
presence of uninsulated dangerous voltage within the
product’s enclosure that may be of sufcient magnitude
to constitute a risk of electric shock to persons.
The exclamation point within an equilateral triangle is
intended to alert the user to the presence of important
operating and maintenance (servicing) instructions in
the literature accompanying the appliance.
WARNING
RISK OF ELECTRIC SHOCK
DO NOT OPEN
12. Unplug this apparatus during
lightning storms or when unused for
long periods of time.
18
Page 19

20. Do not attempt to clean this unit
with chemical solvents as this might
damage the finish. Use a clean
dry cloth.
21. Operate controls and switches as
described in the manual. Before
turning on the power, make certain
that power cord is properly installed.
22. When moving the apparatus, be sure
to first disconnect the power cord.
23. Use caution when wearing loose
clothing or articles near the spinning
turntable.
FCC & IC Information
This equipment has been tested and found to comply with the limits for a Class B
digital device, pursuant to Part 15 of the FCC Rules. This digital apparatus does not
exceed the Class B limits for radio noise emissions from digital apparatus as set out in
the Radio Interference Regulations of Industry Canada.
These limits are designed to provide reasonable protection against harmful
interference in a residential installation. This equipment generates, uses and can
radiate radio frequency energy and, if not installed and used in accordance with the
instructions, may cause harmful interference to radio communications. However,
there is no guarantee that interference will not occur in a particular installation. If this
equipment does cause harmful interference to radio or television reception, which can
be determined by turning the equipment off and on, the user is encouraged to try to
correct the interference by one or more of the following measures:
• Re-orient or relocate the receiving
antenna.
• Increase the separation between the
equipment and receiver.
• Connect the equipment into an outlet
on a circuit different from that to which
the receiver is connected.
• Consult the dealer or an experienced
radio/TV technician for help.
This device complies with Part 15 of the
FCC Rules. Operation is subject to the
following two conditions:
1. This device may not cause harmful
interference, and
2. This device must accept any
interference received, including
interference that may cause undesired
operation.
Important!
Since digital circuitry may cause interference to other radio or television tuners nearby,
switch this unit off when not in use or move it away from the affected radio/television tuner.
19
Page 20
uance.com
 Loading...