

Page 1
1
Fluance F i70 Quick St art Guide
Quick Start Guide
Fi70 - Bluetooth® Music System
Page 2

2
Fluance F i70 Quick St art Guide
Important Safety Instructions
1. Read these instructions.
2. Keep these instructions.
3. Heed all warnings.
4. Follow all instructions.
5. Do not use this apparatus near water.
6. Clean only with dry cloth.
7. Do not block any ventilation openings. Install in accordance with the
manufacturer’s instructions.
8. Do not install near any heat sources such as radiators, heat registers,
stoves, or other apparatus (including ampliers) that produce heat.
9. Do not defeat the safety purpose of the polarized or grounding-type
plug. A polarized plug has two blades with one wider than the other.
A grounding type plug has two blades and a third grounding prong.
The wide blade or the third prong are provided for your safety. If the
provided plug does not t into your outlet, consult an electrician for
replacement of the obsolete outlet.
10. Protect the power cord from being walked on or pinched particularly at
plugs, convenience receptacles, and the point where they exit from the
apparatus.
11. Only use attachments/accessories specied by the manufacturer.
12. Use only with the cart, stand, tripod, bracket, or table specied by the
manufacturer, or sold with the apparatus. When a cart is used, use
caution when moving the cart/apparatus combination to avoid injury
from tip - over.
13. Unplug this apparatus during lightning storms or when unused for long
periods of time.
14. Refer all servicing to qualied service personnel. Servicing is required
when the apparatus has been damaged in anyway, such as power supply
cord or plug is damaged, liquid has been spilled or objects have fallen
into the apparatus, the apparatus has been exposed to rain or moisture,
does not operate normally, or has been dropped.
15. Do not place open ame sources on or near the unit.
16. Batteries must be disposed of in accordance with local environmental
regulations. Please recycle batteries!
Page 3
3
Fluance F i70 Quick St art Guide
Introduction
Fluance believes everyone should experience audio in its truest form,
recreating the performance the way the artist intended. Utilizing only
superior components and expert audio engineering, their products are a
testament to the performance that can be achieved when a passion for
music takes center stage. The perfect complement to any audiophile’s
lifestyle, you’ll be enjoying live performances in your home for years to come.
Break-in Period
Our speakers have a Butyl rubber ring surrounding the cone. The breakin period allows the rubber to loosen and stretch, allowing the cone a
larger range of movement, which gives a better sound reproduction. We
recommend 10-12 hours of play at moderate volume to achieve this.
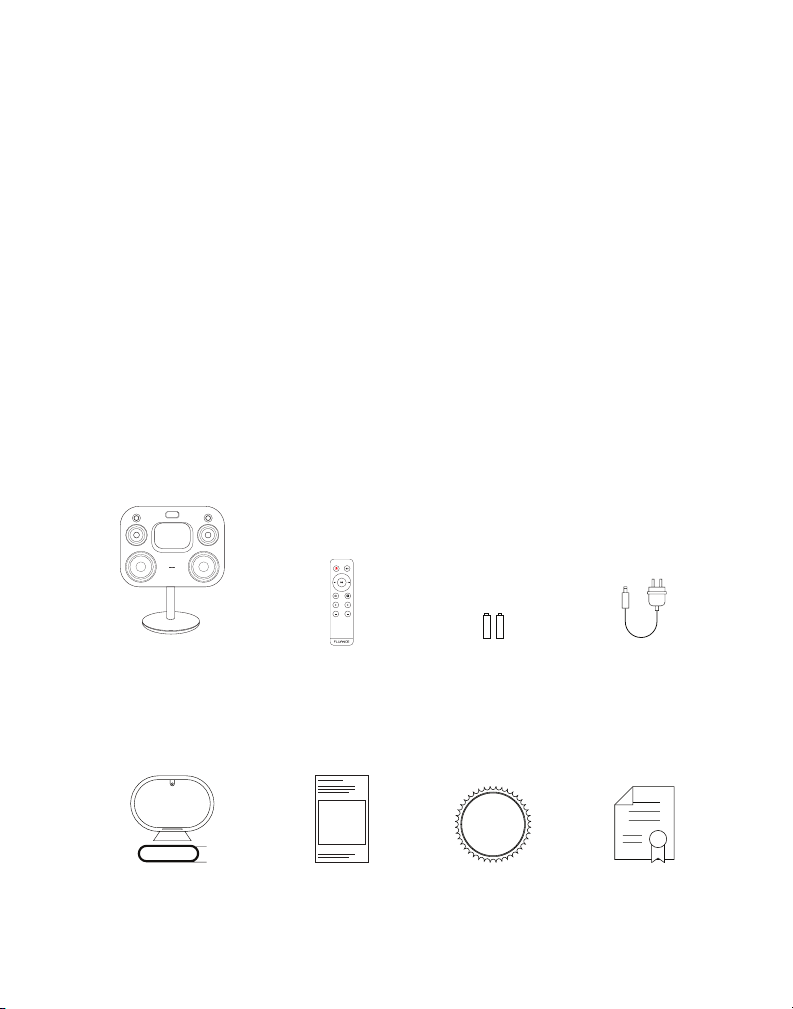
What’s Included
VOL +
VOL -
TREBLEBASS
Music System
with Stand and
Mounting Hardware
AM/FM
Radio Antennas
Remote
Control
Quick Start
Guide
2 ‘AAA’
Batteries
LIFETIME
Customer Support
Lifetime
Customer
Support
Power
Cord
2 Ye ar
Warranty
Page 4

4
VOL +
VOL -
TREBLEBASS
Cabinet Buttons
1. Power ON/OFF
2. Source
3. Settings
4. Previous/Back*
5. Play/Pause
6. Next/Forward*
7. Volume Down
8. Volume Up
Remote Control Layout
1. Power ON/OFF
2. Volume
3. Source
4. Bass
5. Mute
6. Play/Pause
7. Forward/Back*
8. Settings
9. Tre b l e
Fluance F i70 Quick St art Guide
1 3 5 7
2 4 6 8
1
2
3
4 9
5
6
7
8
*Note: Previous Track/Next Track (when on
Bluetooth®); Previous Station/Next Station
(when on Radio Source)
Page 5
5
OFF
ON
120V~6 0Hz
280W
FM
AM
POWER
AUXIN
OPTICAL IN
RADIO
OFF
ON
FM
AM
POWER
AUXIN
OPTICAL IN
RADIO
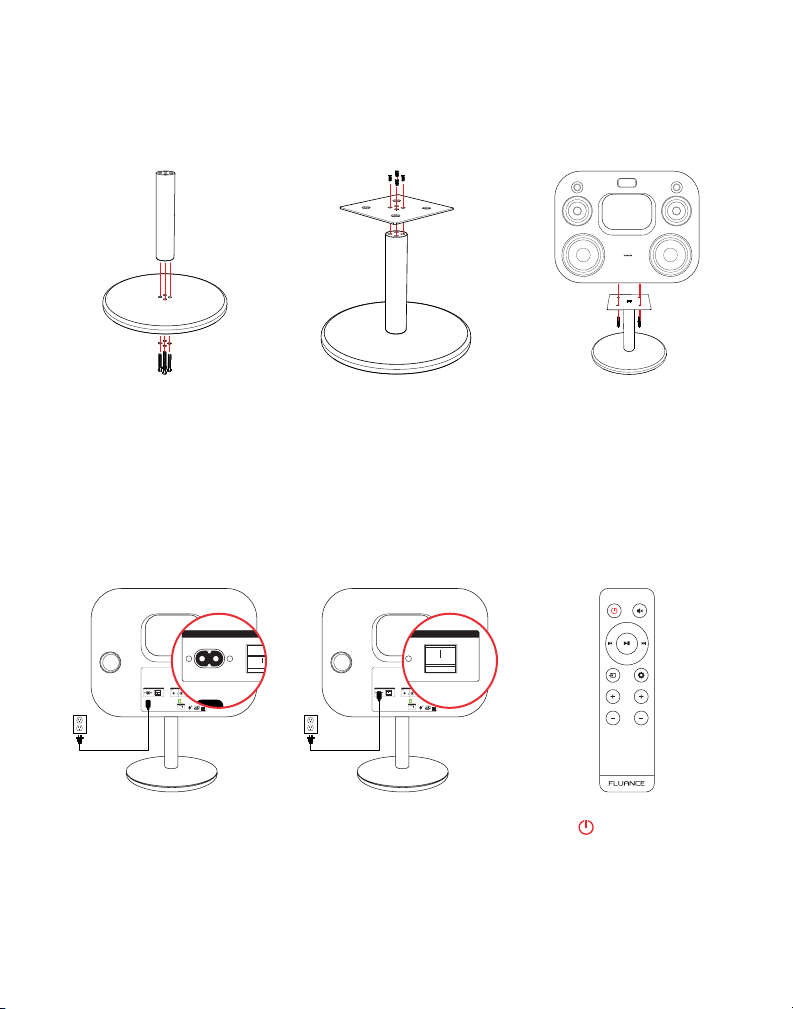
First Time Use
Assembling The Stand (Optional)
Fluance F i70 Quick St art Guide
Attach the pole to the
base using the large
screws and washers.
Powering Up Your Music System
AUXIN
POWER
OPTICAL IN
RADIO
ON
FM
AM
OFF
120V~60Hz
280W
USB CHARGING
DC 5V 2.1A
Plug the Power Cord
into the Cabinet and
into a wall outlet.
Attach the pole to
the bracket using the
small screws.
Flip the Power Switch
to the ON position.
Attach the assembled
stand to the cabinet
with the bolts.
VOL +
VOL -
AUXIN
POWER
OPTICAL IN
RADIO
ON
FM
AM
OFF
120V~60Hz
280W
USB CHARGING
DC 5V 2.1A
TREBLEBASS
Press on the
Remote or Cabinet.
Page 6
6
FM
AM
AUXIN
OPTICAL IN
RADIO
FM
AM
DC 5V 2.1A
OPTICAL IN
USB CHARGING
RADIO
FM
AM
RADIO
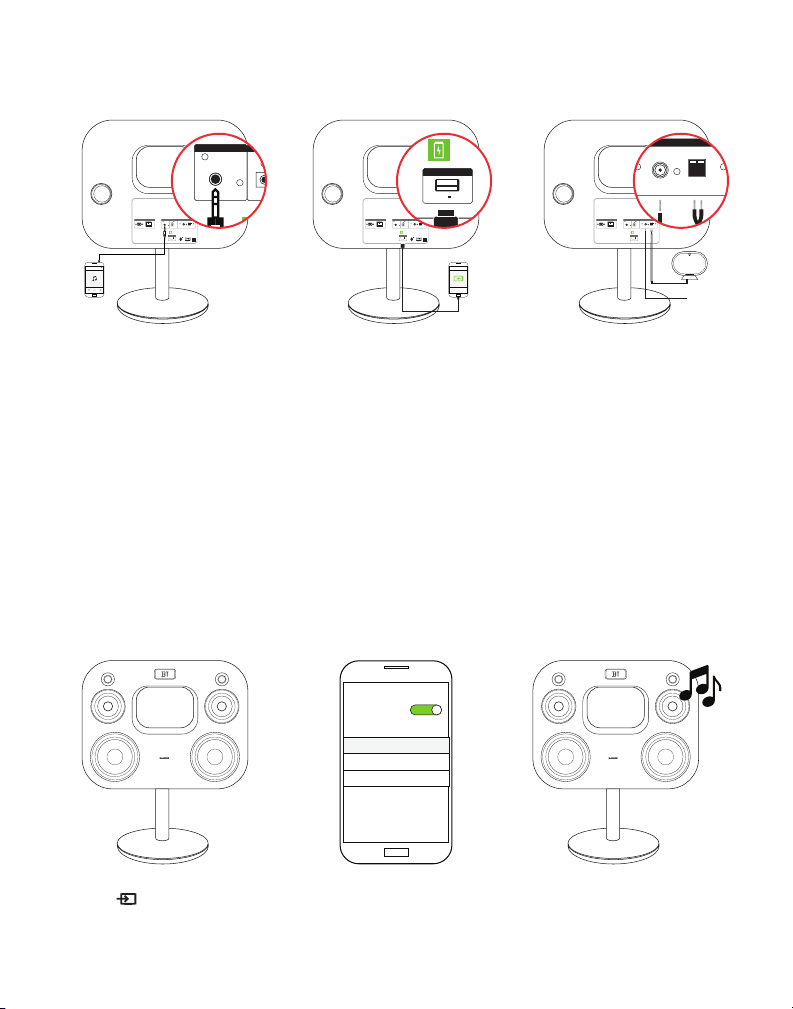
Listening To Music
Fluance F i70 Quick St art Guide
AUXIN
POWER
OPTICAL IN
RADIO
ON
FM
AM
OFF
120V~60Hz
280W
USB CHARGING
DC 5V 2.1A
Playback Charging
AUX Playback from
mobile devices.
USB Charging for mobile devices.
AUXIN
POWER
OPTICAL IN
RADIO
ON
FM
AM
OFF
120V~60Hz
280W
USB CHARGING
DC 5V 2.1A
AUXIN
POWER
OPTICAL IN
RADIO
ON
FM
AM
OFF
120V~60Hz
280W
USB CHARGING
DC 5V 2.1A
AM
AM/FM Antenna for
radio listening.
Optical Audio Signal Compatibility
The Fi70 does not support Dolby Digital Audio or DTS Audio. Locate Audio
Output Settings on your source device and ensure Dolby Digital is turned
off. This setting is sometimes referred to as PCM or Stereo. Some TV’s also
require that audio output be enabled. This setting may be referred to as
External Speakers. Ensure this is selected as your speaker/audio output.
For instructions on a specic device , please consult the device’s user manual.
Bluetooth® Setup
Settings
Bluetooth
MY DEVICES
Fluance Fi70
Press until you
see “BT” on the LCD
screen.
Connect to Fluance
Fi70 from your mobile
device’s Bluetooth®
settings.
Play Music!
To reset Bluetooth®
pairing, press and hold
the Play/Pause Button
for 3 seconds.
Page 7
7
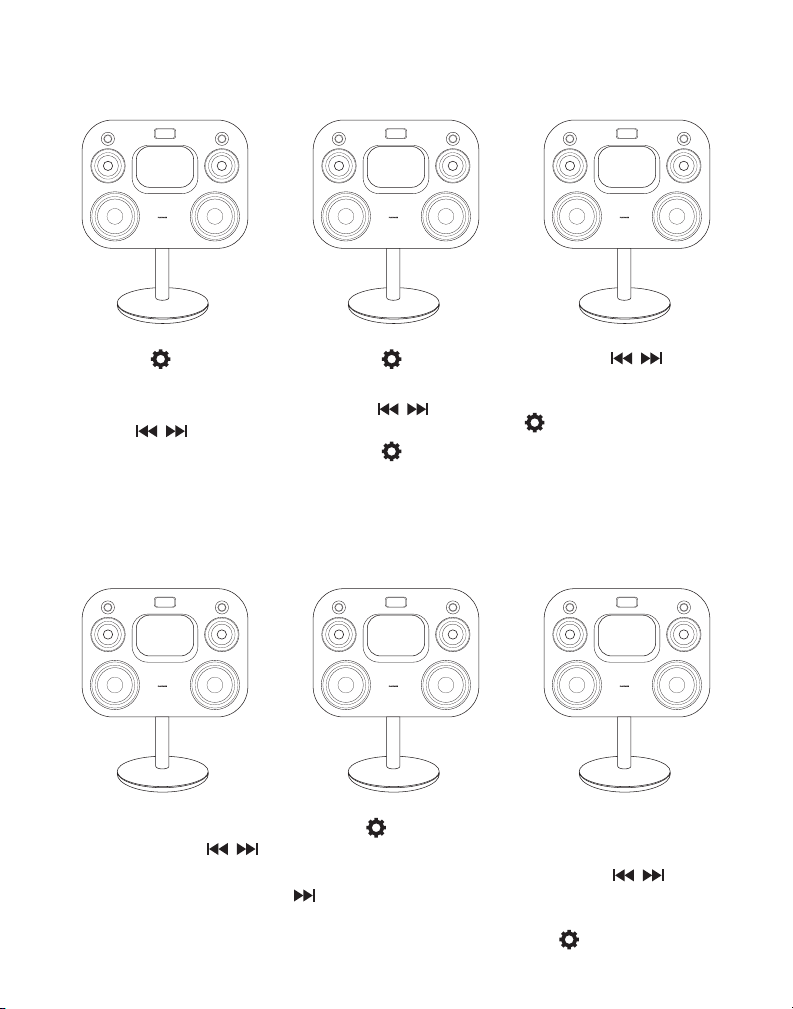
Setting The Time
TIME
08:30
Fluance F i70 Quick St art Guide
OK
Press the Button
until you see “TIME”
on the LCD screen.
Use the Buttons
to cycle between AM
or PM.
Save Radio Presets
FM
On the AM or FM
input, press the
Buttons to select the
radio station you wish
to save.
Press the Button
to conrm.
Press the Buttons
to select the hour and
press the Button
again to conrm.
MEM
Tap the Button until
you see “MEM” on the
display, now press the
Button to continue.
Press the
Buttons to select the
minute and press the
Button again to
conrm.
“OK” will now be
displayed on the LCD
screen.
CH00
“CH00” will ash on
the display.
Press the Buttons
to select the pre-set
channel to save to. Press
the Button to conrm.
Page 8
8
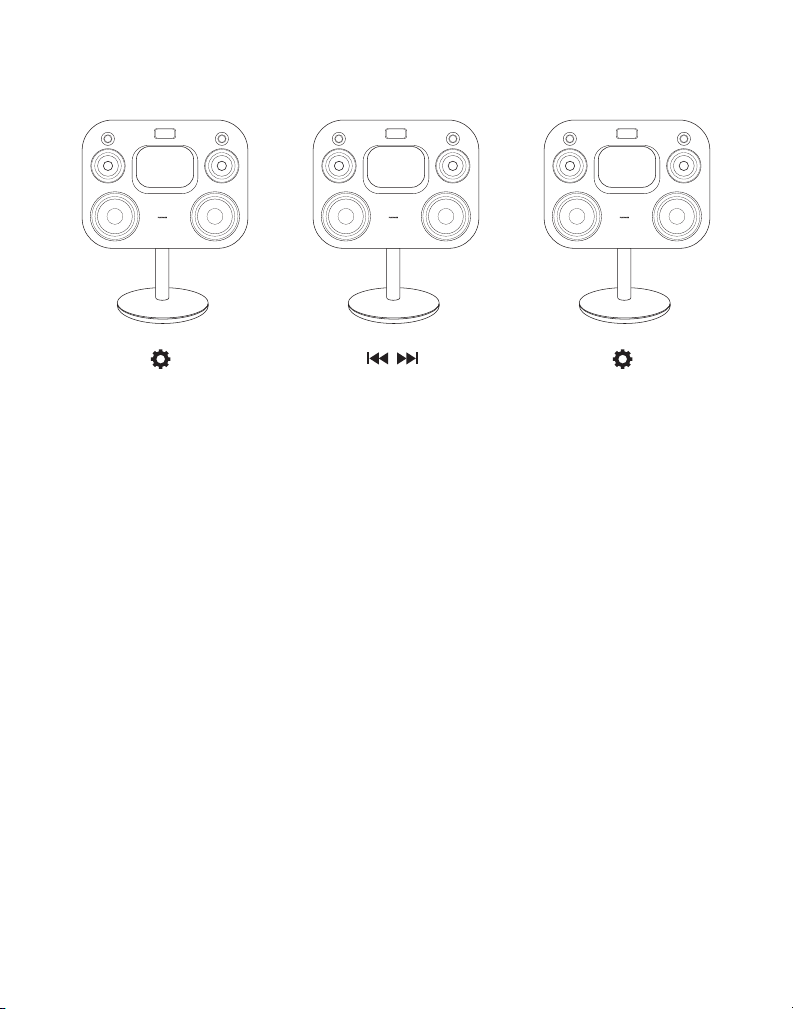
Changing The Display
LCD MODE
Fluance F i70 Quick St art Guide
OK
Press the Button
until LCD is displayed.
Use the Buttons
to cycle between
MODE, TIME, and OFF.
MODE - Displays the current source
TIME - Displays the time
OFF - Turns the display off
Press the Button to
conrm the selection.
"OK" will be displayed
on the LCD screen.
Page 9

9
Fluance F i70 Quick St art Guide
Frequently Asked Questions
How do I adjust the Volume / Change the Bass or Treble?
Select the equalizer using the settings button on the touch panel or using
the Bass/Treble EQ buttons on the remote. Use the +/- buttons to increase
or decrease volume accordingly. The range of the BASS/TREBLE is -10 to 10
and the range of volume is 0 to 40.
What is “Auto-Pairing” and how does it work?
Auto-Pairing is a convenient connection feature implemented into all Fluance
bluetooth enabled speakers. If the connected Bluetooth enabled device leaves
the connection range of the Fi70 and returns at a later time, the device will
automatically connect. If the device’s Bluetooth function is disabled and then
enabled at a later time, the device will automatically connect as well. Please
note that the Fluance Fi70 will only auto-pair to the last device that it was
connected to and if the Fi70 is set to its Bluetooth input.
What is the purpose of the USB port on the back panel?
The USB port is designed to charge any of your devices such as
smartphones, tablets, music players, etc., however, it cannot be used for
playing audio les with the Fi70.
I can’t connect my device to the Fi70.
Please ensure Bluetooth is enabled on your device and attempt to re-pair
with the Fi70. Please consult the included Quick Start Guide. If more
troubleshooting is needed consult the full instruction manual which is
located at Fluance.com/Support.
Another device is connected to the Fi70 and I wish to connect my device.
You can reset any Bluetooth connection by pressing and holding the
“Play/Pause” button on the remote/touch panel. The Fi70 will be available
to connect to any new device for the next 30 seconds. If no device is found,
the Fi70 will auto-pair back to the previously connected device. Please note
only one device can be paired at a time.
What is the range of the Bluetooth Connection?
The Fi70 operates with Power Class 2 Bluetooth devices, which have a range
of approximately 33’ feet (line of sight).
How can I connect a turntable to the Fi70?
The best method to connect a turntable to the Fi70 is using an Aux to RCA
cable. The RCA connection would be connected to the turntable and the
Aux connection would be connected to the Fi70.
Page 10

10
Fluance F i70 Quick St art Guide
Certification Information
FCC Statement
This equipment has been tested and found to comply with the limits for a Class B digital
device, pursuant to Part 15 of the FCC Rules . These limits are designed to provide reasonable
protection against harmful interference in a residential installation. This equipment generates
uses and can radiate radio frequency e nergy and, if not installed and used in accordance with
the instructions, may c ause harmful interference to radio communic ations. However, there is
no guarantee that interference will not occur in a particular installation. If this equipment does
cause harmful interference to radio or television reception, which can be determined by
turning the equipment off and on, the user is encouraged to tr y to correct the interference
by one or more of the following measures:
• Reorient or relocate the receiving antenna.
• Increase the separation between the equipment and receiver.
• Connect the equipment into an outlet on a circuit dif ferent from that to which the
receiver is connected.
• Consult the dealer or an experienced radio/TV technician for help.
This device complies with part 15 of the FCC Rules. O peration is subject to the following two
conditions:( 1) This device may not cause harmful interference, and (2) this device must accept
any interference received, including interference that may cause undesired operation.
Changes or modications not expressly approved by the par ty responsible for compliance
could void the user’s authority to operate the equipment.
This equipment complies with FCC radiation exposure limits set forth for an uncontrolled
environment. This equipment should be installed and operated with minimum distance 20cm
between the radiator & your body.
IC Warning
This device complies with Industry Canada license -exempt RSS standard(s). Operation is
subject to the following two conditions:
(1) This device may not cause interference, and (2) This device must accept any interference,
including inter ference that may cause undesired operation of the device .
Changes or modications not expressly approved by the par ty responsible for compliance
could void the user’s authority to operate the equipment.
This equipment complies with IC radiation exposure limits set forth for an uncontrolled
environment. This equipment should be installed and operated with minimum distance 20cm
between the radiator & your body. This transmitter must not be co -located or operating in
conjunction with any other antenna or transmitter.
Page 11

11
Fluance F i70 Quick St art Guide
Warranty Information
Fluance gives the following warranty to the original customer of each new Fluance product
purchased from a dealer authorized by Fluance. Fluance warrant s that each new product,
under normal use, is free from defects, subject to the terms and conditions set forth. If a
defect should occur within the warranty period, repairs will be made free of charge for parts
and labor when such defe cts are determined by us to be attributable to faulty materials or
workmanship at time of manufacture.
Warranty Period
The Fluance products listed below are warranted for parts and labor for the stated period
from the date of original purchase and are subject to the terms and conditions of the
warranty.
Home Audio Passive Speakers: Lifetime Warranty
Active/Powered Speakers: 2 Year Warrant y
HiFi Turntables: 2 Year Warranty
Warranty Exclusions
• Products purchased from a dealer not authorized by Fluance.
• Products with the serial number defaced, altered or missing.
• Defects resulting from disaster, accident, abuse, misuse, lightning, power surges, neglect,
unauthorized modication or water damage.
• Defects or damage as a result of repairs performed by a person or party not authorized
by Fluance.
• Defects or damage occurring during shipping (claims should be made with the shipping
comp any).
• Defect or damage as a result of connecting a product to an outlet with the incorrect
voltage . Voltage converters must be used where applicable.
To Obtain Warranty Service
Should your Fluance product require warranty service, please contact your Fluance Authorized Dealer and send your product fully insured and freight prepaid to the nearest Fluance
authorized ser vice center. Before sending to Fluance, you will be require d to get a Return
Authorization Number from your dealer.
Products shipped without a valid Return Authorization Number will be refused. To avoid
possible shipping damage, make sure the product is properly packaged and well protected.
Include a copy of your original bill of sale as proof of warranty along with your name, home
and/or work telephone number(s), a complete return address and a detailed description of
the faults.
Products repaired within warranty will be returned freight prepaid. This warranty in itself is
not considered a valid proof of purchase. When applying for warranty repairs, you must
present the original copy of your bill of sale as proof of warranty.
Page 12

12
Fluance F i70 Quick St art Guide
Fluance.com
 Loading...