

Page 1
QUICK START GUIDE
DB10
fluance.com
Page 2

WARRANTY INFORMATION
Fluance Warranty
Fluance gives the following warranty to the original customer of each new Fluance product purchased
from a dealer authorized by Fluance. Fluance warrants that each new product, under normal use, is free
from defects, subject to the terms and conditions set forth. If a defect should occur within the warranty
period, repairs will be made free of charge for parts and labor when such defects are determined by us
to be attributable to faulty materials or workmanship at time of manufacture.
Warranty Period
The Fluance products listed below are warranted for parts and labor for the stated period from the
date of original purchase and are subject to the terms and conditions of the warranty.
Home Audio Passive Speakers: Lifetime Warranty
Active/Powered Speakers: 2 Year Warranty
HiFi Turntables: 2 Year Warranty
Warranty Exclusions
• Products purchased from a dealer not authorized by Fluance.
• Products with the serial number defaced, altered or missing.
• Defects resulting from disaster, accident, abuse, misuse, lightning, power surges, neglect, unauthorized
modification or water damage.
• Defects or damage as a result of repairs performed by a person or party not authorized by Fluance.
• Defects or damage occurring during shipping (claims should be made with the shipping company).
To Obtain Warranty Service
Should your Fluance product require warranty service, please contact your Fluance Authorized Dealer
and send your product fully insured and freight prepaid to the nearest Fluance authorized service
center. Before sending to Fluance, you will be required to get a Return Authorization Number from
your dealer.
Products shipped without a valid Return Authorization Number will be refused. To avoid possible
shipping damage, make sure the product is properly packaged and well protected. Include a copy of
your original bill of sale as proof of warranty along with your name, home and/or work telephone
number(s), a complete return address and a detailed description of the faults.
Products repaired within warranty will be returned freight prepaid. This warranty in itself is not
considered a valid proof of purchase. When applying for warranty repairs, you must present the original
copy of your bill of sale as proof of warranty.
Fluance has successfully revolutionized the home audio
industry. Fluance develops a broad line of high-fidelity
products based on five key aspects: Sound Quality, Solid
Construction, Performance, Style, and Value. These
distinctive points make Fluance the most reliable and
respected name among our fans and ensure your music is
heard the way your favorite artist intended.
Today, Fluance expands on this vision and takes its
approach to a new level. With our dedicated team,
Fluance assures its products meet the most stringent
marks of quality control - overseeing each step from
design to manufacturing - and has raised the industry bar
in customer experience and quality to be second-to-none.
Page 3
SAFETY INFORMATION
FCC Statement
This equipment has been tested and found to comply with the limits for a Class B digital device,
pursuant to Part 15 of the FCC Rules. These limits are designed to provide reasonable
protection against harmful interference in a residential installation. This equipment generates
uses and can radiate radio frequency energy and, if not installed and used in accordance with
the instructions, may cause harmful interference to radio communications. However, there is
no guarantee that interference will not occur in a particular installation. If this equipment does
cause harmful interference to radio or television reception, which can be determined by turning
the equipment off and on, the user is encouraged to try to correct the interference by one or
more of the following measures:
• Reorient or relocate the receiving antenna.
• Increase the separation between the equipment and receiver.
• Connect the equipment into an outlet on a circuit different from that to which the receiver is connected.
• Consult the dealer or an experienced radio/TV technician for help.
This device complies with part 15 of the FCC Rules. Operation is subject to the following two
conditions:(1) This device may not cause harmful interference, and (2) this device must accept
any interference received, including interference that may cause undesired operation.
Changes or modifications not expressly approved by the party responsible for compliance
could void the user's authority to operate the equipment.
This equipment complies with FCC radiation exposure limits set forth for an uncontrolled
environment. This equipment should be installed and operated with minimum distance 20cm
between the radiator & your body.
IC Warning
This device complies with Industry Canada licence-exempt RSS standard(s).
Operation is subject to the following two conditions:
(1) This device may not cause interference, and (2) This device must accept any interference, including
interference that may cause undesired operation of the device.
Changes or modifications not expressly approved by the party responsible for compliance could void the
user's authority to operate the equipment.
This equipment complies with IC radiation exposure limits set forth for an uncontrolled
environment .This equipment should be installed and operated with minimum distance 20cm between the
radiator & your body. This transmitter must not be co-located or operating in conjunction with any other
antenna or transmitter.
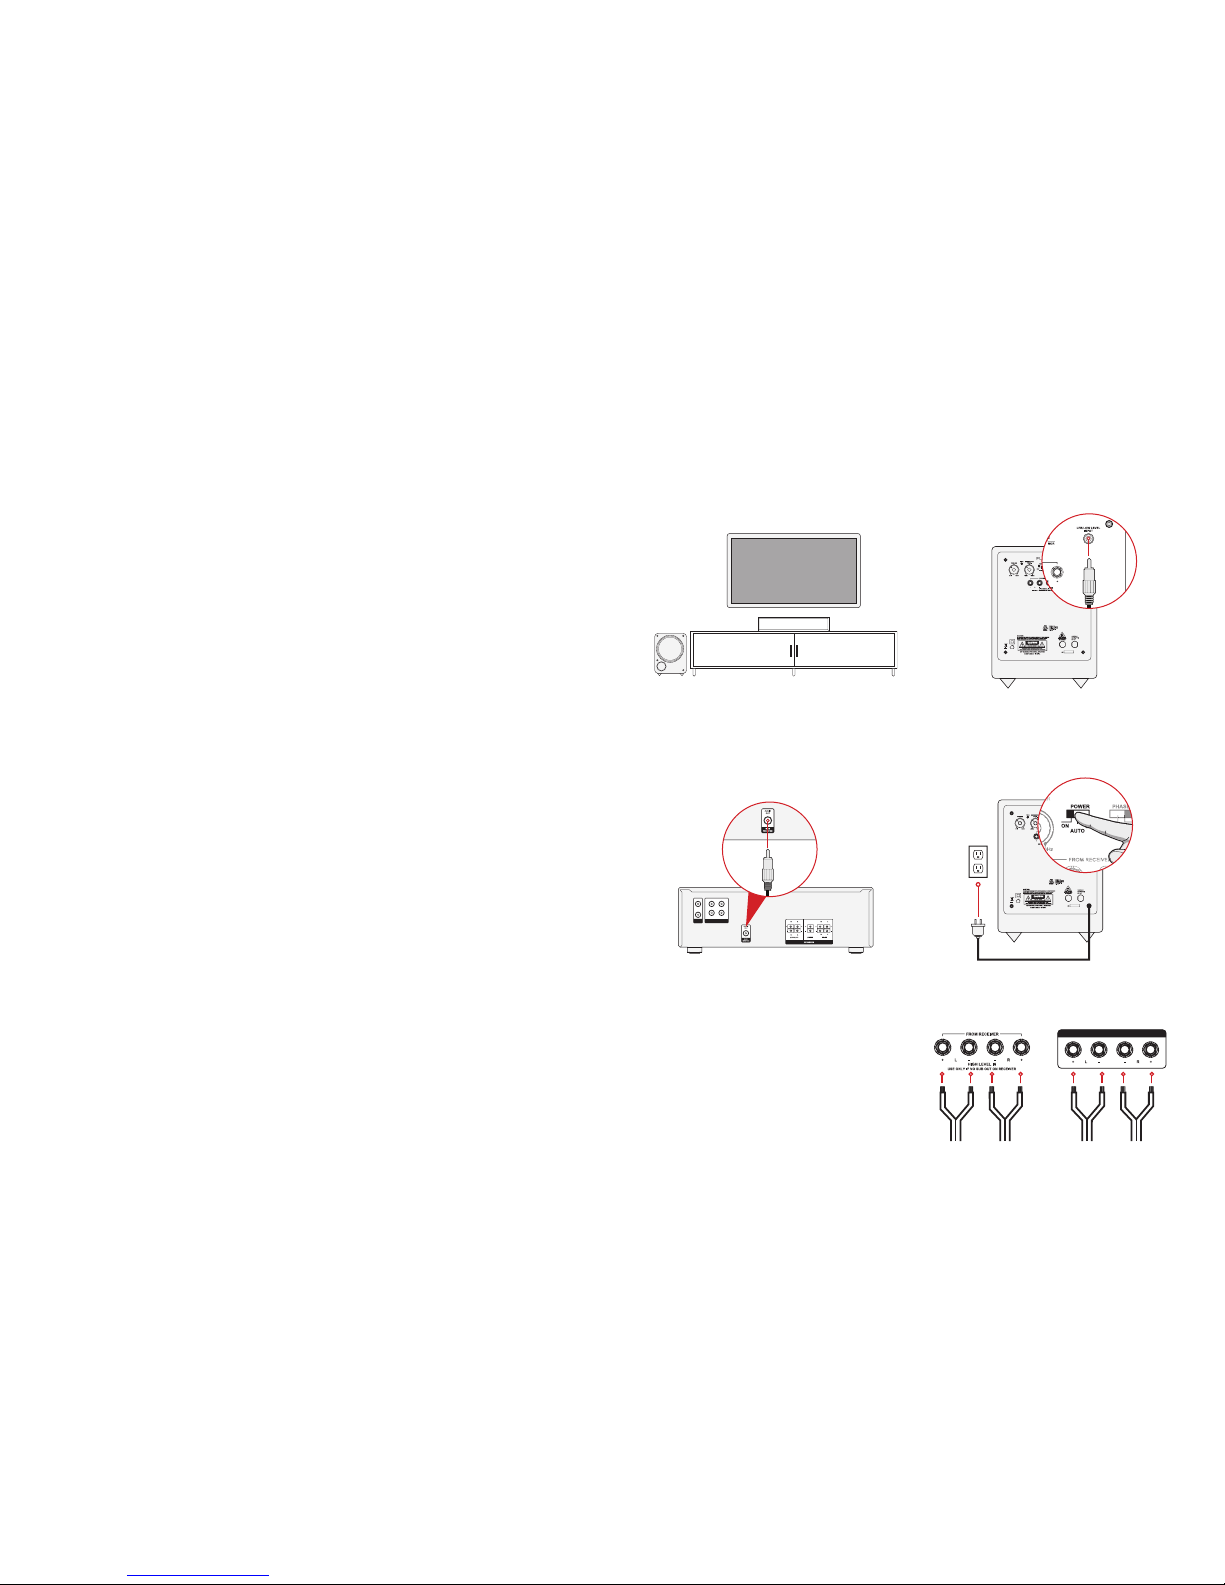
FIRST TIME SET UP
Step 3: Attach same subwoofer cable to the
subwoofer output of your home theater receiver.
Step 4: Connect power cable to wall outlet. Set
power switch to either ON or AUTO ON.
OPTIONAL STEP:
Attach speaker wire to the speaker inputs of
the subwoofer. Attach same speaker wire to
the channel outputs of your choice on the
home theater receiver.
Refer to receiver manual for setup instructions.
Step 1: Place the subwoofer in the most optimal
position.
Fluance recommends having the woofer
face the listener while being positioned near the
front channel speakers in a corner if possible.
Step 2: Attach the subwoofer cable to the
LFE/Low Level Input of the DB10.
DB10 Receiver
SPEAKER OUTPUT
Page 4
FREQUENTLY ASKED QUESTIONS
What is the purpose of the speaker wire inputs?
The speaker wire inputs can be used as an alternative to connect your DB10 to your home theater
receiver, however, Fluance recommends using the LFE/Low Level input connected via subwoofer cable.
LFE (Low Frequency Effect) refers to a channel specifically intended for deep, low-pitched sounds
ranging from 3-120Hz.
How do I adjust the volume / change the crossover settings?
The volume/crossover settings can be adjusted via the volume/crossover knob located on the back
panel of the DB10. The crossover setting changes the cut off frequency for the subwoofer.
What is the auto setting and what are the parameters?
By selecting the auto setting the DB10 will automatically turn on when it detects a signal from the home
theater receiver. The auto setting turns the subwoofer on when the frequency signal reaches a required
voltage. A 100Hz signal requires 3mV and a 1KHz signal requires 5mv.
What is the phase setting and what is the optimal setting?
If your speaker system or DB10 is out of phase. It means that the driver/woofer is moving in the
opposite direction of the other drivers/woofers. This causes frequencies to be canceled out, which can
result in a poor listening experience. By adjusting the phase setting of the DB10, you can ensure the
DB10’s woofer is moving in the same direction as your other speakers, which will result in a more
pleasant listening experience.
What does the LED behavior mean?
Green LED = Power On
Red LED = Protection Mode
What is Protection Mode?
Amplifier Protection Mode is a shutdown state that amplifiers can enable to prevent serious damage to
the unit or other components in the system. Protection Mode can be activated in two scenarios:
1. Unit is overheated – Ensure the area surrounding the DB10 is at room temperature, power off and
unplug the power adapter.
2. The unit is not installed properly – consult the included quick start guide and manual, ensure no wires
are touching.
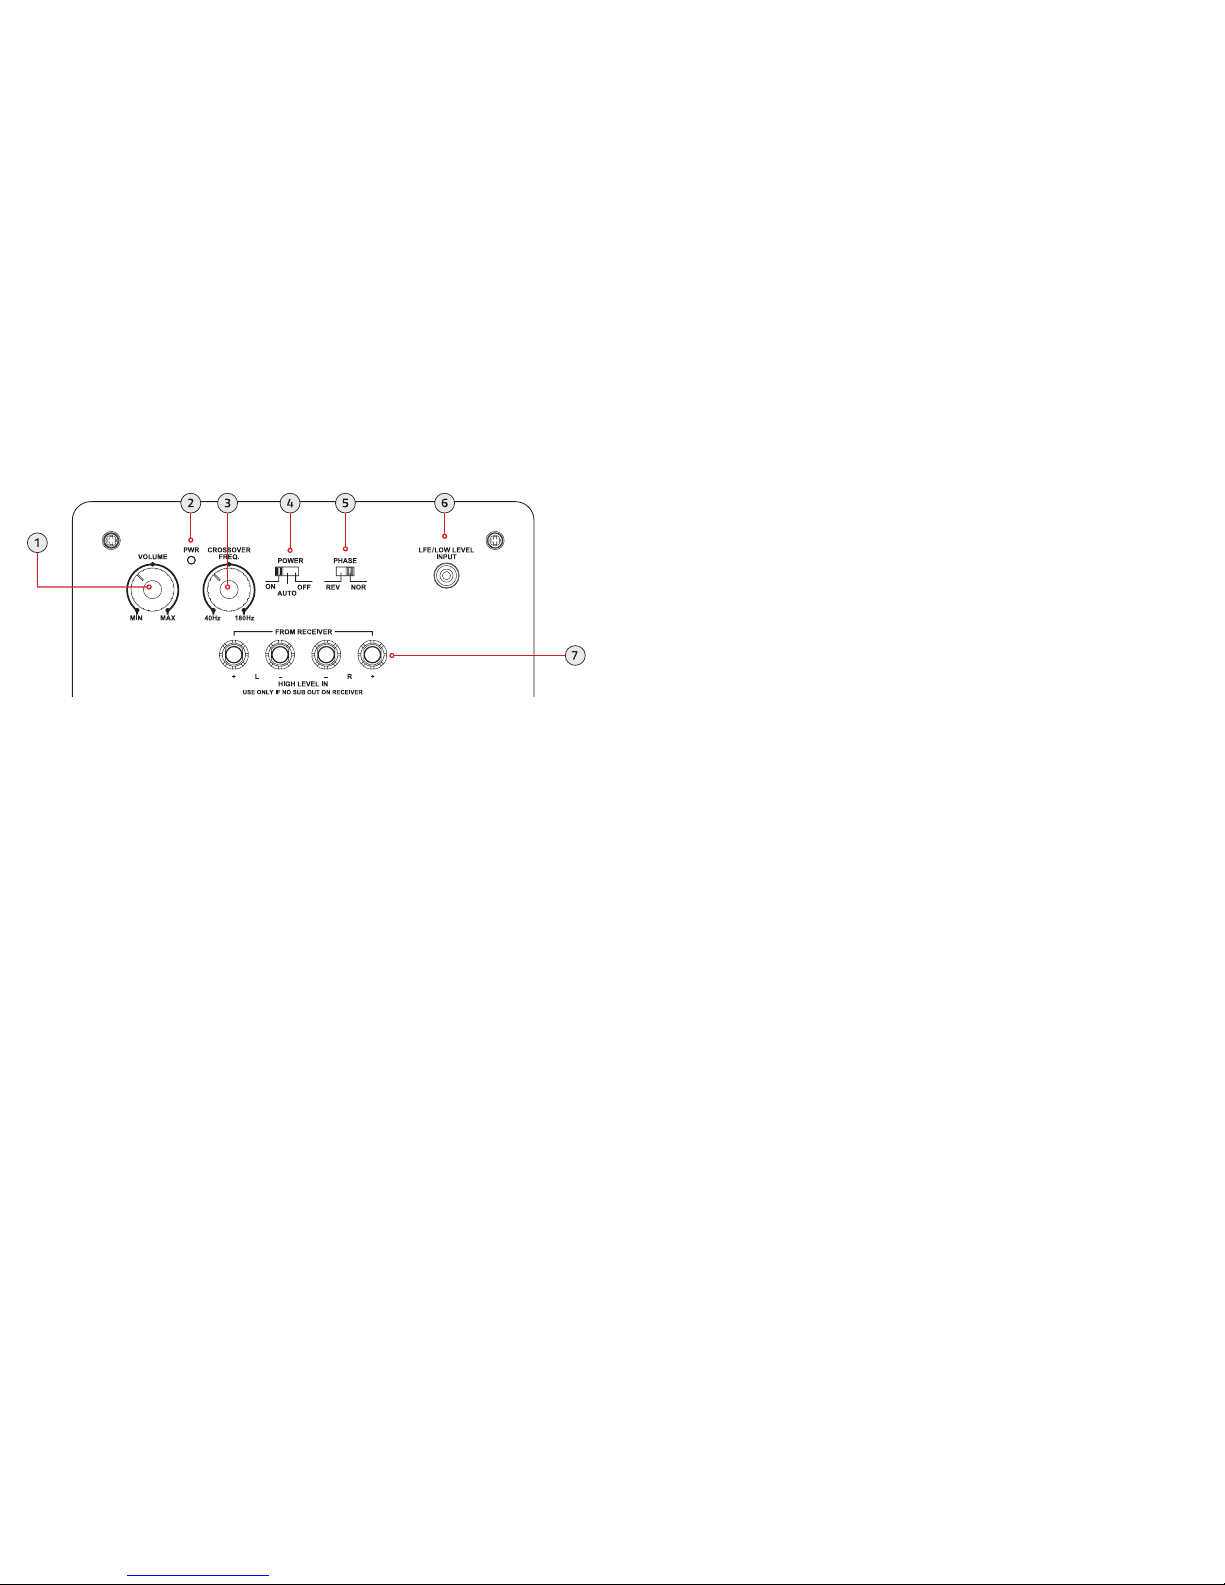
BACK PANEL LAYOUT
1. Volume - Adjust to reduce/increase the intensity of the sound emitted from the DB10.
2. PWR – Power LED indicator.
3. Crossover – Adjust to reduce/increase the frequency range of the DB10. The frequency range is less
than 40Hz to 180Hz.
4. Power – ON / AUTO ON / OFF (AUTO ON: The subwoofer will power on automatically when it
detects a signal from the home theater receiver.)
5. Phase – REVERSE / NORMAL (Adjust to ensure the DB10 is in phase with the rest of your speaker
system. The DB10 will be in phase if the bass response sounds full and balanced.)
6. LFE/Low Level Input – Connect subwoofer cable to receive signal from home theater receiver.
7. Speaker Inputs – Connect speaker wire to receive signal from home theater receiver.
 Loading...