

Page 1
QUICK START GUIDE
AB40
fluance.com
Page 2

WARRANTY INFORMATION
Fluance Warranty
Fluance gives the following warranty to the original customer of each new Fluance product purchased
from a dealer authorized by Fluance. Fluance warrants that each new product, under normal use, is free
from defects, subject to the terms and conditions set forth. If a defect should occur within the warranty
period, repairs will be made free of charge for parts and labor when such defects are determined by us
to be attributable to faulty materials or workmanship at time of manufacture.
Warranty Period
The Fluance products listed below are warranted for parts and labor for the stated period from the
date of original purchase and are subject to the terms and conditions of the warranty.
Home Audio Passive Speakers: Lifetime Warranty
Active/Powered Speakers: 2 Year Warranty
HiFi Turntables: 2 Year Warranty
Warranty Exclusions
• Products purchased from a dealer not authorized by Fluance.
• Products with the serial number defaced, altered or missing.
• Defects resulting from disaster, accident, abuse, misuse, lightning, power surges, neglect, unauthorized
modification or water damage.
• Defects or damage as a result of repairs performed by a person or party not authorized by Fluance.
• Defects or damage occurring during shipping (claims should be made with the shipping company).
To Obtain Warranty Service
Should your Fluance product require warranty service, please contact your Fluance Authorized Dealer
and send your product fully insured and freight prepaid to the nearest Fluance authorized service
center. Before sending to Fluance, you will be required to get a Return Authorization Number from
your dealer.
Products shipped without a valid Return Authorization Number will be refused. To avoid possible
shipping damage, make sure the product is properly packaged and well protected. Include a copy of
your original bill of sale as proof of warranty along with your name, home and/or work telephone
number(s), a complete return address and a detailed description of the faults.
Products repaired within warranty will be returned freight prepaid. This warranty in itself is not
considered a valid proof of purchase. When applying for warranty repairs, you must present the original
copy of your bill of sale as proof of warranty.
Fluance has successfully revolutionized the home audio
industry. Fluance develops a broad line of high-fidelity
products based on five key aspects: Sound Quality, Solid
Construction, Performance, Style, and Value. These
distinctive points make Fluance the most reliable and
respected name among our fans and ensure your music
is heard the way your favorite artist intended.
Today, Fluance expands on this vision and takes its
approach to a new level. With our dedicated team,
Fluance assures its products meet the most stringent
marks of quality control - overseeing each step from
design to manufacturing - and has raised the industry
bar in customer experience and quality to be
second-to-none.
Page 3

SAFETY INFORMATION
FCC Statement
This equipment has been tested and found to comply with the limits for a Class B digital device,
pursuant to Part 15 of the FCC Rules. These limits are designed to provide reasonable
protection against harmful interference in a residential installation. This equipment generates
uses and can radiate radio frequency energy and, if not installed and used in accordance with
the instructions, may cause harmful interference to radio communications. However, there is
no guarantee that interference will not occur in a particular installation. If this equipment does
cause harmful interference to radio or television reception, which can be determined by turning
the equipment off and on, the user is encouraged to try to correct the interference by one or
more of the following measures:
• Reorient or relocate the receiving antenna.
• Increase the separation between the equipment and receiver.
• Connect the equipment into an outlet on a circuit different from that to which the receiver is connected.
• Consult the dealer or an experienced radio/TV technician for help.
This device complies with part 15 of the FCC Rules. Operation is subject to the following two
conditions:(1) This device may not cause harmful interference, and (2) this device must accept
any interference received, including interference that may cause undesired operation.
Changes or modifications not expressly approved by the party responsible for compliance
could void the user's authority to operate the equipment.
This equipment complies with FCC radiation exposure limits set forth for an uncontrolled
environment. This equipment should be installed and operated with minimum distance 20cm
between the radiator & your body.
IC Warning
This device complies with Industry Canada licence-exempt RSS standard(s).
Operation is subject to the following two conditions:
(1) This device may not cause interference, and (2) This device must accept any interference, including
interference that may cause undesired operation of the device.
Changes or modifications not expressly approved by the party responsible for compliance could void
the user's authority to operate the equipment.
This equipment complies with IC radiation exposure limits set forth for an uncontrolled
environment. This equipment should be installed and operated with minimum distance 20cm between
the radiator & your body. This transmitter must not be co-located or operating in conjunction with any
other antenna or transmitter.
FREQUENTLY ASKED QUESTIONS
What does the "3D" toggle do?
The 3D toggle will enable or disable the 3D Virtual Surround Sound mode. The Virtual Surround Sound
mode uses a 3D algorithm to create a wider, more room filling soundstage. This technical Grammy
award winning software combined with angled drivers on each side of the cabinet result in a superb
immersive experience.
How do I adjust the Volume / Change the EQ settings?
Use the +/- buttons on the remote or touch panel located on the cabinet to increase or decrease the
volume accordingly. The range of volume is 0 to 40. To adjust the EQ settings either select STANDARD
or BASS BOOST on the remote control to select your desired EQ setting. STANDARD EQ is the
soundbase’s default EQ. It has been designed for an ideal audio experience across all applications. BASS
BOOST EQ increases the volume of the low end frequencies, resulting in a more impactful experience.
What is "Auto-Pairing" and how does it work?
Auto-Pairing is a convenient connection feature implemented into all Fluance Bluetooth Speakers. If the
connected Bluetooth enabled device leaves the connection range of the AB40 and returns at a later
time, the device will automatically connect. If the device’s Bluetooth function is disabled and then
enabled at a later time, the device will automatically connect as well.
Note: The Fluance Soundbase will only Auto-Pair to the last device that it was connected to.
How do I change the input of the Fluance Soundbase?
Press the SOURCE button on either the remote or touch panel of the cabinet to cycle between AUX
and Optical inputs. Press the Bluetooth button on the remote or continue pressing the SOURCE button
on the touch panel to switch to Bluetooth mode.
What do the LEDs color/behavior mean?
GREEN = 3.5mm AUX input, WHITE = Optical input, BLUE = Bluetooth input
If the LED flashes once it means that the soundbase has received the command from the remote or
touch panel.
Another device is connected to the AB40 and I wish to connect my device.
You can reset any Bluetooth connection by pressing and holding the “Bluetooth” button on the remote.
The AB40 will be available to connect to any new device for the next 30 seconds. If no device is found,
the AB40 will auto-pair back to the previously connected device. Please note only one device can be
paired at a time.
What is the range of the Bluetooth Connection?
The AB40 operates with Power Class 2 Bluetooth devices, which have a range of approximately 33’ feet
(line of sight).
What is the break-in period for Fluance speakers?
The break in period for our speakers is about 10 hours of playing time at normal listening volumes. After
this period the drivers will have had enough movement to perform at their
peak level.
Page 4
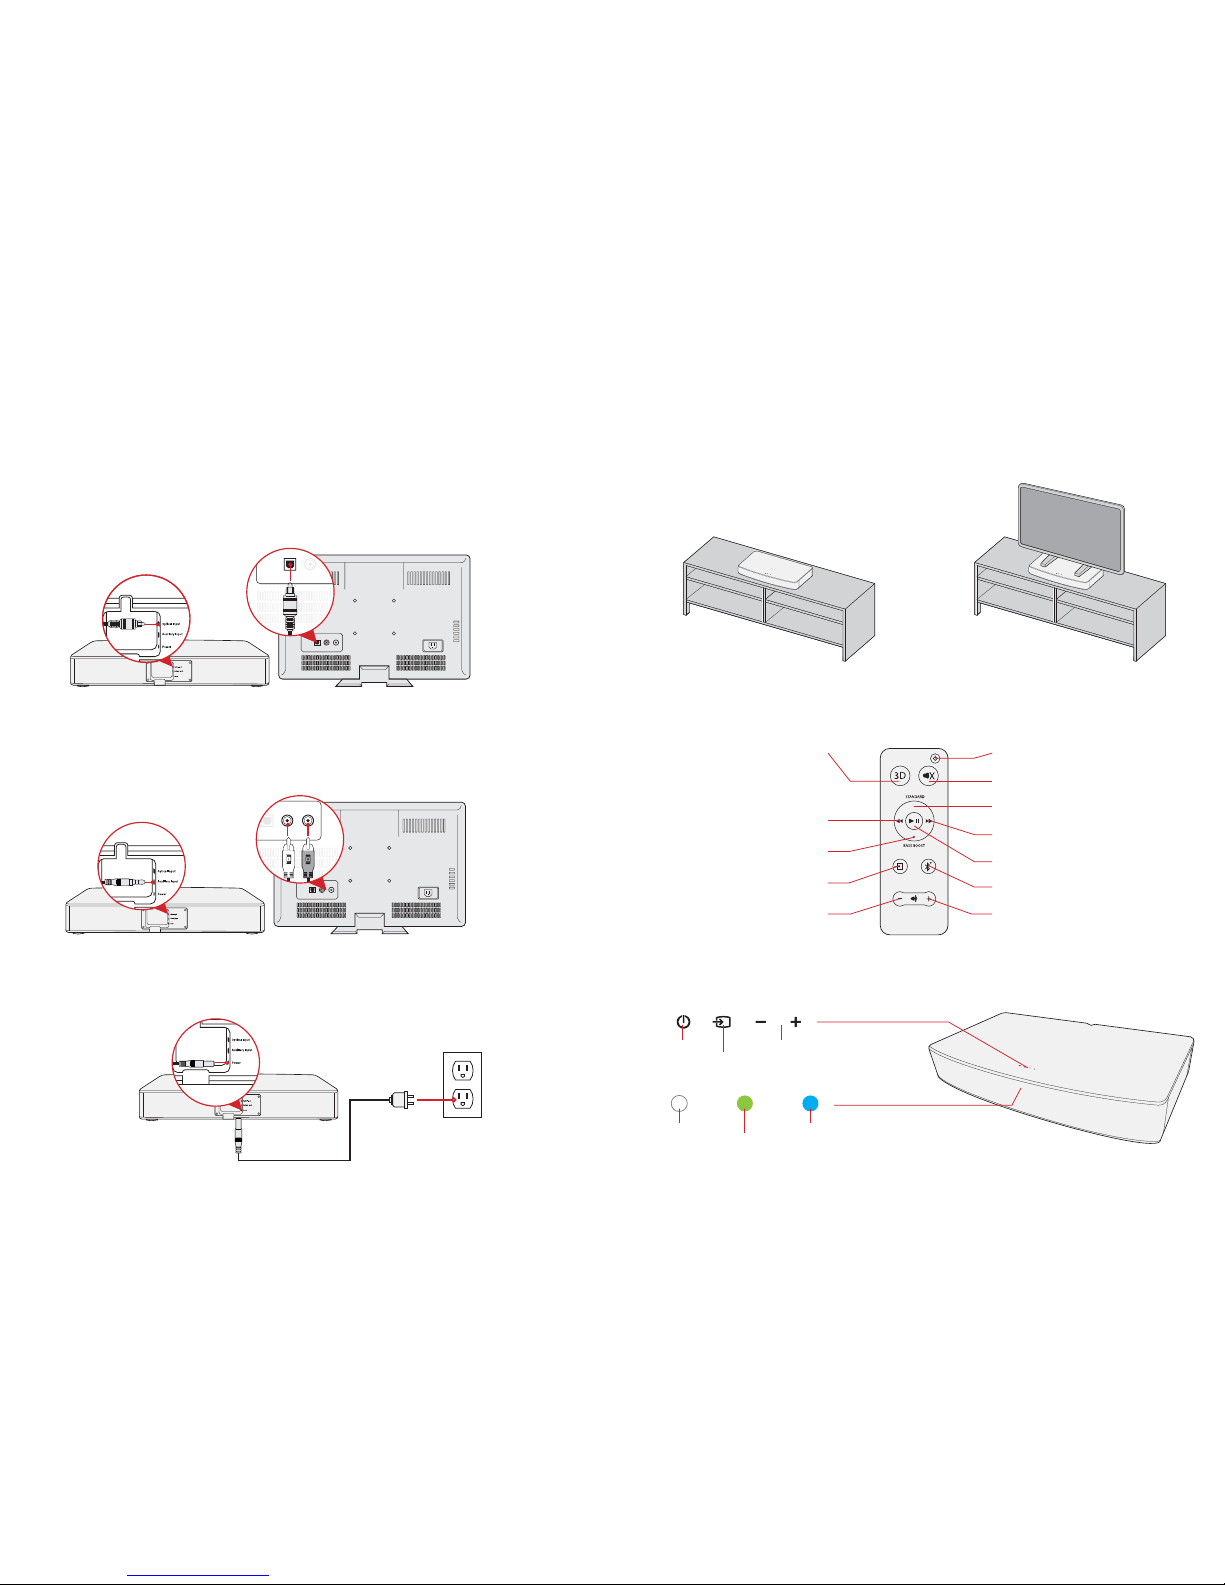
CONNECTING YOUR SOUNDBASE SYSTEM
PLEASE NOTE: Connect all wires to the Soundbase before placing into final position. Check the audio
output settings in your TV’s settings and ensure audio output is enabled correctly.
Place the Soundbase on your media table where you had your TV.
Place your TV on top of your Soundbase.
PLACING YOUR SOUNDBASE SYSTEM
Connecting to Power
Plug one end of the Power Cable into the Power Input of the Soundbase. Plug the other end into a
power outlet.
Option 2: Auxillary Cable (Optional)
Plug one end of the Auxillary Cable into the Soundbase. Plug the L and R connectors into the TV’s
auxillary output.
NOTE: This setup is optional as it is not required to set up the product. Auxillary cable is NOT included.
Option 1: Optical Cable (Preferred Method)
Plug one end of the Optical Cable into the Soundbase, and the other end into the TV’s optical output.
USING THE REMOTE
Virtual Surround Sound ON/OFF
For a more life like viewing-experience ideal
for movies and TV shows. LED will flash 2x
when enabled and 1x when disabled.
Previous Track
Bass Boost
Source Selection
Volume Down
Power ON/OFF
Mute
Standard Equalizer Preset
Skip Track
Play/Pause
Bluetooth
®
Feature
Volume Up
BUTTONS & LED INDICATOR
Power
On/Off
Source
Selection
Volume
Up/Down
White LED:
Optical
Green LED:
AUX
Blue LED:
Bluetooth
®
 Loading...