

Page 1
Copyright © WESSOL LLC
/ 1 12
4-GALLON ELECTRIC SPRAYER WITH
BACKPACK & ROLLER
OPERATION GUIDE
FLZ36R
Page 2
Copyright © WESSOL LLC
/ 2 12
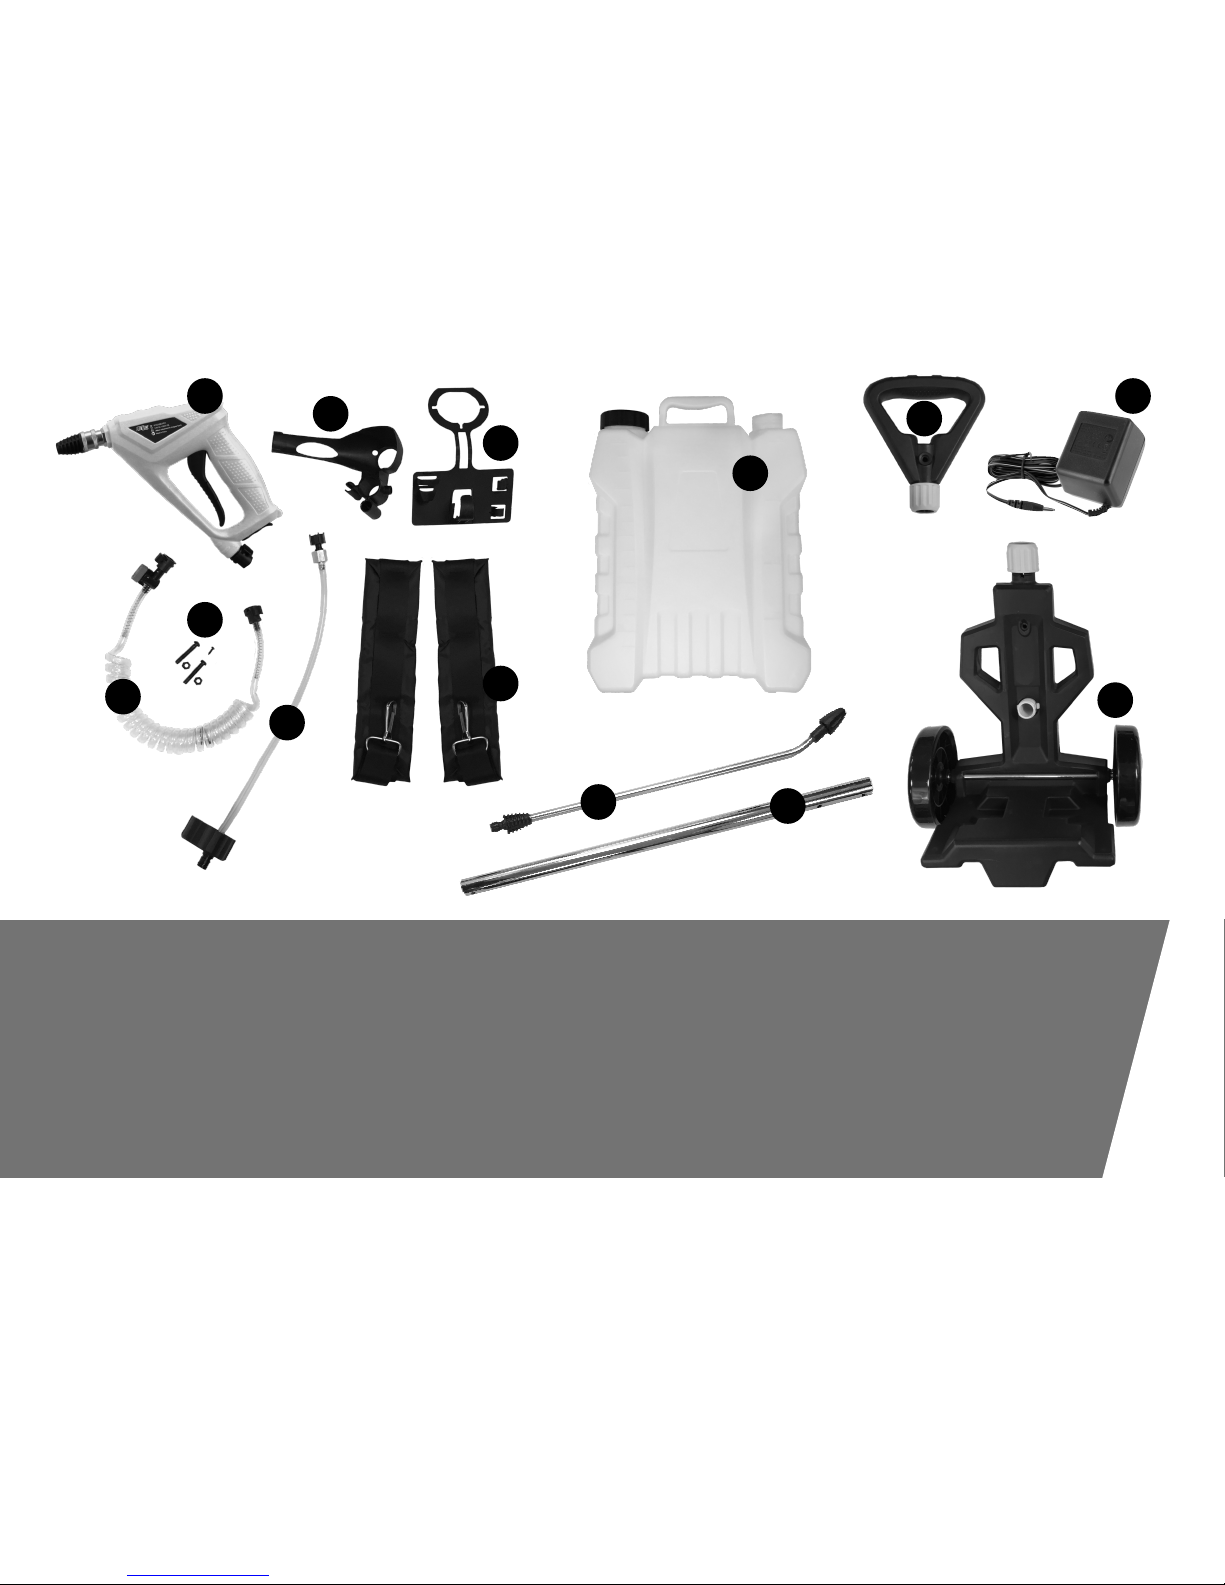
1.
SPRAY GUN
2.
HOLSTER (ROLLER)
3.
HOLSTER (BACKPACK)
4.
TANK (4 GAL)
5.
ROLLER HANDLE
6.
BATTERY CHARGER
7.
COILED HOSE
8.
SCREW, BOLTS & NUTS
9.
TAN K CAP / H OSE
10.
BACKPACK STRAPS
11.
EXTENSION WAND
12.
ROLLER HANDLE BAR
13.
ROLLER BASE
PARTS LIST
1
11
7
4
13
5
12
10
3
2
9
8
6
Page 3
PRODUCT SPECIFICATIONS
Copyright © WESSOL LLC
/ 3 12
IMPORTANT SAFETY SYMBOLS
Warning notice!
Read the Owner’s Manual!
Do not expose the sprayer to rain or submersion
Only use the battery charger indoors!
Battery charger contains a safety transformer
PLEASE TAKE CAUTION!
•
READ MANUAL BEFORE USE
•
To reduce the risk of injury, the user must read and understand the
operator’s manual before using this product. Battery must be fully
charged before first use.
•
RETAIN THIS MANUAL FOR FUTURE REFERENCE.
Model&number
FLZ36R
Pump&type
gear+pump
Ba2ery&type
Lithium-ion
Con4nuous&working&4me
~45+min
Ba2ery&voltage
3.6V
Working&pressure
45+psi
Ba2ery&capacity
2600mAH
Spray&distance
>15+feet
Ba2ery&charging&4me
2+hours
Tank&capacity
4+gallons
Ba2ery&cycle&life
1000+cycles
Liquid&flow
650ml/min
Ba2ery&charger
5V+/+1A
Pump&life
200+hours
QUALITY STATEMENT
This product has been engineered and
manufactured to our high standard for
dependability, ease of operation, and operator
safety. Properly cared for, it will give you years of
rugged, trouble-free spraying performance.
Thank you for your purchase
of a FlowZone sprayer!
If you need assistance with the assembly
or operation of your sprayer, please
don’t hesitate to contact WESSOL via:
WESSOL.com/flowzone
+1 803 339 2500
Page 4

CHARGING THE BATTERY
Fully charge the battery before first use! The charging time is about 2
hours. The battery charger supplied is compatible with the lithium-ion
battery installed in the sprayer. DO NOT USE any other charger to
recharge the sprayer. When the battery is dead, the sprayer will
automatically switch off via a protective circuit to prevent the lithium-ion
battery from deep discharging.
WARNING: If the trigger is used continually on an empty battery, the
lithium-ion battery can be damaged. Do not continue to use the sprayer
before recharging the battery.
CHARGING PROCEDURE
1.
Insert the charger cable into charging inlet on bottom of sprayer gun.
2.
Make sure the wall outlet in your home is normal household voltage
(~120V). Insert the battery charger plug into the main power supply.
3.
The red LED charging indicator will light up to tell you that the battery
pack is charging. The battery is fully charged when the red LED
charging indicator turns off.
•
During the charging process, the spray gun assembly will warm up, this
is normal. When not using the spray gun for extended periods,
disconnect the battery charger from the socket.
•
When the sprayer is charging DO NOT USE the product.
•
Only charge the battery between 50ºF -110ºF (10ºC - 45ºC).
•
After prolonged use, allow battery to cool down first before recharging.
NOTE: Numbers in brackets ( ) reference the parts list on page 2.
SAFETY PRECAUTIONS
WARNING: Failure to read and follow all safety warnings and all
instructions may result in electric shock, fire and serious injury. Save all
warnings and instructions for future reference. The term "power tool" in
the warnings refers to your FlowZone Electric Sprayer.
WORK AREA SAFETY
a)
Keep work area clean and well lit. Cluttered or dark areas invite
accidents.
b)
Do not operate power tools in the presence of flammable liquids,
gases or dust. Power tools create sparks which may ignite the dust or
fumes.
c)
Keep children and bystanders away while operating a power tool.
Distractions can cause you to lose control.
ELECTRICAL SAFETY
a)
Power tool plugs must match the outlet. Never modify the plug in any
way. Do not use any adapter plugs with earthed or grounded power
tools.
b)
Avoid body contact with earthed or grounded surfaces, such as pipes,
radiators, ranges and refrigerators. There is an increased risk of
electric shock if your body is earthed or grounded.
c)
Do not expose power tools to rain or wet conditions. Water entering a
power tool will increase the risk of electric shock.
d)
Do not abuse the cord. Never use the cord for carrying, pulling, or
unplugging the power tool. Keep cord away from heat, oil, sharp
edges, or moving parts. Damaged or entangled cords increase the risk
of electric shock.
Copyright © WESSOL LLC
/ 4 12
Page 5

ELECTRICAL SAFETY
e)
When operating a power tool outdoors, use an extension cord
suitable for outdoor use. Use of a cord suitable for outdoor use
reduces the risk of electric shock.
f)
If operating a power tool in a damp location is unavoidable, use a
residual current device (RCD) protected supply. Use of an RCD
reduces the risk of electric shock.
PERSONAL SAFETY
a)
Stay alert, watch what you are doing and use common sense when
operating a power tool. Do not use a power tool while you are tired or
under the influence of drugs, alcohol, or medication. A moment of
inattention while operating power tools may result in serious
personal injury.
b)
Use personal protective equipment. Always wear eye protection.
Protective equipment such as a dust mask, non-skid safety shoes,
hard hat, or hearing protection will reduce the risk of injury.
c)
Prevent unintentional starting. Ensure the switch is in the off-position
before connecting to the power source and/or battery pack. Ensure
the switch is in the off position before picking up or carrying the tool.
Carrying power tools with your finger on the switch or is hazardous.
d)
Remove any adjusting key or wrench before turning the power tool
on. A wrench or a key left attached to a rotating part of the power tool
may result in personal injury.
e)
Do not overreach. Keep proper footing and balance at all times. This
enables better control of the power tool in unexpected situations.
f)
Dress properly. Do not wear loose clothing or jewelry. Keep your hair,
clothing and gloves away from moving parts. Loose clothes, jewelry or
long hair can be caught in moving parts.
BATTERY TOOL USE & CARE
a)
Recharge only with the charger specified by the manufacturer. A
charger that is suitable for one type of battery pack may create a risk
of fire when used with another battery pack.
b)
Use power tools only with specifically designated battery packs. Use
of any other battery packs may create a risk of injury and fire.
c)
When battery pack is not in use, keep it away from other metal
objects, like paper clips, coins, keys, nails, screws, or other small metal
objects, that can make a connection from one terminal to another.
Shorting the battery terminals together may cause a fire.
d)
Under abusive conditions, liquid may be ejected from the battery;
avoid contact with this fluid. Liquid ejected from the battery may
cause irritation or burns. If contact occurs, flush contact site with cool
water. If liquid contacts eyes, seek urgent medical help.
SERVICE
Have your power tool serviced by a qualified repair person using only
identical replacement parts. This will ensure that the safety of the power
tool is maintained.
Copyright © WESSOL LLC
/ 5 12
FOR MORE INFORMATION
For more helpful information regarding the assembly or
operation of your FlowZone Electric Sprayer, please visit:
www.WESSOL.com/flowzone
Page 6
Copyright © WESSOL LLC
/ 6 12
INTRODUCTION & INSTALLATION
HOW TO USE THE WATER TANK!
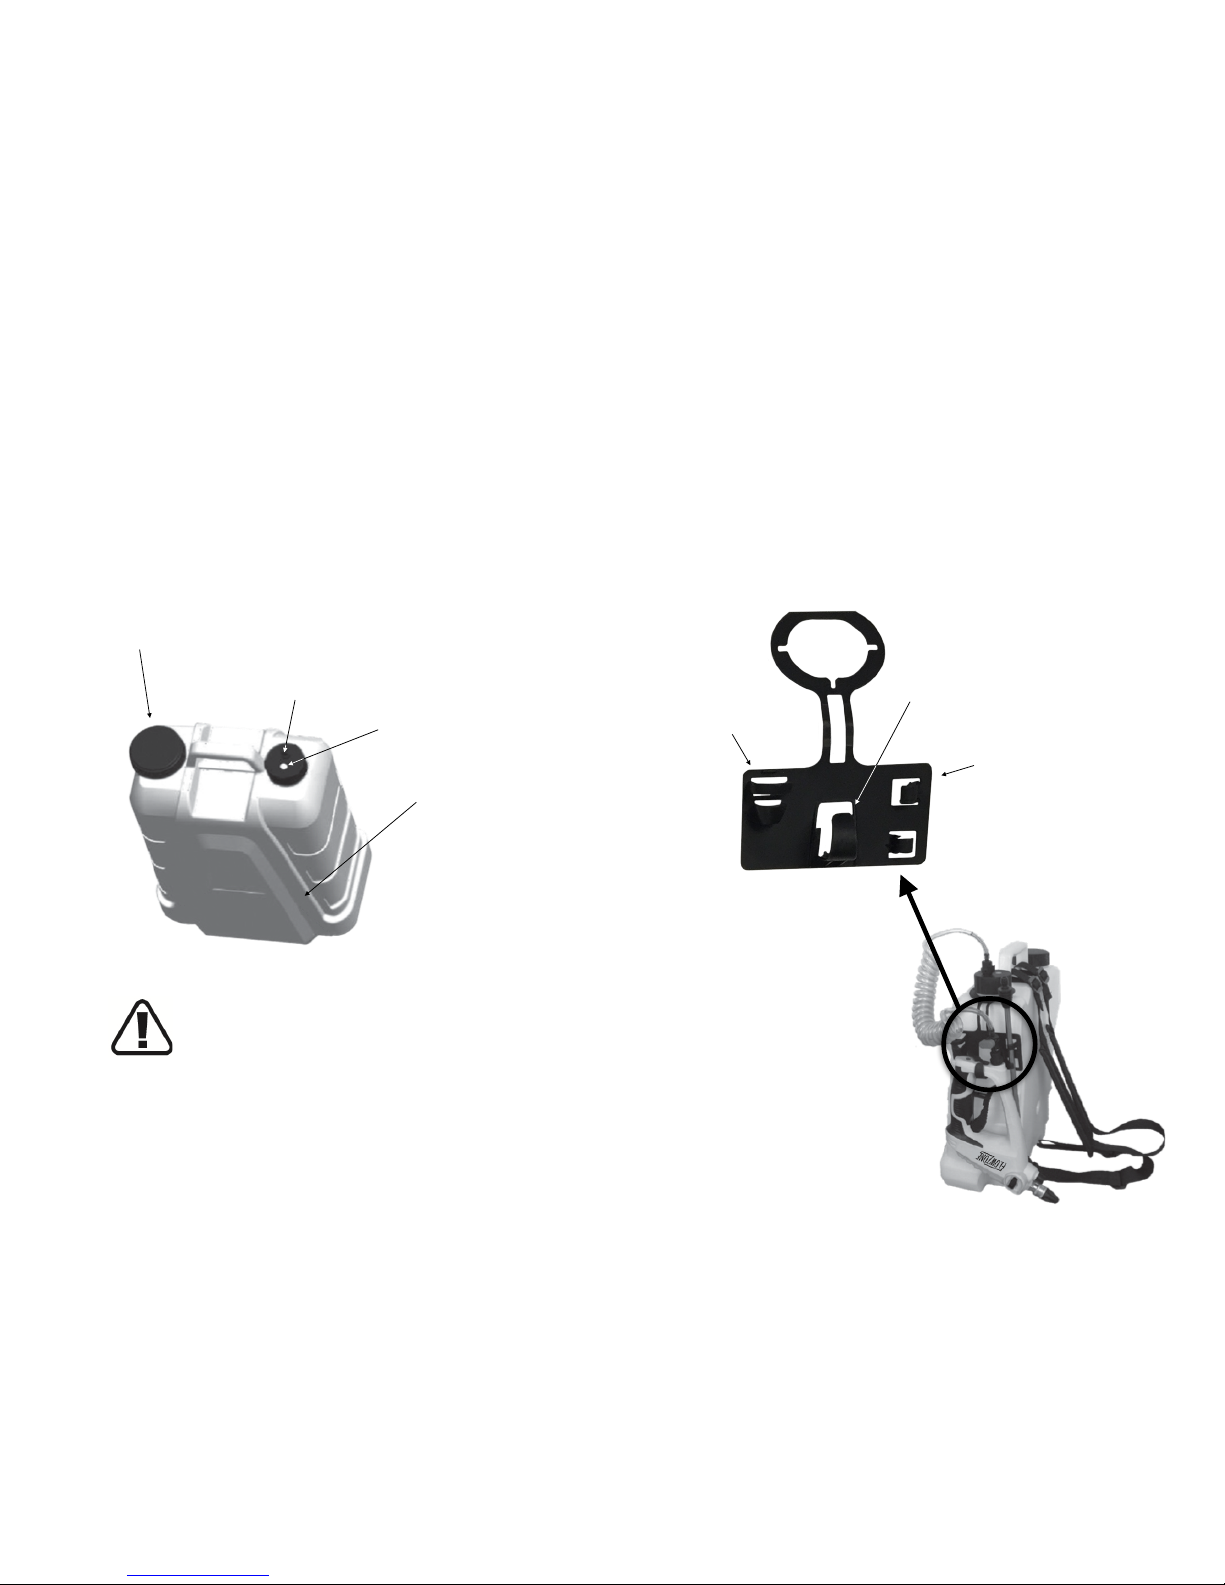
Remove the lid of the inlet hole (shown below). Make sure filter net is
affixed on inlet hole. Pour up to 4 gallons of water, pesticide or liquid
fertilizer and replace the lid.
ATTEN TION : Pesticide or liquid fertilizer must
be dissolved completely before pouring into
the tank in case that any solid material will
block off the spraying. Remove any solids on
the filter after injection.
spray gun handle hook
outlet hole
capacity scale (Gal)
air valve
HOLSTER FOR SPRAY GUN & WAND
Attach the spray gun backpack holster to the
neck of the inlet hole for mobile storage of spray
gun and extension wand.
inlet hole (with filter net inside)
position for nozzle
extension wand
hook
Page 7
Copyright © WESSOL LLC
/ 7 12
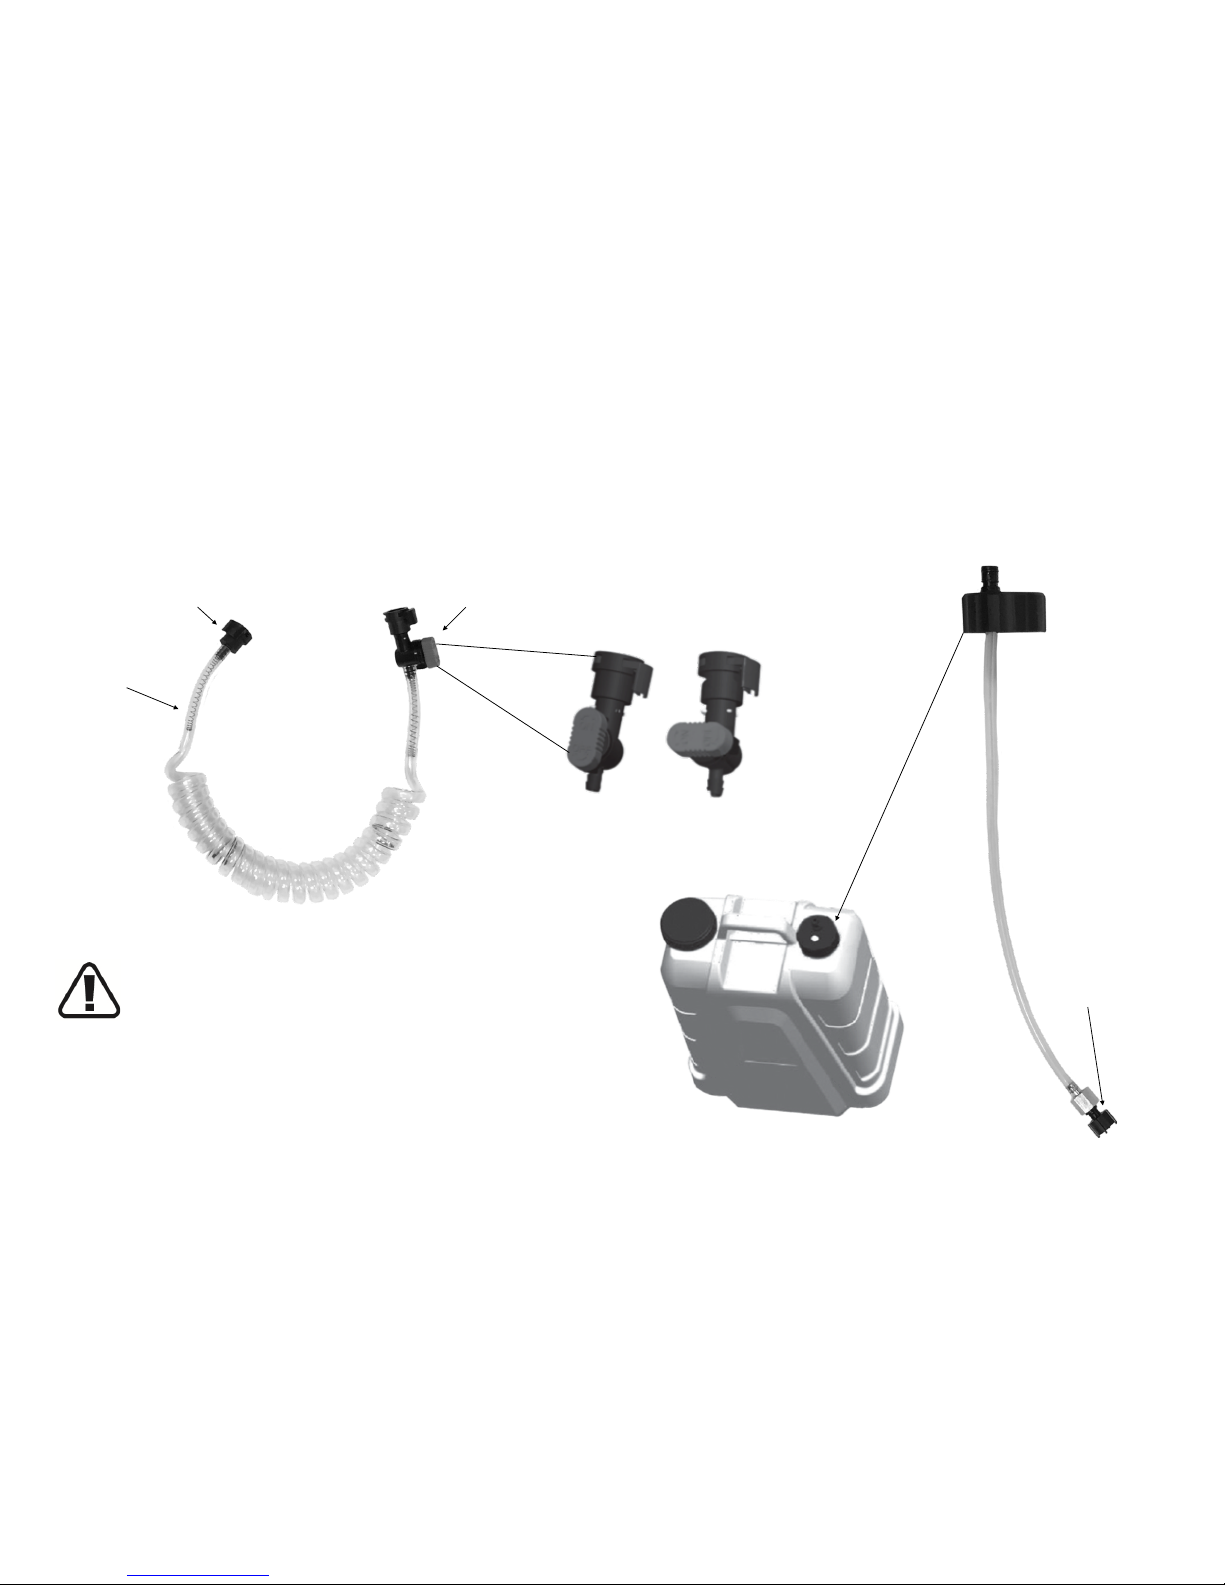
COILED HOSE
Attach the end with the on / off toggle to the spray gun and the end
with spring clip only to the air valve on the tank. cap Press the spring
clip in to connect and pull it out to detach.
ATTEN TION : Before use, you must open the ON/OFF
fluid valve first. Make sure to provide the sprayer fluid
from the tank. When you stop spraying, turn the switch
to the OFF position to avoid fluid back flow.
spring clip
bend-resistant
spring
on / off
toggle
ON
position
OFF
position
TANK CAP / HOSE
Attach tank cap and hose after adding a water,
pesticide or liquid fertilizer to the tank. The hose
contains an extra filter at the end to prevent
solids from reaching the pump.
input filter
Page 8
Copyright © WESSOL LLC
/ 8 12
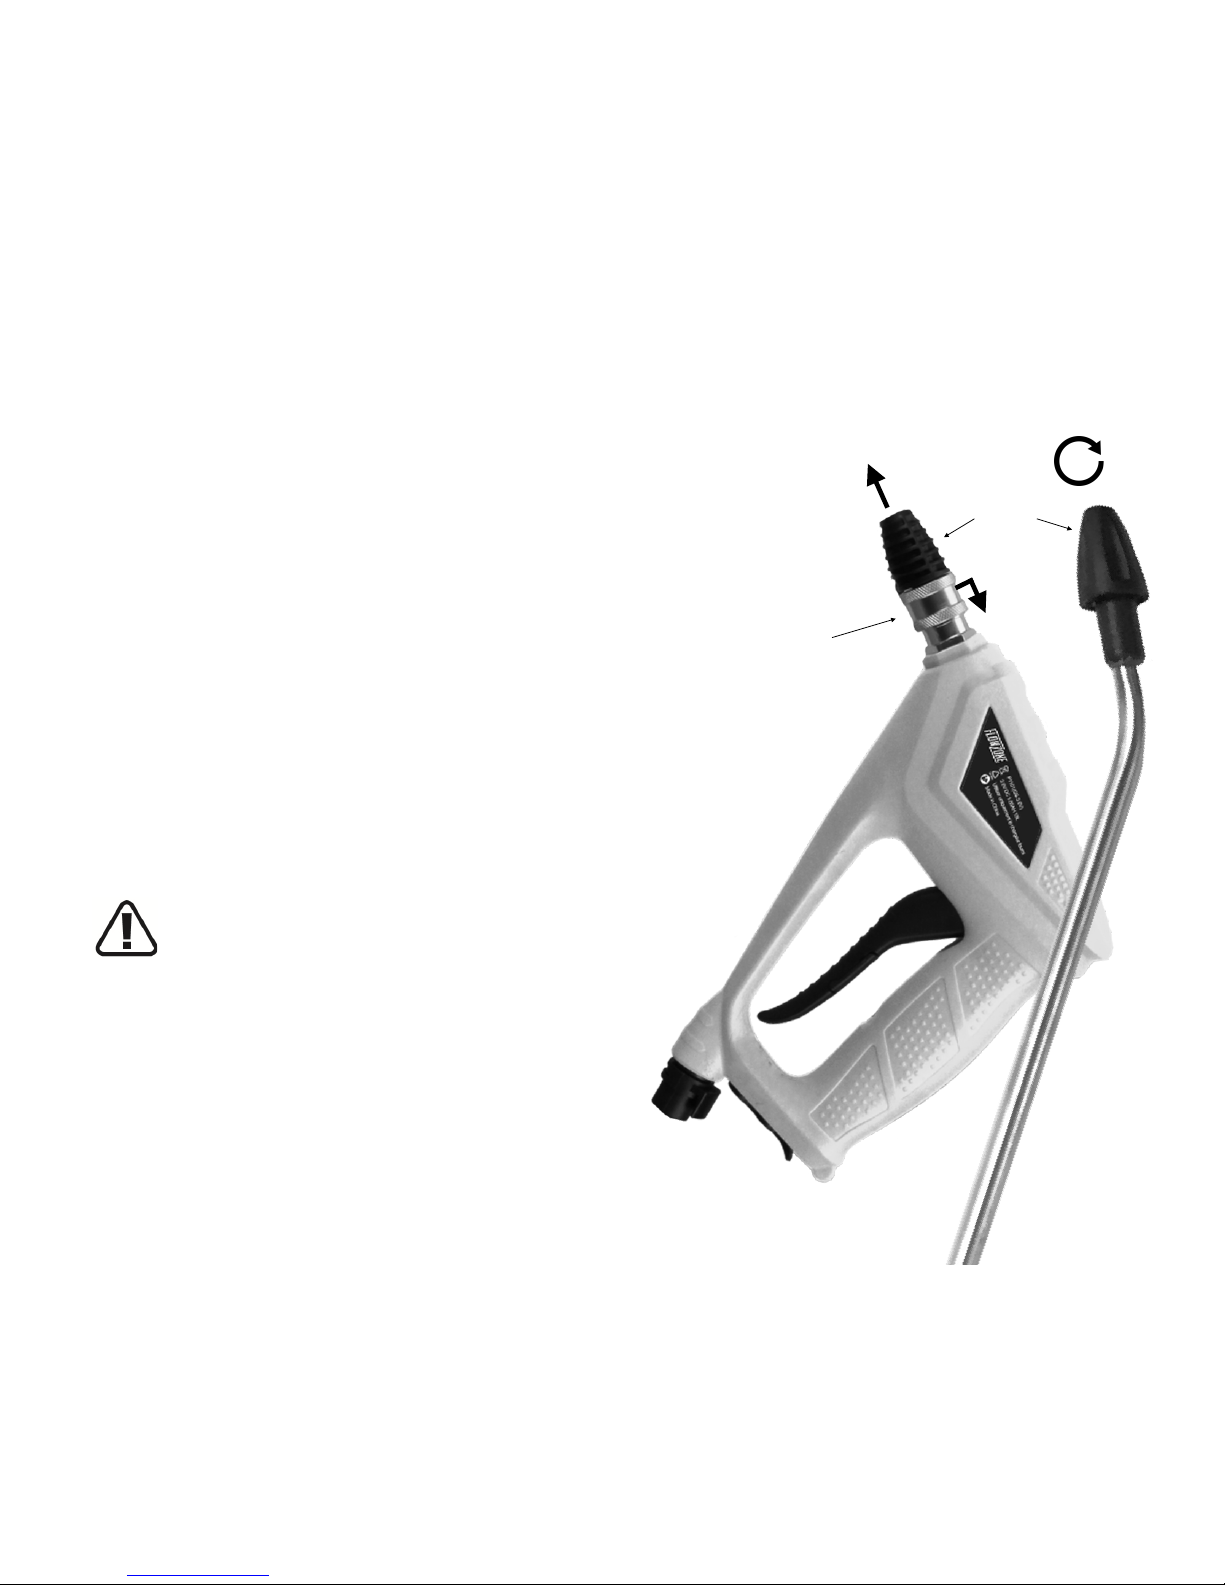
HOW TO USE THE SPRAY GUN
This machine has 2 nozzles that can switch between 3 different
modes: mist, fan or jet for various spraying situations. Twist the
nozzle tip clockwise and counter-clockwise to adjust the spray range.
HOW TO CHANGE THE NOZZLES!
Switch between nozzles by rotating the copper nut to the left, pulling the
copper nut down, and pulling the nozzle outward.
ATTEN TION : Please keep the safety lock in place
when not in use to prevent from switching the
machine unintentionally. The LED light (shown below)
can be used for night time and low light areas.
HOW TO USE THE EXTENSION WAND
The extension wand extends spraying distance by 17.5 inches and has the
same adjustability as the short nozzle. The extension wand can be rotated 360°.
making it easier to reach hard places.
copper nut
nozzle
Page 9
Copyright © WESSOL LLC
/ 9 12
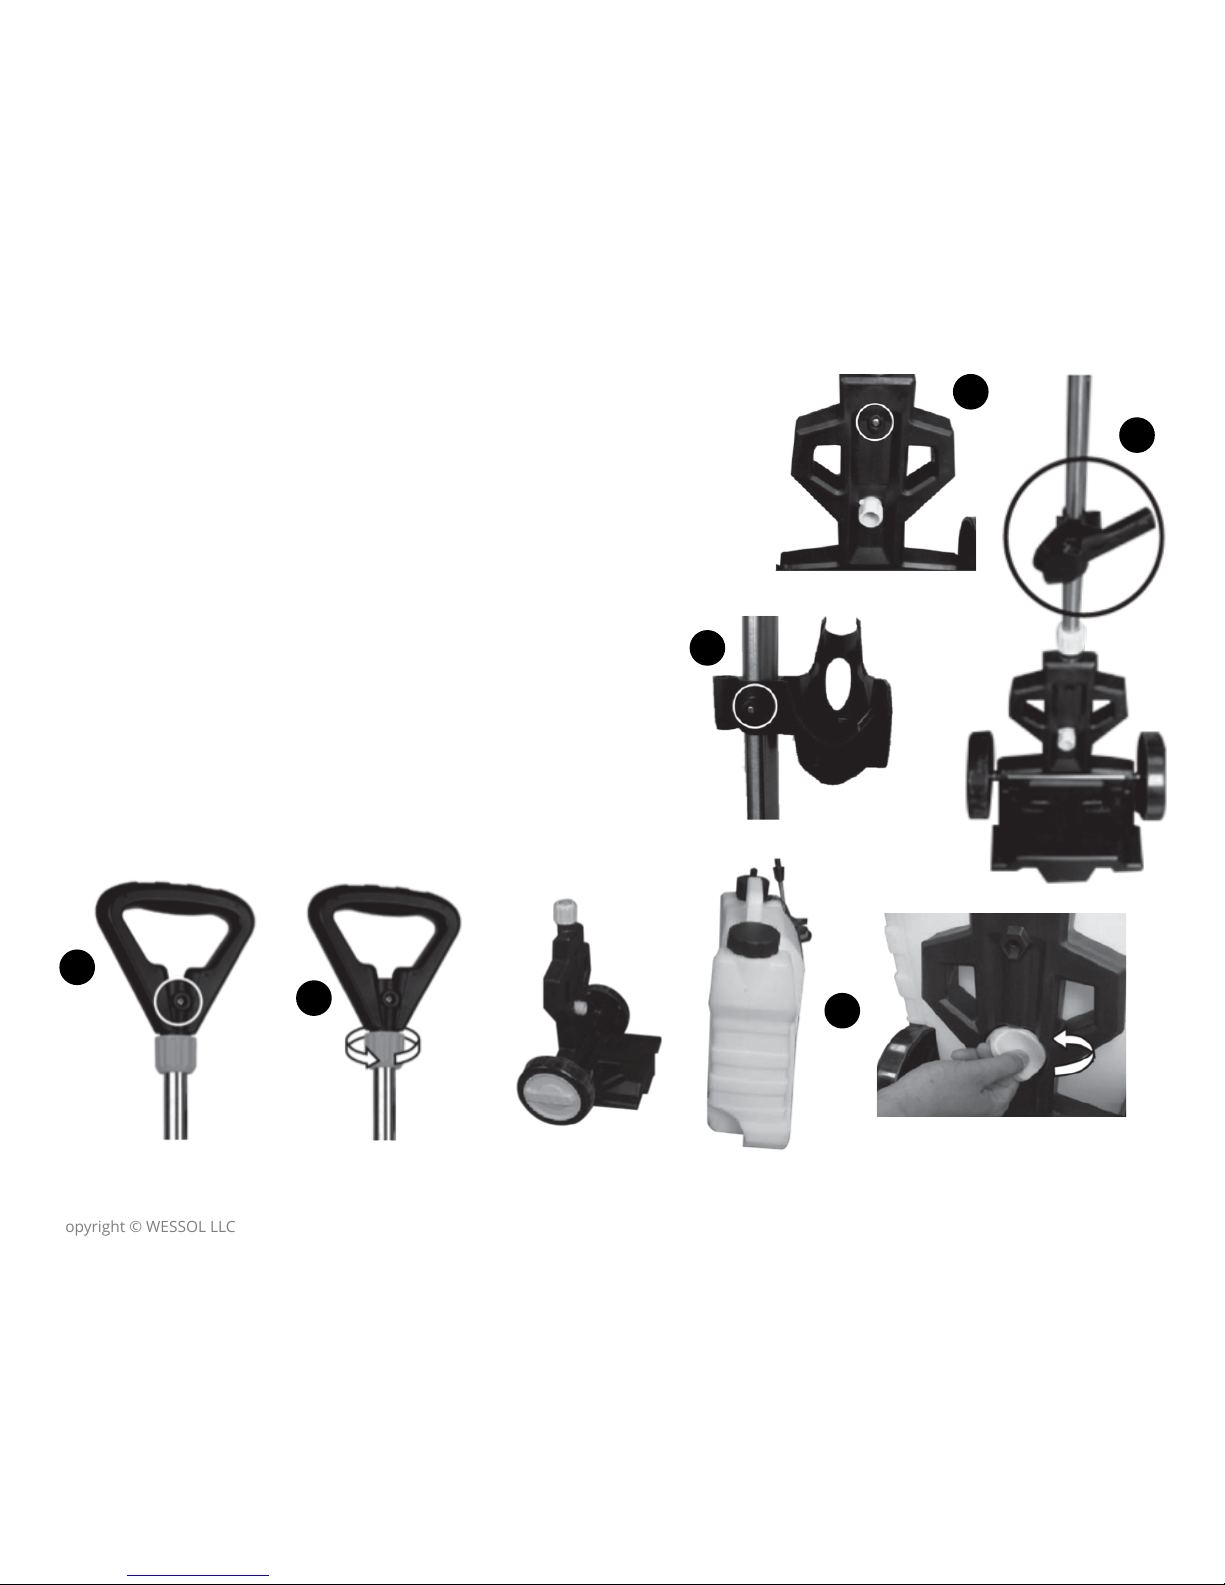
INSTALLATION INSTRUCTIONS FOR ROLLER
1.
Begin by inserting the single hole end of the roller handle bar (12)
into the roller base (13).
2.
Secure handle bar to base with bolt and nut as pictured.
3.
Slide the roller holster (2) onto the middle of the roller handle bar.
4.
Use the provided screw to secure the holster to the bar.
5.
Slide the roller handle (5) onto the roller handle bar.
6.
Secure roller handle to bar with nut and bolt as pictured.
7.
Tighten knob on top and bottom of roller bar after adjusting to
desired roller handle height.
8.
Place tank on roller base and tighten knob on the back of the
roller base to the tank..
2
3
4
6
7
8
Page 10

!
Copyright © WESSOL LLC
/ 10 12
MAINTENANCE
ATTEN TION : keep the safety lock in the place when not in use to prevent from switching on unintentionally. Do not
switch chemicals used in the garden sprayer without proper cleaning. Do not store liquids in the tank. Follow chemical
manufacturer’s directions for storage and disposal. Make sure caps on the tank are tight and secured at all times. Clean
the filter periodically to guarantee good performance.
CLEANING/STORAGE
After use, rinse out spray gun and tank with clean water. Run water through the spray gun for 30 seconds while pressing trigger.
If necessary you may remove both nozzles for cleaning if clogged.
ATTEN TION : when you are finished spraying, detach the coiled hose from the tank and turn on the sprayer to make
sure that there is no liquid in the coiled hose to prevent the liquid from overflowing due to differential pressure. Always
charge the battery 2 hours before storing. During storage, charge the battery at least once every three months to
protect it from damage. Store the garden sprayer in a dry, indoor place out of the reach of children. Do not place any
other objects on top of the garden sprayer. The sprayer must not be stored in temperatures higher than 95°F (35°C) or
in direct sunlight. Do not store the garden sprayer in places with static electricity.
PRODUCT DISPOSAL
Waste electrical products should not be disposed of with household waste. Please recycle where facilities exist. Check with your
Local Authority or retailer for recycling advice.!
This product contains a lithium ion battery. Do not dispose of battery powered spray gun in household waste, water
or fire. Spray gun must be collected, recycled or disposed of in an environmentally friendly way. Please dispose of
properly at a public recycling facility.
Page 11

!
Copyright © WESSOL LLC
/ 11 12
FlowZone Limited Warranty
WESSOL LLC agrees to repair or replace under this warranty any defective product or part from the original date of purchase for
one (1) year except for the conditions and circumstances listed below.!
Proof of purchase (original dated sales receipt) must accompany all warranty claims. THIS WARRANTY IS NOT TRANSFERABLE and
does not cover products sold damaged or incomplete, sold “as is”, sold reconditioned, or used as rental equipment. Expendable
items that become worn during normal use. Delivery, installation, or normal adjustments explained in the operator’s manual.
Cosmetic defects that do not interfere with product functionality.!
Damage or liability caused by shipping, improper handling, improper installation, incorrect voltage or improper wiring, improper
maintenance, improper modification, or the use of accessories and/or attachments not specifically recommended.!
Freight costs from customer to vendor. Repair and transportation costs of products or parts determined not to be defective.
Repairs necessary because of operator abuse or negligence, or the failure to install, operate, maintain or store the product
according to the instructions in the operator’s manual.!
ANY INCIDENTAL, INDIRECT, OR CONSEQUENTIAL LOSS, DAMAGE, OR EXPENSE THAT MAY RESULT FROM ANY DEFECT, FAILURE,
OR MALFUNCTION OF THE PRODUCT.
Some states do not allow the exclusion or limitation on how long an implied warranty lasts, so the above limitations may not
apply to you. Damage caused by cold, heat, rain, excessive humidity, corrosive environments and materials, or other
contaminants.
ANY NON-RESIDENTIAL USE OR COMMERCIAL USE VOIDS ALL WARRANTIES.
Page 12

Copyright © WESSOL LLC
/ 12 12
wessol.com/flowzone
[email protected]
+1 803-339-2500
© WESSOL LLC
1750 Highway 160 West, Suite #101 Box 114
Fort Mill, South Carolina 29708
 Loading...