

Page 1
Water meter SVTU-11B
Operating manual
SMP.407251.010 РЭ
(Part 1)
September 2010
Page 2

Page 3

3
Documentation:
1. Operating manual SMP407251.010 OM part 1.
2. Operating manual SMP.407251.010 OM part 2. Verification methodology.
Table of contents
1 Preface ....................................................................................................................... 6
2 Assignment................................................................................................................. 6
3 Technical specifications ............................................................................................. 6
4 Package contents ...................................................................................................... 12
5 Meter’s structure and functioning ............................................................................. 15
6 Marking and sealing ................................................................................................. 18
7 Packing and marking ................................................................................................ 18
8 Safety precautions .................................................................................................... 19
9 Installation ................................................................................................................ 20
9.1 Unpacking and degreasing............................................................................. 20
9.2 Installation requirements ............................................................................... 20
9.3 Requirements to FS installation and arrangement .......................................... 21
9.4 Installation of meter componentry ................................................................. 22
10 Setting-up Procedures ............................................................................................... 32
11 The operating procedure ........................................................................................... 35
12 Servicing .................................................................................................................. 38
13 Typical faultinesses and methods of their elimination .............................................. 42
14 Storing ...................................................................................................................... 45
15 Transportation .......................................................................................................... 45
16 Guarantee of manufacturer ....................................................................................... 45
Appendix А Meter designation...................................................................................... 47
Appendix B Schematic circuits for meter installations .................................................. 48
Appendix C Overall and connecting dimensions of calculator ...................................... 49
Appendix D Menu of control of the meter .................................................................... 50
Appendix E Examples of reports, creating by “Sempal DM” software .......................... 58
Appendix F Schematic of device cable ......................................................................... 60
Appendix K The scheme of pressure sensor mounting .................................................. 63
Appendix L Overall and connecting dimensions for FS ............................................... 64
Appendix M How to set hydraulic zero ......................................................................... 67
Page 4

4
Abbreviation list
OM – operating manual.
FS – flow measurement section with ultrasonic flow sensors FlS.
RТD – resistive temperature detector.
RTD–T – platinum resistive temperature detector manufactured by SEMPAL Co.
NSC RТD – nominal static characteristic of RТD.
FlS – flow sensor.
TS – temperature sensor.
PT – pressure transducer.
DN – nominal diameter.
РN – nominal overpressure.
PC – personal computer.
RDU – data reader.
Х – digit on the device display.
Page 5

5
Information for customers
SVTU-11B water meters (hereinafter referred to as meters) are complex measuring devices, which should undergo the starting-up and adjustment works by qualified personnel
during commissioning.
Manufacturer's guarantees (48 months since shipment) extend on the meters which
were put into operation by the specialized enterprises having corresponding credentials from
company-manufacturer. More detailed information is resulted in section 16 ‘Manufacturer’s
Guarantee’.
A recalibration interval is no more than 4 years.
The Quality System of SEMPAL is certificated under ISO 9001:2000.
If you have any questions about purchase, maintenance, operation and service of meters, contact us or our authorized regional representatives.
“SEMPAL Co LТD” contacts:
3 Kulibina Street, Kyiv, 03062 Ukraine
Phone/fax: (+38044) 239-2197, (+38044) 239-2198.
http://www.sempal.com
Page 6

6
1 Preface
This operating manual (hereinafter referred to as OM) contains the following information: the assignment, field of application, performance capability and completeness, a principle of operation and a design, the method of installation and commissioning, the method of
operation and maintenance service of meters.
While meters are in exploitation, it is necessary to be strictly guided by present OM.
Constantly working at functional enhancement, improvement of performance capability
and increase of meter reliability, manufacturing company SEMPAL Co LTD reserves the
right to itself to change the meter design without claiming it in present OM.
2 Assignment
2.1 Water meters SVTU-11B are intended for measurement of the water volume and
mass.
Meters also measure the volume, mass, temperature and overpressure of the water or
fluids with solid particles of no more than 200 µm and residue mass of no more than
500 mg/l (hereinafter referred to as a water).
2.2 Meters are applied for metering (including fiscal metering) of water volume accord-
ing to acting rules for the control of supply and consumption of water on industrial objects
and objects of municipal services. Functional features of meters’ configurations are given in
3.5.
3 Technical specifications
3.1 Water meters can have next configurations:
− 1 – 1-channel water meter;
− 3 – 2-channel water meter (two independent water meters);
3.2 Meters depending on their permissible error limits while measuring volume and
mass of the water are released in the following modifications: М1 and М2.
3.3 Meters of all modifications in accordance with environmental conditions meet class
С of EN 1434 1. The meters can work under the following conditions:
− atmospheric pressure can vary from 84.0 up to 106.7 kPa;
− relative air humidity is up to 95 %.
3.4 Meters meet the requirements of EN 1434.
3.5 The meter consists of the following functional units:
− flow measurement sections with ultrasonic flow sensors (FS);
− resistive temperature detectors (RТD);
− SVTU-11B calculator.
Highest possible number of measurement channels depending on meter’s configuration
is given in the table 3.1
Table 3.1
Channel
Number of channels
Ultrasonic
flow measurement channel
2
Temperature measurement channel
3 Pressure measurement channel
2
Page 7

7
Distinctive functional features of meter configurations and basic functional units are
represented in the table 3.2 (meters’ configurations in details are given in the appendix B).
Table 3.2
Distinctive structural and functional features
Configuration
1 3 1
Number of FS
1 2
2 Number of RТD
1 2
Additionally the meter can have one or two overpressure transducers (further under the
text - pressure transducers or PT), which are used for transformation of the water overpressure in a proportional electric signal with current from 4 up to 20 mA.
Metrological performance of pressure transducers PT fits to the individual order.
3.6 Meters indicate the results of measurements in SI unit system.
3.7 Measured results are displayed on 2-sectional LCD.
The first section has 8-bit 7-segment indicator with special symbols. The measuring data are always displayed in this section.
The second section has one row (on the top of the indicator) for displaying text information. This section is switched on only during operation with keyboard.
− The calculator indicates the following quantities:
− volume (mass) of the water, m3 (ton);
− volumetric flow rate of the water, m3/h;
− water temperature, С;
− overpressure of the water, МPа;
− work time and non-work time, hour;
− current time (hours, minutes, seconds) and date.
3.8 The calculator provides storage of such archive data as measured values of volume
(mass) of the water, work time and non-work time and also average measured temperatures:
per hour - during 70 preceding days (hourly archive);
per day - within 1 preceding year (daily archive).
All stored information and measurable parameters can be read by standard interface
RS-232C.
3.9 The number of display digits:
− for volume (mass) of the water is 8;
− for volumetric (mass) flow rate of the water is 5;
− for water temperature is 5;
− for overpressure of the water is 3;
− for work time, non-work time, and current time is 7.
3.10 The minimum bit value of digital display while indicating:
− volume (mass) of the water can vary from 10-7 up to 1 m3 (from 10-7 up to 1 ton);
− volumetric (mass) flow rate of the water can vary from 0.001 up to 0.1 m3/h (from
0.001 up to 0.1 ton/h);
− water temperature is 0.01 °C;
− overpressure of the water is 0.01 МPа;
Page 8

8
− work time and non-work time can vary from 10-5 tо 1 hour;
− current time is 1 sec.
3.11 Meters provide measurements of volume (mass) of the water in ranges of volume-
tric flow rates resulted in the table 3.3.
The table contains values of the lower limit of the flow rate (qi), permanent flow rate
(qp) and the upper limit of the flow rate (qs).
Table 3.3
Flow measurement
section FS
Measurement range of the water, m3/hour
q
i
qp q
s
FS-20 0.05 5 6.5
FS-32 0.22 22 30
FS-50 0.7 70 90
FS-65 1.2 120 160
FS-80 1.8 180 230
FS-100 2.8 280 360
FS-125
4.5 450 580
FS-150
6.5 650 850
The lowest measurable volumetric flow rate is equal to 0.5·qi. If the flow rate is lower
than qi flow rate measurement error is not standardized.
3.12 The temperature of the water can vary in a range from 0 up to 150 °С.
The measurement range of secondary (not for mass calculation) temperatures can vary
from -49 °С to 150 °С.
Number of channels for temperature measurement can vary from 1 tо 3 in accordance
with the order.
3.13 The maximal pressure measured by the meter is 4 МPа.
The range of the electric signals from pressure transducer varies from 4 up to 20 mA.
3.14 Meters have output signal for data communication by standard interface RS-232C.
3.15 Meters’ power supply is realized by built-in lithium battery of 3.6V. Battery life-
cycle is 5-6 years. Battery replacement can be done directly on-site without meter shutdown.
WARNING! Meter is delivered with switched off battery.
While delivering by air transport the battery should be switched off and removed from
the meter.
3.16 Nominal diameters (DN), overall dimensions and weight of FS, аnd also length and
weight of RТD depending on their type are shown in tables 3.4, 3.5 and on Figure 3.1.
The notice
1 It is possible to increase the total length of FS due to the length of straight sec-
tions before and after places for installation of ultrasonic flow sensors.
2 DN is the designation of nominal bore, which numerical value is approximately
equal to internal diameter of attached pipe sections.
3.17 For configurations 1 and 3 in modification М1 water meter meets accuracy class 1,
in modification М2 water meter meets to accuracy class 2 in accordance with EN 1434.
Page 9

9
Permissible error limits for configurations 1 and 3 while measuring water volume:
− ± (1+0.01∙qp/q ) % for accuracy class 1;
− ± (2+0.02∙ qp/q) % for accuracy class 2;
where q is measured flow rate value, m3/h.
3.18 Limits of permissible absolute error for water meters while measuring water tem-
perature are ±(0.2+0.002⋅Θ) °С where Θ is numerical value of temperature.
3.19 Limits of pressure measurement error:
− ± 0.5 % when PT from meter’s set are used;
−
22
PT
0.2
±+δ
when customer's PT are used,
where δ
PT
is permissible error limit of customer's PT.
Specific coefficients of PT curve are entered into calculator’s memory.
3.20 The calculator has two passive pulse outputs. Pulse outputs meet to class OD in ac-
cordance with EN 1434.
Maximum switched voltage should be no more than 10 V while switched current is no
more than 10 mА.
Maximum pulse-repetition frequency is 100 Hz while pulse duration is 4 ms ± 0.5 ms.
3.21 Pulse settings (set by user) are from 1 to 9999999 pulse/unit. Where «unit» is unit of
measure for transformed physical quantity. The user can select from the following physical
quantities: volume (pulse/m3), mass (pulse/ton).
3.22 Limits of absolute meter error while measuring the work time and non-work time
are ± 1 minute per 24 hours.
3.23 Measurement information about water volume, work time and non-work time is
stored in nonvolatile meter’s memory within 8 years with power off.
3.24 The maximal water overpressure inside flow measurement section is 1.6 МPа
(16 kgf/cm2).
3.25 Time for meter commissioning after battery installation is no more than 10 minutes
(battery is switched off in delivery set).
3.26 Protection class of calculator enclosure is IP 65.
3.27 Calculator mass is no more than 750 gram.
3.28 Calculator overall dimensions don’t exceed 170×110×35 mm, and with device con-
nector and wall mounting accessories – 250×110×60 mm (see Appendix С).
3.29 Nominal diameters (DN), overall dimensions, and FS weight, as well as length and
weight of RTD depending on their type are shown in tables 3.7, 3.8 and in figures 3.1, 9.9.
3.30 Mean error-free work time for meters is not less than 50 000 hours, for calculators –
100 000 hours.
3.31 Total average meter life cycle is not less than 12 years.
Page 10

10
Table 3.4 Types, dimensions and weight of RTD-T
RTD types
Length in mm, no more than
Weight, kg,
no more than
L
RTD
L
4 58 86 0.06
2 80 108 0.08
3 150 178 0.1
5 310 346 0.25
6 360 396 0.3
The notice. Select the type depending on DN according to instructions mentioned in tables 9.2, 9.3
and in figures 9.8, 9.9, 9.10
Mounting dimensions for RTD of types 2, 3, 4 are given in Figure 3.1.
Figure 3.1
7
34
6
(1 pcs.)
9.7*
L
RTD
for sealing
Screw with a hole
20.5
L
(screw location
is undefined)
1
8
Hexahedron s=17 mm
Plug УЗНЦ 05-7
M10x1.5
13
Page 11
11
Table 3.5 Overall and connecting dimensions, FS weight (for drawings see Appendix L)
FS
Nominal diameter, mm
Nominal overall and connecting dimensions of FS,
mm
n,
pcs.
Weight, kg, not
more than (no fasts)
DN L
D
f
H D d d1 For FS
For flanges
РУ-20 20
270 Pipe
. G1”
90
∅20
- - - 2.3 2.7*
РУ-32 32
180 M48x2
79 ∅32 - - - 1.8 2.6*
РУ-50 50
180
∅122 -
∅50
∅102
∅11
6 4.8 2.2
РУ-65 65
200
∅144 -
∅63
∅124 5.8 2.9
РУ-80 80
210
∅155 -
∅79
∅135 6.9 3.2
РУ-
100 100 230
∅
184
230
∅
(95…105)**
∅164
8 7.8 4.1
РУ-
125 125 265
∅
210
270
∅
(119…131)**
∅190
10
10.6 5.2
РУ-
150 150 315
∅
236
296
∅
(143…156)**
∅212 ∅13
20.0 7.7 *
Weight of straight sections with screws
.
** Nominal bores D are multiple of 1mm
Page 12

12
4 Package contents
4.1 The meter package contents is represented in the table 4.1.
Table 4.1
Name and
reference designation
Marking Number Additional information
SVTU-11B,
including:
SMP.407251.010 1 pcs.
Configuration and completeness in accordance
with the order (see items
1…8)
1 SVТU-11B Calculator
with battery
SMP.408843.012 1 pcs. While in delivery the bat-
tery is switched off
2 Flow measurement section
(FS) with screws for flow sensors fixing (no screws in complete set for FS-20 … FS-150)
Marking for FS-20 to
FS -150 included – see
Table 4.2
See additional
informa-
tion
Number, configuration
and dimension-type in
accordance with the order
(see Appendixes A and
tables 4.2, 4.3)
3 Ultrasonic flow sensor
(FlS) with fluoroplastic seal
ring (FlS for FS-20 aren’t delivered separately. Flow measurement section FS-20 is delivered together with FlS)
SMP.407151.009
(for FS-32…80);
SMP.407151.011-01
( for FS-100);
See additional
informa-
tion
Number of FlS for one
FS is defined by number
of places for their installation in accordance with
the order (see table 4.2)
4 Resistive temperature de-
tector RTD-T
SMP.405212.003 - 01
(−02, −03)
See additional
informa-
tion
Number and configuration (type) in accordance
with the order
5 Overpressure sensors (PS)
-
See additional
informa-
tion
Number, type and completeness according to the
order. Complete set can
include elements indicated in Appendix K
6 Connection cable (device
cable)
SMP.685694.029 1 pcs. Number of communica-
tion lines and their length
according to the order
(see Appendixes A)
7 SVТU-11B. Water meter
Operating Manual
SМP.407251.010 РЭ 1 pcs.
8 Packaging (set)
SМP.323248.002 1 set
9 Modem
Type is selected in coordination with the customer
In coordination with the
customer while ordering
the МDМ unit
10 Data Reader
Special order
11 Adapter module МС-1
Special order
Page 13

13
Name and
reference designation
Marking Number Additional information
12 Protection enclosure
SMP.301538.006 Special order
13 SVTU-11B. Operating ma-
nual. Part 2 «Verification methodology»
SМP. 407251.010 РЭ2 1 pcs. Special order
14 Reserve belongings
SМP.305653.001 Completeness and num-
ber is ordered
Notes
1 FS is delivered with flanges and fasteners see table 4.3.
2 FS can be delivered with straight pipe sections (length is up to 25 internal diameters
of the pipeline). The specified sections can be welded to flanges if necessary. While ordering straight pipe sections all necessary materials for installation (for example, electrodes for welding, paint, sealing materials, etc.) can be delivered additionally
3 Reserve belongings can include elements listed in the table 4.1, table 4.3, enclosure
of the SVТU-11B calculator, a board of the SVТU-11B calculator as it was ordered.
4 Data Reader can be delivered as a pocket PC, laptop or as a dedicated device RDU-
02. Model of pocket PC or laptop is selected by customer.
Page 14
14
Designation and basic parameters of FS in complete set are indicated in the table 4.2.
(For outline drawing of FS see Appendix L)
Table 4.2
FS
DN,
mm
Marking on FS Number of places
for flow sensors
Marking
Nominal bore Nominal
pressure
Single beam flow measurement section
FS -20
20 DN 20
PN 16
-
FS -20
FS -32
32 DN 32
2
FS -32
FS -50
50
DN 50
FS -50
FS -65
65
DN 65
FS -65
FS -80
80
DN 80
FS -80
FS -100
100
DN 100
FS -100
РУ-125
125
DN 125
FS -125
РУ-150
150
DN 150
FS -150
Another componentry included in delivery set in accordance with the obligatory or ad-
ditional order are listed in the table 4.3.
4.2 Meter’s configuration, FS type, connecting cables, number of communications
channels and their length are specified while ordering. The format of meter’s marking is given in Appendix A.
Description of design features for FS and also drawings, mounting dimensions are re-
sulted in Appendix K.
Warning!!!
Identification of FS standard size is provided by marking of nominal diameter DN on
FS body.
Thus numerical value in FS reference designation meets to a numerical value in a de-
signation of a nominal diameter DN (see table 4.2).
Example:
− Marking “DN 32” put on the flow measurement section with reference designation
FS-32. Next element of marking “РN 16” means that this flow measurement section is in-
tended for use in heat- or water-supply systems with overpressure 1.6 МPа (16 kgf/сm2);
Table 4.3 Componentry included in delivery set
# Name Marking Assignment Number
Set of delivery
oblig
a-
tory
Special
order
1
Pipe nipple
SMP
.752291.001
Connection of FS
-
20 with
straight pipe section
2 pcs. for
1 FS
+
2
Pipe nipple
SMP
.302661.002
Connection of FS
-
32р with
straight pipe section
+
3
Sleeve nut
SMP
.758422.006
Mounting of FS
-20 +
4
Sleeve nut
SMP
.758422.001
Mounting of FS
-32 +
5
Flange
SMP
.711154.013
-
01, 013
-
03,
013-05 (in accordance with DN
of FS)
Mounting of FS
-50…80
+
Page 15
15
6
Flange
SMP
.711154.004
-
03 … 004
-
05
(in accordance with DN of FS)
Mounting of FS
-100 +
7
Gasket (paronite)
SMP
.754152.013
Sealing of flanges FS
-20
2 pcs. for
1 FS
+
8
Gasket (paronite)
SMP
.754152.009
Sealing of flanges FS
-32 + 9
Gasket (paronite)
SMP
.754152.007…007
-16
Sealing of flanges
FS-50…100
+
10
RTD pocket
(L
RTD
=58mm, type 4)
SMP
.753137.002
-03
Protection of the RТD from
hydraulic impacts
1 pcs. for
1RТD
+
11
RTD pocket
(L
RTD
=80mm, type 2)
SMP
.753137.002
-01 + 12
RTD pocket
(L
RTD
=150mm, type 3)
SMP
.302634.002
+ 13
Sealing ring (fluoropla
s-
tic)
SMP
.754176.003
Sealing of RТD for types 2,
3, 4
+
14
Sealing ring (fluoropla
s-
tic)
SMP
.754176.003
-01
Sealing of RTD bush for
types 2, 3, 4
1 pcs. for
1 sleeve
+
15
Bush (for angle
α
=45º)
SMP
.723144.007
Installation of RТD for types
2, 3, 4 without bush
1 pcs. for
1RТD
+
16
Bush (for angle
α
=60º)
SMP
.723144.008
+ 17
Bush (for angle
α
=90º)
SMP
.723144.009
+ 18
Bush (for angle
α
=45º)
SMP
.723144.007
-01
Installation of RТD bush for
types 2, 3, 4
1 pcs. for
1 sleeve
+
19
Bush (for angle
α
=60º)
SMP
.723144.008
-01 + 20
Bush (for angle
α
=90º)
SMP
.723144.009
-01 + 21
Connecting pipe (G 1/2" x
1/4")
SMP
.716161.004
For installation of pressure
sensor
1 pcs. for
1 PS
+
22
Gasket (paronite or flu
o-
roplastic)
SMP
.754156.010
For PS
+ 23
Gasket (paronite or flu
o-
roplastic)
SMP
.754156.010
-01
For threaded
+ 24
Gаsket SMP
.754156.001
Sealing of device
connector
1 pcs. +
25
AB 1000WLV Set:
- crampon
n/a Mounting of the Calculator
2 pcs.
+ -
corbel
2 pcs. + -
washer «star»
2 pcs. + -
screw М4 (hex)
2 pcs. +
Fixings: (thread diameter d and bolt length L fit to holes in flanges and total
flange
thickness)
26 -
screw М3x10
Mounting of device conne
c-
tor
4
pcs. +
27 -
washer
3 4
pcs. +
28
Bolts А. (dxL).88.35.019
FS-50…100
In acco
r-
dance with
total number
of holes in
FS flanges
(see table
3.3)
+
29
Nuts А. (d). 9.35.019
+
5 Meter’s structure and functioning
5.1 The principle of flow measurement of water volume is ultrasonic time-of-flight. The
time for the sound to travel between a transmitter and a receiver is measured. The time difference is proportional to the average fluid velocity and flow rate correspondingly. The integrated momentary flow rate values give the information about water volume which has
passed through FS. The mass is calculated as a function of volume and density of the flow
depending on its temperature.
5.2 Water temperature is measured by platinum resistive temperature detectors installed
in appropriate pipes.
Page 16

16
5.3 Flow rate measuring process is continuous. Flow rate measurement is occurred a
few times per second and obtained data are stored. Reading of stored data is occurred 1 time
per second to calculate the quantity of water.
Measurement cycle for temperature and pressure is one time in 10 sec.
Every measurement cycle lasts for 1 sec and includes measurement of water parame-
ters, as well as self-diagnostics of the meter.
5.4 Water meters are delivered in following configurations (see Appendix B):
− 1 – 1-channel water meter;
− 3 – 2-channel water meter;
Schemes for sensors connection in different configurations are represented in Appen-
dix B.
5.5 Calculation and storage of average temperature values the meter carries out as
arithmetic mean for set period of time (hour or day).
5.6 The meter carries out flow measurement in the range from 0.5qi (q
min
) till qs
(see table 3.2).
For all types of FS measurement errors are provided in a range [qi (q
min
); qs], but in sub-
ranges [0.5.qi (q
min
); qi (q
min
)[ the mentioned measurement errors are not standardized, how-
ever device working capacity is kept, and water mass storing and calculation are carried out.
While measuring instantaneous flow rate values .q < 0.5 qi (q
min
) the device indicates
zero flow and mass storing m=q ⋅ρ isn’t carried out.
5.7 Measurement of water overpressure is carried out by calculator while measuring the
current of electric signal from the pressure transducer. Overpressure values Рop (MPa),
measured and displayed by the calculator, and current Iin (mA) on an input of pressure measuring channel (on the calculator input) are connected by a following ratio:
21
opmeas11
21
(PP)
P(II)P
(II)
−
=−⋅+
−
(5.12)
where P1 and P2 are pressure values in two points of pressure transducer characteristic
(for example, minimal and maximum pressure);
I
1
and I2 are correspondingly currents on the PT outputs in the above specified
points;
U
meas
is value of measured current on the output of PT.
5.8 While measuring time parameters the meter carries out measurement of following
quantities: time of correct work (running or work time), time of incorrect work (time of errors), power on time, power off time (non-work or idle time), and also displays current
date/time (taking into account daylight saving).
Time of correct work (running time Тrun or work time) – device operating time
(power on, no error messages). Time of correct work on 1-st and 2-nd channels is displayed
on the water meter indicator in a mode «Indication of additional parameters» (see item
11.2.2, table 11.3 of this Manual, and also Appendix D).
Time of incorrect work (time of errors Terr) – device operating time (power on,
there are error messages). Тerr values are presented in printouts of stored data archives and
error archives.
Page 17
17
Power on time Тpower – total time when the device power supply voltage is on. It is
indicated on the meter display in a mode “Indication of additional parameters” and also is
presented in a daily archive printout.
Power off time (idle time Тidle or non-work time) – total time when the device pow-
er supply voltage is off. It is displayed on the meter indicator in a mode « Indication of ad-
ditional parameters», and also included in daily report.
Current date/time – current time (taking into account daylight saving). It is indicated
on the meter display in a mode “Indication of additional parameters”. Automatic switch
to daylight saving time mode can be on/off.
Measurement, indication and registration of above-listed parameters are carried out in
hours. In figure 5.1 the timing sheet is represented. It explains how time of correct work
Тrun and time of non-working condition Тnw for accounting period Тacc are resulted. During Тrun authentic measurement of all parameters was made, during Тnw there is no registration of any parameter or there is no power supply voltage (battery disconnected).
Figure 5.1
5.9 To connect to external devices RS-232C is applied. RxD, TxD, DTR, RTS lines are
used.
5.10 Meters have a few separate modules which connected between themselves. They
are calculator, temperature sensors, flow measurement section with ultrasonic flow sensors,
pressure transducers.
5.10.1 The calculator housing has four control buttons, the digital display, slot for con-
necting cable.
Water meter control buttons are described in chapter 11 and Appendix D.
5.10.2 Meter’s digital display has two sections. The first one contains a 8-bit 7-
segment indicator and specific symbols. In this section the measuring data and units are displayed. The second section is a row for displaying text information. It is arranged in the upper part of indicator. This section is enabled if the user needs to see additional information
and complete some kind of actions in device menu.
The basic working mode of the meter is displaying measuring data from main menu. At
this time the second section is switched off.
5.10.3 FS is a spool piece with flanges and bushes for mounting ultrasonic flow sen-
sors. FS sizes (linear and angular) have rigid tolerances to achieve required measuring accuracy and stability in operation. Sizes are resulted in the table 4.2, and also in the Appendix L.
Тrun
Тpower
Тidle
Тerr
Тnw
Тacc
Page 18

18
5.10.4 RТD are installed in pipelines in special thermometer pockets or bushes (in ac-
cordance with the order) on the flow and return pipes of heat exchange system.
5.10.5 The length of connecting cables is determined according to a lay-out of meter
components and can be within the limits:
− from 2 to 10 m (max 30 m) for ultrasonic flow sensors,
− from 2 to 10 m (max 30 m) for temperature sensors,
− from 2 to 10 m (max 30 m) for pressure sensors,
− from 2 to 30 m (max 50 m) for RS-232 interface.
Extending cable length up values in squares possible only by additional agreement.
6 Marking and sealing
6.1 Meter marking on the calculator contains the following data:
− name and reference designation of water meters;
− trade mark of the manufacturer;
− accuracy class (meter’s modifications М1 or М2);
− environmental class;
− serial number;
− date of manufacture (two last digits of a year, printed before serial number).
On the indicating device of water meters:
− flow rate limit values.
On the flow measurement section:
− nominal bore;
− flow direction arrow;
− maximum operating pressure.
Serial numbers of RТD and FS are put on their bodies.
6.2 FS marking contains nominal diameter DN and maximal operational overpressure
value РN.
6.3 Meter components are sealed up to prevent a non-authorized access to adjustment
of meter’s readings.
6.4 The calculator is sealed up by two mastic seals. Seals are put on fixing screws on
lateral covers. For mastic fixing sealing cups are provided under screw heads.
For realization of additional sealing by means of a lead seal, the screws with holes in
heads on lateral covers are stipulated. On customer’s demand the replacement of these
screws by additional sealing cups is possible.
Marking of connecting cables are put on labels located near corresponding connectors.
7 Packing and marking
7.1 Marking of transport container has specific instructions "CAUTIOUSLY FRA-
GILE", “PROTECT FROM MOISTURE”, "TOP".
7.2 Meter components are packed into the boxes in accordance with drawings of manu-
facturer.
Page 19

19
In coordination with the customer FS delivery without transport container or in customer’s container is possible.
8 Safety precautions
8.1 Meter’s design meets to safety precautions in accordance with State Standard
GOST 12.2.003.
8.2 If meter runs together with equipment of 220V power supply, then safety require-
ments for work with electrical installations (voltage up to 1000V) should be considered.
Page 20

20
9 Installation
9.1 Unpacking and degreasing
Unpacking and degreasing of meters are carried out after their being indoors within 2
hours, while ambient temperature varies from 10 up to 30 С and relative humidity is no more
than 80 %.
To make unpacking, please follow the instructions:
− open packing boxes;
− take a package with the calculator and operational documentation;
− check up completeness of meters in accordance with the order;
− take meter components from packing boxes, make an external survey and be con-
vinced that there is no mechanical damages, coating infringements and isolation of connecting cables.
Battery installation into calculator should be done as follows:
− unscrew four screws, which fix a cover of battery module;
− connect a battery to a calculator board in accordance with the figure 12.1;
− carefully put a battery into a module, battery cable should be located right inside a
module;
− close a cover of module and tighten it up by screws.
Wait for appearance of a notice “battery” on the indicator.
Set current time. Procedure to set time is described in Appendix D.
9.2 Installation requirements
9.2.1 Installation of meter components is carried out in accordance with chosen con-
figuration, necessity of application of the additional equipment, and also parameters of water
consumption object.
Schematic circuits for meter installation depending on its configuration are given in
Appendix B.
9.2.2 Climatic conditions in a room, where meter components are installed should be
as follows:
1) In a place for FS and RТD installation:
− ambient temperature can vary from −40 °C up to +70 °C;
− ambient humidity is up to 95 %, while temperature is 35 °С;
2) In a place for calculator installation:
− ambient temperature can vary from 5 °C up to 55 C;
− ambient humidity is up to 93 % while temperature is 25 °С.
Climatic conditions in a place for installation of the additional equipment should meet
the conditions specified in the operational documentation for this equipment
9.2.3 Protection of places for FS and RTD installation from direct ingress of mois-
ture, dirt, oils and aggressive liquids should be provided.
The content of acid and alkali fume in air of premises, where meter components are installed, should be within the limits of sanitary rules.
For outdoor FS installation it is recommended to provide protection (canopy) against
direct ingress of atmospheric precipitates on ultrasonic flow sensors.
Page 21
21
FS installation in places with possible short-term water flooding is allowed while observing following protection measures for FS and entrance cables:
− the lining of cables should be made in protective waterproof pipes, which are resis-
tant to influence of an environment (including the increased temperature);
− area for connection of protective pipes to ultrasonic flow sensors or RTD should be
protected from water influence by means of tight clutch, profile sealants or other ways recommended by the manufacturer of protective pipes
9.3 Requirements to FS installation and arrangement
FS should be installed into a pipeline.
FS installation place should be as much as possible moved away from sources of vibrations, jolting, electromagnetic interferences (electromotors, pumps, compressors, etc.). No
electric voltage relative to a protective contour of grounding in the place, where FS should
be installed
The distance between flow measurement section and an installation place for the calculator should be minimal and not exceed 10 m. It is possible to increase the distance up to 30
m by agreement with the manufacturer.
In all cases it is necessary to provide full filling of flow measurement section with water otherwise meters stop functioning, and malfunction (see chapter 13 of OM) would be diagnosed.
Flow measurement sections can be installed in vertical position, however submission of
the water thus should be carried out in a direction bottom-top for providing FS with water
filling.
Water meter operation in special conditions (incomplete filling of FS with the water or
polluted water) determines its location as resulted in figure 9.1. In this case complete water
filling of FS is guaranteed. The most polluted pipeline section appears in a place below FS
FS
Horizontal
15−20
°
Drain
valve
Figure 9.1
To remove water from the bottom part of the pipeline (see figure 9.1), it is possible to
provide the drain valve.
Please follow the requirements resulted below while installing FS:
− the pipeline section chosen for FS installation, should be located in horizontal plane
(a deviation from a horizontal within the limits of ± 20 °).
− bushes for flow sensors are also arranged in horizontal plane with a deviation from a
horizontal line no more than ± 20 °.
Minimal straight pipe distances downstream of flow disturbances in accordance with
specified meter accuracy should be not less than mentioned in the Table 9.1:
Page 22

22
Table 9.1
Flow Disturbance Modification М2 Modification М1
Conical Contraction with an angle no more
than 20 °
7 DN 10 DN
Single 90 ° Bend
10 DN 15 DN
Gate valves* or two 90 ° Bends in perpendicular planes
15 DN 20 DN
Pump 20 DN 30 DN
Remarks:
* Completely open globe valve is not considered as a disturbance.
The straight upstream pipe section between two serial flow disturbances should be not
less than 5 DN. Otherwise upstream straight section should be increased by the length equal
to a difference (in millimeters) of the required and real distances between disturbances.
Straight pipe sections upstream and downstream FS-20, while applying conical contraction with an angle no more than 20°, should be not less than 60 mm. In this case welding of
special branch from complete set just to a conical contraction is possible.
All other requirements regarding straight pipe sections for FS-20 can be reduced twice.
Distance downstream of FS should be not less than 5 DN for modification М2 and not
less than 10 DN for modification М1 for one-beam FS and 5 DN for two-beam FS.
If DN of flow pipeline and DN of straight sections are different then application of
conical contraction is required.
The straight pipe section downstream a conical contraction should meet requirements
for all flow measurement sections.
To calculate the minimal length of straight sections we use distance equal to DN in mm
for appropriate standard size of FS (for example, DN 32 means 32 mm, DN 50 means
50 mm etc.).
It is not allowable to install any kind of disturbances on straight sections upstream a
flow meter.
Internal diameter of a straight pipeline section should not differ more than on ± 5 %
from:
− digital value of DN in mm for FS with DN20, DN32, DN50. In other words, nominal
value of internal diameter of straight section should be 20 mm, 32 mm and 50 mm correspondingly;
− real diameter of FS, which is resulted in chapter 17 “Parameters and characteristics
of meter components” for FS with DN65…DN150.
For modification М1 deviation of internal diameter of straight section is permitted, but
no more than + 5 % (negative deviation is not acceptable).
9.4 Installation of meter componentry
9.4.1 FS installation
9.4.1.1 FS is insertion type of a flow meter.
9.4.1.2 Delivery sets with FS of DN32 and DN20 include special pipe branches
(nipples), which are welded to straight sections of the pipe during installation.
Page 23

23
For other FS the straight sections are included in delivery set according to customer’s
request.
Pipe branch with sleeve nut, which is included in delivery sets for FS of DN20 and
DN32, is a part of straight section and applied for further welding to pipeline to create required distance of straight section.
The axis of a branch pipe and straight section should be a uniform coaxial line without
significant jogs and bends. Transition ‘jump’ from a branch pipe to a pipe should not exceed
0.5 mm (± 2.5%) for FS of DN20 and 0.8 mm (± 2.5%) for FS of DN32
9.4.1.3 While installing FS-20 (FS connection to welded pipe branches with sleeve
nut) its position should be fixed (to prevent a revolution) by a screw driver S = 30 mm,
which is based on special faces of FS (see figure in Appendix L).
It is strongly prohibited to apply another place of FS to prevent FS revolution (PS
connectors, FS body, faces with marking).
For tightening a sleeve nut the screw driver S = 41 mm should be applied.
9.4.1.4 While connecting flow meter’s flange to the pipe, the flange bore can be
reamed to external pipe diameter with the least allowable tolerances. The schemes for flange
welding are given in Fig. 9.2 and Fig. 9.3.
Flange mounting to the pipeline should be carried out without metal sagging on the internal pipe surface. Otherwise change of velocity profile can lead to additional meter error.
After flow meter installation the flange painting should be done.
Figure 9.2 Figure 9.3
WARNING!
Please avoid welding of flanges to the pipeline if FS has been installed! It can lead to flow meter
damage because of overheating.
9.4.1.5 Pressure loss on flow measurement sections
Pressure losses at maximal flow rate Qmax don’t exceed 0.085 kgf/сm2 (for all flow
meters, if there are no additional remarks).
Pressure loss for flow meters of DN20 in kgf/сm2 is shown on the plot (see fig. 9.4)
Page 24

24
Figure 9.4. Pressure loss for FS-20
Pressure loss (kgf/сm2) for flow meters of DN32 (with straight sections DN 32) is
shown on the plot (see fig. 9.5). The curve 2 demonstrates pressure loss directly on the flow
meter of DN32. The curve 1 demonstrates pressure loss on the flow meter, straight sections
and conical 10°- contractions, while installing the flow meter of DN32 on the pipe of DN 50.
Figure 9.5. Pressure loss for FS-32
0
0.05
0.1
0.15
0.2
0 5 10 15 20
P, kgf/sm
2
q, m
3
/h
1
2
0
0.1
0.2
0.3
0.4
0.5
0.6
0 1 2 3 4 5 6 7
ΔP,
kgf
/с
m
2
q,m3/h
Page 25

25
For FS-50 pressure loss is resulted in fig. 9.6.
Figure 9.6
9.4.2 Installation of flow sensors
9.4.2.1 The order for installation of flow sensors FlS listed below is applied for FS
of DN 32… DN150.
FS of DN20 is delivered with installed and sealed flow sensors FlS, their dismantling
can be done only at manufacturing company.
9.4.2.2 After installation of flow measurement section ultrasonic flow sensors
should be installed as follows:
− clean internal surfaces of bushes from dust and dirt if necessary;
− for protection of fixing nut and flow sensor materials from diffusion with material of
FS it is necessary to grease a bush thread and a lateral cylindrical surface of ultrasonic flow
sensors with graphite greasing;
− FlS effective area (edge) should be cleaned from greasing;
− insert ultrasonic flow sensors in bushes (pipe-bends) of flow measurement section.
Marking is put on sensor cable outputs. So FlS with marks “11” (or “21” for the second flow
measurement channel) should be inserted in first (according to flow direction) FS bush,
FlS with marks “12” (or “22” for the second flow measurement channel) should be inserted
in second (according to flow direction) FS bush;
− at tightening of flow sensor’s fixing nut the force put to a wrench should be equal to
40 … 45 N·m and provide a ‘zero’ gap between FS surface and FlS ring surface outside of
its sealing gasket. For FlS installed in FS of DN32 the force is 18 … 20 N·m.
0
0.05
0.1
0.15
0.2
0.25
0.3
0 20 40 60 80
P, kgf/cm
2
Flow rate,m3/h
Page 26

26
WARNING!
Ultrasonic flow sensors contain piezoceramic elements and thin-walled design elements, which have the increased fragility and do not permit shock and excessive compressing loads.
That is why
IT IS FORBIDDEN:
− to swap around flow sensors for different channels;
− to install flow sensors with marks “11” (“21”), intended for installation in the first
flow meter bush (according to flow direction), into the second bush and sensors with marks
“12” (“22”) to install into the first bush;
− to drop ultrasonic flow sensors or to knock on them at transportation and installation;
− to carry out mounting and dismantling of FS with installed ultrasonic flow sensors;
− to accomplish metalwork or welding works on the pipeline closely to FS with the in-
stalled ultrasonic flow sensors;
− to exceed the mentioned above force for tightening of FlS;
− to dismount stuck to FS flow sensors, while turning them in bushes during regular
service.
9.4.2.3 For the removal of the flow sensor its design provides special elements.
The manufacturer has developed and can propose special removers or complete set of design
documentation for their manufacturing:
− for FlS of DN 32…80 – see remover (SMP. 296454.004);
− for FlS of DN DN 100…150 – see remover (SMP.296454.001).
9.4.3 Installation of temperature sensors
Temperature sensors (manufactured by SEMPAL Co.) RTD-T can be installed in two
ways:
− by screw-driving in bushes (lugs) of the first type welded into the pipeline for direct
contact of the RTD with the water;
− by screw-driving in thermal pockets, which, in turn, are screwed in bushes (lugs) of
the second type. The last ones are welded into the pipeline for contact with the water via a
protective thermal pocket.
Choosing a way of RTD installation in the pipeline it is necessary to consider, that to
obtain a maximal accuracy of temperature measurement the sensitive element of RTD
should be arranged as close as possible to an axis of the pipeline. There are three types of
RTD with length of 58, 80, 150 mm (type 4, 2, 3 correspondingly) and variants of their angular installation in accordance with specified requirement irrespective of pipeline diameter.
The inclination angle and depth of RTD immersing is provided with use of bushes (lugs), the
design of which depends on pipeline DN. Recommended variants of RTD depending on FS
type are given in tables 9.2 and 9.3. Variants of RTD installation in thermal pockets and
without it are given in figures 9.7, 9.8.
Warning! Applying lugs with inclination 45 or 60 °, it is necessary to provide a contact
of water with the bottom part of RTD, where thermosensitive element is located.
The installation place for each RTD included in delivery set is given on the meter’s
scheme for installation (see the appendix B). The RTD which measures temperature of the
water should be installed close to FS. The distance between the RTD and the calculator
should not exceed 10 m.
Page 27

27
The RTD can be installed on the upstream or downstream sections of FS, but installation on the downstream section is preferable. While installing the RTD after FS, the distance
between the bush and FS should be not less than 5 DN and at installation before FS - not less
than 10 DN.
After bush welding, it is necessary to process its thread by tap М10х1.5 or М16х1.5
(depending on bush type).
While installing the RTD with inclination 45° or 60°, it is necessary to drill 10 mm hole
(16 mm for a thermal pocket) and to saw it up to a necessary oval depending on thickness of
a pipe wall (see figure 9.7).
The sealing surface of the bush should be protected from splashes of the fused metal
during welding.
Before application of sealing gasket (fluoroplastic ring) a sealing surface of the bush
should be greased.
While screwing the RTD in the bush, the force put to a wrench of 200 mm length,
should be no more than 5 kg and provide hermetic seal. The deformation of fluoroplastic
gasket in the gap between sealing surfaces of RTD and the bush is not permitted.
Before screwing the RTD in the thermal pocket it is necessary to be convinced of cleanliness of a thermal pocket and to fill it on 1/8 of volume with high-temperature silicon lubricant of any type.
Тable 9.2
DN,
mm
Configuration of RТD,
nominal length
(LTD, mm), type
Configuration variants for bushes of first
type (internal thread of bushes is М10х1.5)
Angle
of incli-
nation
Labeling Marking
32
SMP.405212.001-03
L
RTD
=58; type 4
SMP.723144.007 1
45
°
50 SMP.723144.008 2
60
°
65
SMP.723144.009
3
90
°
80
100
SMP.405212.001-01
L
RTD
=80; type 2
125
45°
150
SMP.405212.001-02
L
RTD
=150; type 3
SMP.723144.007
1
60°
Page 28

28
Таble 9.3
DN,
mm
Configuration of thermal
pocket, nominal length
(LTP), mm; nominal length
of RТD (LTD), mm
Configuration variants for bushes of
second type (internal thread of bushes
is М16х1.5)
Angle
of incli-
nation
Labeling
Marking
50
SMP.753137.002-03
(type 4) LTP=56; L
RTD
= 58
SMP.723144.008-01 5 60°
65
SMP.723144.009-01 6 90°
80
100
SMP.753137.002-01
(type 2) LTP=78.5; L
RTD
= 80
125
150
SMP.753137.002
(type
3) LTP=
148
; L
RTD
= 150
SMP.723144.007-01 4 45°
Page 29

29
Figure 9.7 Installation of RТD-S of type 2, 3 and 4 without thermal pocket
Page 30

30
Figure 9.8 Installation of RТD-S of type 2, 3 and 4 with thermal pocket
Page 31

31
9.4.4 Installation of pressure sensors
Pressure sensors are installed strictly in vertical position. The scheme of installation is
represented in the appendix K.
Power module, which is used for powering of pressure sensors, should be galvanically
isolated from power network.
Application of pressure intake devices is obligatory!
9.4.5 Mounting of the calculator
The calculator can be fixed in horizontal position (on the table, stand or shelf) or in vertical position (on the wall or in device enclosure).
For fixing of the calculator special accessories in delivery complete set are provided.
The scheme for fixing is given in the appendix C.
9.4.6 Cabling
After installation of all meter components their bond by means of connecting cables
from the delivery complete set is made in following sequence:
1) cabling;
2) cable connection to the calculator, RТD and ultrasonic flow sensors.
Cabling is carried out under following requirements:
− cable mounting should exclude a possibility of its contact with pipelines and other
elements if their temperature is below a minus 40 С or above 70 С;
− cable protection against mechanical damages should be carried out by cable groom-
ing in pipes, hoses, ducts, etc. Cable grooming for one meter in one protective housing is
permitted;
− cable grooming of two and more meters should be provided in protective housings
separated from each other on a distance not less than 5 cm for prevention of mutual electromagnetic inductions
− after cable grooming it is necessary to make their connection to meter components
considering marks of cables.
The rest of the cable should be left in device enclosure.
WARNING!
• Grooming of connecting cables near power supply lines or in their protective hous-
ings (housings of power lines) is forbidden.
Cable connection to the calculator and to all sensors should be carried out as follows:
while defining ‘switch’ positions on connectors, plug connectors accurately, without ap-
preciable effort. Mutual rotation is not permitted; after all a sleeve nut should be
twisted to prevent possible crumpling (bend, fracture) of contact items (pins) at partial leng-
thwise coupling.
While connecting sensors it is necessary to strictly follow the marks on device cable
and flow sensor cable outputs.
In Table 9.4 marking on communications channels has been adjusted with marking on
flow sensor cable outputs (for 1-beam flow meters).
Page 32

32
Table 9.4
Cable function
(connected unit)
Marking on device
cable
Marking on flow sensor cable outlets
Marking
Arrangement
FlS1 of channel 1 A11 11 First downstream
FlS2 of channel 1 A12 12 Second downstream
FlS1 of channel 2 (FlS3) A21 21 First downstream
FlS2 of channel 2 (FlS4) A22 22 Second downstream
In Table 9.5 marking on communications channels of device cable is given to connect
temperature sensors, pressure transducers and peripheral devices.
Table 9.5
Cable function
(connected unit)
Marking on
device cable
Cable function
(connected unit)
Marking on device cable
ТS1 B1 PT1 C1
ТS2 B2 PT2 C2
ТS3 B3 RS232 D1
Pulse outputs D4
Structural and basic schemes of device cable are given in the appendix F.
After meter commissioning and also in cases of repairs, verification and adjustments,
service worker should record corresponding information in Table 19.
CAUTION! IT IS FORBIDDEN:
1 To break the procedure of cable connection according to marking in tables 9.4 – 9.6.
2 To swap RTD of temperature sensors ТS1, ТS2, ТS3 (see the Appendix B) and pres-
sure sensors PT1 and PT2.
3 To increase or shorten the length of cables of ultrasonic flow sensors FlS.
4 To apply FS, RTD, ultrasonic flow sensors FlS and calculators from different deli-
very sets.
5 Cable twisting, kinking and sharp bends is not permitted while connecting to FlS.
CAUTION!!!
If it was required to make welding during device commissioning, the meter should
be switched off and device cable should be disconnected from the calculator housing.
Otherwise the meter can be damaged.
10 Setting-up Procedures
10.1 While meters work with additional devices (PC), these devices should be connected
to meters strictly according to maintenance documentation.
10.2 For comfortable work with the meter (after its purchase and before installation) and
for check of meter working capacity together with ultrasonic flow sensors it is necessary:
1) Assemble a flow meter section with rubber or paronite gasket (thickness of 1-2
mm) and technological cap at the end face, install it vertically, fix flow sensors, and
completely fill FS with water.
2) Check up all items in «Indication of main parameters» mode, check up all items
in "Check" mode and also it is obligatory to provide zero setting in "Setup" mode to
Page 33

33
correctly repeat this operation while installing device on the object (the description of
operating modes is also given in Chapter 11).
10.3 While installing device on the real object it is necessary to fill with water the
pipeline with installed flow measurement section. Run through FS the water with increased
volumetric flow rate during 10 minutes. Be convinced of no leakage in places, where meter
components are installed, and no error messages on the digital display of the calculator. The
list of these messages is resulted in Chapter 13.
10.4 Accomplish mentioned hereinafter actions in «Setup» mode.
To login in "Setup" mode see instructions described in item 11.2.8, the order of menu
access in "Setup" mode is described in item 11.2.5, and also in Appendix D.
In "Setup" mode:
− set hydraulic zero for the channel of volume measurement;
− set a proper archiving format for the water volume data;
− set «In account» account mode. At this time reset of all meter parameters for certain
calculating channel would be done.
For zero setting following actions should be done:
− zero setting should be carried out not earlier than in 10 minutes after battery installa-
tion.
− cut off a water flow, but FS should remain completely filled with water.
− provide zero setting according to “Setup” menu item.
In case of failure or wrong zero setting the measurement error increases and can exceed
permissible value. Reset of device readings at its commissioning is blocked, if setting of hydraulic zero is not made. Detailed information about zero setting is given in Appendix M
“How to set hydraulic zero”.
If during meter startup its commissioning was not provided, a proper warning will be
displayed on the indicator.
After ending of the above-stated operations meters are ready for functioning.
WARNING!
− While in service it is forbidden to disconnect sensors, to change arrangement of sen-
sors (to prevent such not authorized actions a mechanical socket sealing of all FlS, TS, PT
is stipulated), to switch off the calculator, to install meters on the pipeline with incomplete
(partial) water filling of FS or on the pipeline supplying the water in steam condition. In all
above-stated cases the water meter will register failure operating time, which is subtracted
from the time of water volume measurement. Power off time (time with disconnected battery) isn’t considered during failure operating and would be displayed in a mode «Indication
of additional parameters».
− If the water was cut off for a long time (interheating period, repair of the system,
etc.) and it had led to occurrence of stagnations in the pipeline (drains, a rust, bubbles, etc.) it
is recommended to set the “Stop” mode and to provide the guaranteed absence of the water
in a flow measuring section.
Page 34

34
− Scum on internal FS walls reduces the real FS diameter and can lead to overestima-
tion of water flow rate readings. Therefore it is necessary to provide maintenance service of
meter (see Chapter 12).
− During each operation cycle (1 - 2 seconds) the water meter carries out self-
diagnostics of a technical condition by several criteria. In case of measurement section failures, breakage of flow (temperature) sensor cables, absence of the water, etc., storage of
integral parameters (water volume and mass, and non-failure operating time) is discontinued
and the error message is appeared (see Chapter 13).
Page 35

35
11 The operating procedure
11.1 Requirements to the personnel.
The maintenance personnel should be completely acquainted with present OM.
11.2 Structure of the menu of control of the meter.
Control of the meter (a readout and specification of operating mode and meter parame-
ters) is carried out by means of proper menu item selection.
Items of Menu are displayed in the top row of meter indicator.
Use of the menu (switching of items) allows to get the information about measured pa-
rameters values, parameters of the meter and also to carry out meter verification.
Selection of menu items and changing (input, setting) of parameters is carried out by
pressing buttons on the calculator. Sequence of operations to select the certain menu item
and to input parameter value or to select a parameter from the list is given in the Appendix D.
All measured quantities, meter parameters and commands for meter control are com-
bined in some sections – modes of control of the meter.
Some service modes (‘Setup’, ‘Verification’) are protected from non-authorized access
by the password.
The meter modes are given in the Appendix D.
11.2.1 ‘Indication of main parameters’ Mode.
The device switches to ‘Indication of main parameters’ mode after battery installa-
tion, after device set-up in ’Setup’ mode, after ending of work in service modes (’Check’,
’Verification’), and also at automatic returning to ‘Indication of main parameters’ mode if
buttons are inactive.
Depending on meter configuration the proper measured parameters, which meet to a
given configuration, are displayed on the calculator indicator.
In this mode error messages are shown on display.
Meter has three accounting mode:
− “Not in account” – this is initial mode. In this mode it is possible setup some para-
meters in “Setup” menu. This mode indicated by periodically display text “no rSt”;
− “In account” mode. This is main mode for accounting. There is no additional indica-
tion for this mode.
− “Stop” mode. This mode can be activated, when no water in pipe for long period,
etc. In this mode no data are placed in archive and no errors indicated.
11.2.2 ’Errors’ Mode.
The menu of this mode is appeared only if some errors in device functioning take place.
This mode is used for presentation of complete (not only code, but text) information about
running errors. It is possible to see all registered to this moment errors.
Doesn’t have impact on measuring process.
11.2.3 ‘Indication of additional parameters’ Mode.
This mode is intended for displaying of minor (rarely viewed) measuring magnitudes. It
doesn’t have impact on measuring process.
While working in ‘Indication of main parameters’ and ‘Indication of additional pa-
rameters’ modes in worst-case situations the code and explanation of the failure is displayed (see Chapter 13).
Page 36

36
11.2.4 ’Check’ Mode.
’Check’ mode is intended for indication of parameters which should be checked.
’Check’ mode doesn’t interrupt measuring process and can be used either by auditor or by
user. In particular, in this mode counters of entries into ‘Setup’ and ‘Verification’ modes are
displayed.
11.2.5 ’Setup’ Mode.
’Setup’ mode is used during meter commissioning for hydraulic zero setting in volume
measurement channels, input of necessary parameters (pressure, etc.), and also for choosing
an appropriate mode.
It should be considered that in account modes “In account” and “Stopped” menu of
‘Verification’ mode is blocked. In addition, those items of ‘Setup’ mode which should be
unchangeable during process of measurement are also blocked.
11.2.6 ’Verification’ Mode.
’Verification’ Mode is used to evaluate measuring errors and calculating errors of ba-
sic meter performance, and also to check correctness of their indication.
’Verification’ Mode is used for automation of water meter performance verification in
case of regular verification. Verification is conducted only by authorised personnel.
11.2.7 ‘Limit prolongation’ Mode.
It is intended for password entering if time limit prolongation is needed.
11.2.8 Password entering.
Entry into service modes ‘Setup’ and ‘Verification’ is permitted only after entering
the proper passwords to avoid non-authorized access to parameters saved in calculator
memory. To run a proper mode in the menu password is requested.
The manufacturer set the following standard passwords for service modes (see table
11.1):
Table 11.1
MODE STANDARD PASSWORD
«Setup»
25205757
On customer’s demand the manufacturer can set INDIVIDUAL PASSWORDS for
service modes, that is equivalent to additional ELECTRONIC SEALING of the calculating
unit and provides inaccessibility of unauthorized users to saved up measuring information.
The password is represented by 8-digit integer number to get access to one of service
modes.
Symbols «-» on the indicator mark bits for entering password digits.
Non-masked (open) value of input digit is displayed only in that digit place, in which
input of its values (editing) is provided.
While entering a password, press the button "To the right" to move the cursor on one
digit place to the right. It allows to change any digit of the password.
Pressing buttons «Up» and «Down» leads to a change in the digit value.
Pressing the button «To the left» means ending of password entering.
If during 2 minutes there was no pressing any button the meter switches from ‘Enter
password’ mode to ‘Indication of main parameters’ mode.
On figure 11.1 the way to run ‘Setup’ mode is given.
Page 37

37
Figure 11.1
Page 38

38
12 Servicing
12.1 The Instruction to the representative of inspecting service
12.1.1 The SVTU-11B water meter is protected from consumer intervention as well as
intervention of heat supply organization. Any changes of a water meter parameters can be
carried out only in ‘Setup’ and ‘Verification’ service modes. To except a non-authorized
access into device functioning process and prevent possible attempts to change any device
constants (calibration factors of thermoresistor Kdl and Krc, flow rate conversion ratio,
geometrical parameters of a flow meter), the fact of login or running through these modes is
fixed in the ‘Check’ mode. The opportunity to check inputs in the specified modes is
equivalent to a mechanical sealing (i.e. it substitutes mastic seals, branded labels, etc.), so it
is electronic way of sealing of the calculator. Therefore the basic attention should be paid
to the number of entries into service modes. Difference of this number from the recorded
one at the moment of device commissioning (release date according to the certificate) should
be considered as damaging of the seal installed by inspecting organization. The possibility of
mechanical sealing of the calculating unit with the use of sealing cups with holes on device
case is stipulated. So, the fact of intervention in device functioning should be registered by
analysis of event journal. All user’s actions, which lead to change in device readings are
dated in the event journal. If the event journal has a record about entering into service mode,
but no records about meter parameters changing, it means that the user logged in and immediately logged out without changing meter parameters and performance.
12.1.2 In doubts of correct installation or proper operation of the water meter it is ne-
cessary to run ‘Check’ mode and to compare correctness of the entered values for RTD temperature coefficients, FS exact diameters, distances between flow sensor transmitters and FS
conversion ratios to data resulted in Chapter 17 ‘Parameters and characteristics of meter
components’. Thus compared values can differ in limits, which are not exceeding units mentioned in Chapter 17 of this OM.
12.1.3 It is necessary to consider, that water meter commissioning begins with reset
(zeroing) of its integrated indications (accumulated measuring data) on setting account mode
to “In account”. Reset of indications also should be carried out after meter repair or verification.
12.1.4 Difference between power on time and time of correct work means that a water
meter operated incorrectly (switching-off, breakage or short circuit of sensor cables, absence
of the water, etc., see item 10.8). Therefore sealing of flow sensors or their connectors is not
obligatory. However, the possibility of mechanical sealing for flow sensors and their connectors with a use of proper holes in clamping nuts of FlS and connector housings is stipulated.
12.1.5 To except a non-authorized influence on RTD parameters and so on temperature
measurement accuracy it is necessary to mechanically seal up the temperature sensor using a
hole in RTD housing.
12.2 Maintenance service is carried out by the representative of service organization.
During servicing it is necessary to carry out the security measures interpreted in Chapter 8.
Page 39

39
12.3 Battery replacement.
Battery resource is indicated in ‘Check’ menu and also included in current status report.
Battery replacement (lithium battery, voltage 3.6 V) should be done at least once every 6
years. Replacement can also be carried out sooner or later depending on meter operation.
Battery replacement can be done without breaking of measuring process or with break-
ing when verification is needed. Battery should be ordered only at manufacturing company.
Installation of other type batteries is forbidden.
The order of battery replacement:
− run ’Setup’ mode, ’Battery replacement’ item;
− after confirmation of replacement, meter switches to battery replacement mode and
«battEry» is indicated on the meter display. Being in this mode meter stops measuring
process and wait for battery replacement;
− unscrew four screws that fix the cover of battery slot on the back side of the meter,
remove the battery and disconnect it from the meter;
− install the new battery, put it in the slot so, that the wire should not be bent by slot
cover;
− close the cover of battery slot and screw the four screws to provide tightening of the
slot gasket;
− press «To the right» button on the meter keyboard. Meter switches from battery re-
placement mode to measuring process.
Time of starting and ending of battery replacement is recorded in the event journal and
time period of replacement is identified as meter non-work time.
Warning!
After switching off the old battery the new one should be switched on in
5 minutes. Otherwise meter stops metering and resets current time. This also
will be registered in the event journal.
If after entering battery replacement mode procedure is not completed within 10 mi-
nutes, the meter switches to a regular measurement mode.
The order of battery replacement is represented in Figure 12.1.
Page 40

40
Figure 121.1
Page 41

41
12.4 There are two types of maintenance for meters: #1 and #2.
12.4.1 Maintenance #1 is carried out on a meter operation place once in six months
and includes visual check and check of working capacity.
Check visually:
− no leak in places of meter installation;
− reliability of contact joints;
− no mechanical damages on plastic details;
− safe isolation of connecting cables;
− measuring data output in accordance with items 11.2.1.
At the end of the heating season it is recommended to clean of flow sensor surfaces us-
ing washing-up liquids, weak solutions of alkalis or acids (without mechanical cleaning). If
water meter was out of service for a long period of time it is recommended to switch the meter into ‘Stop’ mode and provide the guaranteed absence of the water in a flow measurement
section.
12.4.2 Maintenance #2 is carried out before regular verification of meters.
Following operations should be carried out:
− operations, provided by maintenance #1;
− visual check of precipitation on the inner surface of flow measurement section (FS);
− dismantling and cleaning of FS according to item 12.5.1 and dismantling and clean-
ing of RTD if severe precipitation has been detected.
Dismounting and cleaning of FS of DN20 should be carried out only at manufacturing
company or in authorized labs for verification.
Dismounting and cleaning of FS is carried out in the following way:
− to dismount ultrasonic flow sensors (except for FS of DN20);
− to dismount FS from the pipeline (if possible);
− to carry out visual check of FS and, if necessary, to clean mechanically its inner sur-
face from precipitation;
− to wash out inner FS surface by a synthetic washing-up liquid of any type and then
by water.
12.5 Meters (calculator, ultrasonic FlS, temperature sensors, flow measurement sections)
undergo a verification after maintenance #2. Recalibration interval is no more than 4 years.
FS of DN20 should undergo verification procedure with undamaged seals on FlS.
Page 42

42
13 Typical faultinesses and methods of their elimination
While in operation, the meter constantly checks both the working capacity of its units
and the working capacity of sensors (flow sensors, temperature sensors, etc.) connected to
the meter.
Diagnosed errors are subdivided into groups according to a priority (importance for rea-
lization of correct measurement). The group number is less, the error importance is more.
The error code includes its number and number of the measurement channel, in which there
was an error.
Displayed error looks on the indicator as follows (example):
Er 1_3_1
Here 1_3_1 is error code, which consists of group number (first digit), error number
(second digit) and measurement channel number (third digit). In this case measurement
channel number is a number of temperature sensor. Simultaneously only one error can be
displayed on the indicator. To view all errors it is recommended to use ‘Errors’ mode.
13.1 System errors.
As mentioned above, the lower number of errors, the higher its priority. Without priori-
ties, there are system errors - errors of internal meter’s hardware, which generally preclude
the operation of the meter. If there are such errors, no parameter is measured and accumulation of any parameters is not provided. Such errors are displayed on the indicator as follows
(example):
«SYSErr02»
Number means an error type. System errors are registered in the event journal with
some text decoding, if possible.
In case of system error the meter should be delivered to manufacturer for repair.
13.2 Error group «0».
In group «0» following errors are included:
− «0_1_0» - The error of flow rate measurement. Flow rate measurement in both chan-
nels is impossible.
− «0_2_0» - Error of ADC. Temperature measurement in all channels is impossible.
− «0_3_0» - The error of calibration of temperature detector. Calibration parameters
have been distorted somehow.
− «0_4_0» - The error of calibration of pressure transducer. Calibration parameters
have been distorted somehow.
13.3 Error group «1».
This group includes errors referring to temperature measurement (the sign «x» specifies
number of the channel):
− «1_1_x» - break of ТSx.
− «1_2_x» - fault of ТSx.
− «1_3_x» - ТSx is failed. Resistance of mentioned ТS is out of specified limits.
− «1_4_x» - The error of incorrect coefficients for ТSx, while calibrating coefficients
are entered manually.
Page 43

43
− «1_5_x» - ТSx is below the tolerance. Measured temperature value is below permiss-
ible minimum (below -50 °C).
− «1_6_x» - ТSx is over the tolerance. Measured temperature value is above permissi-
ble maximum (over +150 °C).
If ТS with an error is involved into flow rate measurement process, then all measure-
ments in the proper flow measurement channel would be canceled.
13.4 Error group «2».
This group includes flow rate measurement errors referring to one of applied pair of
flow sensors (one of enabled chords for sound propagation).
− «2_1_x» - the error of flow sensors in beam «x». This error can be caused by follow-
ing reasons:
− failure of flow sensors;
− failure of flow sensors’ cable – breakdown or fault;
− no water in FS.
13.5 Error group «3».
This group includes errors referring to flow rate measurement. If multi-beam flow me-
ter is applied the error in measurement along one of sound paths not necessary leads to flow
measurement error of flow meter.
− «3_1_x» - measurement by FSx. Flow measurement in mentioned FS is impossible.
− «3_2_x» - temperature of FSx. Because of malfunction of TS, which measures tem-
perature in specified FS, a flow rate measurement is impossible. This error always takes
place with an error of measurement by TS. This error is displayed (and is brought in error
archive) to define interrelation between a temperature measurement error and a flow rate
measurement error.
− «3_3_x» - high velocity in FSx. The volumetric flow rate in mentioned FS exceeds
maximum value for this FS type more than twice.
13.6 Error group «6».
− This group includes the errors of pressure measurement (the sign «x» specifies num-
ber of the channel):
− «6_1_x» - PSx is below the tolerance. Measured pressure is below zero. It can be
caused by object conditions (underpressure), or with breakage of certain PS.
− «6_2_x» - PSx is over the tolerance. Measured pressure is above 20 kgf/сm2. It can
be explained by the fact of increased pressure on the object and faultiness of PS.
− «6_3_x» - PSx parameters are incorrect.
Pressure measurement errors don’t affect flow rate and temperature measurements.
In hourly and daily archive printouts there is a value of error appearance duration
(Тerr). This value includes errors referred to flow measurement channel and errors, which
lead to impossibility of flow rate measurement. Errors of a flow meter and errors of temperature measurement are included here.
Printouts have a field ‘Error types’, in which presence of certain error type is displayed.
In total up to four various types of errors can be displayed within an hour and up to 8 types
of errors can be displayed within a day. The error is displayed on printout only if its duration
exceeds 1 minute.
Page 44

44
Errors are displayed by letters of the Latin alphabet. The certain letter meets to each
type of errors :
А – system errors (error group 0);
B – temperature measurement errors (error group 1);
С – flow rate measurement errors (error group 3);
D – flow rate measurement errors (error group 2);
F – pressure measurement errors (error group 6);
For example, record ‘BD’ means, that there were errors of group 1 and group 2. More
detailed information on these errors can be taken in the error archive printout.
In error archive printout the error code in the above described format and duration of
this error in hours are mentioned. Within one hour up to 4 polytypic errors can be registered
(in archive) and for a day - up to 8 polytypic errors can be registered. If the number of errors
is more than it was mentioned, than the most significant errors are stored. For example, the
error of one TS can cause some more other errors, so only error of ТS will be displayed.
Examples of archive reports are in appendix E.
The list of certain faultinesses and methods of their elimination are resulted in table
13.1.
Table 13.1.
Appearance of faultiness Possible reason Method of elimination
1. There is no indication on
the indicator
The battery is completely
discharged or not installed.
Replace (install) the battery.
2. The meter does not react
on button pressing
The calculator is faulty Provide a repair of the calcu-
lator
The notice: A repair of the calculator should be provided by specialized manufacturing
division.
Page 45

45
14 Storing
14.1 Water meter storing can be made in heated or unheated storehouses.
Meter life cycle:
− in heated storehouse is no more than 10 years;
− in unheated storehouse is no more than 5 years.
14.2 Storage conditions for meters:
1) in heated storehouse:
− ambient temperature can vary from 0 up to 50 °С;
− relative air humidity is up to 80 %, while temperature is 30 °С and below without
moisture condensation;
2) in unheated storehouse:
− ambient temperature can vary from minus 5 °C up to 50 °С;
− relative air humidity is up to 95 %, while temperature is 35 °С and below without
moisture condensation.
14.3 At long-term storage in unheated storehouse meters should be placed in an addi-
tional cover from a polyethylene film.
15 Transportation
15.1 Meters can be transported by all modes of transport. Their packing should provide
protection against direct influence of atmospheric precipitation.
While transporting by air transport, meters in packing should be placed in hermetically
compartments.
15.2 Transportation conditions:
− ambient temperature:
− for calculator can vary from minus 20 °С up to 50 °С;
− for FS can vary from minus 50 °С up to 70 °С;
− relative air humidity is up to 98 %, while temperature is 35 °С;
− transport jolty with acceleration 30 m/sec2 , while frequency varies from 80 up to 120
beats per minute.
15.3 Meters are steady against influence of sinusoidal vibrations, while frequencies vary
from 5 up to 35 Hz with amplitude up to 0.35 mm.
15.4 Throwing of meters during delivering and unloading it is not permitted.
FS and packing box with the calculator should be fixed to except accidental moving at
shipment in vehicle.
16 Guarantee of manufacturer
16.1 Manufacturer guarantees that produced water meters meet to all requirements of
their specifications within 48 months from the moment of shipment if the consumer observes
the following conditions:
− installation, starting-up and adjustment of the water meter is made by the organiza-
tion, which has the manufacturer’s sanction;
− a mark of the organization, which has provided installation, starting-up and adjust-
ment of the water meter should be put in section 19 of present Operating manual;
Page 46

46
− conditions of service, transportation and storage meet to requirements in Chapters 8-
11, 14 and 15 of present Operating manual.
16.2 Guarantees are extended on defects of meter components in delivery complete set in
case of manufacturing defects, defects of materials and componentry.
16.3 Guarantees provide replacement of defective componentry and check of meter
working capacity by manufacturer.
16.4 Faulty device should be delivered to the manufacturer for testing and repair.
16.5 Unsealing of the calculating unit (breaking of seals) before its returning to the man-
ufacturer is not allowed.
16.6 Guarantees do not provide expenses indemnification for dismantle, return and re-
peated installation of the device, and also any secondary losses caused by malfunction.
16.7 In case of malfunction identification during a warranty period the consumer should
report unsatisfactory condition of the equipment to manufacturer:
SEMPAL Co. LTD
3 Kulibina Str., Kyiv, Ukraine, 03062
Phone/Fax: (+38 044) 239-2197, 239-2198.
http://www.sempal.com
16.8 Do not put in claims to a water meter in following cases:
− installation, starting-up and adjustment have been carried out by organization, which
has no manufacturer's license on carrying out of such works;
− damage of seals on the calculating unit;
− the expiration of a warranty period;
− violation of service, storage and transportation regulations stipulated by the opera-
tional documentation
16.9 After ending of a warranty period or loss of the right on warranty service the manu-
facturer makes repair of water meters according to a tariff.
Page 47
47
Appendix А
Meter designation
Example of designation: «SVTU11B – М1 – 3 – RU50/RU50 – 4b45p/4/0 – 3/5 –
3/5/0 – 3/5 – 1/2»
Interpretation:
SVTU11B - М1 – 3 – RU50/RU50n – 4b45p/4/0 – 3/5 –
Water meter name
Water meter modification
Configuration
Types of RU.
“n”- delivery without flanges
Types of applied RTD (0 – RТD
isn’t applied)
“b”with digit –angle of inclina-
tion of the bush, “p” – if there is
a thermometer pocket
Cable length up to correspond-
ing RU, m
3/5/0 – 3/5/1 – 1/2
Cable length up to corresponding
RТD, m
Cable length up to PS, m, and num-
ber of PS for delivery (3
d
digit)
Cable length RS232C / pulse output
cable, m
Page 48

48
Appendix B
Schematic circuits for meter installations
in different configurations
Configurations 1
One water meter
Figure B.1
Configurations 3
Two independent water meters
Figure B.2
Water supply pipeline
Θ2
Water supply pipeline
Θ
1
Water meter
Calculator
Water meter
q
m1
q
m2
Θ
qm
(Water meter)
Calculator
Page 49

49
Appendix C
Overall and connecting dimensions of calculator
17
Page 50

50
Appendix D
Meter control menu
Reference designation
-«Right»,
Move to next item if corresponding button has
been pressed («Right»in the case)
"Channel 3"
See continuation on the next
page with corresponding title
«Channel3»
These buttons have the following functions:
-«Up», -«Down», -«Left»
Indication of menu item
Indicator in basic work mode.
The type of parameter and its dimension are displayed.
Editing of parameter can be done in three following steps:
-indication of parameter current value;
-editing the parameter. To start editing press “Right” button;
-indication of the result after ending of editing process.
After pressing the button “Right” edited symbol begins to blink.
Menu item denoted as ( )are indicated only for corresponding meter configuration.
t3
123.56 °C
1.3. Mass channel 1
12345678 t
Indicator in menu item select mode.
Top line shows number of menu item and its name.
Bottom line can be used to display value of indicated parameter.
Page 51

51
Page 52
52
‘Indication of main parameters’ mode
Page 53

53
’Check’ mode
Page 54

54
“Setup” mode
Page 55

55
‘Setup / Set zero’ mode
‘Setup / PS parameters’ mode
Page 56

56
‘Setup/Pressures’ mode
Page 57

57
’Setup / Pulse outputs’ mode
Pulse ouputs
3.9.1 Puls out1 info
3.9.3 Puls out1. Weight
200 P/L
3.9.4 Puls out2 info
3.9.6 Puls out2. Weight
200 P/L
3.9.1 Puls out1 _Mass_
Selection of informational parameter for
pulse output 1:
-Volume
-Mass
Selection of informational parameter for
pulse output 2.
-Volume
-Mass
3.9.3 Puls out1. Weight
200 P/L
Enter pulse weight for channel 1
-P/L (volume puls/liter)
-P/t (mass puls/ton)
3.9.4Puls out2 _Mass_
3.9.6 Puls out2. Weight
200 P/L
Enter pulse weight for channel 2
-P/L (volume puls/liter)
-P/t (mass puls/ton)
3.9.2 Puls out1. Channel 3.9.2 Puls out1 _Chan 1_ Select data channel number (number of
flow channel, ex.) for pulse output 1
3.9.5 Puls out2. Channel 3.9.5 Puls out2 _Chan 1_
Select data channel number (number of
flow channel, ex.) for pulse output 2
Page 58

58
Appendix E
Examples of reports, creating by “Sempal Device Manager” software
Hourly report example
Daily report example
Measurement system used in report (SI or SGS) chosen by user in “Setup” mode menu.
Errors report example
Page 59

59
Journal report example
Event journal for meter S/N 00050
с 29/06/2010 по 29/06/2010
14/09/2010 13:41:03; page 1 of 1
Pos.
Date Journal record
1 29/06/2010 07:44:09 Exit from "SETUP" mode
2 29/06/2010 07:43:45 End of reset
3 29/06/2010 07:43:45 Data clearing …
4 29/06/2010 07:42:20 3.2.Archive _Volume_
5 29/06/2010 07:42:02 "SETUP" mode enter
Page 60

60
Appendix F
Schematic of device cable
The notice. Enumeration of connection lines according to tables 9.4 and 9.5.
To FS1
To calculator
To sensors and peripheral devices
Device
connector
To TS
RS232 interface
Х1
Х2
FlS 1
FlS 2
FlS 3
FlS 4
TS 1
TS 2
TS 3
Х4
Х3
Х5
Х6
Х7
Х8
To FS2
D1
A11
A12
A22
A21
B1
B3
B2
Х10
To PS
Puls outputs
D4
Х11
C2
PS2
C1
PS1
Page 61
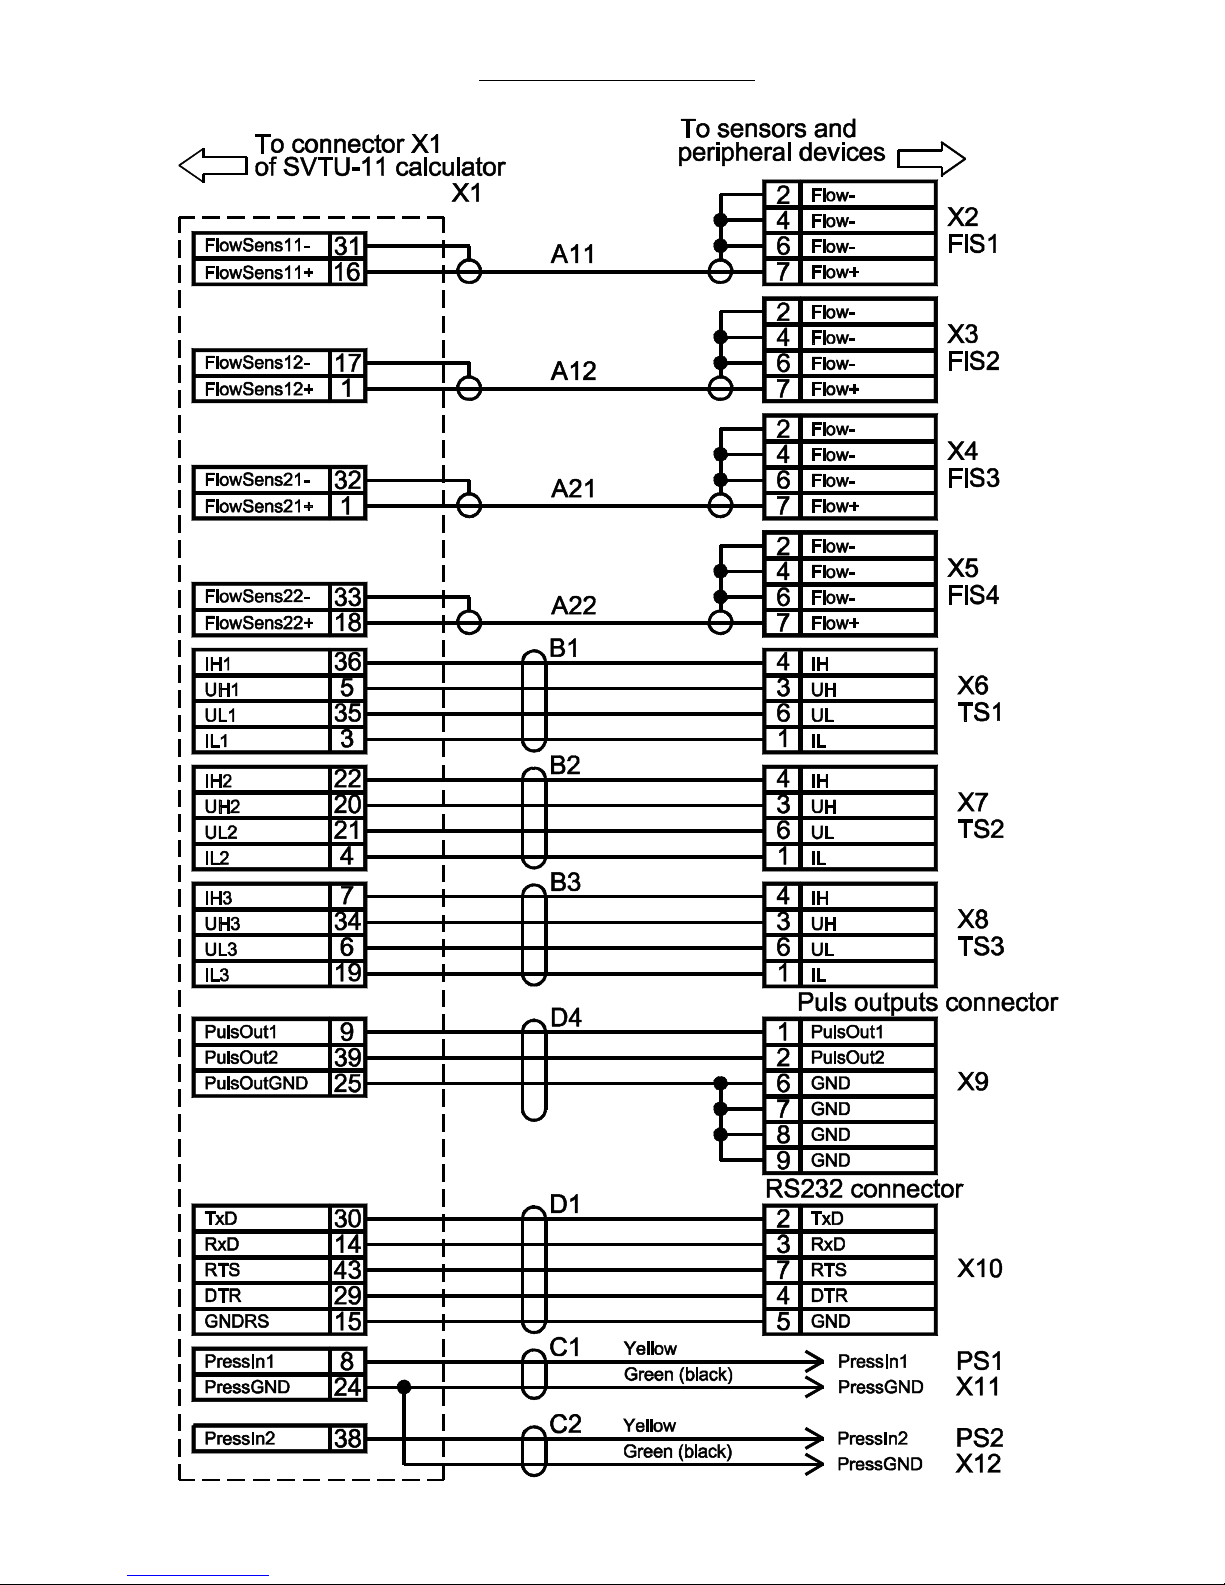
61
Schematic of device cable
Page 62

62
Pinout of connectors
Page 63

63
Appendix K
The scheme of pressure sensor mounting
Recommended mounting scheme for pressure sensor
CTU8300GQ6 (as example) and dimensions of pressure takeoff devices
1 The sensor is mounted in strictly vertical position (see figure).
2 If water characteristics don’t meet to technical requirements, then to prevent polymerizing, crystallizing and pollution on a sensor it is necessary to mount a membranous divider
with application of dividing organosilicon liquids #2.
3 The length of tubes should provide cooling of water up to 70 °C.
Page 64

64
Appendix L
Overall and connecting dimensions for flow measurement sections (FS)
Page 65

65
Overall and connecting dimensions for FS-32
Page 66

66
FS of DN 50…80
FS of DN 100…150
Page 67

67
Appendix M
How to set hydraulic zero
Setting of hydraulic zero is necessary for exception of a systematic measurement error.
It is possible occurrence can be caused by difference in manufacturing and real conditions of
setting zero.
This phenomenon appears as non-zero meter indications when the real flow velocity is
equal to zero.
This action allows eliminating of a systematic measurement error from measuring results.
Device maintenance without zero setting or with incorrect zero setting can lead to significant flow measurement errors, especially in a range of low flow rates.
Zero setting should be carried out:
− at device commissioning;
− after mounting (dismantling) of flow sensors (FlS) during routine maintenance;
− after changing of order of cable connections to flow measurement section (FS);
− at inspection of flow measurement channel functionality.
Zero setting in each water meter channel is desirable to conduct at first out of pipe (on
‘tapped’ FS) and then (it is obligatory) on the object. If there is no possibility to cut off a water, zero setting out of pipe is a unique way for correct device commissioning. Thus it is necessary to provide repeated connection of flow measurement channels cables and FlS, which
has been used during zero setting in laboratory conditions. Thus FlS should not be dismantled from ‘tapped’ FS.
1 Inspection of correctness for zero setting on ‘tapped’ FS:
1.1 Assemble a flow measurement section with technological tap at the end face, lo-
cate it vertically, fix flow sensors and completely fill FS with preliminary boiled or settled
water. Clean end faces of flow sensors from remained air bubbles manually (by a finger or a
brush) if they were appeared during filling of FS.
1.2 Connect flow sensors (FlS) and resistive temperature detectors (RТD) to corres-
ponding cables.
1.3 No error messages concerning flow rate and temperature measurements.
1.4 Enter the mode ‘Zero setting’ and make setting on both channels simultaneously
or separately. While setting, two groups of digits are displayed on the screen. The first one
represents the hardware information about zero water velocity. This group is stored before
following resetting. The second group shows number of zero velocity measurement cycles.
For identical FS types these numbers of measurement cycles usually coincide. For different
FS types they can be different, within the limits of 96 cycles, but do not exceed 120.
1.5 If zero setting has not been completed positively, it is necessary to check up ser-
viceability of cables, quality of connections in sockets and then repeat the previous item.
2 For successful zero setting on an object it is necessary to provide:
− reliable water cutting off from both sides of flow measurement section by means of
valves;
− qualitative installation and serviceability of flow sensors, temperature sensors and al-
so device entrance cables;
Page 68

68
− the level of electromagnetic interference created by surrounding equipment, should
not exceed a permissible level for the meter.
Before hydraulic zero setting it is necessary to run the water meter in waterworks on the
maximal water flow rate for half an hour, then to cut off a valve after flow measurement section, to cut off a valve before flow measurement section. Hydraulic zero setting can be conducted in a few minutes after water fluctuations in the tapped section will stop.
If value of the first group of digits, displayed on the meter indicator and registered by
the meter as water zero velocity noticeably exceeds 500 or number of measurement cycles,
then some obstacles are possible on tapped FS:
− air bubbles in FS;
− water leak through valves;
− significant level of external electromagnetic noise.
 Loading...