

Page 1
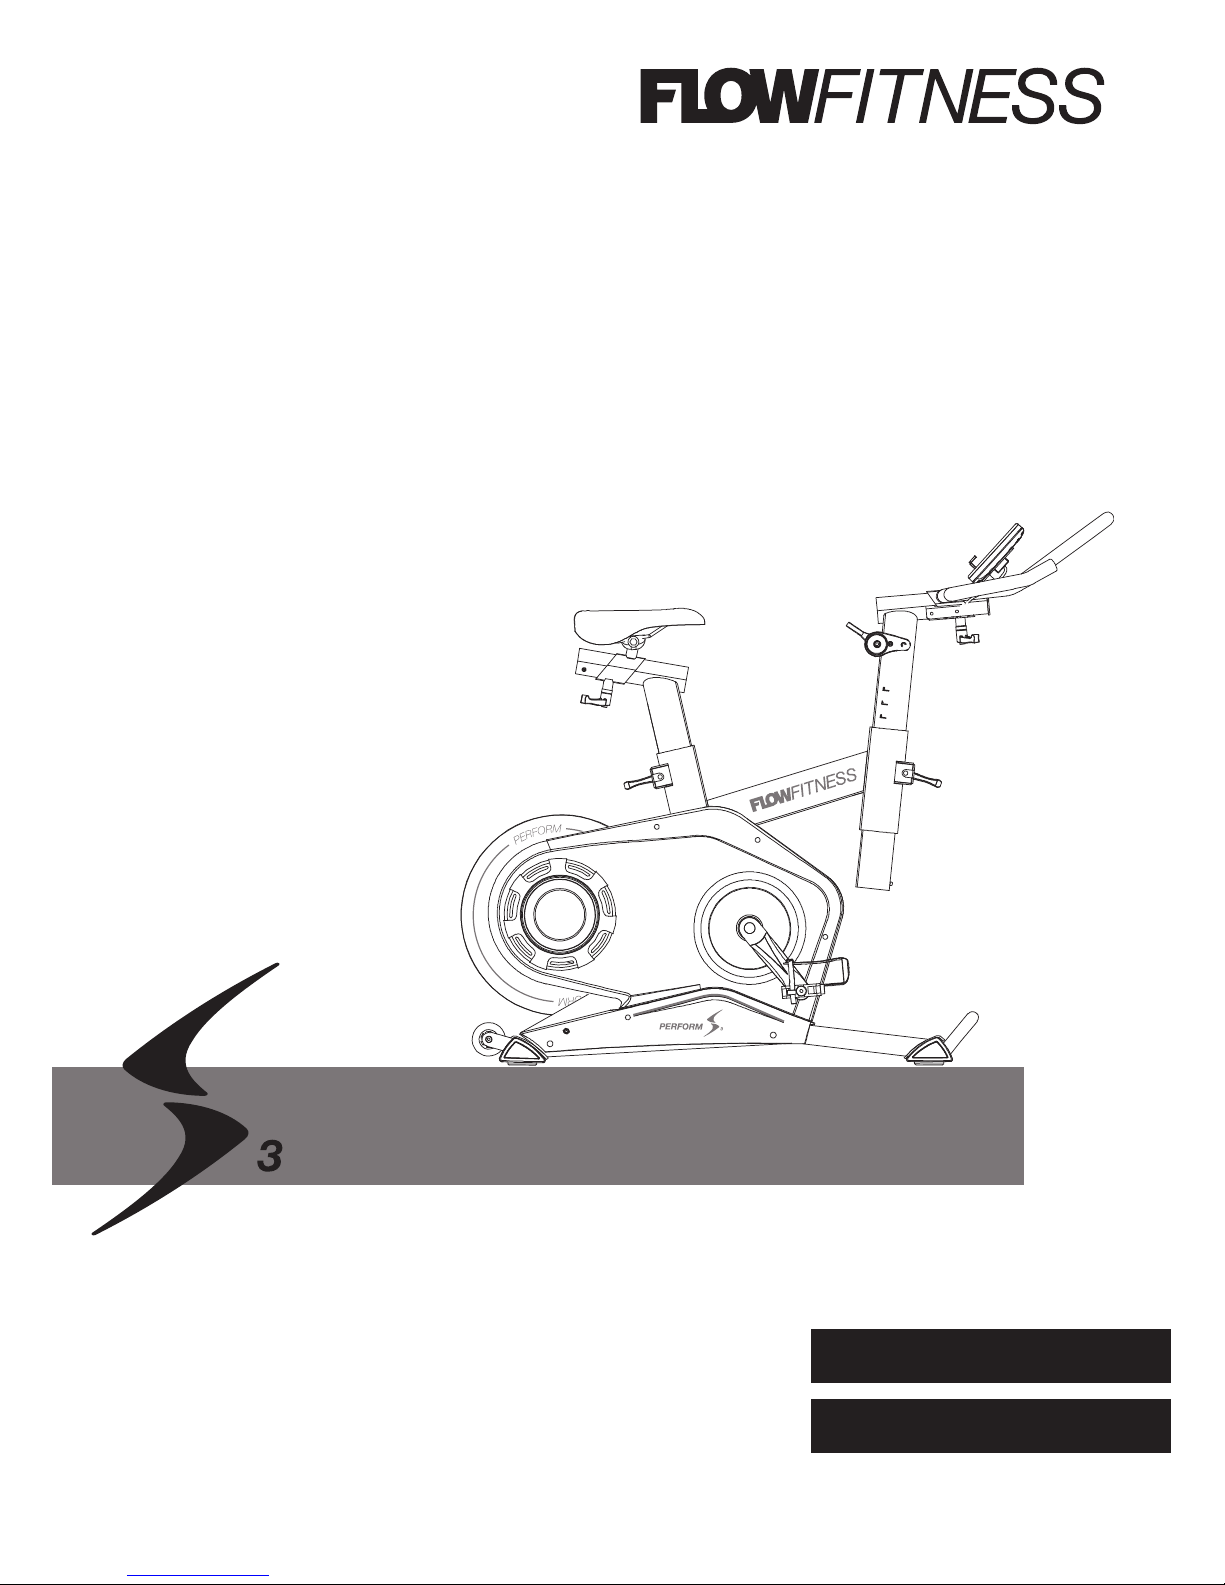
PERFORM S3
User Manual
ENGLISH
NEDERLANDS
Page 2
Flow Fitness PERFORM S3
Copyright © Flow Fitness B.V.
Alle rechten voorbehouden. Niets uit deze gebruiksaanwijzing mag worden gebruikt of gereproduceerd in welke vorm of op welke wijze dan ook
zondervoorgaande schriftelijke toestemming van Flow Fitness B.V.
All rights reserved. Nothing in this instruction manual may be used or reproduced in any form or way without the express written permission of
Flow Fitness B.V.
NEDERLANDS 3 - 33
ENGLISH 34 - 68
Page 3
Gebruiksaanwijzing - Flow Fitness PERFORM S3 - 3
Inhoud
1. Belangrijke informatie 4
Inhoud verpakking .........................................................................................................................................................5
2. Introductie 6
Belangrijke onderdelen ..................................................................................................................................................6
Specificaties ..................................................................................................................................................................7
3. Fitness 8
Wat is Fitness ................................................................................................................................................................8
Trainen op hartslag ........................................................................................................................................................8
Uw trainingsdoel bepalen ..............................................................................................................................................8
Warming Up & Cooling Down .........................................................................................................................................9
Introductie training schema ......................................................................................................................................... 10
Trainingschema conditie verbeteren ............................................................................................................................11
Trainingschema gewicht verliezen ............................................................................................................................... 11
4. Montage 12
1. Montage van de stabizatoren ................................................................................................................................... 12
2. Verstellen van de stuur- en zadelbuis .......................................................................................................................13
3. Montage van het zadel, stuur en bidonhouder ..........................................................................................................14
4. Montage van de iConsole .........................................................................................................................................15
5. Montage van de trappers en aansluiten van de voeding ...........................................................................................16
5. Gebruik 17
Verplaatsen, opbergen en in gebruik nemen ................................................................................................................17
Onderhoud ..................................................................................................................................................................17
Gebruik van de iConsole ..............................................................................................................................................18
Trainen met de iConsole
+
app ......................................................................................................................................22
6. Product informatie 30
Exploded view .............................................................................................................................................................30
Onderdelenlijst ............................................................................................................................................................31
Probleemoplossen .......................................................................................................................................................32
7. Garantie 33
Garantievoorwaarden ..................................................................................................................................................33
Page 4
4 - Flow Fitness PERFORM S3 - Gebruiksaanwijzing
1
Belangrijke informatie
Gezondheid
BELANGRIJK: lees eerst deze handleiding en volg de instructies nauwkeurig op voordat u het product gaat gebruiken.
- Raadpleeg een deskundige om het trainingsniveau te bepalen dat voor u het best geschikt is.
- Indien u tijdens het trainen last krijgt van duizeligheid, misselijkheid of ander lichamelijk ongemak, stop dan direct met trainen en raadpleeg een arts.
- Houd tijdens het trainen uw hartslag in de gaten en stop onmiddellijk bij afwijkende waarden.
- Wij adviseren u warming up en cooling down oefeningen te doen gedurende vijf tot tien minuten voor en na gebruik van het product. Zo kan uw
hartslag geleidelijk toe- en afnemen en voorkomt u spierpijn.
Veiligheid
- Controleer voor gebruik of het product juist functioneert. In geval van storing of defect stoppen met trainen en direct contact opnemen met uw dealer.
- Gebruik het product nooit als deze defect is.
- Het product mag door maximaal één persoon tegelijk worden gebruikt.
- Het product dient op een vlakke ondergrond te staan.
- Het product is geschikt voor personen met een lichaamsgewicht tot 150 kilogram.
- Zorg ervoor dat er altijd minimaal één meter vrije ruimte in alle richtingen rondom het apparaat is wanneer u aan het trainen bent.
- Steek geen voorwerpen in openingen van het apparaat.
- Houd kinderen en huisdieren uit de buurt van het apparaat.
- Personen met een handicap moeten medische goedkeuring hebben en begeleiding krijgen bij gebruik van dit product.
- Plaats geen handen en voeten onder het product.
- Houd nooit uw adem in tijdens het trainen. Uw ademhaling moet op een normaal tempo zijn, afhankelijk van de intensiviteit van uw training.
- Begin uw trainingsprogramma langzaam en bouw dit geleidelijk op.
- Draag altijd geschikte kleding wanneer u aan het trainen bent. Draag geen te wijde kleding, die tussen bewegende delen van het product kan komen.
- Gebruik voor het verplaatsen van het product altijd daarvoor geschikte tiltechnieken om rugklachten te voorkomen.
- Controleer regelmatig of schroeven en bouten goed vastzitten en draai ze indien nodig aan.
- De eigenaar van dit apparaat is er verantwoordelijk voor dat alle gebruikers op de hoogte zijn van de waarschuwingen en voorschriften zoals vermeld
in deze gebruiksaanwijzing.
- Dit product is bedoeld voor gebruik in een schone, droge omgeving. Opslag in koude en / of vochtige ruimtes zou tot defecten aan het product kunnen
leiden.
WAARSCHUWING
Laat uw conditie controleren door een arts voordat u begint met trainen. Dit is extra belangrijk voor personen ouder dan 35
jaar of personen met gezondheidsproblemen. Lees alle instructies voor gebruik. Flow Fitness is niet verantwoordelijkheid
voor persoonlijk letsel of schade aan bezittingen veroorzaakt door gebruik van dit product.
Page 5
Gebruiksaanwijzing - Flow Fitness PERFORM S3 - 5
1
Belangrijke informatie
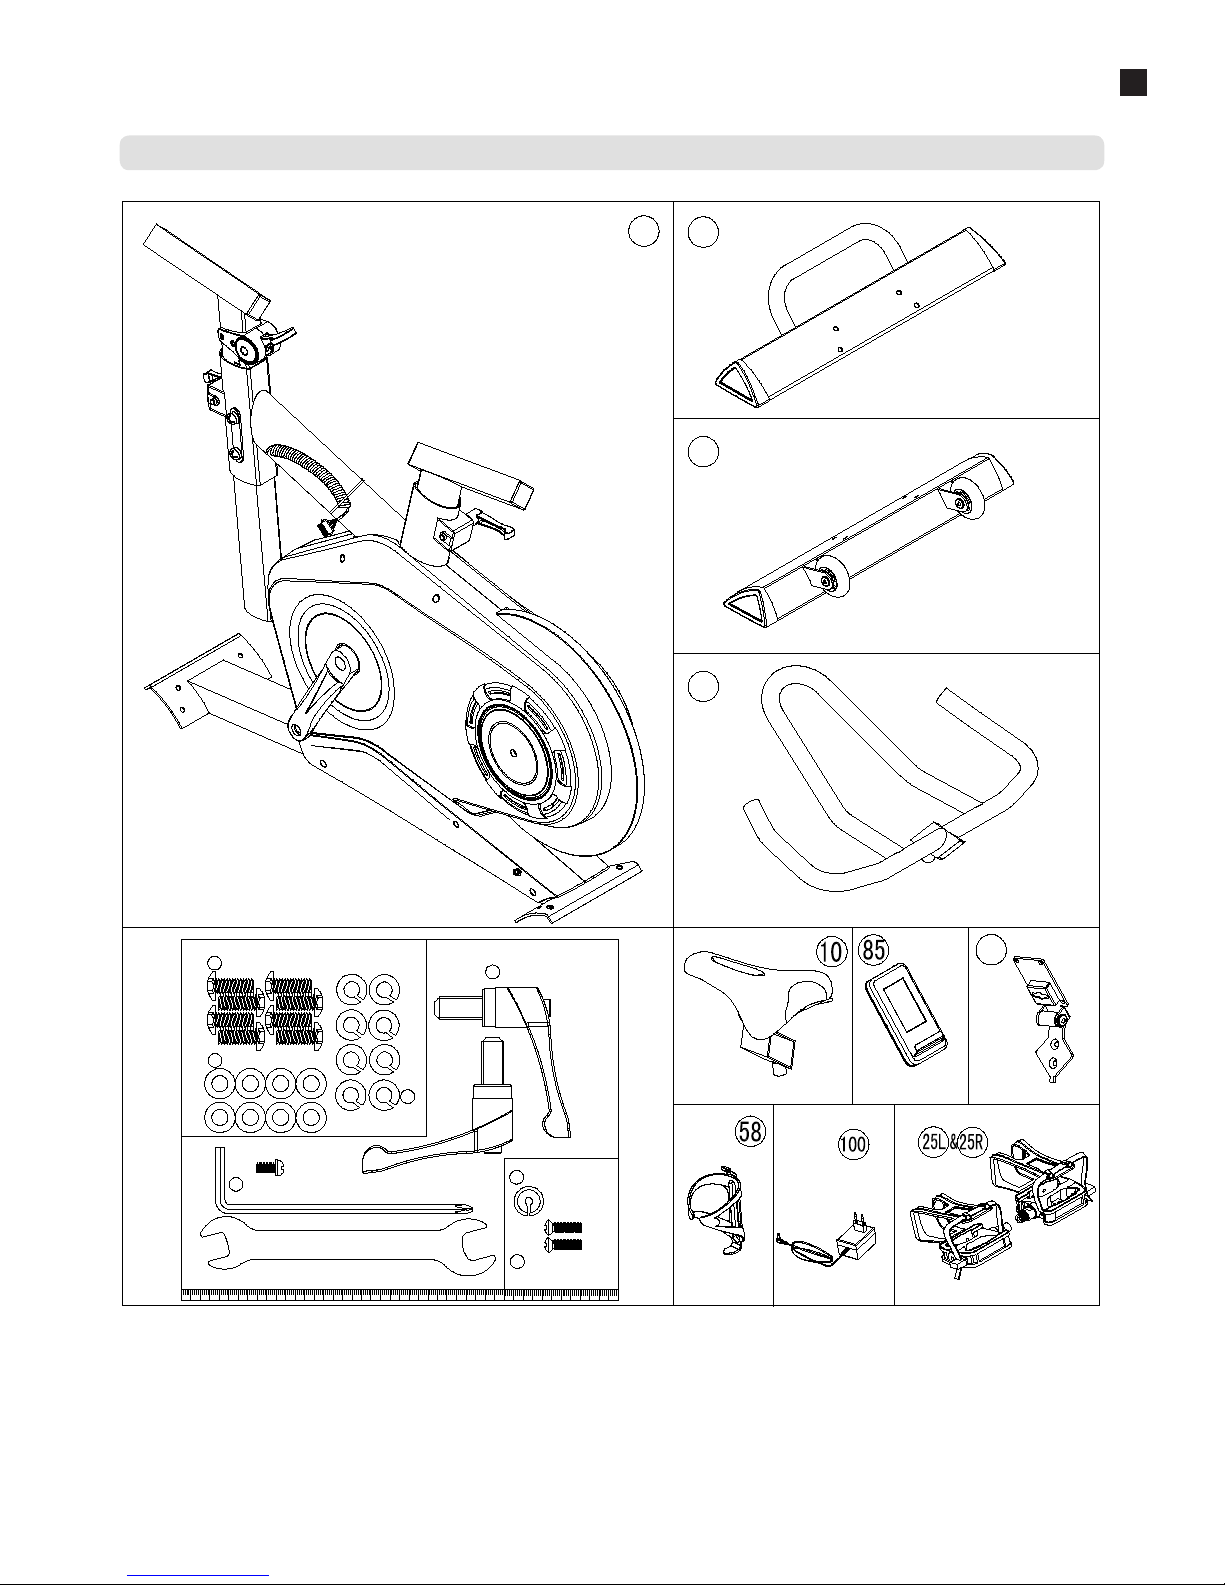
Inhoud verpakking
x1
x1
x1
x1
x1
x1
x1
1 2
3
13
14
x1
x1
(mm)
M8x1.25x20L 8PCS
D15.4xD8.2x2T 8PCS
D16xD8.5x1.2T 8PCS
5
6
7
KH-848
2PCS
12
STEP-1
M5*10L 1PCS
97
13
15
STEP-3
M5*0.8*15L 2PCS
86
STEP-4
41
1pcs
x1
Page 6
6 - Flow Fitness PERFORM S3 - Gebruiksaanwijzing
2
Introductie
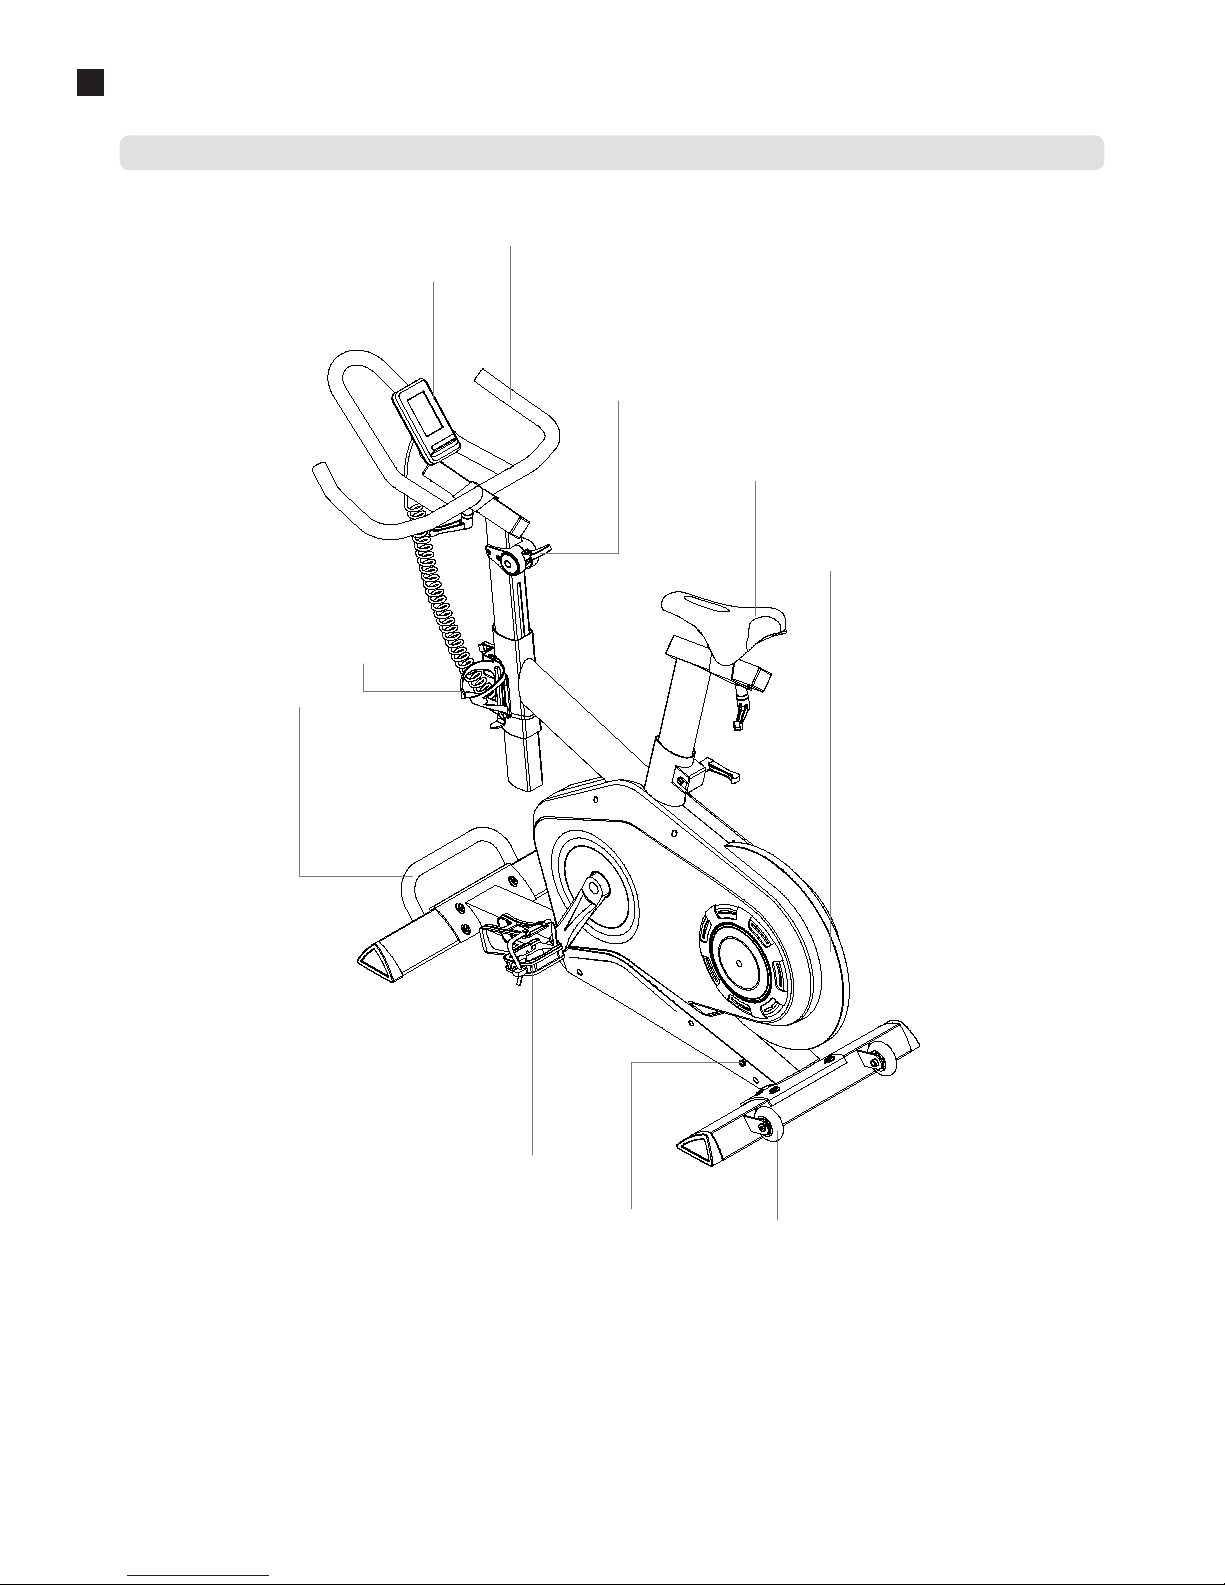
Belangrijke onderdelen
Verstelbaar stuur
Handrem - Noodrem
Verstelbaar zadel
Vliegwiel
iConsole
Bidonhouder
Handgreep
Pedaal met voetband & SPD
Aansluiting voeding
Transportwielen
Page 7
Gebruiksaanwijzing - Flow Fitness PERFORM S3 - 7
2
Introductie
Specificaties
18 programma’s
1 Manueel programma
12 Voorgeprogrameerde programma’s
3 Harslag gestuurde programma’s
1 Target Heart Rate programma
1 Constant WATT programma
Recovery test
Hartslag meting d.m.v.
een optionele 5kHz borstband
USB oplader
Bluetooth
Geschikt voor iConsole app met iRoute
iConsole
Console
18 programma’s
1 Manueel programma
12 Voorgeprogrameerde programma’s
3 Harslag gestuurde programma’s
1 Target Heart Rate programma
1 Constant WATT programma
iConsole+ APP
32 Weerstandslevels
18 kg Roterende massa
Permanent magneet weerstandssysteem
Afmetingen
Lengte: 152 cm
Hoogte: 104 cm
Breedte: 59 cm
Gewicht: 50 kg
Techniek
Horizontaal en verticaal verstelbaar zadel
Horizontaal en verticaal verstelbaar stuur
Pedalen met voetbanden
Pedalen schikt voor schoenen met SPD
Ergonomie
Page 8
8 - Flow Fitness PERFORM S3 - Gebruiksaanwijzing
3
Fitness
Wat is fitness? In het algemeen is een fitnessoefening te omschrijven als een activiteit die er voor zorgt dat uw hart meer zuurstof via
het bloed van uw longen naar uw spieren pompt. Hoe zwaarder de training, hoe meer brandstof (zuurstof) de spieren nodig hebben
en hoe harder het hart moet werken om zuurstofrijk bloed naar de spieren te pompen. Als u in een goede conditie bent, kan uw hart
met elke hartslag meer bloed pompen. Het hart hoeft dan niet zo vaak te pompen om de noodzakelijke zuurstof naar uw spieren te
transporteren. Uw rusthartslag en hartslag bij inspanning gaan omlaag.
Bij het trainen is het dus belangrijk om uw hartslag in de gaten te houden. De hoogte van uw hartslag is namelijk bepalend voor het
resultaat van de training. Wat voor u de beste hartslag is om op te trainen, hangt ten eerste af van uw leeftijd en aan uw trainingsdoel.
Als uw trainingsdoel is om gewicht te verliezen dan kunt u het beste op 60% van uw maximale hartslag trainen. Wanneer uw
trainingsdoel is om de conditie te verbeteren dan is dat 85% van uw maximale hartslag.
Het lichaam slaat energie op in twee vormen; koolhydraten en vetten. Bij een inspanning gebruiken we een combinatie van deze twee
engergievoorraden. Wanneer de in spanningsintensiteit hoog is, kiest het lichaam grotendeels voor snel verbrandbare energie, te
weten koolhydraten. Aangezien hiervan maar een beperkte hoeveelheid is, zal dit slechts korte tijd worden volgehouden. Bij trainingen
op lage intensiteit zal het lichaam grotendeels kiezen voor een langdurige en energievoorraad te weten vet. Aangezien dit in grote
hoeveelheden in het lichaam is opgeslagen, is dit langer vol te houden.
Hieronder is een schema weergegeven waarin u kunt aflezen wat voor u de beste hartslag is om mee te trainen. In dit schema is per
leeftijdscategorie een hartslaggebied aangegeven waarbinnen uw hartslag moet liggen tijdens de training. in de middelste kolom
staan de waarden vermeld die u moet aanhouden als u gewicht wilt verliezen. Indien u uw conditie wilt verbeteren dient u de waarden
in de rechterkolom aan te houden.
De beste manier om te beginnen met trainen is per persoon verschillend. Als u ongetraind bent of overgewicht heeft, moet u rustig aan
beginnen en uw trainingsarbeid geleidelijk opvoeren.
In het laatste hoofdstuk van deze gebruiksaanwijzing (zie: 5.Algemene informatie) staan verschillende trainingsschema’s weergeven.
Deze schema’s kunt u gebruiken bij het bereiken van uw trainingsdoel. Het programma is verdeeld in twee fasen. De eerste fase bestaat
uit zes weken en is een goede richtlijn voor beginners of personen die sinds lange tijd weer gaan trainen. gedurende deze fase wordt de
intensiteit van de training langzaam opgebouwd. Na zes weken begint de tweede fase. U kunt dan kiezen voor een trainingsschema om
gewicht te verliezen of om uw conditie te verbeteren.
Op www.flowfitness.nl kunt uw vooruitgang berekenen.
Leeftijd
Gewicht verliezen
(slagen per minuut)
60%
Conditie verbeteren
(slagen per minuut)
85%
20 -24 120 - 118 170 -167
25 - 29 117 - 115 166 - 163
30 - 34 114 - 112 162 - 158
35 - 39 111 - 109 157 - 154
40 - 44 108 - 106 153 - 150
45 - 49 105 - 103 149 - 145
50 - 54 102 - 100 144 - 141
55 - 59 99 - 97 140 - 137
60 en ouder 96 - 94 136 - 133
Wat is Fitness
Trainen op hartslag
Uw trainingsdoel bepalen
Page 9
Gebruiksaanwijzing - Flow Fitness PERFORM S3 - 9
3
Fitness
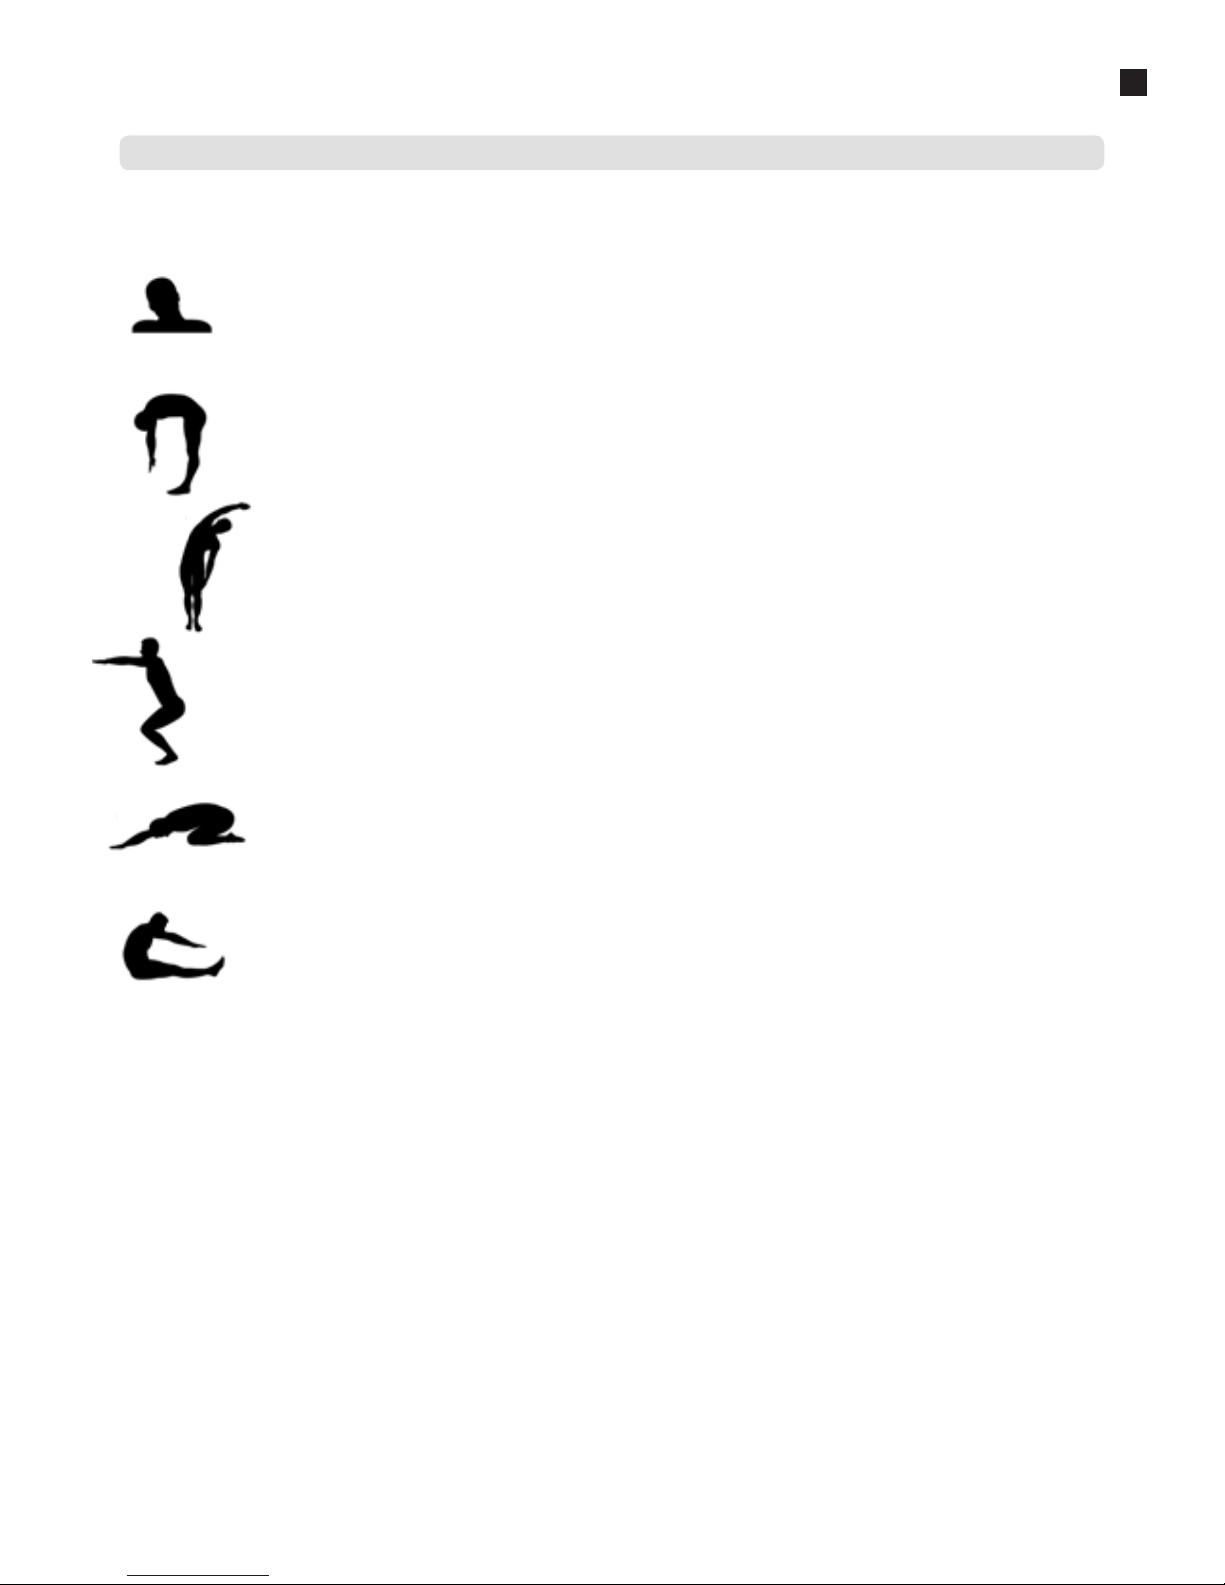
Warming Up & Cooling Down
A good training schedule starts with a good warming up and ends with a cooling down of the muscles. This will prevent painful
muscles and injury. Below you will find some suitable exercises.
Head Roll
Kantel uw hoofd naar rechts. Hou dit één tel vast, zodat u de linkerkant van uw nek licht voelt trekken. Doe dezelfde beweging naar
links, naar voren en naar achteren. Herhaal dit twee tot drie keer.
Toe Touch
Buig langzaam voorover met ontspannen armen en rug. Doe dit zover u kunt en houd dit tien seconden vast. Herhaal dit twee tot drie
keer.
Side Stretch
Steek uw rechterarm in de lucht en rek met uw arm zo hoog als u kunt. Buig naar links, zodat uw rechterzijde wordt gestrekt. Houd dit
gedurende één seconde vast. Ontspan en doe vervolgens dezelfde beweging met uw linker arm. Herhaal dit drie tot vier keer.
Knee bend
Plaats uw voeten op schouwder breedte en strek uw handen voor uw uit. Buig nu langzaam door uw knieen, niet meer als 10 centimeter.
Kom rustig omhoog en herhaal deze oefening een aantal keren.
Lower back stretch
Begin met uw knieën en voeten op de vloer. Stek uw armen voor u uit richting de grond. Plaats uw bekken boven uw voeten en leun naar
achteren en voel de spanning uw onderrug.
Hamstring Stretch
Ga op de vloer zitten met uw rechterbeen gestrekt en plaats uw linkervoet plat tegen de binnenkant van uw rechter bovenbeen.
Buig voorover richting uw rechtervoet en houd dit gedurende tien seconden vast. Ontspan en doe dit vervolgens met uw linkerbeen
gestrekt. Herhaal dit twee tot drie keer.
Page 10
10 - Flow Fitness PERFORM S3 - Gebruiksaanwijzing
3
Fitness
Introductie training schema
Trainingschema week 1 en 2
Train op 60% van uw maximale hartslag. Maximaal 3 keer per week.
Warming Up
---
5 - 10 minuten
Training
---
4 minuten
Rust
---
1 minuut
Training
---
2 minuten
Rustig fietsen
---
1 minuut
Cooling down
---
5 minuten
Trainingschema week 3 en 4
Train op 60% van uw maximale hartslag. Maximaal 4 keer per week.
Warming Up
---
5 - 10 minuten
Training
---
5 minuten
Rust
---
1 minuut
Training
---
3 minuten
Rustig fietsen
---
1 minuut
Cooling down
---
5 minuten
Trainingschema week 5 en 6
Train op 60% van uw maximale hartslag. Maximaal 5 keer per week.
Warming Up
---
5 - 10 minuten
Training
---
6 minuten
Rust
---
1 minuut
Training
---
4 minuten
Rustig fietsen
---
3 minuut
Cooling down
---
5 minuten
Na het volbrengen van het zes weken durende introductie trainingsschema, kunt u een keuze maken uit vervolgtrainingen. U kunt kiezen tussen een trainingsschema om gewicht te verliezen of een trainingsschema om conditie te verbeteren. Beide trainingsschema’s staan weergeven op de volgende pagina.
Page 11
Gebruiksaanwijzing - Flow Fitness PERFORM S3 - 11
3
Fitness
Trainingschema conditie verbeteren
Trainingschema week 7 en 8
Train op 85% van uw maximale hartslag. Maximaal 6 keer per week.
Warming Up
---
5 - 10 minuten
Training
---
7 minuten
Rust
---
1 minuut
Training
---
5 minuten
Rustig fietsen
---
1 minuut
Cooling down
---
5 minuten
Trainingschema week 9 en verder
Train op 85% van uw maximale hartslag. Maximaal 6 keer per week.
Warming Up
---
5 - 10 minuten
Training
---
10 minuten
Rust
---
1 minuut
Training
---
10 minuten
Herhaal training
---
1 a 2 keer
Rustig fietsen
---
1 minuut
Cooling down
---
5 minuten
Trainingschema gewicht verliezen
Trainingschema week 7 en 8
Train op 60% van uw maximale hartslag. Maximaal 6 keer per week.
Warming Up
---
5 - 10 minuten
Training
---
7 minuten
Rust
---
1 minuut
Training
---
5 minuten
Rustig fietsen
---
1 minuut
Cooling down
---
5 minuten
Trainingschema week 9 en verder
Train op 60% van uw maximale hartslag. Maximaal 6 keer per week.
Warming Up
---
5 - 10 minuten
Training
---
10 minuten
Rust
---
1 minuut
Training
---
10 minuten
Herhaal training
---
2 a 3 keer
Rustig fietsen
---
1 minuut
Cooling down
---
5 minuten
Page 12
12 - Flow Fitness PERFORM S3 - Gebruiksaanwijzing
4
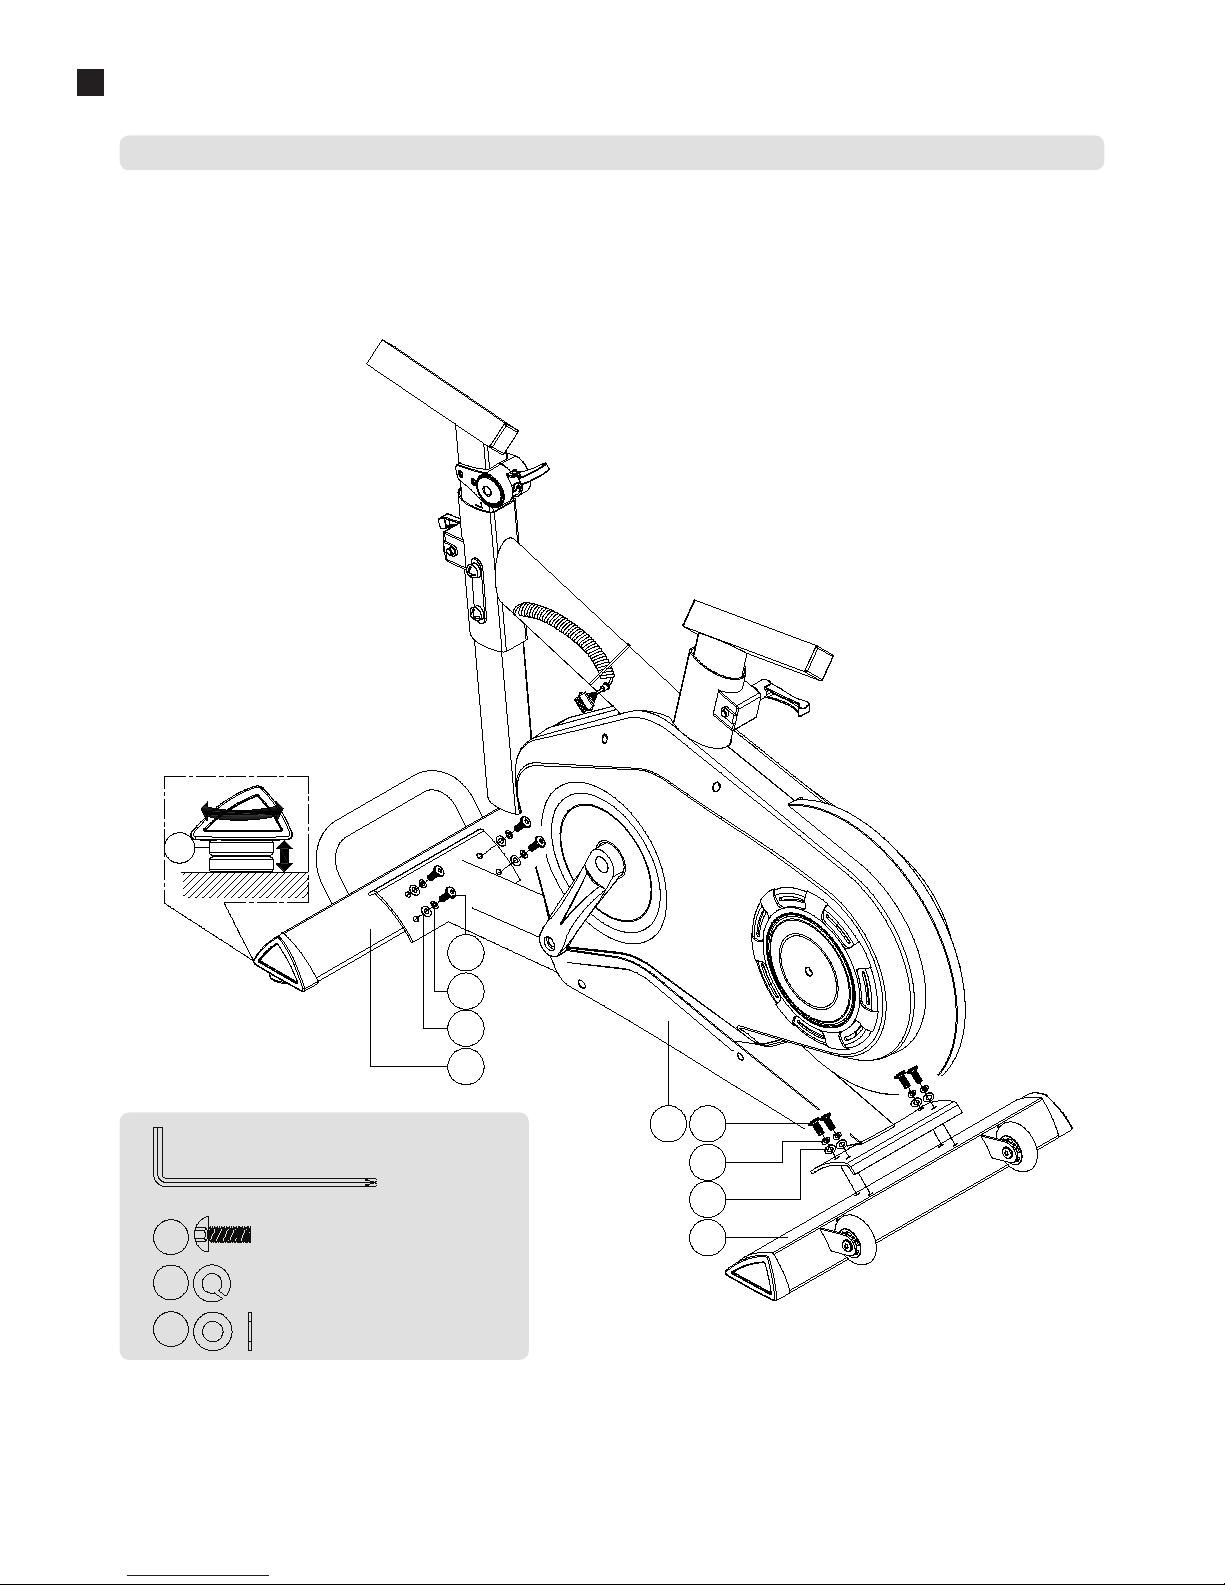
Monteer de voor en achtvoet zoals op onderstaande afbeelding staat beschreven. Nadat de voeten volledig gemonteerd zijn kan de Perform S3 door middel
van de vier stelpoten (59) waterpas gezet worden.
Montage
1. Montage van de stabizatoren
M8*1.25*20L
(x8
)
D15.4*D8.2*2T
D16*D8.5*1.2T
(x8
)
(x8
)
5
6
7
5
6
7
2
1
5
6
7
3
59
Page 13
Gebruiksaanwijzing - Flow Fitness PERFORM S3 - 13
4
Montage
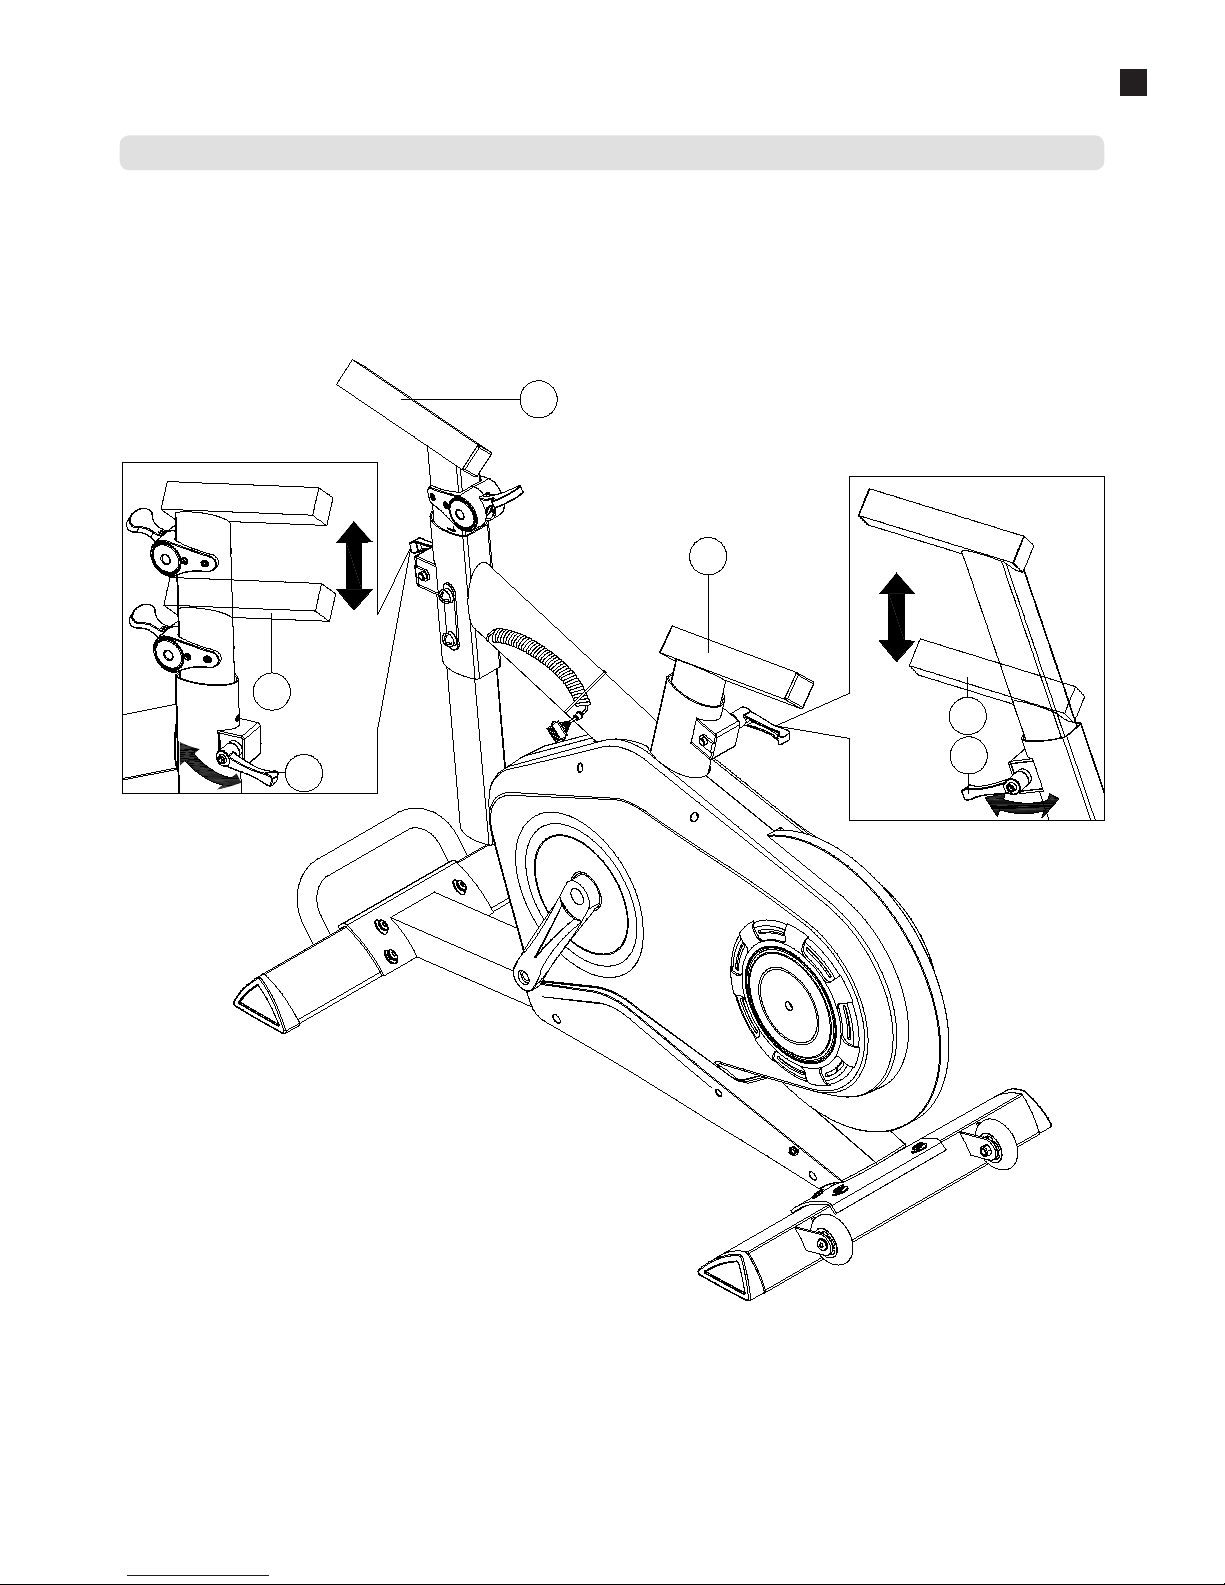
Verstelde stuur- en zadelbuis naar een hogere stand om het stuur en zadel in de volgende stap makkelijker te assembleren. Om dit in te stellen dient u
hendel (22) los te draaien. Vervolgens versteld u de buis en weer door hendel (22) vast te draaien. Wanneer u de hendel naar achter trekt kunt u de hendel
positioneren zonder dat de stuur of zadel buis vaster of los gedraaid wordt. Tijdens het gebruik van de S3 kunt u deze hendels gebruiken om het zadel en
stuur op gewenste hoogte in te stellen.
2. Verstellen van de stuur- en zadelbuis
8
DOWN
UP
DOWN
UP
8
9
9
22
22
Page 14
14 - Flow Fitness PERFORM S3 - Gebruiksaanwijzing
4
Montage
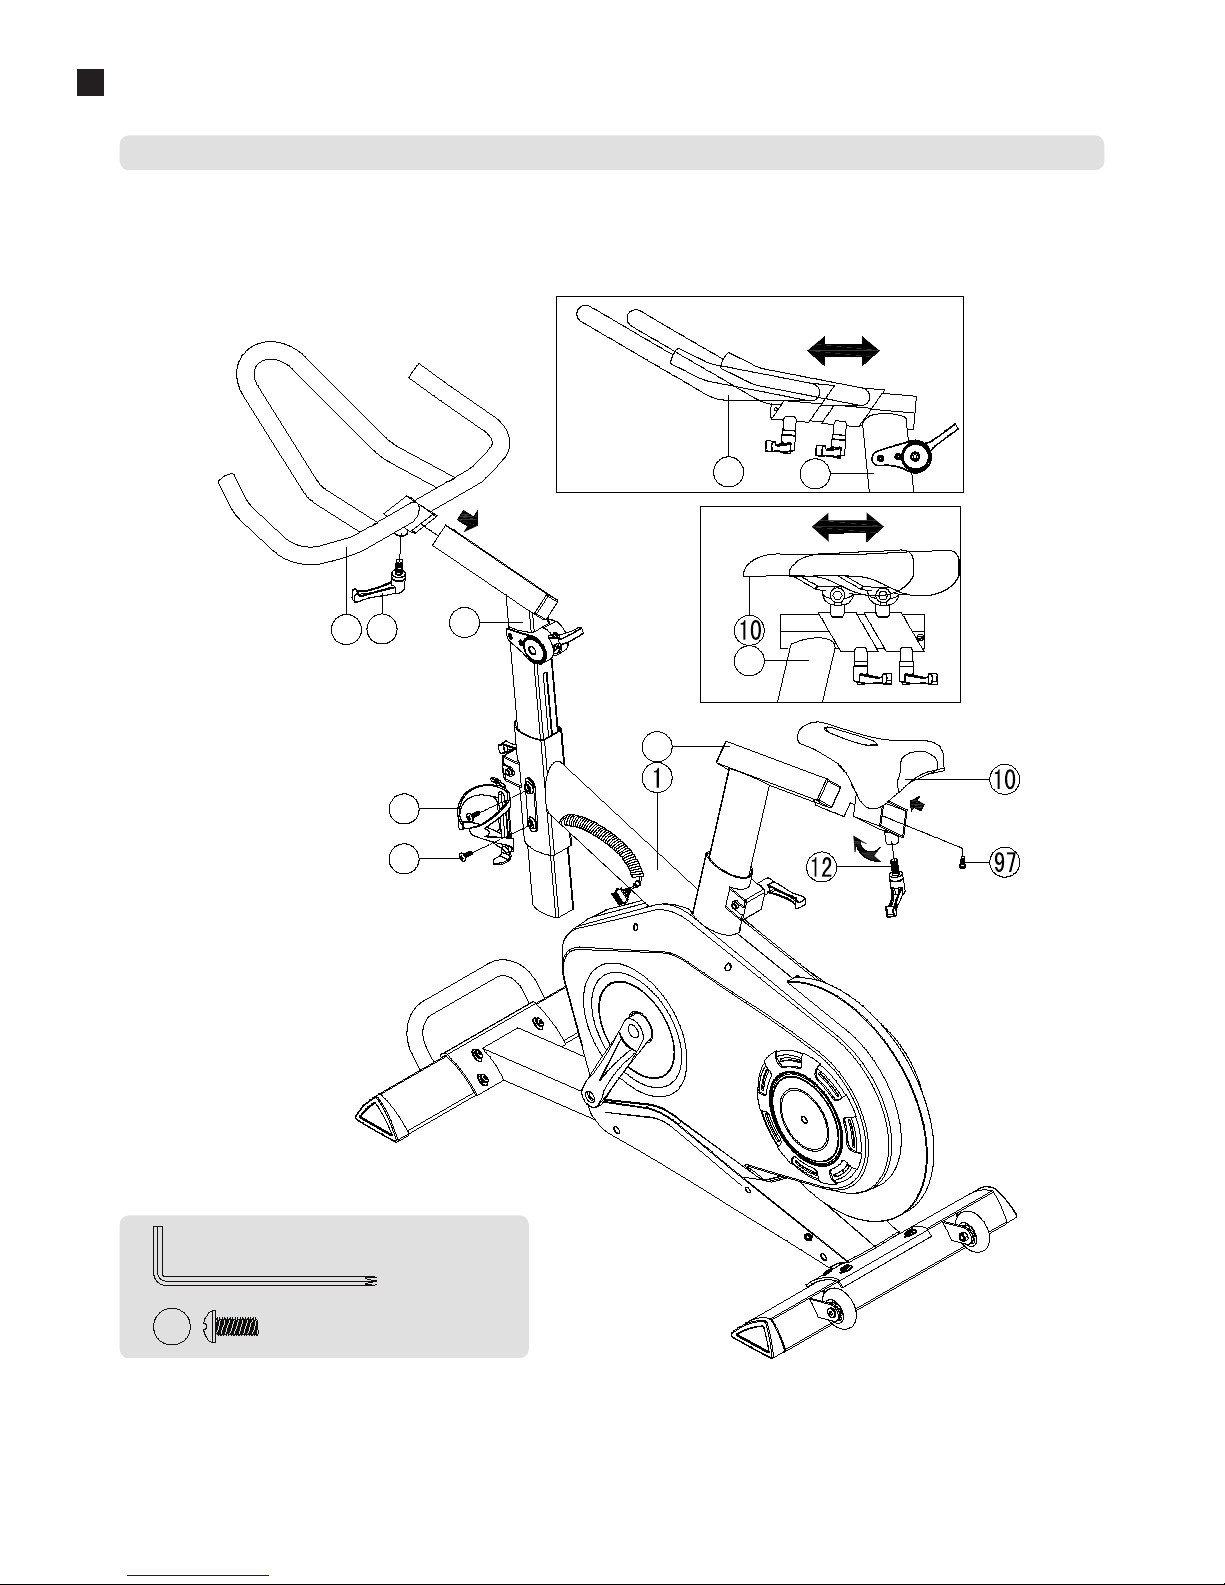
Monteer het stuur en zadel zoals aangegeven in onderstaande afbeelding. Let op dat na het monteren van het zadel schroef (97) geplaatst wordt zodat bij het
instellen van het zadel deze niet van de stuurbuis af kan schuiven. Haal vervolgens schroeven (57) uit het frame, plaats de bidonhouder en schroef deze vast
met de eerder verwijderde schroeven (57).
3. Montage van het zadel, stuur en bidonhouder
13
8
9
9
13
8
12
57
58
M5*10L
97
(x1
)
Page 15
Gebruiksaanwijzing - Flow Fitness PERFORM S3 - 15
4
Montage
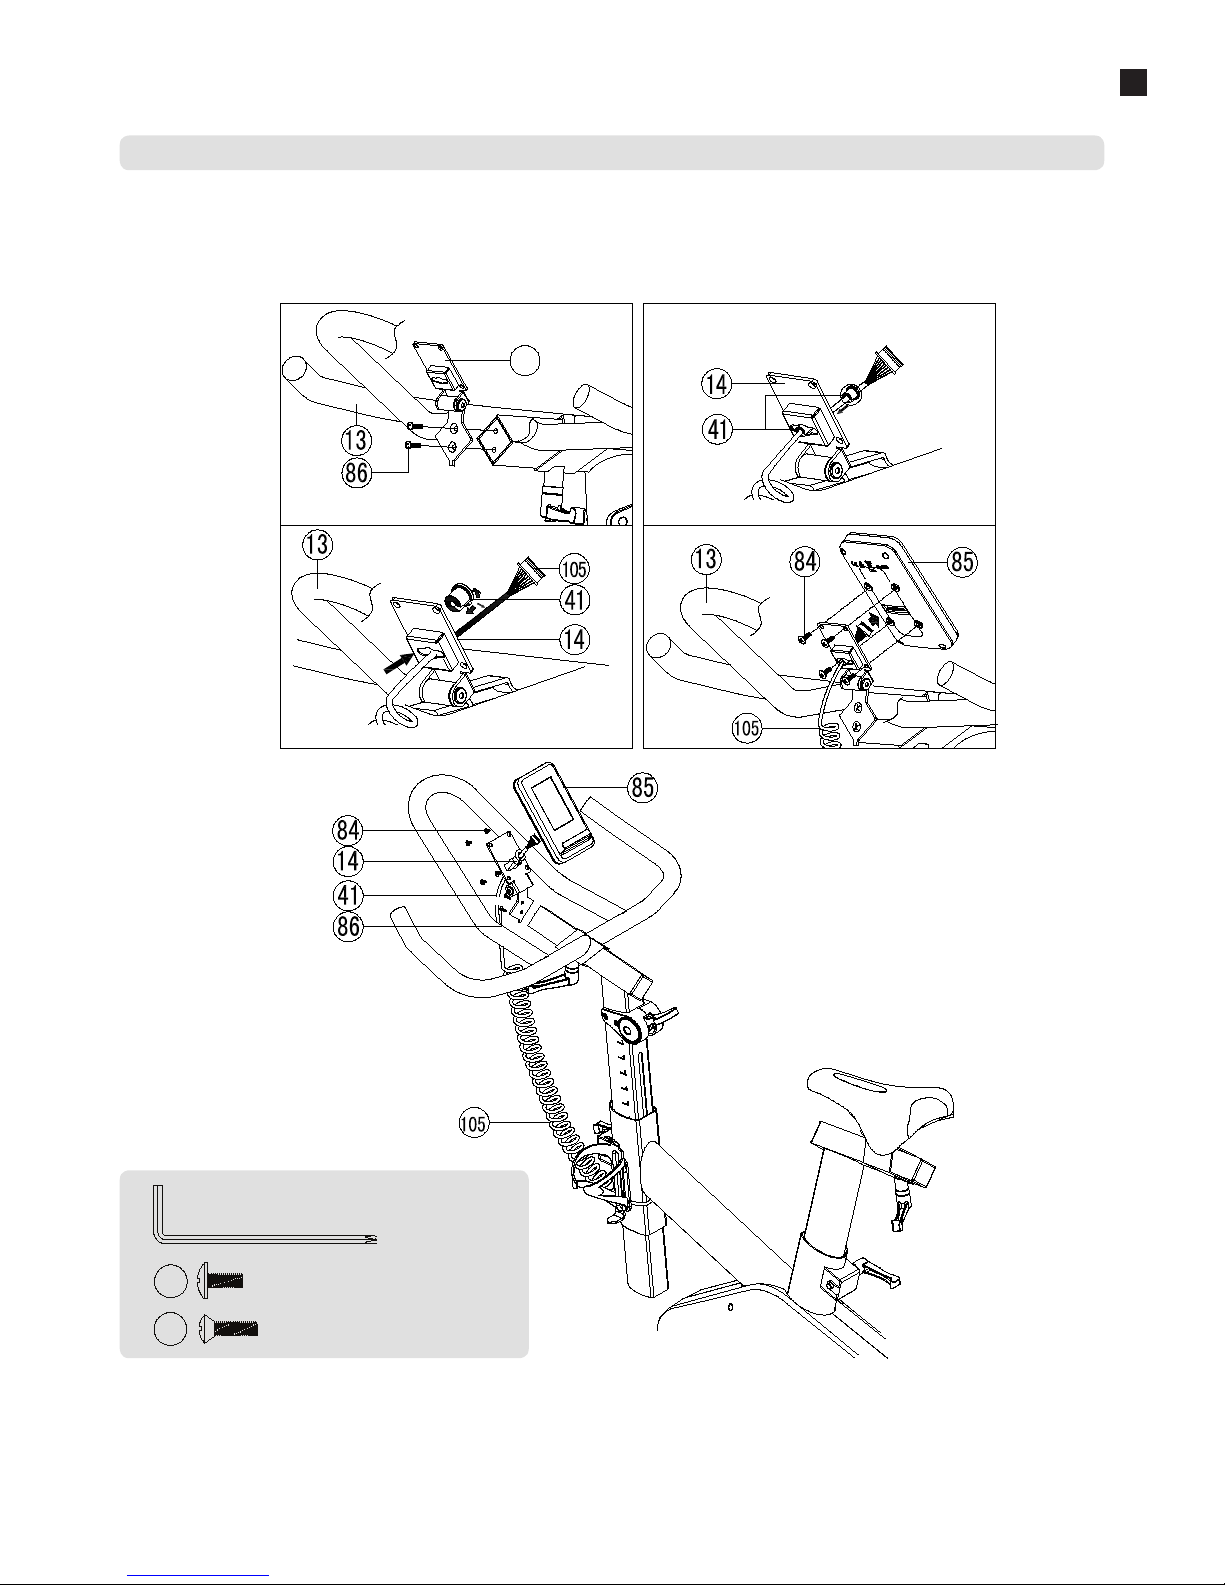
a. Monteer de iConsole houder zoals geïllustreerd in afbeelding a.
b. Voer de console kabel door de houder zoals geïllustreerd in afbeelding b.
c. Plaats het kabel afdekdopje om de console kabel en druk deze in de houder zoals geïllustreerd in afbeelding c.
d. Druk de console kabel eerst in de iConsole, vervolgens kunt u deze op de houder bevestigen zoals geïllustreerd in afbeelding d.
Wanneer de iConsole gemonteerd is kunt u deze met het meegeleverde gereedschap in de door u gewenste positie draaien.
4. Montage van de iConsole
a
b
d
c
14
84
(x4
)
M5*15L
86
(x2
)
M5*10L
Page 16
16 - Flow Fitness PERFORM S3 - Gebruiksaanwijzing
4
Montage
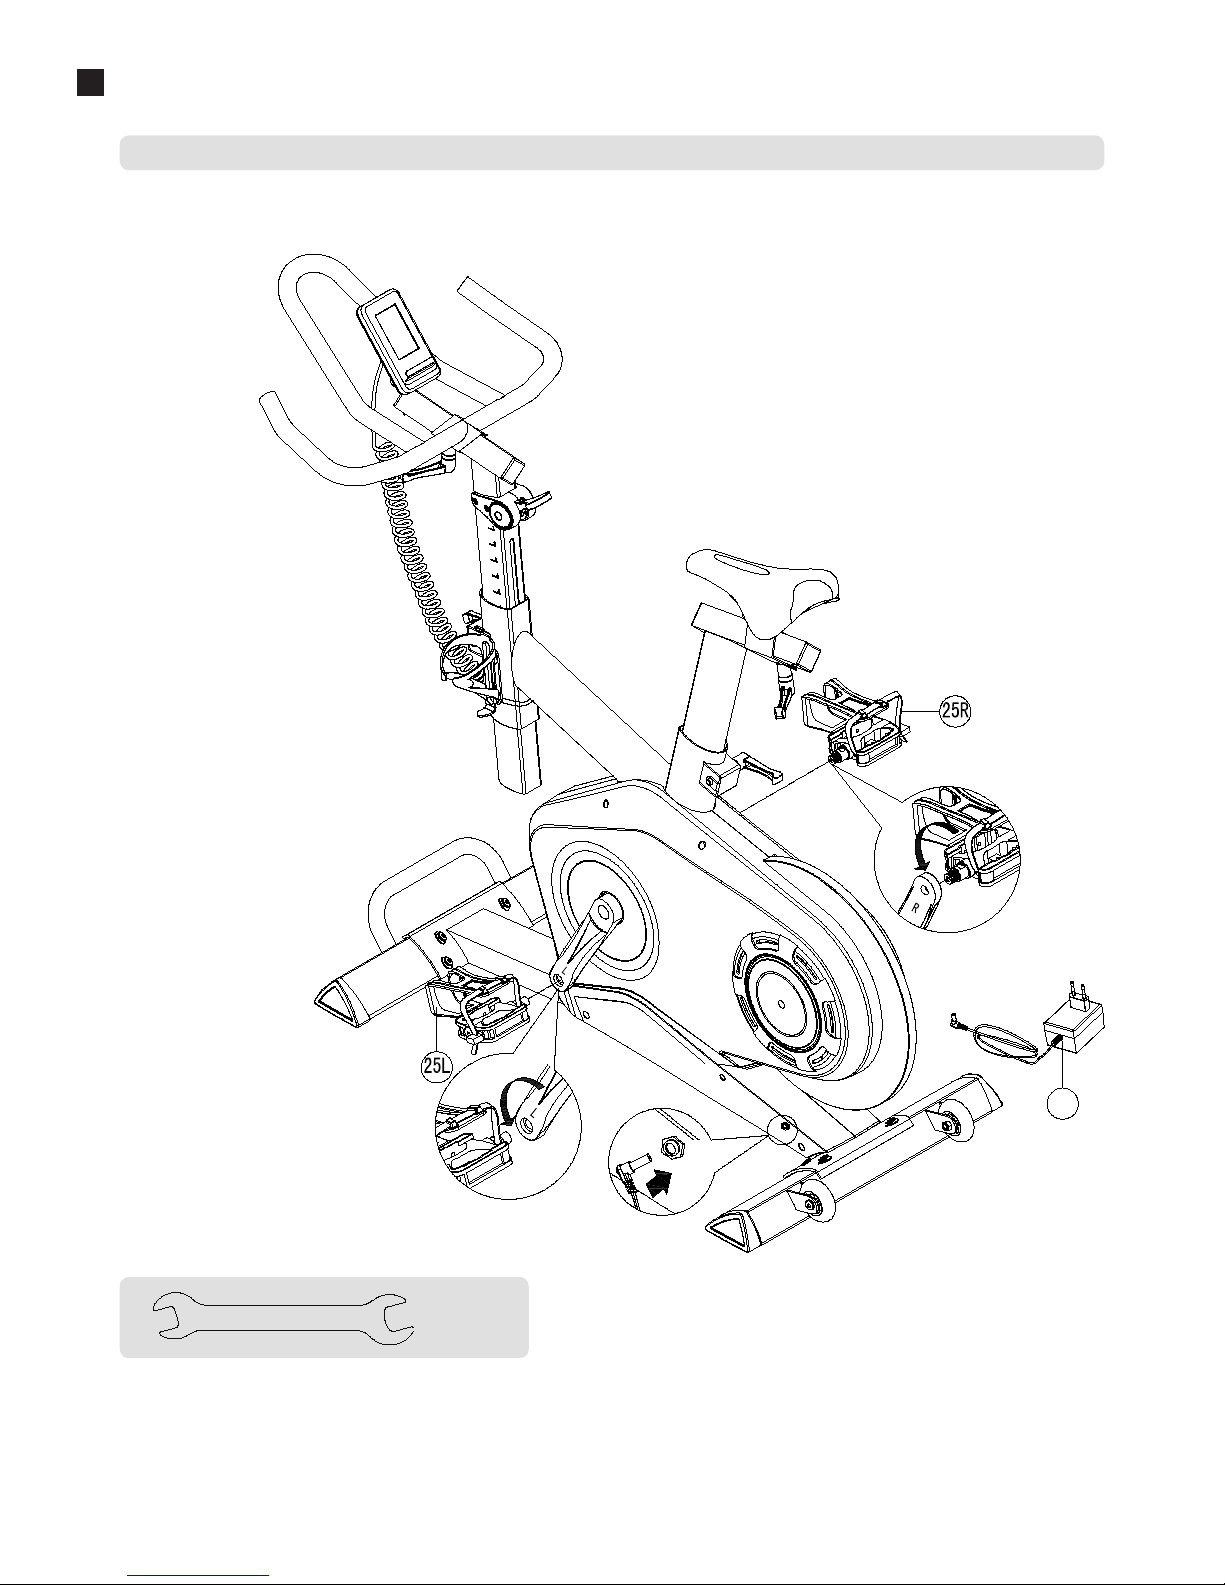
Monteer de trappers met de meegeleverde sleutel nr. 15. Draai de trappers tegen de traprichting in totdat deze stevig vast zitten. Sluit verlogens de voeding
(100) aan.
5. Montage van de trappers en aansluiten van de voeding
100
13
15
Page 17
Gebruiksaanwijzing - Flow Fitness PERFORM S3 - 17
5
Gebruik
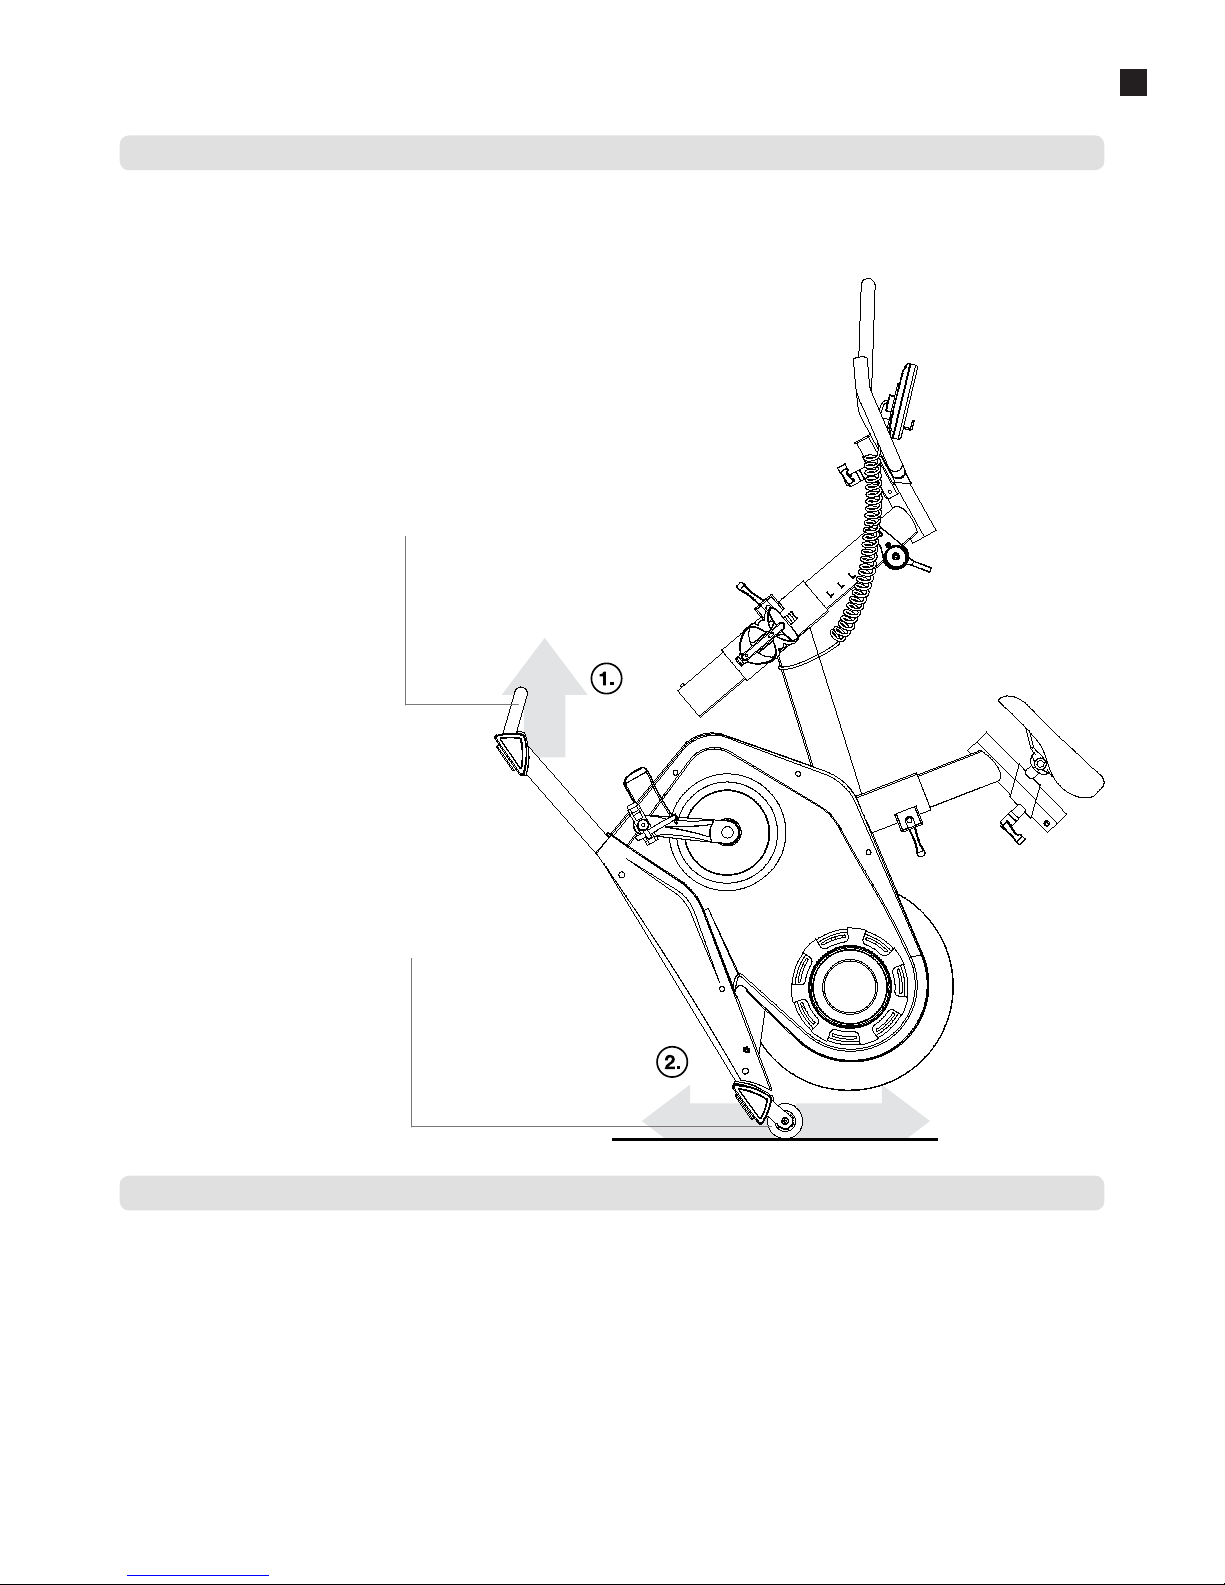
Voordat uw de PERFORM S3 gaat verplaatsen haalt u de voeding uit het product en stopcontact. Aan de voorste stabilisator zit een handgreep waarbij u de
S3 met twee handen en door u knieën omhoog kunt tillen. De S3 staat nu op zijn transport wieltjes waarmee u het product gemakkelijk naar de gewenste
plaats kunt verrijden. Het kan mogelijk zijn dat u na het verplaatsen van de S3 het product opnieuw waterpas moet zetten. Nadat het product op de gewenste
plaats staat kunt u de voeding opnieuw aansluiten.
Verplaatsen, opbergen en in gebruik nemen
Gebruik deze handgreep
om de S3 op te tillen
todat deze volledig op de
transportwielen staat.
Wanneer de S3 op
zijn transport wielen
staat kunt u het
product zowel vooruit
als achteruit verrijden.
Flow Fitness adviseert om eens in de zes weken de bouten en moeren van de scharnierpunten te controleren en indien nodig aan te draaien. Gebruik
hiervoor het bij het product aangeleverde gereedschap.
Veeg tevens na iedere training het eventuele zweet van alle onderdelen. Hiermee voorkomt u dat het zweet kringen of zelfs corrosie veroorzaakt.
De metalen en kunststof onderdelen zijn met standaard schoonmaakmiddelen te reinigen. Zorg er echter wel voor dat alle onderdelen goed droog zijn,
voordat deze weer worden gebruikt.
Onderhoud
Page 18
18 - Flow Fitness PERFORM S3 - Gebruiksaanwijzing
5
Gebruik
Gebruik van de iConsole
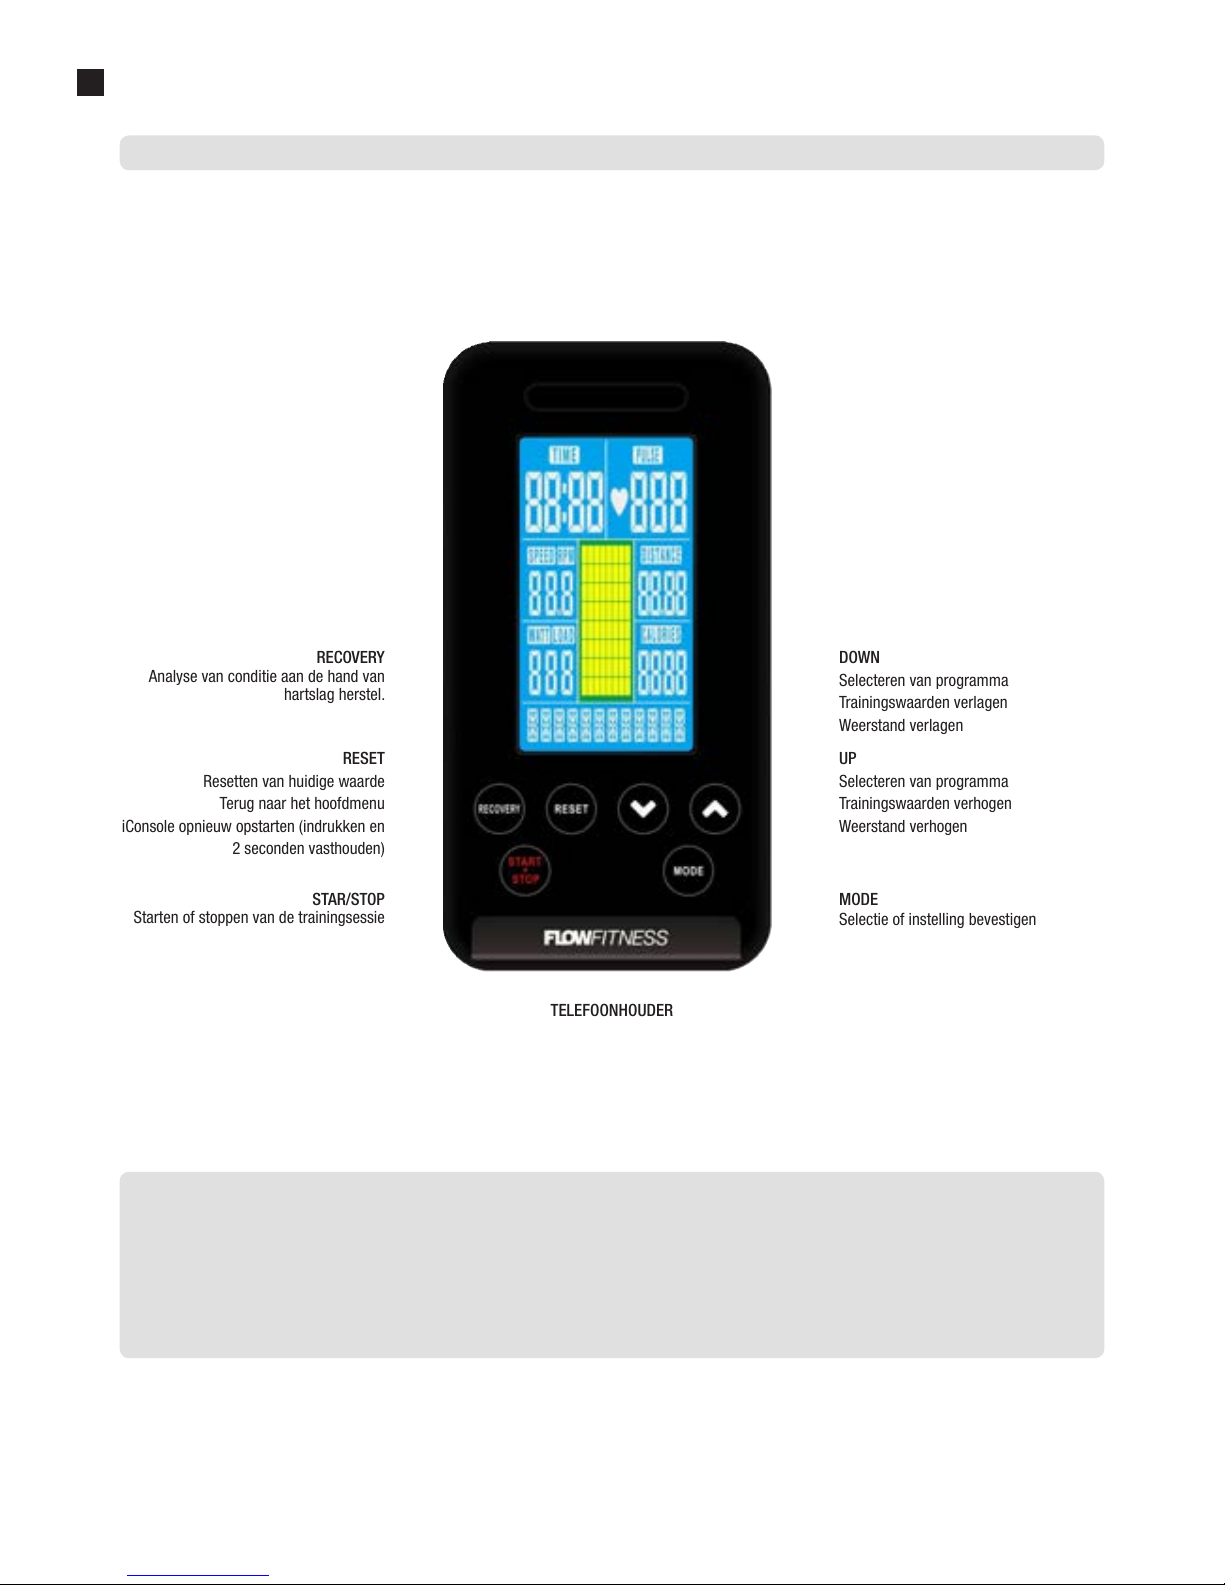
Display weergave
Time tijdsduur
Speed snelheid
Distance afgelegde afstand
Calories aantal calorieën verbruikt
Pulse hartslag
RPM Rotaties Per Minuut
WATT Geleverde vermogen in wattage
STAR/STOP
Starten of stoppen van de trainingsessie
DOWN
Selecteren van programma
Trainingswaarden verlagen
Weerstand verlagen
UP
Selecteren van programma
Trainingswaarden verhogen
Weerstand verhogen
MODE
Selectie of instelling bevestigen
RECOVERY
Analyse van conditie aan de hand van
hartslag herstel.
TELEFOONHOUDER
RESET
Resetten van huidige waarde
Terug naar het hoofdmenu
iConsole opnieuw opstarten (indrukken en
2 seconden vasthouden)
Page 19
Gebruiksaanwijzing - Flow Fitness PERFORM S3 - 19
5
Gebruik
Opstarten
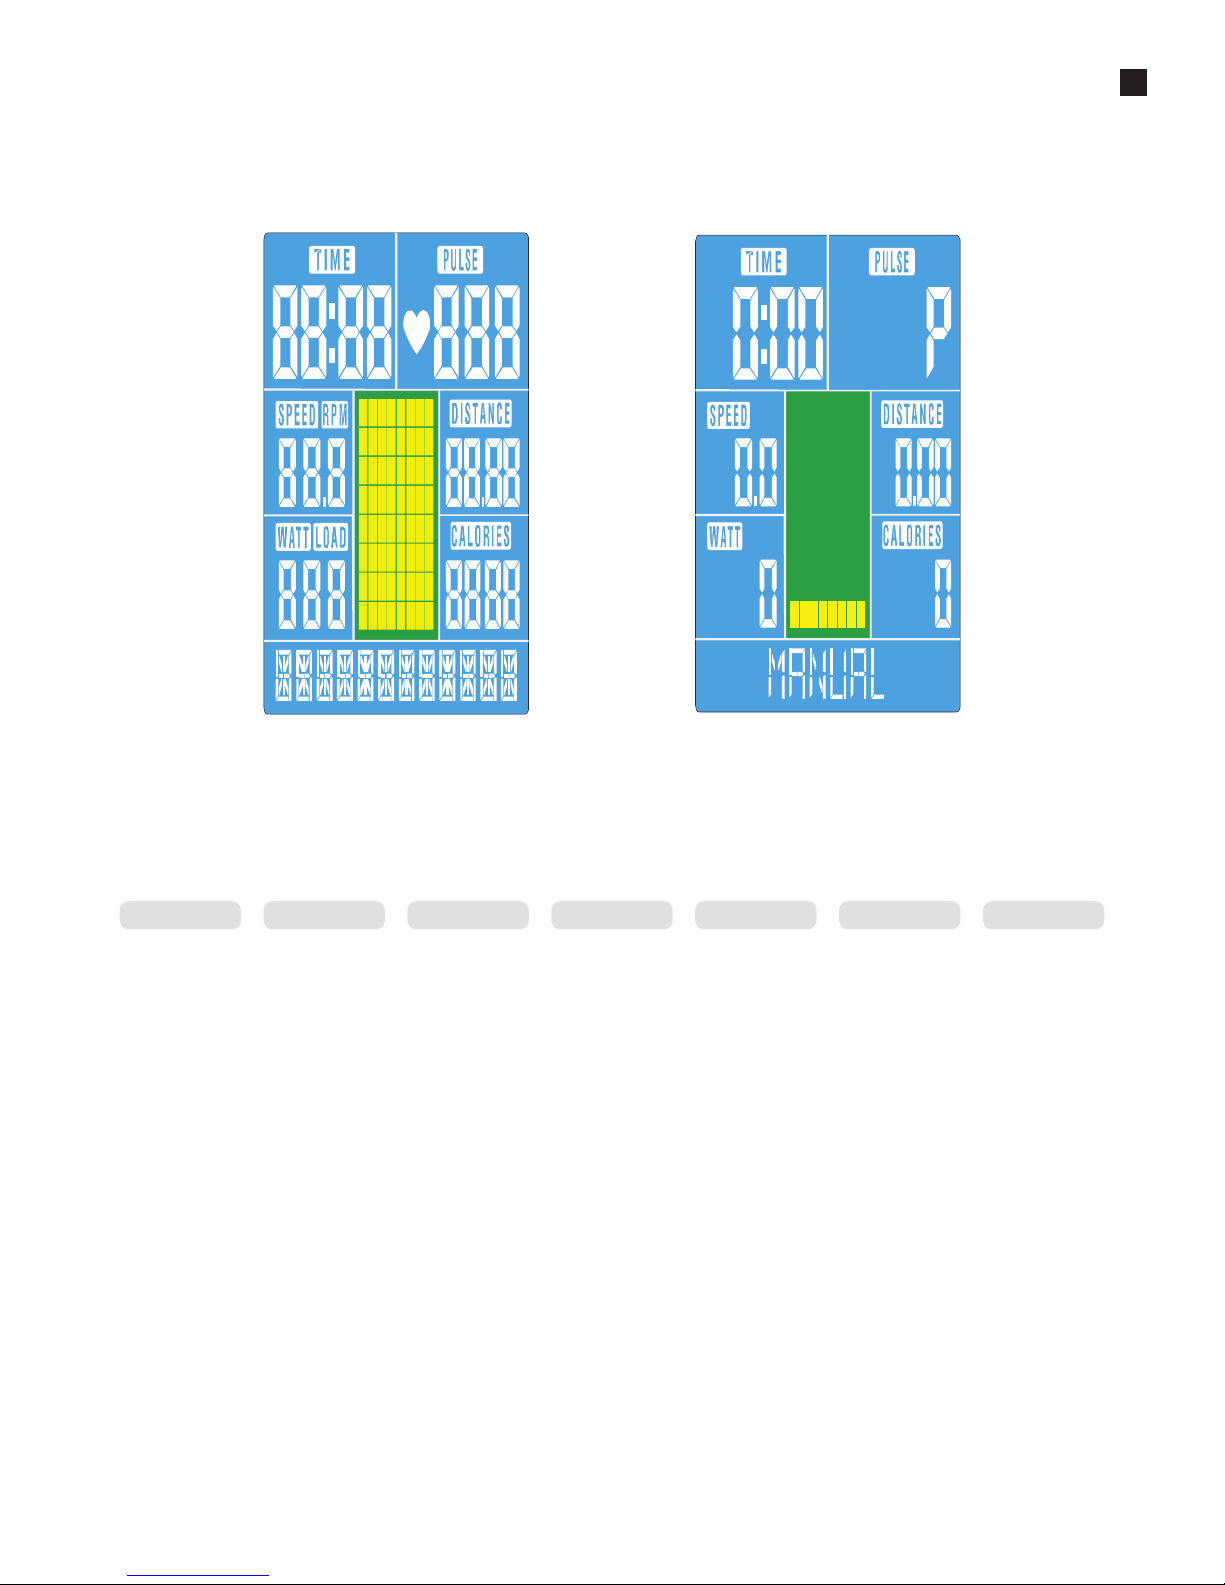
Na het inpluggen van de adapterkabel klinkt er een kort geluidssignaal en het display licht op. Het product is nu klaar voor gebruik. Na 4 minuten inactiviteit
zal de computer overschakelen naar “standby” modus. Om het product uit de standby modus te halen kunt u op een van de knoppen drukken of beginnen te
fietsen.
U kunt met de iConsole op twee manieren trainen; de console kan via bluetooth met uw smartphone of tablet gekoppeld worden. Hiermee kunt u via de
iConsole
+
app trainen. Of u kunt alleen de iConsole gebruiken en een van de 18 programma’s kiezen. Hieronder zal eerst het trainen met de iConsole
beschreven, voor het trainen met de iConsole
+
app gaat u naar pagina 22 van deze handleiding.
De computer bevat 6 verschillende soorten trainingen en een recovery test. Gebruik de UP en DOWN knoppen om een programma te selecteren. Bevestig
uw selectie door op MODE te drukken. Wanneer u in een training zit kunt u deze pauseren met de START • STOP knop. Druk vervolgens op RESET om de
training te beëindigen of op START • STOP om de training te hervatten
Op de volgende pagina’s wordt iedere training en de recovery test toegelicht.
MANUAL BEGINNER ADVANCED SPORTY CARDIO WATT RECOVERY
Page 20
20 - Flow Fitness PERFORM S3 - Gebruiksaanwijzing
5
Gebruik
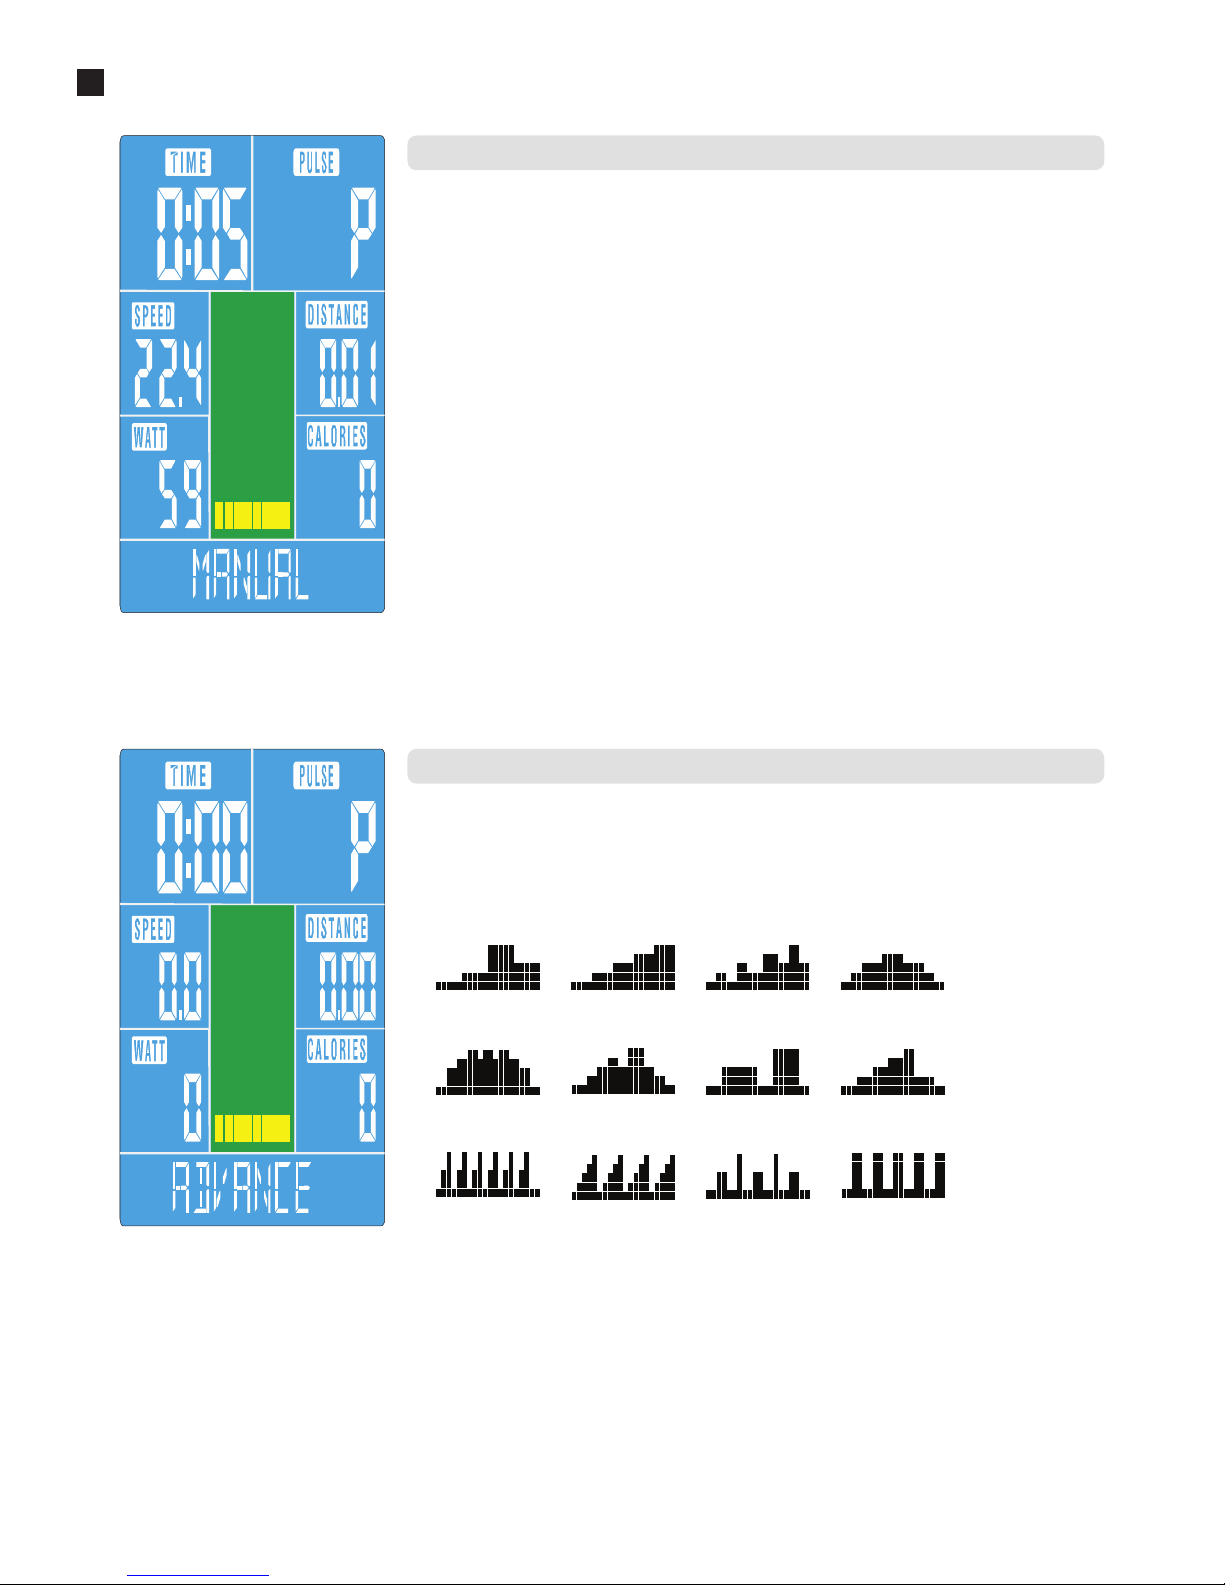
Het MANUAL programma is een programma met een constante weerstand en waarbij doelwaarden voor TIME,
DISTANCE, CALORIES, PULSE van te voren kunnen worden ingesteld. Wanneer deze niet ingesteld worden zullen
de trainingswaarden oplopen.
1. Selecteer met de UP en DOWN knoppen het MANUAL programma. Bevestig de selectie door op MODE
te drukken. Druk op START • STOP om te training te starten of stel de volgende doelwaarden in; TIME,
DISTANCE, CALORIES, PULSE.
2. Stel de gewenste tijdsduur in met de UP en DOWN knoppen. Bevestig de selectie door op MODE te drukken.
3. Stel de gewenste afstand in met de UP en DOWN knoppen. Bevestig de selectie door op MODE te drukken.
4. Stel de gewenste calorieën in met de UP en DOWN knoppen. Bevestig de selectie door op MODE te drukken.
5. Stel de gewenste harstlag in met de UP en DOWN knoppen. Bevestig de selectie door op MODE te drukken.
6. Druk op START • STOP om te training te starten.
7. Gebruik de UP en DOWN knoppen om de weerstandsniveau gedurende deze training aan te passen.
De training is afgelopen wanneer een van de doelwaarden de nul bereikt.
Er kan ook gekozen worden voor een voorgeprogrammeerde training. Hierbij varieert de weerstand volgens een
bepaald profiel. In totaal zijn er 12 profielen die zijn ingedeeld in 3 groepen. Te weten; BEGINNER, ADVANCED
en SPORTY.
1. Selecteer met de UP en DOWN knoppen het BEGINNER, ADVANCED of SPORTY programma. Bevestig de
selectie door op MODE te drukken.
2. Stel het gewenste trainingsprofiel (1 t/m 4) in met de UP en DOWN knoppen. Bevestig de selectie door op
MODE te drukken.
3. Stel de gewenste tijdsduur in met de UP en DOWN knoppen. Bevestig de selectie door op MODE te drukken.
4. Druk op START • STOP om te training te starten.
5. Gebruik de UP en DOWN knoppen om de weerstandsniveau gedurende deze training aan te passen.
De training is afgelopen wanneer de ingestelde tijd verstreken is.
Handmatig programma: MANUAL
Voorgeprogrameerde trainingen: BEGINNER / ADVANCED / SPORTY
BEGIN NER 1 BE GI NN ER 2 BE GI NN ER 3 BEG IN NE R 4
AD VAN CE1 ADVANC E 2 AD VAN CE 3
AD VAN CE 4
SPORT Y 1 SPO RTY 2 SPORT Y 3 SPORT Y 4
Page 21
Gebruiksaanwijzing - Flow Fitness PERFORM S3 - 21
5
Gebruik
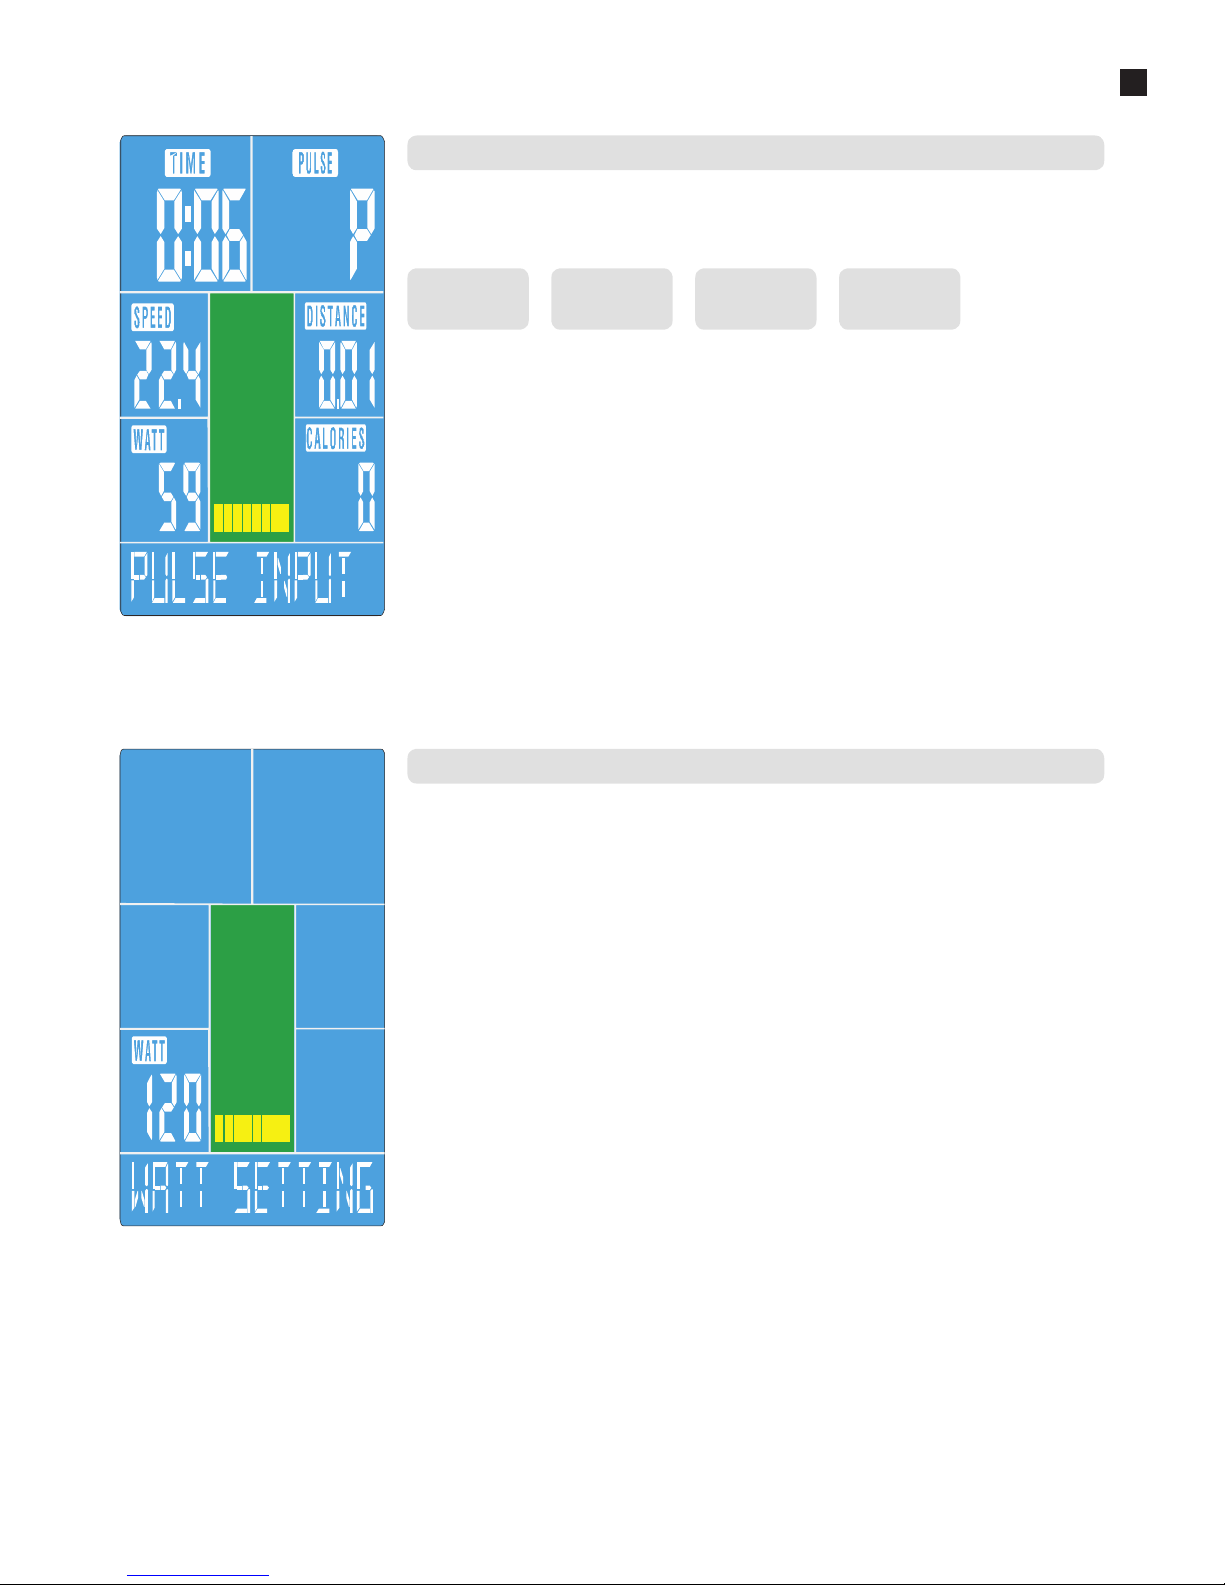
Bij deze training is er de mogelijkheid om hartslag gestuurd te trainen. Voor dit training programma heeft uw
een Flow Fitness harstlagband nodig (niet inbegrepen). Er zijn 4 verschillende niveau’s: 55%, 75%, 90% of
Target Heart Rate (TAG). Het niveau is een percentage van uw maximale hartslag, die berekend wordt a.d.h.v.
uw leeftijd.
1. Selecteer met de UP en DOWN knoppen het CARDIO programma. Bevestig de selectie door op MODE te
drukken.
2. Kies met de UP en DOWN knoppen voor 55%, 75%, 90% van uw maximale harstlag of stel zelf een Target
harstslag, hiervoor selecteert uw TAG. Bevestig de selectie door op MODE te drukken.
3. Indien u voor 55%, 75% of 90% van uw maximale harstlag gekozen kunt u deze stap overslaan. Als u TAG
geselecteerd hebt dient u nu uw gewenste hartslag in te stellen met de UP en DOWN knoppen. Bevestig de
selectie door op MODE te drukken.
4. Stel de gewenste tijdsduur in met de UP en DOWN knoppen. Bevestig de selectie door op MODE te drukken.
5. Druk op START • STOP om te training te starten.
Wanneer er gedurende 6 seconden geen signaal van de harslagband is ontvangen zal de melding PULSE
INPUT in het display verschijnen De training is afgelopen wanneer de ingestelde tijd verstreken is.
Bij deze training kan er worden ingesteld op welk vermogen u wilt trainen. De computer past automatisch de
weerstand aan, zodat uw geleverde vermogen constant blijft.
1. Selecteer met de UP en DOWN knoppen het WATT programma. Bevestig de selectie door op MODE te
drukken.
2. Stel het gewenste vermogen WATT SETTING in met de UP en DOWN knoppen. Bevestig de selectie door op
MODE te drukken.
3. Stel de gewenste tijdsduur in met de UP en DOWN knoppen. Bevestig de selectie door op MODE te drukken.
4. Druk op START • STOP om te training te starten.
De training is afgelopen wanneer de ingestelde tijd verstreken is.
Hartslag gestuurd programma: CARDIO
Trainen op een specifiek vermorgen: WATT
55%
Vet verbanding
---
75%
Vet verbanding +
Conditieverbeting
90%
---
Conditieverbeting
TAG
Selecteer eigen
doel hartslag
Page 22
22 - Flow Fitness PERFORM S3 - Gebruiksaanwijzing
5
Gebruik
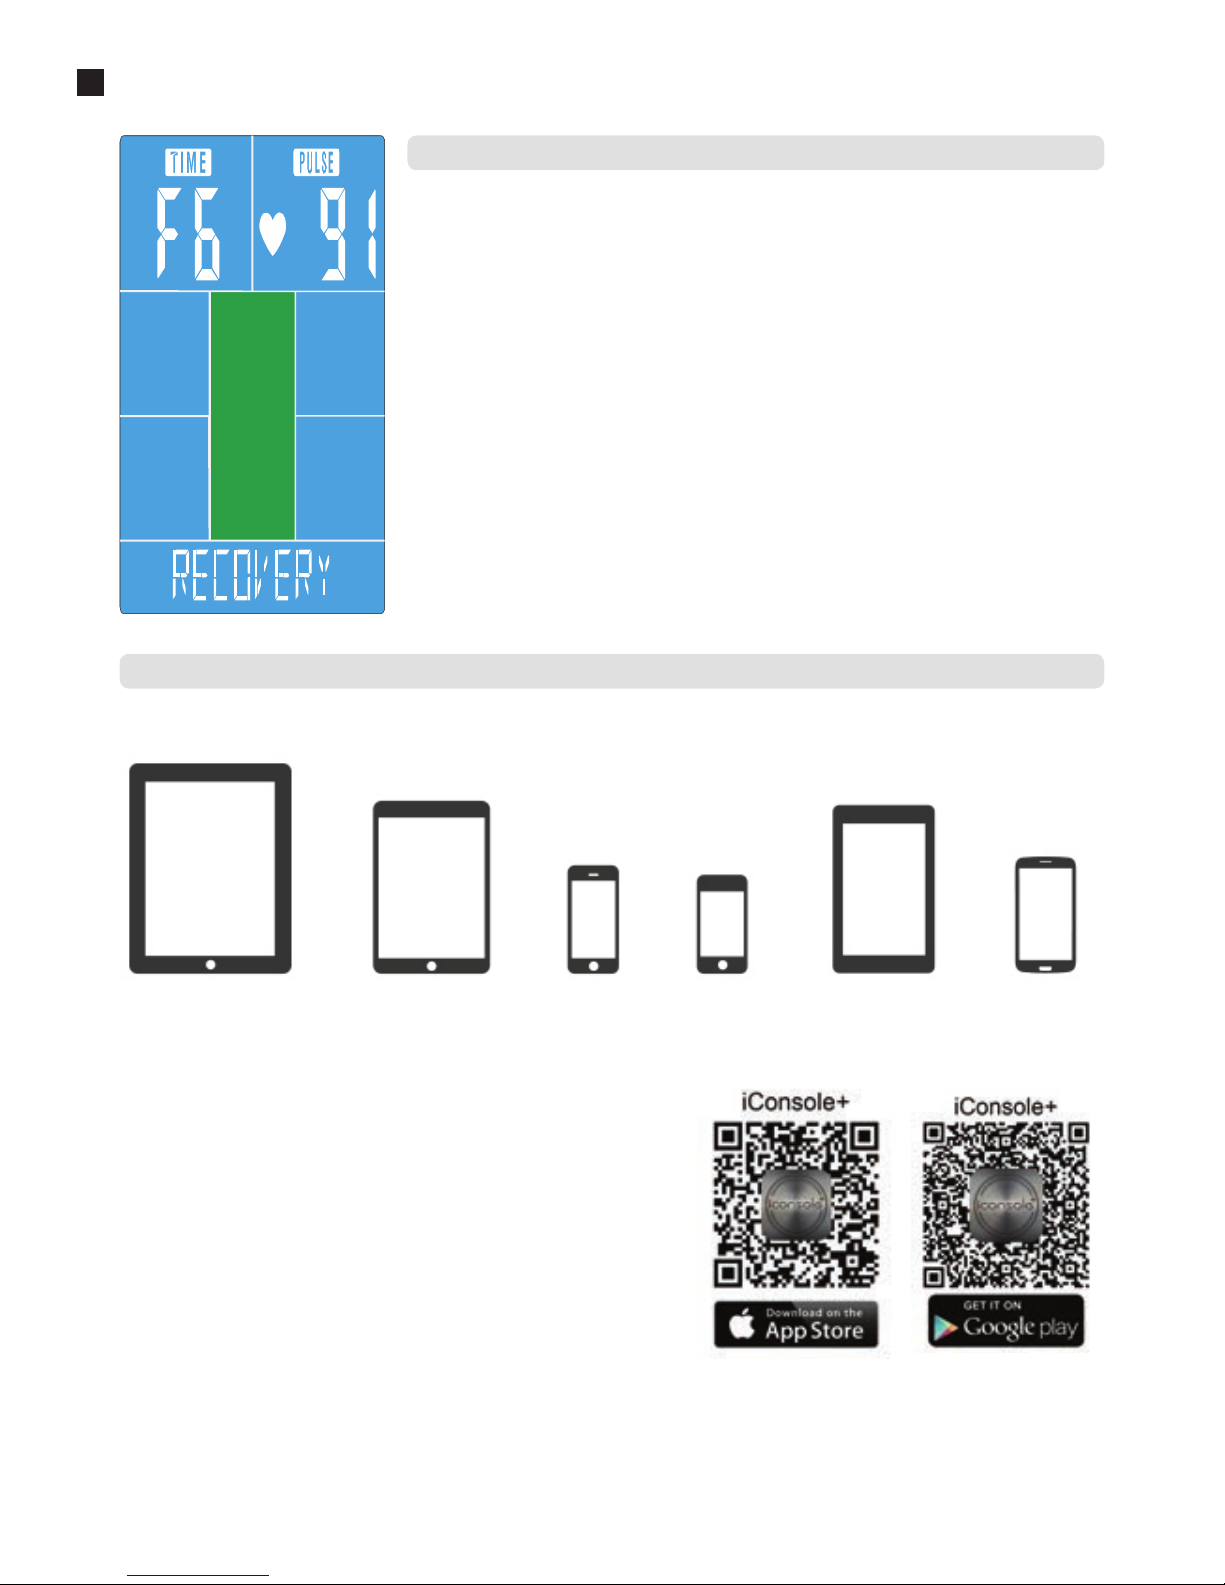
Na een training is het mogelijk om uw conditie te meten door. Hiervoor heeft uw een Flow Fitness harslagband
(niet inbegrepen) nodig. Druk direct na een training sessie op de RECOVERY knop. Alle waarden verdwijnen uit
beeld en alleen de tijd en de hartslag verschijnen nog. De tijd loopt terug van 60 seconden naar 0. Vervolgens
verschijnt er
een code die correspondeert met een conditie niveau. In onderstaande tabel vindt u de verschillende codes en
de bijbehorende uitleg.
F1: Zeer goed
F2: Goed
F3: Boven gemiddeld
F4: Gemiddeld
F5: Slecht
F6: Zeer slecht
De recovery functie werkt enkel na een intensieve workout waarbij uw harslag verhoogd is tot minimaal 150
slagen per minuut (BPM). Voor het meeste accurate resultaat dient uw de recovery meting zo snel mogelijk na
de training te starten.
Training met behulp van iConsole
+
App
Allereerst dient u de iConsole
+
app te downloaden. Afhankelijk van het
besturingssysteem van de tablet of smartphone moet u naar Google Play Store of Apple
App Store om de iConsole
+
app te downloaden. U kunt ook onderstaande QR code
scannen om direct de app te kunnen downloaden. Voor Android tablets kan het beste de
iConsole HD app gedownload worden. De iConsole
+
app is geheel gratis.
Nadat de iConsole
+
app succesvol is gedownload, dient u de volgende stappen te
doorlopen om de tablet of smartphone met elkaar te laten communiceren.
Voor Apple smartphones of tablets
1. Ga naar optie instellingen van uw smartphone of tablet en zet de bluetooth functie
aan.
2. Vervolgens wordt er gezocht naar bluetooth apparaten. In de lijst verschijnt dan
ICONSOLE.
Trainen met de iConsole+ app
Hartslag herstel test: RECOVERY
De iConsole biedt de mogelijkheid om via uw smartphone of tablet te trainen. Hiervoor dient u de iConsole+ app te downloaden. Deze app werkt uitsluitend
op de volgende smartphones en tablets of nieuwere varianten.
iPad 1 of nieuwer
iPad air 1 of nieuwer
iPad Mini
of nieuwer
iPhone 3GS
of nieuwer
iPod touch (3gen)
of nieuwer
Android tablet
OS4.0 of hoger
1280X800 pixels
Android Phone
OS2.2 of hoger
800x480 pixels
Page 23
Gebruiksaanwijzing - Flow Fitness PERFORM S3 - 23
5
Gebruik
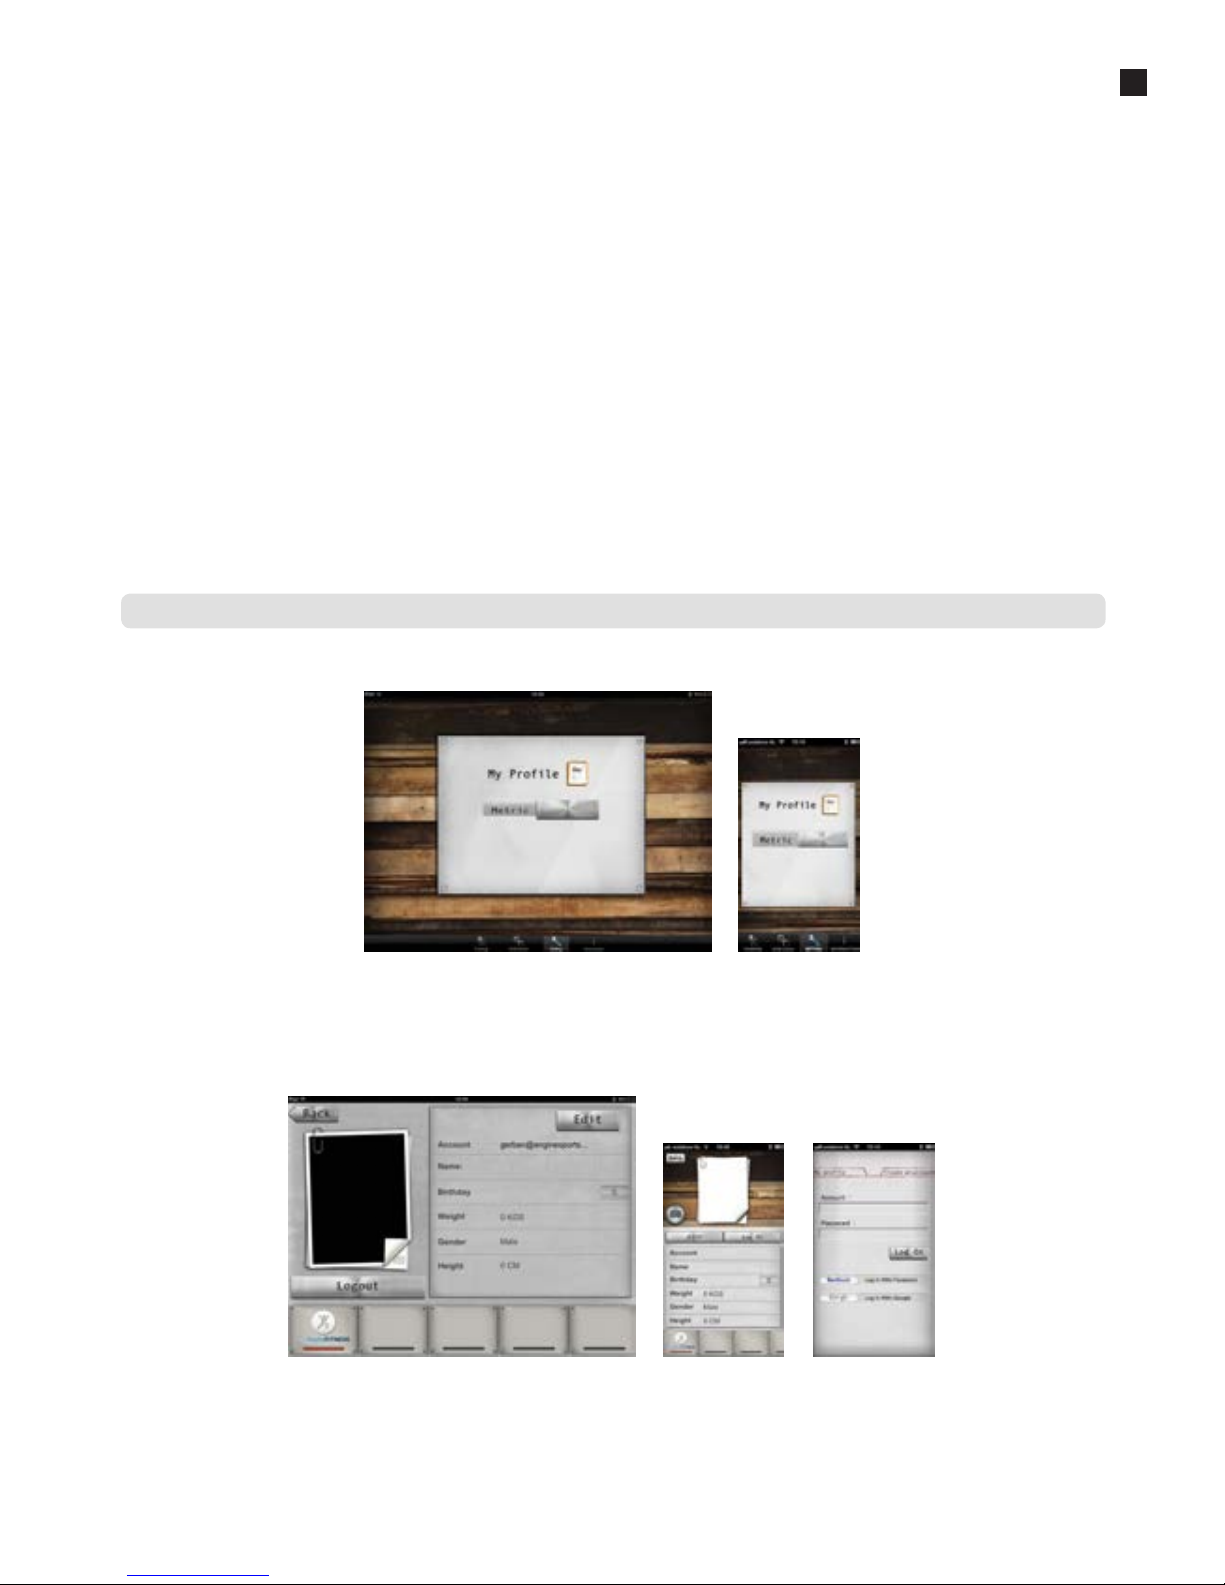
Voordat u van start gaat en de iConsole+ app optimaal kunt gebruiken dient u eerst de instellingen in te voeren in het SETTING menu. Ten eerste is het
mogelijk om het metrische (METRIC) of Britse (IMPERIAL) maten systeem te kiezen. “Swipe” hiervoor de schuif naar rechts of naar links.
Ten tweede kunt u in dit menu uw persoonlijke gegevens invoeren. Deze gegevens worden gebruikt bij de verschillende trainingsprogramma’s en voor het
opslaan van uw trainingen in het INFORMATION MENU. Tevens kan er hierdoor gebruik worden gemaakt van de aanvullingen op de iConsole
+
app die staan
weergegeven in het GYM CENTER MENU.
Druk hiervoor op “MY PROFILE”, zodat u in het persoonlijke gegevensmenu komt. U dient allereerst een account aan te maken. Een account maakt u aan
door op LOG IN te drukken. Druk daarna op CREATE AN ACCOUNT. Vul bij ACCOUNT een emailadres in en bij PASSWORD een eigen bedacht wachtwoord.
Plaats hetzelfde wachtwoord bij CONFIRM PASSWORD. Druk vervolgens op SIGN UP. Als alles goed is ingevuld krijgt u een melding SUCCESFULLY SIGNED
iConsole+ SETTINGS MENU
3. Selecteer de ICONSOLE en de twee apparaten gaan verbinding zoeken.
4. Type vervolgens de code 0000 in, zodat de twee apparaten met elkaar zijn verbonden.
5. Als de twee apparaten met elkaar verbonden zijn gaat de computer van de S3 automatisch uit.
6. Start nu de ICONSOLE app op.
Voor Android smartphones of tablets
1. Ga naar optie instellingen van uw smartphone of tablet en zet de bluetooth functie aan.
2. Start nu de ICONSOLE app op.
3. Druk op het bluetooth icoontje met draaiende pijlen voor de lijst met bluetooth apparaten.
4. Selecteer ICONSOLE in deze lijst om te verbinden.
5. Als de twee apparaten met elkaar verbonden zijn gaat de computer van de S3 automatisch uit.
Op de volgende pagina’s staat het gebruik van de iConsole
+
app beschreven voor zowel de smartphone als tablet app.
Let op: deze app wordt regelmatig ge-update. Het kan daarom zijn dat deze handleiding onvolledig is. Ga naar
http://www.flowfitness.nl/nl/service/gebruiksaanwijzing.php waar u de meest recente handleiding kunt downloaden.
De iConsole+ app bevat 4 menu’s:
TRAINING alle beschikbare trainingen
GYM CENTER alle extra aangekochte toevoegingen
SETTINGS in te stellen waarden en profiel
INFORMATION trainingshistorie
Alle 4 menu’s worden op de volgende pagina’s beschreven.
Page 24
24 - Flow Fitness PERFORM S3 - Gebruiksaanwijzing
5
Gebruik
UP en er wordt een bevestigings-email verstuurd naar het ingevulde email adres. Klik vervolgens op de bijgevoegde link om uw account te activeren.
Vervolgens verschijnt de melding
The account’s email has been validated!
Nu kan er in gelogd worden met behulp van het emailadres en het wachtwoord. Indien u een Facebook of Google account heeft kunt u daar ook mee
inloggen. Als uw eigen gemaakte routes wilt opslaan kunt u inloggen of een account aanmaken of op Map My Fitness. Dit doet u door op het Map My Fitness
logo te drukken en de stappen op de Map My Fitness site te volgen. Als Map My Fitness succesvol is geactiveerd zal de balk onder het icoon rood kleuren.
Door op EDIT te drukken kunnen de persoonlijke gegevens worden ingevoerd. U kunt zelfs een foto toevoegen. Dit doet u in de EDIT mode op het cameraatje
te drukken. Indien u alle gegevens hebt ingevoerd drukt u op DONE en daarna op BACK om weer in het SETTING menu terug te keren.
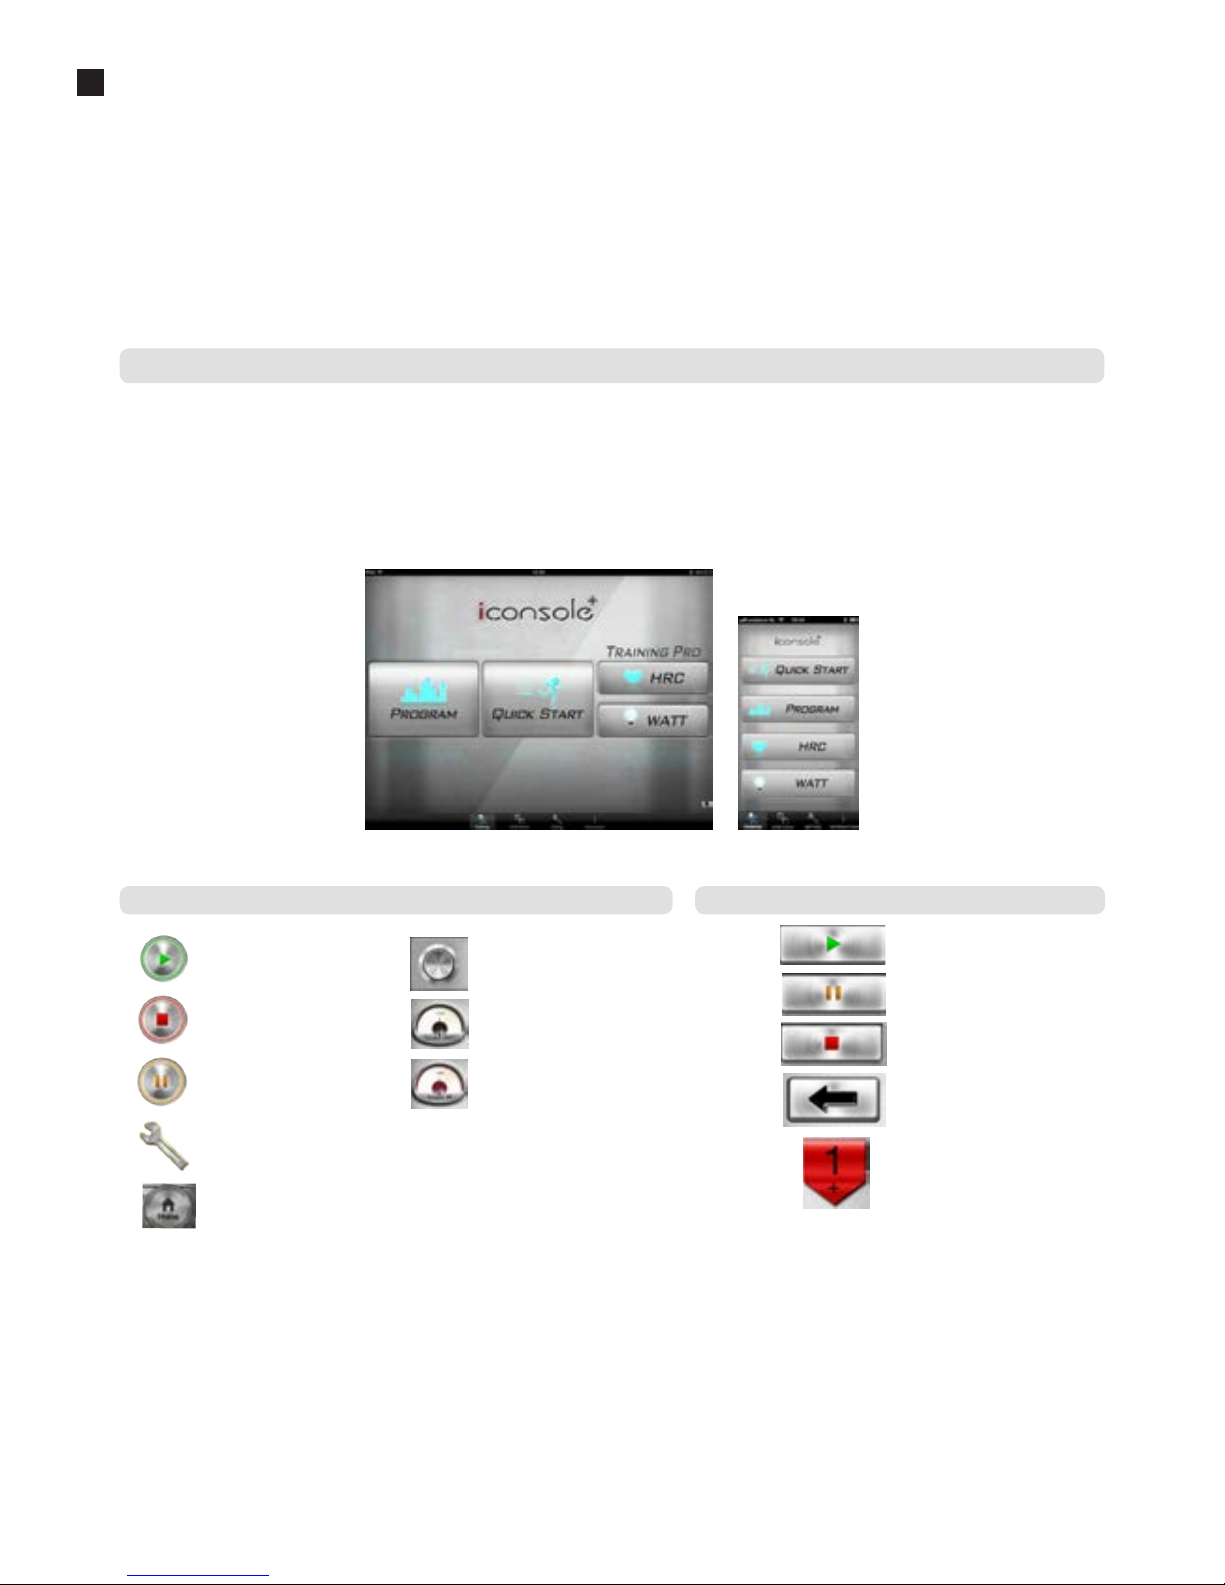
In het trainingsmenu van de iConsole+ app ziet u 4 verschillende typen programma’s:
QUICK START Direct starten
PROGRAM Voorgeprogrammeerde trainingen
HRC Hartslaggestuurd trainingsprogramma
WATT Watt gestuurd trainingsprogramma
START knop
PAUZE knop
STOP knop
Terug naar TRAINING menu
weerstand instelling knop
START knop
STOP knop
PAUZE knop
Mogelijkheid tot waarde
invoeren
Terug naar TRAINING menu
Scroll wheel voor invoeren
waarden
Draaibare schijf voor
invoeren hartslag niveau
Knop voor invoeren
hartslag niveau
Knoppen van de Tablet iConsole+ app Knoppen van de Smartphone iConsole+ app
iConsole+ TRAININGS MENU
Page 25
Gebruiksaanwijzing - Flow Fitness PERFORM S3 - 25
5
Gebruik
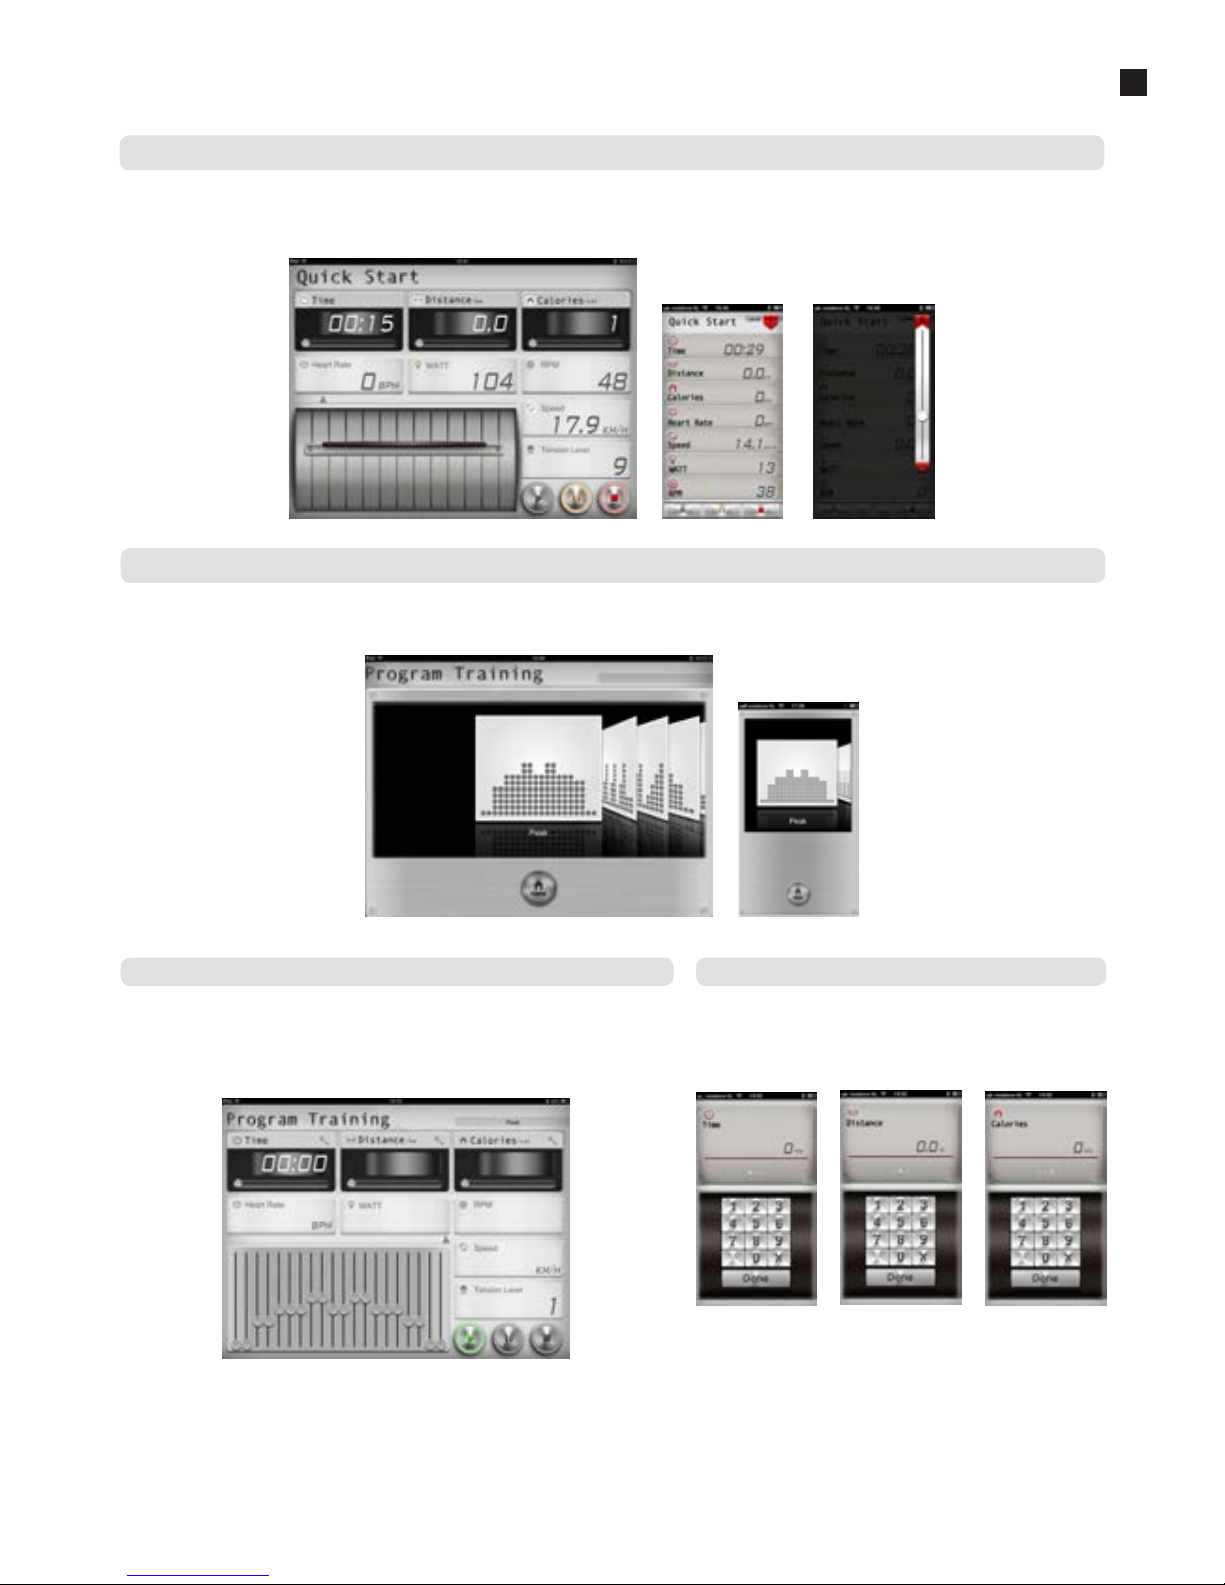
Indien u een gewenst programma heeft geselecteerd kunnen
de volgende waarden worden ingesteld: TIME, DISTANCE en
CALRORIES. Als er geen waarden worden ingesteld en direct op start
drukt lopen alle waarden op. Iedere 2 minuten gaat het programma dan
naar een volgende fase.
De waarden zijn afzonderlijk in te stellen. Als eerste verschijnt
TIME.
Indien u een gewenst programma heeft geselecteerd kunnen de volgende waarden
worden ingesteld: TIME, DISTANCE en CALRORIES. Als er geen waarden worden
ingesteld en direct op start drukt lopen alle waarden op. Iedere 2 minuten gaat het
programma dan naar een volgende fase. De waarden zijn afzonderlijk in te stellen door
op de sleutel naast de waarde te drukken.
Instellen van PROGRAM op de Tablet iConsole+ app Instellen van PROGRAM op de Smartphone iConsole+ app
iConsole+ PROGRAM - Voorgeprogrammeerde trainingen
iConsole+ QUICK START - direct starten
Het QUICK START programma is een programma waarbij u niets hoeft in te stellen alleen de weerstand. Als er gestart wordt met de training lopen de
trainingswaarden op. Met de tablet app kan door de bruine hendel omhoog of omlaag te “swipen” kan de weerstand worden verhoogd of verlaagd. Voor de
smartphone app dient u eerst op het rode lint in de rechter bovenhoek te drukken alvorens uw kunt “swipen”.
Het trainingsprogramma PROGRAM bevat meerdere voorgeprogrammeerde trainingen. Hierbij varieert de weerstand volgens een bepaald profiel. In totaal zijn
er 12 profielen. Door te “swipen” kunnen de verschillende trainingen bekeken worden. Indien de gewenste training is geselecteerd druk dan op het profiel
om in de training te komen.
Page 26
26 - Flow Fitness PERFORM S3 - Gebruiksaanwijzing
5
Gebruik
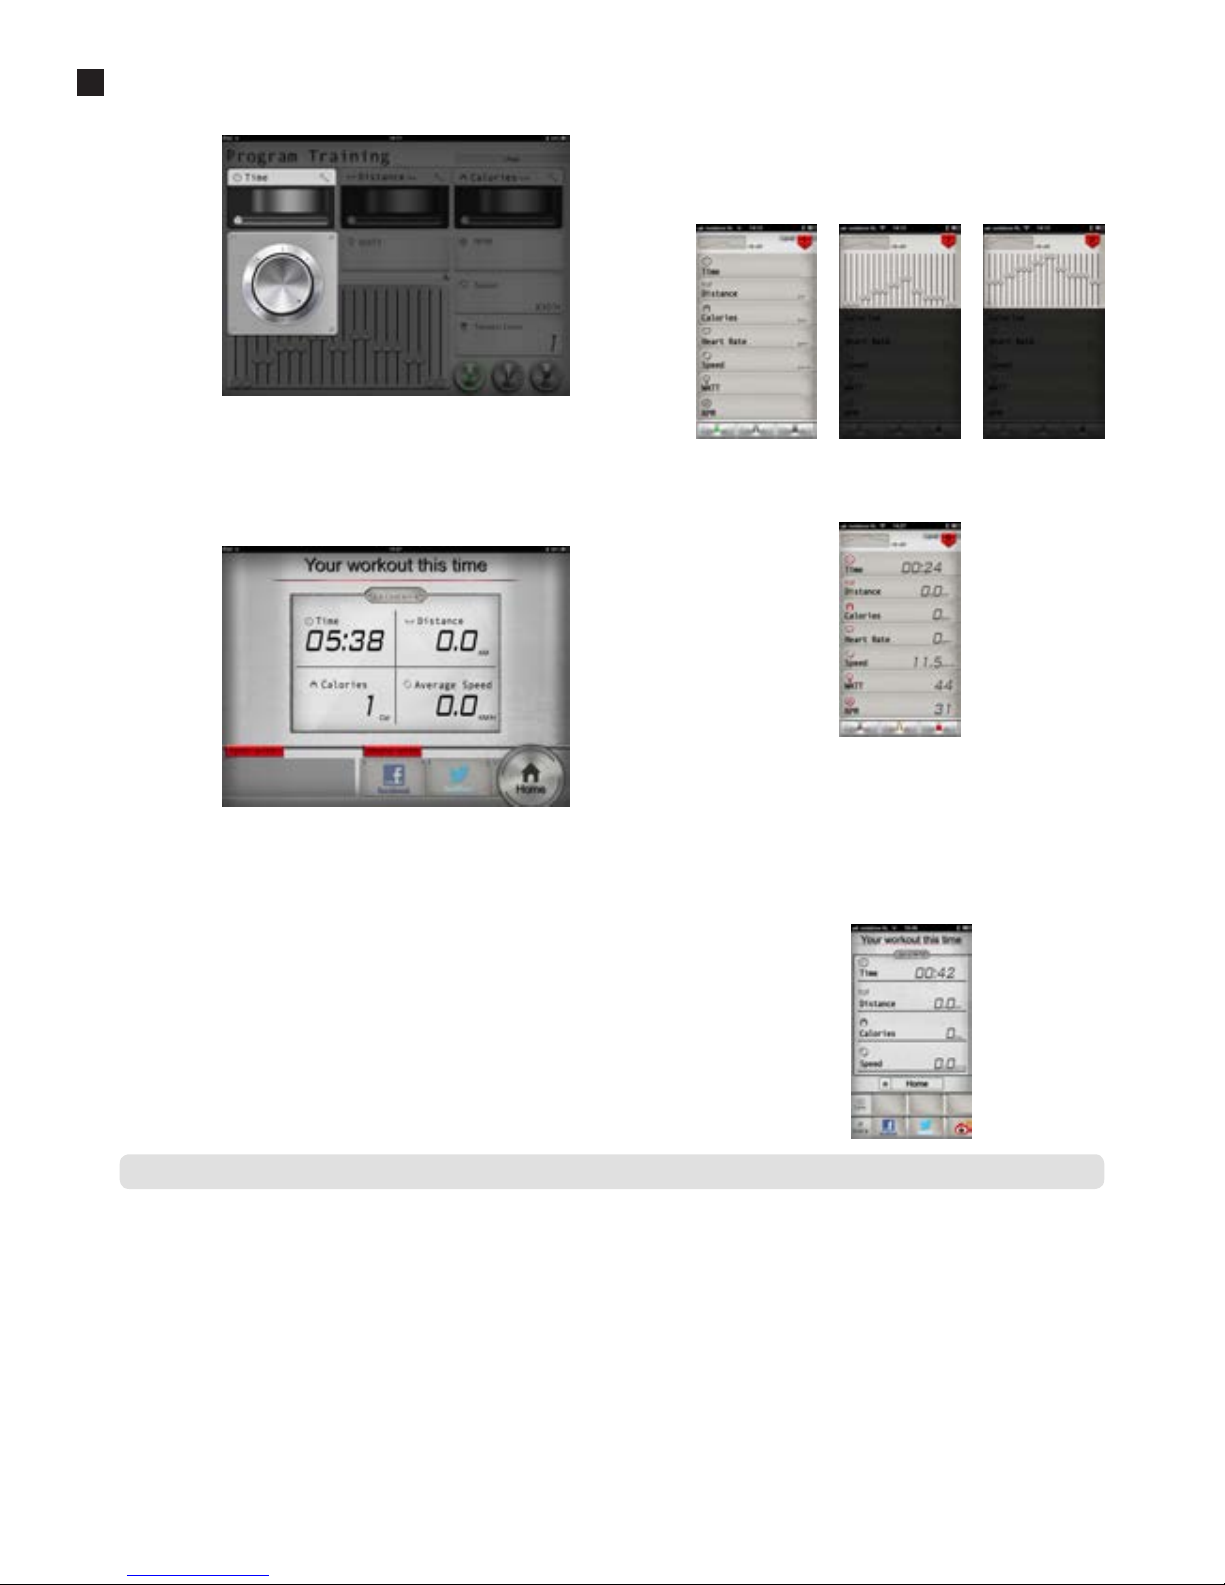
Indien u een hartslaggestuurd programma wenst, selecteer dan HRC in het trainingsmenu.
Allereerst moet het doel hartslagniveau worden ingevuld. Dit is een percentage van uw berekende maximale hartslag. Kies hiervoor een van de onderstaande
hartslagadviezen of stel een eigen percentage in.
55% WARM UP om uw training mee te beginnen (10 min.)
65% FAT BURNING vetverbranding (minimaal 30 min.)
75% ENDURANCE TRAINING conditie verbeteren (afhankelijk van basis conditie)
Vervolgens verschijnt er een draaiknop. Door deze naar rechts of links te draaien kan de
waarde worden ingesteld. Door weer op de sleutel naast waarde te drukken verschijnt
het programma weer. Indien u ervoor kiest een of meerdere waarden in te stellen zal de
training eindigen als u een van deze waarden bereikt heeft.
Tijdens de training is de weerstand te verzwaren of te verlichten door in het programma
een schuif uit het profiel omhoog of omlaag te bewegen.
Als het programma afgelopen is kan er met behulp van de HOME knop terug worden
gekeerd naar het hoofdmenu. Er is ook de mogelijkheid om de resultaten te “posten” op
Facebook of Twitter. Hiervoor dient u een account te hebben en in te loggen.
iConsole+ HRC - hartslag gestuurd programma
Met behulp van het toetsenbord kan een waarde worden ingevoerd.
Door het TIME vakje naar links te “swipen” verschijnt vervolgens
DISTANCE en CALORIES. Indien u de afstand of te verbrande calorien
niet wilt invoeren. Kunt u op DONE drukken en het programma zal
starten.
Tijdens de training is de weerstand te verzwaren of te verlichten. Druk
op de 1 in het rode vlak in de rechter bovenhoek. Vervolgens verschijnt
het trainingsprofiel in de vorm van 20 verschillende schuiven. Druk
op 1 van de schuifjes en verplaats die omhoog of omlaag. Nadat de
juiste weerstand is ingesteld druk dan op het getal in het rode vlakje
in de rechter bovenhoek en u keert weer terug naar het programma.
Druk op de
START knop om het trainingsprogramma te starten. Druk
op de PAUZE knop om te pauzeren en op de STOP knop om het
trainingsprogramma te beëindigen. Als het programma afgelopen is
kan er met behulp van de HOME knop worden teruggekeerd naar het
hoofdmenu. Er is ook de mogelijkheid om de resultaten te “posten” op
Facebook of Twitter. Hiervoor dient u een account te hebben en in te
loggen.
Page 27
Gebruiksaanwijzing - Flow Fitness PERFORM S3 - 27
5
Gebruik
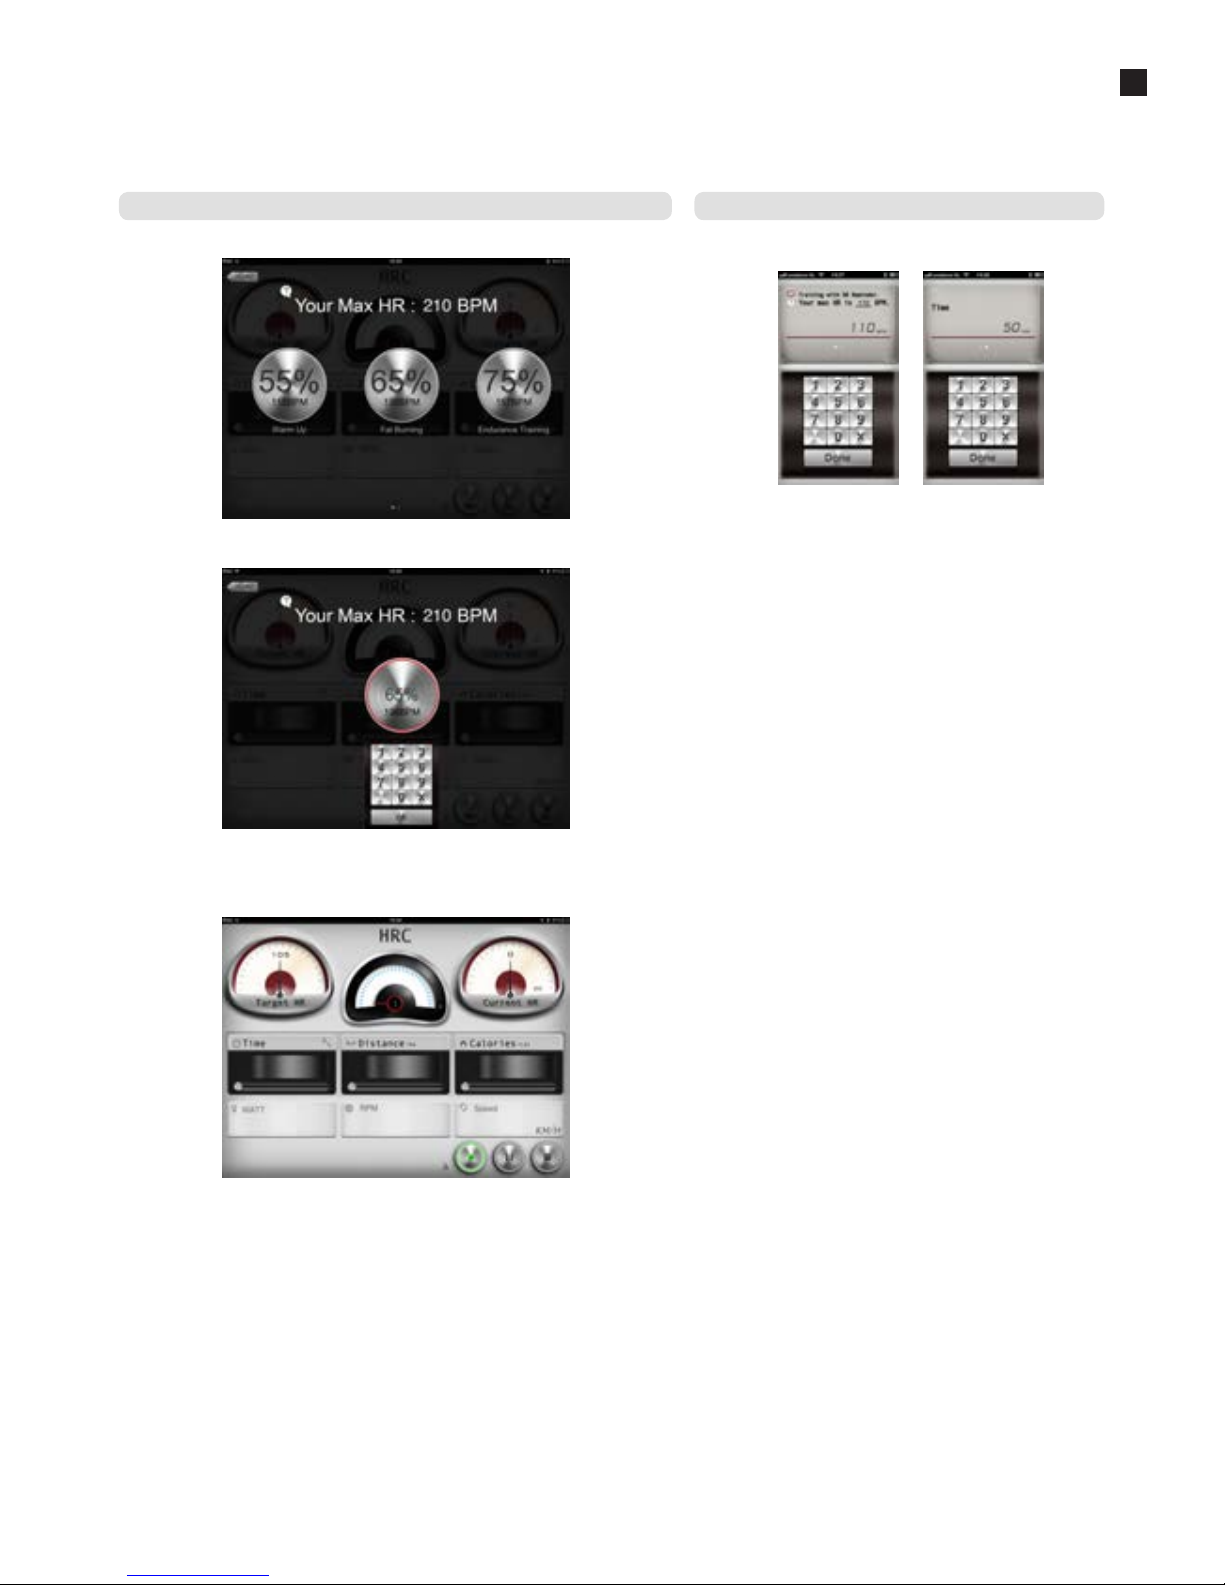
Naast de 3 voorgeprogammeerde HRC programma’s, kunt u ook kiezen voor een zelf in
te stellen HRC programma. “Swipe” bovenstaande scherm naar rechts en u komt in het
CUSTOM HRC programma.
Druk op de knop met CUSTOM en er verschijnt een toetsenbord waarmee het gewenste
% van de maximale hartslag ingevoerd kan worden. Druk vervolgens op OK om de
training te beginnen. Het scherm hieronder verschijnt en de waarde
TIME is in te stellen,
zoals eerder is beschreven bij PROGRAM.
De meter linksboven in het scherm is de TARGET HR. Dit is het doel hartslagpercentage
waarop u moet trainen. De meter in het midden geeft aan in welk weerstandniveau (1-
16) u aan het trainen bent. De meter rechtsboven in het scherm is de CURRENT HR en
geeft het huidige hartslagniveau aan. Indien de CURRENT HR onder de TARGET HR is zal
de weerstand automatisch verzwaard worden en als de CURRENT HR boven de TARGET
HR blijft zal de weerstand automatisch verlicht worden.
Allereerst moet het doel hartslagniveau worden ingevuld. Standaard staat dit ingesteld op 65%.
Het is ook mogelijk een willekeurig hartslagniveau in te voeren.
Druk hiervoor op de X in het toetsenbord. Nu kunt u een nieuw
niveau invoeren. Vervolgens “swipped” u het hartslag blokje naar
links om TIME in te voeren. Daarna drukt u op DONE en u komt
in het trainingsprogramma overzicht.
Instellen van HRC op de Tablet iConsole+ app
Instellen van HRC op de Smartphone iConsole+ app
Voor het hartslag gestuurd programma heeft uw een hartslagband (niet inbegrepen) nodig.
Page 28
28 - Flow Fitness PERFORM S3 - Gebruiksaanwijzing
5
Gebruik
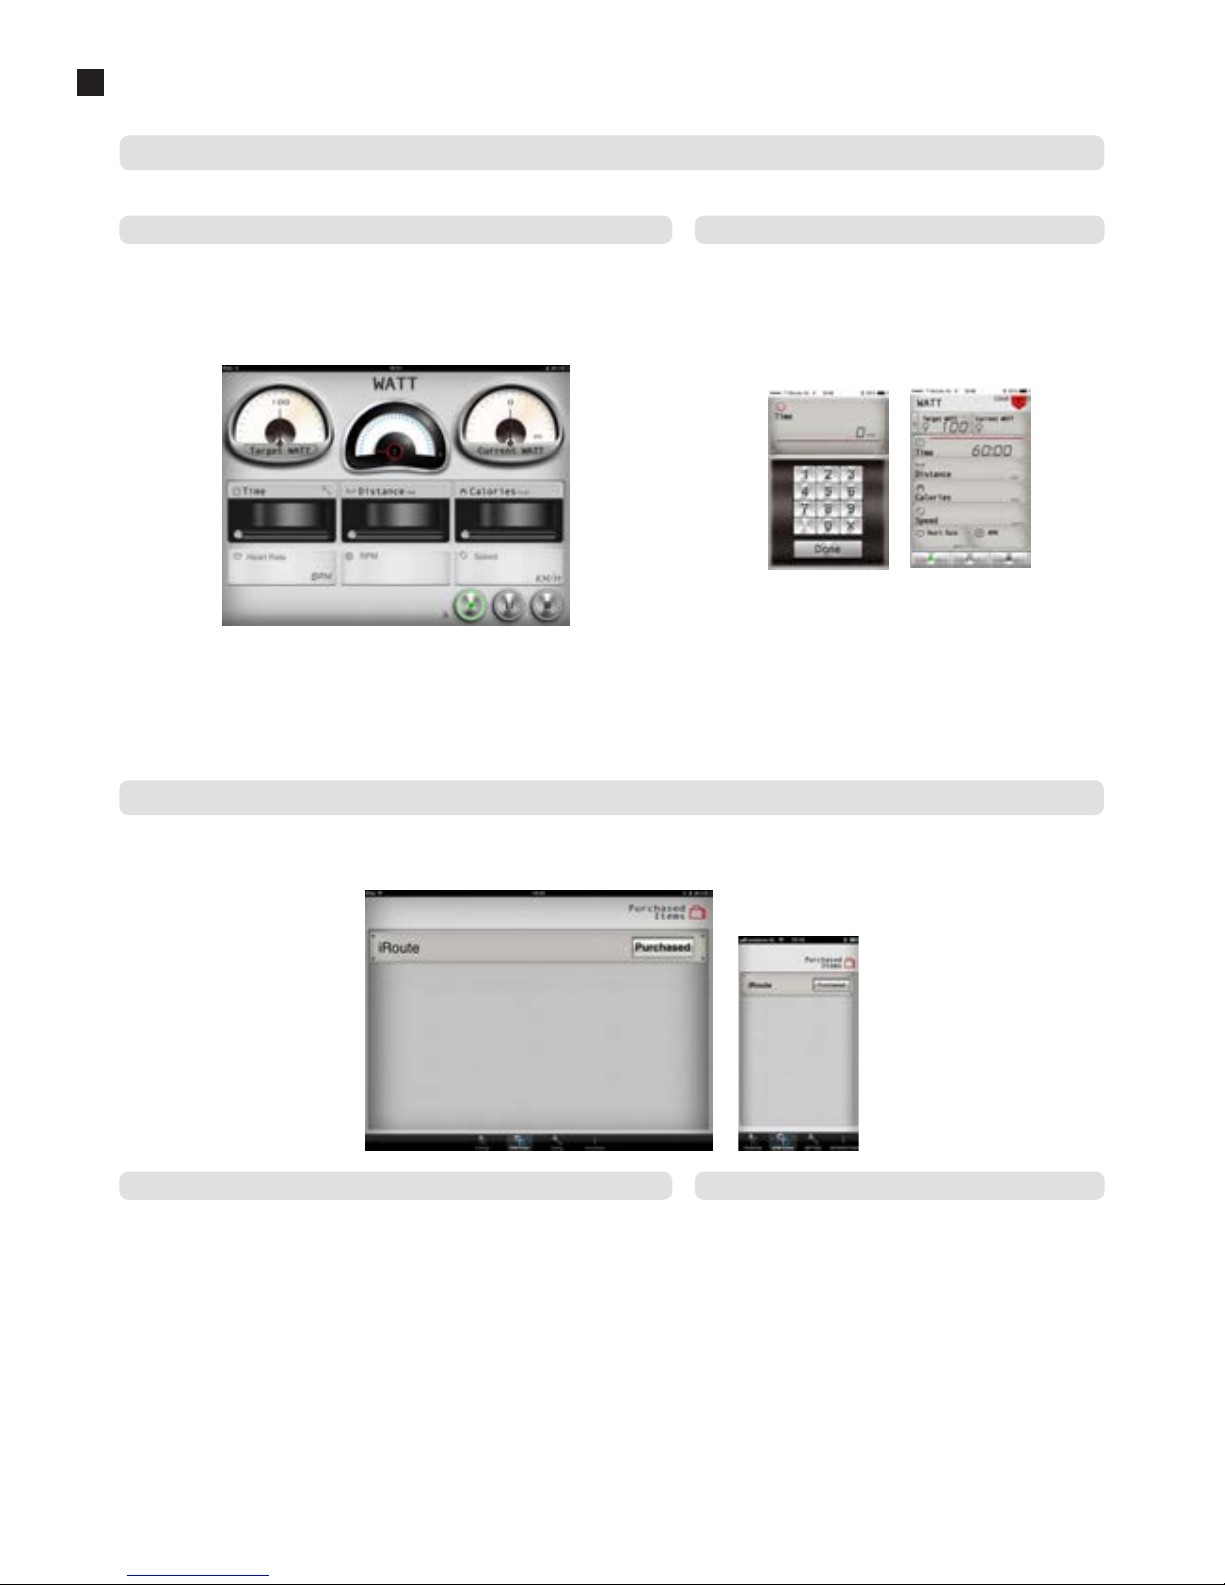
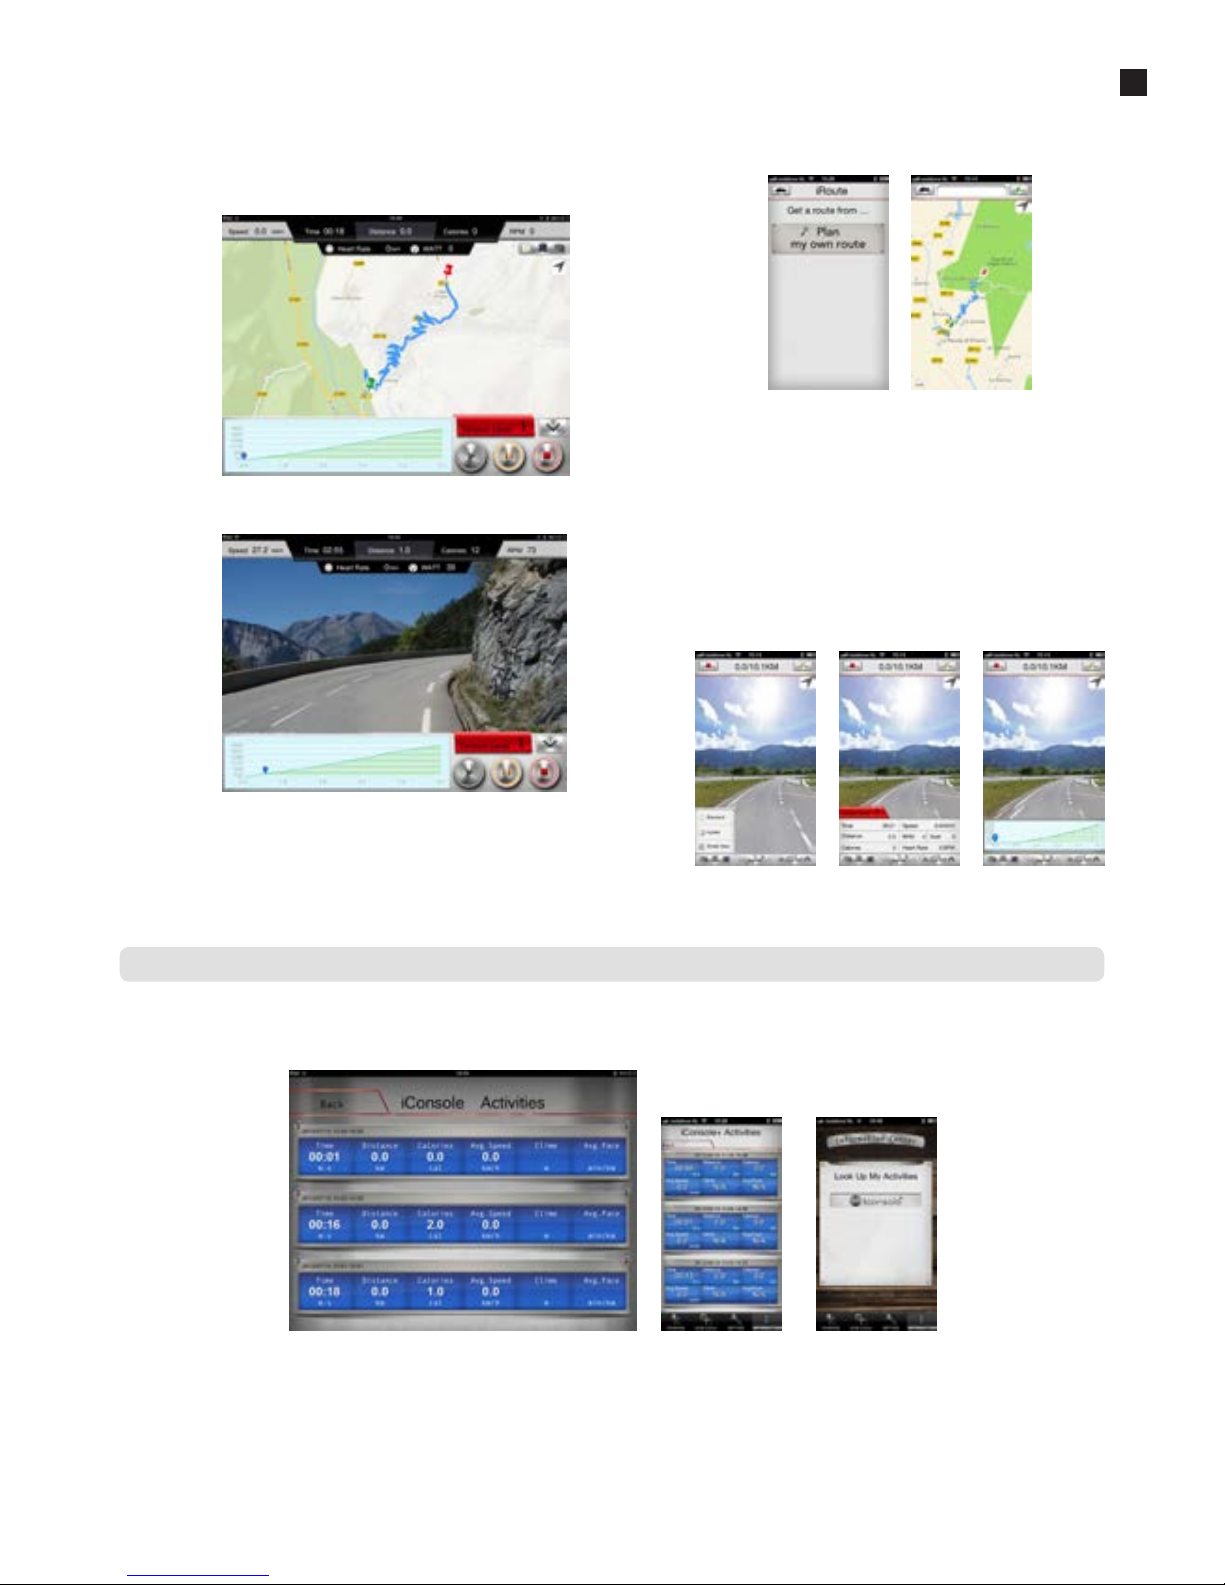
In het GYM CENTER verschijnen aanvullingen op de iConsole+ app. Een leuke gratis aanvulling is IROUTE. Om deze aanvulling te gebruiken dient uw tablet of smartphone
verbonden te zijn met het internet.
iConsole+ GYM CENTER MENU
Selecteer het Watt gestuurde programma door in het trainingsmenu op WATT te drukken.
iConsole+ WATT - Watt Gestuurd programma
Instellen van WATT op de Tablet iConsole+ app
Instellen van IROUTE op de Tablet iConsole+ app
Instellen van WATT op de Smartphone iConsole+ app
Instellen van IROUTE op de Smartphone iConsole+ app
Het standaard ingestelde Watt niveau is 100 Watt. Dit staat op de meter linksboven in
het scherm. Door op TARGET WATT te drukken is een ander vermogen in stellen (zie
beschrijving instellen CUSTOM HRC bij HRC). Tevens is het ook mogelijk om de waarden
TIME
, DISTANCE en CALORIES in te stellen: (zie beschrijving in stellen waarden bij
PROGRAM)
De meter linksboven in het scherm is de TARGET WATT. Dit is doel vermogen waarop
u wilt trainen. De meter in het midden geeft aan in welk weerstandniveau (1-16) u aan
het trainen bent. De meter rechtsboven in het scherm is de CURRENT WATT en geeft
het huidige vermogen aan. Indien de CURRENT WATT onder de TARGET WATT is zal de
weerstand automatisch worden verzwaard en als de CURRENT WATT boven de TARGET
WATT is zal de weerstand automatisch worden verlicht.
Voer vervolgens uw de gewenste trainingstijd in en druk
vervolgens op done. Het standaard ingestelde Watt niveau is
100 Watt. Dit staat op de meter linksboven in het scherm. Door
op TARGET WATT te drukken is een ander vermogen in stellen.
Wanneer het toetsenbord verschreind drukt u op de X om de
waarde te wissen en vervolgens stelt u de gewenste waarde in.
Om de trainingsessie te starten drukt u op de play knop links
onder.
Druk op de IROUTE balk en u komt in het menu waar u een
route kan invoeren. Druk op MY FAVORITES om 1 van de
voorgeprogrammeerde routes of eigen opgeslagen route te
starten. Druk op MAP MY FITNESS om een route op Map My
Fitness te selecteren (voor Favorites of Map My Fitness heeft
uw een account nodig bij Map My Fitness. Of druk op PLAN MY
OWN ROUTE
om een eigen route te maken. Druk op Vervolgens
Druk op de IROUTE balk en u komt in het menu waar u een route kan invoeren. Druk op
MY FAVORITES om 1 van de voorgeprogrammeerde routes of eigen opgeslagen route
te starten. Druk op MAP MY FITNESS om een route op Map My Fitness te selecteren
(voor Favorites of Map My Fitness heeft uw een account nodig bij Map My Fitness). Of
druk op PLAN MY OWN ROUTE om een eigen route te maken. Druk op Vervolgens ziet u
een landkaart. In de tekstbalk bovenaan het scherm kunt u nu een locatie intypen. Het
is ook mogelijk door middel van het plaatsen van startpunt, eindpunten en maximaal 8
Page 29
Gebruiksaanwijzing - Flow Fitness PERFORM S3 - 29
5
Gebruik
In dit menu vindt u onder andere de opgeslagen trainingen. Druk hiervoor op het iConsole+ logo en het rechter scherm zal verschijnen. Er zit geen limiet aan
het aantal op geslagen trainingen.
iConsole+ INFORMATION MENU
ziet u een landkaart. In de tekstbalk bovenaan het scherm kunt
u nu een locatie intypen. Het is ook mogelijk door middel van het
plaatsen van startpunt, eindpunten en maximaal 8 tussenpunten
een route te bepalen. Druk op de landkaart en houdt het 1 seconde
vast. Er verschijnt nu een groene punaise. Dit is het startpunt.
Druk vervolgens nog een keer 1 seconde op het scherm en er
verschijnt een rode punaise. Dit is het eindpunt. Voeg een aantal
tussenpunten toe of druk op de START knop en u doorloopt uw
eerder ingevoerde route. Tijdens het trainen kunt u zelf nog
“street view” of “hybride” of “standard” selecteren.
Indien u uw eigen gemaakte route wil opslaan kunt u aan het
einde van de training kunt uw de op het favoriet ster icoon te
drukken. Hiervoor heeft uw een Map My Fitness account nodig.
In te stelling in het SETTINGS menu.
Indien u een andere route wilt invoeren gaan dan terug naar het
GYM CENTER menu en doorloop de eerder beschreven stappen.
tussenpunten een route te bepalen. Druk op de landkaart en houdt het 1 seconde vast.
Er verschijnt nu een groene punaise. Dit is het startpunt. Druk vervolgens nog een keer 1
seconde op het scherm en er verschijnt een rode punaise. Dit is het eindpunt. Voeg een
aantal tussenpunten toe of druk op de START.
knop en u doorloopt uw eerder ingevoerde route. Tijdens het trainen kunt u zelf nog
“street view” of “hybride” of “standard” selecteren.
Indien u uw eigen gemaakte route wil opslaan kunt u aan het einde van de training
kunt uw de op het favoriet ster icoon te drukken. Hiervoor heeft uw een Map My Fitness
account nodig. In te stelling in het SETTINGS menu.
Indien u een andere route wilt invoeren gaan dan terug naar het GYM CENTER menu en
doorloop de eerder beschreven stappen.
Page 30
30 - Gebruiksaanwijzing Flow Fitness PERFORM S3
6
Product informatie
s
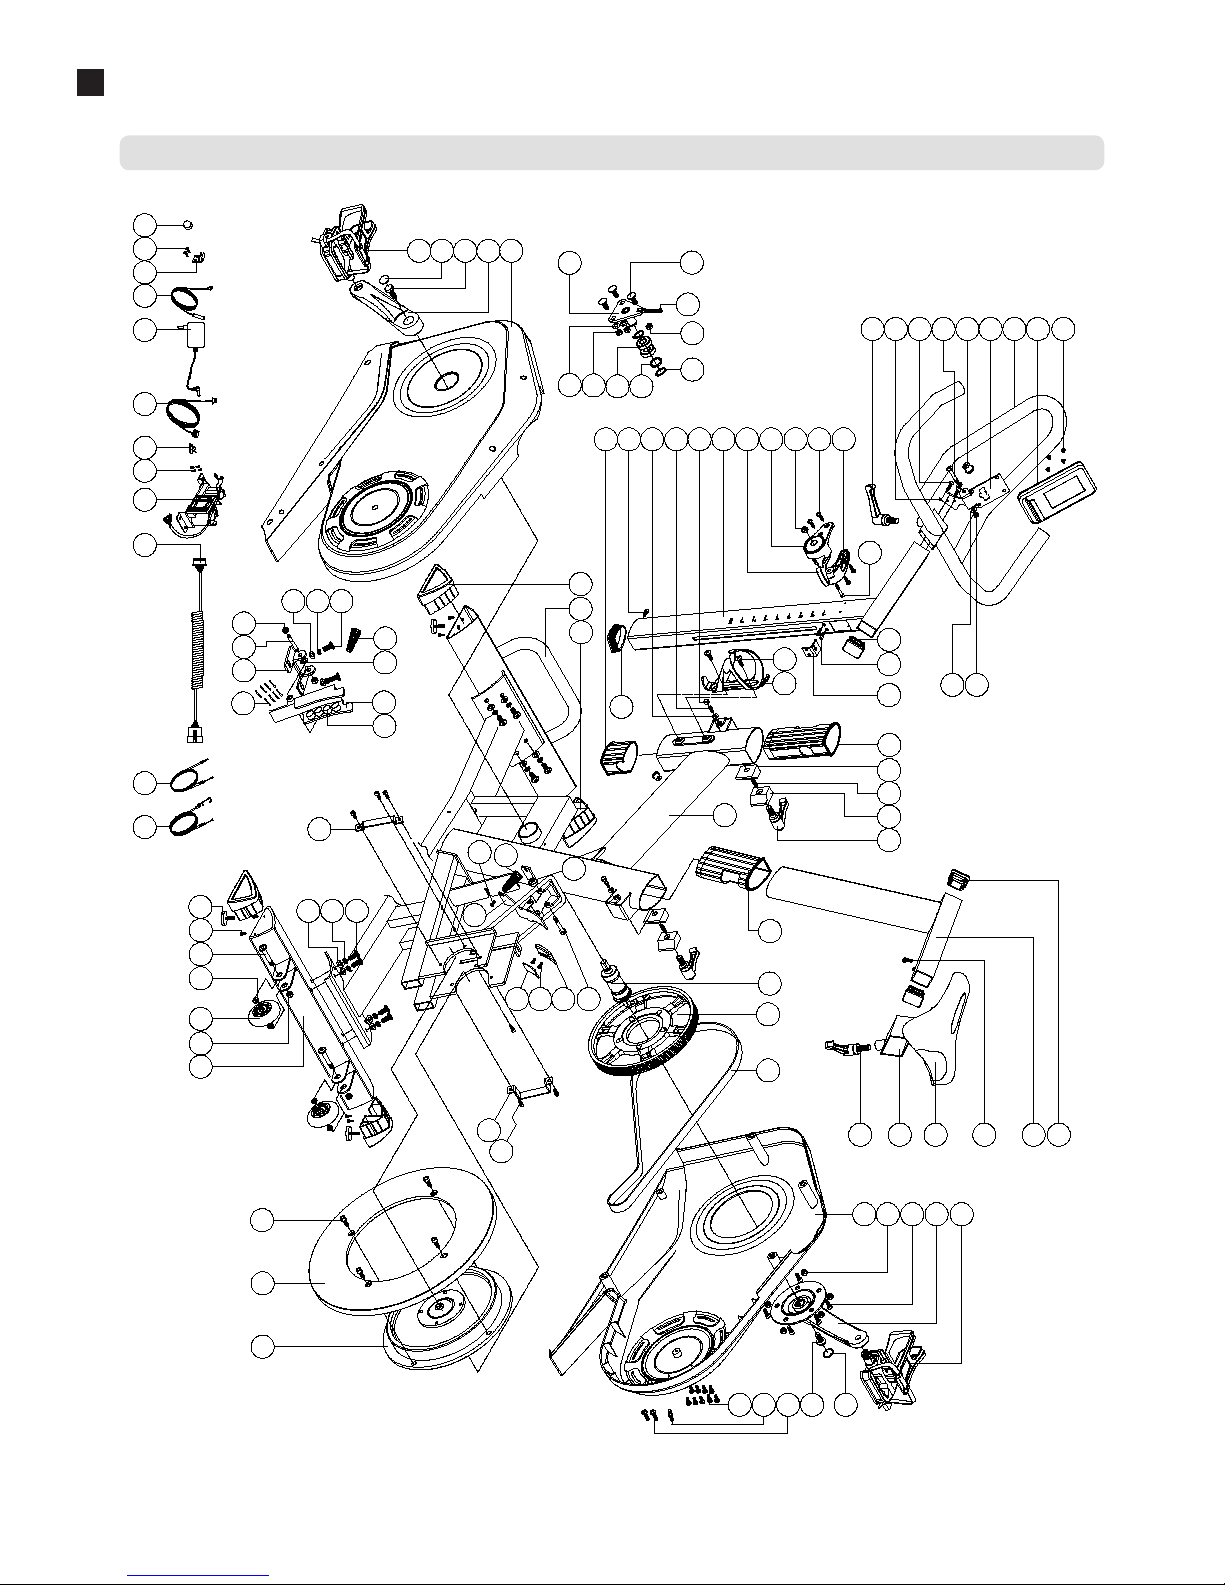
Exploded view
1
2
3
4L
4R
5
6
7
9
8
10
11
12
13
14
42
16
18
17
19
20 21 22
23L
23R
24L
25L
26
27
24R
26
27
25R
28
29
30
31
32
33R
33L
34
35
36
37
39
40
44
47
48
49
56
57
50
53
38
6
5
52
51
59
60
62
61
63
64
65
69
66
68
74
72
53
71
73
75
77
76
81
80
30
78
82
86
85
84
88
89
90
92
93
94
88
96 64
98
99
100
101
102
103
104
105
45
46
63
83
83
97
7
53
15
87
95
91
12
41
22
79
57
58
Page 31

Gebruiksaanwijzing Flow Fitness PERFORM S3 - 31
6
Product informatie
Onderdelenlijst
1 frame 1
2 voorste stabilisator 1
3 achterste stabilisator 1
4L linker driehoekige afdekkap 2
4R rechter driehoekige afdekkap 2
5 inbusbout M8x1.25x20L 10
6 veerring D15.4xD8.2x2T 10
7 platte ringD16xD8.5x1.2T 10
8 stuurbuis 1
9 zadelbuis 1
10 zadel 1
11 horizontaal verstelbare zadelbuis 1
12 L knop 25L 2
13 stuur 1
14 consle bevestigingsplaat 1
15 D plug 1
16 geleidingskap stuurbuis 1
17 afdekkap stuurbuis 1
18 geleidingskap zadelbuis 1
19 frictieplaat 2
20 drukveer 2
21 frictieplaat 2
22 L knop 50L 2
23L linker hoofdkap 1
23R rechter hoofdkap 1
24L left crank 1
24R right crank 1
25L/R pedaal set 1
26 bout 2
27 bout afdekkap 2
28 inbus M10*1.5*20L 5
29 moer M10*1.5*8T 5
30 kruiskopschroef M5x0.8x15L 4
31 pin D6*26.5*7.7 1
32 kruiskopschroef ST4.2*1.4*20L 9
33L linker afdekkap voor de (nood)rem 1
33R rechter afdekkap voor de (nood)rem 1
34 (nood) handrem 1
35 v snaar 1
36 pulley 1
37 trapas 1
38 platte ring D25*D8.5*2T 2
39 vliegwiel buiten 1
40 vliegwiel binnen 1
41 adapter plug 2
42 stuurbuis - console bevestigingsplaat 1
44 inbus M6*1*15L 6
45 spannigskabel 1
46 onderste spanningskabel 1
47 bevestigingsplaat magneet 1
48 magneet 8
49 bevestig set magneet 1
50 as bevestigingsplaat magneet 1
51 veer D1.2*55L 1
52 platte ringD18*D8.5*1.0T 1
53 nylon moer M8*1.25*8T 5
56 magneet cel 6
57 schroef M5*0.8*10L 3
58 bidonhouder 1
59 stelpoot 4
60 inbus bout M8*1.25*40L 2
61 transportwiel 2
62 bus D22.2*D8.2*7T 2
63 nylon moer M8*1.25*8T 3
64 schroef ST4*1.41*12L 10
65 bevestigingsplaat spanwiel 1
66 bout M8*1.25*20L 3
68 moer M6*1*5T 1
69 lager 6203-2RS 2
71 platte ring D18*D8.5*1.2T 2
72 C ring S-17(1T) 2
73 gegolfde ring D17*D22*0.3T 1
74 moet M8*1.25*6T 1
75 inbusbout M8*1.25*16L 4
76 veer D1.4*55L 1
77 beverstigingsplaat handrem 1
78 bout M8*52L 1
79 inbusbout M6*1.0*50L 1
80 remplaat 1
81 remblokje 1
82 inbusbout M8x1.25x45L 1
83 vierkante afdekkap buis 38x38x18L 3
84 kruiskopbout M5*0.8*10L 4
85 iConsole 1
86 schroef M5*15L 2
87 nylon moer M6*1.0*6T 1
88 inbusbout M6*1*15L 2
89 bevestigingsplaat spanningskabel 1
90 schroef ST4.2*1.4*15L 4
91 bevestigingsplaat (1) 1
92 buffer D10*5.5T 2
93 bout M5*0.8*10L, 2
94 platte ring D15*D5.2*1.0T 2
95 bevestigingsplaat (2) 1
96 ronde magneet 1
97 bout M5*10L 1
98 bevestigingsplaat sensor 1
99 sensor kabel 1
100 adapter 1
101 electrische kabel 1
102 kabelklem 1
103 kruiskopschroef ST4.2x1.4x12L 4
104 motor 1
105 bovenste computer kabel 1
Nr. Onderdeel Aantal Nr. Onderdeel Aantal
Page 32

32 - Flow Fitness PERFORM S3 - User Manual
6
Product information
Probleemoplossen
Tijdens het trainen piept of kraakt de spinningbike.
Piepen of kraken wordt in veel gevallen veroorzaakt door dat een kunststof kap die tegen het metalen frame of stang schuurt. Om dit
te verhelpen kunt u er WD40 olie op spuiten. Dit is te verkrijgen in de betere fietsenwinkel of doe-het-zelf zaak.
De computer ontvangt slecht of geen hartslag.
Hiervoor controleert u de volgende punten van de hartslagband:
- Is de hartslagband gecodeerd? Dit werkt niet op onze apparatuur. De hartslagband moet “Polar Compatible” zijn of te wel een
signaal van 5kHz zenden.
- Heeft u de gebruikers instructie gevolgd van de hartslagband? Het is namelijk belangrijk dat de sensoren vochtig worden gemaakt
voor beter contact met de huid.
- Is de batterij vol en juist geplaatst?
- Zit de band strak genoeg?
Ik kan de iConsole
+
app niet vinden in Google play of ITunes store.
Indien u de app niet kunt vinden met het zoekwoord “Iconsole”, probeer dan “Iconsole+”, “I-console” of “I-console+”
Bij de Bluetooth instellingen van mijn tablet / smart phone verschijnt de iConsole computer niet in de lijst van Bluetooth apparaten.
De iConsole dient aan te staan wil het een Bluetooth signaal afgeven. De adapter moet dus in het stopcontact zitten en het andere
eind aangesloten op het apparaat. Breng vervolgens de S3 in beweging, zodat de computer aan gaat. Nu verschijnt de iConsole in de
lijst van Bluetooth producten en kan er verbinding worden gemaakt.
Mijn tablet / smart phone kan geen contact krijgen via bluetooth met de iConsole.
1. De iConsole+ app communiceert niet met alle tablets en smart phones. Op pag. 23 staat een lijst van producten waarmee de
iConsole+ app gebruikt kan worden.
2. Bluetooth kan maar 1 connect tegelijkertijd maken. Zorg evoor dat uw telefoon of tablet niet met een ander apparaat verbonden.
3. De verbinding kan wel eens verstoord worden door externe factoren. Schakel de Bluetooth functie op uw tablet of smart phone uit
en daarna weer aan. Maak vervolgens weer verbinding met de iConsole en gebruik de inlog code 0000.
Mijn trainingen worden niet opgeslagen in het INFORMATION MENU.
U dient een account te hebben en ingelogd te zijn als u de trainingen wilt opslaan. In hoofdstuk van het SETTING MENU vindt u een
beschrijving om een account aan te maken.
Ik kan geen gebruik maken van IROUTE functie in het GYM CENTER MENU.
U dient een account te hebben en ingelogd te zijn als u van de IROUTE functie gebruik wilt maken.
In hoofdstuk van het SETTING MENU vindt u een beschrijving om een account aan te maken. Wanneer er een route op IROUTE gestart
wordt verschijnd het menu “Your workout this time”.
Wanneer uw een Android tablet heeft dient uw de iConsole HD app te downloaden uit Google play store.
Probleem
Oplossing
Probleem
Oplossing
Probleem
Oplossing
Probleem
Oplossing
Probleem
Oplossing
Probleem
Oplossing
Probleem
Oplossing
Probleem
Oplossing
Indien uw probleem niet is opgelost of niet staat beschreven, raadpleeg dan de fitnessdealer waar uw het product heeft gekocht.
Page 33

Gebruiksaanwijzing - Flow Fitness PERFORM S3 - 33
7
Garantie
Flow Fitness verleent de volgende garantie op dit product te rekenen vanaf de datum van aankoop:
1. THUISGEBRUIK
Het toestel wordt gebruikt in een huiselijke omgeving en uitsluitend door de leden van het gezin dat het toestel heeft aangeschaft.
2. LICHT COMMERCIEEL GEBRUIK
Het toestel wordt door een beperkte groep mensen die onder toezicht staan van een fitness professional, zoals bij scholen, hotels, appartementen, kleine
fysiotherapie praktijken en bedrijven. De maximale gebruiksintensiteit bedraagt maximaal 5 uur per dag.
- De garantie heeft uitsluitend betrekking op materiaal- en/of productiefouten.
- Indien u optimaal gebruik wilt maken van deze garantie, vul dan het online garantie aanmeld formulier in en voeg daarbij een kopie van het aankoopbewijs.
Dit formulier kunt u vinden op:
www.flowfitness.nl/nl/service/garantie.php
Indien het product defect is, neem dan contact op met de fitnessdealer bij wie u het product heeft gekocht en meld het defect. Omdat Flow Fitness uitsluitend
met gespecialiseerde en ervaren dealers samenwerkt, kan deze in veel gevallen het defect verhelpen. Indien nodig neemt de dealer contact op met Flow
Fitness. Vervolgens zal Flow Fitness in samenwerking met de dealer het defect naar eigen inzicht verhelpen. Indien het defect binnen het garantietermijn valt,
zal dit kosteloos gebeuren.
De garantie vervalt wanneer:
- er gebreken zijn ontstaan aan het product door een onjuiste montage van het toestel dan wel wanneer er sprake is van het niet juist opvolgen van de
instructies zoals beschreven in deze handleiding,
- reparaties aan het product zijn verricht door anderen dan door Flow Fitness aangewezen personen of zonder haar schriftelijke toestemming,
- het product naar het oordeel van Flow Fitness is verwaarloost dan wel onvoorzichtig en/of ondeskundig is gebruikt, behandeld en/of onderhouden, en/of
sprake is van normale slijtage,
- het product op andere wijze is gebruikt dan in deze gebruiksaanwijzing is beschreven,
- het product onder andere omstandigheden is gebruikt dan in deze gebruiksaanwijzing is beschreven,
- defecten zijn ontstaan door overige factoren van buitenaf.
Het garantietermijn wordt niet verlengd of vernieuwd door uitvoering van garantiewerkzaamheden, met dien verstande dat de garantie op uitgevoerde
werkzaamheden drie maanden bedraagt.
Garantie
Garantievoorwaarden
Onderdelen
Frame
Voorrijkosten & Arbeidsloon
5 jaar
10 jaar
3 jaar
2 jaar
2 jaar
2 jaar
Thuisgebruik Licht commercieel gebruik
Page 34
PERFORM S3
User Manual
ENGLISH
Page 35
User Manual - Flow Fitness PERFORM S3 - 35
Table of content
1. Important information 36
Content of package .....................................................................................................................................................37
2. Introduction 38
Important parts ............................................................................................................................................................38
Specifications .............................................................................................................................................................. 39
3. Fitness 40
What is fitness .............................................................................................................................................................40
Training by heart rate .................................................................................................................................................. 40
Determining your trainings goal ...................................................................................................................................40
Warming Up & Cooling Down .......................................................................................................................................41
Introduction training schedule .....................................................................................................................................42
Training schedule to improve stamina ..........................................................................................................................43
Training schedule to lose weight ..................................................................................................................................43
4. Assembly 44
1. Assembly of the stabilizers ...................................................................................................................................... 44
2. Adjust the handlebar post and seat post .................................................................................................................. 45
3. Assemble the seat, handlebar and bottle holder .......................................................................................................46
4. Assemble the iConsole .............................................................................................................................................47
5. Assemble the pedals and connect the adapter .........................................................................................................48
5. Use 49
Storeage, moving and usage .......................................................................................................................................49
Maintenance ...............................................................................................................................................................49
Using the iConsole ....................................................................................................................................................... 50
Training with the iConsole
+
app ...................................................................................................................................54
6. Product information 62
Exploded view .............................................................................................................................................................62
Part list ........................................................................................................................................................................63
Troubleshooting ...........................................................................................................................................................64
7. Warranty 65
Warranty .....................................................................................................................................................................65
Page 36
36 - Flow Fitness PERFORM S3 - User Manual
1
Important information
Health
IMPORTANT: read this instruction manual first and follow the instructions carefully before using the product.
- Consult an expert to determine the training level that is most suitable for you.
- If you experience any dizziness, nausea or any other physical discomfort while training, cease the training immediately and consult a physician.
- Watch your heart beat during the training and immediately stop training when values are inconsistent.
- We advise you to do warming up and cooling down exercises during five to ten minutes before and after use of the product. This way your heart rate
can increase and decrease gradually and you can prevent painful muscles.
Safety
- Only use this product as described in this instruction manual.
- Before using this product check that the product functions as it should. In case of malfunction or a defect stop training immediately and contact your
dealer.
- Do not use the product when there is a malfunction.
- The product has to be positioned on a flat surface.
- The product can only be used by one person at the same time.
- The product can be used by persons weighing up to 150 kg.
- Always make sure that there is at least one meter of free space in all directions around the product when you are training.
- Don’t stick any objects in any opening of the product.
- Keep children and pets away from the product.
- Handicapped persons should get consent from a medical expert and follow their directions for training with the product.
- Do not place hands or feet under the product.
- Never hold your breath during a training session. Your breathing should be at a normal interval depending on the intensity of the training.
- Start your training schedule slowly and build it up gradually.
- Always wear appropriate clothing during training. Don’t wear anything that’s too loose and can get caught between moving parts of the equipment.
- When moving the equipment always use the appropriate lifting techniques to prevent back injury.
- Check screws and bolts regularly and fasten them if they are loose.
- The owner of the product is responsible for all users to be aware of the warnings and instructions as mentioned in this instruction manual.
- This product is intended for use in a clean and dry environment. Storage in cold and / or moist areas could lead to problems with the product.
WARNING
Have your physical condition checked by a licensed physician before you start training. This is particularly important for
persons over 35 years old or persons who have any problems with their health. Read all instructions before using the
equipment. Flow Fitness is not responsible for any personal injury or damage to property caused by the use of this equipment.
Page 37
User Manual - Flow Fitness PERFORM S3 - 37
1
Important information
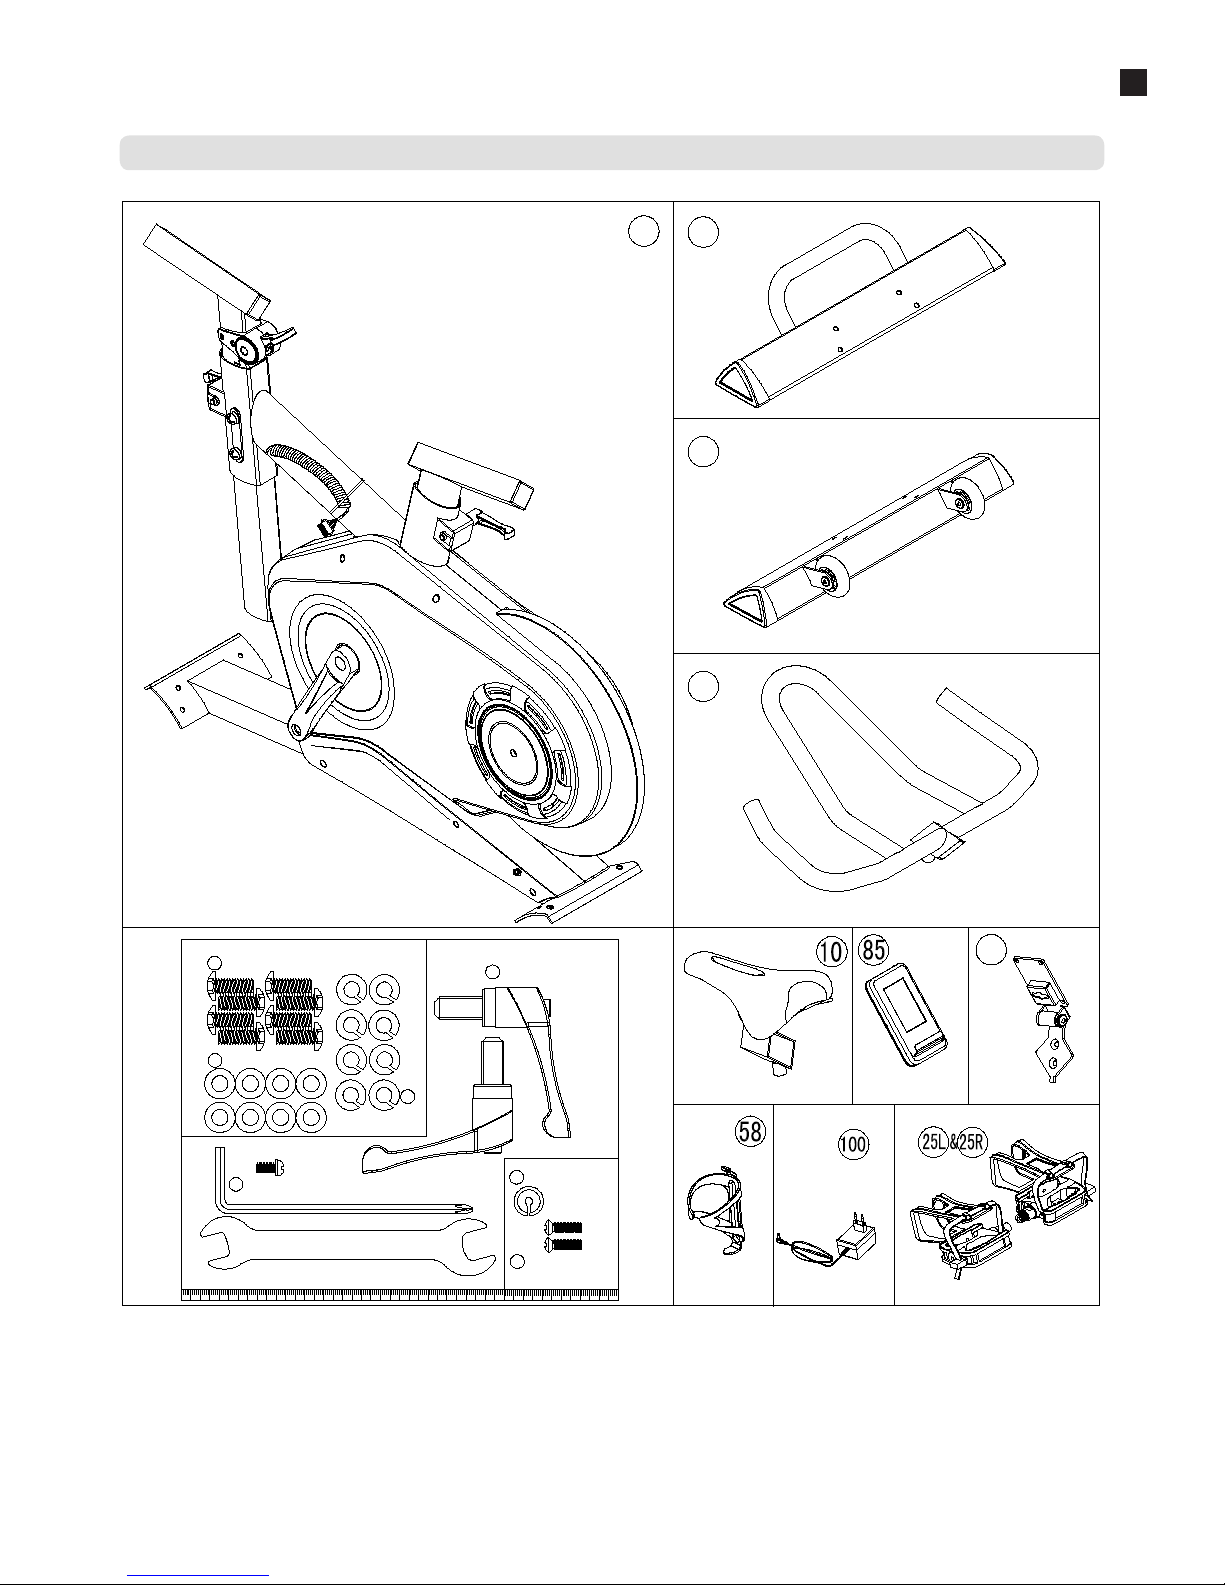
Content of package
x1
x1
x1
x1
x1
x1
x1
1 2
3
13
14
x1
x1
(mm)
M8x1.25x20L 8PCS
D15.4xD8.2x2T 8PCS
D16xD8.5x1.2T 8PCS
5
6
7
KH-848
2PCS
12
STEP-1
M5*10L 1PCS
97
13
15
STEP-3
M5*0.8*15L 2PCS
86
STEP-4
41
1pcs
x1
Page 38
38 - Flow Fitness PERFORM S3 - User Manual
2
Introduction
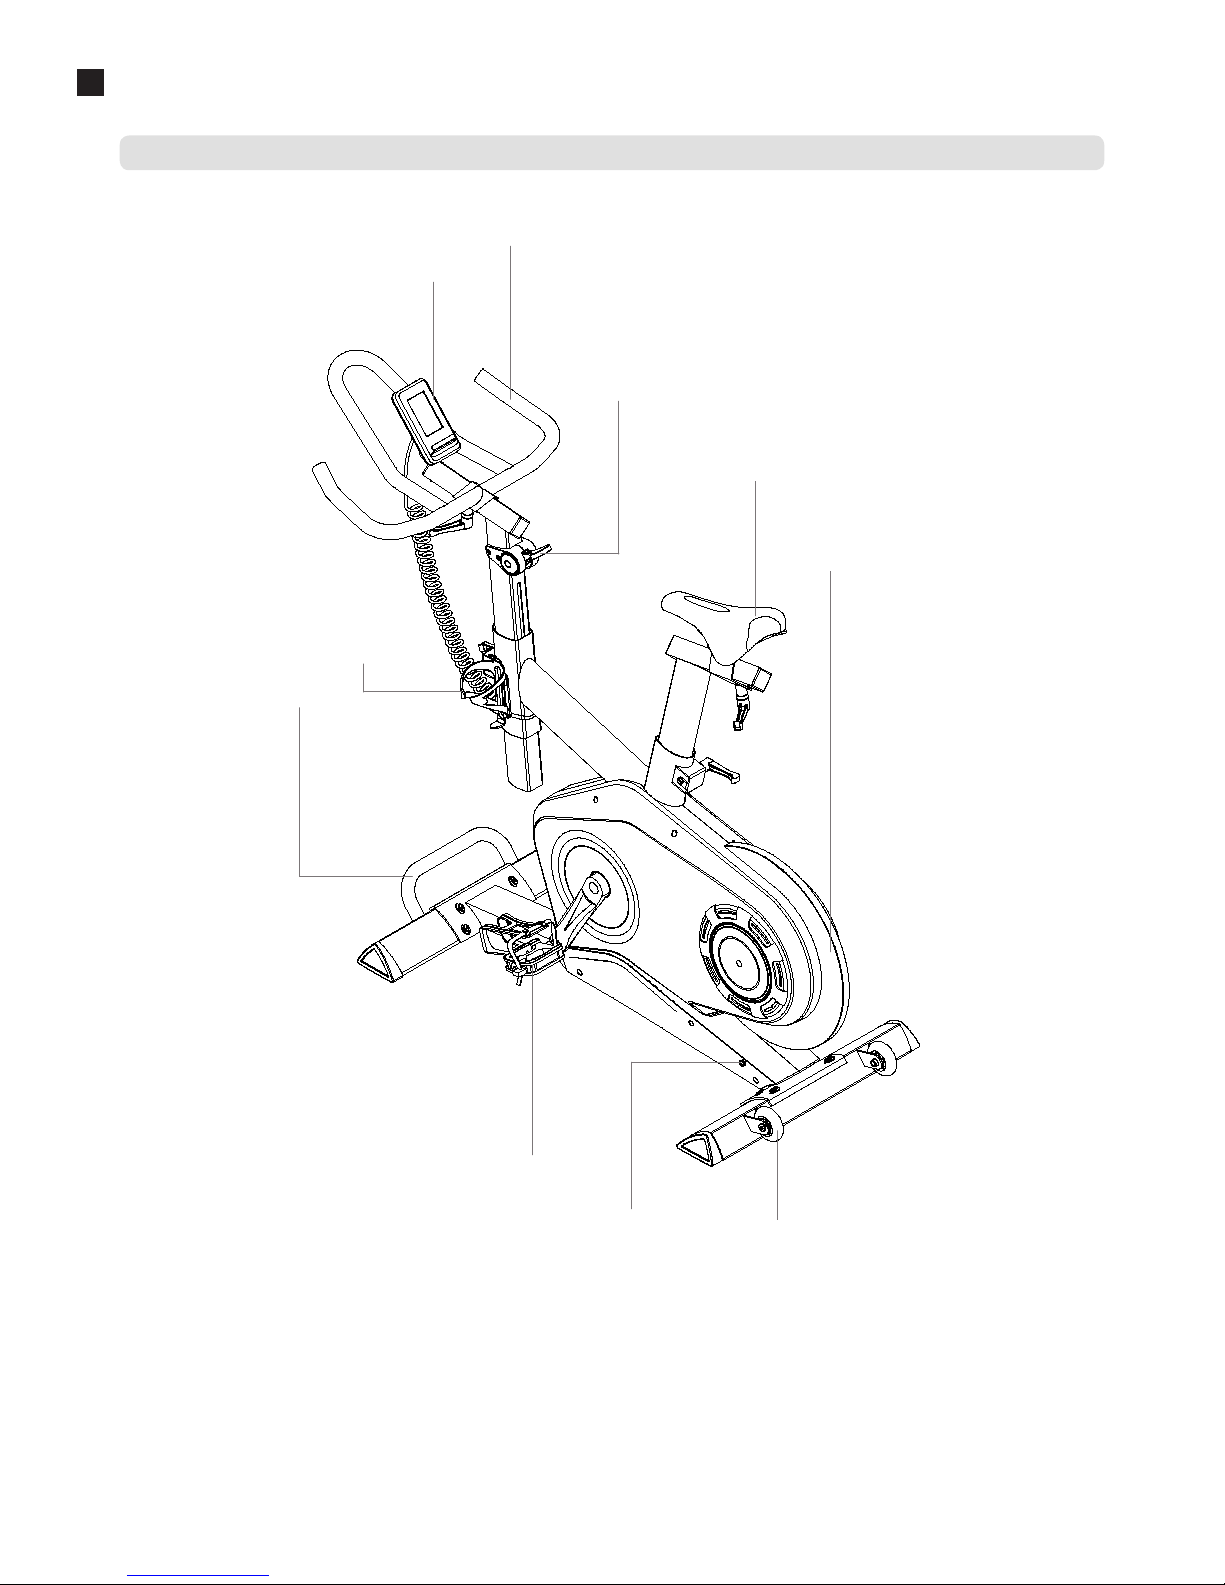
Important parts
Adjustable handlebar
Hand brake - emergency brake
Adjustable seat
Flywheel
iConsole
Bottle holder
Transport grip
Pedal with feet straps & SPD
adaptor plugin
wheel for transportation
Page 39
User Manual - Flow Fitness PERFORM S3 - 39
2
Introduction
Specifications
18 Total programs
1 Manual program
12 Preset programs
3 Heart Rate Controlled programs
1 Target Heart Rate program
1 Consistant WATT
Recovery test
Heart rate registration with an
optional 5kHz chest belt
USB charger
Bluetooth
iConsole app (with iRoute) compatible)
iConsole
Training with iconsole app
18 Total programs
1 Manual program
12 Preset programs
3 Heart Rate Controlled programs
1 Target Heart Rate program
1 Consistant WATT
iConsole+ APP
32 Resistance levels
18 kg Rotating mass
Permanent magnet resistance system
Size and weight
Length: 152 cm
Heigth: 104 cm
Widht: 59 cm
Weight: 50 kg
Technical
Horizontal and vertical adjustable seat
Horizontal and vertical adjustable handle bar
Pedals with feet straps
Pedals are compatible with SPD cycle shoes
Ergonomics
Page 40
40 - Flow Fitness PERFORM S3 - User Manual
3
FitnessFitness
What is fitness? Generally it can be described as an fitness exercise that causes your heart to pump more oxygen to your muscles
via the blood from your lungs. The harder the workout, the more fuel (oxygen) the muscles require to achieve this rate of oxygen. The
heart has to pump harder to get the oxygenated blood into the muscles. If you have a good stamina, your heart pumps more blood
with each heartbeat. The heart will not have to beat that often to transport the necessary oxygen into your muscles. Your resting heart
rate and heart rate during exercise will reduce.
While training it is important to monitor your heart rate. The heart rate is essential for the result of your training. Your best training
heart rate depends firstly on your age. Your maximum heart beat can be determined by this. Secondly the most effective heart rate
depends on your training goals. If your training goal is to lose weight, then the most effective training is at 60% of your maximum
heart rate. If your training goal is to improve your stamina, then you should train at 85% of your maximum heart rate.
The body stores energy in two forms: carbohydrates and fat. When we exercise we use a combination of these two energy supplies. If
the training intensity is at a high level the body will mostly choose the energy that burns fast: carbohydrates. Since there is a limited
supply of these carbohydrates you can’t continue this for a long period of time. When training at a low intensity the body will mostly
choose to use a long lasting source of energy: fat. Since this is stored in large quantities in the body, you can continue this kind of
training for a longer time.
Below you will find a schedule allowing you to calculate the best heart rate for your training. In this schedule each age category has a
range that your heart rate should be in during your training. The middle column has the values you should try to maintain if you want
to lose weight. If you want to improve your stamina you should try to maintain the rates in the right column.
For each individual the best way to start training is different. If you have not exercised in some time or are overweight, you should
start your training schedule slowly and gradually increase the level of activity.
In the last chapter of this instruction manual you will find several different training schedules (chapter 5. general information). You can
use these schedules to reach your training goals. The schedules are divided in two phases. The first phase can be used for beginners
or persons who start training after a long period of inactivity. During this phase the level of intensity is built up gradually. After six
weeks the second phase begins. You can then choose a training schedule to lose weight or improve your stamina.
At www.flowfitness.nl you can calculate your progress.
Age
Weight lost
(beats per minute)
60%
Improve stamina
(beats per minute)
85%
20 -24 120 - 118 170 -167
25 - 29 117 - 115 166 - 163
30 - 34 114 - 112 162 - 158
35 - 39 111 - 109 157 - 154
40 - 44 108 - 106 153 - 150
45 - 49 105 - 103 149 - 145
50 - 54 102 - 100 144 - 141
55 - 59 99 - 97 140 - 137
60 and older 96 - 94 136 - 133
What is fitness
Training by heart rate
Determining your trainings goal
Page 41
User Manual - Flow Fitness PERFORM S3 - 41
3
Fitness
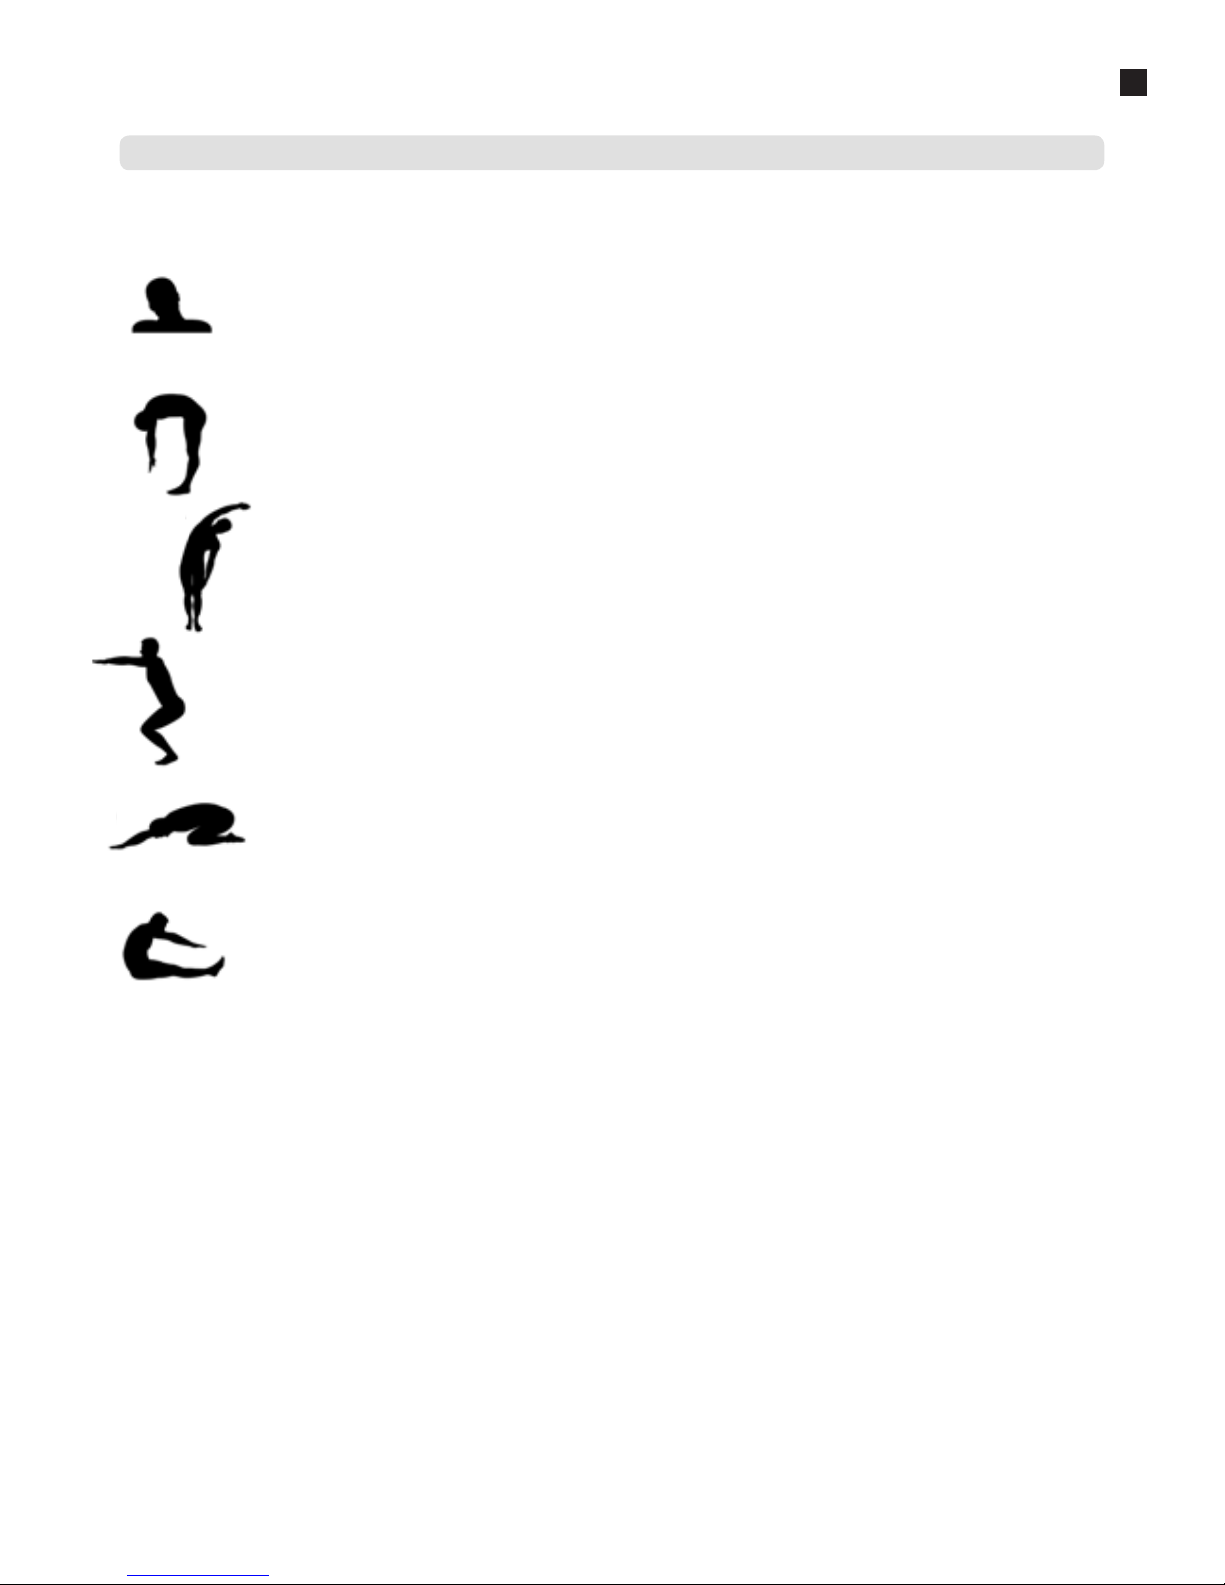
Warming Up & Cooling Down
A good training schedule starts with a good warming up and ends with a cooling down of the muscles. This will prevent painful
muscles and injury. Below you will find some suitable exercises.
Head Roll
Tilt your head to the right. Hold this for one second, so that you feel a little pull in the muscles on the left side of your neck. Do the same
for the other side, front and back. Repeat two or three times.
Toe Touch
Slowly bend forward with your back and arms relaxed. Bend as far as you can and hold the position for ten seconds. Repeat this two or
three times.
Side Stretch
Extend both your arms up in the air and reach as high as you can with your right arm. Lean a bit to the left so that the muscles in the
right side of your torso are stretched. Hold this position for one second. Relax and make the same motion on the other side of your body.
Repeat this three or four times.
Knee bend
Set your feet shoulder-width apart and your stretched your hands out. Lower yourself no more than 10cm by bending your knees. Come
back up again and repeat several times.
Lower back stretch
Begin on all fours. Stretch your arms out in front of you, allowing your face to lower to a position near the floor. Gently sit back. Rest your
glutes just above your heels. Ease back and feel the gentle stretch in your lower back.
Hamstring Stretch
Sit down on the floor with your right leg extended in front of you and place the sole of your left foot on the inside of your right upper leg.
Bend forward in the direction of your right foot and hold this position for ten seconds. Relax and then do the same with your other leg.
Repeat two or three times.
Page 42
42 - Flow Fitness PERFORM S3 - User Manual
3
Fitness
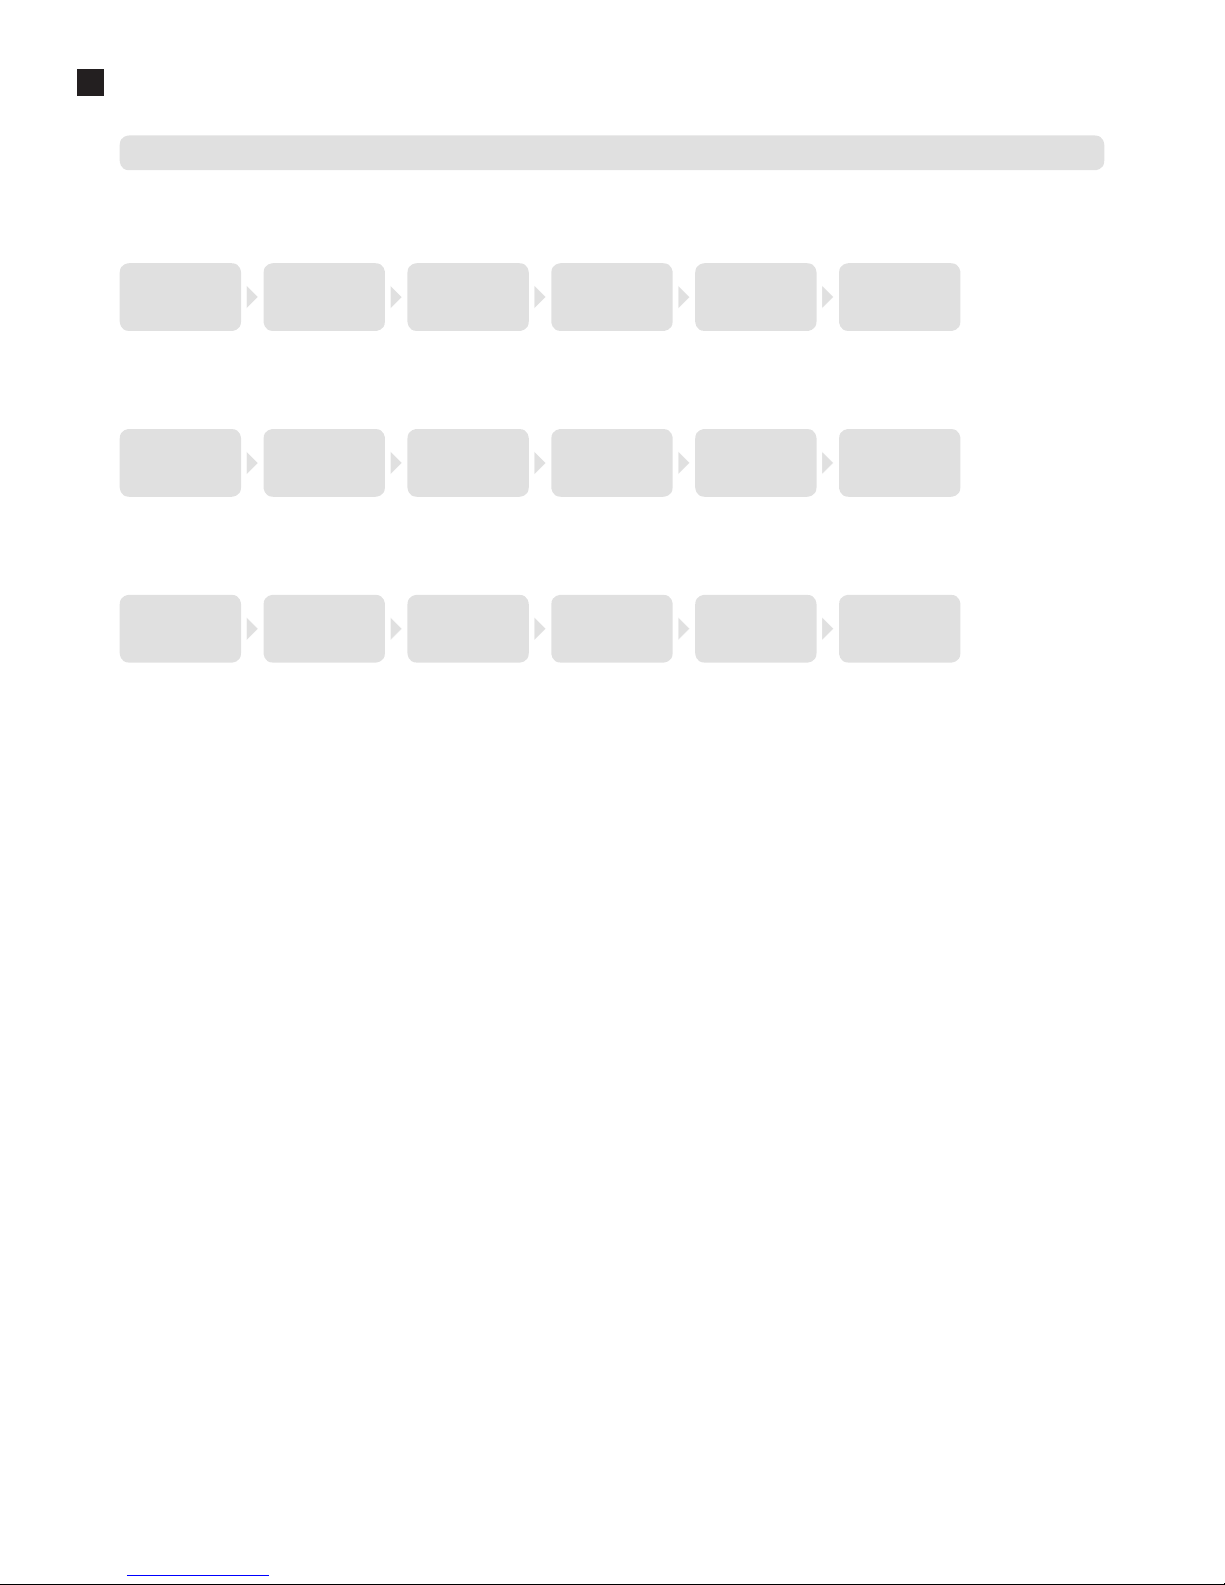
Introduction training schedule
Training schedule week 1 and 2
Train at 60% of your maximum heart rate with a maximum of 3 times a week.
Warming up
---
5 - 10 minutes
Train
---
4 minutes
Rest
---
1 minute
Train
---
2 minutes
Slow pedaling
---
1 minute
Cooling down
---
5 minutes
Training schedule week 2 and 3
Train at 60% of your maximum heart rate with a maximum of 4 times a week.
Warming up
---
5 - 10 minutes
Train
---
5 minutes
Rest
---
1 minute
Train
---
3 minutes
Slow pedaling
---
1 minute
Cooling down
---
5 minutes
Training schedule week 5 and 6
Train at 60% of your maximum heart rate with a maximum of 5 times a week.
Warming up
---
5 - 10 minutes
Train
---
6 minutes
Rest
---
1 minute
Train
---
4 minutes
Slow pedaling
---
3 minutes
Cooling down
---
5 minutes
After completing the introduction training schedule for six weeks, you can choose the follow-up training schedule that is best suited to your needs. You can
choose a schedule that will maximize your weight loss, or one that will improve your stamina. Both training schedules are on the next page.
Page 43
User Manual - Flow Fitness PERFORM S3 - 43
3
Fitness
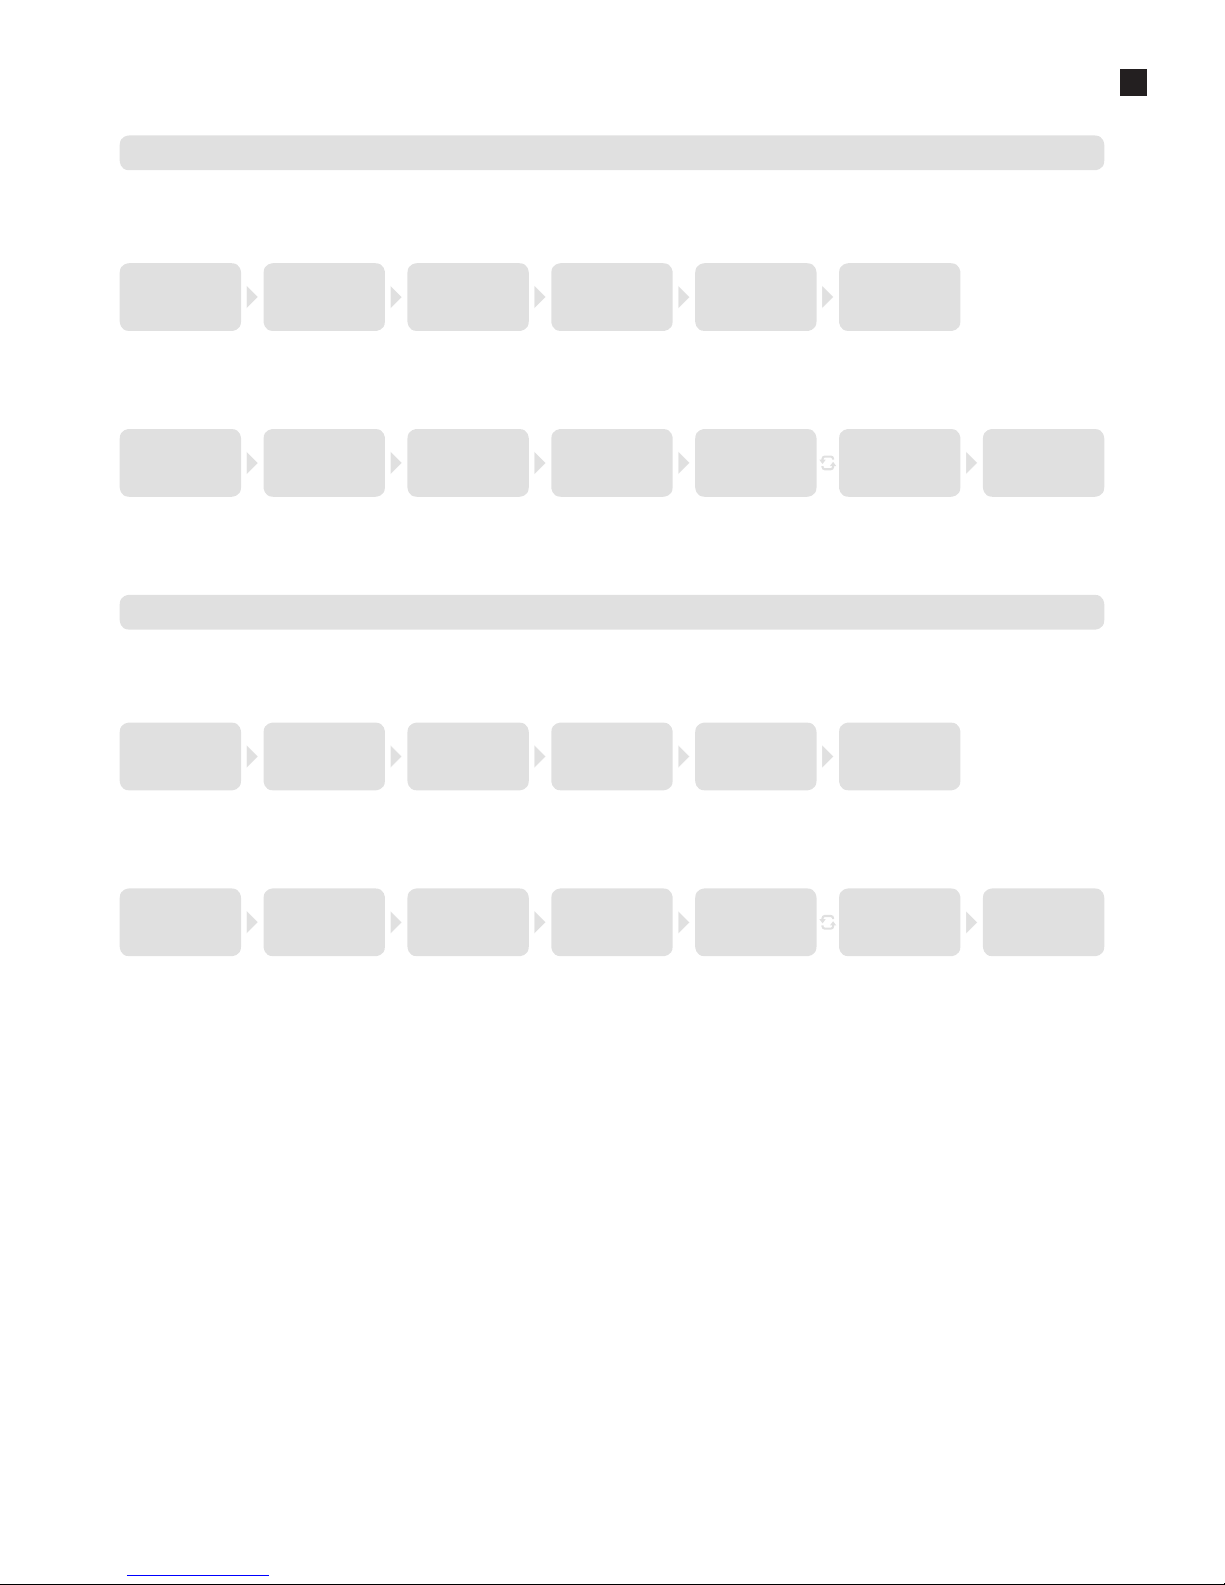
Training schedule to improve stamina
Training schedule week 7 and 8
Train at 85% of your maximum heart rate with a maximum of 6 times a week.
Warming up
---
5 - 10 minutes
Train
---
7 minutes
Rest
---
1 minute
Train
---
5 minutes
Slow pedaling
---
1 minute
Cooling down
---
5 minutes
Training schedule week 9 and beyond
Train at 85% of your maximum heart rate with a maximum of 6 times a week.
Warming up
---
5 - 10 minutes
Train
---
10 minutes
Rest
---
1 minute
Train
---
10 minutes
Repeat training
---
2 or 3 times
Slow pedaling
---
1 minute
Cooling down
---
5 minutes
Training schedule to lose weight
Training schedule week 7 and 8
Train at 60% of your maximum heart rate with a maximum of 6 times a week.
Warming up
---
5 - 10 minutes
Train
---
7 minutes
Rest
---
1 minute
Train
---
5 minutes
Slow pedaling
---
1 minute
Cooling down
---
5 minutes
Training schedule week 9 and beyond
Train at 60% of your maximum heart rate with a maximum of 6 times a week.
Warming up
---
5 - 10 minutes
Train
---
10 minutes
Rest
---
1 minute
Train
---
10 minutes
Repeat training
---
2 or 3 times
Slow pedaling
---
1 minute
Cooling down
---
5 minutes
Page 44
44 - Flow Fitness PERFORM S3 - User Manual
4
Assembly
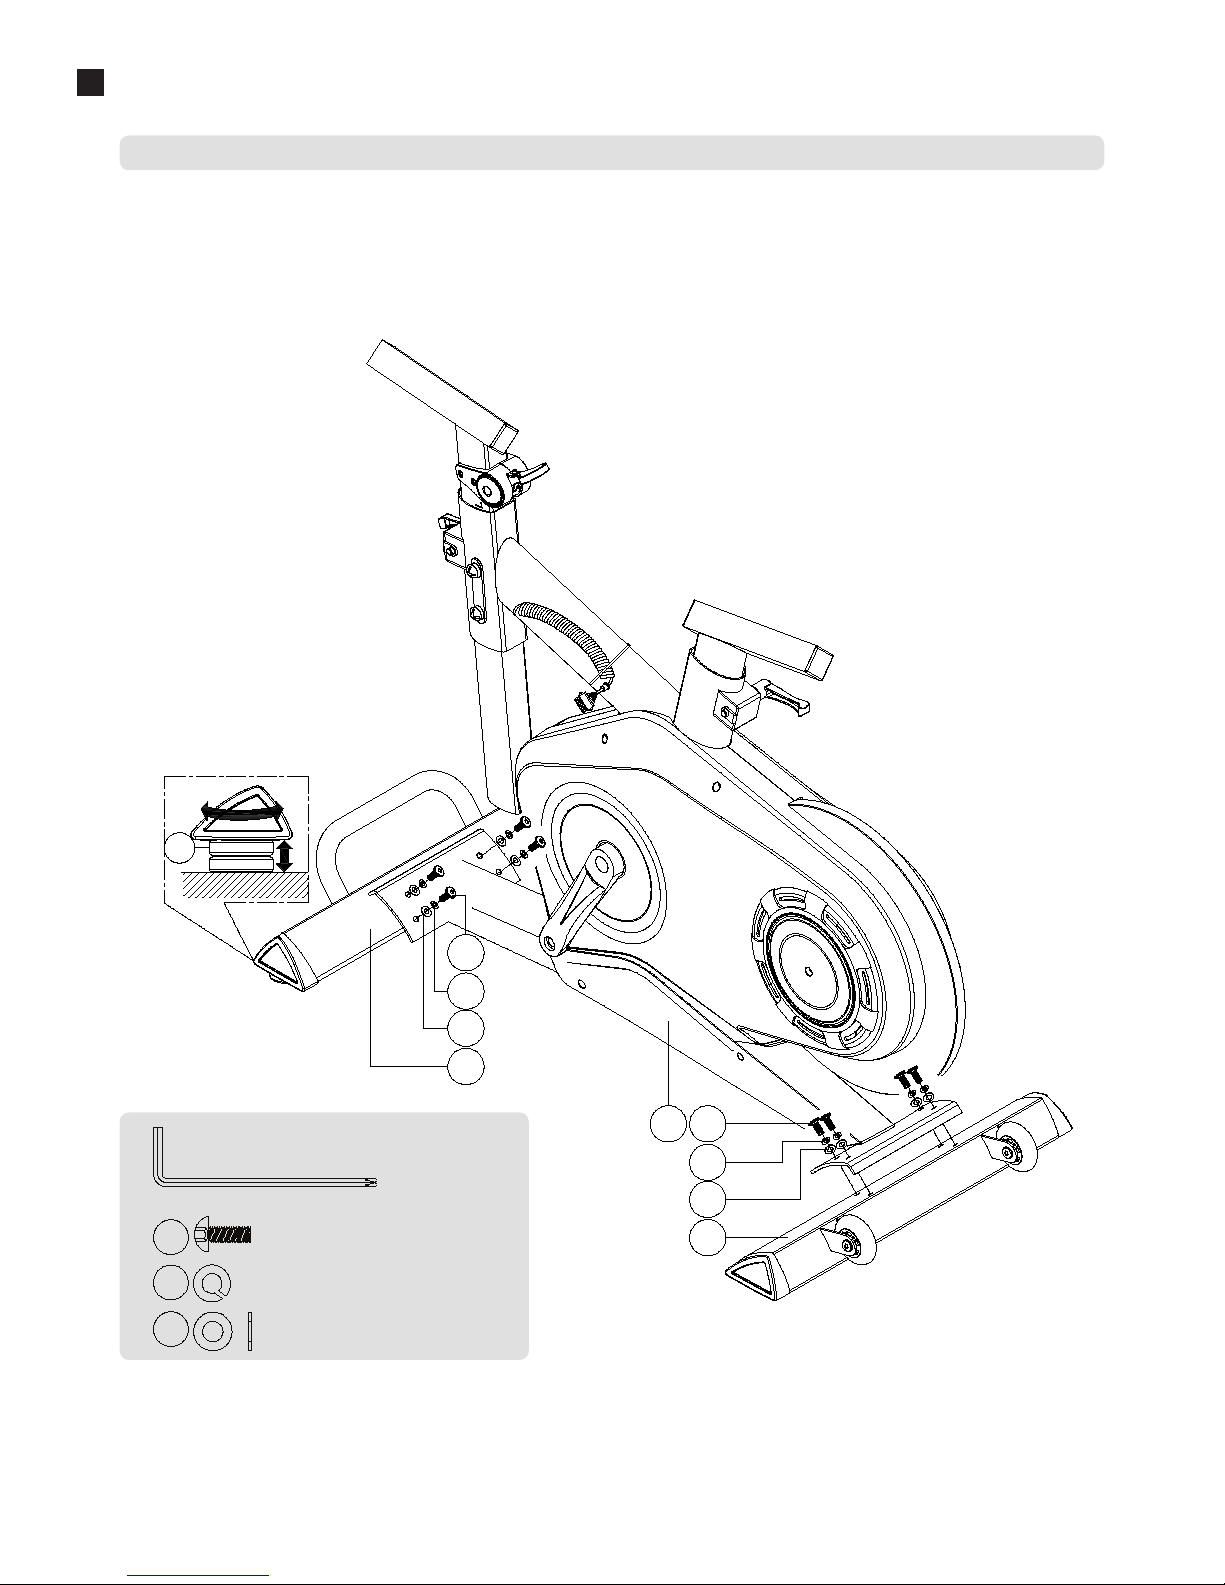
Assemble the front stabilizer and rear stabilizer as displayed in the illustration below. After assembling the stabilizers you can level the S3 by rotating the four
adjustable feet underneath the stabilizers.
1. Assembly of the stabilizers
M8*1.25*20L
(x8
)
D15.4*D8.2*2T
D16*D8.5*1.2T
(x8
)
(x8
)
5
6
7
5
6
7
2
1
5
6
7
3
59
Page 45
User Manual - Flow Fitness PERFORM S3 - 45
4
Assembly
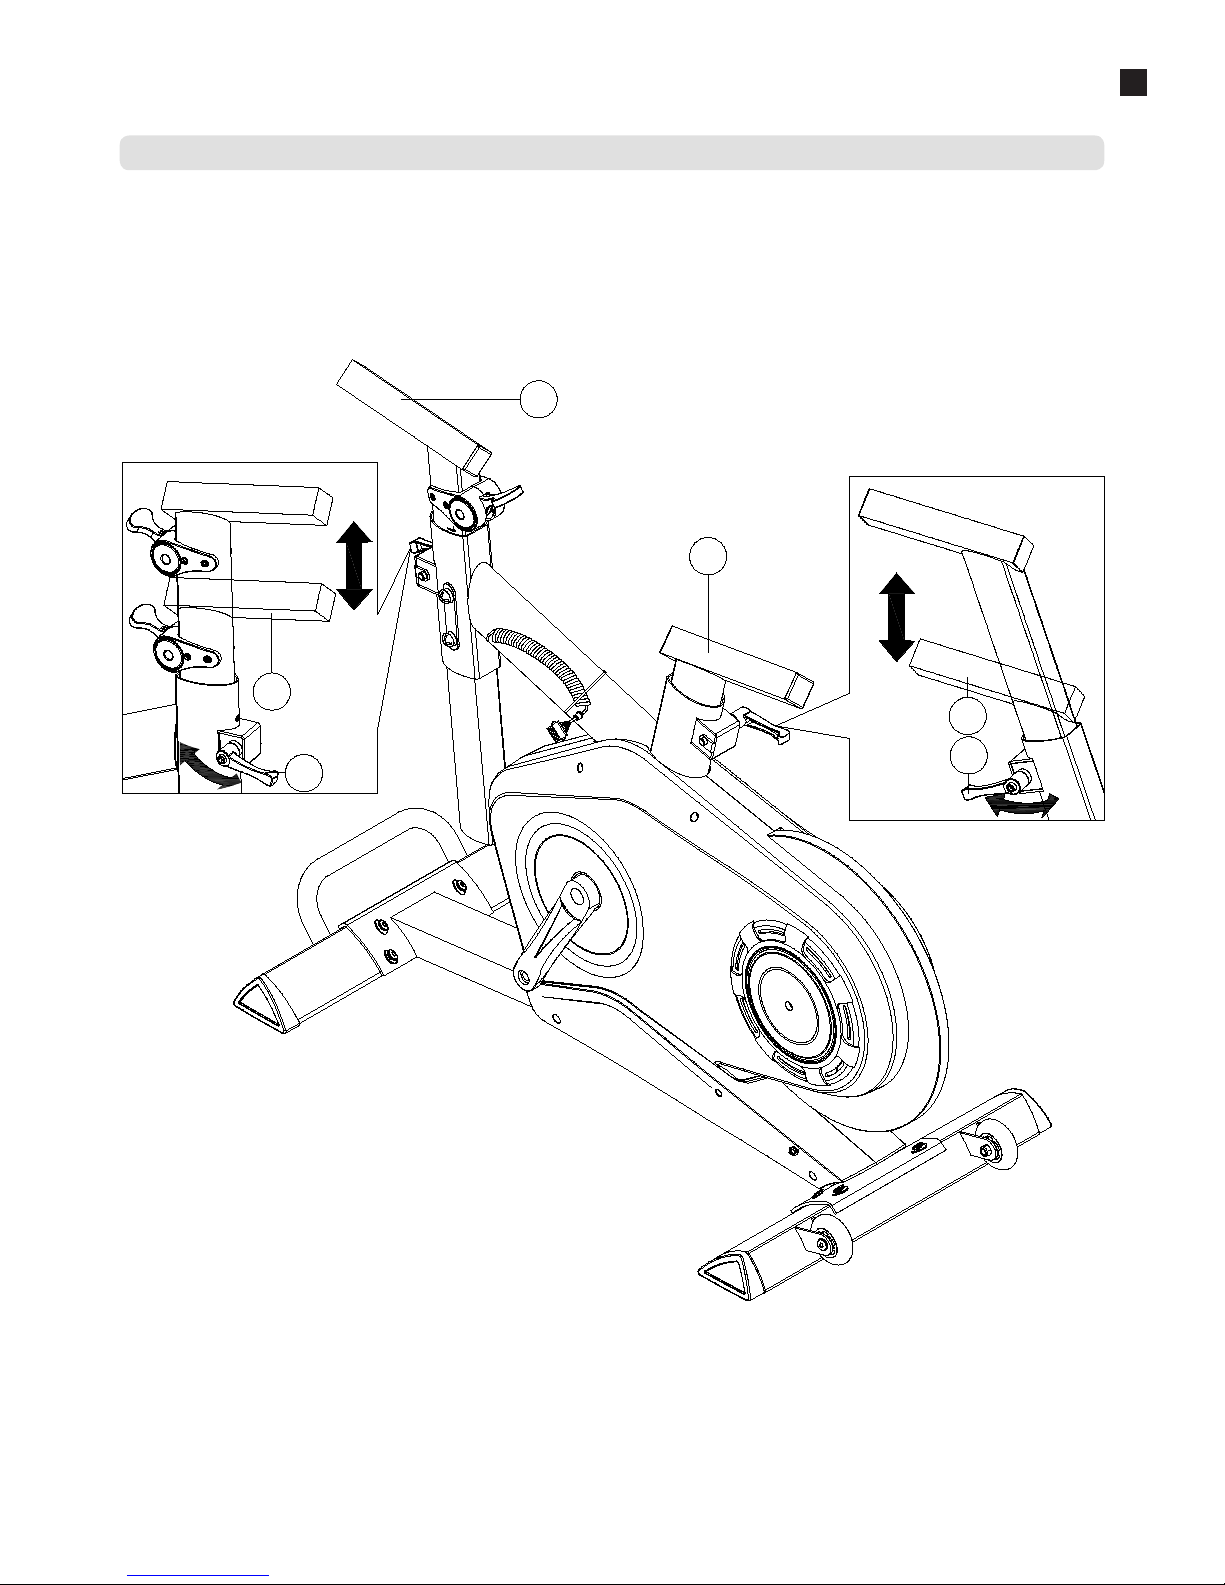
Set the handlebar and seat post into an higher position for easy assembly. The posts can be adjusted by loosening lever (22). Then pull the post to the desired
height. Pulling the lever (22) before rotating allows you to position the lever handle without fastening or loosening the post. While using the S3 these levers
can be used to setup the preferred height of the handlebar and seat.
2. Adjust the handlebar post and seat post
8
DOWN
UP
DOWN
UP
8
9
9
22
22
Page 46
46 - Flow Fitness PERFORM S3 - User Manual
4
Assembly
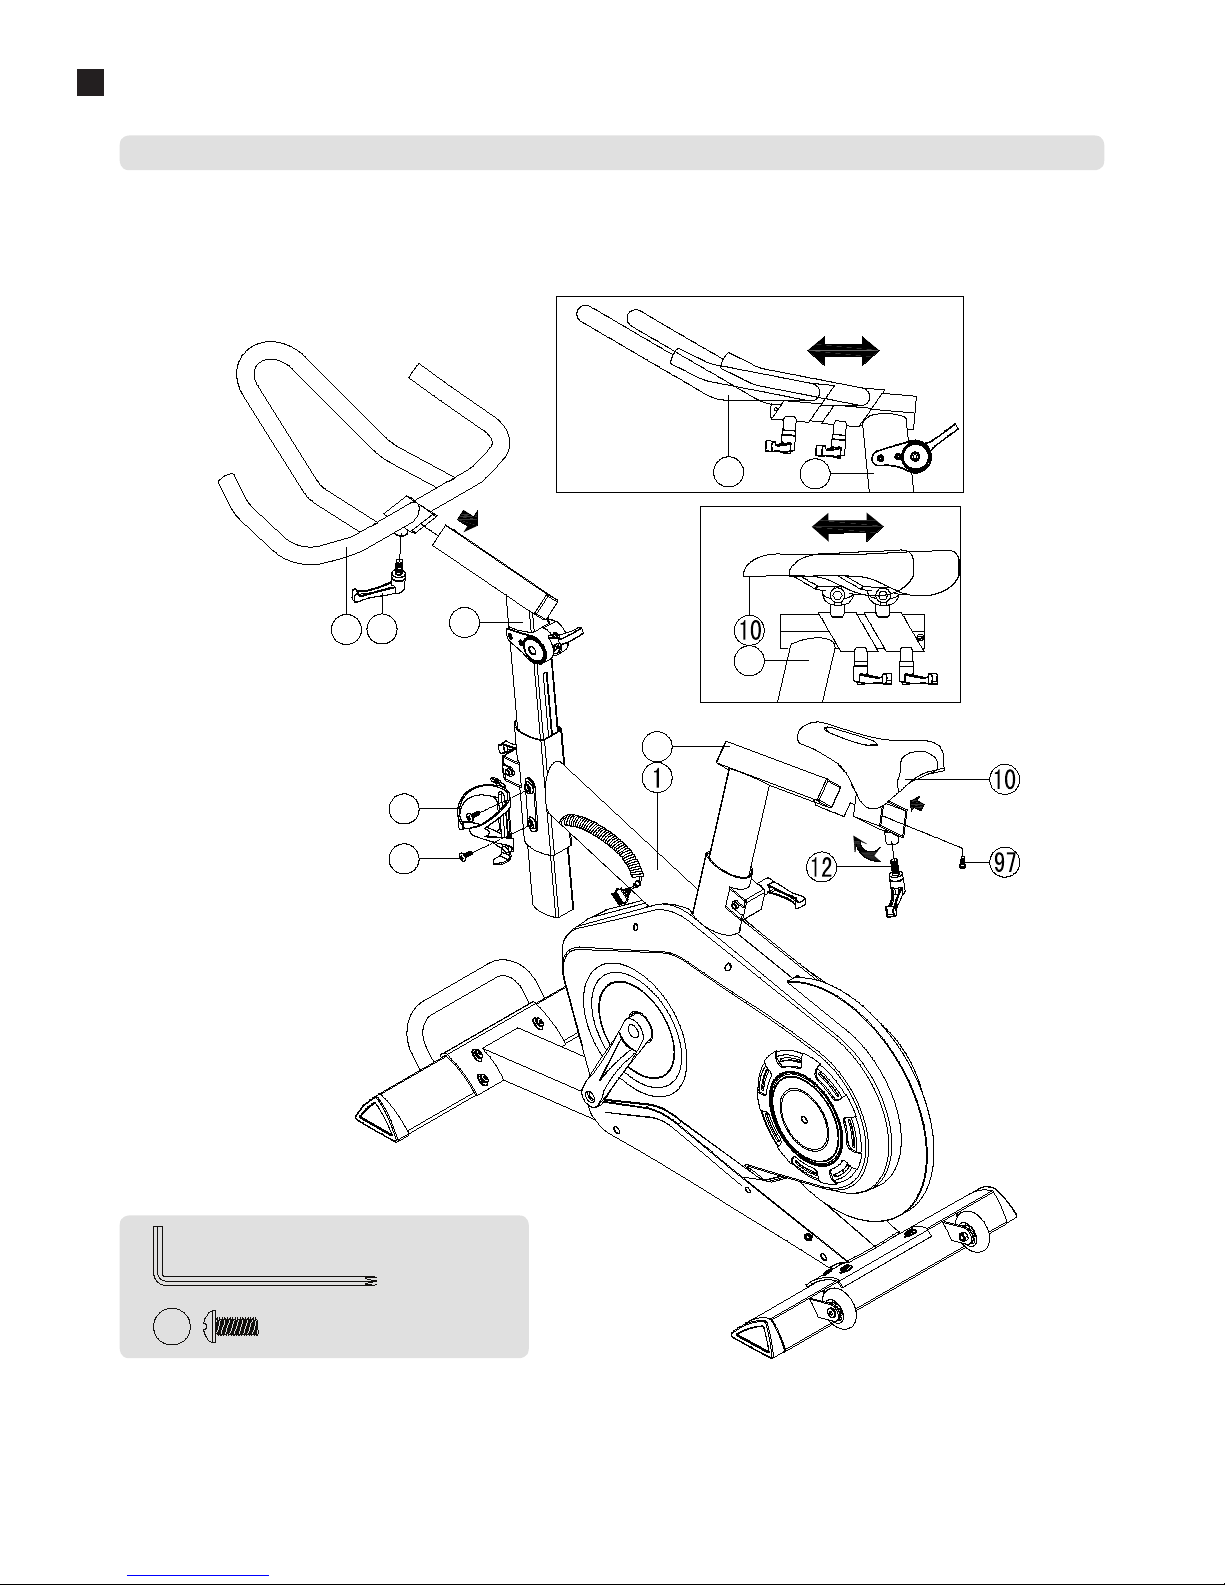
Assemble the handlebar and seat as displayed in the illustration below. After assembling the seat fasten screw (97) to secure the seat onto the rail. To
assemble the bottle holder remove screws (57). Then use these screws to fasten the bottle holder
3. Assemble the seat, handlebar and bottle holder
13
8
9
9
13
8
12
57
58
M5*10L
97
(x1
)
Page 47
User Manual - Flow Fitness PERFORM S3 - 47
4
Assembly
a. Assemble the iconsole bracket as display in illustration a.
b. Feed the console cable through the bracket as display in illustation b
c. Place the cable cover onto the console cable and press it inside the bracket as display in illustration c.
d. First connect the console cable to the iConsole before assembling the iConsole to the bracket by fastening 4 screws, as displayed in illustration d.
e. After assembling the iConsole the screen can be rotated and fixed into the desired position with included tools.
4. Assemble the iConsole
a
b
d
c
14
84
(x4
)
M5*15L
86
(x2
)
M5*10L
Page 48
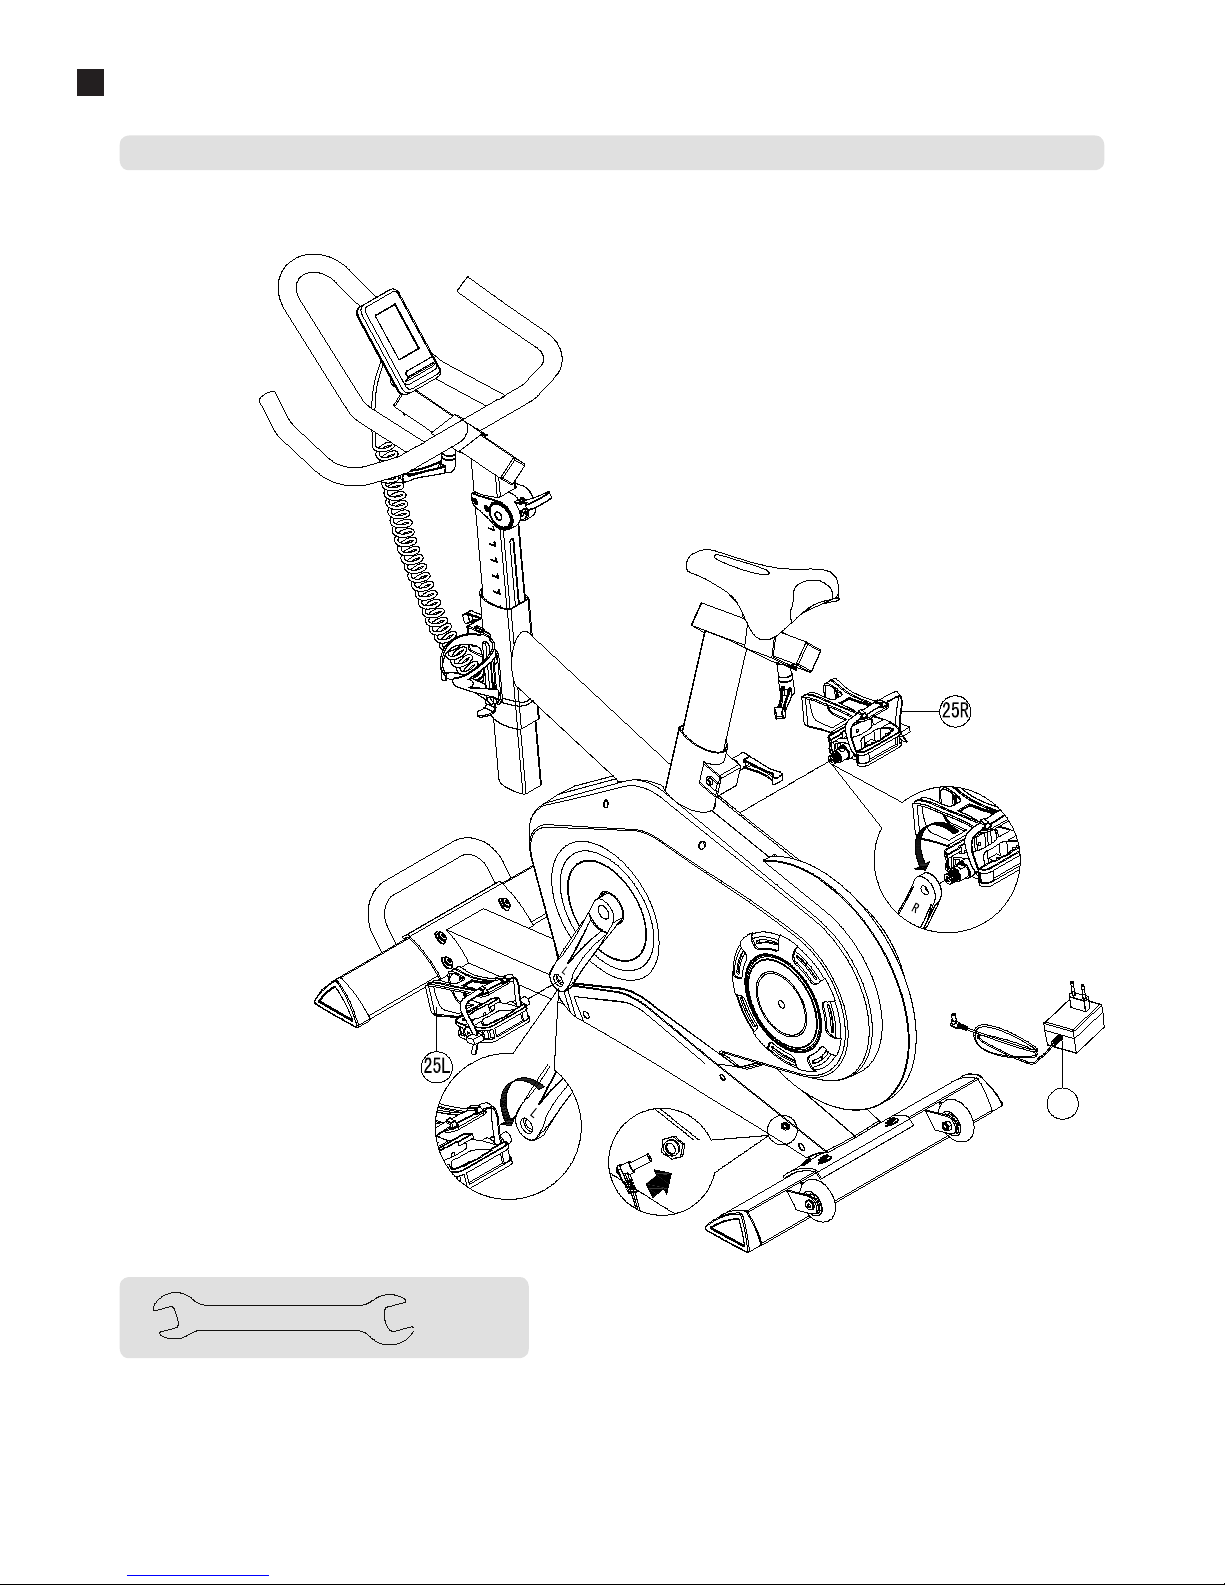
48 - Flow Fitness PERFORM S3 - User Manual
4
Assembly
Fasten the pedals with the included wrench no. 15 against the pedaling direction. At last connect the power adapter (100) to the S3 and an power outlet.
5. Assemble the pedals and connect the adapter
100
13
15
Page 49
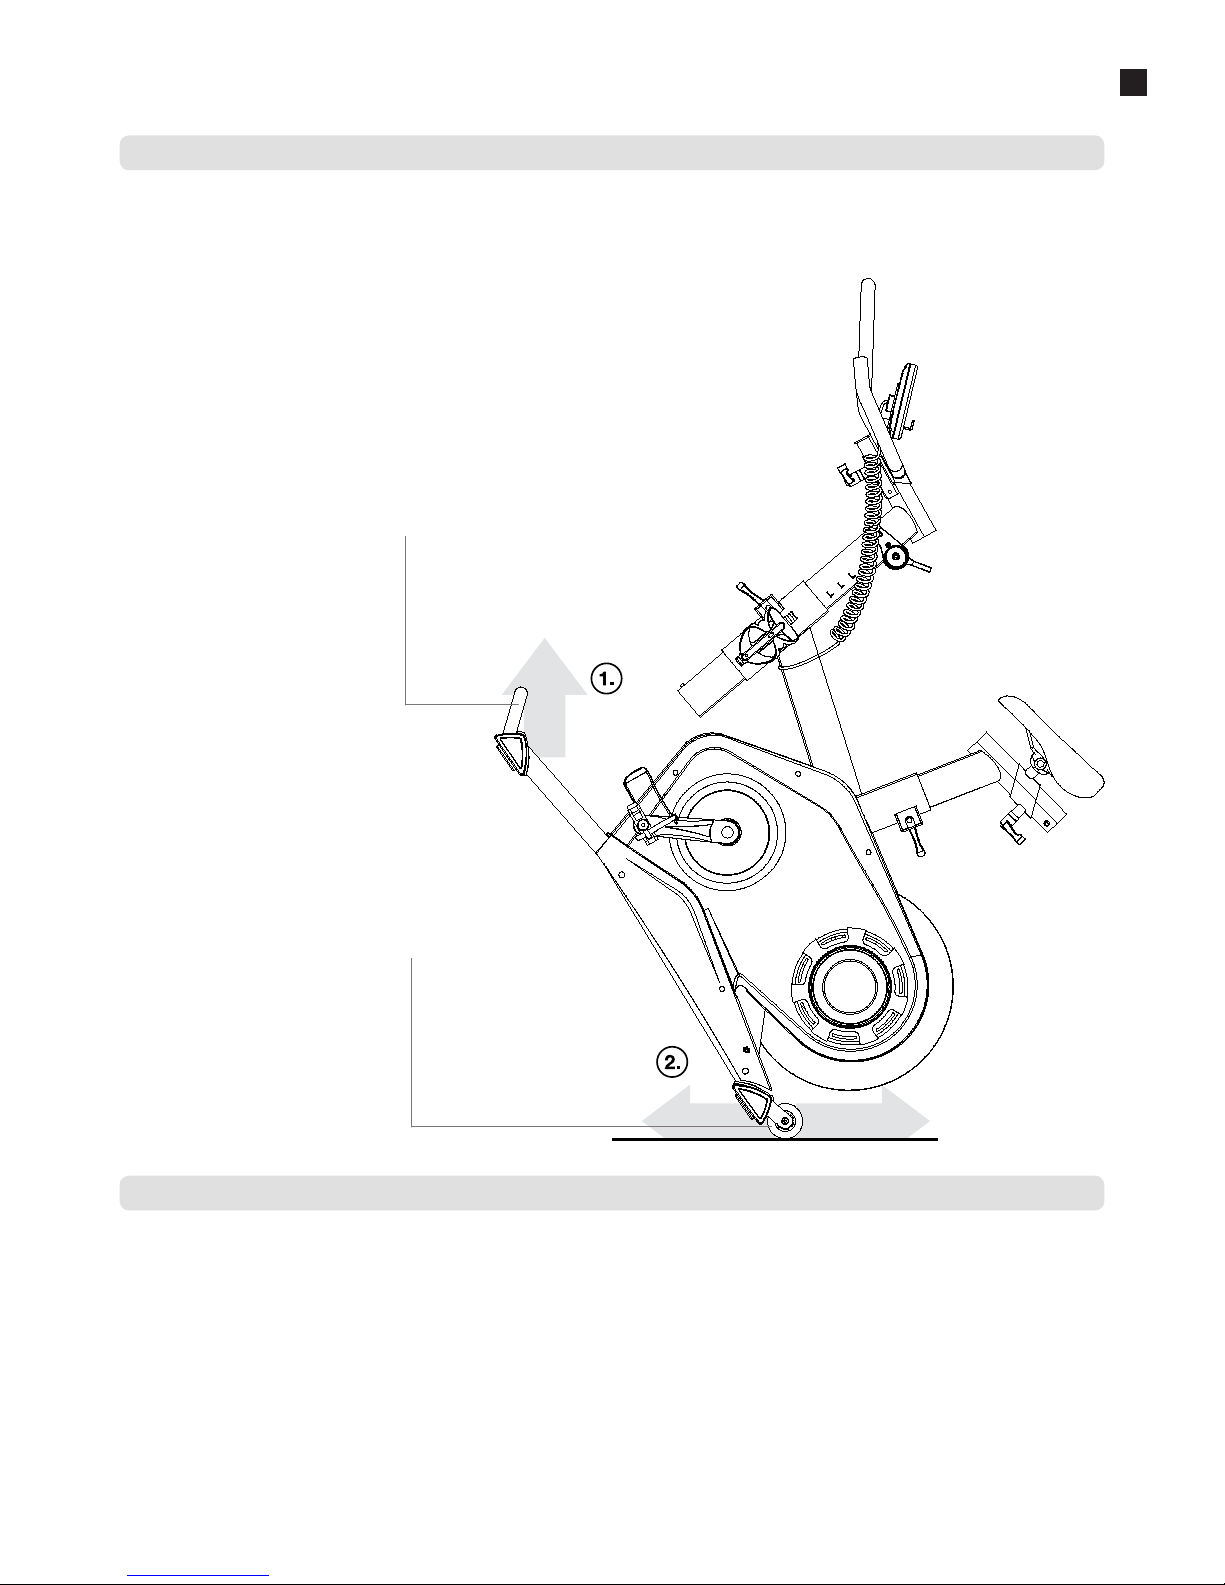
User Manual - Flow Fitness PERFORM S3 - 49
5
Flow Fitness advises to fasten nuts and bolts, check and fasten pivot points once every six weeks. For fastening use the tool supplied with the product.
Clean metal and plastic parts with standard cleaning products after every training session. However, make sure that all parts are completely dry before they are
used again.
To prevent unnecessary wear, the spinning bike can only be used inhouse and in a dry environment.
Before moving the PERFORM S3 make sure that the power adapter is disconnected from the product and outlet. For easy moving there is a handle on the
front stabilizer for lifting the product with both hands and from the knees. The product is now on its transporting wheels and you are able do ride the spinning
bike to the desired location. When placing the product into a new location it might be possible that product needs to be levelled again. When the product is on
the desired location, reconnect the power adapter.
Use
Storeage, moving and usage
Lift the S3 by this
handle to get it onto its
transport wheels
When the S3 is lifted
onto its transporting
wheels the spinning bike
can be easily moved
Maintenance
Page 50
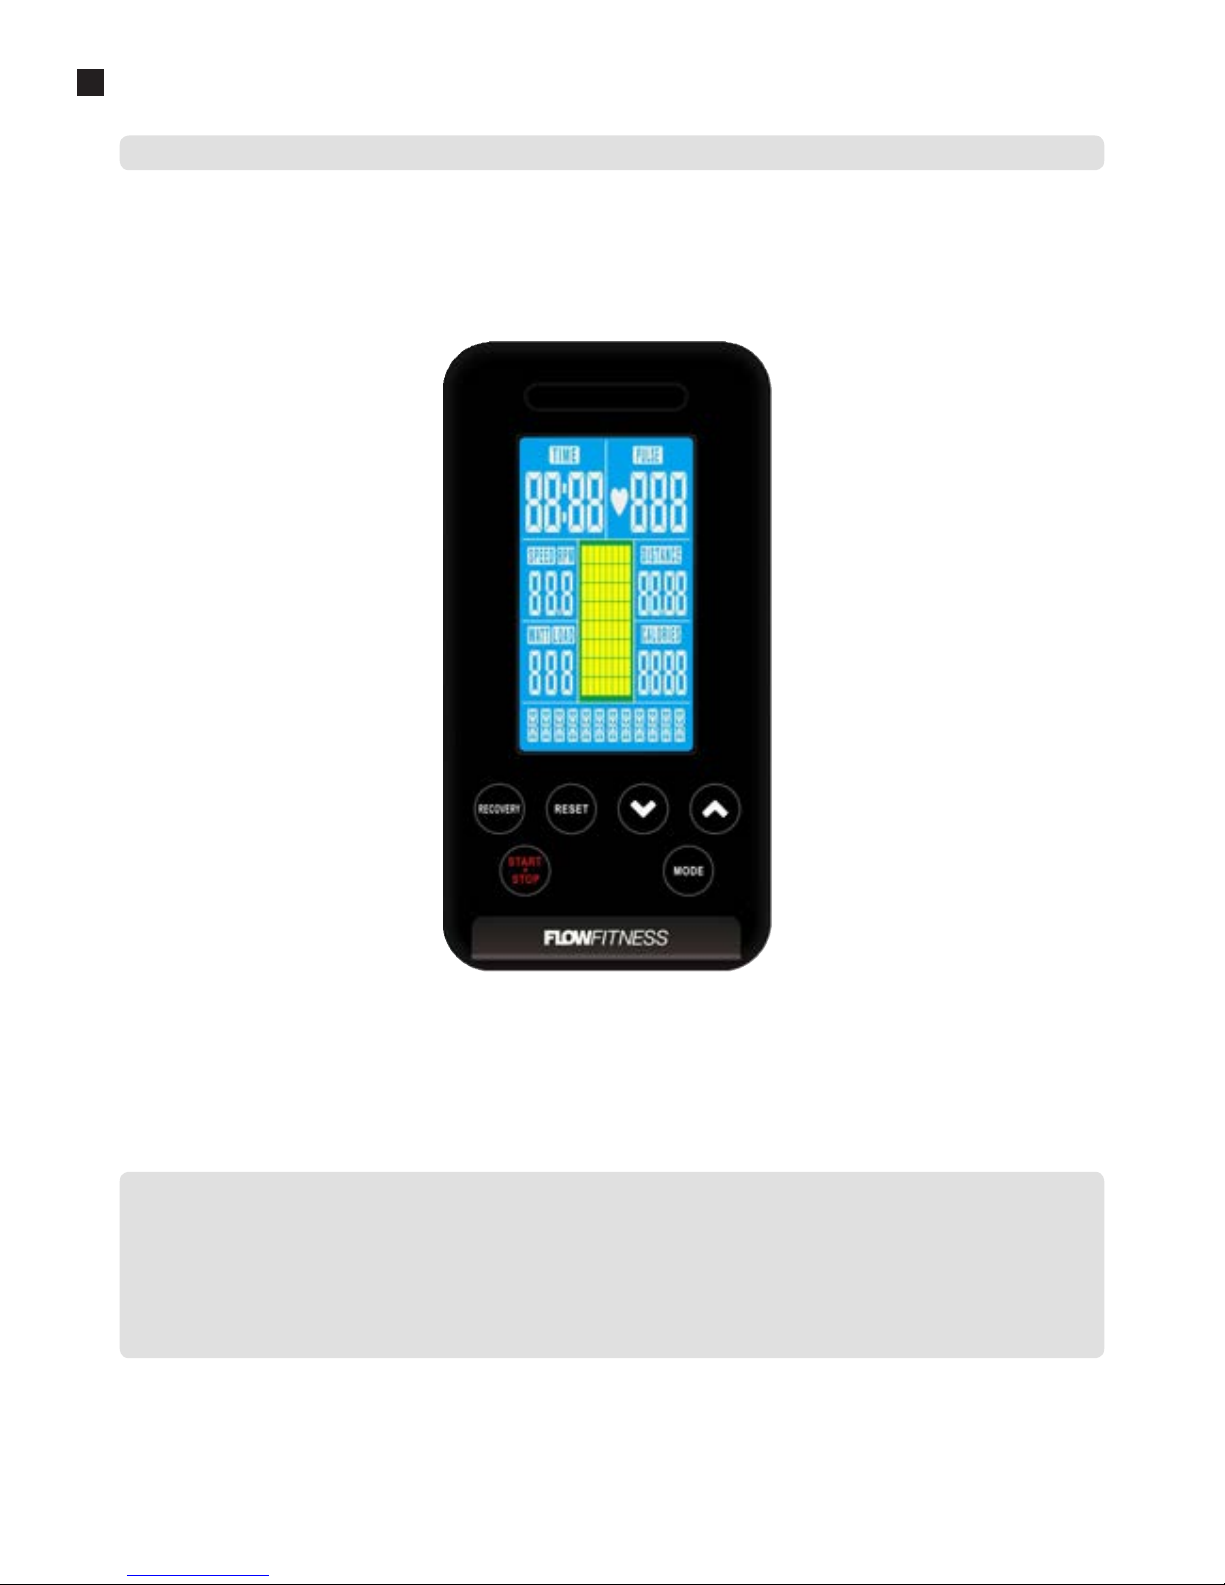
50 - Flow Fitness PERFORM S3 - User Manual
5
Use
Using the iConsole
iConsole display values
Time Elapsed or target time
Speed Current speed
Distance elapsed or target distance
Calories Burned or target calories
Pulse Your heart rate in Beats Per Minute
RPM Rotating per minute
WATT You output in WATT
STAR/STOP
Start, pause or stop a training session
DOWN
Program selection
Decrease training value
Decrease resistance level
UP
Program selection
Increase training value
Increase resistance level
MODE
Confirm selection or setting
RECOVERY
Analyses stamina on the basis of the heart
rate recovery
PHONE HOLDER
RESET
Reset to current value
Back to main menu
Reboot the iConsole
(press and hold for 2 seconds)
Page 51
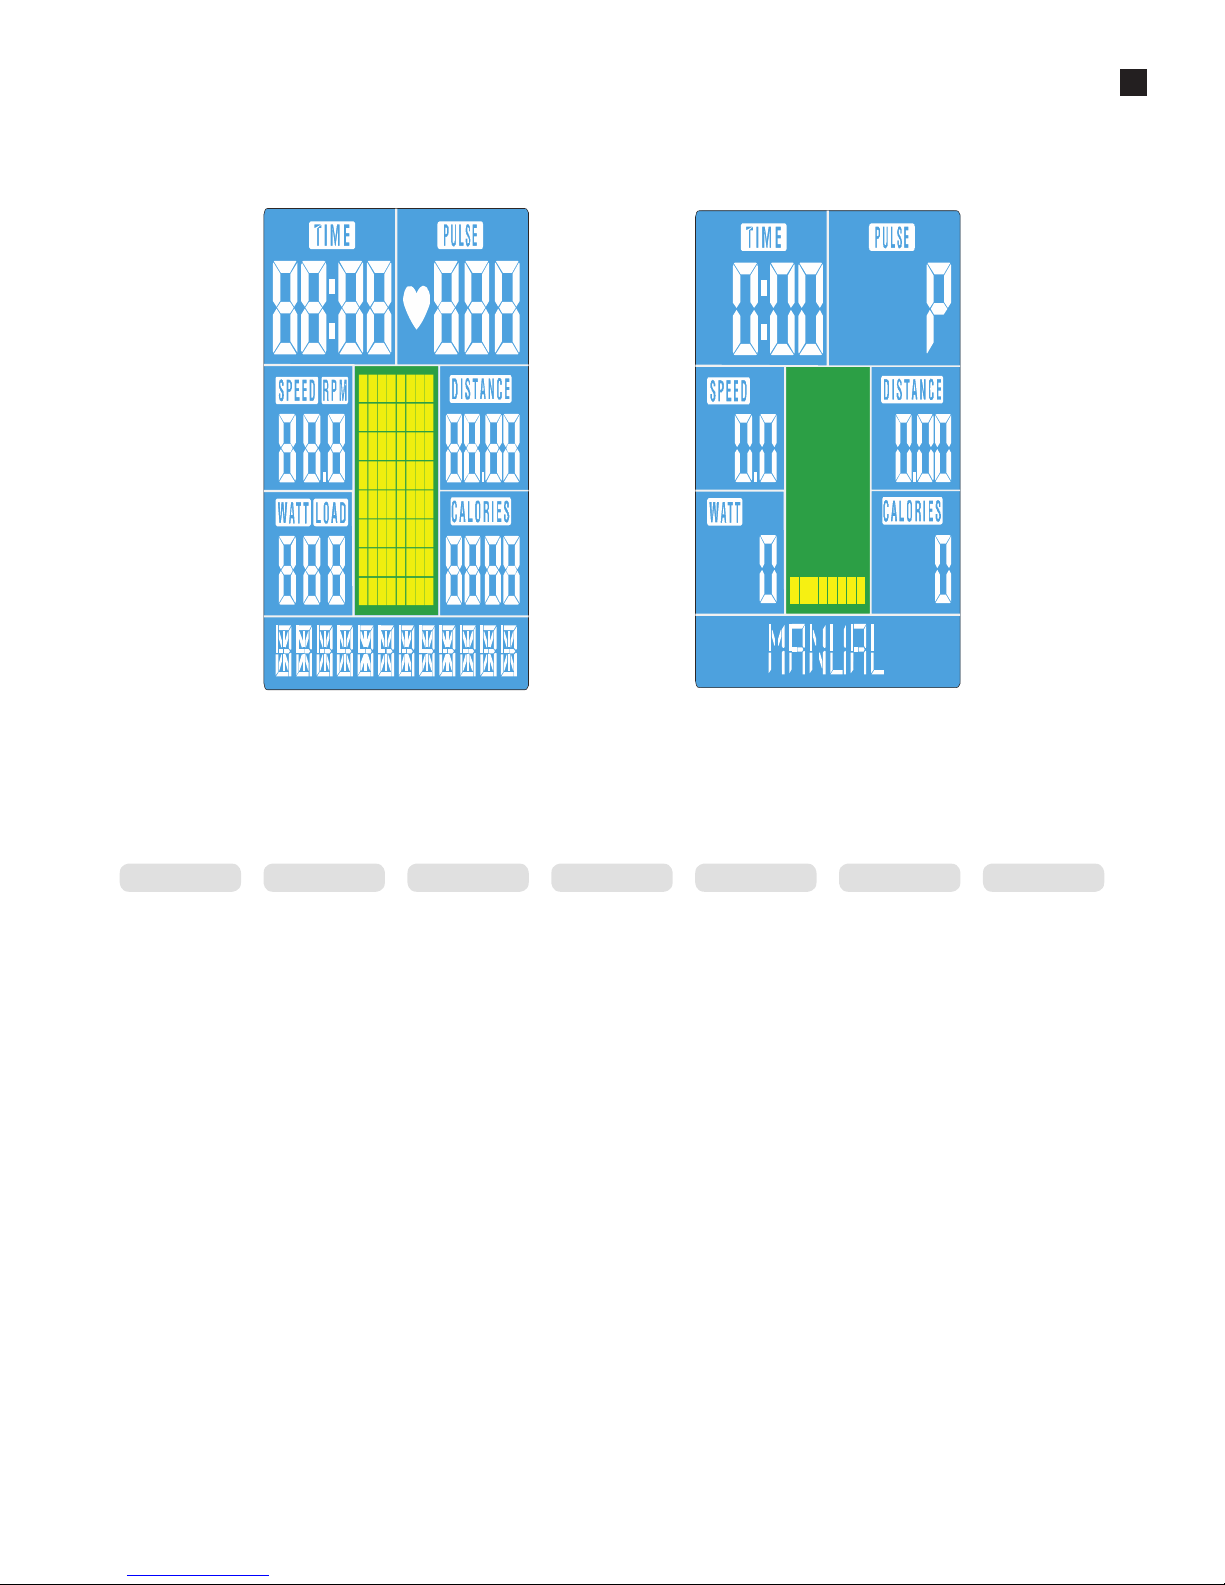
User Manual - Flow Fitness PERFORM S3 - 51
5
Use
Power on
Plug in the power supply. The computer will power on, there will be a short sound signal and the display will light up. In case of 4 minute inactivity the
iConsole will enter standby mode. To wake the iConsole from standby modus press any button or start pedaling.
The iConsole can be used in two different ways; by connecting your smartphone or tablet using the bluetooth signal. With a smartphone or tablet connected
you are able to train with programs on the iConsole
+
app. Or there are 18 training programs available with just the iConsole. Training with only the iConsole is
described on the next pages. Training with the iConsole
+
app is described on page 54 of this manual.
The programs on the iConsole computer are categorized into six training programs and a recovery test. Use the UP and DOWN buttons to select a training
program. Confirm your selection by pressing MODE. During a training session press START • STOP to pause the program. Press RESET to end the training
program or press START • STOP again to resume the program.
MANUAL BEGINNER ADVANCED SPORTY CARDIO WATT RECOVERY
Page 52
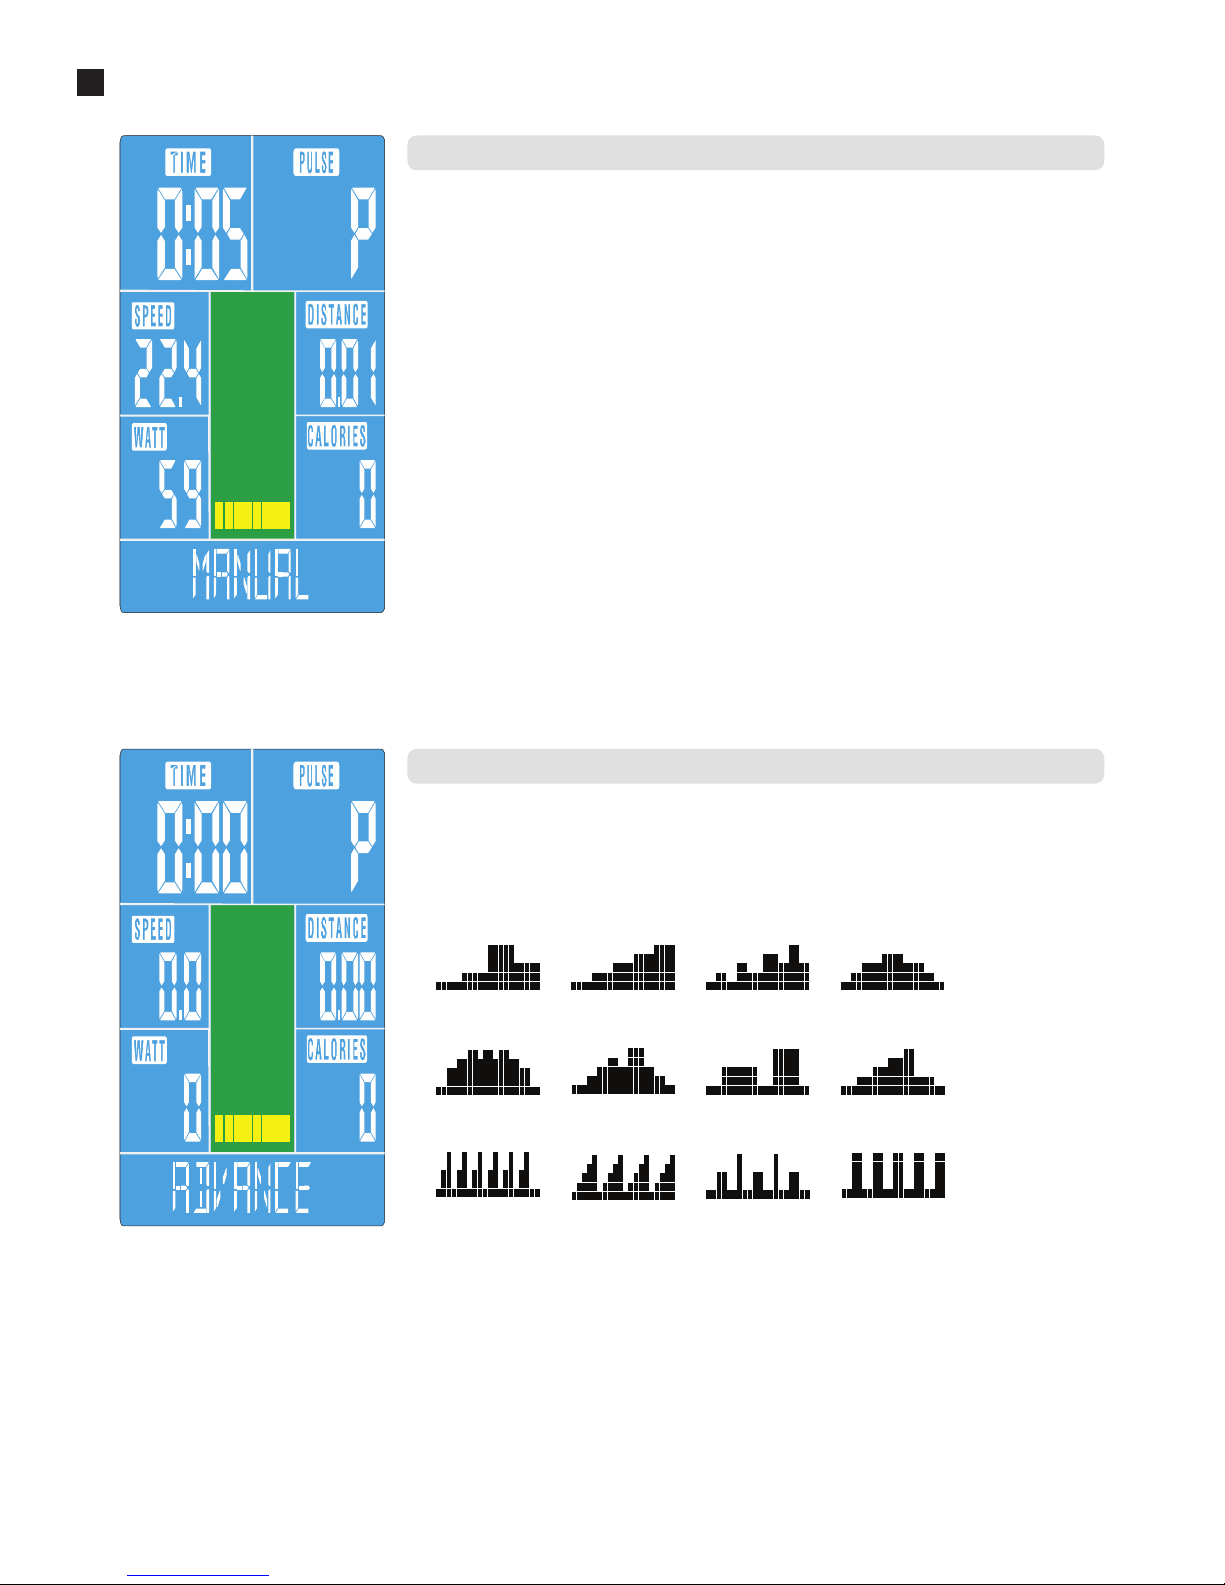
52 - Flow Fitness PERFORM S3 - User Manual
5
Use
You can choose for one of the preset programs. With a preset program the resistance will vary according to the
selected profile. In total there are 12 different profiles categorized in 3 groups; BEGINNER, ADVANCED and
SPORTY.
1. Select BEGINNER, ADVANCED or SPORTY training with the UP and DOWN buttons. Press MODE to confirm
the selection.
2. Choose the desired training profile (1/4) with the with the UP and DOWN buttons. Confirm the selection by
pressing MODE.
3. Set the preferred training duration with the UP and DOWN buttons. Confirm the selection by pressing MODE.
4. Press START • STOP to start the training program
5. Use the UP and DOWN buttons to adjust the resistance level.
The program is finished when the set training time has elapsed.
The MANUAL program is a program with a consistence resistance with preselected target values for TIME,
DISTANCE, CALORIES, PULSE. If the values
1. Select MANUAL program with the UP and DOWN buttons. Press MODE to confirm the selection. Press
START • STOP to start the training or set one or more of the following target values; TIME, DISTANCE,
CALORIES, PULSE.
2. Set the preferred training duration with the UP and DOWN buttons. Confirm the selection by pressing MODE.
3. Set the preferred distance with the UP and DOWN buttons. Confirm the selection by pressing MODE.
4. Set the preferred calorie target with the UP and DOWN buttons. Confirm the selection by pressing MODE.
5. Set the preferred heart rate target with the UP and DOWN buttons. Confirm the selection by pressing MODE.
6. Press START • STOP to start the training program
7. Use the UP and DOWN buttons to adjust the resistance level.
The program is finished when one of the target values reaches zero.
BEGIN NER 1 BE GI NN ER 2 BE GI NN ER 3 BEG IN NE R 4
AD VAN CE1 ADVANC E 2 AD VAN CE 3
AD VAN CE 4
SPORT Y 1 SPO RTY 2 SPORT Y 3 SPORT Y 4
MANUAL TRAINING
PREPROGRAMMED: BEGINNER / ADVANCED / SPORTY
Page 53
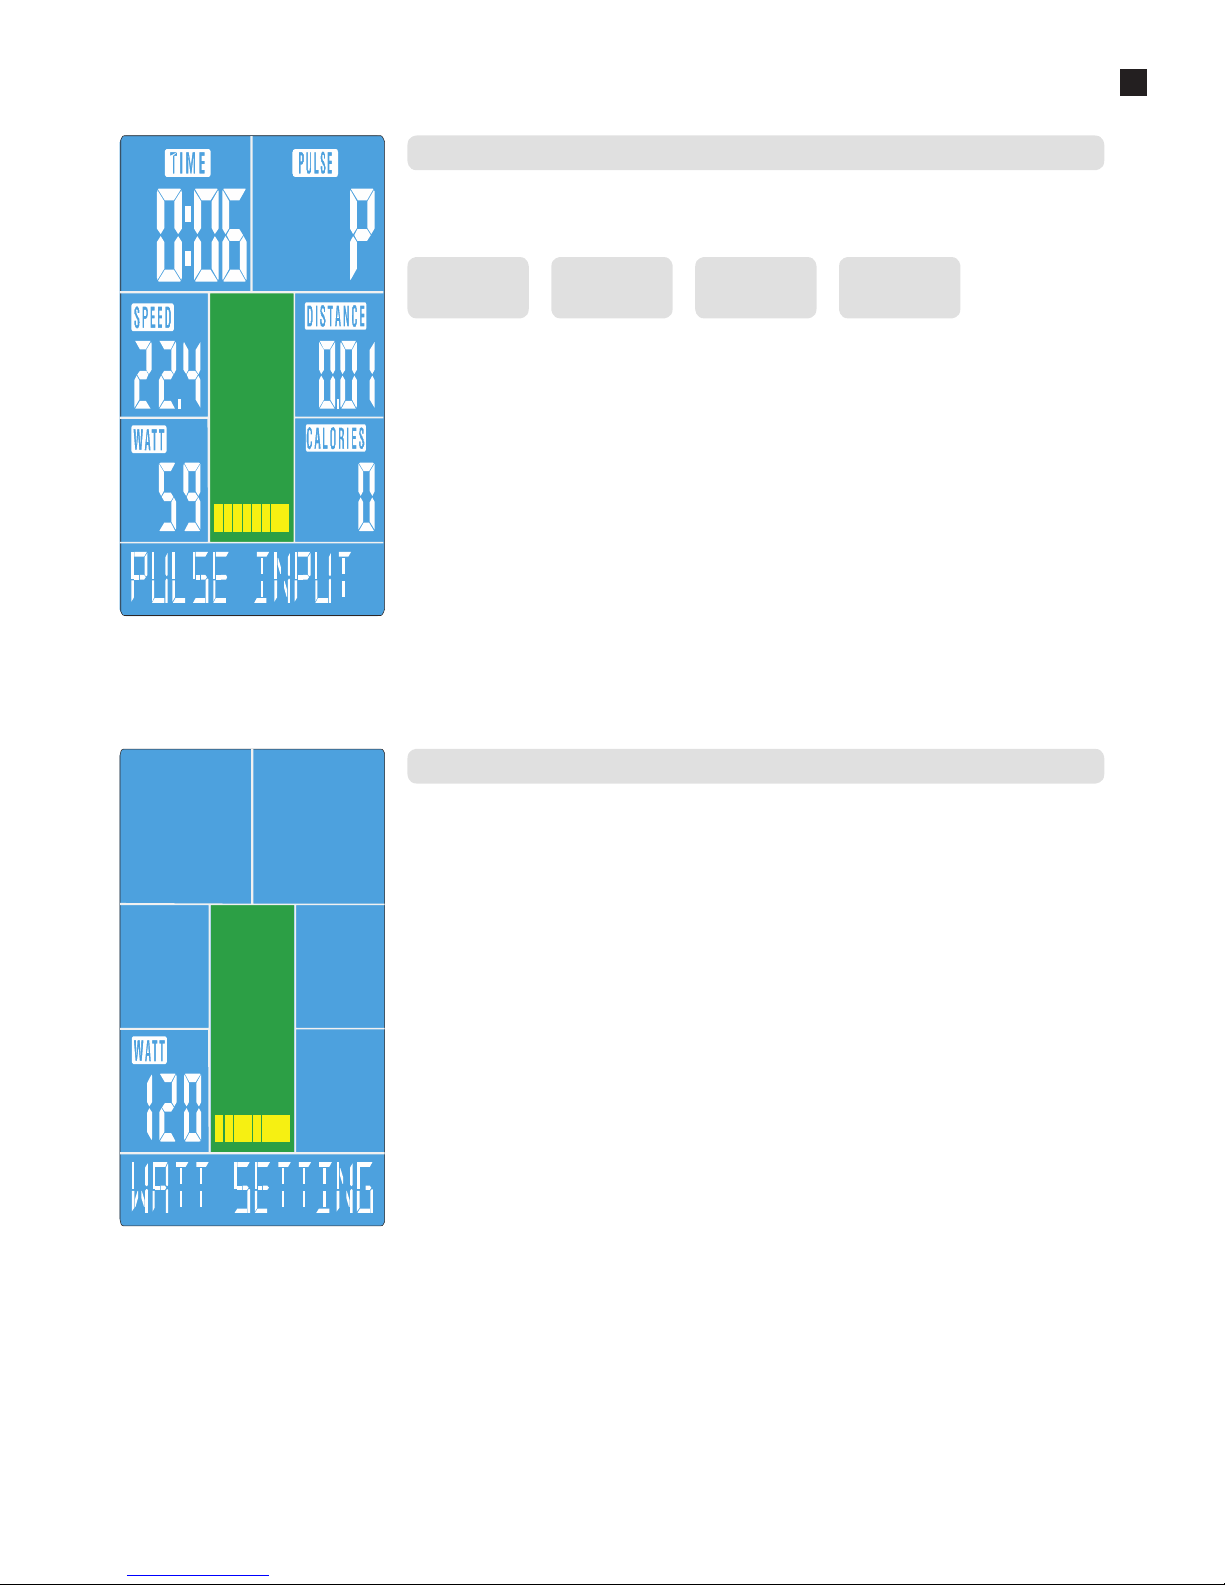
User Manual - Flow Fitness PERFORM S3 - 53
5
Use
With this training it is possible to train by using your heart rate. For this training program you need to wear
a optional chest belt. There are 4 different levels: 55%, 75%, 90% or Target Heart Rate (TAG). The level is a
percentage of your maximal heart rate, which is calculated on the base of your age.
1. Select CARDIO with the UP and DOWN buttons. Press MODE to confirm the selection.
2. Set your age with the UP and DOWN buttons. Confirm the selection by pressing MODE.
3. Set your heart rate level; 55%, 75%, 90% or TAG with the UP and DOWN buttons. Confirm the selection by
pressing MODE.
4. When you have selected TAG in the previous step set your target heart rate with the UP and DOWN buttons.
Confirm the selection by pressing MODE. If you have selected one of the percentages you can skip this step.
5. Set the preferred training duration with the UP and DOWN buttons. Confirm the selection by pressing MODE.
6. Press START • STOP to start the training program
When there is no pulse detected for 6 seconds the display will show PULSE INPUT. The program is finished
when one of the target values reaches zero.
With this training you can select on with output you want to train. The computer will automatically adjust the
resistance to keep your output consistent.
1. Select WATT with the UP and DOWN buttons. Press MODE to confirm the selection.
2. Set the preferred output (WATT) with the UP and DOWN buttons. Confirm the selection by pressing MODE.
3. Set the preferred training duration with the UP and DOWN buttons. Confirm the selection by pressing MODE.
4. Press START • STOP to start the training program
The program is finished when the set training time has elapsed.
HEART RATE CONTROLLED TRAINING: CARDIO
WATT TRAINING
55%
Vet verbanding
---
75%
Vet verbanding +
Conditieverbeting
90%
---
Conditieverbeting
TAG
Selecteer eigen
doel hartslag
Page 54
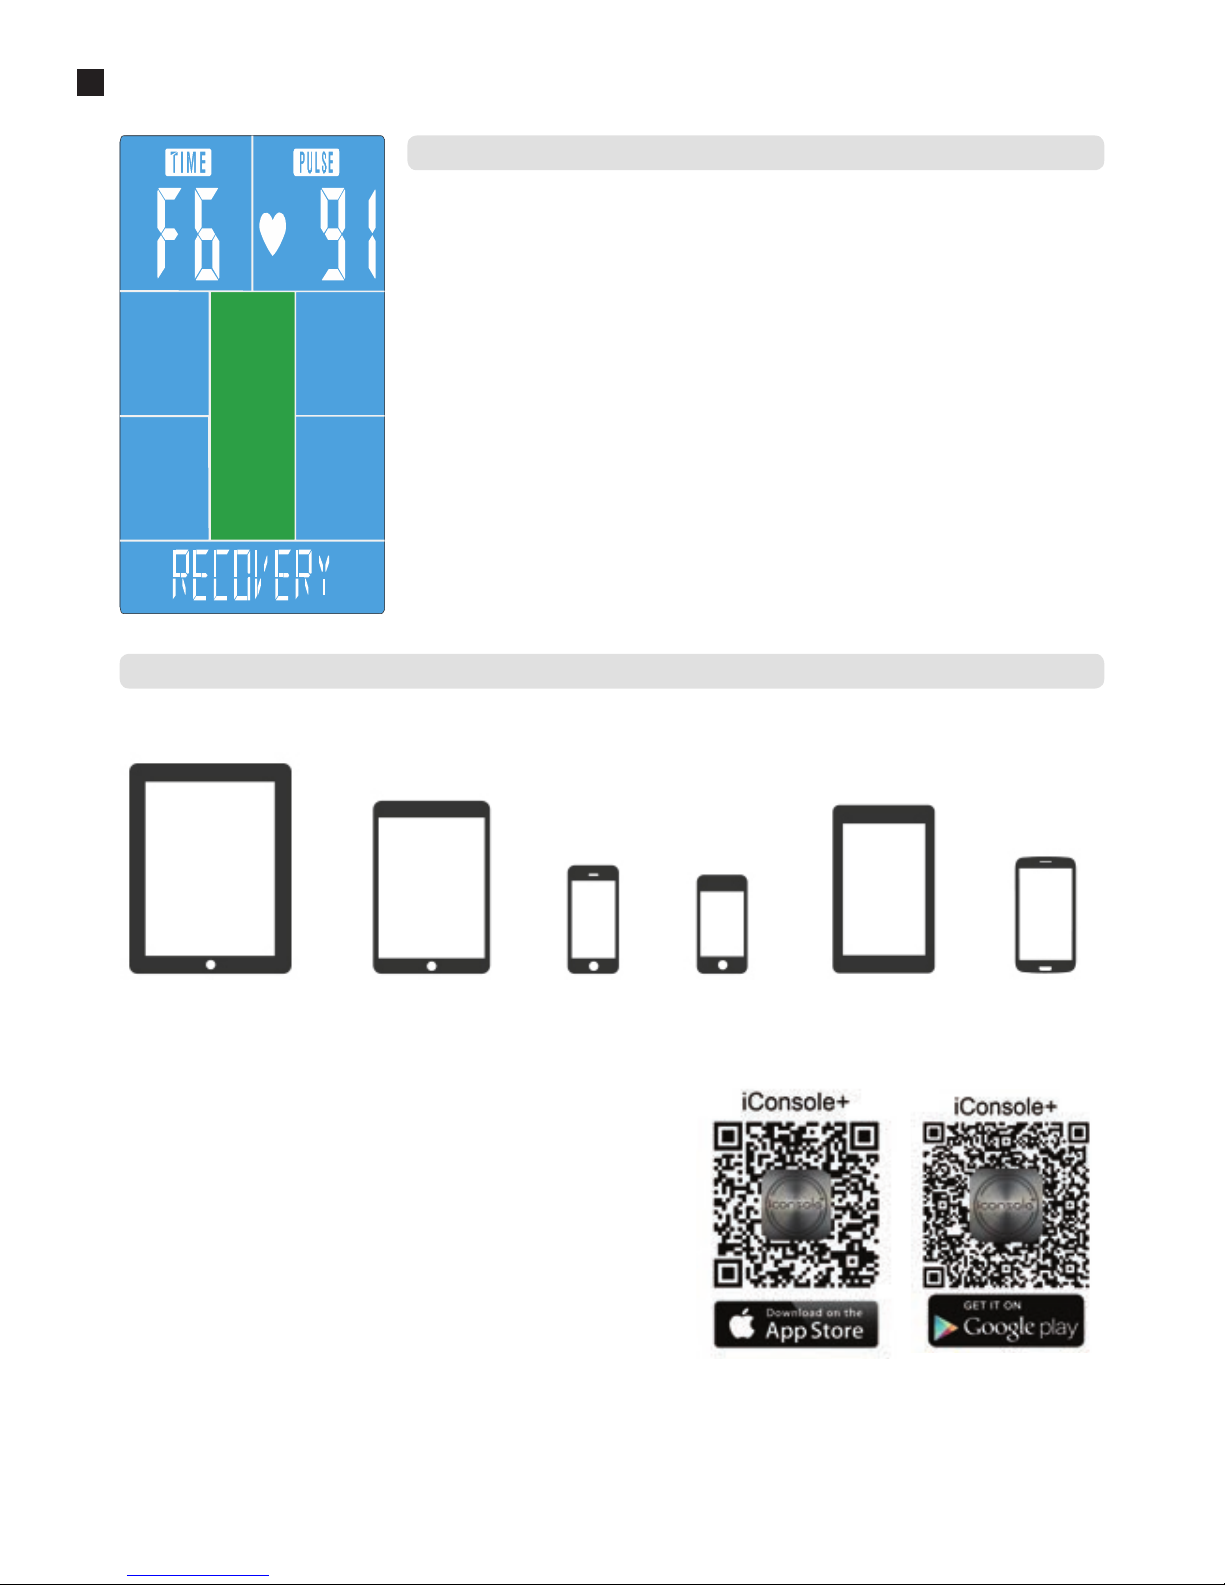
54 - Flow Fitness PERFORM S3 - User Manual
5
Use
After a workout it is possible to check your stamina level. For the recovery test you need an optional chest belt.
Press the RECOVERY button directly after finishing a training session. All values will disappear from the screen
and a countdown from 60 to 0 seconds will be visible. After the countdown a code will appear. This code
displays your stamina level. Explanation of the code is shown in the table below:
F1: Excellent
F2: Good
F3: Average
F4: Below average
F5: Bad
F6: Very bad / no correct measurement
Important:
The RECOVERY stamina test will only start when a heart rate is detected. Your stamina is based upon the
time in which your heart rate returns to rest level. Therefore the RECOVERY program can only be done after a
intense workout with a raised heart rate of at least 150 BPM.
Training session with the iConsole
+
App
First the iConsole
+
app needs to be downloaded. Depending on your device and
operating system the App can be downloaded in the Google Play store or the Apple
App Store. You can also download the App directly by scanning the QR code below.
For Android tablets its best to download the iConsole HD app. The iConsole
+
App is
completely free
After a successful download of the iConsole+ App you need to follow these steps to
connect the tablet or smartphone.
For Apple devices
1. Go to the settings of or your smartphone or tablet and turn bluetooth on.
2. Your smartphone or tablet will search for available bluetooth devices. In the
list ICONSOLE will appear.
3. Select ICONSOLE to connect both devices.
Training with the iConsole+ app
RECOVERY TEST
The iConsole enables you to train by using your smartphone or tablet. For training by smartphone or tablet you need to download the iConsole app.
The App can only be used for:
iPad 1 or newer
iPad air 1 or newer
iPad Mini
or newer
iPhone 3GS
or newer
iPod touch (3gen)
or newer
Android tablet
OS4.0 or higher
1280X800 pixels
Android Phone
OS2.2 or higher
800x480 pixels
Page 55
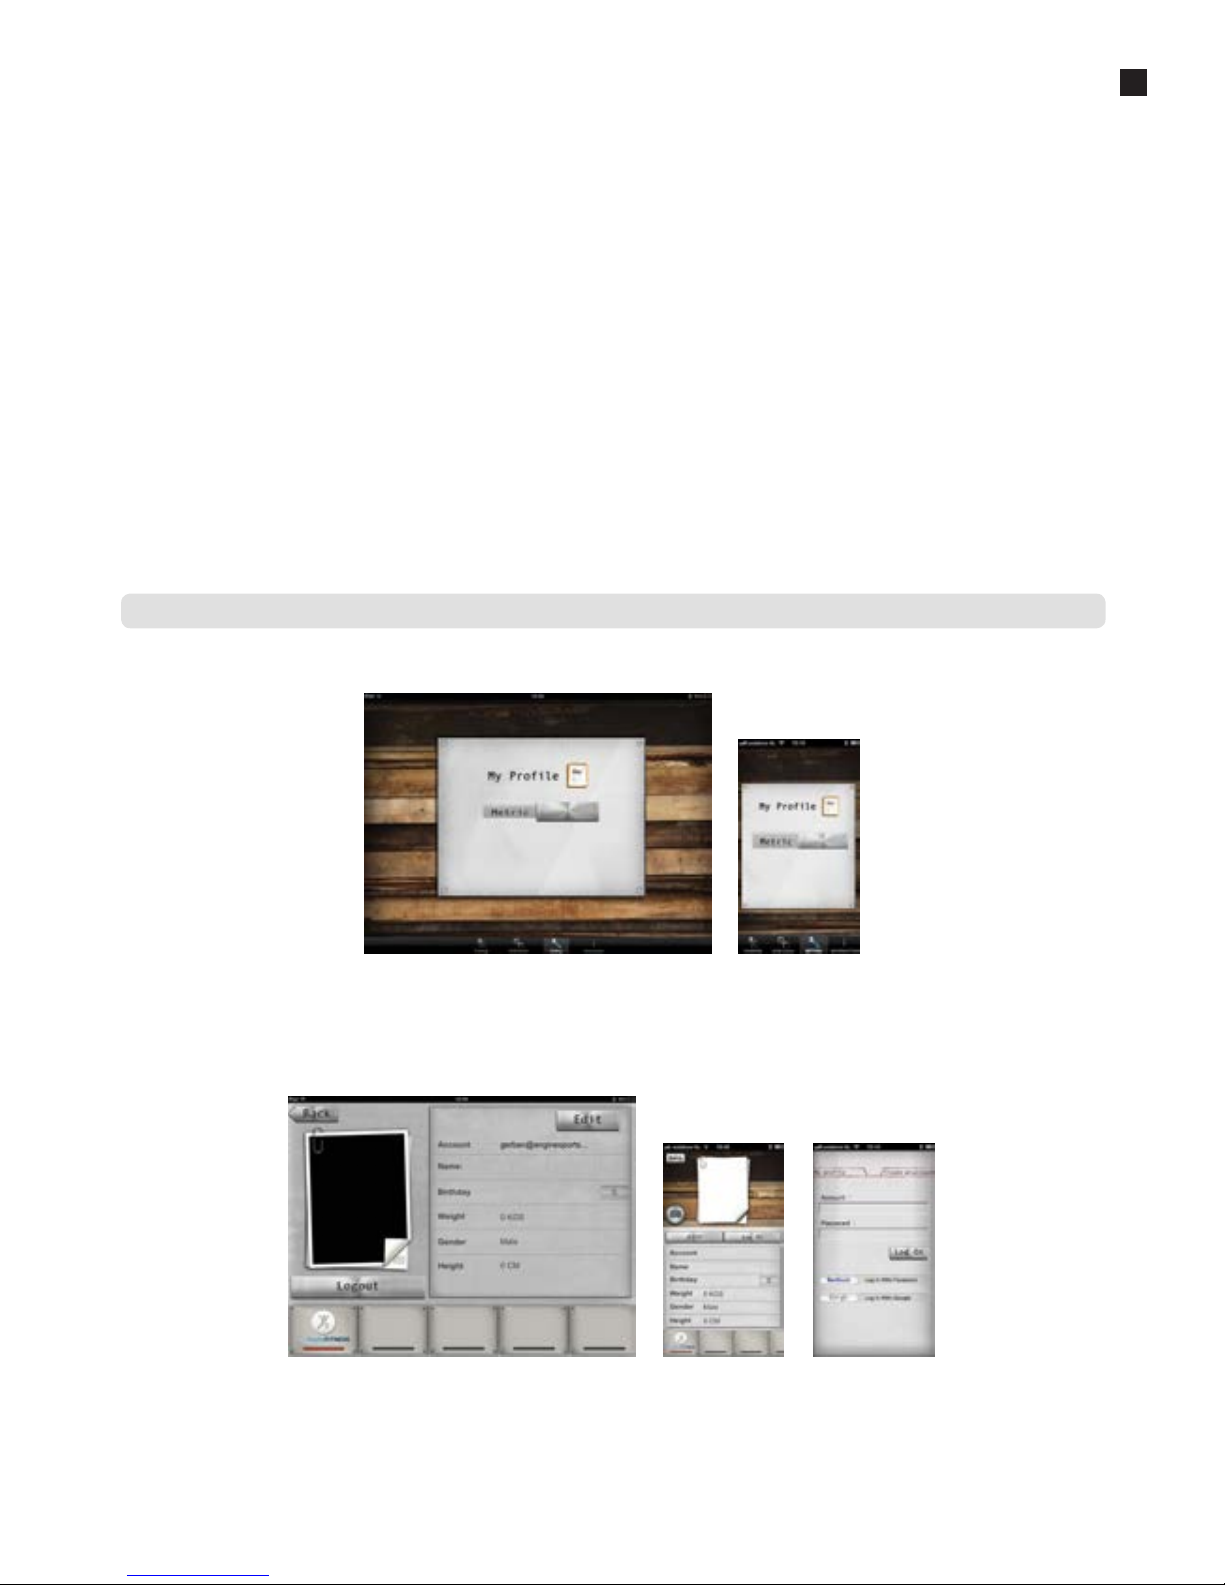
User Manual - Flow Fitness PERFORM S3 - 55
5
Use
Before you start using the iConsole+ App enter your settings for an optimal use by going to the SETTING menu. First it is possible to chose from the metric
(METRIC) or the British (IMPERIAL) system. “Swipe” the switch to the right or left.
Secondly, you can enter your personal information in this menu. This information will be used for the different training programs and storing training
information into the INFORMATION MENU. The information can also be used for add-ons of the iConsole
+
App displayed in the GYM CENTER MENU.
Press “MY PROFILE”, to enter your personal information. Firstly you need to create an account. A account can be created by pressing LOG IN and CREATE
AN ACCOUNT. Enter your email under ACCOUNT and create your own PASSWORD. Repeat the same password under CONFIRM PASSWORD. After filling your
account and password press SIGN UP. If every thing is filled out correctly the message SUCCESSFULLY SIGNED UP will appear and a confirmation mail will
be sent to your provided email.
iConsole+ SETTINGS MENU
4. Use the password 0000, to complete the connection.
5. When the two devices are connected the display of the S3 will automatically turn off.
6. Start the ICONSOLE App on your device.
For Android devices
1. Go to the settings of or your smartphone or tablet and turn bluetooth on.
2. Start the ICONSOLE App.
3. Press the bleutooth icon with rotating arrows on top of the screen. A list of bluetooth devices will appear.
4. Select ICONSOLE to connect both devices.
5. When the two devices are connected the display of the S3 will automatically turn off.
On the next pages the use of the iConsole
+
App is described. There is a description for using the tablet App and one for the smartphone App.
Important: the App will be regularly updated. It may be possible this manual is outdated and incomplete. Go to http://www.flowfitness.nl/en/service/
gebruiksaanwijzing.php where you can download the most recent version of the manual.
De iConsole+ app has 4 menus:
1. TRAINING All available trainings
2. GYM CENTER All extra in App purchases.
3. SETTINGS General settings and profile
4. INFORMATION Workout history
All 4 menus are described on the next pages.
Page 56
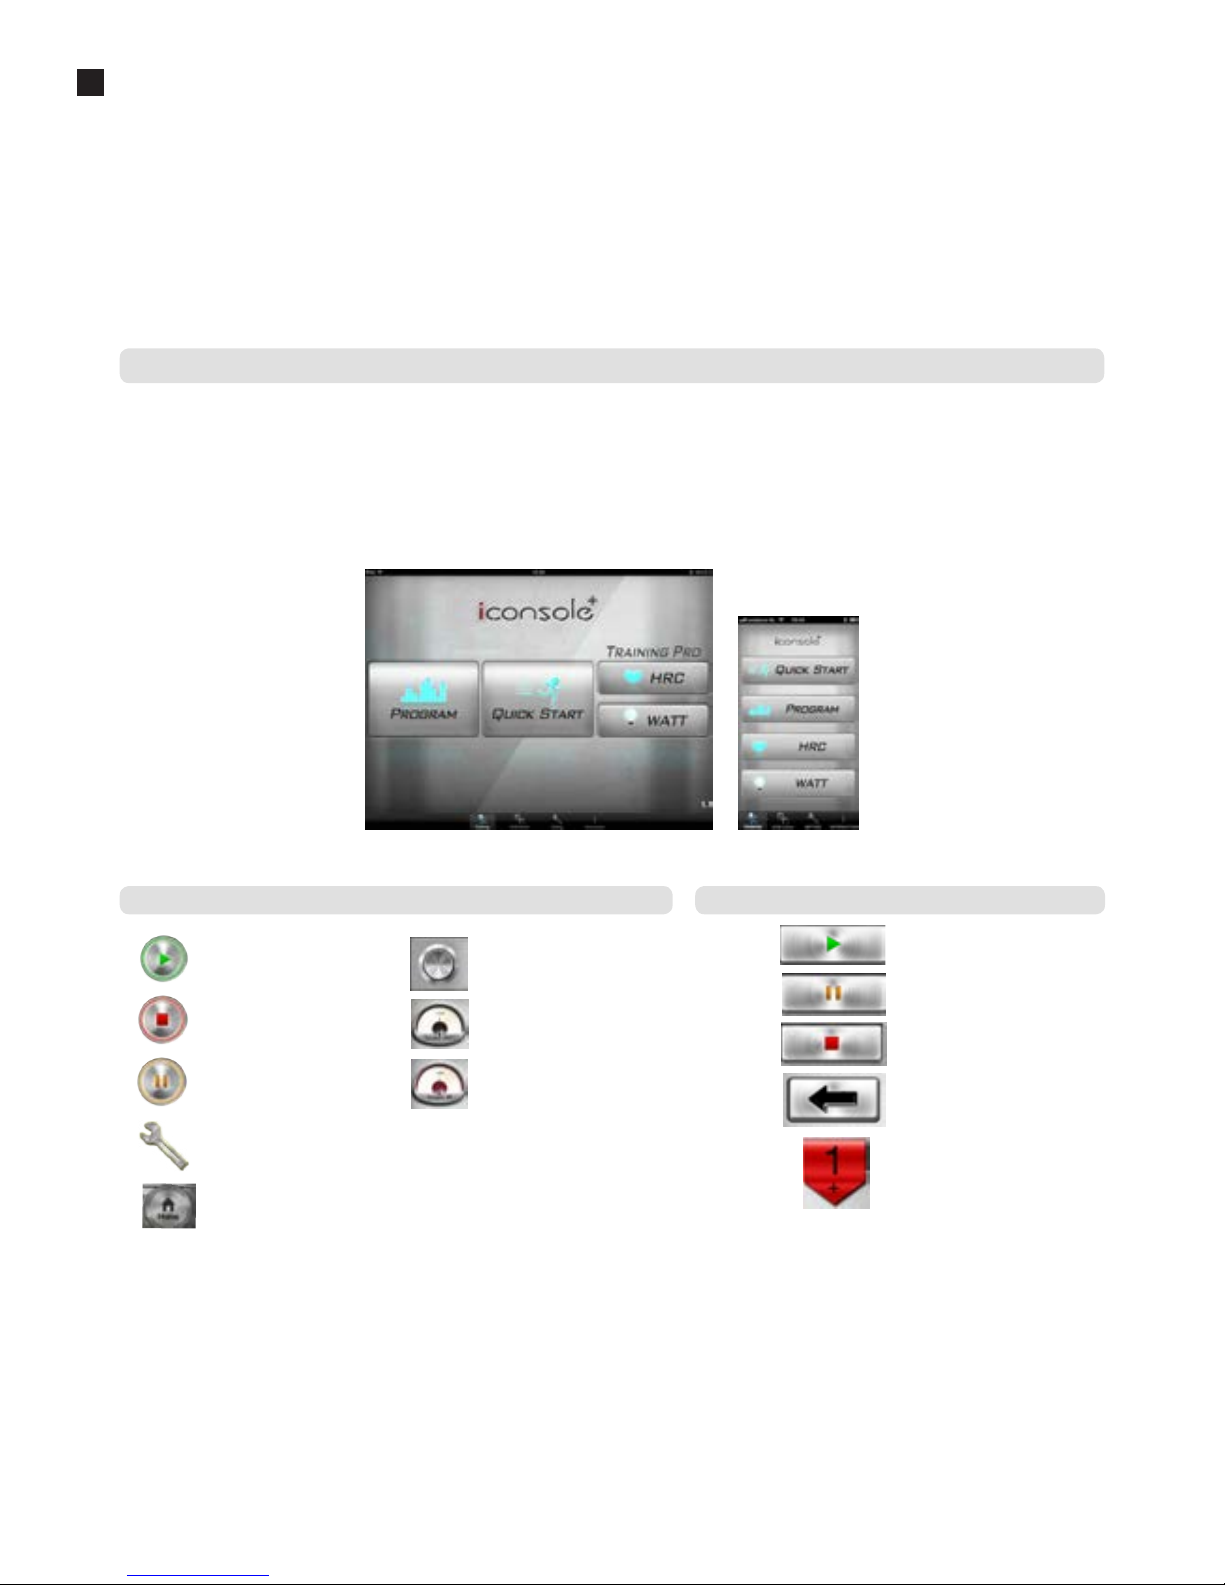
56 - Flow Fitness PERFORM S3 - User Manual
5
Use
Click on the attached link to activate your account and the following message will appear:
The account’s email has been validated!
Now you can login with your email and password. You can also login with your Facebook or Google account.
By pressing EDIT your personal information can be entered. You can even add a photo, by pressing within the EDIT mode on the camera icon. When you have
entered all the personal information press DONE, press BACK to go back to the SETTING menu.
Within the training menu of the iConsole
+
app there are 4 different types of programs.
PROGRAM Preset training programs
QUICK START Start directly with a training
HRC Heart Rate Controlled program
WATT Constant Watt program
START button
PAUZE button
STOP button
Back to TRAINING menu
Resistance level button
START button
STOP button
PAUZE button
Button to set target values
Back to the TRAINING menu
Scroll wheel for entering
values
Disk to set the heart rate
level
Button to set the heart rate
level
Tablet iConsole+ app buttons Smartphone iConsole+ app buttons
iConsole+ TRAININGS MENU
Page 57
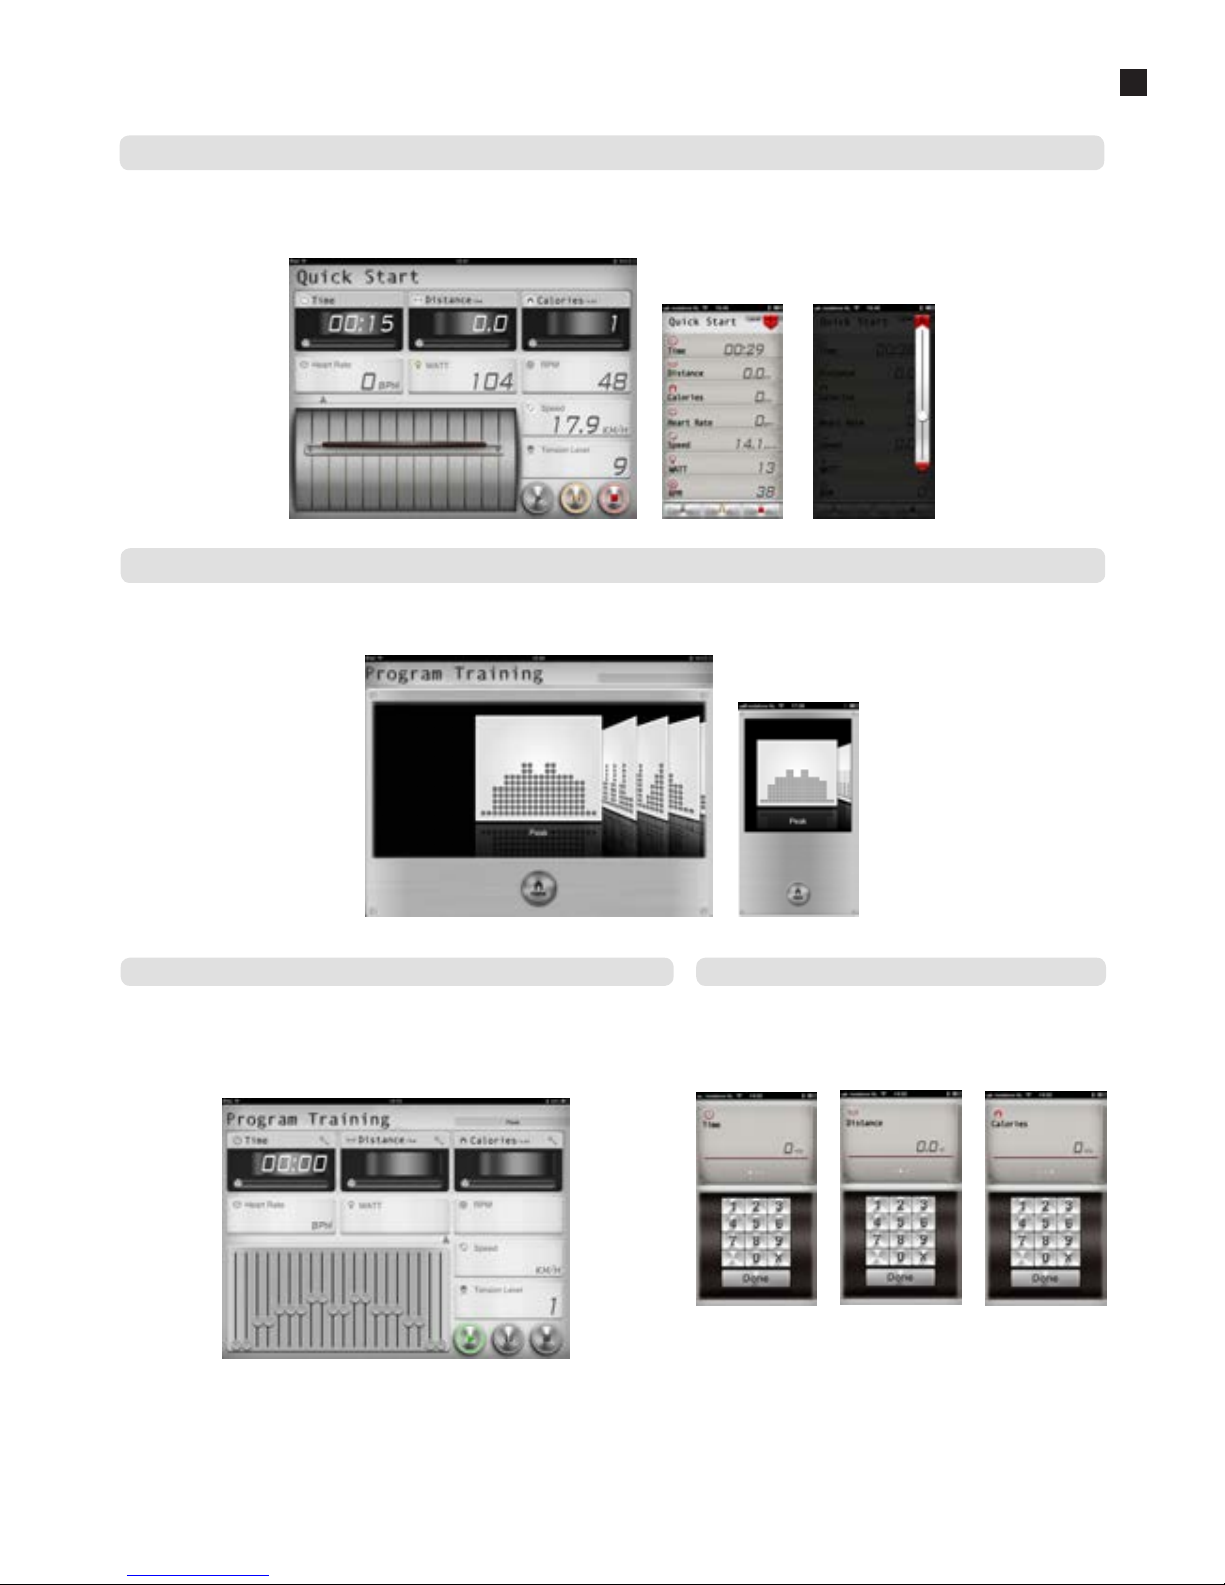
User Manual - Flow Fitness PERFORM S3 - 57
5
Use
The PROGRAM contains several preset training programs. The resistance varies according to the selected profile. There are 12 profiles in total. Browse
trough the profiles by “swiping”, until the preferred training is found. Start the training by pressing the preferred profile.
With the QUICK START program you don’t have to set anything except the resistance. The values TIME, DISTANCE and CALORIES will increase during the
training. The resistance on the tablet can be increased or decreased by “swiping” the brown lever up or down. For the phone app press the red ribbon to
make the resistance slider appear.
When you have selected the preferred profile a few values have
to be entered: TIME, DISTANCE and CALORIES. If no values are
entered and start is directly pressed all values will increase.
Every 2 minutes the program will go to the next phase.
The values can be set independently. First TIME will appear. The
value can be entered by using the keypad. By “swiping” the TIME
When you have selected the preferred profile a few values have to be entered: TIME,
DISTANCE and CALORIES. If no values are entered and start is directly pressed all
values will increase. Every 2 minutes the program will go to the next phase.
The values can be entered individually by pressing the wrench next to the value.
Set a PROGRAM with the Tablet iConsole+ app Set a PROGRAM with the Smartphone iConsole+ app
iConsole+ PROGRAM - Preset training programs
iConsole+ QUICK START
Page 58
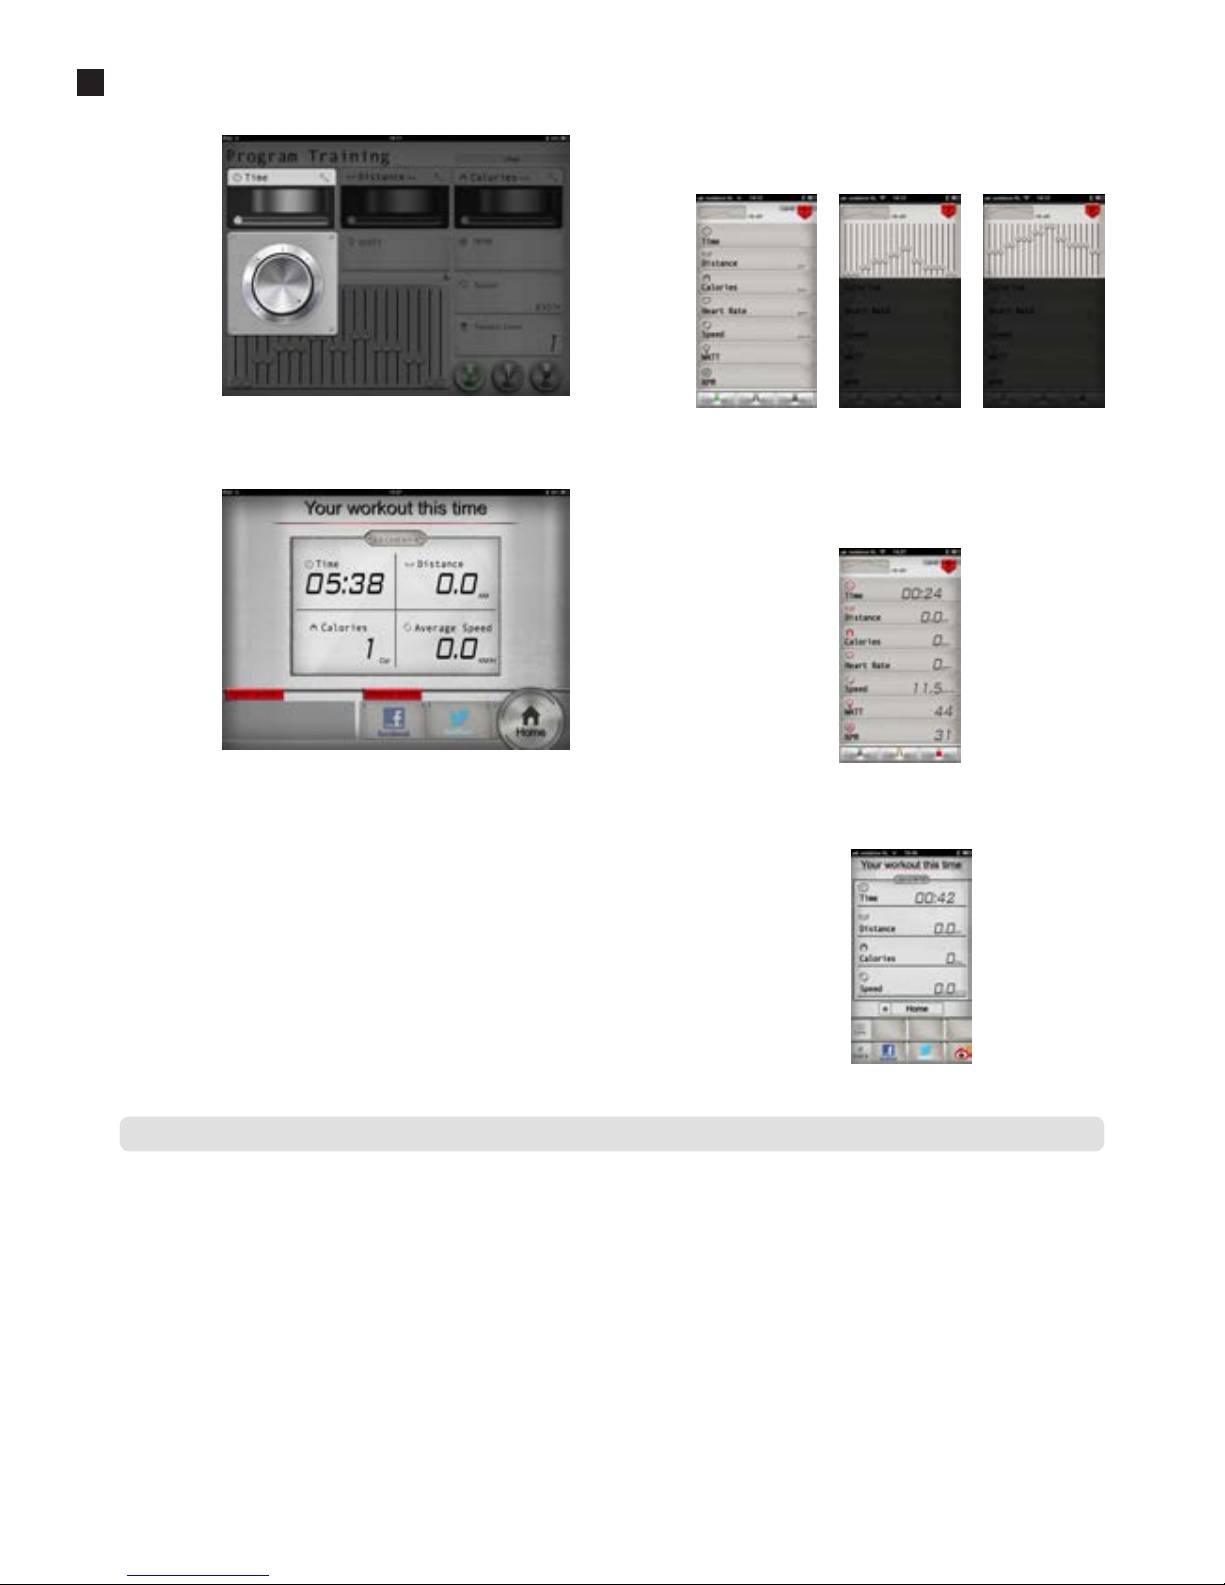
58 - Flow Fitness PERFORM S3 - User Manual
5
Use
When you want to train by using your heart rate, select HRC in the training menu.
There will be a choice of 3 levels:
55% WARM UP to start your training (10 min.)
65% FAT BURNING Fat buring (minimal 30 min.)
75% ENDURANCE TRAINING Improving stamina (depends on you basis stamina)
This program can only be used with an chest belt (not included).
The scroll wheel will appear. By turning the scroll wheel clock or counter clockwise
the value can be set. Go back to the program by pressing the wrench again. When you
choose to set one of the values the training will end when you have reached one of this
values.
The resistance can be increased or decreased during a training by moving the profile
slider up or down. When the program is finished you can return to the main menu by
pressing the HOME button. After a training your able to “post” your result on Facebook
or Twitter. For posting you need an account to log in.
iConsole+ HRC TRAINING
box to the left DISTANCE and CALORIES will appear. When you
don’t want to enter the distance or burned calories you can press
DONE and the program will start.
During a training the resistance is adjustable. Press the red box
in the top right corner. Next, the workout profile will appear in the
form of 20 different slides. Press on of the sliders and slide up or
down. After selecting the desired resistance press on the number
in the red box in the top right corner of the screen and you will
return to the program.
Press the START button to start the training program. Press the
PAUSE button to pause the training and the STOP button to end
the training program.
Page 59
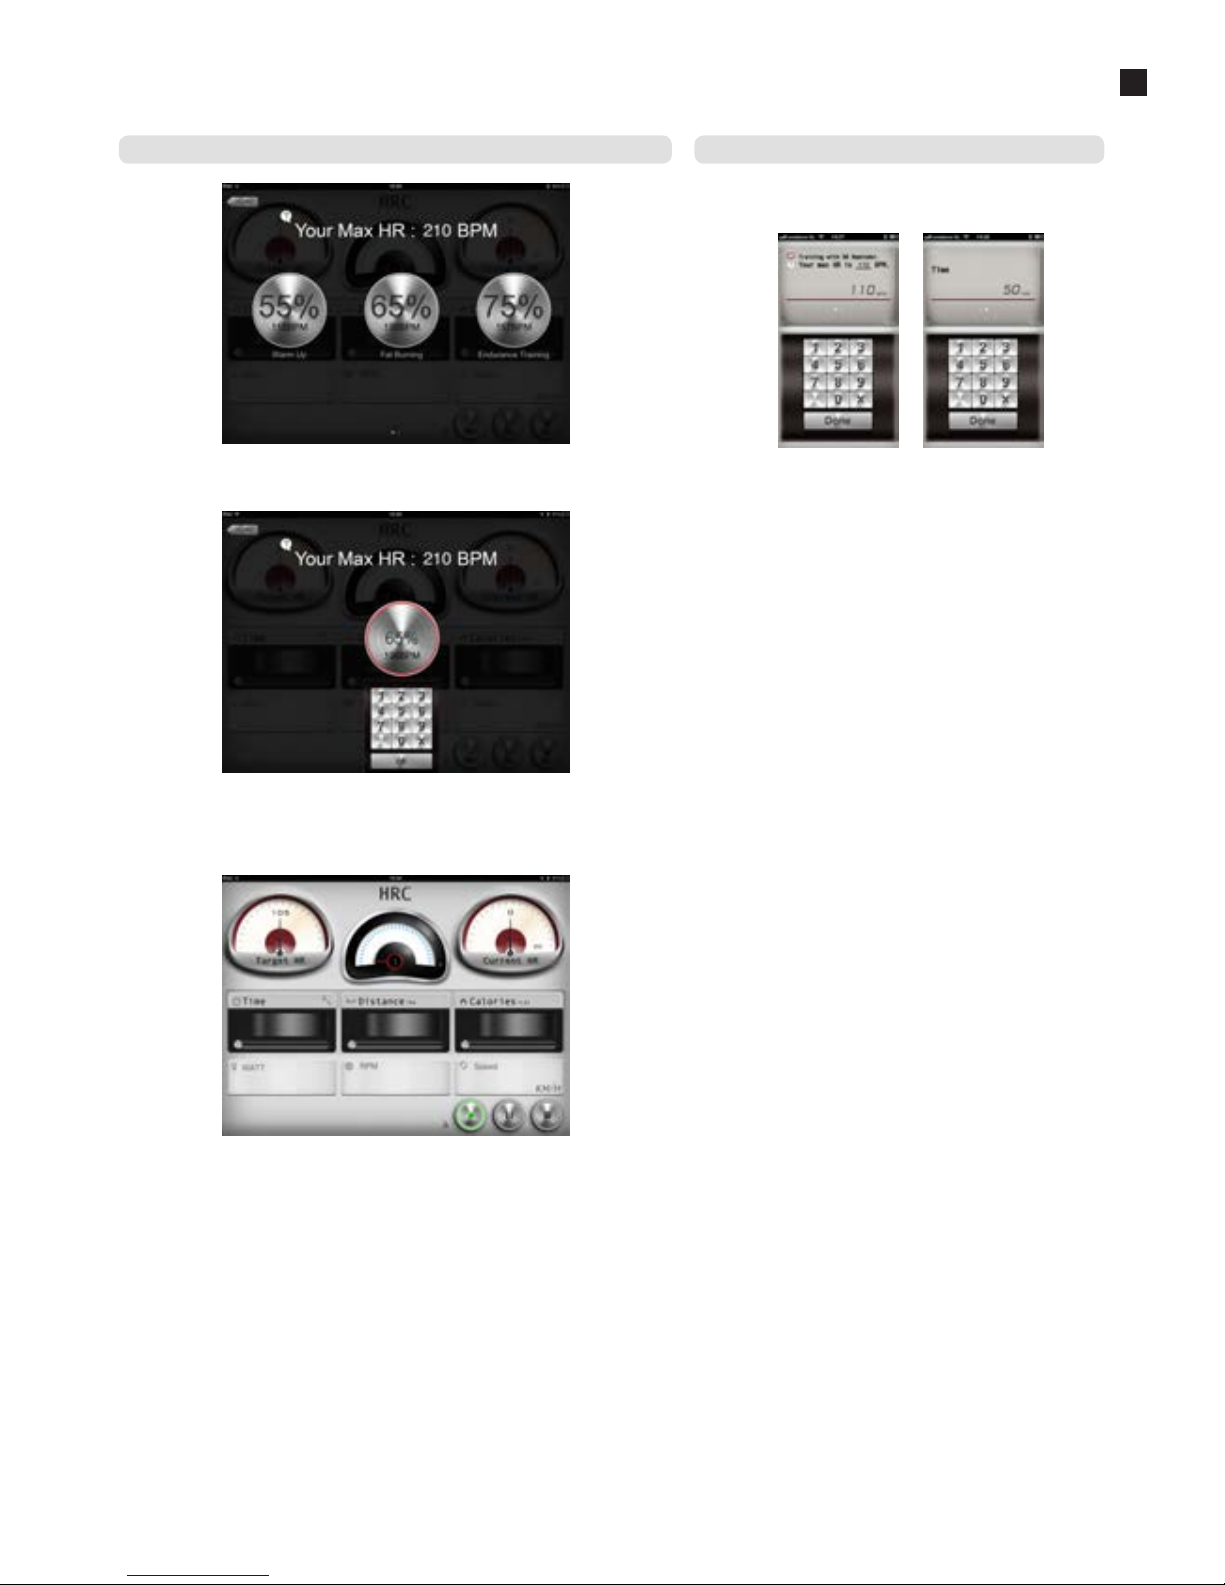
User Manual - Flow Fitness PERFORM S3 - 59
5
Use
Next to the 3 preset HRC programs your able to create your own HRC program. “Swipe”
(when in the screen shown above) to the right and you will get into the CUSTOM HRC
program.
Press the button with CUSTOM and a keyboard will appear where you can enter the
preferred percentage % of you maximal heart rate. Press OK to start the training.
A screen like the one shown below will appear and the value TIME can be set, as
previously described in PROGRAM.
The meter left on the screen is showing the TARGET HR. This is your training heart rate
goal. The meter in the middle shows the current resistance level (1-16). The meter on
the right is the displaying the CURRENT HR. When the CURRENT HR drops below the
TARGET HR the resistance will automatically be increased. When the CURRENT HR tops
the TARGET HR the resistance will automatically be decreased.
First the heart rate goal needs to be set. The default goal is set
to 65%.
It is also possible to set your own heart rate level. For this option
press X on the keypad and enter your level. “Swipe” the heart
rate box to the right to enter TIME. Press DONE to get a overview
of the training program.
Set HRC with Tablet iConsole+ app
Set HRC with Smartphone iConsole+ app
Page 60
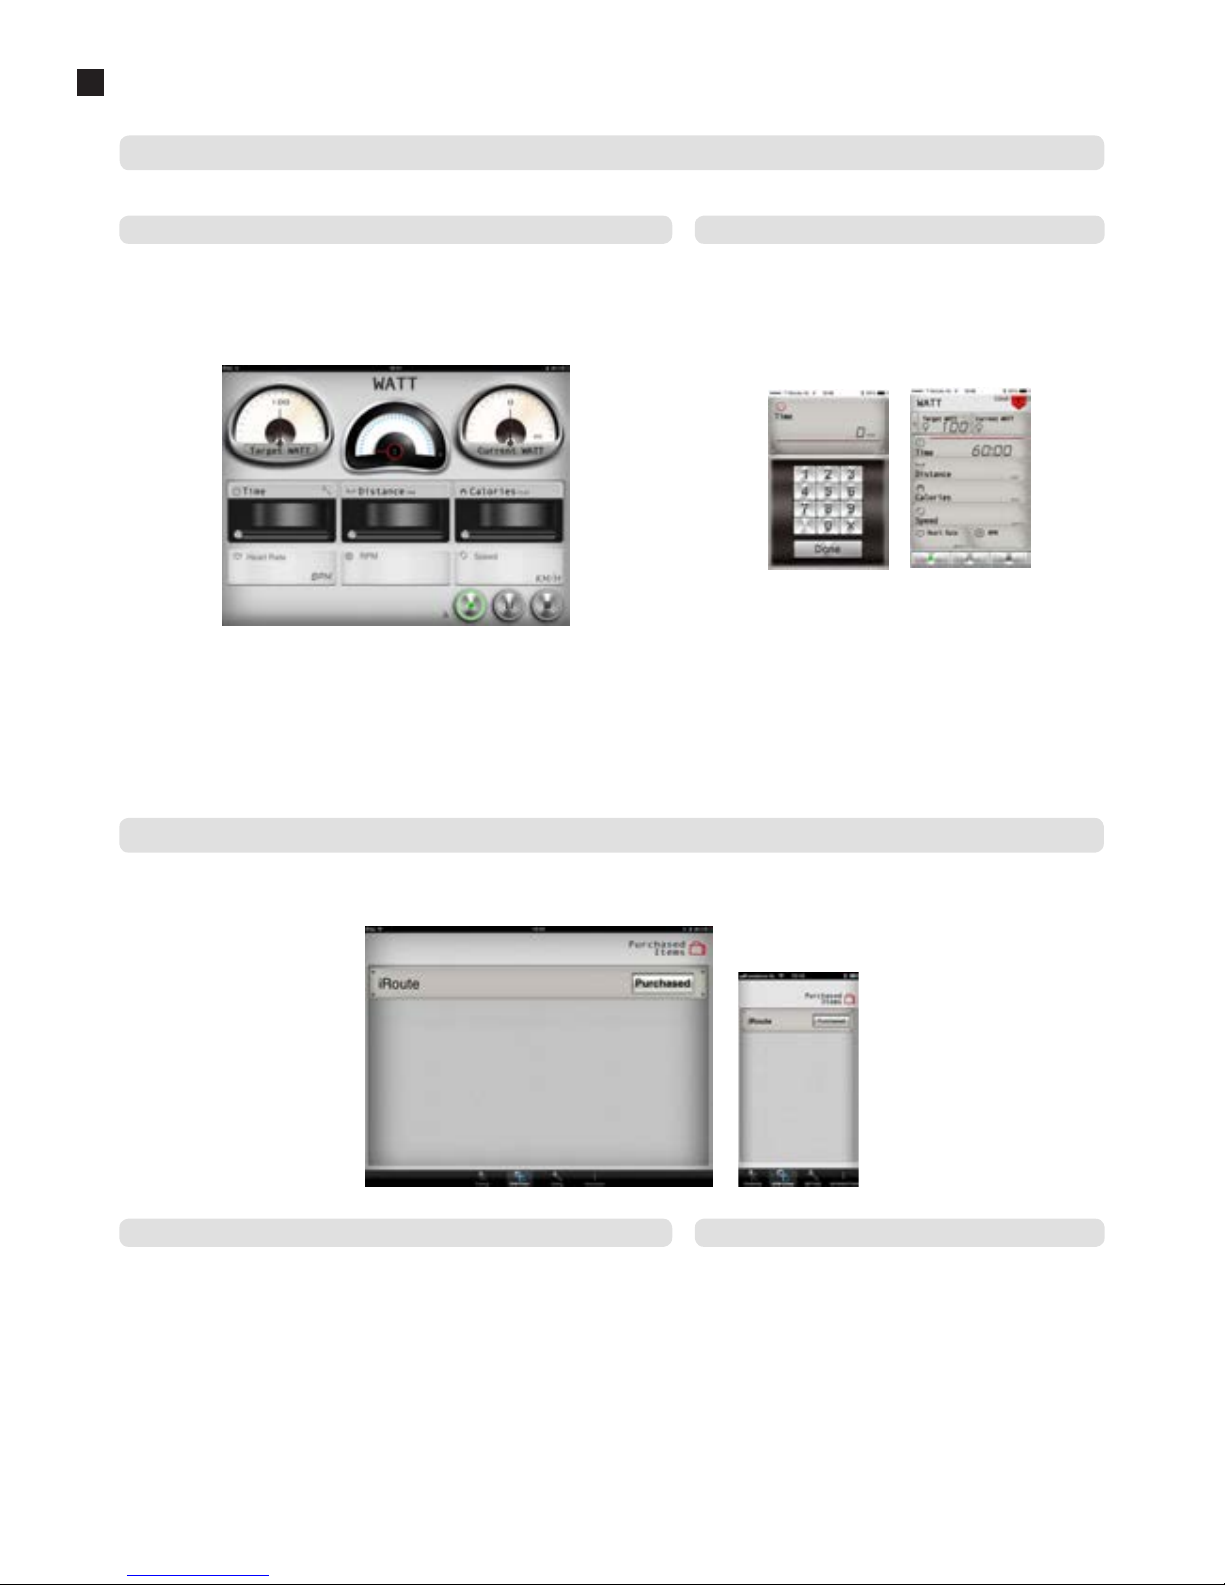
60 - Flow Fitness PERFORM S3 - User Manual
5
Use
The GYM CENTER will shown additional (purchased) items of the iConsole+ app. A great free addition could be IROUTE. To use this addition your tablet or
smartphone needs to be connect to the internet.
iConsole+ GYM CENTER MENU
Select the consistent Watt program by pressing WATT within the training menu.
iConsole+ WATT TRAINING
Set WATT on the Tablet iConsole+ app
Set IROUTE on the Tablet iConsole+ app
Set WATT on the Smartphone iConsole+ app
Set IROUTE on the Smartphone iConsole+ app
100 Watt is the default Watt level. This is shown by the left meter on the screen. By
pressing TARGET WATT the output can be set (see description set CUSTOM HRC under
HRC). It is also possible to set the TIME, DISTANCE and CALORIES. (see description set
values under PROGRAM)
The TARGET WATT is displayed in the left meter on the screen. This output is the
trainings goal. The meter in the middle shows the current resistance level (1-16). The
meter at the right of the screen is displaying the CURRENT WATT and displays the
current output. When the CURRENT WATT drops below the TARGET WATT the resistance
will automatically be increased. When the CURRENT WATT tops the TARGET WATT the
resistance will automatically be decreased.
Set your preffered trainings duration and press done. The default
WATT level is 100 displayed in the top left corner of the screen.
By pressing TARGET WATT the consistent WATT level can be
changed. After pressing a keypad will appear. Press the X to
erease the current value and then set you preferred value.
Press the PLAY button in the bottom left corner of the screen to
start the WATT program.
Press IROUTE in the bar and a menu will pop up where you can
set your own route. Press PLAN MY OWN ROUTE. You will see a
map with a bar on top where you can enter an location. It is also
possible to create a route by using two location points. Press and
hold your finger for one second on the map and a green pin will
Press IROUTE in the bar and a menu will pop up where you can set your own route.
Press PLAN MY OWN ROUTE. You will see a map with a bar on top where you can enter
an location. It is also possible to create a route by using two location points. Press and
hold your finger for one second on the map and a green pin will appear. This is your
starting point. Press and hold again to place the finishing point displayed by a red pin.
Page 61
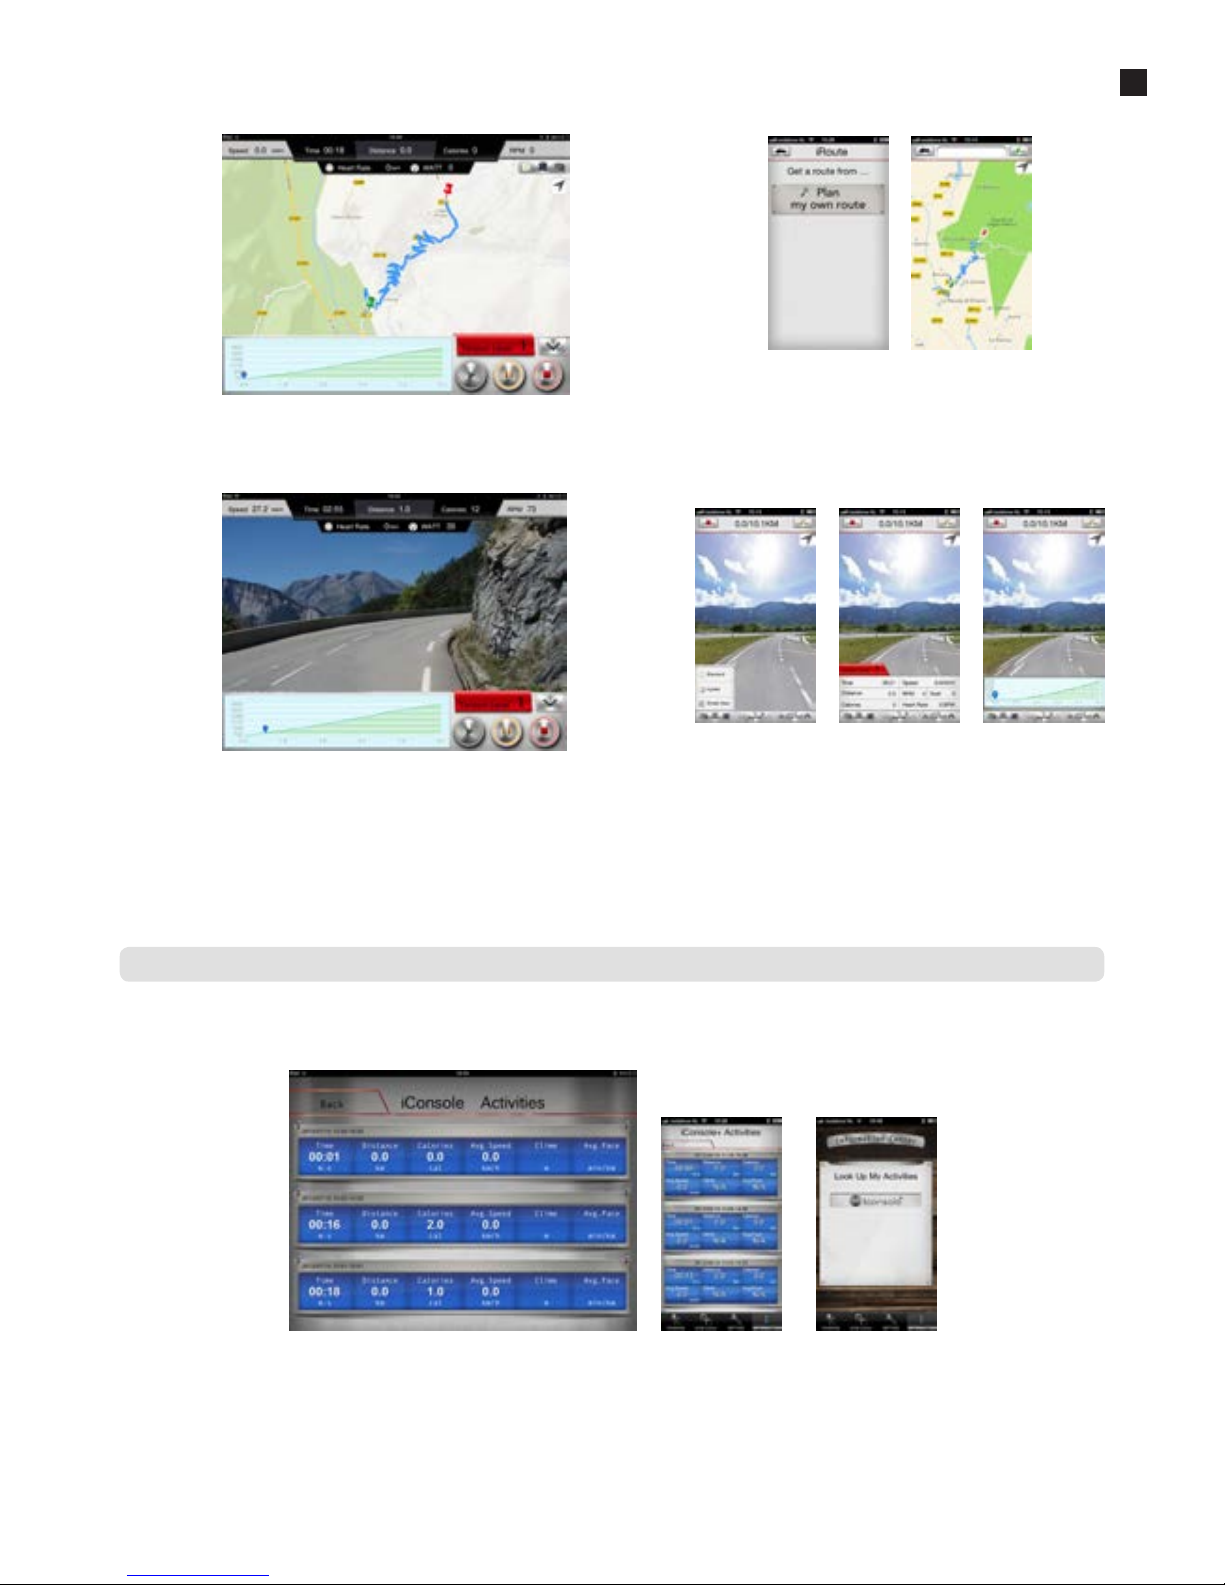
User Manual - Flow Fitness PERFORM S3 - 61
5
Use
This menu displays the saved training workouts. Press the iConsole+ logo and the screen below will appear. There is no limit to the number of saved training
workouts.
iConsole+ INFORMATION MENU
appear. This is your starting point. Press and hold again to place
the finishing point displayed by a red pin.
The computer will now calculate the route. Press the START
button and start to train on the route you just have set. During
the training you can switch between “street view” or “hybrid” or
“standard”.
When you want to set an other different route you need to go
back to the GYM CENTER menu and follow the previous steps
again.
The computer will now calculate the route. Press the START button and start to train on
the route you just have set. During the training you can switch between “street view” or
“hybrid” or “standard”.
When you want to set an other different route you need to go back to the GYM CENTER
menu and follow the previous steps again.
Page 62
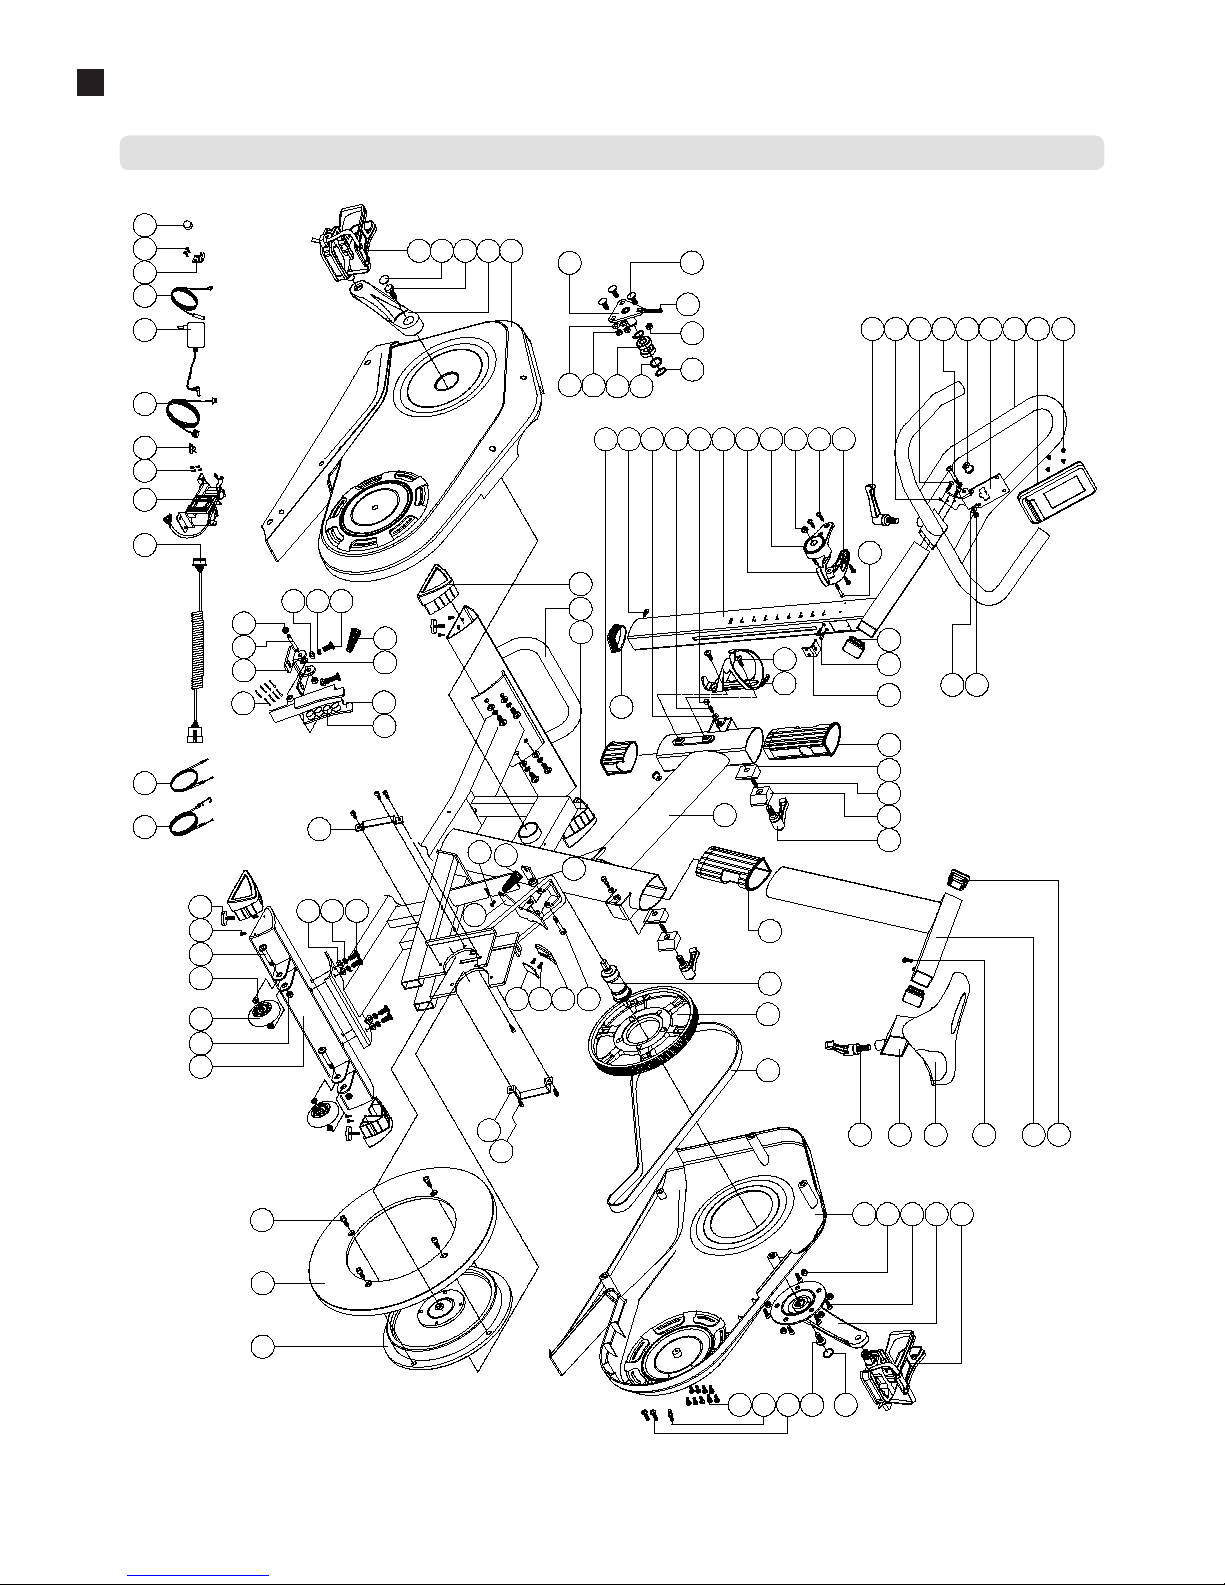
62 - Flow Fitness PERFORM S3 - User Manual
6
Product information
s
Exploded view
1
2
3
4L
4R
5
6
7
9
8
10
11
12
13
14
42
16
18
17
19
20 21 22
23L
23R
24L
25L
26
27
24R
26
27
25R
28
29
30
31
32
33R
33L
34
35
36
37
39
40
44
47
48
49
56
57
50
53
38
6
5
52
51
59
60
62
61
63
64
65
69
66
68
74
72
53
71
73
75
77
76
81
80
30
78
82
86
85
84
88
89
90
92
93
94
88
96 64
98
99
100
101
102
103
104
105
45
46
63
83
83
97
7
53
15
87
95
91
12
41
22
79
57
58
Page 63

User Manual - Flow Fitness PERFORM S3 - 63
6
Product information
Part list
1 main frame 1
2 front stabilizer 1
3 rear stabilizer 1
4L left triangle cap 2
4R right triangle cap 2
5 allen bolt M8x1.25x20L 10
6 spring washerD15.4xD8.2x2T 10
7 flat washerD16xD8.5x1.2T 10
8 front post 1
9 seat post 1
10 seat 1
11 seat adjustable tube 1
12 L knob 25L 2
13 handlebar 1
14 computer fixing plate 1
15 D plug 1
16 cover of front post 1
17 protective cover 1
18 inner insert 1
19 stop plate 2
20 sping 2
21 stop plate(2) 2
22 L knob 50L 2
23L left chaincover 1
23R right chaincover 1
24L left crank 1
24R right crank 1
25L/R pedal set 1
26 hex bolt 2
27 bolt cover 2
28 allen screwM10*1.5*20L 5
29 hex nutM10*1.5*8T 5
30 round cross boltM5x0.8x15L 4
31 pinD6*26.5*7.7 1
32 cross screwST4.2*1.4*20L 9
33L left cover of brake 1
33R right cover of brake 1
34 brake handlebar 1
35 belt 1
36 pulley 1
37 BB sets 1
38 flat washerD25*D8.5*2T 2
39 outer flywheel 1
40 inner flywheel 1
41 cable plug 2
42 swing connection fixing bracket 1
44 allen screwM6*1*15L 6
45 tension cable 1
46 lower tension cable 1
47 magnet fixing bracket 1
48 magnet 8
49 magnet fixing plate set 1
50 axle of magnet fixing bracket 1
51 spring D1.2*55L 1
52 flat washerD18*D8.5*1.0T 1
53 nylon nutM8*1.25*8T 5
56 magnet cell 6
57 screw M5*0.8*10L 3
58 water bottle holder 1
59 adjustable round wheel 4
60 allen boltM8*1.25*40L 2
61 round moving wheel 2
62 bushing D22.2*D8.2*7T 2
63 nylon nut M8*1.25*8T 3
64 screwST4*1.41*12L 10
65 idle wheel fixing plate 1
66 square boltM8*1.25*20L 3
68 hex nut M6*1*5T 1
69 bearing 6203-2RS 2
71 flat washerD18*D8.5*1.2T 2
72 C ring S-17(1T) 2
73 waved washerD17*D22*0.3T 1
74 hex nutM8*1.25*6T 1
75 allen screw M8*1.25*16L 4
76 spring D1.4*55L 1
77 fixing plate of brake strap 1
78 hex boltM8*52L 1
79 allen screw M6*1.0*50L 1
80 brake plate 1
81 cow leather 1
82 allen boltM8x1.25x45L 1
83 square plug38x38x18L 3
84 cross boltM5*0.8*10L 4
85 computer 1
86 round-head screwM5*15L 2
87 nylon nutM6*1.0*6T 1
88 allen screwM6*1*15L 2
89 tension fixing plate 1
90 screwST4.2*1.4*15L 4
91 fixing plate (1) 1
92 bufferD10*5.5T 2
93 hex boltM5*0.8*10L, 2
94 flat washerD15*D5.2*1.0T 2
95 fixing plate (2) 1
96 round magnet 1
97 cross boltM5*10L 1
98 sensor bracket 1
99 sensor cable 1
100 adaptor 1
101 electric cable 1
102 cable buckle 1
103 cross screwST4.2x1.4x12L 4
104 motor 1
105 upper computer cable 1
Nr. Part Quantity Nr. Part Quantity
Page 64

64 - Flow Fitness PERFORM S3 - User Manual
6
Product information
During a training the spinning bike makes beeping or scratching noises.
Beeping or scratching noise are mostly caused by the plastic cover hitting or scratching the metal frame. The solution to this problem
is to spray this components with WD40. WD40 is available in hardware stores.
De console doesn’t or badly reads your heart rate.
When there is no heart rate reception check the following:
- Is the chest belt coded? Coded chest belts don’t work on our equipment. The chest belt must be “Polar Compatible” and send a 5Hz
signal.
- Have you read the chest belt’s manual? It is important that the sensors are made moist for a better contact with the skin.
- Is there a full and correctly placed battery?
- Is the chest belt worn tight enough?
I cant find the iConsole+ App within the Google Play store or Apple App Store.
If you can’t the App with the search term “iConsole”, try “iConsole+”, “I-console” of “I-console+” instead.
iConsole does’t show in the list of bluetooth devices on my smartphone or tablets settings menu.
The spinning bike needs to be turned on for transmitting the bluetooth signal. The adapter must be connected between the wall outlet
and the spinning bike. Then get the spinning bike into motion for turning on the display. Now the iConsole will appear in the list of
Bluetooth devices and a connection can be established.
My tablet / smartphone can’t get a bluetooth connection with the iConsole.
1. The iConsole+ App doesn’t communicatie with all types of tablets and smartphones. The devices that can be used with the
iConsole+ App are listed at page 52.
2. The bluetooth function only supports one connection. Make sure your not connected to an other device while trying to connect to
iConsole.
3. The connection can be disrupted by external factors. Turn off the bluetooth function on your tablet or smartphone. Then turn
bluetooth back on again and make a connection with the iConsole.
My training exercises are not stored in the INFORMATION MENU.
For saving and storing training exercises you need to have a account. In the chapter
SETTING MENU you will find the description on how to make an account.
I can’t use the IROUTE function in the GYM CENTER MENU.
To start up the IROUTE application an account is required for logging in. In the chapter
SETTING MENU you will find the description on how to make an account.
When starting a route on IROUTE the menu “Your workout this time” appears.
If you are using an Android Tablet download the iConsole HD app from the Google play store.
Troubleshooting
Problem
Solution
Problem
Solution
Problem
Solution
Problem
Solution
Problem
Solution
Problem
Solution
Problem
Solution
Problem
Solution
In case your problem is not resolved or not described, consult the fitness dealer where you purchased this product.
Page 65

User Manual - Flow Fitness PERFORM S3 - 65
7
Warranty
The warranty is provided by the Flow Fitness distributor of your country and the reseller where you have purchased your product. Please check
http://www.flowfitness.nl/en/dealers/locations.php for contact information.
Warranty
Page 66
66 - Flow Fitness PERFORM S3
Notities / Notes
Page 67

Flow Fitness PERFORM S3 - 67
Notities / Notes
Page 68
www.flowfitness.nl
 Loading...