

Floureon H101 Instruction Manual
F L O U R E O N
AGES
14+
1. INSTRUCTION
2. LITHIUM BATTERY CHARGING
R/C QUADCOPTER
INSTRUCTION MANUAL
NOTICE
• Please read through the manual before using.
• Please according to the manual's order to proceeding operation.
• Please store small parts only in places out of the reach of children, to avoid danger.
• N ever leave the battery unattended during charging, to avoid the battery overheat and
result in serious danger.
• Never throw Li-Polymer batteries in afire, to avoid unexpected danger.
• Operating must be caution each parts from the body, never close to the rotary propeller.
• Never attempt to dismantle or modify the parts lest it will cause damage.
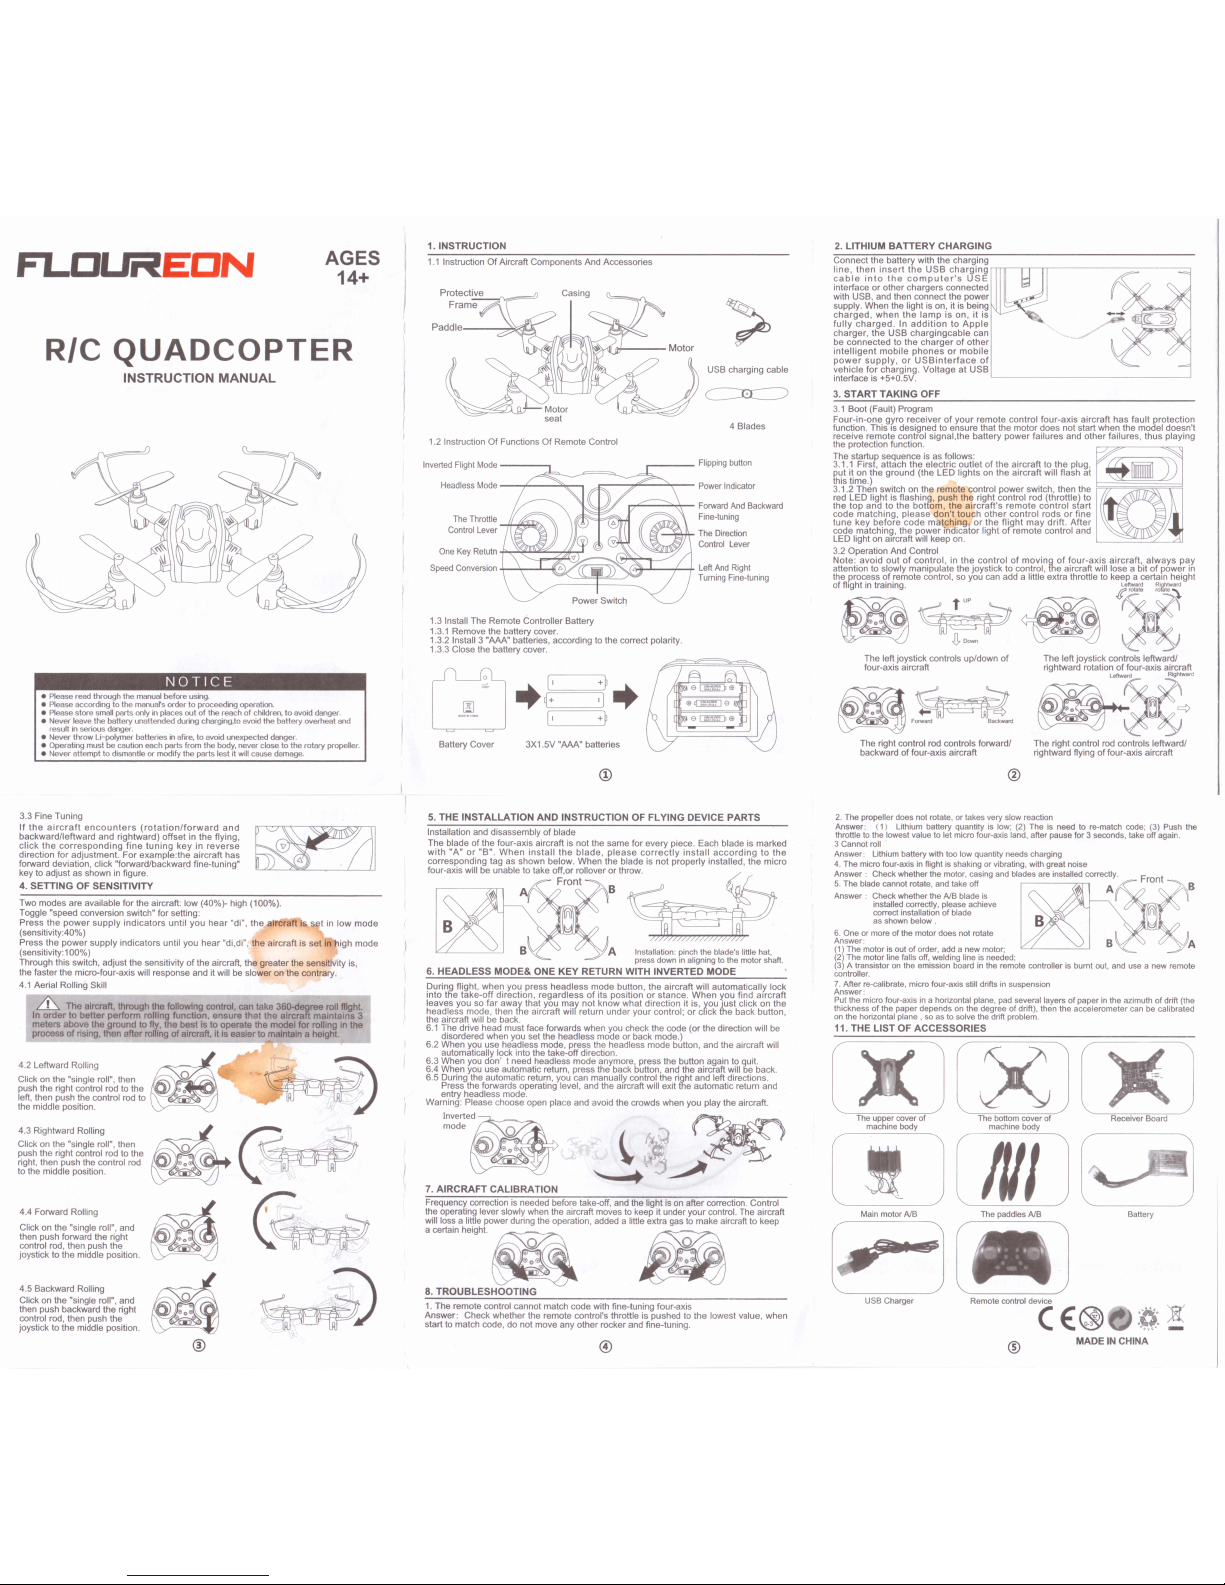
1.1 I nstructio n O f Aircraf t Com ponent s And Access ories
1.2 In struction Of Function s Of Remote Contro l
Inverted Flight Mode
Headless Mode
Forward And Backward
Fine-tuning
Left And Right
Turning Fine-tuning
1.3 In stall The Rem ote Co ntroll er Batte ry
1.3.1 R emove the b attery co ver.
1.3.2 Install 3 "AAA" batterie s, ac cording to the corr ect pola rity.
1.3.3 C lose th e bat tery cove r.
Batte ry Cov er 3X1 .5V "AA A" ba tteries
3.1 Boot ( Fault) Program
Fou r-in- one gyr o r ecei ver of y our rem ote con trol four -axi s a ircra ft h as f ault pro tect ion
func tion. This is des igned to en sure that th e mo tor do es n ot star t when the model does n't
rece ive remo te c ontrol sig nal, the ba ttery pow er fa ilure s an d o ther f ailure s, thus play ing
the protec tion fun ction.
The startu p sequ ence is as fol lows:
3.1.1 F irst, attac h th e e lectr ic o utlet of the aircr aft t o th e plu g,
put it on the grou nd (the LED lig hts on the a ircra ft wil l fla sh at
this time.)
3.1.2 The n swit ch on the remo te co ntrol pow er swit ch, then t he
red LED ligh t is fl ashin g, push the right cont rol rod (thro ttle) to
the to p a nd to the bot tom, th e a irc raft 's rem ote co ntro l s tart
cod e matc hing , plea se don 't to uch o ther co ntro l r ods or fine
tun e key be fore co de ma tchi ng, or the flig ht ma y d rift . A fter
code ma tching , th e p ower indic ator ligh t of remot e c ontrol and
LED light on aircr aft will keep on.
3.2 O peratio n And Contro l
Not e: avo id out of con tro l, in the co ntro l o f m ov ing of fou r-ax is ai rcra ft, alw ay s p ay
atte ntion to slo wly manipu late the joy stick to c ontrol, the aircra ft will lose a bit of po wer in
the p roces s of remote control, so y ou can add a little extra throttle to ke ep a c ertain height
of fli ght in training. Rightward rotate
The left joys tick c ontrols up/d own o f
four- axis a ircraft
The right c ontrol rod co ntrols forwar d/
backw ard o f four-a xis a ircraft
The right control rod co ntrols leftwa rd/
rightw ard fly ing o f four-ax is air craft
3.3 Fine Tu ning
If th e a irc ra ft e nc ou nte rs (ro ta tio n /fo rw ar d a nd
bac kwa rd/le ftwar d a nd right ward ) of fset in t he fly ing,
cli ck the c orr esp on din g fine t unin g ke y in reve rse
dire ction for adju stme nt. For e xam ple:th e a ircra ft has
forw ard deviatio n, c lick " forwar d/back ward fine- tuning "
key to adju st as shown in figure.
4. SETTING OF SENSITIVITY
Two mode s are availab le for t he airc raft: low (40 %)- hig h (100 %).
Togg le "sp eed c onversio n sw itch" f or setting :
Pre ss the po wer sup ply ind icat ors un til you hea r “d i”, the aircraft is set in low mode
(sen sitivity: 40%)
Pres s the po wer supp ly in dicat ors until you hea r “di .di”, t he a ircra ft is set in hig h m ode
(sens itivity: 100%)
Thro ugh th is switc h, ad just the sens itivity o f the aircraft, the g reater the se nsitivit y is,
the faster the m icro-fou r-axis will re sponse and it will be slow er on th e cont rary.
4.1 Aerial Rolling Skill
I
B The a ircraft, thro ugh th e fol lowing cont rol, ca n tak e 36 0-degr ee ro ll flight.
In orde r to be tter per form r olling fu ncti on, en sure tha t th e a ircr aft ma intai ns 3
met ers a bove the groun d to fly, the best is to opera te th e mo del for ro lling in th e
proc ess of rising, then a fter ro lling o f aircraft , it is easier to main tain a height.
4.2 Leftwa rd Ro lling
Click on the "single roll", then
push the rig ht con trol rod to the
left, th en pu sh the contro l rod to
the middle position .
4.3 Rightw ard R olling
Click on the "sing le roll", then
push the ri ght con trol rod to the
right, then push the contr ol rod
to the midd le pos ition.
4.4 Forwa rd Rolli ng
Click on the "sing le roll", and
then push forward the right
contro l rod, then push th e
joys tick t o the middle position .
4.5 Backw ard R olling
Click on the "single roll", and
then push backwa rd the right
contro l rod, then push t he
joy stick to the middle position .
5. THE INSTALLATION AND INSTRUCTION OF FLYING DEVICE PARTS
Install ation and dis assem bly o f blade
The blade of th e fou r-axis airc raft is not the s ame fo r eve ry p iece. Each blade is m arked
wi th "A " or "B". Whe n in sta ll the blad e, p lea se co rre ct ly in sta ll ac cor din g to the
corr espo nding tag as shown be low. When the blad e is not prop erly install ed, the micro
four -axis w ill be unable to take off,o r rollo ver or th row.
Fro nt'
Installation: pinch the blade's little hat,
press down in aligning to the motor shaft.
6. HEADLESS MODE& ONE KEY RETURN WITH INVERTED MODE__________
Durin g fl ight, when you pr ess headl ess mode butt on, the a ircra ft wil l au tom atica lly lo ck
into the ta ke-o ff d irec tion, re gar dles s o f its po sition o r st ance . W hen you find a ircra ft
leav es you s o fa r awa y th at yo u m ay n ot kn ow w hat dire ction it is, you lus t cl ick o n the
hea dless mod e, th en tn e a ircraf t wil l retu rn u nder your contr ol; or cl ick th e b ack b utton,
the aircraft will be back.
6.1 T he driv e head mus t face f orward s when you check the co de (o r the d irection will be
disor dered when you se t the headles s mod e or b ack mo de.)
6.2 W hen you use head less mode, press t he hea dless mode button, and th e airc raft will
auto matica lly lock into th e tak e-off d irection.
6.3 When you d on’ t nee d hea dless mode anymore , pre ss the button again to quit.
6.4 W hen y ou use auto matic return, press the ba ck butto n, and the aircraft will be back.
6.5 During the a utomati c return , you can m anuall y contr ol the right and left directio ns.
Press the fo rwards opera ting level, a nd the aircraf t will e xit tne autom atic re turn and
entry headl ess m ode.
Warn ing: Please choose open place and a void the crow ds whe n you play the airc raft.
7. AIRCRAFT CALIBRATION
Frequen cy correc tion is n eeded bef ore take-o ff, and the ligh t is on aft er correctio n. Contr ol
the o perating lever slow ly when th e aircra ft moves to keep it under y our con trol. The aircraft
will loss a little power d uring the operation, added a little e xtra gas t o make aircraft to keep
a certa in height.
8. TROUBLESHOOTING
1. The remot e contro l ca nnot m atch co de wit h fine- tuning four-ax is
Ans wer: Che ck wh ether the r emote contro l's thr ottle is push ed to the lowe st value , wh en
start to mat ch code , do not m ove an y othe r rock er and fi ne-tunin g.
2. The propeller does not rotate, or takes very slow reaction
Answer: (1) Lithium battery quantity is low; (2) The is need to re-match code; (3) Push the
throttle to the lowest value to let micro four-axis land, after pause for 3 seconds, take off again.
3 Cannot roll
Answer: Lithium battery with too low quantity needs charging
4. The micro four-axis in flight is shaking or vibrating, with great noise
Answer : Check whether the motor, casing and blades are installed correctly.
F t
5. The blade cannot rotate, and take off
-------------------
rr on t *
Answer : Check whether the A/B blade is
installed correctly, please achieve
correct installation of blade
as shown be low.
6. One or more of the motor does not rotate
Answer:
(1) The motor is out of order, add a new motor;
(2) The motor line falls off, welding line is needed;
(3) A transistor on the emission board in the remote controller is burnt out, and use a new remote
controller.
7. After re-calibrate, micro four-axis still drifts in suspension
Answ er:
Put the micro four-axis in a horizontal plane, pad several layers of paper in the azimuth of drift (the
thickness o f the paper depends on the degree of drift), then the accelerometer can be calibrated
on the horizontal plane , so as to solve the drift problem.
11. THE LIST OF ACCESSORIES
The upper cover of The bottom cover of
machine body machine body
USB Charger Remote control device
©
©
C€®0#S
MADE IN CHINA
Co nnect the batte ry with the cha rging
lin e, th en i nse rt the USB c ha rgin g
ca b le in to th e c om p u te r' s U SE
inte rface or o ther charg ers conne cted
with USB, and th en co nnec t the power
supp ly. Wh en the light is on, it is b eing
ch arg ed, w hen t he lam p is on, it is
fu lly c ha rge d. In a dd itio n to A ppl e
cha rger , th e USB cha rgin gca ble can
be conn ecte d to the ch arg er o f ot her
in tell ige nt mo bile p hon es or mo bile
po we r su pp ly, o r US B int erf ac e of
ve hicle fo r ch argin g. Volt age at USB
inter face is +5+0.5V .
3. START TAKING OFF
 Loading...