

Floureon FC200 User Manual

FC200
TWO-WAY RADIO
User Manual


CONTENTS
English······························1-6
Deutsch··························7-12
Français························13-18
Español························19-24
Italiano··························25-30
EN-1
Safety and General Information
Caution
Before using this radio, read this booklet which contains important operating instructions.For
information on product details, brochures, user manuals and approved accessories. Please refer
to http://www.floureon.com
Package Contents
Operating Instructions
• Transmit no more than 50% of the time. To transmit (talk), press the Push-To-Talk (PTT)
button. To receive calls,release the PTT button.
• Hold the radio in a vertical position in front of the face with the microphone (and other parts of
the radio including the antenna) at least 1 in. (2.5 cm) away from the nose or lips.Antenna
should be kept away from the eye.
• DO NOT hold the antenna when the radio is transmitting.
• DO NOT use any portable radio that has a damaged antenna. If a damaged antenna comes
into contact with your skin, a minor burn can result.
Acoustic Safety
Exposure to loud noises from any source for extended periods of time may temporarily or
permanently affect your hearing. The louder the volume of the radio, the sooner your hearing will
be affected. Hearing damage from loud noise is sometimes undetectable at first, and can have a
cumulative effect.
To protect your hearing, follow these precautions:
• Use the lowest volume necessary to do your job.
• Turn up the volume only if you are in noisy surroundings.
• Turn down the volume before putting on a headset or headphones.
• Limit the amount of time you use a headset or headphones at high volume.
• When using the radio without a headset or headphones,do not place the speaker of the radio
directly against your ear.
Package Content
Walkie-Talkie
Belt Clip
User Manual
FC200
2
2
1
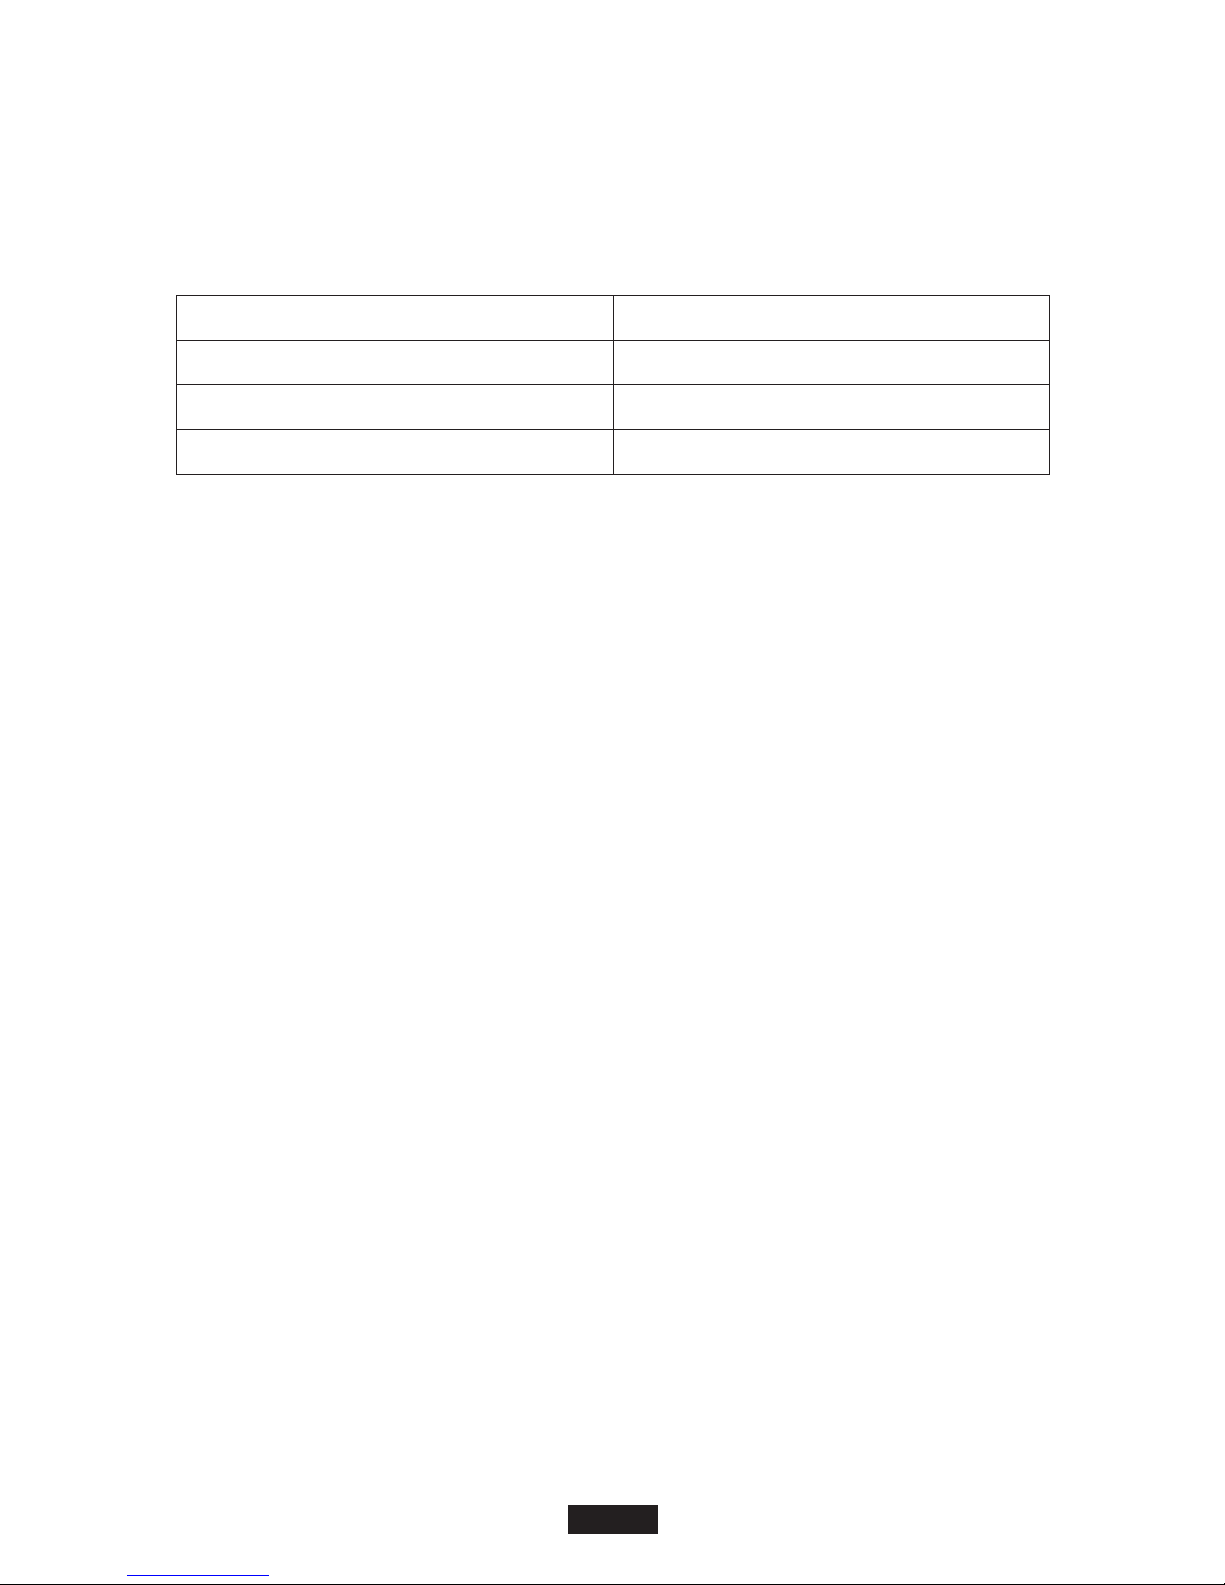
Channel/Sub-Code Up Key
Call Tone Button
Lamp Button
Channel/Sub-Code Down Key
PTT Button
Flash Light/Lamp
Antenna
Radio On/Off,Volumn Knob
Accessory Port
USB Charging Port
Menu/Lock Button
Scan/Monitor/Button
Mic
Speaker
Control Buttons
Display Screen Guide
EN-2
1. Battery Indicator
2. Scan
3. High Power
4. Dual Watch
5. Receive
6. Transmit
7. IVox
8. Interference Eliminator code
9. Keypad Lock
10. Channel
Transmit and Receive Procedure
Your two-way radio contains a transmitter and a receiver. To control your exposure and ensure
compliance with the general population/uncontrolled environment exposure limits, always
adhere to the following procedure:
• Transmit no more than 50% of the time.
• To receive calls, release the PTT button.
• To transmit (talk), press the Push-to-Talk (PTT) button in front of the face.
• Hold the radio in a vertical position with the microphone (and other parts of the radio including
the antenna) at least one inch (2.5 centimeters) away from the nose or lips. Keeping the radio
at a proper distance is important to ensure compliance.
Note: RF exposure decreases with increasing distance from the antenna.
• Body Worn Operation. When worn on the body, always place the radio in a approved clip for
this product.
Two-way Radio Operation
• Use only approved supplied or replacement antennas and audio accessories. Use of
non-approved antennas and wired or wireless accessories may exceed the applicable RF
exposure guidelines (iEEE, ICNIRP or FCC).
Installing the Three AA NiMH Rechargeable Batteries(or Alkaline Batteries)

1. Take the belt clip off.
2. With the back of the radio facing you, lift the battery cover latch up and remove the cover.
3. Insert the three AA NiMH batteries (or Alkaline Batteries) with + and – polarity as shown
inside. (The ribbon must be underneath the three AA NiMH battery and must wrap around the
right side of the batteries).
4. Close the battery cover firmly.
Radio Battery Meter
The number of bars ( ) on the radio battery icon shown indicates the charge remaining in the
battery. When the radio battery meter show 0 segments, the radio chirps periodically (Low
Battery Alert). When the battery power falls below 3V, the intercom will shut down.
Note: Remove the battery from radio for storage purposes.
Removing the Three AA NiMH Rechargeable Batteries (or Alkaline Batteries)
1. Turn the radio off.
2. With the back of the radio facing you, lift the battery cover latch up and remove the cover.
3. Remove each the three AA NiMH rechargeable batteries(or Alkaline Batteries) by pulling the
ribbon attached to the radio.
4. Close the battery cover firmly.
Note:
• Be careful when removing NiMH or AA batteries. Do not use sharp or conductive tools to
remove either of these batteries.
• Remove the batteries before storing your radio for extended periods of time. Batteries corrode
over time and may cause permanent damage to your radio.
Using the Micro-USB Charger
The micro-USB charger is a handy port that allows you to conveniently charge your NiMH
batteries.
1. Make sure your radio is turned OFF.
2. Plug the micro-USB cable into the micro-USB charging port on your radio. Connect the other
end of the micro- USB charger to wall power outlet.
3. The battery meter on LCD will move to indicate the battery is charging.
Note:
• It is recommended to power OFF your radio while charging.
• When moving between hot and cold temperatures, do not charge the NiMH batteries until the
battery temperature acclimates (usually about 20 minutes).
• Do not store the radio while connected to the charger.
• Do not charge AA alkaline batteries.
Turning your Radio On and Off
1. To Power on your radio, turn rotary knob clockwise.
2. To Power off your radio, turn rotary knob counterclockwise.
Setting the Volume
1. To increase volume, turn the rotary knob clockwise..
2. To decrease volume, turn the rotary knob counterclockwise.
Talk Range
Your radio is designed to maximize performance and improve transmission range. Do not use
the radios closer than five feet apart.
Monitor Button
EN-3

Press and hold Scan/Mon for 3 seconds to enter monitor mode and listen for weak signals on
the current channel. You can also listen to the volume level of the radio when you are not
receiving. This allows you to adjust the volume if necessary.
Push-to-Talk Timeout Timer
To prevent accidental transmissions and save battery life, radio will stop transmitting if you press
PTT button for 180 seconds continuously.
Selecting the Channel
The channel is the frequency of the radio uses to transmit.
1. Press the Menu/Lock button until the channel number starts to flash.
2. Press ▲/▼ to change the channel.
3. Press the PTT button to exit menu or menu to continue setup.
Selecting the Interference Eliminator Code
Sub-Codes help minimize interference by blocking transmission from unknown sources. Your
radio has 121 Sub-Codes.
To set the code for a channel:
1. Press Menu until the code starts to flash.
2. Press ▲/▼ to select code.
3. Press the PTT button to exit menu or menu to continue setup.
help minimize interference by blocking transmission from unknown sources. Your radio has
121 Sub-Codes.
4. To set the code for a channel:
5. Press Menu until the code starts to flash.
6. Press ▲/▼ to select code.
7. Press the PTT button to exit menu or menu to continue setup.
Setting and Transmitting Call Tones
Your radio can transmit different call tones to other radios in your group when you pressed
button.
To set a call tone:
1. Press Menu until call tone ‘CA’ appears. The current call tone setting flashes.
2. Press ▲/▼ to change and listen to the call tone.
3. Press the PTT button to exit menu or menu to continue setup.
Voice Operated Transmission (VOX)
Transmission is initiated by speaking into the microphone of the radio instead of pressing the
PTT button.
1. To activate VOX, press Menu button with four times until appears on the display. The
current setting will flash..
2. Sensitivity level. Press menu until icon appears on the display. Press ▲/▼ to select
sensitivity.
3. Press the PTT button to exit menu or menu to continue setup.
L3 = High Sensitivity for quiet environments
L2 = Medium Sensitivity for most environments
L1 = Low Sensitivity for noisy environments
L0 = Turn Off VOX function
Dual Channel Monitor
Enable you to scan current channel and another channel alternately.
1. Press Menu until ‘CH’ appears on the display.
2. Press ▲/▼ to select channels.
3. Press the PTT button to exit menu or menu to continue setup.
EN-4
Keypad Tones
You may enable or disable the keypad tones. You will hear the key tone each time a button
pushed.
• To disable/disable keypad tones, power OFF your radio. Press ▼ button & power ON radio at
the same time until you see the display.
Roger Tone
You can set your radio to transmit a unique tone when you finish transmitting.
• To disable/enable roger tone, power OFF your radio. Press ▲ button & power ON radio at the
same time until you see the display.
Setting High Low Power
1. Press Menu until ‘Pr’ appears on the display.
2. Press ▲/▼ to select HI or LO. (HI- High Power, LO- Low Power)
3. Press the PTT button to exit menu or menu to continue setup.
Keypad Lock
To avoid accidentally changing your radio settings:
1. To lock the radio, press and hold MENU/ button until the key lock indicator icon on
display appear.
2. To unlock the radio, press and hold MENU/ button until key lock indicator icon on
display disappear.
Scanning Channels
Use the scan function search all channels for transmission from unknown sources; find
someone in your group who has accidentally changed channels or find unused channels quickly
for own usage.
To Start Scanning
1. Press the Scan/Mon button briefly to turn on the scan function. The scan icon will appear
on the display and the radio begins to scan through the channel & sub-codes.
2. When the radio detects channel activities matching the channel and sub-code combination,
the radio stops scanning and you can hear the transmission. Press the PTT/Menu/Scan/Call
button to exit the scan function.
Advanced Scanning
3. If the radio stops scanning on a channel you do not want to listen to, you may temporarily
remove that channel from the scan list by long press the ▲ or▼ key for more than 3 seconds.
This channel will be temporarily removed from the scan list. Press ▲ or ▼to resume
scanning. To restore the channel, turn the radio off and then back on.
Priority scan
4. Before entering scan, current channel and sub-code are the priority channel and sub-code.
When a radio receives transmission from priority channel and a sub-code, the radio will switch
to priority channel and sub-code without completing the whole scanning cycle.
LED Lamp
Your radio has a built-in-LED Lamp.
Press ‘LAMP’ button once to turn ON the lamp, press again to turn OFF the lamp.

EN-5
Keypad Tones
You may enable or disable the keypad tones. You will hear the key tone each time a button
pushed.
• To disable/disable keypad tones, power OFF your radio. Press ▼ button & power ON radio at
the same time until you see the display.
Roger Tone
You can set your radio to transmit a unique tone when you finish transmitting.
• To disable/enable roger tone, power OFF your radio. Press ▲ button & power ON radio at the
same time until you see the display.
Setting High Low Power
1. Press Menu until ‘Pr’ appears on the display.
2. Press ▲/▼ to select HI or LO. (HI- High Power, LO- Low Power)
3. Press the PTT button to exit menu or menu to continue setup.
Keypad Lock
To avoid accidentally changing your radio settings:
1. To lock the radio, press and hold MENU/ button until the key lock indicator icon on
display appear.
2. To unlock the radio, press and hold MENU/ button until key lock indicator icon on
display disappear.
Scanning Channels
Use the scan function search all channels for transmission from unknown sources; find
someone in your group who has accidentally changed channels or find unused channels quickly
for own usage.
To Start Scanning
1. Press the Scan/Mon button briefly to turn on the scan function. The scan icon will appear
on the display and the radio begins to scan through the channel & sub-codes.
2. When the radio detects channel activities matching the channel and sub-code combination,
the radio stops scanning and you can hear the transmission. Press the PTT/Menu/Scan/Call
button to exit the scan function.
Advanced Scanning
3. If the radio stops scanning on a channel you do not want to listen to, you may temporarily
remove that channel from the scan list by long press the ▲ or▼ key for more than 3 seconds.
This channel will be temporarily removed from the scan list. Press ▲ or ▼to resume
scanning. To restore the channel, turn the radio off and then back on.
Priority scan
4. Before entering scan, current channel and sub-code are the priority channel and sub-code.
When a radio receives transmission from priority channel and a sub-code, the radio will switch
to priority channel and sub-code without completing the whole scanning cycle.
LED Lamp
Your radio has a built-in-LED Lamp.
Press ‘LAMP’ button once to turn ON the lamp, press again to turn OFF the lamp.

EN-6
US Channel Frequency (MHz)
Channel
Frequency
Channel
Frequency
Channel
Frequency
Channel
Frequency
Channel
Frequency
Channel
Frequency
1
462.5625
5
462.6625
9
467.5875
13
467.6875
17
462.6000
21
462.7000
2
462.5875
6
462.6875
10
467.6125
14
467.7125
18
462.6250
22
462.7250
3
462.6125
7
462.7125
11
467.6375
15
462.5500
19
462.6500
4
462.6375
8
467.5625
12
467.6625
16
462.5750
20
462.6750
Europe Channel Frequency(MHz)
Channel
Frequency
Channel
Frequency
Channel
Frequency
Channel
Frequency
1
446.00625
5
446.05625
9
446.10625
13
446.15625
2
446.01875
6
446.06875
10
446.11875
14
446.16875
3
446.03125
7
446.08125
11
446.13125
15
446.18125
4
446.04375
8
446.09375
12
446.14375
16
446.19375
Channels and Frequencies
DE-7
Sicherheit und allgemeine Informationen
Vorsicht
Bevor Sie dieses Radio benutzen, lesen Sie diese Broschüre, die wichtige
Bedienungsanleitungen enthält. Für Informationen über Produktdetails, Broschüren,
Bedienungsanleitung und genehmigtes Zubehör. Webseite http://www.floureon.com als
Referenz.
Lieferumfang
Bedienungsanleitung
• Senden Sie nicht mehr als 50% der Zeit. Um zu senden (sprechen), drücken Sie die
Push-To-Talk-Taste (PTT). Um Anrufe zu erhalten, lassen Sie die PTT-Taste los.
• Halten Sie das Radio in einer senkrechten Position vor dem Gesicht, wobei das Mikrofon (und
andere Teile des Radios einschließlich der Antenne) mindestens 1 Zoll (2,5 cm) von der Nase
oder den Lippen entfernt sind. Die Antenne sollte von der Antenne ferngehalten werden Auge.
• Halten Sie die Antenne NICHT fest, wenn das Radio sendet.
• Verwenden Sie KEIN tragbares Radio mit beschädigter Antenne. Wenn eine beschädigte
Antenne in Kontakt mit Ihrer Haut kommt, kann dies zu einer leichten Verbrennung führen.
Akustische Sicherheit
Die Einwirkung von lauten Geräuschen von jeder Quelle für längere Zeit kann Ihr Gehör
vorübergehend oder dauerhaft beeinträchtigen. Je lauter die Lautstärke des Radios ist, desto
eher wird Ihr Gehör beeinträchtigt. Gehörschäden durch laute Geräusche sind zunächst nicht
erkennbar und können kumulativ wirken.
Befolgen Sie diese Vorsichtsmaßnahmen, um Ihr Gehör zu schützen:
• Verwenden Sie die geringste für Ihre Arbeit erforderliche Lautstärke.
• Erhöhen Sie die Lautstärke nur, wenn Sie sich in einer lauten Umgebung befinden.
• Verringern Sie die Lautstärke, bevor Sie ein Headset oder Kopfhörer aufsetzen.
• Beschränken Sie die Zeit, in der Sie ein Headset oder Kopfhörer mit hoher Lautstärke
verwenden.
• Wenn Sie das Radio ohne Headset oder Kopfhörer verwenden, platzieren Sie den
Lautsprecher des Radios nicht direkt an Ihrem Ohr.
Lieferumfang
Walkie-Talkie
Gürtelschnalle
Bedienungsanleitung
FC200
2
2
1
DE-8
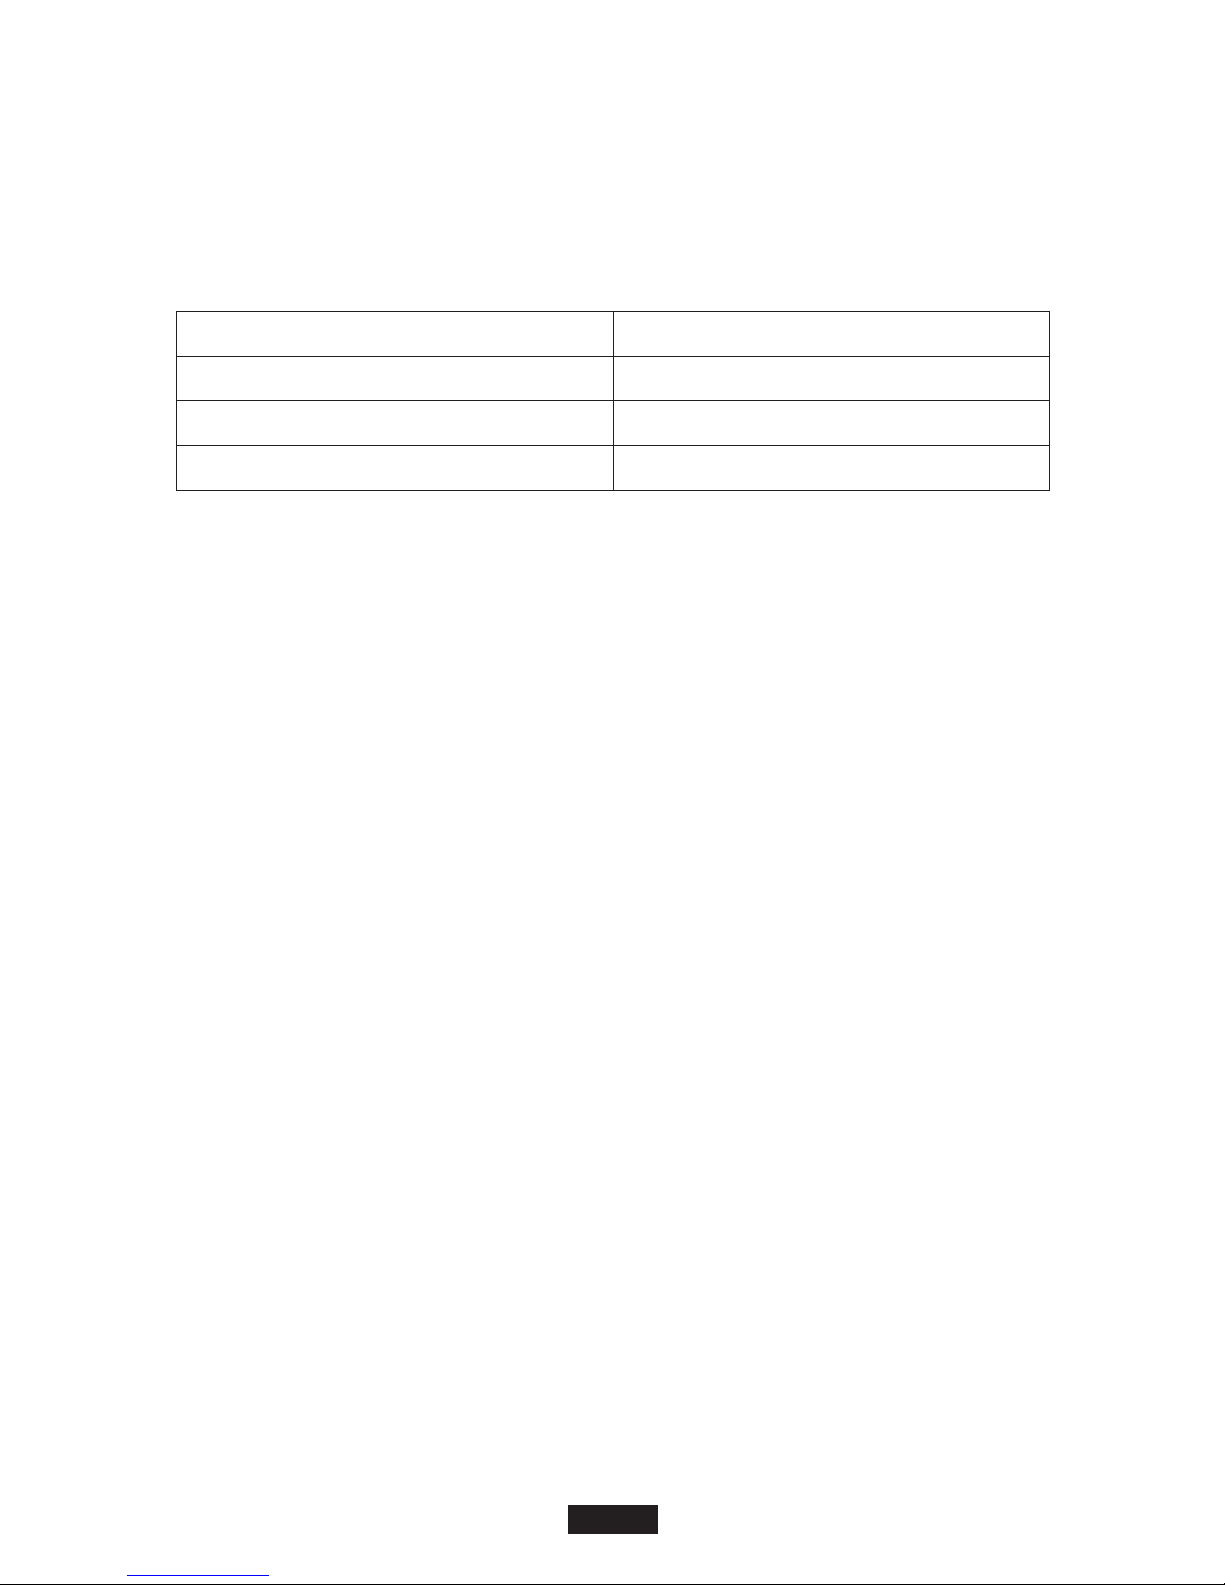
Kanal / Sub-Code Up Key
Rufton-Taste an
Lampe Taste
Kanal / Sub-Code Down Key
PTT- Taste
Blitzlicht
Antenne
Radio ein / aus.
Lautstärkeregler
Zubehöranschluss
USB Ladeanschluss
Menü / Sperrtaste
Scannen/Monitor Taste
Mic
Redner
1. Batterieanzeige
2. Scannen
3. Hohe Energie
4. Doppeluhr
5. Erhalten
6. Übertragen
7. IVox
8. Interferenz-Eliminator-Code
9. Tastensperre
10. Kanal
Steuerknöpfe
Bildschirmführung
Sende- und Empfangsverfahren
Ihr Funkgerät enthält einen Sender und einen Empfänger. Um Ihre Exposition zu kontrollieren
und die Einhaltung der Grenzwerte für die allgemeine Bevölkerung / unkontrollierte
Umweltbelastung sicherzustellen, befolgen Sie immer das folgende Verfahren:
• Senden Sie nicht mehr als 50% der Zeit.
• Um Anrufe zu empfangen, lassen Sie die PTT-Taste los.
• Um zu senden (sprechen), drücken Sie die Push-to-Talk-Taste (PTT) vor dem Gesicht.
• Halten Sie das Radio in einer senkrechten Position mit dem Mikrofon (und anderen Teilen des
Radios einschließlich der Antenne) mindestens 2,5 cm von der Nase oder den Lippen entfernt.
Es ist wichtig, das Radio in einem angemessenen Abstand zu halten, um die Einhaltung
sicherzustellen.
Hinweis: Die RF-Exposition nimmt mit zunehmender Entfernung von der Antenne ab.
• Vom Körper getragene Operation. Tragen Sie das Radio, wenn es am Körper getragen wird,
immer in einem zugelassenen Clip für dieses Produkt.
Two-way Radio Betrieb
• Verwenden Sie nur zugelassene oder Ersatzantennen und Audiozubehör. Die Verwendung von
nicht zugelassenen Antennen und drahtgebundenem oder drahtlosem Zubehör kann die
geltenden RF-Expositionsrichtlinien (IEEE, ICNIRP oder FCC) überschreiten.
Installation der drei AA-NiMH-Akkus (oder Alkalibatterien)
1. Nehmen Sie den Gürtelclip ab.
2. Heben Sie die Batteriefachabdeckung mit der Rückseite des Radios zu Ihnen hin an und
 Loading...