

Floureon A5 User Manual

A5
TWO WAY RADIO
User Manual


CONTENTS
English······························1-13
Deutsch··························14-25
Français··························26-36
Español··························37-48
Italiano····························49-60

EN-1
TO CUSTOMERS
Thank you very much for using our two way radio.
This radio of modern design is reasonable structure with stable functions. It is designed to meet different customers' need for high quality
with easy operation and perfect capability. We believe you are pleased with its nice shape and excellent performance.
CE Statement
The information listed above provides the user with information needed to make him or her aware of a RF exposure, and what to do to
assure that this radio operates within the CE exposure limits of this radio.
The device complies with RF specifications when the device used at 25mm from your front face and 0mm from your body. Third-party
belt-clips, holsters, and similar accessories used by this device should not contain any metallic components. Body-worn accessories that do
not meet these requirements may not comply with RF exposure requirements and should be avoided. Maximum SAR Value
(10g):0.383W/Kg.
Operation Frequency Range: 446.00625 MHz ~ 446.19375MHz.
Rated Output Power: 0.5W
In all EU countries, no restrictions of use applied for this product.
1. Risk of explosion if battery is replaced by an incorrect type. Dispose of used batteries according to the instructions.
2. Adapter shall be installed near the equipment and shall be easily accessible.
3. The device operating temperature range is -20~45°C.
4. The plug considered as disconnect device of adapter.
5. The device complies with RF specifications when the device used at 25mm from your front face and 0mm from your body.
6. Declaration of Conformity.
Hereby, declares that this Walkie talkie is in compliance with essential requirements and other relevant provisions of Directive 2014/53/EU.
FCC licensing
This device complies with Part15, Part97 of the FCC Rules. Operation is subject to the following two conditions: (1) this device may not
cause harmful interference, and (2) this device must accept any interference received, including interference that may cause undesired
operation.
SAR
The information listed provides the user with information needed to make him or her aware of a RF exposure, and what to do to assure that
this radio operates within the FCC exposure limits of this radio. The device complies with RF specifications when the device used at 25mm
from your front face and 0mm from your body and must operate with a duty factor not exceeding 50%. Third-party belt-clips, holsters, and
similar accessories used by this device should not contain any metallic components. Body-worn accessories that do not meet these
requirements may not comply with RF exposure requirements and should be avoided. Maximun SAR Value (1g):0.561W/Kg.
IC Statement
This device complies with Industry Canada license-exempt RSS standard(s): Operation is subject to the following Two conditions:
(1) This device may not cause interference, and

(2) This device must accept any interference, including interference that may cause undesired operation of the device.
Le present appareil est conforme aux CNR d'Industrie Canada applicables aux appareils radio exempts de licence. L'exploitation est
autorisée aux deux conditions suivantes:
(1) l'appareil ne doit pas produire de brouillage, et
(2) l'utilisateur de l'appareildoit accepter tout brouillage radioélectrique subi, même si le brouillage est susceptible d'en compromettre le
fonctionnement.
The information listed above provides the user with information needed to make him or her aware of a RF exposure, and what to do to
assure that this radio operates within the RSS-102 exposure limits of this radio.The device complies with RF specifications when the device
used at 25mm from your front face and 0mm from your body and must operate with a duty factor not exceeding 50%. Third-party belt-clips,
holsters, and similar accessories used by this device should not contain any metallic components. Body-worn accessories that do not meet
these requirements may not comply with RF exposure requirements and should be avoided. Maximun SAR Value (1g):0.567W/Kg.
Using tips
Please read the following brief instructions, non-compliance with these rules may cause danger or violate the law.
Obey the local government regulation before using this radio, improper use may violate the law and be punished.
Turn off the radio before entering flammable or explosive areas.
Do not charge or change the battery in flammable or explosive areas.
Turn off the radio before getting close to the blasting zone or detonator areas.
Do not use radio whose antenna is damaged, touching of damaged antenna will cause heat injury.
Do not attempt to open the radio; the maintenance work should be done by technical expert only.
To avoid troubles caused by electromagnetic interference or electromagnetic compatibility, please turn off the radio in places where have the
banner "Do not use wireless equipment", such as hospital and other healthcare places.
In the car with an airbag, do not put the radio within the scope of the airbag deployment. - Do not store the radio under the direct sunshine
or in hot areas.
When you transmit with the radio, do keep away from its antenna for 5cm at least.
If the radio appears smelly or smoke, please shut off its power immediately and contact with your local dealer.
Do not transmit too long, for the radio may heat and hurt the user.
Unpacking and checking equipment
Welcome to use two-way radio. Carefully unpack the radio. We recommend you check the items listed in the following table before
discarding the package.
If any item is missing, please contact local dealer immediately.
Supplied accessories:
EN-2
Li-ion battery (1) Belt Clip (1) Charger (1) User’s Manual (1)
A5
TWO WAY RADIO
User Manual
EN-3
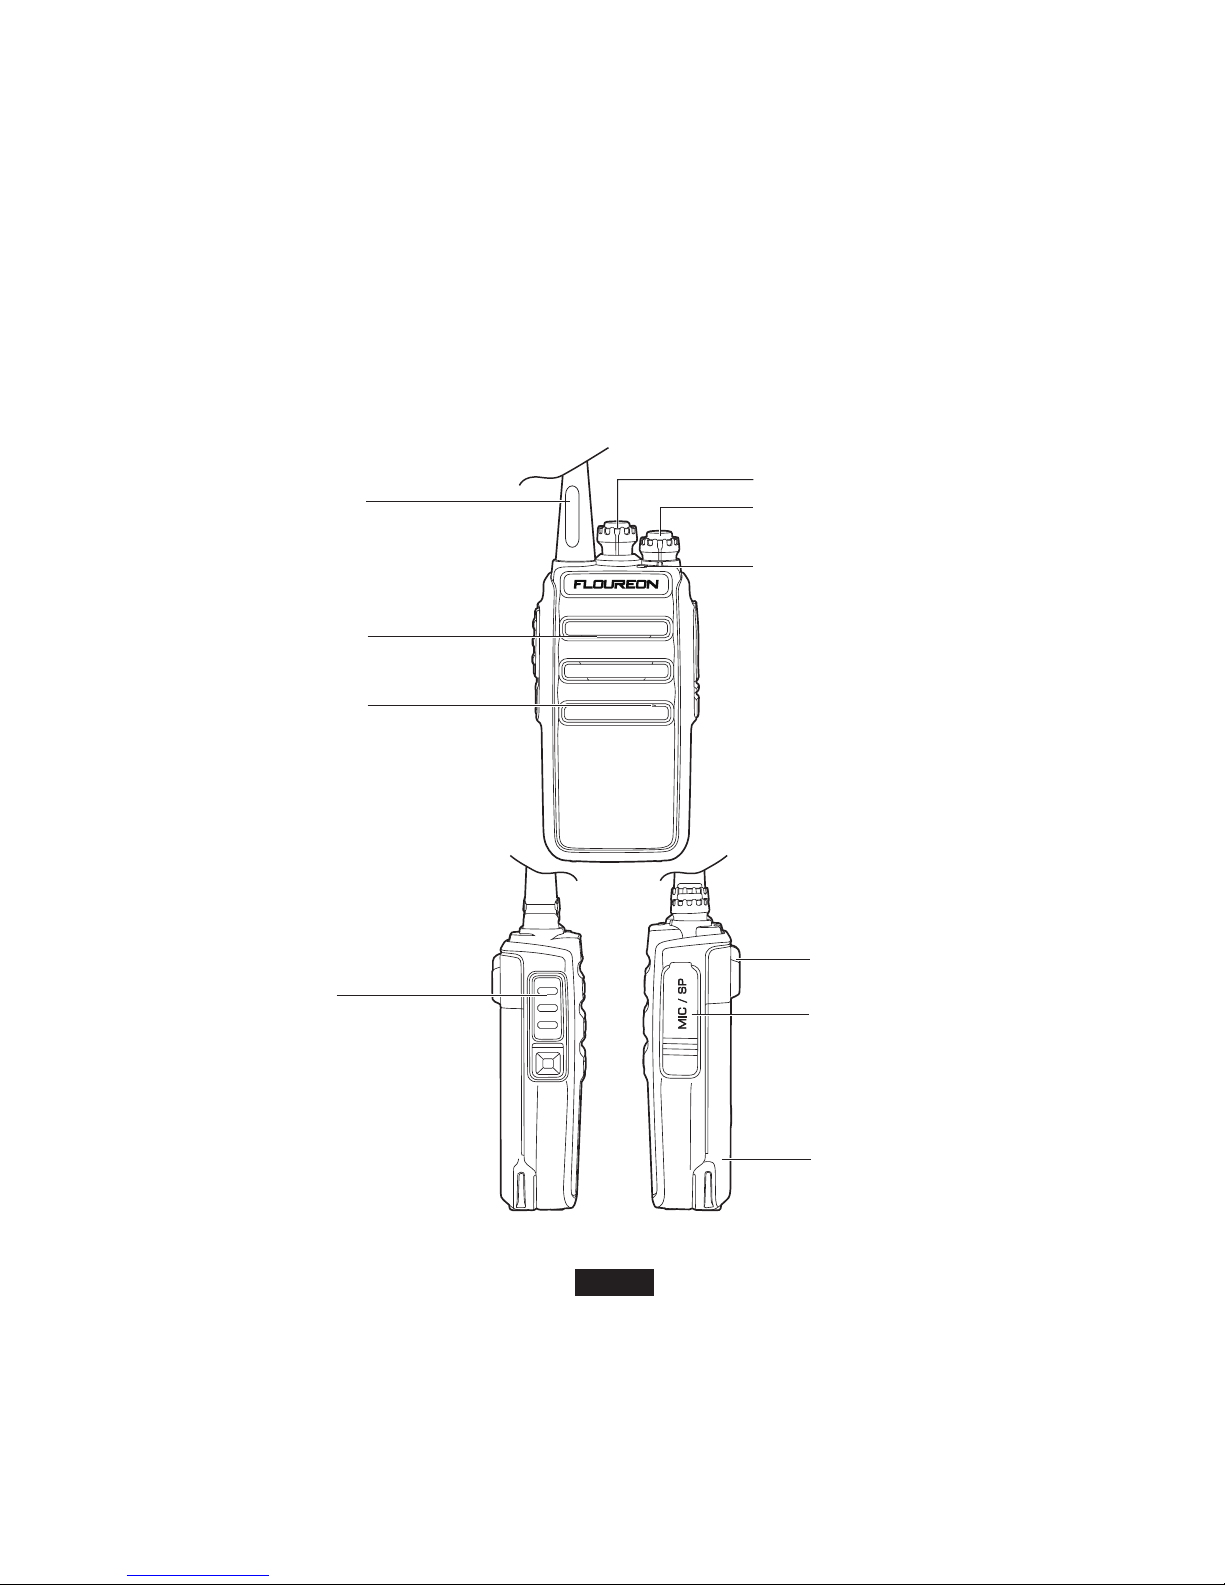
Note: The antenna frequency range please refers to the annular label at the bottom of antenna.
Getting familiar
Antenna
Channel knod
Power/volume knob
Mic/speaker jack/
programming port
Used to connect headset
or external programming
via PC programming software
Li-ion battery
For supplying power to radio
Indicator light
It turns red in transmitting,
and turns green in receving.
It blinks red when the batterry capacity is low.
Speaker
Sound output
Microphone
Sound input
PTT switch
Press it to transmit,
release to receive

EN-4
Battery
Notice:
1. Please do not short-circuit the battery terminals or expose of in fire. Do not dissemble the battery by yourself.
2. Charge the battery between temperature 0°C and 45°C. The battery cannot be fully charged beyond this temperature range.
3. Please turn off the power when you charge the radio with battery. Transmit with the radio in charge will affect its correct charge.
4. Do not unplug the power or battery when it is charged.
5. The operating time becomes short even the battery is fully charged, the battery is exhausted, please replace battery.
6. Please do not charge when the battery or the radio is wet. Please dry it with a cloth before charging to avoid any danger.
Warning:
When the conductive metals such as jewelry, key or decorative chains touch the battery terminals, all the batteries are likely to cause
damage to the items or personal injury. These conductive metals may form a short circuit and generates much heat.
Do deal with any battery carefully, especially when put it into pocket, wallet or other metallic containers.
Charging operations:
Charge the battery as follows:
1) Power off.
2) Insert the DC adaptor plug in the DC jack on the back of charger.
3) Insert the AC adaptor plug in the AC power output socket.
4) Insert the battery or radio with battery vertically in a charger, to check whether the battery and charger terminal is in normal contact.
5) Make sure the battery and charger terminal is in good contact, when the charging indicator light turns red, it starts charging.
Note:
1. Before inserting the battery, it is abnormal if the charging indicator blinks.
2. To change the battery for charging, please wait until the indicator is stable.
3. When the battery is well inserted, the indicator turns red and the charging is on the process, if the indicator blinks, then the battery is
damaged or the temperature is too high or too low.
Self-testing
When the charger powers up, if the orange indicator lights for one second and then goes out, entering the standby mode, the charger
passes the self-testing and can charge the battery. If the orange indicator blinks constantly, the charger fails to pass the self-testing, and
cannot charge the battery.
Normal charging indicator
When charging the battery, if the indicator light turns red, the battery is on the normal charge; if the red indicator light blinks constantly, the
battery capacity is too low, and is on the trickling charge, and after the battery capacity reaches a certain level, it will switch to the normal
charge.
Note: Trickling charge does not exceed 30 minutes, if the red indicator light blinks after 30 minutes, it means the charger cannot charge
battery, please check whether the battery or the charger has been damaged.
EN-5
Charging precautions:
1) The battery is not fully charged in factory, please charge before using it.
2) Charge and discharge the battery for two or three times, the battery capacity will reach the best condition. When the battery capacity is
low, please charge or change the battery.
3) The battery lasts shortly even if it is fully charged, the battery is exhausted, please contact your local dealer to buy a new authentic battery.
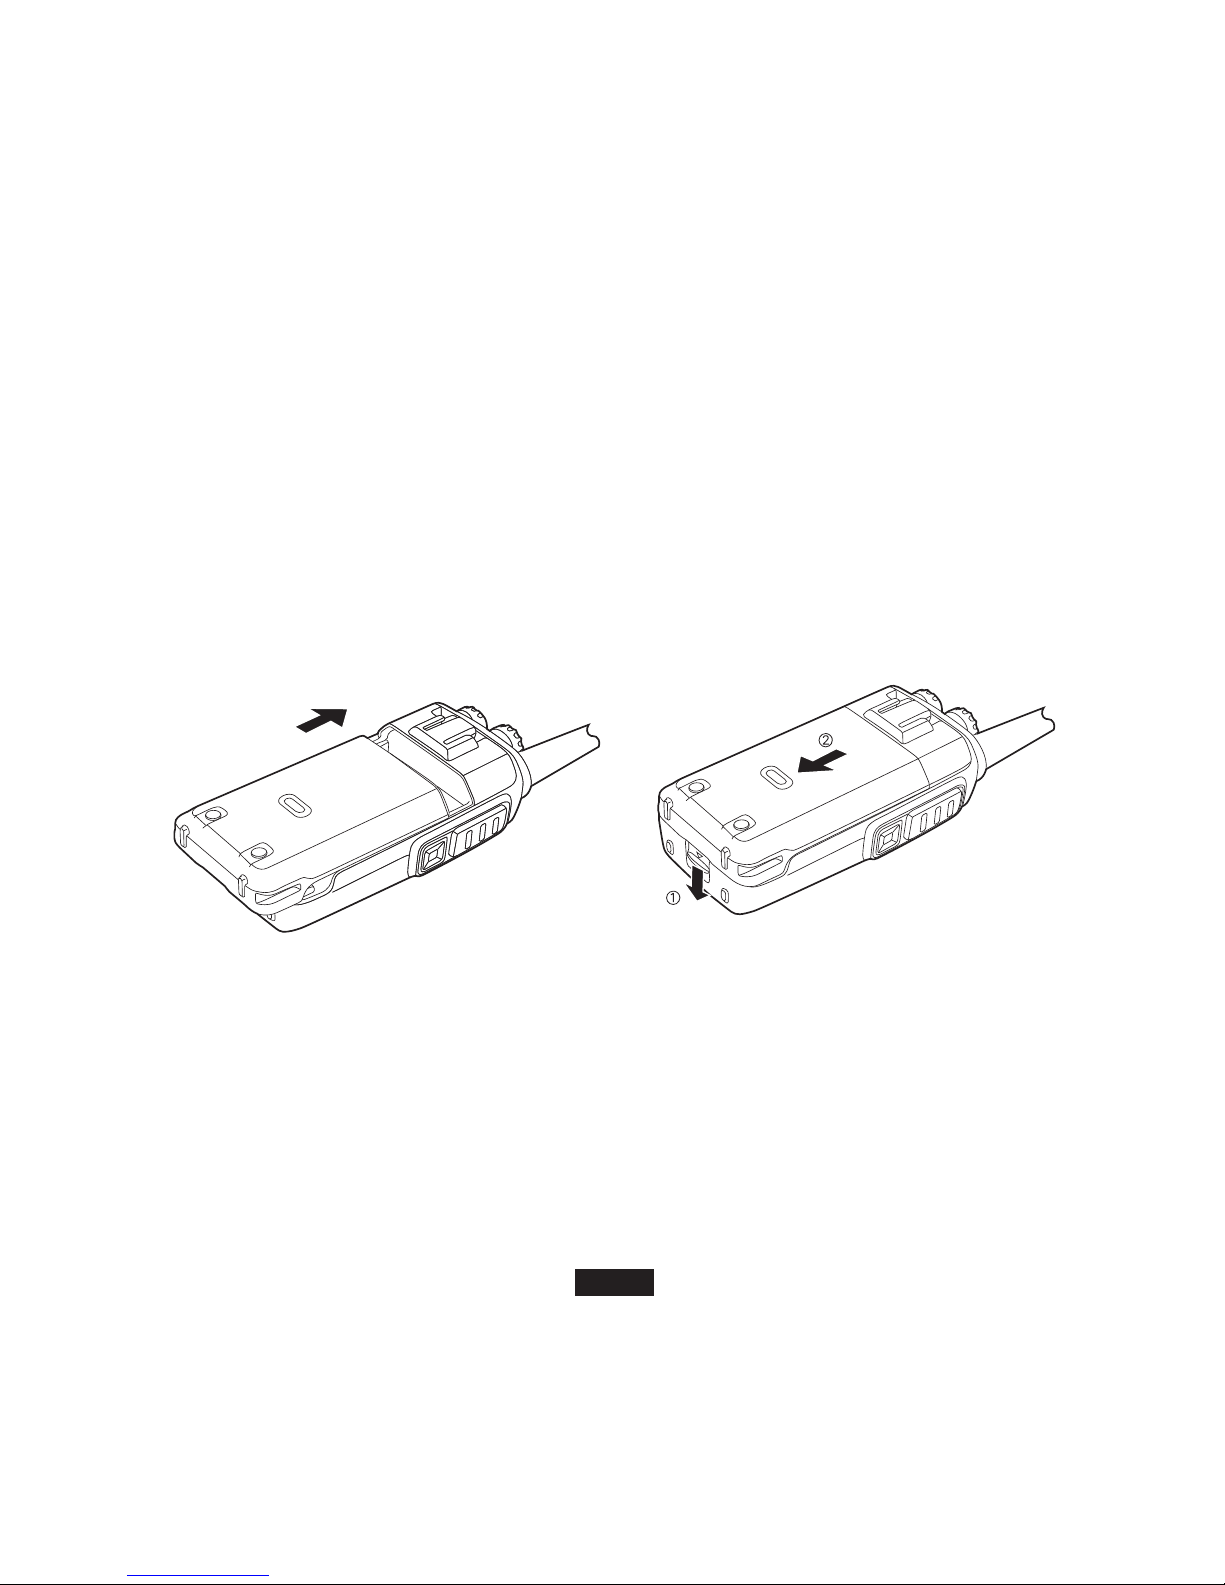
Installing and uninstalling of the accessories
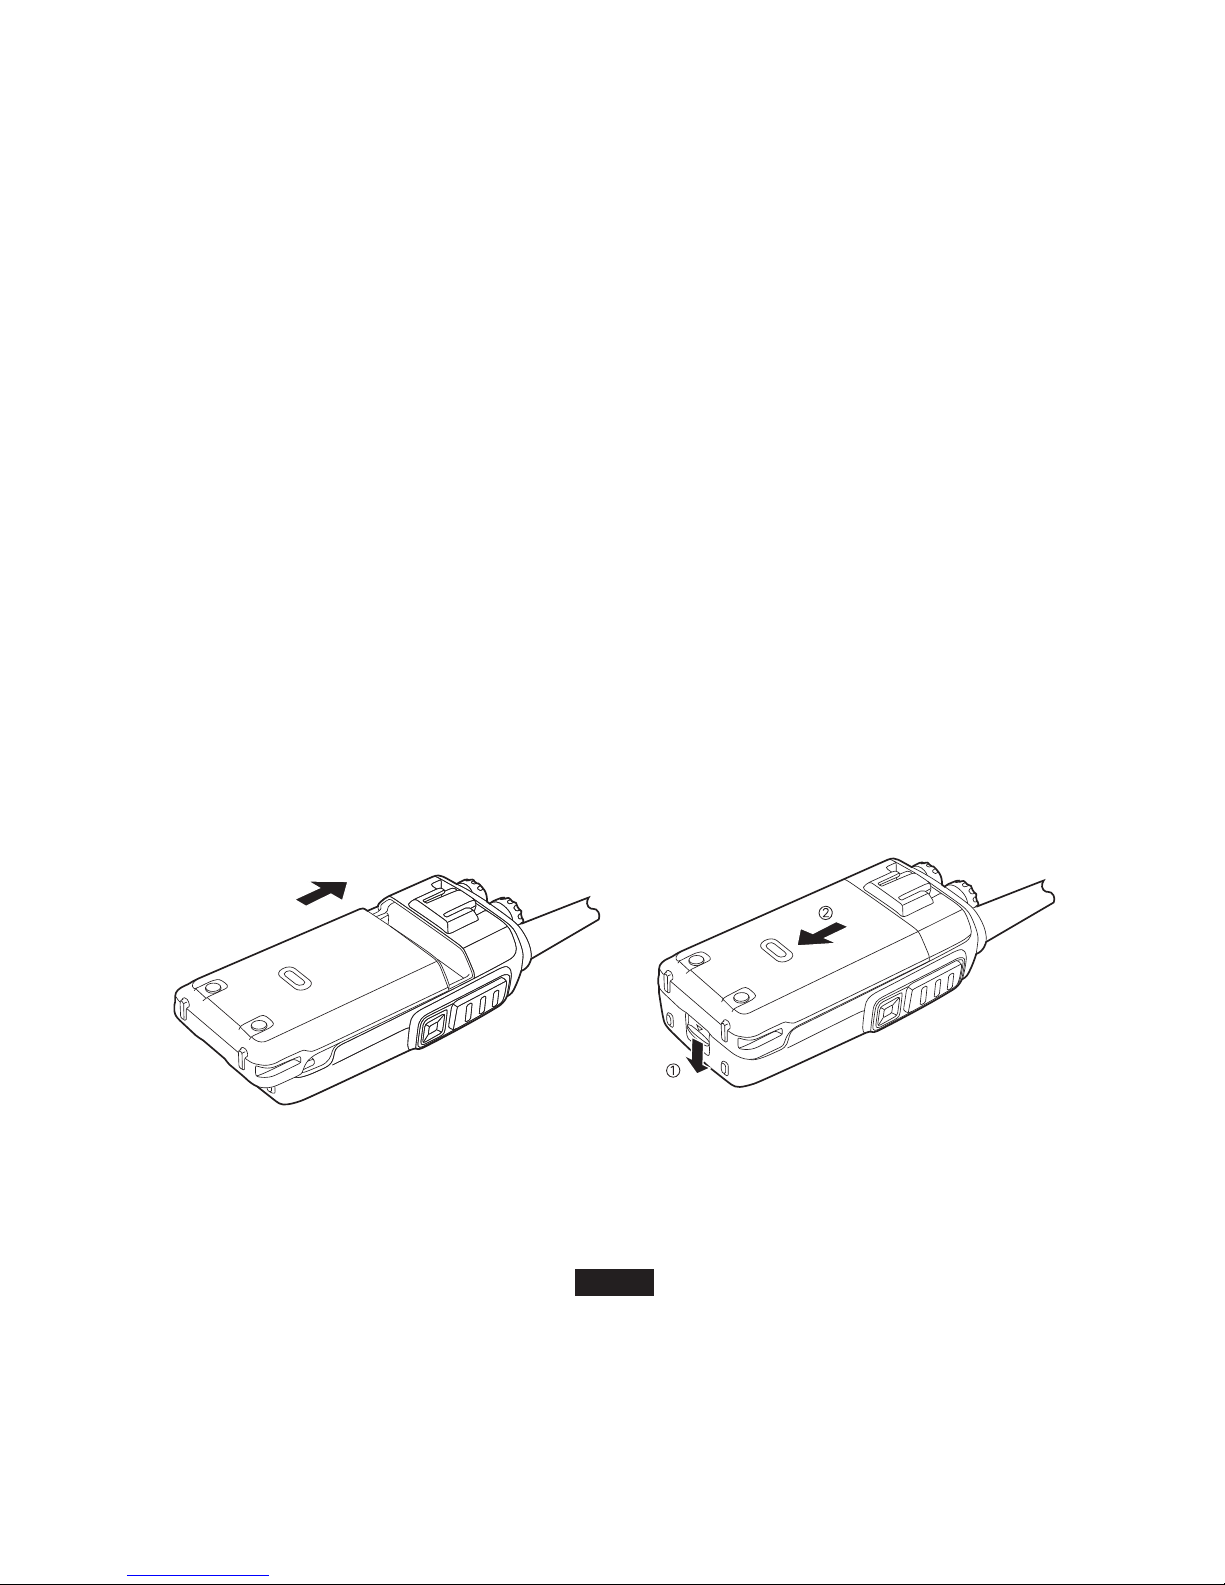
Installing/Removing the battery
1) Align the two grooves of battery and the guide rail on the back of aluminum shell, ensuring full contact and in parallel, then push the
battery up to the radio base along the rail on the back of aluminum shell, until the battery latch locks up. (Picture 1)
2) To remove the battery, please make sure the radio is closed, push the battery latch down, and make sure the radio and battery is on the
releasing state, and then push the battery out from the radio, (picture 2)
(picture 1) (picture 2)
Installing external headset
Reveal (do not remove) the Mic/speaker jack cover (picture 3), insert the headset into the Mic/speaker jack (picture 4).
Note: Using the external headset will affect the water-tightness performance of radio.
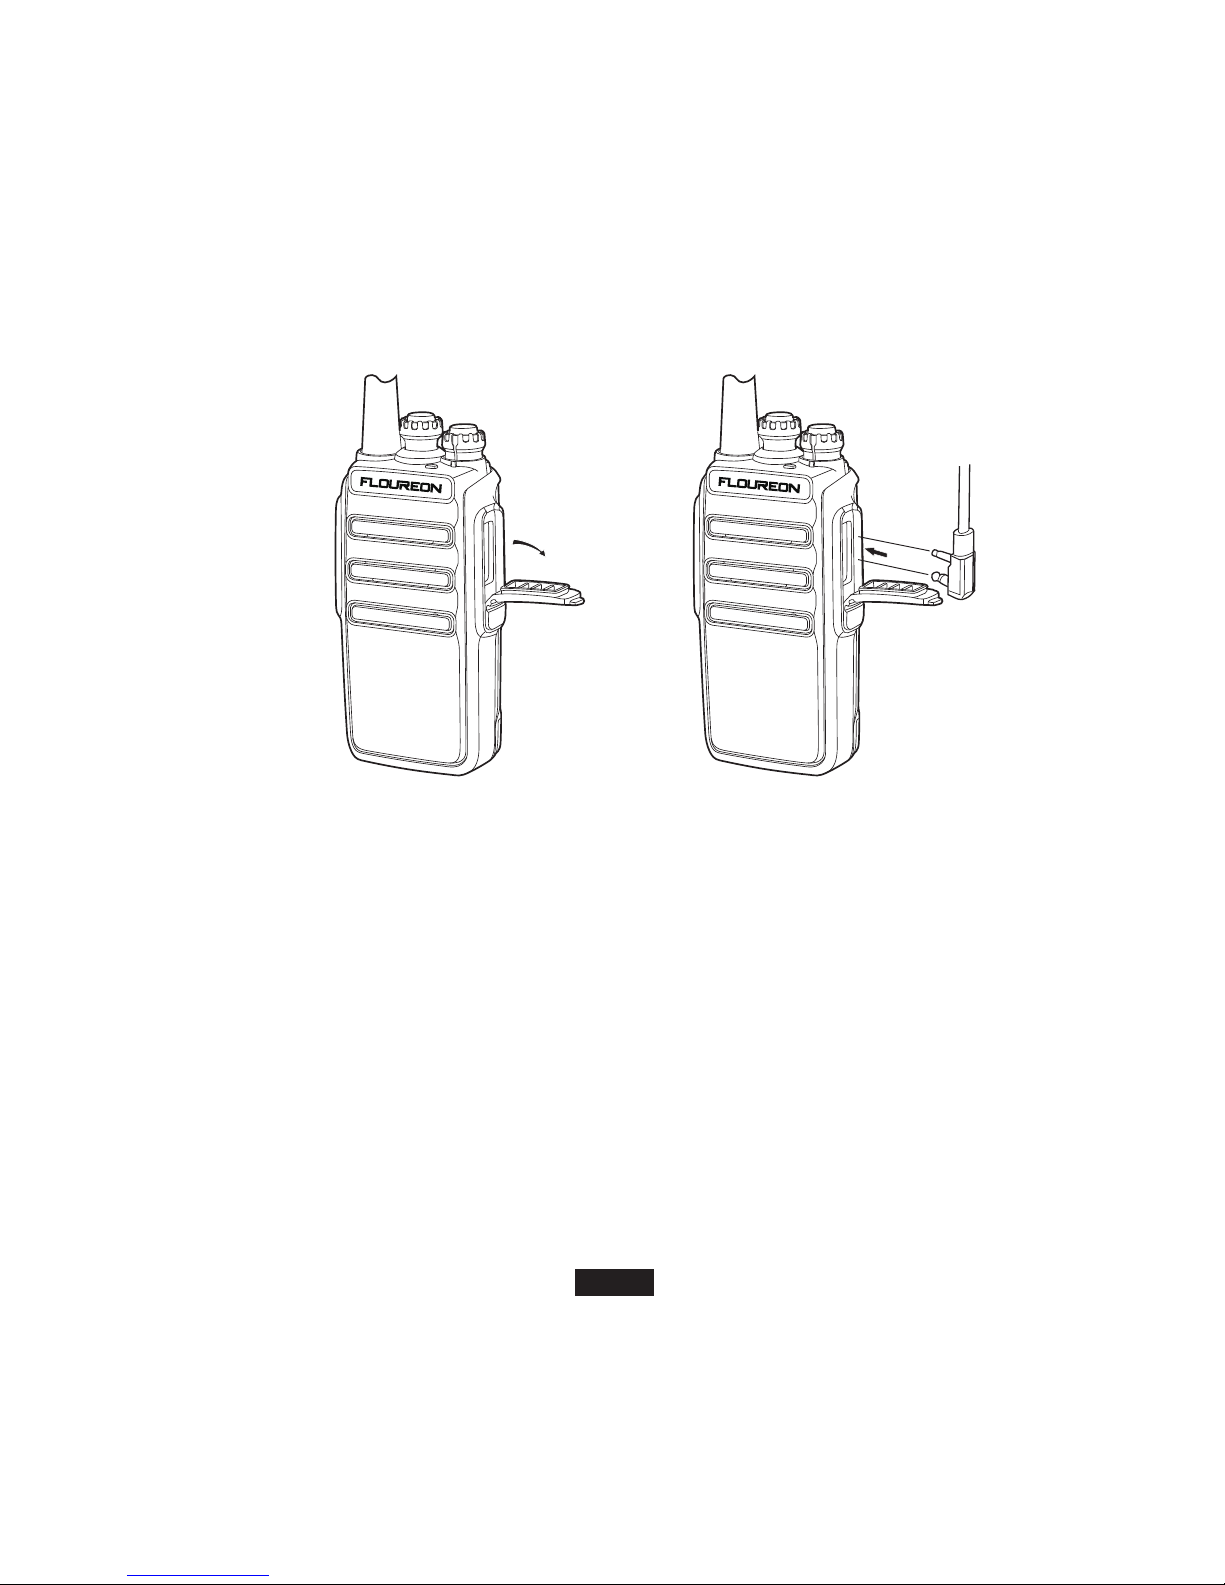
(picture 3) (picture 4)
Basic operation
1. Scan Function
When the radio is allowed to be scanned, which can be set by the software, you can press the PTT key to turn on or turn off the scan. When
the scan begins, indicators lights green, the radio will can scan automatically from channel 1 to 16 which is defined as scan added.
When there is signal in the scanning channel, it will stop in the channel for talk.
Note:
When there is signal in the scanning channel, it will stop in the channel for a talk and after several seconds.
Please note that scan is only available when there are two or more than two memory channels and two or more scan added channels.
EN-6
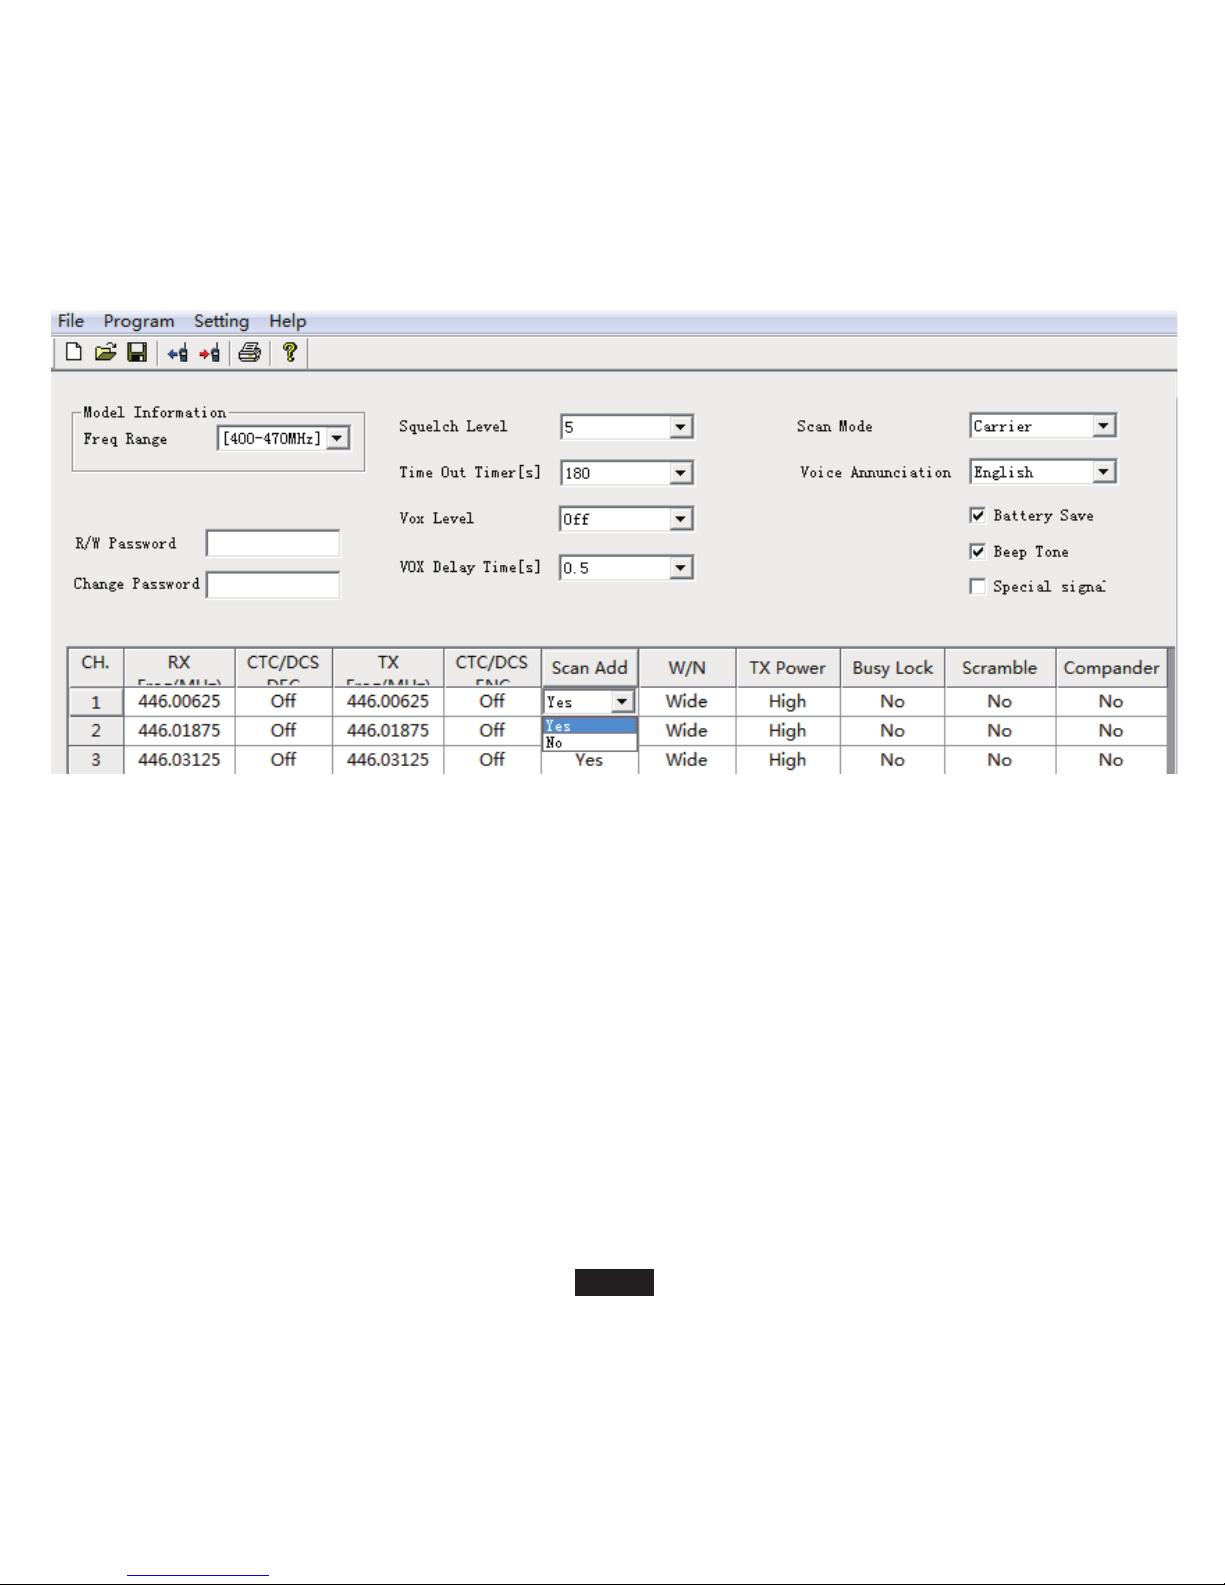
2. Battery Save Function
This function can be set by the software.
Turn on this function can make the standby time longer.
In the software:
EN-7
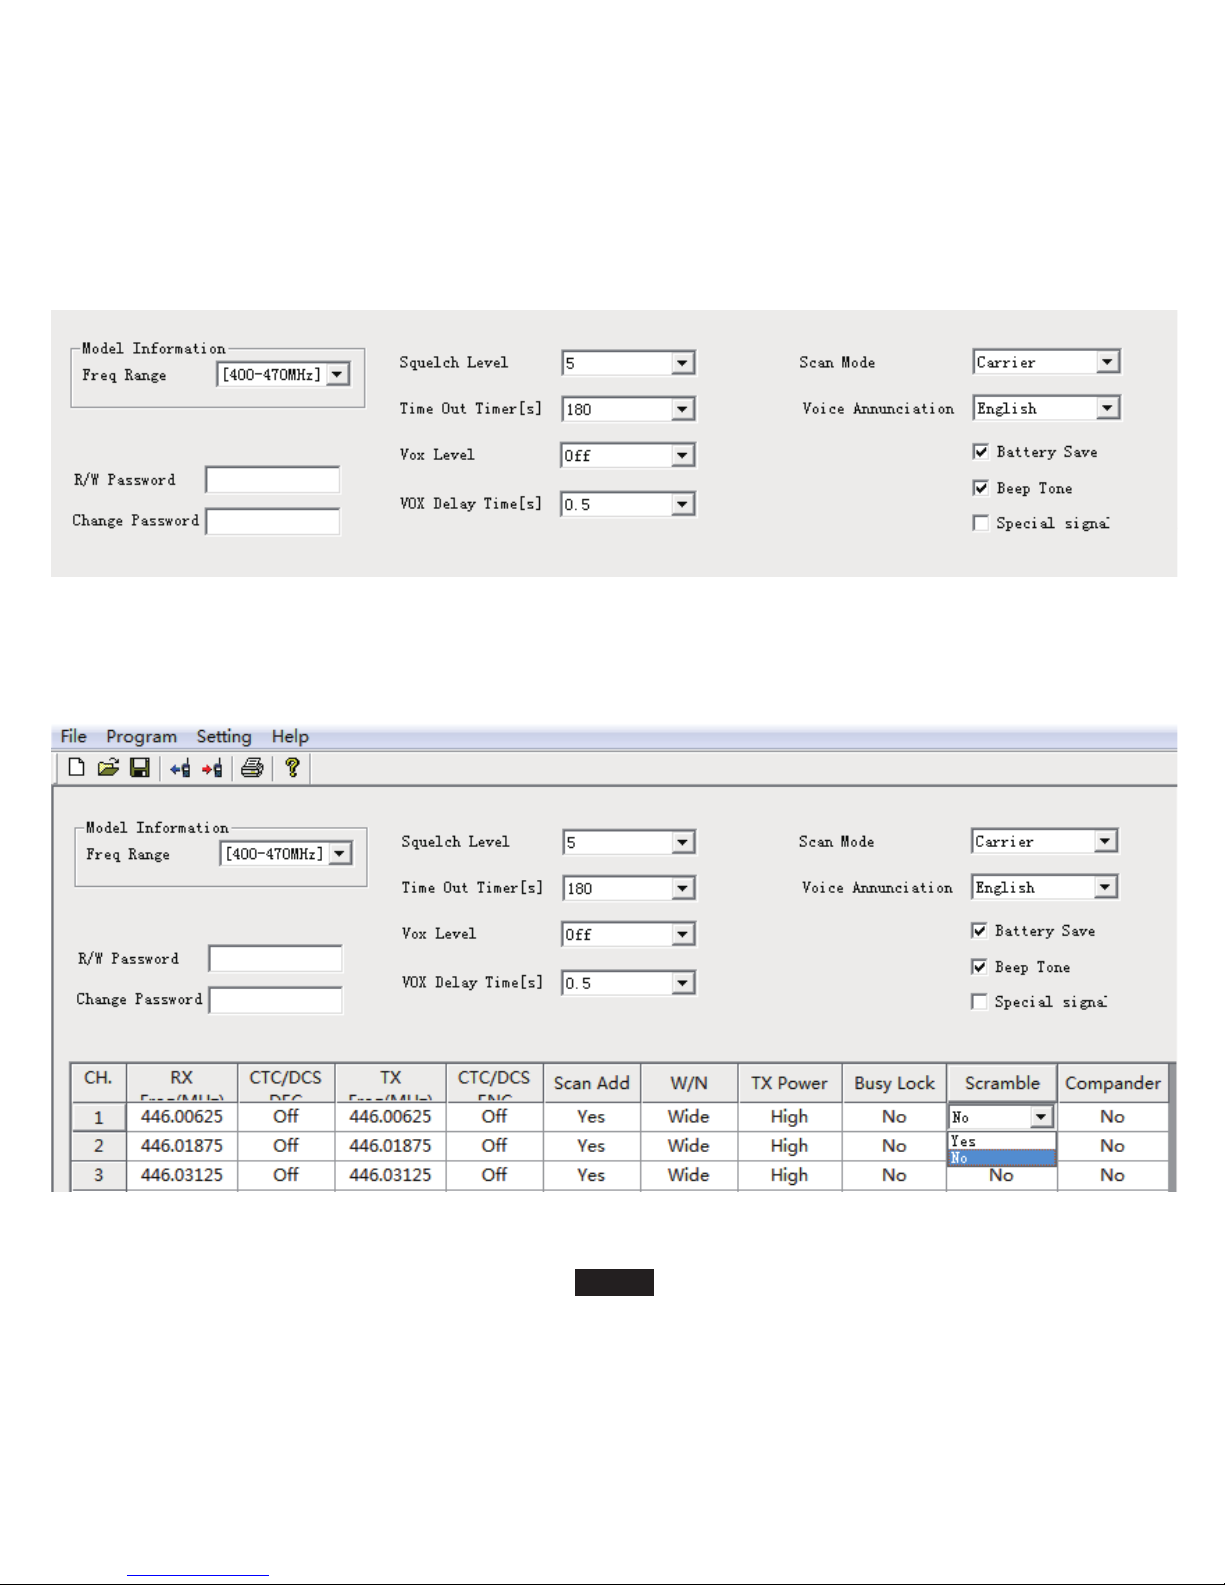
3. Scramble
When the radio is allowed the scramble function, and press the key, TX voice will be sent out with scramble, other radio only received the
signal when its scrambler also turns on.
EN-8

4. Busy Channel Lock
You can turn on/off this function via software.
A: if the current channel does not have CTCSS/DCS, when there is signal, TX prohibited when you press PTT.
B: If the current channel does not have CTCSS/DCS, when there is signal which does not nave CTCSS/DCS, TX prohibited when you press
PTT.
C: If the current channels does not have CTCSS/DCS, when there is signal which have CTCSS/DCS, the radio will transmit when you press
PTT.
5. VOX
Speak to the microphone in normal voice to transmit, no need to press PTT switch, turn VOX on/off though the software.
A: when VOX is on in your working channel.
Speak to the microphone directly, it will transmit automatically.
The radio stops transmitting when there is no voice, and waits for receiving
B: when a headset with a microphone is used.
When VOX is on, you should VOX again for the radio to identify voice volume.
If the microphone is too sensitive, the noise around radio will start transmitting.
If the microphone is not sensitive, the radio cannot collect your voice, Please Adjust VOX level well to guarantee smooth communications.
English/Chinese Voice Prompt
6. Voice prompt
The default setting is Chinese voice prompt, and you will know the working condition of the radio with voice prompt.
1)The voice prompt can be selected "Chinese/English/Tone/OFF" through the menu "Voice/Beep Tone" of the "Optional Features" in the
software for. When choosing "OFF", voice prompt turns off.
2) Channel annunciation: You will get to know the working conditions of current channel which is being operated.
3) Low battery alert: The radio will alert you when the battery capacity reaches the minimum operating voltage.
7. Low battery prompt
The default setting is Chinese voice prompt. When transmitting or standby, if the battery capacity reaches the pre-determined low level, the
indicator light blinks red, and a low battery alert tone will be heard.
The indicating tone can be "Please change the battery". When the low battery alert occurs, it cannot transmit, please change or charge the
battery.
8. Squelch function
The squelch level will determine the signal strength to open the speaker of the radio. If the squelch level is lower, the background noise of
opening the radios speaker will be higher, and the corresponding communication range will be further, but the anti-interference capacity will
be weaker.
The default setting of squelch level is 5, you can adjust it through the menu "Squelch Level" of the "Optional Features" in the software for.
Level 0 to 9 can be selected. 0 is the lowest level.
9. Time out timer (TOT)
The purpose of TOT is to prevent any radio from talking in one channel for a long time, and to prevent the transceiver from being damaged
EN-9

EN-10
because of continuous transmission,
If the transmitting time exceeds the TOT pre-set time, the radio will sound "Du".
10. Power protection function
When the radio is in normal use or maintenance, the transmission will be prohibited if the working voltage is beyond the normal supplying
voltage. Lower than 3V or higher than 5V, the transmission will be prohibition. The radio cannot power on when it is higher than 5V.
Walkie talkie PC programming operation process
I. System Requirements
Operating System: Windows98, Windows Me, Windows XP, Windows Vista, Windows7, Windows8 Hard Disk Space: At least 50MB of
available.
The minimum memory: 64M
II. Install the programming cable driver
1. Find the write line drive which your system corresponded to
2. Click to install, successfully installation is ok
3. Installed, and open the programming software programming interface
III. Programming software installation
1.Programming cable readying
• USB Programming cable - need to install the driver before they PC programming
• Serial port Programming cable does not need to install the driver.it can directly write
2.Computer terminal preparations
• Open the computer, run the computer operating system.
• Install the programming software which has been downloaded well or Install it from the programming software CD.
3.Walkie Talkie end preparations
• USB (or serial) Programming cable connect the computer end
• The USB Programming cable pin is connected with one end of the Walkie talkie prograĐmming interface
• Ensure the Walkie talkie under the condition of power, open it.
IV. Programming software operating process
1. Find the software settings, open communication port, to ensure the communication port Option and computer connection port consistent
(inconsistent will not read frequency) to solve the related problem
2. In the menu to find reading frequency and click in the window that appears can reading frequency
3.This process needs waiting for a while, after the completion of reading the progress bar shows the Walkie talkie channels and frequencies
that have been read into the current software
4. Modify the Walkie talkie channel and frequency data, and other functional parameter data
5. Find the PC programming in the menu .click the appeared window to confirm, complete the progress bare
6. If multiple Walkie talkie needs the same frequency, frequency steps can be repeated to write

EN-11
V. Related problem solving
When reading or PC programming of Walkie talkie long time no response or a communication error?
1. Check the programming cable to find if it is damaged
2. Check whether the programming cable with computer serial port or Walkie talkie interface is bad or loose
3. Check to find whether the Walkie talkie battery is low or out of power, if this, please repĐlace the battery or charging the battery
4. Check whether the programming software is match with the current model
5. Please check whether the programming software port settings are assigned to the computer USB port
6. Please check whether the power is switched on the Walkie talkie
7. Whether to choose the corresponding drive system and the correct installation When PC programming is completed, found two Walkie
talkie cannot normal call or receive
8. Make sure whether the two walkie-talkie are in the same channel
9. Determine the same channel at the receiving end CTCSS, CDS and the transmitter is not the same
10. Make sure whether the two Walkie talkies' volume is too low, if it is too low, Turn up the volume
11. Please check whether the two walkie-talkies are open, or at low/no power status
12. Check whether the walkie-talkie installed antenna
13. Check and confirm whether the communication distance is too far
Trouble shooting guide
No Electrical Source
The operating time becomes short, even the battery is fully
charged.
Not able to communicate with the transceivers of the same
group.
The voice of another group can be heard.
Other radios cannot receive the TX signals or receive signals in
a low volume.
Noise Is always heard.
• The battery has been exhausted. Replace or recharge the
battery.
• The battery is installed incorrectly. Remove it and install again.
• Replace the battery.
• Confirm the QT/DQT is the same.
• The distance is outside of range.
• Change all QT/DQT of the group.
• Switch the volume knob to the highest level
• The microphone may be damaged, send it to the local dealer for
check.
• The distance is outside of range.
Turn on the radio in nearer range and try again.
Troubles Solution

EN-12
CE(PMR)
Specifications
CH.NO
1
2
3
4
5
6
7
8
0.5w
0.5w
0.5w
0.5w
0.5w
0.5w
0.5w
0.5w
114.8
114.8
114.8
114.8
114.8
114.8
114.8
114.8
9
10
11
12
13
14
15
16
446.10625
446.11875
446.13125
446.14375
446.15625
446.16875
446.18125
446.19375
0.5w
0.5w
0.5w
0.5w
0.5w
0.5w
0.5w
0.5w
D026N
D026N
D026N
D026N
D026N
D026N
D026N
D026N
446.00625
446-01875
446.03125
446.04375
446.05625
446.06875
446.08125
446.09375
General
Frequency range
Channel Number
Working Voltage
Working Temperature
Antenna
Antenna Impendence
Working Mode
Receiver
Frequency range
Sensitivity
Occupied Bandwidth
Selectivity
Intermediation
Audio power
Audio distortion
Frequency Stability
PMR446/400~480MHz
16
DC 3.7V
-10°C~+50°C
High gain antenna
50Ω
Simplex
PMR446/400~480MHz
≤ 0.2uV
≤ 16KHz
≥ 65dB
≥ 55dB
1W
≤5%
5ppm
ERPFreq.(MHz) CTCSS/DCS CH.NO ERPFreq.(MHz) CTCSS/DCS

80mA(when standby) 220mA(when working)
+7 ~-12.5dB
PMR446/400~480MHz
0.5W/2W
16KF¢3E
≤7.5uW
<-40dB
<5%
5ppm
≤ ±5KHz
≤ 2300mA
+6.5~-14dB
≥65dB
8~12mv
EN-13
Current
Audio response
Transmitter
Frequency range
Output power
Modulation mode
Spurious radiation
Modulation noise
Modulation distortion
Frequency Stability
Maximum deviation
Current
Audio response(300-3000Hz)
Adjacent Ch. power
Intermediation sensitivity
Note: Specifications will be revised without notice due to technical improvement. Thank you.

ZU KUNDEN
Wir bedanken uns herzlich bei Ihnen dafur, dass Sie sich fur ein Funkgerat von entschieden haben. Dieses angebotene hochwertige Walkie
Talkie verfugt uber wissenschaftliche Struktur und schickes Design. Es wird mit der einfachen Bedienung und stabilen Betriebsfahigkeit fur
die verschiedenen Kundengruppen entwickelt. Wir sind fest davon uberzeugt, dass Ihnen dieses Handfunkgerat gufe Dienste leisten wird.
Verwendungstipps:
Bitte halten Sie sich an die Verordnung von dem Bundesnetzagentur, bevor Sie das Funkgerät in Betrieb nehmen, die inkorrekten Bedienungen konnten die Gefährlichkeit verursachen oder gegen die Rechtlinie stofien.
Bitte das Gerät nicht in den gefährlichen Umgebungen und ungeschutzten elektronischen Platzen verwenden.und schalten Sie das Gerät
aus, wenn Siei sich in soch einer Umgebung befinden , ansonsten konnte die Feuersbrunst oder Explosion verursacht werden.
Bitte die Batterie nicht in der brennbaren und explosiven umgebung wechseln.
Sollte das Gerät brandeln, bitte schalten Sie das Gerät sofort aus und nehmen Sie Verbindung mit Ihrem Handler auf.
Bitte das Gerät nicht in der heiRen Umgebung oder direkt in der Sonne langfristig legen.
Bitte das Gerät nicht weiterhin verwenden, wenn die Antenne defekt oder abgebrochen ist,unter solchem Umstand, bitte die Antenne nicht
anfassen, damit die Verletzung gegen Menschen vermieden werden kann,dabei bitte lassen Sie das Gerät einfach reparieren oder besorgen
Sie sich eine neue Antenne.
Im Auto,bitte halten Sie das Gerät von dem Bereich des Airbags fern,um die potentielle Gefährlichkeit zu vermeiden.
Bitte vermeiden Sie,das Funkgerät ohne fachliche Anleitung abzubauen,
Bitten Sie einen professionellen Techniker, die Maschine zu warten.
Auspacken und Uberprufen des Lieferinhalts
Herzlichen willkommen bei der Benutzung des Handfunkgeräts.Nehmen Sie bitte das Funkgerät vorsichtig aus der Verpackung.
Wir empfehlen, den Packungsinhalt auf Vollstandigkeit zu uberprufen, bevor Sie die Verpackungsmaterialien (Karton, Kabelbinder & Folien)
entsorgen. Sollten Gegenstande fehlen Oder etwas Teile des Inhalts wegen des Transports beschadigt sein, setzen Sie sich bitte umgehend
mit Ihrem Handler in Verbindung.
Geliefertes Zubehor
DE-14
Li-ion Akku (1) Gurtelclip (1) Ladegerat (1)
Gebrauchsanweisung (1)
A5
TWO WAY RADIO
User Manual
Hinweis: Um die Antenne Frequenzbereich zu erfahren,bitte schauen Sie das ringformige Etikett an der Unterseite der Antenne an.

DE-15
Struktur erfahren
Antenne
Kanal-Taste
Power/Lautstärke-Taste
MIC/Lautsprecher-Buches
Batterie
LED Indikator
Lautsprecher
Mikrofon
PTT switch
Press it to transmit,
release to receive

DE-16
Akku
Benutzen Sie bitte die anderen Akku nicht die anderen Akkutyps könnten die Explosion verursachen und Menschen verletzen.
Note:
1. Schließen Sie den Akku niemals kurz. Werfen sie ihn auf keinen Fall ins Feuer.
2. Bitte den Akku zwischen den Temperaturen 0°C - 45°C aufladen,es besteht die Möglichkeit,dass der Akku wegen der unstabilen oder
extremen Temperatur nicht voll aufgeladet werden könnte.
3. Bitte das Funkgerät ausschalten, ehe Sie den Akku wechseln.
4. Bitte den Akku nicht direkt aus dem Funkgerät ode Standlader rausnehmen, solches Benehmen kann die Lebenddauer des Akkus und
Funkgeräts verkürze n.
5. Wegen der langfristen Benutzung ist eine Alterung des Akkus unvermeidlich bitte ersetzen Sie den alten durch den neuen,wenn der Akku
Ihnen das Bedürfnis nicht mehr erfüllen kann.
6. Bitte das Funkgerät nicht aufladen, wenn das Gerät oder der Akku feucht ist, um Gefährlichkeit zu vermeiden, bitte das Gerät vor der
Ladung mit einem Tuch trocknen.
Warnung:
Wenn der Batteriepol mit den leitenden Metallen bespielweise wie Schmuck, Schlüssel oder Lichterketten in Berührung kommt, Solche
leitende Metalle könnten den Akku zu einem Kurzschluss führen und dabei viel Wärme erzeugen. Bitte bewahren Sie den Akku sorgfätig auf,
um eine Berührung mit den leitenden Metallen zu vermeiden.
Ladevorgänge:
1. Bitte Schalten Sie das Gerät vor der Aufladung aus.
2. Stecken Sie den DC-Adapter-Stecker in die DC-Buchse, die sich auf der Rückseite des Ladegeräts befindet.
3. Verbinden Sie den Netzstecker des Ladegeräts mit einer Steckdose.
4. Setzen Sie das Walkie-Talkie oder den einzigen Akku von oben in den Ladeschacht der Ladeschale und überprüfen Sie, ob die Batterie
mit dem Ladegerät Kontakt hat.
5. Wenn die Ladeanzeige rot leuchtet, beginnt der Ladevorgang.Die grüne LED signaliert das erfolgreiche Ende des Ladevorgangs.
Note:
1. Am Anfang des Ladevorgangs ist es unnormal, dass die Ladeanzeige blinkt.
2. Um die Batterie aufzuladen, bitte warten Sie, bis die Ladeanzeige stabil ist.
3. Wenn die Ladeanzeige ständig rot leuchtet,das heißt,die Aufladung nimmt schon ihren Weg, wenn die Anzeige blinkt,bedeutet einen
Misserfolg der Aufladung,die Batterie könnte beschädigt sein oder von der unstabilen Temperatur beeinflusst werden. Finden Sie das
Problem durch Einstellen der Batterie.
Selbsttest
Am Anfang des Ladevorgangs sollte die orangefarbene Anzeige für eine Sekunde aufleuchten und dann erlischen, dann wird das Funkgerät
automatisc in den Ständ-by Modus eingehen, fängt das Ladegerät anschließend mit einerr Selbsttest an.sodass der Akku aufgeladet
werden kann. Sollte die orangefarbene Anzeige ständig blinken, ist es unnormal, der Akku könnte wahrscheinlich nicht richtig aufgeladet
werden, bitte überprüfen, ob sich es um einen Wackelkontakt handelt.
Normale Aufladung
Normalerweise sollte die Anzeige bei der Aufladung ständig rot leuchten.
Wenn der Strom niedriger als der Einstellwert ist,wird die Anzeige am Anfang der Aufladung rot blinken,solange der Strom bei der Aufladung
den Einstellwert erreicht,wird die Anzeige aufhören zu blinken und der Stromvorgang wird auch in den Normalen Zustand wechseln.
Note:
Ein blikender Zustand dauert höchstens nicht über 30 Minuten .sollte über 30 Minuten dauern,heißt es,dass der Akku nicht richtig aufgeladet
wird, bitte kontrollieren Sie,ob der Akku richtig sitzt oder defekt ist.
Vorsicht bei dem Ladevorgang:
1. Zur erstmaligen Verwendung bitte die Batterie erst voll aufladen, da sie im vollen unbenutzten Zustand von der Fabrik an Sie geliefert wird.
2. Es ist unvermeidlich, dass die Batterie bei der erstmaligen Aufladung oder nach der langfristen Aufbewahrung nicht zu 100% aufgeladen
werden kann , aber die volle Leistungsfähigkeit wird bereits nach drei vollständigen Ladezyklen erreichen.
3. Sollte der Akku ganz kurz funktionieren, obwohl er schon voll aufgeladet wurde, es könnte sein,dass der Akku beschädigt ist .bitte
besorgen Sie sich einen neuen.
Installation des Zubehörs
Einsetzen und Entnehmen des Akkus
1. Achten Sie beim Einsetzen des Akkus da rauf, dass er sich parallel zum Gehäuseboden des Funkgeräts befinden soll und die
Kontaktfläche frei von Verschmutzung sind.
Setzen Sie den Akku in die aufnahmesschine des Batteriefaches und schieben Sie ihn nach oben,bis ein deutlicher Klick hören zu sein.
Der eingesetzte Akku verriegelt über das Push Bedienelement im oberen 3ereich der Rückseite. (Bild 1)
2. Die Batterie lässt sich nur rausnehmen,wenn das Funkgerät ausgeschaltet st, drücken Sie die Batterieverriegelung nach unten, und stellen
Sie sicher, dass der Walkie Talkie und Batterie auf dem Freigabezustand ist, und dann die Batterie aus dem Walkie Talkie
herausschieben.(Bild 2)
DE-17
(Bild 1) (Bild 2)
Installation des Headsets:
1. Decken Sie die Mic/Lautsprecher-Buchseabdeckung auf,(Bild 5) und schließen Sie das Headset an das Funkgerät an.(Bild 6)
Hinweis
Die anderen externen Headsettyps könnten die Wasserdichtigkeit des Walkie Talkies beschädigen.
 Loading...