

Page 1

User Manual
Page 2

Table of Contents
Getting Started
What’s In the Case ............................................................................................................................................ 1
Matched Pairs: the VoiceWorks Colored Stickers .......................................................................... 1
Charge the VoiceWorks Headset ............................................................................................................. 2
It’s Wireless, So You’re Free to Move .................................................................................................... 3
How to Wear the VoiceWorks Headset ................................................................................................ 3
Proper Placement of the VoiceWorks Headset Boom Mic ........................................................ 5
How to Speak into the VoiceWorks Boom Mic ................................................................................. 6
How to Successfully Communicate with the VoiceWorks System ........................................ 6
............................................................................................................................................... 1
Start Using the VoiceWorks System ................................................................................................ 7
Perform Several Practice Exams Using Paper Charts ................................................................... 7
Establish a Connection Between the VoiceWorks Headset & VoiceWorks Key ............ 7
Plug in the FP32 Software Key ............................................................................................................ 8
Launch the FP32 Software ........................................................................................................................... 9
What the Information in the VoiceWorks Dialog Box Means ................................................. 12
Patient Lookup Dialog Box ......................................................................................................................... 14
Creating a New Patient ................................................................................................................................. 14
The Personal Page ........................................................................................................................................... 15
2 Ways to Enter Missing Teeth .................................................................................................................. 15
Enter Missing Teeth & Other Dentition from the Personal Page ........................................... 16
How to Create a Bridge ................................................................................................................................ 16
Start Charting with VoiceWorks ....................................................................................................... 17
Check the Headset and VoiceWorks Key ........................................................................................... 17
Start VoiceWorks Listening Mode .......................................................................................................... 17
Begin Charting a Simple Periodontal Exam ..................................................................................... 18
Visit Settings Dialog Box ............................................................................................................................. 19
Enter Missing Teeth on the Fly ................................................................................................................ 20
Pocket Depth Mode ........................................................................................................................................ 21
Enter Paper Chart Data Into the FP32 Periodontal Page ........................................................ 23
Changing Modes on the Fly ....................................................................................................................... 24
Save & Print ......................................................................................................................................................... 27
Printout Selection ........................................................................................................................................... 28
Moving Mode ..................................................................................................................................................... 28
Periodontal Page Printout ......................................................................................................................... 29
Deleting a Visit ................................................................................................................................................. 30
Closing the Program ....................................................................................................................................... 31
Turn the VoiceWorks Headset Off and Charge It .......................................................................... 31
Integration with Practice Management Software ............................................................... 32
Launching VoiceWorks from your Practice Management Software .................................. 32
Page 3

Troubleshooting ............................................................................................................................................ 33
Quick Troubleshooting Tips for VoiceWorks ................................................................................... 33
Sound ..................................................................................................................................................................... 34
FP32 Software Key not Recognized ..................................................................................................... 39
Headset Not Working ................................................................................................................................... 39
Headset Too Big .............................................................................................................................................. 40
Certain Commands or Phrases are Scored Low by VoiceWorks or Not at All ............ 40
Adjust the Confidence Level for a Word or Phrase ...................................................................... 41
Reset the Confidence Level for Any Word ....................................................................................... 42
Train Specific Words or Phrases ............................................................................................................. 42
Adjust the Weight of a Word or Phrase ............................................................................................. 43
Reset the Weight of any Word .............................................................................................................. 43
Appendix ........................................................................................................................................................... 44
Paper Perio Charts ......................................................................................................................................... 44
VoiceWorks Headset Reference .......................................................................................................... 45
Headset Lights and How to Dock ....................................................................................................... 46
Core VoiceWorks Commands List.......................................................................................................... 47
Quick Troubleshooting .............................................................................................................................. 48
How to Search for Patients ........................................................................................................................ 4949
What an Asterisk * in Front of Visit Number Means ................................................................... 50
Deleting a Patient ........................................................................................................................................... 50
Change the Order of Search Results .................................................................................................... 511
Dismiss the Patient Lookup Dialog Box ........................................................................................... 511
How to Change to Quadrant Tooth Numbering Method
How to Enter & Edit Medical Alerts .................................................................................................... 53
Create or Edit a Medical Alert ...............................................................................................................
...................................................... 522
. 544
Page 4
1
Getting Started
What’s In the Case
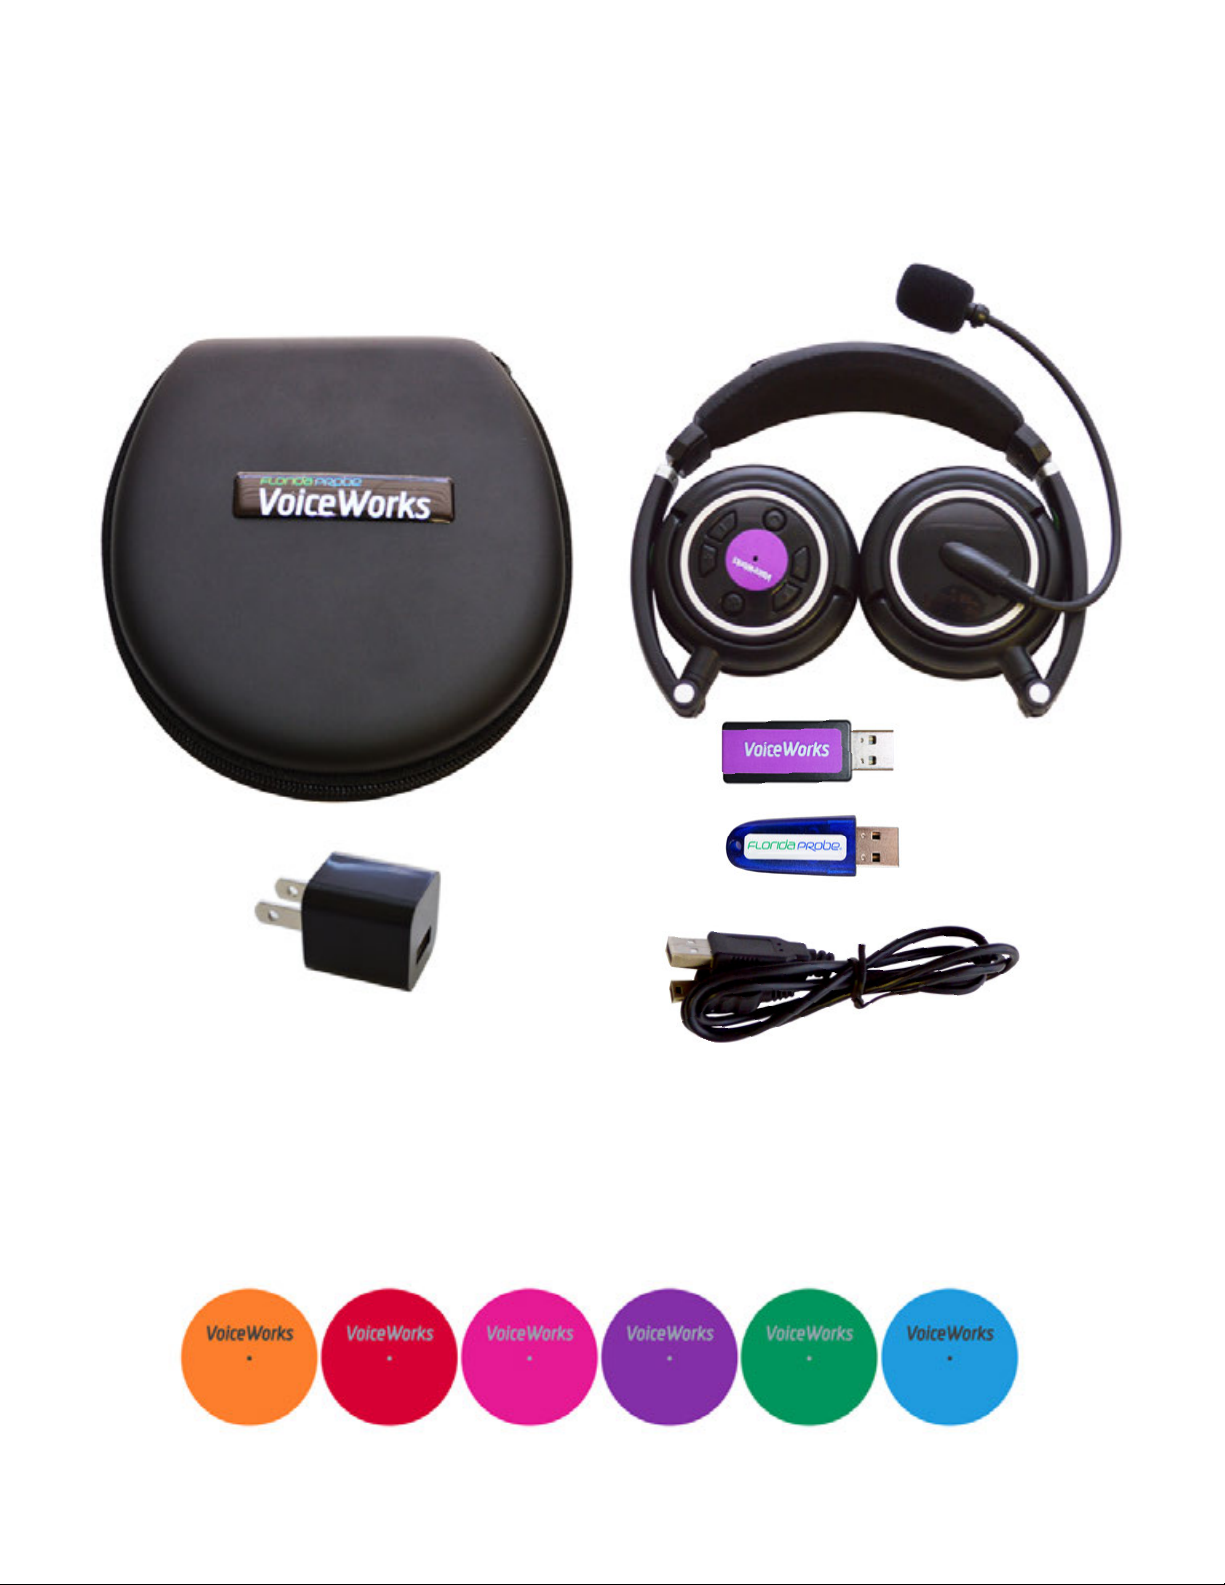
You will find the following items in your VoiceWorks Case: (1) VoiceWorks Wireless Headset
(2) VoiceWorks USB Key (3) FP32 Software Key (4) USB Charging Cable (5) Black USB Wall Plug
VoiceWorks Case
5
1
2
3
4
Matched Pairs: the VoiceWorks Colored Stickers
Remove your conveniently folded VoiceWorks Wireless Headset from its case. Notice the round,
colored sticker on the right headphone. This sticker may be orange, red, hot pink, purple, yellow,
pink, green, or blue and it will match the color of the sticker on your accompanying VoiceWorks
USB Key.
The colors of these two stickers must be the same because they are a specially matched pair from
the factory. If your office is using multiple headsets, then the headsets should all have different
Page 5
2
colored stickers/matched pairs so that you do not accidentally try to use your headset with a
co-worker’s VoiceWorks USB Key.
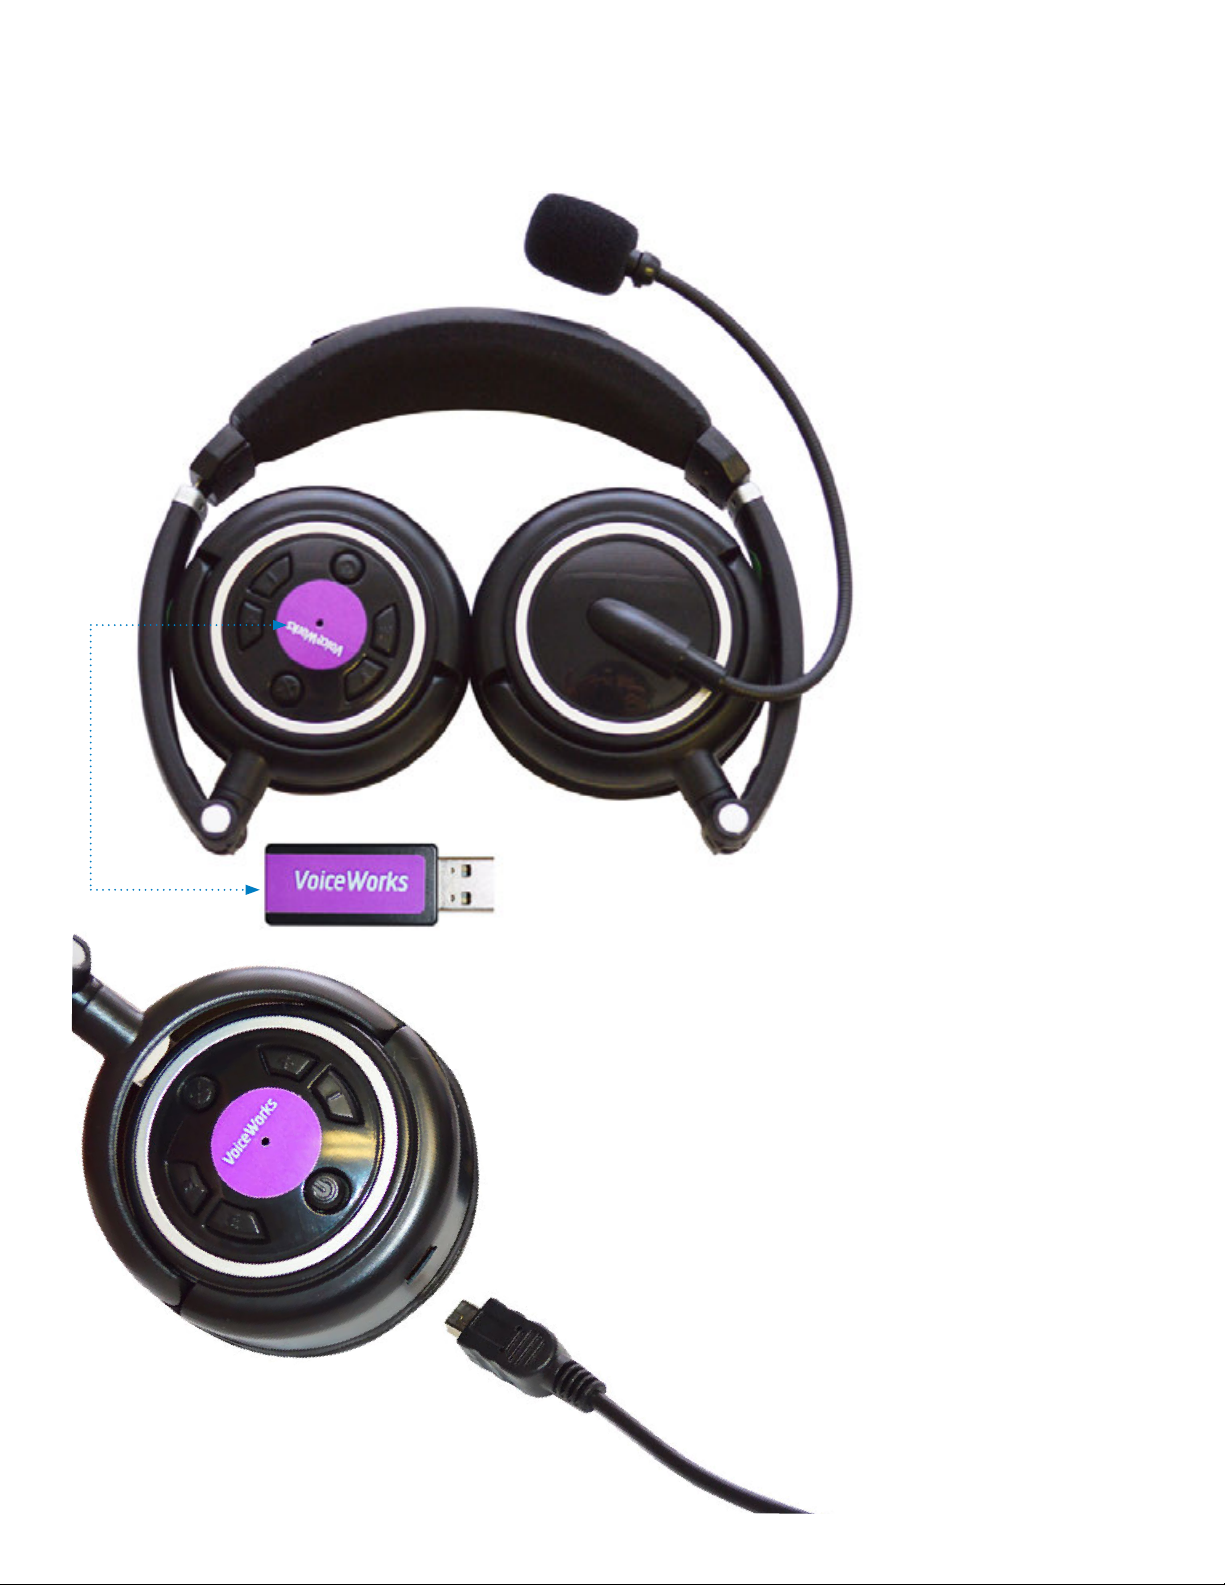
Matched Pair
Charge the VoiceWorks Headset
Next, plug the USB Charging Cable for your Voiceworks
Headset into the small opening located on the bottom
of the right headphone (with the colored sticker). Plug
the other end into the provided Black USB Wall Plug and
then plug into a wall outlet. Alternatively, you can plug
the other end into the provided optional White USB Hub
and then connect the hub to your computer; however, the
headset will not charge if you turn your computer off.
Page 6

3
When not in use, we recommend charging your VoiceWorks Headset. On a full charge (which takes
about 2 hours to accomplish), the headset will work non-stop for about 6 hours. 5 minutes before
your headset is about to lose power, you will hear a “beep-beep” sound from the headset. This
sound will repeat every 30 seconds until the battery is completely drained.
Note: In some earlier models, the headset will automatically turn off after 5 minutes of not using it.
Just press the power button again for 2 seconds to turn it back on.
Get to Know Your VoiceWorks Wireless Headset
It’s Wireless, So You’re Free to Move
Your new VoiceWorks Headset is wireless, meaning it allows convenient, wire-free use around your
operatory by connecting to the VoiceWorks USB Key that you plug into your computer or USB
hub. The wireless connection is good for about 20 ft. in all directions from the VoiceWorks USB
Key (when the key is plugged into your computer or USB hub & it has established a successful
connection with the headset).
How to Wear the VoiceWorks Headset
It is recommended that the right headphone with the sticker and controls is placed so that your
ear is partially exposed in order for you to hear your patient or other office staff.
Page 7

4
Note: The boom mic can be rotated at its base so that if you are left-handed, you can flip the
microphone around in order for the right headphone (with the sticker and controls) to be worn
over your left ear instead. Rotate the mic clockwise from the base, do NOT pull on the mic itself to
rotate (Fig. 1).
Fig. 1
Rotate the mic clockwise
from the base, do NOT pull
on the mic itself to rotate.
Once you have rotated it 180 degrees, gently bend the mic into place (Fig. 2).
Fig. 2
Be Careful not to
aggressively bend the mic -
use care.
Page 8

5
Proper Placement of the VoiceWorks Headset Boom Mic
The VoiceWorks Boom Mic has been designed to work with paper face masks that most clinicians
wear during their patient exams. It is most effective when used with such a mask. The VoiceWorks
Boom Mic is located on the left headphone and should be placed about 2 inches away from your
face mask, below your nose. Hold two finger-widths in front of your mask and position the boom
mic after those fingers.
Boom Mic should
be positioned
below nose
Boom Mic should be
positioned 2 finger-widths
in front of mask
The white dot located directly below the foam head should always be facing you and you should
be able to see it out of the corner of your eye. The other side of the boom mic is designed as a
sort of wind shield that blocks out ambient noise, which is another reason to make sure that the
white dot is facing toward you and not away from you. Please make sure the boom mic is properly
placed for optimum performance by VoiceWorks.
IMPORTANT: White dot
should always be facing you
when you are using VoiceWorks.
Page 9

6
Note: If you feel like the headset is too big for your head, we recommend an alternate way
of wearing it. Please see the “Troubleshooting” section at the end of the user manual for this
information.
How to Speak into the VoiceWorks Boom Mic
The VoiceWorks Boom Mic is designed to be able to receive your voice input in a normal tone
of voice (not your “Radio Announcer” voice). Do not yell or speak more loudly than your normal
speaking voice, or it will not work properly.
Please don’t yell and don’t eat or
chew gum while using VoiceWorks,
even if it’s just a practice session.
In addition to speaking in your normal tone of voice, please: No Eating or Chewing Gum, even if
you are only practicing, as VoiceWorks will mistakenly adapt to how your voice sounds when your
mouth is full or you are chewing.
How to Successfully Communicate with the VoiceWorks System
The VoiceWorks FP32 software is designed to recognize 1-3 word phrases as one word. For
example, the phrase, “Change Mode Pocket Depth” should be spoken as one continuous phrase,
“ChangeModePocketDepth” in order for VoiceWorks to correctly understand the command.
Please refer to the VoiceWorks Commands List in the back of this manual for a complete list of
commands. These commands are being updated all the time, and you can always find a link to the
most up-to-date list in the VoiceWorks Dialog Box within the software (see example on page 13).
Page 10

7
Start Using the VoiceWorks System
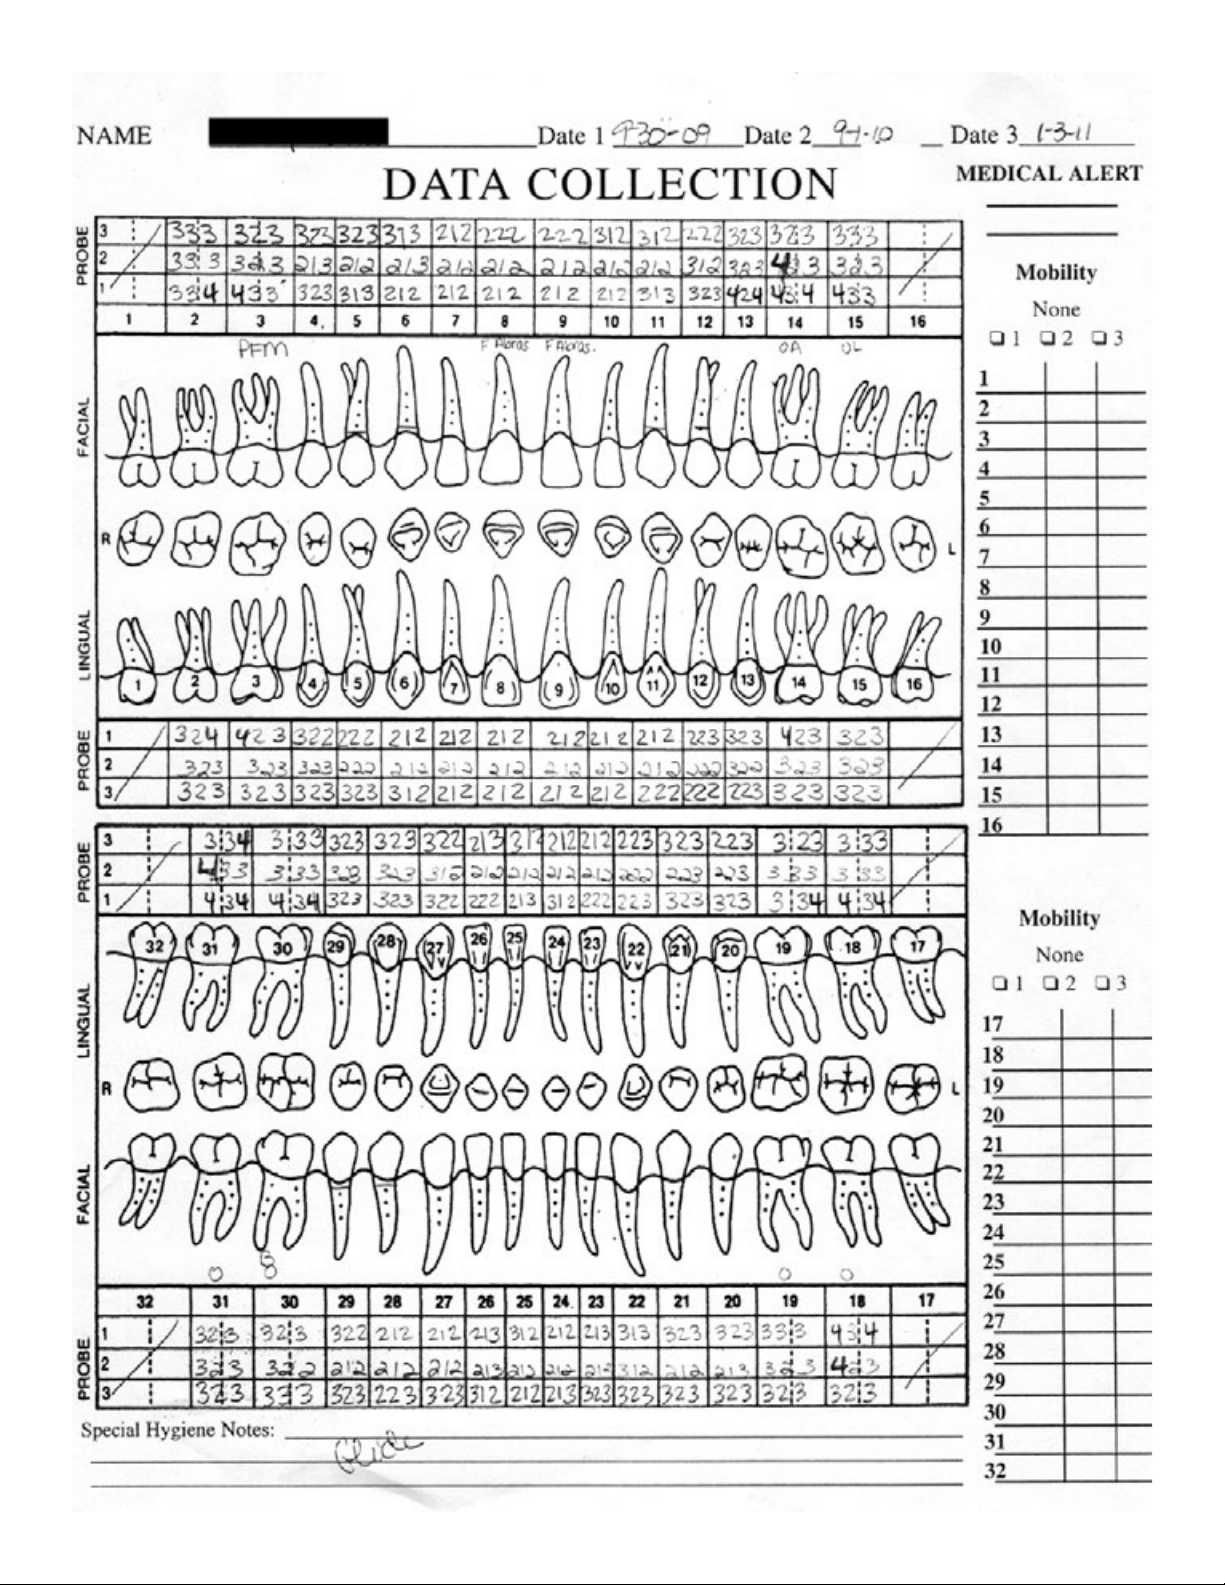
Perform Several Practice Exams Using Paper Charts
It is recommended that you practice using the VoiceWorks system by first entering the exam data
from at least 10 Paper Periodontal Charts (we have provided 5 for you as a start in this manual,
with the first 2 having also been converted to Florida Probe Periodontal Charts, so you can check
your work) before actually performing an exam using a real patient. This will allow you to become
comfortable with speaking exam data into the headset without having the stress of a patient in the
chair. After you are comfortable with entering paper charts, it is recommended that you practice
with several live test patients (office staff, etc.) before you perform an actual patient exam with the
VoiceWorks system. The additional 3 paper perio charts are located in the Apendix on page 43.
Establish a Connection Between the VoiceWorks Headset & VoiceWorks Key
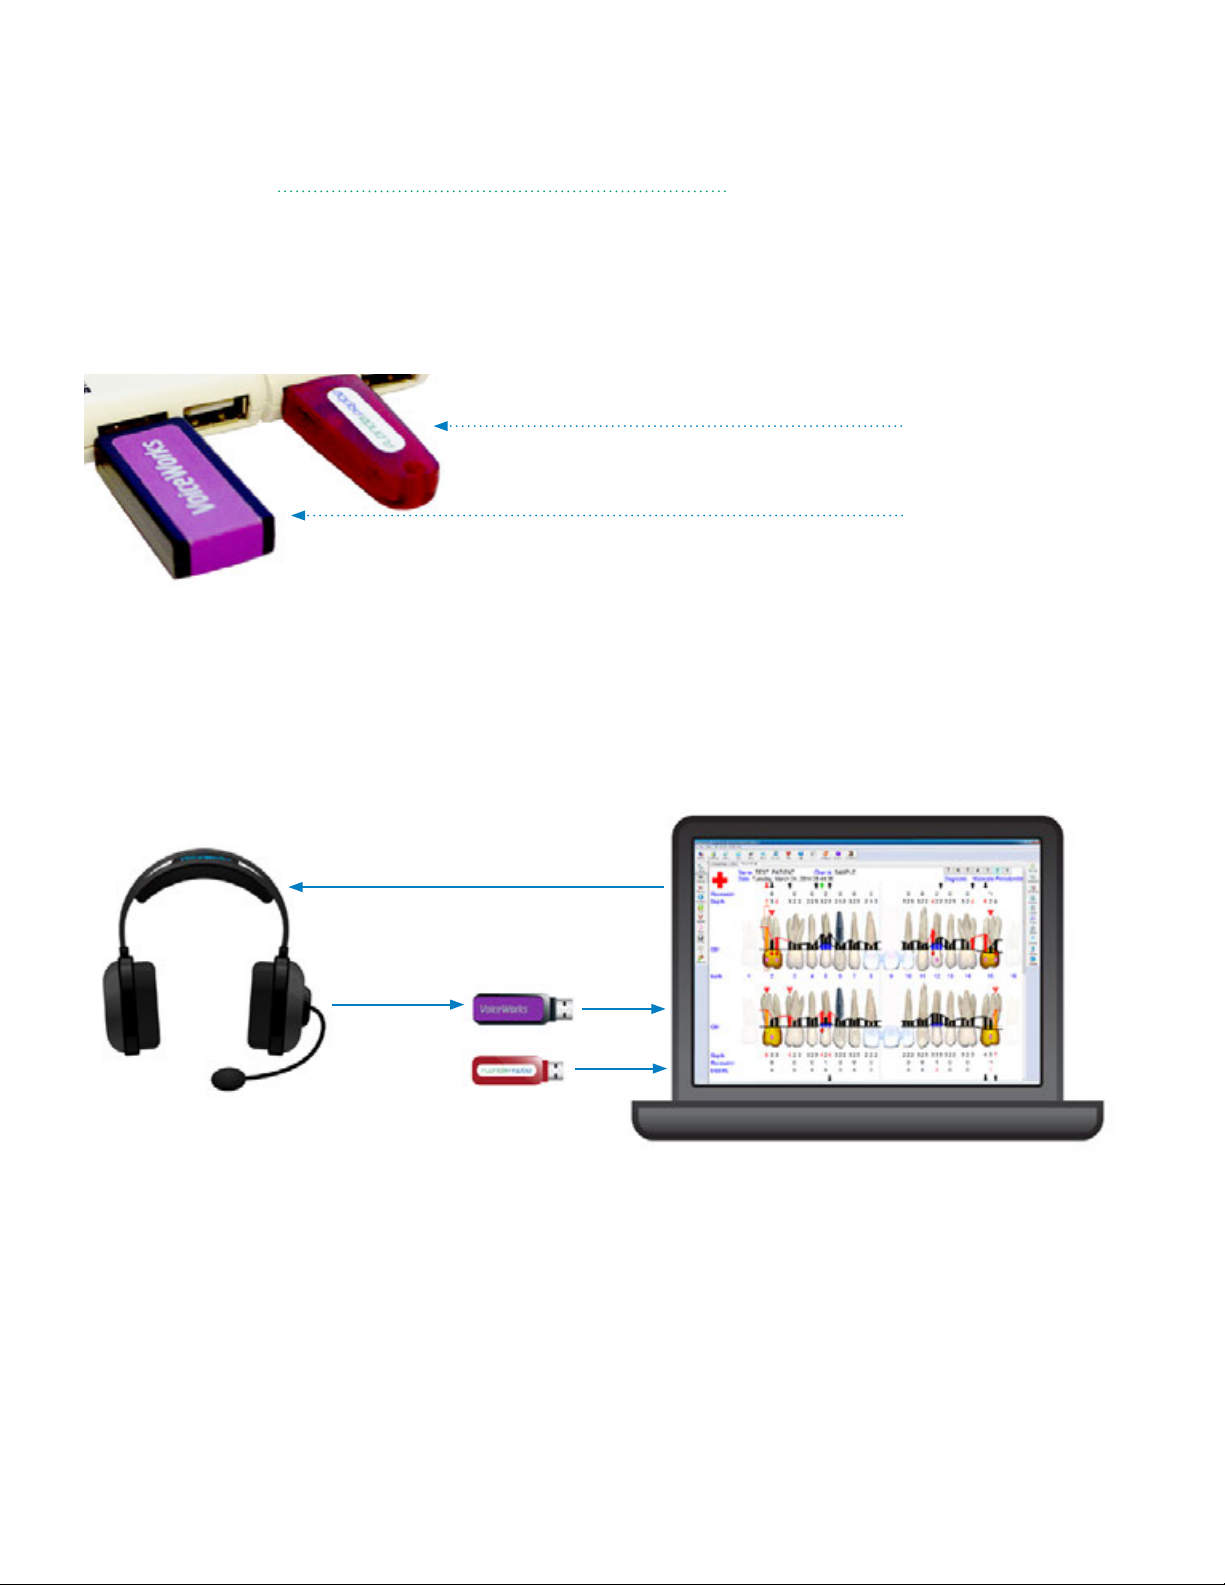
Plug the VoiceWorks Key into an available USB port on the *same* computer that the FP32
Software is installed on.
Plug this end into an available USB
port on your computer.*
VoiceWorks Key
Next, unplug your VoiceWorks Headset from the USB Charging Cable. Press and hold the power
button on the headset for 2 full seconds. A blue light in the center of the VoiceWorks sticker on
the right headphone will appear. If the blue light turns solid, then it has made a connection to
the VoiceWorks Key, which is the goal. If the blue light is blinking, it has lost connection to the
VoiceWorks Key or the key is not plugged into a working USB port.
You should see a blue, steady light in the center of the
VoiceWorks Headset right headphone sticker once you
turn the power on. If it is blinking, it has lost connection
to the VoiceWorks key or the key is not plugged into a
working USB port.
Page 11
8
You can also look for a red, steady light on the back of the VoiceWorks USB Key after you plug it
into the computer or USB hub. If the red light is blinking, you haven’t yet turned the power on to
your wireless headset OR it has not established a connection with the headset for some reason.
Please refer to the VoiceWorks Wireless Headset Reference in the back of this manual for more
information, including information about the other controls on the right headphone.
Plug in the FP32 Software Key
Next, plug the FP32 Software Key into an available USB port on the same computer that the FP32
Software is installed on .
FP32 Software Key
VoiceWorks Key
This will “unlock” the FP32 Software to full functionality, including the ability to perform a new
periodontal exam.
Establishing a connection between the VoiceWorks Headset & VoiceWorks Key allows the software
on the computer to communicate with the headset.
Page 12

9
Launch the FP32 Software
Launch the FP32 Software from the Windows Start Menu or by double-clicking the FP32 Desktop Icon.
If you are launching from your Practice Management Software, please refer to this section,
Integration with Practice Management Software on page 32, then continue to the next page.
Page 13

10
Note: If you have not already plugged the FP32 Software Key into one of the available USB ports
on your computer or into the provided optional White USB Hub (and then plugged this USB hub
into your computer - see page 8), or if the USB connection is not working, you will see the “Mode
Select” dialog box when you launch the software: Plug in the FP32 Software Key and select the
Hardware Key License option. Click “OK.”
Mode Select Dialog
When the program opens, you should hear the greeting, “Welcome to the Florida Probe,” – if you
don’t hear this greeting, check to make sure your speakers or sound are working properly,
as sound is an integral part of any VoiceWorks exam experience.
Hint: If you still see this Mode Select dialog message when you try to launch the software, try
removing the FP32 Software Key from the USB port that it is plugged into and move it to another
available USB port. Click “OK.”
Page 14

11
Next, you may be presented with the
“Tip of the Day,” dialog box, which
provides helpful information about the
FP32 Software and Hardware, as well as
periodontal exam tips. You can disable
this dialog by unchecking the check box
marked, “Show Tips on Startup”, in the
lower left hand corner of the dialog box.
You should also see the VoiceWorks dialog box appear in the upper-right corner of the screen. You
should hear, “Loading [your name] ‘s Profile”, “Profile Loaded” and “Headset Ready.” These words
will also appear in the Voiceworks Dialog Box (see image below). Voice Recognition Control may
be in “Not Listening” Mode (red) if the option, “Start Listening Automatically” in the dialog box has
not been checked. If this is the case, check the box so that the next time you launch the software,
it will start listening automatically. You can say, “StartListening” to change this right away.
VoiceWorks Dialog Box
Some other options that should be enabled (make sure box is checked) are: “Auto Learning
(Adaptation)” (if you come into the office with a hoarse voice then this feature will adjust to those
changes in your voice and then it will adjust back once your voice is back to normal) and “Always
on Top” (so that you will always be able to see the VoiceWorks dialog). Note: In the figure above,
the Voice Recognition Control small rectangle is green, for “Listening,” which means the software
is ready to receive your voice input.
Page 15
12
What the Information in the VoiceWorks Dialog Box Means
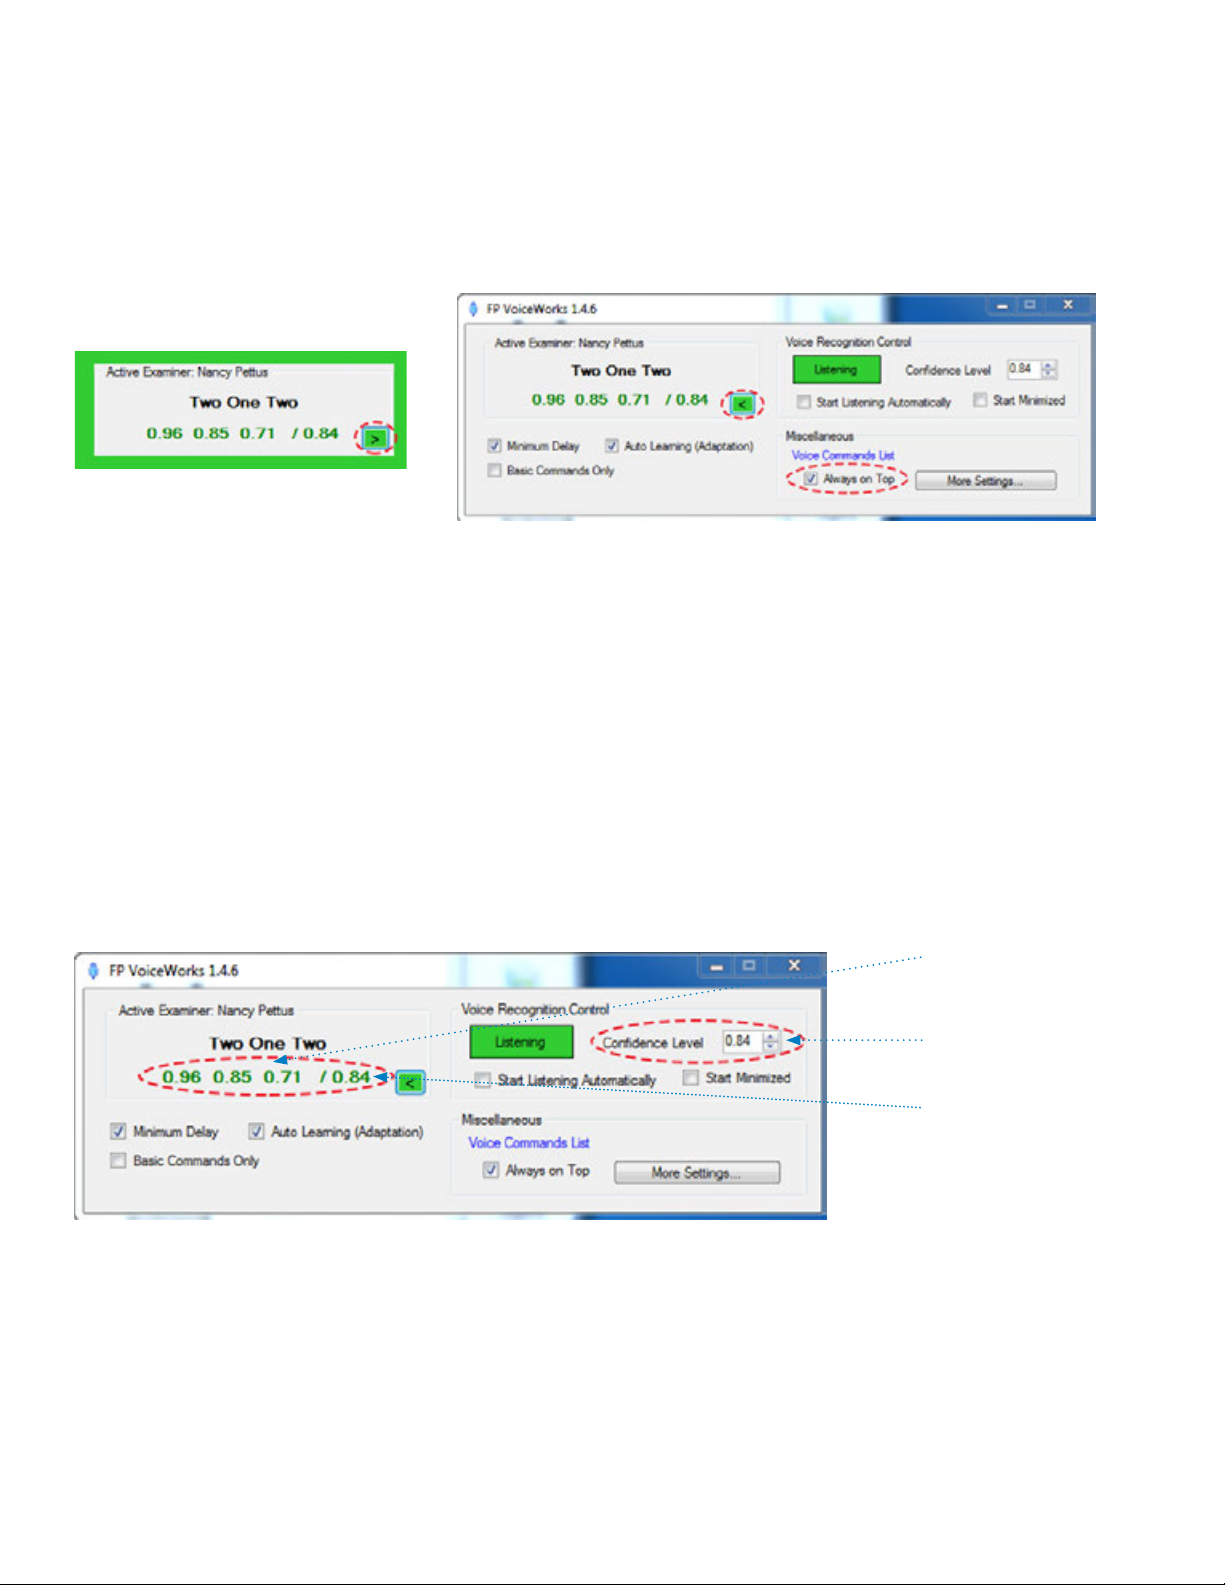
The VoiceWorks Dialog Box can be collapsed by clicking the green arrow in the box. Some users
prefer to keep it collapsed once they have performed a few practice exams so that the rest of the
information in the dialog does not distract them from seeing how well their commands are being
recognized.
VoiceWorks dialog Maximized
VoiceWorks dialog Minimized
This VoiceWorks dialog contains a wealth of information: the first number(s) before the slash
under “Active Examiner” show how well the software made a match to what you said (if you
are speaking the pocket depths for the 3 different sites of the facial or lingual side of a tooth, it
will display a number for each site). The second number after the slash is the number that your
“Confidence Level” is set at. The Confidence Level is the level (percent expressed as a decimal) at
which you are confident that what you say will be recognized by VoiceWorks. Anything that you
speak that VoiceWorks scores higher than what your confidence level is set at will be accepted.
Anything that you say that VoiceWorks scores lower than what your confidence level is set at will
be rejected (it will appear in red). VoiceWorks will score up to 3 commands in a row. It will accept
a single (“bleeding”), double (“2, bleeding”) or triple (“2, 1, 2”) command.
1st number or group
of numbers = how well
matched
Set the confidence
level here
2nd number = current
confidence level
We recommend that most offices set their confidence levels between .70-.85 (70-85%). Never set
the confidence level over .90 (90%) unless your VoiceWorks trainer has recommended this.
Page 16

13
Hint: If you are experiencing
a lot of background noise,
try setting the confidence
level higher (87%) for
maximum efficiency.
When you check “Minimum Delay,” it allows you to chart as fast as possible. It does this by playing
the sounds faster and getting rid of certain “Warning” sounds, such as the “Danger” sound and
siren. You can also use the voice command, “MinimumDelayOn” or “MiniumumDelayOFF.”
There is a link to the Voice Commands List in the expanded version of the box (see Figure below).
For a more organized list, check the Voice Commands List in the Appendix on page 45.
VoiceWorks Dialog Box
Page 17

14
How to Use the Patient Lookup Dialog
Patient Lookup Dialog Box
The next dialog box to appear will be the Patient Lookup Dialog. If this is the first time you are
using the software, you will have at least one patient in the database – the TEST PATIENT that we
have included.
Creating a New Patient
Click on the ‘New Patient’ button. You will be taken to a blank Personal Page Dialog
(See the Personal Page section). Note: Only select New Patient if this will be the patient’s first visit.
Click on ‘Cancel’ to
dismiss the Patient
Lookup dialog without
opening a patient
record.
Note: If another record
is already open, it will
remain open. Refer to
pages 49-51 for more
information about
how to use the Patient
Lookup Dialog.
Page 18

15
The Personal Page
Once you click the New Patient button on the Patient Lookup dialog, you will be directed to the
Personal Page. You should enter the patient’s Last Name, First Name and Date of Birth to be able
to easily differentiate them from other patient’s with the same name. We also recommend entering
their chart number. You may also enter any other information that you wish, but most clinicians
choose to enter that other information in their PM software.
Note: If you have selected a current patient from the Patient Lookup dialog, you will be taken to
their specific Personal Page. You may edit any of their information on the page.
2 Ways to Enter Missing Teeth
There are two ways to enter missing teeth and other applicable dentition (crowns, bridges,
implants, missing, and impacted). You should use the one that is fastest for the particular patient.
1. If the patient has simple dentition (for ex., missing their wisdom teeth and maybe they have
a couple of crowns), it’s fastest to enter missing teeth with your voice on the fly. For example,
you’re probing along, you get to a crown - say the word, “Crown” and keep probing.
2. If the dentition is more complex, for example, they have a bridge to build, you can also do that
with your voice, but most find it faster to do it with your mouse on the personal page.
Page 19

16
Enter Missing Teeth & Other Dentition from the Personal Page
Using the mouse, double-click on any tooth that you need to mark as missing or some other
type of dentition. You will then be presented with the Missing + Tooth Restoration Dialog. Click
on “missing” and the tooth will fade on the chart to indicate its missing status. You can also pick
implants, crowns, impacted teeth, and build bridges. Again, the look of the teeth will update.
Feel free to experiment with inputting these restorations. If you make a mistake, you can easily
correct it. You may change any tooth by double-clicking on it and choosing “re-enter” from the
Missing + Tooth dialog.
How to Create a Bridge
Double-click on the desired tooth.
Choose “bridge” from the Missing + Tooth
Restoration dialog.Choose the appropriate
Abutment type. Abutment 1 represents a
natural tooth. Abutment 2 represents an
implant. Click on pontic as many times
as needed to build the bridge. Click on
Abutment 1 or Abutment 2 to anchor
the bridge. Click “done” to complete the
bridge. Note: If you need to make a change
or correct a mistake, choose the “back”
button to return to the Missing + Tooth
dialog. Double-click on any tooth and
choose“re-enter” to start from scratch.
Page 20
17
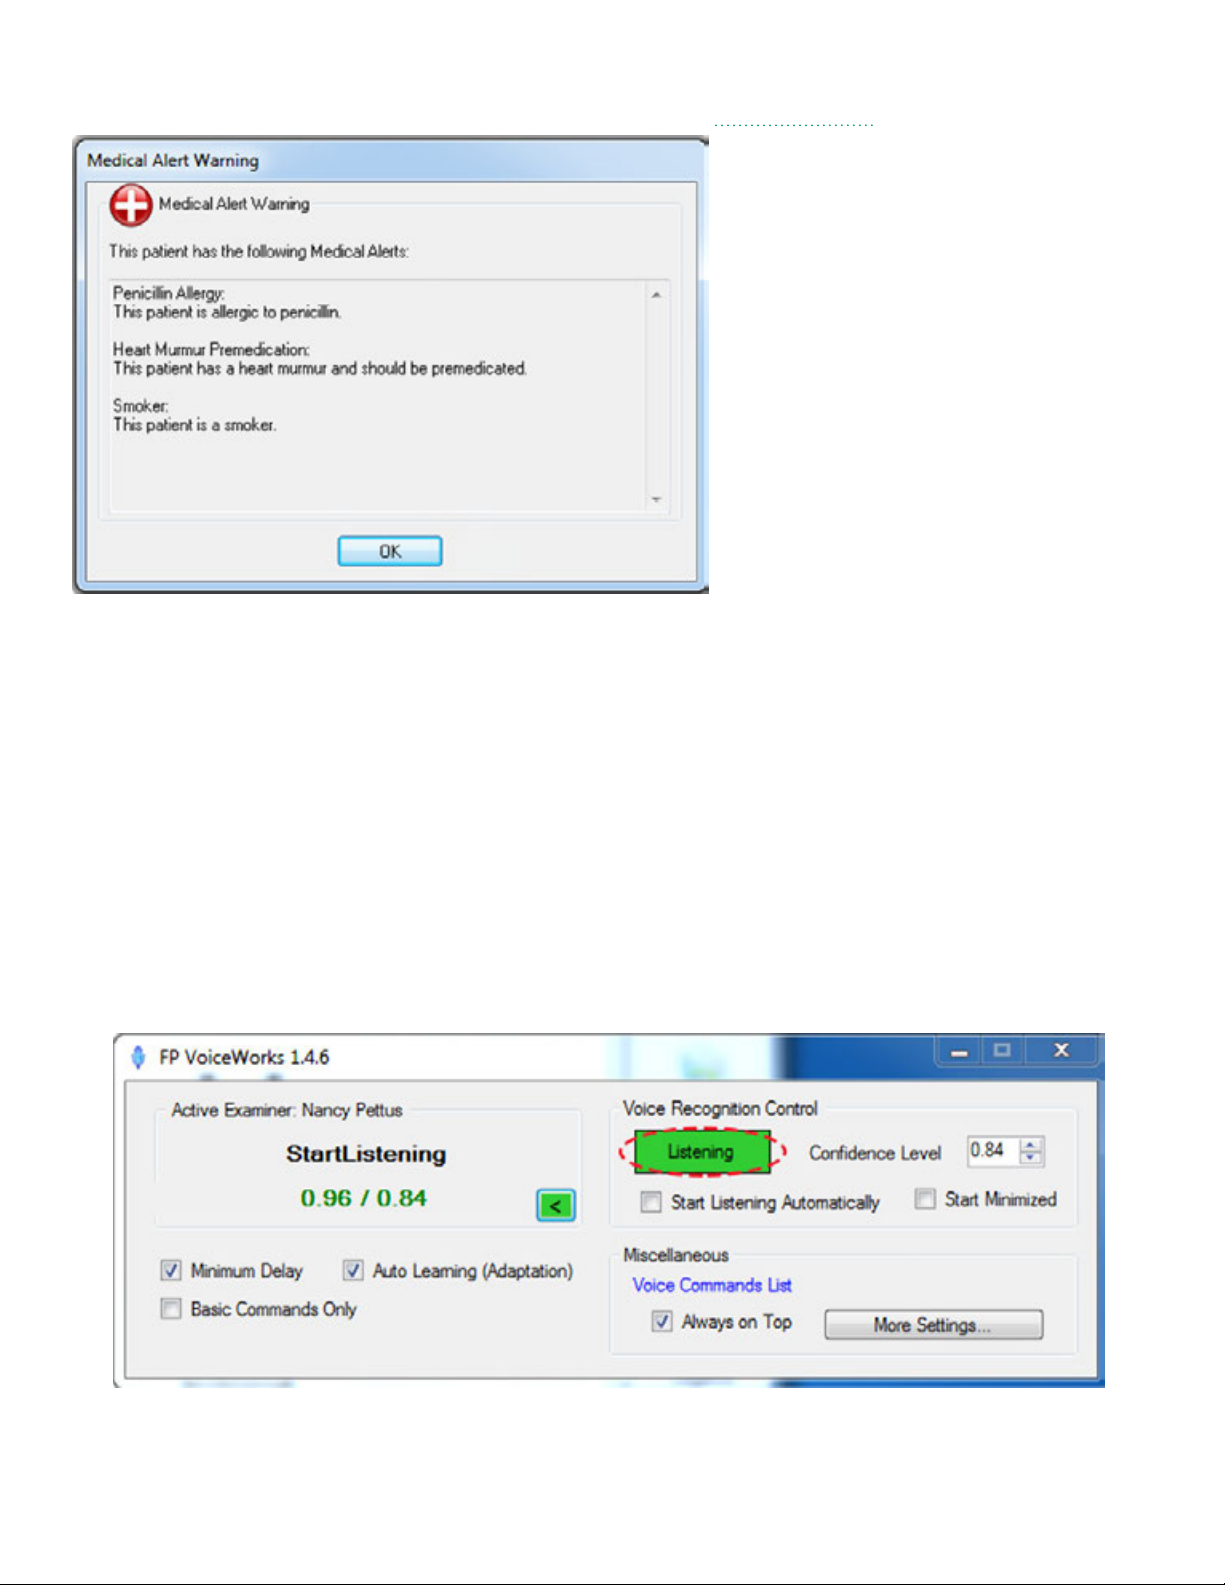
If the patient it is a current patient, then any Medical Alerts for the patient will appear as soon as
the Personal Page appears. More info on how to enter/edit Medical Alerts on page 53.
Start Charting with VoiceWorks
Check the Headset and VoiceWorks Key
*Make sure your VoiceWorks wireless headset is turned on and has a connection with the
VoiceWorks USB Key (make sure the steady, blue light is showing in the center of the VoiceWorks
sticker on the right headphone and you can also check that the red light is showing steady on the
back of VoiceWorks USB Key, if you wish).
Start VoiceWorks Listening Mode
Now that you are ready to begin an exam, tell VoiceWorks to “StartListening.” Remember that
VoiceWorks is designed to correctly respond to 1-3 word phrases that are said as one word. You
should immediately see the red areas in the VoiceWorks dialog box turn green and the message in
the box will be, “Listening.”
Page 21

18
Begin Charting a Simple Periodontal Exam
Hint: The FP32 program is designed to be simple in its basic design with three pages, or think of
them as three tabs in a patient folder: the Personal Page, the PSR Page and the Periodontal Page.
Click on the Periodontal Page tab OR say, “PeriodontalPage” to begin a new exam. As previously
stated, it is recommended that you begin by inputting actual paper patient charts, if available.
This will give you practice in inputting exam data into the software without having the stress of a
patient in the chair.
Page 22

19
Visit Settings Dialog Box
You will next be presented with the Visit Settings Dialog Box. The default Probe Type is Pocket
Depth Probe or Keyboard Data Entry, but it will be greyed out unless you are using one of our
probes with VoiceWorks (hybrid system). The default Settings are Record Pocket Depth, Bleeding
and Suppuration. Make sure that your name is selected under Examiner Name. If you do not see
your name, then type it in EXACTLY as you would like it to appear on every subsequent patient
chart – most examiners include their title; for example, “Mindy Cohen, RDH”
Many general dentist offices only collect
pocket depth and bleeding data and
this may be easier to learn for the
beginning user. As you gain experience,
you may wish to enable recession and
other data collection options. The more
data you collect, the longer it will take
to complete the exam.
Note: Even if you only checked to
record certain types of data in the Visit
Settings dialog box, if you change your
mind while you are performing the
exam, you will still be able to record
data such as recession or furcation “on
the fly” by using the voice command,
“ChangeMode_____.” For example, if
you were charting pocket depth, and
you noticed the patient had some
recession at that site (but you hadn’t
checked to record recession in the Visit
Settings dialog box), you could say,
“Recession2” (or whatever the value
was) and the software would chart it
and then be ready to continue with
recording pocket depth for the next site.
IMPORTANT: Type your name in the
Examiner box if you can’t find it already
listed in the dropdown menu. You MUST
always choose yourself as the examiner
because the custom voice profile that
will load for the exam is controlled by
this selection!
Page 23
20
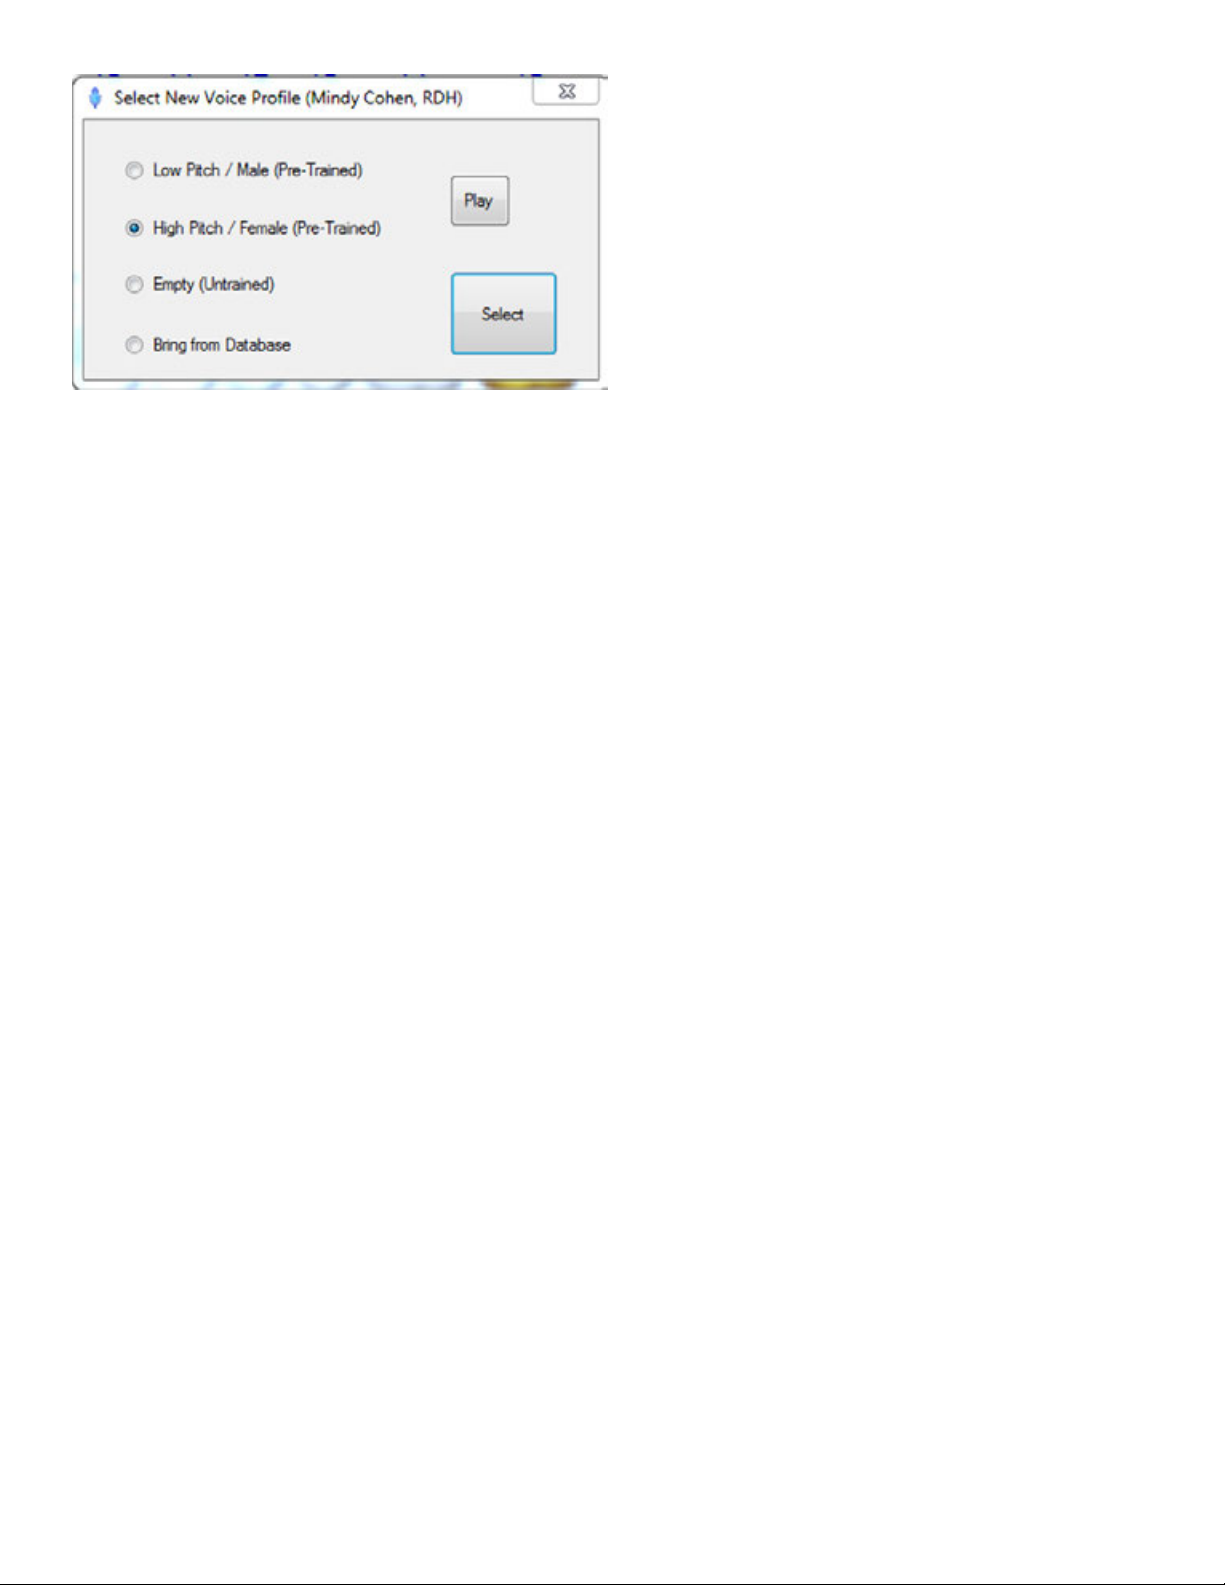
Note: If you are using someone else’s computer
and VoiceWorks system and have never had your
voice profile saved, if you type your name into
the examiner box, you may hear the software
say, “Saving _______’s Profile” and then it may
show you this dialog box. Choose a pre-trained
profile to start. The Low Pitch/Male (Pre-
Trained) and HIgh Pitch/Female (Pre-Trained)
are recommended starting points (unless your
Trainer has specified that you pick another
profile).
Enter Missing Teeth on the Fly
Hint: Remember, you can enter missing teeth on the fly after you have started the exam by
(first make sure you are at desired tooth location - use “JumpTo[Tooth Number]” command,
if necessary) saying, “Missing” or by switching to Missing Tooth Mode to enter missing teeth
for the entire mouth (say, “ChangeModeMissing”) and enter/update any missing teeth or
other restorations, as needed. Note: If you have started the exam and have to enter new
exam data for a tooth that was previously missing, you must change into Missing tooth mode
(“ChangeModeMissingTeeth”) in order to re-enter the tooth there.
Page 24
21
Pocket Depth Mode
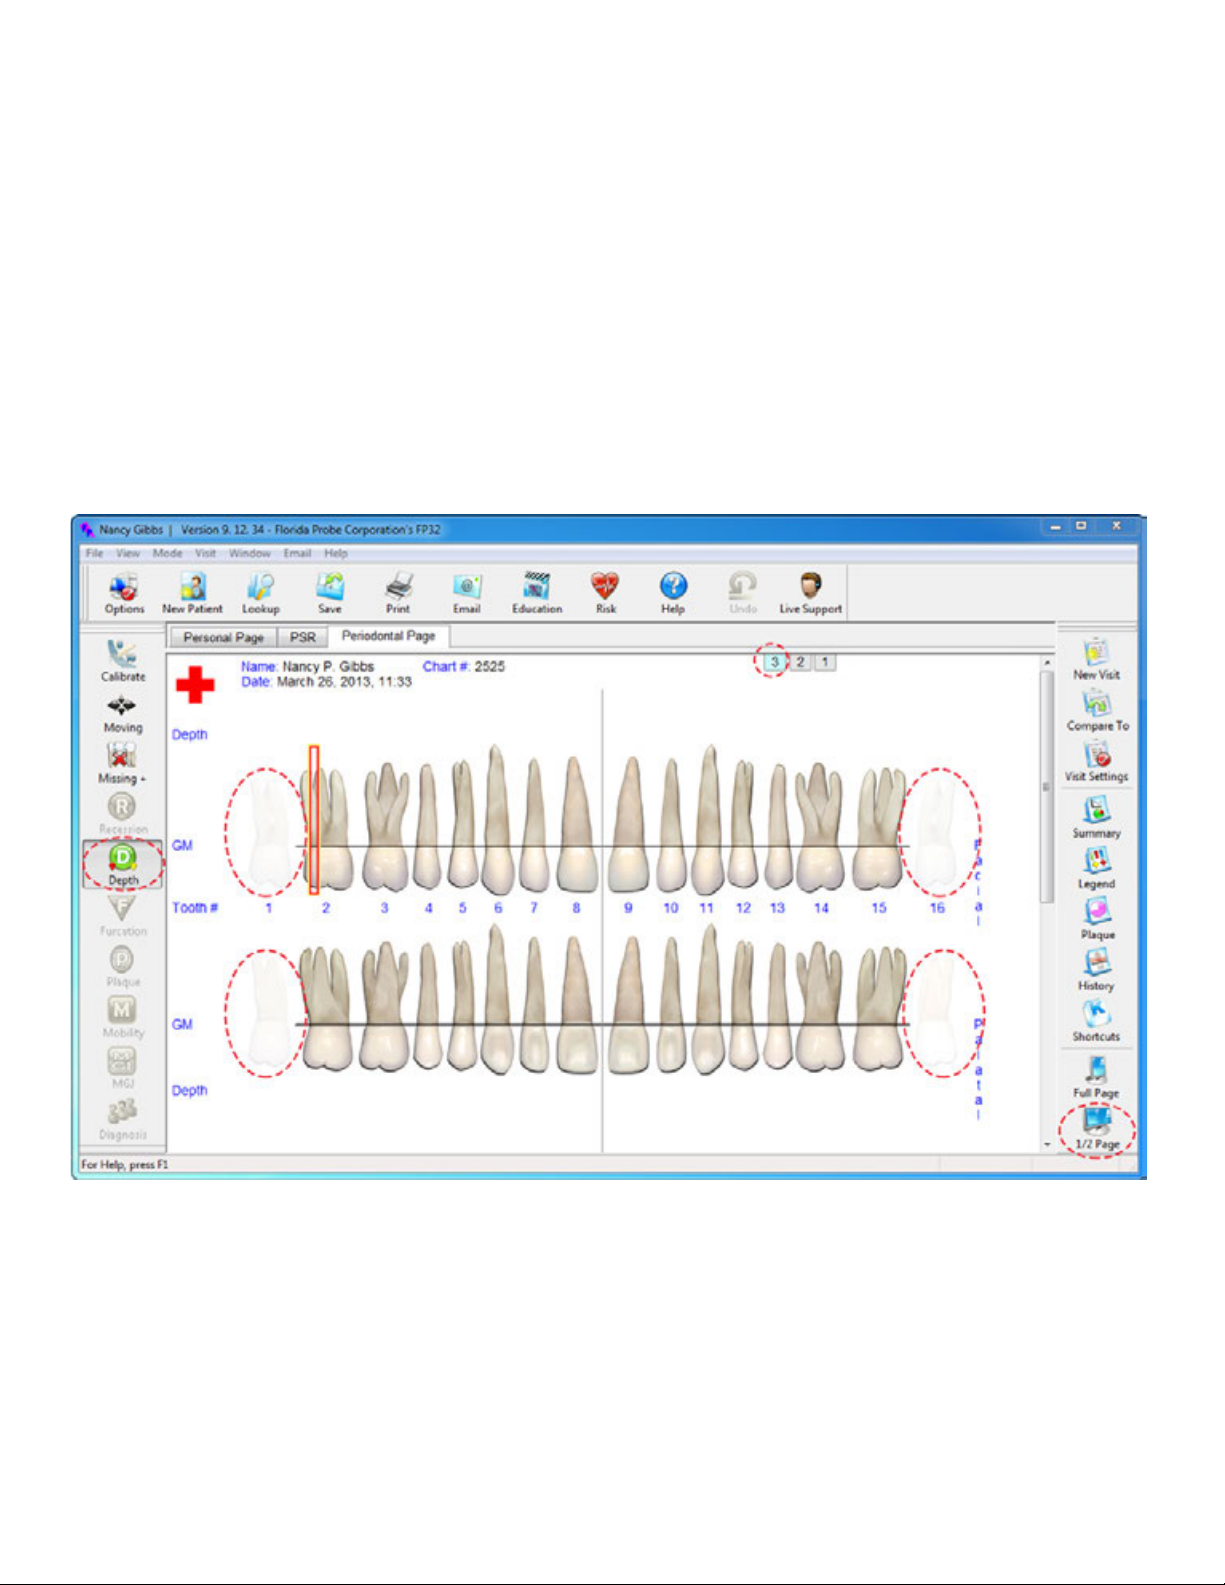
Next, you should see the Periodontal Page and Pocket Depth Mode on the left-hand side of the
toolbar should be highlighted.
Note: In the blank chart below, because of what was selected during Visit Settings, Only the
Pocket Depth mode, Missing + Teeth, Moving Mode, and Calibrate are selectable – other options,
such as Plaque, are greyed out because they weren’t checked in the Visit Settings dialog. You can
change this at any time by clicking on the Visit Settings button in the right-hand toolbar. The red
dotted circles on the blank 1/2 Page View of the chart on the next page indicate that we are in
Pocket Depth mode and this is exam 3. Notice that the patient’s missing teeth are faded.
Page 25

22
The FP32 Software always measures Pocket depth at 6 sites per tooth, 3 Facial and 3 Lingual. The
exam follows a set pattern taught in many schools, Tooth 1-16 Facial, then Tooth 16-1 Lingual, Tooth
32-17 Facial and finishes with Tooth 17-32 Lingual. See the red dotted lines and blue arrows for the
pattern the software follows below. Note: This set pattern cannot be changed.
Page 26

23
Enter Paper Chart Data Into the FP32 Periodontal Page
Information written in the paper chart below was used to create 2 Florida Probe visits for the
patient. If you wish, you can use these paper charts to enter your first practice visits and then
compare your data to the correctly entered Florida Probe charts on pages 17 and 18 to check to
see if you are on the right track.
data at any time.
Hint: It’s OK to make mistakes – you can re-enter/correct exam
Page 27
24
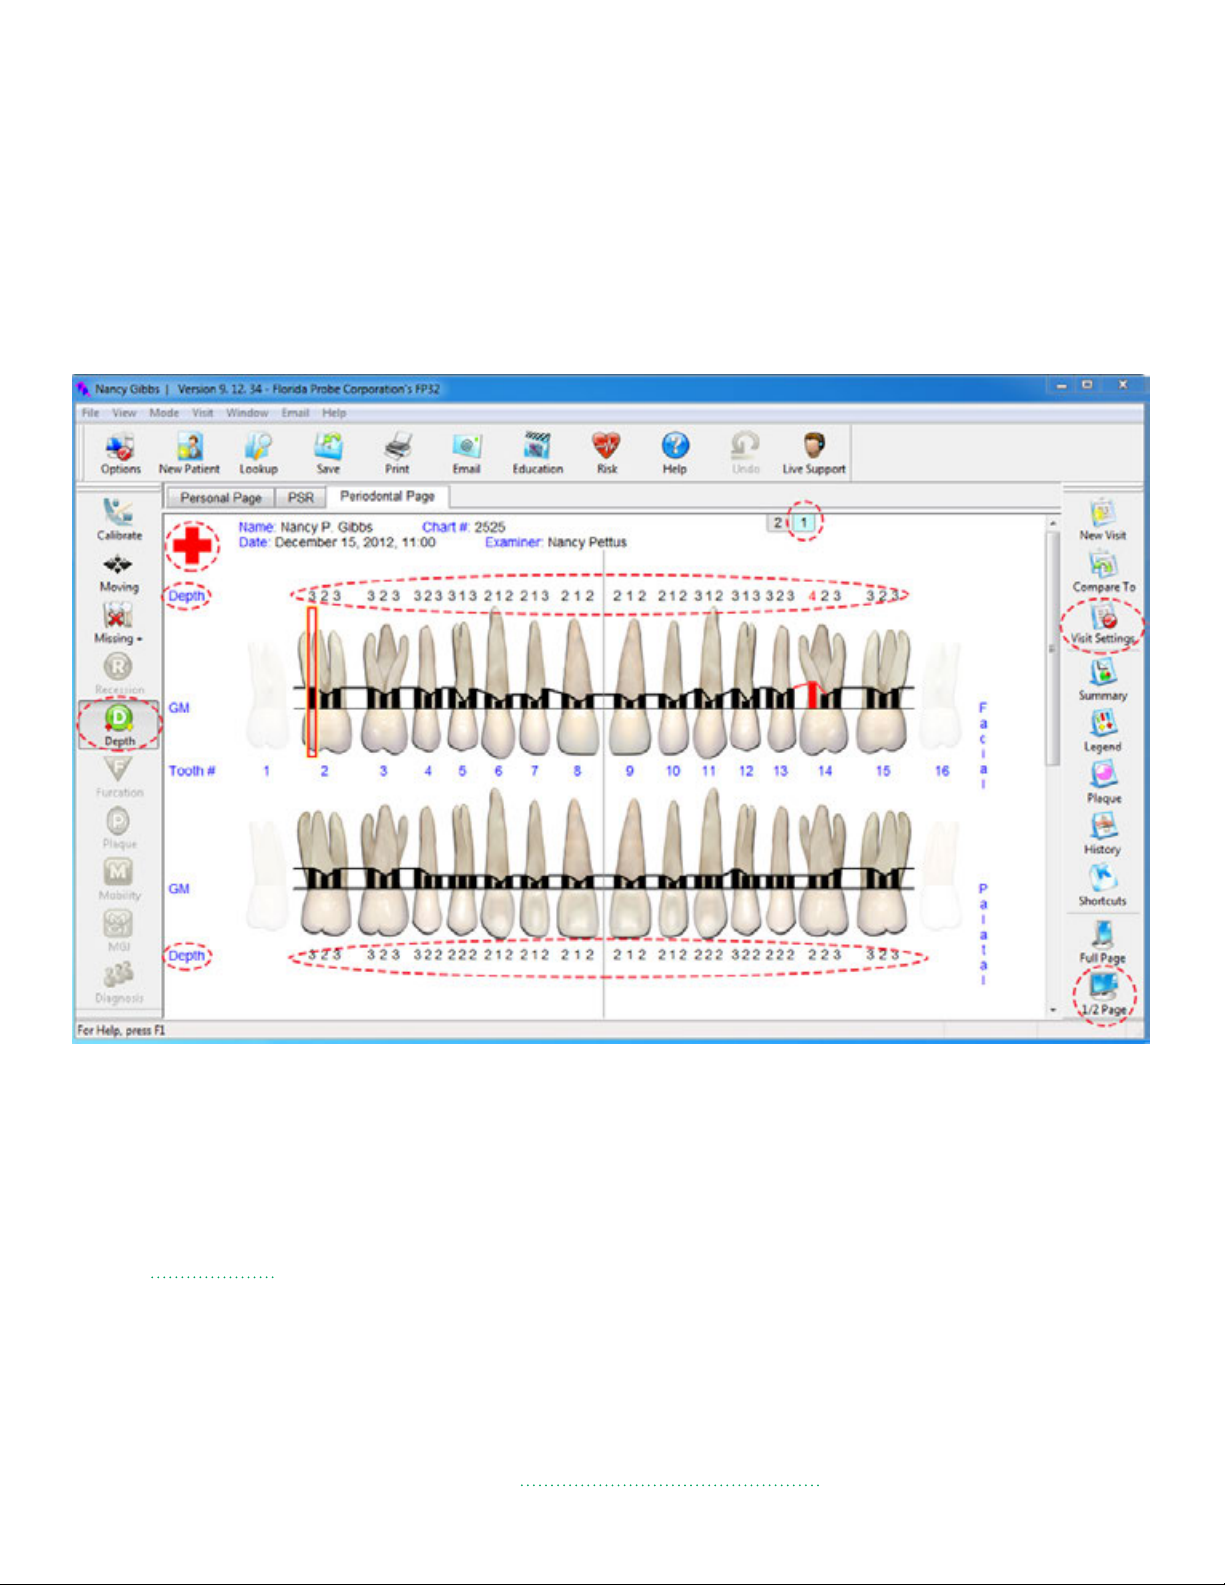
Note: You will see that it is much easier for both the patient and clinician to visualize the data from
the Florida Probe chart than the paper chart.
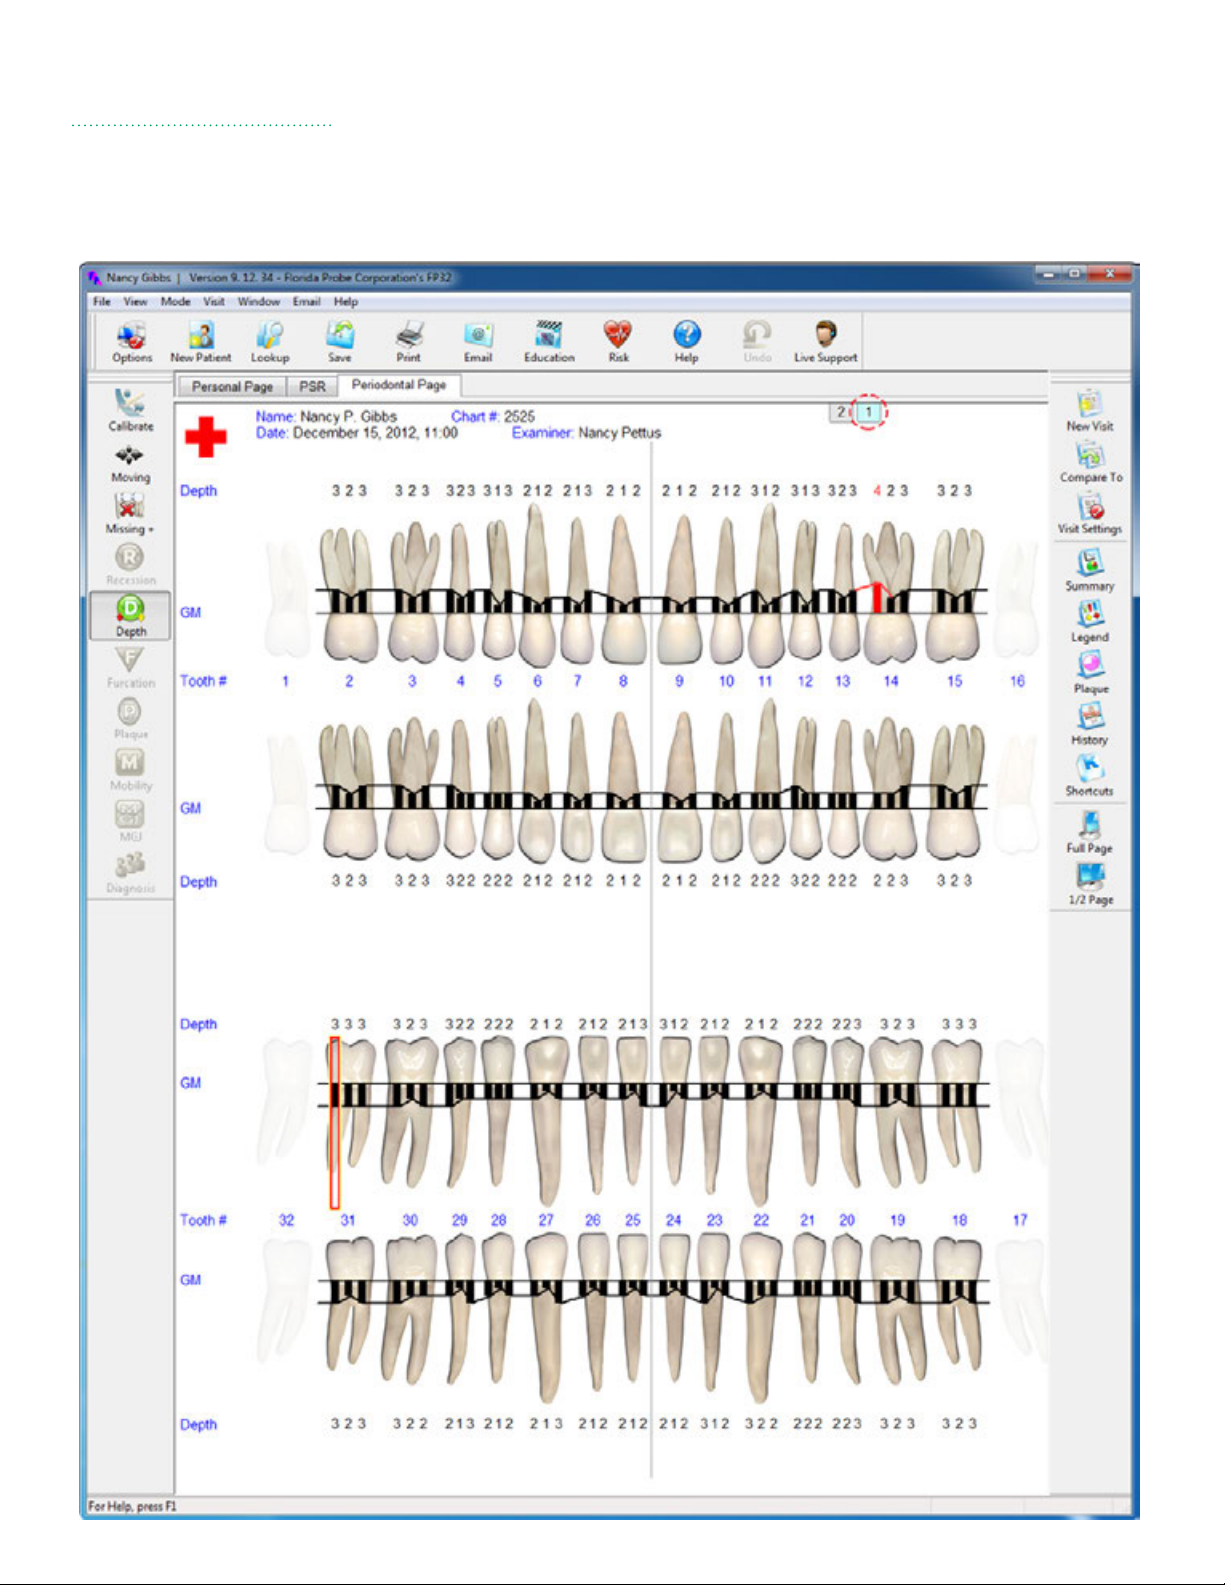
Take note of the red dotted circles in the 1/2 Page View of the chart below. The first thing to be
aware of on the left-hand side of the chart is what Mode you are currently in – you can see that the
Green Depth Mode button is highlighted. Notice that other modes, such as Recession, Furcation,
Plaque, Mobility, MGJ and Diagnosis are greyed out because they were not selected during the
Visit Settings – at any time this can be changed by looking at the right hand tool bar and selecting
the Visit Settings button and editing the settings. The Calibrate, Moving and Missing + buttons are
not greyed out because you selected these during the Visit Settings.
Notice the red dotted circle around the red cross in the upper left-hand corner of the chart – this
indicates that Medical Alerts were previously entered for this patient. Also note that there is a red
dotted circle around around the light blue Number 1 tab near the top of the chart, which indicates
that you are currently viewing one of two of this patient’s charts. There are also red dotted circles
around the word, ‘Depth’ on the chart, as well as the groups of 3 numbers above and below the
teeth. These are the pocket depth numbers that have been entered for this patient from the paper
chart’s 1st Probing on page 25.
Changing Modes on the Fly
VoiceWorks is unique in that even if you did not plan on entering Furcation or Recession when
you checked certain options in the Visit Settings dialog box, you can still enter this data during an
exam, “on the fly.” For example, let’s say you just spoke the following pocket depth modes: “1, 2,
1” and then you noticed recession of 2 on the last site – just say, “Recession2” and VoiceWorks will
record it, no problem! Please refer to the VoiceWorks Command List in the Appendix for a list of
Page 28
25
all the voice commands. The most recent list always appears in the software within the
VoiceWorks Dialog Box. Note: Once you add modes while you are already in the midst of an exam
(see the example of adding Recession above), you will notice that the mode button for whatever
mode you added will no longer be greyed on on the left-hand side of the toolbar.
Fig. 1: 1st Probing (data taken from paper chart on page 23).
Page 29

26
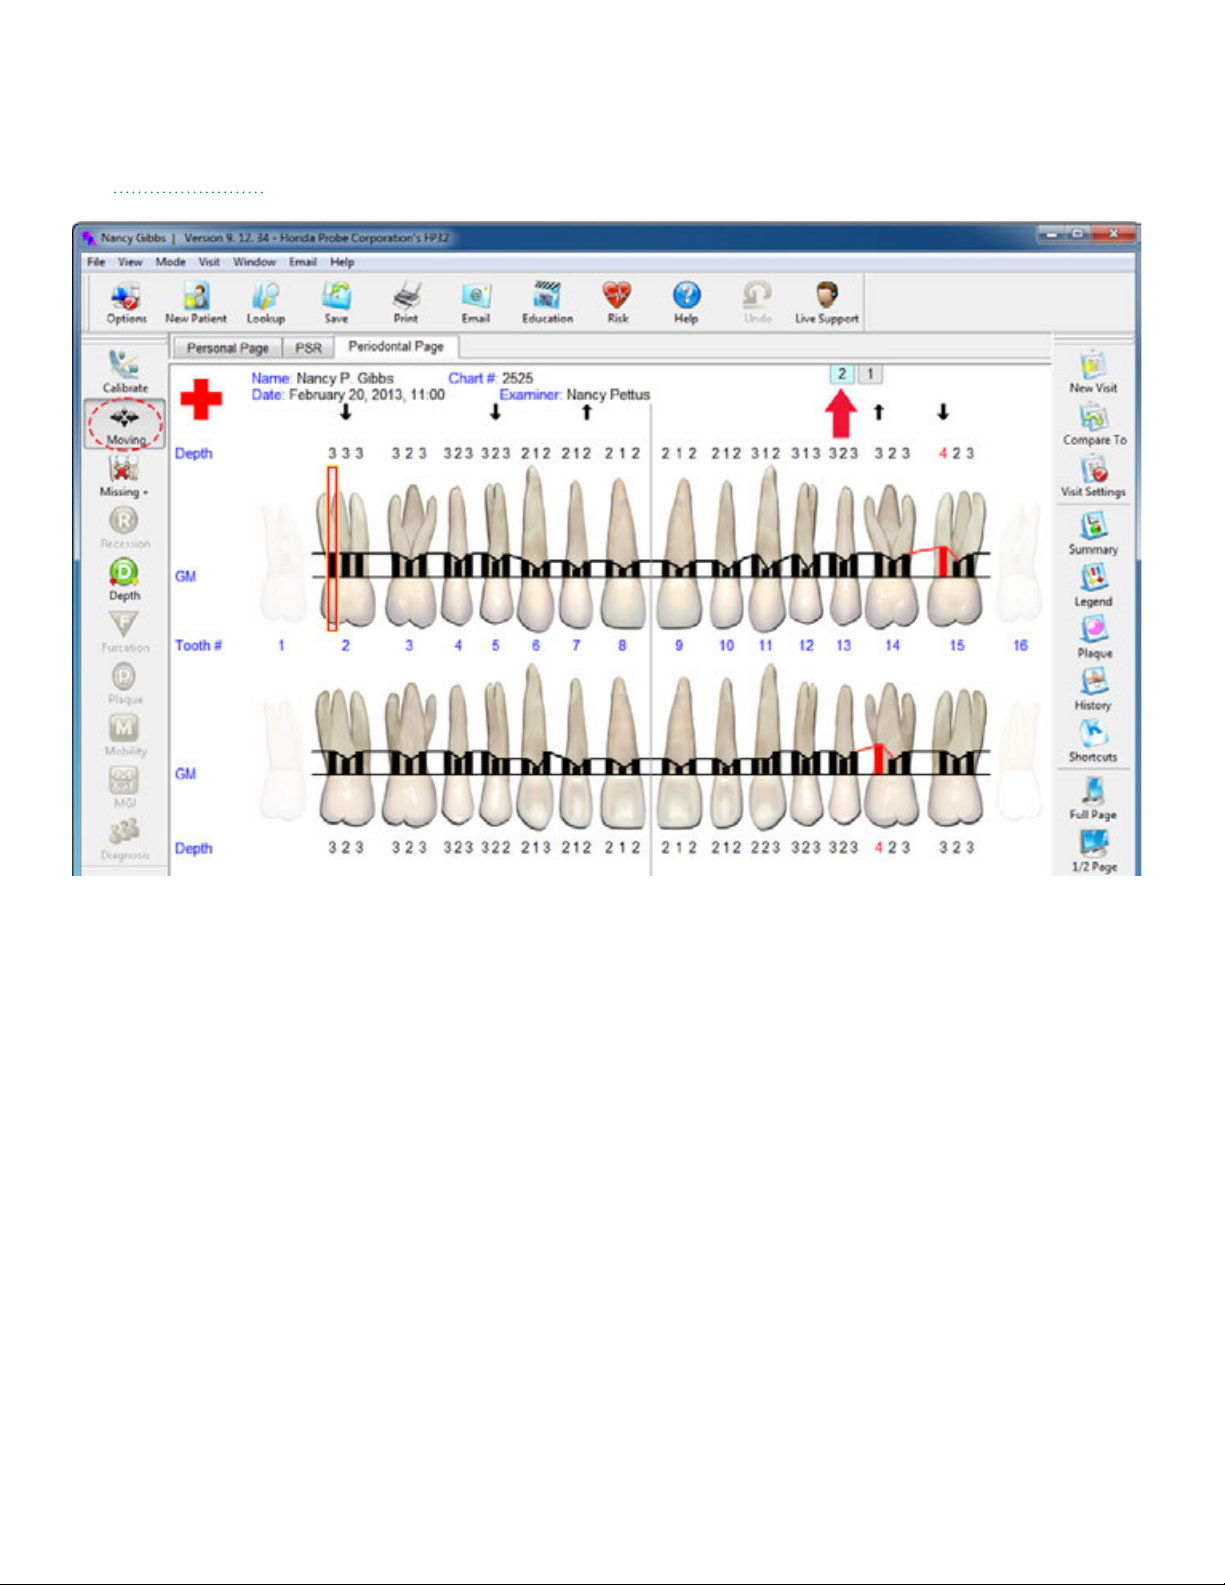
Fig. 2: 2nd Probing (data taken from paper chart on page 23).
Page 30
27
Save & Print
After you have said the very last probing number and you are ready to end the exam, say,
“EndTheExam” it will automatically Save & Print the patient’s chart and the software will then be in
the Moving Mode for data protection and showing the patient their on-screen chart, if needed.
Hint: Remember, even after you’ve saved your data, you can always go back and edit the patient’s
chart to correct any mistakes you might have made or enter information that was previously
overlooked.
Page 31

28
Printout Selection
In the example below, we chose to create a digital copy of the Periodontal Graphical Chart and to
save a .pdf of this chart to our Desktop. See the Periodontal Page Printout section on page 29 for
the results of our choices.
Moving Mode
Once you print your selected documents, the software will take you back to the patient’s
periodontal chart and automatically put you into Moving Mode. The purpose of being in Moving
Mode is to be able to freely move throughout the chart without accidentally editing data. This is
useful when you want to highlight specific areas of the chart for a patient or yourself or another clinician.
Page 32

29
Periodontal Page Printout
Here is the actual printout of the patient’s second visit that we saved to our Desktop. This printed
hard copy of the chart can be given to the patient to take home and refer to specific areas for
targeted flossing and brushing.
Page 33

30
It can also be filed with the patient’s record or insurance company.
Deleting a Visit
There might be a case where you do not want to delete a patient, but rather one of their visits. You
can accomplish this by going to the Compare To Button on the Right Hand Side Toolbar.
This will bring up the Visit Comparison/Visit Management Dialog. Look at the right-hand column
labeled Display Visit. Highlight/Select the visit that you wish to delete. Click the Delete button –
it will give you a warning asking if you are sure that you wish to delete this visit – choose Yes to
follow through with the deletion. Click OK to dismiss the dialog and return to the Periodontal Page.
WARNING: Once a patient’s record has been deleted, the data cannot be restored.
Page 34
31
Closing the Program
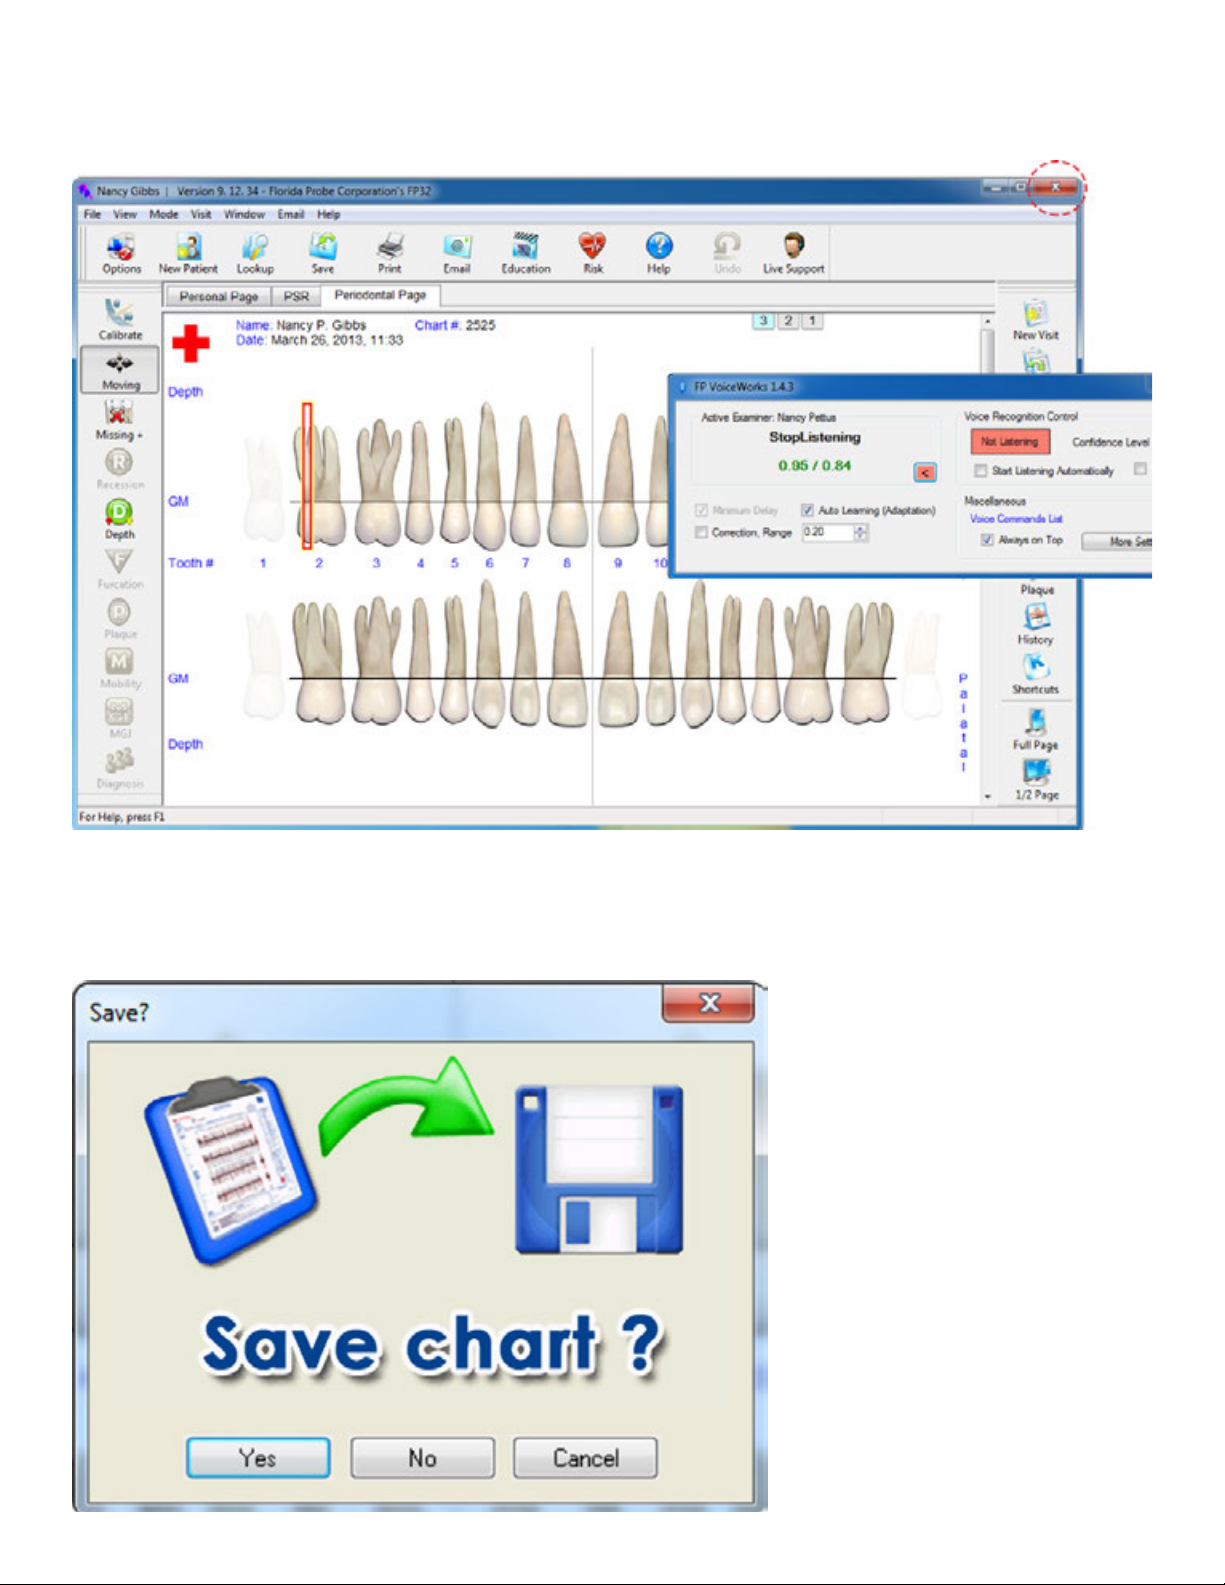
When you are ready to exit the program, close the “x” on the upper right-hand side of the window,
which will turn red when you hover over it. This will also close the VoiceWorks Dialog Box.
If you have unsaved chart changes, the program will ask you if you want to save these changes to
the current chart (see below) – you must either choose, Yes , No, Cancel or click the “x” (same as
Cancel and will take you back to whatever tab you were on in the Patient’s Record).
Turn the VoiceWorks Headset Off and Charge It
Page 35

32
Once you have closed the program, turn the VoiceWorks headset off by holding the power button
for 2 seconds. Plug the USB Charging Cable for your Voiceworks headset into the small opening
located on the bottom of the right headphone. Plug the other end into the provided Black USB
Wall Plug and then plug into a wall outlet. Alternatively, you can plug the other end into the
provided optional White USB Hub and then connect the hub to your computer; however, the
headset will not charge if you turn your computer off.
For More Info About Our Products: Please refer to our other online user manuals at:
www.floridaprobe.com/downloads.htm
Integration with Practice Management Software
Launching VoiceWorks from your Practice Management Software
If you are using VoiceWorks with your Practice Management Software, you will start out in your
practice management software first and select the patient you want to chart. You will then click on
the Florida Probe link (see drop down menu choice, or click on button). See sample from SoftDent
PM software below.
Link to Florida Probe within SoftDent PM Software
The very first time you click on the Florida Probe link from a patient that you haven’t charted on
within Florida Probe/VoiceWorks, the Florida Probe/VoiceWorks software will launch and you
will see a message, like, “We couldn’t find this patient in our database, do you want to create a
New Patient?” Choose “Yes” and you the patient’s name and chart number will auto-fill in Florida
Probe’s Personal Page. Click on the Periodontal Tab to begin charting. The next time you click
on the Florida Probe link from that patient’s Practice Management chart, you will be immediately
taken to the patient’s last Periodontal Chart within Florida Probe/VoiceWorks where you can view
older charts, or create new perio charts with VoiceWorks.
Page 36

Problem Solution
Headset Doesn’t Seem
to be Hearing You
33
QUICK TROUBLESHOOTING
1.
If the VoiceWorks Dialog box is red, say, “VoiceWorksON” - You
should hear and see “Profile Loaded” appear in the VoiceWorks
Dialog box and it should turn green. Give it a second to fully load
and try speaking your command again.
VoiceWorks Dialog box is
On (Green) but Nothing
is Happening or it’s Not
Charting Bleeding, etc.
2.
Make sure you are working under the correct
voice profile (check for your name in the
VoiceWorks box). If not, click on Visit Settings in
the right-hand toolbar and select your name from
the Examiner drop-down menu or type it in if it is
not listed.
Redock the headset into the charging stand base and wait at
3.
least 15 seconds. Battery Status Light should turn
slow-blinking white or solid white. If it’s red, headset power is
very low and it needs to be charged. Headset Pairing
Status Light should also turn white, NOT red. If it’s still red after
15 seconds, remove and redock the headset. Please refer to the
Wireless Headset Reference for specific information
on how to accomplish this and verify correct docking
technique. Once you confirm that the battery is not
drained and the headset is paired to the charging
stand base, you may remove the headset and use it.
DOCK HERE
Make Sure You are in Pocket Depth
Mode, NOT Missing Teeth Mode or
Moving Mode. Check the left-hand
side of the toolbar on the Periodontal
Page. The green “Depth” Mode button
should be highlighted. If it isn’t, say
“ChangeModePocketDepth” or click the
“Depth” Mode button. If this does not
help, log into Live Support.
SPEAKER OR PRINTER ISSUES
To ensure that you receive the best case acceptance from your patients, they must hear the important verbal feedback
that VoiceWorks provides during the periodontal exam. You can accomplish this by making sure your computer is not
streaming music that might interfere with your patient hearing VoiceWorks. Please do not alter the sound settings
made by our remote installation technician when he installed your VoiceWorks software.* ** If you are attaching a new
printer, television, monitor, or are making changes to your external speakers, please consult with your IT personnel. If
they cannot assist you, please call us at 352-372-1142 and we will try to help.
*It is possible to play all VoiceWorks sounds through your headset, without the patient hearing them. If you wish to do this, please
call us and we will set this up for you. **You can turn warning and danger sounds off by saying, “WarningSoundsOff.”
352-372-1142
Page 37
34
Troubleshooting
Sound
You may experience the phenomena of hearing both the Headset reminders (“Headset Ready”)
and the Florida Probe sounds (“2,1,2”) in your headset. If this happens, your speakers are probably
not set up as the default device. To remedy this situation:
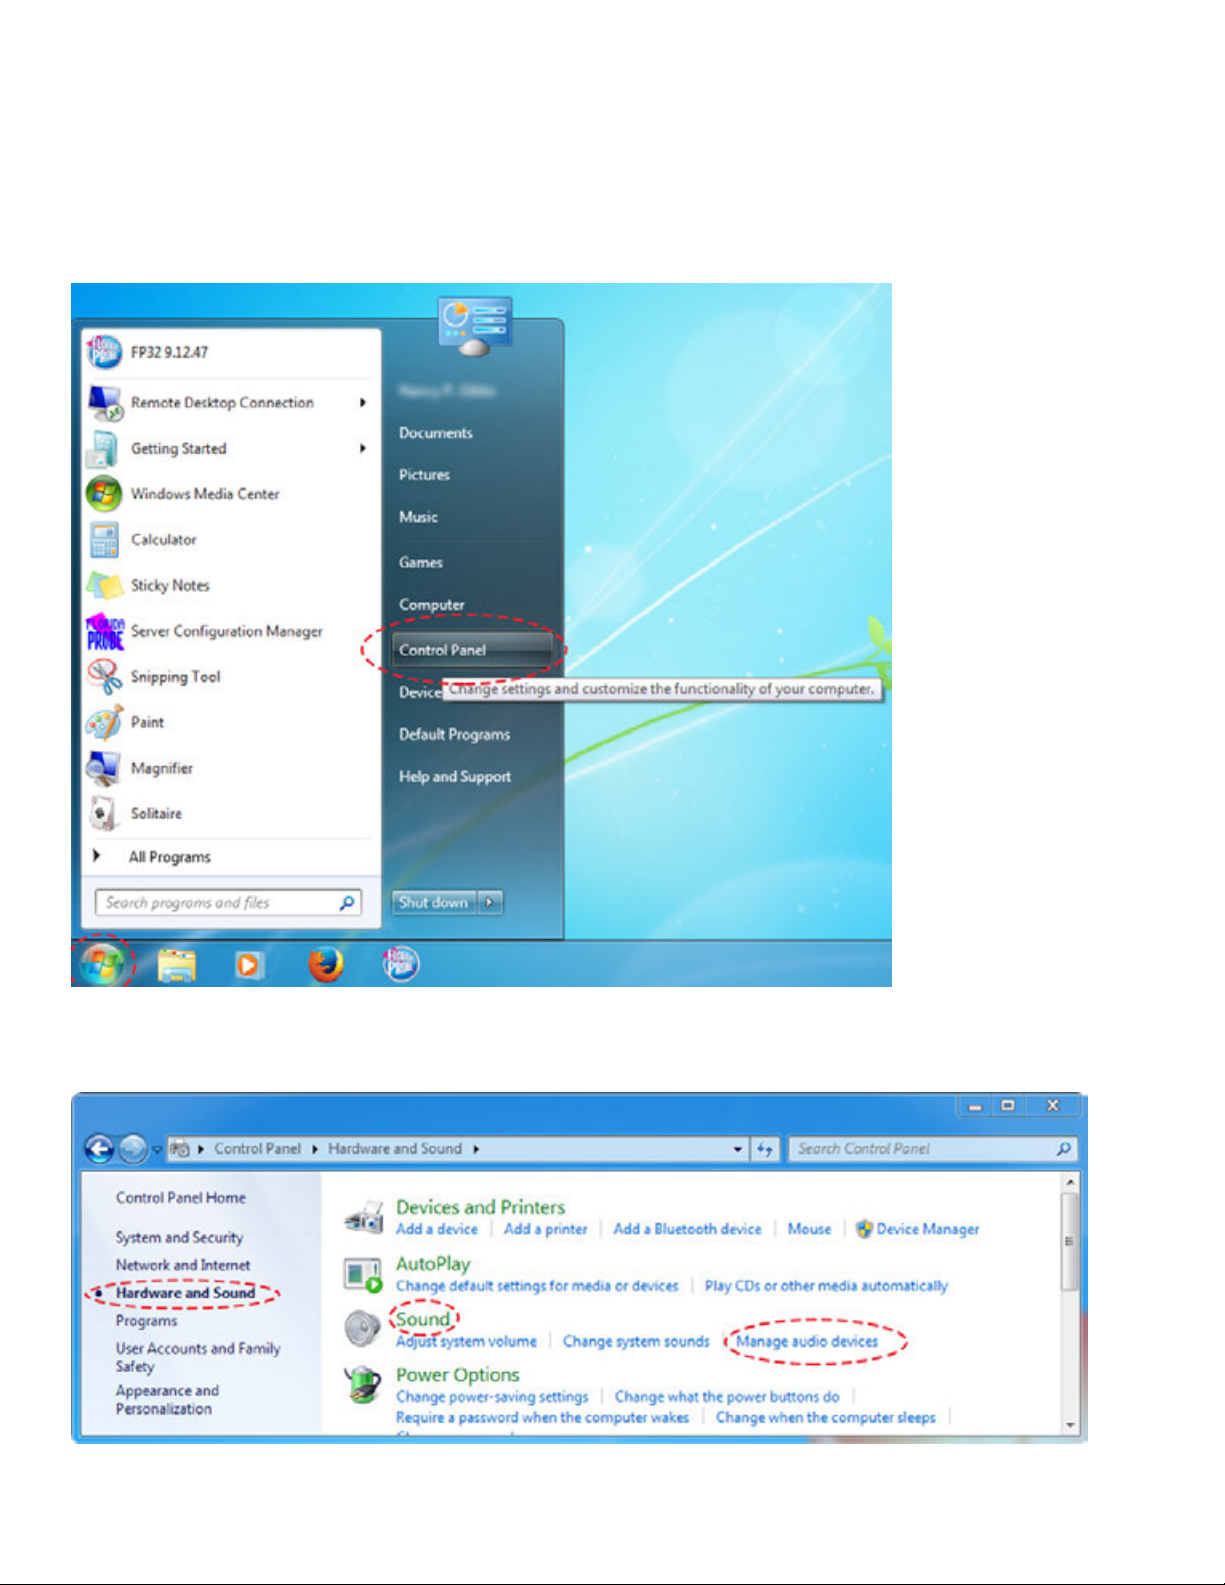
Right click on the “Start” Menu in Windows. Click the “Control Panel” tab.
Open Sound options in Windows. Click on “Hardware and Sound,” then “Sound” and then, “Manage
Audio Devices.”
Page 38

35
Note the two devices listed. The one that has “FloridaProbe” in the name should NOT be listed as
the default device. Instead, make sure your computer’s speakers are selected as the default device.
If your computer’s speakers are already
selected as the default device, there
will be a green checkmark next to the
icon as well as the words, “DEFAULT
DEVICE.” If you find that you need to
change them to the default device, then
click on the button, “Set Default.”
Note: the wireless headset won’t show
up in the list of devices unless the
VoiceWorks USB Key is plugged into the
computer or usb hub connected to the
computer.
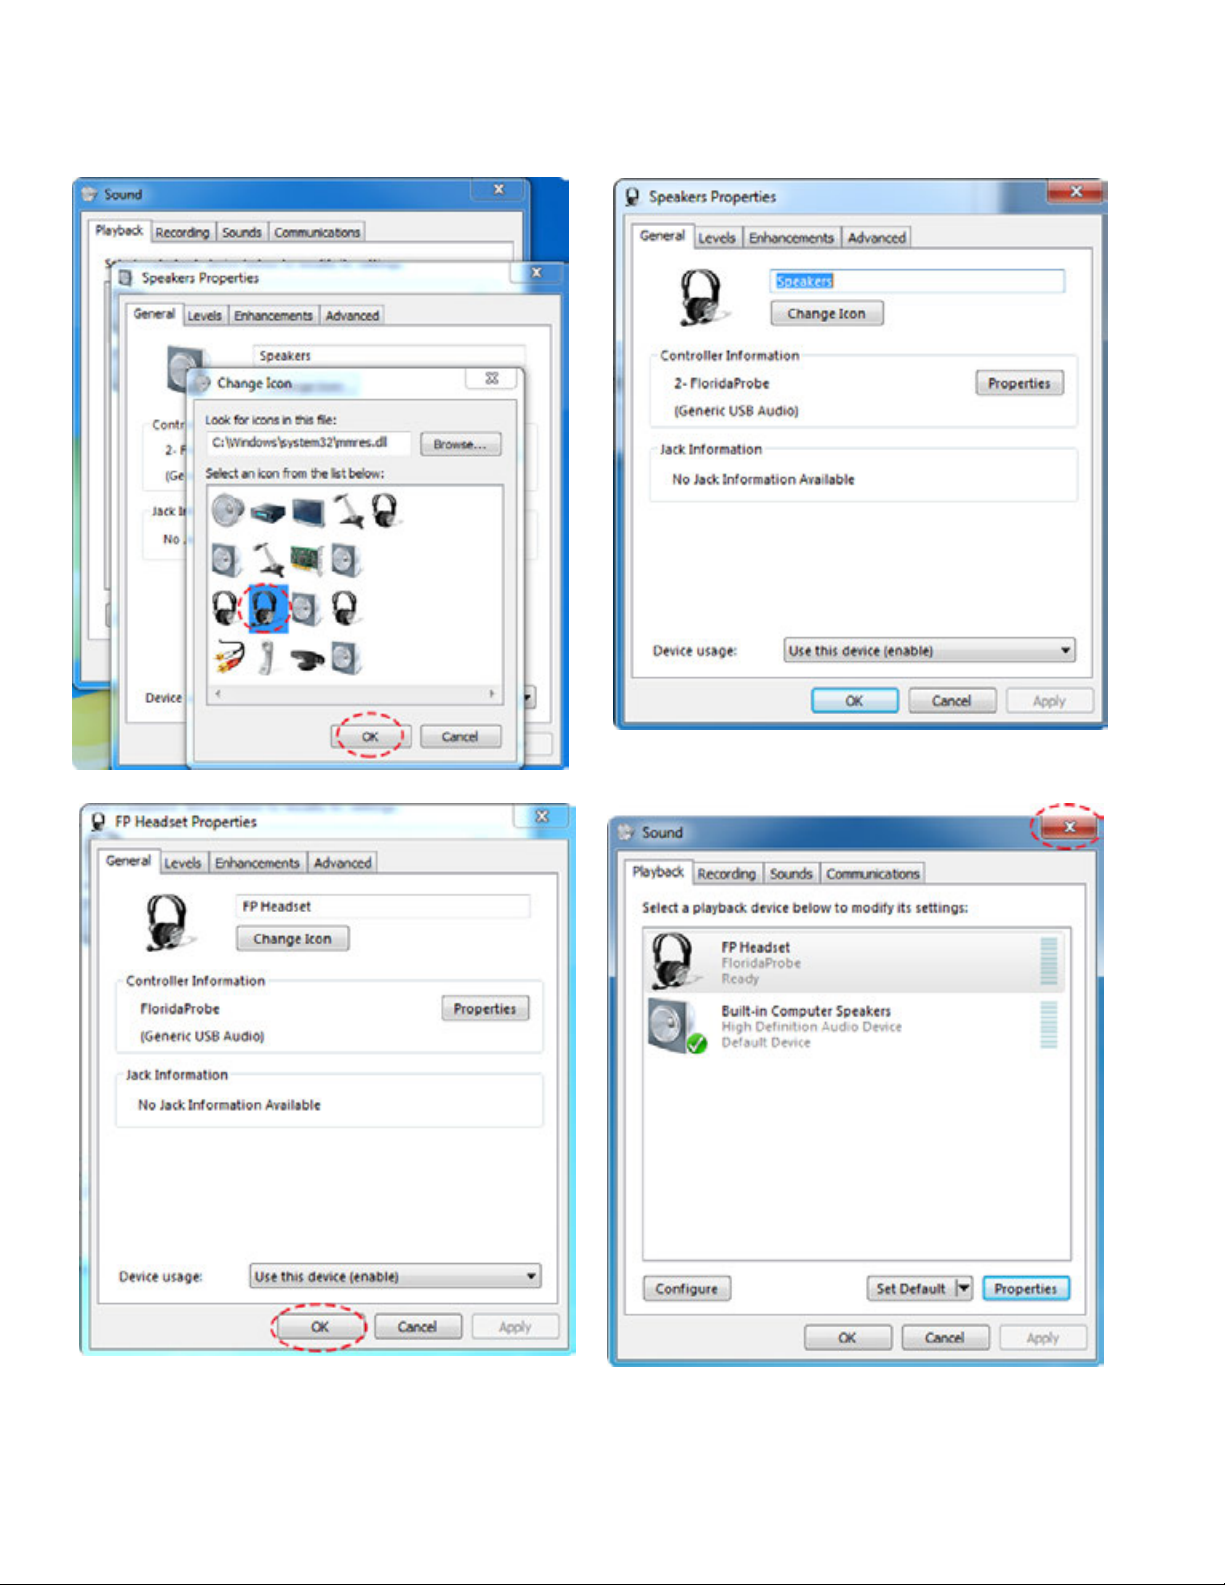
To further clarify between the devices, you should change the icon to resemble a headset with mic.
To do this, first select the FloridaProbe Speakers from the list of playback devices, then click
“Properties.” Click the “Change Icon” button.
Page 39
36
Choose the headset icon as indicated below, then press “OK.” You will then be taken back to
the “Speakers Properties” tab. Next, change the name of the device to “FP Wireless Headset” or
something similar so that you will know that it refers to your Florida Probe Wireless Headset.
Press “OK.” Close the Sound tab.
Page 40
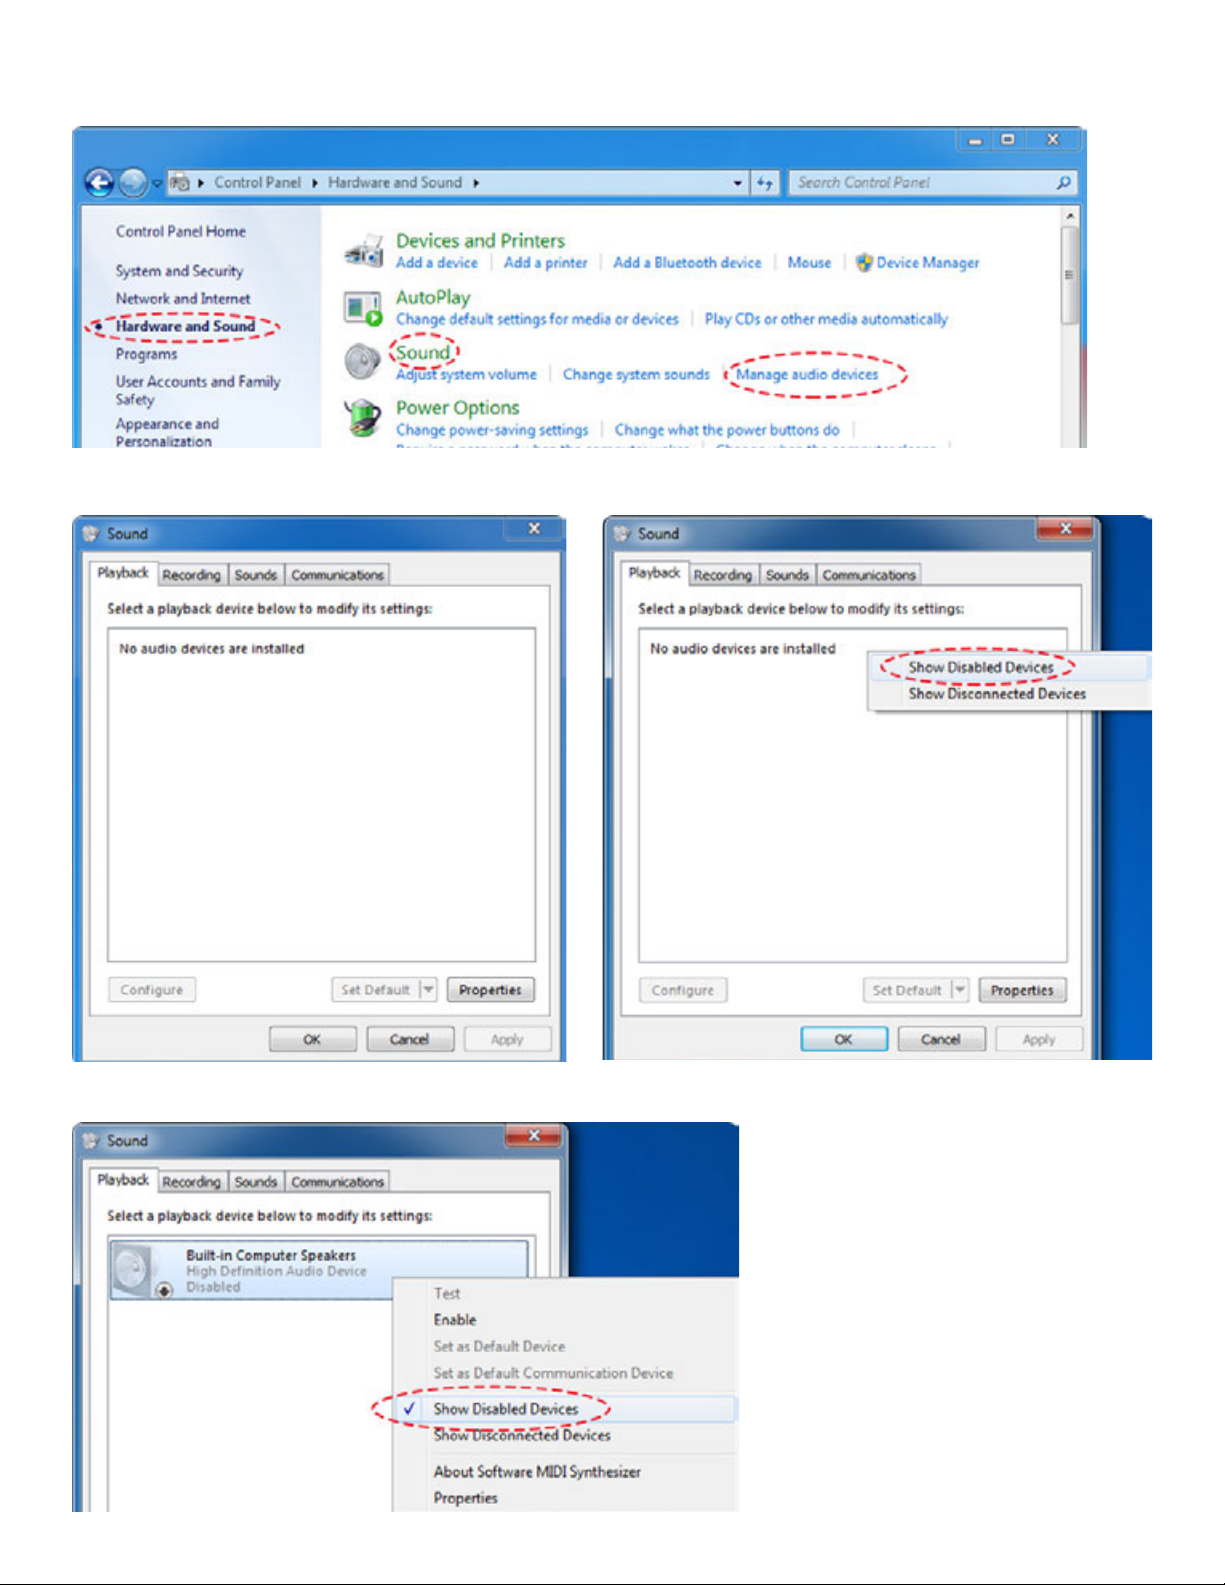
37
Your internal speakers may be “hidden.” Open Sound options in Windows. Click on Hardware and
Sound and then Sound and then, “Manage Audio Devices.”
Under the “Playback” tab, you may be presented with the message that “No audio devices are
installed.” Left-click in the window and select, “Show Disabled Devices.”
If you have computer speakers, you should see them appear (greyed out) and they will be
indicated as “Disabled.”
Page 41
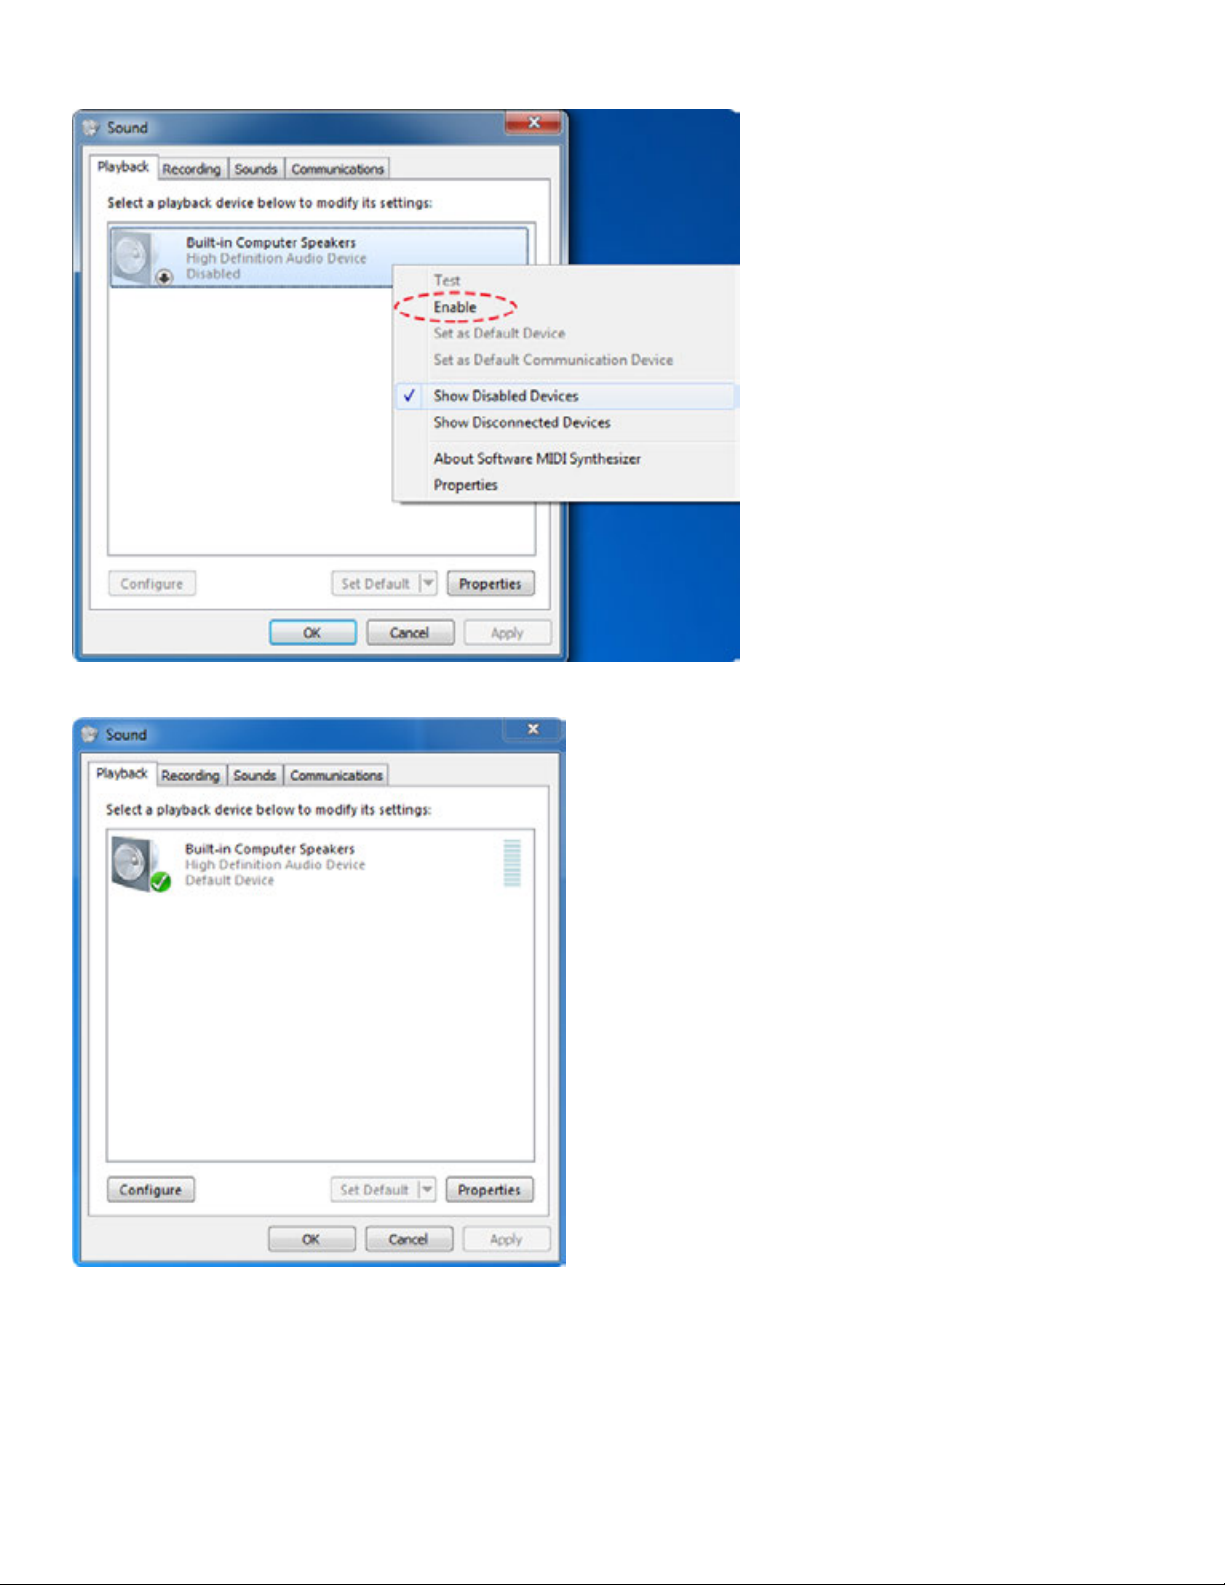
Next, move your mouse to select, “Enable.”
38
The Speakers should no longer be greyed out and should be listed as the “Default Device.”
Page 42

39
FP32 Software Key not Recognized
You may launch the FP32 Software and receive this dialog image:
This means that the FP32 Software Key has not been recognized by the computer/software.
Proceed as follows: Close the dialog. Check to see that the FP32 Software Key is plugged into a
USB port that is connected to the computer that has the FP32 Software Installed on it. If it is, then
unplug the key and plug it back in. Launch the software again. If you still get the dialog image,
then unplug the key and plug it into a different USB port (you may have to move another device to
another USB port to do this).
Headset Not Working
You may say voice commands into the wireless headset and have it not respond. If this happens:
Look at the paired VoiceWorks USB Key that came with your headset (it has the same color
VoiceWorks sticker as your headset). Is the red light on the back of the key blinking? If yes, then
make sure you press the power button on your wireless headset for at least 2 seconds. You should
see a blue light come on in the center of the VoiceWorks sticker on the headphone. Also, check to
see that the FP32 Software Key is plugged into a USB port that is connected to the computer that
has the FP32 Software Installed on it. If it is, then unplug the key and plug it back in. Launch the
software again. If you still get the dialog If you still get the dialog image, then unplug the key and
Page 43
40
plug it into a different USB port (you may have to move another device to another USB port to do
this).
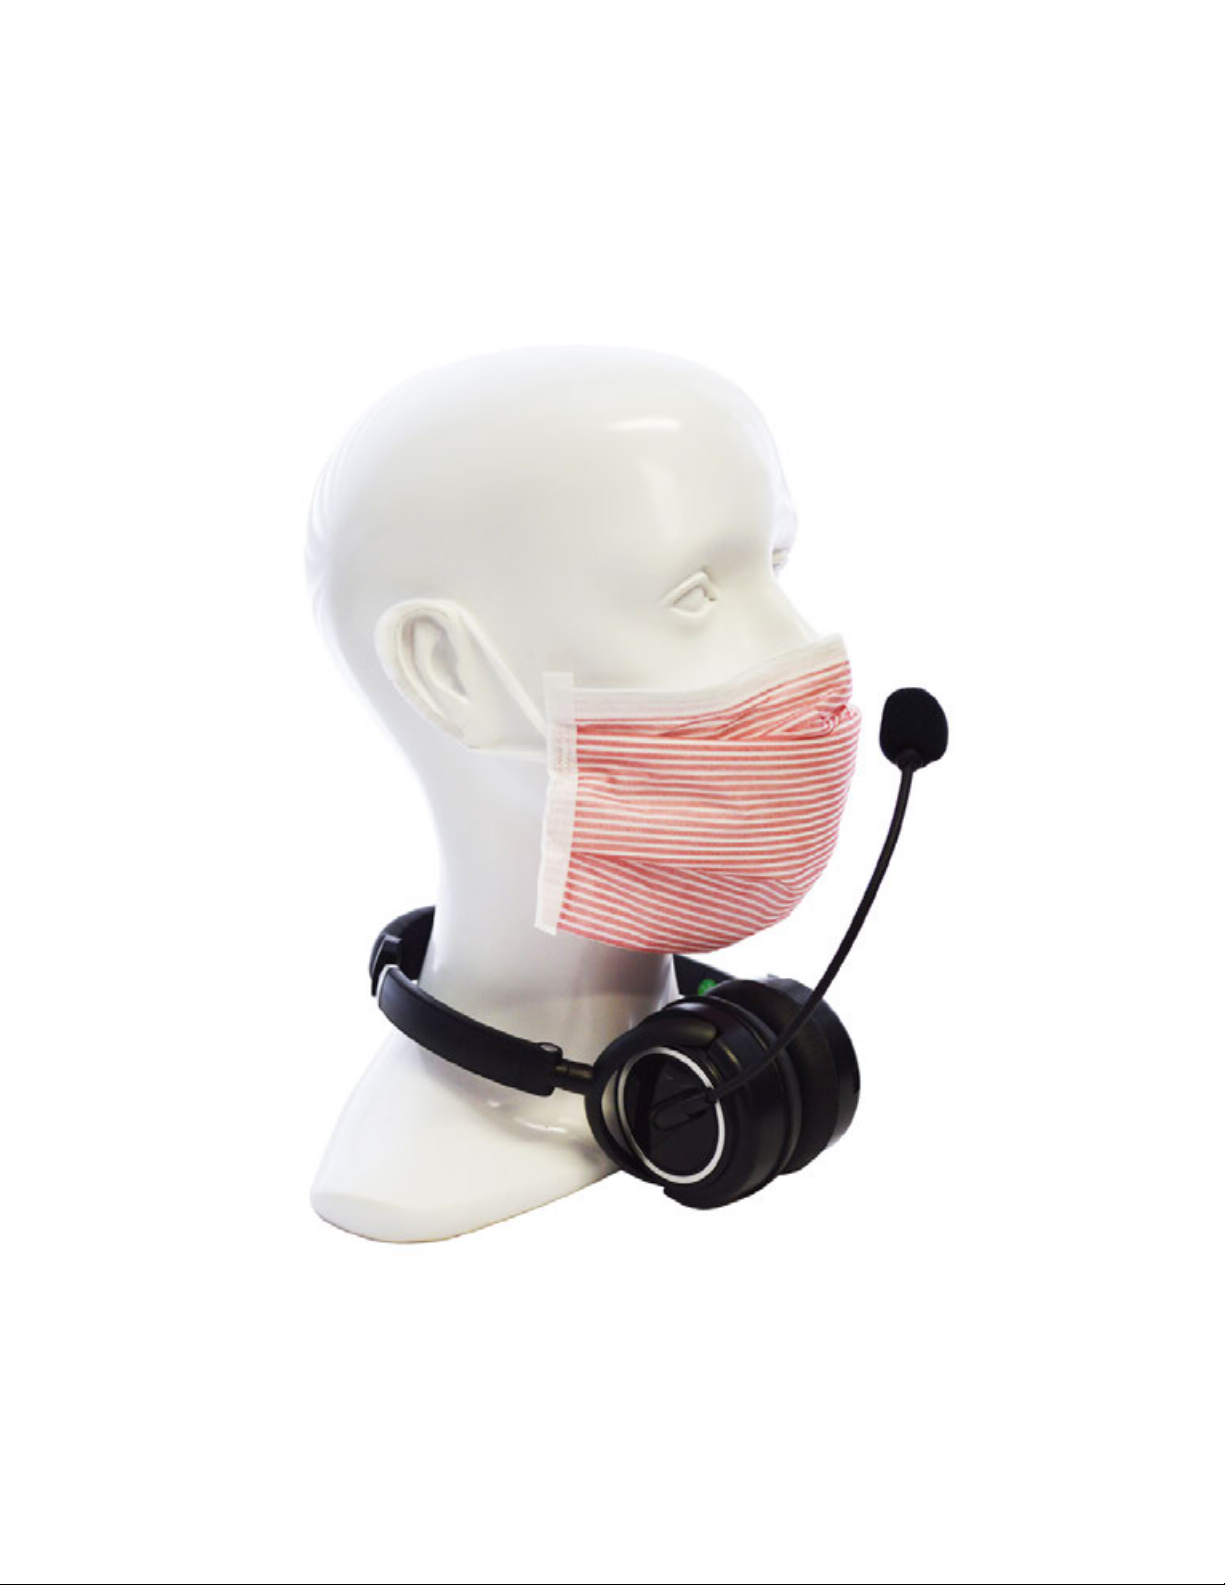
Headset Too Big
If you find the headset is too big, please try wearing it around your neck with the boom mic angled
vertically toward your mouth. See fig. below for details.
Certain Commands or Phrases are Scored Low by VoiceWorks or Not at All
You may say a command and the VoiceWorks dialog will indicate that it heard the command, but
scored you very low, so it didn’t execute the command. For example, you say “BuccalBleeding”
and you can see that it heard the command because “BuccalBleeding” appears in the VoiceWorks
Page 44

41
dialog, but it scores you below the current Confidence Level, so it doesn’t input that exam data
into the chart. The first thing you should do is check to make sure “Auto Learning (Adaptation)”
is checked (turned on) in the VoiceWorks dialog box. Next, you should repeat the phrase or
command several times and see if your Confidence Level score (1st number before the slash) rises.
If it does, VoiceWorks has now learned the phrase over time.
“BuccalBleeding” appears in the dialog, but score is .82,
which is below the current Confidence Level
The increase in the Confidence Level score
to .96 indicates that VoiceWorks has now
learned the phrase over time
Some words have more than one command - for example, “BuccalBleeding” and “FacialBleeding.”
Let’s say that one choice for this word is always scored low. *You can go into the training module
and change the confidence level for just that phrase or word.
WARNING: PLEASE CONTACT YOUR
TRAINER BEFORE YOU CHANGE THESE SETTINGS!
First, click “More Settings” in the
VoiceWorks Dialog Box.
Next, click “Train Voice Profile” - you will
be presented with the “Training Options”
dialog.
Adjust the Confidence Level for a Word or Phrase
Locate the phrase/command that you wish to train. Lower the confidence level at least 20 points
below what VoiceWorks is scoring that particular command at. For example, if it is scoring “Buccal
Bleeding” at about a .40, find that phrase in the list and lower the confidence level (“Set Custom
Level” button) for “BuccalBleeding” to at least .20. Make sure the radio button for “To Confidence”
is selected and then press, “Apply to Selected items.” Close the dialog.
Page 45

Training Options dialog
42
*WARNING: PLEASE
CONTACT YOUR
TRAINER BEFORE
YOU CHANGE THESE
SETTINGS!
Reset the
Confidence Level
for Any Word
In order to reset the
confidence level for
any word, change the
Custom Confidence
Level for that word to
“0.0,” click “Apply to
Selected Items” and the
next time you launch
VoiceWorks, it will
reset to the standard
confidence level.
Train Specific
Words or Phrases
Sometimes, you may
say a phrase such as
“FurcationTwo” and
VoiceWorks doesn’t
score it at all. In that
case, you should train
that specific word.
Locate the offending
word/phrase in the
Training Options dialog,
select the word, and
click the train button.
The training dialog
will appear. Say the
word that shows up
the screen. If you have
selected more than one
word that you want
to train, it will show
all the words that you
previously selected.
Page 46

43
Train each word at least 2-3 times. When the training is done, you will see the message below.
Say or press “Save Training” to save the changes. Say or press “Cancel Training” to discard the
changes.
Adjust the Weight of a Word or Phrase
Let’s suppose you say “4, 5, 6,” and it puts in “4, 5, 7” meaning that the 6 and 7 are being confused.
In this example you have to train the 6 and 7 - see previous example of how to train words.and
then you go back and check it to make sure it’s working. If it still doesn’t work, you may have to
go back and adjust the weight of the words. The weight refers to how much VoiceWorks thinks
you are going to use this word when compared to other words. You can take a word that you don’t
want to use and give it zero weight so that it can’t be used. This will block its usage completely if
you put a zero weight in. The normal weight is .5 - if you want to weight it more, make it .75 - the
strongest you can make a weight is one.
Reset the Weight of
Any Word
In order to “reset” the
weight of any word,
go back to that word
and give it a weight of
“0.50.” Click “Apply to
Selected Items.” The
word or phrase now has
a normal weight.
Page 47
Appendix
44
Page 48

Headset Pairing Status Light
Battery Status Light
QuickStart
45
WIRELESS HEADSET REFERENCE
Headband
Volume Down
Volume Up
**Space between the Ear Cup
(make sure headset is properly
placed in charging stand base for
successful charging and pairing
Ear Cup
Microphone (make sure it is positioned by mouth)
Mute LED (lit when microphone is muted)
Mute button (Say,“VoiceWorksOFF” instead)
1
Connect the charging stand base to the
power adapter and the power adapter
to an electrical outlet.
2
Connect the charging stand base to the
computer where the VoiceWorks software
is installed using the supplied USB cable.
and Headband**
using this space)
3
Insert the FP32 Software Key into a USB
port on the same computer.
NOTE: Both the USB cable and the power
adapter must be plugged into the charging
stand base in order for the headset to work
wirelessly when you remove it from the charging
stand base to record a periodontal chart. Once
the headset is removed from the charging stand
base, the Battery Status Light will not be lit, but
the Headset Pairing Status Light will function
and will tell show you the pairing status of the
headset: (1) paired, (2) trying to pair or (3) not paired.
4
Dock the headset onto the charging stand base when not in use in order to keep
headset charged. Headset power should last about 12 hours on a full charge.
**IMPORTANT** For successful charging and pairing, the headset must be placed
on the charging stand base using the **Space between the Ear Cup and Headband.**
The Battery Status Light will be lit when headset is connected properly for charging;
however, Battery Status Light does NOT indicate whether or not headset is paired with
charging stand base. Headset will not work if it is not paired to charging stand base
(see back of this sheet for more info on how to make sure headset is successfully paired with base).
Charging Stand base
(lit when headset is properly seated
in charging stand base for charging)
(see back of this sheet for more info)
1-877-357-7623 FloridaProbe.com
Page 49

Battery Status Light
46
Battery Icon Not Lit:
Headset is NOT docked properly*
Solid white:
Headset battery is fully charged
Slow Blinking white:
Headset battery is currently charging
Solid red:
Headset battery/charge is very low
Headset Pairing Status Light
Blinking white:
Headset is attempting to pair with
charging stand base
Solid white:
*Redock the Headset until the battery status
light comes on (it may either be slow blinking
or solid white). See pics at the bottom of this
page for more info.
Headset is sucessfully paired with
charging stand base
Solid red:
Headset is NOT paired with
charging stand base*
*If it has been 5 seconds since
you docked the headset and the
Headset Pairing Status Light
remains red, remove and redock
the headset. First, make sure the
Battery Status Light comes on
(it may either be slow blinking or
solid), then watch for the Headset
Pairing Status Light to change to
solid white to indicate pairing with
the charging stand base has been
successful. Call us toll-free if you
need help at any point!
WHAT ELSE IS IN THE BOX
USB Cable Power Adapter
FP32 Software
Key
1-877-357-7623 FloridaProbe.com
Page 50

CORE VOICE COMMANDS
Note: A link to the complete list of VoiceWorks Commands
can be found in the VoiceWorks dialog window within the
software. *This list is for version 9.12.53 and above.
47
Correct Mistakes
Undo, Undo2, Undo3, etc.
Jump to a Specific Tooth
Turn On/Off
VoiceWorksOn VoiceWorksOff
Changes in Dentition
RemoveThirdMolars
RemoveLowerArch RemoveUpperArch
Missing / ReEnter
Crown / Implant / Bridge / Impacted
Numbers
You can enter numbers one at a time (“One”),
two at a time (“OneTwo”), or at a maximum
of three at a time (“OneTwoThree”). Pause
after three at a time (ex., “OneTwoThree
[pause], Bleeding.” Numbers 0-19 are available.
Patterns
Bleeding,
DistalBleeding, MesialBleeding,
FacialBleeding, BuccalBleeding
LingualBleeding, PalatalBleeding
InterproximalBleeding
HalfToothBleeding
WholeToothBleeding
JumpTo14
JumpTo14Lingual
JumpTo14MesialLingual
View Summary or Other Info
ViewSummary
ViewToothHistory
ViewFullPage
Escape
or Cancel (to remove Dialogs)
or ViewHalfPage
Change Modes (left toolbar)
ChangeModeRecession
ChangeModePocketDepth
Faster Data Entry
Healthy = 2, 1, 2
Normal = 3, 2, 3
HealthyHealthy
NormalNormalNormal
Repeat4
Lost? or Move the Cursor
GeneralizedInterproximalBleeding
You can also replace the command,
“Bleeding,” with these patterns (for ex.,
“DistalExudate”): Exudate, Plaque,
Recession, PseudoPocket, Furcation
HalfToothRecession2
InterproximalRecession2
WholeToothFurcation3
WhereAmI
Next / Back
MoveUp / MoveDown
Done & Ready to Save/Print
SaveChart
PrintChart
EndTheExam
(does both)
Page 51

Problem Solution
Headset Doesn’t Seem
to be Hearing You
48
QUICK TROUBLESHOOTING
1.
If the VoiceWorks Dialog box is red, say, “VoiceWorksON” - You
should hear and see “Profile Loaded” appear in the VoiceWorks
Dialog box and it should turn green. Give it a second to fully load
and try speaking your command again.
VoiceWorks Dialog box is
On (Green) but Nothing
is Happening or it’s Not
Charting Bleeding, etc.
2.
Make sure you are working under the correct
voice profile (check for your name in the
VoiceWorks box). If not, click on Visit Settings in
the right-hand toolbar and select your name from
the Examiner drop-down menu or type it in if it is
not listed.
Redock the headset into the charging stand base and wait at
3.
least 15 seconds. Battery Status Light should turn
slow-blinking white or solid white. If it’s red, headset power is
very low and it needs to be charged. Headset Pairing
Status Light should also turn white, NOT red. If it’s still red after
15 seconds, remove and redock the headset. Please refer to the
Wireless Headset Reference for specific information
on how to accomplish this and verify correct docking
technique. Once you confirm that the battery is not
drained and the headset is paired to the charging
stand base, you may remove the headset and use it.
DOCK HERE
Make Sure You are in Pocket Depth
Mode, NOT Missing Teeth Mode or
Moving Mode. Check the left-hand
side of the toolbar on the Periodontal
Page. The green “Depth” Mode button
should be highlighted. If it isn’t, say
“ChangeModePocketDepth” or click the
“Depth” Mode button. If this does not
help, log into Live Support.
SPEAKER OR PRINTER ISSUES
To ensure that you receive the best case acceptance from your patients, they must hear the important verbal feedback
that VoiceWorks provides during the periodontal exam. You can accomplish this by making sure your computer is not
streaming music that might interfere with your patient hearing VoiceWorks. Please do not alter the sound settings
made by our remote installation technician when he installed your VoiceWorks software.* ** If you are attaching a new
printer, television, monitor, or are making changes to your external speakers, please consult with your IT personnel. If
they cannot assist you, please call us at 352-372-1142 and we will try to help.
*It is possible to play all VoiceWorks sounds through your headset, without the patient hearing them. If you wish to do this, please
call us and we will set this up for you. **You can turn warning and danger sounds off by saying, “WarningSoundsOff.”
352-372-1142
Page 52

49
How to Search for Patients
You can use the voice command, “PatientLookup” to launch the Patient Lookup Dialog. Once the
dialog has been launched, you can also use the commands, “Back” to move to patients toward
the top of the list and “Next” to highlight patients toward the bottom of the list. When you have
the desired patient highlighted, say “Select” to launch that patient’s record. You will be taken to
that patient’s Personal Page. By default, the Patient Lookup Dialog will search for all patients by
Last Name when you type this information into the Autosearch box. Use the Search by feature to
change the method of the patient search to First Name, Chart Number, Last Modified, or # of Visits
– then type what you are searching for into the Autosearch box. When a possible match is found, it
will be highlighted in the list. Click the ‘OK’ button to access the patient’s record and exam data.
IMPORTANT: If the patient is a current patient already in the database, you must select the patient’s
name from the Patient Lookup Dialog before performing an additional visit, rather than selecting
the New Patient button. If you inadvertently create a new patient when you intended to create a
new “visit,” the exam data will be associated with a separate new patient and the visit comparison
functions of the FP32 Software will not work. You will have to re-enter the exam data under the
correct patient and delete the new patient you accidentally created.
Page 53

50
What an Asterisk * in Front of Visit Number Means
If a patient has an asterisk before their # of Visits then that means that someone has started a
chart for them by filling out at least the minimum information on the Personal Page, but that no
periodontal chart has been created for them yet. Sometimes, the front office staff will pre-fill out
information on the patient’s Personal Page to assist the RDH or Dentist before the patient’s first
periodontal exam.
Deleting a Patient
Select the patient you wish to delete. Click on the Delete Patient button. You will receive a warning
asking if you really want to delete the patient/info.
WARNING: Once a patient’s record has been deleted, the data cannot be restored.
Page 54

51
Change the Order of Search Results
You can also change the order that the search results are listed, simply by clicking on the criteria
that you want listed first. In the examples below, the first Patient Lookup Dialog box lists patients
by Last Name first and in the second dialog, patients are listed by their Last Modified date first.
Dismiss the Patient Lookup Dialog Box
Click on ‘Cancel’ to dismiss the Patient Lookup dialog without opening a patient record.
Note: If another record is already open, it will remain open.
Page 55

52
How to Change to Quadrant Tooth Numbering Method
For those users outside of the United States, you can easily change the Tooth Numbering Method
by clicking on the Options menu in the Main Tool Bar and then clicking on the Periodontal Page
mini-tab in the Setup Options dialog that pops up (see figure below). Then just change the default
Tooth Numbering Method from the 1 to 32 used in the U.S. to the Quadrant Method.
Hint: There are many other options that you can change from this menu, but those are covered
in another manual. Feel free to experiment with these options as they can be changed back and
forth.
Sometimes the FP32 program must be closed and re-launched in order to implement these
changes.
Page 56

53
How to Enter & Edit Medical Alerts
From the patient’s Personal Page, locate the “Medical Alerts” section and click the “Edit Patient
Alerts” button (see figure below).
You will be presented with the “Alerts” dialog. Highlight a diagnosis from the Default Medical
Alerts column. For example, “Diabetes” - click on the arrow between the two columns. It will now
appear in the “Medical
Alerts for this Patient”
column (see figure on next
page).
Page 57

Alerts dialog
54
Add more Medical Alerts
or click “OK” to finish.
Create or Edit a Medical Alert
You can create a new medical alert for the patient by clicking “Create.” The “New Medical Alert”
dialog will pop up. Enter the name for the alert. Enter a description for the alert. Choose a Priority
level of “Low,” “Medium,” or “High” for the alert. Click “Ok.” The new alert wil now appear in the
“Medical Alerts for this Patient” column. Click “Ok” to save the information and dismiss the dialog.
If you want to edit an
alert, choose “Edit” from
the “Alerts” dialog (see
figure above) and edit the
information. Click “Ok” to
save and then “Ok” again
to dismiss the “Alerts”
dialog.
 Loading...