

Flora Digital Printing System
Model LJ320P
Copyright 2011@ Shenzhen Runtianzhi Image Technology Co.,Ltd. By Victor Xu
~1~
Flora
LJ3208P USER GUIDE
2011-7-18
Shenzhen Runtianzhi Image Technology Co.,Ltd
www.floradigital.com.cn

Flora Digital Printing System
Model LJ320P
Copyright 2011@ Shenzhen Runtianzhi Image Technology Co.,Ltd. By Victor Xu
~2~
FLORA.....................................................................................................................................................................1
LJ3208P USER GUIDE.............................................................................................................................................1
FLORADIGITALPRINTINGSYSTEM............................................................................................................................................5
DISCLAIMER.........................................................................................................................................................................5
MANUALUSEGECONDITIONSANDLIMITATIONS.........................................................................................................................5
CONTENTSOFPACKAGE..........................................................................................................................................................6
PRINTERINTRODUCTION.........................................................................................................................................................6
TABLE1GENERALFEATURES...................................................................................................................................................6
TABLE2TECHNICALSPECIFICATION............................................................................................................................... ............6
TABLE3FLORALJ3208PPRINTERMODELCODING....................................................................................................................7
ABOUTTHEMANUAL............................................................................................................................................................7
CHAPTER1SAFETYOPERATINGINSTRUCTIONS...........................................................................................................................8
1.1 BriefIntroduction...............................................................................................................................................8
1.2 SafetyInformation.............................................................................................................................................8
1.2.1 SolventandInkProperties.........................................................................................................................................8
1.2.2 DangerofFireandExplosion.....................................................................................................................................8
1.2.3 Anti‐ultravioletRadiation...........................................................................................................................................8
1.2.4 ProperVentila ti onandExhaustSystem.....................................................................................................................8
1.2.5 InkandSolventspillage,apotentialriskofFireandexplosion..................................................................................8
1.2.6 Highvoltagemayshockpeopleortriggerafire.........................................................................................................8
1.2.7 Printingmediarollsarebulkyandveryheavy............................................................................................................9
1.3 Fireproofing.......................................................................................................................................................9
1.4 ExhaustSystem..................................................................................................................................................9
1.5 HandlingPrecautions.........................................................................................................................................9
1.5.1 PowerSupply.............................................................................................................................................................9
1.5.2 Printer........................................................................................................................................................................9
1.6 RegularInspectionandMaintenance................................................................................................................9
1.7 Consumables......................................................................................................................................................9
CHAPTER2PREINSTALLREQUIREMENT............................................................................................................................... .....11
2.1 GettingStarted.................................................................................................................................................11
2.2 OperatingConditions.......................................................................................................................................11
2.2.1 InstallationSpace.....................................................................................................................................................11
2.2.2 EnvironmentConditions...........................................................................................................................................11
2.3 ConfigurationofComputer..............................................................................................................................12
2.4 PowerSpecification..........................................................................................................................................12
2.5 SuggestInventoryList......................................................................................................................................12
2.6 AvailableMediaTypes.....................................................................................................................................13
CHAPTER3EXTERNALVIEWS,PARTNAMESANDFUNCTIONS......................................................................................................14
3.1 ComputerStation.............................................................................................................................................15
3.2 MaintenanceStation........................................................................................................................................15
3.3 Carriage&BeamAssembly..............................................................................................................................15

Flora Digital Printing System
Model LJ320P
Copyright 2011@ Shenzhen Runtianzhi Image Technology Co.,Ltd. By Victor Xu
~3~
3.4 InkSupplyCompartment.................................................................................................................................16
3.5 ElectricalCompartment...................................................................................................................................16
3.6 DryingSystem..................................................................................................................................................16
3.7 Take ‐upSystem&FeedingSystem...................................................................................................................17
3.8 PowerControlPanel.........................................................................................................................................17
CHAPTER4WORKINGSYSTEMOFFLORALJ3208P...................................................................................................................18
4.1 SystemBlockDiagram.....................................................................................................................................18
4.2 PolarisPrintheadIntroduce.............................................................................................................................19
4.3 PrintingControlSystem....................................................................................................................................20
4.3.1 PrintingControlBoard(116‐0401‐132).................................................................................................................... 20
4.3.2 USBBoard(116‐0417‐011).......................................................................................................................................21
4.3.3 ServoCard(116‐0385‐022)..................................................................................................................................22
4.3.4 HPPBoard(116‐0396‐081)..................................................................................................................................23
4.3.5 ConnectorBoard(116‐0402‐020).............................................................................................................................24
4.3.6 RTZ‐16UVMediaBoard‐V1.3(116‐0030‐041)...........................................................................................................24
4.4 MechanicalMovementSystem........................................................................................................................24
4.4.1 X‐axisMovement(CarriageMotionSystem)............................................................................................................25
4.4.2 Y‐axisMovement(MediaFeedingSystem)...............................................................................................................26
4.5 InkSupply&NegativePressureSystem...........................................................................................................28
4.5.1 InkSupplySystem....................................................................................................................................................28
4.5.2 LackofInkWarnin gFunction...................................................................................................................................28
4.5.3 PurgeandFlushindividually.....................................................................................................................................29
4.5.4 NegativePressureSystem........................................................................................................................................29
4.5.5 OverflowProtectionFunction..................................................................................................................................29
4.5.6 Otherpartsintro......................................................................................................................................................30
4.6 FlushingSystem...............................................................................................................................................31
4.7 DryingSystem..................................................................................................................................................32
4.8 Take ‐upandfeedingSystem............................................................................................................................32
CHAPTER5INSTALLATIONMANUALOFFLORALJ3208P............................................................................................................34
5.1 MachinePre‐installation..................................................................................................................................34
5.2 InstallationofSoftware....................................................................................................................................34
5.3.1 InstallPhotoPRINTServerFloraEdition6.1v2..........................................................................................................35
5.3.2 InstallFloraDriver....................................................................................................................................................37
5.3.3 InstallUSBDriver......................................................................................................................................................38
5.3.4 Addsetup.................................................................................................................................................................39
5.3 InstallPrintHeads............................................................................................................................................40
5.4 InkandSolventPreparation.............................................................................................................................43
5.5 HeadAlignment...............................................................................................................................................43
5.5.1 Tes t PrintToolBar.....................................................................................................................................................43
5.5.2 SetParameter&NozzleCheck.................................................................................................................................43
5.5.3 PrintheadYAlignment.............................................................................................................................................44
5.5.4 Vertica lAlignment....................................................................................................................................................47

Flora Digital Printing System
Model LJ320P
Copyright 2011@ Shenzhen Runtianzhi Image Technology Co.,Ltd. By Victor Xu
~4~
5.5.5 InternalRightAlign...................................................................................................................................................47
5.5.6 InternalLeftAlign............................................................................................................................... ......................49
5.5.7 RightAlign................................................................................................................................................................49
5.5.8 XAlignment..............................................................................................................................................................51
5.5.9 StepAlignment.........................................................................................................................................................52
CHAPTER6OPERATIONMANUALOFFLORALJ3208P...............................................................................................................54
6.1 BriefIntroduction.............................................................................................................................................54
6.2 Starting‐upActivities........................................................................................................................................54
6.3 PrintheadJettingCheck..................................................................................................................................54
6.4 OperationalApproachofPhotoPRINTServerFloraEdition6.1v2....................................................................54
6.4.1 JobFolder.................................................................................................................................................................54
6.4.2 LayoutTag ............................................................................................................................... .................................55
6.4.3 WorkFlowTa g ..........................................................................................................................................................56
6.4.4 ColorManagementTag............................................................................................................................................56
6.4.5 PrintOptionTag.......................................................................................................................................................57
6.5 Shut‐offprocedure...........................................................................................................................................62
6.5.1 Over‐nightprotection............................................................................................................................... ................62
6.5.2 Longtermprotection...............................................................................................................................................62
CHAPTER7SERVICEANDMAINTENANCEMANUALOFFLORALJ3208P........................................................................................63
7.1 BriefIntroduction.............................................................................................................................................63
7.2 Maintenanceofprintheads.............................................................................................................................63
7.2.1 FlushingPrinthead...................................................................................................................................................63
7.2.2 PrimePrinthead......................................................................................................................................................63
7.2.3 ReplacingPrinthead............................................................................................................................... .................63
7.3 MaintenanceofInkSupplyandVacuumLineSystem......................................................................................64
7.3.1 ChangingDefectiveInkPumpandFilter..................................................................................................................64
7.4 MaintenanceofPrinterMovingPart...............................................................................................................64
7.5 AdjustTimingBeltTen s ion ............................................................................................................................... 65
APPENDIXATROUBLESHOOTINGGUIDE................................................................................................................................67
APPENDIXBHOWTOSETNEGATIVEPRESSURESENSOR(CKD)DISPLAY........................................................................70
APPENDIXCGLOSSARY......................................................................................................................................................72

Flora Digital Printing System
Model LJ320P
Copyright 2011@ Shenzhen Runtianzhi Image Technology Co.,Ltd. By Victor Xu
~5~
Flora Digital Printing System
Flora Digital Printing System, reserves the right to make changes without prior notice to the specifications and
materials contained herein and shall not be responsible for any damages (including consequential) caused by
reliance on the materials presented, including but not limited to typographical, arithmetic, or listing errors.
This equipment has been tested and found to comply with the limits for a class A digital device. Pursuant to p art
15 of the FCC Rules, these limits are designed to provide reasonable protection against harmful interference
when the equipment is operated in a commercial environment.
This equipment generates, uses, and can radiate radio frequency energy and used in accordance with the
instruction manual, may cause harmful interference to radio communications. Operation of this equipment in a
residential area is likely to cause harmful interference, in which the user will be required to correct the
interference at his own expense.
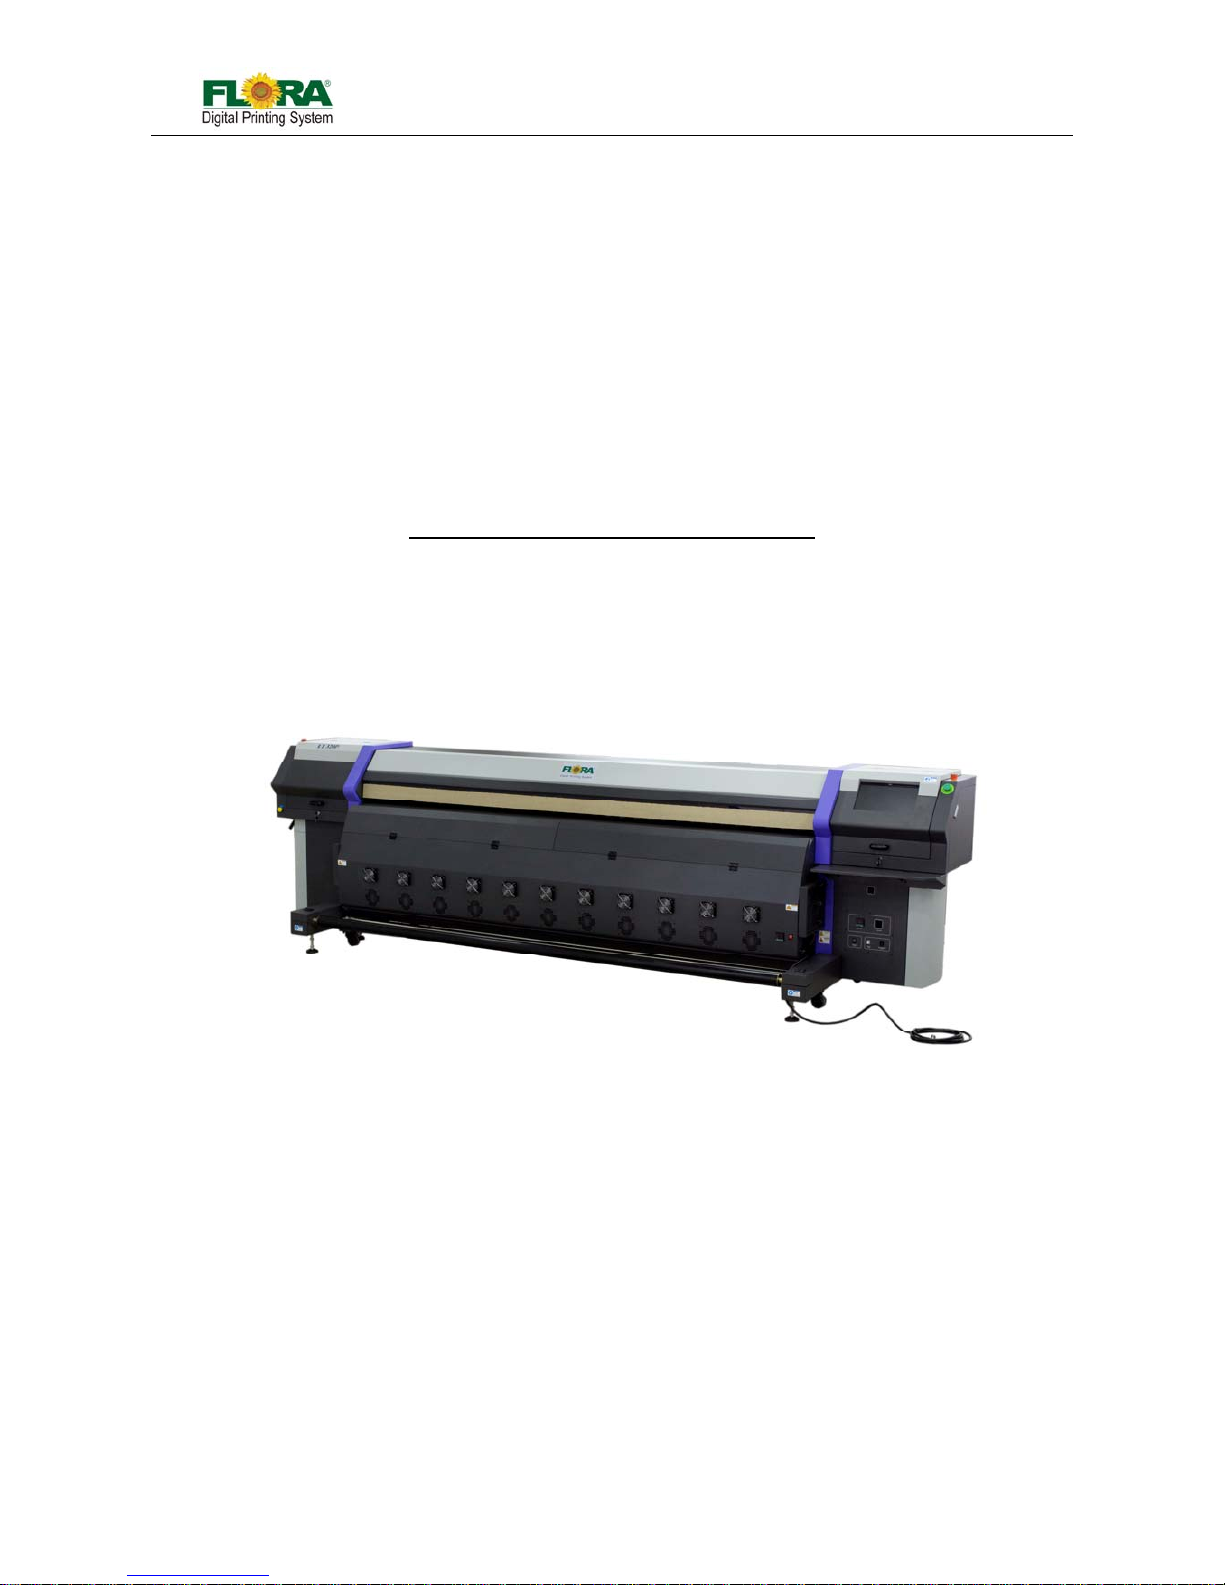
This printer is a color inkjet printer that uses a Solvent ink, support s up to 3200mm of media wi dt h, and has one
built-in USB interfaces.
This manual, the LJ3208P User's Guide, describes the features of the printer, names of components,
information needed before use, and basic operations, such a s how to turn the po wer ON and OFF, loading and
setting of the media and loading of ink.
The following items should be read before proceeding to Section 1;
− Contents of the package
− Safety precautions
− Handling precautions
− Notion
Notice: Read these items to use the printer safely and properly. Keep this manual in a place whe re you can
quickly access it any time.
Disclaimer
This is an alpha release of the User's Guide for Flora LJ3208P printer. We have made every ef fort to guara ntee
the accuracy and integrity of the information in this manual. If you find some errors or omissions, please bring
them to our attention so we can check and correct them accordingly.
This manual can be used as a reference for operation and routine maintenance of the Flora LJ3208P printers.
It can’t be a replacement for the formal training provided by Shenzhen Runtianzhi Image Technology Co., Ltd,
regarding on how to operate the printers properly. Shenzhen Runtianzhi Image Technology Co., Ltd will not
take any responsibility for the consequences of misusing this manual and appendix.
Manual Usege Conditions and Limitations
The manual includes patent information, which belongs to Shenzhen Runtianzhi Image Technology Co., Ltd.,
the purpose of which is to help the authorized customers. Without the written permission from RTZ Company
and the public declaration, any content of this manual should not be used for other purposes.
The text and images are subject to change without prior notice. Any software mentioned in this manual is
provided by permission. Use or copy of these softwares must be according and to follow prior regulations. If the
information in this manual has changed, there will be no further notice unless it is specified.
Flora Digital Printing System
Model LJ320P
Copyright 2011@ Shenzhen Runtianzhi Image Technology Co.,Ltd. By Victor Xu
~6~
Contents of Package
The internal printer components, including the options, are installed on the main unit on delivery. The print
heads and extension table assembly are included on a separated box within the main crate.
If any parts are missing or damaged, please contact the shop or dealership where you have purchased the
product or the nearest service center.
Printer Introduction
The Flora LJ3208P printer is a wide format digital printer suitable for small up to medium size business use. It
uses a Solvent ink. It provides high productivity and is capable to replace traditional silkscreen printing. This
type of printer is widely used in the fields such as advertisement, packing, printing, interior decoration, flexible
packaging, etc.
Flora LJ3208P series printers use drop-on-dema nd and Piezo-electric tech nolog y. It can print colorful and wide
image by using the highest 1200x1200 dpi resolution. It can output any size of images with “tile” feature in the
software.
Table 1 General Features
Item
No
Description Specification
1
Printing Method Drop-on-demand Piezo-electric
2
No. of colors 4 (CMYK)
3
Ink Solvent
4
Ink reservoir capacity (volume) 4 Li/color (refillable while printing is on progress)
5
Outdoor Durability 1 years for Flora Solvent ink
6 Media handling system Roll-to-Roll with vacuum
7 Drying system Dual Drying System
8 Media types
Roll-to-roll including paper, vinyl, adhesive back
vinyl, fabrics, banners, PVC, etc
9 Maximum printing size 3.2 m width
10 Rip software PhotoPRINT V6.1 Flora edition (Windows 7)
11 Driver software Flora Driver
12 Color management ICC based color, density adjustment curves
13 File format Bitmaps, Tiffs, Jpeg, Postcripts3, Eps, Pdf, etc.
14 Work Flow Rip and Print
15 Warranty 1 year (please consult your local dealer for details)
Table 2 Technical Specification
Item No D e s c r i p t i o n Specification
1 Model Flora LJ3208P
2 Print Head Binary Drop-on-demand Piezo-electric
3 No. of print heads 8 (CMYK, 2 print heads/color)
4 No of colors 4 colors
5 Printing resolution option
300x200, 300x400, 300x600, 600x400,600x600,
600x800, 1200x1200 dpi
6 Printing quality option Standard, High and Ultra
Flora Digital Printing System
Model LJ320P
Copyright 2011@ Shenzhen Runtianzhi Image Technology Co.,Ltd. By Victor Xu
~7~
7 Printing Speed
Draft Quality: 185 m
2
/hr
Standard Quality: 125 m
2
/hr
High Quality: 92 m
2
/hr
8 Media maximum width 3.3 m
9 PC minimum operating requirement.
Intel Core 2 Duo, Q6600 @2.40GHz
3GB RAM, 250GB HDD, Windows 7 or XP
11 Operating environment
220VAC/50/60Hz/Single Phase, Distortion<
0.5% Heating:3000W, System:3500W
12 Room temperature 23~33 ºC
13 Humidity 40~70%
14 Dimensions 4.83.m x 1.37m x 1.38m
15 Weight 700 Kg
Table 3 Flora LJ3208P Printer Model Coding
Code Explanation
Flora
Brand Name
LJ
Light Jet
3208P
320: maximum width 320cm
8: 8 print heads
P: Polaris head
About The Manual
The manual provides the end user all the information related to the machine basic functions, software
installation, machine parameter calibration, maintenance and troubleshooting of Flora LJ3208P.

Flora Digital Printing System
Model LJ320P
Copyright 2011@ Shenzhen Runtianzhi Image Technology Co.,Ltd. By Victor Xu
~8~
Chapter 1 Safety Operating Instructions
1.1 Brief Introduction
This chapter introduces the important safety information. Please read and understand the safety
information carefully before operating the printer.
1.2 Safety Information
FLORA printer uses the following chemical substances
z All kinds of printing media
z Solvent Ink
z Cleaning liquid (Solvent Flush)
1.2.1 Solvent and Ink Properties
Solvent and Ink are flammable.
Eye contact with the ink and Solvent will break the cornea and weaken the eyesight.
Contact lens should not be worn when operating printer or when there is no proper
ventilation.
Wear safety glasses and gloves while flushing print heads, ink tube or moving the ink
bottles or containers.
Solvent and ink can be irritating to eyes, throat and skin. Inhaling the ink fumes would
result in swoon or other symptoms.
Solvent vapors are heavier than air and may flow and gather in low spot.
1.2.2 Danger of Fire and Explosion
Open flames, heat energy or spark around the printer can trigger fire and explosion.
No smoking, pilot lights, open flames, stoves, heaters or halogen lights should be
turned on within 5m distance from any edge of the printer.
No portable spark-producing equipment (static, ele ctrical or Mechanical) within 5m
distance from any edge of the printer.
1.2.3 Anti-ultraviolet Radiation
Wear solvent protection glasses and gloves when operating the machine and avoid
being too closer to solvent lights.
When doing maintenance task or being close to the flatbed machine, solvent lights
must be shut off or close all solvent protection doors.
1.2.4 Proper Ventilation and Exhaust System
The vacuum exhaust system must be functioning before the printer operates.
Do not ignore this safety warning sign to avoid accumulation of flammable fumes in the
area.
1.2.5 Ink and Solvent spillage, a potential risk of Fire and explosion
Store ink and Solvent in proper cabinet for flammable liquid storage.
Keep ink and Solvent containers tightly closed at all times. If a container has sig n of
damage/leakage, fix or replace it immediately.
Clean ink or Solvent spillages as soon as possible.
Only use dry powder, or carbon dioxide type of fire extinguishers.
1.2.6 High voltage may shock people or trigger a fire
If there’s no emergency power switch which can shut down all the power, do not
connect the printer to main-power supply.
When the machine’s power is on, do not open the back cover of machine, or avoid
touching electrical parts.
The printer or other equipments should be grounde d, according to the local safety
This caution symbol represents danger. If this sign is ignored it
may lead to serious injury or damage to the printer.

Flora Digital Printing System
Model LJ320P
Copyright 2011@ Shenzhen Runtianzhi Image Technology Co.,Ltd. By Victor Xu
~9~
electrical connection regulation. The ground voltage should be less than 3 V.
Set the machine on smooth ceramic tile or cement ground
Use specified anti-static floor mat to minimize harmful st atic build-up.
1.2.7 Printing media rolls are bulky and very heavy
Wear hand and foot safety protection gear when loading, unloading and han dling
media to avoid serious body injuries.
Use proper heavy duty handling equipment if available.
1.3 Fireproofing
Ink and Solvent should be clearly labeled and stored in a specific area for flammable liquid and
should be in accordance with local regulations of fireproof and safety standard. Ensure that the specifie d
fire extinguisher is always available near the storage area and should be cleared from any obstacle in
case of emergency.
1.4 Exhaust System
The printing area should be equipped with sufficient exhaust system. The exhaust should be inst alled
in such a way build up of fumes is minimized. Best location for the exhaust should be at lowest level, this
way the fumes build-up is minimized. Solvent fumes are heavier than air, so fumes build-up concentrates
on the lower level of the room.
1.5 Handling Precautions
1.5.1 Power Supply
Install the printer near an easily accessible electrical outlet.
Do not provide power to the printer through the same power line as for other noise
generating devices such as motors.
Use a power supply matched with the printer specification.
Connect the power cable directly to an electrical outlet. Do not plug several devices
into one electrical outlet.
1.5.2 Printer
Do not place anything on top of the printer.
Do not rest you elbows on the printer .
Open and close the top cover gently from the front of the printer with both hands.
Before connecting or disconnecting the interface connector, turn the printer OFF.
Do not clean the surface of the cover with benzene or paint thinner. The coating may
come off or deteriorate. Wipe the cover with a soft cloth, if the cover is very dirty, use a
cloth moistened with a neutral detergent.
Do not touch the ink jet head surface.
1.6 Regular Inspection and Maintenance
The following regular inspection and maintenance must be performed in terms of characteristics of
the solvent ink:
a) Clean the carriage unit and the flat table conveyor surface every day.
b) Make sure that the carriage covers are always replaced.
c) Perform ink supply circuit and print head cleaning when leaving the printer for a long
time (2 weeks or more with no power).
d) Perform head cleaning after leaving the printer idle for a long time.
e) Shut off the solvent lamp whenever the printer is not in use.
1.7 Consumables
z Always use the recommended consumables (printing media, ink, ink filters). Failure to
follow this instruction may cause poor printing quality and breakdown.
z Do not use ink past the expiration date as this may cause a print head breakdown and poor
printing quality.

Flora Digital Printing System
Model LJ320P
Copyright 2011@ Shenzhen Runtianzhi Image Technology Co.,Ltd. By Victor Xu
~10~
z Put a used ink bottle into a plastic bag and dispose of it as an industrial waste. Observe
local regulations for disposal of waste ink bottles.
z Avoid spilling ink into your skin or clothes. Wash any ink off immediately with soapy water.
z Check the waste ink container everyday so as not to permit waste ink to leak from you
printer.
z If the waste ink container is being installed or removed, spread a stain preventing sheet so
as not to stain the floor with spilled ink.
z Store ink in a dark and cool place. Never store the ink in high temperatures or direct sunlig ht,
doing so may cause the ink to deteriorate.
Flora Digital Printing System
Model LJ320P
Copyright 2011@ Shenzhen Runtianzhi Image Technology Co.,Ltd. By Victor Xu
~11~
Chapter 2 Preinstall Requirement
This is a pre-install guide for Flora LJ3208P. Customers are recommended to prepare the room and other
necessary devices before the machine arrived and installation. We have made every effort to guarantee the
accuracy and integrity of the information in this guide. Should you find some errors or omissions, please bring
them to our attention so we can check and correct them accordingly.
2.1 Getting Started
This section provides the necessary information to preinstall the printer. Familiarize yourself with the
basic of the printer before reading Section 2.
Contents of this section:
z Operating conditions
z Consumables
2.2 Operating Conditions
This section describes the operating conditions for the printer.
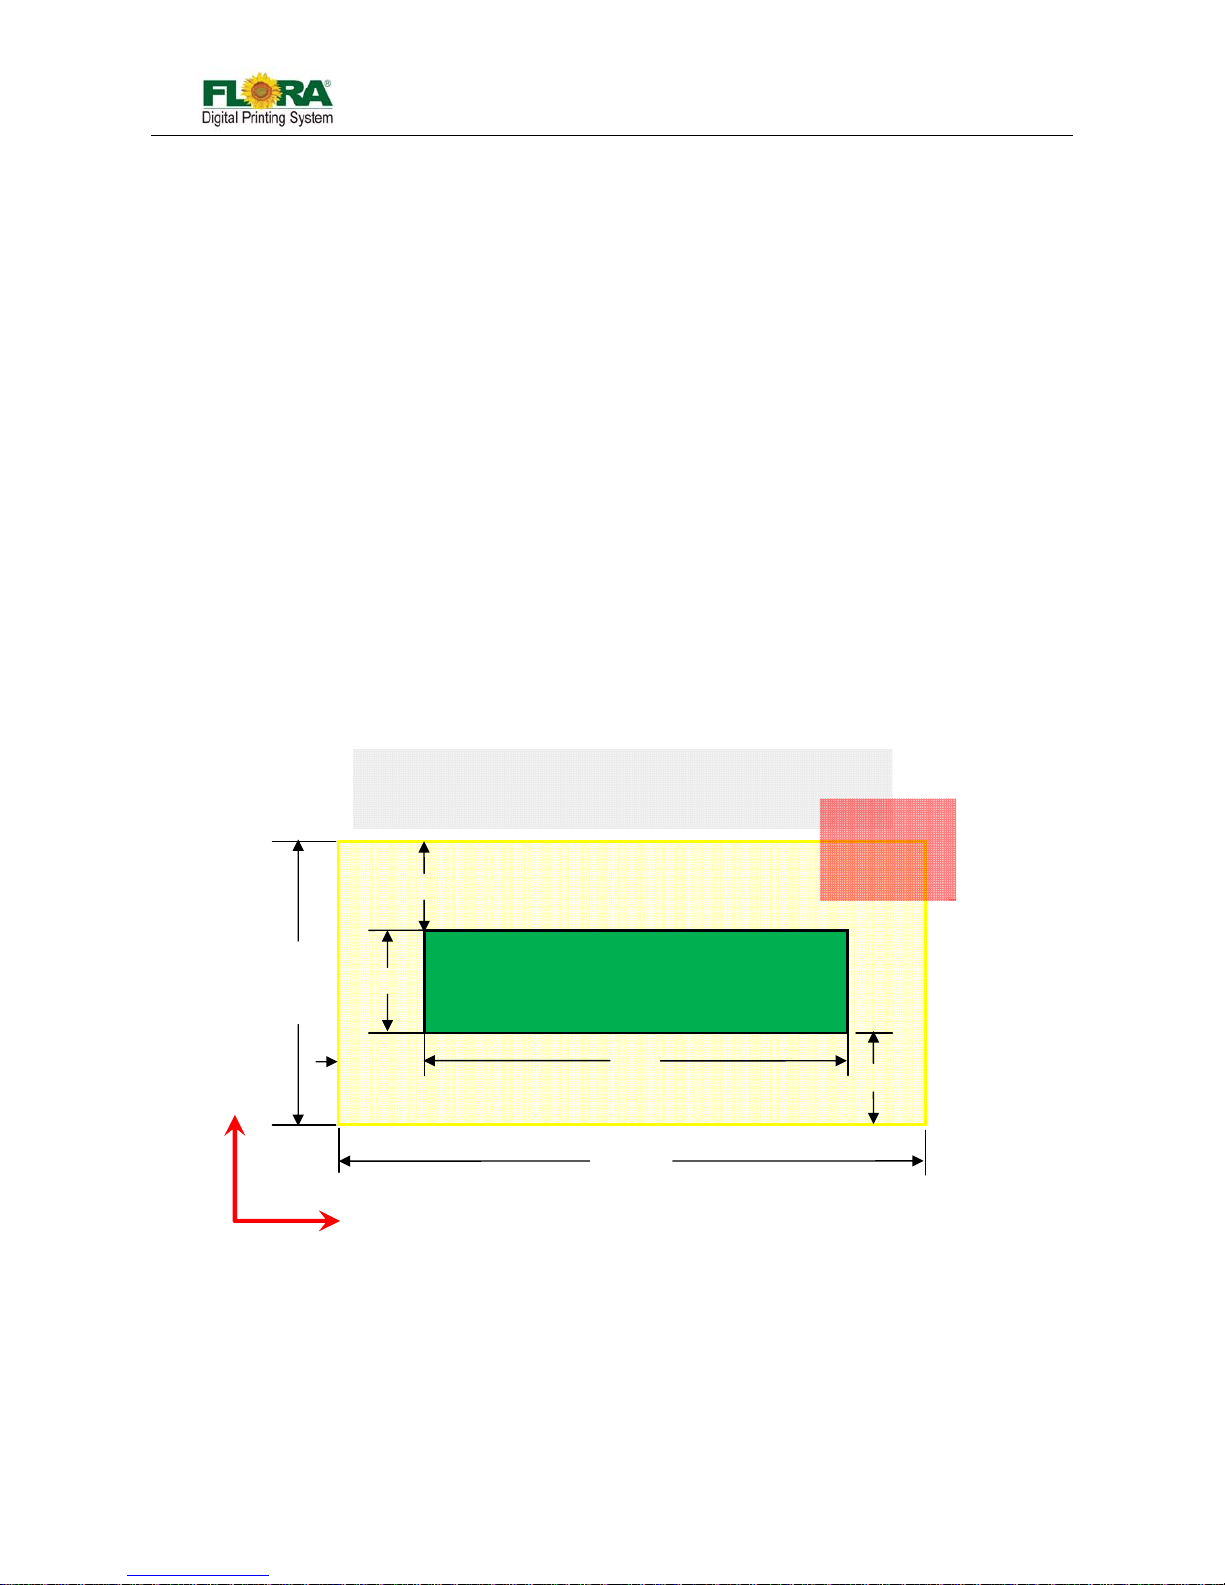
2.2.1 Installation Space
There must be sufficient space around the printer for the replaceme nt of frequently used parts,
for the output of the printed media and for ventilation. In addition, maintenance space, shown below,
is required to repair the printer or replace components.
There must be at least 1m of space in every side at X-axis, at least 1.5m of space at in every
side Y-axis, at least 1m from the top of the machine.
2.2.2 Environment Conditions
2.2.2.1 Operating temperature and humidity levels
The printer should be used within the temperature and humidity ranges as shown below;
Temperature: 20 ºC to 30 ºC
Humidity: 40% to 70%
Note: To obtain better print quality, use the printer within temperature of 25 ºC to 30 ºC.
X
Y
Media
LJ 3208P Top View
Power
Distribution
Area
1.0m
4.83m
LJ 3208P Printer
Left
Back
Right
Front
0.96m
1.5m
1.5m
3.96m
6.83m
Flora Digital Printing System
Model LJ320P
Copyright 2011@ Shenzhen Runtianzhi Image Technology Co.,Ltd. By Victor Xu
~12~
When the operating temperature is lower than 20 ºC or higher than 40º C, printing speed
should be reduced to two-thirds of normal print speed to maintain good print quality.
2.2.2.2 Places where the printer must not be installed
Do not install the printer in the following places:
A location near a fire
Places exposed to direct sunlight
Places subject to vibration
Places with excessive dust
Places subject to extreme changes in temperature or humidity
Places near an air conditioner or a heater
Places where the printer may get wet
Places near a diazo copier that may generate ammonia gas
Places with poor ventilation
Unstable place
2.3 Configuration of Computer
z Intel Core 2 Duo, Q6600 @2.40GHz
z 3G RAM
z 250G Hard disk
z DVD-ROM
z USB 2.0 port(at least 2)
Notice: This is only for reference, which is used to test in our company! Recommend to use
Brand Computer.
2.4 Power Specification
System Power Heating Power
Rated voltage
220VAC (±5%) 220VAC (±5%)
Rated currency
25A 16A
Input power frequency
50/60HZ 50/60HZ
Phase
Single-phase Single-phase
Electrical Safety:
z The machine should be grounded, according to the local safety electrical regulation.
z The grounding should be less than 3V.
z Use specified anti-static floor matting to minimize the harmful static buildup.
z Use ESD Ground Strap when handling Print heads and any Electronic Boards to avoid any
electric static discharge that may damage these part s.
z Do not open the cover where electrical spare parts are located to avoid possible electrical
shock.
Notice: AVR or UPS is recommended to keep supplying stable power to the machine!
2.5 Suggest Inventory List
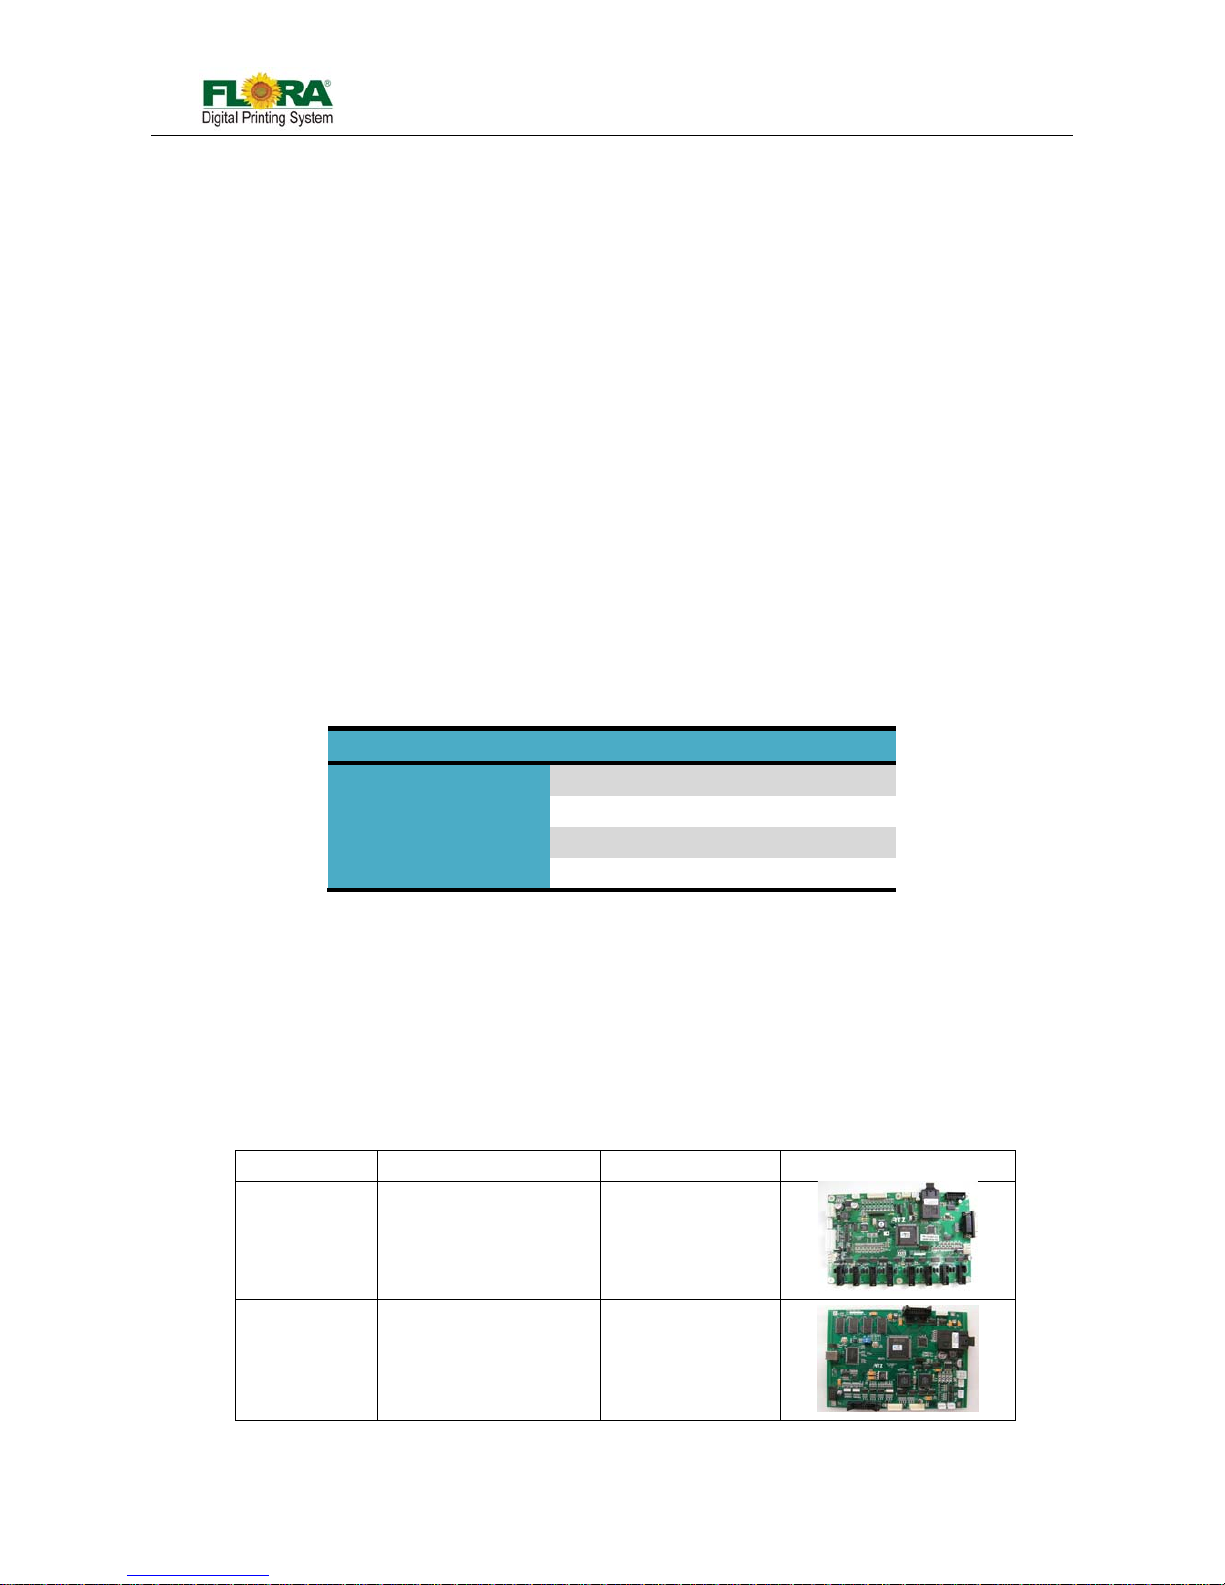
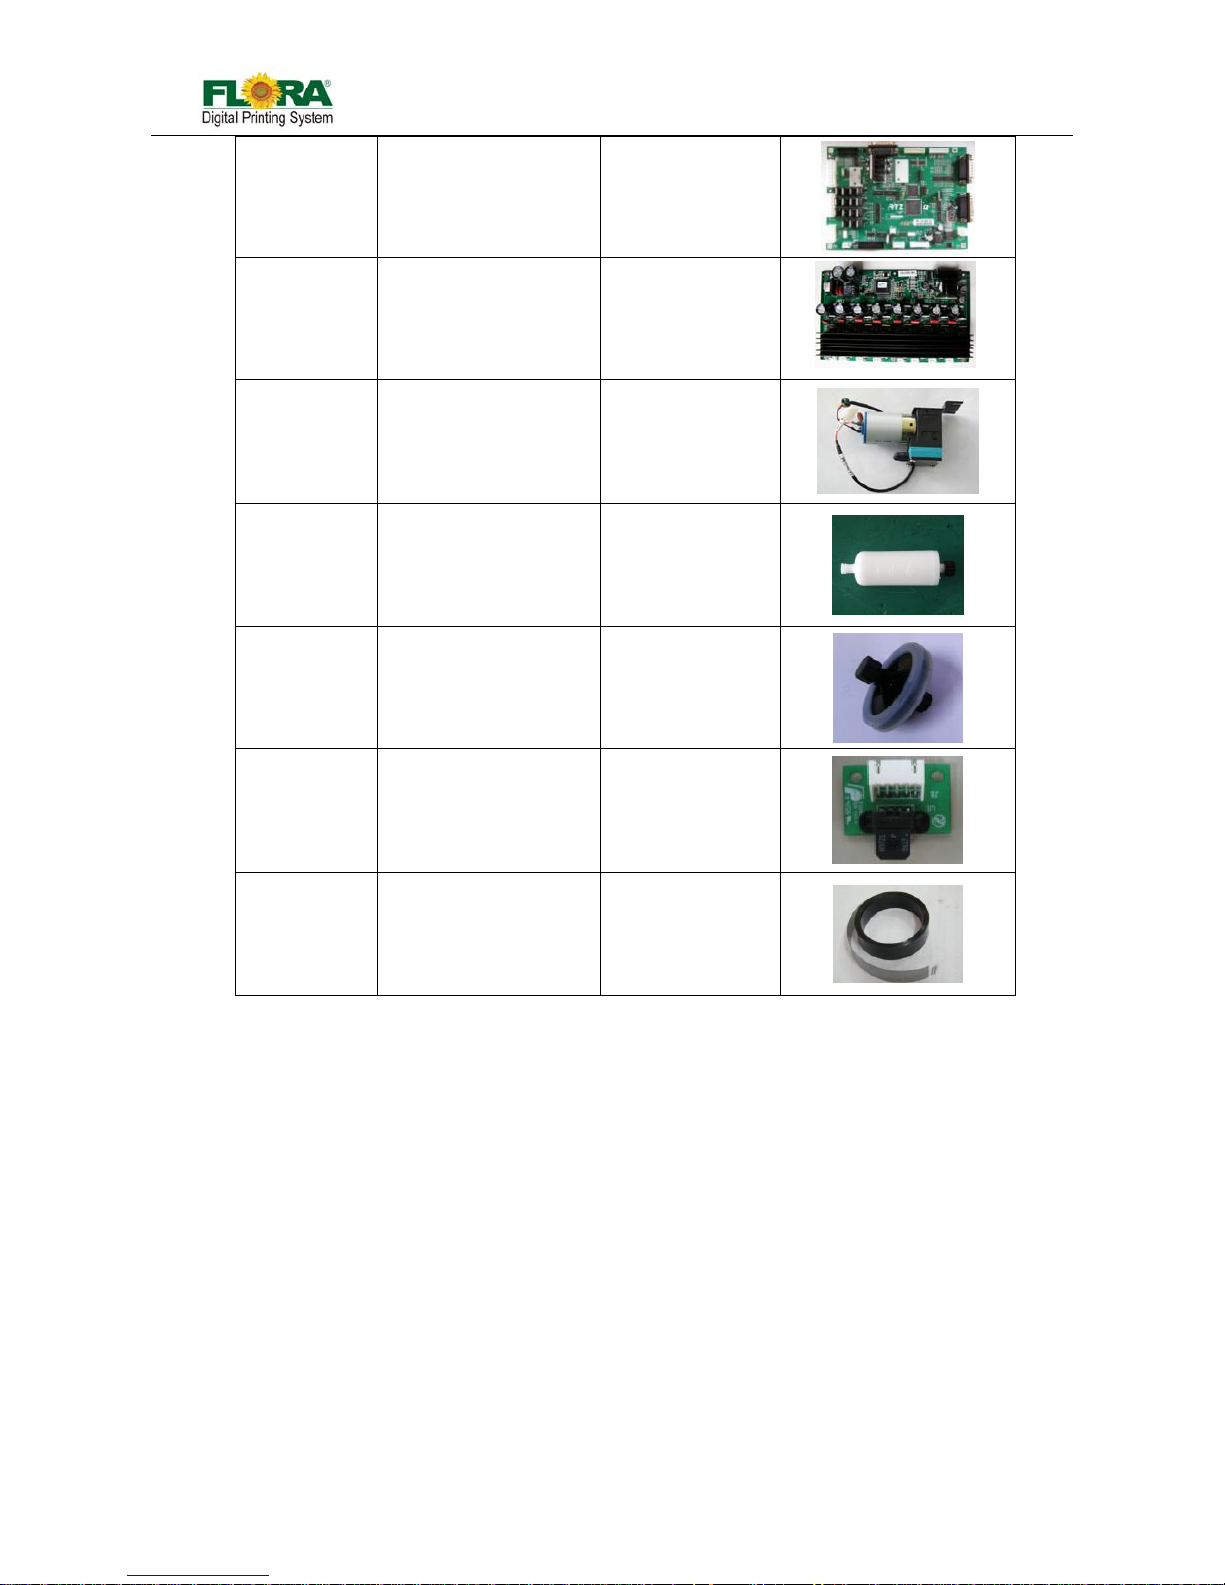
PN Part Name Number/Machine Photo
1 16 -04 01-132 Printing Control Board 1pcs
116-0417-011 USB Board 1pcs
Flora Digital Printing System
Model LJ320P
Copyright 2011@ Shenzhen Runtianzhi Image Technology Co.,Ltd. By Victor Xu
~13~
116-0385-022 Servo Card 1pcs
116-0396-081 HPP Board 1pcs
312-0015-233 Ink Pump 9pcs
141-0487-000 Ink Pump Filter 9pcs
141-0428-006 Disc Filter 16pcs
116-0340-020 Raster Reader 1pcs
141-0134-004 Raster Strip
1pcs
2.6 Available Media Types
The following types of media are available:
z Paper
z Advertising banner
z PVC
z Mesh Fabrics
z Adhesive Vinyl
Note: Contact our service center for detail!
Flora Digital Printing System
Model LJ320P
Copyright 2011@ Shenzhen Runtianzhi Image Technology Co.,Ltd. By Victor Xu
~14~
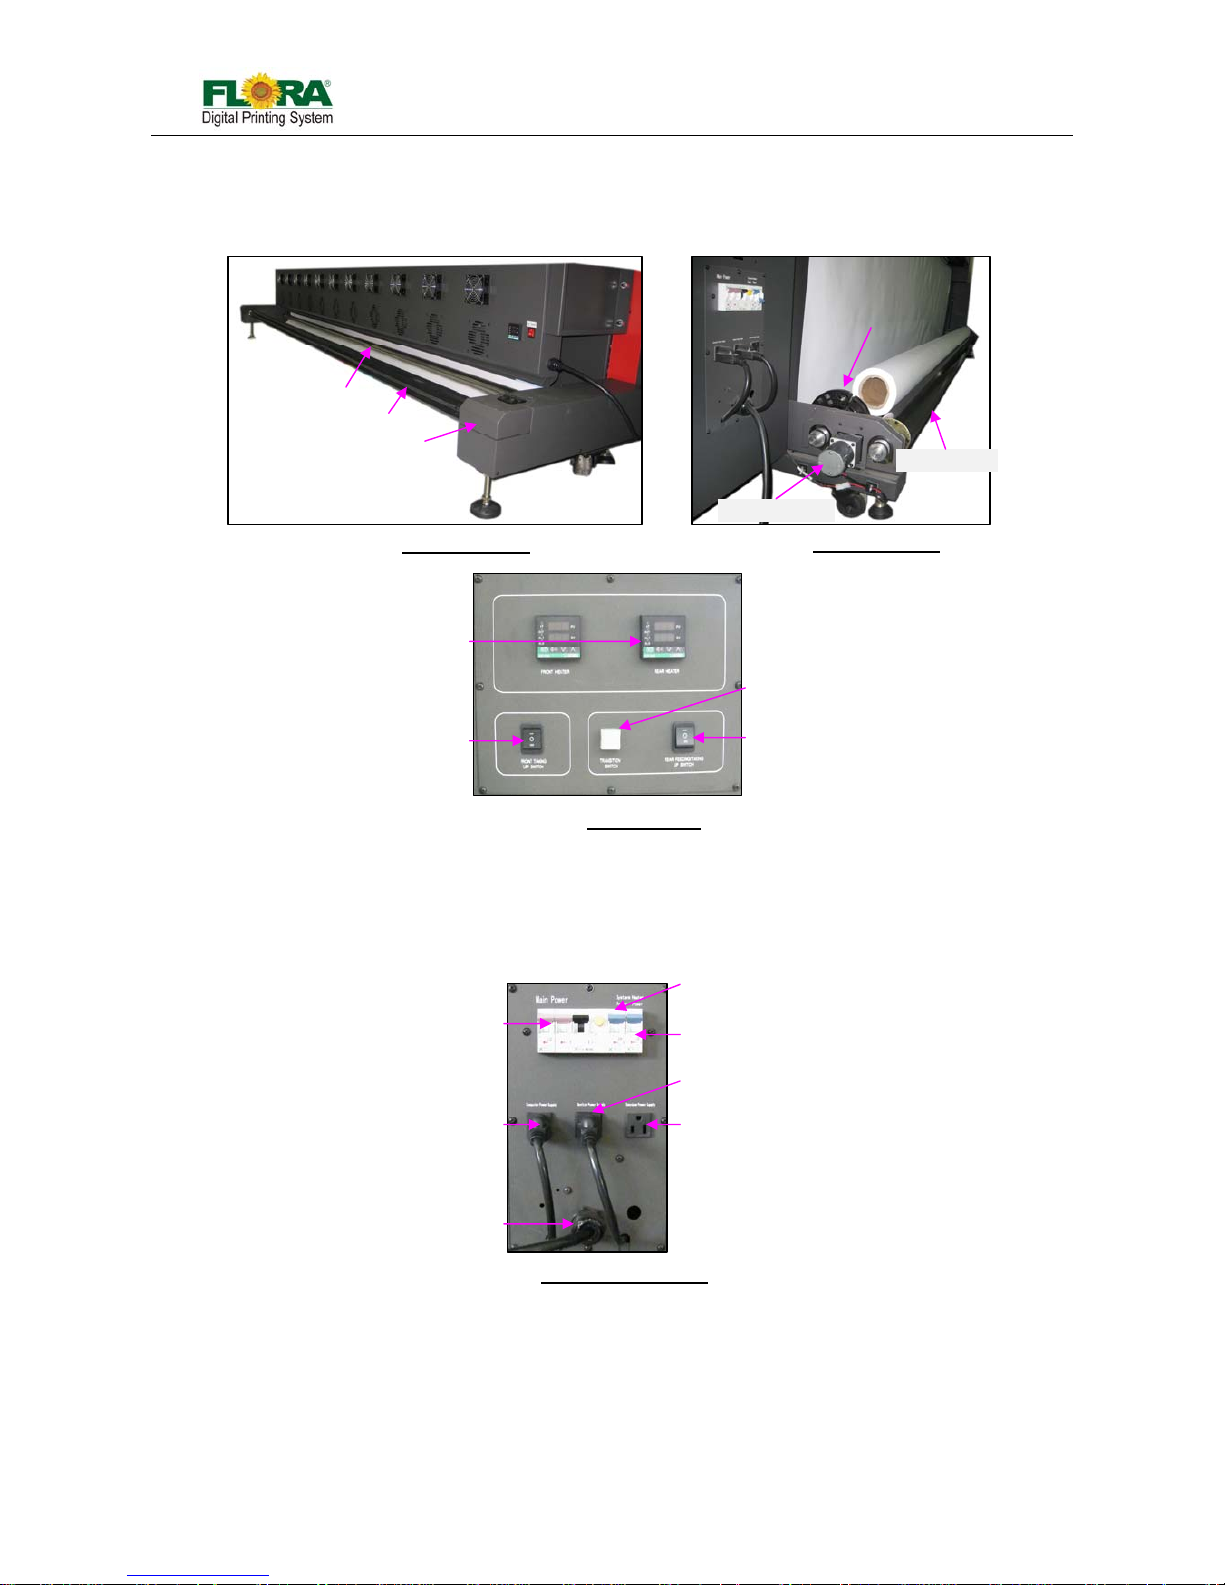
Chapter 3 External Views, Part Names and Functions
The mechanical design parts/assembly of the
machine are grouped according to its function;
namely, the print head carriage, the x-axis
movement mechanism, the y-axis movement
mechanism, the roll media feeding and take-up
mechanism, the ink supply compartment, the
electrical control cabinet and the printing platform.
The printing system control is a modular control
that has the dedicated controller board for a specific function. Othe r controller board function s as a stand-alone
control, like the roll media feeding and take-up control board, that has no communication and no interlock with
the other controller board, it needs only the power supply from the machine. The mechanics, the electronics
and the standard electrical parts are harnessed together to form a system for large format printing application.
LJII-series Perspective View
Fig.3-1Top View
(Back Side)
(Front Side)
Fig.3-2 Left View
Ink Supply Control
Compartment
Fig.3-4 Right View
Computer
Compartment
Fig.3-3 Front View
Ink Bottle
Compartment
Drying Plate
Drying Fans
Roll Media
Take-up Roller
Heater Controller
and Roll Media
Control Switches
User Interface
(UI)/Monitor
Maintenance
Station
Fig.3-5 Back View
ELCB and Circuit
Breakers
Roll Media
Feeding Roller
Roll Media
Feeding Motor
Roller Wheel
and Adjustable
Footing
Exhaust Fan
Ducting Port

Flora Digital Printing System
Model LJ320P
Copyright 2011@ Shenzhen Runtianzhi Image Technology Co.,Ltd. By Victor Xu
~15~
3.1 Computer Station
Computer station is control centre, which is located at right side of the machine! It takes charge early
treatment before printing including image ripping and print mode setting. Most function starts to work
when get the command from computer.
3.2 Maintenance Station
Maintenance station is in right compartment. When the carria ge stopped working, it will come back to
station. All the maintenance performance should be done here.
3.3 Carriage & Beam Assembly
The print head carriage assembly houses the print heads, secondary ink tanks, print head control
board, raster reader, ne gative pressure sensor.
Rail guide serves as pathway for carriage moving, and the beam serves as frame for rail guide
mounting.
Fig.3.2-1 Maintenance Panel
Vacuum Toggle
Switch
Flush Toggle
Switch
A
ir flow Control
Fig.3.2-2 Maintenance Station
Purge Button
Waste ink Tray
Fig.3.3-1 Carriage Assembly
Ink Tank
PH Plate
Fig.3.3-2 Beam&Pinch Roller&Plate
Carriage
Printing Platform
Rail Guide
Pinch Roller
Fig.3.1-1 Monitor&Keyboard&Mouse
Monitor
Key Board &
Mouse Bracket
Fig.3.1-2 Computer
PC
Flora Digital Printing System
Model LJ320P
Copyright 2011@ Shenzhen Runtianzhi Image Technology Co.,Ltd. By Victor Xu
~16~
3.4 Ink Supply Compartment
Ink supply station contains two compartments. One is on the right side for ink pumps and filter, while
the other one is on the back right side for ink bottles.
3.5 Electrical Compartment
Electrical compartment is a shelf for mounting USB Board, Servo Card, Media Board, transformer
and DC power supply. It is built in steel frame.
3.6 Drying System
Because of speciality of the ink, one drying system is necessary for output job. This system is fixed in
front of the machine, including Hot drying and Cold drying system.
Fig.3.4-1 Ink Pump Compartment
Buzze
r
Bulk Filte
r
Ink Pump
A
ir Pump
Flush Pump
Fig.3.4-2 Ink Bottle Compartment
Ink Bottle
Waste ink Bottle
Fig.3.6-1 Drying System
Heating Plate
Hot wind Fans
Cold Air Fans
Power Inlet
Fig.3.6-2 Fan Switch &Temp. Controller
Hot-Fans Switch
Cold-Fans Switch
Temp. Controller
Fig.3.5-1 Electrical Shelf
Media Sensor
Transformer
36VDC Power Supply
24VDC Power Suppl
y
Take-up Media PCB
Feeding Media PCB
USB Board
Servo Card
Flora Digital Printing System
Model LJ320P
Copyright 2011@ Shenzhen Runtianzhi Image Technology Co.,Ltd. By Victor Xu
~17~
3.7 Take-up System & Feeding System
Take-up system in the front of the machine is used to roll up the output media, while the feeding
system fixed behind the machine used for roll down the media for feeding.
3.8 Power Control Panel
Power control panel is fixed behind the machine on the right side! On this pa nel, there is one inlet
used for main power input, three built-in outlets two of which are used for computer and monitor.
All the power breakers are also built on this panel!
Fig.3.7-1 Take-up System
Tension Ba
r
Take-up Rolle
r
Motor Box
Fig.3.7-2 Feeding System
Feeding Motor
Feeding Roller
Media Hoop
Fig.3.7-3 Control Panel
Back Heat Controller
Take-up Switch
Transition Button
Feeding Switch
Fig.3.8-1 Power Control Panel
Main power Breaker
Computer outlet
Main Power Inlet
System Breaker
Heating Breaker
Monitor Outlet
Backup Outlet

Flora Digital Printing System
Model LJ320P
Copyright 2011@ Shenzhen Runtianzhi Image Technology Co.,Ltd. By Victor Xu
~18~
Chapter 4 Working System of Flora LJ3208P
The Flora LJ3208P large format printer is using raster image technology to process photos stored in computer.
It is one of the most innovative products, which combines photo digital technology with high precision engine
driver. It produces super wide printouts for business use.
It is a high-technology equipment with a user friendly operating system with simple operational and
maintenance procedures. Though simple, it is composed of several precise systems. In this chapter, we will
introduce the system components and operator guide.
4.1 System Block Diagram
Fire signal
HPP Board
USB_IF
Board
Control Si
gna
l
Level, Pressure Signal
Monitor &
Keyboard
Mouse
Host Computer
USB2
.
0
Servo Card
Ink Pumps
(24Vdc)(CMYK)
- Buzzer
- Flush Pump
- Air/Vac Pump
Home
Left LS
Right
Switches
& Signal:
- Flush
- Prime
Printing Control
Board
IT Level
Sensors
IPT Level
Sensor
NP
Sensor
Raster
Encoder
O
p
tical fiber
Image Data,
Clock, DC
Supply & Heater
Control signals
PHd Temp.
Sensor Signal
K2
Y2
C1
M2
Y1
M1
C2
K1
Power Supply
+36Vdc
+36Vdc Supply
Power Supply
+24Vdc
+24Vdc
220Vac
Supply
Temp.
Controller
Solid State
Relay
Heaters
- Printing Platform
- Drying Platform
Sensor
Media
Take-Up
PCB
Media
Feeding
PCB
Media Sensor Media Sensor
Y-axis motion
X-axis motion
Dir/Step
signal
36Vdc
Power
X-axis
Servo
Driver
Servo
Motor
(X-axis
Encode
r
Dir/Step
signal
36Vdc
Power
Y-axis
Servo
Driver
Servo
Motor
(
Y
-axis
Encode
r
Flora Digital Printing System
Model LJ320P
Copyright 2011@ Shenzhen Runtianzhi Image Technology Co.,Ltd. By Victor Xu
~19~
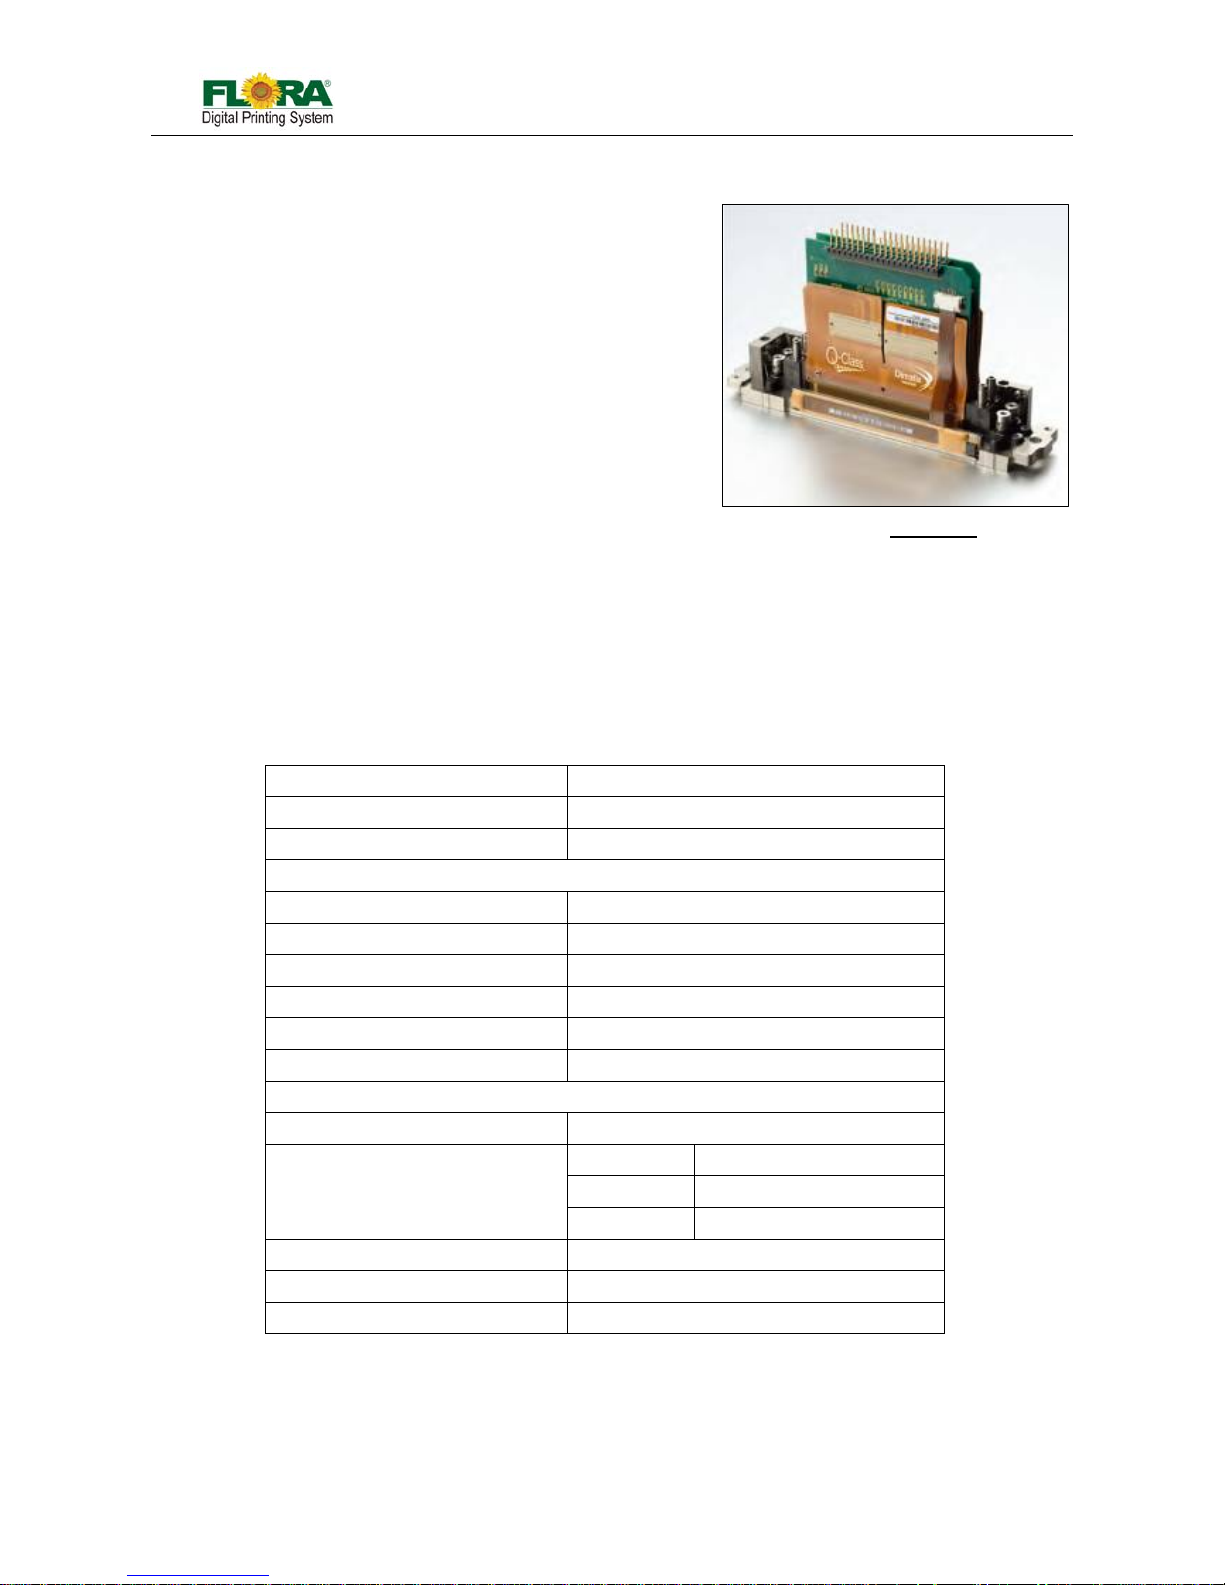
4.2 Polaris Print head Introduce
Feature:
35 picoliter nominal drop size
512 individual addressable nozzles
Incorporates versaDropTM binary jetting
capability
Excellent channel-to-channel uniformity
High frequency continuous operation
Designed for long service life
Integral mounting bezel with precision
features
Configurable for single and two-color
operation
Optimized for high viscosity jetting fluids
Built-in heaters and temperature sensors
Operation up to 60°C(140°F)
Simplified field repair with no special tools required
Supports UV-curable, solvent and aqueous-based inks
Technology Specification Table:
Parameter Polaris PQ-512/35AAAPrint head
Number of addressable jets 512
Print width 64.897mm(2.555inches)
NOZZLE SPACING
Single color(4 rows of jets)
127 microns [0.005in.](200 dpi)
Two color(2 rows of jets/per color) 254 microns [0.01in.](100 dpi)
Jet straightness ,1 sigma* 2.0mrad[0.11°]
Nominal drop velocity 8m/s
Calibrated drop mass 35ng
Compatible jetting fluids solvent-curable, organic solvents, aqueous
BINARY OPERATION
Adjustment for drop size 35-80 picoliters
Productivity Drop size Maximum Frequency
35 pl 30kHz
80 pl 13kHz
Operating temperature range Up to 60°C
Fluid viscosity at jetting 10 to 14 centipoise
Dry weight 160ams
Fig. 4.2-1 Print head

Flora Digital Printing System
Model LJ320P
Copyright 2011@ Shenzhen Runtianzhi Image Technology Co.,Ltd. By Victor Xu
~20~
4.3 Printing Control System
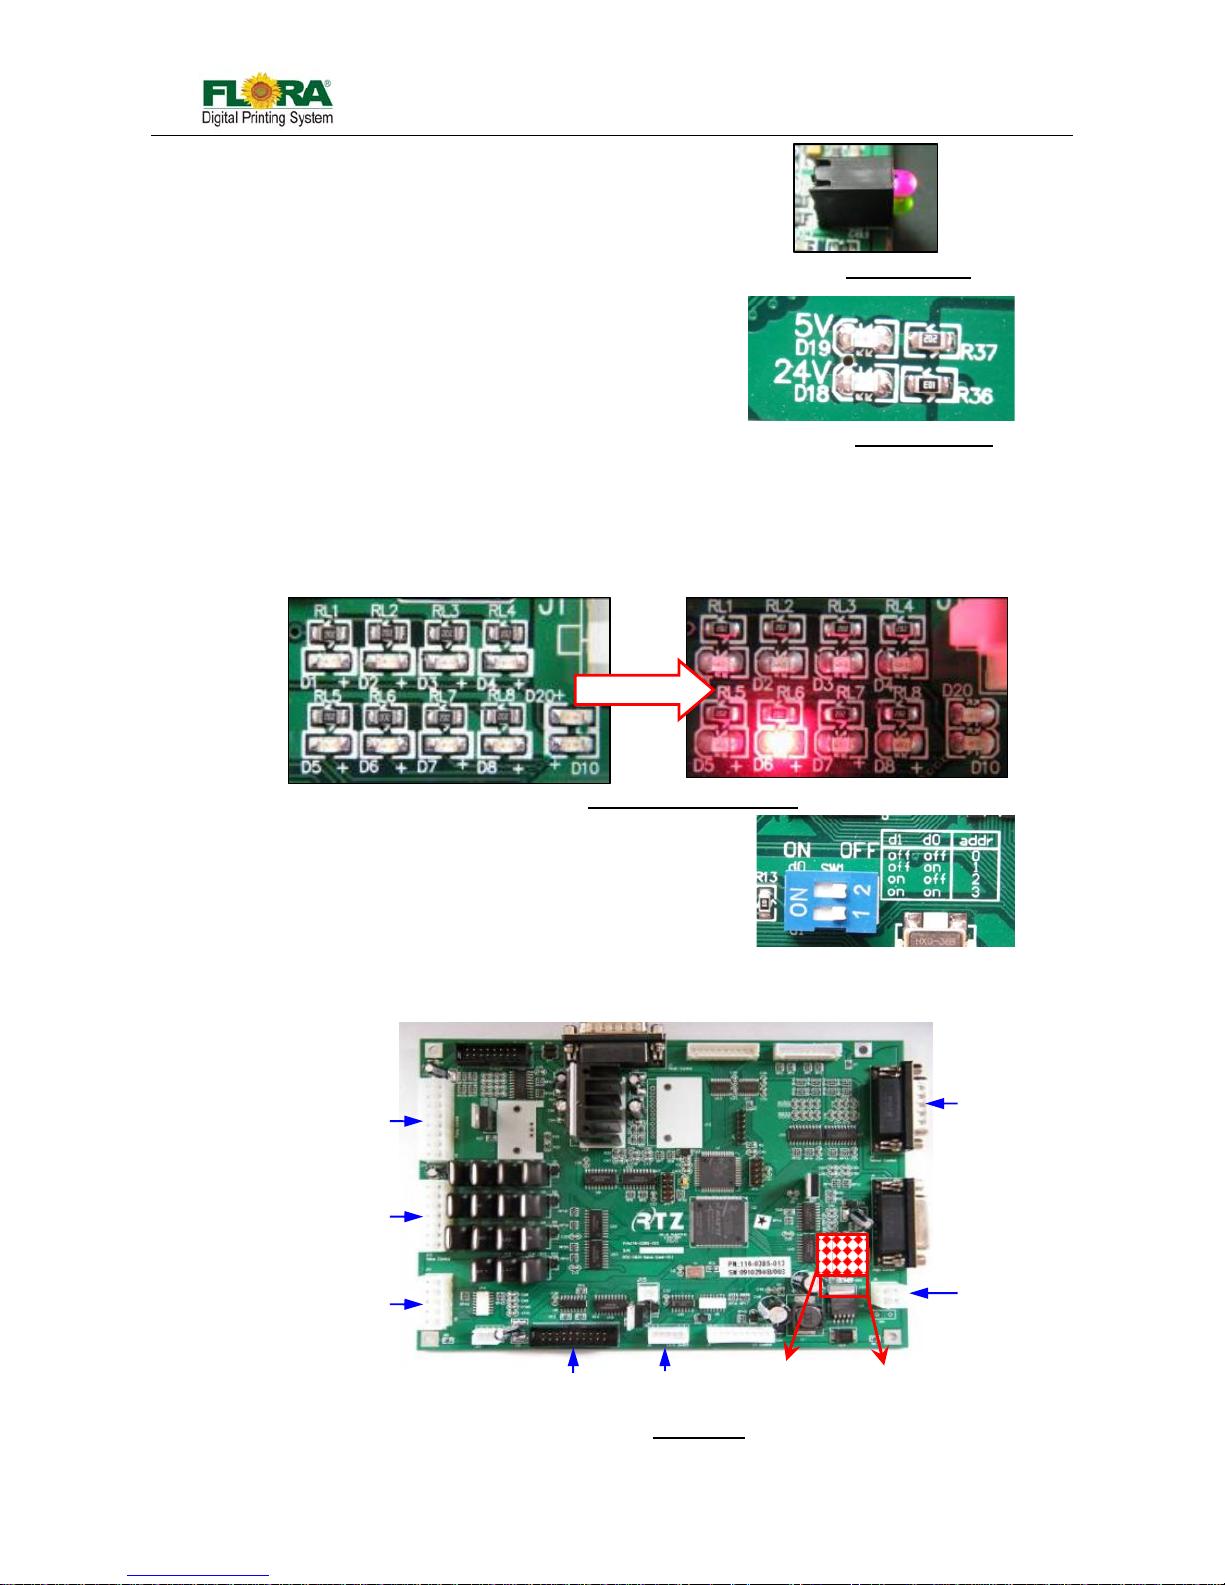
4.3.1 Printing Control Board (116-0401-132)
The print head control board controls and drives the jetting parameters of the print heads.(as
below). Functions of the board are as follow:
Receiving optical signal from USB Board ,change it into electric signal and sep arate
the image data & control order from the signal ;as the same time,combine level
signal , negative signal , raster signal etc., then change them into optical signal and
send them to USB Board
Supplying power & clock to print head to drive it work
Detecting automatically: detecting level of ink tank is full or not ; detecting negative
pressure is in the range of setting or not ; reading raster signal
Level indicator:
When the tank is full, the responsible indicator will turn on!
Fig.4.3.1-1 Printing Control Board
DC 24V
USB J6
Level Sensor
USB J11
NP Sensor
Raster
Reader
HPB J2
Y1 Y2M2M1
C1 C2 K1 K2
Linking
indicator
Working
indicato
r
Status
indicator
Level
indicator
Powe
r
indicato
r
Common Port
Indicator
Tanks are full
Fig.4.3-1 Printing Control Board

Flora Digital Printing System
Model LJ320P
Copyright 2011@ Shenzhen Runtianzhi Image Technology Co.,Ltd. By Victor Xu
~21~
Note: D8~D15 are normal on, while D7 is off. Because the negative pressure tank is always
empty.
Power indicator:
All of these four LEDS will be normal on.
D3: 3.3V
D4: 5V
D5: 24V
D6: 24V
Status indicator:
D56: Fire indicator working normally: on
D57: Configuring indicator working normally: on
D58: TX indicator Transmitting data: on
D59: RX indicator Receiving data: on
Working indicator:
D16: Temperature indicator: heating, on; or it will be off.
D17: Working indicator: shine all the time
D18: Raster reader indicator: Carriage moving, on; carriage stopping, off
4.3.2 USB Board (116-0417-011)
The board is an interface between computer and printer, including functions as follow:
Apply data of image from computer and save it into the buffer, waiting the data request
from the printing control board
Conform the data and the order from computer, convert electric signal into light signal
and transmit it to the Printing control board; receive light signal form Printing control
board, convert them into electric signal and extract after separating them.
Communicate with the other boards, servo driver and computer, to coordinate the
whole printer working.
Take order form computer and control motion of the X axis and Y axis
D7 D8 D9 D10 D11 D12 D13 D14 D15
color NP Y M C K K C M Y
Fig.4.3.1-2 Indicators
Fig.4.3.2-1 USB Board
USB Indicator
Motion Indicator
PHB J1
PC
Communication
indicator
Linking
Indicator
PHB J11
SCB J7
Power
Indicator
5VDC
X-axis SD
Y-axis SD
SCB J5
Flora Digital Printing System
Model LJ320P
Copyright 2011@ Shenzhen Runtianzhi Image Technology Co.,Ltd. By Victor Xu
~22~
USB indicator:
Green Led: working indicator, normally on;
Red Led: Error indicator, normally off
Power indicator:
D18: 24V power indicator normal on
D19: 5V power indicator normal on
Communication indicator:
D1, D2, D3: null
D4: Hidem indicator Communication: on
D5: Print head board indicator Communication: on
D6: Y-axis indicator Y motor moving: on
D7: Servo Card indicator Communication: on
D8: X-axis indicator Y motor moving: on
D10: TX indicator Transmitting data: on
D20: RX indicator Receiving data: on
Dial Switch
D0=off; D1=off
4.3.3 Servo Card(116-0385-022)
This board serves as assistant functions control board.
Control pump supply ink automatically
Ink-supplying timeout warning,limited switch protection,error indication
Fig.4.3.2-4 Communication Indicators
Working
Air pump1#
buzze
r
Ink pump
Priming button
USB J10
DC24V
Limited
switch
USB J5
Power
indicator
Nixie
Tube
Fig.4.3.3-1 Servo Card
Fig.4.3.2-2 USB Indicators
Fig.4.3.2-3 Power Indicators
Flora Digital Printing System
Model LJ320P
Copyright 2011@ Shenzhen Runtianzhi Image Technology Co.,Ltd. By Victor Xu
~23~
Power indicator:
Power is ok, on; or, off.
Nixie Tube:
Show the error number.
0 No problem 1 Lack of ink
2 Negative problem 3 Movement problem
Error indicator----Nixie Tube
If the digital LED shows 0, it means everything is ok, with no problem.
Number 1 means that there is no ink in the secondary tank:
¾ First, check the ink bottle: make sure the ink bottle is not empty, if there is no
ink ,then load ink;
¾ Second, check the ink pump to see if it is working, replace it if necessary;
¾ Third, check the sensor: make sure the sensor can detect the level exactly,
otherwise change it;
¾ If everything can’t work still, change Servo Card.
Number 2 means some ink over flowed, which also means there is ink in the
negative pressure tank:
¾ Check the ink indicator LED is light or not, it means there is ink in the IPT
when it’s on. Then you need to suck ink out from the tank syringe b efore start
the machine
Number 3 means the movement system has problem
¾ First, check the servo driver report the error or not: if there is a error, shut
down the power of the machine and restart it.
¾ Secondly, check the limited switch: the left & right limited switches are used
for protection. If the switch is pressed, it will stop the motor from working. So
you must make sure that switch is ok and it hasn’t been pressed by carriage
or any other thing.
¾ Third, check the motor can work normally or not. If necessary, change it.
¾ Forth, if it still can work, change the USB Board.
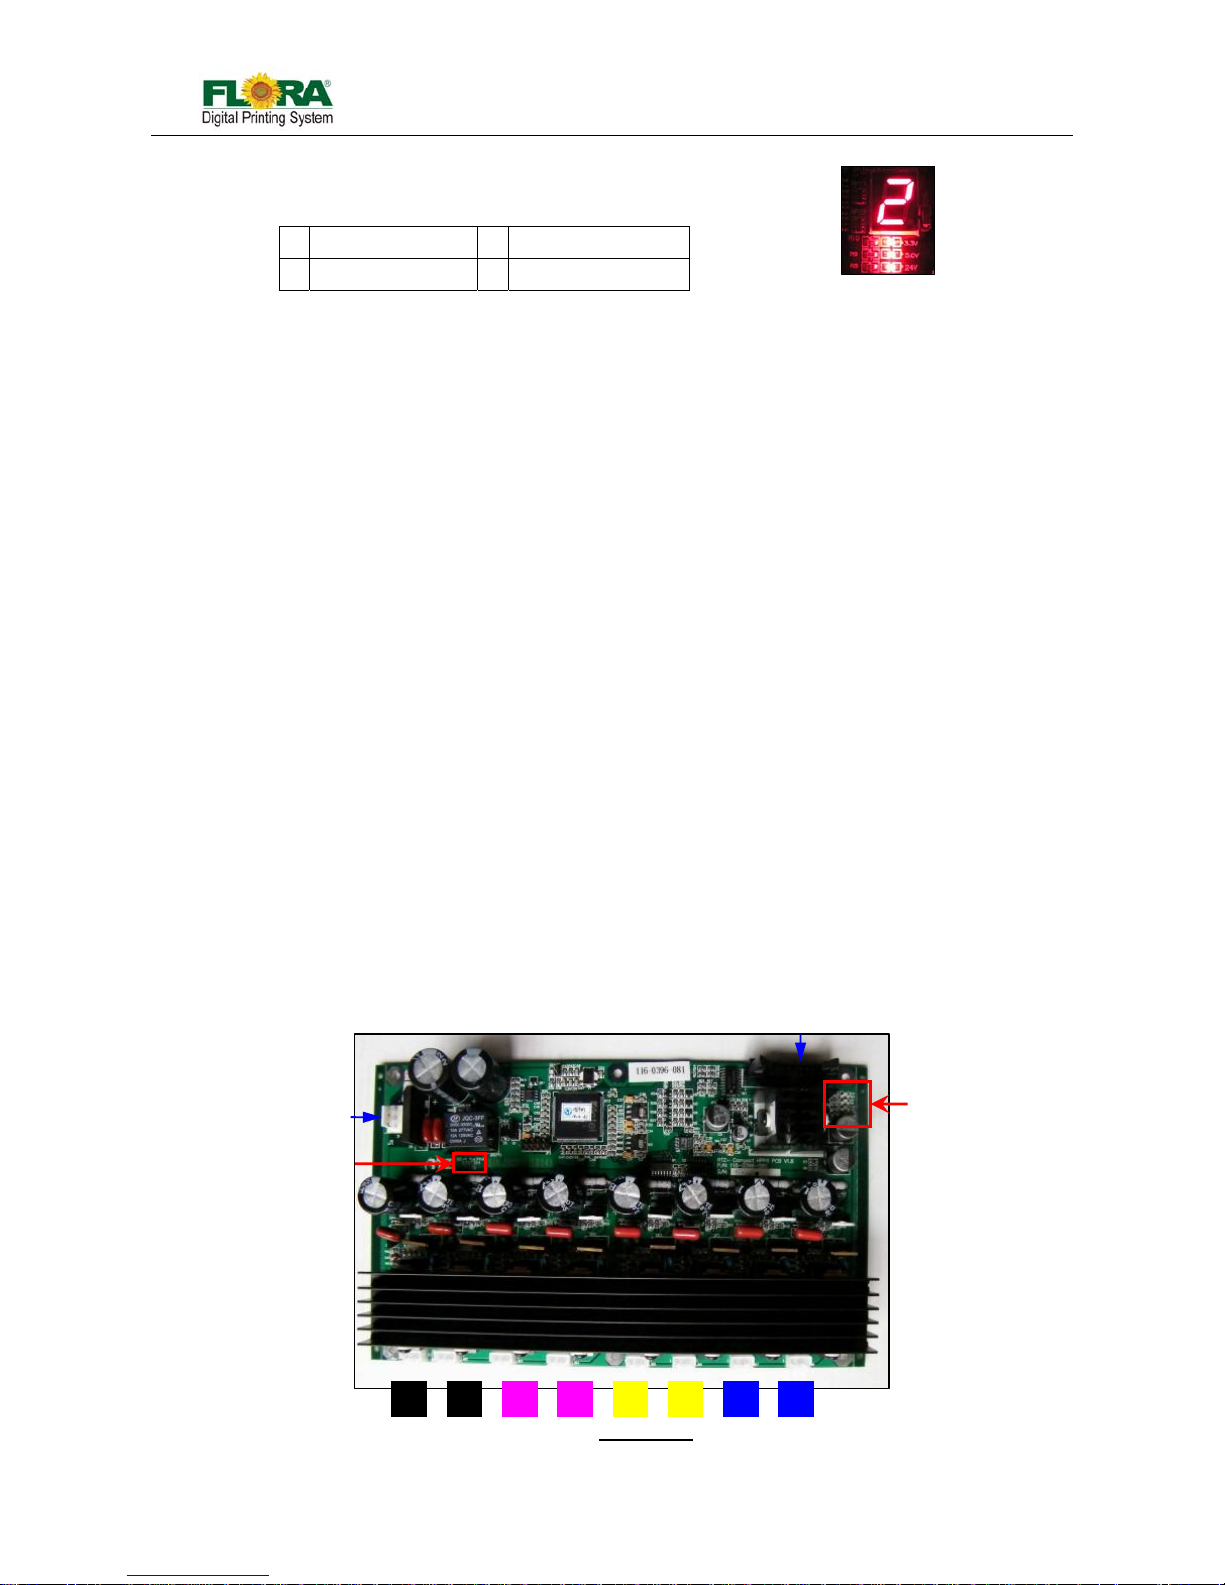
4.3.4 HPP Board(116-0396-081)
The board is an 8-channel high-voltage DC pulse generator, designed to provide fire pulses
necessary to actuate piezoelectric elements in Spectra Polaris heads.
Features:
Up to 8 separate channels of fire pulse outputs
Each output channel capable of driving up to 512 nozzles
Programmable fire pulse amplitudes, from 50V to 120V
Programmable fire pulse widths, from 1 to 10us
Fig.4.3.3-2 Nixie Tube
Fig.4.3.4-:1 HPP Board
Y1 Y2M2M1 C1 C2K1 K2
Working
Indicato
r
AC110
V
PHB J10
Power
indicator

Flora Digital Printing System
Model LJ320P
Copyright 2011@ Shenzhen Runtianzhi Image Technology Co.,Ltd. By Victor Xu
~24~
Power indicator:
D1: 24V power indicator normal on
D2: 5V power indicator normal on
D3: 15V power indicator normal on
4.3.5 Connector Board(116-0402-020)
This board is used as interface board for Print head and the Print head Control Board thru a
16-pin flexible data cable. It is fixed on the print head by insert to the pin of Print head.
Power indicator:
D1: 5V power indicator normal on
D2: high-voltage pulse indicator bright periodically normal on
4.3.6 RTZ-16UV Media Board-V1.3(116-0030-041)
Taking-up or feeding media automatically
4.4 Mechanical Movement System
Movement system is very important part of the machine, which directly decides the printing pr eci sion!
There are two movement system, X-axis movement(Carriage movement) and Y-axis(Media Feeding).
1 2 Model
ON ON Take-up board
OFF OFF Feed board
Fig.4.3.5-1: Connector Board
Working indicator
PHB PB0
HPB JB1
Swing switch
Motor
Optical switch
Optical switch
Shift switch
Shift switch
24V input
Model setting
switch
Working
indicator
F
ig. 4.3.6-1: Media Board
Fig.4.3.4-1 Power Indicator

Flora Digital Printing System
Model LJ320P
Copyright 2011@ Shenzhen Runtianzhi Image Technology Co.,Ltd. By Victor Xu
~25~
Both the Carriage and Feeding assembly are driven by servomotors, which are controlled by their
respective Servo Driver can prove high precision motion as to enhance the printing quality.
4.4.1 X-axis Movement (Carriage Motion System)
X-axis movement System serves for carriage which will drive the print head moving. The Serv o
Motor is responsible for the carriage movement from left and
right. The print head carriage is driven by the Servo Motor
through the timing belt attached to its gear pulley.
4.4.1.1 Servo Driver & Motor
This machine used ACS806 Servo drive and
motor as powerplant. The servo driver installed at the right
side behind the Beam, while the servo motor installed at
the right side of the beam. Servo driver is a transfer
station, which will get movement signal from USB Board
then control the motor working.
4.4.1.2 Raster Reader (116-0340-020) & Strip (141-0134-004)
Raster reader is a optical reader, raster strip is a rasterized transparent plastic. They
work together generate fire signal that will be send to Printing control Board. The raster reader
is fixed on the right side of the carriage, while the strip is installed along the beam.
Notice: The raster reader set-up must up to standard.
4.4.1.3 Limited Switch & Protection Rubber
There are three limit switches for used as electrical protector on this machine. Two of
which are installed at the left end of the beam at carria ge home posi tion. The left most serves as
limit switch for carriage left stroke and the inner side serves as the home position switch. The
third is installed at the right most end of the rail serves as the limit switch for carriage right
DC Power Suppl
y
Step and
Direction
Signal
Servomotor
Power Signal
Encoder
Feedback
Signal
Servomotor 150W
PN: 141-0506-010
Servo Driver ACS806
PN: 141-0505-010
Fig. 4.4.1.1-1: Servo Driver Connecti o n
F
ig. 4.4.1.2-2: Raster Reader
Set-up
Fig. 4.4.1-1:
Servo Driver & Motor
Moto
r
Driving Pulley
Bracket
A
C Servo Driver
Fig. 4.4.1.1-2: Pulley
Dual Pulle
y
Fig. 4.4.1.2-1: Raster Reader
Raster Reader
Raster Strip
Raster Reader Bracket

Flora Digital Printing System
Model LJ320P
Copyright 2011@ Shenzhen Runtianzhi Image Technology Co.,Ltd. By Victor Xu
~26~
stroke.
Besides limited switches, there are two protection rubbers used as mechanical
protector. They are fixed on the side of beam.
4.4.2 Y-axis Movement (Media Feeding System)
The DC Servo Motor is a brush-commutated DC motor which is responsible for the forward
and backward movement of the Media. This motor is powered by 36VDC. To precise movement of
the media feeding is controlled by a servomotor with a closed-loop feedback signal from the encoder
coupled on the shaft of the motor. The step and direction signal is mainly controlled from the USB
Board and this signal is amplified by the Servo Driver to drive the Servomotor.
4.4.2.1 Servo Driver & Motor
This machine used ACS806 Servo drive and motor as powerplant. The servo driver
installed at the right side behind the Beam, while the servo motor inst alled at the right side of the
beam. Servo driver is a transfer station, which will get movement signal from USB Board then
control the motor working.
Home Position Switch
Right Limit Switch
Left Limit Switch
Fig. 4.4.1.3-1: Limited Switches
Pulley
Motor
Pulley
Feeding
Shaft
Timing
Belt
Fig. 4.4.2-1: Feeding Mechanical
Fig. 4.4.2-2: Front View
Fig. 4.4.2-3: Servo Driver & Motor
A
C Servo Drive
r
Y
-axis Motor
DC Servo Driver
Left Rubber Stopper
Fig. 4.4.1.3-2: Rubber Stopper
Right Rubber Stopper

Flora Digital Printing System
Model LJ320P
Copyright 2011@ Shenzhen Runtianzhi Image Technology Co.,Ltd. By Victor Xu
~27~
4.4.2.2 Pinch Roller & Printing platform
Pinch rollers are used to press the media against the knurl-rollers. It used to hold (grip)
the media while on y-axis movement (stepping operation). It helps keep the media from slipping
during printing. The printing platform keeps the media flat by the use of suction mechanism in
which the suction fans can be switched on/off by the operator. The printing platform is equipped
with a set of heaters and can be heated up by turning on the heater controller with the desired
temperature level.
Servomotor 150W
PN: 141-0509-000
Fig. 4.4.2.1-1: Servo Driver & Motor
Servo Driver DCS810
PN: 141-0510-000
Step and
Direction
Signal
Encoder
Feedback
Signal
36VDC Power Suppl
y
Servomotor
Power Signal
Vacuum Suction Fan
(141-0092-010)
Tension Sprin
g
Tensioning
Screws
Fig. 4.4.2.2-2: Adjustment of
Pinch Roller Pressure
Fig. 4.4.2.2-1: Array of Pinch Rollers
Roll Media
X-axis
Beam
Hold Down
Shaft
Printing
Platform
Y
-axis Shaft
Heat Belt
(141-0484-000)
Pinch Roller Lever
Fig. 4.4.2.2-3: Printing Platform Chamber and Suction Fan
Vacuum Chamber
Heaters are
glued on this
This fan is installed
below the vacuum
Chamber

Flora Digital Printing System
Model LJ320P
Copyright 2011@ Shenzhen Runtianzhi Image Technology Co.,Ltd. By Victor Xu
~28~
4.5 Ink Supply & Negative Pressure System
System Circuit:
4.5.1 Ink Supply System
The ink Bottle/Barrel serves as the main reservoir for ink
supply, should be refilled in a timely manner so continuous supply
of ink will not be interrupted during printing. The level of ink inside
the bottle/barrel can be monitored visually or using the buzzer
system. Refilling is done manually.
The ink pumps suck and discharge the ink into the
secondary ink tank. A five-micron filter is being provided to
prevent the secondary tank from being contaminated by
unwanted particles, which are inherent in the ink. Ink level sensor
inside the secondary ink tank sends an open or close contact
signal to the Print head control board and Ink control board to
control the operation of the pumps. An optional micro filter is
added to enhance the filtering of ink before it flows into the print
heads.
Every time the print heads eject/fire ink droplets, the ink
flows and fills the space left by droplets. A negative pressure
system is responsible for holding the ink from flowing out of the
print head nozzles.
4.5.2 Lack of Ink Warning Function
Ink alarm system plays a part in caution when the ink bottle is empty or the secondary tank is
not full.
The level sensor in the bottle detects the level of ink. The print head board will send the level
signal to the servo card. The servo card will process this signal then control the pump working, if the
pump works more than 25s, it will stop all the pump working and activate the buzzer. Meanwhile, the
Servo Card will report error 2.
Fig. 4.5.1: System Circuit
Fig. 4.5.1.1: Ink Supply
Compartment

Flora Digital Printing System
Model LJ320P
Copyright 2011@ Shenzhen Runtianzhi Image Technology Co.,Ltd. By Victor Xu
~29~
As warning happened, Click “flood ” check box in the sof t ware!
4.5.3 Purge and Flush individually
Individual purge system allows for easy convenient respective maintenance of print head,
which will help saving ink also.
If the machine doesn’t work for more than 3 days, flush all the print heads with solvent is
recommended. And whe n the nozzles are blocked seriously, flush is also available.
These two functions are available on this flora machine.
Notice: The valve must be turned with the correct Valve Key.
Situation needs to prime:
¾ Load ink
¾ Some nozzles not work or blocked
Situation needs to flush:
¾ Many nozzles are blocked
¾ Before you don’t want to use machine for long
¾ Before you load ink after long time no using the machine
Principle of air exhaust is like injecting water into one tube. After water was injected into the
tube from one side, bubble will be pushed out from the other side.
¾ Exhaust when there is some bubble in the tube。
Note: Whatever prime, flush or purge, perform it one color at one time. Turn off the other ink
valves. This can make sure that there is big enough pressure..
4.5.4 Negative Pressure System
Negative pressure system is used to hold the ink from dripping out of the print head nozzles.
Pressure settings varied on every machine. The recommended setting range is from -2. 3 to -2.7Kpa.
Too low negative pressure setting will result to ink dripping or print head cannot jet ink.
Too high neg ative pressure setting will cause ink starving over time and ink overflow in the
negative pressure line system.
4.5.5 Overflow Protection Function
Ink protection tank serves as the ink overflow protection for the vacuum line system. If overflow
happens, the ink will flow into this tank, once the ink reaches the maximum level, the sensor will shut
off the print head control board. Without the ink protect tank, the vacuum system will fail to function if
Fig. 4.5.3.1: Ink Tank Valve
(312-0010-031)
Close
Ink Position
Flush Position
Purging Printin
g
Flushin
g
Closed

Flora Digital Printing System
Model LJ320P
Copyright 2011@ Shenzhen Runtianzhi Image Technology Co.,Ltd. By Victor Xu
~30~
5/2 way
Valve
Push-button
Activated
5/2-way V alve(331-0329-000)
Curren
t
Value
Se
t
Value
Pressure Sensor
(312-0078-014)
the tubes are filled with overflowed ink.
There are one ink protection tanks fixed behind the secondary ink tanks!
Note: There are three actual scenarios where the overflow happens.
1. The ink overflow situation will happen when the ink tank level sensor fails to detect the full
level while the ink pump tends to turn-on and ink is keep on flowing into the ink supply circuit;
hence, ink will flow towards the ink protect tank (IPT).
2. The ink level wire connection is wrong at the print head control board connection port.
3. The ink pump wire connection is wrongly connected (reverse connection with the other ink
pump).
4.5.6 Other parts intro
Pressure Sensor
The pressure sensor is an electronic programmable
sensor that is used to detect both the negative and positive
pressure. The tube line is provided to connect the sensing port of
the pressure sensor to the IPT. Any level of pressure i n the IPT is
online displayed and sensed to signal the appropriate output
(OUT1 or OUT2) to further trigger the part/component to protect
the negative pressure system. The parameter setting is set by
the sensor panel keypad; this parameter is used to program the
sensor output control characteristic and display indication.
Pressure Regulator (Flow Control Valve)
The flow control valve is actually a pneumatic valve that is used to
restrict the flow of air. In the negative pressure circuit, the flow control
valve is adjusted appropriately to achieve the right negative pressure
needed by the ink supply system. Adjusting the flow control valve will
in-turn adjust the negative pressure that goes to the print heads; therefore,
acquiring the correct amount of force to hold the ink just on the mouth of
every print head nozzle holes.
5/2 way Valve (Purge Button)
A mechanically activated pneumatic valve serves
as to switch-over the negative pressure to positive
pressure. At normal operation, the suction effect of
negative pressure (vacuum) is connected towards print
heads. During the ink priming operation, the 5/2-way
pneumatic valve is manually activated, the air (positive
pressure) will replace the vacuum and flows towards the
print heads and therefore the ink in the print heads are
Flow Control Valve
(331-0239-000)
A
djustment
Knob
Fig. 4.5.521: Shut-off Valve
(141-0436-001)
Open
Close
Fig. 4.5.5.1: Ink Protect Tank (IPT)
(312-0010-031)
Drain

Flora Digital Printing System
Model LJ320P
Copyright 2011@ Shenzhen Runtianzhi Image Technology Co.,Ltd. By Victor Xu
~31~
Pump
24Vdc
Connect
to
Solvent
Bulk
Filter
Luer
purged out through all nozzles. In this operation, the nozzles are being cleaned from slight
contamination of small debris, and micro-bubbles will be forced out.
Maintenance Toggle Button
Solvent Flush Toggle Switch – used for flushing the solvent into
the Print head. This is being done if you want to remove the ink
out of the Print head or to remove any clogging from the Print
head.
Media Suction Switch – vacuum switch to make sure that the
media is laid down flat on the printing platform.
Negative Pressure Adjustment – used to adjust the Negative
Pressure value as being shown in the Pressure Gauge
4.6 Flushing System
This system provides solvent flushing for all print heads. A solvent
pump is provided to pump the solvent from the solvent bottle to ink tank
manifold then it is distributed through the ink tank manifold. The manifold
valve can be turned individually to appropriately enable the flow of solvent
flush to each particular print head. The solvent pump i s turn-on/acti vated by
a toggle switch that provides the 24Vdc to the solvent pump unit.
The solvent flushing can be done to all print heads at the same time or
only print head at one time by closing and opening the ink tank valves
accordingly. Solvent flush is necessary if there is stubborn clogging in the
print head nozzles or when the machine will not operate over night
Notice: If had to replace the ink , all ink line must be flush to clear!.
Fig. 4.6-1:
Solvent Pump
Ink
Tank
Flush
LCF Disc
Filter
(5um.)
Solvent
Flush
Bottle
M
High Level
Low Level
Solvent
Pump
Level Sensor
(Optional)
Bulk Ink Filter
(5um.)
Magnetic
Floater
Ink
inlet
Negative
Pressure
24Vdc
Motor
Print
Head
Manifold
Valve
Flushing
Switch
+24Vdc
Fig. 4.6-2: Flush Circuit
Fig. 4.5.6-1: Maintenance Panel

Flora Digital Printing System
Model LJ320P
Copyright 2011@ Shenzhen Runtianzhi Image Technology Co.,Ltd. By Victor Xu
~32~
4.7 Drying System
For this model there are two drying system for high speed output drying! One is Heating System
which temperature of heating can be setting by manually, the other one is Cold Fans System.
4.8 Take-up and feeding System
During printing, the roll media indexes forward by the stepping action of the Y-axis Servomotor that
rotates the Pinch Roller. Henceforth, after a certain number of indexes, the roll media will clear the
Feeding Optical Sensor. The clearing of optical sensor will activate the DC Motor to rotate the spooler
roller and lay forward the media until the optical sensor is blocked. This automatic action is kept on
cycling as the printing process is on progress.
On the other hand, when the roll media at the front side becomes loosed and the Front Optical
Sensor is blocked, the Take-up DC Motor will then rotate to wind (spool-in) the printed media. During the
winding of the printed media, the Front Optical Sensor will be cleared and then will automatically stop the
DC Motor. The rotation of the Take-up Roller in Auto Mode energizes the DC Motor (clockwise rotation)
with the image prints turning outside the roller while the Manual Mode turns the other direction which
loosen up the media from the roller .
On the other hand, the Feeding Roller System has a transition switch to change the direction of the
Fig. 4.7-4: LionPower Connetion
Fig. 4.7-1: Drying System
Fig. 4.7-2: Back Heating
Temperature Sensor
Heating Belt
Thermoregulator
Fig. 4.7-3: Control Panel

Flora Digital Printing System
Model LJ320P
Copyright 2011@ Shenzhen Runtianzhi Image Technology Co.,Ltd. By Victor Xu
~33~
Feeding Roller depends upon the printing-side orientation of the media.
Fig. 4.8-4: Take up Roller Assembly
Fig. 4.8-5: Feeding Roller
Auto
Off
Manual
Fig. 4.8-2: Feeding and Take-Up Switches
Fig. 4.8-3: Media Sensor
Fig. 4.8-1: Spooling Set-up of the Media
Tension
Bar

Flora Digital Printing System
Model LJ320P
Copyright 2011@ Shenzhen Runtianzhi Image Technology Co.,Ltd. By Victor Xu
~34~
Chapter 5 Installation Manual of Flora LJ3208P
5.1 Machine Pre-installation
z The minimum working area should content the space for the operator to move around the
machine conveniently and safely.
z Prepare the necessary AC plug on the power cord attached to the machine. Ple ase see the
Technical Specification table for the power requirements.
z If the PC is not supplied with the machine, customer must meet the minimum PC
specification requirement to be used in this machine
z Safety signs must be available within the working area.
z Exhaust System must be provided for the solvent and Ink fumes. Please note that fumes
are heavier than air so it is most likely the concentration happens at the lower level of the
room.
z Lightings should be sufficient enough.
z Flammable Storage Ca binet for the Ink and flushing solution stock is highly recommended
to secure them very well.
z Waste Container should be available for ink and flushing liquid waste as well as ink/solvent
contaminated cloth inside the Printing area.
z Waste disposal should be in accordance with your local laws governing Hazardous Waste
Disposal.
Once the machine is placed and all spare parts are thoroughly checked, start doing the following
pre-installation activities:
z Install the drying device.
z Check the height of the Print head Carriage over the printing plat fo rm. The h eight sho uld be
at least 3mm above the media printing surface.
z Check the movement of the Print head Carriage for any obstruction by moving it manually
from one end to the opposite end.
z Install the LCD Panel / Monitor and the PC, keyboard and mouse to be used on this
machine.
z Place the CPU to the computer compartment provided if applicable.
5.2 Installation of Software
This model supports both Windows 7 and Windows XP. For Windows XP, USB Driver need to be
installed manually. And the account type of computer must be Administrator. And the account must be
active as below:
1) Right click on Computer Icon, choose “Manager”;
2) There is coming with 【Computer Manager Windows】 as below. Click on “Local User and
Group”, you will find two folders in list;

Flora Digital Printing System
Model LJ320P
Copyright 2011@ Shenzhen Runtianzhi Image Technology Co.,Ltd. By Victor Xu
~35~
3) Click “User” folder, you wil l find Account in the left windows as above;
4) Right click on “Administrator”, Choose “Proprieties” and click it;
5) 【Administrator Proprieties Windows】 will come out. Activate the account by un-tick the check
box as below;
6) click “Apply” and “OK”, then finished
5.3.1 Install PhotoPRINT Server Flora Edition 6.1v2
7) Turn-on the Main Power to give power to the PC and Monitor.
8) Insert the CD supplied with the machine with label PhotoPrint 6.1V2 for the necessary
installation.
9) Then screen will prompt you with 【Choose Setup Language】 window; Select which language
you will use. Then click “OK”. Starting 【InstallShield Wizard…. 】

Flora Digital Printing System
Model LJ320P
Copyright 2011@ Shenzhen Runtianzhi Image Technology Co.,Ltd. By Victor Xu
~36~
10) The Application Installer S etup will now prep are the Install Shiel d for the setup process,then
click “Next”. You will get a window for 【License Agreement】, please choose “I accept the
terms of the license agreement”
11) Click “Next” ,then 【Select Features】 and the 【Select Program Folder】 screen window
will show up.
12) Then you will get a window for 【Setup Status】, wait it finish.
13) The 【Product Selection】 window will comes in after that. Please enter password which you
can find from the dongle. And then choose “PhotoPRINT SERVER Flora Edition 6.1v2” from
product

Flora Digital Printing System
Model LJ320P
Copyright 2011@ Shenzhen Runtianzhi Image Technology Co.,Ltd. By Victor Xu
~37~
14) Un-tick the “Install to desktop” selection on 【Install Manager】 window. Then click “OK”.
15) 【Start Copying Files】 window will appear. Click “Next”.
16) Click “Next”, software files will now start to install.
17) Click “Finish” after completing the successful installation.
5.3.2 Install Flora Driver
1) Insert the Flora Driver. From the list of Folder under Print Driver, select corresponding machine
model (Eg: Flora_3208P_3204P_NewUsb_8heads_V1.1.1.1 for 6.12(2011.06.02).exe). Then
double-click the setup file;
Enter your password
Select your language
Select your product

Flora Digital Printing System
Model LJ320P
Copyright 2011@ Shenzhen Runtianzhi Image Technology Co.,Ltd. By Victor Xu
~38~
2) Files will be extracted and later on 【Welcome】 window will appear. Click “Next”, coming with
【choose setup language】 window, select you language then click “Next”;
3) Click “Next” when 【Welcome】 window. Then, 【Select Model】 window will appear. Choose
the particular model of the machine you are about to install, then click “Next”;
4) The software will now start to detect the specified destination folder, if it is not auto detected,
you need to browse ?:\??\SAi\SAi Production Suite. Click “Next” to initiate the installation
process;
5) Click “Finish” after the successful installation and restart your computer;
5.3.3 Install USB Driver
For this machine, there are two USB Boards and the driver for USB need to be installed by
manually.

Flora Digital Printing System
Model LJ320P
Copyright 2011@ Shenzhen Runtianzhi Image Technology Co.,Ltd. By Victor Xu
~39~
1) Go to Device Manager, you can find that the hardware name Flora Digital Printer V2.1;
2) Right click on this option, choose Update Driver as above. Click it, if will pop Hardware Update
Wizard windows as below;
3) Browse the installation folder, click USB install package. Then you will get the Cypress USB
Generic Driver (3.4.4.000) under Universal Serial Bus Controller;
4) Finished!
5.3.4 Add setup
1) Find the PhotoPRINT Server Flora Edition 6.1v2 on the desktop and double click to open;
2) If it is the first time your install, it will prompt you to add your setup,
If not, you can click “Add Setup…” from “Setup” menu;
Or you can click add setup icon directly

Flora Digital Printing System
Model LJ320P
Copyright 2011@ Shenzhen Runtianzhi Image Technology Co.,Ltd. By Victor Xu
~40~
3) Then select the brand name of the printer and the model name. Then click “Next”;
4) Click “Finish” after the final process. Then you can find the device. If the setup is successful the
installed device or printer will be shown on the PhotoPRINT GUI.
5.3 Install Print Heads
i. Unpacking the Print head
a) Open the package, and then take out the anti plastic bag.
b) Open the anti-static plastic bag check the SN. of print head with label on the box.
Note:
The head is pre-loaded with ink analog to prevent drying of the nozzles during
transportation.
Wrap the head with a non-woven
cloth to prote c t the nozzle surface and prevent
drying of the ink analog.
ii. Connect the ink tube and connector PCB
Note:
The ink tube must be tightened, or it will cause leakage.
The pins of the print head should match with connector PCB one by one.
The Brand name should be
Runjiang
Fig.5.3-1 Package Fig.5.3-2 Print head

Flora Digital Printing System
Model LJ320P
Copyright 2011@ Shenzhen Runtianzhi Image Technology Co.,Ltd. By Victor Xu
~41~
iii. Install the print head one by one, position the print head and then tight the two fixation screws
accordingly.
Note:
The back fixation screws must be tightened to fasten fixing tabletting, meanwhile
the front fixation screw must be tightened properly before doing Y-align.
Take note of proper print head orientation.
Male Connector
Female Connector
Fig.5.4-3 Connectors
Filter
Fig.5.3-3 Print head Assembly
Fig.5.3-4 Print head Installation
Print Head Plate
Fixing Tabletting
Adj
ustment
Sprint
Y-Align adjust
screw
Front se
t
screw

Flora Digital Printing System
Model LJ320P
Copyright 2011@ Shenzhen Runtianzhi Image Technology Co.,Ltd. By Victor Xu
~42~
iv. Connect the 30pins flexible print head data cable to the Print head Control Board and print head.
Please take note of the proper connection of cable.
v. Connect the input tubing of print head to the Ink tank supply port accordingly,
Take note not to interchange the connection for input and the bleeding tubes.
vi. Check all the connections again to ensure there are no misconnections or loose connections on
the data cables. Power on the machine and check for any functional abnormalities on the
carriage.
Install print heads, you must take notice as below:
z Switch off the power before install print heads
z The ink tube shouldn’t be too long or short, keep the filter flat as standard
z The installation of screws mounting the print head should moderate, the end of screw can’t
be beyond the carriage plate
z All the connectors and interface should be properly connected. No loose, no reversed or
wrong connection!
Fig. 5.3-6: Carriage with PHs
Fig.5.3-5 Data Cable Connection
Male connector
Proper Connection of Flat Data Cable
Female
Connector
Print head Data Cable
(100-0069-012)

Flora Digital Printing System
Model LJ320P
Copyright 2011@ Shenzhen Runtianzhi Image Technology Co.,Ltd. By Victor Xu
~43~
5.4 Ink and Solvent Preparation
6 Pour the ink and solvent in their corresponding ink/solvent barrels. Be sure to observe
proper procedure in handling the ink. See Chemical Safety Information
6 Flush the print head with solvent, clean the analog.
6 Switch on the printer power
6 Connect the ink pumps one at a time and check for any leakage along the solvent and ink
line system.
5.5 Head Alignment
This is to check the mechanical functionality of the Printer through PC. Meanwhile it is to describe the
proper procedure in aligning the Print heads.
5.5.1 Test Print Tool Bar
Using the RTZ Driver software, move the Print head Carriage from left to right, then
back to home position. Check if the X-axis and Y-axis Servo Motor are working by clicking
the appropriate arrow head below.
5.5.2 Set Parameter & Nozzle Check
Before alignment, nozzle test is very important! Good test print is the premise of
alignment. Then you can get precision output. This section will describ e the necessity to
calibrate the Voltage and Temperature settings for each print head.
Perform Ink Prime by activating the toggle switch. Do ink bleeding one print head at
time to remove air bubbles trapped inside the print head.
Clean the print heads with clean cloth by manually.
Send Test Print head to see if all print heads prints a shown below;
Fig.5.5.1-1 Test Print tools Bar
Fig.5.5.2-1 Dots Illustration
Low Voltage or Low
Temperature Settings
GOOD
High Voltage Setting or
High Temp Settings
Internal Left Align View

Flora Digital Printing System
Model LJ320P
Copyright 2011@ Shenzhen Runtianzhi Image Technology Co.,Ltd. By Victor Xu
~44~
For the purpose of getting the best dot print quality is a painful process so it needs
patience. All you can do is play with temperature and voltage settings.
The recommended Voltage setting range is controlled by Flora driver software so
there’s no chance for you to set the voltage beyond the recommended range.
The recommended voltage is 70~75V, While the recommended temperature setting
is 30-35ºC in most cases. The procedure is as below:
Voltage(V) Temp.(°C) Pulse(us)
70~75 30~35 7
Adjustable Range Adjustable Range Adjustable Range
50~120 10~60 5~10
1. Change the voltage / temperature in the textbox
2. Click “Write” Button
3. Check the value, click “Read” Button
Notice:
Every ink manufacturer has its own recomm ended temperature and volt age settings.
The recommended setting applies to Flora ink!
Other factors than can influence print quality are:
Room Temperature
Humidity
Ink Viscosity
Negative Pressure Settings
Carriage Printing Speed
Note:
In most difficult cases playing with Uni-direction and at low speed can help improve
the print quality significantly.
5.5.3 Print head Y Alignment
Print head Y Alignment is a mechanical alignment, which is the most import ant
alignment. So the Y alignment should be performed first.
For this machine, there are 8 print heads in total, and divided into 2 two rows.
Fig.5.5.2-2 Voltage Tag
Voltage Textbox
Pulse Textbox
Fig.5.5.2-3 Temperature Tag
Actual Temp.
Textbox
Setting Temp.
Textbox

Flora Digital Printing System
Model LJ320P
Copyright 2011@ Shenzhen Runtianzhi Image Technology Co.,Ltd. By Victor Xu
~45~
Unaligned print head will affect ink composition a picture. So for every row print heads, the
first nozzle of every print head must be on the same coordinate at Y-axis. The gap between
two rows should be same with the gap between two nozzles. Print head inst allation must
ensure the print head is perpendicular to Y-axis, and in parallel with X-axis.
1. Highlight Y Align from test drop list, and send to print by click send print icon;
2. Y Align procedure should be as below:
K1
K2 K1 K2
K1
K2
K1
K2
K1
K2
K2
1
K1
256
①
K1
K2
②
③
Fig.5.5.3-4 Illustration for Align K2
Fig.5.5.3-2 Y Align
Fig.5.5.3-1 PH align
The first nozzles should be in the same line
Carriage Asse.
The gap between nozzles of
two rows print heads should
be the same with the gap
between two neighbouring
nozzles
Fig.5.5.3-3 Y Align Drawing

Flora Digital Printing System
Model LJ320P
Copyright 2011@ Shenzhen Runtianzhi Image Technology Co.,Ltd. By Victor Xu
~46~
a) Align K2 with K1. The gap between 256th nozzle of K1 and 1st one of K2(① or
③) must be equal to the gap between two nozzles(②).
If ③ > ②, push print head K2 go upward.(K1 is basic print head, you
mustn’t adjust K2)
If ③ < ②,pull print head K2 downward.
Note:
Carful and gradual adjustment should be taken in to consideration when doing Y Align.
It will take several prints and adjustments before you are able to get perfect alignm ents.
b) Align C, M and Y print heads refer to K print head. The line of C, M or Y should
overlap the K line perfectly.
If K1 print head is above C1, M1 or Y1, pull the C1, M1 or Y1 down.
If K1 print head is below C1, M1 and Y1.push the C1, M1 or Y1 up.
Note:
Fig.5.5.3-5 Adjust Screw
Back setscrew
Front setscrew
Adjusting screw
Note:
Gently lock the
setscrew before ali
gn
the print head.
Note:
Clockwise: push up
Anti-Clockwise: pull down
Fig.1.3-6Illustration for Align C, M Y
Fig.5.5.3-7 Illustration for Align C, M Y
Push up ↑
Pull down↓
Fig.5.5.3-6 Enlarge view of Drawing

Flora Digital Printing System
Model LJ320P
Copyright 2011@ Shenzhen Runtianzhi Image Technology Co.,Ltd. By Victor Xu
~47~
K1 is the reference print for 1# print heads, while K2 is the reference for 2# print
heads.
When perform Y alignment, K1 and K2 print head mustn’t be adjusted unl ess C, M
or Y heads were in maximum position. If on this occasion, K1 and K2 should be
aligned again!!
c) After finishing all the alignment, double check if all print heads are aligned
perfectly referring to below figure.
Or you can align the print heads through it also. Just keep C, M or Y lines are
overlap the K lines perfectly.
5.5.4 Vertical Alignment
5.5.5 Internal Right Align
Internal right align is necessary for Polaris heads because the Polaris head nozzles
are made wherein the 512 nozzles are divided into 2 parallel rows of 256 nozzles.
Due to some uncontrollable manufacturing errors (tolerances) perfect alignment is
not guaranteed. The internal align is required for both printing directions, especi ally for
monochrome.
Fig.5.5.5-1 Illustration for Align C, M Y
Bottom View
Fig.5.5.3-8 Check Align

Flora Digital Printing System
Model LJ320P
Copyright 2011@ Shenzhen Runtianzhi Image Technology Co.,Ltd. By Victor Xu
~48~
1. Highlight Internal Right Align from test drop list, and send print by click align color
icon; you will get prints as below . Every color will have three units of prints, take K
for example:
2. The “0 position” of the top K22 must be aligned with “0 position” of down K22. In
illustration Fig., K22 meets at “3 position” (in green circle ), and the default value of
K22 is 0. So the K22 should be 0+3=3.
Fig.5.5.5-2 Send Internal Right Align
Fig.5.5.5-3 Internal Right Align Drawing
Fig.5.5.5-4 Offset Tag
Internal Left Offset Column
Internal Right Offset Column
Tick this Internal of Head
Radio Button to open internal
offset tag
Offset textbox, change
corresponding value here

Flora Digital Printing System
Model LJ320P
Copyright 2011@ Shenzhen Runtianzhi Image Technology Co.,Ltd. By Victor Xu
~49~
Path for setting Internal Left alignment:
Print Option Tag → Advanced (Test Print Tools Bar → Parameter Setting Icon) →
Offset Tab → Internal of Head
5.5.6 Internal Left Align
Internal left align is similar with internal right alignment, only the moving direction is
different. Because of opposite direction, the inkjet position from bi-direction is different, that
is why bi-direction alignment is in need.
1. The procedure for Internal Left Align is the same with Internal Right Align, please
refer to 1.4.
5.5.7 Right Align
There are 8 print heads in 4 colors in total. As they are fixed in different physical
position, it is necessary to do Right Alignment for secondary colors, otherwise the
secondary color will be fuzzy and the output picture will be rough.
Fig.5.5.6-1 Send Internal Left Align
Fig.5.5.6-2 Internal Left Align Drawing
Fig.5.5.7-1 Illustration for Right Align

Flora Digital Printing System
Model LJ320P
Copyright 2011@ Shenzhen Runtianzhi Image Technology Co.,Ltd. By Victor Xu
~50~
For Flora machine, we take K1 as the base to align the other print heads.
1. Highlight Right Align from test drop down list, and send print by click align color
icon. You will get prints as below.
2. All the print heads will take K1 as basic. The “0 position” of K1 print heads must be
aligned with “0 position” of all the other print heads. Because of the space problem,
I take M print head as example. K1 meets M1 at “- 4 position” (in green circle), M2
at “4 position”.
Fig.5.5.7-2 Send Right Align
Fig.5.5.7-3 Right Align Drawing
Internal Left Offset Column
Internal Left Offset Column
Change valve in this textbox
M1: 1062 – 4 = 1058
M2: 1593 + 4 = 1597
Tick this Internal of Head
Radio Button to open internal
offset tag
Fig.5.5.7-4 Offset Tag

Flora Digital Printing System
Model LJ320P
Copyright 2011@ Shenzhen Runtianzhi Image Technology Co.,Ltd. By Victor Xu
~51~
Path for setting Right alignment:
Print Option Tag → Advanced (Test Print Tools Bar → Parameter Setting Icon) →
Offset Tab → Right align Check Box
Print Heads Previous Value Test Results Modified Value
M1 1062 -4 1058
M2 1593 4 1597
3. Align the other print heads as the same procedure.
5.5.8 X Alignment
X alignment is very necessary for Bi-direction print mode. If this alignment is not
good, the output image will be rough and fuzzy because of dislocation output coming from
double directions.
X alignment is similar with Right alignment. But every print head will take itself as
reference print head! The way to set the value is the same with right alignment!
1. Highlight X Align from test drop d own list, and send print by click align color icon;
Path for setting X alignment:
Print Option Tag → Advanced (Test Print Tools Bar → Parameter Setting Icon) →
Fig.5.5.8-2 Send X Align
Fig.5.5.8-1 Illustration for X Align
Fig.5.5.8-3 X Align Drawing

Flora Digital Printing System
Model LJ320P
Copyright 2011@ Shenzhen Runtianzhi Image Technology Co.,Ltd. By Victor Xu
~52~
Offset Tab → X align Check Box
5.5.9 Step Alignment
Step alignment is an important alignment for Y-axis.
If the step is too big, the output will have blank line;
otherwise, the output will have overlap line.
1. Highlight X Align from test drop d own list, and send print by click align color icon;
2. The first pass will print dotted line, and the printer will feed media forward, after
that it will print straight line. You may get three possible cases as below:
Figure 1 shows the motor step value when the test was sent is higher than exact
value so we need to increase, by trial and error method you can get the correct
value.
Figure 2 shows the motor step value when the test was sent is lower than exact
value so we need to decrease, by trial and error method you can get the correct
value.
Figure 3 shows the motor step has exact value so no need for any changes. To
determine the exact motor step value setting, you need to bring the broken and
solid lines closer until you can see one single line only.
3. Below is the table where you can find the Step Parameter setting.
Path for setting X alignment:
Print Option Tag → Advanced (Test Print Tools Bar → Parameter Setting Icon) →
Motor Tag → Page windows
Notice:
Fig. 1 – Insufficient Media Feeding Step
Fig. 2 – Excessive Media Feeding Step
Fig. 3 – Correct Media Feeding Step
Fig.5.5.9-1 Send Step Align
Enlarge View
Fig.5.5.9-2 Motor Tag

Flora Digital Printing System
Model LJ320P
Copyright 2011@ Shenzhen Runtianzhi Image Technology Co.,Ltd. By Victor Xu
~53~
If any factor (temperature, voltage and highness of the carriage) which will affect viscosity or firing
speed has changed, you must check Internal left & right alignment, right alignment and X alignment!

Flora Digital Printing System
Model LJ320P
Copyright 2011@ Shenzhen Runtianzhi Image Technology Co.,Ltd. By Victor Xu
~54~
Chapter 6 Operation Manual of Flora LJ3208P
6.1 Brief Introduction
This chapter introduces the details of operating the ope rating instruct ions of the machine from starting
up to shutdown procedure.
Before start on the machine, the operator must read this chapter carefully.
6.2 Starting-up Activities
It is highly recommended to do housekeeping before starting to operate the machine. Maintaining
good housekeeping helps improve the quality of the output as well as the safety of operator. Below is the
check list of activities that operator should do prior to operation of the machine.
z Turn on the ventilating and lighting system inside the printing room.
z Check and clear for any traces of ink spillage on the machine and the floor.
z Check if the Waste Ink Bottle is already full and replace if necessary
z Check if there is enough ink for printing and flush solution for cleaning the print head.
z Check and ensure that the printing platform along the print head carriage path is free from
loose parts or obstructing object
z Turn on the Main Power Switch and power-on the PC.
z Turn on the Printer Power
z Check the Negative Pressure setting
z Perform Ink Priming procedure on the Print head
6.3 Print head Jetting Check
Check the jetting status of each Print head periodically before, during and af ter using the machine.
The ideal prints should as below:
Note:
Please take note that all print heads must print the same. If not, do purge or flush the print heads.
6.4 Operational Approach of PhotoPRINT Server Flora Edition 6.1v2
6.4.1 Job Folder
Figure below shows the current job list and statuses, the printer model, add job icon
and other printing instructions. It is divided into three queues:
Click this to send test
p
rint head
Select Test Print Head
Fig.6.3-1 Send Test Print

Flora Digital Printing System
Model LJ320P
Copyright 2011@ Shenzhen Runtianzhi Image Technology Co.,Ltd. By Victor Xu
~55~
Printing job queue shows the jobs that are currently printed and those queued for
printing.
Ripping job queue shows the jobs that are under ripping process, have completed
the ripping process and those ready to be sent for printing.
Job queue shows the list of all jobs that have been printed, aborted, ripped and new
added jobs waiting to be sent for editing or ripping.
① ② ③ ④ ⑤
Add job icon Printer model Printing job queue Ripping job queue Ripping job queue
6.4.2 Layout Tag
Table.6.4.1-1 Window Area
③
④
⑤
②
①
Fig.6.4.1-1 Main Windows
Lay out tab
Nesting check
box
Image orientation
button
Media max
size
Space between
co
p
ies
No of copies
Image size
Fig.6.4.2-1 Layout Windows

Flora Digital Printing System
Model LJ320P
Copyright 2011@ Shenzhen Runtianzhi Image Technology Co.,Ltd. By Victor Xu
~56~
Figure above shows the image layout parameters like: printing size, margi ns, number
of copies and orientation of image. This is the first window that will pop out every time you
click the job or default job properties. After editing you can directly send the job for printing
by clicking send button or send for ripping by clicking OK button. Clicking the reset button
will change all the parameters back to default settings. Other parameters shown on this
window are self- explanatory.
6.4.3 Work Flow Tag
Figure below shows the option what to do with the job file after printing. There are
three options available for the end users:
z Delete – the image will be lost after printing is completed
z Hold – the image will be retained in the job folder after printing is completed
z Archive – the image will be sent in archive folder after printing is completed
Notice: Click “OK” button after you select from the option.
6.4.4 Color Management Tag
Figure below shows the image printing parameters in terms of resolution, ripping
quality, type of media, ICC profile and others. Detail explanations can be read in PhotoPrint
manual, which is available after the RIP software has been installed in the PC.
Click OK button or send button if all parameters are finalized.
Note:
1,Color correction Box: You can choose print with ICC correction or not.
2,ICC check box: Select ICC you want to use.
3,Media check box: Choose Media mode when you create ICC named.
4,Resolution option box: Choose different resolution.
5,Color mode box: By default it is CMYK mode.
6,Dither type box: Choose different dither type, you can get dif ferent print quality. But
the speed of ripping will be different. The higher quality you want, the slower it will be
ripping.
Work flow
tab
Work flow box
Choose hold
Click OK
Fig.6.4.3-1 Workflow Windows

Flora Digital Printing System
Model LJ320P
Copyright 2011@ Shenzhen Runtianzhi Image Technology Co.,Ltd. By Victor Xu
~57~
6.4.5 Print Option Tag
This test is being performed in order to verify the conditions of the Print head nozzles
before printing. It prints a swatch which could represent the nozzle s to be firing on a definite
order.
From the FloraPrint driver window , select “Test Print head” the drop-down list click on
the “Align colors” button.
1
3
5
2
4
6
Spot white must
un-tick this box
Fig.6.4.4-1 Color Management Windows
Fig.6.4.5-1 Print Option Tag & Test Print Tool Bar
Raster
test
Exit
Print Option Tag
Refer to 6.4.6.1
Send
Print
Parameter
setting
Test Data Card
Communication
Test Print head
Communication
Forward
(Media)
Left
(Carriage)
Backward
(Media)
Right
(Carriage)

Flora Digital Printing System
Model LJ320P
Copyright 2011@ Shenzhen Runtianzhi Image Technology Co.,Ltd. By Victor Xu
~58~
6.4.5.1 Advance Button
Figures below will pop out when you click the advance button under job properties
printer option. The following pop out windows representing a printing parameter setting. They
will appear as soon as you click their designated button.
Page setting Tab
Ribbon
Left
Tick this check box, the machine
will print ribbon on the left side of
the image.
Width
set the width of the
ribbon
Right Tick this check box, the machine
will print ribbon on the right side
of the image.
Space
with
image
Define the space
between ribbon and
the image
Default setting
Media’s
width
Define the maximum size of the
image can be printed
Flat
X-base
Define 0 position on
X-axis
Media’s position & Margin
margin keep the margin on the media Media to
X-base
set the
counter-position to
print
Page header keep header space on the media
System Tab
Stop Button
Backward Button
Right Button
Left Button
Forward Button
Fig.6.4.5.1-1 Page Setting Tab
Table.6.4.5.1-1 Page Setting

Flora Digital Printing System
Model LJ320P
Copyright 2011@ Shenzhen Runtianzhi Image Technology Co.,Ltd. By Victor Xu
~59~
Clean
Auto Clean Count by The clean times can be set in this text box
Press ink time Priming time can be set in this text box
Micro Drop
Clean internal(s) Set the micro drop
period
Full clean Set the drop size of
the micro drop
Ink Supply Control
ink supply check box If tick this box, the pump will supply ink until the sub-tank
is full, or the pump will stop working within 25 seconds
Other
Center mirror image ---Output to files ---Skip at blank space
check box
Tick this box, the printer will skip over the blank spa ce in
the image, and start to print from image.
Offset T ab
The tab supplies text box for soft ware alignment. Please refer to Section 5.5.5 for more
details.
Table.6.4.5.1-2 System
Fig.6.4.5.1-2 System Tab

Flora Digital Printing System
Model LJ320P
Copyright 2011@ Shenzhen Runtianzhi Image Technology Co.,Ltd. By Victor Xu
~60~
Motor Tab
Page Print head
Step (111PPD) this text box used to
change page feeding
step(Refer to Step Align)
Step this text box used to set the
carriage moving step when
clicking right moving icon on
test print tool bar
Work speed Feeding Speed St art
speed
Carriage motor start speed
Start speed Feeding motor start
speed
Acceler
ation
Carriage acceleration at
both sides
Acceleration Feeding acceleration Acc
Length
Acc length for speed up
Printing Mode
CMYK Choose Dir ec t ion Choose Speed
T emperature Tab
Refer to Section 5.5.2 for more detail.
Voltage Tab
Refer to Section 5.5.2 for more detail.
6.4.5.2 Pass Number Setting
This section will introduce how to set pass number. The same resolution with different
pass number will produce different quality, so it is important for you to handle this.
Path:
Default job properties → Advanced(Parameter setting) → Motor → Advanced:
Table.6.4.5.1-3 Motor
Fig.6.4.5.1-3 Motor Tab

Flora Digital Printing System
Model LJ320P
Copyright 2011@ Shenzhen Runtianzhi Image Technology Co.,Ltd. By Victor Xu
~61~
is display list which will shows repeat times, extraction and total pass for every
resolution. After setting the printing mode, the detail will be showed in this list.
Resolution: The DPI or dots per inch of an image. Measured by how many
dots or pixels are in one inch of a design. It is a measurement of the fineness
or detail. The higher the resolution is, the finer the detail in an image.
Extract: extract dots from original design and print more passes with the same
ink limited. This will control the print head to jet ink dots on the media more
averagely, which will be helpful to improve the pass banding and other
banding coming with clogged nozzles.
Repeat: repeat printing double, triple, quadruple times. More repeat times
makes darker image output.
Note:
Total pass is concerned with resolution, extraction and repeat times. There is a
formula to count the total pass.
Total Pass =
()
peatExtraction
solution
Re*1*
200*300
Re
+
For example: If the resolution is 600*600DPI, extraction 1 time, repeat 1 time:
()
1*11*
200*300
600*600
+
=2*3*2*1
1
1
2
3
4
Click Set Button
after setting
Fig.6.4.5.2-1 Page Mode Set

Flora Digital Printing System
Model LJ320P
Copyright 2011@ Shenzhen Runtianzhi Image Technology Co.,Ltd. By Victor Xu
~62~
=12pass
6.5 Shut-off procedure
6.5.1 Over-night protection
z Flush print head one by one until you can’t see ink in the ink tube.
z Wipe-off any ink contamination on carriage plate bottom.
z Pour Flush solution to the lint free cloth on top of the prepared print head
capping material.
z Install the Print head Capping into the bottom of the Print head Carriage
securing it with the cling wrap which is wrapped-around the print head carriage
z Shut off the negative pressure valves.
z Shut-off the power for machine and PC
z Close the machine covers
z Do housekeeping if necessary
6.5.2 Long term protection
z Flush the print head until a clear flushing solution are jetting out of the print
head nozzles.
z Shut-off the negative pressure valves.
z Disconnect the print head input tube from the Ink Supply line, cap the inlet
interface.
z Uninstall the print head, package it with lint free cloth. Then put it into
anti-static plastic bag.
z Do the same procedure on other Print heads.
z Wipe-off any ink contamination.
z Turn off the Main Power switch.
z Close all the machine cover.
z Switch-off the ventilation and lighting in the printing room if necessary.
z Perform Housekeeping if necessary.

Flora Digital Printing System
Model LJ320P
Copyright 2011@ Shenzhen Runtianzhi Image Technology Co.,Ltd. By Victor Xu
~63~
Chapter 7 Service and Maintenance Manual of Flora LJ3208P
7.1 Brief Introduction
This is to describe the various service and maintenance procedure to be observed in using this
LJ3208P machine. Every operator must read this chapter carefully.
Maintenance Frequency
- Clean Raster St rip Daily
- Replace Ink Filter once every 3 months~6 months
- Lubrication twice a month
- Circuit inspection once a month
7.2 Maintenance of print heads
7.2.1 Flushing Print head
z Set the Ink Tank valve to flush position.
z Press Flush Button Switch on the Control Panel. The ink will go out from the
print head nozzles.
z Wipe the print heads with a lint-free cloth to removed excess ink re sidue nea r
the nozzles.
z Continue flushing out until all the print head nozzles are showing straight
jetting of flushing solution.
7.2.2 Prime Print head
z After performing a flush procedure, set the Ink Tank Valve to Ink Prime
Position
z Press Ink Prime Button Switch on the Control Panel. The ink will go out from
the print head nozzles.
z Turn the right ink tank valve to flush position, prime until there i s no air bubble
in the ink tube. Then turn it to ink position.
z Wipe the print heads with a lint-free cloth to removed excess ink re sidue nea r
the nozzles.
7.2.3 Replacing Print head
z Turn-off the printer power.
z Perform the flushing procedure on the print head that needs to be replaced.
z Remove the 30pins print head flexible flat data cable.
z Remove the Print head Connector board gently.
z Remove the two print head fixation screws.
z Remove the input tubes from the print head’s ink supply.
z Safe keep the old print head.
z Install the new print head in the carriage accordingly.
z Replace the two fixation screws of the print head.
z Connect the Ink supply tubing to the new print head’s accordingly.
z Install the Print head Connector board on the print head.
z Install the 30pins print head flexible data cable, take note of the correct cable

Flora Digital Printing System
Model LJ320P
Copyright 2011@ Shenzhen Runtianzhi Image Technology Co.,Ltd. By Victor Xu
~64~
direction.
z Orientate the port when connecting the flat data cable on the print head and
Print head Control Board.
z Perform flushing procedure to make sure that all jets are working well.
z Turn on the printer power.
z Perform Ink priming
z Wipe the print heads with a lint-free cloth to removed excess ink residue
around the Print head nozzles.
7.3 Maintenance of Ink Supply and Vacuum Line System
7.3.1 Changing Defective Ink Pump and Filter
Usually the ink pump stops pumping the ink when the secondary tank is full of ink.
The level sensor will energize the LED on the Print head Control Board when the secondary
ink tank is full.
If the level LED doesn’t light after 2 minutes of pumping, then most likely the pump is
defective or there’s a leak somewhere along the input line. Please take note of the polarity
of the power supply cable for the ink pump, usually the red wire is connected to positive “+”
while the black is to negative “-”.
Change the ink and solvent filters every six months to ensure continuous ink and
solvent flow into the system.
7.4 Maintenance of Printer Moving Part
For the purpose of getting high quality output, maintenance of moving parts is very necessary which
Disc Filter
Bulk Filter
Pump
Unit
24Vdc
Motor
Ink Pump

Flora Digital Printing System
Model LJ320P
Copyright 2011@ Shenzhen Runtianzhi Image Technology Co.,Ltd. By Victor Xu
~65~
can insure high-precision carriage moving and paper feeding .
z Clean and lubricate the print head carriage rail on a weekly basis, apply enough light duty
grease or oil in the contact area
z Clean and lubricate slide bearing, ball bearings for timing belt pulleys, gears and ball
bearing for automatic take up/feeding system on a weekly basis.
z Periodically check the tension of all timing belts, adjust them if necessary.
z Check the screws on moving parts, assemblies and those that fix the carriage bumper on
the rail. Tighten them if necessary.
7.5 Adjust Timing Belt Tension
Carriage timing belt can be adjusted through the two Tension Adjusting Bolts installed at the left end
of the carriage rail.
a) Open the left side cover of the machine ,you can see a driven pulley fixed as below figure Loosen up
the Lock Nut
b) Turning the Tension Adjusting Bolts clockwise will tighten the tension while turning it counter
clockwise will loosen up the tension. The Timing Belt should be ideally stay in the middle portion of
the Pulley.
Fig. 7.4-2: Take-up & Feeding Asse.
Fig. 7.4-1: Slider Bearing & Rail Guide
Slider Bearing
Grease Inlet
Rail Guide

Flora Digital Printing System
Model LJ320P
Copyright 2011@ Shenzhen Runtianzhi Image Technology Co.,Ltd. By Victor Xu
~66~
c) Measure the belt pull tension load at the middle of the rail with a distance of 60-70mm should be
1000g, using a pull test gage and a steel ruler.
Upper tension
adjusting bolt
Lower tension
adjusting bolt
Left View
Lock nut
The belt should stay in the
middle of the pulley
Driven Pulle
y
Fig. 7.5-1 Carriage Tension Belt Assembly
Fig.7.5-2 Measuring Belt Tension using Pull Test Gaug

Flora Digital Printing System
Model LJ320P
Copyright 2011@ Shenzhen Runtianzhi Image Technology Co.,Ltd. By Victor Xu
~67~
Appendix A Troubleshooting Guide
Problems Probable Causes Solution
One particular color is not
printing
o No ink flowing to the tube line
of the Print head Carriage
o Empty ink supply in the Ink
barrel
o Clogged Ink line tubing and ink
filter
o Defective Ink Pump
o Defective Print head Control
Board
o Defective Motion Control Board
• Fill-up empty ink barrel
• Replace clogged ink line tubing and ink filter
• Replace defective Ink Pump
• Replace defective Print head Control Board
• Replace defective Motion Control Board
Some Print head Nozzles
are not firing
Print head firing is not
straight
o Clogged Print head
o Print head problems
o Defective Print head Cable
o Defective Print head Control
Board
• Perform solvent flushing and Ink Priming
(make a longer flushing if needed)
• Replace defective Print head
• Replace defective Print head Cable
• Replace defective Print head Control Board
• Adjust the Print head Voltage
Ink Starvation
o Insufficient Negative Pressure
value
o Print head nozzles are not
working well
o Insufficient ink flowing from
the Disc Filter to the Print head
because of clogged disk filter
Increase the Negative Pressure value from
-1.8KPa to -2.1KPa
Perform Test Print to check if all the Print head
nozzles are working well, flush and ink prime
as needed
Replace Filter
Cannot achieve correct
negative pressure
Negative pressure keeps
on changing from time to
time
o Presence of ink in the Ink
Protect T a nk
o Defective Negative Pressure
Regulator
o Defective Press ure Gauge
o Defective Air Pump
o Possible leak in the vacuum line
system (negative pressure line)
Remove or purge any presence of ink in the Ink
Protect T a nk
Replace defective Negative Pressure Regulator
Replace Pressure Gauge
Replace Air Pump
Fix any air leak from the vacuum line system.
Replace Air Fittings if necessary
Air Pump is not working
Ink Pumps are not
working
o Presence of ink in the Ink
Protect T a nk
o Ink Tank Sensor might not be
working that is why ink is
overflowing to the Ink Protect
Tank.
Fix/replace the Ink Tank Sensor
Remove the ink from the Ink Protect Tank
using the Syringe from the Ink Outlet Tube
vent

Flora Digital Printing System
Model LJ320P
Copyright 2011@ Shenzhen Runtianzhi Image Technology Co.,Ltd. By Victor Xu
~68~
l Ink Pumps are not
working
o Presence of ink in the Ink
Protect T a nk
o Defective / Out of Position Ink
Protect Level Sensor
Remove or purge any presence of ink in the Ink
Protect T a nk
Replace/Fix Ink Protect Level Sensor by
opening the Ink Protect Tank
No Print at all
No presence of Printhead
Voltage from RTZ
software
o The Optical Cable must have
been interchanged during
installation
Interchanged again the Rx/Tx connection of the
Optical Cable either from the PCI card or in the
Printhead Control Board
Carriage gets in contact
with media during
printing
o Gap between carriage and media
(printing platform) is too close.
o Media suction is not working
o Wrinkled / curled media
Adjust the Printer Carriage between 2.0 –
2.5mm.
Check the 24V supply of suction fans, replace
defective suction fan if necessary
Replace the media to avoid wrinkled media to
be in contact with the print head during
printing
Carriage is not moving,
left to right stroke
o Defective AC Servo Motor
o Corrupted/Defective Servo
Driver
o Worn-out T iming Belt
o Defective Motion Control Board
Replace defective Servo Motor
Re-program the Servo Driver, replace if
defective
Replace worn-out Timing Belt
Replace Motion Control Board
Media is not moving,
backward and forward
stroke
o Defective DC Servo Motor
o Defective Movement Control
Board
o Worn-out T iming Belt
o Defective Motion Control Board
Replace defective DC Servo Motor
Replace worn-out Timing Belt
Replace Movement Control Board\
Replace Motion Control Board
PC has no communication
from the printer
Printer’s functionality
cannot be accessed
o Corrupted Printer Driver
o Defective PCI Card
o Defective 15pins I/O cable
Re-install the Printer Driver Software
Replace defective PCI Card
Replace defective 15pins I/O Cable
Ink is not drying
o Heat is not enough to dry the
ink
o Heater is not working
o Heater controller is not working
o Density or the ink limits of the
image setup is too high
Increase the heater’s temperature from the
printing platform as well as the front heater
Replace defective heater
Replace heater controller
Lower the ink limits o f the image profile
Decrease the Ink limits of the image
Horizontal banding
o Clogged Print head
o Step alignment is not good
o Print head alignment is not good
Perform solvent f lushing and Ink Priming
(make a longer flushing if needed) then check
the status of the Print head in Test Print
Adjust the mot or steps (see Print head
Alignment Procedure)
Aligned the Print head very well (see Print
head Alignment Procedure)

Flora Digital Printing System
Model LJ320P
Copyright 2011@ Shenzhen Runtianzhi Image Technology Co.,Ltd. By Victor Xu
~69~
A particular portion of the
printer is showing
horizontal banding
o Feeding of the Pinch Roller is
not equal
Adjust the tension of the Pinch Roller (see
Pinch Roller Adjustment Procedure)
Inconsistent step align
problem
o Feeding of the Pinch Roller is
not equal
o Worn-out Gear Box Assembly
o Defective Motor E ncoder
o Worn-out T iming Belt
Adjust the tension of the Pinch Roller (see
Pinch Roller Adjustment Procedure)
Replace worn-out Reducer Gear Box
Replace Y-Axis Servo Motor
Replace Timing Belt
Vertical Banding on the
right side portion of the
machine
o Raster Strip might have
scratches on that portion
o Loose connection on the Print
head Cable Data lines
o Tension on energy chain
assembly
Replace the Raster Strip
Fix loosed Print head Cable Data lines
Fix/replace the energy chain
Re-setup and cabling on the energy chain
Carriage suddenly stops
during operation
X-alignment problem
during printing
o Raster Strip is too dirty
o Portion of Raster Strip has
severe scratches
o Defective Raster Strip
o Defective Raster Encoder
o Raster Encoder is not properly
setup with raster strip
Clean Raster Strip .
Replace defective Raster Strip
Replace defective Raster Encoder
Perform Raster Alignment
Portion of the RIPed
image was not printed
o The RIPed image dimension is
almost /more than 2000in/50m.
o The RIPed image file is more
than 4G bytes
Reduce the size to be RIPed to manageable size
to avoid RIPing error
Output size of the image
print is not same with the
defined image dimension
o Tension Roller problem
o Needs to perform Output Size
Compensation
Adjust/setup the roller tension properly
See page 48 for proper procedure in using
Output Size Compensation

Flora Digital Printing System
Model LJ320P
Copyright 2011@ Shenzhen Runtianzhi Image Technology Co.,Ltd. By Victor Xu
~70~
Appendix B HOW TO SET NEGATIVE PRESSURE SENSOR (CKD) DISPLAY
The sensor will
show this display
Press MODE button
and hold for 2
seconds to display
Press MODE
button 1X then
press arrow
UP/DOWN until it
display
Press MODE
button 1X then
press arrow
UP/DOWN until
it display
Press MODE button 1X
then press arrow
UP/DOWN until it display
Press MODE button 1X
then press arrow
UP/DOWN until it display
P
ower up
the
Press MODE button
1X to exit
Press MODE button 1X
then press arrow
UP/DOWN until it display

Flora Digital Printing System
Model LJ320P
Copyright 2011@ Shenzhen Runtianzhi Image Technology Co.,Ltd. By Victor Xu
~71~
HOW TO SET NEGATIVE PRESSURE PARAMETERS
Press MODE
button 1X to exit
Press arrow
UP/DOWN button to
set the parameter
Press MODE button
1x to display the
encircled below
Press MODE button
1X to display the
encircled below
Press arrow
UP/DOWN button to
set the parameter

Flora Digital Printing System
Model LJ320P
Copyright 2011@ Shenzhen Runtianzhi Image Technology Co.,Ltd. By Victor Xu
~72~
Appendix C Glossary
Adobe Acrobat - Software package created by Adobe for converting any document to an Adobe Portable
Document Format (PDF) file. Anyone can open your document across a broad range of hardware
and software using the downloadable, free software Adobe Acrobat Reader, and it will loo k
exactly as you intended—with layout, fonts, links, and images intact.
Aliasing - A defect which occurs when a graphic file does not have enough resolution to reproduce image
detail and causes visible jagged lines along the edges
Attachment - When referring to e-mail, an electronic file placed within an e-mail for the purpose of sending
through the Internet.
Banding - It is the horizontal, parallel lines in an ink je t print caused by a falsely aligned or defective print
head. It is also the vertical lines caused by some mechanical problem.
Bi-directional Printing - Printing in which the print head alternates printing a line left to right, then the next
line right to left, etc.
Bitmap Images - Computerized image made up of a collection of dots or pixels; these images appear
blocky when you zoom in; also known as raster images
Bleed - Ink which prints beyond the trim edge of the page, created for the purpose of allowing ink to extend
to the edge of the page after trimming. Without bleed, cutting the product becomes extremely
difficult and may sacrifice the quality of the product.
CMYK - cyan, yellow, magenta, black. The subtractive primaries, or process colors, used in color printing.
Black (K) is usually added to enhance color and to print a true black.
Color Bar - Strips of color used as a tool to check color accuracy and density
Color Mapping - The terminology that permits the “best match” in appearance to the “source image”.
Color Separations - The proce ss of preparing artwork, photographs, transparencies, or computer-generated
art for printing by separating color into the four primary printing colors: cyan, magenta, yellow and
black.
Contrast: The comparing of light and dark on an image, such as low = gray (light).
Crop - To cut off parts of a picture or image.
Crop marks - Printed lines showing where to trim a printed sheet.
Densitometer - A quality control devise used to measure the density of printing ink.
Density - The degree of color or darkness of an image or photograph.
Dithering: Creating dots to “fool the eye” into seeing shades of gray.
Dot Size - Relative size of halftone dots as compared to dots of the screen ruling being used. There is no
unit of measurement to express dot size. Dots are too large, too small or correct only in comparison
to what the viewer finds attractive.
Dots-per-inch - Measure of resolution of input devices such as scanners, display devices such as monitors,
and output devices such as laser printers, image setters and monitors. Abbreviated DPI. Also called
dot pitch.
Drop-On-Demand (DOD) / impulse - an ink jet system in which pressure pulses are generated directly in
the print head by piezo crystals or heated resistors to eject drops of ink only when they are needed to
print a dot
Drop Mass or Drop Volume - The size of a jetted drop of ink, usually measured in nanograms. Adequate

Flora Digital Printing System
Model LJ320P
Copyright 2011@ Shenzhen Runtianzhi Image Technology Co.,Ltd. By Victor Xu
~73~
jet-to-jet drop mass uniformity is required in many applications to eliminate banding When the
specific gravity is 1, 1picoliter (pL) = 1 nanogram (ng).
Drop Velocity - The speed at which a drop of jetting fluid travels from the orifice plate to the receiving
medium.
Encapsulated Postscript File (EPS) - An Adobe graphic file format for high resolution images; it translates
graphic and text into code that tells a printer to print in the highest resolution possible and also has
low resolution view files for quick screen viewing.
Encoder - An encoder is a device o r tran sducer that converts linear or rotary motion information into
uniformly spaced incremental signals.
First In First Out (FIFO) - A form of low-level memory (for example, a shift register. Used in the data path for
temporary storage of bitmap data on its way to a print head.
Fire Pulse - A high voltage electrical signal of precise shape, amplitude, and width, causing a jet to eject a
drop. Also called a drive pulse.
Firmware - Embedded software, i.e., software that is not loaded from a storage device at startup, but instead
resides on the board or in the chip.
Fire Pulse Amplitude (FPA) - The peak voltage of a fire pulse.
File Transfer Protocol (FTP) - The language used to facilitate the transfer of files from a server on the
Internet to another location, such as a desktop computer or another server.
GIF Graphic Interchange Format - An image format type generated specifically for computer use. Its
resolution is usually very low (72 dpi, or that of your computer screen), making it undesirable for
printing purposes.
Gradient - Color in shades from one starting point to another gradually blending in between. A grade change
in a hue. It is a transition of color, creating a blended change between screen percentages of a
single color or between two different colors
Grain - The direction in which the paper fiber lie.
Head Drive Electronics Module (HDEM) - This is the component of the Apollo PSK that creates the high
voltage drive pulses. It is programmable for pulse amplitude and width, as well as rise and fall time.
Hypertext Markup Language (HTML) - A series of formatting commands that describes the components of
graphics and text material presented on the World Wide Web in a consistent manner
Image Area - Portion of paper on which ink can appear.
Image - Usually a photograph that is “translated into a bitmapped” image by scanning Ink Jet Printing
Method of printing by spraying droplets of ink through computer-controlled nozzles. Also called jet
printing.
Initialization File - A file, usually with the extension .INI, that sets startup variables for an application
program.
Large Format Printing - refers to large sized prints, typically A1 sized or larger, produced in full color
utilizing full color digital ink jet printers.
Materials Safety Data Sheet (MSDS) - This is a document whi ch describes the potential safety hazards of a
chemical, liquid or solid, and instructs how to handle it safely and how to respond to exposures or
spills.
Meniscus - The curved surface at the top of the water column, or at any interface between a liquid and a
solid. Nozzles have a meniscus, whose shape and position are set by a slight negative pressure in

Flora Digital Printing System
Model LJ320P
Copyright 2011@ Shenzhen Runtianzhi Image Technology Co.,Ltd. By Victor Xu
~74~
the jets at rest, balanced against the surface tension of the liquid.
Meniscus Pressure Used at Spectra - the meniscus pressure often refers to an inward bubble pressure
that equals the fluid pressure at a print head jet nozzle when that jet is not activated. A negative
meniscus pressure is applied to inactivated jets only when the print head system is operating,
helping to prevent the jetting fluid from leaking at the nozzles. More generally, meni scus pressure is
the negative pressure created behind a meniscus, due to surface tension.
Portable Document Format (PDF) - An electronic document format from Adobe that allows the distribution
of digital files across any platform that can display a document as originally designed and formatted
without having the software application or fonts on the viewing computer.
Pigment - Particles that absorb and reflect light and appear colored to our eyes; the subst an ce that gives ink
its color.
Pixel - A single dot on a monitor or on digital image.
Print head - part of a digital printer that is directly responsible for applying ink to a substrate
Protocol - The set of conventions defining communication between electronic components, for example, and
a host computer and its interface. The way information is placed on a network. The steps needed to
communicate or activate an operation or exchange of information in or between computers.
Purge - Performed for a variety of print head maintenance reasons, a purge is a regulated pressure applied
for a fixed amount of time at the air interface to the ink reservoir attached to the print head jetting
assembly to force ink, along with air bubbles and debris if present, out the jets through the nozzles.
Raster - A line of pixels. Also, the process of rendering an image or page, pixel by pixel, in a sweeping
horizontal motion, one line after another.
Rasterization - The process of converting mathematical and digital information (vector commands) into a
series of dots by an output device.
Raster Image Processor (RIP) - A combination of computer software and hardware that controls the printing
process by calculating the bit maps of images and instructs the printing device to create the images..
Most RIPs operate on PostScript.
Resolution - The DPI or dots per inch of a design. Measured by how many dots or pixel s are in one inch of a
design. The measurement of the fineness or detail. The higher the resolution the finer the detail in
an image
Satellites - Small droplets of jetting fluid generated behind the main drop as the main drop detaches from
the nozzle.
Substrate - Any surfa ce on which printing is done.
T agged Image File Format (TIFF) - A standard g raphic image file format often used for storing high
resolution images that can easily handle up to 24 bits of photographic image color.
Transmission Control Protocol/Internet Protocol (TCP/IP) - is an open comm unications protocol
implemented on diverse systems and the Internet and is the preferred protocol for practical
interoperability.
Varnish - A clear liquid coating applied to printed she et for protection and glossiness.
Varnishing - a finishing process whereby a transparent varnish is applied over the printed sheet to produce
glossy finish.
Viscosity - the tendency of a liquid to flow slowly or quickly resulting from the friction of its molecules
 Loading...