

Page 1
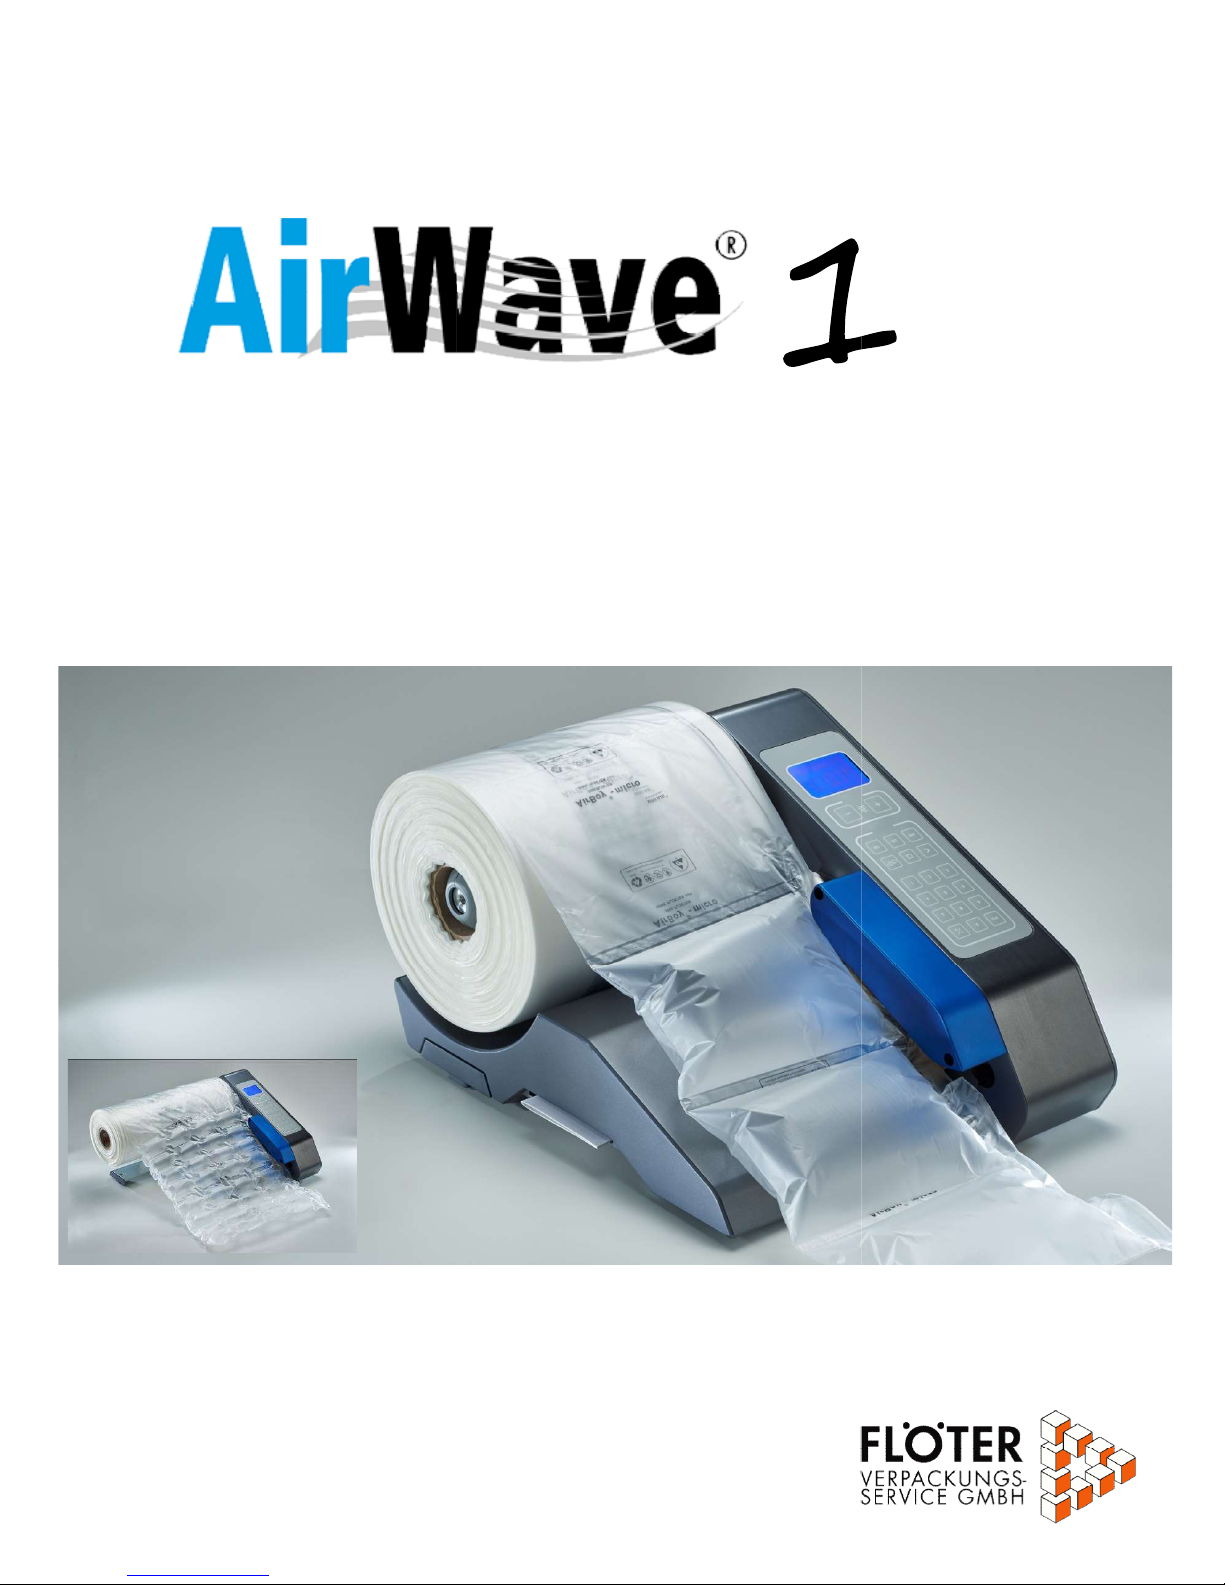
OPERATING INSTRUCTION
Page 2

OPERATING INSTRUCTION
2
Contents
Contents ......................................................................................................................... 2
Safety guidelines ............................................................................................................. 3
Air cushion types - FILLER ............................................................................................... 4
Air cushion types – WRAPPER ......................................................................................... 5
Machine overview ............................................................................................................ 6
Technical data ................................................................................................................. 6
Recommended settings .................................................................................................... 7
Accessories and spare parts ............................................................................................. 8
Operating instructions ...................................................................................................... 9
Control panel settings .................................................................................................... 11
Preset and lock function ................................................................................................. 12
Change the knife ........................................................................................................... 13
Change the Teflon transport belts.................................................................................... 16
Filmguide pins ............................................................................................................... 20
Error codes ................................................................................................................... 20
Options and expandability .............................................................................................. 21
Warranty ....................................................................................................................... 22
Page 3
OPERATING INSTRUCTION
Safety g
uidelines
Please read the safety guidelines and operating instruction closely before using the machine.
Turn off the machine and disconnect power before opening the machine or
performing any repair or maintenance work on the machine.
Switch off the machine if it will not be used for an extended period of time.
Do not insert any objects into the machine when it is connected to the mains.
To prevent the risk of electric shock, ensure that the machine does not come into
contact with liquids.
Do not operate the machine without the covers for the machine components.
Keep hair and loose clothing away from the film feed mechanism.
Place the machine only on surfaces that are adequately large, stable, flat, and level.
This machine is design
ed for safe operation in compliance with the use, instructions, and
guidelines specified in these operating instructions.
All persons who use this machine must be familiar with the content of these
operating instructions and must carefully follow the
FLÖTER shall not be responsible for damage resulting from improper use of the machine or
non-
observance of the safety guidelines.
safety guidelines.
3
Page 4
OPERATING INSTRUCTION
4
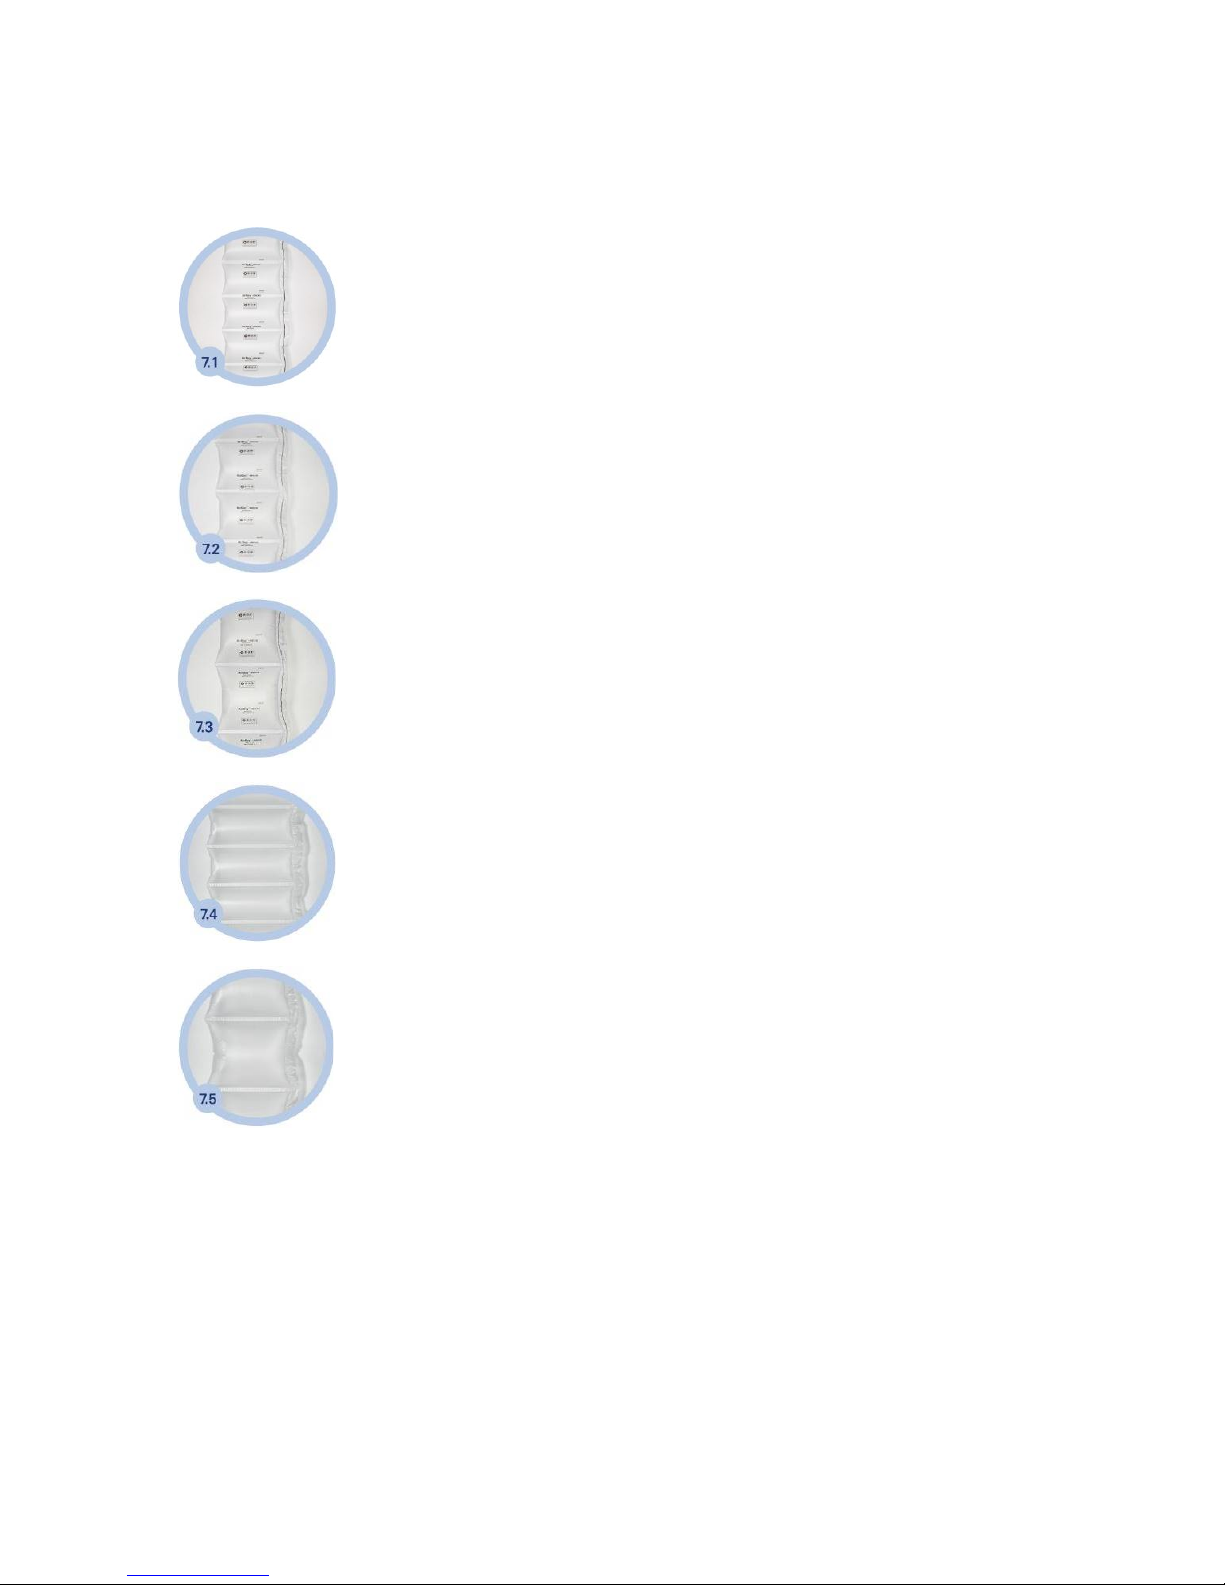
Air cushion types - FILLER
Type 7.1 AirWave 1 air cushion filler 100 x 210 mm 20 µm / 700 m
Ideal for filling small voids and for use as an intermediate layer
Type 7.2 AirWave 1 air cushion filler 150 x 210 mm 20 µm / 700 m
Ideal for filling medium-sized voids and for use as an air cushion ring
Type 7.3 AirWave 1 air cushion filler 200 x 210 mm 20 µm / 700 m
Ideal for filling large voids
Type 7.4 AirWave 1 air cushion filler 130 x 300 mm 20 µm / 600 m
Ideal for filling large voids
Type 7.5 AirWave 1 air cushion filler 240 x 300 mm 20 µm / 600 m
Ideal for filling large voids
Page 5
OPERATING INSTRUCTION
5
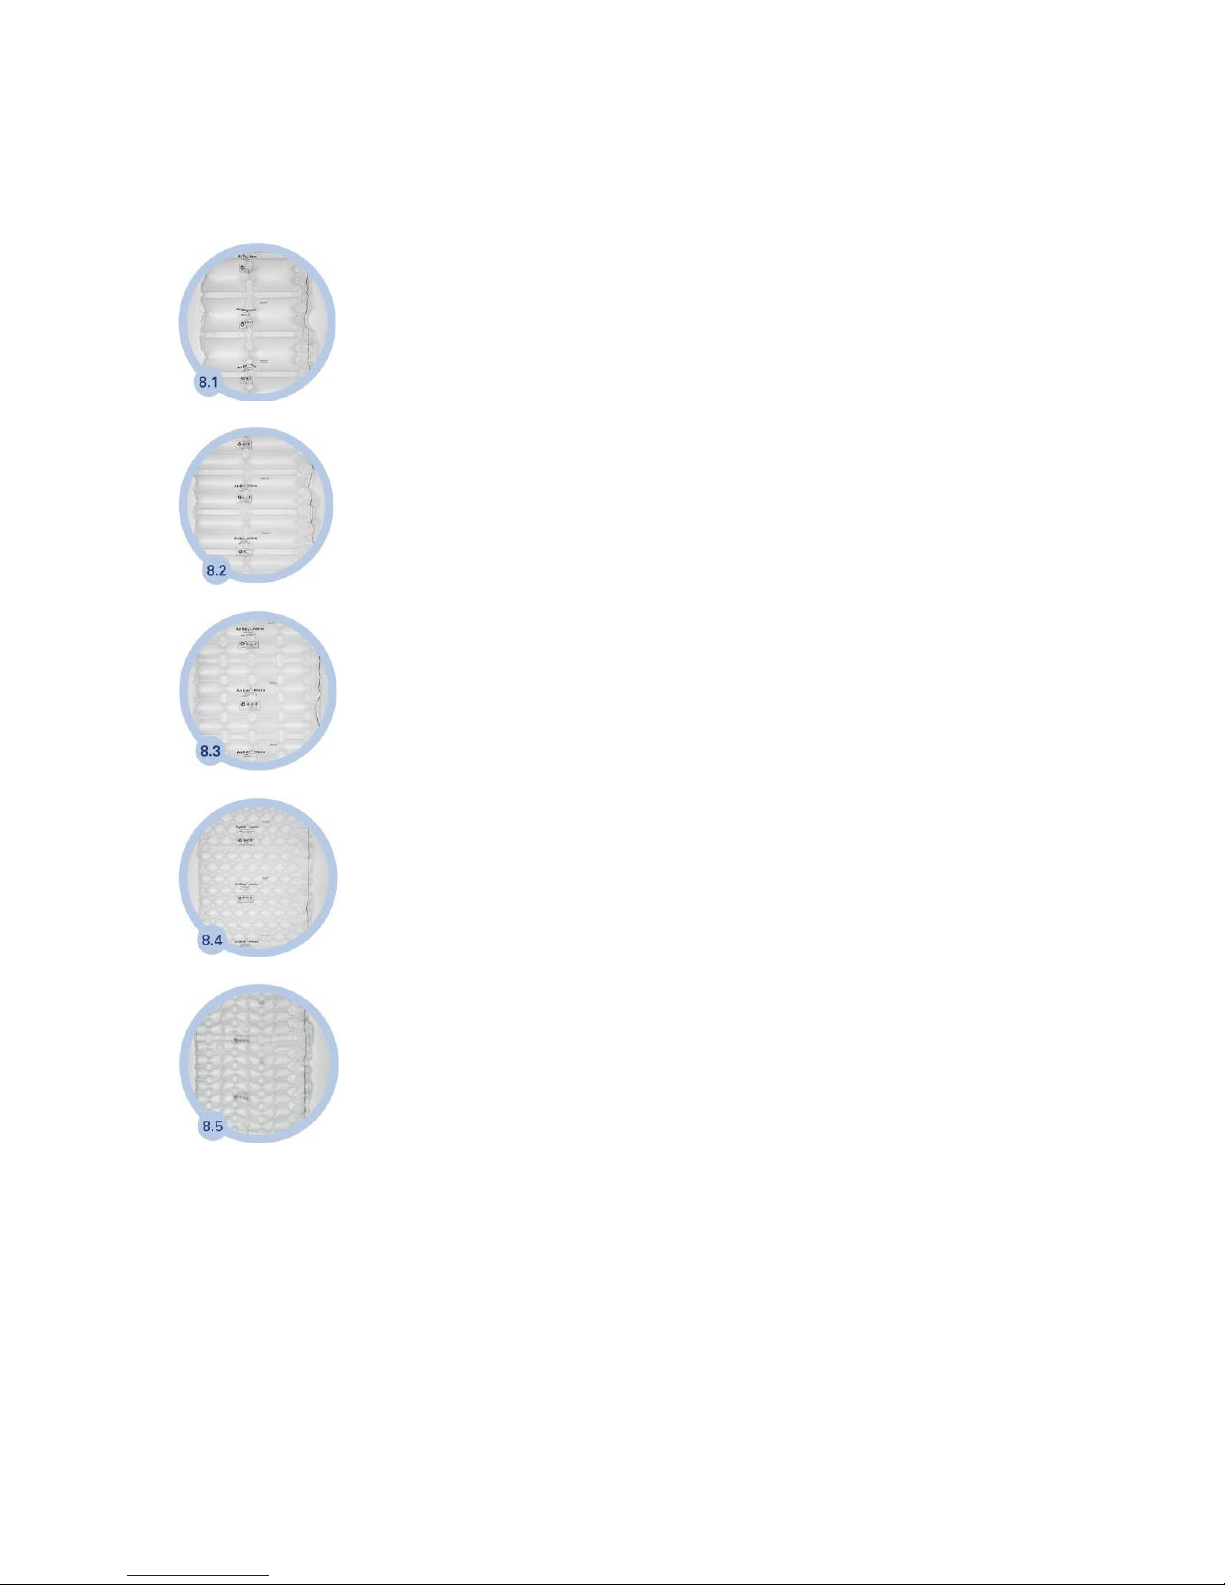
Air cushion types – WRAPPER
Type 8.1 AirWave 1 wrapper 420mm 2 large chambers 20µm / 450 m
2 large chambers for large volumes and for use as a top layer
Type 8.2 AirWave 1 wrapper 420mm 2 small chambers 20µm / 450 m
2 chambers for moulded components, edge protection, and wrapping
Type 8.3 AirWave 1 wrapper 420mm 4 chambers 20µm / 450 m
4 chambers for use as an intermediate layer, wrapping, and envelope
Type 8.4 AirWave 1 wrapper 420mm 8 chambers 20µm / 450 m
8 chambers for use as an envelope and intermediate layer
Type 8.5 AirWave 1 wrapper 420mm 7 wavy chambers 20µm / 450 m
7 chambers for use as an envelope and intermediate layer
Page 6
OPERATING INSTRUCTION
6
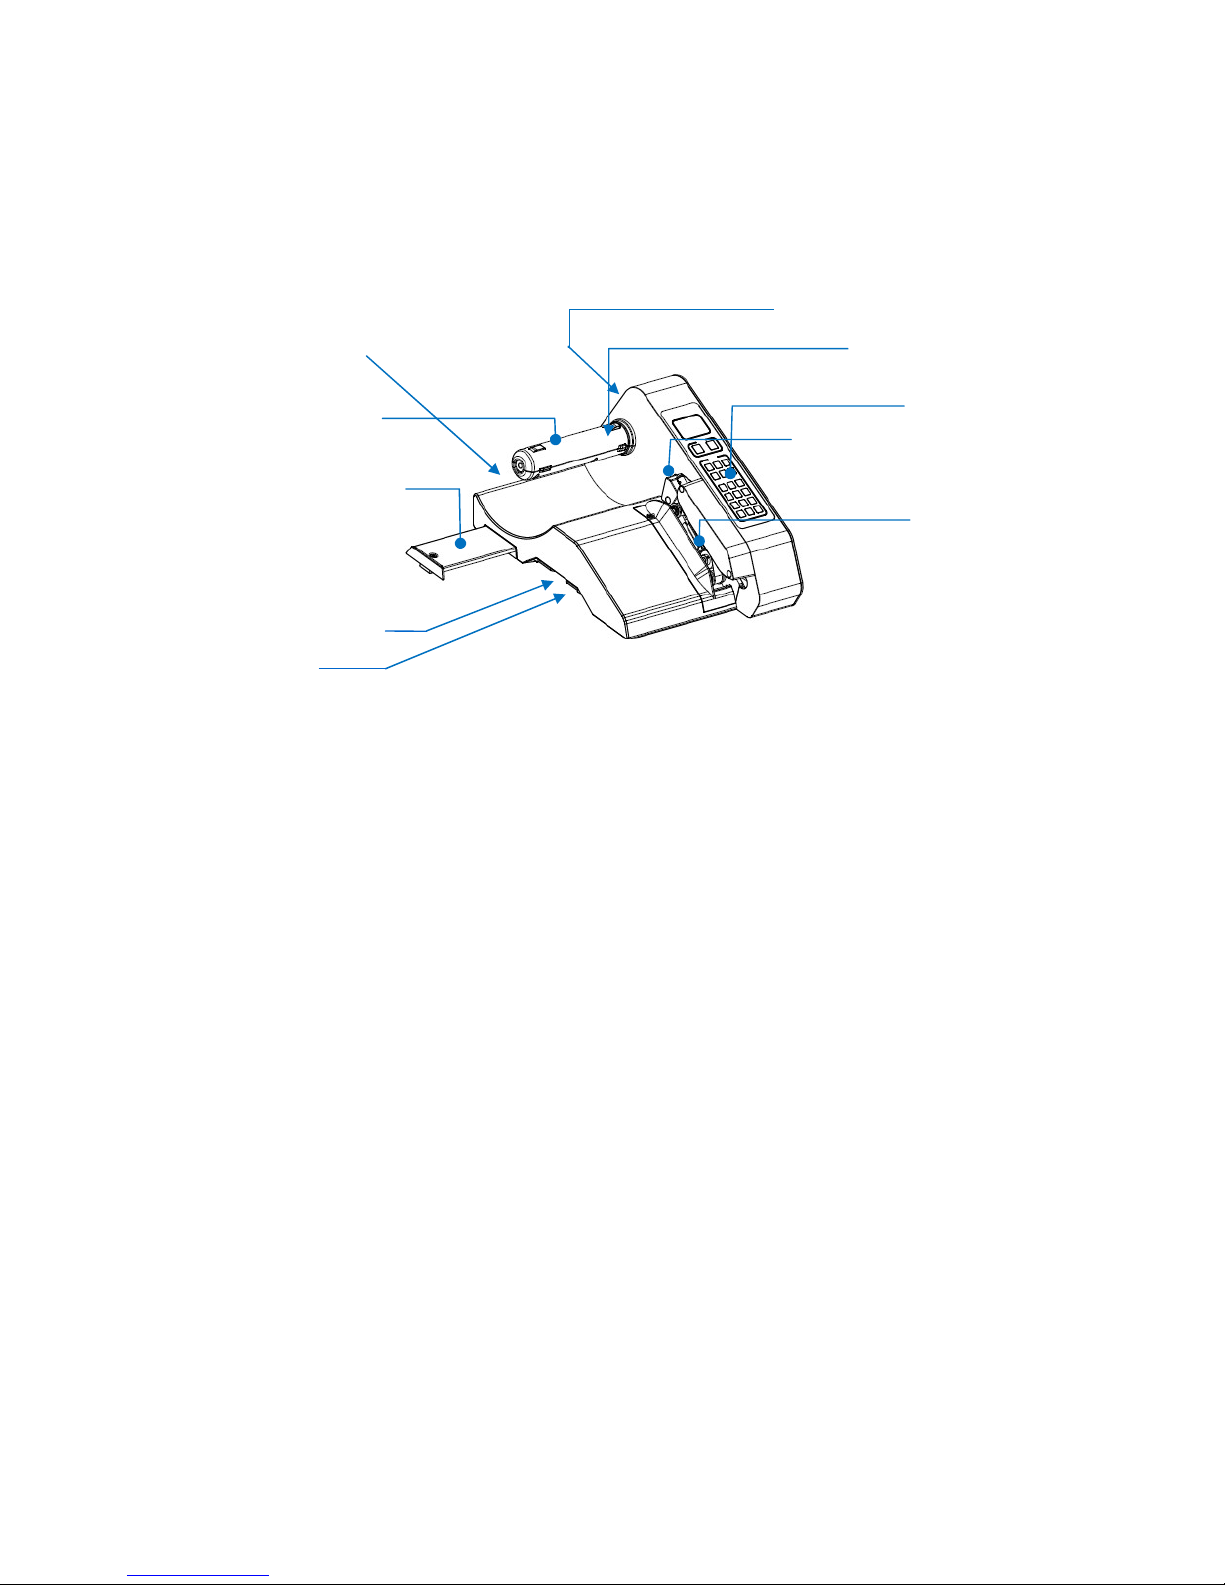
Machine overview
Technical data
Power supply: 230 V; 50 Hz as well as 120 V; 60 Hz
Power consumption: 115 W (20 W Stand-By)
Production speed: 8 m / min
Weight: 5,2 kg
Colour: individual
Dimensions (LxWxH): 413 x 316 x 232 mm (extendible base 150mm)
Bluetooth interface: yes
Control
panel
Filling pipe for air supply
Sensor
end of film
Film channel
Film roll shaft
Power cord, power switch
Interface for
external control
(optional)
Extendible base
Storage operating
instruction
Connection Longrollholder
Spare part
compartment
Page 7

OPERATING INSTRUCTION
7
Recommended settings
Cushion Type
Recommended Temperature
Recommended Air Volume in
%
Typ 7.1
170-180 16-20
Typ 7.2
170-180
16-20
Typ 7.3
170-180 16-20
Typ 7.4
170-180 30-34
Typ 7.5
170-180 32-36
Typ 8.1
170-180 44-48
Typ 8.2
170-180 44-48
Typ 8.3
170-180
44-48
Typ 8.4
170-180 44-48
Typ 8.5
170-180 74-78
Warning: Do not set the machine at a temperature higher than the recommended welding
temperature for the respective film type. In this way you ensure a longer life of the machine.
All modifications require the prior consent of our service technicians. The required
temperature can vary depending on ambient temperature.
Page 8
OPERATING INSTRUCTION
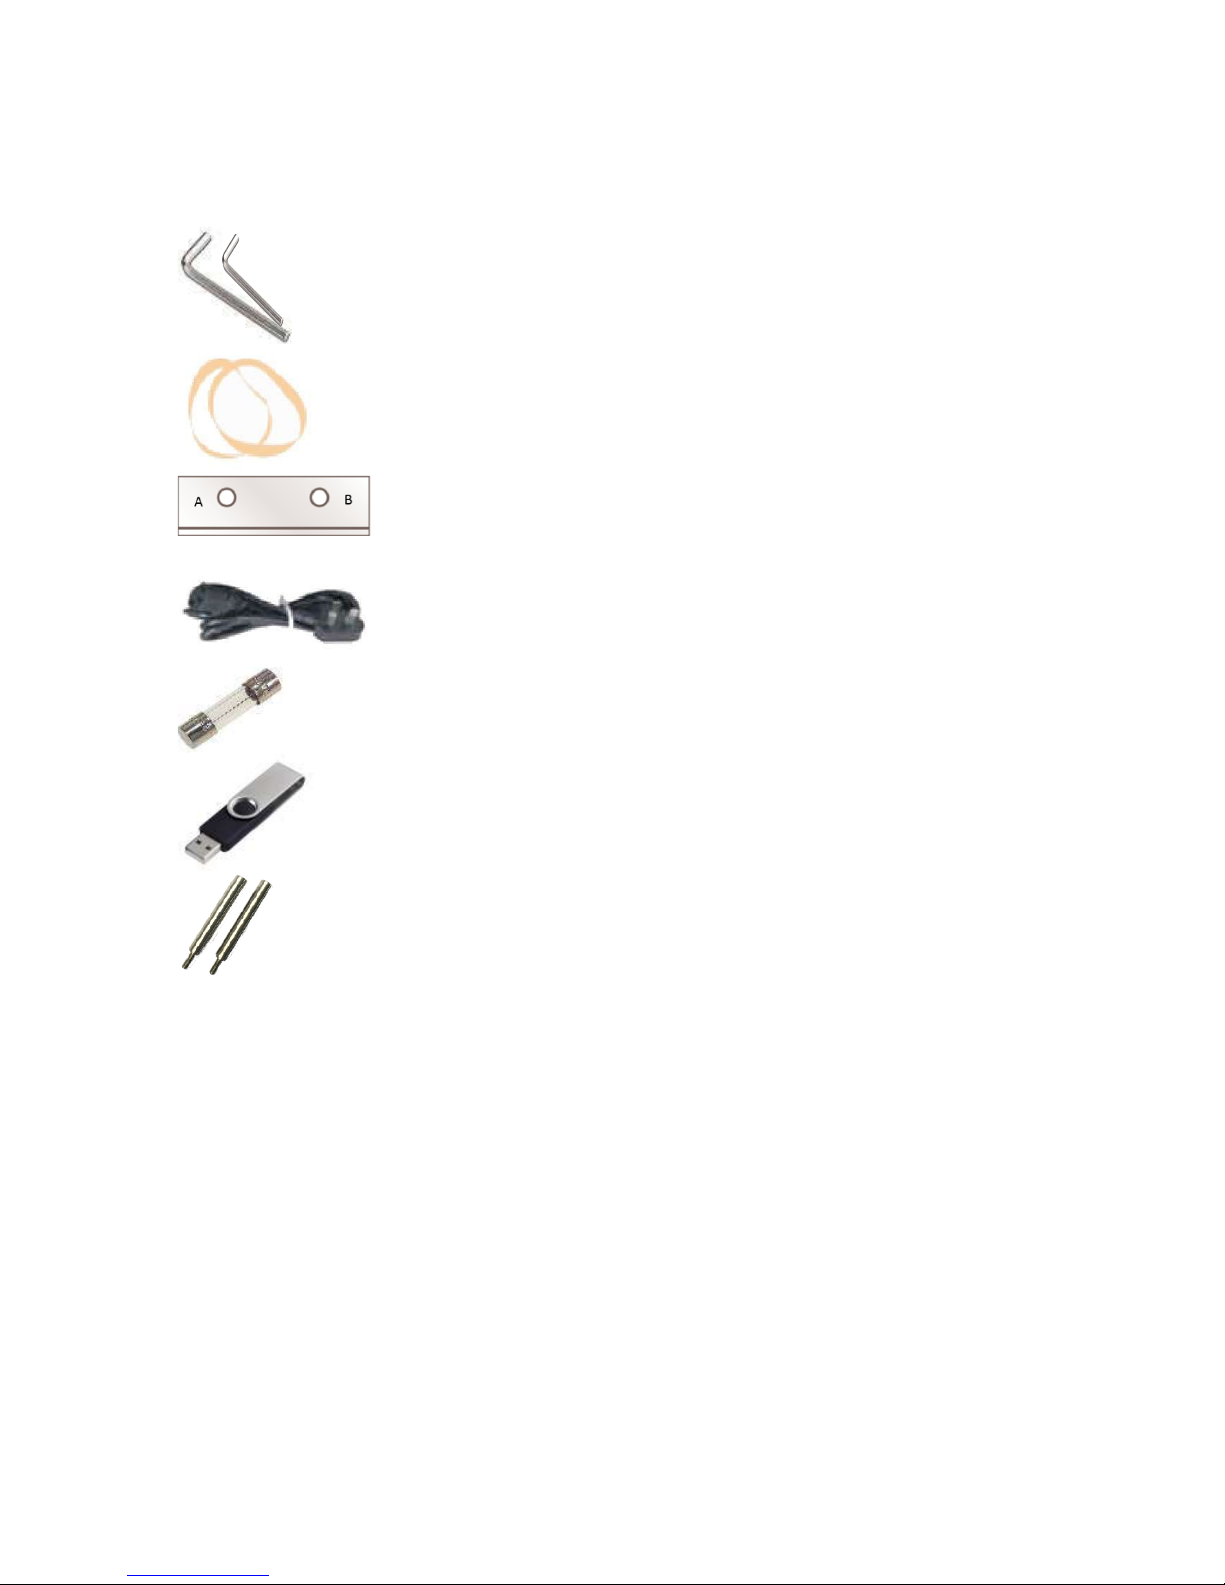
Accessories and s
Hex key
Teflon belt
Knife
Power cord
Fuse
USB
Filmg
pare parts
(2 pcs)
(1 set = 2 pcs)
(1 pcs)
(1 pcs)
(1 pcs)
flash drive
with operating instructions and
uide pins (2 pcs)
8
training video
Page 9
OPERATING INSTRUCTION
Operating i
nstructions
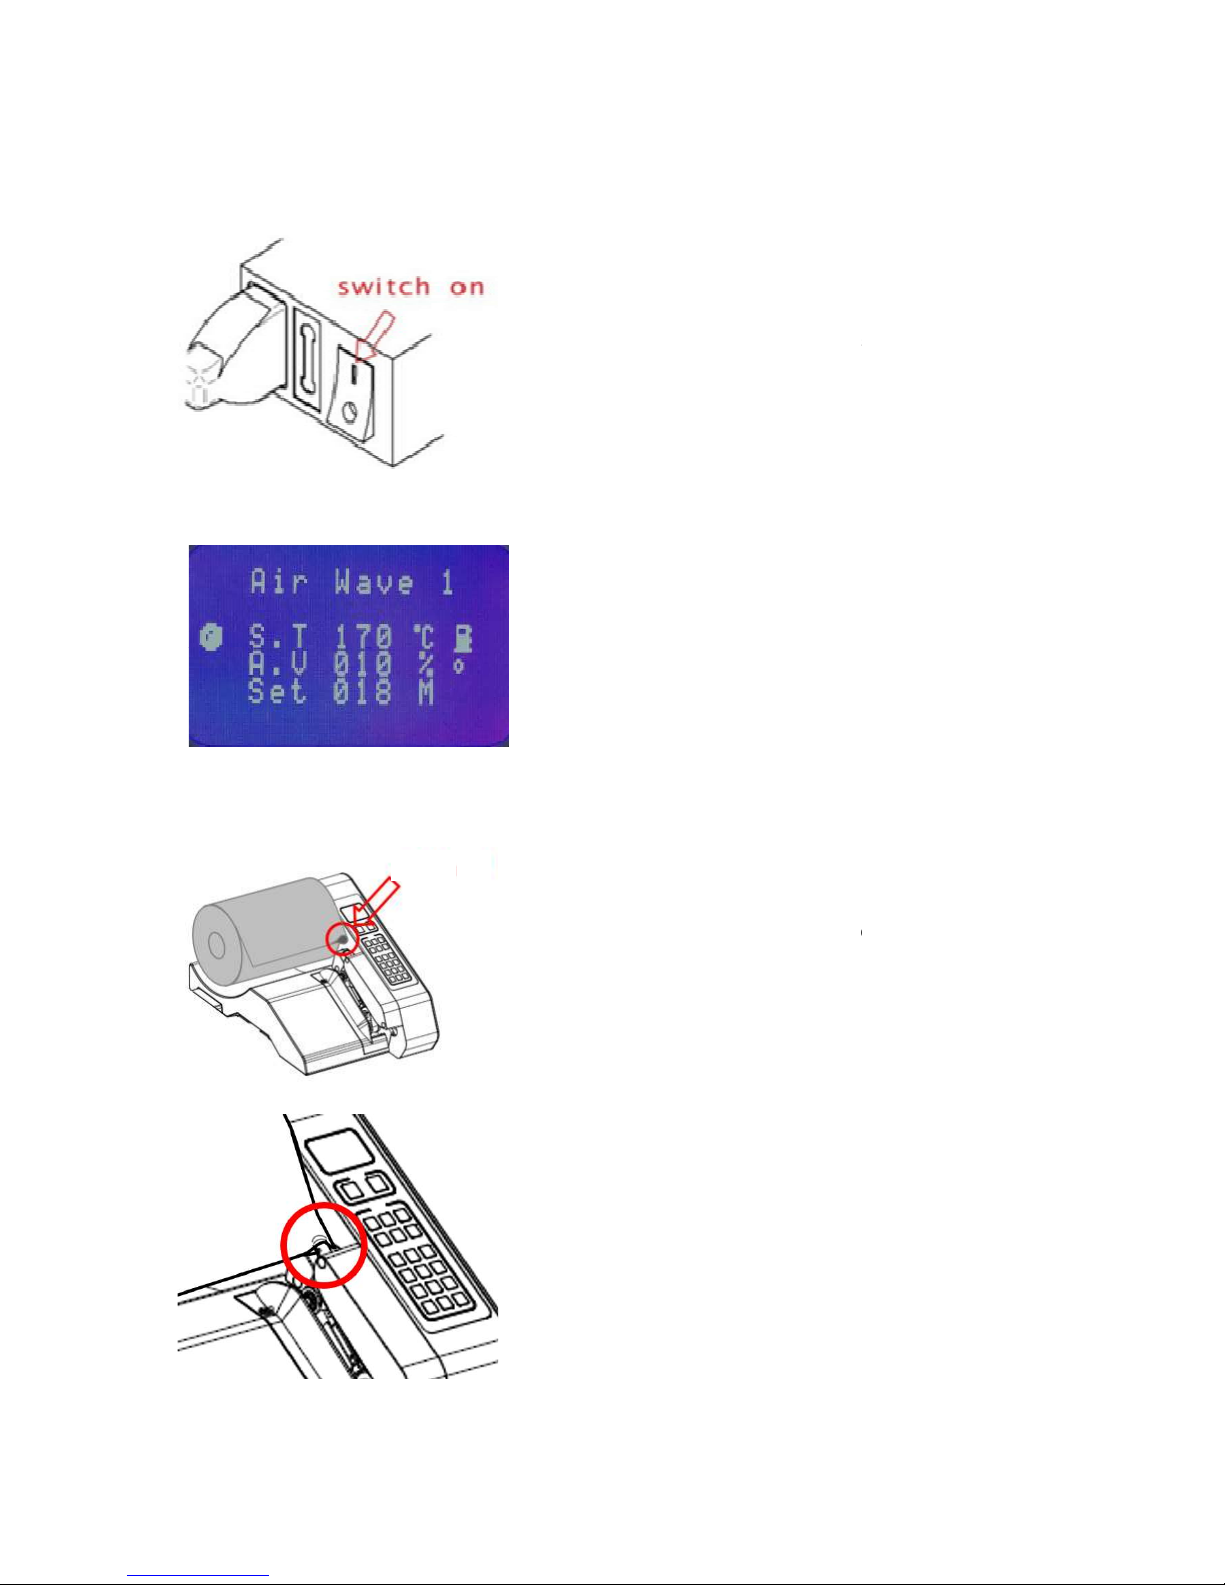
Insert film roll
Air Channel
Connect power to the machine and switch on the
machine.
The start screen will appear automatically after ca. 5
seconds on the control panel.
Loading the roll of film onto the film roll shaft
Please note the side of airfill channel of the film. The
channel must be on the
side closest ro the machine
Guide the air fill channel of the film onto the air nozzle.
Slide
the film on the air nozzle a few more cm forward
direction of sealing unit.
That will simplify the next step.
9
.
.
in
Page 10
OPERATING INSTRUCTION
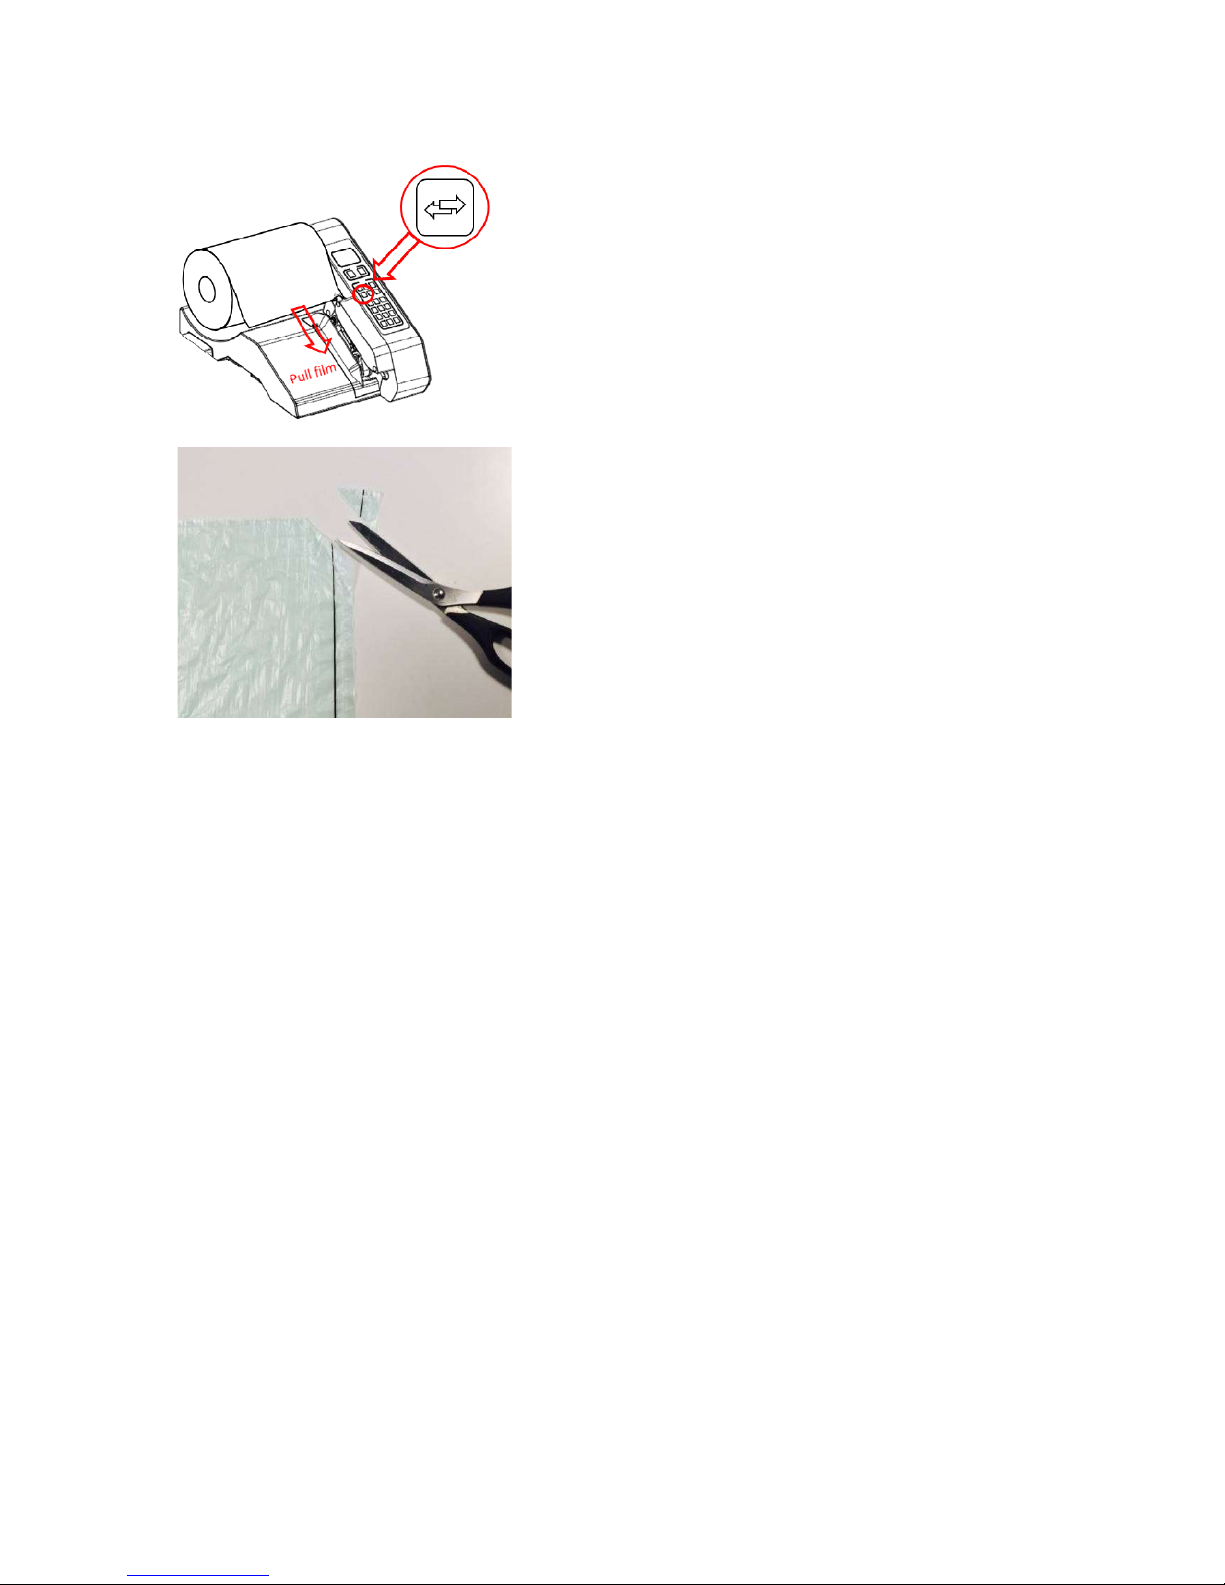
Pull the film above the air nozzle
and through the film
channel. Press the “IN/OUT button” and pull the film all
the way through.
The corner of the film can be cut at an angle to make it
easier to fit the film over the air nozzle.
10
Page 11
OPERATING INSTRUCTION
Control panel s
ettings
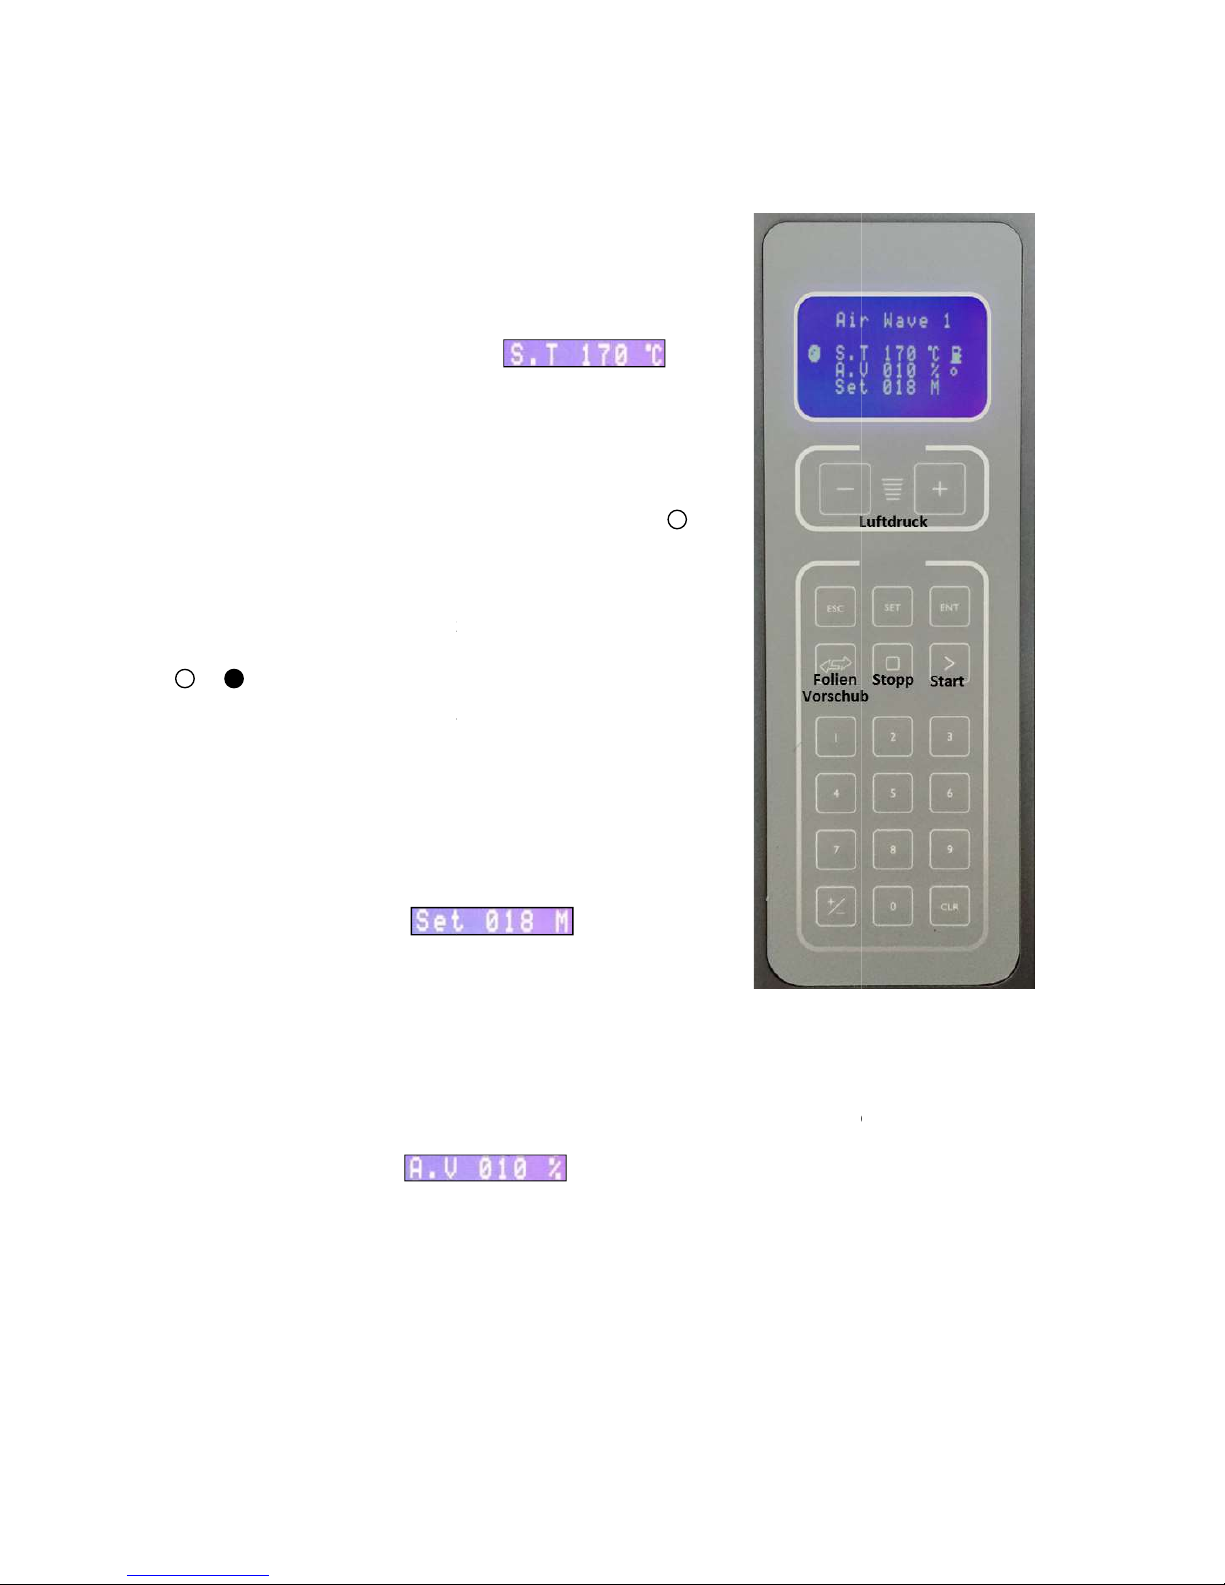
Use the control panel
to set the welding temperature, film
length, and air volume. Once a roll of film is loaded and all
settings are correct, press “Start” to start the production of air
cushions.
Setting the welding temperature
The preset welding temperature
To
change the welding temperature,
the required temperature. Press
„ESC“to end
adjustment function
heating-
up or cooling down to required temperature.
this process the display will show the flashing symbol
The progress bar on the right display the current status of
welding temperature like a thermometer.
requested temperature.
Once the machine reaches the set
temperature,
the symbol on the display will change from
to .
Please have a little patience. The production can start only
when set temperature is reached.
been pressed during heating or cooling process, the
machine would be
in waiting mode and would sta
production independent when target temperature has been
reached.
Setting the film length
The length of the air cushion strand you want to produce can
be preset in meters,
as needed. This value is set to 0 by
default, which tells the machine to
and enter the requested
length.
function. Press “START”
to start the production. The machine will stop automatically once the
preset air
cushion strand length has been reached.
Please note:
the machine will save the set length until you delete or change the length.
Setting the air volume
Set the air volume you want by pressing the buttons “+” and “
volume
can be set between 0 and 40. Use the recommended air volume for the respective film
types.
is 170°C.
press “SET” and enter
„ENTER“ to continue and
. The machine will start
During
.
When the
If the „START“ butten has
rt
produce air cushions
continuously. Press
Press
„ENTER“ to continue and „ESC“to end the adjustment
-
” next to the display. The air
11
three times “SET”
Page 12
OPERATING INSTRUCTION
Preset and lock function
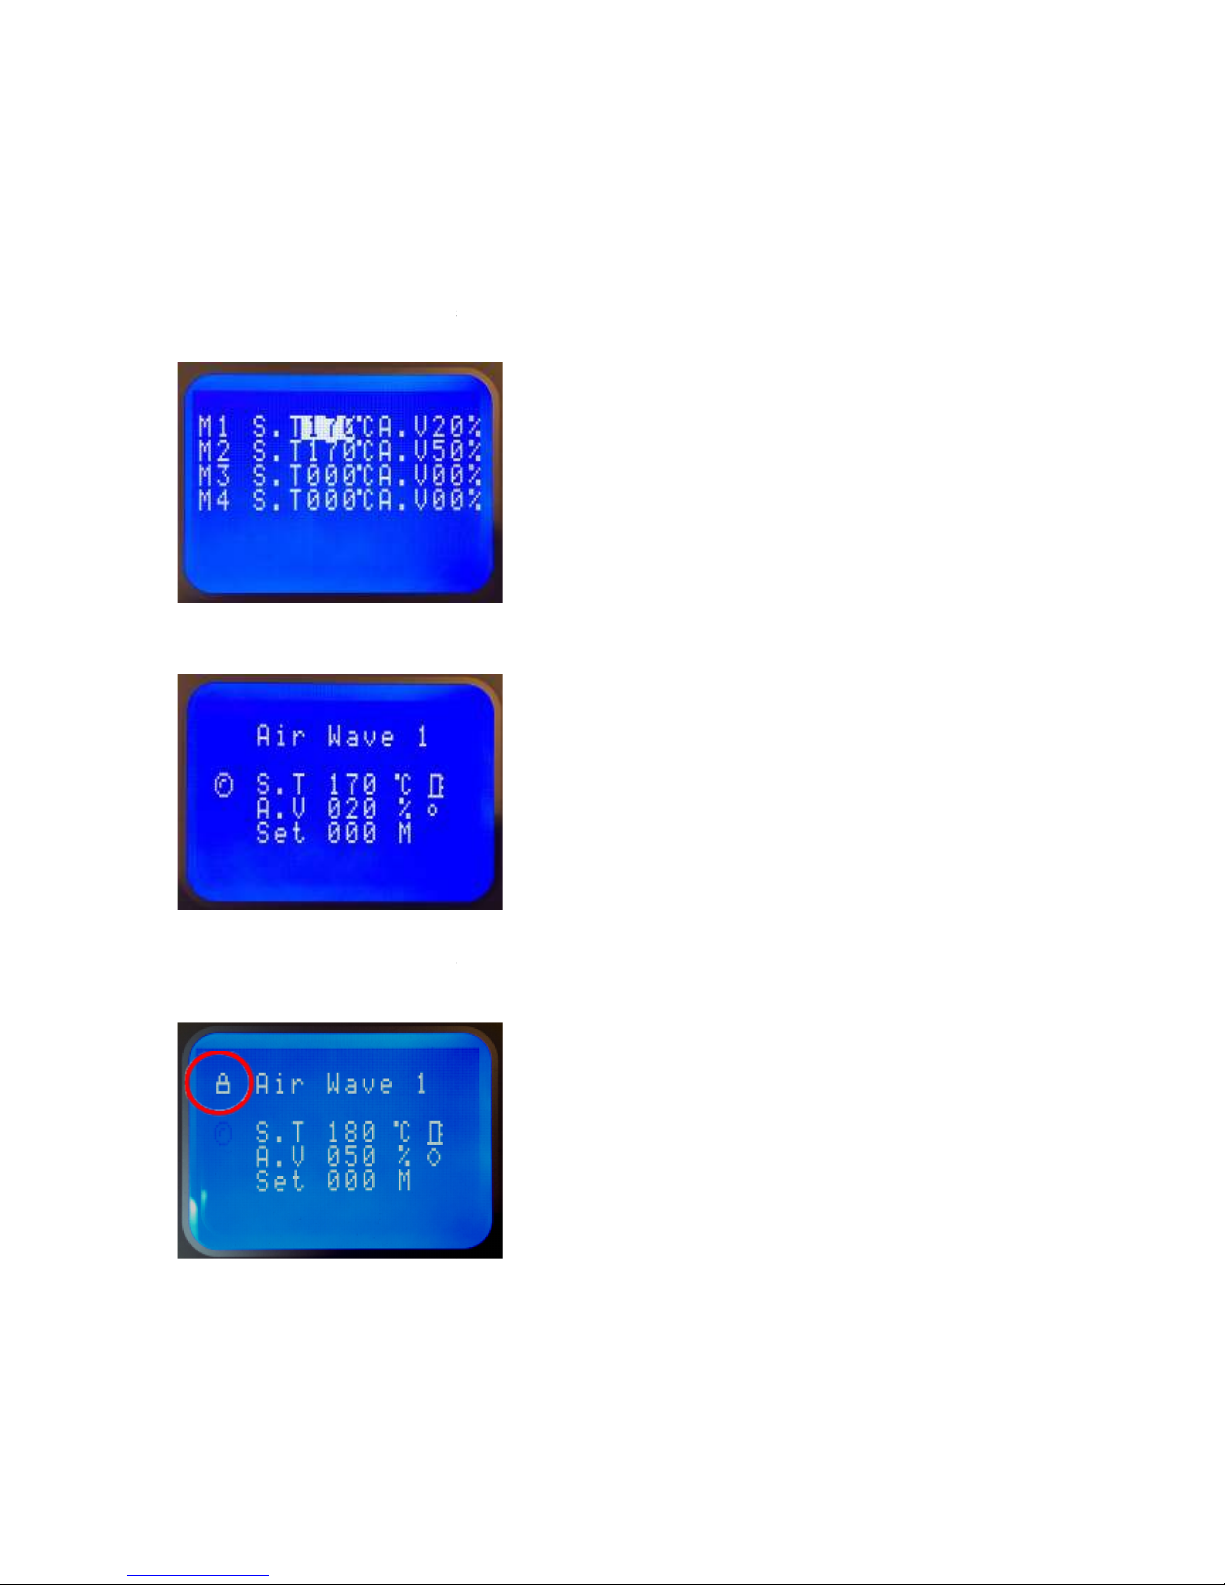
Four presettings
with temperature and air charge are possible
Programming the presettings
can be done
Please ask your foreman
for the required code.
For quick selection
you have to be at foreman / control level. P
requested program position
and settings will be set.
Control panel can be locked
to prevent
Please ask your foreman for the code
for a
quick selection.
at programming level.
ress long time the number of
to prevent setting changes by
unauthorized person.
to lock or unlock the control panel.
12
Page 13
OPERATING INSTRUCTION
Change
the knife
You can easily change the knife for
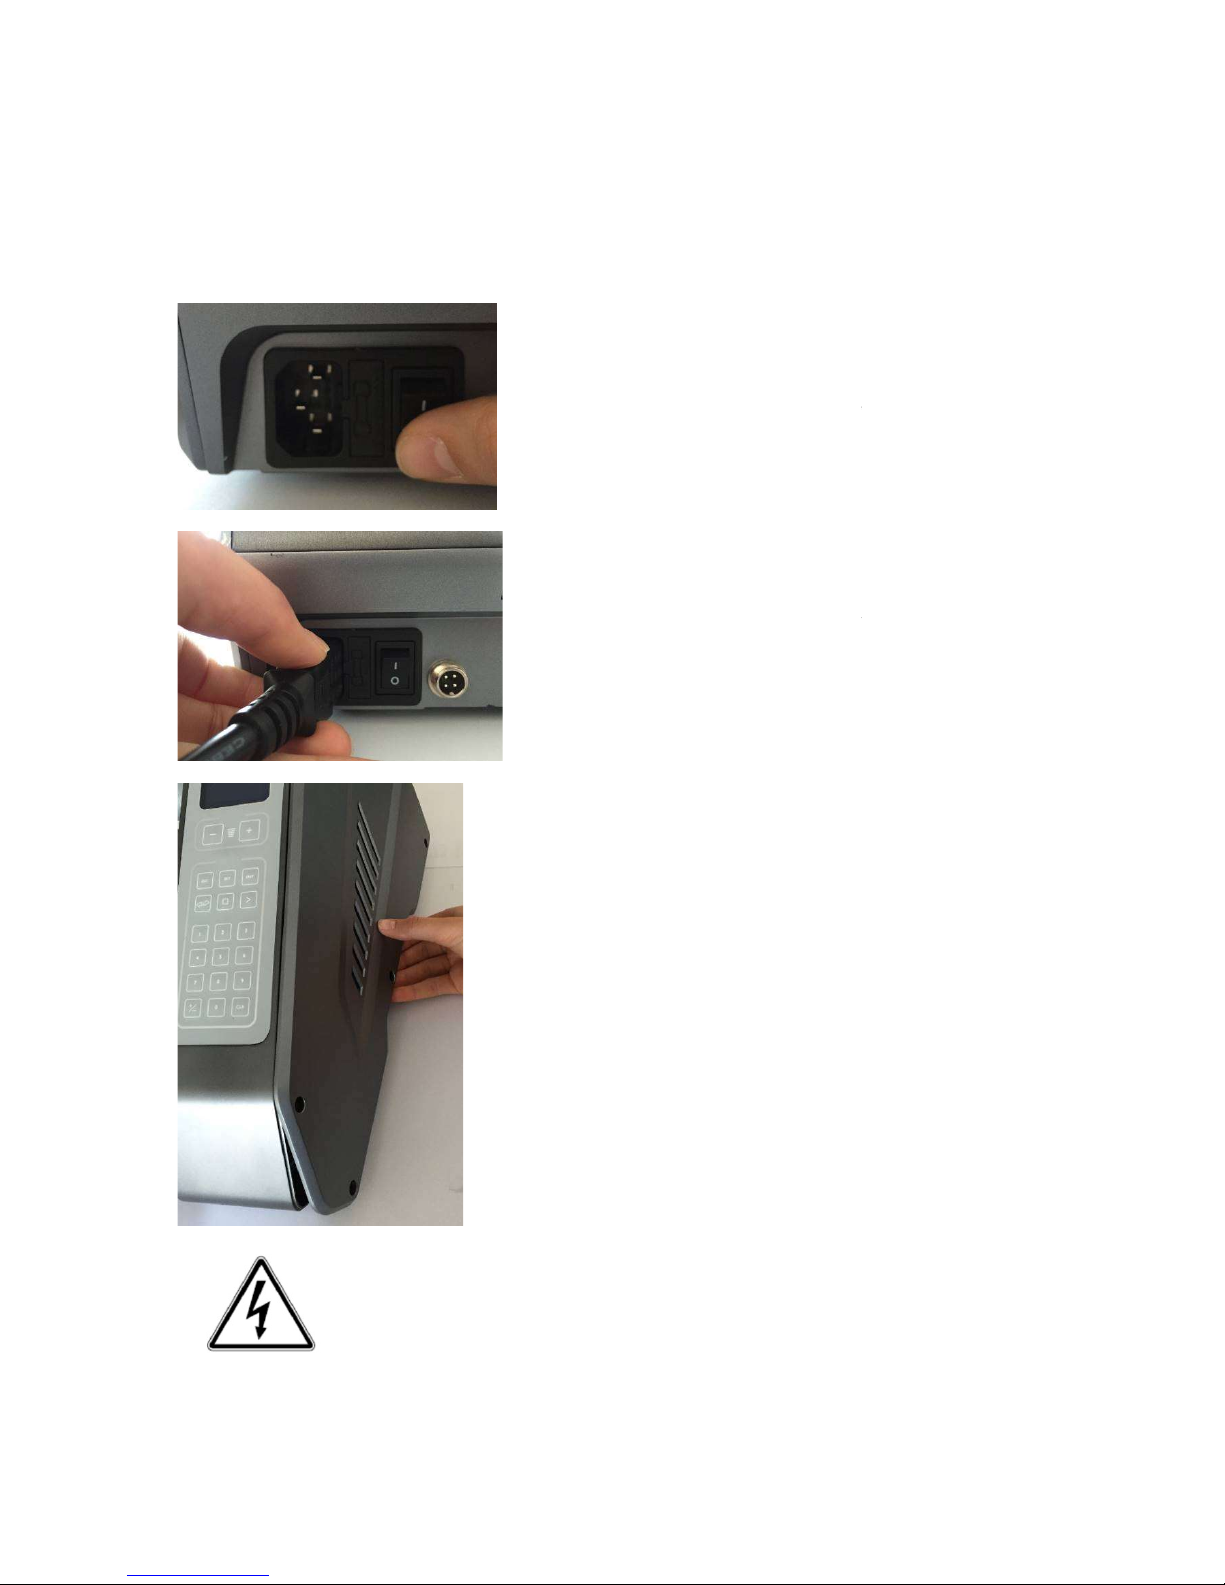
Step 1:
Switch off the machine and disconnect power
You must follow this step. It is for your safety.
Step 2: Remove the knife
AirWave1 yourself.
Always switch off the machine before opening it
Disconnect power
to the machine by removing the
power cord completely from the machine.
Allow the machine to cool down!
Only then open the machine casing on the right
-unscrew the screws
with provided hex key
-hold cover at the bottom and
remove
tilting movement.
13
.
side.
cover with a little
Page 14
OPERATING INSTRUCTION
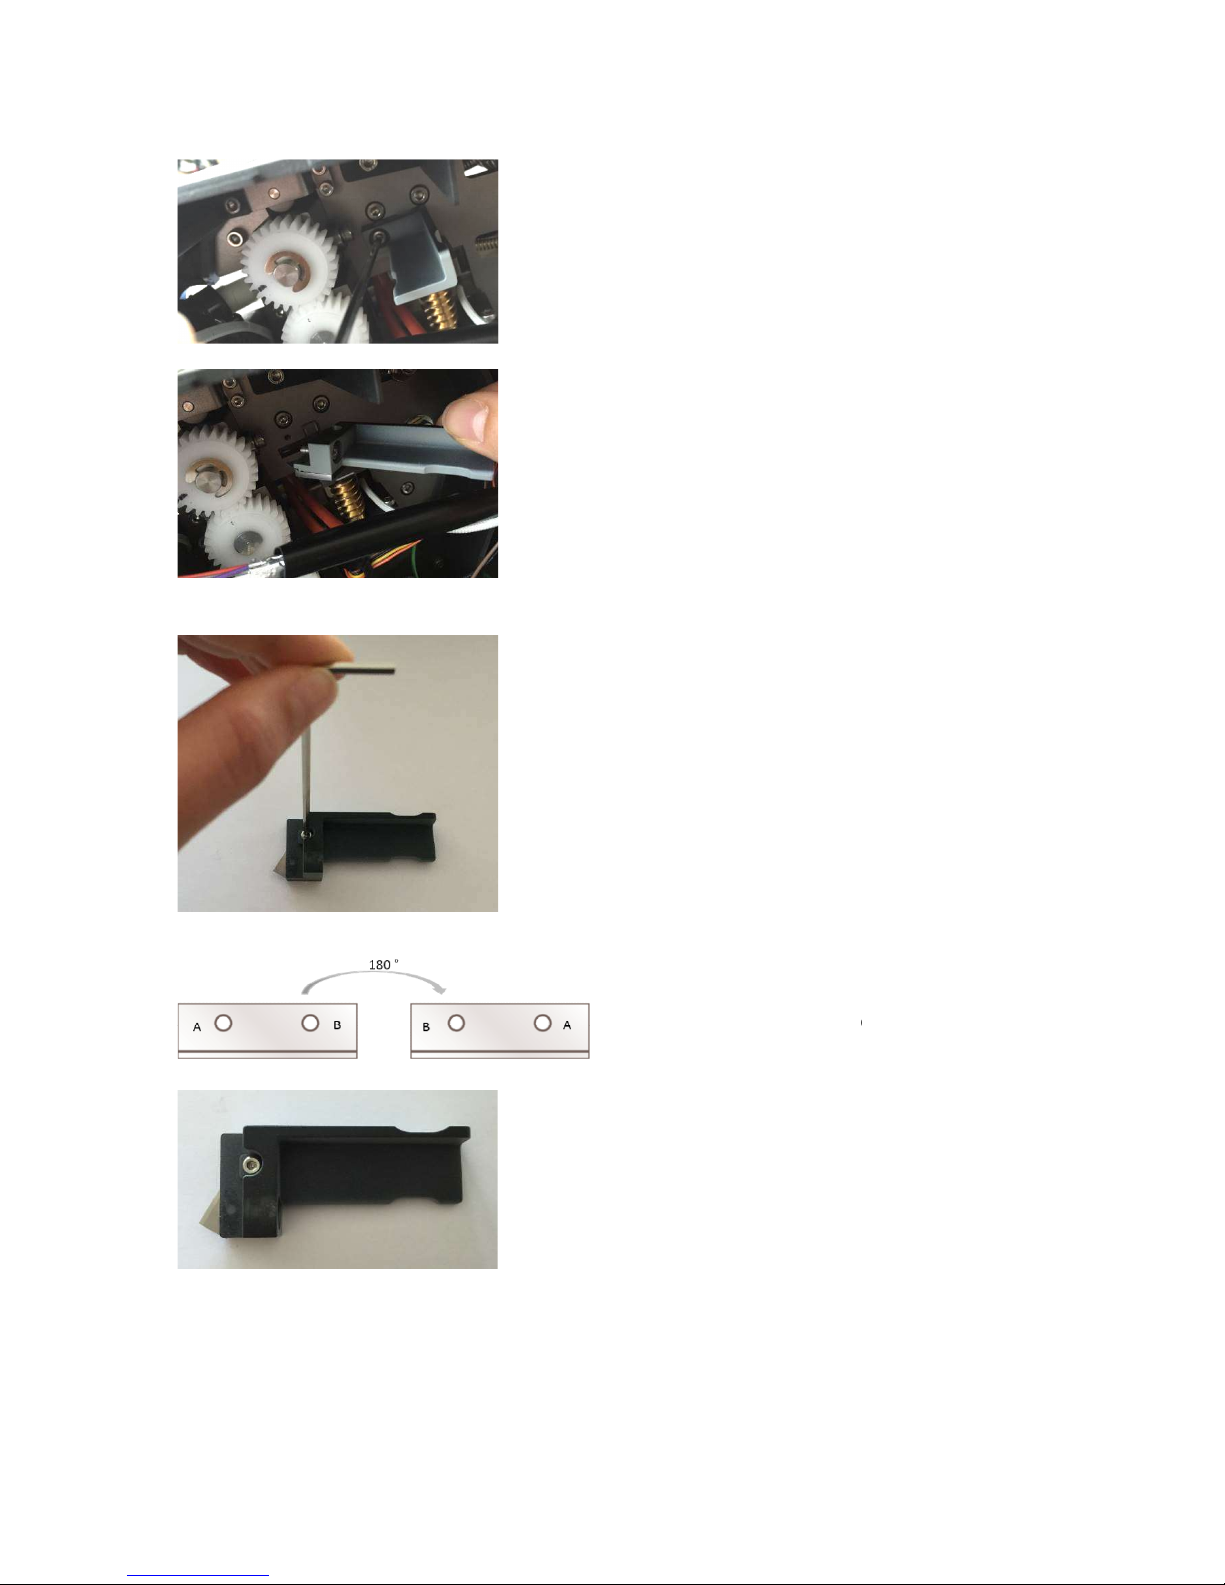
Step 3: Change blade
Undo the locating screw with the provided hex
key.
Remove the blade bracket.
Caution!!
Even used blades are extremely sharp!
Undo the
little screw which fixes the blade with
the provided hex key.
Turn around the blade one time 180° or apply
a new one if both sides were already
Fix
the blade with the corresponding screw.
14
used.
Page 15
OPERATING INSTRUCTION
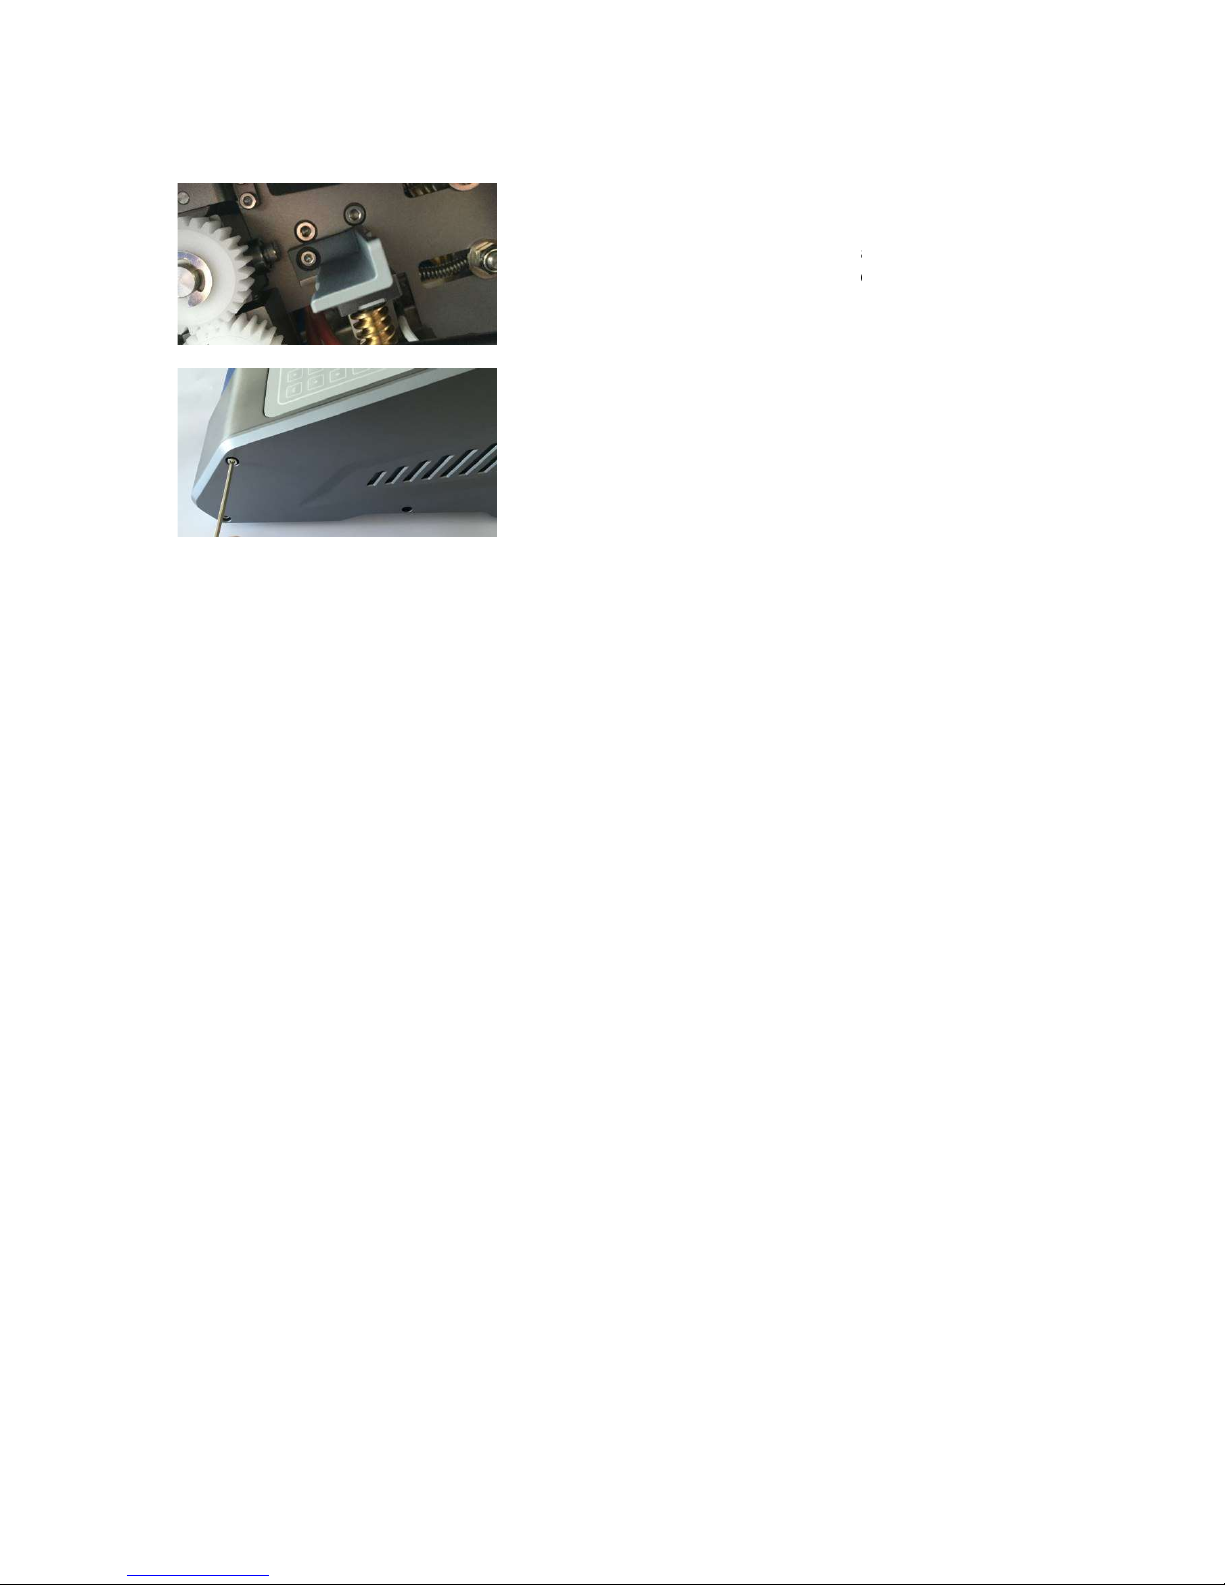
Step 4: Insert the knife
Insert the knife into the slot at the machine
casing and fix it with the screw.
Remount the cover at the top, close the
machine
casing and fix it with the screws.
15
Page 16
OPERATING INSTRUCTION
Change
the Teflon transport belts
You can easily change the Teflon belts for
A
lways switch off the machine before opening it.
machine by removing the power cord completely from the machine.
Allow the
machine to cool down.
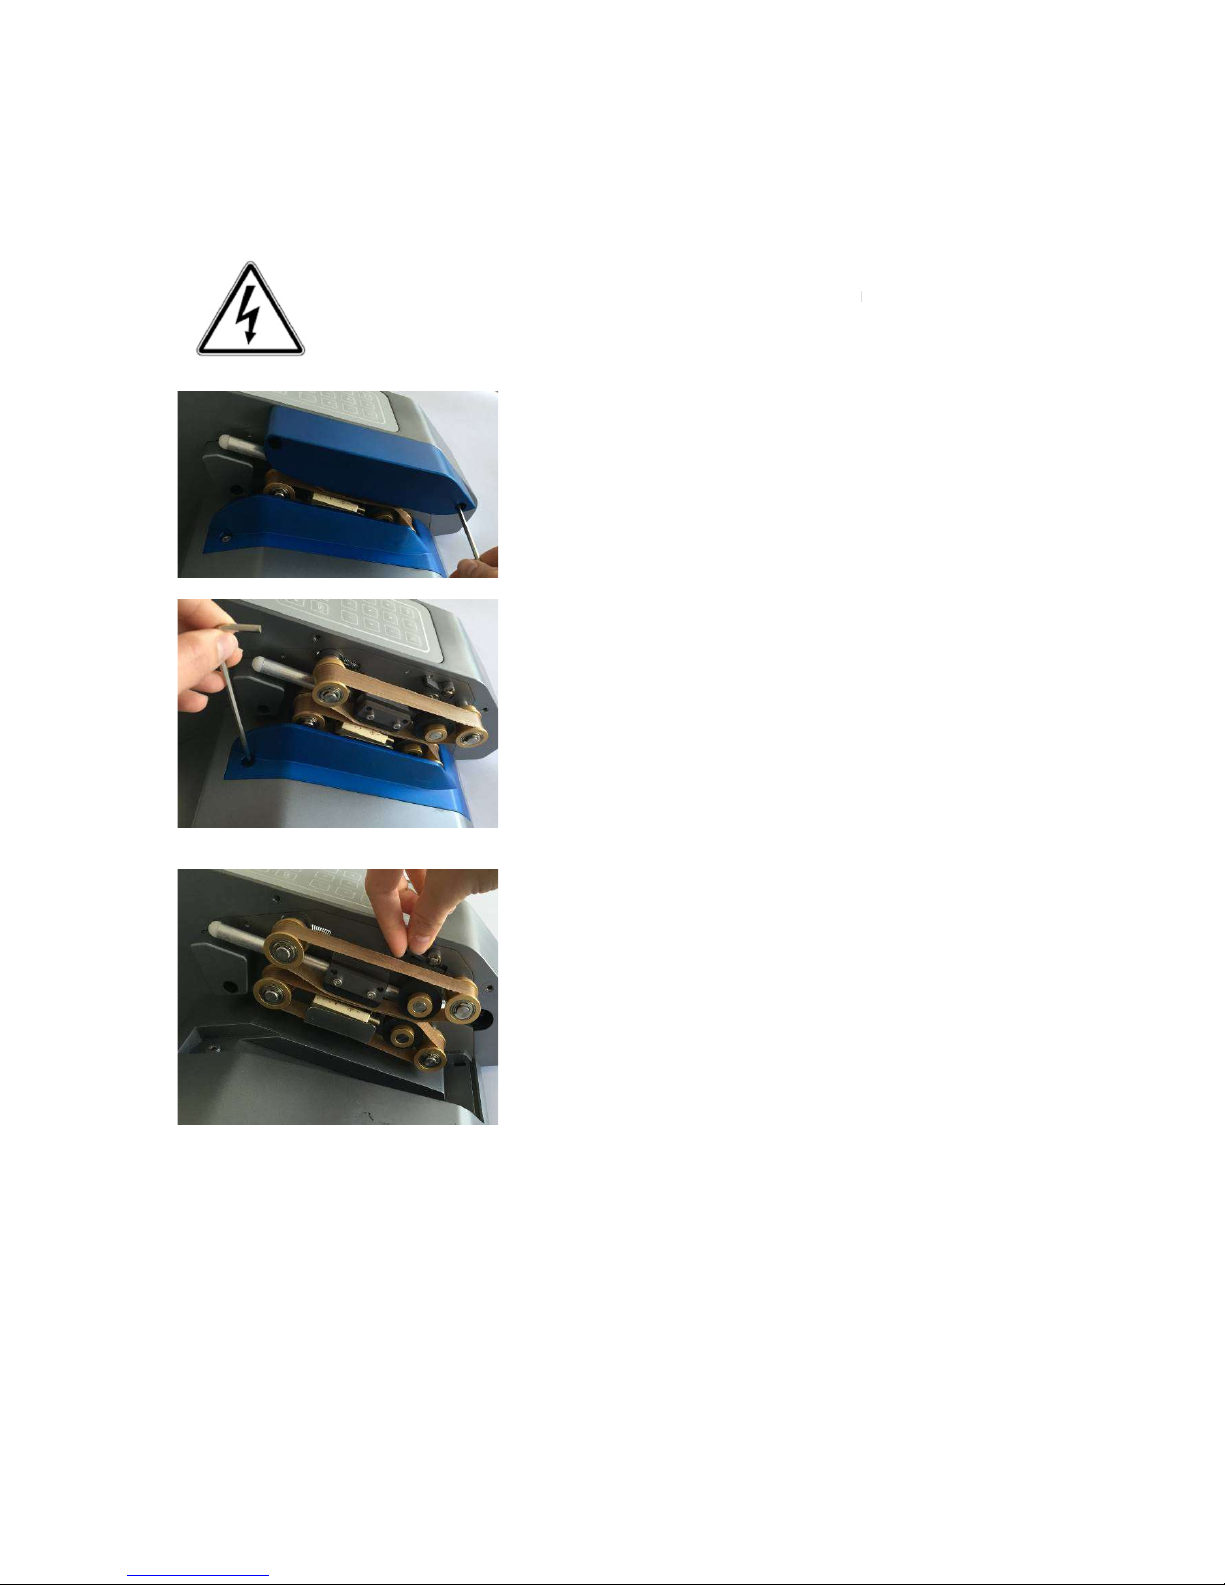
Step 1: Remove the covers
Step 2: Antriebsrollen lösen
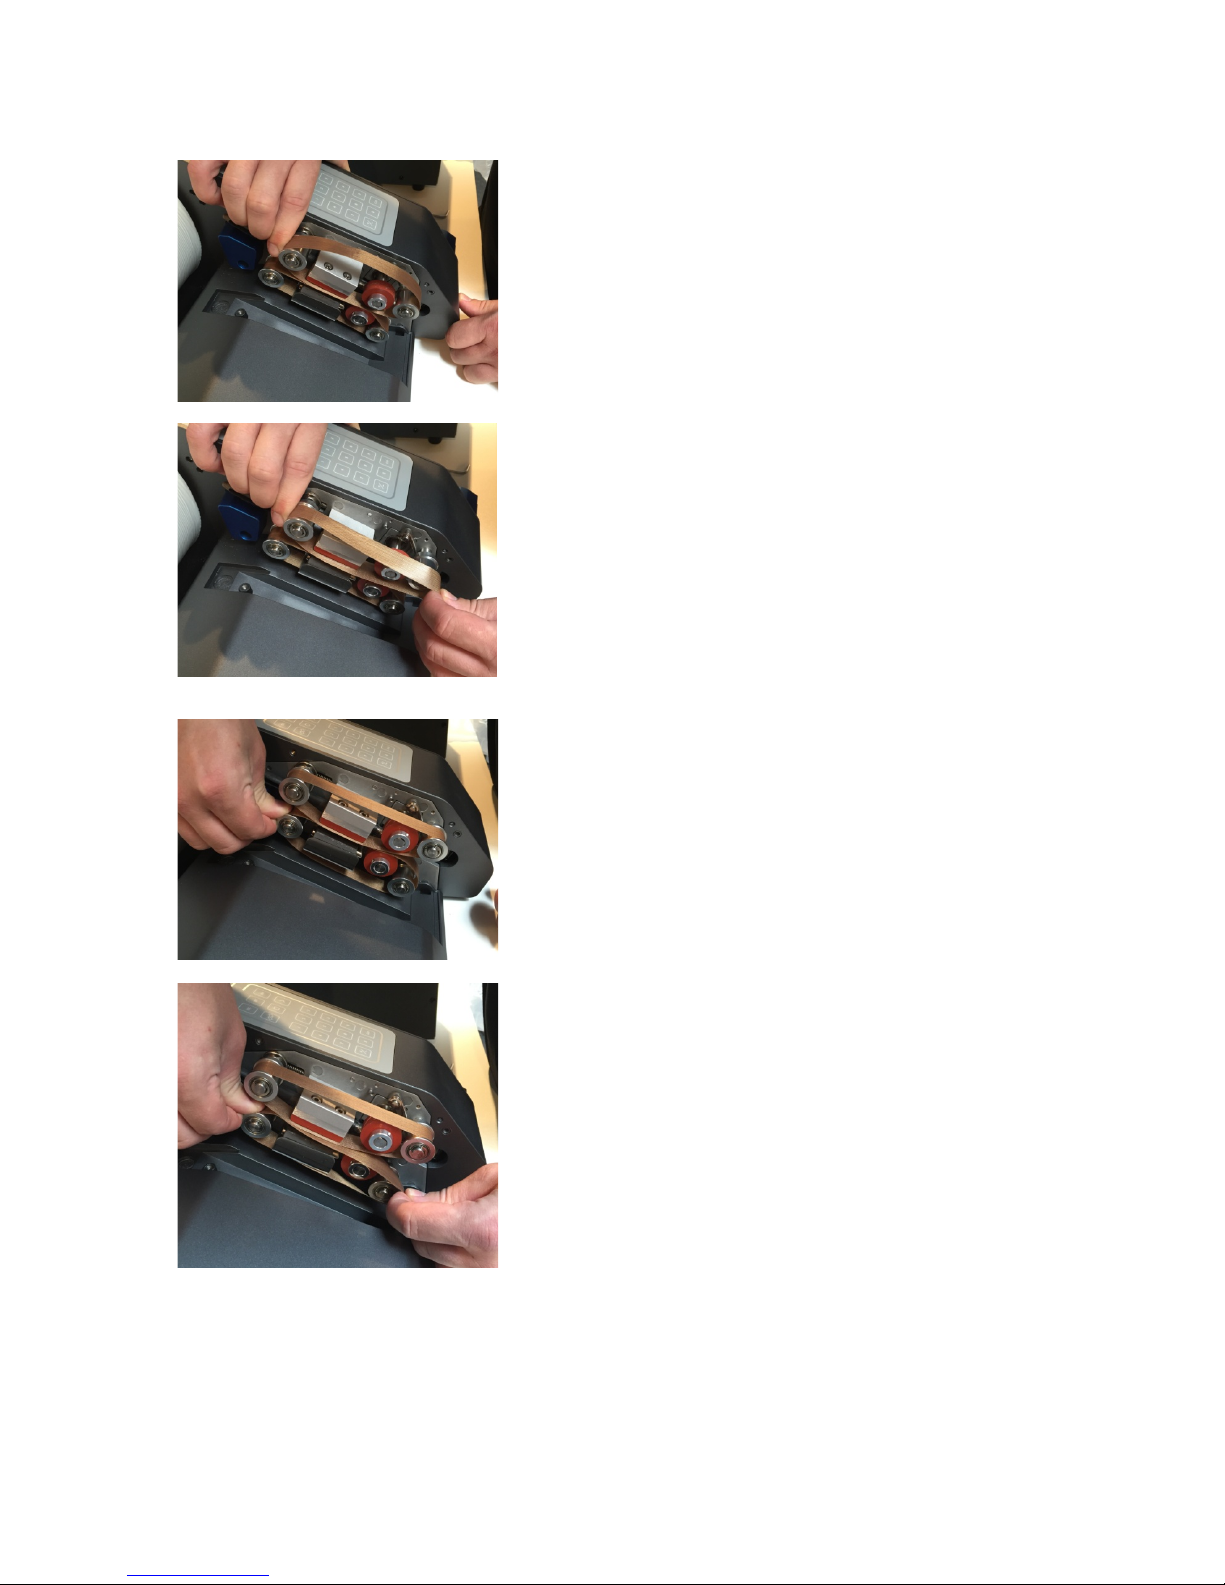
Step 3: Release Teflon belts
AirWave 1 yourself.
Disconnect power
Undo the screws with the provided hex key.
The upper cover has to be removed first.
Next you will be easily able to reach the screws for the
lower safety cover.
Unscrew and flip open the cover to
the side.
Turn
the tension lever to move the transport rolls apart
16
to the
.
Page 17
OPERATING INSTRUCTION
17
Push the upper of the two guiding rollers on the
left in the image to the right against the spring to
release the tension for the upper Teflon belt.
Remove the slackened Teflon belt from the rollers.
Push the lower of the two guiding rollers on the left
in the image to the right against the spring to
release the tension for the lower Teflon belt.
Remove the slackened Teflon belt from the rollers.
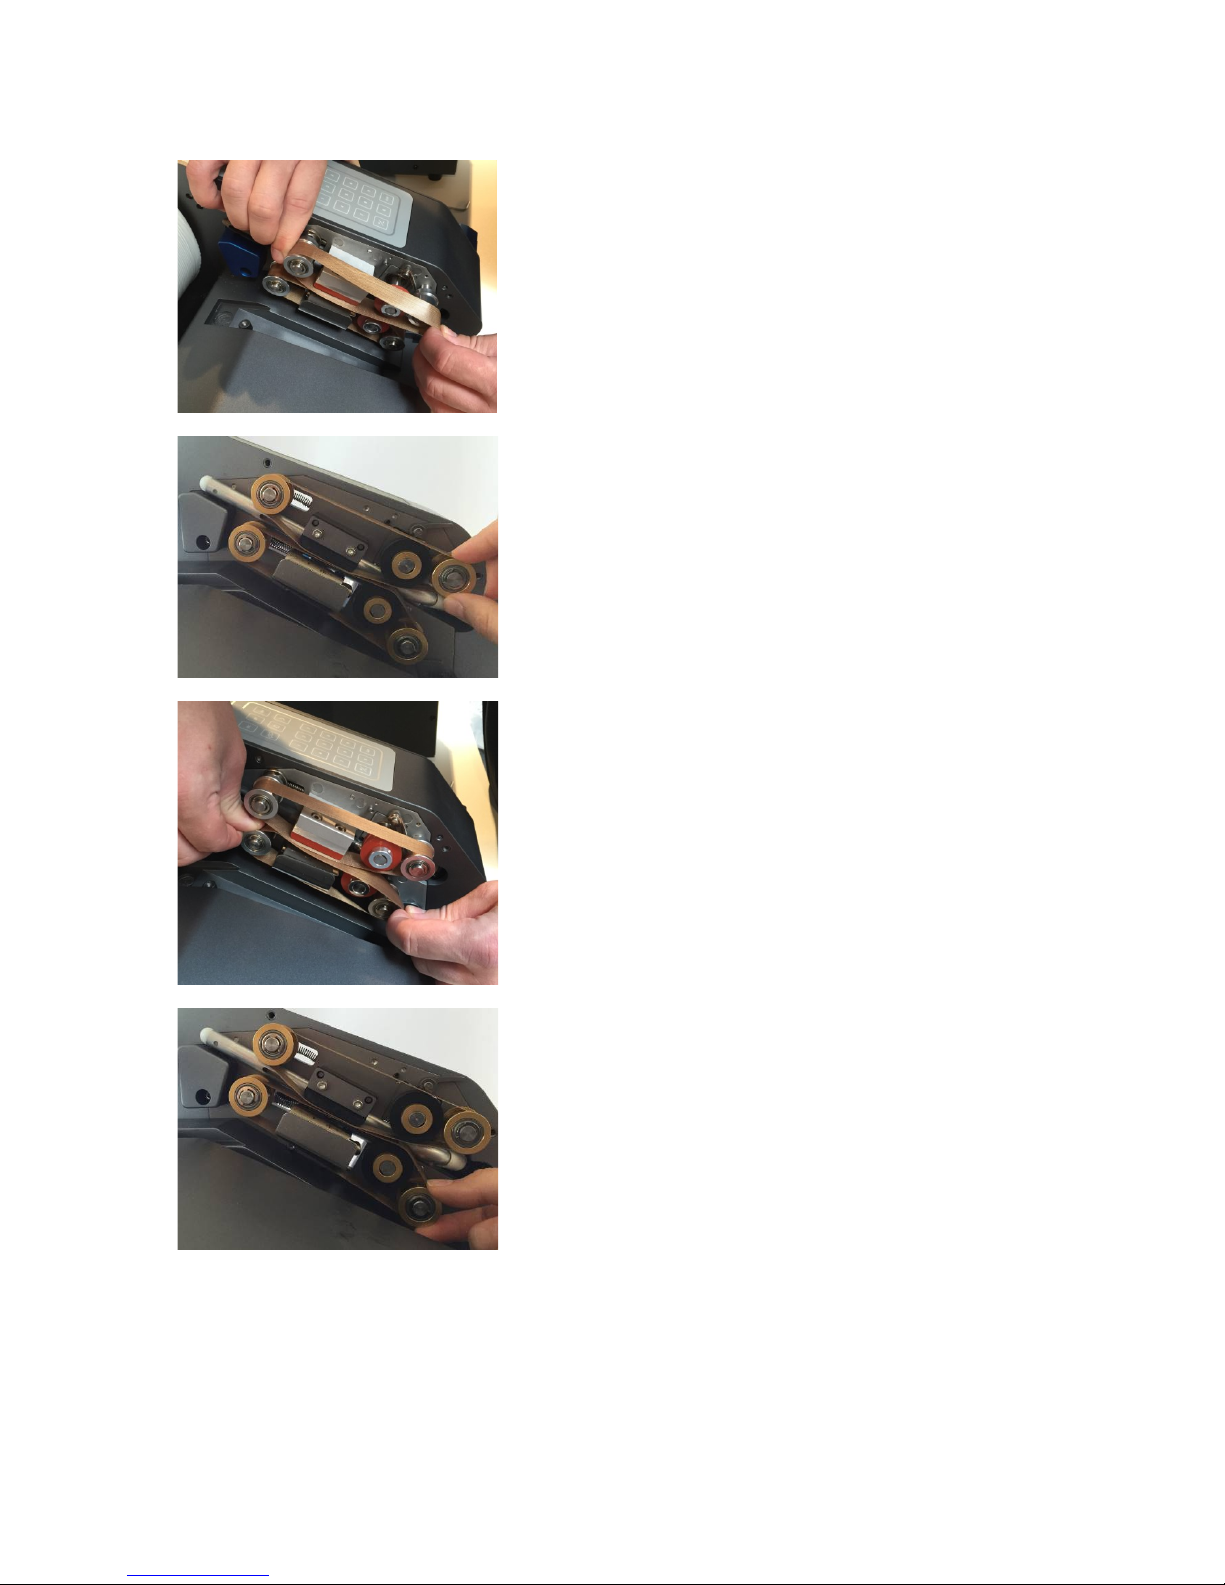
Step 4: Insert new Teflon belts.
Page 18
OPERATING INSTRUCTION
18
Place the new Teflon belt over the upper of the
transport rollers on the left in the picture.
And press the roll again to the right against the
spring.
Place the Teflon belt now also over the upper
transport roll on the right in the image and loosen
pressure at the roll.
Gently turn the rollers to check whether the belt is
situated correctly between the weld pads. The belt
should be able to move free.
Place the new Teflon belt over the lower of the
transport rollers on the left in the picture.
And press the roll again to the right against the
spring.
Place the Teflon belt now also over the lower
transport roll on the right in the image and loosen
pressure at the roll.
Gently turn the rollers to check whether the belt is
situated correctly between the weld pads. The belt
should be able to move free.
Step 5: Tension the belts, close the machine.
Page 19
OPERATING INSTRUCTION
19
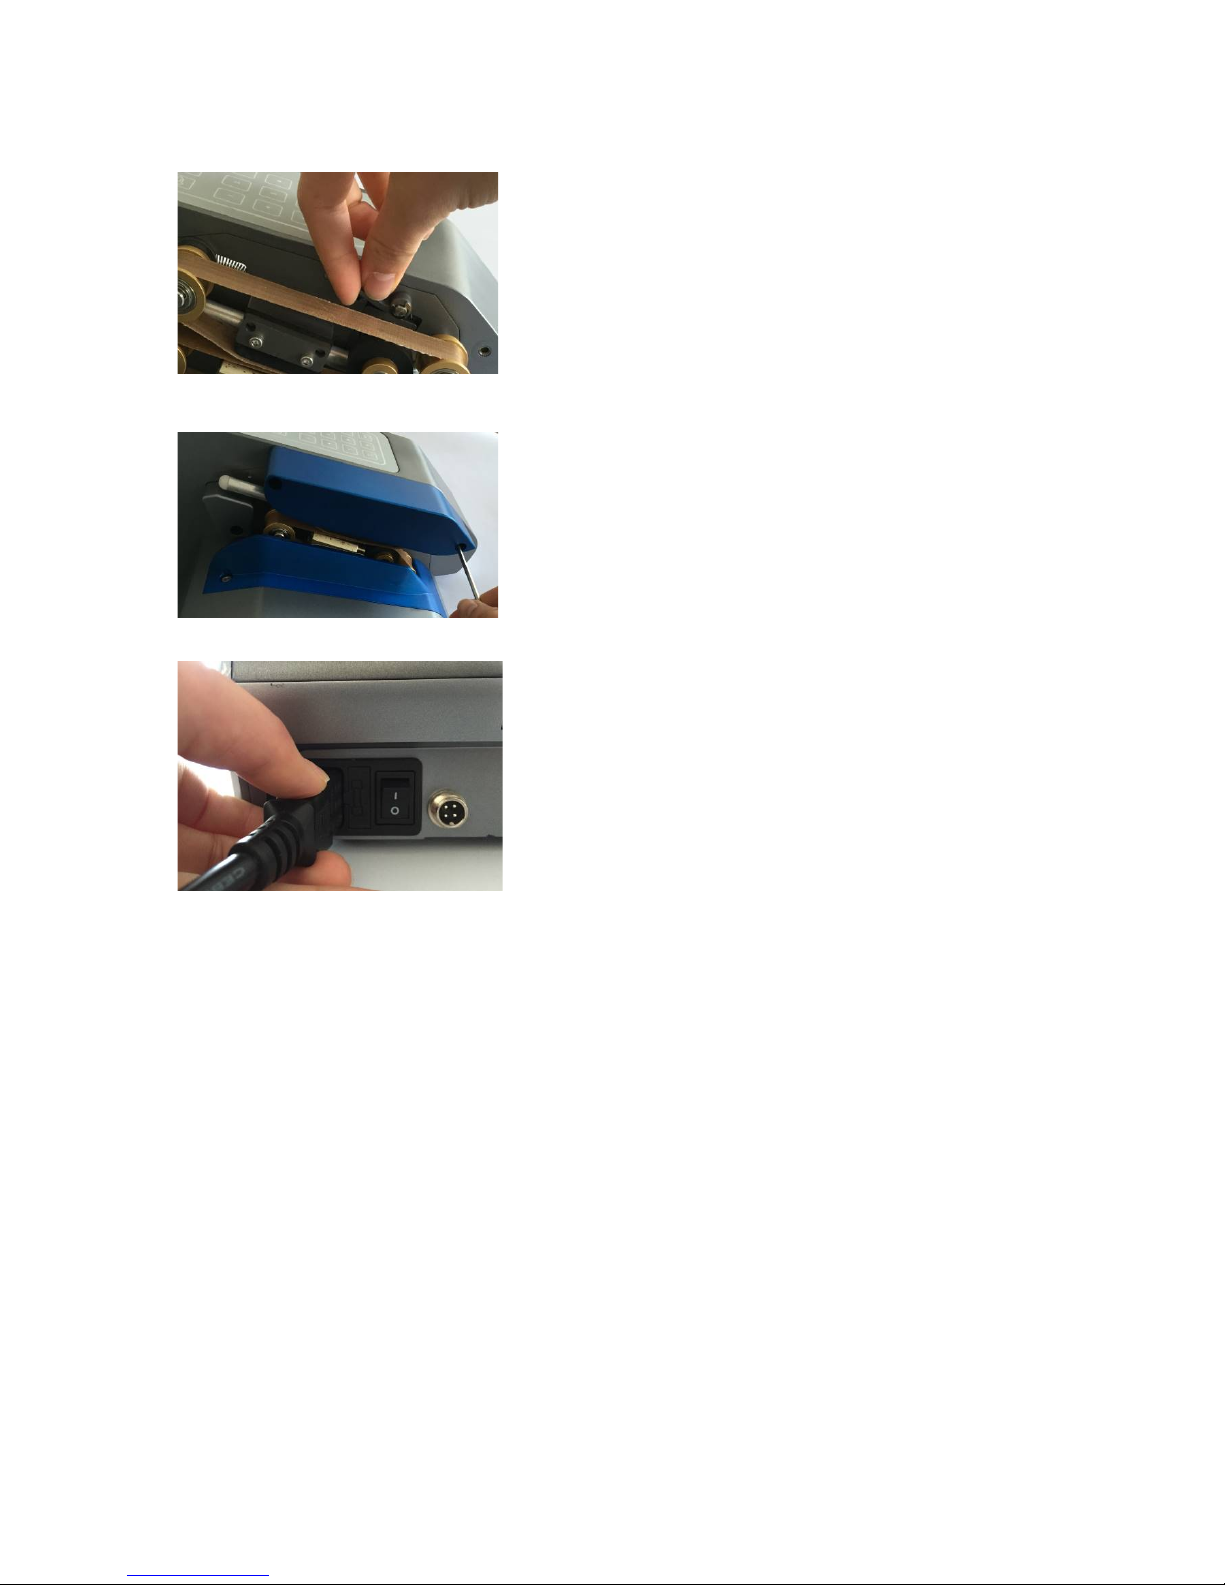
Turn the tension lever back to the left to to press
the transport rolls against each other.
Fit the covers of the Teflon belts and screw it with
the prepared hex key.
Lower cover first and then the upper one.
Now you can reconnect the power cord and switch
on the machine.
Page 20
OPERATING INSTRUCTION
20
Filmguide pins
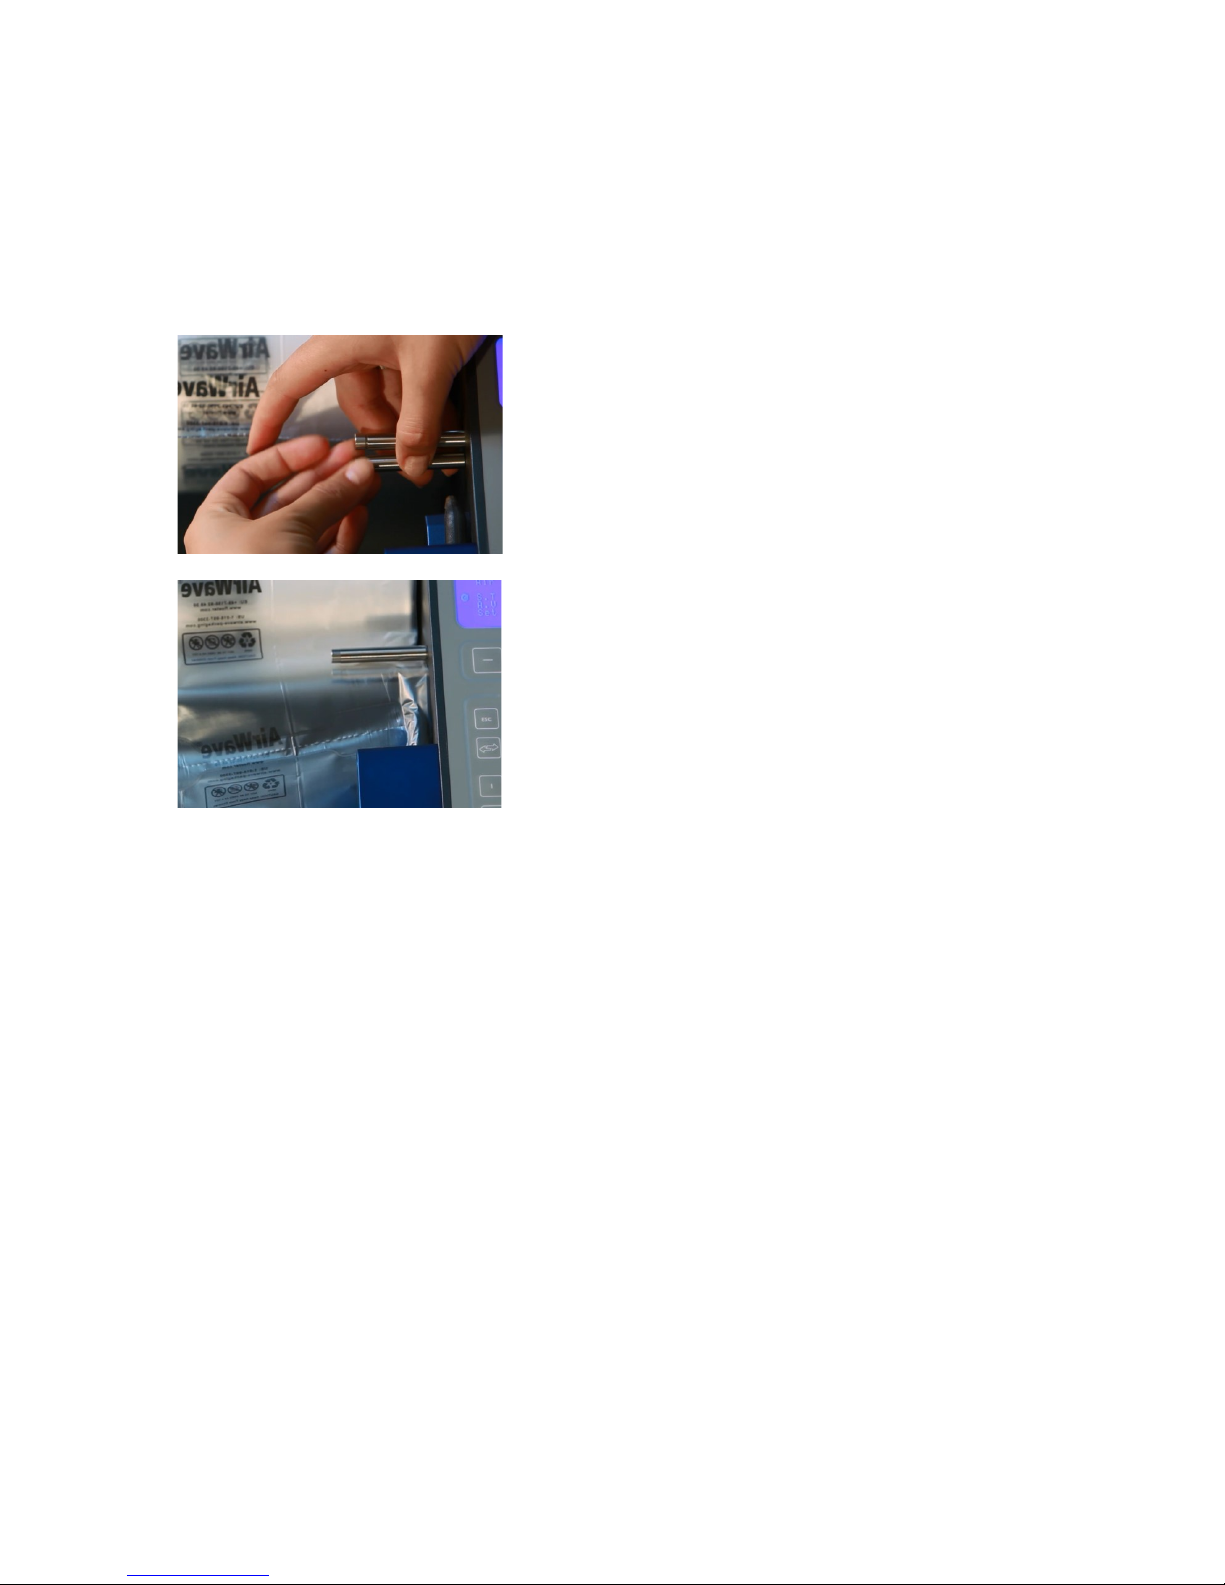
For a more effective air volume or better film guide use the two pins.
Screw the pins at the machine casing
Thread the film trough the pins and over the
airpipe.
Start production.
Error codes
The AirWave 1 has an integrated diagnostic program. In the event of an error, an “E”
code will appear on the display. This code will help you correct the error:
„Foil Empty“: film roll empty.
„Check Foil“: tread film above airpipe
„Heat Error“: please contact our Flöter Service
Page 21
OPERATING INSTRUCTION
21
Options and expandability
Please contact your sales advisor for further information.
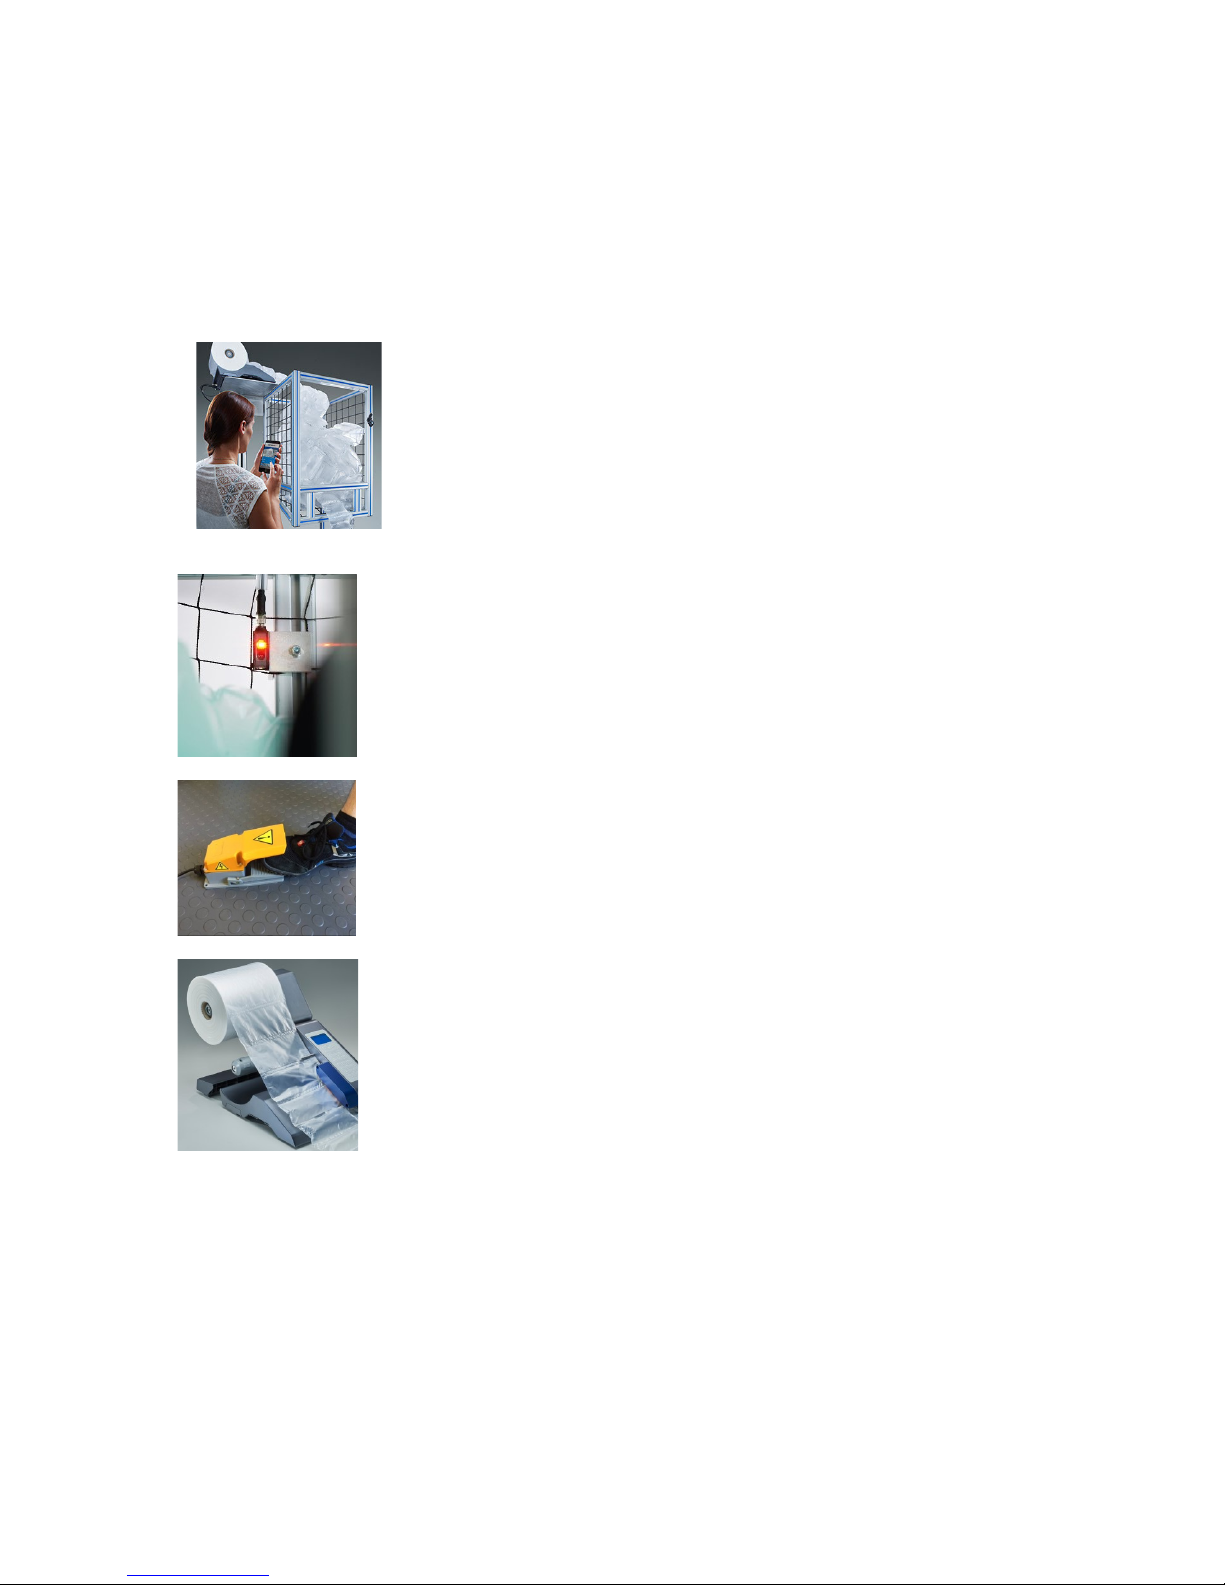
Distance controlled production by Bluetooth connection.
With tablet or smartphone
Fully automated control by the installation of a filling level sensor.
Optimal for overhead compartment or mobile air cushion storage.
Start-/Stop funktion with foot pedal.
For a production on demand.
Longrollholder for bigger rolls
Page 22

OPERATING INSTRUCTION
22
Warranty
AirWave1 has a 12-month manufacturer’s warranty that covers all electronic and mechanical
components. The warranty period starts automatically when you purchase the machine.
In the event of damage, securely package the machine and return it to us (keep the original
packaging). Please include a letter containing a short description of the error and your contact
information.
Our service technicians will inspect the machine and call you to inform you of how long the
repair will take. Your machine will be returned to you immediately once the repair is finished. If
you need a replacement machine, the warranty period will continue from the receipt date of
the first machine. The warranty will not be extended.
The scope of the warranty does not include the following:
Damage resulting from improper use of AirWave1:
This includes, in particular, damage caused by using unsuitable films or inserting
foreign objects into the machine’s transport belts.
Wear and tear caused by regular use
Wearing parts, in particular, Teflon transport belts, knifes, and transport rollers
Damage caused by machine downtimes
Contact:
Flöter Verpackungs-Service GmbH
Robert-Bosch-Str 17
71701 Schwieberdingen
Page 23

OPERATING INSTRUCTION
23
Note
Warning: Changes or modifications to this unit not expressly approved by the party responsible for
compliance could void the user authority to operate the equipment.
This device complies with Part 15 of the FCC Rules. Operation is subject to the following two
conditions: (1) this device may not cause harmful interference, and (2) this device must accept any
interference received, including interference that may cause undesired operation.”
To comply with FCC RF exposure compliance requirements, a separation distance of at least 20 cm
must be maintained between the antenna of this device and all persons.
This Transmitter must not be co-located or operating in conjunction with any other antenna or
transmitter
This equipment has been tested and found to comply with the limits for a Class B digital device,
pursuant to part 15 of the FCC Rules. These limits are designed to provide reasonable protection
against harmful interference in a residential installation. This equipment generates, uses and can
radiate radio frequency energy and, if not installed and used in accordance with the instructions, may
cause harmful interference to radio communications. However, there is no guarantee that
interference will not occur in a particular installation. If this equipment does cause harmful
interference to radio or television reception, which can be determined by turning the equipment off
and on, the user is encouraged to try to correct the interference by one or more of the following
measures:
- Reorient or relocate the receiving antenna.
- Increase the separation between the equipment and receiver.
- Connect the equipment into an outlet on a circuit different from that to which the receiver is
connected.
- Consult the dealer or an experienced radio/TV technician for help.
Page 24

OPERATING INSTRUCTION
24
Flöter Verpackungs-Service
Robert-Bosch-Straße 17
D-71701 Schiweberdingen
tel.: 07150/92483-0
www.floeter.com
www.airwave1.com
 Loading...