

Page 1
Getting Started Guide
FLIR Txxx series
Page 2
EN-USEN-US English
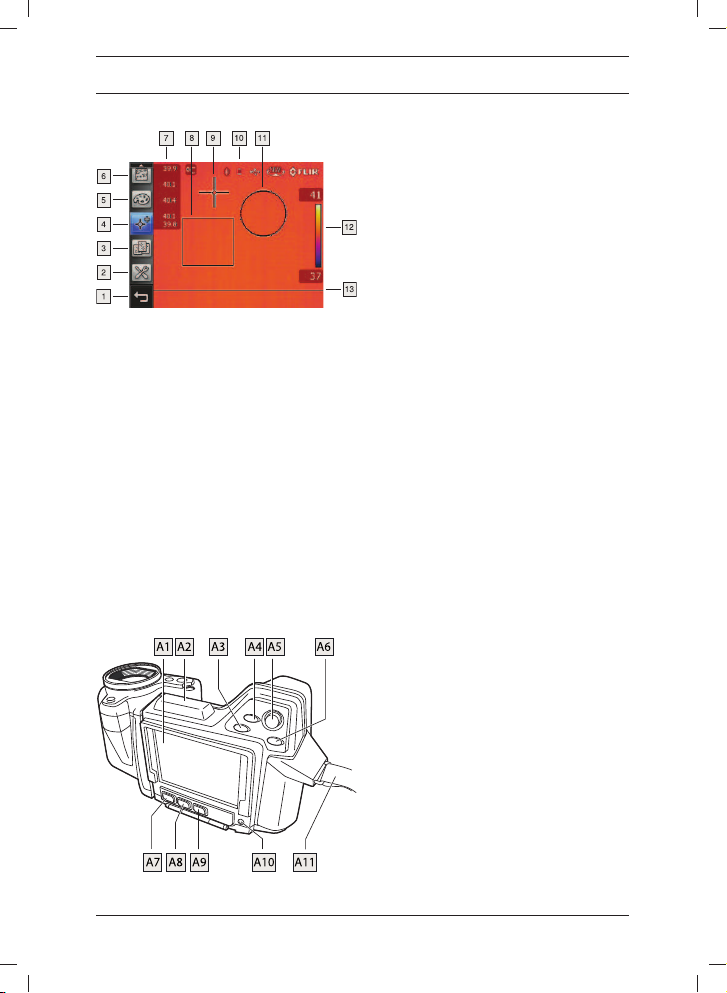
Screen elements
1. Back toolbar button.
2. Mode toolbar button.
3. Presets toolbar button.
4. Tools toolbar button.
5. Palette toolbar button.
6. Parameters toolbar button.
7. Result table.
8. Measurement box.
9. Measurement spotmeter.
10. Various status and mode icons, e.g.,
Bluetooth, battery, USB, and
compass.
11. Measurement circle.
12. Temperature scale.
13. Measurement line.
Rear view
A1 Touch screen LCD.
24
A2 Antenna for wireless communi-
cation.
A3 Digital zoom button.
A4 Programmable button.
A5 Joystick: Move up/down or left/right
to navigate on menus, in dialog
boxes, and in the image archive.
Push to confirm choices.
A6 Menu/Back button: Push to display
the menu on the screen, and to go
back in dialog boxes.
A7 Mode button: Push to display the
mode selector and select a camera
mode. The modes that can be
selected are:
• Thermal camera: Using this
mode, the camera captures infrared images.
• Digital camera: Using this
mode, the camera captures visual images.
• Thermal fusion: Using this
mode, the camera captures an
image where some parts are displayed as an infrared image and
some parts as a visual image,
depending on the temperature.
• Picture-in-picture: Using this
mode, the camera captures an
image where the middle part is
displayed as an infrared image
and the outer frame as a visual
image.
• MSX: Using this mode, the camera captures infrared images
where the edges of the objects
are enhanced.
A8 A/M button: This button has two
main functions:
1. Push to switch between auto-
matic and manual adjustment
modes. The manual adjustment
© 2012, FLIR Systems, Inc. All rights reserved worldwide.
Publ. no. T559755, rev. 003
Page 3

modes that can be selected are
the following:
• Manual: Using this mode,
the top and bottom temperature levels in the scale can
be changed simultaneously,
by pushing the joystick
up/down. The temperature
span can be changed by
pushing the joystick left/right.
• Manual min: Using this
mode, the bottom temperature level in the scale can be
changed by pushing the joystick up/down, while the top
temperature level remains
fixed.
• Manual max: Using this
mode, the top temperature
level in the scale can be
changed by pushing the joystick up/down, while the bottom temperature level remains fixed.
2. Push and hold the button until
you hear a clicking sound to
autoadjust the image.
A9 Archive button: Push to open/close
the image gallery.
A10 On/Off button: Push to turn on/turn
off the camera. Allow 45 seconds
for the start-up sequence.
A11 Hand strap.
Front view
B1 Laser pointer button: Push to acti-
vate the laser pointer.
B2 This button has two main functions:
1. Preview/Save: Push the button
fully down to save an infrared
image and a digital photo simultaneously. Note: The behavior
of this button can be changed
under Settings to one of the
following:
• Preview/Save.
• Save directly (default).
• Always preview.
2. Autofocus: Push the button half-
way down to autofocus the
camera.
B3 Focus button: Move left/right to
manually focus the camera.
B4 Attachment point for the neck strap.
B5 Video lamp.
B6 Digital camera lens.
B7 Release button for additional infra-
red lenses.
B8 Laser pointer.
B9 Infrared lens.
© 2012, FLIR Systems, Inc. All rights reserved worldwide.
Publ. no. T559755, rev. 003
25
Page 4

Connectors and storage
media
C1 To connect an external USB device
to the camera, use a USB-A cable
and this socket.
C2 To connect a computer to the cam-
era to move images and files to and
from the camera, use a USB Mini-B
cable and this socket.
C3 To insert an SD memory card, use
this card slot.
C4 To connect a video monitor to the
camera, use a CVBS (composite
video) cable and this socket.
Quick Start Guide
Follow this procedure to get started right
away:
1. Charge the battery for 4 hours.
2. Insert the battery into the camera.
3. Insert an SD memory card into the
card slot (C3) at the bottom of the
camera.
26
4. Push the On/Off button (A10) to turn
on the camera. Allow 45 seconds for
the start-up sequence.
5. Aim the camera toward your target of
interest.
6. Push the Preview/Save button (B2)
halfway down to autofocus the camera.
7. Push the Preview/Save button (B2)
fully down to save an image.
8. To move the image to a computer, do
one of the following:
• Remove the SD memory card (C3)
and insert it into a card reader
connected to a computer.
• Connect a computer to the camera
using a USB Mini-B cable (C2).
9. Move the image from the card or
camera using a drag-and-drop operation.
To keep in mind
• Adjust the focus first. When the cam-
era is out of focus, the measurement is
wrong.
• By default, the camera adapts the
scale automatically. Use this mode
first, but do not hesitate to set the
scale manually.
• A thermal camera has a resolution
limit. This depends on the size of the
detector, the lens, and the distance to
the target. Use the center of the spot
tool as a guide to the minimum possible object size, and get closer if
necessary. Make sure to stay away
from dangerous areas or live electrical
components.
• Be careful when holding the camera
perpendicular to the target—you can
become a source of infrared radiation
through reflection.
• Select a zone of high emissivity, i.e.,
an area with a matte surface, to perform a measurement.
© 2012, FLIR Systems, Inc. All rights reserved worldwide.
Publ. no. T559755, rev. 003
Page 5

• Blank objects, i.e., with low emissivities, may appear warm or cold in the
camera, as they can cause reflections.
• Avoid direct sunlight on the details that
you are inspecting.
• Various types of faults, such as those
in a building’s construction, may result
in the same type of thermal pattern.
• Correctly analyzing an infrared image
requires professional knowledge about
the application.
Additional resources
• User documentation CD-ROM (in the
transport case):
• User’s manual.
• Technical data.
• Application stories.
• Guidebooks.
• And more…
• Customer support:
http://support.flir.com
• Corporate website: http://www.flir.com
• Training by ITC (Infrared Training Center):
• http://www.infraredtraining.com
• http://www.irtraining.com
• http://www.irtraining.eu
© 2012, FLIR Systems, Inc. All rights reserved worldwide.
Publ. no. T559755, rev. 003
27
Page 6

A note on the technical production of this publication
This publication was produced using XML – the eXtensible Markup Language. For more information about XML, please
visit http://www.w3.org/XML/
A note on the typeface used in this publication
This publication was typeset using Linotype Helvetica™ World. Helvetica™ was designed by Max Miedinger
(1910–1980).
LOEF (List Of Effective Files)
$URL: file:///C:/SVNRepository/svn/T638001--T639000/T638207.xml $$Rev: 246 $
$URL: file:///C:/SVNRepository/svn/T639001--T640000/T639471_cs-CZ.xml $$Rev: 1071 $
$URL: file:///C:/SVNRepository/svn/T639001--T640000/T639471_da-DK.xml $$Rev: 1071 $
$URL: file:///C:/SVNRepository/svn/T639001--T640000/T639471_de-DE.xml $$Rev: 1071 $
$URL: file:///C:/SVNRepository/svn/T639001--T640000/T639471_el-GR.xml $$Rev: 1071 $
$URL: file:///C:/SVNRepository/svn/T639001--T640000/T639471_en-US.xml $$Rev: 1023 $
$URL: file:///C:/SVNRepository/svn/T639001--T640000/T639471_es-ES.xml $$Rev: 1071 $
$URL: file:///C:/SVNRepository/svn/T639001--T640000/T639471_et-EE.xml $$Rev: 1071 $
$URL: file:///C:/SVNRepository/svn/T639001--T640000/T639471_fi-FI.xml $$Rev: 1071 $
$URL: file:///C:/SVNRepository/svn/T639001--T640000/T639471_fr-FR.xml $$Rev: 1071 $
$URL: file:///C:/SVNRepository/svn/T639001--T640000/T639471_hu-HU.xml $$Rev: 1071 $
$URL: file:///C:/SVNRepository/svn/T639001--T640000/T639471_it-IT.xml $$Rev: 1071 $
$URL: file:///C:/SVNRepository/svn/T639001--T640000/T639471_ja-JP.xml $$Rev: 1071 $
$URL: file:///C:/SVNRepository/svn/T639001--T640000/T639471_ko-KR.xml $$Rev: 1071 $
$URL: file:///C:/SVNRepository/svn/T639001--T640000/T639471_nb-NO.xml $$Rev: 1071 $
$URL: file:///C:/SVNRepository/svn/T639001--T640000/T639471_nl-NL.xml $$Rev: 1071 $
$URL: file:///C:/SVNRepository/svn/T639001--T640000/T639471_pl-PL.xml $$Rev: 1071 $
$URL: file:///C:/SVNRepository/svn/T639001--T640000/T639471_pt-PT.xml $$Rev: 1071 $
$URL: file:///C:/SVNRepository/svn/T639001--T640000/T639471_ru-RU.xml $$Rev: 1071 $
$URL: file:///C:/SVNRepository/svn/T639001--T640000/T639471_sv-SE.xml $$Rev: 1071 $
$URL: file:///C:/SVNRepository/svn/T639001--T640000/T639471_tr-TR.xml $$Rev: 1071 $
$URL: file:///C:/SVNRepository/svn/T639001--T640000/T639471_zh-CN.xml $$Rev: 1071 $
$URL: file:///C:/SVNRepository/svn/T639001--T640000/T639471_zh-TW.xml $$Rev: 1071 $
$URL: file:///C:/SVNRepository/svn/T638001--T639000/T638208.xml $$Rev: 246 $
Page 7

Corporate Headquarters
FLIR Systems, Inc.
27700 SW Parkway Ave.
Wilsonville, OR 97070
USA
Telephone: +1-503-498-3547
Website
http://www.flir.com
Customer support
http://support.flir.com
Certified paper
Paper stock certified by Forest
Stewardship Council:
Carbon offset
The logistics chain of the
hardcopy of this publication was
carbon offset with the following
unit series:
ES-1-1-1931819756-1-1 to
ES-1-1-1931819765-1-1
Document identity
Publ. no.: T559755
Revision: 003
Last revised: May 30, 2012
##
 Loading...