

Information in this document is s ubject to change without n otice. As our products are su bject
to continuous improvement, FL IR Systems, Inc. reserve t he right to modify produc t design,
specifications and pri ces, without notice and with out incurring any obligation. E& OE © 2013
FLIR Systems, Inc. All right s reserved.
1. RJ45 Network Interface: Connect to a router or
switch on your network using RJ45 Ethernet cable
(Cat5e or better). 100Mhz connection. PoE supported
(class 3 PoE switch required).
2. Audio Input (RCA): Connect to a self-powered
microphone for listen-in audio.
3. Audio Output (RCA): Connect to an amplifier or
self-powered speaker for intercom/2-way audio.
4. DC12V (1A): 12V DC power input terminal. Make
sure to follow correct polarity (+/-) marked on the
power connector. See the instruction manual for your
camera for DC power requirements.
NOTE: See the instruction manual for your camera
for physical installation instructions.
NOTE: Use the included RJ45
coupler to connect to male end
of RJ45 Ethernet cable.
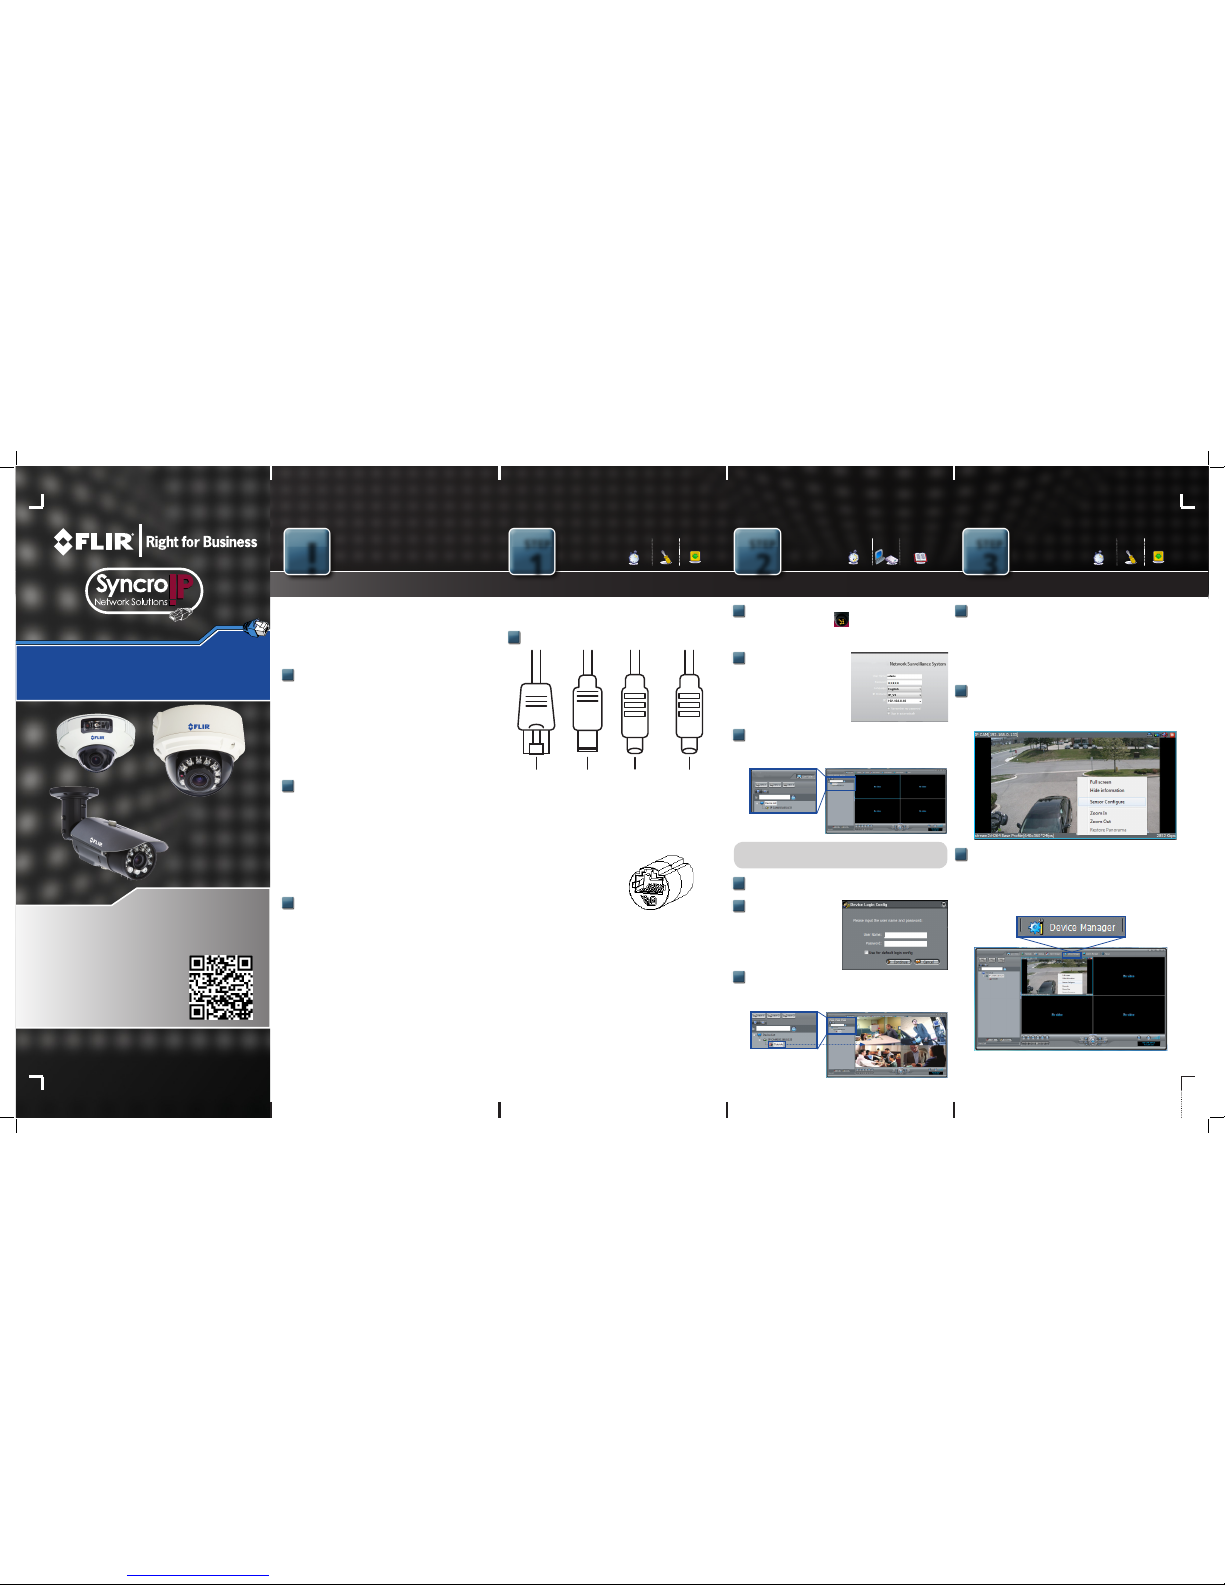
CONNECTION
Ethernet
RJ45 (PoE )
Power - DC Audio IN Audio OUT
The camera has the following termination cables:
1
SyncroIP Series Quick Setup Guide - English - R3
Time
under 30 minutesunder 15 minutes under 60 minutes
Hand Tools Hardware
Hi Speed
over 60 minutes
Skill Level
Time
under 30 minutesunder 15 minutes under 60 minutes
Hand Tools Hardware
Router
Hi Speed
over 60 minutes
Time: 20 Minutes
Hand Tools Skills - Easy
BASIC INSTALLATION GUIDE
Toll free tech support available after
completing product registration. For
more information on this product,
firmware updates, warranty and
accessory products, please visit:
www.flirsecurity.com
!
1
STEP
CONNECTING THE CAMERA OVER THE LAN USING SYNCRO-V
2
STEP
3
STEP
QUICK SETUP GUIDE
SyncroIP
Camera Series
ONVIF COMPATIBILITY AND INCLUDED SOFTWARE
1
The camera includes the following software options:
This camera is ONVIF v2.1 compliant. It is designed for
interoperability with popular VMS’s and NVR’s*, with
backwards compatibility to ONVIF v.1.02. For more information
on ONVIF, visit www.onvif.org
Milestone XProtect Go®: A client/server solution
providing mobile applications and remote access
capabilities. Milestone XProtect® Go supports up to 8 IP
cameras. Upgrade options are available from Milestone.
For Milestone XProtect® Go documentation and support,
visit
www.milestonesys.com/Support-and-Upgrades/
Technical-Support
2
CMS-DH PRO: A client-only solution with remote viewing
capabilities that supports up to 16 IP cameras and analog
cameras from Touch Series DVR’s side-by-side via the Virtual
DVR feature. CMS-DHS PRO does not support all the features of the camera, such as microSD/SD card recording.
See the CMS-DH PRO manual on www.flirsecurity.com for
instructions.
3
Syncro-V: A client-only solution with
remote viewing capabilities that supports up to 36 IP
cameras and supports all the features of the camera.
This Quick Start Guide provides the initial setup instructions
for accessing your camera using Syncro-V over a LAN and
the Internet. For detailed instructions, see the Syncro-V
manual on www.flirsecurity.com.
Install Syncro-V from the CD or from www.flirsecurity.com.
Double-click the Syncro-V icon on the Desktop. The
login screen appears.
1
Under User Name and
Password, enter the default
Syncro-V user name (admin) and
password (admin). Click Login.
2
Syncro-V opens and scans the local network for connected cameras.
Detected camera IP addresses on the LAN appear in the Device List.
Write down the camera IP address below, you will need it for remote
networking setup.
3
Click on a camera IP address in Device List to login.
4
Under User Name, enter the
user name for the camera
(default: admin). Under
Password, enter the
password for the camera
(default: admin). Click
Continue.
5
The camera appears under the
camera IP address. Click and
drag the camera to the display
grid to open it.
6
USING SYNCRO-V
LOCAL VIEWING INSTALLATION GUIDE
Time: 30 Minutes
Skills - IntermediateHardware PC/
Router
under 30 minutesunder 15 minutes under 60 minutes
Router
Hi Speed
over 60 minutes
Hi Speed
over 60 minutes
ATTENTION:
• This guide refers only to the so ftware set-up.
• Broad band Router and Computer are required for loc al and
remote monitoring (not included).
* See www.flirsecurity.com for the most updated list of
third party VMS compatibility.
IP ADDRESS: _______._______ ._______._______
Time
under 30 minutesunder 15 minutes under 60 minutes
Hand Tools Hardware
Hi Speed
over 60 minutes
Skill Level
Time
under 30 minutesunder 15 minutes under 60 minutes
Hand Tools Hardware
Router
Hi Speed
over 60 minutes
Time: 20 Minutes
Hand Tools Skills - Easy
BASIC INSTALLATION GUIDE
1
Recording & Playback Options: You can record video to the hard
disk on the computer Syncro-V is installed on, a NAS device, FTP server,
or a microSD/SD memory card installed in the camera. You can also
playback video from all the locations listed above.
See the Syncro-V manual on www.flirsecurity.com for details
on setting up recording.
2
Digital Zoom: You can zoom in on live video from your cameras.
• To zoom in, click and drag inside the display area.
• To return to default zoom, right-click inside window and click
Restore Panorama.
3
Camera Setup: You can use Syncro-V to configure settings for your IP
cameras, such as the time and date or motion detection.
• To configure settings, click Device Manager > Video Device
Management. Then, click the camera you would like to
configure.
Click and drag
NOTE: Provided software is PC compatible only; Mac OS®
access to the cameras is available via Safari® browser only.
See the instruction manual for details.

SyncroIP Series Quick Setup Guide - English - R3
4
STEP
CONNECTING TO THE CAMERA OVER THE INTERNET USING SYNCRO-V
CONTD.
4
DDNS (Dynamic Domain Name System) Set-up:
6
Open your web browser (Internet Explorer by default) and enter
http://ddns.myddns-flir.com in the address bar.
http://ddns.myddns-flir.com
Create Account:
5
Click the “Create Account”
button.
1. Complete the Account
Information fields with
your personal information.
2. Complete the System
Information fields.
Product License: Select
your product model from the
Product License drop down
menu. (e.g. DND13TL2)
<Product Code> <MAC Address>: Enter the camera’s MAC
address you recorded earlier.
URL Request: Choose a URL for your DDNS connection (i.e.
your name, your company or business name, or anything of your
choice).
3. Once the information has been entered, click Create New
Account.
4. Your Account information will be sent to you at the email address
you used in Step 2.
Complete New Account Information
4
STEP
CONTD.
Enable DDNS on the Camera:
8
1. In Syncro-V, click Device Manager > Video Device
Management.
2. Click the camera you would like to configure and click
Network Service > DDNS.
3. Check Enable DDNS.
4. Configure the following:
• Provider: Select FLIRDDNS.
• Domain Name: Enter the Domain Name you received
from the confirmation email you received after you created
your DDNS account (e.g. tomsmith.myddns-flir.com).
• User Name: Enter the User Name you received
in the confirmation email.
• Password: Enter the Password you received in the
confirmation email.
5. Click Apply to save settings.
An automated REGISTRATION CONFIRMATION EMAIL will be
sent to your email. Print and save this confirmation. You will need this
information to access your system remotely.
Registration Email:
7
Domain Name: tomsmith.myddns-flir.com
User Name: tomsmith
Password: (your password)
EXAMPLE
Hi Speed
over 60 minutes
REMOTE VIEWING INSTALLATION GUIDE
Time: 60 Minutes
Skills - AdvancedHardware PC/
Router
Hi Speed
over 60 minutes
Hi Speed
over 60 minutes
REMOTE VIEWING INSTALLATION GUIDE
Time: 60 Minutes
Skills - AdvancedHardware PC/
Router
Hi Speed
over 60 minutes
Connect to the DDNS Address of the Camera over
the Internet Using Syncro-V:
9
1. Install Syncro-V on a remote PC.
2. Open Syncro-V and click Device Manager > Video Device
Manager.
3. Click Manager. The Device Maintenance window opens.
4. Under Device IP, enter the Domain Name from the
confirmation email (e.g. tomsmith.myddns-flir.com).
5. Under Control Port, enter the camera’s control port
(default: 30001).
6. (Optional) Under Device Name, enter a name for the
camera.
7. Click Add to add the camera to the Device List.
8. Click Save to save changes. Click OK.
9. Close all windows to return to the Live Video screen. The
newly added camera will appear in Device List.
NOTE: A icon is shown for all cameras outside of the LAN. This
does not affect your ability to connect to the camera remotely.
CONNECTING TO THE CAMERA OVER THE INTERNET USING SYNCRO-V
Hi Speed
over 60 minutes
REMOTE VIEWING INSTALLATION GUIDE
Time: 60 Minutes
Skills - AdvancedHardware PC/
Router
Hi Speed
over 60 minutes
4
STEP
CONTD.
CONNECTING TO THE CAMERA OVER THE INTERNET USING SYNCRO-V
Hi Speed
over 60 minutes
REMOTE VIEWING INSTALLATION GUIDE
Time: 60 Minutes
Skills - AdvancedHardware PC/
Router
Hi Speed
over 60 minutes
4
STEP
CONTD.
CONNECTING TO THE CAMERA OVER THE INTERNET USING SYNCRO-V
10. Click on the camera in Device List to login. Enter the User Name
(default: admin) and Password (default: admin) and then click
Continue.
11. Click and drag the camera to a display grid screen to open it.
NOTE: It is recommended to select stream2 when remotely connecting
to cameras. Stream2 has a lower resolution that conserves bandwidth.
To select stream2: Click ( ), select stream2 under Stream and
click Apply then OK.
4
STEP
CONNECTING TO THE CAMERA OVER THE INTERNET USING SYNCRO-V
Hi Speed
over 60 minutes
REMOTE VIEWING INSTALLATION GUIDE
Time: 60 Minutes
Skills - AdvancedHardware PC/
Router
Hi Speed
over 60 minutes
You need to enable port forwarding on your router to the camera’s
local IP address for the following ports:
• HTTP Port (default: 80)
• Control Port (default: 30001)
1
An example of a port forwarding screen is shown for illustration purposes.
HTTP 80 80 12
EXAMPLE
CONTROL
30001 30001
12
NOTE: If you are configuring multiple IP cameras for
individual remote access, you must change the ports for each
camera. Two cameras cannot use the same port number. For
information on changing camera ports, see the instruction
manual for your camera.
Locate your camera’s MAC address:
2
Port Forward your Router:
1. In Syncro-V, click Device Manager > Video Device
Management.
2. Click the IP address of the camera then click Device Info.
3. Write down the MAC address below.
Register for FLIR DDNS:
3
FLIR offers a free DDNS service for use with your IP camera. A DDNS
account allows you to set up a website address that points back to
your local network.
NOTE: You may use the same DDNS account for multiple IP cameras on
the same LAN, but you must change the control port to a different port
for each camera and port forward the new port number, see the
instruction manual for your camera.
MAC ADDRESS: _____:_____:_____:_____:_____:_____
Click and drag
NOTE: Your router must support UPnP to enable DDNS.
 Loading...