

Page 1

User’s manual
Remote control
Page 2

Page 3

Table of contents
The latest revision of this publication always applies, and can be downloaded from http://support.flir.com.
Packing list...................................................................................................5
View from the right .......................................................................................6
View from the rear........................................................................................8
Screen elements ........................................................................................10
Battery condition indicator.......................................................................... 11
Charging the remote control battery ..........................................................12
Installing the remote control battery...........................................................13
Removing the remote control battery.........................................................14
Configuring the remote control for wireless mode .....................................15
Technical data............................................................................................17
Dimensional drawings................................................................................18
© 2011, FLIR Systems, Inc. All rights reserved worldwide.
Publ. no. T559044, rev. C
Page 4

Page 5

Packing list
Packing list
Contents
• Cardboard box
• Remote control
• Battery
• Mains cable
• Pouch
• Power supply
• Sunshield
• USB cable
• User’s manual
• WLAN USB micro adapter (intended for the remote control)
• WLAN USB micro adapter (intended for the camera)
Note
FLIR Systems reserves the right to discontinue models, parts or accessories, and
other items, or to change specifications at any time without prior notice.
© 2011, FLIR Systems, Inc. All rights reserved worldwide.
5
Publ. no. T559044, rev. C
Page 6
View from the right
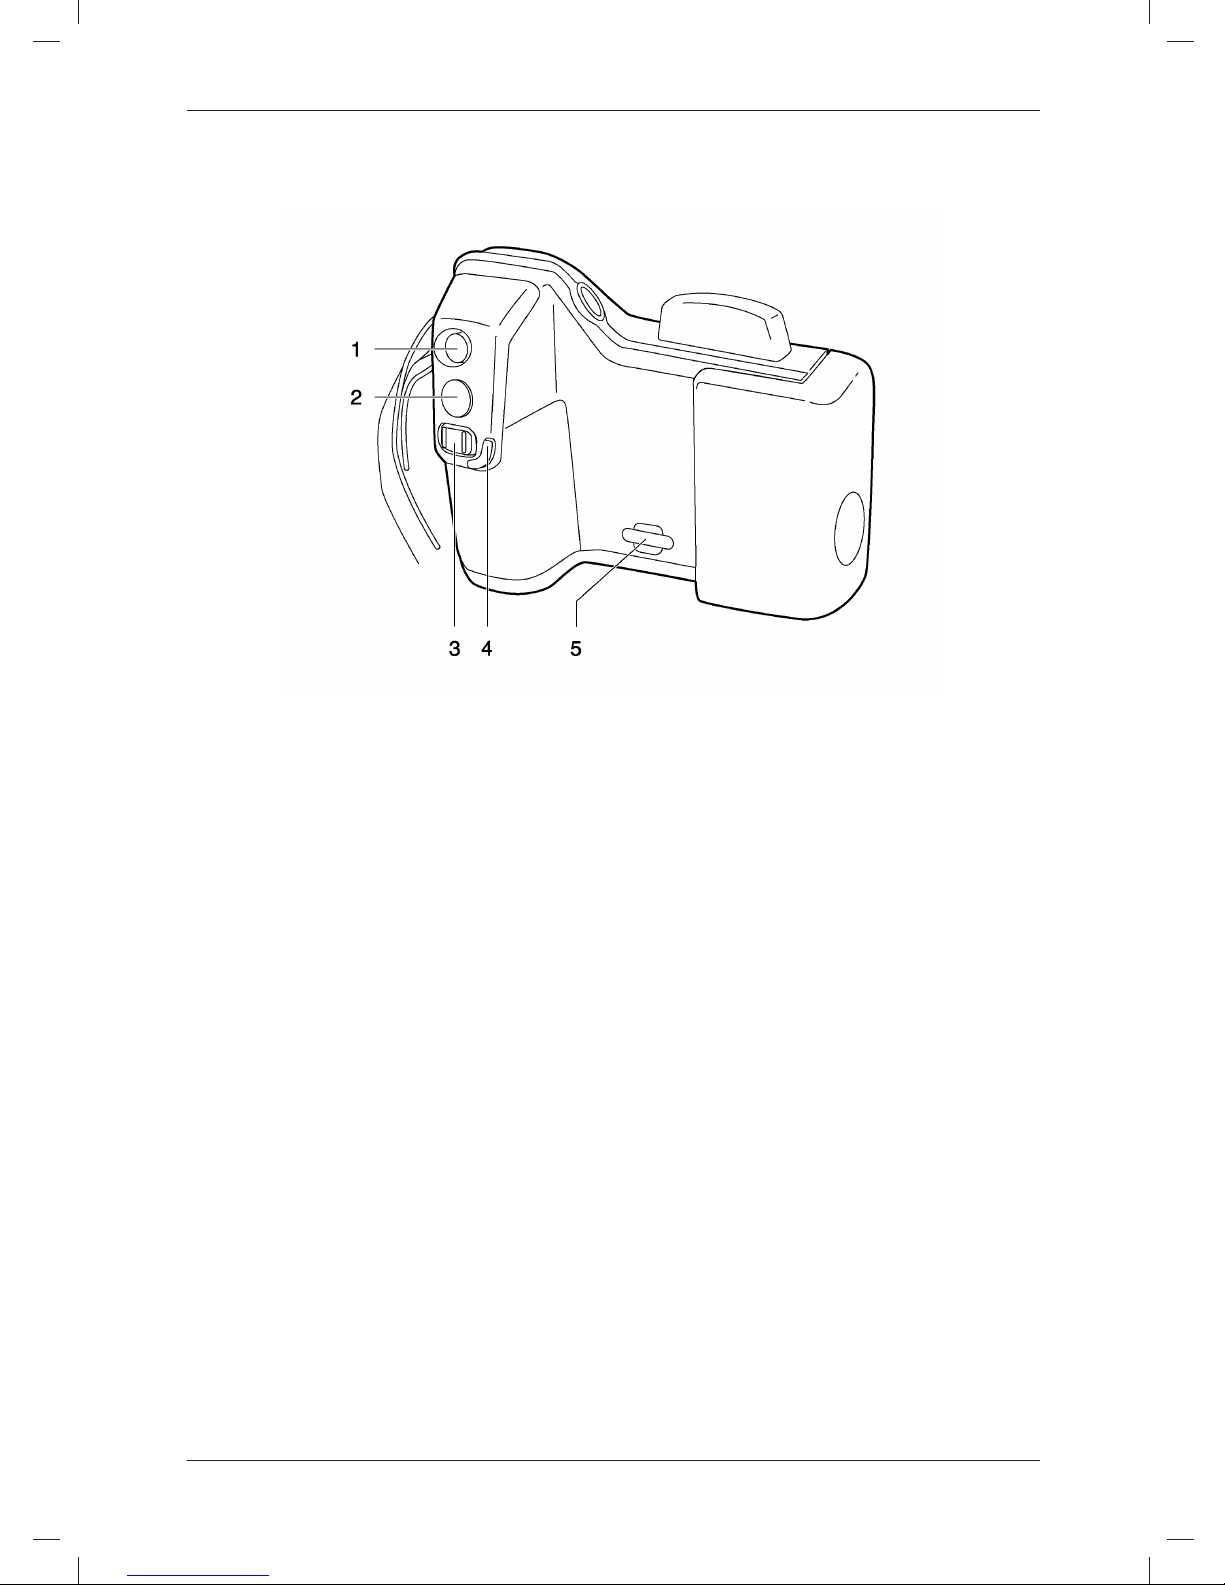
View from the right
Figure
Explanation
This table explains the figure above:
1. Auto/Manual.
The Auto/Manual button has the following functions:
When an image is in live mode:
• To switch between auto-adjust mode and manual mode, push the button.
• To make an image calibration, push and hold the button.
When an image is in preview or recall mode:
• To auto-adjust the image, push the button.
2. Preview/Save button.
The Preview/Save button has the following functions:
• To preview an image, push and release the button.
• To save an image, push and hold the button for more than 1 second.
3. Focus button.
The Focus button has the following functions:
When an image is in live mode:
• To adjust the focus, push the button left/right.
• To autofocus the camera, push and release the center of the Focus button.
When an image is in the preview or recall mode:
• To adjust the zoom, push the button left/right.
© 2011, FLIR Systems, Inc. All rights reserved worldwide.
6
Publ. no. T559044, rev. C
Page 7

View from the right
4. Protective lip for the focus button.
5. Attachment point for the neck strap.
© 2011, FLIR Systems, Inc. All rights reserved worldwide.
7
Publ. no. T559044, rev. C
Page 8
View from the rear
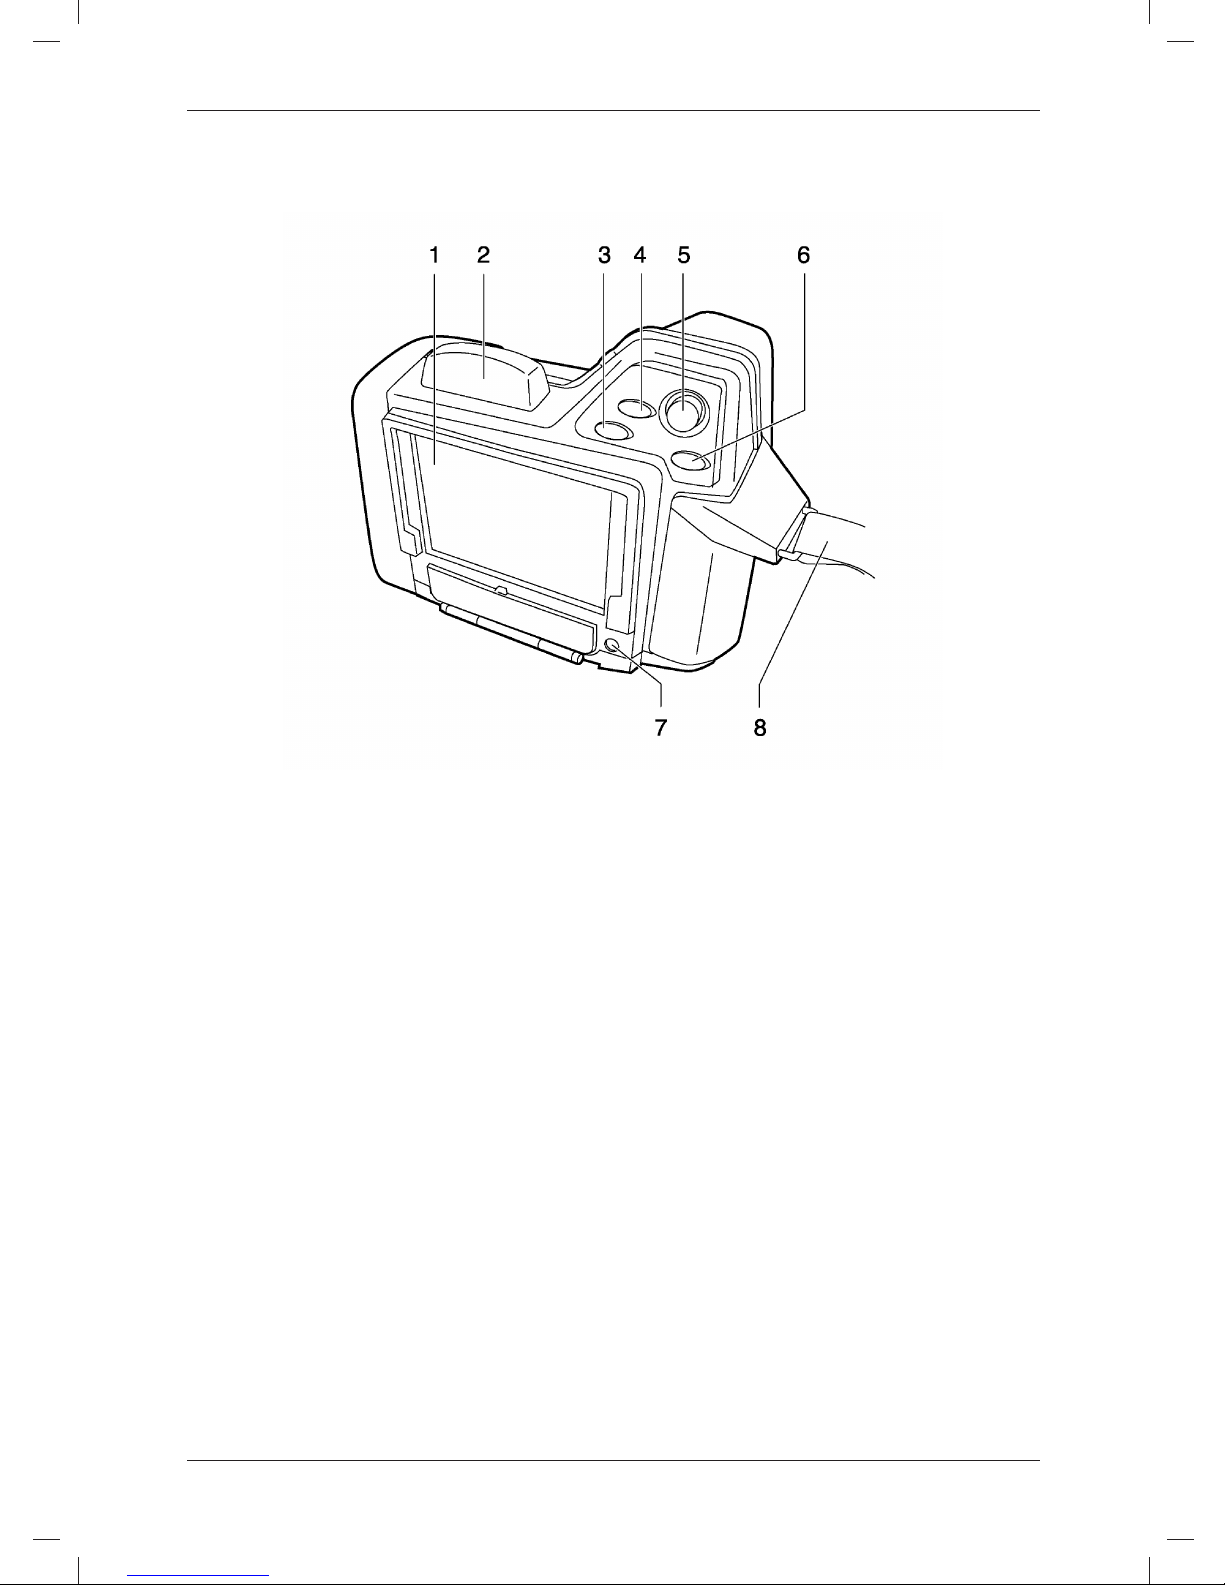
View from the rear
Figure
Explanation
This table explains the figure above:
1. LCD.
2. WLAN antenna. (Obsolete. An USB-WLAN micro adapter is the preferred device
to use.)
3. User-defined button #1.
The User-defined button #1 can be configured to have one of the following
functions:
• Switch between infrared images and visual images.
• Switch between the current image and the reference image.
• Go to the next palette.
• Switch between the color palette and the grayscale palette.
• Invert the palette.
• Adjust one time (only in Manual mode).
• Manual adjust. Switch between temperature ranges.
• Zoom.
• Hide graphics.
• Switch between the LCD and the viewfinder
• Switch between auto-adjust modes (level and span, or level only).
• Switch between color distribution modes (linear, histogram, contrast
optimization).
© 2011, FLIR Systems, Inc. All rights reserved worldwide.
8
Publ. no. T559044, rev. C
Page 9

View from the rear
• Switch between active measurement tools.
4. User-defined button #2.
For possible functions, see User-defined button #1 above.
5. Joystick, with push function.
6. Back button.
7. On/Off button.
The On/Off button has the following functions:
• To turn on the remote control, push the On/Off button.
• To turn off the remote control, push and hold down the On/Off button for more
than 0.2 second.
• The On/Off button is also a power indicator that shows when the remote
control is on.
8. Hand strap.
© 2011, FLIR Systems, Inc. All rights reserved worldwide.
9
Publ. no. T559044, rev. C
Page 10

Screen elements
Screen elements
General
The remote control LCD has a number of icons that are specific to using the remote
control with the camera.
Explanation
This table explains the screen elements:
Screen element Explanation
The radio mast icon indicates the signal
strength of the signal between the
camera and the remote control.
The battery icon indicates that the remote
control is currently powered using the
battery.
It also indicates the battery level.
The wall plug icon indicates that the
remote control is currently powered using
the external power supply.
The windows icon indicates the transfer
rate between the camera and the remote
control.
Windows alternating in color once per
second indicate an optimum transfer rate.
Windows alternating in color slower than
once per second indicate an inferior
transfer rate.
© 2011, FLIR Systems, Inc. All rights reserved worldwide.
10
Publ. no. T559044, rev. C
Page 11

Battery condition indicator
Battery condition indicator
General
The remote control battery has a battery condition indicator.
Figure
Explanation
This table explains the battery condition indicator:
Signal Explanation
The green light flashes. The power supply is charging the battery.
The green light is The battery is fully charged.
continuous.
The green light is off. The remote control is using the battery (instead of the
power supply).
© 2011, FLIR Systems, Inc. All rights reserved worldwide.
11
Publ. no. T559044, rev. C
Page 12

Charging the remote control battery
Charging the remote control battery
General
You must charge the battery for 4 hours before you start using the remote control for
the first time. After that, you must charge the battery when a low battery voltage
warning is displayed on the screen.
Procedure
Follow this procedure to use the power supply to charge the battery when it is inside
the remote control:
1. Open the battery compartment cover.
2. Connect the power supply cable plug to the connector on the battery.
3. Connect the power supply mains-electricity plug to a mains socket.
4. Disconnect the power supply cable plug when the green light of the battery
condition indicator is continuous.
Note
You can also charge the battery when it is outside the remote control.
© 2011, FLIR Systems, Inc. All rights reserved worldwide.
12
Publ. no. T559044, rev. C
Page 13

Installing the remote control battery
Installing the remote control battery
Note
Use a clean, dry cloth to remove any water or moisture on the battery before you
insert it.
Procedure
Follow this procedure to install the battery:
1. Push the release button on the battery compartment cover to unlock it.
2. Connect the power supply cable plug to the connector on the battery.
3. Connect the power supply mains-electricity plug to a mains socket.
4. Disconnect the power supply cable plug when the green light of the battery
condition indicator is continuous.
© 2011, FLIR Systems, Inc. All rights reserved worldwide.
13
Publ. no. T559044, rev. C
Page 14

Removing the remote control battery
Removing the remote control battery
Procedure
Follow this procedure to remove the battery:
1. Push the release button on the battery compartment cover to unlock it.
2. Open the cover to the battery compartment.
3. Push the red release button in the direction of the arrow to unlock the battery.
4. Pull out the battery from the battery compartment.
© 2011, FLIR Systems, Inc. All rights reserved worldwide.
14
Publ. no. T559044, rev. C
Page 15

Configuring the remote control for wireless mode
Configuring the remote control for wireless mode
Using the USB-WLAN micro adapter
General
Before you start using the remote control for the first time in wireless mode you must
configure it.
Procedure
Follow this procedure to configure the remote control:
1. Turn on the camera and the remote control.
2. Insert an USB-WLAN micro adapter into the USB connector on the camera.
3. Connect the remote control to the camera using a USB cable. Use the (large)
USB-A connector on the remote control and the (small) USB-Mini-B connector on
the camera.
4. Wait until a confirmation message appears on the remote control that the
configuration was successful. If no confirmation message appears, remove the
USB cable from the camera and repeat Steps 1–3.
5. Remove the USB cable from the remote control and insert an USB-WLAN micro
adapter into the USB connector on the remote control.
Note
• You must configure the remote control for each new camera.
• The remote control is not intended to be used at temperatures below 0°C (32°F).
Using the remote control at lower temperatures can affect WLAN video streaming.
• The operating range using WLAN is approximately 15 m (49 ft.).
• If you experience transmission or interference problems, you can change the
WLAN setting in the camera. See the camera manual for more information about
this.
• The remote control has a significantly lower frame rate than the camera. However,
the images are still saved with the same high quality as when saved them the
camera.
• Using the remote control, you can only access a subset of the functions in the
camera. To access the functions that are not supported by the remote control, you
will need to use the camera.
Using the WLAN card (obsolete)
Applicability
This procedure is obsolete and only included for the purpose of managing older
remote controls.
General
Before you start using the remote control for the first time in wireless mode you must
configure it.
Procedure
Follow this procedure to configure the remote control:
1. Turn on the camera and the remote control.
© 2011, FLIR Systems, Inc. All rights reserved worldwide.
15
Publ. no. T559044, rev. C
Page 16

Configuring the remote control for wireless mode
2. Insert a WLAN card into Slot I on the camera.
3. Connect the remote control to the camera using a USB cable. Use the (large)
USB-A connector on the remote control and the (small) USB-Mini-B connector on
the camera.
4. Wait until a confirmation message appears on the remote control that the
configuration was successful. If no confirmation message appears, remove the
USB cable and the WLAN card from the camera and repeat Steps 1 –3.
5. Remove the USB cable.
Note
• You must configure the remote control for each new camera.
• The remote control is not intended to be used at temperatures below 0°C (32°F).
Using the remote control at lower temperatures can affect WLAN video streaming.
• The operating range using WLAN is approximately 15 m (49 ft.).
• If you experience transmission or interference problems, you can change the
WLAN setting in the camera. See the camera manual for more information about
this.
• The remote control has a significantly lower frame rate than the camera. However,
the images are still saved with the same high quality as when saved using the
camera.
• Using the remote control, you can only access a subset of the functions in the
camera. To access the functions that are not supported by the remote control, you
will need to use the camera.
© 2011, FLIR Systems, Inc. All rights reserved worldwide.
16
Publ. no. T559044, rev. C
Page 17

Technical data
Technical data
Weight, including battery 0.61 kg (1.3 lb.)
Weight, excluding 0.49 kg (1.1 lb.)
battery
L × W × H 166.5 × 87.4 × 125.1 mm (6.6 × 4.9 × 3.4 in.)
Range Approximately 15 m (49 ft.)
Operating temperature The remote control is not intended to be used below 0°C
(32°F)
© 2011, FLIR Systems, Inc. All rights reserved worldwide.
17
Publ. no. T559044, rev. C
Page 18

Dimensional drawings
Dimensional drawings
Front view
Side view
Top view
© 2011, FLIR Systems, Inc. All rights reserved worldwide.
18
Publ. no. T559044, rev. C
Page 19

Dimensional drawings
Battery
Use a clean, dry cloth to remove any water or moisture on the battery before you
install it.
© 2011, FLIR Systems, Inc. All rights reserved worldwide.
19
Publ. no. T559044, rev. C
Page 20

Page 21

Page 22

A note on the technical production of this publication
This publication was produced using XML – the eXtensible Markup Language. For more information about XML, please
visit http://www.w3.org/XML/
A note on the typeface used in this publication
This publication was typeset using Linotype Helvetica™ World. Helvetica™ was designed by Max Miedinger
(1910–1980).
LOEF (List Of Effective Files)
$URL: file:///C:/SVNRepository/svn/T638001--T639000/T638207.xml $$Rev: 246 $
$URL: file:///C:/SVNRepository/svn/T639001--T640000/T639116_en-US.xml $$Rev: 762 $
$URL: file:///C:/SVNRepository/svn/T638001--T639000/T638208.xml $$Rev: 246 $
Page 23

Page 24

Corporate Headquarters
FLIR Systems, Inc.
27700 SW Parkway Ave.
Wilsonville, OR 97070
USA
Telephone: +1-503-498-3547
Website
http://www.flir.com
Customer support
http://support.flir.com
Carbon offset
The logistics chain of the
hardcopy of this publication was
carbon offset with the following
unit series:
ES-1-1-1931819756-1-1 to
ES-1-1-1931819765-1-1
Document identity
Publ. No.: T559044
Revision: C
Issue date: May 18, 2011
 Loading...