

User’s manual
FLIR ix series
T559733_en-USPubl. No.
a571Revision
English (EN)Language
November 4, 2011Issue date


User’s manual
Publ. No. T559733_en-US Rev. a571 – ENGLISH (EN) – November 4, 2011

Legal disclaimer
All products manufactured by FLIR Systemsarewarranted against defectivematerialsandworkmanship for aperiodof one(1)year from the
delivery date of the original purchase, provided such products have been under normal storage, use and service, and in accordance with
FLIR Systems instruction.
Uncooled handheldinfraredcameras manufactured by FLIRSystems are warranted againstdefectivematerials and workmanship fora period
of two (2) years from the delivery date of the original purchase, provided such products have been under normal storage, use and service,
and in accordance with FLIR Systems instruction, and provided that the camera has been registered within 60 days of original purchase.
Detectors foruncooledhandheld infrared cameras manufacturedbyFLIR Systems are warrantedagainstdefective materials and workmanship
for a period of ten (10) years from the delivery date of the original purchase, provided such products have been under normal storage, use
and service, and in accordance with FLIR Systems instruction, and provided that the camera has been registered within 60 days of original
purchase.
Products which are not manufactured by FLIR Systems but included in systems delivered by FLIR Systems to the original purchaser, carry
the warranty, if any, of the particular supplier only. FLIR Systems has no responsibility whatsoever for such products.
The warranty extends only to the original purchaser and is not transferable. It is not applicable to any product which has been subjected to
misuse, neglect, accident or abnormal conditions of operation. Expendable parts are excluded from the warranty.
In the case of adefect inaproduct coveredbythis warrantytheproduct must notbe furtherusedin order toprevent additional damage.The
purchaser shall promptly report any defect to FLIR Systems or this warranty will not apply.
FLIR Systems will, at its option, repair or replace any such defective product free of charge if, upon inspection, it proves to be defective in
material or workmanship and provided that it is returned to FLIR Systems within the said one-year period.
FLIR Systems has no other obligation or liability for defects than those set forth above.
No other warranty is expressed or implied. FLIR Systems specifically disclaims the implied warranties of merchantability and fitness for a
particular purpose.
FLIR Systems shall not be liable for any direct, indirect, special, incidentalor consequential loss or damage, whether basedon contract, tort
or any other legal theory.
This warranty shall be governed by Swedish law.
Any dispute, controversy or claim arising out of or in connection with this warranty, shall be finally settled by arbitration in accordance with
the Rules of the Arbitration Institute of the Stockholm Chamber of Commerce. The place of arbitration shall be Stockholm. The language to
be used in the arbitral proceedings shall be English.
Copyright
© 2011, FLIRSystems. All rights reservedworldwide. No parts ofthesoftware including source codemaybe reproduced, transmitted, transcribed
or translated into any language or computer language in any form or by any means, electronic, magnetic, optical, manual or otherwise,
without the prior written permission of FLIR Systems.
This documentation must not, in whole or part, be copied, photocopied, reproduced, translated or transmitted to any electronic medium or
machine readable form without prior consent, in writing, from FLIR Systems.
Names and marks appearing on the products herein are eitherregistered trademarksor trademarksof FLIR Systems and/or its subsidiaries.
All othertrademarks,trade names or companynames referenced herein areusedfor identification only andarethe property of theirrespective
owners.
Quality assurance
The Quality Management System under which these products are developed and manufactured has been certified in accordance with the
ISO 9001 standard.
FLIR Systems is committed to a policy of continuous development; therefore we reserve the right to make changes and improvements on
any of the products described in this manual without prior notice.
Patents
One or several of the following patents or design patents apply to the products and/or features described in this manual:
0002258-2; 000279476-0001; 000439161; 000499579-0001; 000653423; 000726344; 000859020; 000889290; 001106306-0001; 001707738;
001707746; 001707787; 001776519; 0101577-5; 0102150-0; 0200629-4; 0300911-5; 0302837-0; 1144833; 1182246; 1182620; 1188086;
1285345; 1287138; 1299699; 1325808; 1336775; 1365299; 1402918; 1404291; 1678485; 1732314; 200530018812.0; 200830143636.7;
2106017; 235308; 3006596; 3006597; 466540; 483782; 484155; 518836; 60004227.8; 60122153.2; 602004011681.5-08; 6707044; 68657;
7034300; 7110035; 7154093; 7157705; 7237946; 7312822; 7332716; 7336823; 7544944; 75530; 7667198; 7809258; 7826736; D540838;
D549758; D579475; D584755; D599,392; DI6702302-9; DI6703574-4; DI6803572-1; DI6803853-4; DI6903617-9; DM/057692; DM/061609;
Registration Number; ZL00809178.1;ZL01823221.3;ZL01823226.4;ZL02331553.9;ZL02331554.7;ZL200480034894.0;ZL200530120994.2;
ZL200630130114.4; ZL200730151141.4; ZL200730339504.7; ZL200830128581.2; ZL200930190061.9
EULA Terms
You have acquired a device (“INFRARED CAMERA”) that includes software licensed by FLIR Systems AB from Microsoft Licensing, GP
■
or its affiliates (“MS”). Those installed software products of MS origin, as well as associated media, printed materials, and “online” or
electronic documentation(“SOFTWARE”)are protected by internationalintellectualproperty laws and treaties.TheSOFTWARE is licensed,
not sold. All rights reserved.
iv Publ. No. T559733_en-US Rev. a571 – ENGLISH (EN) – November 4, 2011

IF YOU DO NOTAGREETO THISENDUSERLICENSE AGREEMENT(“EULA”), DONOT USE THEDEVICEOR COPY THE SOFTWARE.
■
INSTEAD, PROMPTLY CONTACT FLIR Systems AB FOR INSTRUCTIONS ON RETURN OF THE UNUSED DEVICE(S) FOR A REFUND.
ANY USE OF THE SOFTWARE, INCLUDING BUT NOT LIMITED TO USE ON THE DEVICE, WILL CONSTITUTE YOUR AGREEMENT
TO THIS EULA (OR RATIFICATION OF ANY PREVIOUS CONSENT).
GRANT OF SOFTWARE LICENSE. This EULA grants you the following license:
■
You may use the SOFTWARE only on the DEVICE.
■
NOT FAULT TOLERANT. THE SOFTWARE IS NOT FAULT TOLERANT. FLIR Systems AB HAS INDEPENDENTLY DETERMINED
■
HOW TOUSE THE SOFTWAREIN THE DEVICE,AND MS HASRELIED UPON FLIRSystems AB TOCONDUCT SUFFICIENT TESTING
TO DETERMINE THAT THE SOFTWARE IS SUITABLE FOR SUCH USE.
NO WARRANTIES FOR THE SOFTWARE. THE SOFTWARE is provided “AS IS” and with all faults. THE ENTIRE RISK AS TO SAT-
■
ISFACTORY QUALITY, PERFORMANCE, ACCURACY, AND EFFORT (INCLUDING LACK OF NEGLIGENCE) IS WITH YOU. ALSO,
THERE ISNO WARRANTY AGAINSTINTERFERENCE WITH YOURENJOYMENT OF THESOFTWAREOR AGAINST INFRINGEMENT.
IF YOU HAVE RECEIVED ANY WARRANTIES REGARDING THE DEVICE OR THE SOFTWARE, THOSE WARRANTIES DO NOT
ORIGINATE FROM, AND ARE NOT BINDING ON, MS.
No Liability for Certain Damages. EXCEPT AS PROHIBITED BY LAW, MS SHALL HAVE NO LIABILITY FOR ANY INDIRECT,
■
SPECIAL, CONSEQUENTIAL OR INCIDENTAL DAMAGES ARISING FROM OR IN CONNECTION WITH THE USE OR PERFORMANCE OF THE SOFTWARE. THIS LIMITATION SHALL APPLY EVEN IF ANY REMEDY FAILS OF ITS ESSENTIAL PURPOSE.
IN NO EVENT SHALL MS BE LIABLE FOR ANY AMOUNT IN EXCESS OF U.S. TWO HUNDRED FIFTY DOLLARS (U.S.$250.00).
Limitations on Reverse Engineering, Decompilation, and Disassembly. Youmay not reverse engineer, decompile,or disassemble
■
the SOFTWARE, exceptand only to the extentthat such activity isexpresslypermitted by applicable lawnotwithstandingthis limitation.
SOFTWARE TRANSFER ALLOWED BUT WITH RESTRICTIONS. Youmaypermanentlytransferrights under this EULA only aspart
■
of a permanent sale or transfer of the Device, and only if the recipient agrees to this EULA. If the SOFTWARE is an upgrade, any
transfer must also include all prior versions of the SOFTWARE.
EXPORT RESTRICTIONS. You acknowledge that SOFTWARE is subject to U.S. export jurisdiction. You agree to comply with all
■
applicable international andnationallawsthatapplytotheSOFTWARE, includingthe U.S. Export Administration Regulations,aswell
as end-user, end-use and destination restrictions issued by U.S. and other governments. For additional information see
http://www.microsoft.com/exporting/.
Publ. No. T559733_en-US Rev. a571 – ENGLISH (EN) – November 4, 2011

vi Publ. No. T559733_en-US Rev. a571 – ENGLISH (EN) – November 4, 2011

Table of contents
11 Warnings & Cautions .....................................................................................................................
42 Notice to user ..................................................................................................................................
53 Customer help ................................................................................................................................
64 Documentation updates .................................................................................................................
75 Important note about this manual .................................................................................................
86 Quick Start Guide ...........................................................................................................................
107 Parts lists .........................................................................................................................................
107.1 Scope of delivery ..................................................................................................................
107.2 List of accessories ................................................................................................................
128 Camera parts ..................................................................................................................................
169 Screen elements ............................................................................................................................
1810 Connectors and storage media ....................................................................................................
1911 Using the camera ............................................................................................................................
1911.1 Installing the battery .............................................................................................................
2011.2 Charging the battery .............................................................................................................
2111.3 Saving an image ...................................................................................................................
2211.4 Recalling an image ...............................................................................................................
2311.5 Opening the image archive ..................................................................................................
2411.6 Deleting an image .................................................................................................................
2511.7 Deleting all images ...............................................................................................................
2611.8 Measuring a temperature using a spotmeter .......................................................................
2711.9 Measuring a temperature using an area ..............................................................................
2811.10 Marking all areas above or below a set temperature level ..................................................
2911.11 Changing the color palette ...................................................................................................
3011.12 Changing the settings ..........................................................................................................
3111.13 Changing the image mode ...................................................................................................
3211.14 Setting the surface properties ..............................................................................................
3311.15 Changing the emissivity .......................................................................................................
3411.16 Changing the reflected apparent temperature ....................................................................
3511.17 Resetting the camera ............................................................................................................
3611.18 Finding the serial number of the camera .............................................................................
3712 Cleaning the camera ......................................................................................................................
3712.1 Camera housing, cables, and other items ...........................................................................
3812.2 Infrared lens ..........................................................................................................................
3912.3 Infrared detector ...................................................................................................................
4013 Technical data .................................................................................................................................
4113.1 Additional data ......................................................................................................................
4414 Dimensions ......................................................................................................................................
4414.1 Camera (front) ......................................................................................................................
Publ. No. T559733_en-US Rev. a571 – ENGLISH (EN) – November 4, 2011 vii

4514.2 Camera (side) .......................................................................................................................
4615 Application examples .....................................................................................................................
4615.1 Moisture & water damage ....................................................................................................
4715.2 Faulty contact in socket ........................................................................................................
4815.3 Oxidized socket ....................................................................................................................
4915.4 Insulation deficiencies ..........................................................................................................
5015.5 Draft ......................................................................................................................................
5116 About FLIR Systems .......................................................................................................................
5216.1 More than just an infrared camera .......................................................................................
5316.2 Sharing our knowledge ........................................................................................................
5316.3 Supporting our customers ...................................................................................................
5316.4 A few images from our facilities ...........................................................................................
5517 Glossary ...........................................................................................................................................
5918 Thermographic measurement techniques ...................................................................................
5918.1 Introduction ..........................................................................................................................
5918.2 Emissivity ..............................................................................................................................
6018.2.1 Finding the emissivity of a sample .......................................................................
6018.2.1.1 Step 1: Determining reflected apparent temperature .......................
6218.2.1.2 Step 2: Determining the emissivity ...................................................
6318.3 Reflected apparent temperature ..........................................................................................
6318.4 Distance ................................................................................................................................
6318.5 Relative humidity ..................................................................................................................
6318.6 Other parameters ..................................................................................................................
6419 History of infrared technology ......................................................................................................
6820 Theory of thermography ................................................................................................................
6820.1 Introduction ...........................................................................................................................
6820.2 The electromagnetic spectrum ............................................................................................
6920.3 Blackbody radiation ..............................................................................................................
7020.3.1 Planck’s law ..........................................................................................................
7120.3.2 Wien’s displacement law ......................................................................................
7320.3.3 Stefan-Boltzmann's law .........................................................................................
7420.3.4 Non-blackbody emitters .......................................................................................
7620.4 Infrared semi-transparent materials .....................................................................................
7821 The measurement formula .............................................................................................................
8422 Emissivity tables .............................................................................................................................
8422.1 References ............................................................................................................................
8422.2 Important note about the emissivity tables ..........................................................................
8522.3 Tables ....................................................................................................................................
viii Publ. No. T559733_en-US Rev. a571 – ENGLISH (EN) – November 4, 2011

1 Warnings & Cautions
(Applies only to Class A digital devices.) This equipment generates, uses, and
WARNING
■
can radiate radio frequency energy and if not installed and used in accordance
with the instruction manual, may cause interference to radio communications. It
has beentested andfound to complywith the limitsfor a ClassA computing device
pursuant to Subpart J of Part 15 of FCC Rules, which are designed to provide
reasonable protection against such interference when operated in a commercial
environment. Operation of this equipment in a residential area is likely to cause
interference in which case the user at his own expense will be required to take
whatever measures may be required to correct the interference.
(Applies only to Class B digital devices.) This equipment has been tested and
■
found to comply with the limits for a Class B digital device, pursuant to Part 15 of
the FCC Rules. Theselimits are designedto provide reasonableprotection against
harmful interference in a residential installation. This equipment generates, uses
and canradiate radiofrequencyenergy and, ifnot installed andused in accordance
with the instructions, may cause harmful interference to radio communications.
However, there is no guarantee that interference will not occur in a particular installation. If this equipment does cause harmful interference to radio or television
reception, whichcan be determinedby turning the equipmentoff and on,the user
is encouraged to try to correct the interference by one or more of the following
measures:
Reorient or relocate the receiving antenna.
■
Increase the separation between the equipment and receiver.
■
Connect the equipment into an outlet on a circuit different from that to which
■
the receiver is connected.
Consult the dealer or an experienced radio/TV technician for help.
■
(Applies only to digital devices subject to 15.19/RSS-210.) NOTICE: This device
■
complies with Part 15 of the FCC Rules and with RSS-210 of Industry Canada.
Operation is subject to the following two conditions:
1 this device may not cause harmful interference, and
2 this device must accept any interference received, including interference that
may cause undesired operation.
(Applies only to digital devices subject to 15.21.) NOTICE: Changes or modifica-
■
tions made to this equipment not expressly approved by (manufacturer name)
may void the FCC authorization to operate this equipment.
(Applies onlyto digitaldevicessubject to2.1091/2.1093/OETBulletin 65.) Radiofre-
■
quency radiation exposure Information: Theradiatedoutput powerofthe device
is far below the FCC radio frequency exposure limits. Nevertheless, the device
shall beused in such amanner that the potentialfor human contact duringnormal
operation is minimized.
(Applies only to cameras with laser pointer:) Do not look directly into the laser
■
beam. The laser beam can cause eye irritation.
Applies only to cameras with battery:
■
Do not disassemble or do a modification to the battery. The battery contains
■
safety and protection devices which, if they become damaged, can cause the
battery to become hot, or cause an explosion or an ignition.
Publ. No. T559733_en-US Rev. a571 – ENGLISH (EN) – November 4, 2011 1

1 – Warnings & Cautions
■
CAUTION
■
■
■
■
If there is a leak from the battery and the fluid gets into your eyes, do not rub
■
your eyes.Flush well withwater and immediatelyget medical care. Thebattery
fluid can cause injury to your eyes if you do not do this.
Do not continue to charge the battery if it does not become charged in the
■
specified charging time. If you continue to charge the battery, it can become
hot and cause an explosion or ignition.
Only use the correct equipment to discharge the battery. If you do not use the
■
correct equipment, you can decrease the performance or the life cycle of the
battery. If you do not use the correct equipment, an incorrect flow of current
to the battery can occur. This can cause the battery to become hot, or cause
an explosion and injury to persons.
Make sure that you read all applicable MSDS (Material Safety Data Sheets) and
warning labelson containersbeforeyou usea liquid: theliquids can bedangerous.
Do not point theinfrared camera (withor without thelens cover)at intensive energy
sources, for example devices that emit laser radiation, or the sun. This can have
an unwanted effect on the accuracy of the camera. It can also cause damage to
the detector in the camera.
Do not use the camera in a temperature higher than +50°C (+122°F), unless
specified otherwise in the user documentation. High temperatures can cause
damage to the camera.
(Applies only to cameras with laser pointer:) Protect the laser pointer with the
protective cap when you do not operate the laser pointer.
Applies only to cameras with battery:
Do not attach the batteries directly to a car’s cigarette lighter socket, unless a
■
specific adapter for connecting the batteries to a cigarette lighter socket is
provided by FLIR Systems.
Do not connect the positive terminal and the negative terminal of the battery
■
to each other with a metal object (such as wire).
Do not get water or salt water on the battery, or permit the battery to get wet.
■
Do not make holes in the battery with objects. Do not hit the battery with a
■
hammer. Do not step on the battery, or apply strong impacts or shocks to it.
Do not put thebatteries inor near a fire, orinto direct sunlight. When thebattery
■
becomes hot, the built-in safety equipment becomes energized and can stop
the battery charging process. If the battery becomes hot, damage can occur
to the safety equipment and this can cause more heat, damage or ignition of
the battery.
Do not put the battery on a fire or increase the temperature of the battery with
■
heat.
Do not put the battery on or near fires, stoves, or other high-temperature loca-
■
tions.
Do not solder directly onto the battery.
■
Do not use the battery if, when you use, charge, or store the battery, there is
■
an unusual smell fromthe battery,the battery feelshot, changes color, changes
shape, or is in an unusual condition. Contact your sales office if one or more
of these problems occurs.
Only use a specified battery charger when you charge the battery.
■
2 Publ. No. T559733_en-US Rev. a571 – ENGLISH (EN) – November 4, 2011

1 – Warnings & Cautions
The temperature range through which you can charge the battery is ±0°C to
■
+45°C (+32°F to +113°F), unless specified otherwise in the user documentation. If you charge the battery at temperatures out of this range, it can cause
the battery to become hot or to break. It can also decrease the performance
or the life cycle of the battery.
The temperature rangethrough which you can dischargethe battery is −15°C
■
to +50°C (+5°F to +122°F), unless specified otherwise in the user documentation. Use of the battery out of this temperature range can decrease the performance or the life cycle of the battery.
When the battery is worn, apply insulation to the terminals with adhesive tape
■
or similar materials before you discard it.
Remove any water or moisture on the battery before you install it.
■
Do not apply solvents or similar liquids to the camera, the cables, or other items.
■
This can cause damage.
Be careful when you cleanthe infraredlens. Thelens has a delicate anti-reflective
■
coating.
Do not clean the infrared lens too vigorously. This can damage the anti-reflective
■
coating.
In furnace and other high-temperature applications,you mustmount aheatshield
■
on the camera. Using the camera in furnace and other high-temperature applications without a heatshield can cause damage to the camera.
(Applies only to cameras with an automatic shutter that can be disabled.) Do not
■
disable the automatic shutter in the camera for a prolonged time period (typically
max. 30 minutes). Disabling the shutter for a longer time period may harm, or irreparably damage, the detector.
The encapsulationratingis valid onlywhen all openings onthe camera are sealed
■
with their designated covers, hatches, or caps. This includes, but is not limited
to, compartments for data storage, batteries, and connectors.
Publ. No. T559733_en-US Rev. a571 – ENGLISH (EN) – November 4, 2011 3

2 Notice to user
Typographical
conventions
User-to-user
forums
Calibration
Accuracy
Disposal of
electronic waste
This manual uses the following typographical conventions:
Semibold is used for menu names, menu commands and labels, and buttons in
■
dialog boxes.
Italic is used for important information.
■
Monospace is used for code samples.
■
UPPER CASE is used for names on keys and buttons.
■
Exchange ideas,problems, and infraredsolutions with fellowthermographers around
the world in our user-to-user forums. To go to the forums, visit:
http://www.infraredtraining.com/community/boards/
(This notice only applies to cameras with measurement capabilities.)
We recommend that you send in the camera for calibration once a year. Contact
your local sales office for instructions on where to send the camera.
(This notice only applies to cameras with measurement capabilities.)
For very accurate results, we recommend that you wait 5 minutes after you have
started the camera before measuring a temperature.
For cameras where the detector is cooled by a mechanical cooler, this time period
excludes the time it takes to cool down the detector.
10742803;a1
As with most electronic products, this equipment must be disposed of in an environmentally friendlyway, and in accordancewith existingregulationsfor electronicwaste.
Please contact your FLIR Systems representative for more details.
Training
To read about infrared training, visit:
http://www.infraredtraining.com
■
http://www.irtraining.com
■
http://www.irtraining.eu
■
4 Publ. No. T559733_en-US Rev. a571 – ENGLISH (EN) – November 4, 2011

3 Customer help
General
Submitting a
question
Downloads
For customer help, visit:
http://support.flir.com
To submit a question to the customer help team, you must be a registered user. It
only takes a fewminutes to registeronline. If you only wantto search the knowledgebase for existing questions and answers, you do not need to be a registered user.
When you want to submit a question, makesure thatyou have the following information to hand:
The camera model
■
The camera serial number
■
The communication protocol, or method, between the camera and your PC (for
■
example, HDMI, Ethernet, USB™, or FireWire™)
Operating system on your PC
■
Microsoft®Office version
■
Full name, publication number, and revision number of the manual
■
On the customer help site you can also download the following:
Firmware updates for your infrared camera
■
Program updates for your PC software
■
User documentation
■
Application stories
■
Technical publications
■
Publ. No. T559733_en-US Rev. a571 – ENGLISH (EN) – November 4, 2011 5

4 Documentation updates
General
Our manuals are updated several times per year, and we also issue product-critical
notifications of changes on a regular basis.
To access the latest manuals and notifications, go to the Download tab at:
http://support.flir.com
It only takes a few minutes to register online. In the download area you will also find
the latest releases of manuals for our other products, as well as manuals for our
historical and obsolete products.
6 Publ. No. T559733_en-US Rev. a571 – ENGLISH (EN) – November 4, 2011

5 Important note about this manual
General
NOTE
FLIR Systems issues generic manuals that cover several cameras within a model
line.
This means that this manual may contain descriptions and explanations that do not
apply to your particular camera model.
FLIR Systemsreserves therightto discontinuemodels,software, parts oraccessories,
and other items, or to change specifications and/or functionality at any time without
prior notice.
Publ. No. T559733_en-US Rev. a571 – ENGLISH (EN) – November 4, 2011 7

6 Quick Start Guide
Procedure
Follow this procedure to get started right away:
Remove the protective film from the LCD.1
You must charge the battery inside the camera for four full hours (or until
2
the battery charging indicator displays a green light) before you use the
camera for the first time.
Charge thebatteryby connecting thepowersupply to the powerconnector
on the camera. Make sure that you use the correct AC plug.
Note: The first time you charge a factory-new battery you must turn on and
then turn off the camera after you have connected the power supply to the
power connectoron thecamera.This isneeded in orderto initiate thebattery
measuring.
T630175;a1
1 Battery charging indicator
2 Power supply cable
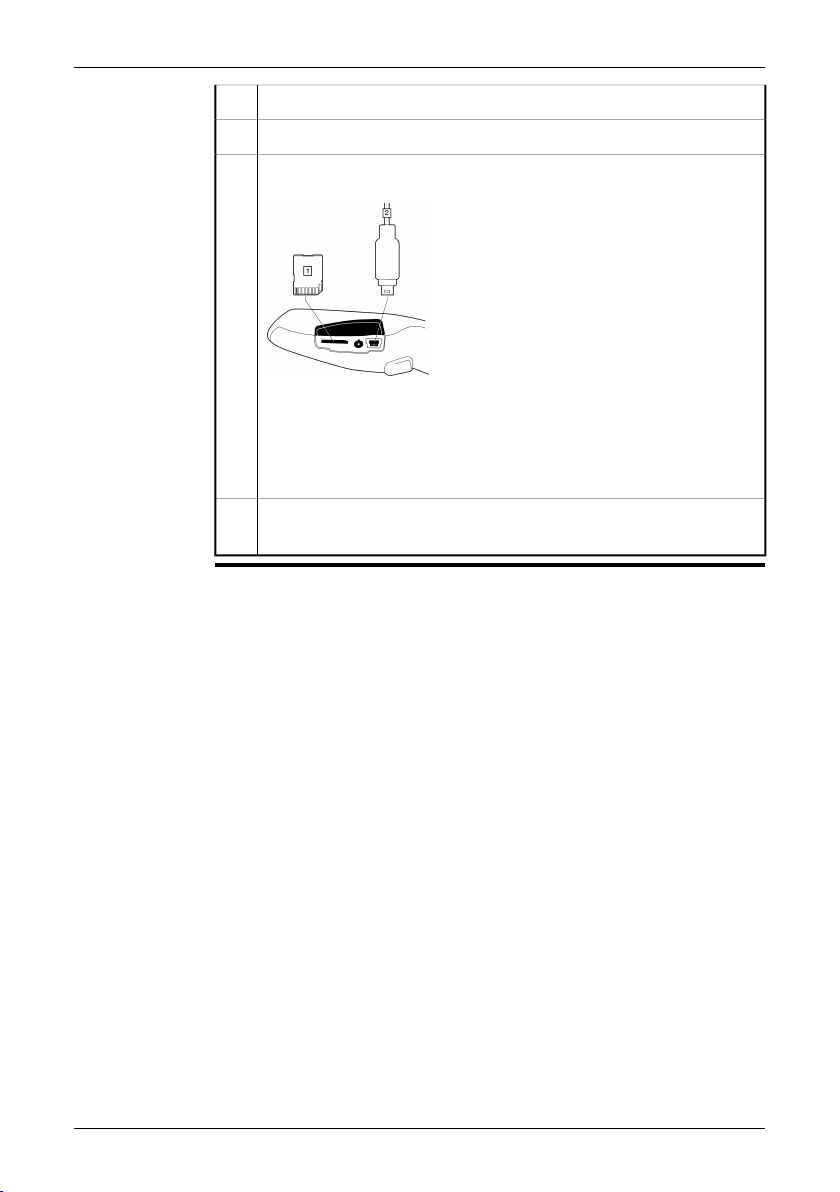
Insert a miniSD™ memory card into the card slot.
3
T630176;a1
Push the On/Off button to turn on the camera.4
Open the lens cap by pushing the lens cap lever.
5
T630177;a2
8 Publ. No. T559733_en-US Rev. a571 – ENGLISH (EN) – November 4, 2011
6 – Quick Start Guide
Aim the camera toward your target of interest.6
Pull the Save trigger to save the image.7
To move the image to a computer, do one of the following:
8
T630178;a2
(Item 1 above) Remove the miniSD™ memory card and insert it into a
■
card readerconnected to a computer. A miniSD™ cardadapter is included with your camera.
(Item 2 above) Connect a computer to the camera using a USB™ Mini-
■
B cable.
In Windows®Explorer, move the image from the card or camera using a
9
drag-and-drop operation.
Publ. No. T559733_en-US Rev. a571 – ENGLISH (EN) – November 4, 2011 9

7 Parts lists
7.1 Scope of delivery
■ Battery (inside camera)
■ Calibration certificate
■ Downloads brochure
■ FLIR Tools CD-ROM
■ Hand strap
■ Hard transport case (including padlock)
■ Infrared camera
■ Power supply/charger with EU, UK, US and Australian plugs
■ Printed Getting Started Guide
■ Printed Important Information Guide
■ Service & training brochure
■ USB cable
■ User documentation CD-ROM
■ miniSD card, with SD card adapter
Contact your local sales office if any item is damaged or missing. You can find the addresses and
■
telephone numbers of local sales offices on the back cover of this manual.
FLIR Systems reserves the right to discontinue models, parts or accessories, and other items, or to
■
change specifications at any time without prior notice.
7.2 List of accessories
■ 1910423 USB cable Std A <-> Mini-B
■ ITC-CER-5101 ITC Level 1 Thermography Course - attendance, 1 pers.
■ ITC-CER-5105 ITC Level 1 Thermography Course - additional student to on site
class, 1 pers
■ ITC-CER-5109 ITC Level 1 Thermography Course – group of 10 pers.
■ ITC-EXP-1001 ITC Training 1 day - attendance 1 pers.
■ ITC-EXP-1009 ITC Training 1 day - group up to 10 pers.
■ ITC-EXP-1011 ITC Short course Introduction to thermography -attendance 1 pers.
(1 day)
■ ITC-EXP-1019 ITC Short course Introduction to thermography - inclusive 10 pers.
(1 day)
■ ITC-EXP-1021 ITC In-house training - additional attendance 1 pers. (per day)
■ ITC-EXP-1029 ITC In-house training - group up to 10 pers. (per day)
■ ITC-EXP-2001 ITC Training 2 days - attendance 1 pers.
■ ITC-EXP-2009 ITC Training 2 days - group up to 10 pers.
■ ITC-EXP-2011 ITC Short course building thermography -attendance 1 pers. (2 days)
■ ITC-EXP-2019 ITCShort course building thermography - inclusive 10pers. (2days)
10 Publ. No. T559733_en-US Rev. a571 – ENGLISH (EN) – November 4, 2011

7 – Parts lists
■ ITC-EXP-2041 ITC Short course electrical thermography - attendance 1 pers. (2
days)
■ ITC-EXP-2049 ITC Short course electrical thermography - inclusive 10 pers. (2
days)
■ ITC-EXP-2061 ITC Short course HVAC and plumbing - attendance 1 pers (2 days)
■ ITC-EXP-2069 ITC Short course HVAC andplumbing -group upto 10 pers (2 days)
■ ITC-EXP-3001 ITC Training 3 days - attendance 1 pers.
■ ITC-EXP-3009 ITC Training 3 days - group up to 10 pers.
■ ITC-PRA-2011 ITC Practical Course - Solar panel inspection - attendance, 1 pers
(2 days)
■ ITC-PRA-2019 ITC Practical Course - Solar panel inspection - group up to 10 pers
(2 days)
■ ITC-SOW-0001 ITC Software course - attendance 1 pers. (per day)
■ ITC-SOW-0009 ITC Software course - group up to 10 pers. (per day)
■ T126024 Pouch
■ T197410 Battery
■ T197619 Hard transport case for ix
■ T197717 FLIR Reporter 8.5 SP3, Professional
■ T197717L10 FLIR Reporter 8.5 SP3, Professional, 10 user licenses
■ T197717L5 FLIR Reporter 8.5 SP3, Professional, 5 user licenses
■ T197778 FLIR BuildIR 2.1
■ T197778L10 FLIR BuildIR 2.1, 10 user licenses
■ T197778L5 FLIR BuildIR 2.1, 5 user licenses
■ T199806 One year extended warranty for ix series
■ T199833 General Maintenance ix series
■ T910711 Power supply/charger with EU, UK, US and AU plugs
■ T910737 Memory card micro-SD with adapters
Contact your local sales office if any item is damaged or missing. You can find the addresses and
■
telephone numbers of local sales offices on the back cover of this manual.
FLIR Systems reserves the right to discontinue models, parts or accessories, and other items, or to
■
change specifications at any time without prior notice.
Publ. No. T559733_en-US Rev. a571 – ENGLISH (EN) – November 4, 2011 11
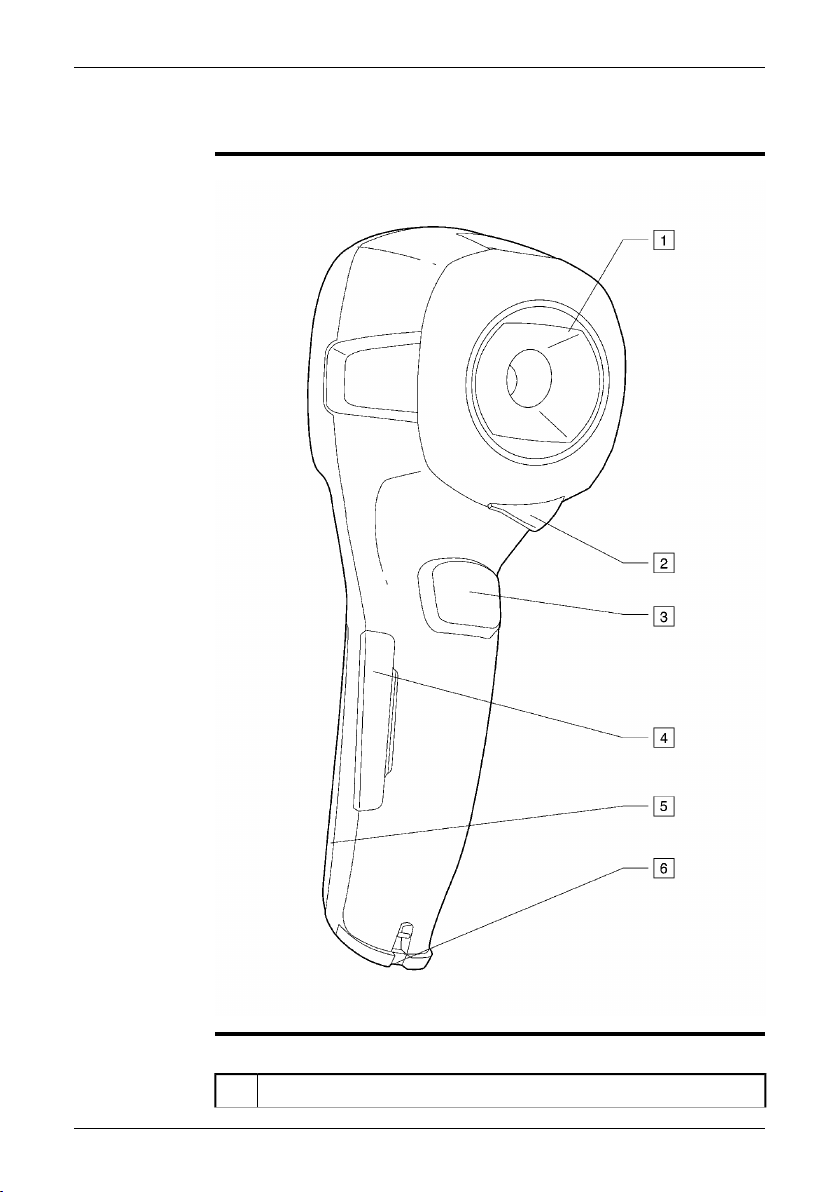
8 Camera parts
Figure
10780903;a2
Explanation
This table explains the figure above:
Infrared lens1
12 Publ. No. T559733_en-US Rev. a571 – ENGLISH (EN) – November 4, 2011

8 – Camera parts
Lever to open and close the lens cap2
Trigger to save images3
Cover to connectors and the miniSD™ memory card slot4
Cover to the battery compartment5
Attachment point for the hand strap6
Publ. No. T559733_en-US Rev. a571 – ENGLISH (EN) – November 4, 2011 13
8 – Camera parts
Figure
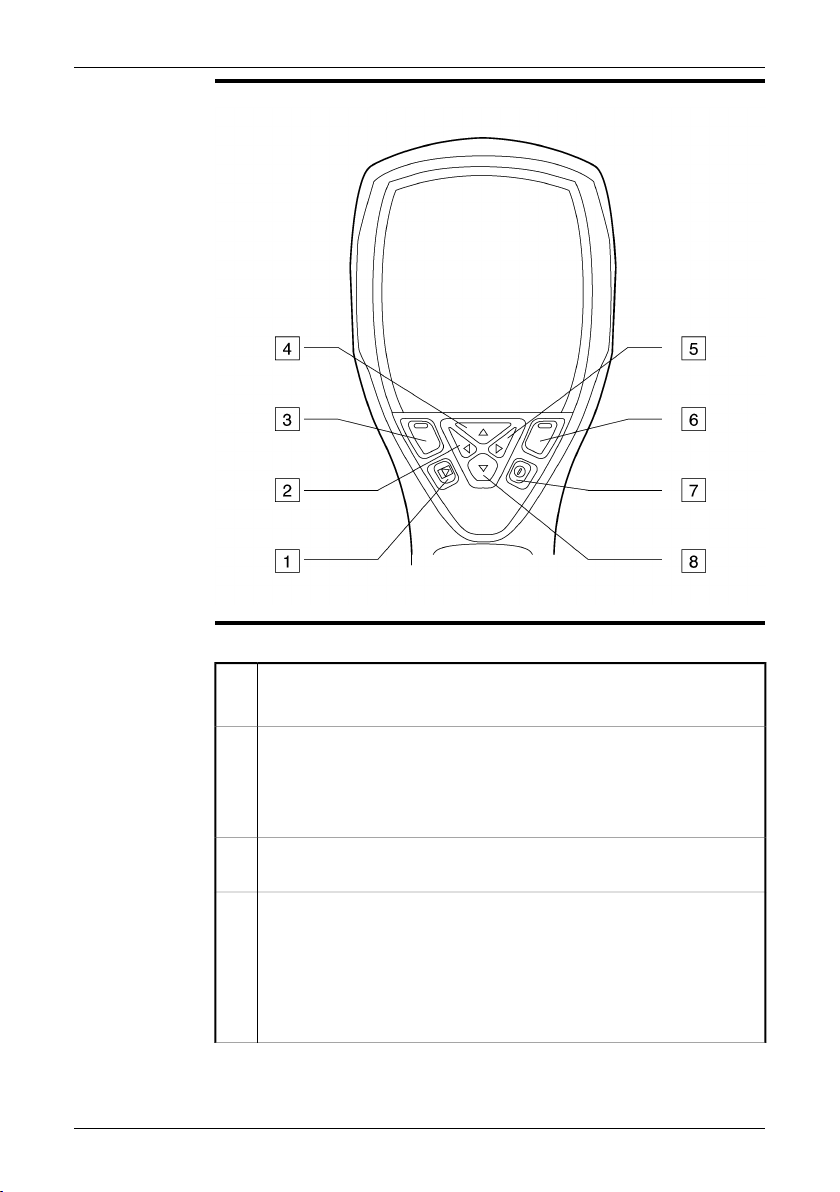
Explanation
10781003;a2
This table explains the figure above:
Archive button
1
Function: Push to open the image archive.
Left arrow button (on the navigation pad)
2
Function:
Push to go left in menus, submenus, and dialog boxes
■
Push to navigate in the image archive
■
Left selection button. This button is context-sensitive, and the current
3
function is displayed above the button on the screen.
Top arrow button (on the navigation pad)
4
Function:
Push to go up in menus, submenus, and dialog boxes.
■
Push to display the image archive (after having pushed the Archive
■
button).
Push to increase/change the value.
■
14 Publ. No. T559733_en-US Rev. a571 – ENGLISH (EN) – November 4, 2011

Right arrow button (on the navigation pad)
5
Function:
Push to go right in menus, submenus, and dialog boxes.
■
Push to navigate in the image archive.
■
Right selection button. This button is context-sensitive, and the current
6
function is displayed above the button on the screen.
On/Off button
7
Function:
Push to turn on the camera.
■
Push and hold down for more than one second to turn off the camera.
■
Bottom arrow button (on navigation pad)
8
Function:
Push to go down in menus, submenus, and dialog boxes.
■
Push to decrease/change the value.
■
8 – Camera parts
Publ. No. T559733_en-US Rev. a571 – ENGLISH (EN) – November 4, 2011 15
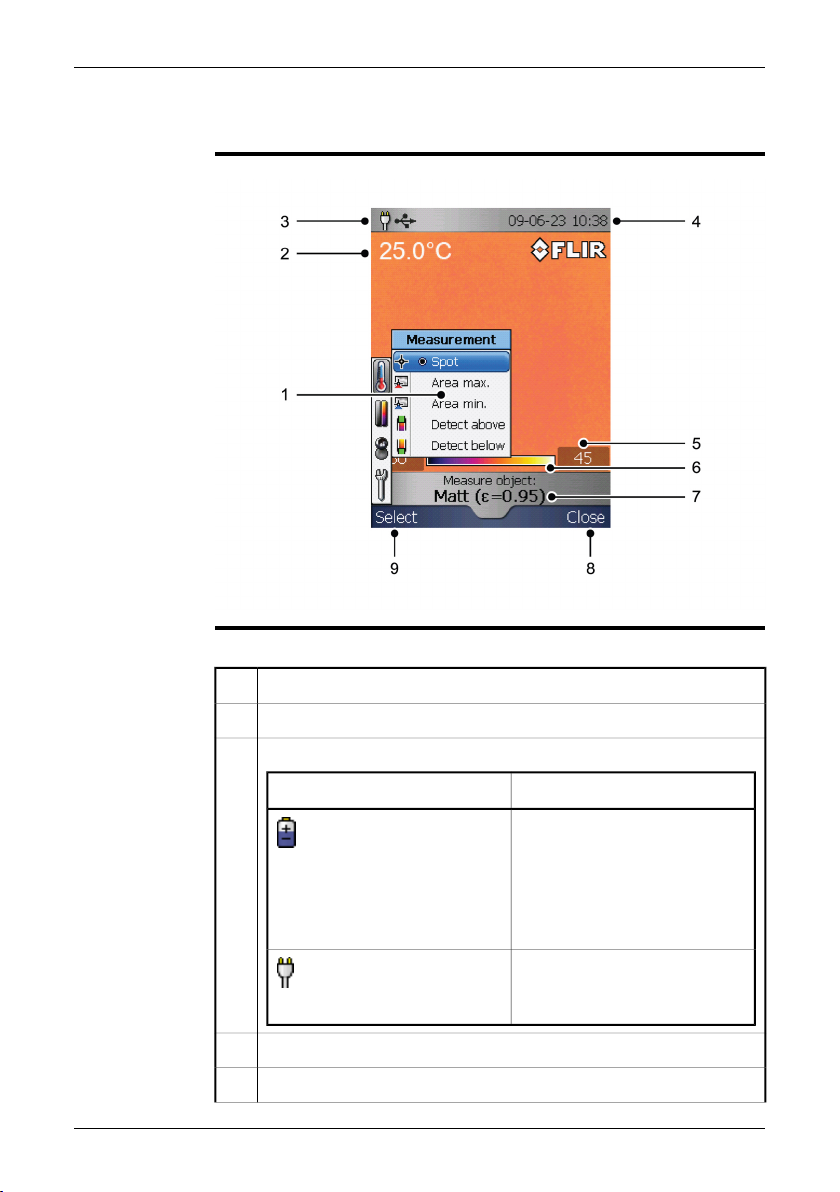
9 Screen elements
Figure
Explanation
10781203;a4
This table explains the figure above:
Menu system1
Measurement result2
Power indicator
3
MeaningIcon
One of the following:
The camera is powered using
■
the battery.
The battery is being charged
■
(indicated by a refilling battery
animation).
The batteryis fullycharged and the
camera is powered using the
power supply.
Date and time4
Limit value for the temperature scale5
16 Publ. No. T559733_en-US Rev. a571 – ENGLISH (EN) – November 4, 2011

9 – Screen elements
Temperature scale6
Currently set emissivity value or material properties7
Current function for the right selection button8
Current function for the left selection button9
Publ. No. T559733_en-US Rev. a571 – ENGLISH (EN) – November 4, 2011 17
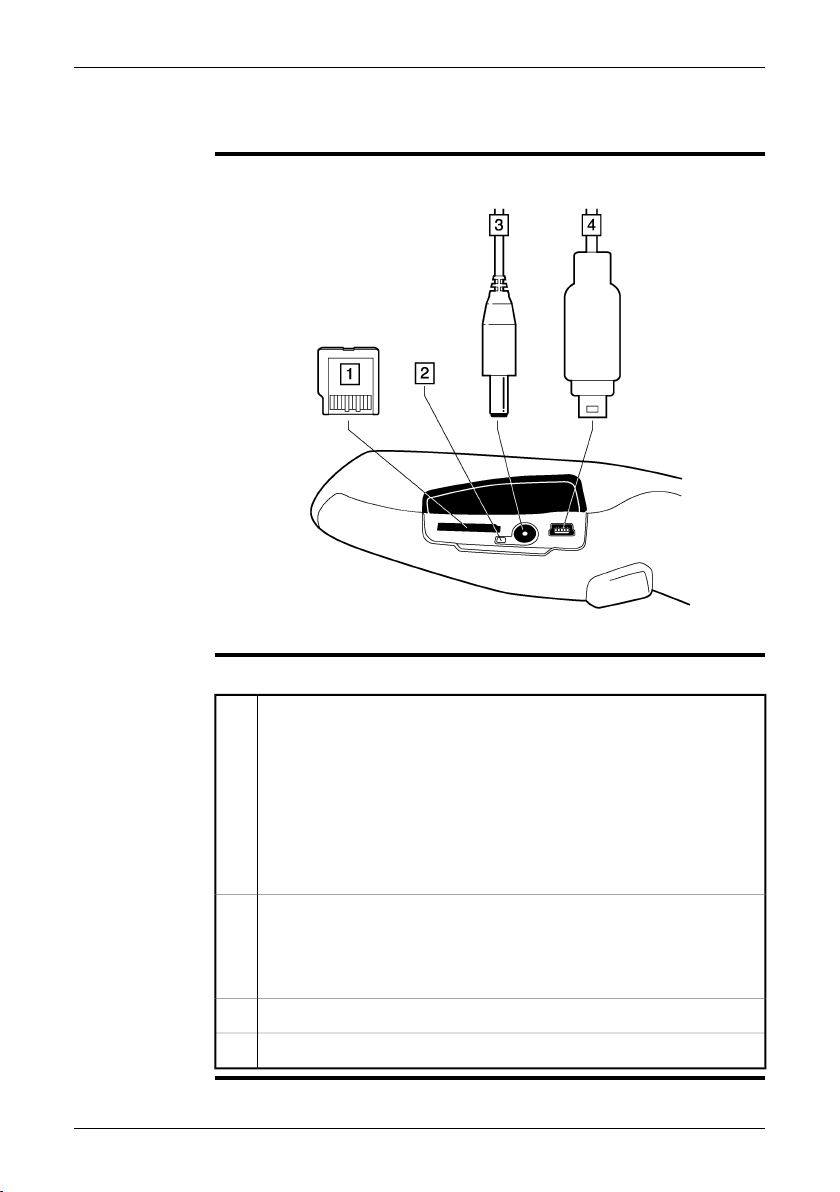
10 Connectors and storage media
Figure
Explanation
10780803;a1
This table explains the figure above:
miniSD™ memory card
1
We recommend that you do not save more than 5,000 images on the miniSD™ memory card.
Although a memory card may have a higher capacity than 5,000 images,
saving more than that number ofimages severelyslows down file management on the miniSD™ memory card.
Note: There is no upper limit to the memory size of the miniSD™ memory
card.
Battery charging indicator:
2
No light: The power supply is not connected.
■
Orange light: The battery is being charged.
■
Green light: The charging of the battery is completed.
■
Power supply cable3
USB cable with USB Mini-B connector4
18 Publ. No. T559733_en-US Rev. a571 – ENGLISH (EN) – November 4, 2011
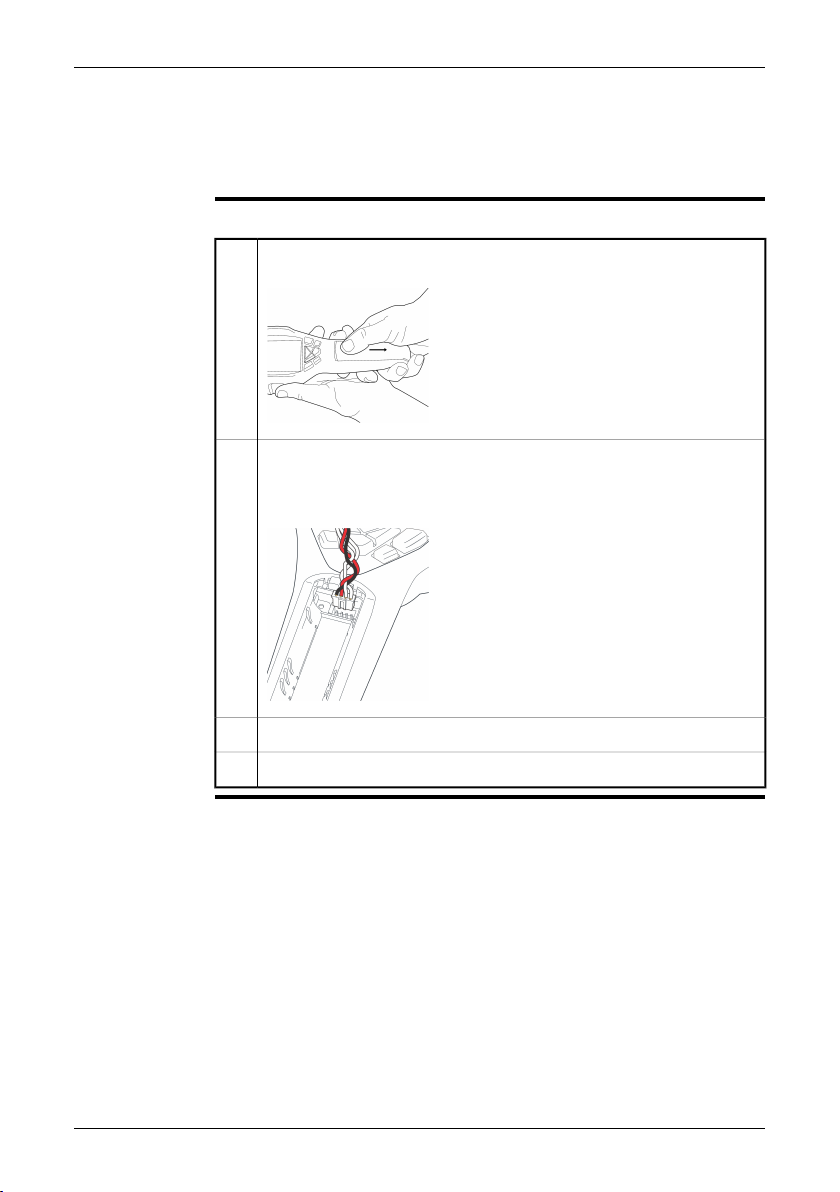
11 Using the camera
11.1 Installing the battery
Procedure
Follow this procedure to install the battery:
Remove the battery compartment cover.
1
T630174;a2
Connect the cable that is attached to the battery to the connector inside
2
the battery compartment. Note: Do not use conductive tools when doing
this.
T630173;a2
Push the battery into place.3
Replace the cover to close the battery compartment.4
Publ. No. T559733_en-US Rev. a571 – ENGLISH (EN) – November 4, 2011 19
11 – Using the camera
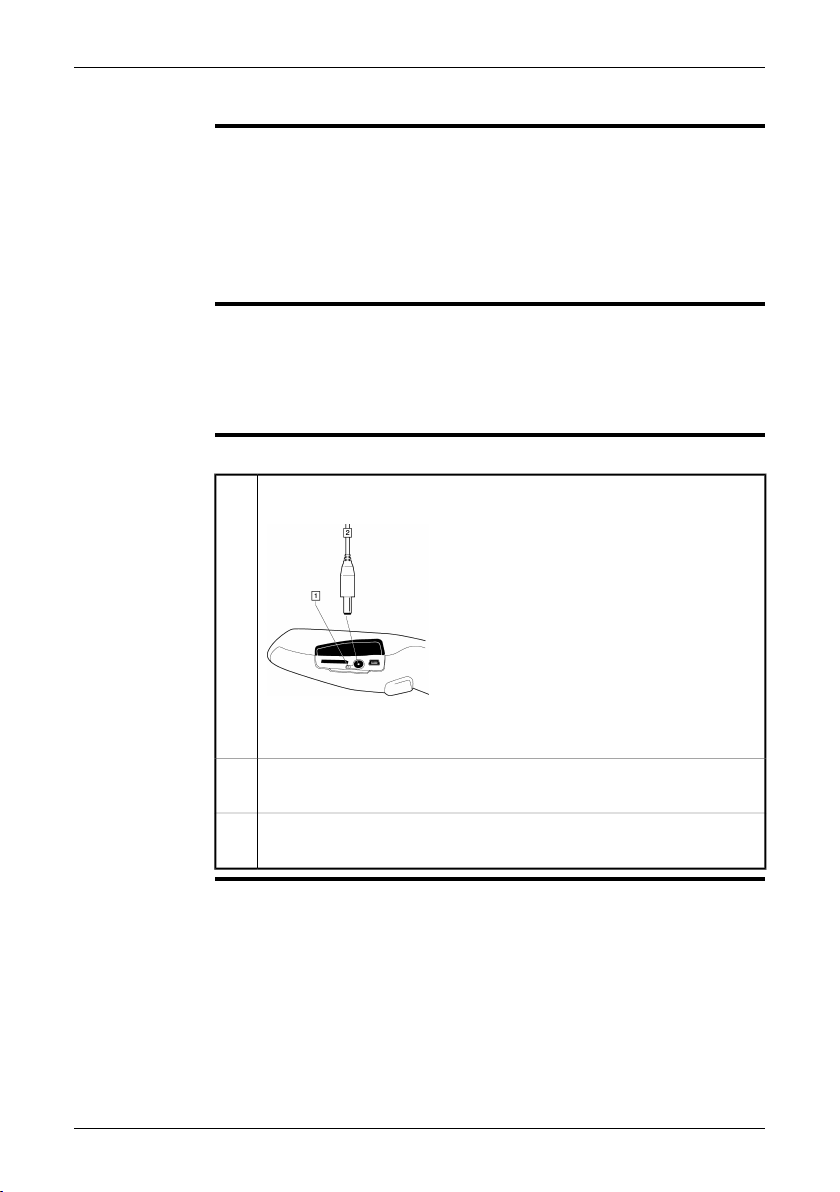
11.2 Charging the battery
You must charge the battery inside the camera for four full hours (or until the
NOTE
■
battery indicator displays a green light) before you use the camera for the first
time.
The first time you charge a factory-new battery you must turn on and then turn off
■
the camera after you have connected the power supply to the power connector
on the camera. This is needed in order to initiate the battery measuring.
Do not replace the battery on a frequent basis. Only replace the battery when it
■
is worn out.
About the battery
charging indicator
Procedure
The battery charging indicator is an LED beside the power connector. It displays the
following signals:
No light: The power supply is not connected.
■
Orange light: The battery is being charged.
■
Green light: The charging of the battery is completed.
■
Follow this procedure to charge the battery:
Connect the power supply to the power connector on the camera.
1
T630175;a1
1 Battery charging indicator
2 Power supply cable
Connect the power supply mains-electricity plug to a mains socket. Make
2
sure that you use the correct AC plug.
Disconnect thepower supply cableplug when thebattery charging indicator
3
displays a green light.
20 Publ. No. T559733_en-US Rev. a571 – ENGLISH (EN) – November 4, 2011

11.3 Saving an image
11 – Using the camera
General
Image capacity
Formatting
memory cards
Naming
convention
You can save multiple images to the miniSD™ memory card.
We recommend that you do not save more than 5,000 images on the miniSD™
memory card.
Although amemory card mayhave a highercapacity than 5,000images, saving more
than that number of images severely slows down file management on the memory
card.
Note: There is no upper limit to the memory size of the miniSD™ memory card.
For best performance, memory cards should be formatted to the FAT (FAT16) file
system. Using FAT32-formatted memory cards may result in inferior performance.
To format a memory card to FAT (FAT16), follow this procedure:
Insert the memory card into a card reader that is connected to your com-
1
puter.
In Windows®Explorer, select My Computer and right-click the memory
2
card.
Select Format.3
Under File system, select FAT.4
Click Start.5
The naming convention for images is IR_xxxx.jpg, where xxxx is a unique counter.
When youselect Restore, the cameraresetsthe counterand assigns thenext highest
free file name for the new file.
Procedure
Publ. No. T559733_en-US Rev. a571 – ENGLISH (EN) – November 4, 2011 21
To save an image, pull the Save trigger.

11 – Using the camera
11.4 Recalling an image
General
Procedure
When you save an image, it is stored on the removable miniSD™ memory card. To
display the image again, you can recall it from the miniSD™ memory card.
Follow this procedure to recall an image:
Push the Archive button.1
Do one of the following:
2
Push the navigation pad left/right to select the image you want to view.
■
Push the top arrow button, use the navigation pad to select the image
■
you want to see, then push the right selection button (Open).
To return to live mode, do one of the following:
3
Push the Archive button.
■
Push the right selection button (Close).
■
22 Publ. No. T559733_en-US Rev. a571 – ENGLISH (EN) – November 4, 2011
 Loading...