

Page 1
User Manual
®
identiFINDER
Digital Handheld Gamma Spectrometer with
Radionuclide Identication
R300
identiFINDER®R300/en/2014.4(13623)/Feb2015
Page 2

FLIR Detection
This document is changed in accordance with our Quality Management system. All changes are
archived.
Revision identiFINDER®R300/en/2014.4(13623)/Feb2015
Product FLIR identiFINDER R300
Language English (en)
Version 2014.4 (13623)
Latest Change February 19, 2015 at 13:49 (UTC-0600h)
nanoRaider®is a registered trademark of FLIR Detection, Inc.
FLIR®is a registered trademark of FLIR Systems, Inc.
All other trademarks belong to their respective holders.
Copyright © 2012–2015 FLIR Detection, Inc.
All rights reserved.
2 identiFINDER®R300/en/2014.4(13623)/Feb2015
Page 3

FLIR Detection CONTENTS
Contents
List of Figures 9
1 Welcome 17
1.1 Conventions Used in This Document . . . . . . . . . . . . . . . . . . . . . . . . . . . 17
1.2 Safety Warnings . . . . . . . . . . . . . . . . . . . . . . . . . . . . . . . . . . . . . . . 18
1.3 Before First Use . . . . . . . . . . . . . . . . . . . . . . . . . . . . . . . . . . . . . . . 18
1.4 The FLIR identiFINDER R300 . . . . . . . . . . . . . . . . . . . . . . . . . . . . . . . 19
1.5 Unpacking and Identifying Accessories . . . . . . . . . . . . . . . . . . . . . . . . . . 20
1.6 Instrument Description and Application Overview . . . . . . . . . . . . . . . . . . . 24
2 Operating the FLIR identiFINDER R300 27
2.1 The FLIR identiFINDER R300 Display . . . . . . . . . . . . . . . . . . . . . . . . . . . 29
2.1.1 Status LEDs . . . . . . . . . . . . . . . . . . . . . . . . . . . . . . . . . . . . 31
2.2 The FLIR identiFINDER R300 Keys . . . . . . . . . . . . . . . . . . . . . . . . . . . . 32
2.2.1 Using Command Lists . . . . . . . . . . . . . . . . . . . . . . . . . . . . . . 35
2.2.2 Choosing from Menus . . . . . . . . . . . . . . . . . . . . . . . . . . . . . . 35
2.2.2.1 Scrolling in Menus . . . . . . . . . . . . . . . . . . . . . . . . . 37
2.2.3 Changing Values . . . . . . . . . . . . . . . . . . . . . . . . . . . . . . . . . . 37
2.2.4 Changing Composite Values . . . . . . . . . . . . . . . . . . . . . . . . . . . 40
2.2.5 Changing Numerical Values . . . . . . . . . . . . . . . . . . . . . . . . . . . 41
2.2.6 Entering Text . . . . . . . . . . . . . . . . . . . . . . . . . . . . . . . . . . . 43
2.2.7 Entering the Password . . . . . . . . . . . . . . . . . . . . . . . . . . . . . . 46
2.2.8 Taking Screenshots . . . . . . . . . . . . . . . . . . . . . . . . . . . . . . . . 49
2.3 The FLIR identiFINDER R300 Holster . . . . . . . . . . . . . . . . . . . . . . . . . . . 50
2.4 The FLIR identiFINDER R300 Web Server . . . . . . . . . . . . . . . . . . . . . . . . 51
2.4.1 Operating the Web Server Pages . . . . . . . . . . . . . . . . . . . . . . . . 51
2.4.2 Tables on Web Pages . . . . . . . . . . . . . . . . . . . . . . . . . . . . . . . 55
2.4.3 Records on Web Pages . . . . . . . . . . . . . . . . . . . . . . . . . . . . . . 56
2.4.4 Printing Web Pages . . . . . . . . . . . . . . . . . . . . . . . . . . . . . . . . 59
2.4.5 Password Entry . . . . . . . . . . . . . . . . . . . . . . . . . . . . . . . . . . 59
2.4.6 Administration Access . . . . . . . . . . . . . . . . . . . . . . . . . . . . . . 60
2.5 Starting Up the FLIR identiFINDER R300 . . . . . . . . . . . . . . . . . . . . . . . . . 62
identiFINDER®R300/en/2014.4(13623)/Feb2015 3
Page 4

CONTENTS FLIR Detection
2.6 Shutting Down the FLIR identiFINDER R300 . . . . . . . . . . . . . . . . . . . . . . . 64
2.7 Low Power Conditions . . . . . . . . . . . . . . . . . . . . . . . . . . . . . . . . . . . 65
2.8 Resetting the FLIR identiFINDER R300 . . . . . . . . . . . . . . . . . . . . . . . . . . 66
3 Field Operating Guide 69
3.1 Switching On and Checking the Instrument . . . . . . . . . . . . . . . . . . . . . . . 70
3.2 Observing the Environment . . . . . . . . . . . . . . . . . . . . . . . . . . . . . . . . 70
3.2.1 Gamma Radiation Survey . . . . . . . . . . . . . . . . . . . . . . . . . . . . 70
3.2.2 Neutron Radiation Survey . . . . . . . . . . . . . . . . . . . . . . . . . . . . 71
3.3 Locating a Radiation Source . . . . . . . . . . . . . . . . . . . . . . . . . . . . . . . . 73
3.4 Identifying a Radiation Source . . . . . . . . . . . . . . . . . . . . . . . . . . . . . . . 75
3.5 Communicate with a Local Computer . . . . . . . . . . . . . . . . . . . . . . . . . . . 77
3.6 Sending Results to a Remote Server . . . . . . . . . . . . . . . . . . . . . . . . . . . . 81
3.7 Switching Off . . . . . . . . . . . . . . . . . . . . . . . . . . . . . . . . . . . . . . . . . 84
4 FLIR identiFINDER R300 Modes 85
4.1 Dose Rate Mode . . . . . . . . . . . . . . . . . . . . . . . . . . . . . . . . . . . . . . . 86
4.2 Finder Mode . . . . . . . . . . . . . . . . . . . . . . . . . . . . . . . . . . . . . . . . . 88
4.3 Identiication Mode . . . . . . . . . . . . . . . . . . . . . . . . . . . . . . . . . . . . . 90
4.4 Automated Mode . . . . . . . . . . . . . . . . . . . . . . . . . . . . . . . . . . . . . . . 93
4.5 Remote-Controlled Spectrum Acquisition . . . . . . . . . . . . . . . . . . . . . . . . 95
5 FLIR identiFINDER R300 Alarms 97
5.1 Gamma Alarms . . . . . . . . . . . . . . . . . . . . . . . . . . . . . . . . . . . . . . . . 98
5.2 Neutron Alarms . . . . . . . . . . . . . . . . . . . . . . . . . . . . . . . . . . . . . . . 101
5.3 Sigma Notiications . . . . . . . . . . . . . . . . . . . . . . . . . . . . . . . . . . . . . 101
6 FLIR identiFINDER R300 Menu Reference 103
6.1 Complete Option Menus (Outline) . . . . . . . . . . . . . . . . . . . . . . . . . . . . . 103
6.2 Spectrum . . . . . . . . . . . . . . . . . . . . . . . . . . . . . . . . . . . . . . . . . . . 106
6.3 Calibration . . . . . . . . . . . . . . . . . . . . . . . . . . . . . . . . . . . . . . . . . . 115
6.4 Identiication Settings . . . . . . . . . . . . . . . . . . . . . . . . . . . . . . . . . . . . 116
6.5 Nuclide Visibility . . . . . . . . . . . . . . . . . . . . . . . . . . . . . . . . . . . . . . . 118
6.6 Nuclide Usage . . . . . . . . . . . . . . . . . . . . . . . . . . . . . . . . . . . . . . . . . 119
6.7 Nuclide Severity . . . . . . . . . . . . . . . . . . . . . . . . . . . . . . . . . . . . . . . 120
6.8 Presets . . . . . . . . . . . . . . . . . . . . . . . . . . . . . . . . . . . . . . . . . . . . . 121
6.9 Display Settings . . . . . . . . . . . . . . . . . . . . . . . . . . . . . . . . . . . . . . . 122
6.10 Clock Settings . . . . . . . . . . . . . . . . . . . . . . . . . . . . . . . . . . . . . . . . . 125
6.11 GPS Settings . . . . . . . . . . . . . . . . . . . . . . . . . . . . . . . . . . . . . . . . . . 127
4 identiFINDER®R300/en/2014.4(13623)/Feb2015
Page 5

FLIR Detection CONTENTS
6.12 Set Password . . . . . . . . . . . . . . . . . . . . . . . . . . . . . . . . . . . . . . . . . 128
6.13 Clear Password . . . . . . . . . . . . . . . . . . . . . . . . . . . . . . . . . . . . . . . . 129
6.14 Show Status . . . . . . . . . . . . . . . . . . . . . . . . . . . . . . . . . . . . . . . . . . 130
6.15 Reset Factory Settings . . . . . . . . . . . . . . . . . . . . . . . . . . . . . . . . . . . . 132
6.16 Erase All Spectra . . . . . . . . . . . . . . . . . . . . . . . . . . . . . . . . . . . . . . . 133
6.17 Erase All Alarms . . . . . . . . . . . . . . . . . . . . . . . . . . . . . . . . . . . . . . . 133
6.18 Erase All Screenshots . . . . . . . . . . . . . . . . . . . . . . . . . . . . . . . . . . . . 134
6.19 Self Test . . . . . . . . . . . . . . . . . . . . . . . . . . . . . . . . . . . . . . . . . . . . 134
6.20 Automated Mode Settings . . . . . . . . . . . . . . . . . . . . . . . . . . . . . . . . . . 135
6.21 Send Identiication . . . . . . . . . . . . . . . . . . . . . . . . . . . . . . . . . . . . . . 137
6.22 Send Spectrum . . . . . . . . . . . . . . . . . . . . . . . . . . . . . . . . . . . . . . . . 140
6.23 Bluetooth . . . . . . . . . . . . . . . . . . . . . . . . . . . . . . . . . . . . . . . . . . . 141
6.23.1 Bluetooth SPP Status . . . . . . . . . . . . . . . . . . . . . . . . . . . . . . . 141
6.23.2 Bluetooth SPP Settings . . . . . . . . . . . . . . . . . . . . . . . . . . . . . . 142
6.23.3 Bluetooth Periphery . . . . . . . . . . . . . . . . . . . . . . . . . . . . . . . 144
6.24 Remote Server Settings . . . . . . . . . . . . . . . . . . . . . . . . . . . . . . . . . . . 149
6.25 Mass Storage . . . . . . . . . . . . . . . . . . . . . . . . . . . . . . . . . . . . . . . . . 150
6.26 Network . . . . . . . . . . . . . . . . . . . . . . . . . . . . . . . . . . . . . . . . . . . . 152
6.27 Report Settings . . . . . . . . . . . . . . . . . . . . . . . . . . . . . . . . . . . . . . . . 153
6.28 Download Settings . . . . . . . . . . . . . . . . . . . . . . . . . . . . . . . . . . . . . . 154
6.29 Gamma, Neutron Counters . . . . . . . . . . . . . . . . . . . . . . . . . . . . . . . . . 155
6.30 Finder Settings . . . . . . . . . . . . . . . . . . . . . . . . . . . . . . . . . . . . . . . . 157
6.31 Dose Rate Settings . . . . . . . . . . . . . . . . . . . . . . . . . . . . . . . . . . . . . . 159
6.32 Alarm Indicators . . . . . . . . . . . . . . . . . . . . . . . . . . . . . . . . . . . . . . . 160
6.33 Dose Alarm Thresholds . . . . . . . . . . . . . . . . . . . . . . . . . . . . . . . . . . . 161
6.34 Dose Rate Alarm Thresholds . . . . . . . . . . . . . . . . . . . . . . . . . . . . . . . . 162
6.35 Neutron Alarm Thresholds . . . . . . . . . . . . . . . . . . . . . . . . . . . . . . . . . 163
6.36 Current Alarm State . . . . . . . . . . . . . . . . . . . . . . . . . . . . . . . . . . . . . 165
7 Connecting the FLIR identiFINDER R300 to a Local Computer 167
7.1 Plugging and Unplugging . . . . . . . . . . . . . . . . . . . . . . . . . . . . . . . . . . 168
7.2 The FLIR identiFINDER R300 as a Mass Storage Device . . . . . . . . . . . . . . . . 170
7.3 Preparing the USB Network Connection on a Computer . . . . . . . . . . . . . . . . 171
7.3.1 Linux . . . . . . . . . . . . . . . . . . . . . . . . . . . . . . . . . . . . . . . . 171
7.3.2 Windows XP . . . . . . . . . . . . . . . . . . . . . . . . . . . . . . . . . . . . 171
7.3.3 Windows Vista, Windows 7 . . . . . . . . . . . . . . . . . . . . . . . . . . . 175
7.4 Using the Network Connection . . . . . . . . . . . . . . . . . . . . . . . . . . . . . . . 178
identiFINDER®R300/en/2014.4(13623)/Feb2015 5
Page 6

CONTENTS FLIR Detection
8 Using the FLIR identiFINDER R300 Web Server 179
8.1 Info (Web Page) . . . . . . . . . . . . . . . . . . . . . . . . . . . . . . . . . . . . . . . 181
8.2 Resources (Web Page) . . . . . . . . . . . . . . . . . . . . . . . . . . . . . . . . . . . . 182
8.3 General (Web Page) . . . . . . . . . . . . . . . . . . . . . . . . . . . . . . . . . . . . . 184
8.3.1 Measurement . . . . . . . . . . . . . . . . . . . . . . . . . . . . . . . . . . . 184
8.3.2 Identiication . . . . . . . . . . . . . . . . . . . . . . . . . . . . . . . . . . . 184
8.3.3 User Interface . . . . . . . . . . . . . . . . . . . . . . . . . . . . . . . . . . . 186
8.4 GPS and Clock (Web Page) . . . . . . . . . . . . . . . . . . . . . . . . . . . . . . . . . 186
8.5 Alarm (Web Page) . . . . . . . . . . . . . . . . . . . . . . . . . . . . . . . . . . . . . . 188
8.5.1 Alarm Indicators . . . . . . . . . . . . . . . . . . . . . . . . . . . . . . . . . 188
8.5.2 Gamma Alarms . . . . . . . . . . . . . . . . . . . . . . . . . . . . . . . . . . 189
8.5.3 Neutron Alarms . . . . . . . . . . . . . . . . . . . . . . . . . . . . . . . . . . 190
8.6 Connectivity (Web Page) . . . . . . . . . . . . . . . . . . . . . . . . . . . . . . . . . . 190
8.6.1 Local Area Network . . . . . . . . . . . . . . . . . . . . . . . . . . . . . . . 190
8.6.2 Remote Server . . . . . . . . . . . . . . . . . . . . . . . . . . . . . . . . . . . 192
8.6.3 Reports . . . . . . . . . . . . . . . . . . . . . . . . . . . . . . . . . . . . . . . 192
8.6.4 Download Options . . . . . . . . . . . . . . . . . . . . . . . . . . . . . . . . 192
8.7 Bluetooth SPP Settings (Web Page) . . . . . . . . . . . . . . . . . . . . . . . . . . . . 192
8.7.1 Bluetooth SPP Settings (Web Page) . . . . . . . . . . . . . . . . . . . . . . 192
8.8 Nuclides (Web Page) . . . . . . . . . . . . . . . . . . . . . . . . . . . . . . . . . . . . . 193
8.9 Backup (Web Page) . . . . . . . . . . . . . . . . . . . . . . . . . . . . . . . . . . . . . 194
8.10 Bulk Download (Web Page) . . . . . . . . . . . . . . . . . . . . . . . . . . . . . . . . . 197
8.11 Identiications (Web Page) . . . . . . . . . . . . . . . . . . . . . . . . . . . . . . . . . 199
8.11.1 Identiication Details (Web Page) . . . . . . . . . . . . . . . . . . . . . . . . 200
8.12 Spectra (Web Page) . . . . . . . . . . . . . . . . . . . . . . . . . . . . . . . . . . . . . 202
8.12.1 Spectrum Details (Web Page) . . . . . . . . . . . . . . . . . . . . . . . . . . 203
8.13 Alarms (Web Page) . . . . . . . . . . . . . . . . . . . . . . . . . . . . . . . . . . . . . . 206
8.13.1 Alarm Details (Web Page) . . . . . . . . . . . . . . . . . . . . . . . . . . . . 207
8.14 Screenshots (Web Page) . . . . . . . . . . . . . . . . . . . . . . . . . . . . . . . . . . . 207
8.15 Live Screen (Web Page) . . . . . . . . . . . . . . . . . . . . . . . . . . . . . . . . . . . 208
8.16 Live Spectrum (Web Page) . . . . . . . . . . . . . . . . . . . . . . . . . . . . . . . . . 209
8.17 Software Update (Web Page) . . . . . . . . . . . . . . . . . . . . . . . . . . . . . . . . 215
8.18 Password (Web Page) . . . . . . . . . . . . . . . . . . . . . . . . . . . . . . . . . . . . 215
8.19 System Files (Web Page) . . . . . . . . . . . . . . . . . . . . . . . . . . . . . . . . . . 216
9 Sending Data to a Remote Server 219
9.1 Internet Connection . . . . . . . . . . . . . . . . . . . . . . . . . . . . . . . . . . . . . 220
6 identiFINDER®R300/en/2014.4(13623)/Feb2015
Page 7

FLIR Detection CONTENTS
10 Connecting via Satellite Phone 223
10.1 Pairing the FLIR identiFINDER R300 to a Satellite Phone . . . . . . . . . . . . . . . 223
10.2 Coniguring Remote Server Settings for the Satellite Phone . . . . . . . . . . . . . . 227
11 Powering the FLIR identiFINDER R300 229
11.1 External Power Sources . . . . . . . . . . . . . . . . . . . . . . . . . . . . . . . . . . . 229
11.1.1 Wall Mounted Power Supply . . . . . . . . . . . . . . . . . . . . . . . . . . 230
11.2 Charging the FLIR identiFINDER R300 . . . . . . . . . . . . . . . . . . . . . . . . . . 230
11.2.1 Charging Durations . . . . . . . . . . . . . . . . . . . . . . . . . . . . . . . . 231
11.3 Battery Power Saving Tips . . . . . . . . . . . . . . . . . . . . . . . . . . . . . . . . . 231
12 Accessories for the FLIR identiFINDER R300 233
12.1 Source Set . . . . . . . . . . . . . . . . . . . . . . . . . . . . . . . . . . . . . . . . . . . 233
Appendix 235
A Info Pool 237
A.1 identiFINDER R 300: Speciications . . . . . . . . . . . . . . . . . . . . . . . . . . . . 237
A.2 Detector Positions . . . . . . . . . . . . . . . . . . . . . . . . . . . . . . . . . . . . . . 241
A.3 Optimum Illumination of Detector Crystals . . . . . . . . . . . . . . . . . . . . . . . 242
A.4 Unmanned Neutron Detection . . . . . . . . . . . . . . . . . . . . . . . . . . . . . . . 243
A.5 Certiicates . . . . . . . . . . . . . . . . . . . . . . . . . . . . . . . . . . . . . . . . . . 244
A.5.1 FLIR identiFINDER R300: Manufacturer’s declaration of conformity (CE) 244
A.6 Bluetooth Serial Port Proile (SPP) Communication Overview . . . . . . . . . . . . 245
A.6.1 Bluetooth Device Name and PIN . . . . . . . . . . . . . . . . . . . . . . . . 245
A.6.2 Data Format . . . . . . . . . . . . . . . . . . . . . . . . . . . . . . . . . . . . 245
A.6.3 Conventions and Usage Notes . . . . . . . . . . . . . . . . . . . . . . . . . . 245
A.6.4 General Command Format . . . . . . . . . . . . . . . . . . . . . . . . . . . . 246
A.6.5 General Update Format . . . . . . . . . . . . . . . . . . . . . . . . . . . . . 247
A.6.6 General Error Format . . . . . . . . . . . . . . . . . . . . . . . . . . . . . . 248
A.7 SPP Commands and Updates . . . . . . . . . . . . . . . . . . . . . . . . . . . . . . . . 249
A.7.1 Ping . . . . . . . . . . . . . . . . . . . . . . . . . . . . . . . . . . . . . . . . . 249
A.7.2 Status . . . . . . . . . . . . . . . . . . . . . . . . . . . . . . . . . . . . . . . . 250
A.7.3 Get Spectra . . . . . . . . . . . . . . . . . . . . . . . . . . . . . . . . . . . . . 252
A.7.4 Counts . . . . . . . . . . . . . . . . . . . . . . . . . . . . . . . . . . . . . . . 253
A.7.5 Dose Rate . . . . . . . . . . . . . . . . . . . . . . . . . . . . . . . . . . . . . 253
A.7.6 Neutron Rate . . . . . . . . . . . . . . . . . . . . . . . . . . . . . . . . . . . 253
A.7.7 Serial Number . . . . . . . . . . . . . . . . . . . . . . . . . . . . . . . . . . . 254
A.7.8 Other Commands and Updates . . . . . . . . . . . . . . . . . . . . . . . . . 254
identiFINDER®R300/en/2014.4(13623)/Feb2015 7
Page 8

CONTENTS FLIR Detection
B Maintenance 255
B.1 Field Maintenance . . . . . . . . . . . . . . . . . . . . . . . . . . . . . . . . . . . . . . 255
B.2 Software Installation . . . . . . . . . . . . . . . . . . . . . . . . . . . . . . . . . . . . . 255
B.3 Storage . . . . . . . . . . . . . . . . . . . . . . . . . . . . . . . . . . . . . . . . . . . . . 256
B.4 After Sales Service and Support . . . . . . . . . . . . . . . . . . . . . . . . . . . . . . 257
C Nuclide Library 259
D Glossary 267
Index 291
8 identiFINDER®R300/en/2014.4(13623)/Feb2015
Page 9

FLIR Detection List of Figures
List of Figures
1 The FLIR identiFINDER R300 with accessories . . . . . . . . . . . . . . . . . . . . . . . . 21
2 The FLIR identiFINDER R300 with accessories in Pelican carrying case . . . . . . . . . . 22
3 Name plate at the rear side of the FLIR identiFINDER R300 . . . . . . . . . . . . . . . . . 23
4 Functional units of the FLIR identiFINDER R300 (see text). . . . . . . . . . . . . . . . . . 25
5 Map of the FLIR identiFINDER R300 components . . . . . . . . . . . . . . . . . . . . . . . 26
6 Surveying an object with the FLIR identiFINDER R300. . . . . . . . . . . . . . . . . . . . 27
7 Papercraft model of the FLIR identiFINDER R300 with operating elements: Display,
LEDs and keys. . . . . . . . . . . . . . . . . . . . . . . . . . . . . . . . . . . . . . . . . . . . 28
8 Anatomy of the FLIR identiFINDER R300 display. . . . . . . . . . . . . . . . . . . . . . . . 29
9 Signals of the status LED . . . . . . . . . . . . . . . . . . . . . . . . . . . . . . . . . . . . . 31
10 Right-handed operation of the FLIR identiFINDER R300 with normal key assignments . 33
11 Left-handed operation of the FLIR identiFINDER R300 with reverse key key assigments 34
12 Skipping commands for value editing . . . . . . . . . . . . . . . . . . . . . . . . . . . . . . 35
13 Choosing from a menu: Initial state without chosen item . . . . . . . . . . . . . . . . . . 35
14 Choosing from a menu: Choosing the next item with Down . . . . . . . . . . . . . . . . . 36
15 Choosing from a menu: Choosing other items with Down . . . . . . . . . . . . . . . . . . 36
16 Choosing from a menu: After executing the command with Select . . . . . . . . . . . . . 37
17 Choosing from a menu: Scrolling in long menus . . . . . . . . . . . . . . . . . . . . . . . . 37
18 Changing Values: Choosing the setting . . . . . . . . . . . . . . . . . . . . . . . . . . . . . 38
19 Changing Values: Selected entry ield . . . . . . . . . . . . . . . . . . . . . . . . . . . . . . 38
20 Changing Values: Changed entry ield . . . . . . . . . . . . . . . . . . . . . . . . . . . . . . 39
21 Changing Values: Revealing more commands . . . . . . . . . . . . . . . . . . . . . . . . . 39
22 Changing Values: Changed setting accepted . . . . . . . . . . . . . . . . . . . . . . . . . . 40
23 Changing Combined Values: Changing the selected component . . . . . . . . . . . . . . . 40
24 Changing Combined Values: Selecting components. . . . . . . . . . . . . . . . . . . . . . . 41
25 Changing Numerical Values: Changing the selected digit . . . . . . . . . . . . . . . . . . . 42
26 Changing Numerical Values: Selecting digits . . . . . . . . . . . . . . . . . . . . . . . . . . 42
27 Editing Text: First character “J” is selected. . . . . . . . . . . . . . . . . . . . . . . . . . . . 43
28 Editing Text: Next character to the right is selected (“o”). . . . . . . . . . . . . . . . . . . 44
29 Editing Text: Set of available characters . . . . . . . . . . . . . . . . . . . . . . . . . . . . . 44
identiFINDER®R300/en/2014.4(13623)/Feb2015 9
Page 10

List of Figures FLIR Detection
30 Editing Text: After changing the selected “o” to an “a”. . . . . . . . . . . . . . . . . . . . . 44
31 Editing Text: About to delete the selected character “h”. . . . . . . . . . . . . . . . . . . . 45
32 Editing Text: After deleting a character, the next character is selected. . . . . . . . . . . . 45
33 Editing Text: After inserting space before “ Doe” for an additional character. . . . . . . . 46
34 Editing Text: Done. . . . . . . . . . . . . . . . . . . . . . . . . . . . . . . . . . . . . . . . . . 46
35 Entering a password to access the option menus. . . . . . . . . . . . . . . . . . . . . . . . 47
36 Password entered but not yet conirmed. . . . . . . . . . . . . . . . . . . . . . . . . . . . . 48
37 Message after entering a wrong password. . . . . . . . . . . . . . . . . . . . . . . . . . . . 48
38 Status display showing the number of saved screenshots. . . . . . . . . . . . . . . . . . . 49
39 Inserting the FLIR identiFINDER R300 into a holster so alarm LEDs remain visible . . . 50
40 FLIR identiFINDER R300 in a belt holster with visible alarm LEDs . . . . . . . . . . . . . 50
41 Anatomy of a FLIR identiFINDER R300 web page, narrow layout . . . . . . . . . . . . . . 52
42 Anatomy of a FLIR identiFINDER R300 web page, wide layout . . . . . . . . . . . . . . . 53
43 Visible menu hierarchy on a web page with narrow layout . . . . . . . . . . . . . . . . . 53
44 Single submenu on a web page with wide layout . . . . . . . . . . . . . . . . . . . . . . . 54
45 Anatomy of a web page with a data table . . . . . . . . . . . . . . . . . . . . . . . . . . . . 55
46 Anatomy of a web page with details of a record . . . . . . . . . . . . . . . . . . . . . . . . 57
47 Web page section with GPS coordinates . . . . . . . . . . . . . . . . . . . . . . . . . . . . . 58
48 Steps of the transmission of data to a reachback server . . . . . . . . . . . . . . . . . . . 58
49 Successful transmission of data to a reachback server . . . . . . . . . . . . . . . . . . . . 59
50 Example printout of measurement results . . . . . . . . . . . . . . . . . . . . . . . . . . . 60
51 Entering the password before accessing protected web pages . . . . . . . . . . . . . . . 61
52 Entering the administration password . . . . . . . . . . . . . . . . . . . . . . . . . . . . . 61
53 Powering up the FLIR identiFINDER R300: Product identiication . . . . . . . . . . . . . 62
54 Powering up the FLIR identiFINDER R300: Starting up . . . . . . . . . . . . . . . . . . . 63
55 Powering up the FLIR identiFINDER R300: Initialization . . . . . . . . . . . . . . . . . . 63
56 FLIR identiFINDER R300 after powering up. . . . . . . . . . . . . . . . . . . . . . . . . . . 63
57 Shutting down the FLIR identiFINDER R300 . . . . . . . . . . . . . . . . . . . . . . . . . . 64
58 Shutting down the FLIR identiFINDER R300 during an alarm . . . . . . . . . . . . . . . . 65
59 Battery almost empty. . . . . . . . . . . . . . . . . . . . . . . . . . . . . . . . . . . . . . . . 65
60 Schematic timing of triple beeps indicating low power conditions. . . . . . . . . . . . . . 65
61 Low Power Dose Rate Mode . . . . . . . . . . . . . . . . . . . . . . . . . . . . . . . . . . . 66
62 Battery is empty. . . . . . . . . . . . . . . . . . . . . . . . . . . . . . . . . . . . . . . . . . . 66
63 Powering up the FLIR identiFINDER R300: General system status . . . . . . . . . . . . . 70
64 Dose Rate mode . . . . . . . . . . . . . . . . . . . . . . . . . . . . . . . . . . . . . . . . . . 71
65 Surveying an object with the FLIR identiFINDER R300. . . . . . . . . . . . . . . . . . . . 72
66 Dose rate warning reported on screen . . . . . . . . . . . . . . . . . . . . . . . . . . . . . 72
10 identiFINDER®R300/en/2014.4(13623)/Feb2015
Page 11

FLIR Detection List of Figures
67 Optimum posture for neutron detection . . . . . . . . . . . . . . . . . . . . . . . . . . . . 73
68 Finder mode: Initial background measurement . . . . . . . . . . . . . . . . . . . . . . . . 74
69 Finder mode: Continuous measurement . . . . . . . . . . . . . . . . . . . . . . . . . . . . 74
70 Spectrum acquisition in Identiication Mode . . . . . . . . . . . . . . . . . . . . . . . . . . 75
71 Finding the position for best measurements . . . . . . . . . . . . . . . . . . . . . . . . . . 76
72 Identiication results . . . . . . . . . . . . . . . . . . . . . . . . . . . . . . . . . . . . . . . . 76
73 Spectrum the identiication is based upon . . . . . . . . . . . . . . . . . . . . . . . . . . . 77
74 Valid IP address after a connection was established . . . . . . . . . . . . . . . . . . . . . 78
75 The FLIR identiFINDER R300’s home page . . . . . . . . . . . . . . . . . . . . . . . . . . . 78
76 Table of identiication result records . . . . . . . . . . . . . . . . . . . . . . . . . . . . . . 79
77 Details of an identiication result record . . . . . . . . . . . . . . . . . . . . . . . . . . . . 80
78 Identiication results . . . . . . . . . . . . . . . . . . . . . . . . . . . . . . . . . . . . . . . . 81
79 Identiication result summary for sending . . . . . . . . . . . . . . . . . . . . . . . . . . . 82
80 Data transmission progress . . . . . . . . . . . . . . . . . . . . . . . . . . . . . . . . . . . . 82
81 Ready to search for Bluetooth devices . . . . . . . . . . . . . . . . . . . . . . . . . . . . . . 83
82 List of suitable Bluetooth devices detected . . . . . . . . . . . . . . . . . . . . . . . . . . . 83
83 Pairing with a Bluetooth device . . . . . . . . . . . . . . . . . . . . . . . . . . . . . . . . . 83
84 Shutting down the FLIR identiFINDER R300 . . . . . . . . . . . . . . . . . . . . . . . . . . 84
85 Cycling the manual modes Dose Rate, Finder, and Identiication . . . . . . . . . . . . . . 86
86 While Finder mode is disabled, cycling modes will toggle between Dose Rate and Iden-
tiication modes . . . . . . . . . . . . . . . . . . . . . . . . . . . . . . . . . . . . . . . . . . 86
87 Dose Rate mode . . . . . . . . . . . . . . . . . . . . . . . . . . . . . . . . . . . . . . . . . . 86
88 Detector overload . . . . . . . . . . . . . . . . . . . . . . . . . . . . . . . . . . . . . . . . . 87
89 Finder mode: Initial background measurement . . . . . . . . . . . . . . . . . . . . . . . . 89
90 Finder mode: Continuous measurement . . . . . . . . . . . . . . . . . . . . . . . . . . . . 89
91 Identiication Mode: Progress display during time limited data acquisition . . . . . . . . 90
92 Identiication Mode: Count rate too low for best results . . . . . . . . . . . . . . . . . . . 91
93 Identiication Mode: Count rate too high for best results . . . . . . . . . . . . . . . . . . . 91
94 Identiication Mode: Progress display during count limited data acquisition . . . . . . . 92
95 Identiication Mode: Identiication was not possible. . . . . . . . . . . . . . . . . . . . . . 92
96 Identiication Mode: Identiied radionuclides . . . . . . . . . . . . . . . . . . . . . . . . . 93
97 Countdown announcing the start of a scheduled measurement . . . . . . . . . . . . . . . 94
98 Automated measurement . . . . . . . . . . . . . . . . . . . . . . . . . . . . . . . . . . . . . 94
99 Message during remote-controlled spectrum acquisition . . . . . . . . . . . . . . . . . . 96
100 Dose rate display with alarm indication . . . . . . . . . . . . . . . . . . . . . . . . . . . . . 98
101 Alarm display: Dose rate warning . . . . . . . . . . . . . . . . . . . . . . . . . . . . . . . . 99
102 Alarm display: Dose rate alarm . . . . . . . . . . . . . . . . . . . . . . . . . . . . . . . . . 99
identiFINDER®R300/en/2014.4(13623)/Feb2015 11
Page 12

List of Figures FLIR Detection
103 Gamma alarms as announced by the red LED, beeper, and vibrator . . . . . . . . . . . . . 100
104 Alarm display: Neutron alarm . . . . . . . . . . . . . . . . . . . . . . . . . . . . . . . . . . 101
105 Neutron incidents as announced by the blue LED, beeper, and vibrator . . . . . . . . . . 101
106 Dose rate display with 𝜎 notiication . . . . . . . . . . . . . . . . . . . . . . . . . . . . . . 102
107 Hierarchy of the FLIR identiFINDER R300 menu . . . . . . . . . . . . . . . . . . . . . . . 105
108 Anatomy of the spectrum display . . . . . . . . . . . . . . . . . . . . . . . . . . . . . . . . 106
109 Spectrum information around the chart . . . . . . . . . . . . . . . . . . . . . . . . . . . . 107
110 Acquiring spectrum data . . . . . . . . . . . . . . . . . . . . . . . . . . . . . . . . . . . . . 107
111 Acquiring spectrum data while the duration is preset . . . . . . . . . . . . . . . . . . . . 108
112 Spectrum with cursor at local peak . . . . . . . . . . . . . . . . . . . . . . . . . . . . . . . 109
113 ROI Speciication: Moving the cursor . . . . . . . . . . . . . . . . . . . . . . . . . . . . . . 110
114 ROI Speciication: Marking the irst ROI boundary . . . . . . . . . . . . . . . . . . . . . . 110
115 ROI Speciication: Marking the second ROI boundary . . . . . . . . . . . . . . . . . . . . 111
116 Spectrum Scale: Complete spectrum visible . . . . . . . . . . . . . . . . . . . . . . . . . . 111
117 Spectrum Scale: First half of spectrum visible . . . . . . . . . . . . . . . . . . . . . . . . . 112
118 Spectrum Scale: One display pixel equals the width of one spectral channel . . . . . . . 112
119 Spectrum Scale: The deined ROI its into the available screen width . . . . . . . . . . . 113
120 Choosing a saved spectrum to be loaded for display . . . . . . . . . . . . . . . . . . . . . 113
121 Radionuclides identiied in the current spectrum . . . . . . . . . . . . . . . . . . . . . . . 114
122 Checking the calibration . . . . . . . . . . . . . . . . . . . . . . . . . . . . . . . . . . . . . . 116
123 Upper items of the identiication settings . . . . . . . . . . . . . . . . . . . . . . . . . . . . 117
124 Top of the nuclide list used by the identiication algorithm . . . . . . . . . . . . . . . . . 119
125 Usage information in the nuclide list used by the identiication algorithm . . . . . . . . 120
126 Severity information in the nuclide list used by the identiication algorithm . . . . . . . 121
127 Preset times for spectrum data acquisition . . . . . . . . . . . . . . . . . . . . . . . . . . . 122
128 Display settings in daytime colors . . . . . . . . . . . . . . . . . . . . . . . . . . . . . . . . 123
129 Display settings in nighttime colors . . . . . . . . . . . . . . . . . . . . . . . . . . . . . . . 123
130 Display settings in classic colors . . . . . . . . . . . . . . . . . . . . . . . . . . . . . . . . . 124
131 Setting date and time while GPS clock is not available. . . . . . . . . . . . . . . . . . . . . 125
132 Clock Settings: Selecting the time zone . . . . . . . . . . . . . . . . . . . . . . . . . . . . . 126
133 Clock Settings: Selecting the time zone . . . . . . . . . . . . . . . . . . . . . . . . . . . . . 126
134 GPS Settings . . . . . . . . . . . . . . . . . . . . . . . . . . . . . . . . . . . . . . . . . . . . . 127
135 Entering a new password . . . . . . . . . . . . . . . . . . . . . . . . . . . . . . . . . . . . . 129
136 Entering a new password: Conirmation . . . . . . . . . . . . . . . . . . . . . . . . . . . . 129
137 Removing the password . . . . . . . . . . . . . . . . . . . . . . . . . . . . . . . . . . . . . . 130
138 FLIR identiFINDER R300 status display: System . . . . . . . . . . . . . . . . . . . . . . . 131
139 FLIR identiFINDER R300 status display: GPS . . . . . . . . . . . . . . . . . . . . . . . . . 131
12 identiFINDER®R300/en/2014.4(13623)/Feb2015
Page 13

FLIR Detection List of Figures
140 Reestablishing the factory default settings . . . . . . . . . . . . . . . . . . . . . . . . . . . 132
141 Deleting saved spectra . . . . . . . . . . . . . . . . . . . . . . . . . . . . . . . . . . . . . . . 133
142 Starting a self test of the FLIR identiFINDER R300. . . . . . . . . . . . . . . . . . . . . . . 135
143 Testing the annunciators. . . . . . . . . . . . . . . . . . . . . . . . . . . . . . . . . . . . . . 135
144 Automated Mode Settings . . . . . . . . . . . . . . . . . . . . . . . . . . . . . . . . . . . . . 136
145 Sending Data: Choosing a record of identiication results . . . . . . . . . . . . . . . . . . 137
146 Sending Data: Identiication summary . . . . . . . . . . . . . . . . . . . . . . . . . . . . . 138
147 Sending Data: Incomplete settings . . . . . . . . . . . . . . . . . . . . . . . . . . . . . . . . 139
148 Sending Data: Transmission progress . . . . . . . . . . . . . . . . . . . . . . . . . . . . . . 139
149 Sending Data: Mission accomplished . . . . . . . . . . . . . . . . . . . . . . . . . . . . . . 140
150 Sending Data: Choosing a spectrum . . . . . . . . . . . . . . . . . . . . . . . . . . . . . . . 141
151 Sending Data: Spectrum summary . . . . . . . . . . . . . . . . . . . . . . . . . . . . . . . . 141
152 Bluetooth SPP . . . . . . . . . . . . . . . . . . . . . . . . . . . . . . . . . . . . . . . . . . . . 142
153 Bluetooth SPP . . . . . . . . . . . . . . . . . . . . . . . . . . . . . . . . . . . . . . . . . . . . 143
154 Bluetooth Periphery . . . . . . . . . . . . . . . . . . . . . . . . . . . . . . . . . . . . . . . . 144
155 SPP Enabled . . . . . . . . . . . . . . . . . . . . . . . . . . . . . . . . . . . . . . . . . . . . . 144
156 Ready to search for Bluetooth devices . . . . . . . . . . . . . . . . . . . . . . . . . . . . . . 145
157 Searching for Bluetooth devices . . . . . . . . . . . . . . . . . . . . . . . . . . . . . . . . . 146
158 No devices detected . . . . . . . . . . . . . . . . . . . . . . . . . . . . . . . . . . . . . . . . 146
159 List of suitable Bluetooth devices detected . . . . . . . . . . . . . . . . . . . . . . . . . . . 147
160 Selecting a PIN for the pairing of Bluetooth devices . . . . . . . . . . . . . . . . . . . . . . 147
161 Pairing with a Bluetooth device . . . . . . . . . . . . . . . . . . . . . . . . . . . . . . . . . 148
162 Paired to a Bluetooth device . . . . . . . . . . . . . . . . . . . . . . . . . . . . . . . . . . . 148
163 Pairing to a Bluetooth device failed . . . . . . . . . . . . . . . . . . . . . . . . . . . . . . . 149
164 Upper items of the remote server settings . . . . . . . . . . . . . . . . . . . . . . . . . . . 149
165 Starting the USB mass storage mode . . . . . . . . . . . . . . . . . . . . . . . . . . . . . . 151
166 The FLIR identiFINDER R300 in USB mass storage mode . . . . . . . . . . . . . . . . . . 151
167 Network settings . . . . . . . . . . . . . . . . . . . . . . . . . . . . . . . . . . . . . . . . . . 152
168 Report settings . . . . . . . . . . . . . . . . . . . . . . . . . . . . . . . . . . . . . . . . . . . 154
169 Download settings . . . . . . . . . . . . . . . . . . . . . . . . . . . . . . . . . . . . . . . . . 155
170 Gamma counter information . . . . . . . . . . . . . . . . . . . . . . . . . . . . . . . . . . . 156
171 Gamma and neutron counter information (Available only for variants equipped with a
neutron detector.) . . . . . . . . . . . . . . . . . . . . . . . . . . . . . . . . . . . . . . . . . 156
172 Finder settings . . . . . . . . . . . . . . . . . . . . . . . . . . . . . . . . . . . . . . . . . . . 157
173 Dose rate settings . . . . . . . . . . . . . . . . . . . . . . . . . . . . . . . . . . . . . . . . . 159
174 Alarm indication settings . . . . . . . . . . . . . . . . . . . . . . . . . . . . . . . . . . . . . 160
175 Dose alarm threshold settings . . . . . . . . . . . . . . . . . . . . . . . . . . . . . . . . . . 161
identiFINDER®R300/en/2014.4(13623)/Feb2015 13
Page 14

List of Figures FLIR Detection
176 Dose rate alarm threshold settings . . . . . . . . . . . . . . . . . . . . . . . . . . . . . . . 163
177 Neutron alarm threshold settings . . . . . . . . . . . . . . . . . . . . . . . . . . . . . . . . 164
178 Current Alarm State . . . . . . . . . . . . . . . . . . . . . . . . . . . . . . . . . . . . . . . . 165
179 Connecting the FLIR identiFINDER R300 (Mini USB-B connector) and a computer (USB-
A connector) . . . . . . . . . . . . . . . . . . . . . . . . . . . . . . . . . . . . . . . . . . . . 168
180 USB socket covered by a lap in the rubber boot . . . . . . . . . . . . . . . . . . . . . . . . 168
181 Plugging and unplugging the cable . . . . . . . . . . . . . . . . . . . . . . . . . . . . . . . . 169
182 Do not bend the cable or the plug! . . . . . . . . . . . . . . . . . . . . . . . . . . . . . . . . 169
183 FLIR identiFINDER R300 mounted as mass storage device on a computer running Mi-
crosoft Windows 7 . . . . . . . . . . . . . . . . . . . . . . . . . . . . . . . . . . . . . . . . . 170
184 FLIR RNDIS driver installer . . . . . . . . . . . . . . . . . . . . . . . . . . . . . . . . . . . . 171
185 Beginning of the installation . . . . . . . . . . . . . . . . . . . . . . . . . . . . . . . . . . . 172
186 Installation warning . . . . . . . . . . . . . . . . . . . . . . . . . . . . . . . . . . . . . . . . 172
187 End of the installation . . . . . . . . . . . . . . . . . . . . . . . . . . . . . . . . . . . . . . . 173
188 Windows XP reporting new hardware at the notiication area. . . . . . . . . . . . . . . . 173
189 Windows XP New Hardware Wizard . . . . . . . . . . . . . . . . . . . . . . . . . . . . . . 173
190 Specifying a driver source . . . . . . . . . . . . . . . . . . . . . . . . . . . . . . . . . . . . . 174
191 Installation warning . . . . . . . . . . . . . . . . . . . . . . . . . . . . . . . . . . . . . . . . 174
192 End of the installation . . . . . . . . . . . . . . . . . . . . . . . . . . . . . . . . . . . . . . . 175
193 FLIR RNDIS driver installer . . . . . . . . . . . . . . . . . . . . . . . . . . . . . . . . . . . . 176
194 Installation warning . . . . . . . . . . . . . . . . . . . . . . . . . . . . . . . . . . . . . . . . 176
195 Beginning of the installation . . . . . . . . . . . . . . . . . . . . . . . . . . . . . . . . . . . 177
196 End of the installation . . . . . . . . . . . . . . . . . . . . . . . . . . . . . . . . . . . . . . . 177
197 Windows 7 reporting and coniguring new hardware . . . . . . . . . . . . . . . . . . . . 177
198 End of the installation . . . . . . . . . . . . . . . . . . . . . . . . . . . . . . . . . . . . . . . 178
199 Valid addresses of the FLIR identiFINDER R300 after a connection to a computer was
established . . . . . . . . . . . . . . . . . . . . . . . . . . . . . . . . . . . . . . . . . . . . . 178
200 Info web page . . . . . . . . . . . . . . . . . . . . . . . . . . . . . . . . . . . . . . . . . . . . 182
201 Resources web page . . . . . . . . . . . . . . . . . . . . . . . . . . . . . . . . . . . . . . . . 183
202 General Settings web page . . . . . . . . . . . . . . . . . . . . . . . . . . . . . . . . . . . . 185
203 The GPS and Clock settings web page . . . . . . . . . . . . . . . . . . . . . . . . . . . . . . 187
204 Alarm Settings web page . . . . . . . . . . . . . . . . . . . . . . . . . . . . . . . . . . . . . 189
205 Connectivity Settings web page . . . . . . . . . . . . . . . . . . . . . . . . . . . . . . . . . 191
206 Bluetooth Settings web page . . . . . . . . . . . . . . . . . . . . . . . . . . . . . . . . . . . 193
207 Nuclide Settings web page . . . . . . . . . . . . . . . . . . . . . . . . . . . . . . . . . . . . 194
208 Backup web page . . . . . . . . . . . . . . . . . . . . . . . . . . . . . . . . . . . . . . . . . . 195
209 Bulk download web page . . . . . . . . . . . . . . . . . . . . . . . . . . . . . . . . . . . . . 198
14 identiFINDER®R300/en/2014.4(13623)/Feb2015
Page 15

FLIR Detection List of Figures
210 Table of identiication result records . . . . . . . . . . . . . . . . . . . . . . . . . . . . . . 200
211 Details of an identiication result record . . . . . . . . . . . . . . . . . . . . . . . . . . . . 201
212 Table of spectrum records . . . . . . . . . . . . . . . . . . . . . . . . . . . . . . . . . . . . . 203
213 Details of a spectrum record . . . . . . . . . . . . . . . . . . . . . . . . . . . . . . . . . . . 205
214 Table of alarm records . . . . . . . . . . . . . . . . . . . . . . . . . . . . . . . . . . . . . . . 206
215 Details of an alarm record . . . . . . . . . . . . . . . . . . . . . . . . . . . . . . . . . . . . . 207
216 Table of screenshots . . . . . . . . . . . . . . . . . . . . . . . . . . . . . . . . . . . . . . . . 208
217 The FLIR identiFINDER R300’s screen live in the web interface . . . . . . . . . . . . . . . 209
218 Empty live spectrum page . . . . . . . . . . . . . . . . . . . . . . . . . . . . . . . . . . . . . 210
219 Live spectrum page during data acquisition . . . . . . . . . . . . . . . . . . . . . . . . . . 213
220 Identiication results of a live spectrum . . . . . . . . . . . . . . . . . . . . . . . . . . . . . 214
221 File upload web page . . . . . . . . . . . . . . . . . . . . . . . . . . . . . . . . . . . . . . . 215
222 Web page to change the administrator password . . . . . . . . . . . . . . . . . . . . . . . 216
223 System iles web page . . . . . . . . . . . . . . . . . . . . . . . . . . . . . . . . . . . . . . . 217
224 A possible scenario for remote handling of FLIR identiFINDER R300 data . . . . . . . . 219
225 Connection for uploading FLIR identiFINDER R300 data to a remote server . . . . . . . 221
226 Select ”Change Device” if an unwanted device is paired . . . . . . . . . . . . . . . . . . . 224
227 ”Prepare your Bluetooth devices…” appears after selecting ”Change device” . . . . . . . 224
228 Searching for Bluetooth devices . . . . . . . . . . . . . . . . . . . . . . . . . . . . . . . . . 224
229 No Bluetooth devices detected . . . . . . . . . . . . . . . . . . . . . . . . . . . . . . . . . . 225
230 Detected SD1000 device entry chosen . . . . . . . . . . . . . . . . . . . . . . . . . . . . . 225
231 Selecting a PIN for the pairing of Bluetooth devices . . . . . . . . . . . . . . . . . . . . . . 226
232 Bluetooth Periphery Information: Pairing is in progress... . . . . . . . . . . . . . . . . . . 226
233 Pairing to a Bluetooth device failed . . . . . . . . . . . . . . . . . . . . . . . . . . . . . . . 226
234 The Device Details indicates successfull pairing . . . . . . . . . . . . . . . . . . . . . . . . 227
235 Power Supply: Removing the international adapter . . . . . . . . . . . . . . . . . . . . . . 230
236 Power Supply: Attaching an international adapter . . . . . . . . . . . . . . . . . . . . . . 230
237 Source set (sold separately) . . . . . . . . . . . . . . . . . . . . . . . . . . . . . . . . . . . . 233
238 Position of the detector centers of the FLIR identiFINDER R300 . . . . . . . . . . . . . . 241
239 Optimal dose rate calculation needs a uniform illumination of the three detector crys-
tals, for which the source to detector distance should be at least 15 cm (6 in) (drawn to
scale). . . . . . . . . . . . . . . . . . . . . . . . . . . . . . . . . . . . . . . . . . . . . . . . . 242
240 Recommended setup for unmanned measurements of fast neutrons . . . . . . . . . . . . 243
241 After uploading a software package . . . . . . . . . . . . . . . . . . . . . . . . . . . . . . . 256
242 Full width at half maximum height of a peak . . . . . . . . . . . . . . . . . . . . . . . . . . 274
243 Ionizing radiation warning symbol (ISO 21482) . . . . . . . . . . . . . . . . . . . . . . . . 277
244 Multi Channel Scaling . . . . . . . . . . . . . . . . . . . . . . . . . . . . . . . . . . . . . . . 280
identiFINDER®R300/en/2014.4(13623)/Feb2015 15
Page 16

List of Figures FLIR Detection
245 Shielding of ionizing radiation (not to scale) . . . . . . . . . . . . . . . . . . . . . . . . . . 283
16 identiFINDER®R300/en/2014.4(13623)/Feb2015
Page 17

FLIR Detection 1. Welcome
Chapter 1
Welcome
This chapter offers introductory information about this manual, some important advice for your
safety and that of the instrument, and a general overview of the FLIR identiFINDER R300 and its
accessories.
1.1 Conventions Used in This Document
This document uses the following conventions to signify various kinds of text.
Ordinary Text
looks like this, sometimes bold or italics is used for emphasis.
Constant Width
is used for URLs, ile names, path names, text you have to enter somewhere.
Information about danger for yourself, an instrument, or data.
Information you should carefully consider before proceeding.
Additional information you should pay attention to.
A tip suggests commands or procedures for advanced usage. You might skip tips on your irst
pass through this document.
Information related to particular variants of the product.
The path to a command or setting in the FLIR identiFINDER R300 menu hierarchy or the web interface, respectively, is displayed at the beginning of appropriate sections as shown in the following
examples:
Options Menu (p. 103) ä More Options (p. 103) ä Identication Options (p. 103) ä Identication Settings
Settings (p. 180) ä General (p. 184) ä Identication
identiFINDER®R300/en/2014.4(13623)/Feb2015 17
Page 18

1.2. Safety Warnings FLIR Detection
If you read this manual as a PDF document, you can click cross references, items in the table
of contents, links into the Internet or similar to immediately view the designated item.
1.2 Safety Warnings
The FLIR identiFINDER R300 is designed for outdoor use. When operated in accordance with the
operating instructions, it should not present any hazard to the operator.
The housing is essential to the integrity and safe operation of the instrument. Under no cir-
cumstances should the housing be tampered with, penetrated, or otherwise removed except
for normal access to the external connectors (see chapter 7, p. 167 and 11, p. 229).
The FLIR identiFINDER R300 is not certiied for use in explosive environments.
The power adapter is connected to line power. Normal care in handling such a line power
device should be exercised. In particular this unit should not be connected to line power if it
is wet.
The nature of the application is such that objects being surveyed with the FLIR
identiFINDER R300 could emit radioactive radiation with hazardous intensity.
1.3 Before First Use
We recommend charging the batteries of the FLIR identiFINDER R300 after unpacking (11.2,
p. 230) prior to irst time use.
This is a good time to get familiar with the FLIR identiFINDER R300 by reading this manual.
Please read at least the rest of this chapter and those on basic operation (chapters 2, p. 27
and 3, p. 69) before starting to experiment with the FLIR identiFINDER R300.
Chapter 2, p. 27 explains the principles of operating the FLIR identiFINDER R300 to get you pre-
pared for a typical survey you will be guided through in chapter 3, p. 69.
The fundamental modes of operation of the FLIR identiFINDER R300 are detailed in chapter 4, p. 85,
followed by explanations of the FLIR identiFINDER R300 alarms in chapter 5, p. 97.
A detailed reference on all the commands is given in chapter 6, p. 103, which you should read to
know about all the features and possibilities in case you need them.
Chapter 7, p. 167 explains how to setup the connection of the FLIR identiFINDER R300 to a local
computer. The web interface for monitoring, coniguring and transferring data is detailed in chapter
8, p. 179.
18 identiFINDER®R300/en/2014.4(13623)/Feb2015
Page 19

FLIR Detection 1. Welcome
The setup for sending data to a remote server (reachback) is explained in chapter 9, p. 219
Chapter 11, p. 229 details the power supply for the FLIR identiFINDER R300.
The appendix comprises speciication data (Appendix A.1, p. 237), maintenance information (Ap-
pendix B, p. 255), information about the nuclides the FLIR identiFINDER R300 can identify (Ap-
pendix C, p. 259), a glossary of terms and abbreviations (Appendix D, p. 267) and, inally, an index
(p. 291)
The FLIR identiFINDER R300 is available in several variants (see A.1, p. 237 for detailed spec-
iications). All variants share almost identical operating procedures and are covered in this
manual. The few places where a feature of a certain variant differs from the main stream are
marked accordingly in the text.
1.4 The FLIR identiFINDER R300
The FLIR identiFINDER R300 instrument, engineered and manufactured by FLIR Detection is a dig-
ital, self-contained battery-powered instrument that provides the power of advanced spectroscopy
in your palm. It is part of the FLIR Detection family of instruments designed to provide critical ca-
pabilities required in a wide range of mission circumstances. Such capabilities include:
• Search for sources of gamma radiation or scan areas contaminated with gamma radionuclides
• Automatic identiication of radionuclides by analysis of gamma ray spectra
• Gamma dose and dose rate measurements
• Neutron detection with count rate and accumulated counts (Available only for variants
equipped with a neutron detector.)
• Semi-conductor detector for improved resolution and ruggedness
The FLIR identiFINDER R300 combines the capabilities of a Personal Radiation Detector (PRD) with
the radionuclide identiication capabilities of a Radio-Isotope Identiication Detector (RIID) into
one conveniently small package. The FLIR identiFINDER R300 utilizes the same reliable advanced
technology that is deployed in the well-known identiFINDER 2 family of instruments. We offer a
family of handheld products to address the various applications operators will encounter while
ensuring operators will be presented with the same screens, information, and operation between
all our devices.
identiFINDER®R300/en/2014.4(13623)/Feb2015 19
Page 20

1.5. Unpacking and Identifying Accessories FLIR Detection
The FLIR identiFINDER R300 is designed for the survey of objects ranging from small packages to
large objects such as freight containers to search for illicit traficking of radioactive material, to scan
containers for radiation leaks, to monitor medical waste or scrap metal, you name it. It will detect
and identify radioactive materials. If the type or quantity of radioactive material exceeds pre-set
alarm levels then this information will be provided to you.
In particular, the FLIR identiFINDER R300 will identify threat objects. A threat object is deined
as radioactive material whose signature is consistent with that of material that could be used for
terrorist purposes. Threat materials are usually those used in a nuclear explosive device or which
could be used in Radiological Dispersive Devices (“Dirty” bombs).
The FLIR identiFINDER R300 incorporates advanced physics algorithms that allow any user to
make highly sophisticated scientiic measurements. The two button interface and simple menu
structure were designed so that it can be operated with minimal training. The high degree of au-
tomation allows for successful operation even in distracting and hostile environments. The instru-
ment is very robust and stable even in the most demanding conditions and can be operated suc-
cessfully with only a few buttons.
Outstanding features are:
• Large Cadmium Zinc Telluride (CZT) detector for fast and accurate identiication
• Brilliant color display with 320×240 pixels, that is easy to read in all lighting conditions
• Large database capacity for more than half a million spectra or other data
• GPS receiver to log incident locations
• Wired communication via standard USB interface
• Wireless communication via Bluetooth for reachback
• Web interface for monitoring and coniguration of the instrument without additional PC soft-
ware
… and many more. See A.1, p. 237 for the complete speciications.
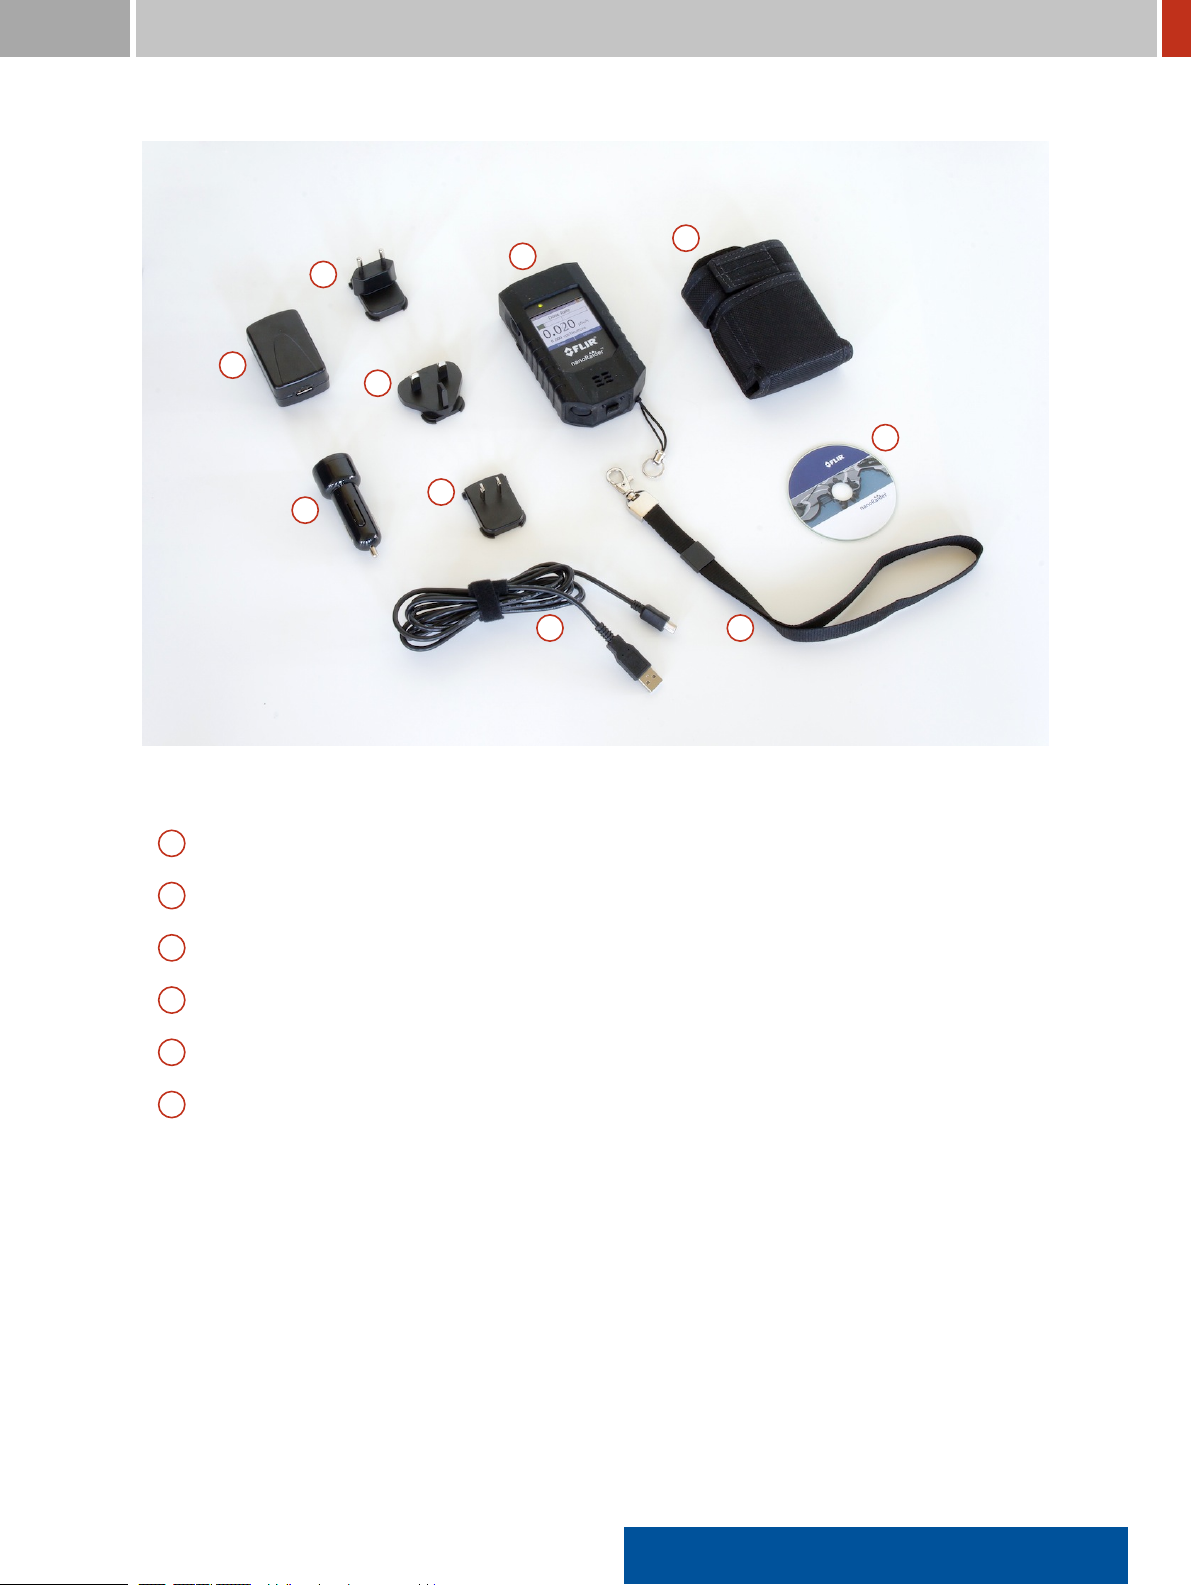
1.5 Unpacking and Identifying Accessories
The FLIR identiFINDER R300 is available in several variants (see A.1, p. 237) which are shipped
with their accessories (Figure 1, p. 21) in a sturdy case (Figure 2, p. 22)
..
A FLIR identiFINDER R300 instrument with rubber boot and wrist strap string
..
B Wrist Strap (Lanyard)
..
C Holster
20 identiFINDER®R300/en/2014.4(13623)/Feb2015
Page 21
FLIR Detection 1. Welcome
H
...A.B.C.D.E.E.E.F.G.
Figure 1. The FLIR identiFINDER R300 with accessories
..
D Wall power adapter with USB-A receptacle
..
E International adapters for power adapter (US, Euro, UK)
..
F Car power adapter with USB-A receptacle
..
G Mini USB-B to USB-A cable for connection to local computer or power adapter (USB 2.0)
..
H CD-ROM with manual and drivers
..
I Pelican case
Review the parts and components received. In the event that a component cannot be located con-
tact the appropriate support organization (see Chapter B.4, p. 257).
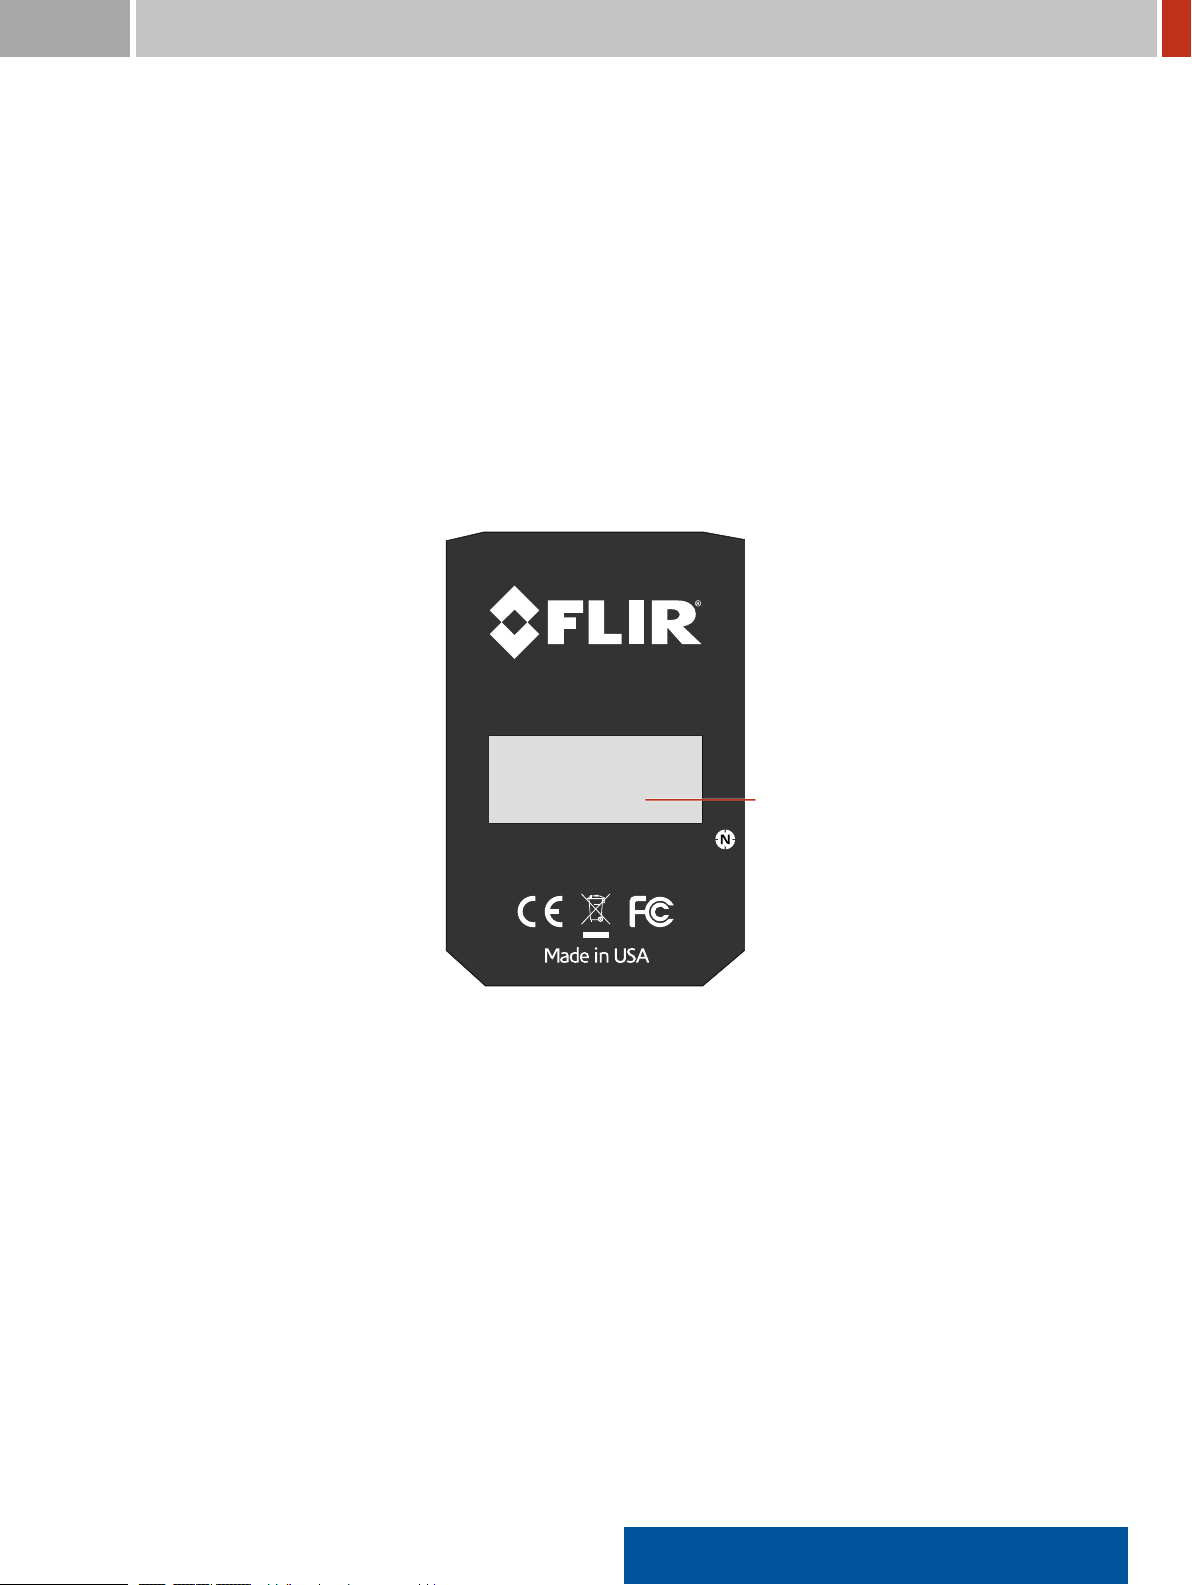
A name plate (Figure 3, p. 23) is attached to the rear side of the instrument. It lists the type of
instrument, the serial number and other important information.
You might want to remember the serial number. It is sometimes used to identify the FLIR
identiFINDER R300 in a computer network.
After the initial charge, the FLIR identiFINDER R300 is ready for use.
identiFINDER®R300/en/2014.4(13623)/Feb2015 21
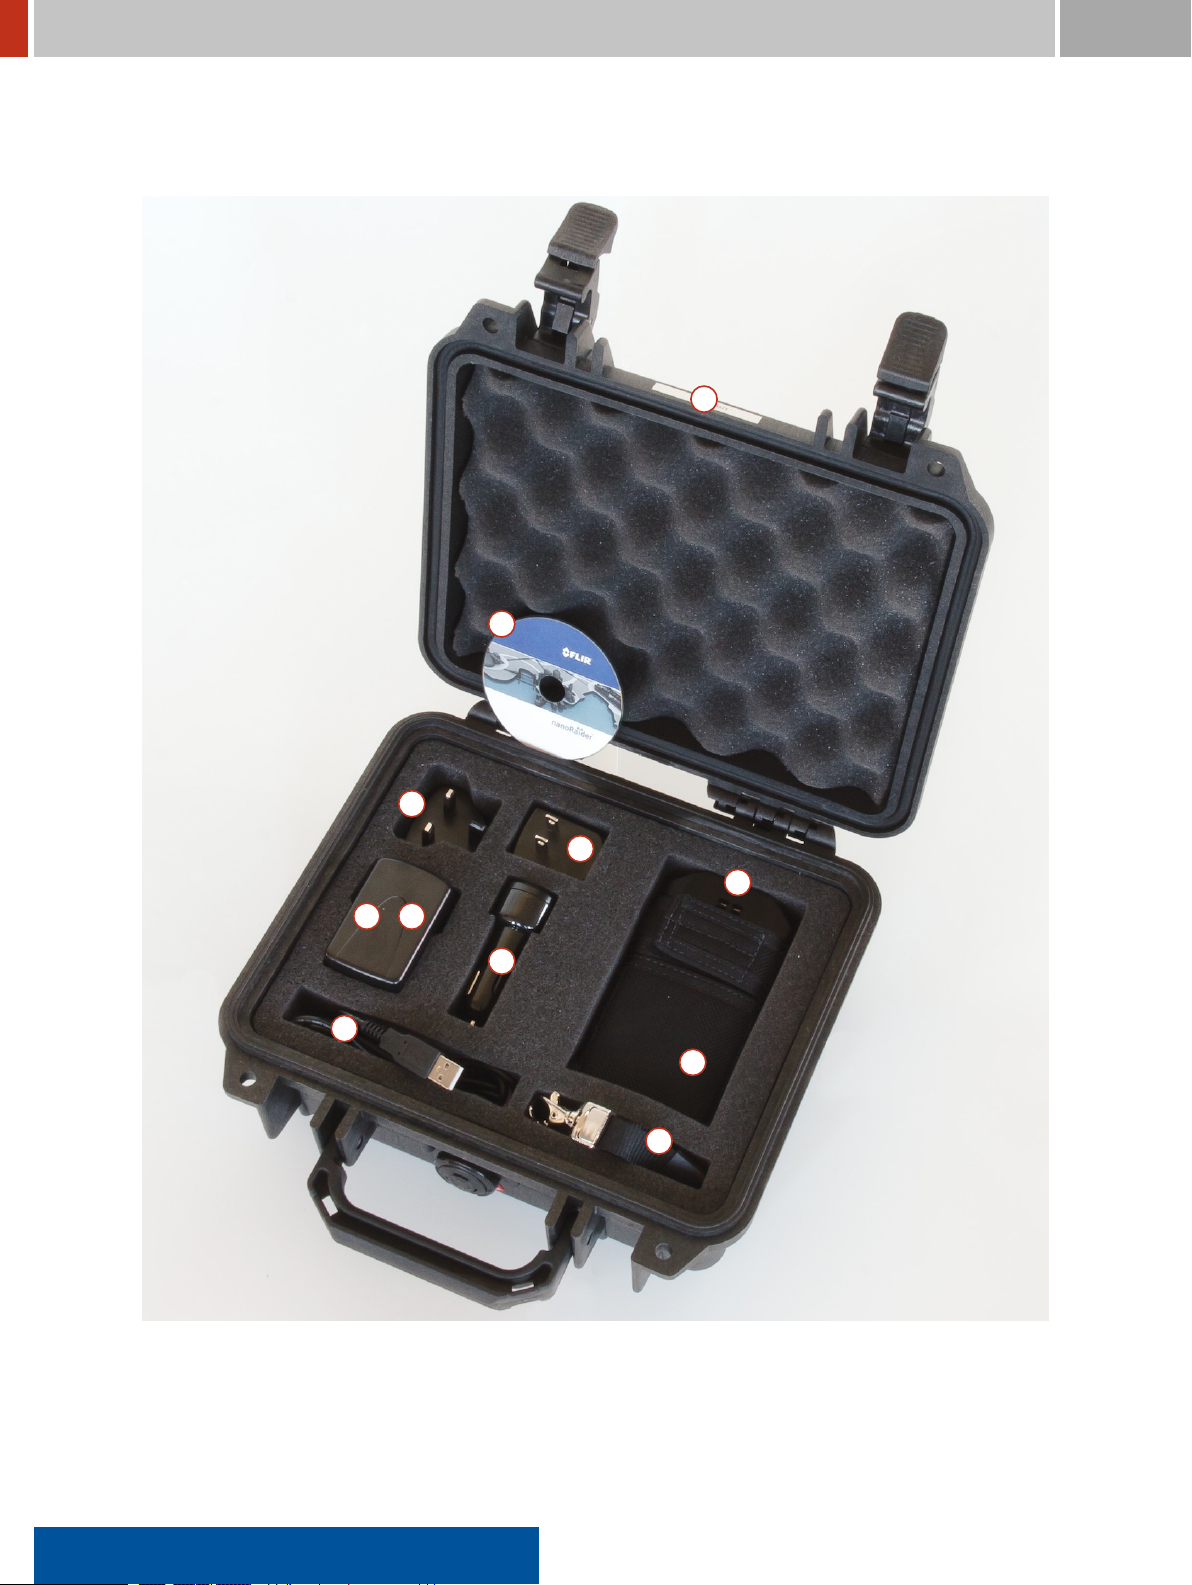
Page 22
1.5. Unpacking and Identifying Accessories FLIR Detection
I
...A.B.C.D.E.E.E.F.G.H.
Figure 2. The FLIR identiFINDER R300 with accessories in Pelican carrying case
22 identiFINDER®R300/en/2014.4(13623)/Feb2015
Page 23
FLIR Detection 1. Welcome
Only
for variants with
a certain neutron
detector.
Model: nanoRaider
Variant: ZH
Serial: 103156000000
DOT: SP12131
Figure 3. Name plate at the rear side of the FLIR identiFINDER R300
identiFINDER®R300/en/2014.4(13623)/Feb2015 23
Page 24

1.6. Instrument Description and Application Overview FLIR Detection
1.6 Instrument Description and Application Overview
The FLIR identiFINDER R300 can be described as a small but powerful computer with keyboard
and LCD screen further equipped with dedicated detectors for gamma and neutron radiation plus
some auxiliary sensors such as a receiver for the NAVSTAR global positioning system (GPS). All data
acquired by the sensors are recorded, processed and evaluated by a sophisticated software that
discriminates innocent from threatening radiation even when operated by personnel with minimal
training.
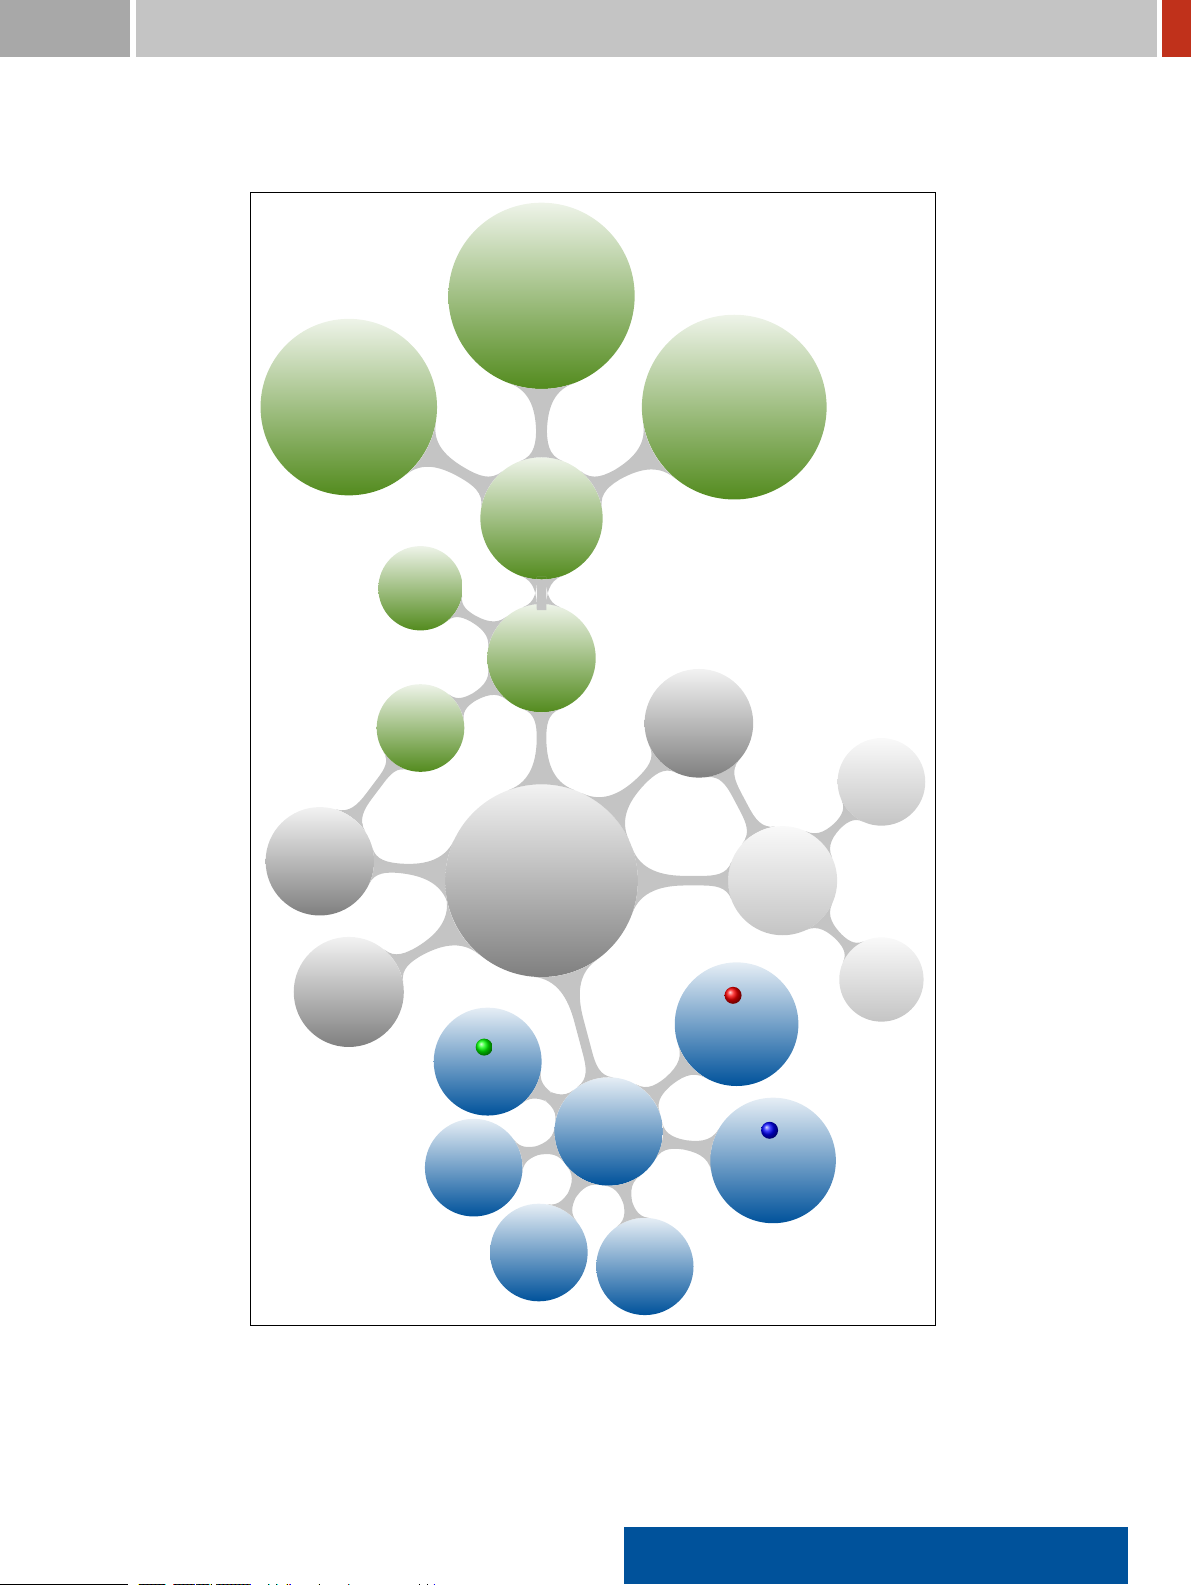
A general outline of the FLIR identiFINDER R300’s functional elements is given in Figure 4, p. 25,
while Figure 5, p. 26 helps to identify and locate the various components of the instrument.
• A microcomputer shown in the center of Figure 4, p. 25 is the central element of the FLIR
identiFINDER R300. It is connected to various peripherals for input, output, and communi-
cation.
• Green circles in the upper left part of Figure 4, p. 25 represent input peripherals including the
keys and, most prominently, the sensors for radioactive radiation:
– A cadmium zinc telluride (CZT, CdZnTe) semiconductor crystal to record gamma radia-
tion spectra
– Two CdZnTe crystals for dose rate measurements
– A3He detector for neutron radiation (optional)
• Outputof the FLIR identiFINDER R300 is directed mainly to the screen plus some status lights,
a beeper, and a vibrator symbolized by blue circles in Figure 4, p. 25.
• The light gray circles in Figure 4, p. 25 represent elements accessible from the outside of the
instrument like the communication facilities.
24 identiFINDER®R300/en/2014.4(13623)/Feb2015
Page 25
FLIR Detection 1. Welcome
.
.
.
.
.
.
.
.
.
.
.
.
.
.
.
.
.
.
.
.
.
.
.
.
.
.
1 CdZnTe
Crystal for Identication
Spectra
3
He Detector †
for Neutrons
Clock
Keys
GPS
Receiver
Radiation
Detectors
Input
FLIR identiFINDER R300
.
.
.
.
.
.
.
.
.
.
.
.
.
.
.
.
.
.
.
.
.
.
.
Microcomputer
2 CdZnTe
Crystals for Dose Rate
Measurement
http
Server
USB
Socket
Commu-
nication
Rechargeable
Battery
.
Status
Output
Display
Beeper
Figure 4. Functional units of the FLIR identiFINDER R300 (see text).
identiFINDER®R300/en/2014.4(13623)/Feb2015 25
Vibrator
.
Gamma
Alarm
.
Neutron
Alarm †
Available only for variants
equipped with a neutron
detector.
Bluetooth
Page 26
1.6. Instrument Description and Application Overview FLIR Detection
Av
ailable only for variants
equipped with a neutron
detector.
Display
Op
eratingKeys
Status
LED
D
etector
GPS
Bluet
ooth
Neutr
on Detector
B
eeper
Neutr
on Alarm LED
G
amma Alarm LED
P
ower Key
USB
Socket
Lany
ard Connector
Figure 5. Map of the FLIR identiFINDER R300 components
26 identiFINDER®R300/en/2014.4(13623)/Feb2015
Page 27
FLIR Detection 2. Operating the FLIR identiFINDER R300
Chapter 2
Operating the FLIR identiFINDER R300
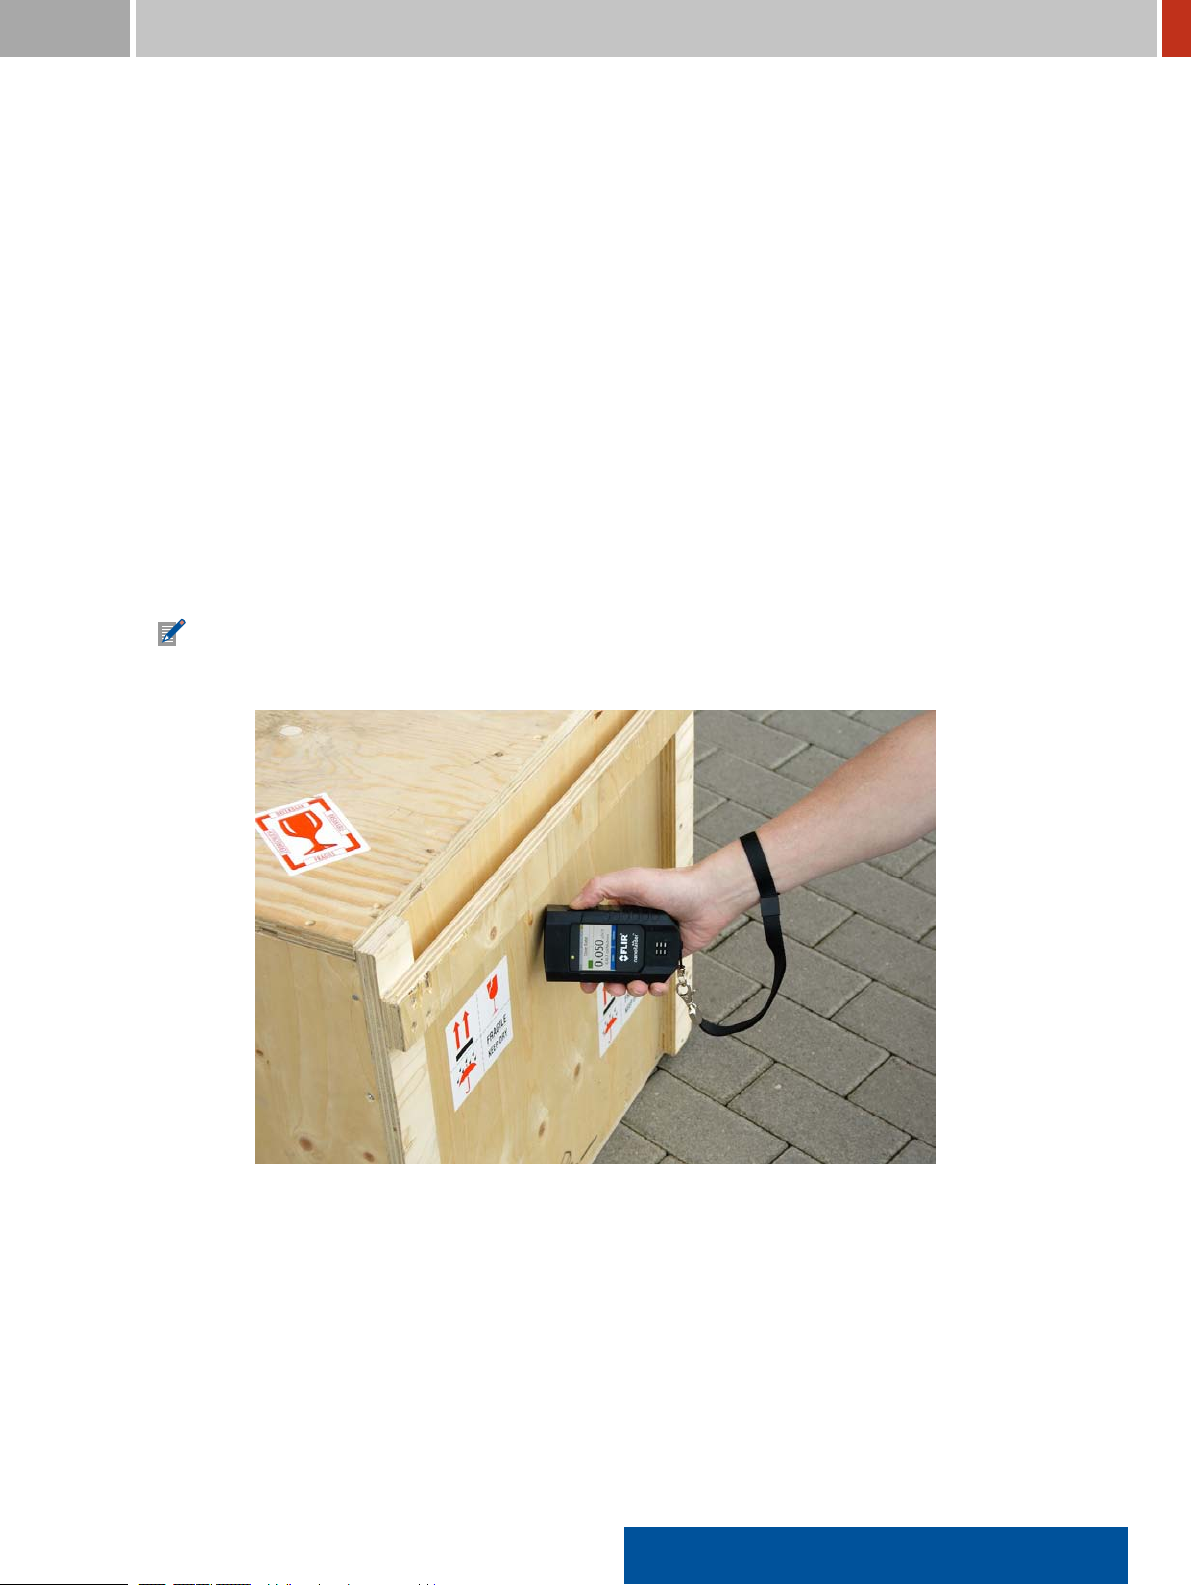
The FLIR identiFINDER R300 is optimized for single-handed operation (see Figure 6, p. 27). The
detector should point to the object to be surveyed while you watch the display and control the
instrument by pressing the keys with thumb and middle inger.
For best dose rate calculations the source must not be too close to the instrument (Figure 239,
p. 242).
Figure 6. Surveying an object with the FLIR identiFINDER R300.
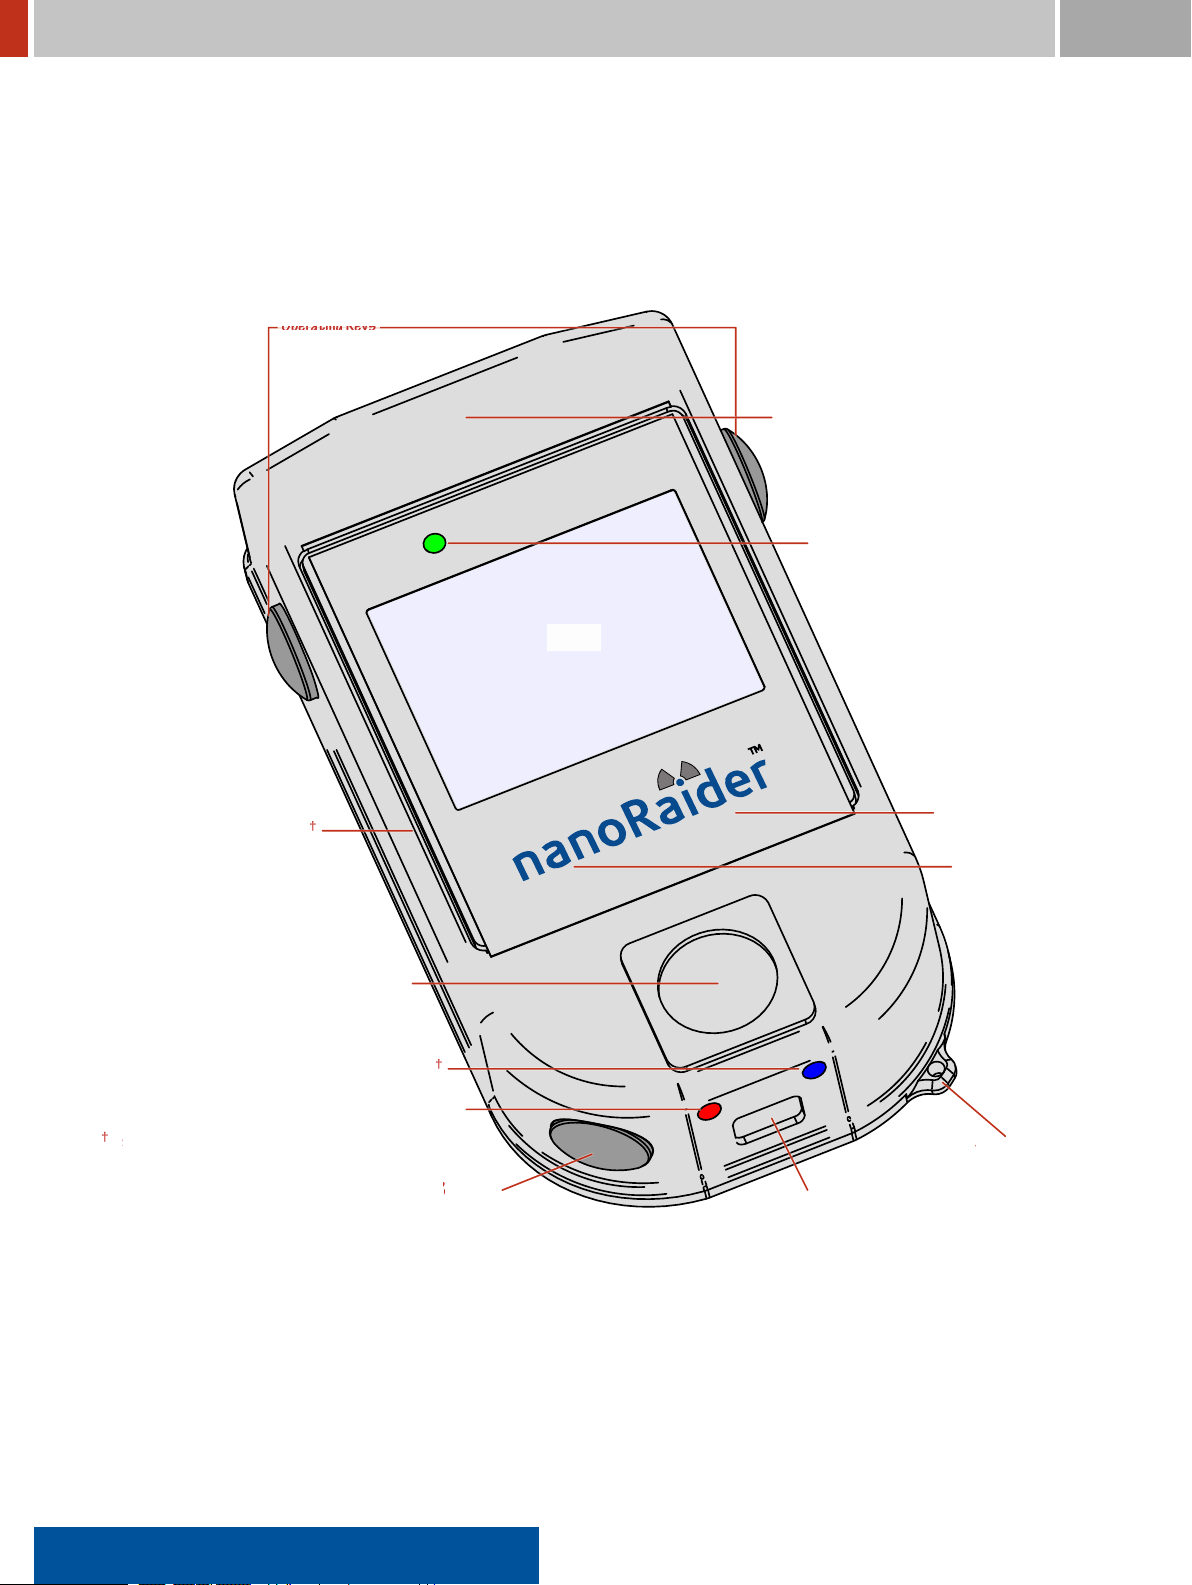
The FLIR identiFINDER R300 display consists of a color LCD screen and several LEDs (Figure 7,
p. 28).
The fundamental principle of operation is to choose one of the available options and then execute
the associated command or function by pressing a key.
identiFINDER®R300/en/2014.4(13623)/Feb2015 27
Page 28
2. Operating the FLIR identiFINDER R300 FLIR Detection
Display
Display
Op
eratingKey
Op
eratingKey
P
ower Key
G
amma Alarm LED
Status
LED
Neutr
on Alarm LED
Available only for variants equipped with a
neutron detector.
Figure 7. Papercraft model of the FLIR identiFINDER R300 with operating elements: Display, LEDs and keys.
28 identiFINDER®R300/en/2014.4(13623)/Feb2015
Page 29
FLIR Detection 2. Operating the FLIR identiFINDER R300
T
itle and Status Bar
Main
Display Area
Key
Descriptions
Ener
gy Saving Options
GPS
Status
D
ate, Time
S
creen Title, Alarm Info
B
aery Status
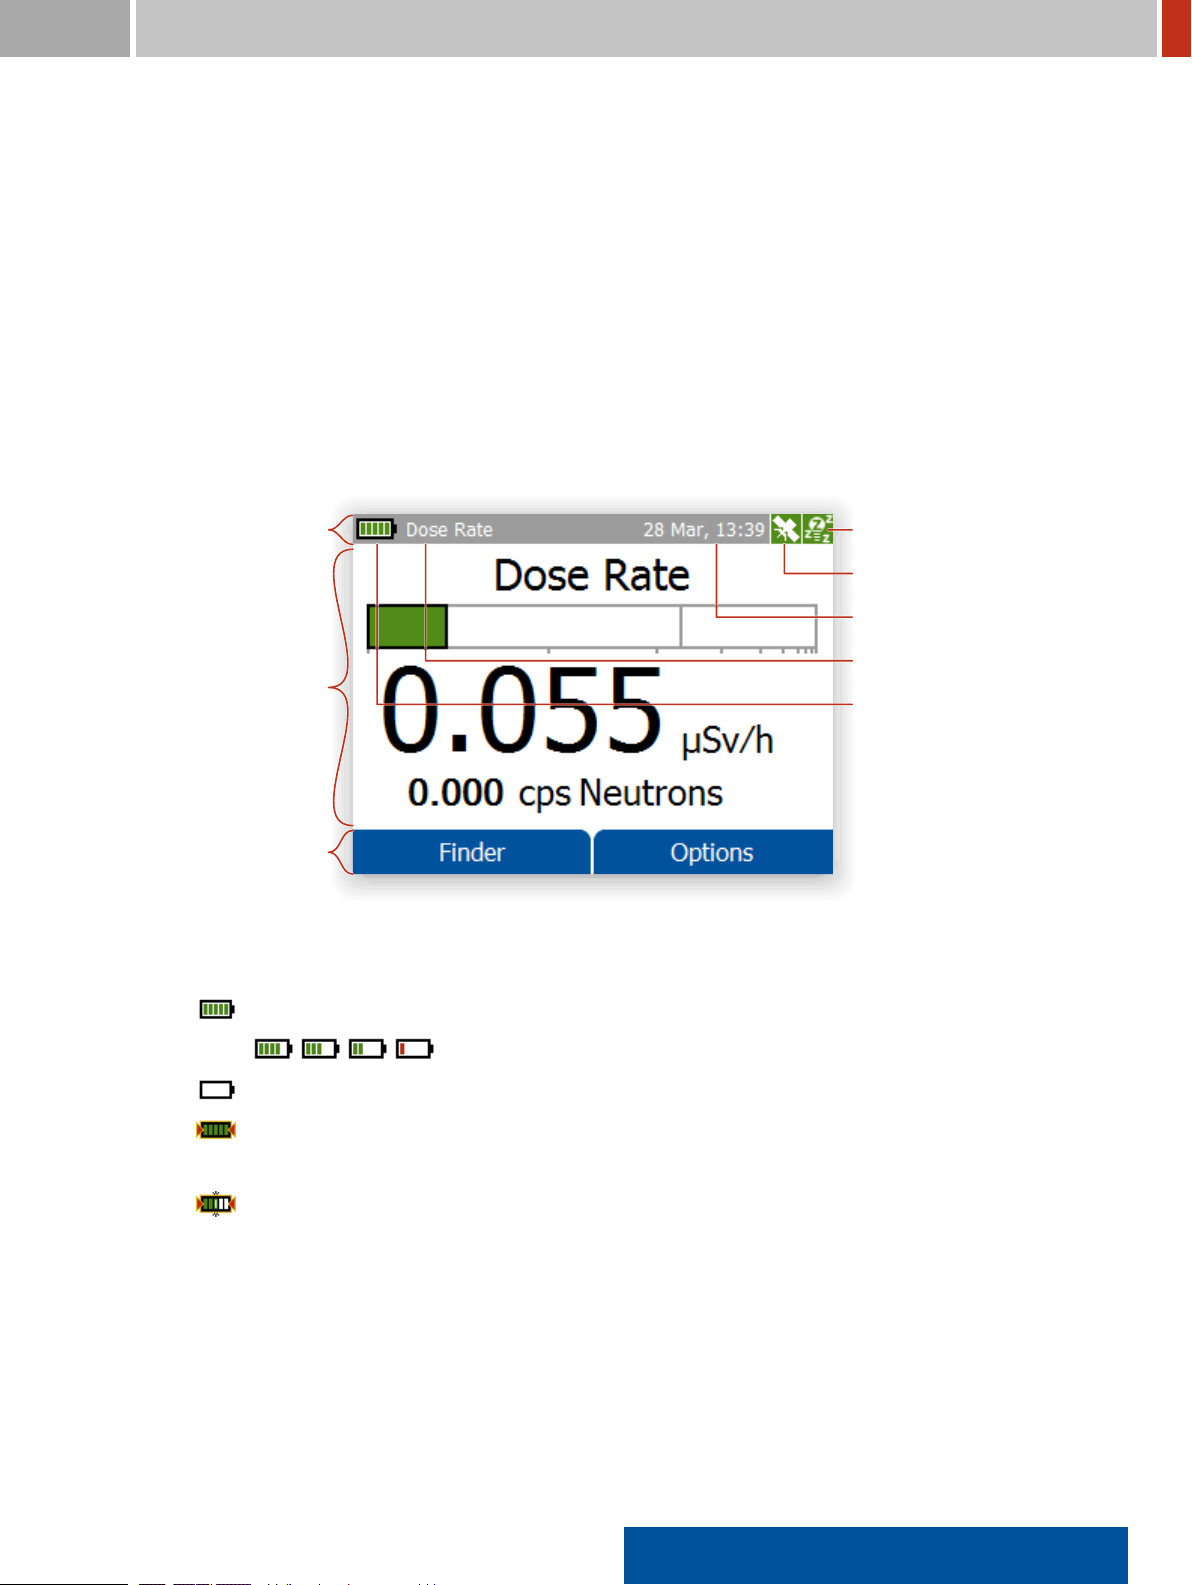
2.1 The FLIR identiFINDER R300 Display
The FLIR identiFINDER R300 display (Figure 7, p. 28) is a color LCD screen divided into three prin-
ciple areas (Figure 8, p. 29):
TOP: Title and Status Bar
This area contains a brief title of the currently performed operation or the current mode the
instrument is switched to and some icons representing the status of several components of
the instrument.
When a warning or an alarm is raised, the alarm information is shown alternating with the
title (see, for example, Figure 100, p. 98).
Figure 8. Anatomy of the FLIR identiFINDER R300 display.
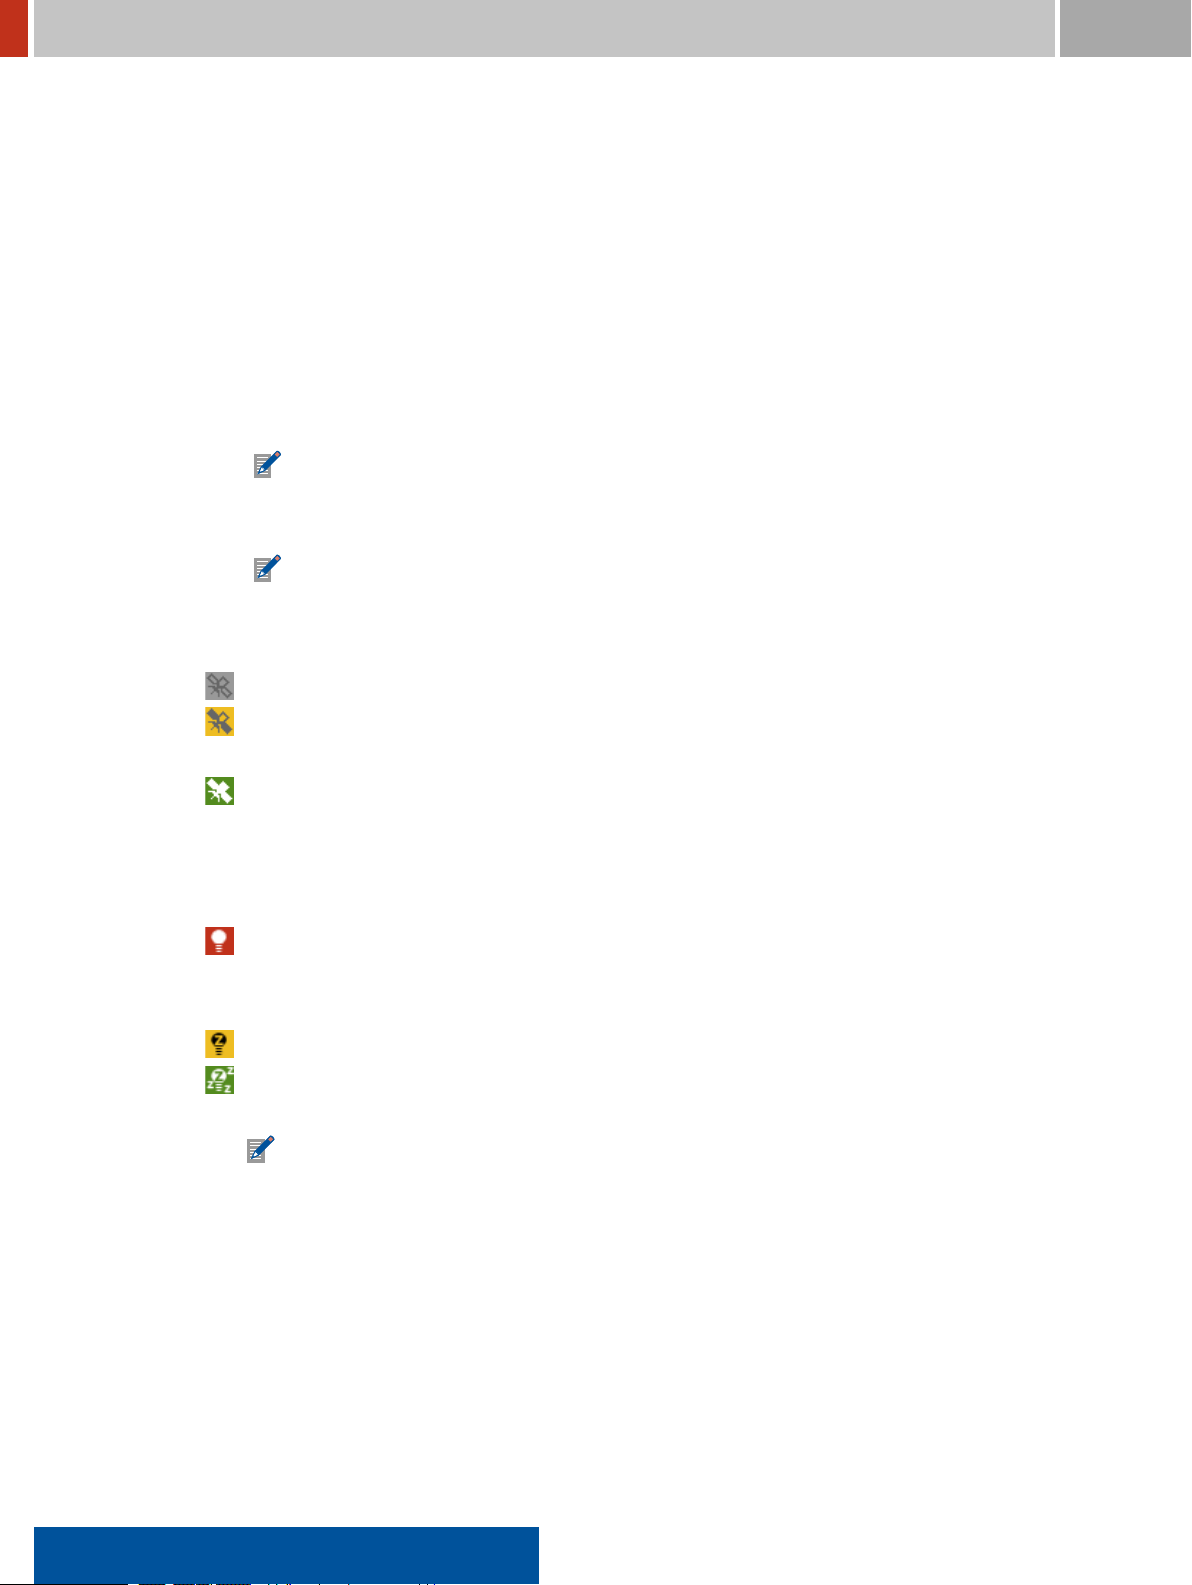
The power indicator and the title are grouped in the left part of the bar.
Full battery
Empty or no battery
Triangles symbolize the connection to an external power supply. This information is
also shown by a green LED (see 11.2, p. 230).
A segment lickers while the battery is being charged.
The current date and time and indicators for the GPS receiver and the energy saving op-
tions are grouped in the right part of the title bar.
19 Feb, 14:10
The current local date and time are shown as day, month, hours (24-hour notation) and
minutes.
identiFINDER®R300/en/2014.4(13623)/Feb2015 29
Page 30
2.1. The FLIR identiFINDER R300 Display FLIR Detection
The time is supplied by the clock built into the FLIR identiFINDER R300. It uses UTC
(a.k.a. “Greenwich Time”) for internal purposes and for time-stamping records saved
in the database, for example, spectra or identiication results.
For correct values you have to ensure the correct setting of the clock and the correct
speciication of your local time zone (see 6.10, p. 125).
The correct time and date can be set using the GPS receiver built into the FLIR
identiFINDER R300. If it is switched on (see 6.11, p. 127), it adjusts the clock to the
high-precision UTC time received from the GPS satellites. All you have to specify is your
local time zone (see 6.10, p. 125).
If the internal clock is completely off, for example after storing the instrument with
empty batteries for a couple of weeks, you have to adjust the internal clock and
specify the time zone (see 6.10, p. 125).
A one-minute countdown is shown instead of the current clock to announce the
beginning of scheduled automated identiication measurement (see 4.4, p. 93).
A satellite symbolizes the state of the GPS receiver.
GPS receiver is switched off (factory setting, 6.11, p. 127).
GPS receiver is switched on (6.11, p. 127) but the GPS reception is not good enough to
determine the current position. Invalid coordinates, marked as such, are saved.
GPS receiver is switched on (6.11, p. 127) and the GPS reception is suficient to deter-
mine the current position which is saved with measurement data and identiication re-
sults.
A light bulb symbolizes the current energy saving options.
The FLIR identiFINDER R300 will not try to save energy because the current opera-
tion requires an active display, for example, during an identiication measurement (4.3,
p. 90).
The backlight of the screen will be dimmed after the timeout you speciied (6.9, p. 122).
The backlight of the screen will be dimmed after the timeout you speciied (6.9, p. 122)
and the application software will power down half a minute later.
This mode is not used while the FLIR identiFINDER R300 is powered by an external
power source.
You can wake up a sleeping system by pressing a key.
CENTER: Variable Main Display
The contents of this area vary with the current operation of the FLIR identiFINDER R300.
It shows, for example, status information after power up (Figure 55, p. 63), menus to choose
commands from (Figure 13, p. 35), the strength of the observed gamma radiation (Figure 87,
p. 86), or corresponding alarms (Figure 101, p. 99).
30 identiFINDER®R300/en/2014.4(13623)/Feb2015
Page 31

FLIR Detection 2. Operating the FLIR identiFINDER R300
.
.
.
BOTTOM: Key Descriptions
The ields in this bar name the current function of each of the operating keys..L..R .
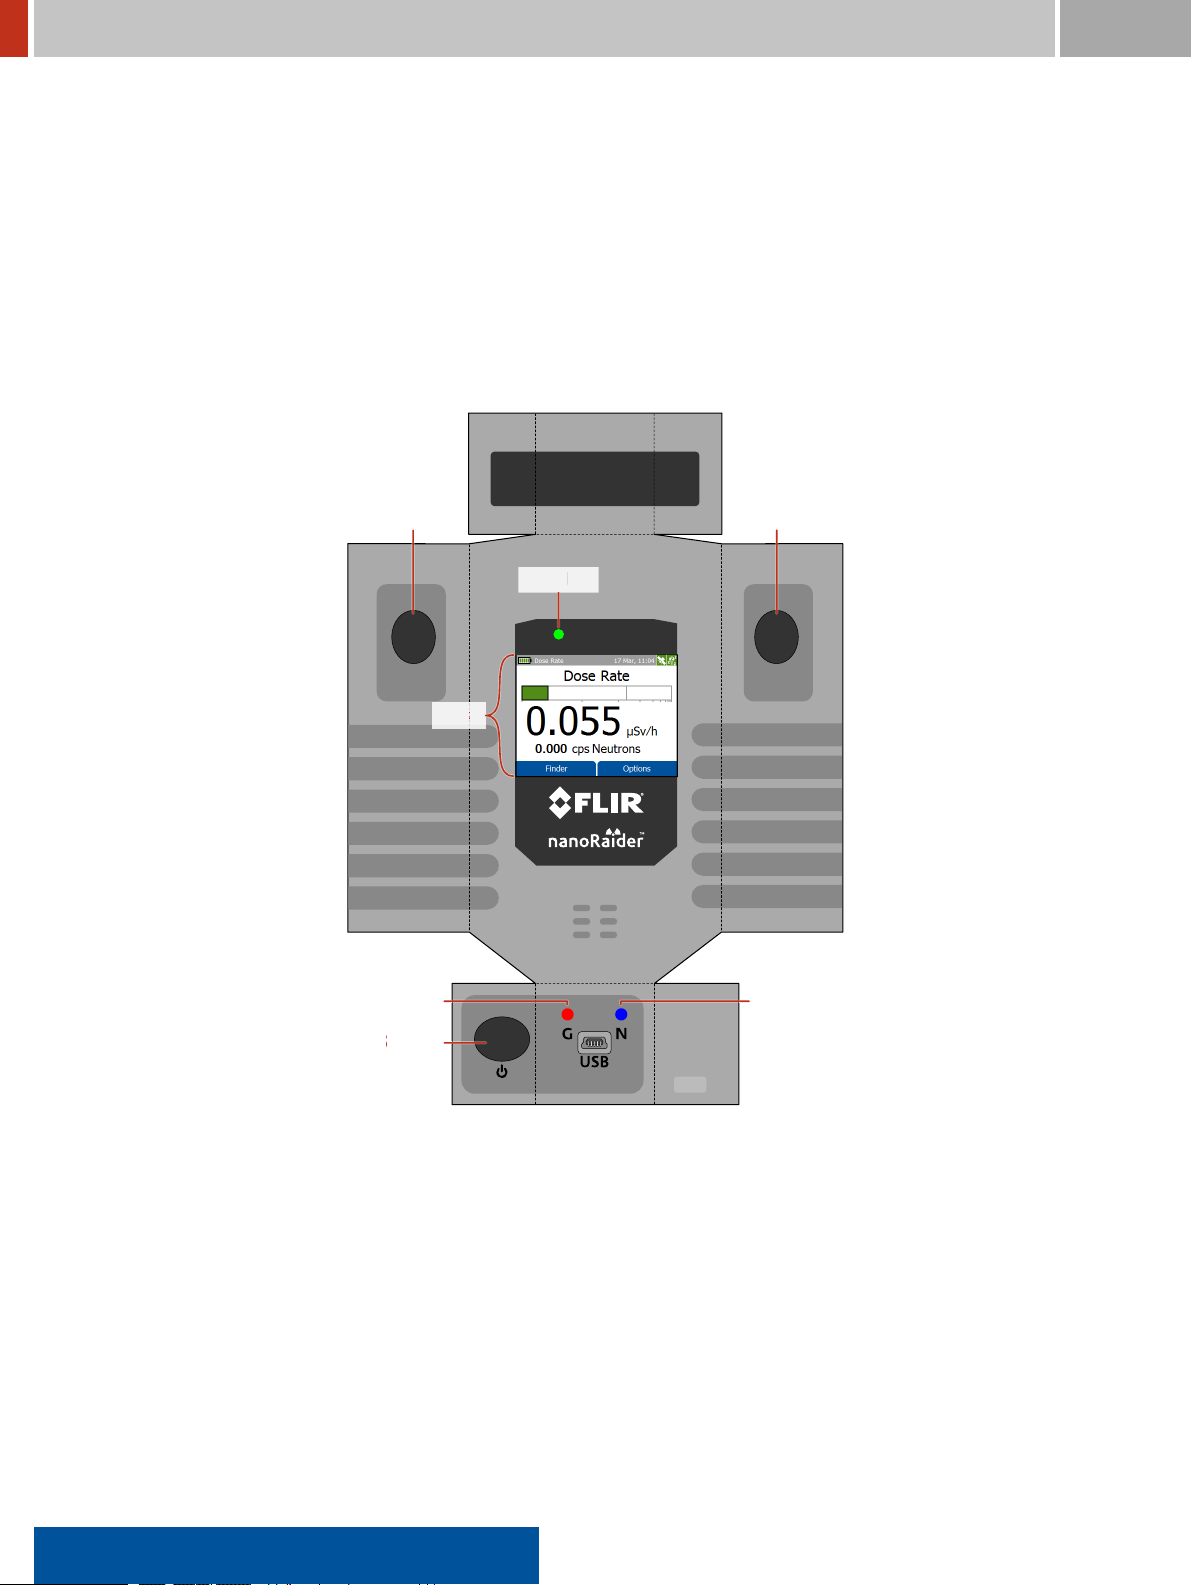
2.1.1 Status LEDs
Several LEDs (Figure 5, p. 26) indicate various status information.
.
Red
labeled “G” (short for “Gamma”) indicates dose and dose rate alarms.
.
Blue
labeled “N” (short for “Neutron”) indicates neutron counts and alarms.
Available only for variants equipped with a neutron detector.
.
Green
indicates the power status (Figure 9, p. 31).
..Instrument Off ..
..
..
..
.
.
.
.
.
.
...
Running on Battery
Running on Low Battery
External Power
clock
1 s
Figure 9. Signals of the status LED
1 s
1 s
You can switch off the red and blue LEDs (6.32, p. 160).
1 s
1 s
1 s
identiFINDER®R300/en/2014.4(13623)/Feb2015 31
Page 32

2.2. The FLIR identiFINDER R300 Keys FLIR Detection
2.2 The FLIR identiFINDER R300 Keys
The FLIR identiFINDER R300 is equipped with three keys (Figure 5, p. 26 and Figure 7, p. 28).
The single key at the bottom is the power key
to cancel edit operations or return to superior menus.
The other two buttons on the
ating keys. They change their function according to the current mode of operation of the FLIR
identiFINDER R300.
For your convenience, the actual function of these keys in any given situation is displayed in the
bottom part of the screen (Figure 7, p. 28). A detailed description of the keys’ functions under
various circumstances is given in chapter 6, p. 103.
Holding the FLIR identiFINDER R300 with your hand (Figure 10, p. 33), you can, for example, press
one key with your thumb and the other one with your middle inger.
To accomodate to your handedness or your personal preferences (Figure 10, p. 33 and Figure 11,
p. 34), you can swap the function of these keys (6.9, p. 122).
This document refers to the keys and their functions using the “normal” assigment and label
them as
L and R , respectively.
L left and R right side of the instrument are the main oper-
I . It is used to switch the instrument on and off,
32 identiFINDER®R300/en/2014.4(13623)/Feb2015
Page 33

FLIR Detection 2. Operating the FLIR identiFINDER R300
..
Figure 10. Right-handed operation of the FLIR identiFINDER R300 with normal key assignments
identiFINDER®R300/en/2014.4(13623)/Feb2015 33
Page 34

2.2. The FLIR identiFINDER R300 Keys FLIR Detection
..
Figure 11. Left-handed operation of the FLIR identiFINDER R300 with reverse key key assigments
34 identiFINDER®R300/en/2014.4(13623)/Feb2015
Page 35

FLIR Detection 2. Operating the FLIR identiFINDER R300
Menu
Items
Key
Descriptions
2.2.1 Using Command Lists
Most features of the FLIR identiFINDER R300 offer more commands than you could immediately
reach with the FLIR identiFINDER R300’s limited number of keys.
In these cases the special command
Skip is permanently mapped to L and you can use it to cycle
the available commands. If you reach the end of the list,
For example, the commands to edit values are
p. 37). You can swap these commands with
Skip
L
Figure 12. Skipping commands for value editing
+ , - , Left , Right , Accept , and Cancel (2.2.3,
Skip (Figure 12, p. 35).
Accept
Cancel
Left
Right
-
+
R
L cycles to the start of the list.
2.2.2 Choosing from Menus
Often you have to choose an operation from a menu like, for example, the “More Options” menu
shown in Figure 13, p. 35.
Figure 13. Choosing from a menu: Initial state without chosen item
identiFINDER®R300/en/2014.4(13623)/Feb2015 35
Page 36

2.2. The FLIR identiFINDER R300 Keys FLIR Detection
Chosen
Item
Cho
ose Items with Down
Chosen
Item
Cho
ose Items with Down
EX
IT
While no item is chosen, you can press R to Exit to the superior screen.
You can choose items from the menu with the command
Down mapped to the L key. The chosen
item is decorated by a distinct color and symbols (Figure 14, p. 36).
Figure 14. Choosing from a menu: Choosing the next item with Down
Press L repeatedly to choose other menu items (Figure 15, p. 36).
Figure 15. Choosing from a menu: Choosing other items with Down
After reaching the bottom of the menu (Figure 15, p. 36), no item will be chosen on the next press
L and Exit becomes available.
of
Once you have chosen the item you are interested in, you can
Select the item with R . This exe-
cutes the chosen command, which, in our example, opens the Advanced Options menu (Figure 16,
p. 37).
36 identiFINDER®R300/en/2014.4(13623)/Feb2015
Page 37

FLIR Detection 2. Operating the FLIR identiFINDER R300
R
eturn to Superior Screen
S
croll Bar
S
croll Bar
P
osition Marker
P
osition Marker
Mor
e Items Available
Chosen
Item
Cho
ose Items with Down
Figure 16. Choosing from a menu: After executing the command with Select
2.2.2.1 Scrolling in Menus
Some menus offer more options than the ive itting on the screen. This is indicated by scroll bars
along the vertical screen edges (Figure 17, p. 37).
A position marker indicates the position of the chosen item relative to the complete list of items.
Arrows at the upper and lower visible item indicate whether more items are available in that direc-
tion, respectively.
If you approach the bottom of the screen with
Down mapped to the L key, the entire menu is
moved up to bring the following items into view. The position markers are adjusted appropriately.
Figure 17. Choosing from a menu: Scrolling in long menus
2.2.3 Changing Values
Many settings of your FLIR identiFINDER R300 require you to choose from a list of options.
identiFINDER®R300/en/2014.4(13623)/Feb2015 37
Page 38

2.2. The FLIR identiFINDER R300 Keys FLIR Detection
Chosen
Item
Key
Descriptions
S
elected Entry Field
Key
Descriptions
R
evealMore Commands
The operations are illustrated using the Display Settings as an example. Like in a menu (2.2.2, p. 35),
you choose the setting you want to change with
Down (Figure 18, p. 38).
Figure 18. Changing Values: Choosing the setting
Once the desired setting is chosen, you Select it with R .
The rendering of the entry ield changes (Figure 19, p. 38): a different color and two arrows indicate
there is a list of values you can choose from.
Figure 19. Changing Values: Selected entry ield
Note that the keys now have other functions. You get the next item in the list with + mapped to
R .
Our example is about the display language, so let’s use
R to change to, for example, Deutsch (Ger-
man, Figure 20, p. 39).
38 identiFINDER®R300/en/2014.4(13623)/Feb2015
Page 39

FLIR Detection 2. Operating the FLIR identiFINDER R300
Changed
Value
G
o to Next Value
R
evealMore Commands
Changed
Value
R
evealMore Commands
Figure 20. Changing Values: Changed entry ield
The actual setting did not change yet, the screen is still displayed in English. You can choose other
values with
+ ad lib.
To make your changes effective, you need another command which is currently inaccessible. Press
Skip mapped to L to make it visible (Figure 21, p. 39).
Figure 21. Changing Values: Revealing more commands
The moment you press Accept mapped to R , the new setting takes effect. In our case the screen
is displayed in German (Figure 22, p. 40).
The keys’ functions return to their previous state.
In case you change your mind, you can
Skip if necessary). The value in effect before you started editing with Select will be reestab-
with
Cancel editing the value with R (Reveal the command
lished.
identiFINDER®R300/en/2014.4(13623)/Feb2015 39
Page 40

2.2. The FLIR identiFINDER R300 Keys FLIR Detection
Chosen
Item
Changed
ValueAccepted
D
own, Select
S
elected Entry Field
S
elected Component
Incr
ease Component
R
evealMore Commands
Figure 22. Changing Values: Changed setting accepted
Pressing I for a moment also cancels editing.
Do not press I for too long. That would power down your FLIR identiFINDER R300.
2.2.4 Changing Composite Values
Some values are combinations of several components. Calendar dates for example, have year,
month, and day components or clock settings have hour and minute components.
Several commands (Figure 12, p. 35) are available if you
Select (see 2.2.3, p. 37) such values for
editing. Always one of the value’s components is selected (Figure 23, p. 40), that is, editing com-
mands are applied to this component.
Figure 23. Changing Combined Values: Changing the selected component
40 identiFINDER®R300/en/2014.4(13623)/Feb2015
Page 41

FLIR Detection 2. Operating the FLIR identiFINDER R300
S
elected Entry Field
S
elected Component
Next
Component
R
evealMore Commands
You increase the component with + and decrease it with - . In the example shown here, you
edit the year of the date since it is the selected component.
Now you need commands to select the other components of the value (see 2.2.1, p. 35). You can
reveal them with
Skip mapped to L (Figure 24, p. 41).
Figure 24. Changing Combined Values: Selecting components.
Press Left or Right to select the component you want to edit.
To get the commands for editing back, press
After you inished editing all components, press
press
R .
In case you change your mind, you can
Skip if necessary). The value in effect before you started editing with Select will be reestab-
with
Skip until + or - reappear.
Skip until you see the Accept command, then
Cancel editing the value with R (Reveal the command
lished.
Pressing
I for a moment also cancels editing.
Do not press I for too long. That would power down your FLIR identiFINDER R300.
2.2.5 Changing Numerical Values
A lot of settings are numerical values, often with a immutable unit.
Severalcommands (Figure 12, p. 35) are available for editing numerical values. One of the number’s
digits is always selected (Figure 25, p. 42), that is, editing commands are applied to this digit. If you
start changing a number with
Select (see 2.2.3, p. 37), the rightmost (least signiicant) digit is
selected.
identiFINDER®R300/en/2014.4(13623)/Feb2015 41
Page 42

2.2. The FLIR identiFINDER R300 Keys FLIR Detection
S
elected Entry Field
S
elected Digit
Incr
ease Digit
R
evealMore Commands
S
elected Entry Field
S
elected Digit
P
revious Digit
R
evealMore Commands
Figure 25. Changing Numerical Values: Changing the selected digit
You increase the selected digit with + and decrease it with - . If you increase the selected digit
above 9 or decrease it below 0, the surrounding digits are changed appropriately.
If you want to change the number in larger or smaller increments, you can select another digit to
be immediateley affected by the
Left or Right , and then use them to select the digit you want to change (Figure 26, p. 42).
+ and - commands. Press Skip until you see the commands
Figure 26. Changing Numerical Values: Selecting digits
To get the commands for editing back, press Skip until + and - reappear.
After you inished editing the number, press
Skip until you see the Accept command, then press
R .
42 identiFINDER®R300/en/2014.4(13623)/Feb2015
Page 43

FLIR Detection 2. Operating the FLIR identiFINDER R300
S
elected Entry Field
S
elected Character
S
elect Next Character
R
evealMore Commands
In case you change your mind, you can Cancel editing the value with R (Reveal the command
Skip if necessary). The value in effect before you started editing with Select will be reestab-
with
lished.
Pressing
I for a moment also cancels editing.
Do not press I for too long. That would power down your FLIR identiFINDER R300.
2.2.6 Entering Text
Several entries consist of arbitrary text, for example the operator’s name, phone numbers, or set-
tings for Bluetooth communication to a remote server (Figure 164, p. 149). Entering and editing
text with the FLIR identiFINDER R300’s limited number of keys is, of course, challenging. It is simi-
lar to editing composite values as described in 2.2.4, p. 40, with every character being a component.
Editing text is a lot more convenient via the FLIR identiFINDER R300’s web interface (see 8,
p. 179).
Several commands are available if you
mands are mapped to the
R key. Use Skip mapped to L to cycle through the available com-
Select (see 2.2.3, p. 37) text values for editing. These com-
mands (see 2.2.1, p. 35).
During text editing, exactly one character is selected (Figure 27, p. 43), that is, editing commands
are applied to this character.
Figure 27. Editing Text: First character “J” is selected.
To select another character, use Left or Right (Figure 28, p. 44).
If you reach the left end of the text,
Left does nothing. At the end of the text, however, Right
moves to two additional characters (spaces) to facilitate appending another word to the text.
identiFINDER®R300/en/2014.4(13623)/Feb2015 43
Page 44

2.2. The FLIR identiFINDER R300 Keys FLIR Detection
S
elected Entry Field
S
elected Character
S
elect Next Character
R
evealMore Commands
S
elected Entry Field
S
elected Character
Change
Selected
Character
R
evealMore Commands
Figure 28. Editing Text: Next character to the right is selected (“o”).
Forthe selected character (Figure 30, p. 44), you can use the commands + and - to cycle through
the available characters in the sequence shown in Figure 29, p. 44.
Use the web interface (see 8, p. 179) to enter international characters like æ, î, ö, ñ, ß, ëtç.
!”§$%&/()[]{}=?*+#’-_@.:,;
0123456789
(Space)
abcdefghijklmnopqrstuvwxyz
ABCDEFGHIJKLMNOPQRSTUVWXYZ
Figure 29. Editing Text: Set of available characters
Figure 30. Editing Text: After changing the selected “o” to an “a”.
To delete the selected character use Delete (Figure 31, p. 45).
44 identiFINDER®R300/en/2014.4(13623)/Feb2015
Page 45

FLIR Detection 2. Operating the FLIR identiFINDER R300
S
elected Entry Field
S
elected Character
D
elete Selected
Character
R
evealMore Commands
S
elected Entry Field
S
elected Character
Figure 31. Editing Text: About to delete the selected character “h”.
The characters from the selected one to the end of the text will be moved towards the beginning to
ill the gap (Figure 32, p. 45).
Figure 32. Editing Text: After deleting a character, the next character is selected.
To insert a character before the currently selected character, use Insert . The existing characters,
including the selected one, are pushed one position towards the end of the text (Figure 33, p. 46).
After you inished editing the text, press
Skip until you see the Accept command and press R
(Figure 34, p. 46).
Spaces at the start or end of the text, if any, are removed from your entry.
identiFINDER®R300/en/2014.4(13623)/Feb2015 45
Page 46

2.2. The FLIR identiFINDER R300 Keys FLIR Detection
S
elected Entry Field
S
elected Character
Inser
t Character
R
evealMore Commands
Figure 33. Editing Text: After inserting space before “ Doe” for an additional character.
Figure 34. Editing Text: Done.
In case you change your mind, you can Cancel editing the value with R (Reveal the command
Skip if necessary). The value in effect before you started editing with Select will be reestab-
with
lished.
Pressing
I for a moment also cancels editing.
Do not press I for too long. That would power down your FLIR identiFINDER R300.
2.2.7 Entering the Password
If your FLIR identiFINDER R300 is protected by a password, you will have to enter it before you can
access most of the options and settings menus of the instrument (Figure 35, p. 47).
If your variant comes with a factory-set password, it is
LMRLMRL
.
46 identiFINDER®R300/en/2014.4(13623)/Feb2015
Page 47

FLIR Detection 2. Operating the FLIR identiFINDER R300
Figure 35. Entering a password to access the option menus.
For better protection against unwanted changes of the instrument characteristics, you should
change the password to something else (6.12, p. 128).
If you don’t need protection but want faster access to the menus, you can remove the password
(6.13, p. 129).
Settings and Commands
Skip
Cycle the list of commands (see 2.2.1, p. 35).
L , M , R
Enter the password by seven presses in the correct sequence.
To cancel the password entry press I for a moment.
After the seventh entry, the key labels change (Figure 36, p. 48).
Accept
Conirm your password entry and have the instrument check your entry for correctness.
After you entered the correct password, you don’t have to enter it again until you switch
off the instrument.
If you enter a wrong password, you will be informed (Figure 37, p. 48). After you conirm the
message with
OK , the instrument will return to the mode it was in before asking for the
password.
Cancel
Cancel the password entry and return without proceeding to the protected options and com-
mands.
identiFINDER®R300/en/2014.4(13623)/Feb2015 47
Page 48

2.2. The FLIR identiFINDER R300 Keys FLIR Detection
Figure 36. Password entered but not yet conirmed.
Figure 37. Message after entering a wrong password.
48 identiFINDER®R300/en/2014.4(13623)/Feb2015
Page 49

FLIR Detection 2. Operating the FLIR identiFINDER R300
2.2.8 Taking Screenshots
You can save the contents of the FLIR identiFINDER R300’s display at any time.
Ô
To take a screenshot…
1. Press and hold I .
2. Press
L .
You have to press L , even if you swapped the assignment of the operating keys (6.9,
p. 122).
Do not wait too long between pressing I and L , otherwise you might initiate the
power down command (2.6, p. 64).
Screenshots are saved in the FLIR identiFINDER R300’s permanent memory as image iles named
after the screen taken sufixed by the current date, time and time zone offset.
To access the saved screenshots, connect your FLIR identiFINDER R300 to a computer (8.14,
p. 207).
You can check the number of saved screenshots in the status display (6.14, p. 130, Figure 38, p. 49)
or erase them (6.18, p. 134).
Figure 38. Status display showing the number of saved screenshots.
identiFINDER®R300/en/2014.4(13623)/Feb2015 49
Page 50

2.3. The FLIR identiFINDER R300 Holster FLIR Detection
2.3 The FLIR identiFINDER R300 Holster
For general monitoring of the environment for gamma or neutron radiation, you can insert the FLIR
identiFINDER R300 into its holster (Figure 39, p. 50) and wear it on your belt (Figure 40, p. 50). You
can still hear and feel the alarms and watch the alarm LEDs.
..
Figure 39. Inserting the FLIR identiFINDER R300 into a holster so alarm LEDs remain visible
..
Figure 40. FLIR identiFINDER R300 in a belt holster with visible alarm LEDs
50 identiFINDER®R300/en/2014.4(13623)/Feb2015
Page 51

FLIR Detection 2. Operating the FLIR identiFINDER R300
2.4 The FLIR identiFINDER R300 Web Server
To access the FLIR identiFINDER R300’s web interface, simply point your web browser to one of
the addresses given after a connection between your computer and the FLIR identiFINDER R300 is
established (see 7.4, p. 178).
Provided a network connection can be established, you can use any modern browser running on, for
example, a desktop or laptop PC, a netbook, a tablet, or a smart phone. The browser must support
• HTML 5
• CSS 3
• Javascript
• Scalable Vector Graphics (SVG)
The following examples were successfully tested:
• Apple Safari 5 (Microsoft Windows, Mac OS X)
• Microsoft Internet Explorer 9 (Microsoft Windows)
• Mozilla Firefox 20 (Linux, Microsoft Windows, Mac OS X)
• Opera 10.6 (Microsoft Windows)
The FLIR identiFINDER R300 web access needs no cookies. If cookies are allowed, they are used to
remember your settings, for example the number of items you prefer in listings.
2.4.1 Operating the Web Server Pages
The web pages of the FLIR identiFINDER R300 are available in slightly different layouts for different
screen or window widths. A narrow version (Figure 41, p. 52) is used on mobile devices like smart
phones or tablet computers. The wider version (Figure 42, p. 53) is used on desktop or laptop
computers.
The instrument serving these web pages is identiied in the page header, which also contains the
menus and several status indicators.
If you print a web page, the page header is suppressed.
The title of the current web page is shown in the main area below the page header. The content of
most web pages is divided into sections of related items.
A tool tip giving details about elements of web pages is shown if you hover and stay with the
pointer above an element. (Not available on touch-driven devices without pointer.)
identiFINDER®R300/en/2014.4(13623)/Feb2015 51
Page 52

2.4. The FLIR identiFINDER R300 Web Server FLIR Detection
T
ype of Instrument
S
erial
Number
Menu
Buon
P
age Title
W
eb Page
Sections
B
aery Status
GPS
Status
P
age Header
Main
Page
Area
P
age Footer
S
oftware
Version
Figure 41. Anatomy of a FLIR identiFINDER R300 web page, narrow layout
The bottom of the pages is marked by the page footer. Especially on systems without visible scroll-
bars (most mobile phones and tablet computers), this footer indicates that you have seen all of the
page.
Apart from the width, the main difference between the narrow and wide layouts of web pages is
the menu in the page header. The wide layout uses the space to show the top level of the menu in
a bar (Figure 42, p. 53), the narrow layout (Figure 41, p. 52) shows a button. If you click a menu in
either layout the menu hierarchy below that item is revealed and you can navigate to the desired
web page (Figure 43, p. 53, Figure 44, p. 54).
52 identiFINDER®R300/en/2014.4(13623)/Feb2015
Page 53

FLIR Detection 2. Operating the FLIR identiFINDER R300
S
erial
Number
T
op-Level
Menu
P
age Title
W
eb Page
Sections
T
ype of Instrument
Chosen
Menu
B
aery Status
GPS
Status
P
age Header
Main
Page
Area
P
age Footer
S
oftware
Version
Figure 42. Anatomy of a FLIR identiFINDER R300 web page, wide layout
Figure 43. Visible menu hierarchy on a web page with narrow layout
identiFINDER®R300/en/2014.4(13623)/Feb2015 53
Page 54

2.4. The FLIR identiFINDER R300 Web Server FLIR Detection
..
Figure 44. Single submenu on a web page with wide layout
54 identiFINDER®R300/en/2014.4(13623)/Feb2015
Page 55

FLIR Detection 2. Operating the FLIR identiFINDER R300
Column
Titleswith
Sorting Buons
T
able Rows
Multi-P
age Table
Navigation
P
age Length
Seings
2.4.2 Tables on Web Pages
Some web pages (e.g., Figure 45, p. 55) show tables of stored records available for download from
the FLIR identiFINDER R300 to your computer.
Figure 45. Anatomy of a web page with a data table
You can set the maximum number of table rows shown per web page.
The current page length is remembered on your computer if cookies are allowed.
Depending on your page length setting and the total number of table entries, a table might be split
across multiple pages which you can navigate using the buttons above the table.
Previous
Proceed to the previous page of records.
x/y Number of the current page and number of total pages
Next
Proceed to the next page of records.
You can have the table sorted by columns. The current sorting status is indicated by an icon in the
column title. Click one of the icons to change table sorting.
Table is not sorted by this column.
Table is sorted ascending by this column.
Table is sorted descending by this column.
The current sorting is remembered on your computer if cookies are allowed.
identiFINDER®R300/en/2014.4(13623)/Feb2015 55
Page 56

2.4. The FLIR identiFINDER R300 Web Server FLIR Detection
You can view details about a record listed in the table.
Show
Opens a window or browser tab showing details of the record for further inspection or anal-
ysis (see 2.4.3, p. 56).
2.4.3 Records on Web Pages
These pages show the results of a single measurement stored in the FLIR identiFINDER R300’s
database, for example, an identiication measurement (Figure 46, p. 57). The main contents vary
with the type of shown records. Several buttons are available for navigation and housekeeping.
Previous
Proceed to the previous record of the same type.
Back
Return to the table of records of the same type.
Next
Proceed to the next record of the same type.
Spectrum
If the record contains a spectrum, you can hover above the chart to get details of the pointed
part shown. (Not available on touch-driven devices without pointer.)
GPS Coordinates
If GPS coordinates were stored with a record, they are shown in an additional section of the
details page (Figure 47, p. 58).
Look Up with GeoHack
Send the GPS coordinates stored with the record to the GeoHack page on the Wikimedia
Toolserver, a free service of Wikimedia Deutschland e.V. (Internet access required).
The service links to international servers of maps, satellite images, aerial photographs
etc. which cover the coordinates saved with your record.
Download
Download the shown record to the computer.
The name of the downloaded
*.zip
archive begins with the serial number of the FLIR
identiFINDER R300 followed by the type and the reference number of the record, for example
103156000000 Identification 4711.zip
Send
Send the record to the conigured (see 6.24, p. 149 and 8.6.2, p. 192) reachback server (see
9, p. 219).
56 identiFINDER®R300/en/2014.4(13623)/Feb2015
Page 57

FLIR Detection 2. Operating the FLIR identiFINDER R300
T
ype and Number of
Record
Navigation
Bu
ons
Figure 46. Anatomy of a web page with details of a record
Your computer must be connected to the Internet for this operation.
The transmission starts immediately and you will be kept posted about the progress (Fig-
ure 48, p. 58).
You will be informed after the transmission inished (Figure 49, p. 59) or about transmission
errors, if any.
identiFINDER®R300/en/2014.4(13623)/Feb2015 57
Page 58

2.4. The FLIR identiFINDER R300 Web Server FLIR Detection
Figure 47. Web page section with GPS coordinates
Figure 48. Steps of the transmission of data to a reachback server
Delete
Delete the shown record from the FLIR identiFINDER R300’s database.
Records referred to by another record, for example a spectrum referred to by an iden-
tiication measurement, are not actually deleted but marked as unreachable for future
direct accesses.
58 identiFINDER®R300/en/2014.4(13623)/Feb2015
Page 59

FLIR Detection 2. Operating the FLIR identiFINDER R300
Figure 49. Successful transmission of data to a reachback server
2.4.4 Printing Web Pages
You can print web pages with the usual printing procedures of your web browser.
Some of the shown elements are suppressed when printing web pages, for example the navigation
menus or push buttons (Figure 50, p. 60).
Many web browsers suppress printing of background images and colors. For better printing results
we recommend to tick the appropriate boxes. Look for settings like
Print Background Colors
4
Print Background Images
4
Print Background Images and Colors
4
2.4.5 Password Entry
An optional (6.13, p. 129) password may protect against unauthorized or accidental access to ad-
vanced settings and commands of your FLIR identiFINDER R300.
If a password is set (6.12, p. 128), you have to enter it in the instrument (see 2.2.7, p. 46) or in the
web interface (Figure 51, p. 61) to gain access.
When entering the FLIR identiFINDER R300 password via the web interface type “L”, “M”, or
“R” (upper case).
identiFINDER®R300/en/2014.4(13623)/Feb2015 59
Page 60

2.4. The FLIR identiFINDER R300 Web Server FLIR Detection
Figure 50. Example printout of measurement results
After entering the correct password, access is granted until you switch off your FLIR
identiFINDER R300 (2.6, p. 64).
2.4.6 Administration Access
Special credentials are required to access the administration pages of the web server where you
can access system iles or upload new software.
The credentials set at the factory are
Username
Password
60 identiFINDER®R300/en/2014.4(13623)/Feb2015
admin
admin
Page 61

FLIR Detection 2. Operating the FLIR identiFINDER R300
..
Figure 51. Entering the password before accessing protected web pages
We recommend to change the password for better protection of your instrument against
unauthorized access (see 8.18, p. 215).
..
Figure 52. Entering the administration password
identiFINDER®R300/en/2014.4(13623)/Feb2015 61
Page 62

2.5. Starting Up the FLIR identiFINDER R300 FLIR Detection
2.5 Starting Up the FLIR identiFINDER R300
Ô To start up the FLIR identiFINDER R300…
1. Ensure that the instrument is clean and free of visible damages.
2. Ensure that the battery is charged or connect the instrument to an external power source
(see 11.2, p. 230)
3. Press and hold
I for a moment.
The red LED lashes.
If your variant is equipped with a neutron detector, the blue LED lashes as well.
4. Release the key.
Wait a moment while the FLIR identiFINDER R300
• Identiies itself (Figure 53, p. 62),
Figure 53. Powering up the FLIR identiFINDER R300: Product identiication
• goes through start-up procedures (Figure 54, p. 63),
• initializes the software (Figure 55, p. 63).
If the time of the FLIR identiFINDER R300’s internal clock is unreasonable, most proba-
bly caused by the battery being empty for some weeks, you will be asked to set the clock
(see 6.10, p. 125).
5. The FLIR identiFINDER R300 switches to the dose rate display (Figure 56, p. 63) and is ready
for operation.
62 identiFINDER®R300/en/2014.4(13623)/Feb2015
Page 63

FLIR Detection 2. Operating the FLIR identiFINDER R300
Figure 54. Powering up the FLIR identiFINDER R300: Starting up
Figure 55. Powering up the FLIR identiFINDER R300: Initialization
Figure 56. FLIR identiFINDER R300 after powering up.
identiFINDER®R300/en/2014.4(13623)/Feb2015 63
Page 64

2.6. Shutting Down the FLIR identiFINDER R300 FLIR Detection
2.6 Shutting Down the FLIR identiFINDER R300
Several methods are available to shut down the FLIR identiFINDER R300.
To shut down the FLIR identiFINDER R300 normally…
Ô
1. Press and hold I .
After a couple of seconds, the shut down screen will be displayed (Figure 57, p. 64).
Figure 57. Shutting down the FLIR identiFINDER R300
2. Press L to conirm the shut down command.
or Keep I depressed and the FLIR identiFINDER R300 will shut down.
or Press R to cancel the shut down and resume normal operation.
If you shut down the FLIR identiFINDER R300 while an alarm is raised (Figure 58, p. 65), the
end time of the alarm entry is not stored in the database (5, p. 97). Instead, the end time will
relect that the instrument was shut down before the end of the alarm.
To shut down the FLIR identiFINDER R300 in case of software failure…
Ô
1. Press and hold I for about 20 seconds until the red LED and the beeper emit six short and
one long signal.
The FLIR identiFINDER R300 should shut down.
64 identiFINDER®R300/en/2014.4(13623)/Feb2015
Page 65

FLIR Detection 2. Operating the FLIR identiFINDER R300
Figure 58. Shutting down the FLIR identiFINDER R300 during an alarm
2.7 Low Power Conditions
When the battery runs out of power, an appropriate warning will be displayed (Figure 59, p. 65) ac-
companied by a characteristic sound (Figure 60, p. 65). The green status LED lashes with a higher
frequency (Figure 9, p. 31).
Figure 59. Battery almost empty.
Low Battery
Empty Battery
30 s
30 s
15 s
10 s
Figure 60. Schematic timing of triple beeps indicating low power conditions.
You can Shut Down with R or Continue using the FLIR identiFINDER R300 with L until the bat-
tery is completely empty, however, the only remaining operation is the dose rate mode (Figure 61,
p. 66 and 4.1, p. 86).
identiFINDER®R300/en/2014.4(13623)/Feb2015 65
Page 66

2.8. Resetting the FLIR identiFINDER R300 FLIR Detection
Figure 61. Low Power Dose Rate Mode
If the battery is completely empty, another message (Figure 62, p. 66) will appear accompanied by
a characteristic sound (Figure 60, p. 65).
Figure 62. Battery is empty.
You should switch off the instrument.
Please connect the FLIR identiFINDER R300 to an external power source (see 11.1, p. 229).
2.8 Resetting the FLIR identiFINDER R300
The FLIR identiFINDER R300 can be reset by performing a normal shut down–start up cycle.
All your custom settings remain unchanged by this procedure. To revert the instrument to
the factory defaults, use
66 identiFINDER®R300/en/2014.4(13623)/Feb2015
Reset Factory Settings (6.15, p. 132).
Page 67

FLIR Detection 2. Operating the FLIR identiFINDER R300
Ô To reset the FLIR identiFINDER R300…
1. Shut down the instrument (2.6, p. 64)
Should a reset be necessary because the instrument does not react to your input any-
more, you might have to use the forced shut down procedure described in section 2.6,
p. 64.
2. Start up the instrument (2.5, p. 62).
identiFINDER®R300/en/2014.4(13623)/Feb2015 67
Page 68

Page 69

FLIR Detection 3. Field Operating Guide
Chapter 3
Field Operating Guide
This chapter provides a guide to the basic operating procedures necessary to survey an object and
generate the analyzed results for the survey of that object.
In many cases, your organization or institution will have its own Standard Operating Proce-
dure (SOP). In such a case, you should refer to that SOP.
A typical application of the FLIR identiFINDER R300 is the survey of objects for radioactive radia-
tion and to document the results of the survey. This process involves these fundamental steps:
1. Turn on and check the instrument (see 3.1, p. 70).
2. Observe the dose rate in your environment to detect gamma radiation (see 3.2, p. 70).
3. Locate the source of the radiation (see 3.3, p. 73).
4. Identify the nuclides that gamma radiation is originating from (see 3.4, p. 75).
5. Transfer the results to a local computer for further processing (see 3.5, p. 77).
6. Send the results to a remote service (see 3.6, p. 81).
7. Turn off the instrument (see 3.7, p. 84).
Please familiarize yourself with the names and positions of the FLIR identiFINDER R300’s
parts and the general methods of operation (chapter 2, p. 27) before proceeding with this
chapter.
Chapter 6, p. 103 provides information about all operations and describes the operations men-
tioned here in more detail. More precise pointers into the reference will be provided with the op-
eration steps outlined below.
The instructions outlined in this chapter assume a variant with a neutron detector (A.1,
p. 237) and with factory settings.
identiFINDER®R300/en/2014.4(13623)/Feb2015 69
Page 70

3.1. Switching On and Checking the Instrument FLIR Detection
3.1 Switching On and Checking the Instrument
This description assumes normal operation of the instrument. For a detailed description of the
startup procedure refer to section 2.5, p. 62.
Ô
To start up the FLIR identiFINDER R300…
1. Press and hold I for a moment until the screen backlight appears.
2. Release the key.
Wait a moment while the FLIR identiFINDER R300
• identiies itself,
• goes through start-up procedures,
• initializes the software (Figure 63, p. 70).
Figure 63. Powering up the FLIR identiFINDER R300: General system status
3. Verify if there is enough energy in the battery and available space in the memory (Figure 63,
p. 70).
4. The FLIR identiFINDER R300 switches to the dose rate display (Figure 64, p. 71) and is ready
for operation.
3.2 Observing the Environment
The Dose Rate Mode (Figure 64, p. 71) is the basic operation mode of the FLIR identiFINDER R300,
please refer to 4.1, p. 86 for a detailed description.
3.2.1 Gamma Radiation Survey
70 identiFINDER®R300/en/2014.4(13623)/Feb2015
Page 71

FLIR Detection 3. Field Operating Guide
Alarm
Threshold
Curr
ent Dose Rate
L
ogarithmic Scale
Curr
ent Dose Rate
D
ose Rate Unit
C
urrent Neutron Rate
Availableonly for variants equipped
with a neutron detector.
Figure 64. Dose Rate mode
Ô To survey for gamma radiation…
1. Move the instrument around (e.g. Figure 65, p. 72) and observe the display (Figure 64, p. 71).
The current dose rate is shown in large digits and as a bar chart.
For best dose rate calculations the source must not be too close to the instrument (Fig-
ure 239, p. 242).
You can change the dose rate unit (see 6.31, p. 159) and the alarm thresholds (see 6.33,
p. 161).
The FLIR identiFINDER R300 continuously compares the radiation to warning and alarm thresh-
olds (see 6.33, p. 161). Should the radiation exceed one of the thresholds, the instrument raises an
alarm which is reported on-screen (Figure 66, p. 72) and optionally by LEDs, beeper, and vibrator
(see 5, p. 97 for details about the beep and vibration patterns).
You can press
Acknowledge after you took notice of the alarm or warning.
L Mute to silence alarm annunciation by beeper and vibrator. Press R
The alarm or warning will be reported in the title bar until the radiation drops below the
appropriate threshold (Figure 66, p. 72).
3.2.2 Neutron Radiation Survey
Available only for variants equipped with a neutron detector.
To survey for neutrons…
Ô
1. Holdthe FLIR identiFINDER R300 close to your body so that the neutron detector (Figure 238,
p. 241) is close to you (Figure 67, p. 73).
identiFINDER®R300/en/2014.4(13623)/Feb2015 71
Page 72

3.2. Observing the Environment FLIR Detection
A
vailable only for variants equipped with a
neutron detector.
T
itle Bar
Figure 65. Surveying an object with the FLIR identiFINDER R300.
Figure 66. Dose rate warning reported on screen
2. Turn around 360° to detect the neutrons regardless of your location relative to the source.
72 identiFINDER®R300/en/2014.4(13623)/Feb2015
Page 73

FLIR Detection 3. Field Operating Guide
Figure 67. Optimum posture for neutron detection
For tests involving un-moderated neutron sources, a 30 cm × 30 cm × 15 cm PMMA phantom
(Figure 240, p. 243) or equivalent must be placed between the source and the detector in the
FLIR identiFINDER R300 (Figure 238, p. 241) in order to provide adequate moderation of fast
neutrons and to simulate the ield operation instructions given here.
3.3 Locating a Radiation Source
Once you suspect the presence of a radiation source from observing the environment, you should
use the FLIR identiFINDER R300’s Finder Mode (4.2, p. 88) to determine the exact location of the
source.
To locate a radiation source…
Ô
1. Move the instrument to a low-radiation position for a background measurement.
2. Press
L Finder to switch from Dose Rate Mode to Finder Mode.
3. Wait until the FLIR identiFINDER R300 inishes the background measurement (Figure 68,
p. 74).
If you are in a hurry, you can R Exit the background measurement (not recom-
mended). The instrument will use the most recent background taken after it was
switched on.
4. Move the instrument around to ind the radiation source.
identiFINDER®R300/en/2014.4(13623)/Feb2015 73
Page 74

3.3. Locating a Radiation Source FLIR Detection
Measuring
Duration
C
urrent Count Rate
C
ount Rate History
B
eep Threshold
Count
Rate Exceededthe
Beep Threshold
C
urrent Count Rate
Curr
ent Dose Rate
C
urrent Neutron Rate
Available only for variants
equipped with a neutron detector.
Figure 68. Finder mode: Initial background measurement
The FLIR identiFINDER R300 averages the count rate for adjustable intervals (see 6.30,
p. 157) and will guide you with its display (Figure 69, p. 74) but mainly by emitting sounds
indicating the distance to the source. The closer you are to the source, the more “excited” the
beeper and the vibrator get.
Listening to the beeper, you can move around to look for the source while watching your step
instead of the screen.
Figure 69. Finder mode: Continuous measurement
You can change the sensitivity of the beeper (see 6.30, p. 157).
74 identiFINDER®R300/en/2014.4(13623)/Feb2015
Page 75

FLIR Detection 3. Field Operating Guide
B
est Range
S
chematic Count Rate
Indicator
Curr
ent Count Rate
Curr
ent Dose Rate
D
uration
D
ead Time Relative to
Passed Duration
A
dvice
3.4 Identifying a Radiation Source
After you have detected a radiation source by surveying the ambient dose rate (3.2, p. 70) or by
locating its position (3.3, p. 73), you can use the FLIR identiFINDER R300’s Identiication Mode (4.3,
p. 90) to ind out the nuclide the radiation is originating from.
The FLIR identiFINDER R300 can identify and report a number of nuclides by analyzing the radia-
tion spectrum they emit. You can inspect the library of these nuclides in appendix C, p. 259 or, with
less detail, in the instrument itself by checking the nuclide visibility under
Options Menu (p. 103) ä More Options (p. 103) ä Identication Options (p. 103) ä Nuclide Visibility (p. 118)
Depending on your instrument’s settings, you might have to enter a password to access the
list (2.2.7, p. 46).
To identify radionuclides…
Ô
1. If the FLIR identiFINDER R300 runs in Dose Rate Mode (Figure 64, p. 71) and Finder Mode
is enabled, then press
Finder . If Finder mode is disabled, then Identify will be present so
proceed to the next step.
2. Press
Identify to switch to Identiication Mode (Figure 70, p. 75).
Figure 70. Spectrum acquisition in Identiication Mode
The FLIR identiFINDER R300 begins to acquire a spectrum of the radiation. Normally, there
is a preset acquisition duration, but you can change that to a minimum number of counts set
at the factory (6.4, p. 116).
3. Move the instrument into a good position for optimal data acquisition.
Try to get the current count rate marker into the center of the schematic indicator (Figure 70,
p. 75) by getting closer to or away from the source.
identiFINDER®R300/en/2014.4(13623)/Feb2015 75
Page 76

3.4. Identifying a Radiation Source FLIR Detection
B
est Range
Curr
ent Count Rate
A
dvice
Identic
ation
Condence
0: bad
the Saved Data
Figure 71. Finding the position for best measurements
The FLIR identiFINDER R300 assists with advice given on-screen (Figure 71, p. 76).
4. Wait until the preset acquisition duration is over.
The FLIR identiFINDER R300 applies the identiication algorithm to the acquired data and
shows the result (Figure 72, p. 76). Additionally, the identiication results including the spec-
trum and, if required and available, the GPS coordinates are automatically saved in the FLIR
identiFINDER R300’s database.
Figure 72. Identiication results
Nuclides the identiication algorithm did not recognize or those recognized but having
their visibility suppressed (see 6.5, p. 118) are reported as “Unknown”.
You can specify whether conidence, usage, or severity are shown, see 6.4, p. 116.
5. If necessary, you can acquire more spectrum data to improve the identiication by pressing
Continue .
76 identiFINDER®R300/en/2014.4(13623)/Feb2015
Page 77

FLIR Detection 3. Field Operating Guide
The FLIR identiFINDER R300 will acquire more data for the preset extra duration (see 6.4,
p. 116).
6. You can inspect the spectrum acquired for the identiication by pressing
Skip and Spectrum
(Figure 73, p. 77). Please refer to 6.2, p. 106 for options and commands for spectrum viewing.
Figure 73. Spectrum the identiication is based upon
3.5 Communicate with a Local Computer
You can access the FLIR identiFINDER R300’s settings and stored data from a computer locally con-
nected to the instrument.
The FLIR identiFINDER R300 acts as a web server so you need no special software other than your
standard web browser. For some computer operating systems, however, you need to install drivers
for the connection. Please refer to section 7, p. 167 for details.
To transfer identication results to a local computer…
Ô
These instructions assume that your computer is correctly prepared. Consult section 7,
p. 167 or your IT administrator for help.
1. Connect the FLIR identiFINDER R300 to your computer with the included USB cable (refer to
section 7.1, p. 168 for details).
After establishing the connection, the FLIR identiFINDER R300 will display its IP address.
(Figure 74, p. 78)
2. Use your computer’s standard web browser to navigate to the given IP address.
The FLIR identiFINDER R300’s home page opens and displays diverse information regarding
your FLIR identiFINDER R300 (Figure 75, p. 78).
identiFINDER®R300/en/2014.4(13623)/Feb2015 77
Page 78

3.5. Communicate with a Local Computer FLIR Detection
Type
Figure 74. Valid IP address after a connection was established
Figure 75. The FLIR identiFINDER R300’s home page
3. Open the table with identiication records stored in the FLIR identiFINDER R300’s database
(Figure 76, p. 79) via the menu
DatatIdentications .
4. To look for the desired data you can click the sorting button in one of the column titles (Fig-
ure 76, p. 79).
5. If many records are stored in the database, you might need to turn pages with the multipage
table navigation (Figure 76, p. 79).
78 identiFINDER®R300/en/2014.4(13623)/Feb2015
Page 79

FLIR Detection 3. Field Operating Guide
Titles
Figure 76. Table of identiication result records
6. To view a summary of a record, hover the pointer over the table row of the record (Figure 76,
p. 79). (Not available on touch-driven devices without pointer.)
7. To view a detailed report of a record, click
Show .
The details will be shown on separate page (Figure 77, p. 80).
8. To print the report, use your browser’s Print command.
9. To download the identiication record to your computer in the formats speciied in the set-
tings (8.6.4, p. 192), click
Download and follow the instructions of your web browser.
identiFINDER®R300/en/2014.4(13623)/Feb2015 79
Page 80

3.5. Communicate with a Local Computer FLIR Detection
..
Figure 77. Details of an identiication result record
80 identiFINDER®R300/en/2014.4(13623)/Feb2015
Page 81

FLIR Detection 3. Field Operating Guide
3.6 Sending Results to a Remote Server
This item is available for FLIR identiFINDER R300 variants with Bluetooth (see A.1, p. 237).
You can transfer identiication results or spectra to a remote server for further processing or anal-
ysis. An ANSI N42.42 ile (p. 269) containing the data is sent from the FLIR identiFINDER R300 to a
cell phone via short range Bluetooth radio and from the phone to the remote server via the Internet.
The connection requires some initial setup on the FLIR identiFINDER R300 and on the mobile
phone, please refer to section 9, p. 219 for details.
Ô
To send identication result records to a remote server…
These instructions assume that your FLIR identiFINDER R300 and your cell phone are
correctly prepared. Consult section 9, p. 219 or your IT administrator for help.
1. While the identiication results (for example of section 3.4, p. 75, Figure 72, p. 76) are dis-
played, press
Skip to reveal the command Send (Figure 78, p. 81).
Figure 78. Identiication results
2. Initiate the data transfer with Send .
A summary of the record is shown (Figure 79, p. 82).
3. Start the data transfer with
Send .
During the transfer of data you will be kept posted about the progress of the transmission
steps (Figure 80, p. 82).
If this is the irst time you are sending data since switching on the FLIR identiFINDER R300, you
have to pair it with your Bluetooth phone. Please refer to section 6.23.3, p. 144 for the complete
details.
identiFINDER®R300/en/2014.4(13623)/Feb2015 81
Page 82

3.6. Sending Results to a Remote Server FLIR Detection
Figure 79. Identiication result summary for sending
Figure 80. Data transmission progress
Ô To pair with a Bluetooth device…
1. Press Start Search (Figure 81, p. 83) to have the FLIR identiFINDER R300 search for suitable
Bluetooth devices.
2. Choose the desired Bluetooth device from the list shown (Figure 82, p. 83) with
3. To start the pairing with the chosen device, press
Select . Your device might require addi-
Down .
tional steps like entering a PIN. Use the PIN shown on your FLIR identiFINDER R300 screen
(Figure 83, p. 83).
4. Your FLIR identiFINDER R300 displays some details about the paired device and is ready to
send data.
82 identiFINDER®R300/en/2014.4(13623)/Feb2015
Page 83

FLIR Detection 3. Field Operating Guide
Figure 81. Ready to search for Bluetooth devices
Figure 82. List of suitable Bluetooth devices detected
Figure 83. Pairing with a Bluetooth device
identiFINDER®R300/en/2014.4(13623)/Feb2015 83
Page 84

3.7. Switching Off FLIR Detection
3.7 Switching Off
After you are done with all your measurements, you should shut down the FLIR identiFINDER R300.
The details on shutting down are given in section 2.6, p. 64, the recommended procedure follows:
To shut down the FLIR identiFINDER R300…
Ô
1. Press and hold I .
After a couple of seconds, the shut down screen will be displayed (Figure 84, p. 84).
Figure 84. Shutting down the FLIR identiFINDER R300
2. Press L to conirm the shut down command.
Store your FLIR identiFINDER R300 in its case while not in use.
84 identiFINDER®R300/en/2014.4(13623)/Feb2015
Page 85

FLIR Detection 4. FLIR identiFINDER R300 Modes
Chapter 4
FLIR identiFINDER R300 Modes
This chapter provides detailed descriptions of the FLIR identiFINDER R300’s essential measuring
modes for day-to-day procedures.
Dose Rate Mode
Observe the ambient radiation (see 4.1, p. 86)
Finder Mode
Locate radiation sources (see 4.2, p. 88)
Identication Mode
Identify radiating nuclides (see 4.3, p. 90)
Automated Mode
Have the unattended instrument identify radiating nuclides at predeined time intervals (see
4.4, p. 93)
Remotely Controlled Spectrum Acquisition
Acquire spectra via the web interface (see 4.5, p. 95, 8.16, p. 209)
The alarms overriding all other modes and commands are detailed in Chapter 5, p. 97.
identiFINDER®R300/en/2014.4(13623)/Feb2015 85
Page 86

4.1. Dose Rate Mode FLIR Detection
Alarm
Threshold
Availableonly for variants equipped
Figure 85. Cycling the manual modes Dose Rate, Finder, and Identiication
Figure 86. While Finder mode is disabled, cycling modes will toggle between Dose Rate and Identiication
modes
4.1 Dose Rate Mode
The Dose Rate Mode is the basic operation mode of the FLIR identiFINDER R300. It is activated
after starting up the instrument.
Figure 87. Dose Rate mode
86 identiFINDER®R300/en/2014.4(13623)/Feb2015
Page 87

FLIR Detection 4. FLIR identiFINDER R300 Modes
For best dose rate calculations the source must not be too close to the instrument (Figure 239,
p. 242).
The dose rate display (Figure 87, p. 86) shows two representations of the gamma dose rate:
Analog
A colored horizontal bar along a logarithmic axis ranging from 0.001 µSv/h to 10 Sv/h
(1 Sv = 100 rem) across the upper part of the screen.
A vertical line marks the position of dose rate alarm threshold (see 6.33, p. 161 for setting the
threshold).
If the dose rate rises above the threshold, the color of the bar representing the current dose
rate changes.
Digital
Large digits and a dose rate unit in the screen’s center.
The unit is adjusted to the order of magnitude of the dose rate (µSv/h, mSv/h, Sv/h) and
relects your preferences (see 6.31, p. 159).
If your variant is equipped with a neutron detector, the current neutron rate is shown
below the gamma dose rate.
If the dose rate rises above the overload threshold (see A.1, p. 237), the instrument’s results
are unreliable. This condition is displayed on the screen (Figure 88, p. 87).
We strongly recommend that you retreat from environments with radiation that high.
Figure 88. Detector overload
Move the FLIR identiFINDER R300 to a location with lower radiation and then press Conrm .
identiFINDER®R300/en/2014.4(13623)/Feb2015 87
Page 88

4.2. Finder Mode FLIR Detection
Settings and Commands
..
Finder
Switch to Finder mode (see 4.2, p. 88).
..
Options
Inspect and change options (see 6, p. 103).
4.2 Finder Mode
You can use the FLIR identiFINDER R300 in Finder Mode to locate a radiation source. Move the
instrument around the vicinity of a suspected source and monitor the display, the red LED, vibrator,
and beeper of the FLIR identiFINDER R300 for changes. The vibration, and especially the sound,
get more “excited” the closer the instrument is to the source.
Finder mode can be disabled (see 6.30, p. 157).
You can switch off the LED, the vibrator, and the beeper (see 6.32, p. 160).
Immediately after switching to the Finder mode, the FLIR identiFINDER R300 begins a background
measurement (Figure 89, p. 89).
For better results, move the FLIR identiFINDER R300 away from suspected radiation sources
during the background measurement.
The duration of the background measurement is shown below the chart showing the measure-
ments.
If a background was measured since switching on the FLIR identiFINDER R300 and you don’t want
to wait until the background is measured (not recommended), you can cancel the background mea-
surement. The FLIR identiFINDER R300 will then use the most recent previous background mea-
surement.
After the background measurement has inished, the Finder mode screen appears (Figure 90, p. 89).
If your variant is equipped with a neutron detector, the current neutron rate is displayed at
the bottom of the screen.
The current count rate is averaged for a period you can specify (see 6.30, p. 157). The average of
the most recent period is visualized as a wide column along the right edge of the screen.
Narrow columns representing older periods ill the screen’s center from right to left, pushing the
oldest periods off the screen’s left edge.
88 identiFINDER®R300/en/2014.4(13623)/Feb2015
Page 89

FLIR Detection 4. FLIR identiFINDER R300 Modes
Available only for variants
Figure 89. Finder mode: Initial background measurement
Figure 90. Finder mode: Continuous measurement
The vertical scaling of the chart is adjusted continuously to make best use of the available screen
height. A dashed line above the chart indicates the adjustable (see 6.30, p. 157) threshold for audi-
ble feed back. If the count rate rises above this level, you get notiied by the red LED, the vibrator,
and the beeper. The sound frequency is proportional to the count rate, that is, the closer the instru-
ment gets to the source the higher the tone.
You can mute the sound by pressing I for a moment. Muting remains in effect until you
leave and re-enter the Finder mode and the background measurement is repeated.
Settings and Commands
Dose
Switch to Dose Rate mode (see 4.1, p. 86).
identiFINDER®R300/en/2014.4(13623)/Feb2015 89
Page 90

4.3. Identication Mode FLIR Detection
A
dvice
Identify
Switch to Identiication mode (see 4.3, p. 90).
Options
Inspect and change options (see 6, p. 103).
4.3 Identication Mode
You can switch the FLIR identiFINDER R300 to Identiication Mode to perform the actions neces-
sary to identify the nuclides gamma radiation is originating from.
The instrument acquires a gamma spectrum for a duration you can specify (6.4, p. 116) and shows
the progress and some parameters of the measurement (Figure 91, p. 90).
The spectrum acquired here overwrites the current contents of the spectrum viewer (6.2,
p. 106). Data acquisition in the spectrum viewer, if any, is stopped.
Figure 91. Identiication Mode: Progress display during time limited data acquisition
The FLIR identiFINDER R300 achieves better identiication results if the count rate is within a cer-
tain range shown in the center of in the indicator. While the current count rate is outside the desired
range, advices are shown so you can shorten (Figure 92, p. 91) or lengthen (Figure 93, p. 91) the
distance between the instrument and the radiation source.
If the acquisition is limited not by the time, but the number of counts (6.4, p. 116), the display looks
slightly different (Figure 94, p. 92).
You should try to move the instrument into a good position although the advice on moving
the instrument in a position for best identiication is not shown in this mode to make room
for the number of counts relative to the required minimum.
90 identiFINDER®R300/en/2014.4(13623)/Feb2015
Page 91

FLIR Detection 4. FLIR identiFINDER R300 Modes
A
dvice
A
dvice
Figure 92. Identiication Mode: Count rate too low for best results
Figure 93. Identiication Mode: Count rate too high for best results
The acquisition of data stops after the duration or count criterion (6.4, p. 116) is met or when you
Exit . The FLIR identiFINDER R300 applies the identiication algorithm and saves and displays the
result (Figure 95, p. 92 and Figure 96, p. 93). If nuclides were identiied, the results are saved. The
reference number of the saved record is shown so you can refer to it for further processing.
You can specify whether conidence, usage, or severity are shown, see 6.4, p. 116.
Nuclides the identiication algorithm did not recognize or those recognized but having their
visibility suppressed (see 6.5, p. 118) are reported as “Unknown”.
Settings and Commands
Dose
Switch to Dose Rate mode (see 4.1, p. 86).
identiFINDER®R300/en/2014.4(13623)/Feb2015 91
Page 92

4.3. Identication Mode FLIR Detection
the Saved Record
Figure 94. Identiication Mode: Progress display during count limited data acquisition
Figure 95. Identiication Mode: Identiication was not possible.
Start
Start the identiication measurement.
Skip
Cycle the list of commands (see 2.2.1, p. 35).
Send
Go to Send Identication (see 6.21, p. 137) avoiding the detour around the normal options
menu hierarchy. The current identiication will be already chosen for sending.
Exit
Return to the previous mode.
92 identiFINDER®R300/en/2014.4(13623)/Feb2015
Page 93

FLIR Detection 4. FLIR identiFINDER R300 Modes
the Saved Record
Figure 96. Identiication Mode: Identiied radionuclides
Continue
Acquire more data to improve the identiication. The acquisition continues for the duration
you speciied (see 6.4, p. 116) no matter whether you limited the duration or the minimum
number of counts for the initial acquisition.
Spectrum
Inspect the acquired spectrum.
This command is available only after you entered the password or if the password pro-
tection is off.
Please refer to 6.2, p. 106 for options and commands for spectrum viewing. After you return
from the spectrum, you can
Continue to acquire data, or Exit the identiication mode.
4.4 Automated Mode
In automated mode, the FLIR identiFINDER R300 collects data for a radionuclide identiication at
speciied time intervals or in response to a dose rate warning. You can switch this mode on or off
and specify the interval (see 6.20, p. 135).
For each measurement, data will be collected until an instrument-speciic number of gamma counts
has been registered (cf. “Dynamic” identiication duration, see 6.4, p. 116).
In low-radiation environments, this can take quite a while, even longer than the interval you
speciied. The next scheduled measurement will be omitted in such cases.
The start of an automated measurement will be announced 60 s in advance by a countdown shown
instead of the current time on the display of the FLIR identiFINDER R300 (Figure 97, p. 94).
identiFINDER®R300/en/2014.4(13623)/Feb2015 93
Page 94

4.4. Automated Mode FLIR Detection
Figure 97. Countdown announcing the start of a scheduled measurement
Automatic identiication measurements override other activities except alarms (see 5, p. 97). Au-
tomatic measurements are blocked during:
• Background measurements in Finder Mode (see 4.2, p. 88)
• A running self test (see 6.19, p. 134)
During these conditions, the countdown continues, but “Blocked” is shown instead of the count-
down timer. Should the condition end before the scheduled time, the measurement starts. Other-
wise, the measurement is omitted and a new attempt is made after the regular interval.
During the measurement, basic radiation data and a small spectrum with logarithmic scaling are
shown (Figure 98, p. 94).
Figure 98. Automated measurement
94 identiFINDER®R300/en/2014.4(13623)/Feb2015
Page 95

FLIR Detection 4. FLIR identiFINDER R300 Modes
Settings and Commands
..
Switch Off
Switch off automated mode.
Depending on your variant, this might require entering the password (2.2.7, p. 46).
..
Cancel
Cancel this measurement. The next measurement will start as scheduled.
Detected Nuclides
Once the Automated Mode measurement is complete, the FLIR identiFINDER R300 will re-
port any nuclide(s) identiied and indicate the reference number assigned to the stored
results.
..
30 s
Initially, the only available command on the nuclide results screen shows a countdown timer
starting at 30 s. When the timer expires, the FLIR identiFINDER R300 will return to the
screen that was active before the Automated Mode measurement started. Pressing
prior to the timer expiring will cancel the timer and the command will change to
..
Exit .
30 s
..
..
Exit
Only appears if the results countdown timer was cancelled. Press to close the results screen
and return to the screen that was active before the Automated Mode measurement started.
Results Storage
The results of the measurements are saved in the database of the FLIR identiFINDER R300.
They are marked as being results of automated measurements (see 8.11, p. 199).
4.5 Remote-Controlled Spectrum Acquisition
While the FLIR identiFINDER R300 is connected to a computer, you can collect and analyze spectra
via the web interface. This method of data acquisition for spectra interrupts other operations of
the instrument.
Alarms will still be reported, if necessary.
During the acquisition, a message is shown (Figure 99, p. 96). You can stop it on the instrument
with
..
Stop or via the web interface with
After the acquisition, the FLIR identiFINDER R300 resumes the mode it was in before. If the previ-
ous operation was interrupted during a time limited task like collecting background or identiica-
tion data, it must start over again.
...
Stop (see 8.16, p. 209).
identiFINDER®R300/en/2014.4(13623)/Feb2015 95
Page 96

4.5. Remote-Controlled Spectrum Acquisition FLIR Detection
Figure 99. Message during remote-controlled spectrum acquisition
96 identiFINDER®R300/en/2014.4(13623)/Feb2015
Page 97

FLIR Detection 5. FLIR identiFINDER R300 Alarms
Chapter 5
FLIR identiFINDER R300 Alarms
If the FLIR identiFINDER R300 detects radiation above certain thresholds you can specify (see 6.33,
p. 161), it raises an alarm. Alarms can be reported via several annunciators:
Main Display
Details of the alarm are always displayed on-screen, no matter which other activity was dis-
played at the time the alarm condition was met (for example, Figure 101, p. 99).
The screen backlight will be switched on if it timed out (6.9, p. 122).
The alarm details remain on the screen until you dismiss them.
Status Bar
If you dismiss the alarm details, the alarm and warning information is shown in the status
bar along the display’s top edge alternating with the normal information shown there (Fig-
ure 100, p. 98).
LED LEDs (Figure 7, p. 28) lash in several patterns.
Beeper
The beeper emits various sound patterns.
Vibrator
The vibrator shakes the instrument (and adds a little sound).
You can switch the LEDs, the beeper and the vibrator on or off (see 6.32, p. 160).
All alarms are stored in the FLIR identiFINDER R300’s database, including date and time (always)
and GPS coordinates (if switched on and available, see 6.11, p. 127).
You can review saved alarms via the web interface (8.13, p. 206) or delete them (6.17, p. 133)
identiFINDER®R300/en/2014.4(13623)/Feb2015 97
Page 98

5.1. Gamma Alarms FLIR Detection
Alarm
Alternates with
the Normal Title
Settings and Commands
Mute
Switch off the beeper and vibrator for the current alarm. The next alarm, if any, reactivates
sound and vibration.
Acknowledge
Acknowledge the alarm.
The beeper and the vibrator are switched off (see “Mute” above) and the screen returns to the
content displayed before the alarm was raised (Figure 100, p. 98). The alarm details, however,
will alternate with the standard information in the title bar until the radiation drops below
the alarm threshold.
Figure 100. Dose rate display with alarm indication
5.1 Gamma Alarms
The FLIR identiFINDER R300 continuously compares the detected gamma radiation against thresh-
olds you can specify for
• dose warning and dose alarm (see 6.33, p. 161)
• dose rate warning and dose rate alarm (see 6.34, p. 162).
When a threshold is exceeded, an appropriate warning or alarm is raised and reported visually
(Figure 101, p. 99 and Figure 102, p. 99). The appropriate behavior of the annunciators is detailed
in Figure 103, p. 100.
98 identiFINDER®R300/en/2014.4(13623)/Feb2015
Page 99

FLIR Detection 5. FLIR identiFINDER R300 Alarms
Figure 101. Alarm display: Dose rate warning
Figure 102. Alarm display: Dose rate alarm
identiFINDER®R300/en/2014.4(13623)/Feb2015 99
Page 100

5.1. Gamma Alarms FLIR Detection
.
.
.
.
...
..
..
....
..
..
....
..
..
..
.
.
.
....
.
.
Warning
Red LED
Beeper
Vibrator
Dose or Dose Rate Alarm
Red LED
Beeper
Vibrator
Dose + Dose Rate Alarm
Red LED
Beeper
Vibrator
clock
Figure 103. Gamma alarms as announced by the red LED, beeper, and vibrator
1 s
1 s
1 s
100 identiFINDER®R300/en/2014.4(13623)/Feb2015
 Loading...