

Page 1

Getting Started
Page 2

© 2007 FlipStart Labs. All rights reserved. Reproduction of any part of this manual without the prior written permission of
FlipStart Labs is strictly prohibited.
Information in this document is subject to change without notice. Screen images simulated. Actual product may differ.
FlipStart, the FlipStart logo, InfoPane, FlipStart Navigator, FlipStart Zoom, and FlipStart Control Center are trademarks of Vulcan Portals Inc. Microsoft, Windows, Vista and Outlook are trademarks of Microsoft Corporation. The Bl uetooth word mark and
logos are owned by the Bluetooth SIG, Inc. and any use of such marks by Vulcan Portals Inc. is under license. Other trademarks
and trade names in this document refer to the entities claiming the marks and names or their products. FlipStart Labs disclaims
any proprietary interest in trademarks and trade names other than its own.
The FlipStart® device, accessories bearing the FlipStart logo and FlipStart proprietary software are protected by copyright,
international treaties and patents, including the following U.S. patents: 6,839,231 and 6,977,811. Additional patents are registered
or pending in countries around the world.
Page 3

Contents
We l com e to F li p St a r t 1
Ge t t in g H e l p 3
Sa f e ty I nf o r ma t i o n 4
Se t t in g U p fo r Fi r s t U s e 6
Vis u a l Q ui c k St a r t 7
St a r ti n g U p 8
Con t rol s 9
Ex p a nd i ng Yo ur F li p S ta r t 12
Ge t t in g O n l in e 14
Fl i p St a r t I nf o P a n e 17
Fl i p St a r t N avi g a to r 18
Fl i p St a r t Z o om 19
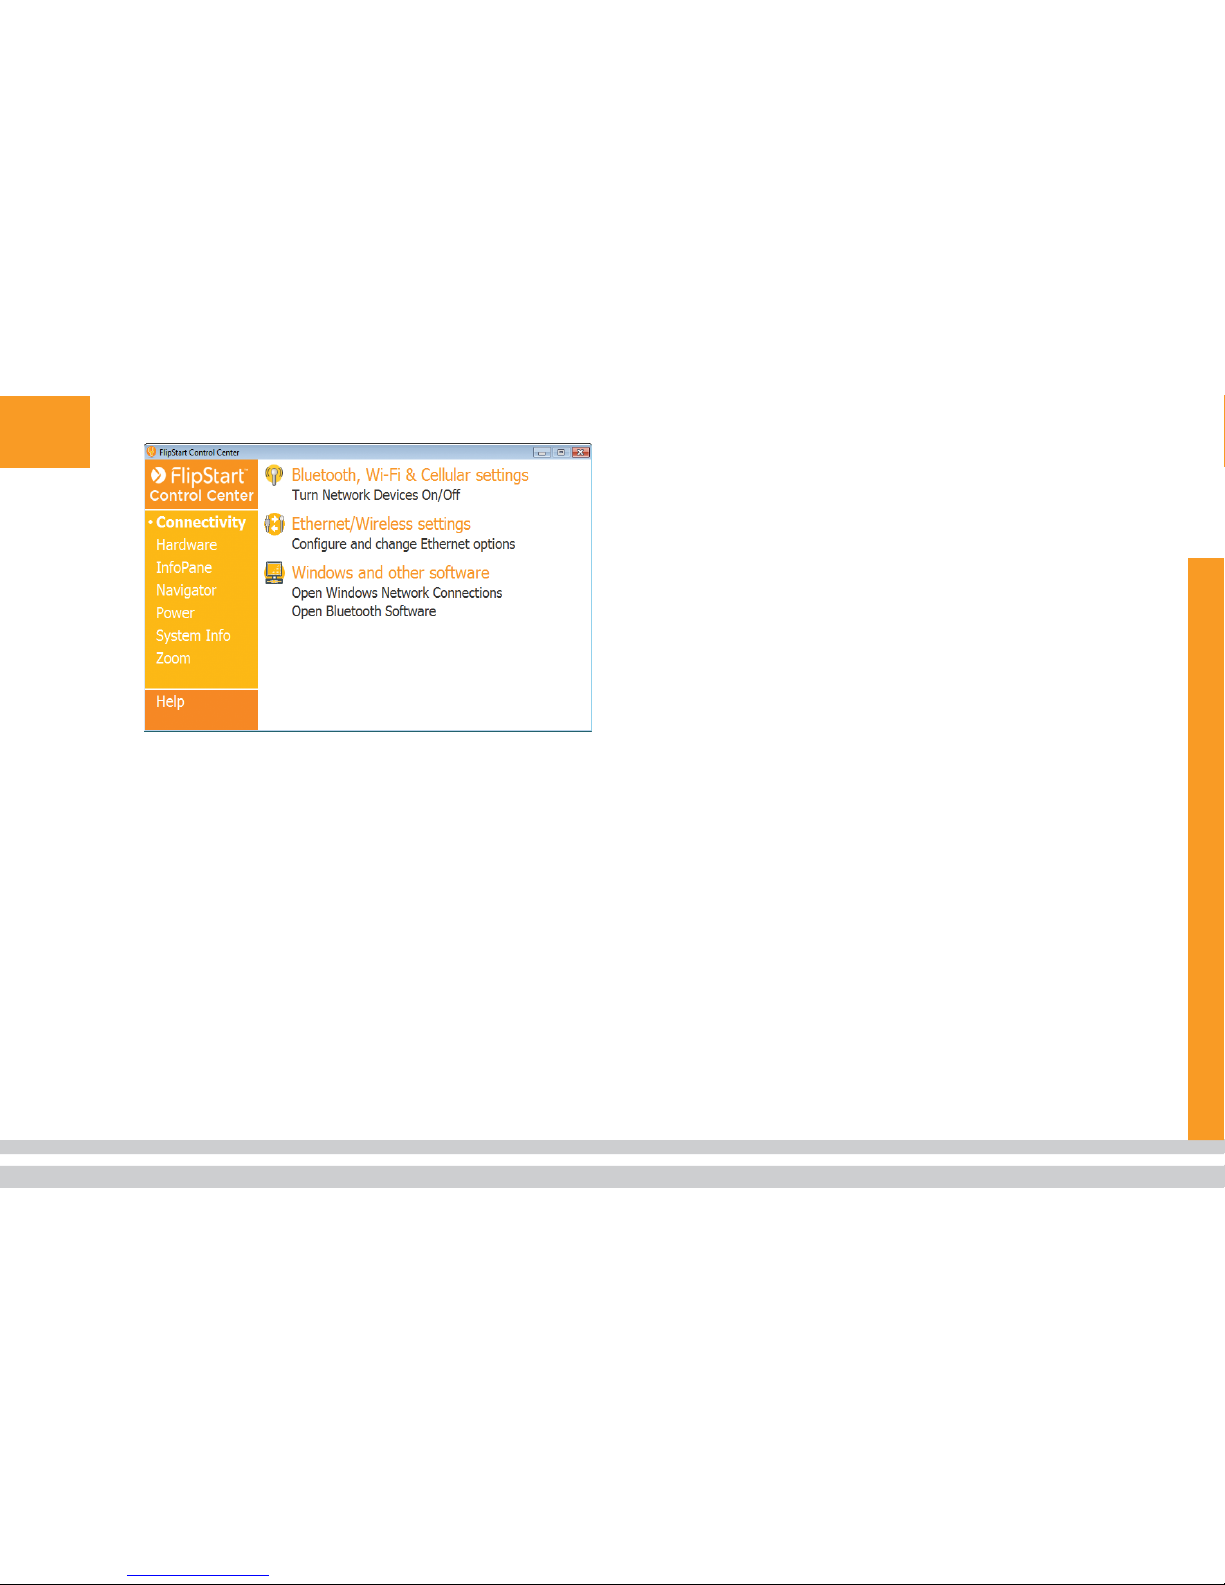
Fl i p St a r t C o n t r o l C e nte r 20
We b ca m 2 1
Aud i o 22
In s t al l i ng Pro g r a ms 24
Us i n g Yo u r F li p S ta r t O n -t h e -G o 25
FCC C om p l ia n c e S t ate m e n t 26
Fl i p St a r t S of t w a re E nd - U s e r L i c en s e
Agre e m en t 27
Page 4
Page 5
1
We l co m e to F l i p S t art
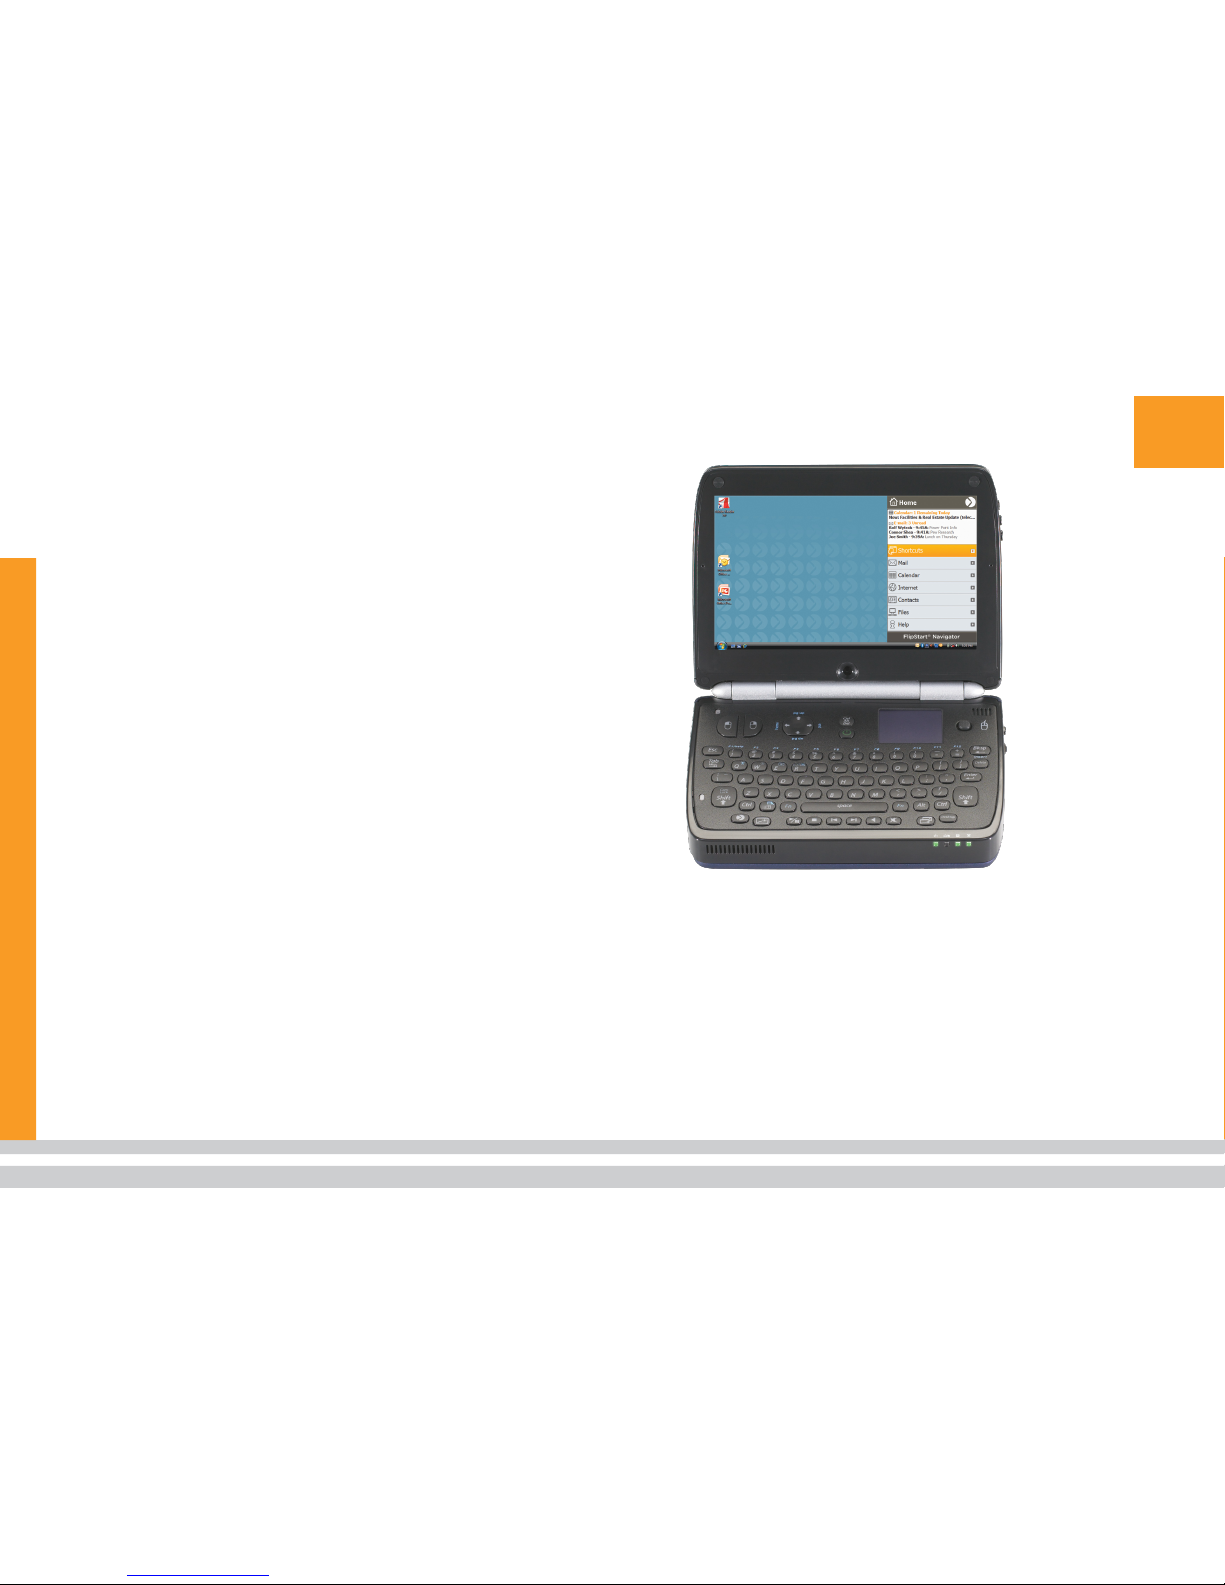
The FlipStart® model E-1001S is a super-compact
Microsoft® Windows® personal computer with a
familiar clamshell design packed with innovative features that make it easy to use—in your hand, on your
desk, or mounted in your vehicle.
The productivity of a PC
The FlipStart offers the capabilities you expect from
your laptop—comfortable application usage, communications, entertainment, and Internet connectivity.
Its industry-standard components include an Intel®
Pentium® M Ultra Low Voltage platform, 1.1 GHz of
processing power, and a 30 GB hard drive with the
choice of Microsoft Windows XP Professional or Windows Vista™ Business operating systems.
Familiar form factor
If you’re a laptop user, you’ll find the clamshell design
immediately familiar. With its adjustable screen angle,
balanced weight, dual-function keyboard, and highresolution 5.6” display, the FlipStart is comfortable
in your hands, on your desk, or mounted in your car.
In addition, the QWERTY keyboard, touchpad, and
touchstick provide easy navigation, while the 1024 x
600 Wide SVGA display provides comfortable screen
viewing.
Page 6
2
Easy access
FlipStart InfoPane™ provides a low-power interactive
display on the outside of the case giving you instant
access to daily details in Microsoft Office Outlook®
such as e-mail, calendar, and contacts. When open, the
FlipStart Navigator™ software provides a fully customizable shortcut menu for one button access to the
applications, files, and systems that you access most
often. The nine-level FlipStart Zoom™ enables you to
quickly drill down on a screen or window for more
detail.
Straightforward connectivity
Wireless wide area network (WWAN) capabilities give
you high-speed cellular data access at DSL speeds.
FlipStart also provides 802.11 b/g functionality, so you
can access office, home, and public Wi-Fi networks.
Built-in Bluetooth® wireless technology delivers connectivity to wireless peripherals such as keyboards,
mice, headsets, and others. Moreover, FlipStart
includes a slim, removable port replicator to provide
VGA output for projectors and large monitors, wired
Ethernet, additional USB ports, and audio output.
What’s in the Box?
Your FlipStart package contains the following
items:
FlipStart PC
FlipStart standard, high-capacity
lithium-polymer battery
AC adapter
Port replicator
Getting Started guide
Stereo ear bud/microphone
combination with volume control
Soft carrying case
Screen polishing cloth
Recovery software DVD (requires
external DVD drive)
Microsoft Windows Vista Quick Start guide
or Microsoft Windows XP Start Here guide
Warranty card
Page 7
3
Gett i n g Help
This guide provides information to help you get up
and running with your FlipStart quickly. If you have
further questions or issues while using your FlipStart,
you can get help in several ways.
Help Central
Your FlipStart includes Help Central, where you can
access all FlipStart user documentation. This documentation includes a User Guide (in Adobe® Reader
format) that provides more detailed information than
this Getting Started manual. Help Central also provides access to Help documentation for all FlipStart
applications. To start Help Central, simply double-click
the Help Central icon on your Windows desktop.
On the Web
Answers to many of your questions can be found online in our Customer Support Knowledge Base.
To use our online resources, open your Internet
browser and go to www.flipstart.com/support to find
out more information.
Customer Support contact
information
If you are having difficulties that cannot be solved
by the user documentation or our Customer Support
Knowledge Base, please contact FlipStart Customer
Support at 800-399-3037.
Page 8
4
Safet y I n f o r mati o n
WARNING! Please read all of the following
safety precautions carefully before using
or storing your FlipStart. Failure to follow
these instructions may result in death, personal injury, or property damage.
General precautions
Do not insert objects into openings
in the FlipStart. Doing so may
cause fire or electric shock.
Do not cover or block the air ventilator or
use the FlipStart if the air ventilator is not
functioning properly. Do not use your FlipStart
on a bed, sofa, chair, rug or other surface
that does not permit sufficient air circulation.
Do not place a powered-on FlipStart in a
carrying bag or other container. Overheating
and damage to the FlipStart may result.
Do not use your FlipStart in or around
water, including near a bath tub, sink,
or swimming pool. Electric shock or
property damage may result.
Do not subject your FlipStart or battery to
extreme heat, cold, humidity, or severe shock.
Protect your FlipStart from dust, dirt,
food, liquids, extreme temperatures,
and overexposure to sunlight.
Do not use your FlipStart or
connect or disconnect any cables
during an electrical storm.
Do not use your FlipStart while
driving a moving vehicle. Serious
injury or death could result.
If you notice smoke, fire, extreme heat,
or unusual noises or odors while using
your FlipStart, disconnect the FlipStart
immediately and contact technical support.
Do not attempt to disassemble, modify,
or repair the FlipStart, battery or
adapter. Doing so may cause serious
personal injury or property damage.
Before cleaning your FlipStart, disconnect
the AC adapter, the battery, and any cables
or accessories. Clean your FlipStart with
a soft cloth slightly dampened with water.
Do not use any aerosols, sprays, solvents,
or abrasive cleaners and do not allow
liquid or moisture to enter the FlipStart.
If you move your FlipStart between
environments that differ significantly in
temperature or humidity, condensation may
form on or within the FlipStart. To avoid
damage to the FlipStart, allow sufficient
time for the FlipStart to acclimate to
room temperature before turning it on.
Improper or prolonged use of the
FlipStart may result in injury. Viewing
the display for extended periods of
time may result in eye strain.
Page 9
5
If you drop your FlipStart or battery causing
damage, you should have the FlipStart or
battery inspected before using it further.
AC adapter
Use the AC adapter only in a well-ventilated
area. Do not cover the adapter or use it
inside of a carrying case. The AC adapter
may become hot during normal use.
Use care when handling the adapter to
avoid injury or damage to property.
Use only the AC adapter provided by
FlipStart Labs or specifically approved by
FlipStart Labs for use with this FlipStart.
Do not place objects on the power cord.
Do not use a damaged power cord or
adapter. Fire or electric shock may result.
Never unplug the adapter by pulling on the
cable. Doing so may damage the power cord,
resulting in a risk of fire or electric shock.
Batteries
Use only batteries provided by
Vulcan or specifically approved by
Vulcan for use with this FlipStart.
Do not use the FlipStart without the
battery attached. Do not remove the
battery while the FlipStart is turned on.
Do not disassemble the battery. Doing so
may cause fire, explosion, or leakage resulting
in personal injury or property damage.
Do not place your battery near a heat
source or expose it to high temperatures.
The battery could explode or catch fire.
Your FlipStart uses a lithium-polymer
battery. Do not dispose of the battery
in a fire or with your household waste.
Contact your local waste disposal
agency for the nearest disposal site.
Airplane travel and hospitals
Certain locations, like hospitals and
airports, may restrict the use of RFemitting devices. Always comply with
posted regulations concerning the use of
your FlipStart to avoid interfering with
aircraft, medical, or other equipment.
Federal Aviation Administration rules
and individual airline regulations may
prohibit the use of your FlipStart while
on board an aircraft, particularly during
take-off and landing. Please follow all
instructions provided by airline personnel.
Do not expose your FlipStart to an airport
metal detector or magnetic wand. X-ray
security machines will not harm your FlipStart.
Page 10
6
Sett i n g Up for F i r st Us e
Before you use your FlipStart for the first time,
write down the Microsoft Windows product activation
key from the sticker on the bottom of the FlipStart,
connect your battery, plug in the AC adapter to the
rear of the FlipStart, and begin charging the battery.
Important! Turn your FlipStart over, and write down
the Windows product activation key located on the
Microsoft Certificate of Authenticity sticker before
attaching the battery. Microsoft Windows setup will
prompt you to enter this product activation key when
you first start your computer.
__ __ __ _ _ - __ __ __ _ _ - __ __ __ _ _ - __ __ __ _ _ - __ __ __ _ _
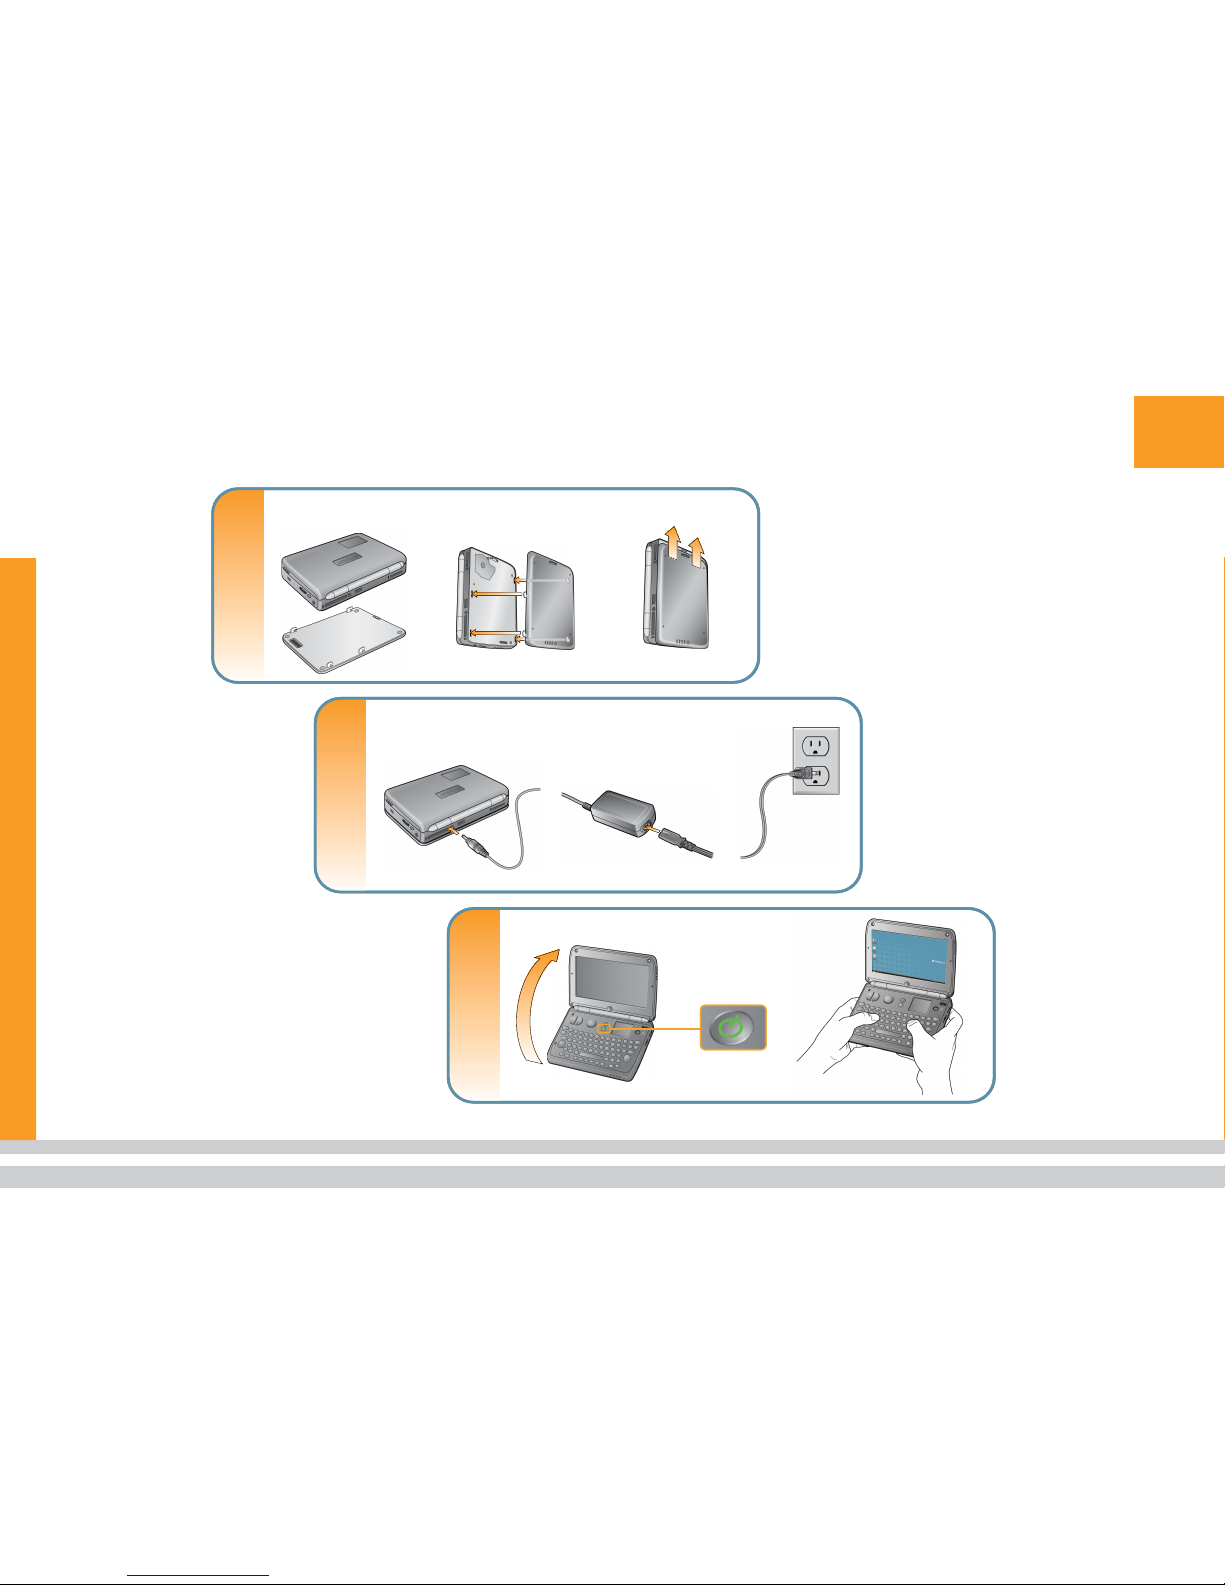
Attach the battery onto your FlipStart as shown in
the illustration.
Place the clips on the battery into the slots on
the bottom of the FlipStart as shown.
Slide the battery up gently until it clicks into
place.
Connect the AC adapter power cord to the AC
adapter, and connect the AC adapter to the DC
power port on the rear of the FlipStart, and then
connect the power cord to an electrical outlet.
1.
a.
b.
2.
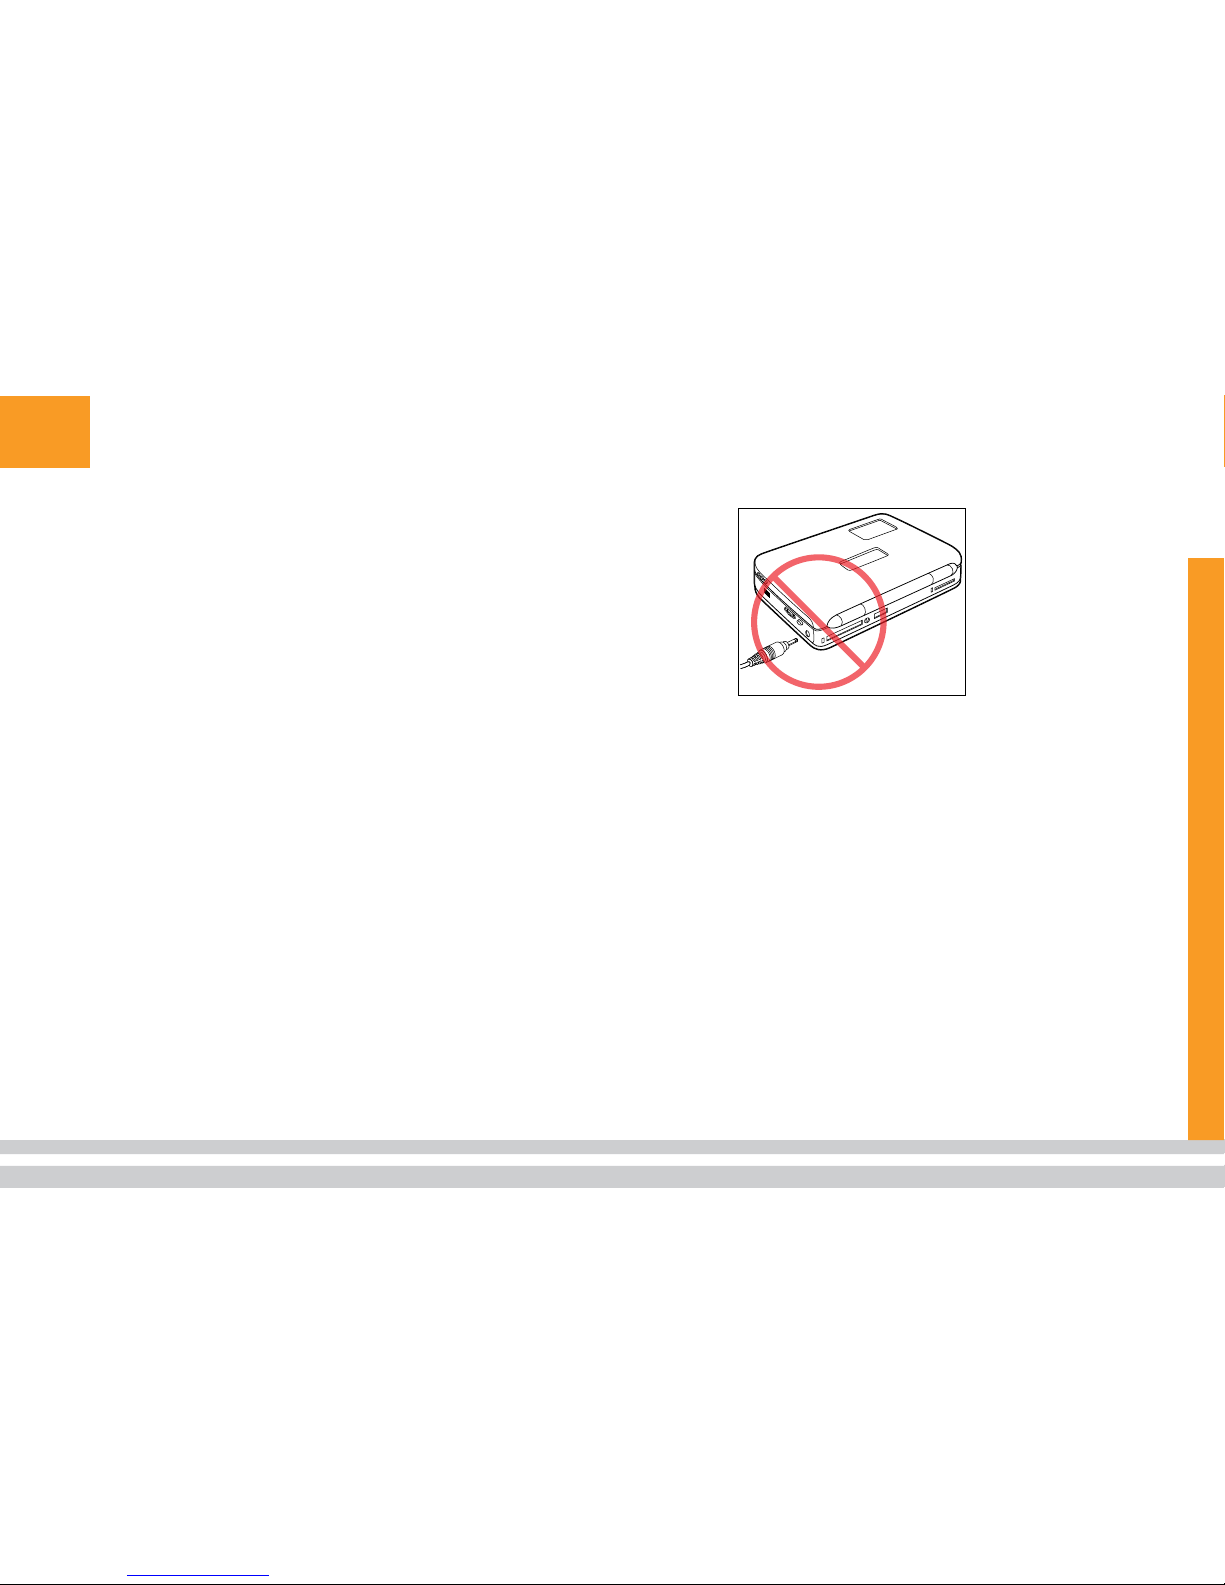
Important! Do not insert the AC power cord into the
headphone jack on the right side of the FlipStart.
Open your FlipStart and press the power button.
Do not continue to press down the power button, or
the computer will power down.
Note: Before using the FlipStart on battery
power alone, let the battery charge until the
amber charging light on the front of the FlipStart turns green.
3.
Page 11
7
Vi s ual Q u i c k Star t
2
Connect the AC adapter
Connect AC
adapter plug to
rear of FlipStart.
Connect
power cord
to AC adapter.
Plug into
power outlet.
3
Start up and go
Press the
power button.
Open
FlipStart.
Insert battery tabs in slots on
bottom of device.
Slide battery up into
locked position.
Attach the battery
FlipStart
device
Battery
1
2
Connect the AC adapter
Connect AC
adapter plug to
rear of FlipStart.
Connect
power cord
to AC adapter.
Plug into
power outlet.
3
Start up and go
Press the
power button.
Open
FlipStart.
Insert battery tabs in slots on
bottom of device.
Slide battery up into
locked position.
Attach the battery
FlipStart
device
Battery
1
Page 12
8
Sta r t in g Up
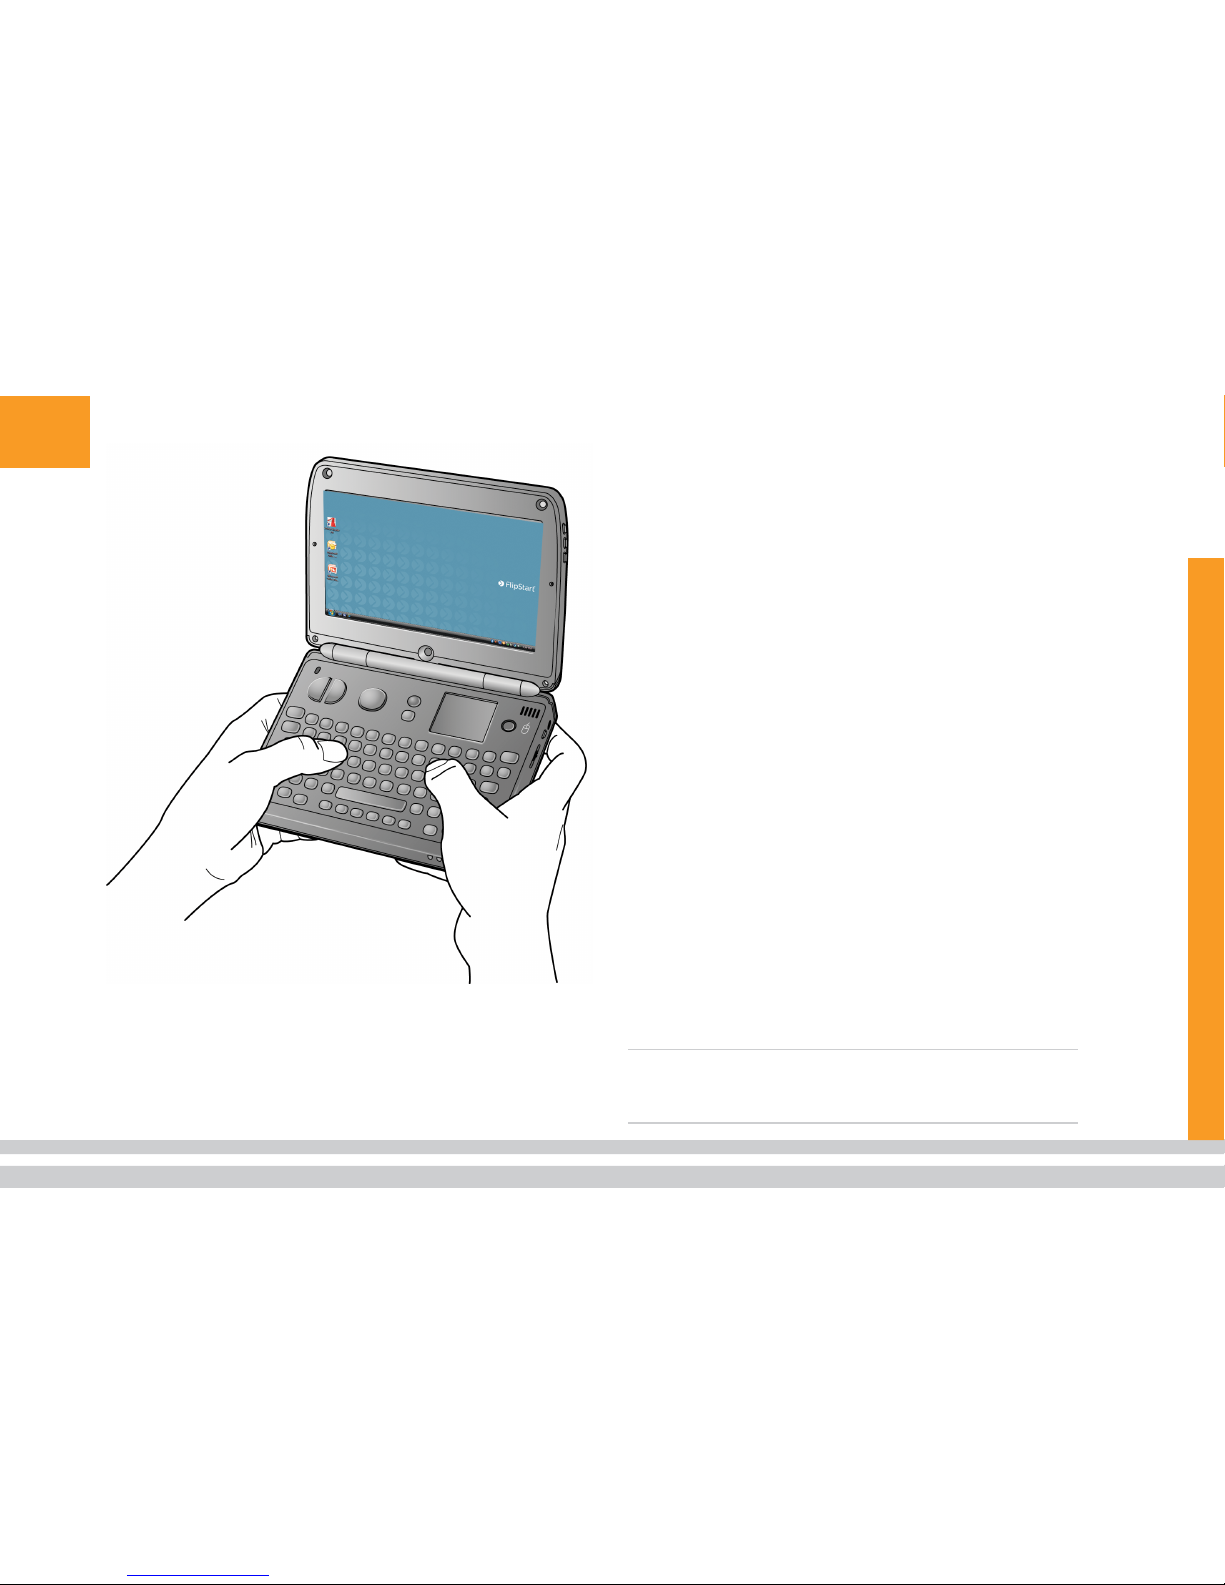
Once you turn your FlipStart on, adjust the display
to a comfortable viewing angle. The FlipStart can be
placed on a flat surface and used much as you might
use a laptop computer. However, the FlipStart is also
designed to be held in both hands, using your thumbs
to press keys on the keyboard, as shown in the illustration.
During initial startup, the Windows setup process
begins. When prompted for a product activation key,
use the key located on the Microsoft Certificate of
Authenticity sticker attached to the bottom of your
FlipStart in the battery compartment.
If you forgot to write down this information before
attaching the battery, turn the FlipStart off, remove
the battery, write down the product activation key, reattach the battery, and turn the FlipStart back on.
Caution! Do not attempt to use your FlipStart with-
out the battery attached.
During initial setup, Windows might prompt you
about network and other Windows configuration options. If you do not know the answers, you can enter
them at a later time.
Once you have finished the initial startup process, the
Windows desktop will appear.
Note: If you have questions about the Windows setup
process or about Microsoft product activation,
please refer to the Windows manual included in
your FlipStart box.
Page 13
9
Co ntrols
The FlipStart is built with several special controls to
help you work with your FlipStart and navigate Windows efficiently.
Mouse controls
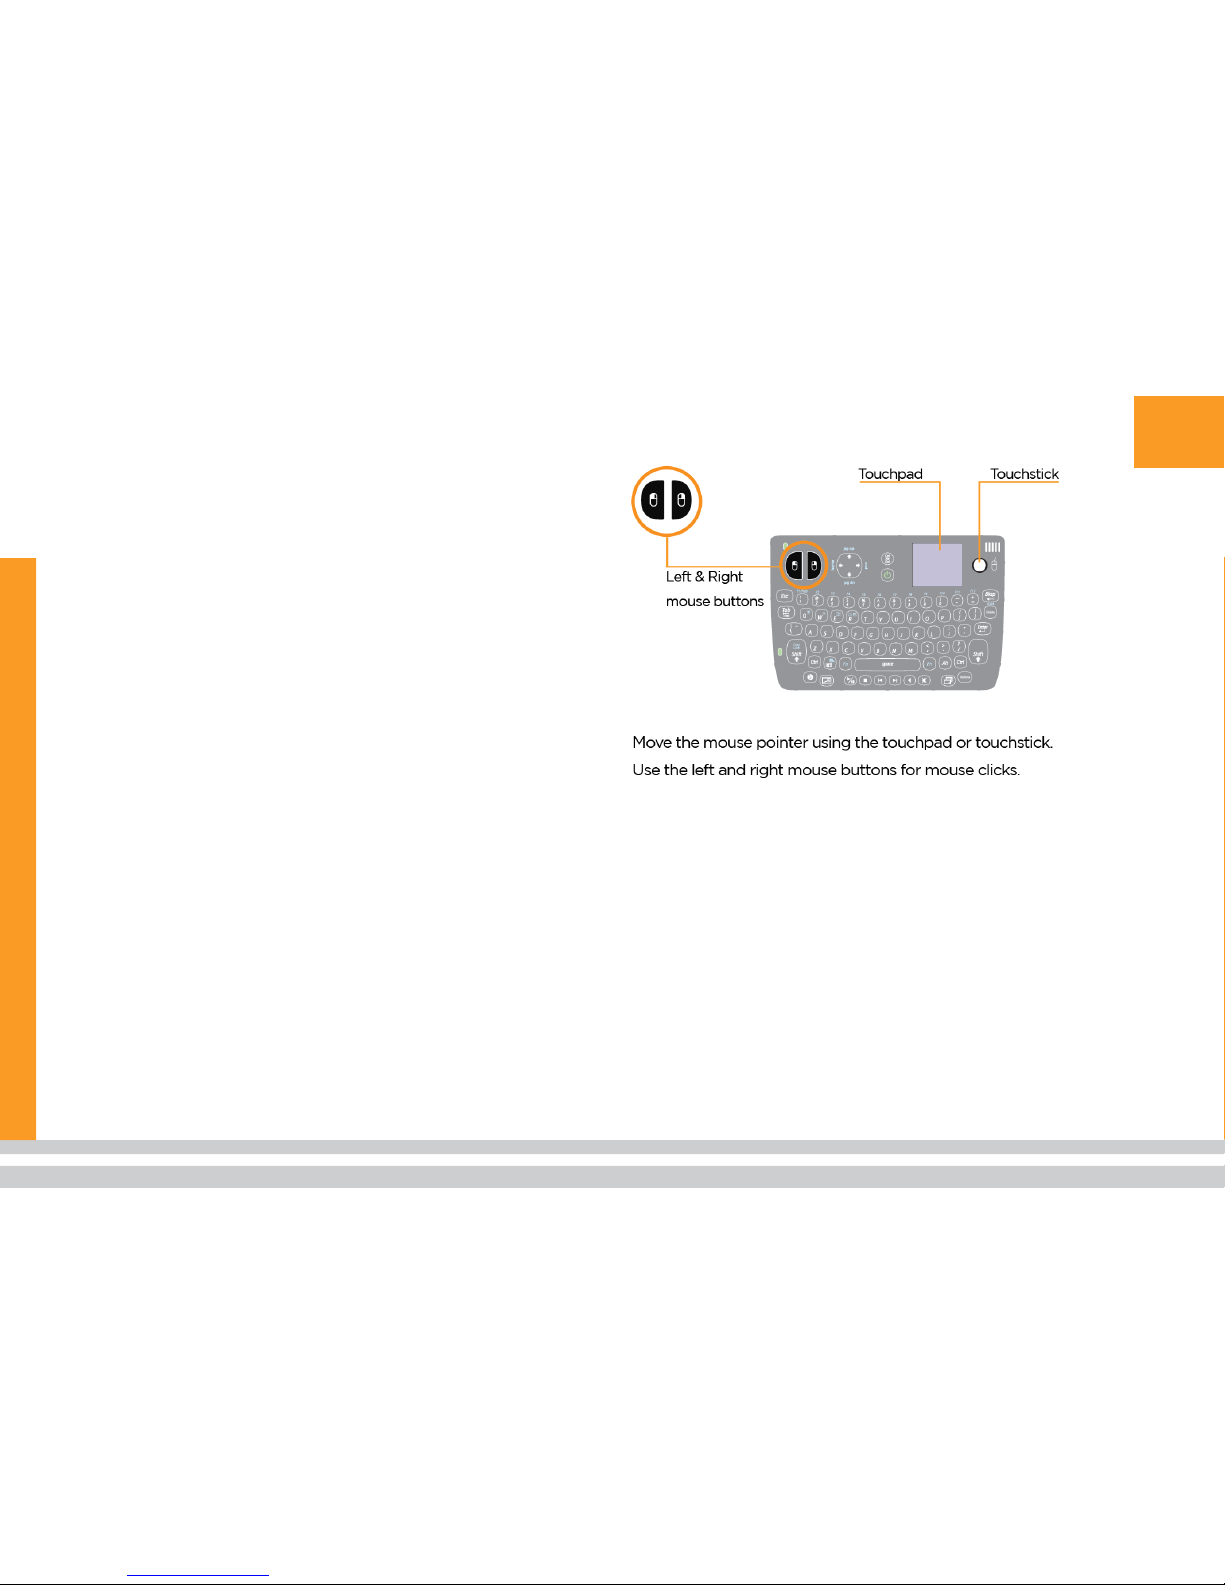
Your FlipStart comes equipped with multiple input
devices to help you control the mouse pointer on the
screen.
Mouse buttons
The FlipStart keyboard contains special keys for left
mouse and right mouse buttons. Pressing either mouse
button functions like a left-click or right-click on an
external mouse.
Mouse touchpad
The touchpad enables you to use the tip of your finger
to control the mouse pointer on the screen. Put the tip
of your finger on the touchpad and lightly move it in
the direction you want to move the mouse pointer. Click
or double-click by tapping or double-tapping on the
touchpad.
Mouse touchstick
The small touchstick controls the mouse on the screen.
Using the tip of your finger or thumb, gently move the
rubber touchstick in the direction you want the mouse
pointer to move.
Page 14
10
Keyboard
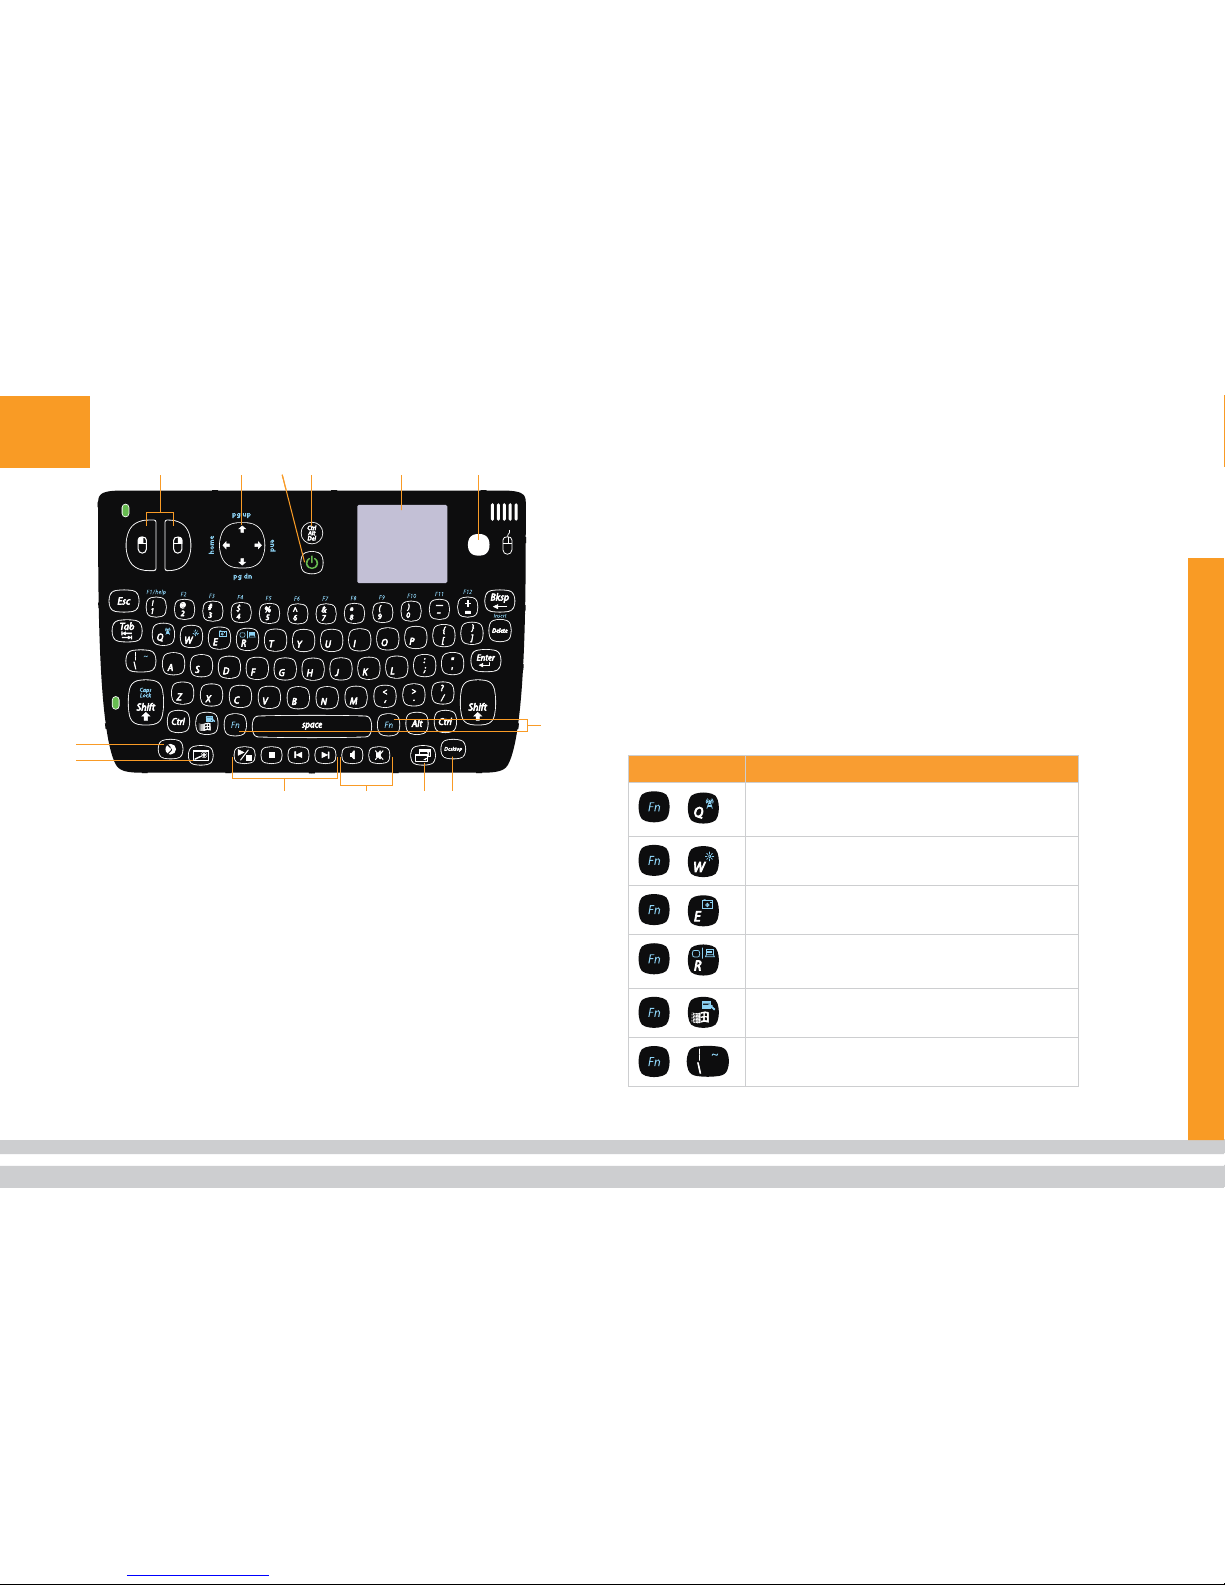
The FlipStart keyboard provides not only a full
QWERTY layout but also a number of special keys
and input devices to help make using your FlipStart
as easy as possible.
The illustration calls out special keys and input devices on the FlipStart.
Fn key combinations
There are two Fn keys located on the FlipStart
keyboard, one on either side of the spacebar. Pressing down an Fn key in combination with other keys
provides quick access to particular functions of your
FlipStart.
Press … To ...
+
Turn off all wirele ss rad ios (Blue tooth, Wi-F i, ce llular ), or turn all back on. (Turns “airplane mode”
on or off.)
+
Adjust the brigh tness of the m ain s creen (press
keys and then adj ust bright ness with Jog Dial) .
+
Turn the webca m on or off.
+
Switch to an exter nal VGA dis play (if a n external
monito r is connected to th e VGA connec tion on
the F lipSt art port replic ator).
+
Open the m ouse righ t-cli ck Shortcu t menu.
+
Type a tilde charac ter.
Left a nd ri ght m ouse b utton s
Direct ion p ad (D-pad)
Power bu tton
Ctrl-Al t-Del key
Touchpad
Touchstick
Fn Keys
Minim ize al l win dows an d show
Windows Deskto p
A.
B.
C.
D.
E.
F.
G.
H.
Switch quic kly b etween open
windows (equi valent to Al t+Tab)
Control audi o volu me
Control audi o play back
Show/hide Flip Start Navig ator
I.
J.
K.
L.
M.
M
L
CBA D E F
G
HIJK
Ke y
Turn FlipStart Zoom on/off
Left a nd ri ght m ouse b utton s
Direct ion p ad (D-pad)
Power bu tton
Ctrl-Al t-Del key
Touchpad
Touchstick
Fn Keys
Minim ize al l win dows an d show
Windows Deskto p
A.
B.
C.
D.
E.
F.
G.
H.
Switch quic kly b etween open
windows (equi valent to Al t+Tab)
Control audi o volu me
Control audi o play back
Show/hide Flip Start Navig ator
I.
J.
K.
L.
M.
M
L
CBA D E F
G
HIJK
Ke y
Turn FlipStart Zoom on/off
Page 15
11
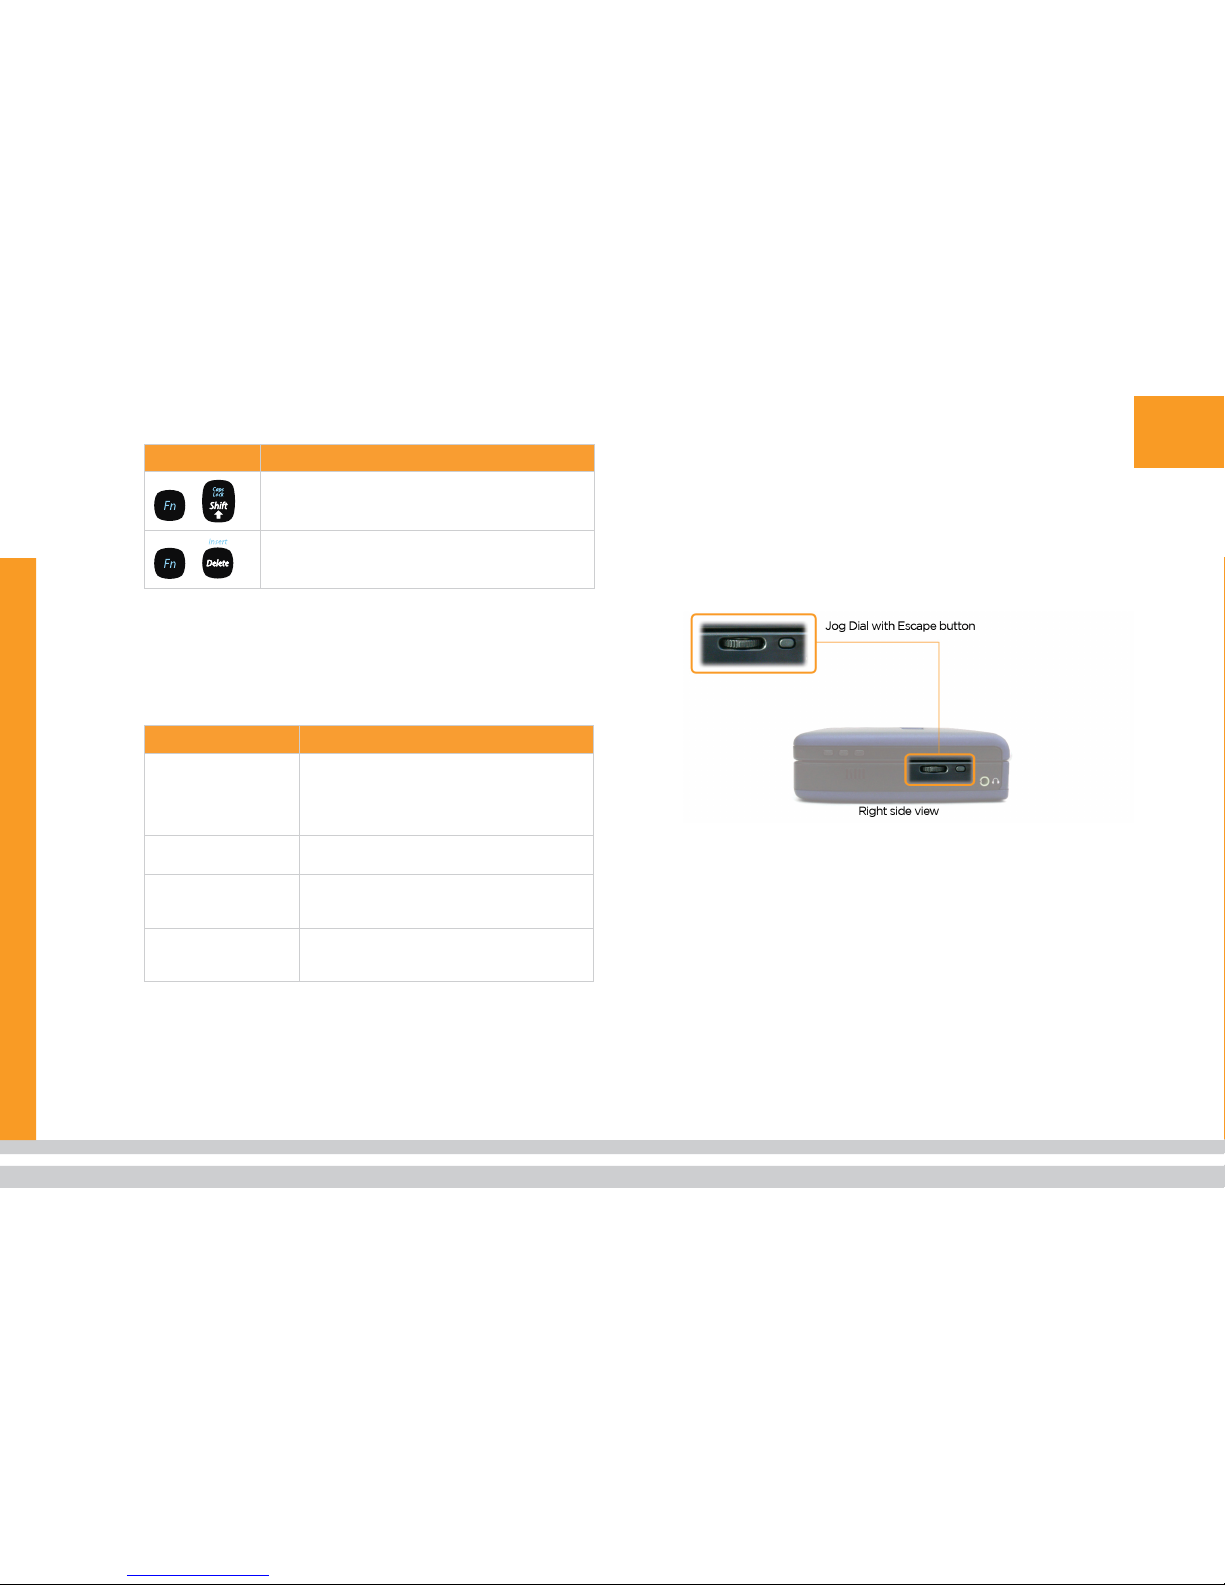
Press … To ...
+
Turn caps loc k on or off.
+
Turn Insert m ode o n or off.
Jog Dial and Escape button
The Jog Dial and Escape button are located on the
right side of the FlipStart and can be controlled easily
with one finger. Moving the Jog Dial up or down has a
different function, depending on what you are doing.
When you are ... Use the Jog Dial to ...
Using Flip Start Info Pane or Nav igator
Scroll the selection bar up and dow n. Press
the J og Di al in to m ake a sele ction . The
Escap e but ton u suall y cancels an action
or moves one level back in the nav igati on
system.
Viewing a Web page
in a Web browse r
Scroll the page up a nd down, as wit h a
mouse scroll wheel.
Adjusting a udio
volume or d isplay
brigh tness
Increa se or decrease audio volume/displ ay
brigh tness .
Using Flip Start Zoom Inc rease and decrea se sc reen magni fica-
tion while simultan eousl y holding down the
Zoom key.
Page 16
12
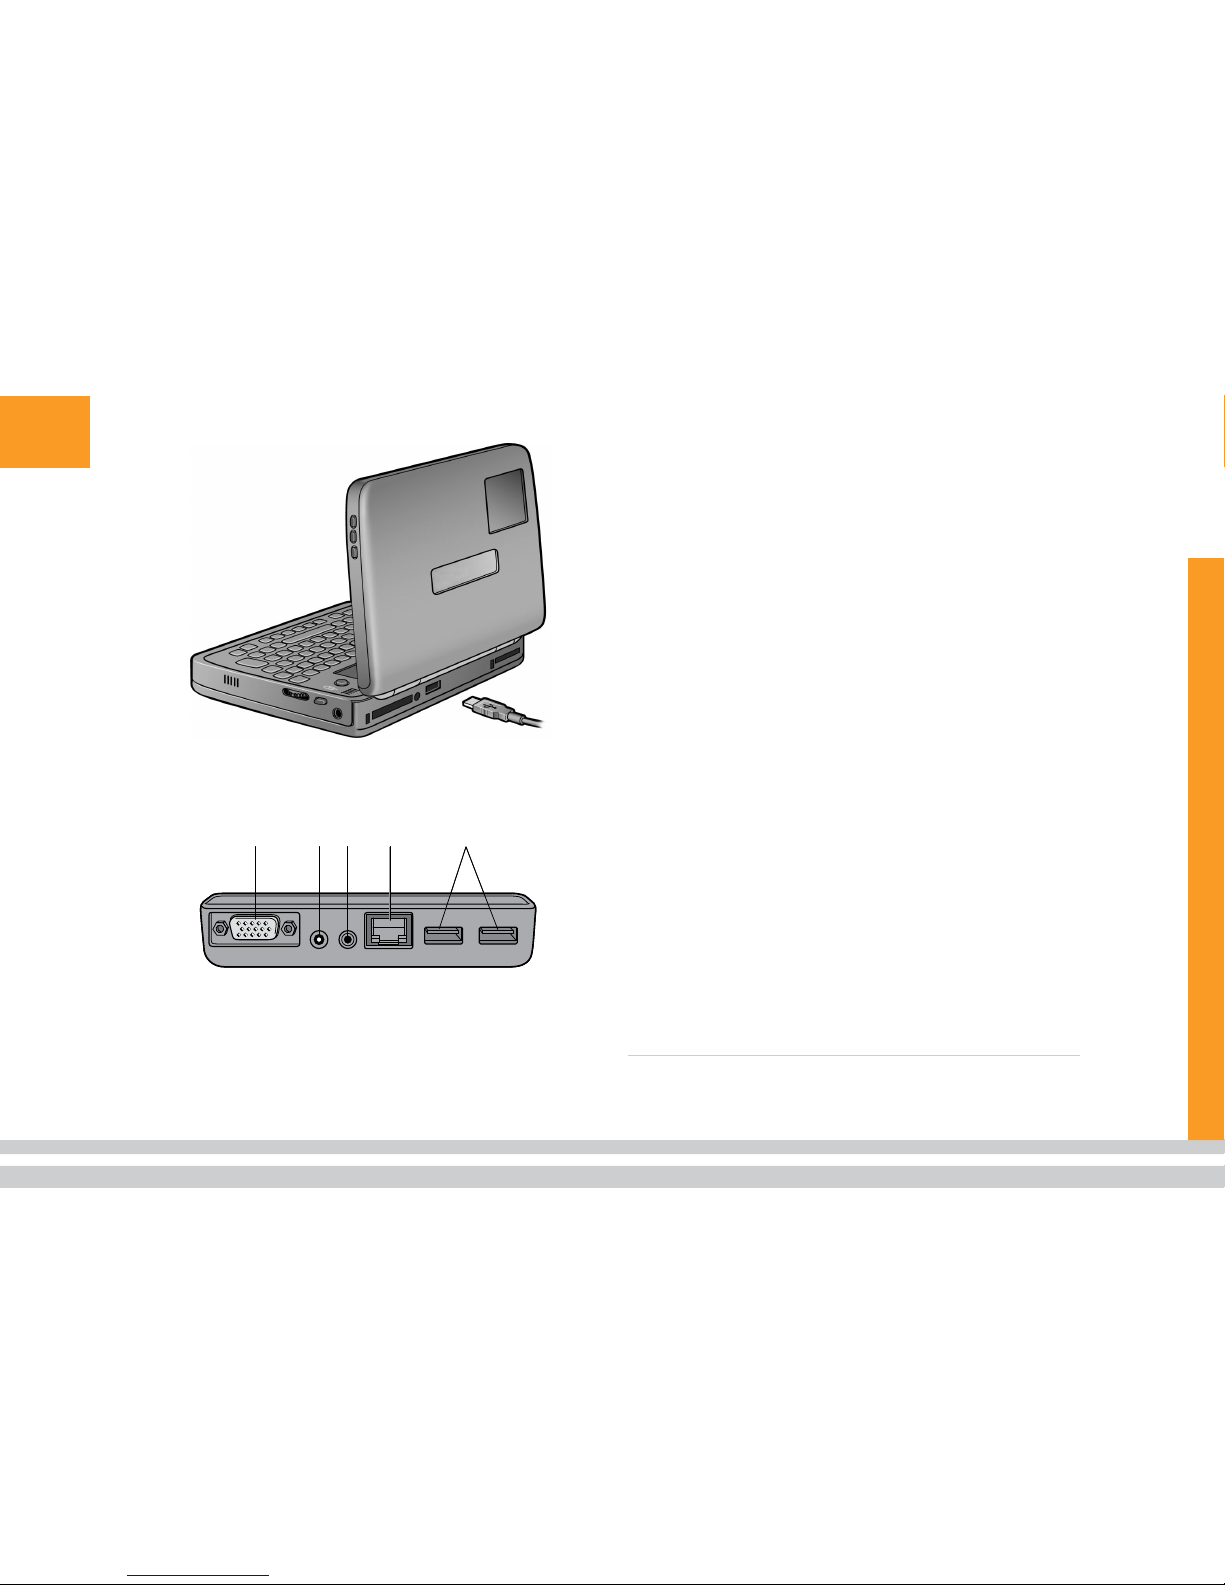
Expa n d i n g Your F l i p Start
It’s easy to expand your FlipStart to accommodate
your working environment. When traveling, a FlipStart
functions just fine on its own without any additional
accessories. However, you can easily connect other
hardware to the FlipStart to expand its capabilities.
If you’d like to expand your FlipStart, you can use the
single built-in USB 2.0 port located on the rear, the
built-in Bluetooth wireless technology, or the included
port replicator.
Here are just a few examples of how you can expand
your FlipStart, some of which can be used with just
the FlipStart’s USB port and others that require use of
the port replicator:
Add a USB keyboard or mouse,
either wired or wireless.
Add an external monitor.
Add a USB drive to expand storage.
Add Bluetooth wireless devices
such as keyboards or mice.
Connecting some USB devices—such as keyboards,
mice, and disk drives—requires little or no configuration. Many USB devices can be connected and disconnected while Windows is running.
Note: Some USB devices draw power from your
FlipStart. Be aware that using some USB devices
while your FlipStart is running on battery power
A B DC E
D. RJ45 10/100
Ethernet jack
E. USB 2.0 ports
A. VGA port
B. AC power port
C. Audio line-out
A B DC E
D. RJ45 10/100
Ethernet jack
E. USB 2.0 ports
A. VGA port
B. AC power port
C. Audio line-out
Page 17
13
can greatly reduce the amount of time the battery
charge will last. Also, some USB devices might
function only if they are using their own power
supply.
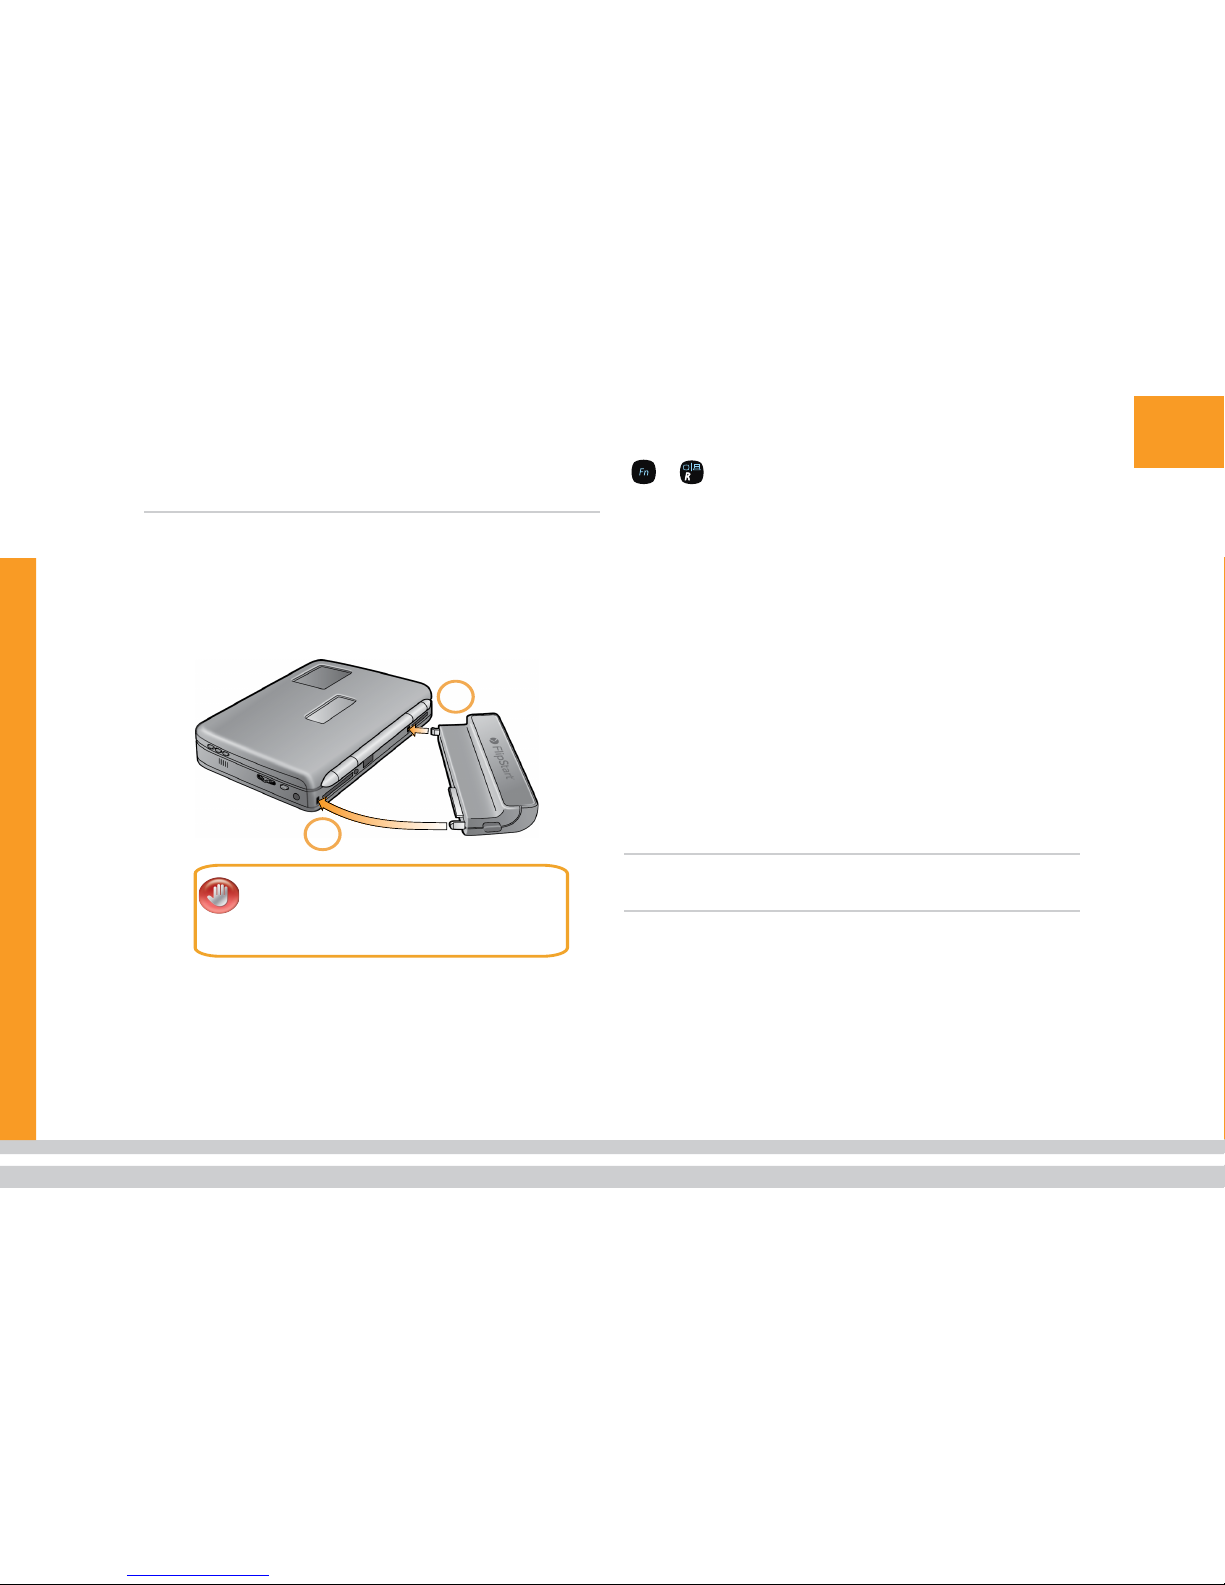
Attaching the port replicator
Snap the included port replicator onto the rear of the
FlipStart as shown in the illustration. Then, connect
other hardware to the FlipStart to make your computing experience easier and more efficient.
1
2
CAUTION!
Do not insert the metal tab first.
Always attach the two ends of the port
replicator in the order shown above, or you
might damage the FlipStart or the port
replicator.
Connecting an external monitor
To use an external CRT or LCD monitor with your
FlipStart, attach the port replicator to the rear of your
FlipStart, and then connect the monitor cable to the
VGA port on the port replicator.
To switch the display to the external monitor, press
+ .
Connecting Bluetooth devices to
the FlipStart
Nearly any Bluetooth-compatible device can be connected to your FlipStart. To add a device, first consult
that device’s instructions for any special needs or
limitations. Then, use the Bluetooth Settings wizard to
add the device:
If the Bluetooth radio is turned off on your
FlipStart, enable it by opening Control Center and
choosing Turn Bluetooth, Wi-Fi & Cellular devices
on/off. Set the Bluetooth device to On in the Connectivity Status area.
Double-click the Bluetooth icon in the Windows
system tray, and follow the on-screen instructions
for adding a new device.
Note: You may need to refer to the instruction manual
for your Bluetooth device for more information
during the connection process.
1.
2.
Page 18
14
Gett i n g Onli n e
Your FlipStart can get on the Internet in several
ways:
Wireless 802.11b/g networks.
Wired Ethernet networks (with a network
cable and the port replicator).
Networks via Bluetooth-enabled
phones or computers.
Broadband cellular networks via
supported wireless data carriers.
Connecting to a home or office
wired Ethernet network
You can connect your FlipStart to the Internet using
wired Ethernet if it is available. Since the Ethernet port
is located on the FlipStart port replicator, the port
replicator must first be attached to the FlipStart. In
addition, you must have a standard Ethernet cable to
use for making the connection.
If you have not already done so, attach the
FlipStart port replicator to the rear of your
FlipStart.
Connect an Ethernet cable between your network
jack or router and the FlipStart port replicator.
Turn on the FlipStart and log on to Windows.
Windows should detect the new network and dis-
1.
2.
3.
play a new networking icon in the system tray at
the bottom of your screen.
In most situations, no configuration will be needed to
join a network that has already been set up.
Connecting to a Wi-Fi network
Your FlipStart can connect to 802.11b and 802.11g WiFi networks in the home, in public locations, and in the
office.
Wireless networks can be set up in several different
ways, depending upon who is accessing the system
and what level of security is required. Many wireless
networks require some type of access key or password
to log on to the wireless connection and use it to connect to the Internet.
To manage your Wi-Fi networking connections,
use the network management tools included with
Windows.
Before you begin, you need to find out what type of
security is enabled on the access point and any necessary authentication information, such as passwords or
encryption keys. (This information is usually available from your network administrator, or you can get
this information from the configuration of your home
network.)
To set up a Wi-Fi network connection:
Turn on Wi-Fi on your FlipStart.
Double-click the Control Center icon in the
system tray.
In Control Center, click Turn Network Devices
1.
a.
b.
Page 19
15
On/Off.
Click Wi-Fi On in the Wi-Fi/Cellular Device section, and then click OK.
Note: If you see the message Airplane Mode
is in effect, press Fn+Q to turn wireless radios
on.
Configure Wi-Fi networking using Windows.
For Windows XP users, go to Start |
Control Panel | Network and Internet
Connections, and then follow the
instructions on the Connections tab.
For Windows Vista users, go to Start |
Control Panel | Network and Sharing
Center and choose the task that you
want to perform from the list.
For further information, in Windows, you can press F1
to access Help for the specific task you are trying to
perform.
Note: You can also quickly access Windows network
configuration by double-clicking the network icon
in the system tray of your FlipStart.
Connecting to a cellular data
network using Bluetooth wireless
technology
Note: For this method to work, you must have
Internet access enabled on your cellular phone.
Please contact your wireless carrier for further
information.
c.
2.
To connect to a network for Internet access using a
Bluetooth-enabled phone, you must first “pair ” your
phone with your FlipStart:
Enable Bluetooth on your FlipStart.
Double-click the Control Center icon in the
system tray.
In Control Center, click Turn Network Devices
On/Off.
Click On in the Bluetooth Device section, and
then click OK.
Note: If you see the message Airplane Mode
is in effect, press Fn+Q to turn wireless radios
on.
Pair your FlipStart with your phone.
Double-click the Bluetooth icon in the Windows
system tray.
Click New Connection. The Add New Connec-
tion window appears.
Follow the instructions in the Add New Con-
nection Wizard to pair your FlipStart with your
Bluetooth device.
After pairing, the procedure for connecting to a cellular data network differs depending on the make and
model of your phone and on your wireless carrier.
Refer to the user manual for your cellular phone or
contact your carrier ’s Customer Support for more
information about the network setup process.
1.
a.
b.
c.
2.
a.
b.
c.
Page 20
16
Connecting to a network using
high-speed cellular wireless
To connect to a network for Internet access using
your FlipStart’s built-in, cellular broadband modem,
you must first have purchased and activated a highspeed cellular data plan from a supported FlipStart
cellular carrier. (For a list of supported carriers, visit
www.flipstart.com.) If you have done this already,
follow these instructions to connect to the cellular
network:
Enable the cellular broadband radio on your
FlipStart.
Double-click the Control Center icon in the
system tray.
Click Turn Network Devices On/Off.
Click Cellular Network On in the Wi-Fi/Cellular
Device section, and then click OK.
Note: If you see the message Airplane Mode
is in effect, press Fn+Q to turn wireless
radios on.
Double-click the icon for your carrier ’s mobile
broadband connection manager software on the
desktop.
When the software has loaded, follow the instructions included in the cellular broadband connection manager software’s documentation to connect to the cellular network.
1.
a.
b.
c.
2.
3.
Page 21
17
Flip S t a r t InfoPa n e
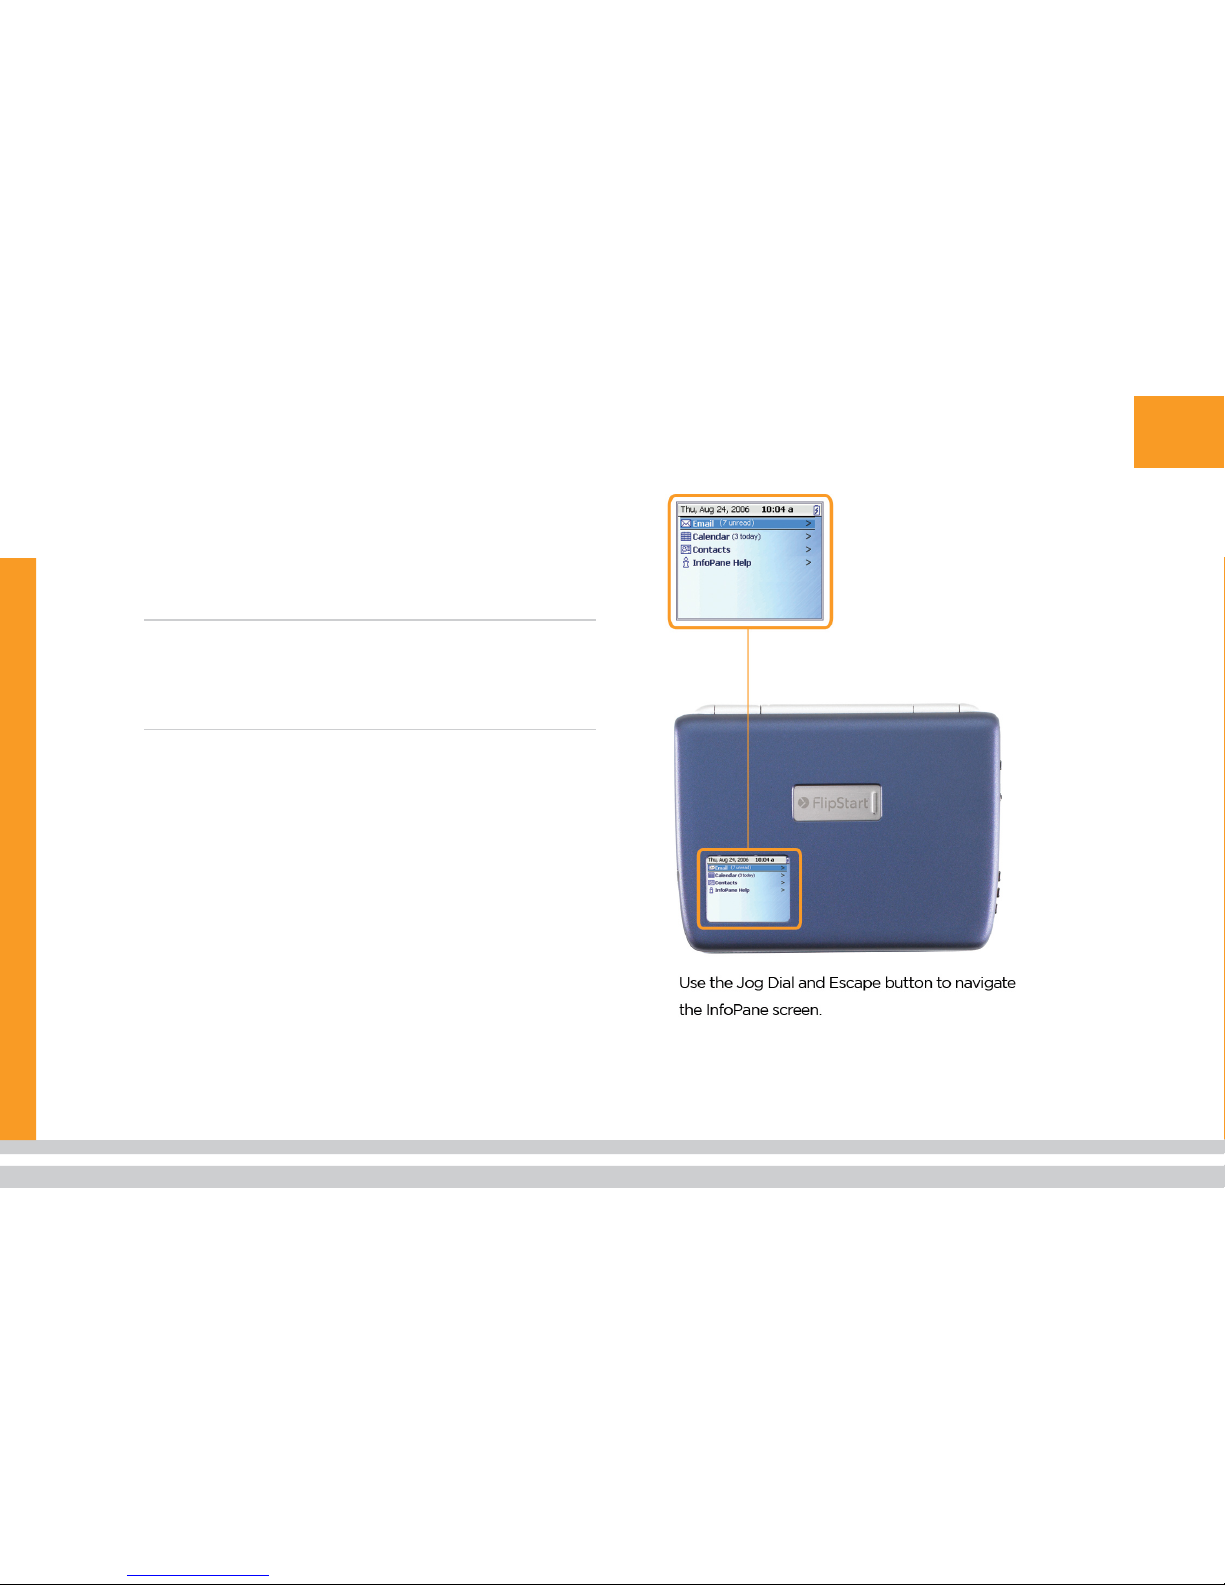
Your FlipStart includes an external screen, called
the InfoPane, built into the lid. You can use FlipStart
InfoPane to view e-mail messages, calendar information, and contacts from Microsoft Office Outlook.
Note: FlipStart InfoPane only displays information.
You cannot reply to messages, delete items, or
otherwise modify items. If you need to perform
actions such as these, just open the lid, and after
Windows wakes up, you can use Microsoft Office
Outlook to perform the desired action.
How does InfoPane work?
InfoPane communicates with Windows to access
your information. InfoPane stores a ‘snapshot’ of your
Microsoft Office Outlook information so that you can
look up your e-mail and calendar items while Windows is turned off, helping to save the battery life of
your FlipStart.
Using InfoPane
When you close the FlipStart, Windows automatically
goes into Standby mode and InfoPane turns on. Use
the Jog Dial and Escape button to navigate items in
InfoPane.
For more information about setting up and using
InfoPane, see the User Guide in Help Central on your
FlipStart.
Page 22
18
Flip S t a r t Nav igator
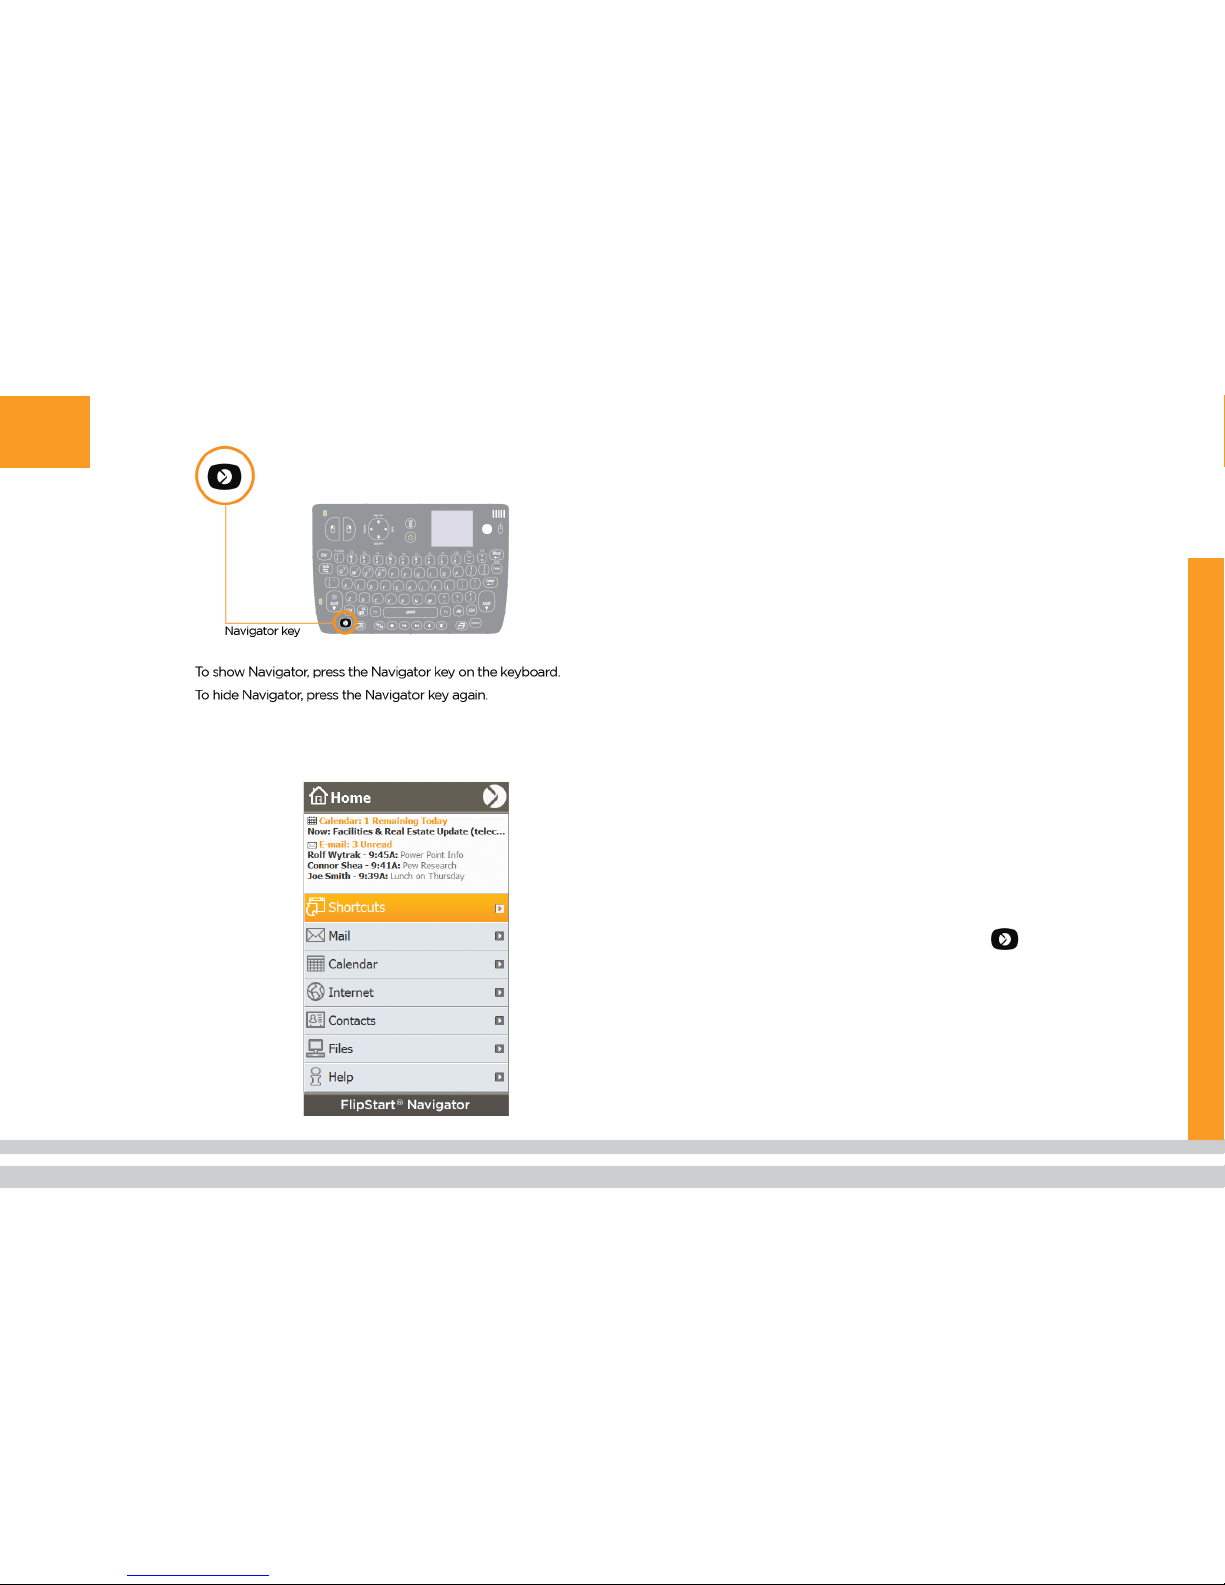
FlipStart Navigator is an application on your
FlipStart that provides quick access to frequently
used programs and frequently used information, thus
making it easier to use Microsoft Windows, Microsoft
Office Outlook, and other programs on the FlipStart’s
small screen.
Navigator makes it a snap to:
View e-mail messages.
View upcoming appointments.
Look up Microsoft Office Outlook
contact information.
Open Web pages.
Navigate the Windows file system.
Open files, folders, and applications from
a list of shortcuts defined by you.
Using FlipStart Navigator
Start Navigator by using the Navigator key on the
FlipStart keyboard.
When Navigator is open, you can use the Jog Dial
together with the Escape button to navigate through
and select choices in the Navigator window. Press the
Jog Dial in to make a selection.
For more information about Navigator and how to use
it, select Help from Navigator’s main window.
ò
Page 23
19
Flip S t a r t Zo o m
FlipStart Zoom is a program that magnifies items
on the FlipStart screen so that you can better view
and work with them. Using Zoom is helpful when
working with items that are too small to be viewed
comfortably on a small screen.
How does Zoom work?
Zoom works by magnifying the currently active
screen item (such as a window, a dialog box, or an
image in a Web browser) and then enabling you to
zoom in or zoom out of the magnified item.
Note: Zoom does not control the magnification
feature already built in to some programs. In
those applications, Zoom will magnify the entire
program window.
Using Zoom
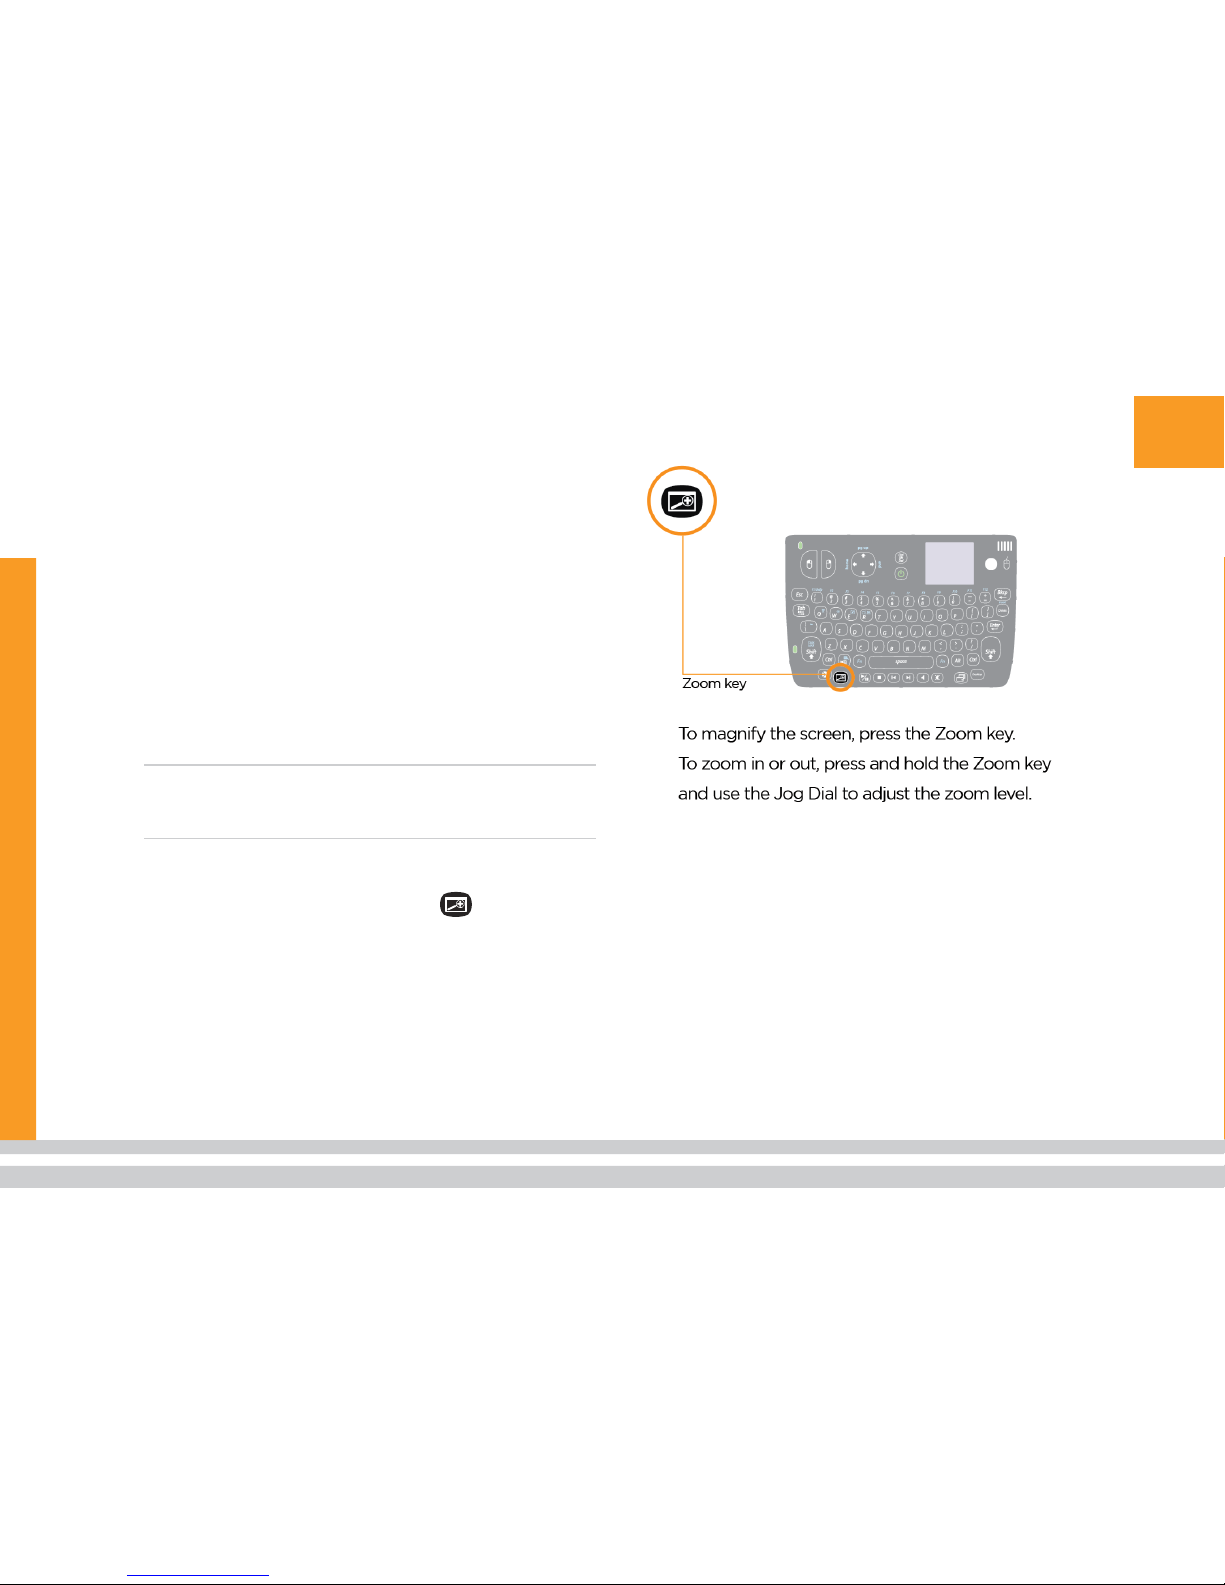
To start Zoom, press the Zoom key .
To increase or decrease magnification, press and
hold the Zoom key and then move the Jog Dial up or
down.
Once you have zoomed in or out to the desired magnification level, continue working normally in your
program.
To return to normal magnification, click the mouse
pointer anywhere outside the zoomed area or press
the Zoom key again.
Page 24
20
Flip S t a r t Control C e n t e r
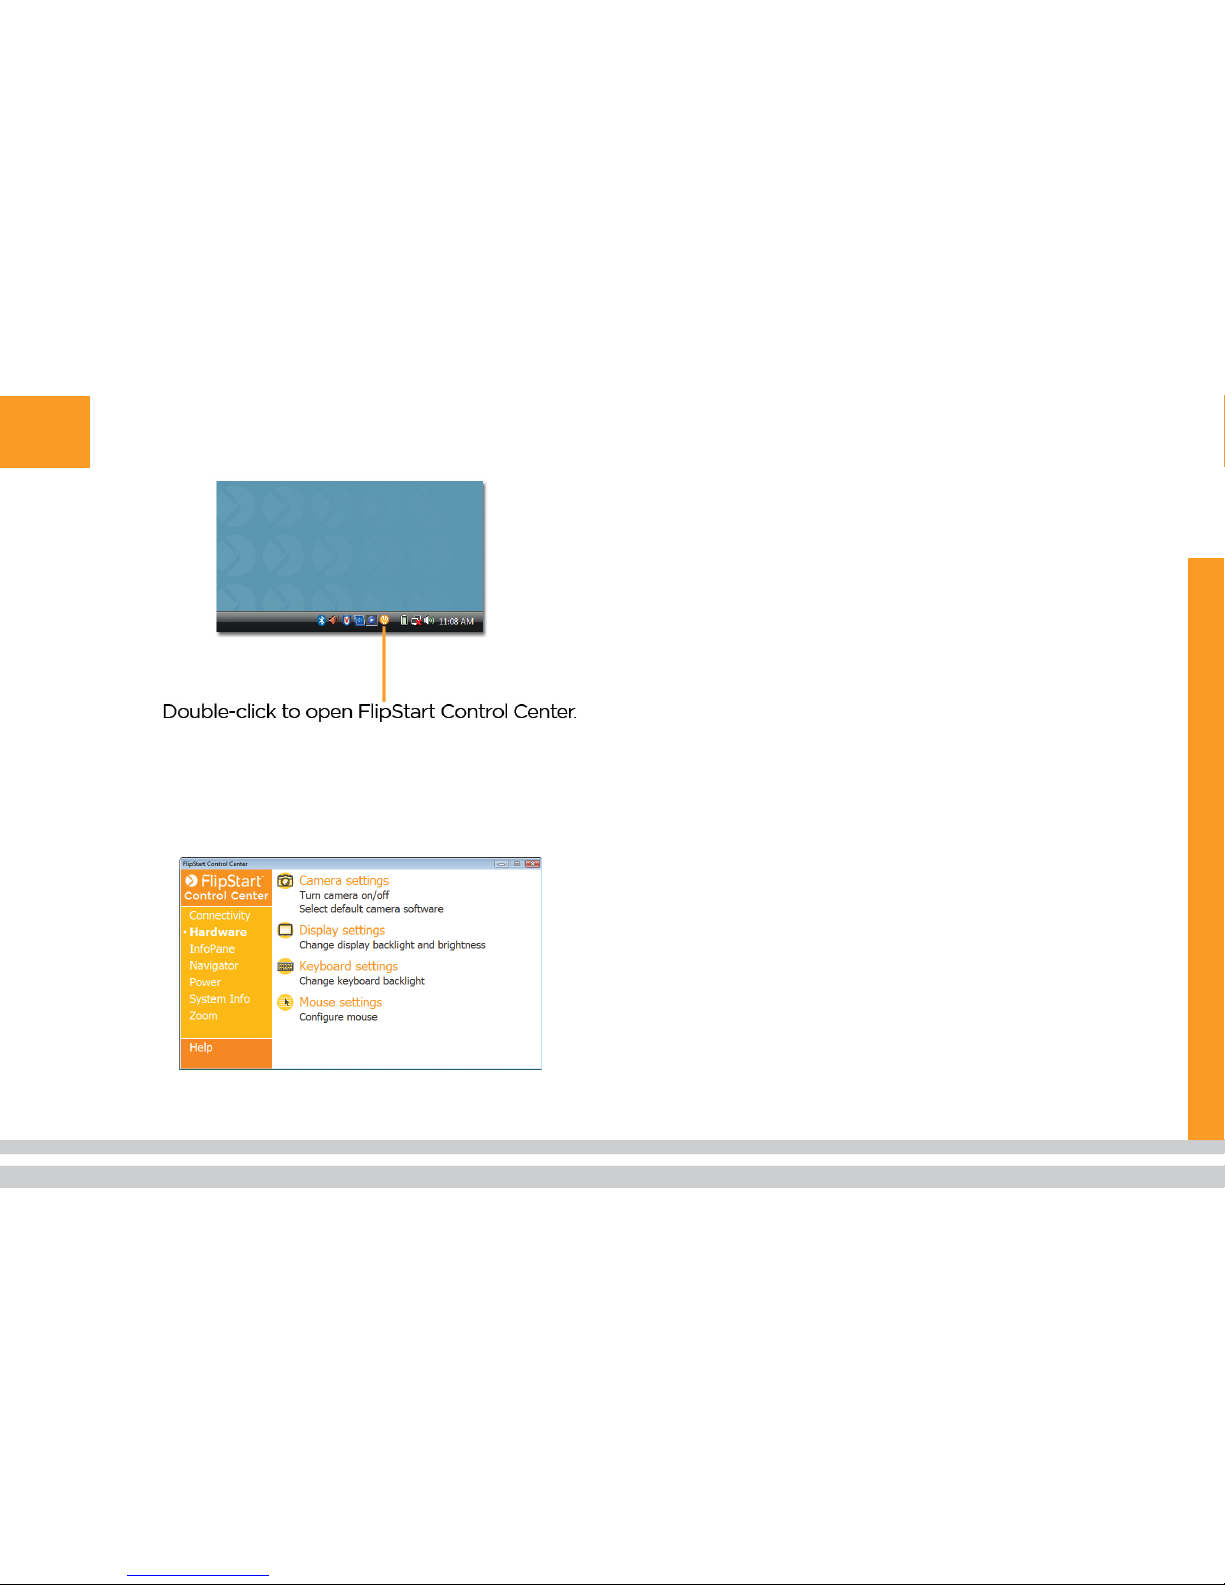
FlipStart Control Center is the software on your
FlipStart that controls hardware and software settings
specific to the FlipStart.
FlipStart Control Center is used to configure many
custom settings on your FlipStart, including the
following:
Enabl e, di sable , and
config ure w ireles s devi ces.
View an d set power
manag ement options.
Defin e sec urity and
password settings .
Custom ize FlipSt art
Zoom s ettin gs.
Custom ize FlipSt art
Naviga tor settin gs.
Turn the buil t-in
webcam on a nd off.
View system an d vers ion
information for Flip Start
hardware and soft ware.
Configure n etwork
switching o ptions.
Using FlipStart Control Center
To start FlipStart Control Center, double-click
the FlipStart Control Center icon in the Windows
system tray.
Click an area to configure on the left-hand side of
the Control Center window, and make any desired
changes to the default settings for that area.
For more information on Control Center and what
you can configure, select Help in the Control Center
window.
1.
2.
Page 25
21
We b cam
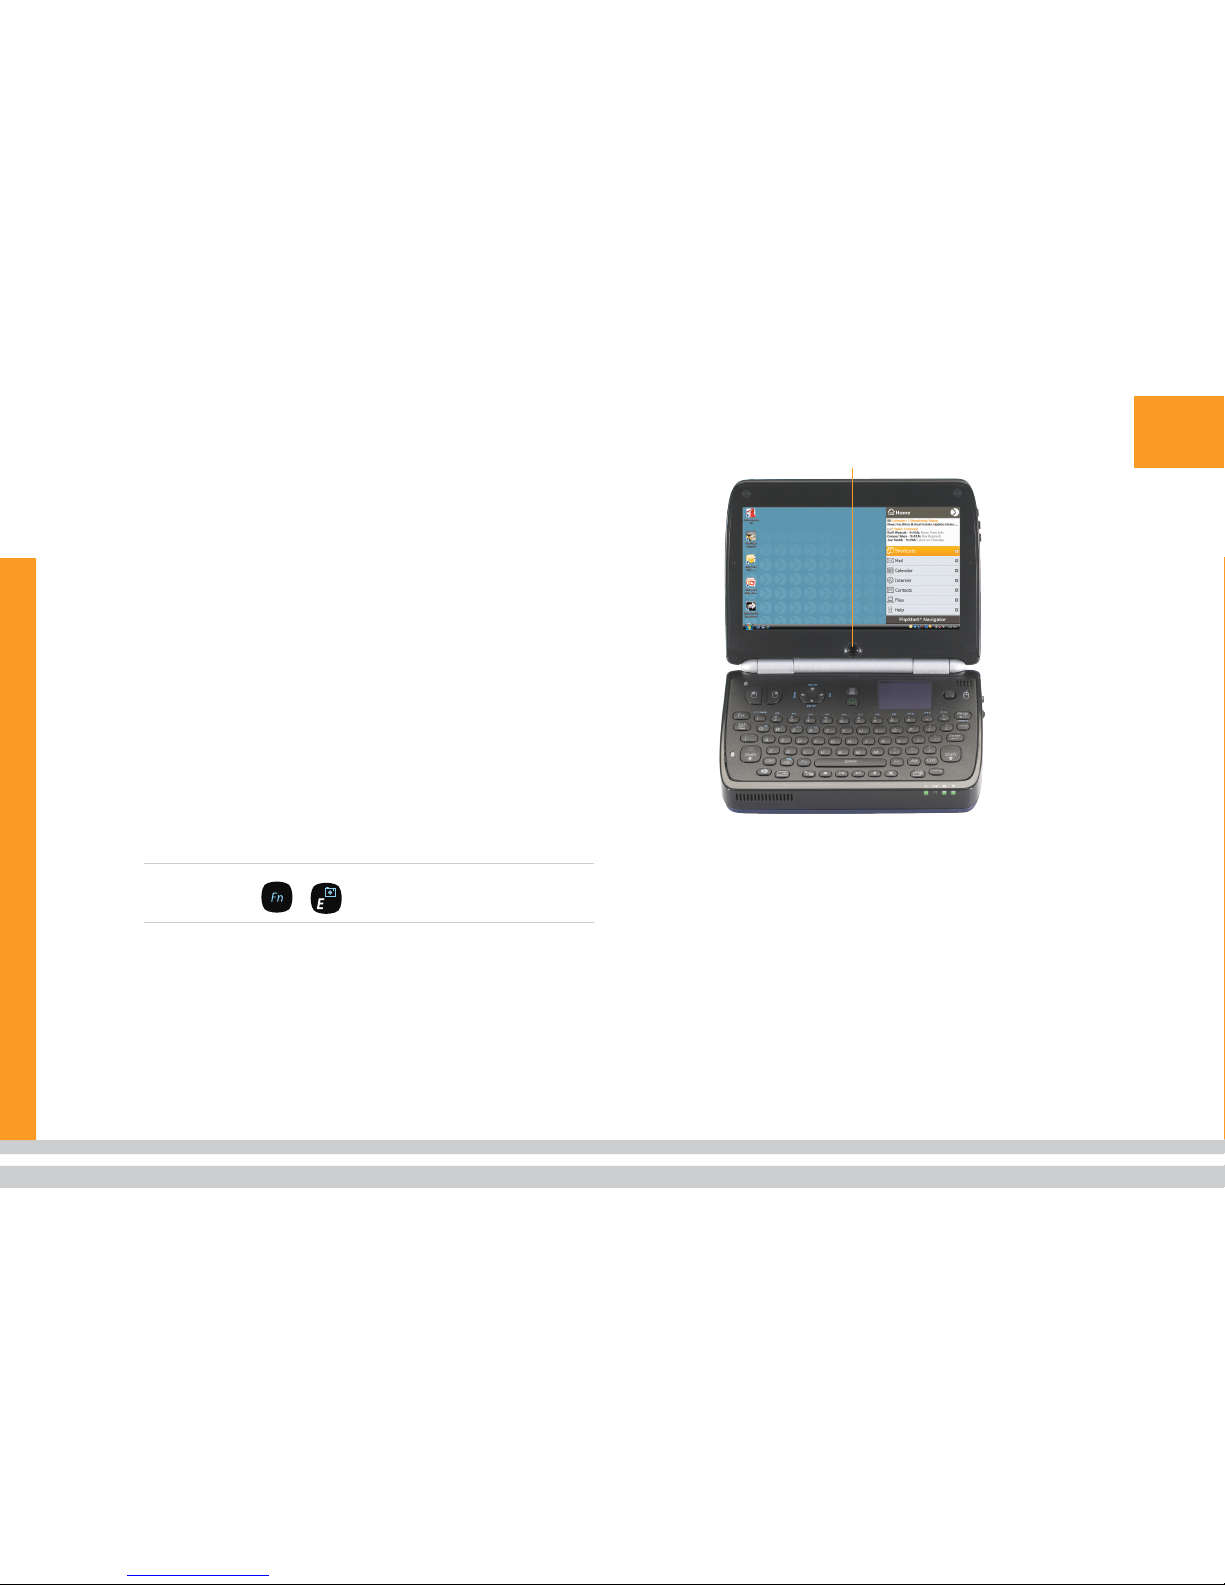
Your FlipStart includes a built-in webcam located
beneath the main screen. It can be used to record
video to a file or stream video over the Internet.
Using your webcam
The webcam can be used for many purposes, including video conferencing, video chat, and recording still
images. To conserve battery power, the webcam is
turned off by default and must be switched on before
you can use it.
To turn the webcam on or off:
Double-click the Control Center icon in the system
tray and select Hardware.
Under Camera settings, choose Turn camera
on/off.
Note: You can also turn the webcam on and off by
pressing + on the FlipStart keyboard.
To select the default webcam software that
starts when the webcam is turned on:
Double-click the Control Center icon in the system
tray and select Hardware | Camera settings | Se-
lect default camera software.
Click Browse in the Select application to launch
with camera section, navigate to and select the
application on your hard drive, and click OK.
1.
2.
1.
2.
Web cam Web cam
Page 26
22
Au dio
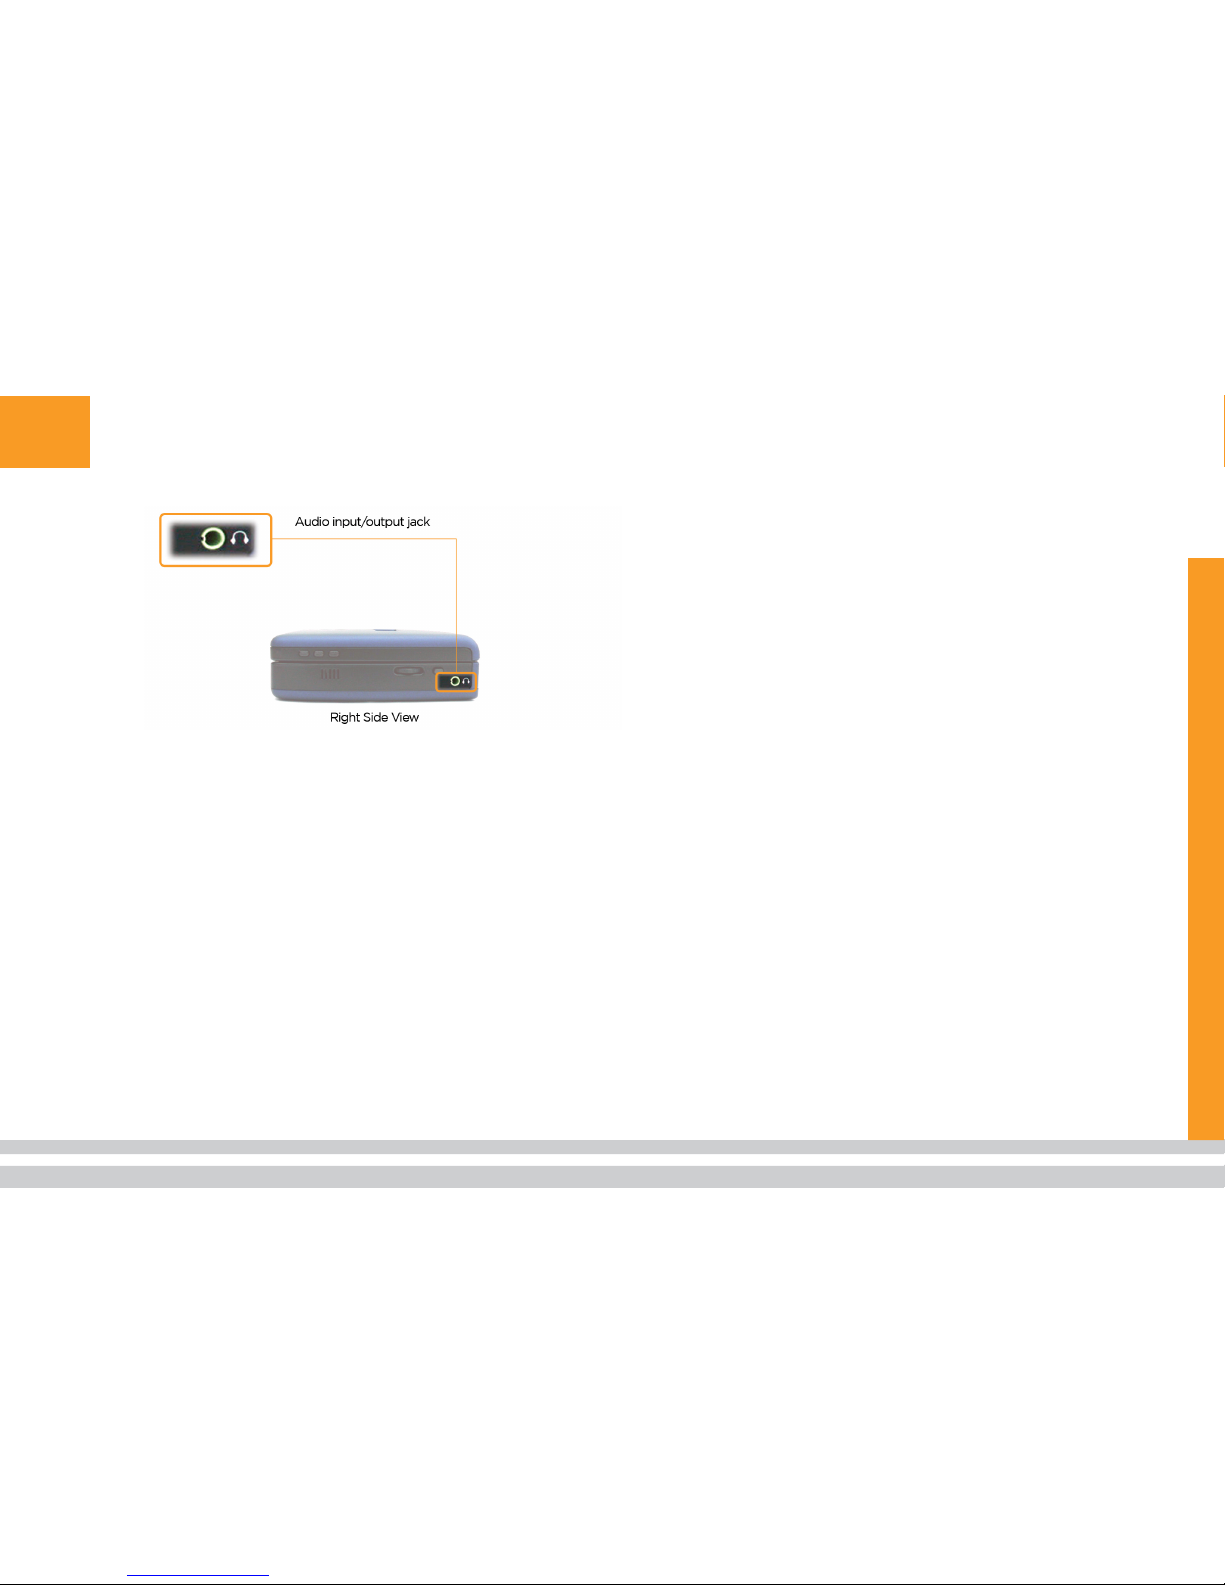
Your FlipStart provides multiple ways to enjoy the
audio capabilities of Windows and Windows programs, including:
An internal speaker.
Two internal microphones.
A multi-function audio input/output jack.
An audio line-out jack on the port replicator.
A special set of ear buds that function as
both headphones and a microphone.
Dedicated audio playback controls on the
keyboard and on the side of the screen.
Audio volume controls on the keyboard.
About the audio jacks
The FlipStart provides two audio jacks:
A multi-function audio jack on the
FlipStart that you can use for either
audio input (with the supplied ear
buds/microphone) or audio output.
An audio line-out jack on the port
replicator (available only when the
port replicator is attached).
The multi-function audio jack on the FlipStart can
provide audio input, audio output, or both simultaneously with certain audio devices, including the
bundled ear buds/microphone. This jack is located
Page 27
23
on the right side of the FlipStart near the rear and is
marked with green color-coding.
When you plug a device into it, the multi-function
audio jack automatically senses what type of device is
connected.
The audio line-out jack on the port replicator only provides unamplified audio output. Attaching output devices that do not amplify audio (such as headphones)
to the audio line-out jack on the port replicator is not
recommended.
Adjusting the sound volume
You can control the audio output volume using the
standard volume control in the Windows system tray
or from within most Windows applications that provide audio playback.
You can also control the audio volume using the builtin volume control keys located near the front of the
FlipStart keyboard . To adjust the volume up or
down, press the volume key, and use the Jog Dial to
make adjustments. To mute the audio, press the mute
key.
Controlling audio playback
Your FlipStart includes dedicated keys and buttons
to control audio playback in most media playback
applications in Windows. These keys are located on
the front of the keyboard, and additional buttons are
located on the right side of the lid. You can control
music playback as you would with any audio device.
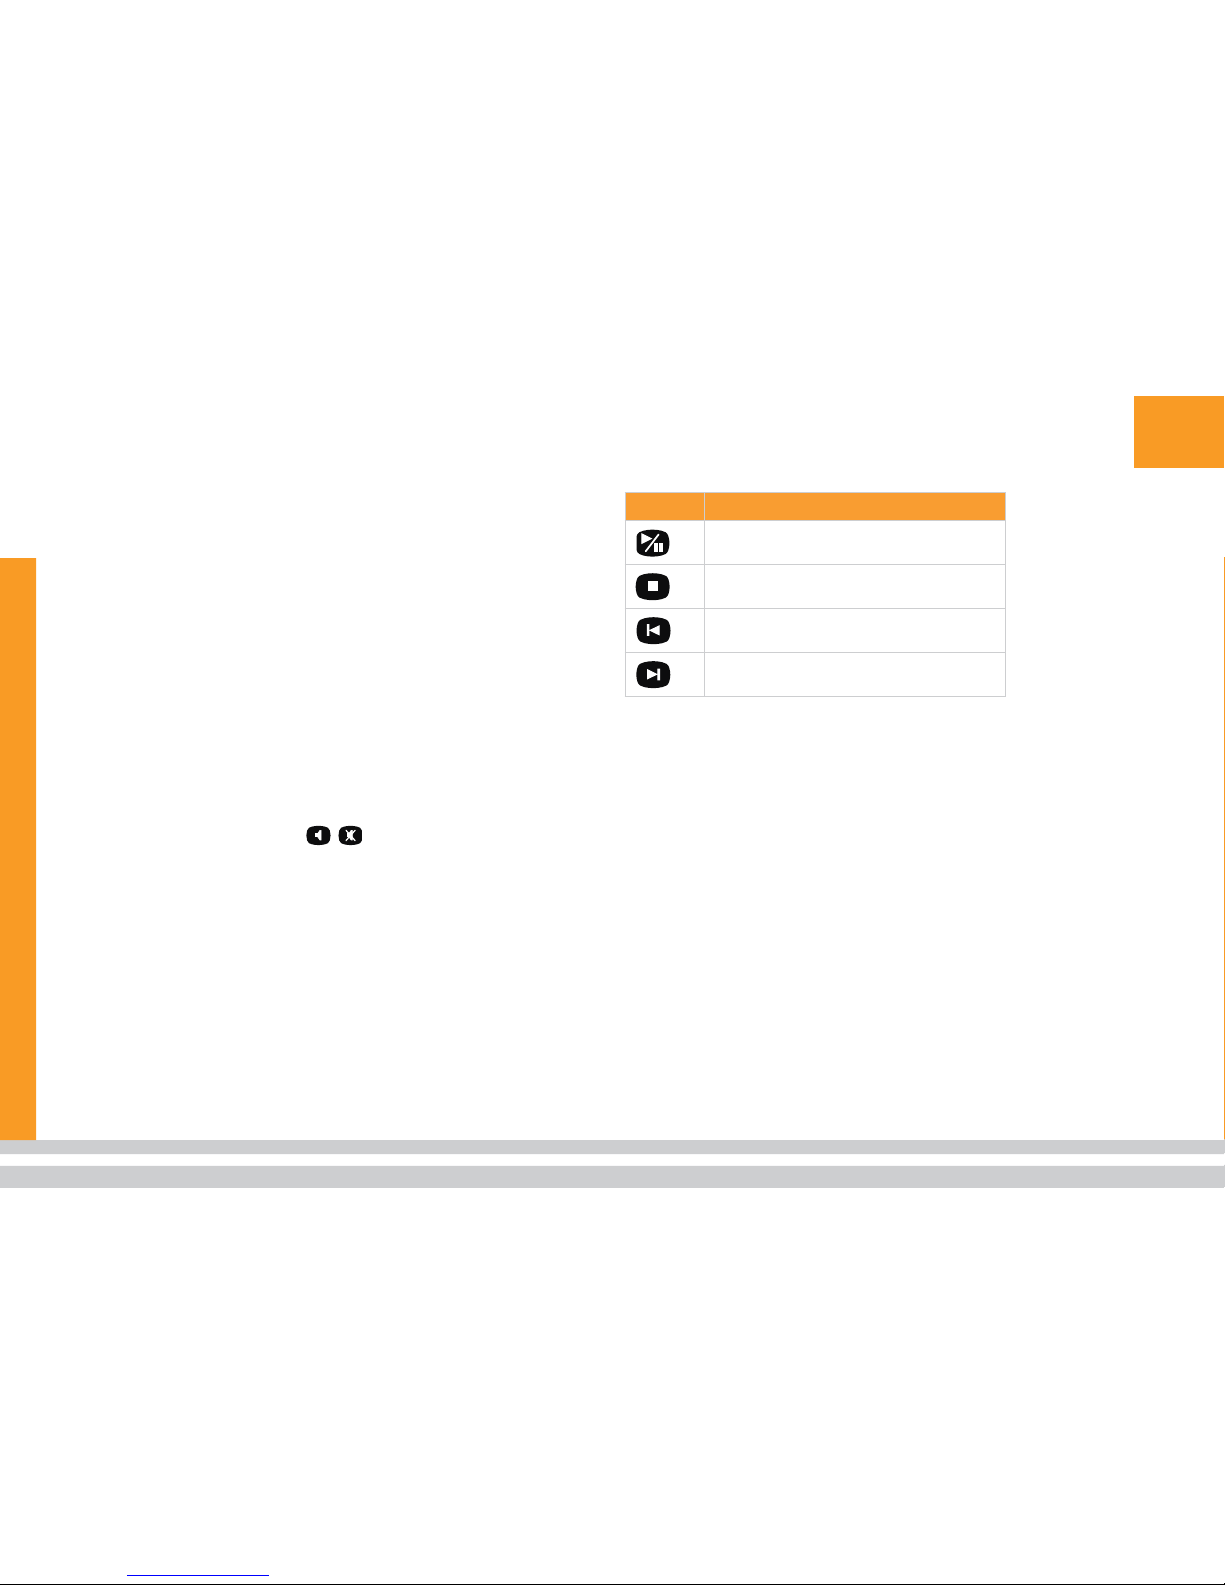
There are four buttons on the front of the FlipStart
keyboard used to control audio playback.
Key Function
Play/Pause
Stop
Rewind/Previous Track
Fast Forward/Next track
Getting more information
For more information about your FlipStart’s audio
capabilities, see the User Guide available through Help
Central on your FlipStart.
Page 28
Insta l l i n g Progra ms
Although system requirements for specific pro-
grams may vary, almost any software compatible with
your Microsoft Windows XP or Microsoft Windows
Vista operating system should run successfully on the
FlipStart.
Installing from a removable
storage device
Removable storage devices range from CD or DVD
drives to an external hard drive to USB flash drives. If
you have one of these storage devices, you can install
programs on your FlipStart simply by plugging the
drive into the FlipStart’s USB port and then running
the installation program.
Installing from a local network
If you have connected to your home or office network,
you can access other computers on your network to
install programs. There are two ways to do this:
Share a CD-ROM or DVD-ROM drive
on a computer, and then access it
with your FlipStart from the network.
Run the installation program from the
shared drive, and choose the installation
location on your FlipStart’s C: drive.
Copy the installation files from another
computer to your FlipStart over the network.
Then, run the installation from your FlipStart.
Installing downloaded files from
the Internet
When you have successfully connected to the Internet, you can download software installation files from
the Internet. Once an installation file is on your
FlipStart, you can run the installation program from
your FlipStart.
Installing directly from another
computer
If you have an Ethernet crossover cable, you can connect two Windows-based computers directly together
to form a network. An Ethernet crossover cable is
a special type of network cable specifically used to
connect two computers to each other.
To connect your computers, plug one end of your
crossover cable into the Ethernet port of your desktop or laptop computer. Plug the other end of the
Ethernet cable into your FlipStart’s Ethernet port,
located on the back of the port replicator. Windows
will recognize the new network and show a “connected” icon in the lower part of your screen in the
system tray.
Once your computers are connected, you can install
software from the network as described above in “Installing from a local network.”
24
Page 29
Usin g Yo u r Flip S t a r t
On-t h e - G o
As a mobile computer, the FlipStart is designed to
be used nearly anywhere you can use a full-sized laptop computer. To best take advantage of the features
of your FlipStart, you can customize power management settings and practice responsible power usage
to maximize the life of your battery.
Tips for using your FlipStart
on-the-go
Use InfoPane to keep track of important
information without starting Windows. You
can synchronize your Microsoft Office Outlook
e-mail, contacts, and calendar information
with InfoPane, and refer to it on-the-go
without starting Windows. Use the Jog Dial
to turn on the InfoPane display when the lid
is closed. Also, use the Jog Dial together with
the Escape button to navigate InfoPane.
Note: If you would like InfoPane to check for new e-
mail messages when the lid is closed, you must
first enable this option in the InfoPane section of
FlipStart Control Center.
Use FlipStart Navigator to choose
programs, perform tasks, and configure
settings from within Windows using the
Jog Dial and Escape button, rather than
mouse input devices and the keyboard.
Add frequently used programs such as
Bluetooth Settings and the Control Center
application to your Navigator Shortcuts
for quick access. For more information, see
Navigator Help in the Navigator application.
Maximizing battery life
Turn off wireless components when you don’t
use them regularly. Disabling the Bluetooth
or Wi-Fi feature, for example, helps to save
power and extend the device’s battery life. For
more information, see Control Center Help.
Customize your device’s power management
settings in Windows and in Control Center
to best fit your usage patterns. For more
information, see the Control Center Help.
Avoid processor or hard drive intensive
applications and tasks, such as video
playback or video editing.
For more information on configuring your FlipStart
for mobile use, see the User Guide available in Help
Central.
25
Page 30
26
FCC C o mpli a n c e
Statemen t
This device complies with part 15 of the FCC rules.
Operation is subject to the following two conditions:
(1) this device may not cause harmful interference, and
(2) this device must accept any interference received,
including interference that may cause undesired
operation.
Radio and television interference
This equipment has been tested and found to comply
with the limits for a Class B digital device, pursuant
to Part 15 of the FCC Rules. These limits are designed
to provide reasonable protection against harmful interference in a residential installation. This equipment
generates, uses and can radiate radio frequency energy and, if not installed and used in accordance with
the instructions, may cause harmful interference to
radio communications. However, there is no guarantee
that interference will not occur in a particular installation. If this equipment does cause harmful interference
to radio or television reception, which can be determined by turning the equipment off and on, the user
is encouraged to try to correct the interference by one
or more of the following measures:
Reorient or relocate the receiving antenna.
Increase the separation between
the equipment and receiver.
Connect the equipment into an outlet
on a circuit different from that to
which the receiver is connected.
If necessary, consult a FlipStart-authorized service
provider or FlipStart. See the service and support
information that came with your FlipStart product. Or,
consult an experienced radio/television technician for
additional suggestions.
IMPORTANT: Any changes or modifications not
expressly approved by Vulcan Portals Inc. could void
the user ’s authority to operate the equipment.
This product was tested for EMC compliance under
conditions that included the use of FlipStart peripheral
devices. It is important that you use FlipStart peripheral devices to reduce the possibility of causing interference to radios, television sets, and other electronic
devices. You can obtain FlipStart peripheral devices
through a FlipStart-authorized dealer. For nonFlipStart peripheral devices, contact the manufacturer
or dealer for assistance.
Responsible party (contact for FCC matters only):
Vulcan Portals Inc.
Product Compliance
505 5th Ave. S., Suite 900
Seattle, WA 98104
U.S.A.
Page 31
27
Flip S t a r t Sof t wa re E n d User L i c e n s e Ag re e ment
This Software End User License Agreement (“Agreement”) is
between you (both the individual installing the Program and
any single legal entity on behalf of which such individual is
acting) (“You” or “Your”) and FlipStart Labs, a dba of Vulcan
Portals Inc. (“Vulcan”).
IT IS IMPORTANT THAT YOU READ CAREFULLY AND UNDERSTAND THIS AGREEMENT. YOU AGREE TO BE BOUND BY
THE TERMS OF THIS AGREEMENT BY INSTALLING, COPYING,
OR OTHERWISE USING THE PROGRAM AND EQUIPMENT. IF
YOU DO NOT AGREE WITH ALL THE TERMS OF THIS AGREEMENT AND DO NOT AGREE TO BE BOUND BY THIS AGREEMENT, PLEASE DO NOT INSTALL OR USE THIS PROGRAM
OR EQUIPMENT. IF YOU DO NOT ACCEPT THIS AGREEMENT,
YOU WILL NOT BE REGISTERED TO USE OR ACCESS THE
PROGRAM.
1. Definitions
1.1 “Documentation” means the user guides for installation and
use of the Program that Vulcan makes generally available.
1.2 “Program” means the software created by Vulcan, including FlipStart InfoPane, FlipStart Navigator, FlipStart Control
Center, and FlipStart Zoom, in object code form only, and the
media, Documentation and any updates provided by Vulcan to
You and for which You are granted a license pursuant to this
Agreement.
1.3 “Equipment” means the Vulcan FlipStart ultra-portable
computer.
2. Program license
2.1 Limited License. Vulcan hereby grants to You a limited,
non-exclusive, non-transferable license (without the right to
sublicense):
(a) to use a single copy of the Program solely for Your own
internal personal use on the Equipment on which the Program
was first installed or, on a temporary basis, on a backup
system if such Equipment is inoperative, consistent with the
limitations specified or referenced in this Agreement and the
Documentation;
(b) to use the Documentation provided with the Program in
support of Your authorized use of the Program; and
(c) to copy the Program for archival or backup purposes, and
to make a sufficient number of copies for the intended use
described in the Documentation, provided that all titles and
trademark, copyright and restricted rights notices are reproduced on all such copies.
2.2 Restrictions. You will not copy or use the Program (including the Documentation) except as expressly permitted by this
Agreement. You will not relicense, sublicense, rent or lease the
Program or use the Program for third-party training, commercial time-sharing or service bureau use. You will not, and will
not permit any third party to, modify, adapt, translate, reverse
engineer, disassemble, decompile or make derivative works
of any Program, except to the extent expressly permitted by
applicable law, and then only after You have notified Vulcan
in writing of Your intended activities. You will not use the Program on multiple processors without the prior written consent
of Vulcan.
2.3 Ownership. Vulcan will retain all right, title and interest in
and to the patent, copyright, trademark, trade secret and any
other intellectual property rights in the Program and any derivative works thereof, subject only to the limited licenses set
forth in this Agreement. You do not acquire any other rights,
express or implied, in the Program other than those rights
expressly granted under this Agreement.
2.4 No Support. Unless otherwise agreed upon, Vulcan has no
obligation to provide support, maintenance, upgrades, modifications or new releases under this Agreement.
3. No warranty
Page 32
28
IN THE ABSENCE OF ANY WARRANTY BY A THIRD-PARTY,
VULCAN MAKES NO REPRESENTATIONS OR WARRANTIES,
EITHER EXPRESS OR IMPLIED, OF ANY KIND WITH RESPECT
TO THE PROGRAM. THE PROGRAM IS PROVIDED “AS IS”
WITH NO WARRANTY. YOU AGREE THAT YOUR USE OF THE
PROGRAM IS AT YOUR SOLE RISK. TO THE FULLEST EXTENT
PERMISSIBLE UNDER APPLICABLE LAW, VULCAN EXPRESSLY DISCLAIMS ALL WARRANTIES OF ANY KIND, EXPRESS
OR IMPLIED, WITH RESPECT TO THE PROGRAM, INCLUDING WARRANTIES OF MERCHANTABILITY, FITNESS FOR A
PARTICULAR PURPOSE, SATISFACTORY QUALITY, ACCURACY, TITLE AND NON-INFRINGEMENT, AND ANY WARRANTIES THAT MAY ARISE OUT OF COURSE OF PERFORMANCE,
COURSE OF DEALING OR USAGE OF TRADE. VULCAN DOES
NOT WARRANT THAT THE PROGRAM WILL OPERATE IN
COMBINATION WITH HARDWARE, SOFTWARE, SYSTEMS OR
DATA NOT PROVIDED BY VULCAN, EXCEPT AS EXPRESSLY
SPECIFIED IN THE DOCUMENTATION, OR THAT THE OPERATION OF THE PROGRAM WILL BE UNINTERRUPTED OR
ERROR-FREE.
4. Termination
This Agreement is effective until terminated. Vulcan may
terminate this Agreement at any time upon Your breach of any
of the provisions hereof. Upon termination of this Agreement,
You will cease all use of the Program, return to Vulcan or destroy the Program and all Documentation and related materials in Your possession, and so certify to Vulcan. Except for the
license granted herein and as expressly provided herein, the
terms of this Agreement will survive termination.
5. General terms
5.1 Law. This Agreement and all matters arising out of or relating to this Agreement will be governed by the internal laws of
the State of Washington without giving effect to any choice of
law rule. This Agreement will not be governed by the United
Nations Convention on Contracts for the International Sales of
Goods, the application of which is expressly excluded. In the
event of any controversy, claim or dispute between the parties
arising out of or relating to this Agreement, such controversy,
claim or dispute may be tried solely in a state or federal court
for King County, Washington, and the parties hereby irrevocably consent to the jurisdiction and venue of such courts.
5.2 Limitation of Liability. In no event will either party be
liable for any indirect, incidental, special, consequential or
punitive damages, or damages for loss of profits, revenue,
business, savings, data, use or cost of substitute procurement, incurred by either party or any third party, whether in
an action in contract or tort, even if the other party has been
advised of the possibility of such damages or if such damages
are foreseeable. In no event will Vulcan’s liability for damages
hereunder exceed the amounts actually paid by You to Vulcan
for the Program. The parties acknowledge that the limitations
of liability in this Section 5.2 and in the other provisions of this
Agreement and the allocation of risk herein are an essential
element of the bargain between the parties, without which
Vulcan would not have entered into this Agreement. Vulcan’s
pricing reflects this allocation of risk and the limitation of liability specified herein.
5.3 Severability and Waiver. If any provision of this Agreement
is held to be illegal, invalid or otherwise unenforceable, such
provision will be enforced to the extent possible consistent
with the stated intention of the parties, or, if incapable of such
enforcement, will be deemed to be severed and deleted from
this Agreement, while the remainder of this Agreement will
continue in full force and effect. The waiver by either party of
any default or breach of this Agreement will not constitute a
waiver of any other or subsequent default or breach.
5.4 No Assignment. You may not assign, sell, transfer, delegate
or otherwise dispose of, whether voluntarily or involuntarily,
by operation of law or otherwise, this Agreement or any rights
or obligations under this Agreement without the prior written
consent of Vulcan. Any purported assignment, transfer or delegation by You will be null and void. Subject to the foregoing,
this Agreement will be binding upon and will inure to the benefit of the parties and their respective successors and assigns.
5.5 Export Administration. You will comply fully with all relevant export laws and regulations of the United States, includ-
Page 33
29
ing, without limitation, the U.S. Export Administration Regulations (collectively “Export Controls”). Without limiting the
generality of the foregoing, You will not, and You will require
Your representatives not to, export, direct or transfer the Program, or any direct product thereof, to any destination, person
or entity restricted or prohibited by the Export Controls.
5.6 Entire Agreement. This Agreement constitutes the entire
agreement between the parties and, other than any Vulcan
standard form customer agreement signed by the parties,
supersedes all prior or contemporaneous agreements or representations, written or oral, concerning the subject matter of
this Agreement. In the event of a conflict between the terms
of this Agreement and a signed Vulcan standard form customer Agreement, the terms of the signed customer agreement
will control. This Agreement may not be modified or amended
except in a writing signed by a duly authorized representative
of each party; no other act, document, usage or custom will
be deemed to amend or modify this Agreement. It is expressly
agreed that the terms of this Agreement will supersede the
terms in any of Your purchase orders or other ordering documents.
Page 34

Online support: www.flipstart.com/support
Customer support: 800-399-3037
© 2007 Flip Start Labs. Al l rig hts reserve d. Fl ipSta rt® and InfoPane™ are reg istere d
tradem arks and/or unregi stered trademarks of Vulcan Porta ls Inc. Th e
Bluetooth
word ma rk and lo gos a re owned by the B lueto oth SIG, Inc. and any us e of such mark s
by Vulca n Portals Inc. is under license. All o ther brands, pro duct names, com pany
names , trad emarks, o r ser vice marks are the p roperties of th eir respec tive ow ners.
Screen images simula ted. Actual produ ct may dif fer.
Part No. 60 0-010 9-01
 Loading...