

Flip-Pal 100C Quick Start Manual
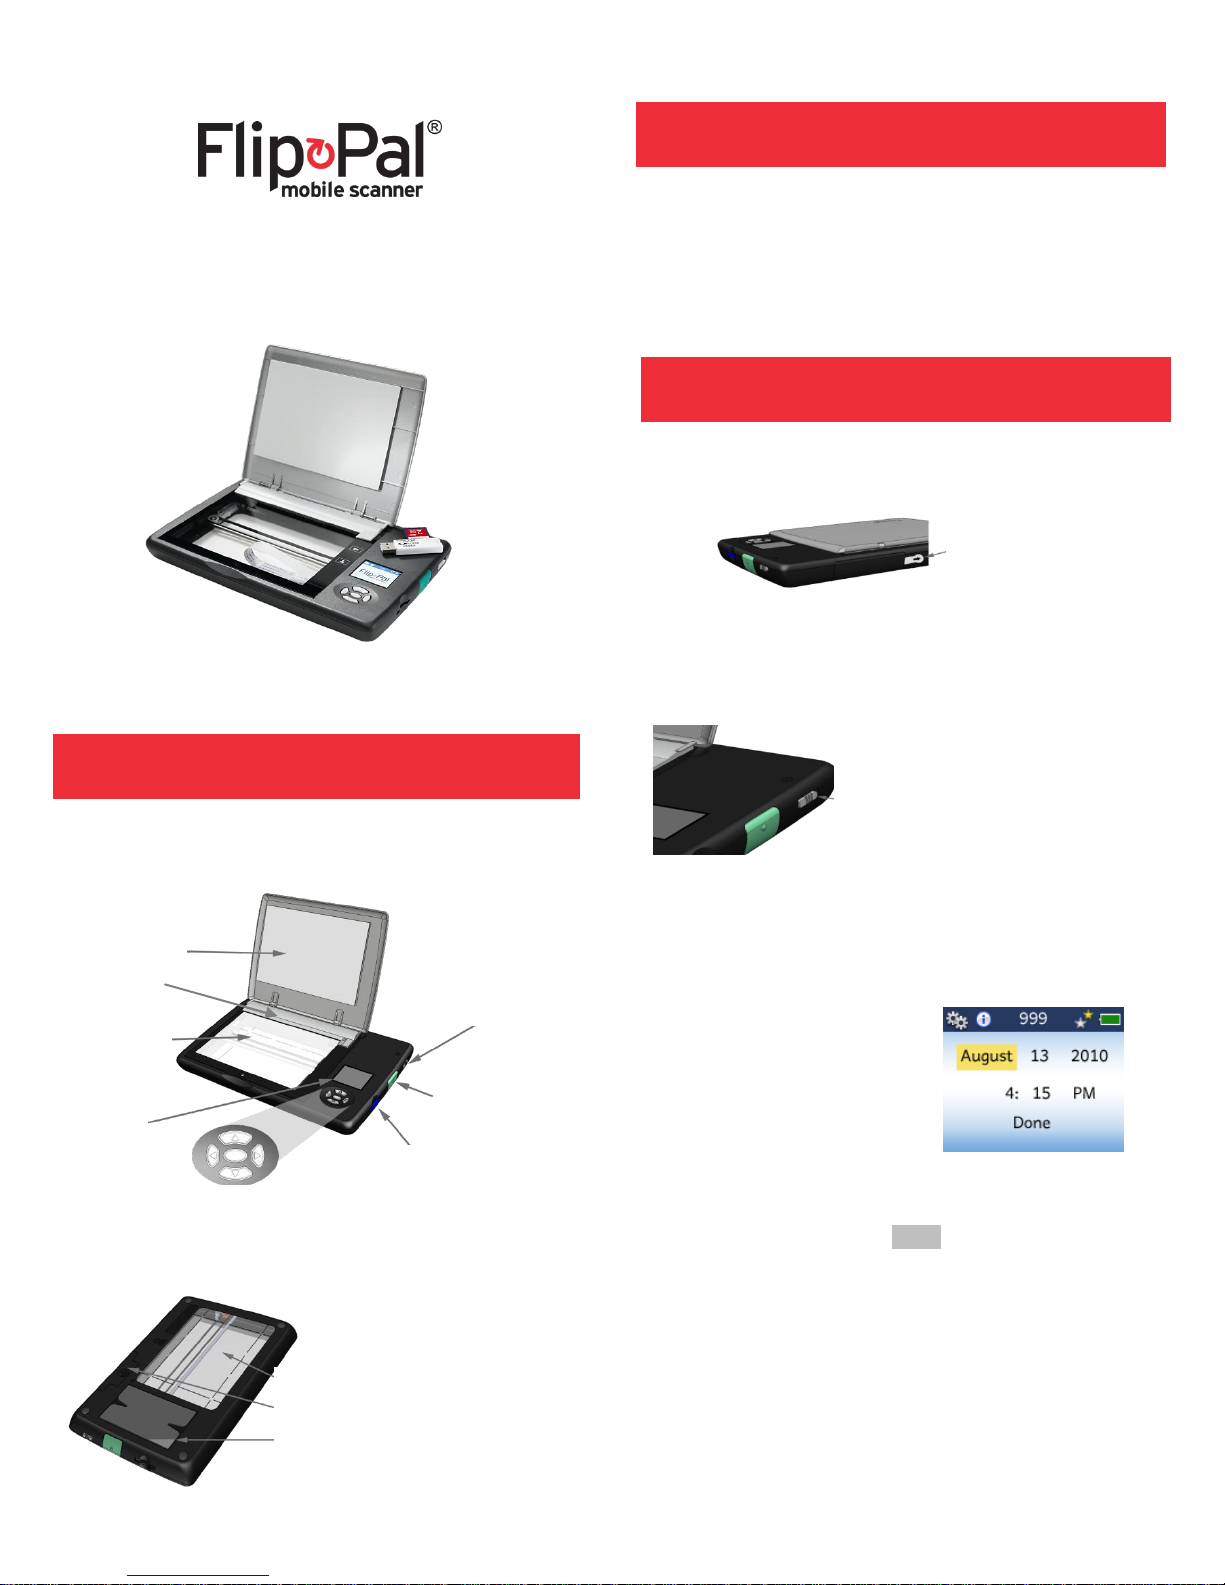
Viewing Window for Flip and Scan
Battery Compartment
Business Card Pocket
Slide power switch toward
rear, hold until the display
lights up, then release
Press gently on battery
door while pulling tab
sideways to remove
Scanner Bed
Removable Lid
SD Memory Card Slot
Scan Button
Power Switch
Display
UP, DOWN, RIGHT, LEFT ARROW Buttons
OK Button (center)
Photo Guide
Scanner Bottom (viewing side)
Quick Start Guide
Quick Start Guide for Mobile Scanner- Flip-Pal® 100C
2 What’s In the Box?
Flip-Pal® Model 100C mobile scanner
Four AA batteries (installed)
2GB SD memory card (installed) which stores
your scans and contains the Flip-Pal® Software
SD Memory Card to USB adaptor
Quick Start Guide
3 Set Up
Activate the Batteries
Power on the Scanner
1 Introduction
Scanner Top (scanning side)
Set Date and Time
At initial power up or battery
change, you will see this
screen.
Use UP ARROW and DOWN
ARROW to change the value of
each field. Use LEFT ARROW and RIGHT ARROW to
scroll to each of the fields in turn, beginning with Month
and ending with AM/PM. When you are satisfied with all
settings, move the cursor to Done and press OK.
Note: If you press the green scan button when you
first see this screen, you can skip the date and time
setting process. Your scans will have factory-set time
and date.

Status
Scans Remaining
Resolution
- 1 star=300 DPI
- 2 stars=600 DPI
Battery Life
Menu
Quick Tips
Custom Settings
4 Scanning
1. Open the lid
2. Place original face down on scanner
bed; align with photo guide
3. Close the lid
4. Press green Scan button
5. Scan is done when image is shown
on display
1. Remove lid: Pull up on
small tabs at ends of
Photo Guide
2. Flip scanner over onto original
3. Align by looking through the
viewing window
4. Press green Scan button
Standard Scanning
Flip and Scan
(scan photo albums & large originals)
For scanning larger originals, see instructions under
Help/Manuals in the Flip-Pal® Software on the SD
memory card.
5 Screens
Review Screen
To access the Review Screen
press OK. You see the mostrecently scanned image. Use
LEFT and RIGHT ARROW to
scroll through scans.
Home Screen
To access helpful Quick Tips or Custom Settings, press
UP ARROW then use the ARROW buttons to navigate
and OK button to select. See the User’s Guide for more
information on Custom Settings.
6 Using Scans
Scans are stored on the SD memory card the same as
digital camera images. To use scans, power off the
scanner. To remove the SD memory card from the
scanner, push it in gently; it springs out, then remove it.
Insert it into your computer. If your computer does not
have an SD card slot, use the supplied SD card to USB
adaptor, connecting it to a USB slot on your computer.
Launch Flip-Pal® Software right from the SD memory
card. Find the Flip-Pal® drive location. Windows users
look for Toolbox.exe; Mac users look for the Mac folder.
Be sure you have the latest version – see www.flip-
pal.com for more information. You can use it to:
View or print the Flip-Pal® documentation
Stitch scans together for larger originals
Transfer scans to your computer for use and
backup
Upload scans to your Facebook account
Order prints from LifePics
Delete scans from the SD memory card
Restore color on old photos
Access www.flip-pal.com and customer support
7 For More Information
The Flip-Pal® User’s Guide has more- information on
these and other topics. You can view or print the User’s
Guide from Flip-Pal® Software on the SD memory card
or from www.flip-pal.com, along with technical support,
Frequently Asked Questions, creative ideas,
accessories, and more.
Register Your Scanner
Please visit www.flip-pal.com to register your new FlipPal® Mobile Scanner. When you register, you will be
eligible to receive free technical support for one year
from date of purchase.
Legal and notice information
© Copyright 2012 Couragent, Inc.
Flip-Pal Quick Start Guide LTR RevE
The information in this manual is subject to change without notice.
Limited One-Year Warranty. The only warranty for this product is set
forth in the express warranty statement found in the User’s Guide or
www.flip-pal.com. Nothing in this manual should be construed as
constituting an additional warranty. Couragent, Inc. shall not be liable
for technical or editorial errors or omissions contained herein.
“FLIP-PAL®” and the Flip-Pal
Couragent, Inc.
Windows® is a U.S. registered trademark of Microsoft
Corporation.
SD Logo is a trademark of SD-3C, LLC.
Other names and products not mentioned above may be
registered trademarks or trademarks of their respective
companies.
®
logo are registered trademarks of
 Loading...